Transcripts
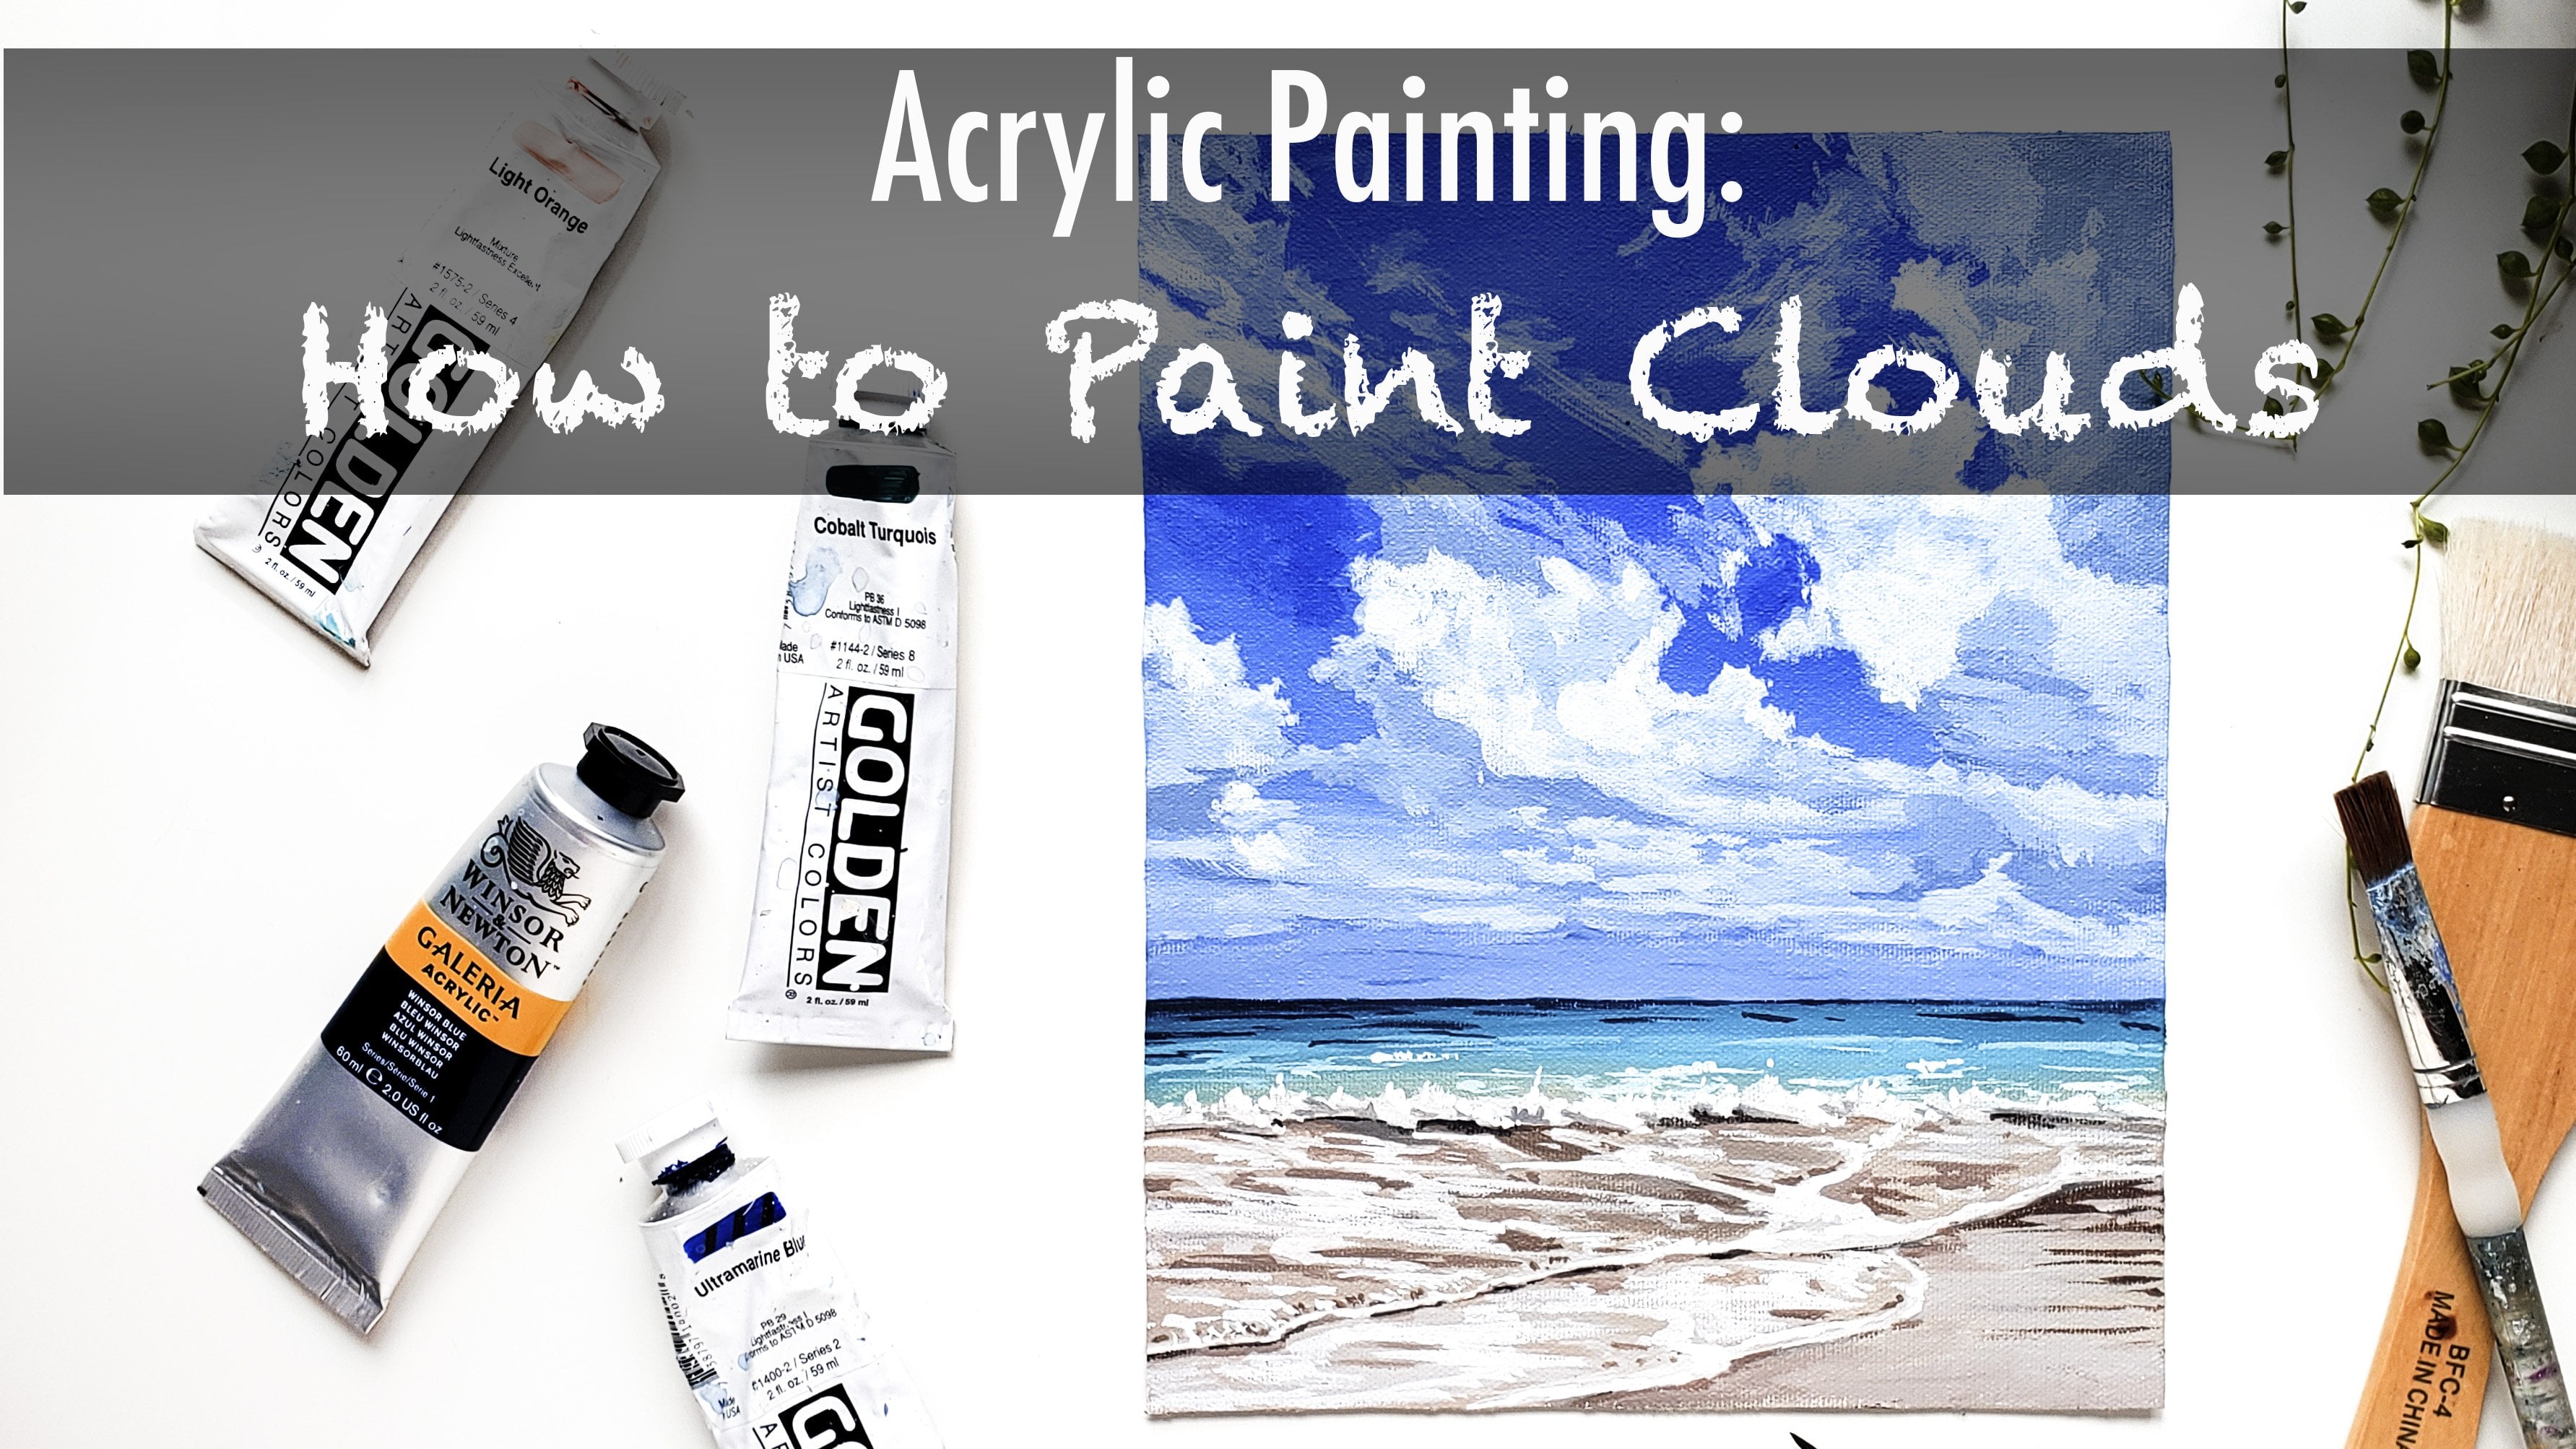
1. Introduction: everyone. My name is Yvette Lab, and I am a fine artist based in Portland, Oregon. I paint landscapes and Seascapes paintings here in my small but beautiful studio. And today I'm gonna be teaching you guys how to paint realistic clouds. I'm gonna be showing you this. Using this demo painting will be painting this along with me. So we're specifically going to be covering how to paint fluffy, colorful clouds in a sunset landscape painting. And you can definitely take all of the lessons that they teach you and apply them to painting clouds in the future as well. So for this class, you, of course, need acrylic paints. We are painting this in acrylic. I will list all the colors you lied in the very beginning of the next video and also in the description below. So you guys know what I'll be using and you're also gonna need, of course and paintbrushes. I recommend having at least one larger half an inch. Well, note. This is an inch. What rush? And here's 1/2 an inch smaller flat brush, and then one medium round brush like this is a seven. It's really good because you can get little details, and you can also cover some larger areas if you want to. In addition to that, you will either need paper or canvas or some kind of wooden panel something to paint on, of course, and also a palette to mix your paints on. I really recommend a glass palate. You can also use the classroom picture frame for this, but you can use whatever you want to use whatever you usually use. Metal, plastic, paper plate. Just use whatever you have, and you always need water to clean your brushes and something to dry your brushes with paper, towel or rag. Something like that, and that's it for this interest. So let's jump right into our painting.
2. Surface Preparation: How to Gesso: All right. So to start out this project will be starting with either a wooden panel or watercolor paper, whatever you have and would prefer to use. And we're going to go ahead on prime these with some just so, And I'm gonna show you guys how I do that. Okay, so this is a really simple process for the wooden panel. We're just gonna take some just so right here and for a bit on there, not too much so that you it can always add more later. It's easier to do it that way. And then we're just gonna take a big, white, flat brush on spread it all across the painting. Justice is essentially just a cheap white paint on. The reason that I like to use just so is because it makes the acrylic paint. Once you're painting on top, sit much nicer, go much farther. You don't have to waste as much paint that gets soaked into the wood. And it also gives it a really nice underneath and texture. One tip I do have is if you're making a landscape oriented painting to make sure that all your strokes at the end after you covered it or going the same way in the landscape. Orientation versus If you were doing a horizontal painting, you would want them to go that way with, and then you will just wait for this to dry. If you're hoping to paint the sides of the painting, I recommend also just doing those today. We're not gonna be doing that. And it's really the vaccine thing with watercolor paper. This is on a block. You don't need to tape it down. If you don't have enough block, it's totally fine. Just painted. Um, you do want to use a watercolor paper that's at least 300 GSM, which just means it's a little bit thicker and can stand up to the paint better and for the papers. Same thing. We'll just apply some just so I may have done too much. So I was going to What about off over here? No big deal, and you just want to make sure that you cover every card of the paper. I actually really love painting on paper. I think it's one of my favorite things to paint on, so if that's what you have, definitely just use it painting on wood or campuses is by no way any better or worse. They're all just different tools. But I think that it's really fun to paint on paper. It gives a really interesting, cool texture, and it's really easy to frame afterwards.
3. Sky: Base Layer Color Mixing: so the colors we're gonna be using for this project are cadmium, yellow, red, violet, cadmium red, ultra marine, blue, Windsor blue. And then we'll also be using titanium white. This is a fluid acrylic, but you can use whatever you have. And this is Payne's gray also fluid acrylic. I really recommend trying them. They're really fun to work with, but you can definitely use tubes of paint if you need to. Also later in the painting will be using sap. Green and burnt are. So now I'm just gonna start preparing my palate. I'm going to be starting out by using ultra marine blue, and then we'll add some Windsor Blue. Here is Well, then I'm going to put out some of the cadmium yellow and a little bit of the cadmium red as well, so that we can have all our colors out and ready to go, and we'll go ahead and add a big pool of our titanium white as well. So the first thing I'm doing here is I am mixing a little bit of ultra marine blue and white together using our biggest brush. And then I'm adding a little bit of our Payne's gray out here as well to mix in with that. And I'm gonna mix that up so I can get a really nice, dark, saturated blue. And then I'm realizing this is a little bit later than I wanted to be. So I'm gonna go ahead and mix up some more blue and Payne's gray into this mixture to get a little bit of a richer, darker sky color. It's good to mix up plenty of paint here. Definitely. Don't be afraid to use a lots. You have plenty to get all the way across the canvas. You might need more than you think. And once we get that nice dark blue, I'm just going to go ahead and start quickly brushing that across the top part of our painting, covering about the 1st 4th and then adding a little bit of white to it and starting to lighten it up as we move downwards. And in this first layer part, we're just trying to cover everything as well as we can, so feel free to do this quickly and just brush and mix everything around. While I'm doing this, I'm continuing to slowly add more and more white to our original dark blue because I'm creating a Grady int and this guy that goes from a nice, dark, rich blue to a much lighter blue. And so that's why it's also important to work quickly while it's still wet so you can blend it all together. I'm going ahead and adding more Payne's gray up to the top because it's all still wet. It's easy to just mix things on the campus and then going back and forth here with this greedy int by adding more white and then going back to our darker color. And I'll go back and forth quite a few times as I feel like it's the best way to get a smooth, greedy int is just to keep mixing paints together and going back and forth until you're satisfied.
4. Sky: Gradient: and we're gonna take this blue almost all the way down the page almost to the bottom. Here, covering about 3/4 of it, and I am letting it taper off in an angle is you can see, and then we'll add this really light blue, which is a mixture of our Windsor blue, Ortho, yellow, blue and white. And it's much more vibrant, and we'll start adding that in along the bottom to show kind of the shift in the greedy of color. I'm adding a little bit more white and the blue to get a really pure color, just white and Windsor blue, with no ultra Marine in it. This creates more of a green blue, and it's pretty different than our warm blue We have up top, but it blends beautifully into the bottom of it. I find that some really important things when you're trying to create a nice, smooth blend with acrylic paintings is, firstly to work quickly, as they said before, and secondly, to use a larger brush like this, it's much harder to get a nice, smooth look ingredient for using a really small brush. So use a bigger brush. You could even go bigger than this if you want it to be really smooth, not kind of helps you work quickly, blended together and get really nice. Smooth look. Also take your time with us, even though you have to work quickly. It's totally easy to just mix up some more of your dark blue in your light blue and keep working back and forth upon them together. Take a long as you need to and redo it as many times as you like. Also, another thing is, I'm cleaning off my brush here so that I can get a really nice saturated color and I'm going to start in with this yellow and we're going to make a light yellow color here, I added. Just the tiniest bit of cadmium reds would be more of a warm yellow, but we don't really want orange, just a light warm butter yellow color. And I'm adding that just below our blue tone, kind of mixing up a little bit of a darker shade here as we get closer to our horizon line . So at this point, you want to keep your yellow and your blue separate when you apply it. If you try to mix them together. Right now, it will end up a little bit muddy. So then you want to. Once you have it laid in, clean off your brush as well as you can and move into your light blue again mixed with some extra white like this. I'm adding just white here and starting to blend them together quickly. And that creates a really nice, smooth, even blend that's not too green, and it just looks the best at this point. Even go start going back and forth. I do work my ingredients for quite a while, as you guys concede to get them nice and smooth, because it's important to get a really nice foundation for your painting this way. And you can keep adding and mixing colors as you go going for a little bit more of a saturated orange as we approach the horizon line because that is where the sun was setting . So that's where you'll have your brightest orange color, although all of it's still pretty light like peachy color. I'm mixing up some cadmium yellow and white here and going above it, like I said, to just continue blending these guys back and forth. And when you're blending at yellow and blue, Like I said, I really recommend going in with white, mostly white and then just a tiny bit of blue as you try to go on the mouse that they don't get to muddy or to green looking. So hearing I'm doing just that, adding the white and kind of lightening it up. So we kind of almost go from yellow toe white, light, light, light, light blue and then back into the more saw traded blue. And you can even use a new brush for this like I am just because it's cleaner than the other brush. I know I'm mixing up a very saturated Windsor, blue and white right here, kind of a teal color, almost and going back over that to really brighten that midsection and give it lots of vibrance. So this greedy int doesn't have to be a perfectly smooth radiant. You just kind of want the edges of your three color sections to be soft and slightly blended together doesn't have to be perfectly smooth just so that the edges air soft and it looks natural
5. Sky: Blending: So now I'm going back in mixing up some of our dark blue using ultra Marine and Payne's gray and white to start to blend that edge of the teal on the darker, cooler blue together. And this is kind of what I mean by just taking your time, going back and forth as much as you need to, even though your brushes moving quickly on the page, it's totally okay to take a much time and add as many layers as you like. And I am keeping it darker in the corner over there, bringing the darkness down much lower on one side because the sunset would be setting towards the left side. So that's where the lighter colors are. And then it's sinking into nightfall as you go further right, And now I'm just dipping into Payne's gray, just straight brains, great to outline our mountains in the distance. We're not going to be working on those yet, but it helps to get an idea of the composition of your painting. So I'm just going ahead and laying in those lines down at the bottom. So now that we've finished our ingredient for the sky, I'm gonna show you guys how I clean off my glass palate at this point, you just take a sharp, flat razor blade and scrape all of it away because it should be pretty dry. I'm gonna leave my little pools of what paint that I will still be working from up in the corner, but we just scrape it off. If it's a little bit too hard and stiff to scrape off easily, you can spray it with a little bit of water. But usually at this point, since it's pretty fresh, you could just scratch it off really easily. So now that our ingredient is dry, I've decided to go in on add a little bit more of our bright teal blue in the middle, not a little bit more lightness to the bottom here. Sometimes it's easier to wait until your piece is a little bit more dry, and then you get a nice, clear, fresh color on there. So I've mixed up this color using Windsor Blue and White. I'm just adding this middle stripe of it into our painting, and I'm really liking how this vibrance looks, So I'm gonna go ahead and abundant into the yellow a little bit more. This will take some of that cadmium yellow, white, tiniest, better read. Add that in down there as well. Basically, just using the same technique is last time a little bit of a late yellow light blue on getting them together softly.
6. Sky: Vibrancy: As you can see with this new layer on our ingredient, it's much more vibrant and pronounced, which I really like. - And I'll be dipping back into our ultra marine blue on Windsor blue toe. Just one these guys out a little bit. It's also handy at this stage to add a little bit of water to help you get really nice, smooth, bland. All right, so now that we finally finished your ingredient, we're gonna wait for that to dry, and then we'll move on to adding in our clouds.
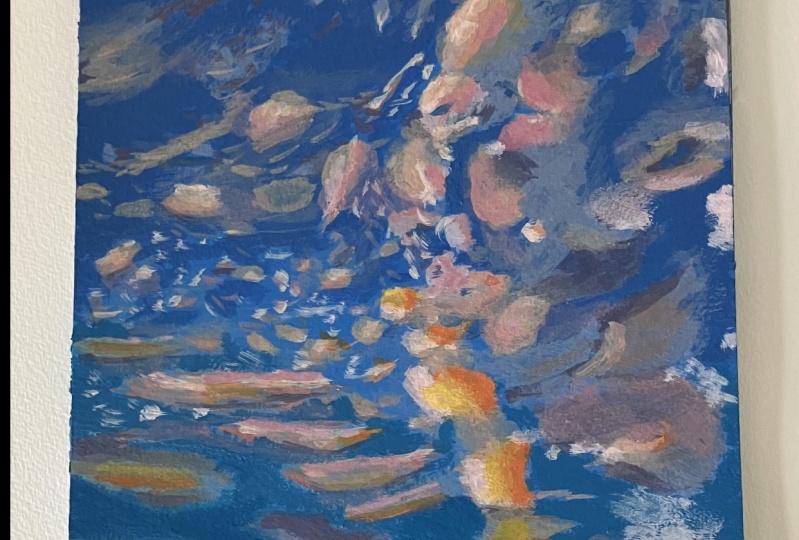
7. Clouds: Outline: so to start our clowns, I'm going to be using this medium round brush on. Now is the time to add some red violet to your palate on replenish any other colors. You might need more of a swell to start. I'm going to be mixing a purple E gray blue color that is just a slight amount lighter than her sky. So I'm using ultra Marine blue, the red violet and Payne's gray for this mixed with white until I get kind of a soft peri winkle calorie. Suppose you don't want this to be to break, to start with. It just has to be a little bit later than the top shade of dark blue. And then I'm gonna go ahead and start adding in clouds where I see them on the reference photo, starting with our large round shapes going straight down the middle. My technique for starting clowns is to use a little bit of a light hand and a scribble emotion. It doesn't need to be perfect shape, so doing these little squiggles and such can add lots of nice, realistic texture. I'm going in here and kind of going around where the shadows of those clouds are and outlining them a little bit. And since this is our first step, it definitely doesn't need to be perfect. We're kind of just laying in the composition of our clouds. Here. I'm starting, sort of in the middle of this painting, painting in the largest fluffiest clouds that air going in sort of a diagonal shape so we can see in the reference photo, just adding in some of the darker values that purple e graze in that and then moving right , adding in some of those fluffy purple lee gray clouds that are not reflecting as much pink light on them as you can see in our reference photo. So it's important to note that these clowns that were starting with do go at a diagonal line across the page, and that will help us with our end shapes. You want to make sure you're visualizing that and comparing with our reference photo so that it gives that nice, fluffy, textured shape of the clouds and the whole sky composition, so this doesn't have to be perfect. I'm not painting each little hair of cloud and exactly the shape that the photo shows. That's why I'm using this darker gray color and kind of just tapping around and brushing around and moving quickly and leaving these really organic shapes. Because clouds are very wispy, they're not perfectly symmetrical. They're not perfectly, um, shaped and edged. They have lots of loose edges and such. That's why I just kind of used this quick movement swirling around the page. And don't worry too much about getting in every little detail. We just want to get the main shapes of the biggest clouds and the direction they're going down here. So I'm starting with this purple gray. I've mixed up a little bit of a darker one now, and the reason that you want to start with a darker gray so that you can slowly build up your layers and you don't have to worry too much about getting out perfect the first time it won't be too stark will add more lights later. This is just a nisi way to get the composition in, and I am switching a little bit between the lighter purple on the darker purple here, taking note of where some of the shadows are versus the lighter parts of the clothes. This isn't too important at this stage because we will go over it again and again. But it can be helpful. So once we've laid in a few those clouds, I'm gonna make some red into our purple mixture and get kind of a purple e pink color and stir using that as well and adding in some of these light pinks where we see them in the reference and starting to kind of fill in our clouds. Morse we can get a better idea of how the shape of this guy will look.
8. Clouds: Base Layer: So I'm outlining the edges of these clouds, knowing that I'm going to go back in with a lighter, brighter pink in the center and then starting to add this 3rd 1 in. I would say that thes 3 to 4 clouds in the centre diagonal are the focal point of this piece, so I'm working on getting those in first. And those a really important The rest of the sky doesn't have to be quite as precise if you can get thes 34 clouds in the middle here, going at a diagonal downward. So I'm just going ahead and adding in this purple e color to different spots on these clouds to give it lots of dimension does not to be too perfect. It could be helpful to look at the reference photo and see what areas of the clouds air later and darker or more peachy than others and start adding that in. But it doesn't have to be perfect. That's the fun part about painting clouds. Is there really organic forms? You don't have to have them look perfect the reference photo to get them to be really realistic and convincing, and you don't have to have a perfect steady hand because there's lots of little organic shapes. Andi, mostly you just want to get in the direction that they're moving, which is what I'm working on now. These air three little clouds that are kind of moving at a diagonal to the right. And these shapes are really important because of all the little pieces of clouds and how they create kind of, ah, net looking type structure where it's got lots of like little cloud bumps or fluffs, I suppose, and then little spaces of sky in between them. And that's the really important form for this whole painting. Is that kind of net structure stretching in polling? So I'm just going in and adding the kind of brightest, most obvious clouds as their the PCI ones. Using this properly color, I'm just trying to get the shape of them to create that net structure with some space in the sky and show how they're all moving together. It's a little bit hard to imagine at this stage, but if you're using your reference photo to put them approximately where they need to be, it will look great. Okay, so now I'm mixing it back into our gray, and I'm gonna go over and start adding in all of the gray clouds in the background, that sort of move up and around the peace and at this point is when you want to start moving all around the peace and paying special attention to the diagonal pull of the clouds as they kind of wrap around each other. So now I'm going ahead of mixing up. Ah, lighter, peachy pink color using cadmium red, a little bit of a red violet and plenty of white. This is the lightest color we've put on so far. And I'm gonna go in and start blocking in the highlights of these pieces. I'm gonna mix up a little bit of a darker, rosy red as well and kind of play back and forth with both of them. I like to work from darker colors, toe lighter colors. I think that's really helpful in getting lots of dimension and shape in these pieces on its at this point, that will really start to see the structure of our clouds coming in as we start to fill in all of it. Like I said, it's thes 3 to 4 clouds that give that kind of we want to base the structure of all our other clouds on. So it's like the center line for a net and then all the other clouds air paste placed in relation to thes three.
9. Clouds: Lights: And then I'm going in with our lighter, peachy color remixed up and going over the rosy reds to really show our brightest point. So now I'm mixing a little bit more. Read into this a little bit more purple, getting a little bit more of a saturated, darker color. And with this bright pink, I'm gonna go right in between our light, peachy color and are more purple e gray color to sort of transition it on. Also show the light coming through and around it. So now I'm going ahead and mixing some red and yellow and white together to get a really nice, vibrant, orangey color. And by using all these different tones and are painting, we get a really good idea of how the light is moving. And the greatness of the sunset and I'm doing the same thing is before kind of adding this in a little bit along that the edges between our light peachy color and are more gray purple color. I'm just adding in lots of different tones here, moving back and forth between our orange and are more rosy color. I'm going ahead and doing that to the brightest parts of our painting right now, - and I'm continuing to work to make that sort of net shape with her clouds and building off of our 1st 3 clouds there. So here I'm connecting them to the clouds next to them, using a mid tone peachy color and then going in with our lighter color to give it highlights and dimension as well.
10. Clouds: Midtones: So now we're mixing up a little bit of a more vibrant dark orange and starting to draw in are really bright. Lower level clouds, as you can see in the reference photo at the top are clouds or pinker. And then, as we get closer to the sun setting and the earth, they get more orangey and fiery. Just why we're starting to move into these bright orange is, and I'm just using that color to draw in the shapes of all of these clouds, not worrying too much at this point about giving it a lot of dimension, but instead worrying about making sure that they're laid in in a reasonable shape and similar direction to the reference photo. No, I need a little bit more yellow. Definitely. Don't be afraid to add more paint to your palate. I know sometimes I struggle with that. I'm trying to use the last little bit, but just add more. It'll be much easier, and I'm mixing up more of that bright orange color and going and adding these to the right side of our clouds, as you can see in the reference, the front of the cloud closest to where the sun would be setting is more bright and light, a light orange color. And then on the other side of these clouds is this more fiery orange color as it fades away ? No, I'm mixing up kind of an in between orange pinky color on adding in some of the lighter colors into these bottom clouds as well as we're building up our clouds don't focus too much on any one layer because we will continue to go back and forth many times with every part of these clouds. Adding color is taking colors away. So, and the more that you do this, the more you get depth on realism in these clouds because there's lots of different colors and shapes going on. I'm continuing to slowly work around with this light pink and add it to different cloud forms. We can see here and starting to build out from our net are curved in that kind of shape. With these little dots coming off of our fiery area, something important to remember here is to make sure to leave plenty of your sky visible. When you're working with this net type cloud shape, you want to be able to see the background through it in lots of places, as you can see in the reference photo, which is why I move really slowly when building up layers. And now I'm starting to add sort of this confetti texture of the clouds as they're moving upwards and farther away towards the left side of the painting, you can see they become sparser and less colorful. I'm just starting to add in these little white dots here and there for that dipping back into the orange, adding a little bit more dimension in these little thoughts, making them look really three dimensional. And I'm gonna add a little bit of that orange up in around our big, fluffy clouds up top as well in little spots, just to give it an extra little pop of color and shape. So I'm mixing a new color almost every time that I add paint to the page. A lot of it is similar oranges and pinks, but it's kind of cool to be remixing your colors. You get a lot of different variances on your clouds, and it gives it a really nice look to have lots of different oranges and shades of pink inside, and now we're going to start adding in the rest of the composition of the sky now. But we've got sort of our main center piece. We can start adding in all the other little clouds in the sky that give all of its shape. When you're trying to get the placement of these clouds. It's really helpful, like I said, to start in the middle with our big focal clouds. And then once you have those laid in work from the edges inward, you can look at the side and see where does that cloud fall on? How does it connect to our middle part? And that can really help to get a nice, clean, accurate composition.
11. Clouds: Composition: - So like I said, I'm slowly starting to work on adding and all the other clouds that are important in this piece that kind of fade out to the left. And I'm actually gonna move into our purple e gray that we used in the very beginning over outlining our clouds because the pieces in the upper left corner are more of a great blue color on. Also, I like toe lay in most of my clouds, starting with this because it's really easy to go over in change if needed, and it's a really settle cloud color. So here we are, kind of adding in those same confetti dots coming off of our painting and showing this really swooping direction in the sky. - So continuing with these greys, I'm going to quickly start laying in just a few of the clouds in the top. In the reference photo, it can seem like there's a 1,000,000 clowns to paint, but in this area where they're a little bit sparser, I'm just selecting a few important ones to show the direction of the painting and how they all connect. It doesn't have to be perfect up in here, and you definitely don't need to add every little detail the clouds up in this corner, - you can see I'm kind of working in the lines of the dots, going diagonally across the page and then joining up with our fluffy or bigger clouds in the middle, mixing up a little bit more of this late purple e pink color and going ahead and adding in some highlights on the cloud. So we just added in just as we did before, slowly building up layers from darker to later, and I do this pretty quickly. As I said, the shapes don't have to be perfect. They should be a little bit textured and a little bit painterly because clouds are such organic forms, and I think it adds to the realism if there's lots of little textures in it. - And once you have this basic composition all laid in and the structure looks OK, you can just start adding in little bits of clouds and textures here and there, joining them together on and it will start to really create a beautiful image. So again, with a light, pink will go in and start adding in some of our brightest areas and emphasizing them
12. Clouds: Volume: on. We're just working back and forth here, adding the lights back in where we need them, adding them to some of the smaller clouds we just added in. I'm just loosely adding some texture and brightness to the clouds all around. And then I'm going to mix up a more saturated orange and start transitioning in between our light, peachy color and the gray color that we laid things down with. And when you start adding that second vibrant orange color into these clouds, you start to really see the dimension and shape of them. - So here, after looking at a reference photo a little bit more, I've decided to in large our top clouds could have bring them out and bigger. So I'm just taking our light, peachy color and making a little bit of a bigger rounder shape on each of those four main diagonal clouds. And then I'm going ahead and adding some size and volume to some of the other clouds around it as well. Then taking an even lighter, peachy color, I'm going ahead and adding some extra break highlights on these clouds, and then I'm adding the same volume to our corner bits of clouds and the confetti parts coming out and just turning toe odd more and more shape and definition to each of these little clouds. And then I'm gonna add a little bit more purple to our peachy pink color and Mr Stark ins in a tiny bit, and then I'll go in and start adding little bits of light into some of our great clouds up in the left hand corner.
13. Clouds: Shadows: And then I'm gonna take this white and some red violet, a little bit of our pains grain ultra marine to mix up a nice purple color again. And we're going to start adding volume on details into the right side of the painting, where we have lots of clouds that are darker and are not reflecting as much pink, light or light at all because they are turned away from the sun again. These don't have to be perfect shapes in accordance with the reference. You just want to get kind of the direction of them on the structure of them in loosely here . - So now I'm mixing in some white to get a little bit of a lighter version of that and adding in some of the lighter parts of the clouds. As we see as they get really close to the right hand side of a reference voter, they get almost white, much lighter but not pink toned. So that's why mixing more white into our purple e gray and adding and highlights that way. Well, it's good to have mixed up a little bit of a lighter purple on a darker purple. At the same time, so you can continually move back and forth between them and blend them together. Similarly, here are mixing up a warmer color, and I'm gonna be using that to transition from the side with lots of pink and light into our cooler Purple East side, which then fades to a more white gray color. - And I'm gonna go ahead and add a little bit of this vibrant pink color to the edges of our fluffy clouds and just in some spots on the shadowed side of our painting. Like I said, when I'm doing clouds, they really love using, like a 1,000,000 different colors to give it lots of dimension and shape. So that's why I go around the painting and add a little flicks of color all over the place when I'm working and here we're starting to add some lights and pull the shape of the light across the painting. I'm gonna clean off my brush here and then get back into our lavender gray color and start adding in more volume. To these shadowy bits I'm It's important to kind of start to connect some of these clubs together, even though I'll start with it a little bit separated like little balls of clouds on their own. Little trails and connections can really help it to be convincing.
14. Sky: Defining and Darkening: As you can see here, I'm just sort of connecting them all gently. So now I'm mixing up some more of our dark blue sky color. I'm gonna be using ultra Marine Blue, Payne's gray and a little bit of white. And then we're going to go ahead and start outlining some of these clouds and adding in naked of space and some spaces. And I've also feel like I want there to be a little bit more darkness around the center of the clouds and the painting, as we see in the reference photo. It's pretty dark coming down. So I'm going to go ahead and start adding in some saturation and dark blue down around the clouds, going over our sky background, still mixing up a little bit more of that with the ultra Marine blue Payne's gray on a little bit of white. This gives us a really rich, dark blue, the same color as we used in our ingredient in the very beginning, and I'm just testing that here on the paper to see if it's the color I want adding a little bit more white because it's a little bit dark and then a little bit more blue and kind of play with it till you get a pretty close match for our top corner of our painting. Doesn't have to be absolutely perfect, but something close to it. And then you can see I'm just taking that down around our cloud forms and filling it in, and it's really helping our shadowy clouds pop off the page more, and I'm taking little dots of this dark blue and adding them in inside the clouds. It's those spots to show that their translucent limb and that they have some little holes of them here and there because this gives it lots of texture. No, I'm mixing some red, yellow and white to get a really nice orangey color. I'm going ahead and adding in some of those clouds that we see really soft, distant clouds at the bottom that are shaped kind of in lines like cotton balls that have been stretched out. So I'm using long, swift strokes, too. Paint those guys in and you'll see that they kind of lineup with our confetti dots in a way as well. It all kind of creates one long line coming down, then with a lighter color will start adding in a little bit of lightness to it on the side where it gets brighter closer to the sun.
15. Clouds: Bright Colors: Now I'm mixing up a little bit of a rosy peachy color similar to the colors we used on our clouds and going over that again to transition between are brighter orange and are lighter orange. And, like with all of the other clouds have been working on, I'm going to take some time to go back and forth here between a light peachy and a little bit more of a darker, more vibrant orangey color until it looks really full on volume ISS. - So , at this point, I'm going to take more light colors, go back over some of the great bits in sky all around where I see them in the reference or where I feel like compositionally could use. Hm. And then I'm going to go in and add little tiny, bright pieces of clouds, little bits of texture that kind of joined them all together and make it more cohesive. - And to do this, I'm just holding my brush really loosely and lightly and tapping it and letting it move around the page kind of Lucy could see style. Also, at this point, I am going in with a little bit of a light peach color and adding in more lights, even to the shadowed side of our clouds. In certain places, after I've added in lots of light colors, I've mixed up a mid tone pink orange color, and I'm going in and adding in a little bit more transition between our lightest lights. On are more vibrant peaches and oranges.
16. Land: Mountains: So at this point, I am just about finished up with the clouds in general. But when you look at the reference photo, you can see that the bottom half of the painting has quite a bit more bright oranges and yellows. So I've mixed some cadmium red and cadmium, yellow and white to get a really vibrant orange color, and I'm going ahead and adding that into are lower half of the painting. And then I'm adding a little bit up in little places on the upper part as well, but mostly concentrating this vibrant, fiery color to the bottom half of the painting. I'm just placing this over places we've already painted and adding in additional layer of color over the same clouds. So now I'm mixing some cadmium, yellow and white together to get a really bright yellow color, and that's what I'll be adding in on top of our orange on this bright yellow color is really what gives it that fiery bright light color and that effect of it being on fire and really, really saturated. So you want to use a nice bright yellow for this, - mixing up a little bit more of that orange, yellow color, same very bright orange, yellow and adding little bits of it to our, um, wispy clouds in the bottom corner as well. And the yellow is what really makes the difference between the top half of the painting, which is more pink, and the bottom half of the painting, which is more yellow. So you definitely want to make sure to add plenty of it. And don't be afraid of it. It should be really bright and vibrant compared to the top half. Okay, so now we're going to start painting in our mountains down at the bottom of the painting, and I'm just mixing together quite a bit of Payne's gray. A little bit of the Windsor blue and white, and mixing it together lightly doesn't have to be perfectly mixed. It gives a little bit of fun texture if you don't mix it perfectly well. And then I'm going ahead and using a flat khalfan inch brush to start to outline the edge of her amount. And when I'm just mixing together different amounts of Payne's gray and Windsor Blue to give it a little bit of variants and color, and once you have this nice top edge filled in. You can start to bring the color down and makes up a little more with white, a little bit of a lighter color, and start bringing that all the way down the page to almost the bottom. You want to use nice, thick paint with not too much water for this part, so that you can't see the canvas or the paper through the paint. If you use paint that's a little bit watery, or just make sure to go over it with a couple more layers to make it really opaque.
17. Land: Hills and Trees: I need a little bit more paint, and I'm gonna mix up a much later color and go over that farther mountain in the distance. Because it's farther away, it will be much lighter in color. That shows the atmospheric perspective and shows that it's really quite far back there for this color. I still amusing the same blend of colors as for the front mountain, just adding quite a bit of white to it. So now I'm gonna add a little bit of the sap green to the palate, and I'm just clearing off speed so I can keep working a little bit more white. And then I'm gonna mix a nice green and white color here to put on the bottom of the painting, where grasses I'm adding just a little bit of yellow to that green and a little bit of Payne's Gray and Windsor Blue as well, because I want this to be a pretty rich forest green, and I'll just go ahead and apply that with a little bit of shape. And it's a little rolling hills in front of the mountains, all the way down to the bottom of the page, with pretty thick layer of paint. We don't want to see the canvas through the paint at this point. Yeah, and now I'm taking a Payne's gray and sap green as a really dark color, and I'm gonna go ahead and add the outline of some distant pine trees in the back. These were just those quickly a triangle shapes. There have to be perfect or anything like that because they are far away. You wouldn't be able to see the details too much anyway, just some little lines with some little branches off of it. We'll just have a few here and there, and I'm gonna add some dark lines down on the hill just to give it a little bit of dimension. And take that dark line all the way to the end of the painting on the right hand side. Then I was adding some little round trees, shadows not as many on this side and adding a tiny bit of light green light to show off of the trees we already painted in just to give it a little bit of extra definition. Next, I'm gonna mix up by light yellow blue green and adds some texture and strokes to our green hills just to give it some dimension doesn't have to be too precise. We're just showing that there's some variances in light. There's some light coming in on the left hand corner as well.
18. Final Details: and you cannot a little bit of this really light yellow a color to our tree Highlights as well if you are and I'm mixing that a little bit of a darker green spending it together. - And then for the last step of this painting, I am going Teoh pour out a little more ultra marine blue and we're gonna be mixing up a nice dark blue for the sky using ultra Marine blue Payne's gray and white again and continuing to blend out what we started earlier and bring it down just a little bit lower this darkness So you'll see I have takes me a couple tries to get the color I'm looking for So don't be afraid to just mix until you like what you have. And I'm just taking this and blending it further down and smoothing out any rough patches we had. - And I'm just moving around the clouds, adding in some darkness where I might have lost it or some definition into some of the corners and around some of the clouds. - And now I'm gonna add a few more gray purple lee lavender clouds to the right hand side of this painting. So I'm just mixing a little bit of purple, indoor sky color, a little bit of white, a little bit of gray, getting that same lavender color that we've worked with quite a few times on those peas. And I'm just going to start dabbing it and filling in some of this side of the painting. You can work loosely with this. You're just adding in a last bit of dimension and volume to these clouds and just quickly moving around, adding in some more grays and lavenders. And at this point, if there's any other areas and the painting, you want to go back to add some more highlights or definition to any part of the clouds or landscape. Go ahead and do that, and we're just finishing up thes last final details here I'm taking a little bit of a lighter grey just to add a little bit of late back into these great clouds on the edge, and that's about it for this skill share class. After you guys finish up your details, I would love to see a picture of what you made and definitely ask me any questions. If you have some
19. Thank you!: All right, you guys. That's it for the sculpture video. Thank you, guys. So much for watching. Please show me a picture of the painting that you guys created. Whether or not you followed along with me or use the tips and tricks this video to create your own cloud painting in the student project section. I would love to see what you guys make and let me know if you have any questions. You can ask them in discussion questions and yeah, that's it. Thank you guys for watching.
 Yvette Lab, Fine artist in Portland OR