Transcripts
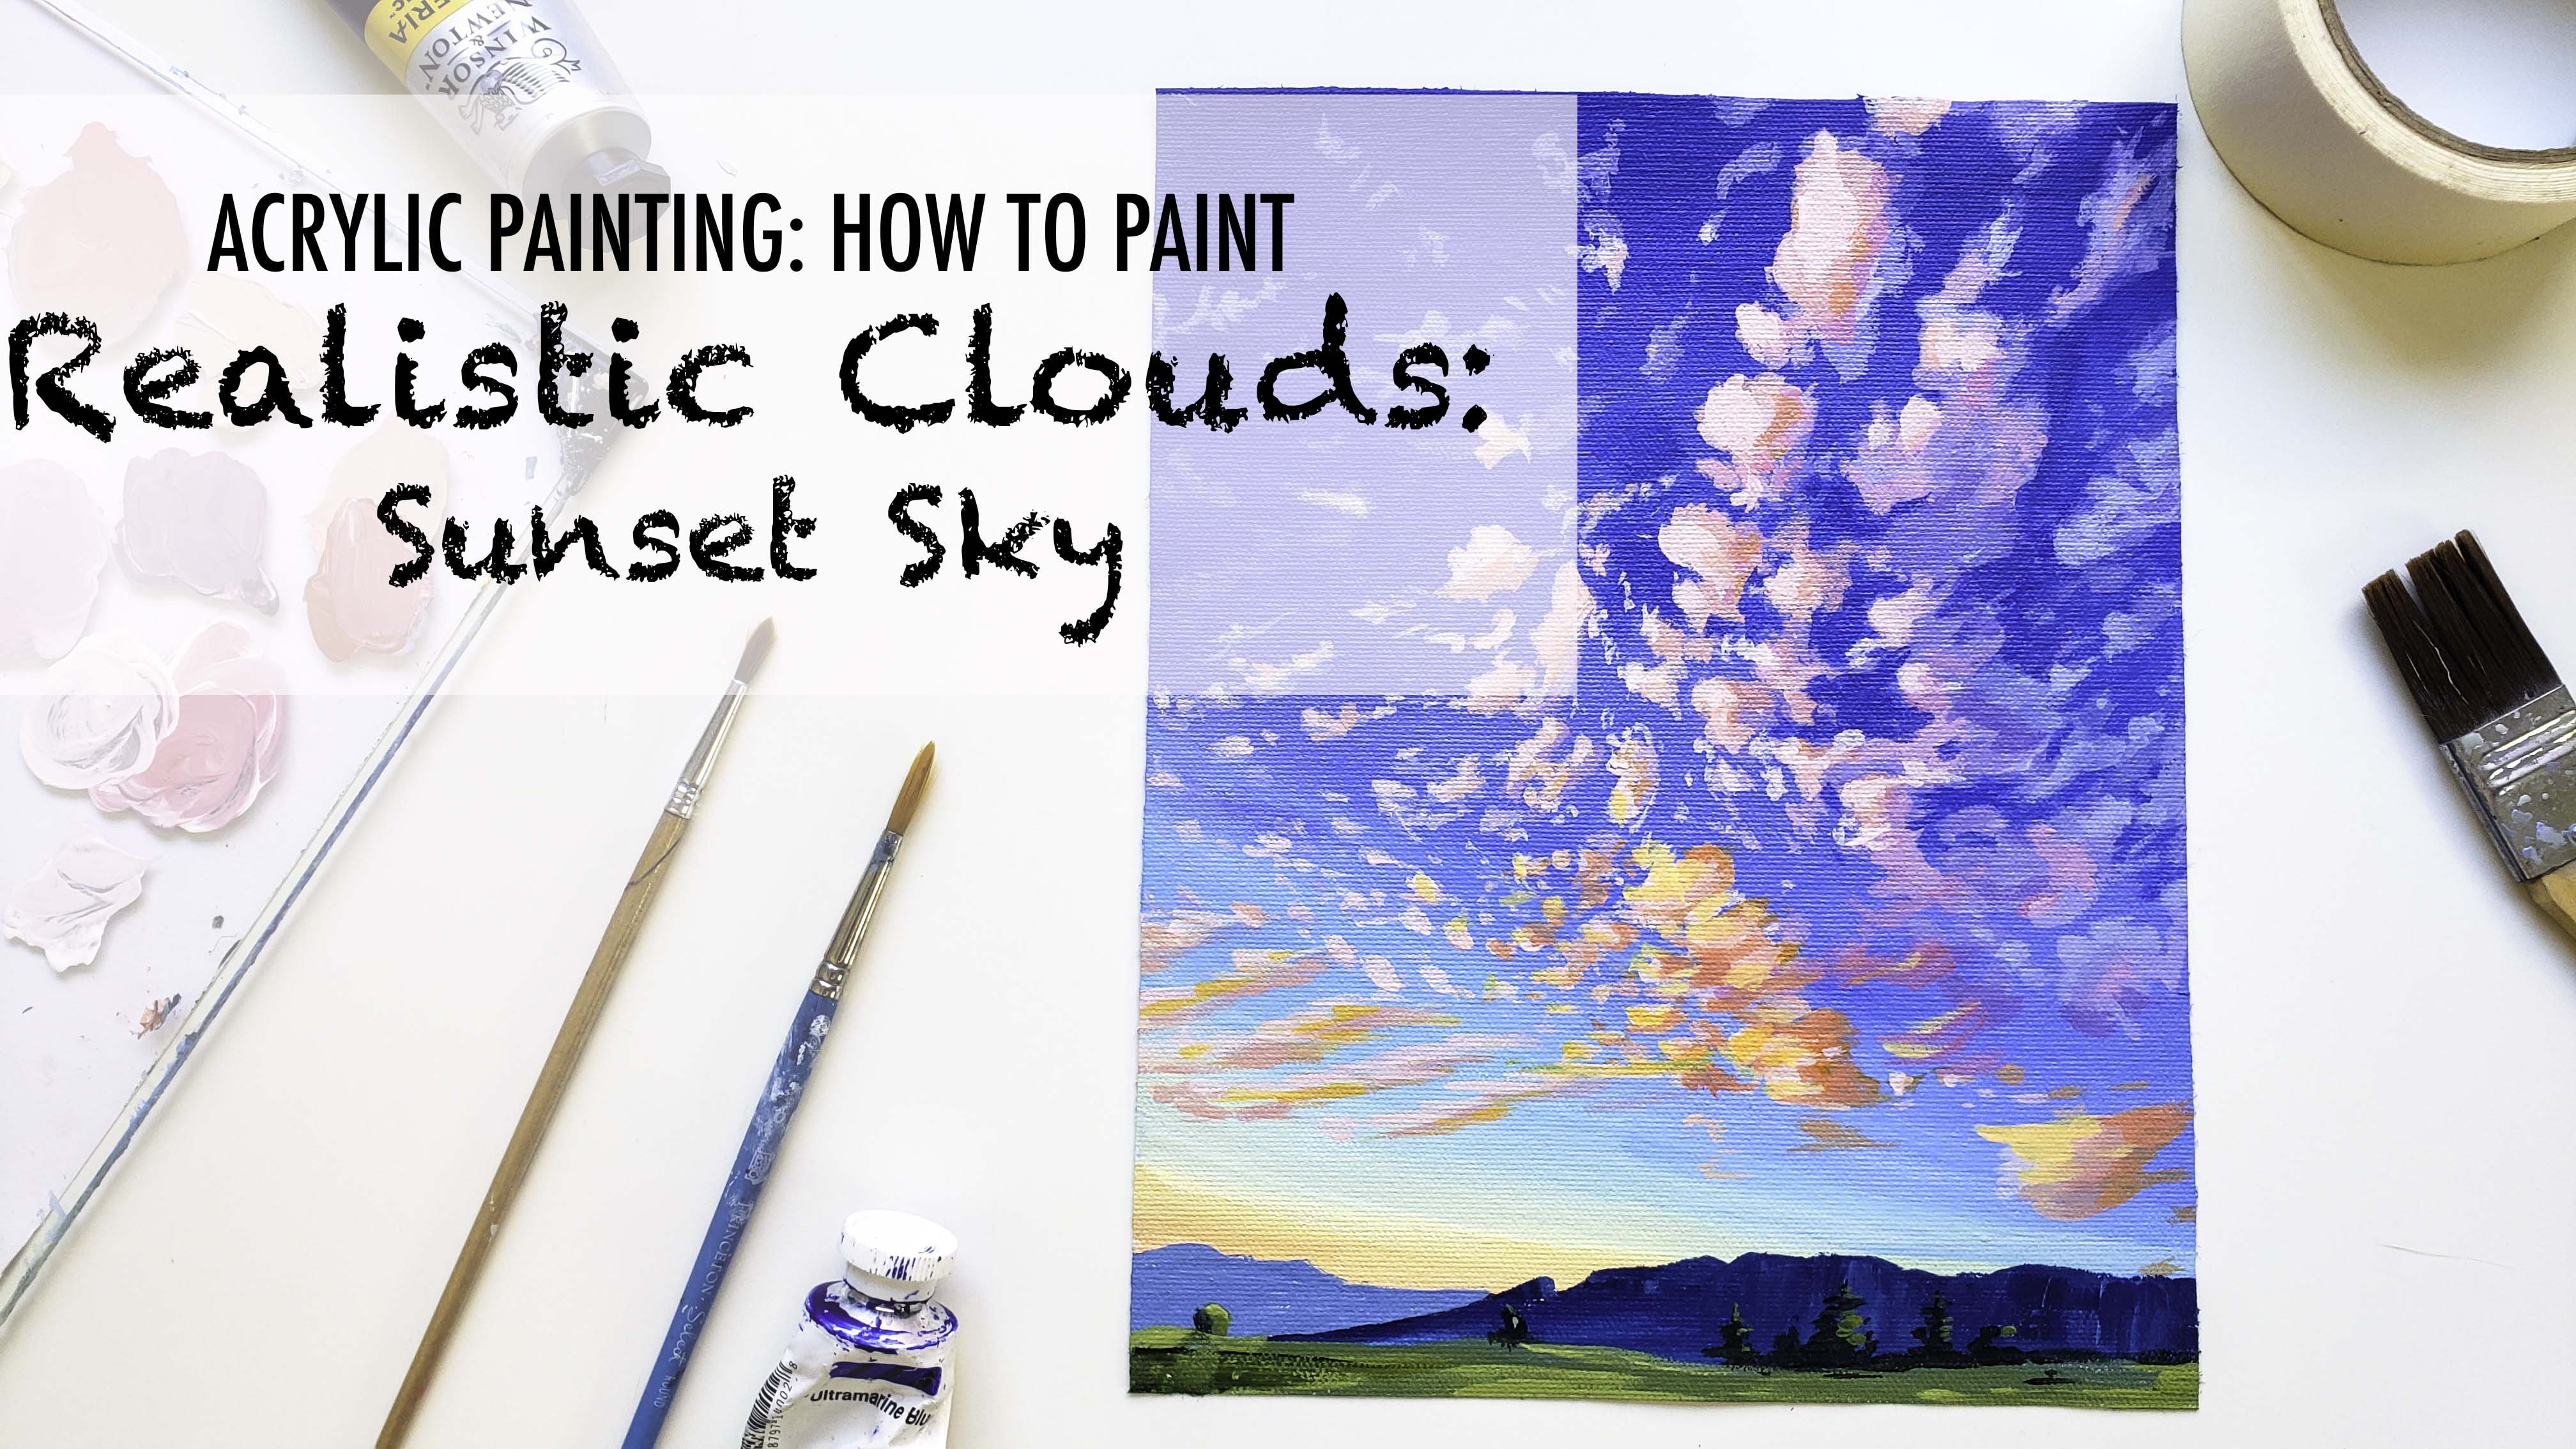
1. Welcome!: Hi, my name is Yvette lab and I'm the artists behind Events Studios based here on the central coast of California. And in today's class, I'm going to be teaching you guys all about how to paint realistic sense that class. In today's class, we're going to be going ahead and painting of this demo painting together. So I will be teaching you guys all of my tips and tricks for painting clouds with acrylic paints. How to best blend acrylic paints, and how to choose colors and mix colors because you'll get to see me mixing all of my colors right alongside you. And lastly, how to look at a reference photo and then make your own painting created from it. Thanks for tuning in. I am so, so, so excited to see the work you create with me and this class. And let's just jump into the art.
2. Materials and Supplies: Hello everyone and welcome back to my Skillshare class. First thing we're going to talk about today is all the materials you're going to need to complete this project. To start out, you're of course going to need acrylic paints. This is an acrylic painting class. And I'm going to really quickly go over all the colors that I recommend for this particular painting. And there are really just a set of colors I recommend to use. In general, when you're creating acrylic paintings, these colors will get you pretty much any painting you can do. So we have, firstly, we have a set which has burnt umber, cadmium red, cadmium yellow, and Winsor blue. And this is kinda of your primary colors set. You can get it pretty affordably altogether. And then I also really recommend having a Payne's gray and ultramarine blue. And if you're doing anything where you want any kind of saturated purple, I also recommend getting a red violet or a magenta hue, because although when you mix red and blue, you can technically get purple and won't be as vibrant and you're using just primary colors. So I really recommend getting a red that is more purple tone or just a purple. For that purpose. The difference between Windsor blue and ultramarine blue is that Winsor blue is more of a green blue and ultramarine as more of a red blue. So it's really handy to have both kinds of blues and mix them to get different queues, although they're not absolutely necessary. And Payne's gray is the favorite color of mine. Lastly, we have titanium white, which will come with a set as well. So that's just your basic weight. We use a lot of that. One more thing. The reason I do recommend Payne's gray is because it's a much more versatile color than black. And it still allows you to get those really deep contrasts. So I definitely recommend using a Payne's gray instead of a block. If you have the option to. Next up, you will need some brushes. Whenever I'm creating paintings, I really like to have at least one larger flat brush. And then a smaller round brush and a really small in detail brown brush. And then I also really like to use this medium small flat brush. Not as necessary as these three, but it's definitely a really good addition. And I feel like with these four brushes, you can create a really big array of paintings. You have your small and your larger. And then sometimes I will use an even larger flat brush, something like this, which is a one-inch brush is a three fourths just to get really big gradients. So maybe if you had to pick, maybe get a little bit of a bigger one, but it's up to you. If you get kind of a versatile craft set of acrylic painting brushes, you should have a lot of these options. The next thing is you will need something to mix your paints on. I really love using a glass palette because it's super easy to clean up. You can pull your paints on, mix them, and then you just use a little razor blade to scratch them right off and then throw them away. So cleanup is really easy with a glass palette. A tip I like to give is if you're not sure if you want to do glass, but you want to try it out. You can use like a small picture frame with glass in it, something you can get it like the dollar store or something like that. I do recommend upgrading to a real glass palette because it's a much stronger glass and has much less of a chance of breaking if you do like using glass after trying it out. Lastly, you'll always need water as well. I really recommend having something with two sides to it or just two jars or cups of water. This is because you can clean your brush in one side to get it all clean and dip into a fresh color. And then if you want to add more water to any year paints, you can use the other side which will still have clean water because when you're cleaning your brushes off, the water will get dirty pretty quickly. And of course, you also need paper towels or some kinda ran just to dry your brush off after cleaning it. For today's project, I'm going to be painting on loose Canvas. This comes in a role from the art store and has already been just, as you saw in the how to just video. Just so is basically a cheap white paint that primes your surface. And you can apply it to one just so. You can apply it to Word, canvas or paper to prepare your surface for painting. If you guys want to work on a stretched canvas, that's totally fine. If you want to work on paper or wood or whatever you most like to use, you can use any thing to paint on. Just today. I'm gonna be using this flat canvas.
3. Surface Preparation: How to Gesso: The first thing I'm going to show you guys today is how to prepare whatever surface you're painting on for painting, whether it's wood or paper or canvas, you can use this same method. And what we're gonna do is use something called jessica to prime the surface of the word. Just 0 is essentially a cheap white paint and you lay it down all over your surface and it becomes the first layer of your painting. The reason that it's important to use is because it soaks into the word so that when you're painting over it with your nicer quality paints like these. It won't also kinda the word and you won't need as many layers to build up a nice vibrant and opaque painting. That being said, you can paint on paper and wood and canvas. That is already primed without doing this step, it just will take a lot more of your acrylic paints and a little bit more time. But if you don't have just so you can still complete this project. So this process is super easy. You're just going to go ahead and some Jessup down on your wood or paper. And then I like to use a nice big brush. You can use this. If this is what you have, it goes really fast and he's nice big brush. And I just spread it all over. My painting. A lot of canvases that you buy at the store already pre primed with one to three layers of DSO. But sometimes adding another one on top can make your surface even better. Or if you're using a really affordable, cheap Canvas, adding a layer of just so it makes it much easier to work on. So I still recommend doing this With stretched canvas as well. And depending on whether or not you're going to be painting the edges of your painting. You can go ahead and just so the edges or leave them as is. And I like to create a little bit of texture. I don't try to make it all go one way down the painting. I just kind of do it lots of loose brush strokes because that way once you're painting over, if you do see any texture, it's not all going the same way. I just really prefer that, but you can do whatever you want to do for this project. So once you've covered your surface in just so you just wait for it to dry. This takes probably between 10 and 20 minutes and just wait for that to dry and then we'll come back and start our painting.
4. Sky Gradient: Blues: So to get started, I'm just going to go ahead and start setting up my palette. So for now we're just going to be working on the sky. So I've just put out my colors for the sky. And then I'll put out the colors that I'll use for the ocean on the beach. Later on we'll add the burnt umber, cadmium red and then still be using all of these colors. So just for now, I'm just doing this guy so that my paints don't dry out before I get to them. So to start out with painting the sky, we're going to lay down a large gradient of a nice deep, rich blue. So I'll just be mixing up some ultramarine blue, some of the Winsor blue, and some weight. And then we're just going to leave that color down right across the top of our piece. And you can have a little bit of water to your paint if you want it to be a little bit more spreadable. And then once we've covered about an inch from the top, we're going to start working it down slowly. And then you can start to add a little bit of white to our pre-mixed color and start adding that in and then blending it out into our darker blue. And then we're going to add quite a bit more white and a little bit more Winsor blue. And mix that color. I will add a bit of water and we'll start bringing that down. When we look at a reference photo about this, much of the painting is beach. And then about half, a little bit more than halfway of the sky is blue before it starts to turn into that pretty yellowy color that marks the sunset. So we'll just kind of take a blue about halfway down. Don't worry about it too much. And as you work from the top-down, always your most saturated mixed up color and mix it into the top. And then you can add more white paint, a little more blue. So it's not too late. And kinda work your way down from there. And the key to getting a really pretty gradient is to work pretty quickly while your paint is still wet. Don't worry too much about it being super precise. Just try to get all of your colors down and blend them together. And then feel free to come back in and add more layers in places that you think need it. Or if you feel like you can still see the Canvas through and some places, you can definitely build up using layers and going back and forth till you feel you have a nice smooth gradient. So for example, I'm going to go back in, mix up another bit of our top saturated blue that we used. Something like this color and kind of blend out a little bit more. Bring it down a little bit further. The other thing I recommend is if you're having any trouble, good making a nice gradient is make sure you're using a big enough fresh. That's why I recommend sometimes using a larger brush because it can be easier to quickly cover space and get all of the colors that you want down quickly. And then we're mixing just a little bit of weight into that and kind of trying to blend it back up. And another pro of doing this a few times is that you make sure you're covering up all of your Canvas marks as well.
5. Sky Gradient: Sunset : Okay, so once we have got Mozart room down, I'm going to go ahead and wash my brush off. Okay, all of that blue off. And then I'm going to dip into some white. And it might have a little bit of blue in it just from the surrounding area, which is helpful. But you don't need to mix up too much or blue. And we're just going to add in this white to the bottom here. And this is going to act as a buffer slash. Help you mix into our next color, which is that yellow color, without it turning into too much of a green. So once you're done with that, quickly wash your brush off again. And then we're going to mix up some white and a little bit of our cadmium yellow. And then just the tiniest bit of our purple color, because purple and yellow are complimentary colors. So when you add a little bit of purple to yellow, it just makes it a little bit more muted. And then we're gonna go ahead and start laying that down here on the bottom. And then you can kind of adjust your colors as you go. I mean, I get a little bit more saturated, little bit darker. By adding a little bit more of the purple and yellow. We can just ignore this blue mark that I made earlier. We'll cover it up later. And as you work, you can just slowly work your way across the page. And then I'm going to add a little bit more white to that. Little bit more purple and a tiniest bit of ultramarine blue to make it more of a cool toned purple. And we'll add in just a little bit of that cloud bank we can see on the bottom there. It doesn't have to be super precise. We're just trying to kind of lay out or colors. And then I'm going to wash my brush off the ground. It's really important when you're working with very light colors to make sure you're washing your brush off so that you don't get them too muddy. And we'll mix up another version of that pretty lightweight yellow, little bit of purple in between these two and blend its way up. I also find that sometimes for Cloud scapes It's easier to blend on Canvas. So I do recommend Canvas for that. Use. If you're also having trouble smoother thing you can try. You definitely can do it on wood or paper. It's just takes a little bit more elbow grease and a little bit longer. To view like Canvas. It's an excellent thing to use for this purpose. I'm going to actually just mix it and carry it down a little bit lower, pastor, blue mark, because we're looking at the reference photo and a beach doesn't start to get pretty far down. Our paper starts about here. It's going to make sure I cover all that. And then at this point you're just about done with the gradient portion of your sky. And we'll let that dry completely is what I recommend. And then we'll start going in with our clouds on top of this. Okay, so once this is all nice and dry, we are going to go ahead and start working on our clouds on top. Firstly, I'm just going to quickly use my razor blade, clean off our pellets. We have more room to work. If you're ever having trouble getting the paint off your palette, just use a spray bottle full of water and spray it and it'll come off super easy as well.
6. Clouds: Blocking in Light Shapes: So I'm going to start using our medium flat brush, and I'm going to mix some white and some Windsor blue together. Make a nice lake color. It makes this light blue and I'm just going to start laying in the general shapes of our clouds with this light blue. Actually, I think what I'm gonna do is mix a little bit of our Payne's gray into that color and then a little bit more white. So it's a little bit more of a neutral color. And so I'm just looking at our reference photo. The reference photo will be available in the student project section if you want to look at it yourself, which I really recommend as well. And I'm not just blocking them in completely. I'm kinda looking at where the lightest parts of them are and adding that in first. We can see you got kind of a big form of light over here that goes up this way. So I'm just going to have scribbling in some of that. And this doesn't have to be too exact. We just want to get kind of the basic structure and the direction of these clouds. Adding a tiny bit of water to our paints too while I work, because I like it to be a little bit more spreadable and thin. At this initial stage. Keep adding in some of these little blobs of light over here. See this whole structures kind of connected feathers out. And then it comes over and connects to another cloud structure over here. And then there's another one over here kind of goes up. And it has lots of layers to it. And then I'm going to actually makes up a little bit of Payne's gray and ultramarine blue to get a darker color. That's gonna kinda act as our shadow. So you can play around with that and may add a little tiny bit of their magenta color as well. This is kinda like a really desaturated purple color, which is what we see in our reference. And then we can start going in and adding some of the shadows in really lightly and loosely as well. And what I wanna do with that is start to block in this large cloud bank we have right here. It kind of stretches all the way across the painting. And I'm actually going to mix up an even darker color for that and start adding in just the general shape of that cloud bank over here. You can see it's got lots of little bits. And I had to kind of use a circular scrubbing motion when I'm laying in clouds for the first time. Kinda like sketching with a paint brush back and forth, moving around, just laying in the layers. We'll add a little tiny bit of white to that mixture as well. And start to work over here where we have a little bit of a lighter, muted purple color. And you can make so little bit of white next to it. So we can kinda go back and forth between these lighter colors.
7. Clouds: Blocking in Midtone Shapes: And I'm just gonna go ahead and start adding in some of that lighter purple down here. We can see that it kinda feathers off into the distance. These little lines a lot in. Maybe add a little bit of our lighter color. So we can use lots of different tones and herpes. And I'm just coming in with some of our lighter color and add some layers. You can kind of see in the photo how the clouds are moving backwards in space. So that's why I add these different layers of wave in dark purple. And again, when you're working in a really big cloud bank like this, not everything has to be so precise. It's just more about getting the contrast in where it's needed and the general shape of the whole Cloud. And you'll also notice when you're looking at clouds, when you're looking at the reference photo, there's a lot of different edges and shapes and clouds. It's not oh, very neat. So I like to add in lots of little details here and there. That's part of why I like to move fast when you're first playing in your colors as well. And I'm gonna take this late, kind of purpley color we've mixed up and add it up on top of that gray color and some of the bright areas as well. And I'm just starting to add in just all these little cloud details we see. And then we can go back and mix up a little bit more of our purple and ultramarine blue and Payne's gray color to get our shadow. And we'll start working up in these cards as well. I'm just kinda mixing it in and see some in-between all your areas. We put in the lights. So now it's time to put in the shadows kinda where ever you see them. And this is just kind of our first layer. We'll come back in with more darks and more lights as we're working. So just scrubbing men were ECM. Don't worry too much about details right now. And you can move back and forth a little bit if you want to blend in some lighter colors at the same time. And you can also add just the tiniest bit of yellow to your light color. Because the clouds do have kind of yellowy tent as well.
8. Creating Distance and Depth in Sky: And then we can also go ahead and lay in our Cloud that sits a little bit lower beneath this one, was kind of adding a little bit of a squiggly line of the top lights, and then we'll go back in with our dark color. This might be a little bit different every time, but that's one of the beauties of working with clouds and with acrylics. You get all these different pretty tones that add to the piece. To this time I'm adding a lot more of the ultramarine blue and less of the Payne's gray to kind of get a nice, stable, warm color. And then we'll add a little bit of white into that nice light lavender color. Can you add in some of these clubs in the distance? There really almost just lines because they're so small, because they're very far away. And we can just make a little bit a color, bit of a lighter purple and add it in down here on the edge to show that cloud bank at the bottom as well. And then because we added in this purple, I feel like this kind of brownish red color doesn't really fit. So I'm just going to mix up a little bit of yellow and white, a little bit of purple, and a slight color. And just go over that really quick. That's something else that's really great about acrylic paintings, is that if you're working and you just feel like something doesn't fit perfectly right? You want to change it. It's super easy to do that because the layer is all dry really quickly. And I'm actually going to add a little bit more white to that lavender color. Kind of blend it down so it's not quite as contrastive. And now we have this really beautiful distant kind of foggy cloud line down upon them. So at this point we kinda have the general shapes laid in some of the colors, some of the contrast. And I'm going to go ahead and move to our small round brush, not the tiny detail one but just a smaller one, something like a three or five if you have y. And I'm going to start working with the smaller brush. So I find it's really a lot easier to paint clouds with a round brush when it gets to the detail part. So I'm going to mix a little bit of weight and ultramarine blue. Tiny has been a very long and it's really tiny is better or Payne's gray. What would a way? You can nice dark blue, little bit lavender color. And start adding in some of the details on our more darker contrasted areas. You'll definitely want to go over everything you think a few times with acrylic, it's good to do a few layers. Make sure you're covering up the canvas bumps or just the paper white nature. It's got nice thick opaque layers. And it also does a lot just to add character and dimension to the piece as well.
9. Depth and Dimension in Each Cloud: And you wanna kinda look at the direction of the shadows. We can see that this one's swooping downwards and this one swoops upwards more. So we're mixing a little bit of white into that. And we're going to blend it upwards because you can see kind of a mid gray in between these. And we're just going to start kind of filling in these areas with a little bit more of a mid tone color. You can kinda move around. I think that's one of the fun parts about acrylics. You can work back and forth between the lights and the drugs really quickly. And that'll also help you blend it really well. So what I'm going to start mixing up a little bit more dark. And that's kinda what we're just doing for this whole P is going back and forth. In our darker colors are lighter colors, building up lots of layers. When you're working with clouds, they're very organic shapes. So I really recommend just kinda of lots of dabbing and quick movements. So your brush, as you can see me doing here. Once we have this whole middle area just kind of covered in a neutral midtone. We can move back into our darker color and blending that in here. And then we'll go in and work on kinda tiers of clouds you can see in the reference photo. So for that, I'm just going to add a whole bunch of white to our mixture. Maybe the video, and get a nice lighter color similar to what we used for this kind of thing. And we'll go in and start adding in some little lines in layers so that you can see that the cloud is multidimensional and that it's kinda moving backwards in space. It's not just one large cloud bank, but rather we're looking kind of kind of at the bottom of a cloud bank with lots of different clouds in it. You can also kinda work on blending different bits of the light in here.
10. Beach Composition: Lights and Darks: And then we'll add even more white to that to get a little bit of a bright red shade and a little bit of yellow. This kinda winner, brighter colors. I'll go over where we just want to add a little bit more contrast to some of these. And especially we want to add that contrast along the top of this cloud because that's kinda where brightest colors are. If you feel like you're having a really hard time getting the colors or the contrast, the sky of any painting. Something that can really help is to skip ahead and go down into the bottom half of your painting. It's sometimes easier to see the contrast once you have all of your basic colors later than it is to work just on the sky at one time. So I think what we're gonna do is that right now, just start bottom colors really quick and we'll come back and work on the details later. But by doing that, it really helps to see the contrast between how bright or the bright in the sky versus the land. So the first thing to do that we just mix up a little bit of the brown color. It's burnt umber. And then I'm going to mix a little bit of white and a little bit of Payne's gray till we get kind of a muted brown. That is pretty dark, light to dark, but it is like in the shadow, like a sunset. And we'll go ahead and lay back, scratch it in really quickly. And then we'll go ahead and add in the Jedi that we see right over here. By mixing up a good amount of our Payne's gray, that'll be a we're mostly Payne's gray. This is a pretty dark color. So we'll just go ahead and leave out in doesn't have to be perfectly straight because it is a Jedi with some rocks. So it wouldn't be a perfect straight line. And that's going to definitely need a couple of layers because sometimes when you're working with dark colors, they are a little bit less opaque. If you don't make some order white. We can go ahead and add in our general watercolor. I'm going to be mixing up some of our Winsor blue, some yellow, some Payne's gray, some white, and a little bit of brown as well to make it more muted. And then I'm just going to keep mixing or to get a really desaturated pretty light because it is reflecting the sky. Greenish, blue. And just lay that in really quickly. Right here.
11. Clouds: Highlights and Details: And then it does get lighter as it approaches the front of the painting and the shore. So I'm going to add in some white as we get closer to that. And we'll come back and go over all the details of this later course. But for now I'm just trying to get in some of those colors. And then this section is partly foam, which will mix with just a little bit of Payne's gray and white. And there's still a lot more blue, then green. And click. And then you can just leave this section white for now because that is a reflection on the sky is pretty white. And then we'll kind of just go in and add the quick shape of our trees. To do this, I'm going to be using our smaller detail brush and just Payne's gray because it's essentially black. And I'm just kinda adding in some little dots Here in there. And some palm fronds. Because these are palm trees. Palm tree. And there's kind of casual little flicks. Doesn't have to be anything too exciting or perfect. We're just using our little brush, giving it some details, give it some texture. There's some bushes on the ground. You can just connect these stems. Some areas like over here, it's pretty doubts. You can go ahead and add that in. And now that we have just the gist of the bottom in, it's much easier to see where we need to add contrast in the top. So that's why I like to kinda work around the piece in that way. And so at this point I'm going to mix up a white, which is a tiny spinning yellow. And we're going to start adding in all the really bright colors on our clouds. And I'm actually going to go back to our round brush because like I said, I do think that it's a little bit easier to get in like little shapes and the edges. And there's lots of little, little wisps and bits of clowns all around these as well. So I like to add in some of those little dots and textures that really adds to the movement and the realism of it. Bring some of that light down into some of our layers down here as well. And mostly when you're looking at your reference, you just kinda wanna take note of the shapes of the clouds. Notice how imperfect they are. So you don't need to match it to an exact measure. But you can get lots of ideas for how they act. And then the more that you paint clouds, the more confident you'll get in recognizing their structures and realizing how to paint them. But it's not a perfect job so much as it as just kind of wiggling your brush around, letting it have very organic shapes. They're not perfect. If you try too hard to get an exact shape, it can kind of make the cloud seem more stagnant. And still really they're moving body. So lots of quick movements as what I like to teach people. I do like a lot of this circular movement and a scrub across it and I do lots of little squiggles.
12. Clouds: Texture and Movement: And then I'm actually going to take a little bit of this really light color and add it in down here as well. You can see that some of our blending underneath on our first layer went a little bit green. And I want it to be a little bit more of a butter yellow instead of a green. So I'm just going to go ahead and cover that up really quickly. Because in the reference photo you can see that this area down here is pretty much just as light as these bright parts of the clouds. So that's part of why I wanna go in and add some of that lateness backs and that really, really pale yellow. And then you can also see that here on the bottom we have a little bit of very light color peeking through from the other side. So I'll go ahead and add some little bits there. And then we also have lots of plate on top of this little mountain of clouds. So we'll work in that as well. And I like to work in multiple layers. You can add a little bit of a more translucent layer with water and then go over it with thicker paint. And I'll help you get lots of dimension easily. And as you can see, Understand what's little dabs, little balls, maybe a little bit of a line off of them. And lots of little connecting solutions because there's a lot going on in that area. How do with species? And then I'm moving back into the meat of our bigger cloud base and adding more light. And that's pretty much what we're going to work on in the sky for now. We have most of our darker colors or delayed in. So now we're just adding contrast with our brightest brights. And then just be sure as you're working that you're going to mix your white in with just a little bit of the yellow and maybe purple mix. And we don't want to use any pure bright whites just yet. And this painting, we'll come back and add some later on. So at this point I'm going to go ahead and work a little bit down. In this area. We can see a little bit of life and our club things here. And then we're actually going to mix up just a little bit of a lavender. And our ultramarine blue make a really soft lilac color. And I'm just gonna go ahead and add that in. Down here, some of these distinct cloud banks and add just a little bit of detail into that as well.
13. Beach: Sand Layer 2: I didn't kinda just some squiggly lines and little shapes, Moodle, I guess little balls kind of attached to a line to give it a little bit more detail. And then at this point we're pretty much done with the sky. Of course will have the opportunity to go back and add any details later on. But I'm gonna go back into the bottom part of this painting and show you guys how I create the ocean and all that kinda stuff. We'll need another layer on the whole bottom half of this painting. So I'm going to start with the sand. Actually what I'm gonna do first is clear off again and add a little bit more weight of our politics are running low. And so we'll mix up some white and some brown and some Payne's gray. To get our sand color again. Add a little bit more Payne's gray. And we'll just go over that again. And I'm actually going to add a little bit of white and a little bit more brown, a little bit of a warmer, lighter color as well, and just mix it in with our darker color, making sure that I bring that little bit lighter brown close to the water edge and then sweep it back.
14. Beach: Ocean Layer 2: And the next thing I wanna do is fill in some of this reflective water. And I'm going to mix up a nice really light yellow and a little bit of our brown color to reflect the beautiful yellow in the sky. And we'll just add that in. Right along there. He might want to add a little bit more yellow brown. We're just kinda following the shape of the curve of the water. And if you see in our reference photo, you some middle comes in and out. And then we'll mix a little bit more brown and kind of pull that shadow from the actual phone and little lines. So I'm starting here and kind of pulling into our yellow or flexion, kind of outlining this area of the water. And this just helps to show the movement in order and the beach that kind of shapes that's making on the beach. I'm mixing up a nice light yellow again. We'll kinda go over that same area, just blending it out. Now we're going to go ahead and add more detail and another layer to our Judea here. And I mostly just using Payne's gray, little bit of brown in there is to warm it up a tiny bit and adding that in. So it's just kinda of a second layer to increase opacity and cover up any Canvas bumps that we're showing through. The texture of the canvas isn't a problem. You just don't want to see like little white parts of the canvas through it. And we're going to make sure that connects with our sand just a little bit over here as well. Little bit of an overlap. Then finally, we have our water. I'm going to move back into our medium flat brush for this, we'll mix up a fresh color over kind of a greenish blue and add a little bit more brown color palette. Never be afraid to add more paint. Some things I've noticed as silly as it sounds that I will try to make the paint on my palette work even when I'm really running out. So that's a little more paint if you need it. And we'll go over that again. And I want to make it a little bit darker this time. Blue, little bit more of the brown. Get this kind of more saturated, darker color. And we're just going to keep a Jedi. We'll have our darkest blue. And then it'll kind of feather and a triangle this way. And then you can mix white into that will be yellow and make a little more green. And we'll start kind of blending that out. And just feather it back and forth. When you really like use this sideways motion with these flat brushes and the paint is wet, it's really good way to blend it.
15. Beach: Water Details and Reflections: And I'm just adding a little bit more weight over the edge here, x, we're going to transition into more of a cool color. So it's often a rush to get all that green off. And then I'm going to dip into the white and a little bit of our ultramarine blue, a tiny bit of our Payne's gray. You can just kind of mix those colors together to you. You want, I want it to be pretty late. So I'm gonna add quite a bit of weight to this. And we go. I'm just going to add that right along the edge. This is the foamy part of the water that you can see in the photo. So it's not green because it's all the air mixed up in it. It really would be, it would look white in life. But because the sunset and it's getting a little bit dark, It's more of a gray color. We can kind of pull that back into our water here. And then I'm going to go in with my smaller round brush out a little bit of white to that gray coloring mixed in. We'll go ahead and add just some areas. It's a little bit lighter. And a little bit of movement into CFO. Kinda doing what we do with our clouds, little like dots and feathering movements. Just to add some texture. This isn't a pure white, It's still a gray because we want to keep the whole lower half of the painting a little bit darker because it's kinda of in shadow as the signer has already set in this photo. And then you can mix up a nice darker blue color. This would be the darkest reviews so far. And we'll just go ahead and add some little lines of water, movement, little waves, shadows. These aren't to extreme, just little bits that break up the smoothness of the surface. You can use your really small detail brush for that. If you think it's a little bit easier, because you don't want it to be 20 in terms.
16. Final Details: We're just about finishing up with this painting. I'm going to go ahead and add a little bit more details into this reflection area. And I'm gonna go ahead and add a little more details into our trees. But that is almost done. And mix just a little bit of really light yellow dot in. This is definitely supposed to be the lightest part of the land of our painting. And I'm applying it in a straight line out from the phone, a horizontal line because that is how the sand shapes itself. When it's being pulled by the water goes straight out. And we can even add a little bit of purple to this if you want. Really light lavender. And then lastly we'll dip straight into our Payne's gray again and just add another layer over these trees. Maybe add a little bit more details if you want to. I find that when you're doing these kind of distant shadow trees, that just doing like one or two. Little palm froms adds a lot of character in depth. But you don't want to do too much because the distance, it wouldn't look too detailed. All right, so now's the time to go ahead and add in any finishing touches that you want. Keep working on your clouds, keep adding in your lights and your darks and working back and forth if you want to. And other than that, that's about it for this painting, I hope you guys had a lot of fun. Maybe learn something, created something, and just how to get time. And thank you guys so much for watching my class. I would really appreciate it if you'd leave me a review. If you had a good time and definitely post whatever you worked on, whether you created this painting along with me or use your skills to create another seascape or cloud scape painting. Put them in the student project section. I love to see your work and celebrate you. And it's just so fun to share it with the community. So definitely share your work. I'd love to see it. And I will see you guys next time.
 Yvette Lab, Fine artist in Portland OR