Transcripts
1. Welcome: [MUSIC] Hey, I'm Denise Love and I want to welcome
you to class. I am a full-time working artist. My main business is
2lilow Art Studio where I make workshops and digital art tools
for photographers. The art workshops are
something new for me. I wanted to add a new
creative outlet for myself. I love the art just as much
as I love the photography. This gives me a way to get a
break from one to the other. I really hope you're
going to enjoy these. I can't wait to
see you in class, so let me show you
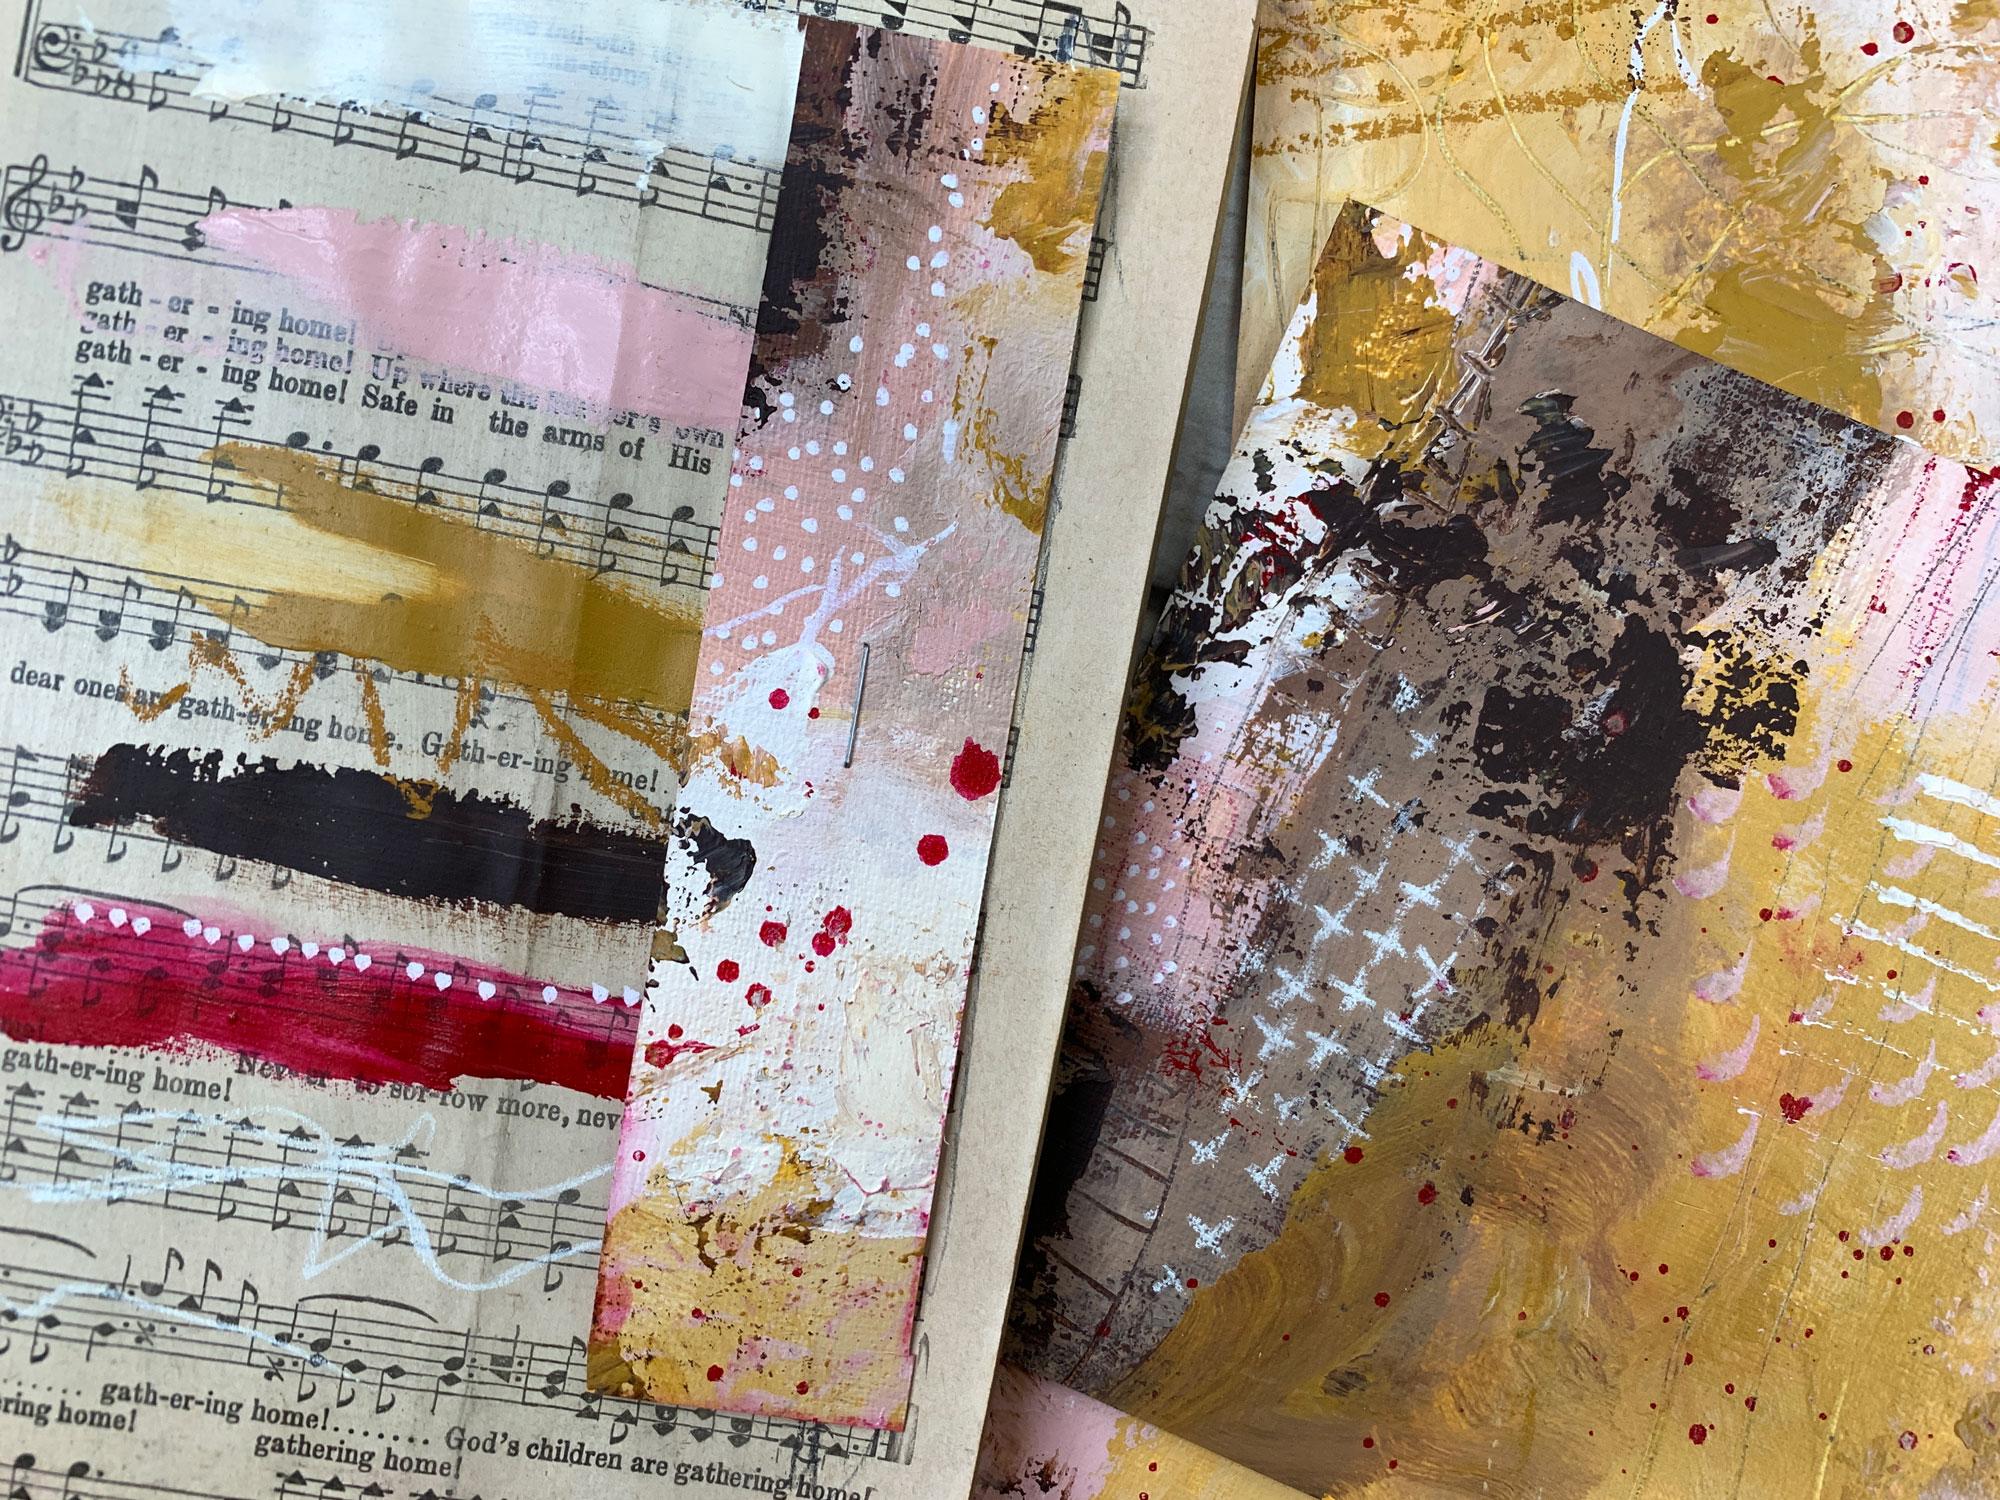
what we'll be doing. In this class, we are going to take
a look at making some beautiful pieces where I focus on creating bigger
splotches of color. A lot of the things that
I do is real tight with the color and you
have a lot going on. They're not real big
swaths of one color. They're very tight with
all the colors mixed in, which tends to be my style, apparently because I'm usually real close up and I'm doing little brushes and when you're doing little
brushes you're doing little bits of color
and so with this one, I wanted to push
outside that range, I wanted to push outside my comfort zone and
experiment with a new color palette
and experiment with larger blocks of color. In this case, I used
some bigger tools, bigger brushes to get bigger color areas and I questioned myself all
the way through it. Did I make a mistake, am
I going to like this? I'm uncomfortable
as I'm doing it. I don't know if I
love any of it. Then when I put my
little viewfinder around the bigger piece and found little pieces within the
big piece that I loved, like this one right
here just was like, I love this so much. When I get that feeling, as I'm searching out
compositions and colorways and mark-making
and things that I love, when I get that, that
takes my breath away feel, I know that I have
done the right thing. I always get pieces I love
doing this technique. This is the similar technique that I did in the abstract, ventures 1 and I
love it so much that it's the perfect
way to experiment and get outside your
comfort zone with your products, with
your techniques. On this one, I was really
big color-blocking and so it ended
up the pieces are completely different
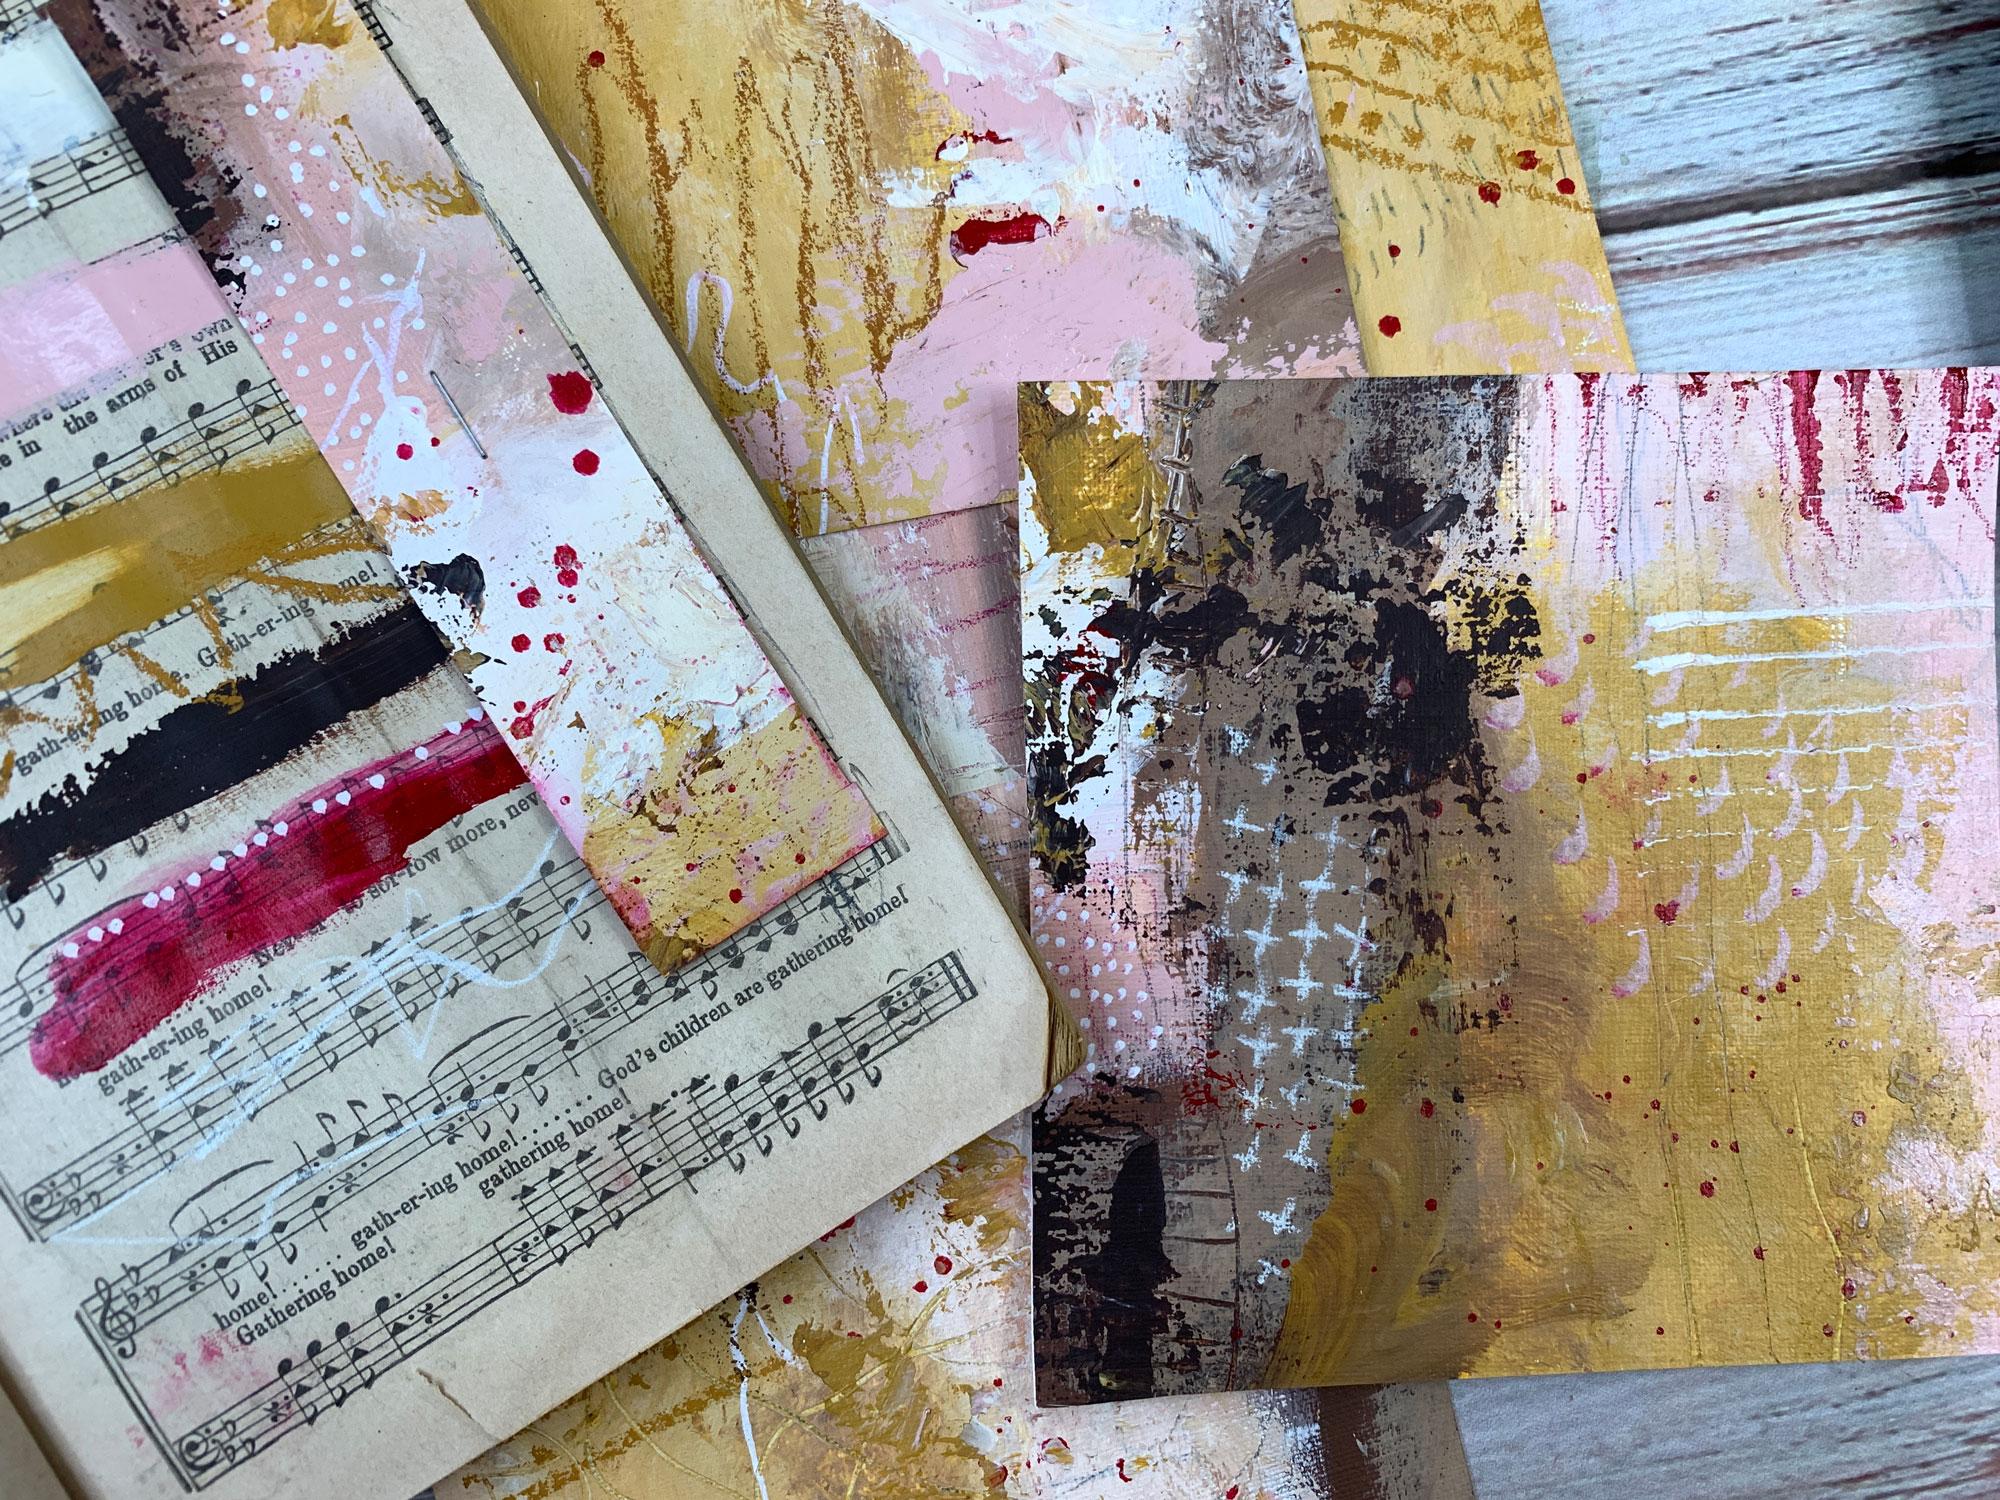
than anything else I've created and I love all of
them so much as a series. I feel like I need
to take all four of these to the framer
and have them framed. Then the leftover pieces
like this one right here, I love this so much, that could be a little
painting by itself or a feature as a
collage element. All these little collage
elements I love. Even as I was done with the great big painting
and I thought, I'm not sure I really like this, as I pulled the pieces out, I'm so in love, I'm so thrilled with
each one of these. Even the compositions, I
can now look at how color looks with this composition
and where I might put light and dark
and a punch of color. I even was questioning my color away with that
over-the-top pink. But as a little
tiny touch in here, that pink really pulls
the whole thing together. It's a little punch
that pulls the eye. I did have a little heart in
here that I just noticed, how fun is that. I wonder if it'll focus
if I come closer, but it's like a little heart [LAUGHTER] which is still
appropriate because I loved this piece of the most. This class, I'm actually
super excited to show you the colors that
I used and the pieces, how I searched out, out of the big piece to
come out with these. I really hope you're
going to enjoy pushing outside your comfort
zone and in this one, maybe thinking in
large blocks of color rather than real
tight chaotic color. I'm pretty excited about
this particular class. I hope you love it. I can't wait to see what pieces you create from
these techniques. Let's get started. [MUSIC]
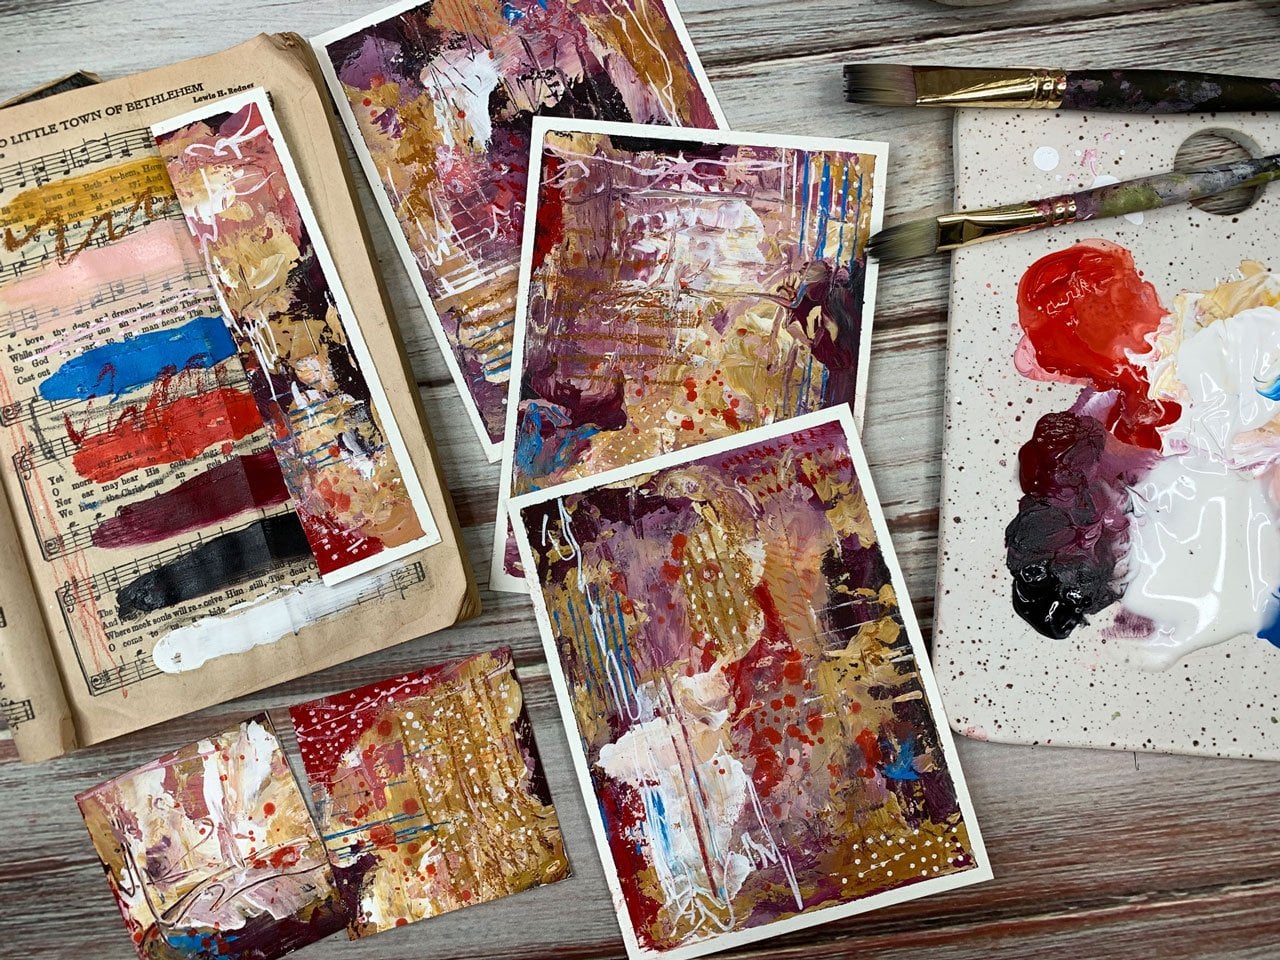
2. Supplies for our class: In this video, I
want to talk about the supplies that I used. I've done it
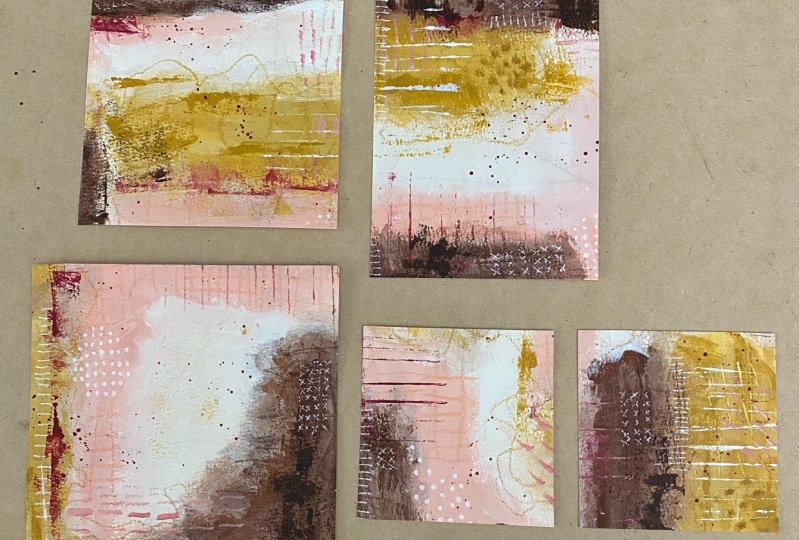
backwards and I have created the little pieces of
art that I wanted to create. Let me tell you these really
make my heart happy today. Look how gorgeous these
little pieces are. My goal was to do larger blocks of color instead of real tight
in like I normally do. I questioned myself all through there whether
I was going to get something that I
liked and questioned, did I even like any of it? But then I started to come
around my drawing with my little viewfinder that I made out of watercolor strips. All of a sudden I was like, "Oh, look at this one and
look at that one," and I got so excited that I'm going to
leave my table today and had rest of the day is
going to be a great day. I got so excited. I'm going to tell you
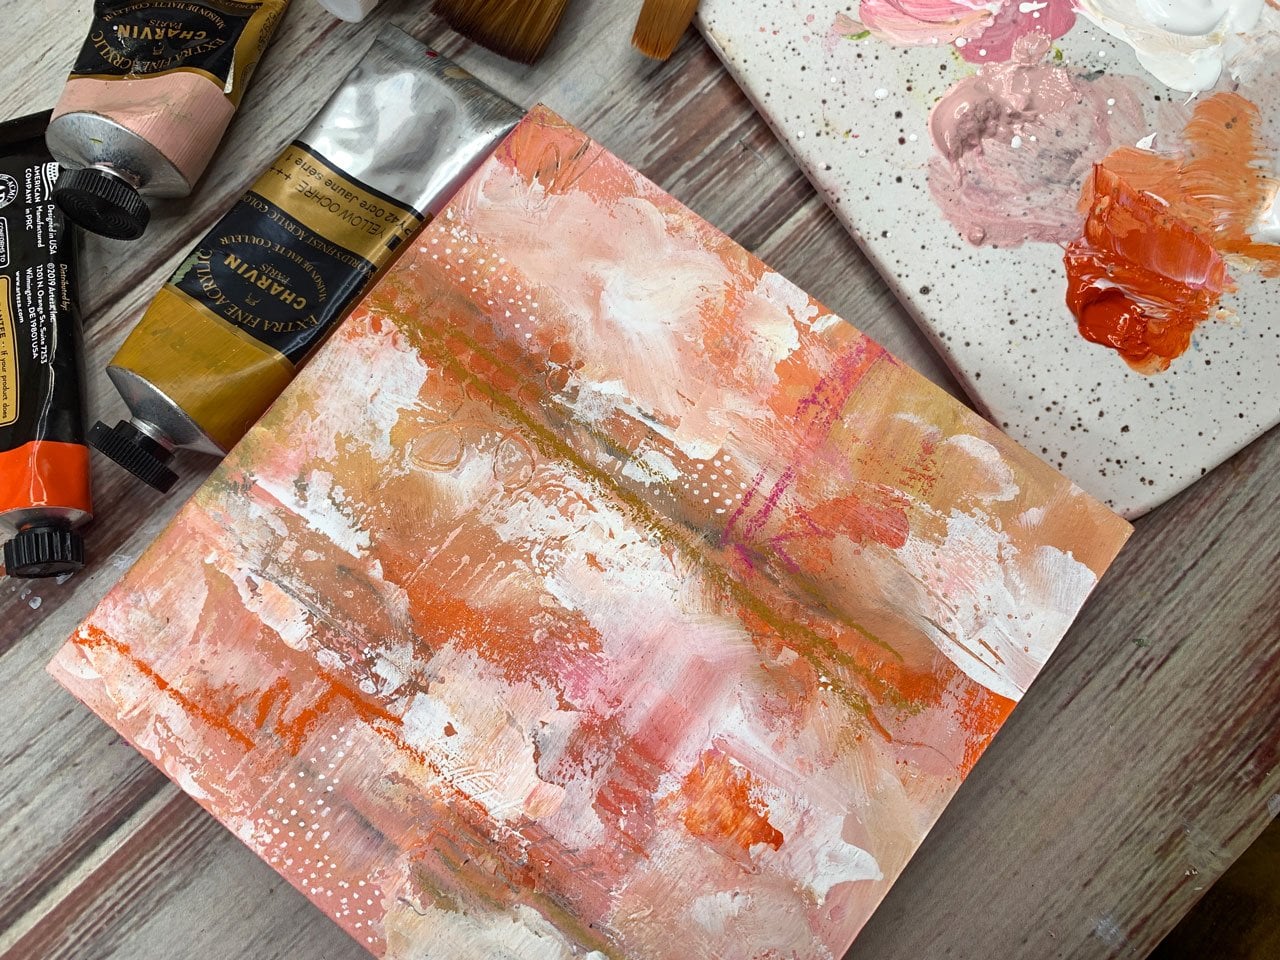
some of the stuff that I experimented with today. I did limit the color palette
pretty significantly. I went with this
Caribbean pink Charvin, which just happens to be one
of my favorite paint colors. This yellow ocher by Charvin. Now these are more expensive
in the acrylic paints. Don't feel you need to buy expensive paints to do
these projects with. I really like the artisan's
set that's pretty inexpensive and I
get them on Amazon. It averages $0.50 or
50, or $1 a tube. Because you can buy
a box of it for like 60 bucks and sometimes they run half-price for $30 and you
get 60 different colors. I love playing with
all of these and these have gone super long way. I've been able to pull colors
and paint all fun things. You can create something like
this Caribbean pink with a brighter pink and white
and just tone it down. Yellow ocher you can
get in any brand. I did play with those colors. This rose matter is just the little pops of pink that I did because I
thought it was really fun to do some muted colors
and a pop of something. Let me tell you that is a pop of something that stands out like neon here on my paint palette and even questioning
that decision. Because I thought, "I don't
know, am I going to like that? Why did I pick that?" Then I did some of it on my pieces and it's just
the right amount of pop. It's not like I used it so
much that it's overwhelming. It's just tiny touches, which is what I want to
encourage you to do. Do some your color palette
and then a pop of something. If you're looking at
your color wheel, I stayed in the pink,
yellow, orange category. The pop that it would
have said if I want it to come over here
would have been blue, but because I was
in the pink area, the yellow area, I
stayed in the pink area. I stayed in colors right here on the same side of the color
wheel to play with these, rather than pull a color
opposite and playing on that same side of
the color wheel sometimes gives you
very dramatic results. Look how beautiful that is. I also put down this brown is just the burnt umber
which you can get any brown in any brand really, and then I did a little bit
of this milky white paint, which I don't know that
I love that or not, but I liked that
it wasn't white, white and this is a cheap
paint that I got it. I think maybe Michaels
or Dick Blick maybe. I don't know if it's a
less expensive paint, it's not as nice a
quality as the Charvin, but when you're doing
a project like this, we're experimenting and
coming up with fun stuff. It doesn't really matter. The difference there in the
really nice paints versus the student grade
paints are the amount of pigment that comes in
that package versus filler. These are going to be
very pigment heavy, very little filler, and that's why they're
more expensive. This is going to be very filler, heavy and not as much pigment, which is why it's more say
like a student grades. They're cheaper and they
just didn't cost as much to make because they didn't have as much of that pigment in it. That's your main
difference there, quality-wise in why you would
pick one versus the other. These artises, I'd say is a
really nice middle ground. I wouldn't say it's like the highest finest quality
paint, like the Charvins, but man, these are
rarely saturated. I've liked everyone
that I've squeezed out. They really work well. I love those. That's
why I'm using there. I do encourage you to
use the paints you have. You don't have to go
out and buy lots of supplies to do this project. Because you're experimenting
with color palette. Maybe your goal is
big swatches of color instead of
real tight color. Make yourself some
little goals you're trying to work really fast and experiment with
different materials and then come up when you're done with compositions that you love out of the big piece. You can do this with any
art supplies you have. You can do it with watercolor, you can do it crayons, you can do it with oil paint, of course, the oil
paint won't dry. There's a much longer project if you try it with oil paints. But acrylic paint, you can do it with acrylic inks. You can do it with
paint pastels. You can do this with any
thing you can imagine. I also used this big
graphite thing that I have, which is basically a gigantic
thing of pencil lead, because it's something
I was randomly sent in my sketch botch subscription
that I used to have. I thought, I need to use some of these things that I've
never tried before. I was playing with
that and I had decided in the past
couple of projects, it's a fun tool to work with. I've pulled that out
a couple of times. I am using some of
the Neo II colors because I like
them to mark make. I do have one or two that
I've used of that and then my little
mechanical pencil, excellent for mark-making. I use that quite a bit. I've used a couple
of catalysts wedges. I tried to do some
mark making with this, which is where these
fun lines came from. They didn't quite give me
the exact effect I wanted, but actually, I love it
here now that they're done. But these weren't really
better in my opinion, if you've got a strip
of wet paint and you're dragging it through it and then you get this pattern on it. I was experimenting with putting paint on this and
putting it all in there. It wasn't as quite
what I wanted, but I do love it in
the finished piece, maybe it was quite
what I wanted. But as I was painting, I was questioning that decision. I used my catalyst wedge here. I made big marks with that, I did having that too. Then I've got the paints
here on a paint palette, which I've shared
a couple of times. It's just a ceramic
paint palette. You can use a disposable
paint palette. You can use a ceramic plate from your kitchen
that works great. When these paints, I
usually try to have a trash painting so that I can use the paints up
rather than waste it. But basically, when
the paint is dry, I just scraped the paint off. If it's too dry,
I can soak it in some water for a bit and this stuff will just
scrape right off. I don't like to wash
the paint off in the sink, because if you're
using any toxic supplies, you don't want any of those
toxins in the water supply. Then also used a couple
of brushes for this. To start off with the
big color blocking, I used a bigger brush
because I wanted to. I thought in my mind, I'm usually using
smaller brushes and that's why I get
tighter patterns and I thought maybe the size of your supplies would affect
the size of your pattern. Now for this, that really
worked out good for me. Just think of that, if you
want a tighter pattern, use smaller brushes and if
you want a bigger pattern, use bigger brushes and
then that might help you lay color in big blocks
a little easier. Also found if I stood back
a bit from the piece, I could get great big
splotches of color. Whereas when I'm sitting on
my table looking real close, I get little splashes of color. Keep in mind how far
or close you are from your piece as to the size of the pattern
you're trying to create. Because these were dramatically
different than some of the really tight patterns
that I've done before. This has got just a
lot more going on. Tighter color, there's not
great big splotches of color like this great big
thing of yellow here. This is much tighter. I liked both ways
and I'm going to experiment more with the
big color blocking now that I've cut these up and it's super happy because even on
the big piece I thought, do I like these, do I not
like these, I don't know. But now that they're done, they could be my very favorite. That's what I like
about this technique when you're doing this too, because I end up with something I like every time,
I leave a happy camper. I also used a couple
of soft pastels. I used a pretty color
that was an ocher color. I just played with
a few of those. I have ciliated are several
different brands out there. I've got some Rembrandt, I think those might've
came from Dick Blick. You want to experiment
with just a few colors. You can get the [inaudible] , you can get a whole
set of half stick pan. I like that because then I started off with several colors. But then as I use them, I can figure out what
my favorite colors are. This is one of my favorite. As I get down in a little
bit smaller stick, then I go to the Dick
Blick and I'm like, I need a bigger stick
of that and I'll buy a bigger piece of that color if I knew that was my favorite. These little half
stick paints are a really fun way to experiment with those to figure out
what colors you like. Because when they say, "Go to
the art store and just pick your favorite colors,"
there's 200 colors. When you're standing
there looking at that display, it's overwhelming. Trust me, I have done that. Then I come home with 50 because I couldn't
narrow it down to my five favorites and
when I'm working in here, as I work with the different
colors and I can see what's in my box and what I've used and what I'm almost
out of, then I can pick. That was my favorite or I
haven't even touched something. There's my white Posca pen
that I was just looking for. I also use the
white Posca pen in this project to make
some dots and lines. I'm going to open that
box because I was like " [inaudible], where
is that Posca pen at?" This is a paint pen. You can do this with any
brand of paint pens probably. It's how I made a few extra
marks and dots in my piece, which I like adding that, that's a feature that I like. I do like my Posca pen. Then I also had on white
gesso and clear gesso. I have big containers of that because I like using
it every time. The gessos I used with my paint to give the
paints some grit because, you know on this project, I'm working with acrylic paints, and acrylic paints are basically plastic and they're shiny. If I wanted to do all
this fun stuff on top, like pastels and neo color
crayons and the charcoal. If I just use the
acrylics by themselves, you can't put stuff
on top of that. It's shiny, it's plasticky, it's too hard and none of these
other things stick to it. I do mix the paint
in with the gessos. I used the white gesso as white paint tubes and I
use it to lighten colors. I use the clear gesso if I just need some gesso in
with that color, and then that allows
that paint to then have enough grit for me to
layer on top of it. If you did the whole thing
with just acrylic paints, and you thought later, I wish I'd put the gesso in, you can paint the
whole top with gesso. That would give
you that grit to, but I just like working it
in as I'm going so that I can just keep on going and being creative as
I'm working it. That is basically, I do recommend one
last thing, gloves, if you're working with
any materials that could be toxic or you don't
want it on your hands. Because you do want to be
careful with art supplies. A lot of the art
supplies are toxic. Definitely consider some
gloves if you're working with anything that has
any toxic properties. One thing I like about these little art
teases is they are non-toxic and they tell you on the tube that
they're non-toxic. But I worked with
enough low supplies, especially these
pastels, that you could be working with
a few toxic materials. Definitely, keep safety in
mind and have some gloves, maybe an apron on to
keep your clothes clean. I wear an apron because I get messy and sometimes
I just dropped stuff on the table and it bounces on my lap and then I'm glad
I had that apron on. This is basically
all the supplies I'm using just in general on my art table I also like to have a little thing
of baby wipes. That is something I use to clean my fingers and my supplies
awful lot of times. If I get something
on my painting, like the dabs of paint that I accidentally got
this bright pink on the back of some
of my pieces and then it stuck to another piece. If you get something on one
of these that you didn't intend while it's wet, you can get it off
with a baby wipe. That worked out nice that I
had these sitting over here. That's all the supplies
I use I to do. Encourage you to play
with what you got. Don't go to the art store
and buy tons of stuff. Experiment with this
technique and then add your supplies as you can. I will see you in class.
3. Blocking out color: [MUSIC] In this project,
I'm going to do one of these larger pieces of paper and cut pieces
out of it that I love. When I usually do this, I get real tight
in with my paint. Let me show you some of my
samples that I've saved, but I get real tied in
with the paint and I have real close and clustered. Here's previous one. It's real tight and there's lots of color and movement
and pattern going in there. That seems to be a
lot of what I do. I get in real tight
with the pattern. But this time I'm going
to have a different goal. I'm going to try to do great big splotches
of color rather than little tiny
splotches of color. Some of this probably happens
because I get in there with little tiny paint brushes and expect to make a great
big blob of color. A little brush is not going
to make a big blob of color. A little brush is
just going to make a little blob of color. I'm going to work on using
some bigger paint brushes. I even have a great
big one here that maybe I could start
with and just see if I can lay out bigger blocks of
color to start with. Then we might come in with the smaller brushes
for more details. Then I want mark-making
and I want to be able to end up with some finished pieces that
I love when I'm done. But I'm not going to be thinking about those as I'm going. As I'm going, I'm
just thinking about laying color and just playing and freeing up my mind
from any expectations. Because when I'm done, I
still might end up with a little tiny pattern that
just may be my style. [LAUGHTER] But every
time I sit to do these, and I'm playing with
color palette sets, or I'm playing on the big
piece of paper that I want to cut pieces out of, I do sit and think, what do I want to try today? What do I want to focus on? Maybe I want to focus on marks, maybe I want to focus on color, maybe I want to focus on bigger pattern or
smaller pattern. You can have a goal
when you sit down even though you're
playing and you're experimenting and
you're not sitting to create an entire
large masterpiece. What I'm starting with is
11 by 14 piece of paper. You can use watercolor
paper, acrylic oil paper. I do like watercolor paper
because it's nice and sturdy. I like the 140 pound
weight for this project. Hot press will be smoother, cold press will
have a little bit of watercolor pattern to it, so it doesn't
matter which paper, but I do encourage you to maybe try both papers because they do react differently to the paint and the materials
that you put on them. Today I'm playing with
some acrylic colors. You can do this type
of project with any kind of paint that you have, any colors that you have, any supplies that you have. I like this because
it's a chance to experiment and play
with your supplies. I'm using acrylic colors today, so I'm going to use Master's
Touch, milky white. This is one of those that I think came from
Michaels or Hobby Lobby. It's not a very
high quality paint and I've had it for a while
and when I squeeze it out, it was not a super smooth
and creamy as the Charvin, higher-quality paint or even
the Arteza colors which are, I think a medium grade paint, but they're really smooth
and they have great colors. I'm trying the milky white
because I wanted this color. I didn't want it
to be white-white. I didn't want it to
be titanium white. I need to go get
a higher quality in the whites, but
I didn't have it. I'm using this milky white. I'm using Arteza, rose madder just maybe for
that pop of color in the sea of neutral colors that I have going here as I get
paint on my finger. [LAUGHTER] [NOISE]
I've got baby wipes over here to clean off
anything paint like that. I'm also using yellow
ocher by Charvin, that pink Caribbean, which
I just love by Charvin. Then here's a Holbein acrylic
and it's a burnt umber, and burnt umber
comes in any brand, so you don't really need to buy a specific brand for that. I've already put these out
on my paint palette with some white gesso and some clear gesso so that I
didn't need white paint. Then the clear can go in
if I don't need a color. Because I like to mix that into my acrylic paint so that I can
then layer stuff on top of it because acrylic paint
is plastic basically, so when it dries,
it's very shiny and things don't stick
to the top of it. If you mix in a gesso, then you can layer things on top of the acrylic
paint very easily. It does make the
paint not shiny. It's a matte finish,
which is what I really love personally, so I love doing that. But if you don't want to
mix it in with the paint, you just want to do
the paint itself, you could put gesso on
top of it later if you changed your mind and
want it to then put more things on top and
it wasn't working. I've got some little Neocolor 2, [NOISE] crayons over here. I like these because
they're water soluble and I like to make
marks getting started. I just have a random
selection here. There's nothing
special about them. I might just [NOISE]
make marks on here with one of these. I like mark-making with
these and then you can put water on them to do other things and maybe
using some of that. I also have this
graphite gigantic piece, which I'm only using
it because I got it in a sketch box subscription and I would have
never bought it. It's a 2b, I guess you
use it with drawing. But I used it in one of the other projects
and I really like how big and I can hold it loose
and it makes great marks. Now I don't know
what I'm going to do when I don't have
a point anymore, I guess I'll shave
it with a knife maybe because it's not going to fit in my
pencil sharpener, but it's basically a great
big piece of pencil lead. I'm only using it
because I got it. I can do this with
one of these crayons. I can do it with my STABILO
pencil, which I really love. My STABILO pencil, it's a
completely different look and feel than the lead is. I always use it for something. Let's just [NOISE] get started. My goal here, I'm trying
to keep it in my mind is bigger areas of color
and some of that too, maybe because I'm
sitting in real close to the palette here and
I might need to stand up and back up a
little bit so that I can then see it from further back and make larger
decisions. [NOISE] This is basically
starting you off. It's getting rid of
that blank page, it gets rid of that
fear of messing up the white page because you've already drawn and
scribbled all over it. You don't have to do this. I do this because it does
just help me mentally get past using that white blank
page and getting stuck. You might see some
of these lines underneath and you might not. We maybe just
covering it all up, but now we've scribbled
on the paper and we can attack it with paint and not
be so precious about it. I'm going to try one of
these big paintbrushes because I never use these, and we'll just see
what we end up with. Maybe I'll start with
this yellow ocher. I may need a bigger
paint palette for bigger paint brushes. As you can see underneath
this on some of these, when you're doing this,
you can see our pencils underneath it that you may end up seeing what you
scribbled under there. I do want it to be
really cool and organic and something that I'm going
to like if I do see it. I'm just experimenting here, just laying some large
pieces of color. I might experiment with
mixing the yellow ocher with the white gesso so that I get a lighter yellow rather
than that darker yellow, or even a combination
of color if I don't mix it completely as well. If mixing the white
in, it makes it a little more opaque too, it is more likely to cover whatever you're painting
on top of if you do that. I might just go right
into the brown, the raw umber that
I've got here. Then what I'm going to be doing, like I did in that
Abstract Adventures 1, I'm going to take my little
viewfinder that I made out of just paper and I'm going to go through and see if
there's anything, when I'm done, that I like. Maybe there will be and
maybe there won't be. This is not the time
to worry about, am I going to get
something I love, or not? This is the time to just clear your mind and lay
down some color. Because it's paint, if you're going along
and you're thinking, I'm not loving it yet, you can always layer
more paint on top. [LAUGHTER] You're not stuck with whatever you've
got there because we can keep on adding
if we need to. Really, the layers are what
make it so interesting. So as we going, we're definitely going to
be layering things on top and adding that
interest and getting those different elements
going that we love, like marks and shapes and color. We'll go with that. I do have some bigger
paintbrushes here. Let's use [NOISE] this one here. Maybe I'll play in this
Caribbean pink for a minute. You can just tell I'm not being real precious
with my paper, I'm not being real
precious with my paint. I'm just trying to get out of my own comfort zone and try something that I
don't normally do. I don't normally
do it like this. If you watch that
Abstract Adventures 1 where I'm putting paint
on with smaller brushes, that's generally how I
approach this project. I'm cutting out smaller
pieces out of it. I'm doing smaller brushes, the pattern is a lot tighter. For me, that's more my norm and when I sit down
to do things like color palette studies and things like this on
big pieces of paper, sometimes you just want to do something different
and try new techniques and really just get out of your own way when
you're creating. Let's go for some of
this milky white here. I am almost going
for very cubish, look here, cubed in the way that I'm laying
colors down because that seems in my mind
easier to block out color in great big cubes than
it is to be more organic, and that's a skill that
I might work on too. I might work on
being more organic, as I do more and more of these. Now I've got some great
big bits of color. Now I'm going to just go in. I have limited my color
palette very deliberately. I have, the pink and the yellow and the
brown and the white, and then maybe just a pop of this brighter color
after I get in there. But I've been very
purposeful about that. I did that on purpose. I just want to loosen up. I don't want to
worry about having too many color choices. Generally your work
turns out better if you limit those choices anyway. It's where I'm
coming from there. I like limiting
my color palette. I like pulling out
a few supplies. I don't want to pull
out all my supplies because I have a cold
cabinet full of them. I just don't want to get
paralyzed with all the choices. You could even say as I'm doing this that I'm falling back into my tiny pattern that I like. [LAUGHTER] You can
overwork these. It's almost better if you give
yourself a timer and say, I'm going to spend
30 minutes on this. That's my timer. Then you're more likely to work faster and more frantic and really get in there
and do things that you might not have done before because you're like,
oh, I'm on a timer. I've got to go real quick, like look at here if we go real fast. If I almost put that
frantic feel and I put that in my voice and I'll put
that in my paint strokes, and then we got big
splashes of color, but they're a little looser. That's fun. Work
yourself up excitedly. I do like these
big bits of color, but not just solid blocks
of the same color. I do like going back through maybe even in the same
area that I've already done and adding
this little bit of frantic to it because
that feels better to me.
4. Adding layers and marks: [MUSIC] This is mostly dry. There's maybe one, or two spots that aren't
completely dry, but it's mostly dry. I've not used any of this really bright pink and
I thought maybe we could try to paint some
random shapes and lines. This is a catalyst wedge and it's just got some
little v's on it. I've got several of these. You can get these
at the art store. It may work, and
it may not work, and so I got a straight
one. I've got several. But I thought maybe we
could put a little paint on that and see if we can drag, normally you would have wet paint there and
drag it through it. But I didn't do
that, so let's just see if this is even
going to work for us. I may end up doing this with
Neocolor crayon instead. But maybe we'll just try and put a little paint on here and see if this will
give us a stripe. Not quite what I was
hoping for, but it's okay. A little more paint down there. See it's not as consistent
as I would like, but now that I've done it we're going to make it
part of the pattern. I might put some over here. Definitely works better. Dragging lines
through wet paint, so interesting to
figure that out. I do have some other, like maybe I want
a little bit of that same color in the
crayon that I could do. I could maybe make this bigger, I could come back in if I
wanted to fill that in. I could just go through and
add some lines and marks. Maybe that aren't so heavy that they're going to
show up far back. But they'll be a nice detail when you're looking close up. Because some of these details, you want to be able to, when you get close
up to be like, look at this little area, or whatever you want to be able to have fun surprises in there. I like things that
give me fun surprises, so I like that. I like using my POSCA paint pen, so I might definitely be
using that at some point. I like the white usually, and this might be like a final touch where I
add a little white bits, or dots, or splatters,
or something. That's another
thing that I might really love here with this is some splatters maybe
in this bright color. I'm just putting
that in the water, and then seeing, can I splatter some of this on here to get that pop that I was thinking because I didn't
want this color to be on there as a pink
color necessarily. I wanted it to be a pop
of something interesting. That's super fun. It's very fun. I'm just sitting all my little paint brushes
in a thing of water until I take them
away to wash them. I actually need to let
that dry a little bit. Let's just think, what
else do we want to do? I might want to have
some more bits of color, maybe with a smaller paintbrush. We can go through and make
marks and patterns with some color and dots and things like that just by
painting them in there. I love that this is very
tiny and it's not going to be standing out so much that
you're like, what is that?" But as you get close, you will see some
detail in here in a slight color that makes just some interest.
Well, I love that. You can do this with
all kinds of stuff. You could do it
with the bottom of a pencil and maybe
make some dots. You could do it with really any art supply
that we've got here. We could come in with some
mark-making and some paint. Stencils, if you'd
like to stencil, you could stencil things on top. That might be fun if you've got some really cool
patterns that you want to incorporate
just randomly, that would be really cool. I do have a lot of stencils, but some of this stuff you think of as you're
painting on the fly. I just thought of them
as I was painting, so I thought I'd
throw that out there. That idea out there, and that may be something
that I pull out, or it may be something I
use in a later project. Just make all your supplies work for you and experiment with them and see what do these do, and how can I use them, and how far can I push them, and how can I make them work
for me in an art project? Just things that you
never even thought. What would I do with this? I want you to use this
time to experiment with those and just see
what can you do with it. I like that. I might do a little white
paint pen work here. Let's see. We can
come in with dots. I like dots. Just make sure I've got enough paint out there so that we get a dot. Yes, I love that little area
of dots. That's pretty. It does make it easier if you will
steady your hand with something like a finger, or on another hand maybe because if you're just out
there in free air winging it, you end up with weird
wonky lines and you might not get the pattern
you were thinking of. Even though my goal here
was bigger blocks of color, I still want plenty
of interest in pattern and texture on
top of that color so that as I cut out small
little pieces that I love, I'll get some interesting
elements in there. That was real fun. What I just did right there in the
middle of my dots, it was like long dash dot. Vary up your little
dots and dashes too, it doesn't have to
be all little dots. You can have a dot, dash, dot, dash, dot, dash, dot, dash. As you're doing stuff that
would be a lot of fun. Just as like a different
line to make in your piece. Let's just do that. Just to see, that
might be something interesting on the edge of
something that we like, who knows, might not
get used at all. But that's what I like
about doing this. I'm not thinking really hard
about my finished pattern. I'm just thinking, what can I do right now that's
going to make this just a little
area interesting and maybe in the end I'll really love what
it was I created. Maybe I won't. I do find
when you do like this, if you don't like
the whole piece, you definitely love a
part of it somehow. I love that part of it. I'm going to take a
palette knife, I think. Then come in maybe
with some color that I can add some texture on there in the same
colors but maybe break up. When I'm back from it, it's
almost too splotchy for me, so I don't know if I'm going to end up loving that, or not, but I might come
back with some of the same colors on
top and just try to then pull some of that
splotchy separation back out. We can do that. If you think
I've made it too rigid, maybe this is a way to pull some of that
rigidity back out. We are going to need some
more of that bad number down. It's cold in my art room today, so I think my paints
are cold. [LAUGHTER] I'm just pulling this across the paper very
lightly just so that, I'm skimming it,
trying to make that paint spread out and give
me a bit of texture. I'm not pressing down real hard. That does get to be a little bit challenging when
your paper is wavy. So you're just real
careful on where you set that palette knife down. This is part of my mark-making
too, I'm going on here, this is creating
more texture and pattern we're building
things up and I like that buildup [BACKGROUND]. I've mixed in brown
with my white and I don't love
that, but it's okay. I do have an apron on, so if you drop
your paint brushes or something onto yourself, if you'll have like
a little apron on, you'll save your
clothes [LAUGHTER] from random paint mishaps. Those are very fun.
I love all that. Now I also have my little pastels that I
like to add to things. So do have some pastels out. I might go back into my
box and pick other colors. These I like because
they're very pigmented and they
will make any marks on top of things and
I can also color in areas that I want to emphasize a color that
maybe had disappeared. Just different things, I might just use this for a moment to make some lines and
more interest here. Some of the goals on my
paintings is to not be so tight and precious with some of the things
that I'm doing. This has got green all over it, but it's actually
an ivory color. The white pastels, I'm just wiping it on
a baby wipe to pull the color back out. Actually, it looks green
when I draw that on there. Maybe I don't want too much
of this one out there. Let's see if I've got
a more white one. Move this one box
out of the way. That definitely reminds me here on my little color palette. Let's just add, keep adding to our color
palette as we're going. I've used some different
things in there, but I'm just going
to continue adding to this as we paint. But I do talk about that in
the color palette section, so you know what
I'm talking about. [LAUGHTER] I also have
some charcoal pencils. Those are real fun
to experiment with. Charcoal comes in lots of different colors and
different sizes. But this is another
random thing I got in one of those sketch
boxes that I thought, what would I ever do
with that and now I know it's good for making marks, it works almost as
good as a pastel, but it's got a nice tip on it. I can make definite marks and like here I'm making
a little cross hatches, you can very clearly see
those on top of the paint. I do like charcoal
things and there's actually a set of colored
charcoal pencils. This happens to be a white and a black that they sent me
in that sketch box thing. But if we just go through, these are great for mark making, and on top of the acrylic that's been mixed with that gesso, just sticks right
to it beautifully. I might do that same
pattern maybe up here. Do have to wait for the paint
to be dry before you can add these on top because
with the wet paint, you won't see it at all,
it doesn't do anything. Super fun. I like that. I'm also wanted the white, so here's the white. Let me just rub that off, but I have lots of
other white in here. Then I got to ask myself, why did I want the white? Maybe I don't want the white. I do have like a bunch of yummy yellow ocher colors so
we might play in the ocher. Maybe I like this color instead. [NOISE] I've got some
I just dropped it. These will break very easily, but even if you break one, don't worry about it you can use every little inch of
it pretty easily. Oh, yeah, that's the
color I wanted to let's see what we can do here. Just a few lines maybe and
that's my mark-making here, just adding some pattern, maybe some dots
in-between the lines. These are a lot less precise than the little
charcoal pencils. We got some fun stuff
going on there. We just have to decide, is there anything else
that we want to do with this before we decide
to chop it up? I'm going to study this for a minute more and see if there's any other marks or anything
that I want to add. Now that I just
said that though, I think I do want
to add some marks. I'm going to use
my catalyst wedge because the edge is a little bit bigger than these
little hard wedges. I want to maybe do some big lines with this
creamy white color. I'm just going to
put some of that white on the edge
of that and just see if I can get some of these lines exactly like
that. That's what I want. I could have done that
with the white gesso. I'm doing it with
this creamy paint because that's what I've got
here on my paint palette, but I just want some of those yummy lines
to maybe show up later. Yeah, I love that. That's fun. Once we cut our pieces out, there's nothing saying that
has to be done if you think, Oh, this needs one more thing, once you find a composite in here that you
like and you think, Oh, it needs one more thing. You can add to that even after you cut your
little piece out. I'm going to let this dry. Then we will see about finding
some compositions that we love and cutting them
out and then seeing are we done or do we need
to add a little bit more, so I'll be back [MUSIC].
5. Cutting out abstracts: [MUSIC] This is mostly dry and let me say if you
get into a hurry, [LAUGHTER] wanting
to dry faster, you can dry it with a heat gun if you need that
to go a little faster. You don't want to use
a blow-dryer usually, but you could try it if
that's what you've got. A heat gun puts
out a lot of heat, but not a lot of air, and with art supplies and stuff, it'll then let it dry without blowing it around, basically. If you're not worried about that and you just want a lot of air then a blow
dryer's just fine. It blows out a lot of air with a little heat if you're
wondering the differences there. I know you're looking at this because I'm looking
at this thinking, how are we going to
come up with something that we love out of this mess? But I'm going to peel the tape. If you end up painting one
like this and you think, "I love it, this is my piece, I'm not cutting
anything out of it." Then that's fantastic. Because I'll be honest as I look at this without the tape. The tape is really what makes it turn into
like a piece of art. It just is that reveal that creates
something that you're like, oh, now it looks like
a finished piece. That's why I like to
tape everything off. Then when you're done, that
could be your finished piece. Actually now that I've
pulled the tape off, I think, oh, I really like that. We could change the direction. We don't have to look at it in the way that we painted it. We could say, I like this better or I
don't like it at all. There's just different
things that we can do there. But there's a lot that I love, there's areas that I love. Basically what I've
done is I have created my own little viewfinder that will allow me to then view different areas without all
of the chaos around it. This is just strips of
watercolor paper that I've taped together in
a specific size. This size is five by five. It matches the five-by-five
wood panels that I like to sometimes mount things
on because I'll mount stuff on a panel when
I'm done sometimes. If I'm going for,
say five-by-five, I'll take strips of watercolor paper and tape them together, and this is a five-by-five hole. Then I've got this nice
little visual separator from the rest of the
painting so I can definitely single stuff out
that I think I'll love. Look at that right there. I love that right there. What I love might be completely different
than what you love. As we move it around, that's pretty awesome
right there too. Oh my goodness. Now
that's a dilemma. If I like this section, and I pull it over and
I like this section, oh it's almost a shame because
I can't have both of them. Oh, I love that though.
Oh, my goodness. We can change directions and see is there
something in it. Oh, look at that. Now that
I've changed the direction, I really like what
this stuff is doing. At this point I am
thinking of composition. I don't want to cut something
out, say in the center, if pulling this more towards the rule of
thirds would look better. This almost looks like
there's a ghost with red eyes in the middle
of my composition. How funny is that? Look at that. [NOISE] This looks
totally rule of thirds. I like all the pattern going. You don't want to cut
out too early though. What if you cut out one thing that had part of it that you really
loved and something else, but oh my goodness, That one got me so
excited with this big, yummy yellow area. I just want to make
sure that I get it rule of thirds
where I want it. I want this in that upper
quadrant right there. I'm feeling like even
though I love this, we'll come back to
that in a second. I'm going to use
this right here. Now you can do this in a
couple different ways. I'm on a cutting mat and I have an exact Exacto knife
that I use to cut, and I like the Exacto knife
to have a nice sharp blade. But you can also
draw that square, do some little marks and
cut it with some scissors. You can also mark each corner and then you can take a ruler and cut it with
your Exacto knife. There's a lot of things
that you can do. You don't have to do it
the way that I'm doing it. We can cut it with a ruler, we can cut it with scissors. I like doing this because, I don't know, it
makes it easier. Let me grab my Exacto knife. I have a couple and there was one that's out but
it's hiding from me. I'll just grab this
other one here. I like having
multiples of my tools because I hide
things from myself. [LAUGHTER] I do like
a nice sharp blade. This is just an Exacto
knife that you can get at the art store
or the hobby store. The blade needs to be sharp
because as it gets dull, it will rip the paper. I'm just, make sure
that I like exactly where it's at because I
moved it, did I like it. Oh, was it right
there? Right there. I like this splotch of
brown that I did on top. I questioned myself when I started going back
with the palette knife, putting paint, am I
going to like it? But now that I've got some dark and some light and
some nice contrast, and now I have the composition, I actually really love it. I'm going to just eyeball
it and then set this down, and then I will cut this one out and see how nice and
easy that makes it to cut. But you can do this anyway that you feel
comfortable doing it. It also makes it nice and ready to mount to the
board because now I've already used a board
to measure it out. I'm being careful not to go too far past the edges. I don't want great big
cuts and then it going past in case I want to use
that piece for something else. Oh, look at that. Oh my goodness. That just
is exactly the feeling that I want when I cut it out and I'm standing back from it
just a little bit, and it just takes
my breath away. This happens to me every time, I get the little bit of
chaos going and I think, how am I going to get
anything out of this? Then I get to this point and I cut something out and I'm like, wow, that's what I wanted. I really like that I have
great big splotches of color, whereas with these older
pieces that I've done, they're really tight color. For instance, if I'm
looking at this piece, you can tell it's really tight
color, much more chaotic. If I'm looking at one of
these finished pieces, I can tell that I worked in great big color splotches and
got something really cool and pushed past my comfort zone using different brushes and different goals
when I was painting this than I was having on
the other earlier pieces. But I just love
everything about this. I feel like this one is going to make itself into a frame. [LAUGHTER] Let's
continue on. Let's see. I really liked this over here, so before I cut anything else where I can't
get that, let's see. I liked this one. If we put that one
next to this one, that would be a pretty pair. It's not the same exact pattern, but it's got all the
similar elements, it's got the colors
that go with it, and the finished piece. I think I would love
hanging as a pair there. Let me just make sure that's
exactly where I want it. Maybe I want it
right there instead, I like that composition better. This is more rule of thirds. Another thing I
really like about finding compositions after
the fact that really inspire you is you can make a whole art journal
or sketchbook of just these pieces that can
then be your inspiration for larger pieces and compositions because you've
already identified something that you love, and now you can replicate
that on a larger scale. Let's cut this one out. I'm so excited. Sometimes I don't get even
this excited but man, these colors inspire me. I like the pink and the
ogre, and the brown. I like the little
pop of the red. I like the pop of the
dark with the dark brown. This is why you want to make
sure your paint is dry. You don't want to
pull your paint off the whole time
you're doing that. Look at those, oh my goodness, look how beautiful those are. Truly exciting. I don't even feel like
I need to go back after the fact and add any more, except maybe right here, I put that charcoal right there
and it's almost not vivid enough or maybe it's not enough of those
little cross hatches. As I'm going, I might decide, let me get that little
piece of charcoal-back out. This is where I could decide, let me just work that
a little better. Maybe those cross
hatches could have gone a little further and maybe that would be the
finishing touch that I like even
better. Look at that. That even made that spread out and worked it
a little better for me. Then here, this is charcoal, you got to keep in
mind that you could smudge this very easily
with your fingers. You're definitely
going to have to put some type of finish on
top of this so that it's protected and you're not rubbing off those pretty
marks that we just put on there with the material that's not stuck on there
like the acrylic paint. Those are so beautiful, I can't even stand it. Let's just look and see
if there's one more. Because sometimes I like
it to be a set of three. Is there anything
else that we like? This is a very
interesting composition. I like that the stripes are going this way a
little bit different. On this one, I had stripe coming on one side at the
rule of thirds, I had something
separating that and then you've got the other
third going this way. You can also turn it
in any direction. I still love this
in any direction. But I'm thinking two-thirds. On this, I'm
thinking third here, a third here, and then
you've got that wide open, which is almost exactly
opposite what I had done on this one where I had this third, third, and two-thirds out here. It's exactly opposite
that. Do I love that? Do I want to cut that out? I don't know. I like
this one is better. Let's just see what's
left over here. We don't have to cut
them out at 5 by 5. I could have done 4 by 6, I could have done
half the sheet, I could've done 4 by 4 to see if it's smaller if I
wanted smaller pieces. This one's okay, but
it's not as exciting. We'll cut this one
out just to see. If you end up and
you say you have two that you love
more than anything, and some that you're like, okay, I love it but I don't
know if I want to do anything with it right now, you could save all these for collage pieces like
this piece right here. Crazy beautiful, I love every
bit of that right there. If I go ahead and cut that off, that could be the
piece I've put in my sketch book as my sample. Or that could be a collage
piece that I use in something else because that right
there, crazy beautiful. The cut-out is where
I get so excited. Look at this, maybe
coming in this direction. Now I do like that. I'm breaking the rules
centered, we're half and half. That might be a nice
little contrast and difference if we like
something centered. But let's see if we like this one going this
direction, that's fine too. Let's just cut both these out. I like both those because we don't have to do anything
with it other than enjoy it. I do tend to want to
frame stuff though. If I find something
I really love, [LAUGHTER] I'm going to hang
it on the wall and enjoy it. It looks like I got
a little bit of paint here on my fingers. Let me cut this out. I've cut it just
on the edge here, but I've still got enough
paint to make that work. I do this with my
photography too. I'm working with
textures in my photos and as soon as I put
a texture on there, that just grabs me. I just get so excited. Not ooh and an ahh, people
love laughing at me for [LAUGHTER] some of that. But look how pretty that is now that we changed the direction. I like this on the angle. I like it, it's centered, centered rather than
rule of thirds. But we still have rule
of thirds up here with this little bit
of pink marking. Very interesting, let's
go ahead and cut this. Well, somehow I've managed
to put pink all over everything on the back
of this. Look at that. [LAUGHTER] I'll just be careful that I don't get
that on everything else. That's one thing about keeping your paints handy over here. You might make some big messes. [NOISE] That is a big
mess, pink everywhere. Maybe I'll wipe some of this off the back of here
while we're in here, just so that we don't
keep spreading it. I don't really care
if there's anything on the back of a piece. If you're doing these to sell paper pieces and you're
going to sell these, be super careful about
the backside because you don't normally want to
sell it looking like that. Or at least I
wouldn't. But if I'm going to use it
for myself and I'm framing it and I'm not so
precious about the back, then don't worry about it. Was this what we liked? I think I liked it. Better this way did not. Let's cut that out and
then we can decide. There we go. Don't
get pink paint. Tell yourself, don't get
pink paint on everything. [LAUGHTER] Do the
same thing here. Like an ooh and an ahh
I'm like, that's how I know that I did a good one. It's my gut that
tells me that's it. I'm a little less deliberate with some things
and a little bit more all about the
serendipity of the piece. I let the piece guide
me rather than worry about what I might have
been thinking in my mind. Let's see if we got all
this out. There we go. I got a big piece of brown. This is wet paint
because I just felt it. I'm just going to wipe
that off with a wet wipe. Well, it came right
off. Because my paint was dry, that worked. If my paint was wet, that
would not have worked. [LAUGHTER] Oh my
goodness, look at that. I like it this way and this way. I love this one. These match really nicely. I had red paint on
there, let's get it out. Nice little lesson
to learn right here. It's fun right there
in the middle though, but I don't want that there. I'm going to take my
baby wipe. Yeah, good. [LAUGHTER] Don't ruin
my beautiful set here that I just created. [LAUGHTER] I got that
pink stuff everywhere. Kind of fun to watch
other people make mistakes and then when
you make your own, you don't feel so
bad. Don't feel bad. We move my piece out
of the way there. Sure, I didn't get. There we go. Oh my goodness, crazy beautiful. Look at these. These
are so beautiful. I really questioned
in our big piece, was I going to get
anything out of here? Because like I said, I was working a bit out
of my comfort zone there. Then as I get to
something like this, I'm just going to take my
scissors and I'm going to save these pieces
like this right here. Look how pretty that
is as a collage piece. I definitely want to save that. Or it could be the
piece that I put in my color palette book. This one here again, I really love everything
about this, it's so pretty. I have saved the
edges because there's enough color here for that
to be a collage piece. These have some
pink on the back, there's blood on the front,
but I don't even care. [LAUGHTER] This
piece right here, perfect collage piece or perfect piece to put in my
sketchbook there. That might be my
sketchbook piece. I'll just cut the
end off of that. Look how pretty that is. As I cut all these out, this is the one I
love right here. Here's a collage piece because I cut all these
out I'm telling you. It's so pretty right there. This would actually be a really beautiful micro piece of art. If I go ahead and just
cut these edges off. Maybe I want it to do a very
interesting slim piece. Now I could cut
this with my ruler and my Exacto knife and
make it really even. But I'm not being
super precious, but look at that. This right here would be
the perfect bookmark. It would be really pretty as a micro piece of art framed, matted and then the
frame being bigger, I love this piece. This might be one of
my favorite pieces. That can be a really
beautiful collage element. This would be a nice
standout piece in a collage, so that might make its way
into collage, I love that. I've got one last little
piece there and then the little tiny pieces
I may or may not keep. You never know what you
could use in a collage. There we go. Wow, look at how beautiful these turned out. I'm pretty excited
with this colorway. I definitely encourage you to experiment with the great
big patches of color, with the different materials,
and with these colors. I really hope you loved
doing this project. I'll see you next time. [MUSIC]
6. Finishing your pieces for display: [MUSIC] Let's talk about
finishing our pieces in this segment because these
have their own paper. If you're going to
take it to the framer and have a frame it. You want to be able to
protect the softer bits that we added on top the pastels that we
might have used, the charcoal that
we might have used. There's materials that I have laid on top of
here that need to be fixed or they will smudge
as people touch them. If it's something that I'm
just taking to the framer, I will use a fixative and I like the Sennelier soft
pastels fixative because it fixes any of those chalky bits down so
that I can't smear them. If you're using oil pastels, you need to use those
on the very top last, you don't need to use
them first because then nothing else will
stick to your painting. You'd use them last. Then Sennelier has a oil pastels fixative that you could use and you get this
at the art store. You could order this online.
But this is the one I like. It doesn't tend to change
the color when it dries. It does look true to what I had been working in and I love it. I would just take this
outside spray both ways, let that dry, spray both ways let
that dry and have three to four coats
of this on top. Even then, it's not like
that's 100 percent permanent, and you can touch
it and rub on it, and it wouldn't damage. You could still possibly
damage any parts that have those pastels
or charcoal on it. A fixative is fixing it so that it's less
likely to be damaged, but you still don't want
to be touching the piece. You either need to have
a final finish on it or put it somewhere where fingers aren't rubbing
on it and ruining it. This would be the first step. I would put this under anything
else that I added on top. I like spray fixatives
because you can get brush on varnish and
stuff from the art store. They do make brushed varnish. But if you're using
anything with soft chalky tops like
the pastels or chalky. Any chalky stuff
or the charcoal, anything you brush on, you're going to smear any of those chalky bits you
added to the top. I don't like brushed
varnishes on top of pieces like this because of the potential to smear the art. The other thing that
I'll then put on top possibly is a varnish. I like this UV archival varnish. I think this one came
from the art store because it doesn't yellow. Some of the varnishes you
get from the hardware store, will turn your artwork
yellow as it ages. Terrible thing to
happen when you put all that work in it and
then it yellows [LAUGHTER]. You want to get a UV
archival type varnish. I get the matte finished because I don't want it to have a shine. You can get this in gloss also. But this is cry lawn
and it came from, I believe the art store. Then these are some
that I had gotten at the hardware store that
I've randomly used. This is Rust-oleum
clear, non yellowing. I like it to say non
yellowing on it. This is Rust-oleum matte finish. I've also gotten Minx
water-based polycrylic, ultrafast drying, crystal-clear. Then I've also tried the
Krylon Kamar varnish, which is acid free, non yellowing, and it was
made for paints and stuff. Now this might have come
from the art store. I don't recall, but that's some of the others that
I've tried and had really good luck at least
putting a finish on the top and you'd want
to use these outside. Take them outside, spray them, let them dry before
because they really stink. if you have any
breathing issues, they'll definitely bother you. Then after you finish them with some type
of finishing spray, then you're ready to
decide how are you going to mount your pieces for
finishing it completely. I take some to the framer
and had them framed some of my first pieces that I was just so thrilled that I got
anything at all that I liked, that I was like, I'm going two frame these
and hanging them up because they're the first
ones [LAUGHTER]. I like it because
they're double matted. There was a frame that I
picked out that I like and they're really
elegant framed. I do encourage you to frame
some of these pieces, even if you don't take them
to the custom framework. Because it really elevates
these little color studies into genuine pieces of art that you're going to
love hanging in your house. I do like custom framing, but that's very expensive. I think these might
have bean $125 in that re for this frame
with two mattes. That's pricey. I
only did it once because they were some
of the first ones I did, and I thought I want to remember
this moment [LAUGHTER]. This is another option. This is a set of little
frames that I got at the Micheal's and it's a
five-by-five frame, and I haven't opened them yet, but this is perfect for
these little pieces. It's double-matted, I
like that double matte. When I open this up, I
can frame these pieces. Just tape that in there. They're ready to go and
something like this, you might spend $10
on, lot cheaper. That's some options for framing. Definitely check out target
Micheal's Hobby Lobby, the framing area for fun frames. When you cut these out. Try to pick a size that you
can easily do something like frame it on a stack frame or
add them to a cradle board. If you use a size that you
can buy the board for, it makes it easier to create
your piece of art than if you're using an unusual
size when you're done. I did purposely do
these at five-by-five. It's a nice size that I
like and I tend to get little compositions that
I love using that size. What I'll do normally for these, I will glue them to the board. You could do that with
matte medium if you want. I have discovered that I love Yes paste for this. Yes paste. This stuff is thick, and so I put it on
with a palette knife, and I just spread the glue on. I put the picture on top. I will use a piece of wax paper, deli paper or
something that's not sticky, parchment paper. You can either smooth
it out with your hands or you might even take a brayer and smooth
it out with a brayer. Then you might, when you do that, squeeze
some glue out the side. so I will just take a baby
wipe when I have squeezed the glue out and just
wipe any glue off. Then I'll let that dry. Then most of the time
your art piece is not perfect to the
size of the board. Generally it's even
nicer if it's a tiny bit bigger and hangs over because then I'll just flip it over. On my cutting mat, I will then take my exact dough knife and I can trim off any edge
that's overhanging. Then I get a perfect fit. Usually, when I'm doing these, cradle boards like this,
they're not finished. I will coat the whole
board just so before I get started and prime the
board and the sides, I'll also generally
paint the sides a color that I've pulled out
of the piece that I like. The sides are painted in something that
complements my art. Then I will glue everything down and then I'll do any
touch-ups that I want. But I do love the Yes paste, but you can also
use other glues, Matte medium, just experiment
with some that you got. I mean, you might even
try Elmer's glue, but some of those
are not going to be acid-free and archival. That's what I like about some of the nicer art glues is there
archival and they'll last for a long time and they
won't yellow your paper or I've never had any
problem with these lifting up if I used
something heavy enough. I do like cradle boards
to finish this with I like some of these little flat boards
just to finish it. They've gotten little
hook on the back and I'll hang around just like
that in my art room. I've got lots of
those that I've done. They come in
different thicknesses and a lot of times I'll paint the sides so that
it's not unfinished. They're ready to
hang that way too. Just some different
ideas for you. I also just have some
of these hanging on a clip on my inspiration boarded sitting right
in-front of me. if I just want to have them up there where I
can look at them, That's how I have those
hanging up there. I love being able to look up
and see pieces that I love inspiring me as I'm creating
hear at my art table. I hope that gives
you a good idea on things that you might consider doing to finish your pieces, at the very least, definitely put a fixative spray on it so that you can then handle them with less
chance of damaging them. I will see you back
in class. [MUSIC]
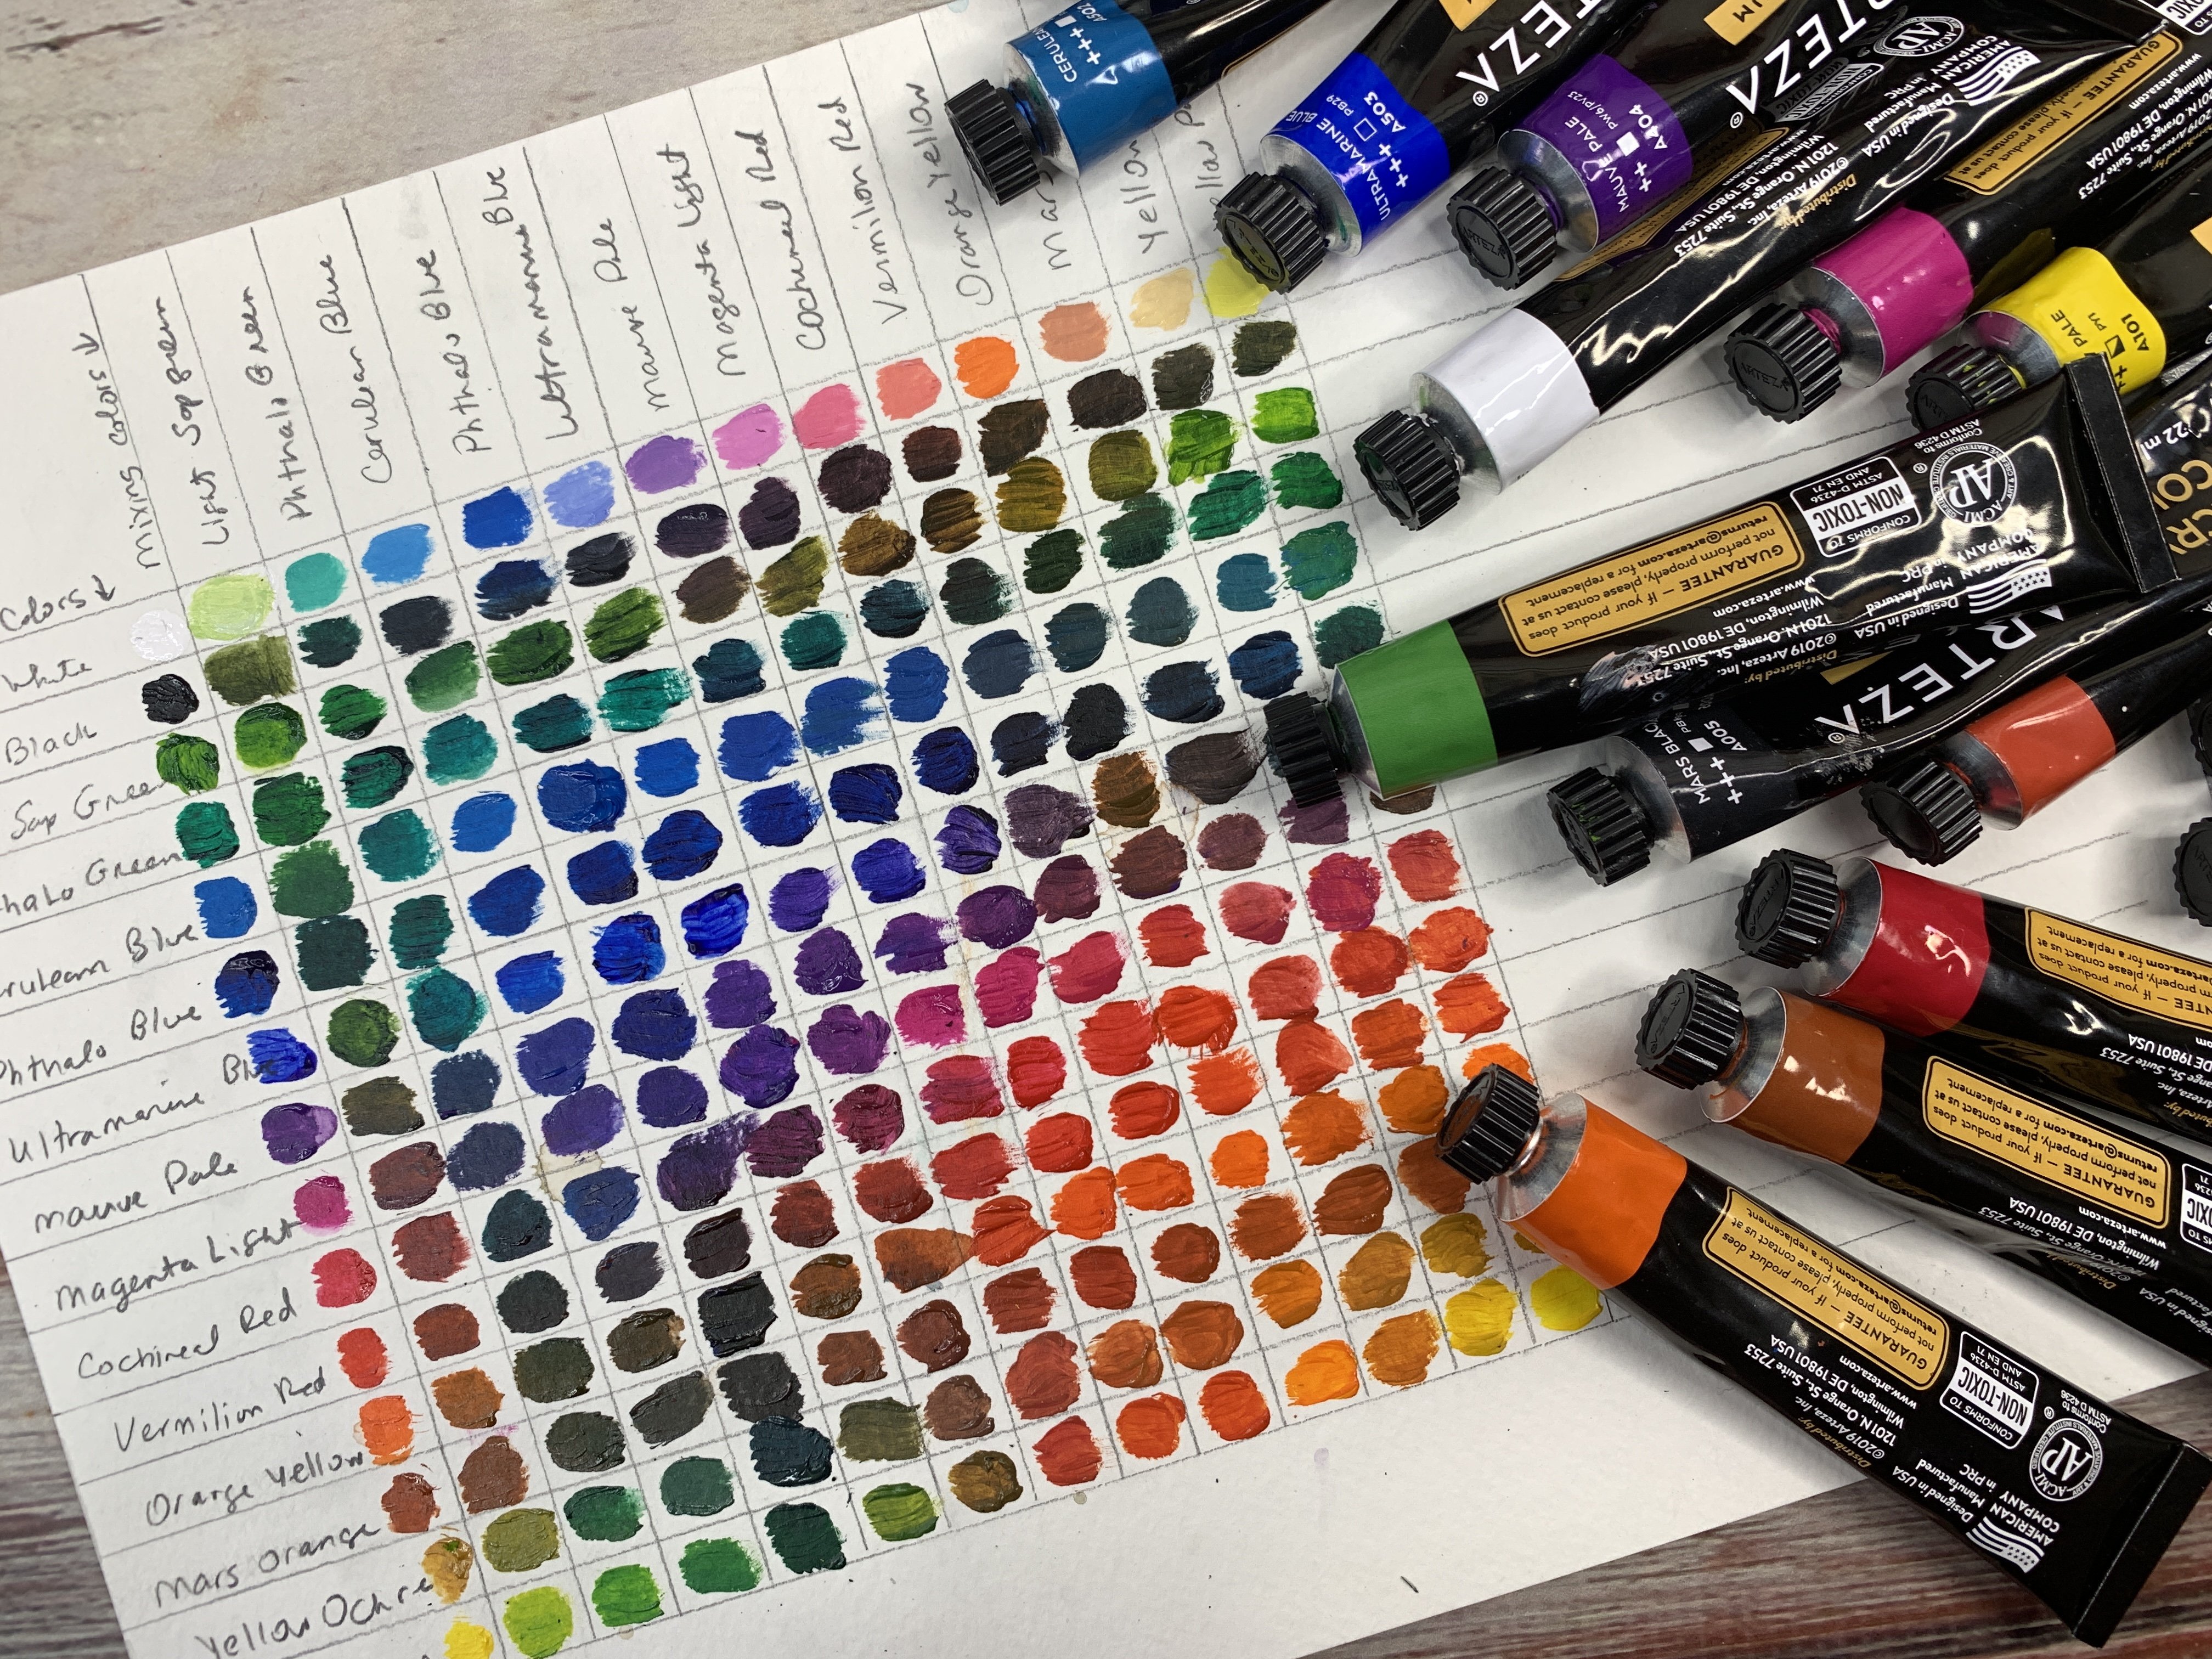
7. Saving our color palette: [MUSIC] While we're
letting our page dry, I want to talk about
one thing I always do, and so I'll probably
show this in every class [LAUGHTER] that I ever make [LAUGHTER] is
I make color palettes. I do this so that later I can refer back to things
that I've made. Like this color
palette here with the pinks and the
ochers and the, I think this is raw umber. That's one of my
favorite color palettes. I love the collection
that came out of that. It's this set here that I have hanging behind me
on my art table. I did this in the
technique of the abstract. One class that I did where I did the whole paper with little pattern everywhere. But I use these
colors and then I put a piece of that
big sheet that was left over on my color palette piece
here. I love this. This is so beautiful to me. I think I could play in this pink and amber color
palette over and over. Because I like it so much, I want to be able to remember
what colors did I use. Even though I don't
write the colors on here, I can get close, like I can pick a
light pink and I can pick a bright pink
and I can pick up an ivory and I can pick
an ocher because I know that's ocher and I can pick
an umber and I can get close. It may not be exact every time, but I don't want
everyone to be exact. I want to experiment, but I want to be able to revisit color palettes that
I fall in love with. I also want to remember color palettes that I
found more difficult. You might date these if you want to keep up with
when you date it, you could put a date on it. You could write what each
of those colors are and the brand if you think you're not going to
remember it or you want to be real
specific for a project, and then I'll know, how did I get to this
finished painting. Like this color palette right
here is actually one that was inspired by this paintbrush. The colors here on the paintbrush and I
thought, oh my goodness, I love the handle of this
paintbrush so much that I want to do a
painting inspired on the handle of that brush
and so that's what I did. I picked out what I thought looked like
this lavender color and this green color and this pink and this kind of burgundy
that's shining under there. I thought that
would be beautiful. Then when I was painting
these, I'm like, I'm not sure if I love this
or not as I was painting it, I was getting a little
disgusted with myself. Then when I finished, I was like, oh my goodness,
I really love this. It was a day or two after I
was done that I was like, okay, wait a minute. I do actually
really loved these. I can actually show that to you. It's this little set here that I did and I didn't like it
when I was painting them. But look how pretty
that little collection is now that it's done. If I hadn't seen that on the paintbrush and experimented
with it and pushed through my mental
reservations about, I'm not liking this
as I've painted. I got to the end and
then cut some out. Now, I love this color palette and I never would
have thought that. I would have got disgusted and stopped right in
the middle of it. Here's some others
that I've done. This one, not one
of my favorites, but it is a fun experiment. Blues and greens. I like playing in the blue-green family
because I like those colors. I love doing this over and over, this neon green and
blue color palette. Man, I love these so much. I have some of these hanging on a gallery wall in my bedroom. I love playing with
color and experimenting. Then I love keeping
track of what that was in a little
color palette book. Usually, to start this off with, I put clear gesso right here on the page because
this is an old book, the stuff will soak in. I don't want to
have all the paint soak into the book pages. I want them to sit on top. Doesn't have to be
real thick just enough to give it a
protective layer. It's like a paint primer. It's priming that. It's going to make it wet
and soak in to the backside, it's going to make
it where I can see what's underneath it. I think that's what's so fun
about using an old book that you got at the thrift store or the antique store for
a couple of dollars. I buy these specifically
to be able to tear them up for collages or to do something
like this where I can then save a more artistic, more enjoyable thing like color palette or
might work in this as my sketchbook or where I'm
doing paintings and stuff. I can play into all kinds
of fun stuff in here, that maybe the white page
do the same thing for me. But if you've just got a
little white sketch book, those are fine too. I've done several on that, but I just don't like
them as much as I do in my little old book. While the other is
drying and before I lose all my little paints here. I'm just going to
take a paintbrush or my finger if I'm using non-toxic paints and just mark a little bit of every
color in here that I've used. Then with the big pages
like I'm painting, I can always end up with a little sample piece to then staple into this book with this. I just want to use
a little bit of every material that I've tried. I haven't used that pink yet. It's questionable as
to whether I will. I might not use that, so I'm not going to put that on here yet. If I use it in my painting, I'll go back and add it to it. I want to do this
while I'm going, or I will forget all
the stuff that I used. I'll even do my mark making in here just to remind myself, I started off with
some mark making. I'll just keep adding
to this as I'm painting while I have what supplies out to put it on there. If you get to the end and
you're like, I forgot that, just open the tip and get a little piece of paint
and mark it on there. It's not like it's a big deal. Just think it's fun to
do it while we're going. Just wanted to remind you to
keep a color palette book. You'll really appreciate
that later as you're going. Then let's get back
to our painting. I've actually been painting some more on our
painting and I've added some more just touches here to my color palette thing. I've already cut out our fun little pieces that we created from this collection. There were a couple of
times that I really questioned that I
make a good choice. Am I going to like these
colors when I'm done? Let me tell you now
that we are done, I am so thrilled with
the way this turned out, but I definitely want to revisit this color palette
over and over. This could be a favorite, it could be a signature
color palette for me. [LAUGHTER] This is one of those times when
it's done and I am so completely thrilled
at what I ended up with that I want to take
these pieces and frame them. I almost want to take these to the custom framer and
let them do their magic because I do like
having things custom framed when I really
love the pieces of art. A lot of times I
love my own art. I don't want to give it
away to somebody else, I spent all this
time creating these. At this point, these
I'm totally in love with and can't wait to do something with them.
They're so beautiful. I also have some little pieces left over like this piece right here is a perfect
representation of these. I want to pick a piece
out usually that I can just add to my page so I can
remember what set that was. Because sometimes just
looking at colors, you might be thinking, a year from now, what was
that? I don't remember. I like putting a
piece on here if it's a scenario where I can do that and I'm just looking at all the little collage
pieces that I ended up with. Even though this is my
very favorite piece, and I could save it
here in my book, I want to not staple this
because maybe I want to use it for something other
than this right here. I think I'm going to use
this piece in the book. All I do is, depending on
how delicate the pages are, I might take a page or two and staple two pages
together for this. I just staple that
right in there. That is my color
palette for today with my sample that very easily lets me remember
what piece I did. This piece I might
use as a bookmark. I just might take this downstairs and stick
it in the book and start using it or use it
as a collage element. This is going to be the
feature on the collage, which probably is what
I will do with that. Because if I'm collaging on
like a five-by-five piece, that's amazing piece
to be the collage, to be the element that I want. That's how I finish
off my yummy page. I do any mark making. I added some little POSCA pen, I added my little charcoal
pencil that we used and I put the piece
that I did in with that so that now I have a
beautiful color palette to work with and I can flip through all the beautiful
color palettes that I've done. Remember how did I get there? What colors did I use? Different experiments
that I did. This is completely
different than a lot of the other things
that I've done so I really love how beautiful
these pieces turned out and how fun my color
palette is here. I hope this really encourages
you to start keeping maybe an old book from the
thrift store and make that be your color palette book and
do something like this. I'll see you back
in class. [MUSIC]
 DENISE LOVE, Artist & Creative Educator