Transcripts
1. Welcome: [MUSIC] Hey, this is
Denise and I want to welcome you to
abstract adventures. This is a series that
I'm doing that is just meant to help you let loose and enjoy your
painting and experiment with your supplies
and just see what it is that you can create
when you just let go of some of those
inhibitions that we have when we sit down
on our paint table. This project I'm
particularly excited about, it's one of my very
favorite ways to do abstract paintings
and I basically start off with a large sheet of just random things
I just let loose. I'm not worried
about composition. I'm not worried about where
I'm laying colors down. I'm not worried about what it's going to look
like when I finish. I'm just throwing paint down, mark-making, having fun
with different supplies, experimenting and
then when I get to the point that I think I can't put anything
else on there, do another mark or do
anything else that I think is going to improve
it or make it different, then I'm going to search out different compositions
and layouts within that bigger piece
to cut out into yummy, delicious, beautiful
abstract pieces. In the project that we're
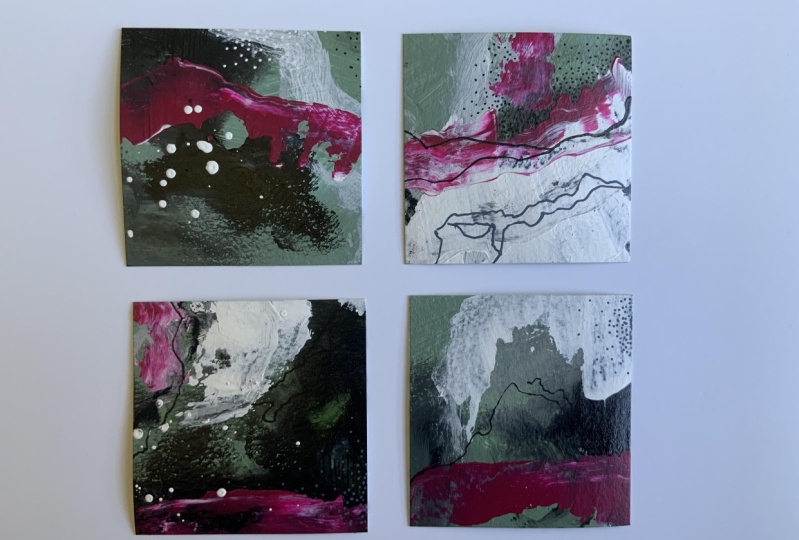
doing in this video, I got all four of these super
beautiful little abstracts. These are five-by-fives. You can get different
sizes depending on what you choose to cut out. You can do larger sizes. You can do the whole paper if you end up liking the
paper when you're done. You could do four-by-fours. You could do any
size that you want, different shapes,
four-by-sixes, six-by-nine. You can do larger
pieces of paper than I chose to do in
this video because I was trying to fit
it all in the frame [LAUGHTER] and then I also have in addition to
the four that I've cut out, I have several micro pieces that I can use as
little micro paintings. I can frame them in a series. I can use these as little
gift tags on gifts. I can use them as
collage pieces. There's just so many uses that the little leftover bits
can be used for that we are definitely using
every square inch of the project that
we create today, which is what makes
me really excited because I get so
frustrated sitting at a table looking at
a white piece of paper and wanting to
come up with something amazing and just not
being able to and this got me out of that rut, got me past seeing the blank
page and worrying about composition and did I get everything on there and do
I like it when I'm done? Because so often, you'll paint something that is intentional and you'll think this is terrible and I hate it. Whereas every time
I have sat down to do one of these cutout abstracts where I cut
little pieces out of it, I have loved every one, has not failed me yet. Even ones that I
questioned the color on, I have loved pieces
that I've gotten. Then a really fun thing that we're going
to do in the class also is create color palettes from whatever we
created that day, so that when we're done, we have a beautiful book of different palettes from
different things that we've painted that we
can refer back to and enjoy using time
and time again. I got lots of fun stuff to
show you in this project. I'm pretty excited about it. I hope you end up loving
it as much as I do. It really is my favorite way to sit and relax and
enjoy and just spread paint on paper and
in the end get something that I've liked every
single time I've done it. I can't wait to show
you what we're doing here and I'll see you
in class. [MUSIC]
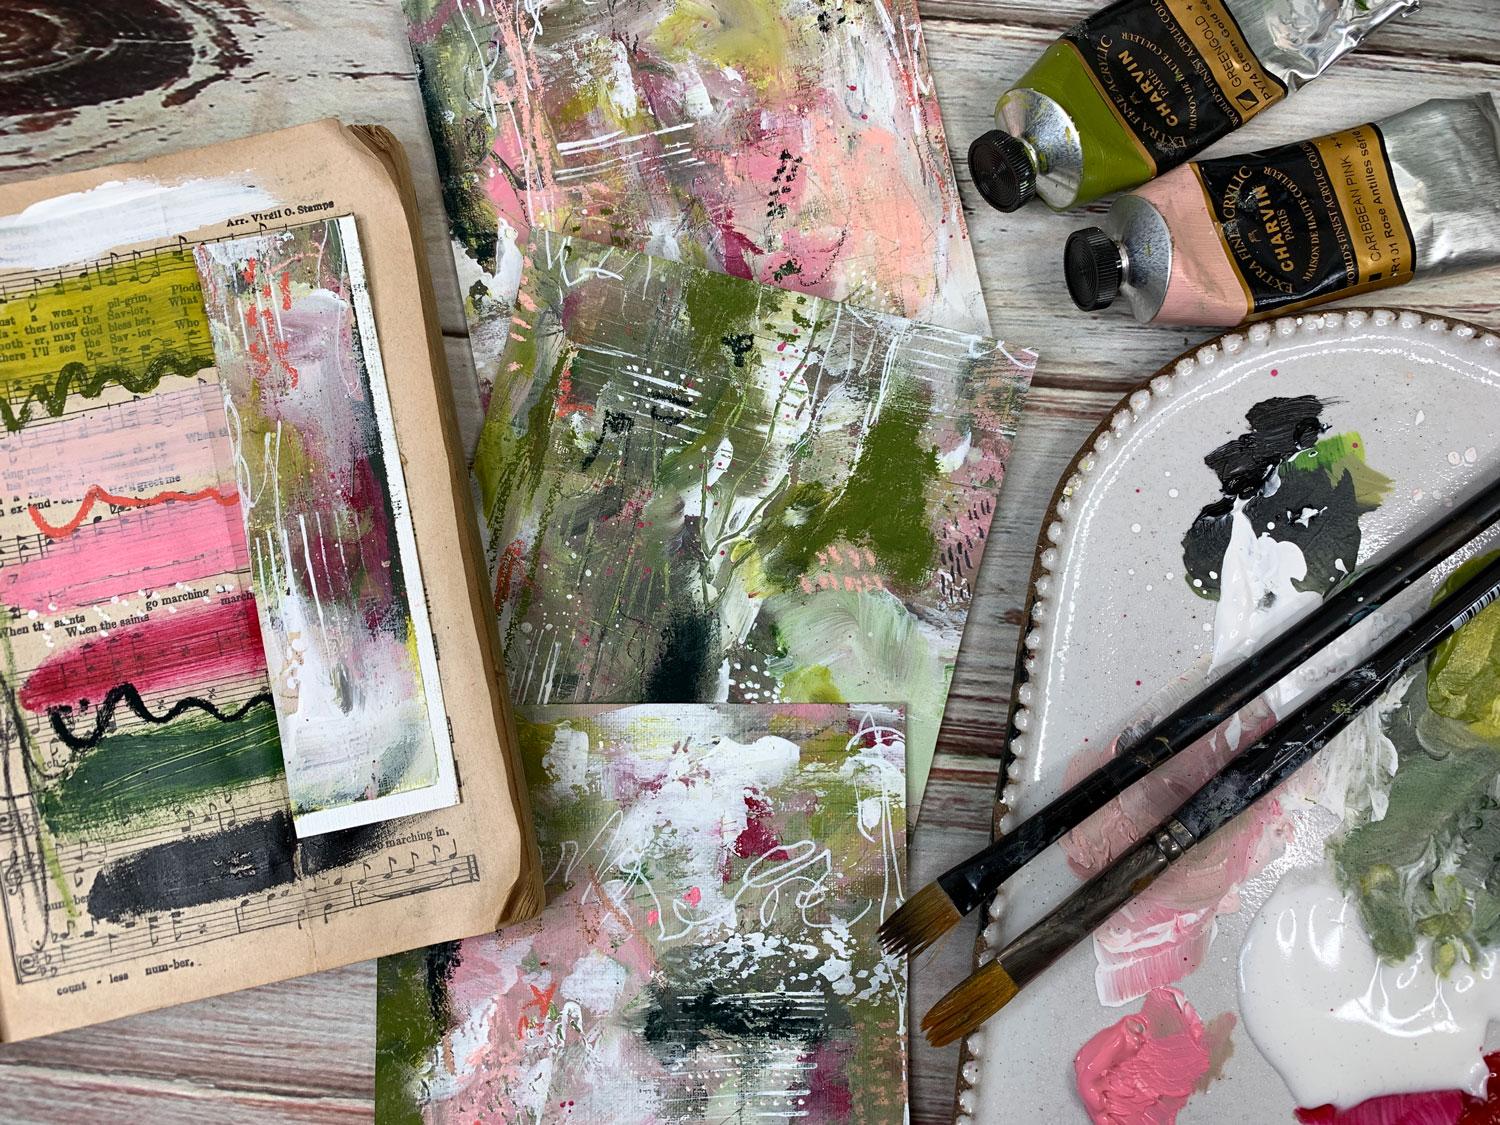
2. Supplies I'll be using: Let's talk about the supplies that I'm using in this workshop. I have decided to go backwards
instead of telling you what I might use and
then doing the project, I did the project and then came back to
tell you what I did use. You'll see my palette
here of paint on it just so that you can get an
idea of what I've been using. This is a ceramic paint palette. You can use a disposable palette if you want but the ceramic
ones I like because, I can just scrape the paint off or go wash it off in the
sink before it's all dry. But I don't like
doing that because, if you're using a toxic paint and you're washing
it off in the sink, then you're washing those
toxins down the sink and you're not
supposed to do that. Generally, what I will
do is let this dry and then I will take a little
paint scraper that I have. I think maybe it's in here. Yes. I will take my
little paint scraper and I will scrape the
paint off of here and then throw the paint away. That's the way to do it. That's the most
environmentally friendly. I like using the ceramic
palette because, it's easy to clean up and I don't have to
throw anything away. You can also use a
disposable paper palette for something like this and then throw that
piece of paper away, either way, but I just
think this is so pretty. There's some fun paint palettes that you can get from
Sylvan Clayworks or Sugarhouse Ceramics and they're both on Instagram. They make fun artist
palettes like this if you think you want
a palette to work on. I like this particular one
because it's a good size and I've got little brush marks
on there to set my brush, but I have paint on here. I just got paint on the brush, but it is nice because I've
got little brush marks that you can set your brush in. I'm using the paint
on the paint palette and just in case
you might like one of those I thought I'd
tell you where I got that. Then of course I'm
using some water. If you're using paints that have toxins in them and
they may be toxic, which some of the acrylic
paint colors can be, especially depending
on the brand and the better quality ones, maybe using the
more pure pigments that are toxic, so be careful. If you're using this Arteza, which is a really nice brand, that's not super expensive and you can get a
whole box of 60 different colors off of Amazon for 60 bucks or if you get
lucky and they're on sale, it'd be 30 bucks, which I actually did get
the whole box for $30, this is a nice grade
to experiment with and you have all the
different colors. If you have paints that you're
not sure if they're toxic or it says on it they're
toxic than wear gloves. I'd have some disposable
gloves handy. I have lots of acrylic paints because even though I told you, try out this one
that you can get all these colors pretty cheap and this is a good
size container. This will last a while. I can paint for a long time on a squeeze at a
time right here. Even though I told you this, sometimes having more
color choices is not good. I'll tell you because I'm one
of those people that thinks I need every color
in every product. Then I get paralyzed because, there's too many choices. Then I'm like, what do I use? What would I like? What color I want to go with? What's my color palette? I don t know, I get stuck. Now I have found it much easier if I just pull out
some of my favorites or pull out a color
palette I want to work in and only work in those and
put everything else away. That's what I'm going
to recommend you do. Pick out your
favorites or pick out some that we're using in class
if you'd like my colors. Or go on Pinterest and
look at color palettes and see if there's a color
palette that you love and go for that color palette. Pick out some of your favorites, and just jump in. The Arteza, I'm going to
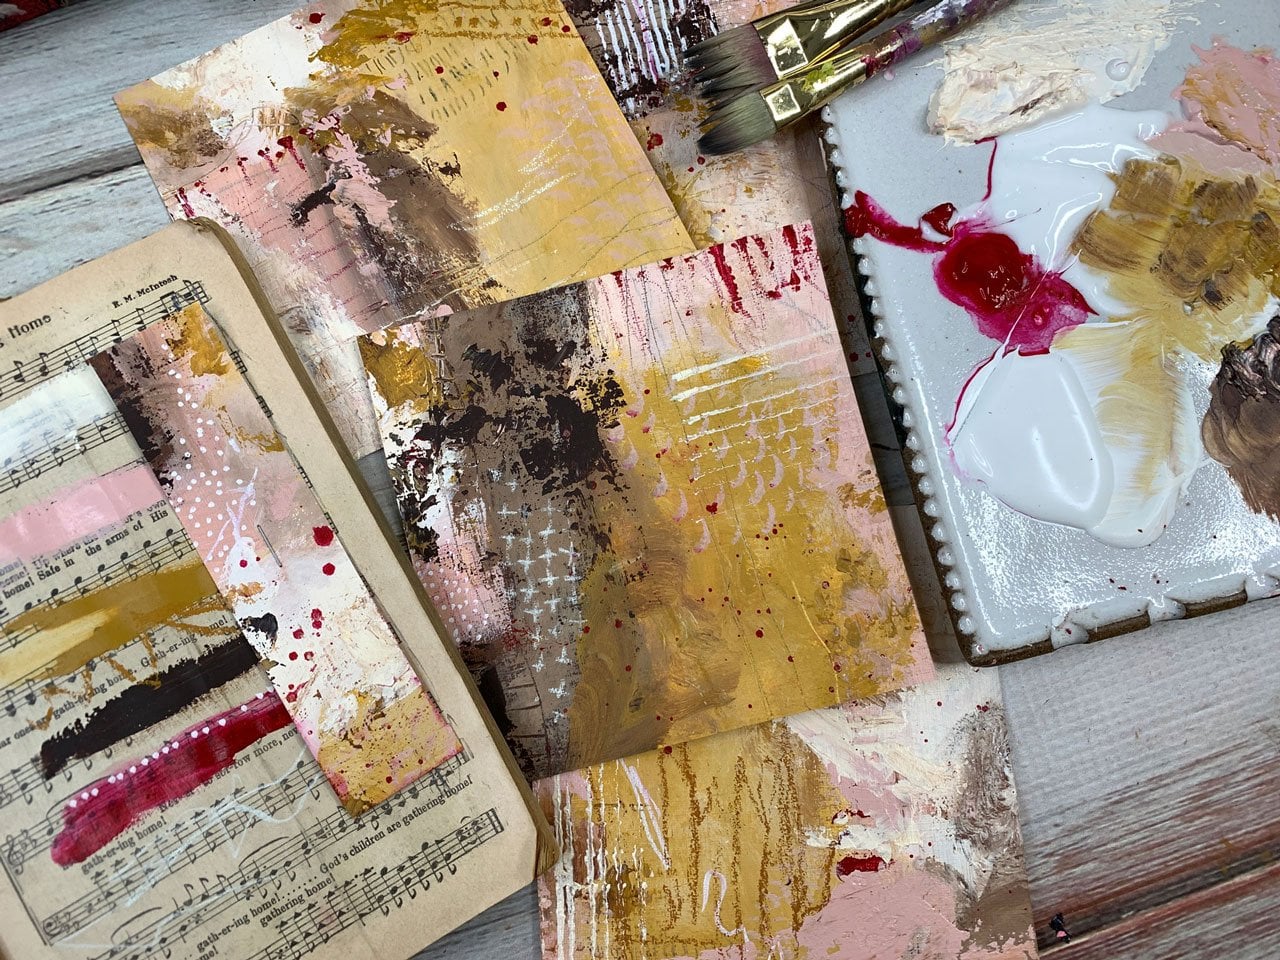
be using some of these. I'm using rose madder. I have Charvin, which I really
loved the Charvins. These are really high-quality. They're not cheap. But I do love them. I've got the Charvin Caribbean
Pink that I used in class. Olive green and green gold, which I particularly love. This olive and pink colorway. I also has some Holbein in a brilliant pink and lamp black, which I will be mixing some in. Then I'm also using
in class gesso, and I'm using some
clear gesso and some white gesso and
it's got tons of uses. It primes our boards. It mixes into our paints so that we can
then put things on top of the acrylic paint that we wouldn't
normally be able to do. The gesso is really important. Let me say just because
this is what I'm using, this project is such that
use whatever you have and experiment before you go out and buy new supplies. I'm just showing you what I used because I'm one of those
people that wants to know what the artist used and maybe I would love
this Caribbean Pink and then I'd know what it is. But by all means, don't feel like
you have to go out and buy any new supplies for this project that
we're doing because, this project really could lend itself to anything
that you have. Any brushes, any mark
making tools, anything. It's really up to you experimenting with your
tools and what you've got. Then we're creating
some beautiful pieces when we're done. I also love my
black STABILO pen. This marks on just
about anything, it's a STABILO pencil. This is black and
I like the black and it is water-soluble, if I wanted to add
water on top of there, I could and it would smear
that around a little bit and I'll show you
that in our project. But I really love
the STABILO pen. If I had to have
some go-to tools, the STABILO pencil and the Posca pencil
are two of my favorite. The Posca pen is a
white paint pen. I really love my
white paint pen. I'm also in this class using
some Neocolor crayons, and even though I have
a whole bunch here out, I only used one or
two of the colors, but I pulled these
possible colors out of the entire set
that I have so that I wasn't overwhelmed looking
at all the available colors. Now, I'm just looking at a few and then I think
I decided to use the black and the green gold. I don't think they
call it green gold, they call it olive clear. But it looks like the green
gold paint that I'm using. I ended up using
those two colors. But I did go ahead and just
pull out a few choices based on the color palette
that I was going with. I also used some
soft chalk pastels. These are Sennelier because, I had gotten a collection
of half pen pastels, which are little half
pieces to experiment with and I love them
so much that I then went and got bigger
pieces at the art store. These are the most expensive
of some of those pastels, I believe the Sennelier. If you want to use
chalk pastels, say in the **** Blick brand or your local art store's brand or different ones
then you try out whichever brand it
is that you've got or want to play with. I'm playing with those because I have them
and I like them. Then I'm also mounting piece on a cradled board to show
you how to do that and you can get cradle
board that's unfinished. You can get them
flat or with a side. You can get them
with a finished top already on it or with
the unfinished top. There are some choices there. You don't have to have those
to finish your pieces. I just happened to have
used one to show you how you might finish it
if you were interested. Then in the finishing video, I'll also show you some
fixative sprays on how you can finish your
piece when you're done. I do like the Sennelier
soft pastel fixative spray if I'm using soft
pastels on my piece. Then other than that, we use some type of
archival finishing spray. Let me grab it. Some type of archival finishing spray to
finish the piece. If I'm not matting it and framing it under
a piece of glass. You can find the finishing
sprays at the art store and you can find some of
them at the hardware store. You just want to
make sure if you get any from the hardware
store that they are archival non yellowing
type finishing spray. I like it in the matte
or satin finish, I don't like it in
the shiny finished personally just happens
to be my choice. You pick what you think is
going to work best for you. That's basically what
I was using in class. I did use some
various paint brushes and this rubbery paintbrush, which there's a couple of
different brands of those. There's this catalyst and
this one is master's touch. You can get those
in different sizes. I used this one during class just because I thought
let's play with that. I also used a palette knife
to finish my piece off when I was putting
glue on my panel. But I also used
this to paint with so a little variety of
palette knives would be good to have if you've
got some of those. I have a lead pencil. This is just like a
regular writing pencil where you click the lead
out in mechanical pencil, I used that for mark-making. I love that. You can also use any
mark-making thing that you can come up with if you've got some of
these little brushes, these comb looking
in, those are fun. You could use a wood skewer
from the grocery store. You're going to make
a skewer for dinner of sticking onions and stuff. Those come from
the grocery store, so you can use those
to make marks. All kinds of things
to make marks. You can be real creative there
in your experimentation, but that's basically
the supplies that I was using in the class
we're about to do. I hope you love it, the pieces that I ended
up with are here. I have a variety of pieces
that we ended up creating. As I'm painting, I'm always doubtful that
I'm going to get anything I like but with this technique, it never fails me. One hundred percent of the time, I like something
that I end up with and today is no different. I ended up with four
pieces here that I love and four smaller
pieces that can be framed as little
micro pieces of art, or can be used in a collage, or could be used as tags if
I want to put it on a gift. Lots of different options there, but I'm thrilled with
what I ended up with, even though as I'm painting
every single time I think, I don't think I'm going to
get anything this time. Every single time I get
something I love because, this method is fantastic. Even if you've never
painted before I think with the abandonment and the
freedom that you give yourself just to
play and create, that when you're done, I
think you're going to end up with something that
you really love too. I can't wait to
see some of those. That's basically all the tools that I use but I encourage you, you don't have to buy new
stuff to do this project, experiment with what you
have and then add pieces as you figure out what
you'd like to try out. I can't wait to see what
you create in this class. Let's get started.
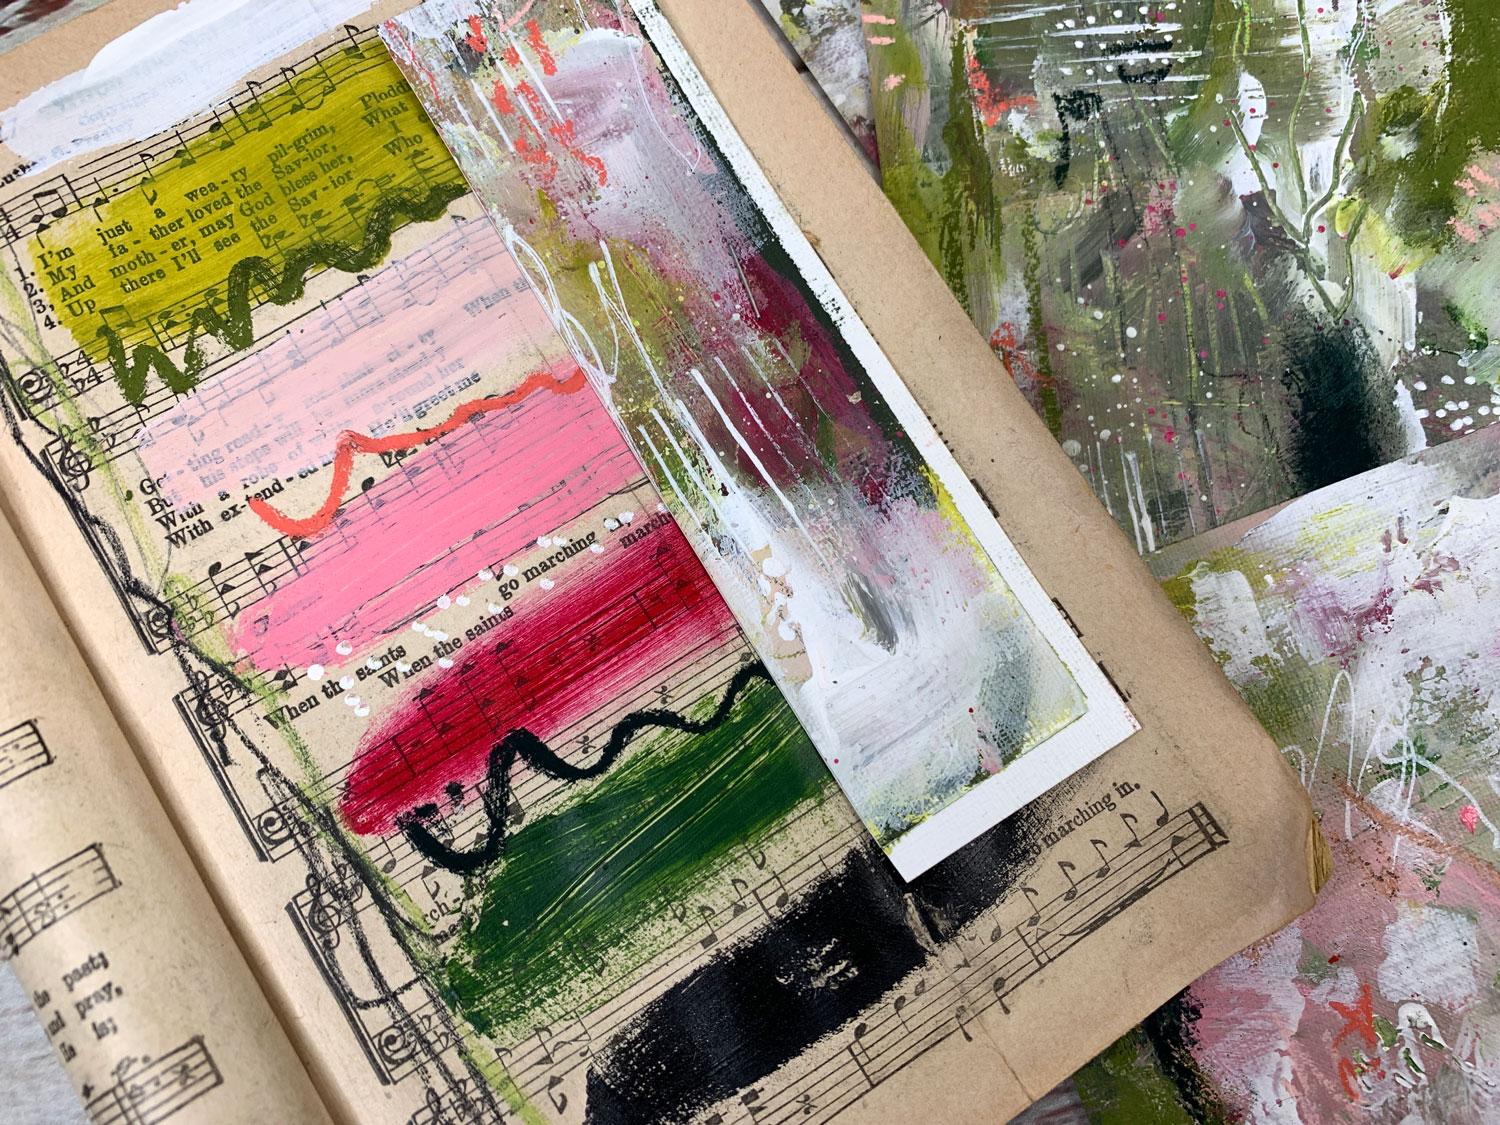
3. Project - Getting started: In this project, we are going to do
something that is my very favorite way to
make little abstracts. Basically, what I do is I create one big mess here on the
paper that I have taped down. Then when we're all done, we're going to search out little compositions that we
love out of the big piece. What I really like about doing abstract art this
way is it's freeing. You're not committing
yourself to a composition. You're not trying
to think of how things are placed on the paper. You're not getting paralyzed by a blank paper, for instance, because I know a lot of times
I'll sit there and look at a blank piece of paper and
I'll just feel paralyzed, like where do you start
and how did you get going, and what if you don't make a masterpiece when you're done? I find that by doing some
abstract art in this way, I eliminate all those
barriers for myself. I'm not trying to create
something amazing. If I get something that
turns out in the end, I'm pretty happy about it. But I got to tell you just to
show you some pieces that I have hanging up above my art table here that
I've done before, this really has turned into my very most favorite way
to create abstract art. Every single time I use it to experiment with supplies,
with different materials, with different tools
that I've gotten. Then when I'm done, I love something out of
every thing that I create. Whether I like it to
begin with or not or I like the overall
big piece of paper doesn't really matter
because when I'm done, I'm picking out
little compositions within the big
piece that I love. This to me is the easiest
way to get started. It helps me experiment with all the tools that I've gotten. For a year or two, I had a SketchBox subscription. So I have several boxes of just supplies that
I've never even tried. This is the perfect
time to experiment with those supplies and
figure out what do they do. To get started, I just taped
down a big piece of paper. This is an 11 by 14. To be honest, I actually usually like even a bigger
piece than this. The biggest piece you
can get if you have, the great, big one is great. But for filming-wise, I want you to be able
to see what I'm doing. This is watercolor paper. I like the 11 by 14, I like hot press or cold press because either one of them, they both have a
different texture. The hot press is pretty smooth. The cold press has a texture. Then the one I'm
using today is not a watercolor paper, it's an oil and acrylic
paper, 136 pound. I like the 136 pound or the
140 pound watercolor paper. This one has a tiny bit of
a canvas texture on it, and this is the perfect way also to experiment with
papers to see, do you like this texture? Would you rather be smooth? Do you want that little bumpy
watercolor texture instead? Do you like this white paper? Do you want something heavier? I mean, this is the
perfect time to experiment with all the
papers and the supplies, and then we'll cut
out some pieces at the end that we love. I guarantee that
you're just going to love this technique
as much as I do. Usually, to begin, I
start with some type of pencil, graphite,
charcoal pencil. I like these Stabilo
mark all pencils. This is black, comes
in a couple of colors. Then the neo color, too, crayons I love, and I'm just going to start
drawing on the paper. When we're all done, we
may not see the scribble, but it's the way you
can easily get started. You can clear your mind at that blank paper paralysis that some of us get me
and switch hands. I don't want them to be
uniform shapes or anything, I want them to be
really just all over. Maybe at the end will see
it and maybe we won't. What I really like
about the Stabilo and even the neo color, either one because I'm
going to get a similar, maybe slightly
different texture, but they're water-soluble. If I get a paintbrush
with some water on it, I can start pushing around
some of that color on here, and each of these will push
around slightly different. The neo color is this
one I've done all over. The Stabilo you'll see the
mark that I just did is darker and a little more vivid when I push that around. So play with even
different supplies in the same color
because if you do something like this where
you're pushing it around with water or pushing
it around with gesso, they'll come out a
little different depending on which material
it was that you were using. This is exactly the way
that I like to start, just get the paper
dirty, just get started. Then you might wear
gloves if you're working with different paints and
stuff that could be toxic. If you're working with some of the acrylic paints
like the Arteza, they say not toxic on
most of these, nontoxic. If I want to play in my
paints with my fingers, I can feel pretty good
about doing that. I've picked out a color
palette today because I find it easier if you'll just start off with a limited
number of colors. No matter how many different
materials that you're using, whether it be pencils, or
crayons, acrylic paint. I love Posca pens. But no matter how
many different types of supplies I'm using, I still want to have
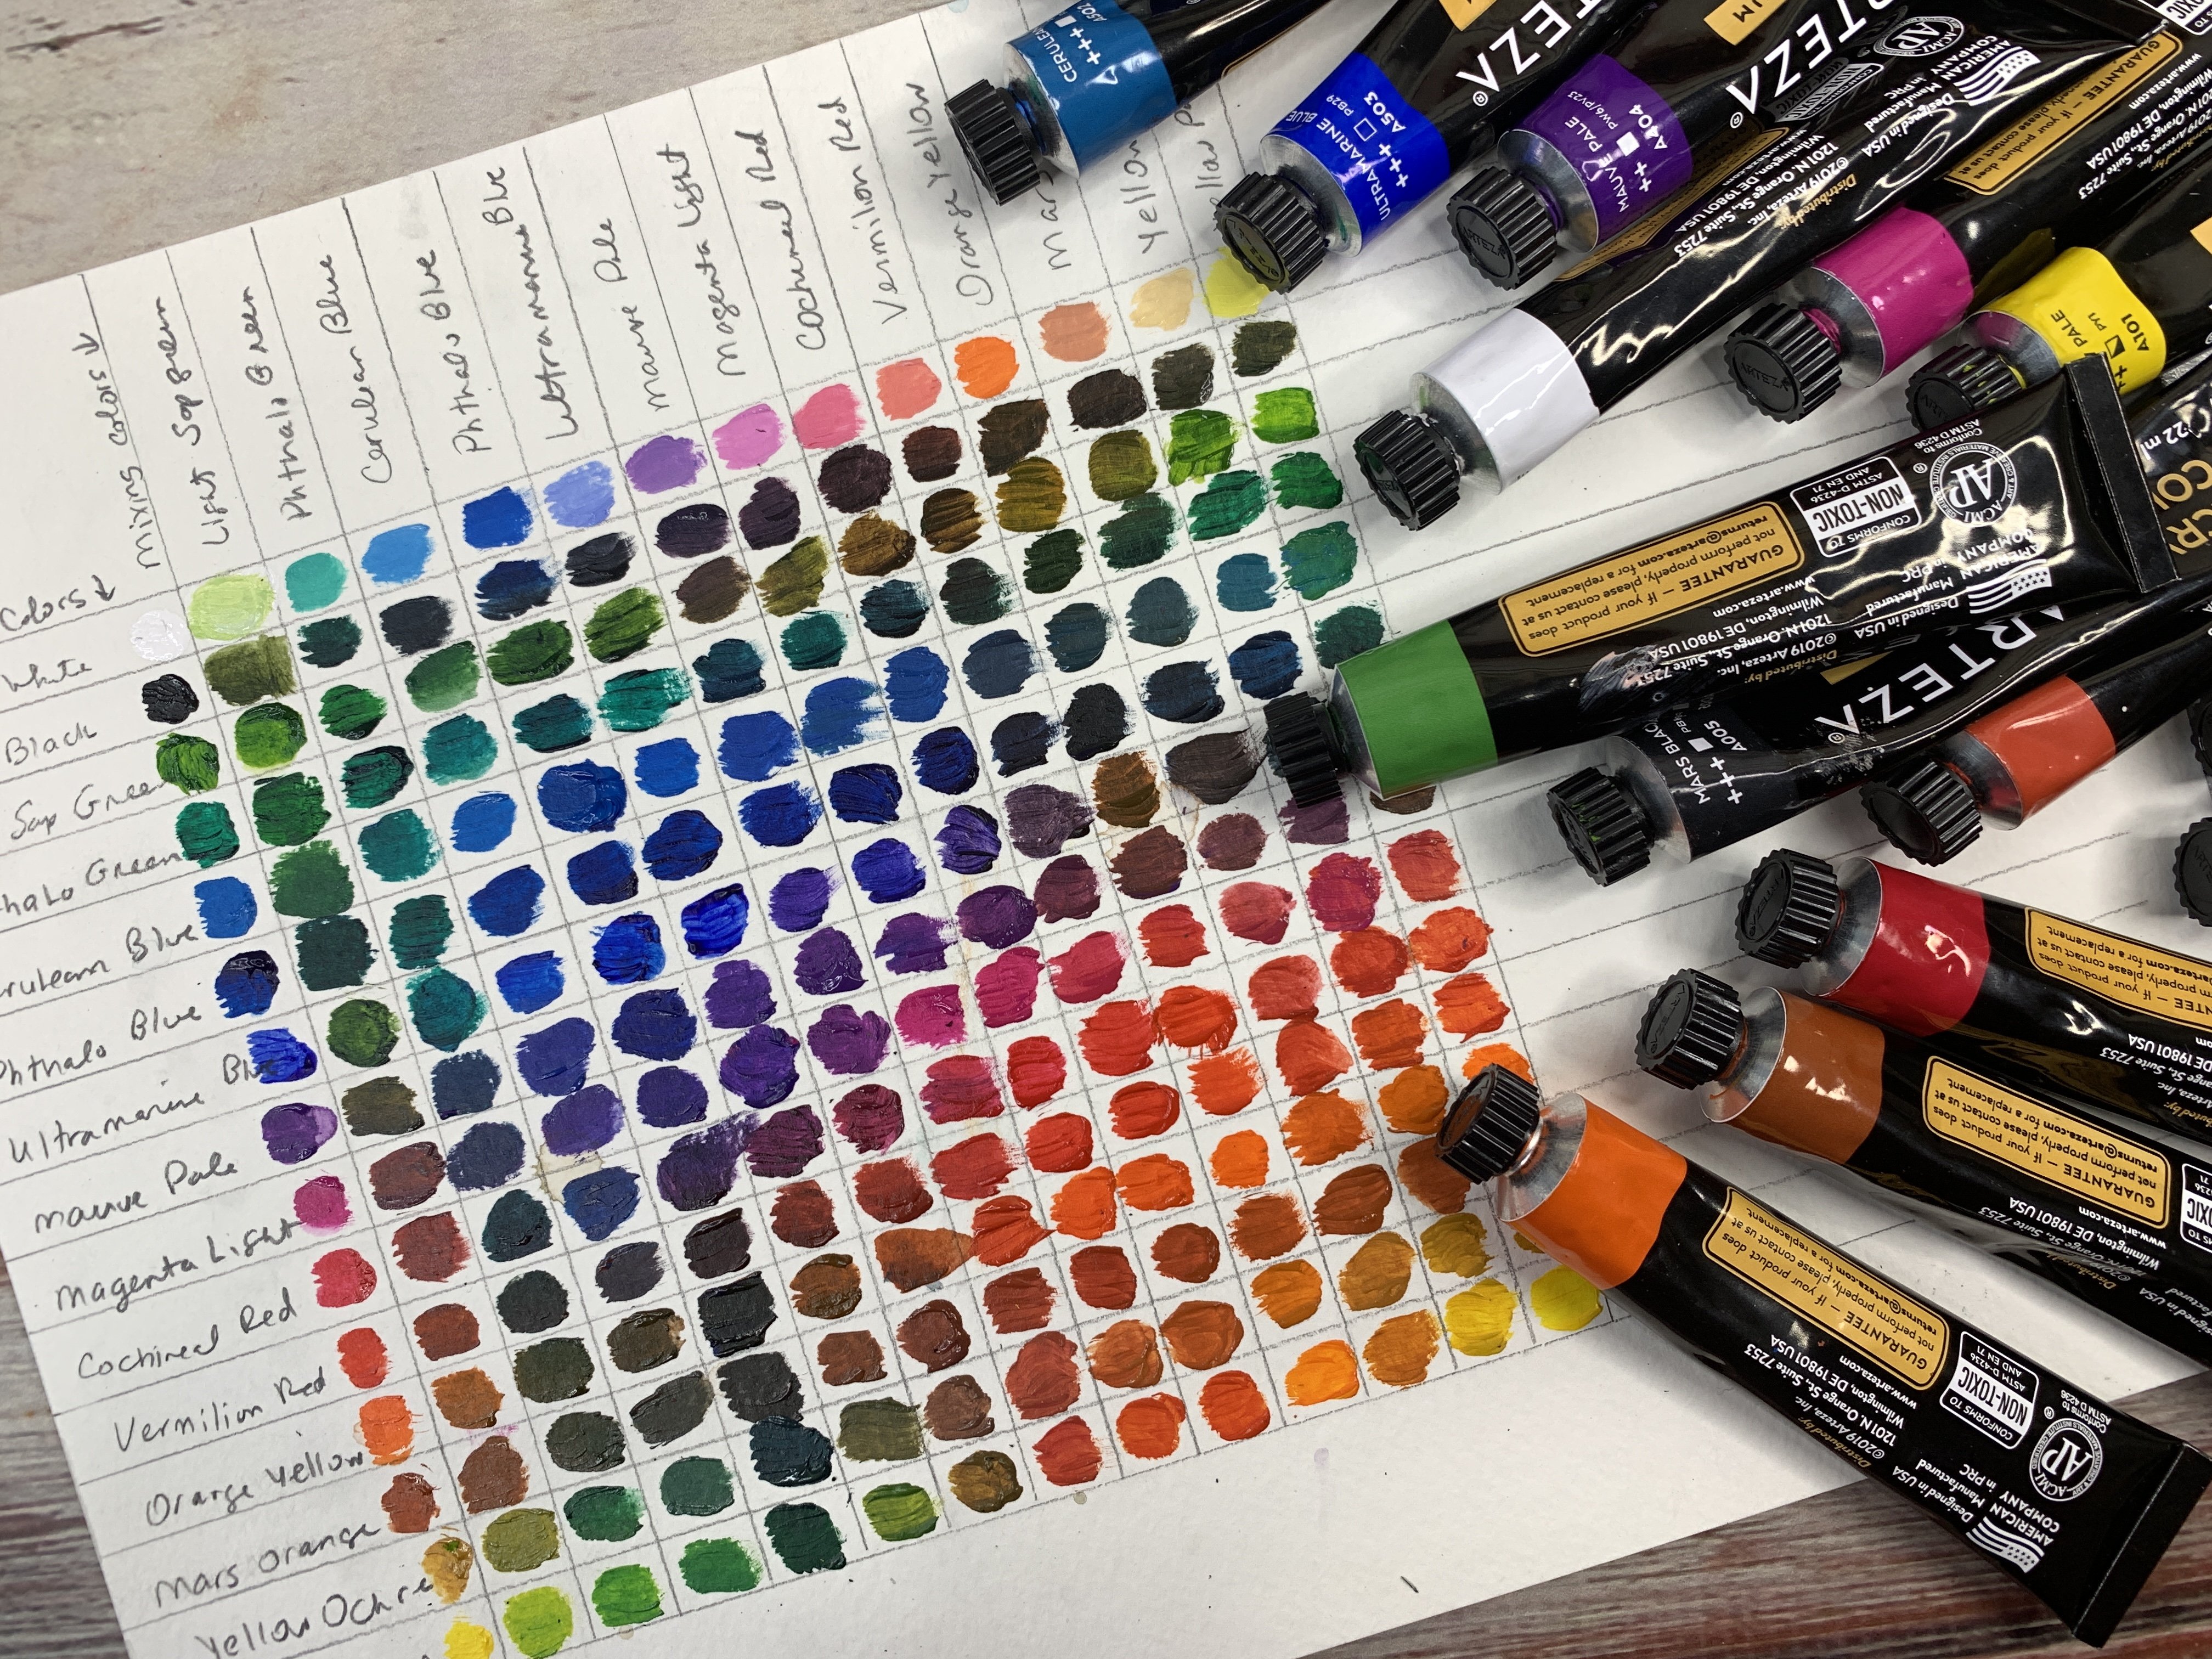
them in a color palette. Just to show you my inspiration
for this color palette, here is a piece that
I did quite a while back and I had it
framed and hangs up on the wall here
in my art room. I really love the army green, moss green color there and
this pink and the white. It really, really appeals to me. This is one of my favorite set. I have a set of three
of these that I did in different colorways, but this one just always
draws me back to it. I'm pulling my color
inspiration from this piece that I have
done quite awhile back. Keeping that in mind, I have pulled a black and
I'm using the Arteza, this pretty rose madder. This is lamp black. I have several
blacks, but I'm using this one because it's the one
that happened to pull out. It's not specific, there's not some specific
reason I did that. I'm also using the
Holbein brilliant pink because it just happens
to be a brighter pink. That's pretty. I'm using
the Charvin olive green, the Charvin green gold which you can tell one of my favorites. You can see how much
I'm using there, and the Charvin Caribbean pink. Now, don't feel like you
need to go out and buy all the colors that you see somebody using in a
project like this. I want you to
experiment and play with the art materials
that you have. Pick a colorway that
appeals to you. I like to look on Pinterest
for different colorways when I'm getting started to see, are any of them appealing? Is there something I might
want to experiment with? This is several different grades of acrylic paints
that I'm playing in. These are nicer artist
paints, and so they'll be more expensive and they're
heavier in their pigment. These Arteza are very nice. They're better than
student grade, but I wouldn't say quite
up to the Charvin quality. But what I like about these is you get a whole box of them of 60 colors for 60 bucks or something crazy
like that on Amazon. You then get tons and tons
of colors in this size tube, which is a really
nice size tube. You can do a lot of
painting with this size, and you get all the colors
to experiment with. While I've gotten into the trap of wanting all the colors with
all the supplies, I do find that having too
many choices is overwhelming. That's why here
at the beginning, I like to limit my
color choices and just pick a color
palette and go with it. You might not like it when
you're done and that's okay, you can just paint over
it because really, how are you going
to know unless you try and experiment with it? Then sometimes you can
get these Artezas on Amazon for $30 for
that whole box of 60, which I did manage to get around the holidays because
sometimes they run it on sale and if
you ever see that, definitely grab it
just to have these as some supplemental colors if you wanted some other
things to play with. This is the color
palette I've picked. If I use any of the
little neo colors, I have pulled those out in
those same type colorways. I really love green gold. You might just pick
some colors that you really love to start with, and when you're going to
purchase some acrylic paints, if you want to go with
the better quality, pick a few colors that you love. You don't need them all.
That's a good way to start. I'm going to go ahead and just put some of these
out here on my palette. This is a ceramic palette. There's a couple of good ceramic companies that you can
get ceramic palettes from. I've gotten some from Sylvan Clayworks and
Sugarhouse Company. What I like about them, this is the Sylvan Clayworks and this is the Sugarhouse Company, and they have
different finishes. Out of the two
different finishes, which I like both of
them quite a bit, they're really well-made and they're really pretty
for doing a demo like this, but I do prefer this
Sylvan Clayworks one because the paint cleans
off of it a little easier. So I do love that. To clean paint off of these, if you do it right
when you're done, you can wash it off with water. Otherwise, you'll take a
little scraper if you let it dry a day and you can just
scrape the paint off. If you let it dry too long, which I did on this one
before I got started, I let it dry for
several weeks before I came back to using it, then you can just soak it
in water for a little bit and the acrylic paint
will lift back off, and then you can
just wipe it off. I do really love using these little ceramic
palettes because they're beautiful and they're
eco-friendly. You're not throwing
away paper and stuff every time you're
using your paints. But you can use disposable
palette paper, too. Either way. I'm just getting started
here with a little bit of paint of each of the
colors that I've chosen. Then I can always add
some more paint to it, and I don't usually want to have like a gigantic glob when I start because I don't
want to waste it. I'm going to be mixing
color and stuff, and I don't want to
waste it completely. Then I'm also going
to be using gesso. So I'm using acrylic paint, and then I'm going to be
adding gesso into it. Acrylic paint is
basically plastic. So if you want to put stuff that was white,
this is clear. I like using white and clear. I use it in my mixing. That's what I'm going to reason. The acrylic paint is very shiny, it's very plasticky, and then if you want to put
more layers on top of it, if you're just using
acrylic paint itself, it's very difficult
to then layer more stuff on top of it because
things don't stick to it. Usually, when I'm painting layers of acrylic paint on here, after I've scribbled on my page, I will mix in some
gesso to that mixture. If I want to make it lighter, sometimes I use the white
gesso as my white paint because it's less expensive than using
the acrylic paint, but you can use the
acrylic paint, too. But I use the white as my white paint and
as a mixture added into the colors I'm mixing and the clear I
like using it too, and it makes it gritty where you can layer
things on top of it. Then another benefit, too, is I don't necessarily
like it to be shiny. I like matte things. I like it to be that matte
look where it's not all shiny and you can see on these, they're not shiny at
all. I love that. That's my favorite look,. So if I want to add
shine at the end, maybe I can finish
it with a lacquer or a finishing spray
that's got shine in it. But for the paint part itself, I like it not to have shine. To be able to layer
things on top, I need to have that
grit in there so that other stuff
will stick to it. At this point, I might use a
great big cheap paintbrush, maybe two of them, depending on how many colors
I've got going. I've got several
paintbrushes here. This is like a $3
paintbrush from Michael's. It's not expensive. This one actually has
some glue stuck in it. So maybe I'll pick another one. But I beat these up, so
I have several of them. I've got some water over here to the side just to
soften those up. I also have over
here some shop rags, which you can use
shop rags or towels. I like these because
they don't have the paper towel texture on them and they're real thick,
and they're heavy, and they stand up good to different art things
that I want to do. I'm going to have one of
these to the side because I might need to use
it for something. I also have a spray bottle
back here if you want to spray things and let them drip
and stuff, so that's fun. I'm just going to start
laying stuff in here. I'm going to start off
with this green gold, just mixing it here
with my gesso. I may have to put
more on my palette, but I'm going to start there. At this point, I'm not thinking of composition, I'm not thinking of where I'm
going with this in the end. My goal here is simply to
lay paint on my paper. Then as we build up the layers, because this is one
of those things where I'm going to layer on top of here with several
different materials possibly, then I'll start thinking
about other colors and I like the way
I've laid those down. Maybe I'll put some
of this darker green. You can see I'm not even changing my paintbrush
on some of these. Now if I change over to the other colorway,
the pinks here, then I'll probably use this other paintbrush
that's in my hand. I'm just mixing here
on the palette, and there's no rhyme and reason to what I'm doing other than, do I like this color
I'm putting down? This is the perfect way
to really experiment with colors, and mark-making,
and materials. When you're all
done, if you like the great big composition
that you created, then you can keep
it just like it is. You don't have to cut it
up like I'm going to do. But boy, I like cutting them up. It's like my favorite part. I like it with this, that I'm not having
to overthink it. I'm not having to worry about where am I
putting this down. Do I like it? Does it making a
good composition? I've already ruined it. You can get your
fingers in there, too, as you're going
and if you think, I want more of this over here. I don't like necessarily the texture it's
creating with the brush. If you're using the
nontoxic colors, then go ahead and put your
fingers in there if you want. Then I also have other
tools besides paintbrushes, like some of these
catalyst wedges things, and we could use that to create some other texture and
marks in our piece if we're not completely happy with where the paintbrush
thing is going. Another thing I like about
this, too, is if you drag it, you really get some
interesting texture in here that you're not going to get any other way and the
paper is going to buckle, like it started to raise
up a little bit here. I don't care about that
because as this dries, it will flatten itself back
out and we will be good. The thicker your paper is, the less likely it is to
do any of this buckling. I'm going to switch
paintbrushes here for the pink and just go ahead. My Charvin Caribbean pink
here is getting thick, so I may need to
replace that tube of paint because I don't want
it to be really gloppy, but it's my favorite color. I might just have
to order a new tube of that, but it's
going down okay. Again, I'm just mixing that with the white gesso
right there so that that paint has a lot of grit. Since this is my first
layer that I'm laying down, I want to be able to
paint on top of this. Because I'm laying it down with the green
paint still wet, it's really blending in
that pink quite a bit. It's meshing it into that color, blending those colors, maybe
even more so than I like. If you're starting to mix
color and you're thinking, I don't like that
it's mixing with the other color
that I've put down, let that dry in
between your layers. You don't have to immediately
go from layer to layer. I could have stopped, let that dry for a few minutes, gone to take a little break. Maybe got something to drink and I could have come back to it. Then when I started laying
color on top of it, they would not have
blended in to that point. Again, I'm not thinking of any specific composition
at this point. I'm just getting color down. In the end, I'm
going to definitely take it around and see, do I like a specific area? Another really good
thing about doing that is you then start
to develop your eye for compositions that
you like because even though at
this point I'm not thinking of any
composition at all. In the end, when I go
back and start searching for something that I
like that I can cut out, I'm going to want some
kind of composition there. So this is a really nice way to build up your own
little library of pieces of compositions
that you like. Then where you go to
create a bigger piece, if we wanted something
bigger but like this, I could then focus on
different areas and where I have put stuff
and drawn things and added more things to,
and I could use that as my guide for a composition
that I might like. I want there to be a
nice mix of lights, and darks, maybe a pop of color. When you're looking at your color wheel
and you're thinking what colors do I want, you might have some stick on one side of the color wheel like the blues and the greens, but then have a pop of orange, or the reds, and the
yellows, and the pinks, but then have a pop of something from the other side in there. I do like to use the color wheel quite often in experimenting with my different
compositions and colors and things when
I'm picking a palette. Let me clean off one
of these paintbrushes. Maybe I'll go back
to the green here. I want some more of that. The name here of
the game is layer. We want layers to add interest, so I'm just going to continue to layer up some of the acrylic before I move on to some other materials
that I want to play in. Those materials could be I could draw on top of this
with the neo color crayon. I could draw on top of this
with the Stabilo pencil. I could draw on top of
it with a lead pencil. I could use my white Posca pen for some little white spots. I'm just trying to get as much texture and color and interest
down before I start then really defining some
of those elements that I like and want to then emphasize. This is a good point, too, to stop for a second
and maybe use a pencil or something
with a sharp point and start making some marks in here while this is still wet. You don't want to do all your marks when
it's completely dry. I want to dig down
into this paint. So I'm going to set
these paintbrushes just aside for a second and
start making some marks. It's really nice if you could
maybe do some of that with your non-dominant hand
because they are less likely to be completely uniform. They're going to be a
little bit more organic I think if you use
the hand that you don't normally draw with. This is why I keep a
little towel handy so I can wipe off the different
things I'm using. I'm doing some nice
long lines right here, but we could also do
different shapes. I could do little hatch marks. I'm just digging
through that top layer. This works best when you have a couple of layers,
and then you can dig through the top
layer for stuff. Maybe I want to make this into maybe a ladder shape because sometimes I like
that ladder look. Maybe I want to do some circles. Maybe I want to do some
little cross-hatches. Those would be fun over here. You'll notice that
at this point, I'm still not thinking
of composition. I'm not thinking of where
I'm putting things. I'm being very random about it. Because these will be little
elements that are like little surprises on our final
piece when we get to it. I did a piece one time where my little random circle
of things like this ended up looking like
an abstract flower on the composition that
I pulled out of it. I love that. I love that. I'm going to go back
with my paintbrush. Some of these layers are
really starting to dry now. So I can then come on top of those without it picking up
that color underneath it. So that might be fun. Every time I do one of these, I get something completely different than I
ever got before. So even though I'm using the same colorway that I
may have picked before, what I end up with is
going to look nothing like what I got the
last time I did it. I love that these are so organic and almost serendipitous in what you end up getting. It's part of the fun of it. It's like a little
present at the end. Like, oh, what did I get? You could use a smaller paintbrush to
do some of this, too, because a big paintbrush on the whole thing
might be too much of something somewhere where
if you used a little brush, you might end up with something that you like a little better. Let's get some more of this. This is the olive green
I'm putting down there, mixing it with a little bit of black and a little bit of gesso. That's the white gesso. I could have mixed it with
the clear gesso if I wanted, and got that a little darker, because the white is
going to lighten it. Another thing that you can
mix acrylic paint with, especially if you
like working in this way where the
paint is not so thick, because it does make the paint a little more translucent
with some layers there. I'm going to put some more
of this green gold down. What you can do, too, is
play with the matte mediums. You can use matte medium
to mix it with it. But the matte medium
is acrylic also, and it's not giving it any grit. So if you're using
the matte medium just to create a matte look, it's not going to
give you the grit to layer things on top of it. So keep that in mind. We've got quite a bit
of paint on this now. So I think what I'm
going to do is let this dry a little bit so
that I can then start coming back on top of it with
some of my other supplies. I've got the Stabilo pen, and I can start drawing on
here with the Stabilo pencil, it's a marks all, and I
can get some good looks. But if I wait until it's dry, then it's less likely to blend in or move the paint around. If I wanted to move
the paint around, I do it when it's wet. If I want to have some areas where it's not digging
into the paint so much, wait till it's a little bit dry, and then you can start
doing other marks on top. I'm just going to actually, while I'm doing it wet, and this is okay. I'm going to go ahead
and do it actually, now that I've got
started since I'm going. Then vary your marks up. Don't make them all the same. Let them be a little
different here and there. So maybe some hatches
like I'm doing now. Because it's still wet, I'm trying to keep my
hand up off the paint. Then when we cut our little
compositions out of this, we would then maybe even again add a few more marks or colors, depending on what
we decide we need. So I could go back on
here with my Stabilo. This is the neo color, too. I would, if you'll notice that doesn't really show
up at the moment. I'm moving paint around. I really would like this
to be a little more vivid, or I might even use a
different material. I'm going to let this
dry for a second, and then we'll come back and
add some more on top of it.
4. Project - Adding paint and marks: As I'm sitting here
and looking at this while it's drying and
thinking about it, I think I want to
come in here and add some layers of
white because I almost feel like I don't have
enough contrast in some of these areas or enough lightness or something that I
think I might like. Because just to
give you an idea, this is one of the things
that I have created out of just some watercolor
paper strips to make a window of what I
might like to cut out. This is how I view it around, I'm going to call
this a viewfinder. This is what I use as I'm going and thinking about
stuff and moving it around, thinking, is there anything in here I think I'm going to like? This is what I use at the end to actually cut these out. Here's another example that
I've done in the past. I've mounted these on little
boards to hang on the wall. But I'm going to move some color around because
I feel like I've made it all too choppy and
not enough rest space in-between some of this, I guess maybe you could say. These are some bigger areas almost of color that
I've laid down. So I'm going to go through
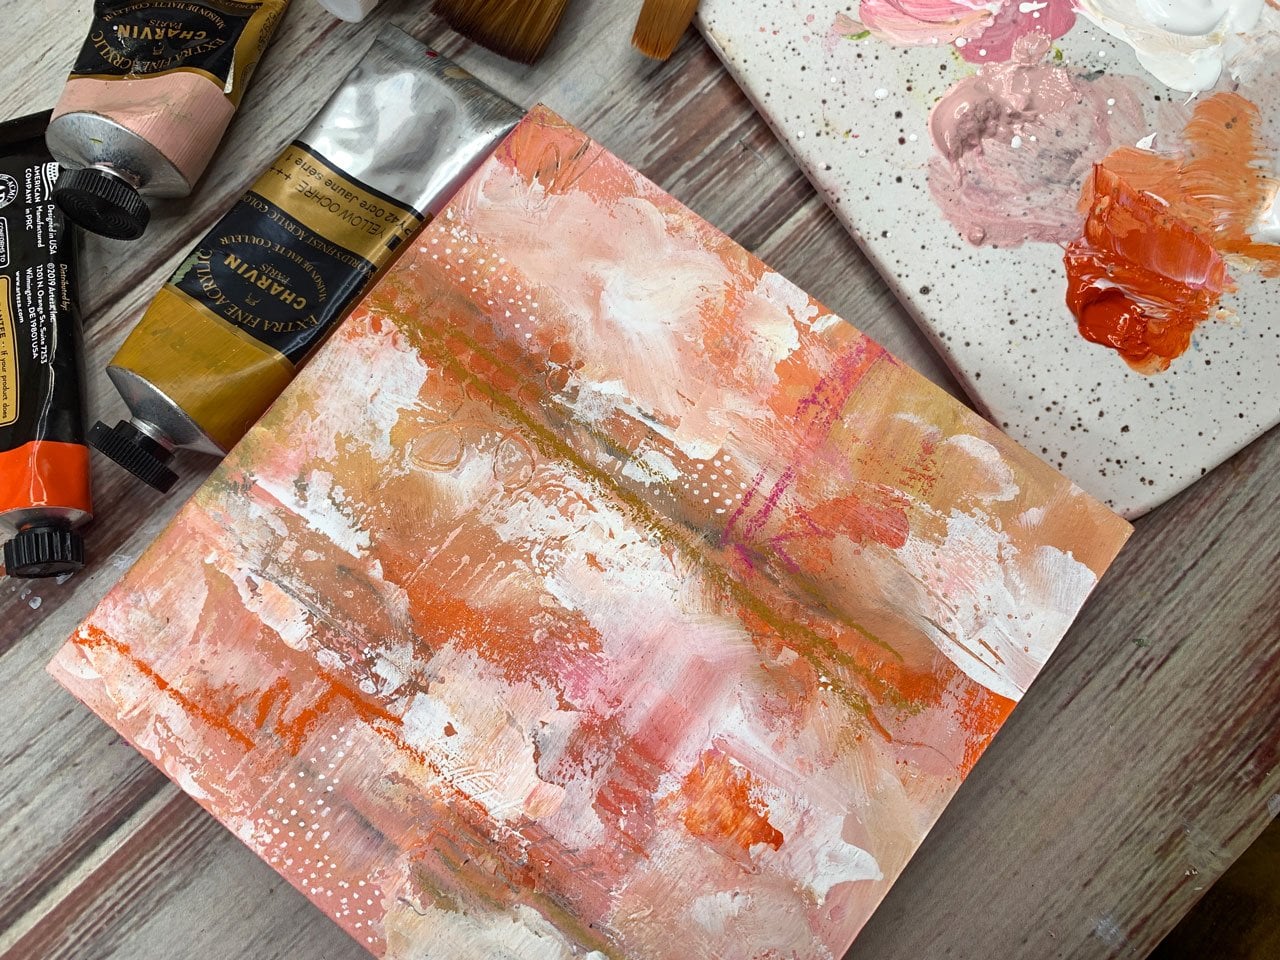
and lay some white down, and I may continue
adding stuff as I go. Just thinking what might
I like this to look like. If I'm actually in
the end thinking I love this area right here, then I might look in
there and think, well, what can I add right
now that's going to really pull that
together for me? So we're going to be using a viewfinder that we make
in a shape that you want. You can make these elongated. You can make it square
like I've made it here. You can make them smaller because there are
several things that I've done that are
like 4 by 4, 5 by 5, 6 by 6, 4 by 6, different shapes
and stuff there, just trying to decide what do we like and what are we
going to cut out of this, and what do I need to do
still after I've laid color now that's going to
pull that together for me. Then even as I'm
laying more color on top, I'm still thinking, what kind of mark can I
put onto my paper with my non-dominant hand
so that hopefully I get something really cool
and organic that I love. This is something fun, too. I just splatted that
down and got splatters. I love splatters
and that might be another thing where we add
some splatters in here. Maybe I'm just going to add some water and a little bit of gesso, and then see what we
can get splatter-wise. Just keep in mind when
you're splattering stuff, you might be splattering
your wall and stuff, too. So be careful how enthusiastic you get
with your splatter. You can splatter in
different colors. That was white, but
we could splatter in maybe this
reddish color here. Yes, I love that.
Get in our water. Now I'm going to let this dry a little bit because I think the next layer that
I want to do is going to be with some pastels. This is a little bit drier. I'm going to come in and
I think I'm going to use my rubber catalyst paint piece. I'm calling it a catalyst. This is actually the catalyst, but this is by Master's Touch. It's just a rubbery
paintbrush-looking thing, but it's made of rubber. I'm just going to come through here and add some
marks with this. That'll give me some yummy
texture like that right there. That's exactly what I
love and hope that I can highlight in a finished
piece that we end up with. I'm being careful of wherever my paper is doing this number. It'll flatten out when it's dry. But as you're adding
stuff like this onto it when it's doing this
little humpy thing, you'll end up with a glop
somewhere you didn't intend to, if you're not real careful about how you're laying
this on with one of these. You could use scrapers to do this with. There's
all kinds of stuff. I could use that
bigger thing to do it with the bigger catalyst
piece if I wanted. I like this size, which is maybe an
inch and a half. It's a little bigger
than an inch. I like that little bit of texture right there
that you get with something like this
if you're just very lightly pulling it along. I also like that we can use the edge to create some pattern, if I want to create some
fun lines like that. Really fun that I
can do with this. Now I'm just starting
into detail work, like I just want
to add in details. I want to get interesting
texture and pattern. It's still too wet to use the
pastels which I'm going to be pulling out in a minute
after I really let this dry. But it's not too wet to do
stuff like this and to just start adding in some texture and stuff with different tools. You could do stencil in here, if you wanted to add some
stencil into your pattern. You could use
different shaped items like bubble wrap,
maybe an eraser. You know what? This is my
catalyst, rubbery one. Two different brands,
same type of thing. I like that this one
is angled. That's fun. I like different tools
to experiment with. You just have to try some stuff out before you decide here's what
my favorite is. A lot of people ask, how do I find my style? That's everybody's goal when
they're working on stuff. They're getting frustrated,
you're doing stuff, you're not seeing what your
style is and you're like, how do I find my style? How do I get to my style? My regular business
is photography. I did a blog post
on my main site. For photographers,
finding your style is simply a process
of deciding what you love and using those
items, or elements, or tools so frequently that it becomes known as like
your thing basically. It's just a process
of determining what you like and what you don't like and using what you like, and then your paintings or your photos or whatever art
medium is that you're doing eventually becomes
so recognizable from the things that
you're choosing to do that that becomes your style. It's just a process of deciding what do you love
and what do you not love, and those are the elements
that you're using. How you figure that
out? You do the work. Unfortunately,
there's no shortcut to getting around that. I'm going to pull
out my post pen, which is just a white paint pen. These don't last super long, but we'll see if this one
is still good enough to at least do some dots. I use this for dots. But that's basically the way you find your style. It's just deciding what
is it that you love and then doing more of that, and then the things
that you create begin to really be
distinguished and look like you every time that
you make it and post it. I could still tell
you to this day, I don't have a style. But other people can
disagree with you. I have plenty of
people that say, every time you post a photo, I instantly recognize it. Because I like the photo to be more processed with
matte processing so it looks more
like vintage film, and I like certain subjects. If I like to photograph
still lives or flowers, you can usually tell that
it's mine because of the lenses that I
like to use and the subject matter that I enjoy. I've been doing it
for a long time. If I'm shooting with a camera, I'm using my favorite
lens and I'm using my setup over
here in my studio, and I'm just working the whole area and the
things that I like. Then when I'm done, it has a recognizable look to
it that people tell me, "Oh, I instantly knew
that was yours." I'm always trying
to change things up because I have a
little business and I want to show lots and lots
of little different styles and elements and things that people might
be interested in, so I don't want everything
I do to look the same. But people will still tell you they recognize
something that I did. I have a style, it just happens to
be the choices of things that I've
made that I love. You're just going to
have to do the work. Eventually, if you do a painting practice,
say, every day, like if I do a little
abstract practice every single day, you get better at it, you decide what
colors that you love because that's a
good question, too. How do you pick a color palette? Well, pick your favorite colors is what people always say. Pick the colors you want to use. But I'll tell you, I actually find that a
little bit frustrating because what if you don't know the colors you
want to use yet? You're just getting started. You're wanting to develop into
what colors that you love. Maybe I love the same colors another artist is using. So whatever I create looks like what they're creating because I used everything
that they told me to. That's okay when
you're starting out. Use the things that you've
got to start out with. Experiment with different things that you see other
people trying. Eventually, you'll try enough stuff out
that you're like, oh, I really love this, but I don't love that, and you'll stop
using whatever that was and start using more
of what you did love. It does get easier. Then it gets to the
point where you're like maybe I want to do
a whole series in this one color because
I love it so much, or this one colorway. So you'll get there. Just know that finding
your style is a process. It's not going to happen
in a month or two. You might think a
month down the road, oh, I found my style, and if you're just getting
started, you probably haven't. You're probably still
heavily influenced by things that you're seeing out there and other
people are doing. Not really pulling from
your depth of yourself. I do that, too. I
like see something that somebody's painting and
I think I want to do that, and then I'll dabble
in that a little bit. Then I'll think,
okay, I did that. I'm going to move on
to the next thing. It really wasn't my thing. That's how we learn
and do things. You take some classes. You practice what those
people are doing, and then you morph those skills into something that
works for you. I'm just putting this
stuff everywhere. I do think it's dry
enough for my pastels. I have a bunch of pastels because I had bought a pack of Sennelier pastels,
which I really like. It is a more expensive
brand of pastels. You might go to the
art store and look at the different pastel
varieties if you think you want to play in the
pastels for a little bit. Because if you go to, say, like the Dick Blick, they have some pastels
that are their own brand. I had gotten a whole set
of these off of I think Amazon because I was just wanting them to bring it to me and everything was
locked down with the coronavirus and I wanted new art supplies to play
with. So I ordered them. Then I do happen to
really, really like them. At some point, I went to
the art store and I have added more to my collection
of the colors that I love. Because some of these, if you get the
Sennelier half pan set, I got a big half pan set, I thought, well,
I'm going to use this color until it's gone, and then I'll never be
able to get it again because who knows
what that color is. I love this color. What I decided to do was
take a few of the ones after I've played with them long enough because I
love this color. I love that color
in this colorway. I decided to take
some of these to the art store and
match them up to a full stick and come home
with some full sticks so that I then had
these for later. These are the chalky pastels. You can see they get on
your finger very easy. They're very pigment heavy. This is a good reason why I like to use gesso with my paint. What you could do if you
wanted to paint it all and not add the gesso upfront, you could coat the painting with clear gesso after the fact. But I like the way that adding that layer in there makes the
paint almost translucent. Also, it gives it a different depth, a
different quality. It makes it matte. So I like all those things. So that's why I do it
the way that I do it. I'm going to pick out some
of these chalky pastels. You can also use oil pastels. I do have some oil pastels, and you can use pastel pencils. If you've got pencils that are
pastel, you can use those. I have these two, randomly a white and a black, because they came with a
SketchBox monthly subscription. They came in those boxes. What I really love about
getting that SketchBox was that I got tools that I never would have bought
to experiment with. But after you get the
box for a whole year, you got like an
obnoxious amount of onesies and twosies that may
be a good color and may not, and you may use them
and you may not. Even though I love getting it after a whole year of them, I did go ahead and put that on hold because I
don't have time to use all the things they already sent me and I
didn't want a whole another year of stuff that
I was just going to again throw in a box and be like, well, I don't
know what this is. I'm not going to
use it or I'm not doing the art stuff right now, I'm doing the photography stuff. Who knows when I'll get back
to this, that kind of thing. I just didn't want to have a whole another
year random things that I may or may not use. But I did enjoy that for
the year that I got it. This stuff, too, because it's
so pigmented and chalky. When you're all done
with your piece, we're going to have
to finish that with something like the Sennelier finishing spray for the pastels because this
stuff will keep on. You'll keep getting marks on it and it'll get
on your fingers, and it doesn't
cure to any point. It's just pigment on top, so we do have to finish
that at some point. Here we go. This
is an oil pastel. The oil pastels,
this is Sennelier. I've got some other
cheaper ones. This happened to be one that
came in the SketchBox also. These are very creamy, but you don't want to use them
on the bottom because you want to use these
on the top so if you get the oil pastels, not the chalky ones, these are for very top details only for something like this. Because if you paint
this on the bottom where we're scribbling,
your acrylic paint is not really going to stick
to that like it should. These would be for detail
items at the top, maybe marks, maybe lines, just any interesting little
section that you want to do. Those would be
great for the top. The thing about these, the creamy oil pastels
is they actually never really dry. If you're thinking, I've done this three months ago and
it's still a little bit wet, well, if you're using
those creamy oil pastels, they don't really truly
dry, I had found out. Something I like
about using these, now that I've started
putting them in here, is I can do lines. I can make marks. I can do different texture. I can do little dots. I can do all kinds of
different mark-making. I can also color block a whole area and then blend
that in with my finger. Because I have got that gesso in with that
acrylic paint that it'll let it grab
that and really add to whatever area that I've
just put that pastel on. This is my pastel box I'm going to be
pulling out a bit, but I'm going to set it
over here to the side. I'm just going to randomly continue with adding some details and stuff like
we've already been doing, before I decide to then see if there's anything
left in here that I love. Because usually
with an abstract, when we get around to
thinking about composition, it's really nice if there's some light and dark and you have that contrast in there to really emphasize the
composition and stuff. You could do the darkest
really at the end, too. If I needed to add some
at the end and I think, well, I've got a little
bit of dark there, but it's not really in this, I need some more somewhere else, we could continue adding some of these details at the
end when we're done. If you get enough of
these on your fingers, you might get to
the point where you can't scribble any color in. I actually have, that I keep at my
desk, some wet wipes. Some baby wet wipes that you can get at the store. These are a little bit dry, but I use these to get
some of the stuff off my fingers in-between using different materials
for this exact reason. So that if I've got
too much of, say, this green on my finger
that I'm not being able to smudge in
pink or something, I can very quickly
and easily clean off my fingers as I'm going. So I do love having some
baby wipes here at my table. I just want it to be just interesting
stuff going on in here. Maybe some lines on
top that contrast. You might pick a color that doesn't quite
match sometimes, and that's okay. You can have a little
pop of some other color in there if you end up
picking one that you're like, that wasn't doing what
I thought it would do. I have done that and
then once I lay it down, if I think that's
different than I thought, then I will maybe put it one or two other areas
just as a pop of color, but I won't put it everywhere like I do some of these others. Then if you just
totally make a mistake, take a baby wipe and
maybe just see if you can get that off if you don t think you like it at all. But the more interesting
color, and marks, and dots, and mark-making, and different things
that we add in here, the more of that
we do in the end when we get our final
composition going, I think the more interesting the piece will be. Look at that. I'm digging on that right there. I'm digging on this here. I like all that different color, and pattern, and texture
that's in there. Sometimes if you're too close to it and you think, "I
don't love any of it," stand back a little bit
because this is abstract. The further back that you get, the more you can maybe see the composition and
the piece in there that you intended.
5. Project - Cutting out abstracts: [MUSIC] Let's just
real quick review. This right here was
our inspiration piece. This is where I thought the
colors were coming from, the Maya piece that I
was inspired by when I said every single time
that I create a piece, it's so dramatically different than the last piece I created, even if I'm using
the same colors. Nothing on here looks like my inspiration
piece. I love that. It's very serendipitous in the way that you create
with this type of thing, but I do like having that inspiration of
something that I was like, oh, I love these colors. I actually think that we're at a good point to maybe cut out one or two of these compositions
and then finish it up. Because I love this and I
think I love this right here. I'm actually going
to pull my tape up and get out my cutting
board, and I'll be right back. I'm actually pulling my tape. I was going to pull it off
and then just have it off but I want to talk
about the tape. I'm using painter's tape, which is the blue painter's tape that comes from the
hardware store. You can also use that artist's tape that you
can get at the art store. Depending on your paper, it may pull off really
easily and it may not. The secret on the ones that doesn't want to
pull off as easily I find, is if you'll pull it at an angle very steadily slow, and then usually this paper is a lot easier than
some of the others, but pull it at the angle
or pull it really slow, like right back, and then you're less
likely to rip your paper. If your paper is
saturated with water, then you will definitely be
ripping the paper possibly. You want to be real careful that the paper is not saturated, that you've left that dry
before you try to peel the paper off because if
it's part wet right here, would have peeled off
some of the paper but you also want to
be really careful, pull it at an angle or
straight back but real slow. I have a cutting board [NOISE] that I'm
going to put down. I'm going to use an x-acto
knife to cut pieces out. This is just a piece that I have made that's the same size as some of the
boards that I use. It's the same size
as this board, which I believe this is a
five-by-five. Let's see. Find a ruler that's
got some sizing on it. Yeah, this is a five-by-five. I also do quite a bit for
these in a four-by-four size. What you can do,
there's a couple of different ways
you could do this, but we're just going to now
start to look around and see, is there a composition
that we love? If we do, we can take a
pencil and mark that out, or we could actually
draw the whole square if we wanted to.
Then you could take a ruler or something straight
and hard, along with an x-acto knife or a utility knife. Then we're
going to cut this out. Now what I have
decided is easier is to pick some of these
finished pieces that I use, that I mount things on. This is a cradle board that I
got from the art store that I painted and then glued
my piece of artwork on. What I'm going to do is just
have one of each size that I might like to use and just chalk it up to trash
for what we're doing. I'm not going to use these for anything other than
cutting these out. [LAUGHTER] This is
this size right here. So if I decide that I really
love that right there, then I will put this down
and cut around this thing. I'll do that in a moment, but I just want to make sure that's really the
piece that I love. Don't be afraid to turn
these other directions too. We don't have to look at it
the way that we painted. I could come around
this way and think, well, is there a
composition that I love, with it moved this way. I could put it upside
down and we could see if there's anything
that jumped out at us in this direction. Then if you think that it needs a little
more of something, you can always add little extra touches
after you cut it out. I do, for some reason, when I look up in
the camera screen, like this composition, even though when I'm looking
at it real close up, I'm like, I don't know
if I love that or not, but I do love it from
a little further back. I'm definitely going
to cut this piece out. Let's just decide. This is where this is
going. You make sure. Do I like this little
pink at the bottom? I do like that. I'm just going to put
that right there. That's exact. It's
not a big deal. This is a little play pieces and then you might end up
using it for something. You could draw around this
and cut it with scissors. Use an x-acto knife and
cut it out with that. I just let this little piece be my guide and try to
cut a straight line. I think I cut into the
wood piece, I wouldn't. [LAUGHTER] I was talking and
cutting at the same time, but just as close as I can. I just cut around until I
get all the sides cut out. [NOISE] Sometimes I don't get all the paint dry
before I start cutting out, which is how all
these little paint pieces ended up on here. That's why I'm considering
these just for that. I'm not going to use them for anything other than my cutouts but now, there we go. We've got our first
piece cut out. From a little bit further back, I think it's really beautiful. Then at this point
too, I could go ahead and see any other
compositions that we like. I don't have to have them
all in the larger size. If I like a little
bit smaller size, I could have several of these: four-by-four,
five-by-five. Maybe I like the smaller
size out of here also. We're just going to see, what else do we love? I really like this here. I think I like this one too. I might add some other elements
after I get it cut out. [NOISE] Look at
those. I love it. Then what's really
fun about this, once you cut out the
pieces that you know you love and you're
still questioning, do I love any of
these other spots? Maybe we do. Maybe we love that. I think we'll cut
this one out too. I do like this. Oh, yeah. See, these are so pretty once they get cut out. So once you get all of that
that you think you like, what you might consider doing is then creating smaller
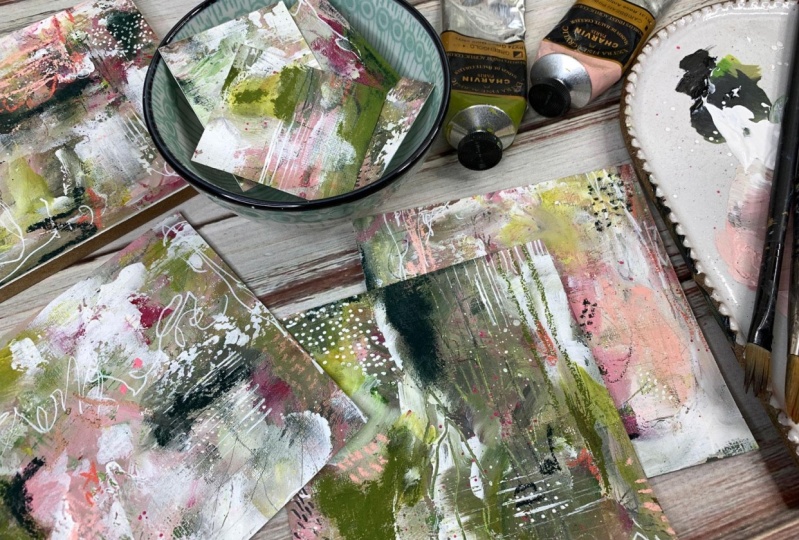
pieces out of what's left. I don't throw pieces away. I save all the little pieces
like this. Let me show you. When I do here. See I have a little different
pieces of ones that I have done before and I
save all those pieces. These are now going to be
something that I can use for collage papers or
other projects later. I really like having the leftover paint bits to be able to do other things with. Another thing that we could do, if you don't want to just
save the pieces for collage, is we can cut these into smaller squares and use them for something
like bookmarks, or we could use them
for tags for gifts. Let me just cut some of
these out and show you. I'm just going to take
some scissors here. That's the biggest pair
of scissors I can find. How funny. Then I just cut off
some of the edges. I don't cut the
edges away either. I may end up using them. Like this piece right here, I actually love that piece.
That is really beautiful. That can be a really
pretty bookmark or a nice collage piece, look how pretty that piece is. I love that piece. I love that. Then what we could
do is we can make some pretty tags or something
out of the rest of this. I'm just going to get it where I can maybe cut the straight here. That might not be straight.
Let's see. [LAUGHTER] Cut that off and then
this right here, look how pretty that is. Let's see what is this, 1, 2, 3, 4, it's like five. So it's two-and-a-half. We could cut that into a
square and then look at these pretty tags that we've
got that we can use for collage pieces or we could
add these to a package. Maybe I can staple, do a little hole here in the corner and that
can be a gift tag. That's really fun. I love this little piece, that can be some
gift tag perhaps. I haven't saved these pieces at the edge even though it's
got the white on it. Because look at this right here, I could use that for something
that's really beautiful. So I can keep the whole piece. I can cut another piece out of here if we look at
it again and think, is there anything else
that we love out of that? We can do that. I set my color. Here we go. My picker just to
double-check before I call this one done. I love that and I do like that. Maybe we'll cut this
fourth one out of here. I do like that. I like that too. I don't know, her
choices. [LAUGHTER] I think I liked this
enough to maybe cut it out and then we could have
four five-by-five pieces. I could have got a whole bunch of four-by-four
pieces out of here. I'm using the five-by-five
size for this project but I like hanging my art up. So I do like being able to get several pieces out that match to
make a little series. Then hanging them in my art
room and enjoying them. I put them up here on
my idea board like the ones I pulled down
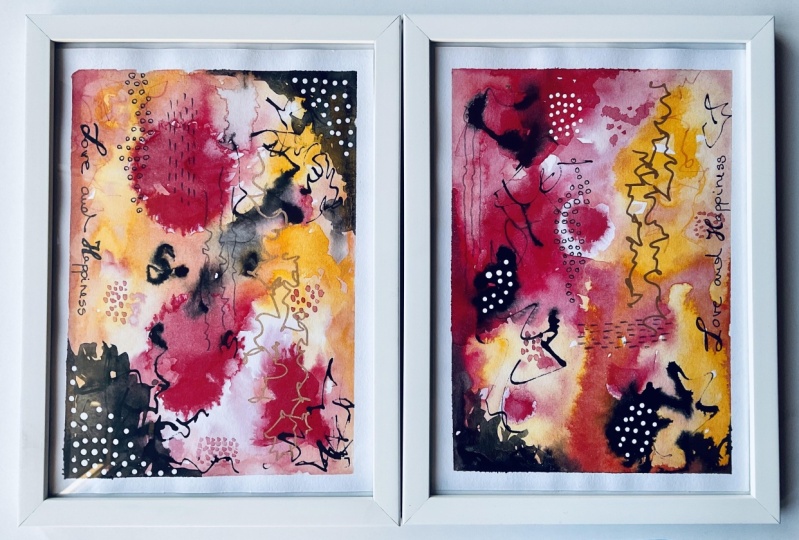
and showed you earlier. Oh, yeah I like that. I'll have some framed like the
frame to one I showed you. I like lots of different
things to do with these. Look at how pretty that is. Just for a little strip on a collage piece,
wouldn't that be pretty? This I might make some
other little tags out of. Since we have a couple of tags, I can make some more tags. I'm going to size it out here to the same size or something close. I mean, they're not to
be exact [LAUGHTER] but it's fun just to have these to use and show off and
have for stuff for later. You could frame these as little micro pieces of
art that can be framed. That's a really pretty
little piece of art. It can be a little too
by two-and-a-half or so size, and you can have a whole little set of
those that you frame. You'll get creative with what
you do is some of these. I didn't like the
great big piece when I was done with it, but I sure do like
all the pieces that have come out of it. So much so that I get excited every time I
start one of these and I can't wait to do
the next one because then I'll experiment
with other colors. I'll experiment with
other supplies. I just love it. I used to get so mad when I worked at my art table
and I wouldn't make anything I liked and I'd just be angry for the rest of
the day because I'd be so frustrated. Because
I wanted to make some masterpiece and
I'd sit down and I'd be paralyzed by the
blank piece of paper. I would not create anything at all that I liked
and I'd be very, very frustrated about it. Now, everything that I
create with this method, I'll come out every single time was something that I like. I just got paint
all over the place [LAUGHTER] running that
through my PayPal accidentally but now, I'll end up with
stuff I like every time. It doesn't matter if it's
colors that I love or not. Because on one said I was really inspired by some colors
on my paintbrush. When I painted them, I thought, I don't think I'm
going to like this. Then I'm going to show
you that real quick. This color set right here, I thought it was on a paintbrush and I
thought, oh my goodness, I love that so much and
I don't even know if that paint brushes
sitting over here where I can show
you, I don't see it. It was just painted all over the handle and I thought,
oh, I love that. Then I got the painting it
and I'm like, I hate this, but then I cut these
out and I'm like, Oh, I love it
actually. [LAUGHTER] So don't worry too much
about colors and stuff. Pick a colorway to work with, but then don't get too
stressed out about what it's going to turn out to be
because that big piece, I didn't like it at all but these little pieces, I am just loving
every one of these. Look at how pretty those are. So it's at this point
now that I might then look a little further
at each piece and think, could I do a little
bit more to this one? Can I do a little bit
more to that one? I add my finishing touches to
these pieces at this point. So I'm going to get
my Posca pen back out because I actually think
I really like this one. So I don't think
I'm going to make any changes to that one. I even like that direction. One thing too about
getting stuff framed and talking
about direction there, decide what direction you like, but when you take
these to the framer or you frame them yourself, maybe mark on the
backside which way you intended up to
be. Because let's say you liked it like this and the frame
reframed it like this. Perfect example. To me, this is the way that
I intended it to go but you can see by the
framing on the back, this is the way that
the frame reframed it. So now I feel like
it's upside down on my wall. [LAUGHTER] I just wanted to
point out a little less than there that I
learned the hard way. Don't let your framer
pick the orientation. You tell the framer, draw with a pencil on
the back or something if you have to, which way is up? So they're not making that
decision for you because I had three pieces framed at the
same time, it's that one. All three pieces are
upside down from what I imagined in my
mind it should have been. So I'm just going to
take my posca pen, maybe add some little white
details here on this one. I really like, and you
see on all three of these pieces that I've
got a little bit of that super dark color. Almost feel like if this were
going to be a set of four, that I need some
of that dark color on this fourth one,
also, perhaps. That's your own
personal decision. I don't feel like I
need a lot of it, but I do feel like it's
missing that color. If this were going to be a set
that I was doing together. I don't want a
whole lot on there, just a touch looking up at the camera screen
because it's almost easier to see the
composition up there when it's a little further
away than it is right here, where I'm looking at it, as I drop this on here. Maybe some pretty dots. Just something subtle like that. Oh yeah, like that. I'm actually super thrilled
with how these came out and so I got a dark
color all over my finger. I don't want to be touching them with all this on there and have little green fingerprints. So at this point, I'm going to stop
this video because I am going to show
you how I might mount these to a board if I
can find a board that I have, but look how pretty
our little collection is that we've just created
out of one piece of paper. I am in love and
thrilled with this little set. So I'm going to show you a couple of other
little things that I do before we wrap
up this class. So that's why I'm going to stop right here and let
these really completely dry and then show you
some couple of things that I do. [MUSIC]
6. Finishing your piece: [MUSIC] Let's talk about finishing our pieces. I have tried lots of
different surfaces. You can frame the piece
just like it is in a frame and this could
be something you get framed at the framer with a mad in it or something you get, say at the Hobby Lobby, or the Michael's or
you frame it yourself. That's one way you can
finish off with these. Another way that we
can finish it off is we can mount it to a wood board, which I really love to do. I have several of
these hanging in a gallery wall in a room downstairs that I did
because I loved him so much. The wood pieces come in a
lot of different options. You've got the flat ones
that are ready to hang. They've got little cutouts on the back that you
could hang this, and then that could be
your finished piece. The thing about these
is you need to be real aware of where the cutouts are so that you glue it to the
right orientation. Because if you mean
it to go this way and you wanted to hang it and there's no spot
there to hang it, well, you just did
hang it upside down. [LAUGHTER] Make sure that you're getting at the same
direction as where your little cutouts
are if you're wanting to do something
like this and hang it and then you'll notice on this one that
the edge is black. I have painted the edge of this before I have glued my
piece to the board. You would keep that in mind too. If you glue it down
and you think, oh no, the edges aren't finished and
then you go to paint that, you want to be real
careful not to paint on top of your piece. Even though I painted it
before I glued it down, when I glued the piece down, I did go back and
touch up the edge of the paper because
the paper was white and I didn't
want that white paper to shine next to
that black side. I did take my
little craft paint, and you can use craft paint,
you can use acrylic paint, you can use anything you have handy really and I just touched that up real careful
and made sure I did get none on the top of my art piece. Be careful when you're
painting the sides of your piece and this
is the one option, that's a flat panel. It's usually the least
expensive option for wood boards because it's
just one piece of wood. You can also go to
the hardware store and have them cut you
out panels of wood. Like this stuff here
that I'm using is a melamine or the
particle board stuff. You could use that from the hardware store and
cut them yourself. Be as creative there
as you want to be. I don't have all those tools to be doing woodwork,
so I don't do that. I go ahead and buy
the panels already, the sizes I'd like to have them. This is the next way. It's a cradled
panel with a side. This is a three-quarter
inch to one-inch side. They also come in two-inch
sides and three-inch sides, which I really love. I love the deep sides. It makes the piece look more
expensive and this just has the gesso primer on it
because if you're using these unfinished boards,
they're not primed. You need to prime
it with the gesso first and then you can let that dry and
then you can mount your piece to the
primed piece of wood. If you do it straight
to the unprimed wood, stuff soaks into the wood,
and then it might not stick. Your glue might not stick
depending on what glue you use, so your peace may
come up later and you just want to go ahead and
seal the whole panel, paint this underneath here. Paint the sides and then your sides are
ready for paint and this piece was already
pretty with the white side. That's the color I
did for the white. That's how I finished that one. Flat panel, cradled panel, and the cradle comes in different sizes and I do
like the two-inch cradle. I think it looks rich, it makes your piece
look expensive, so I love that and this
is what those look like, unfinished with nothing on it. Well, with paint. [LAUGHTER] I also have
some other panels here because I got lots of panels in my little closet for different things
that I want to make. This was a six-by-six,
three-eighths panel. You can see it's a
little thicker than the panel I was using over here because this is more like
might be a quarter-inch. This is thicker flat
panel still and it has only one mounting
thing on the back. You need to make sure for
real that you get it going in the right direction of
where you're going to hang it because you don't
get two choices there. You only get the one and this
one you'll notice is white, so it's already a primed
surface ready for you to put something
on it and then, again, you'd paint the
side to finish it off. I'm going to use one of
these since I don't have an unfinished five-by-five, that is in my junk piece because this one's got
paint all over it. I was going to use one of these but don't
have another one. I'll have to get some
more from the art store. I'm going to use
the panel I have, that's already
primed, which is fun. That'll make it easier anyway. Depending on where you get it, I think this came
from the art store. This happens to be an
artist panel value series by Ampersand and Ampersand is the one that makes most of
the panels that we get. You'll see I've got the
finished piece right here. This is how it needs to be
mounted and to mount these, I use a cheap plastic
utility knife, which can also be
something you paint with on your painting
when you were painting. I used Yes paste.
I love Yes paste. It's very thick. It's very easy to use. It comes out buttery. Because this is already primed, I'm going to put the Yes
paste directly on here to, then adhere my painting to. Use whatever glue
you want to try out. But I do happen to love the Yes paste for this particular project
because it's thick, spreads on like butter. Man, your piece
is not coming off here when you're done and then I will just take a chopped
rag or something and wipe the edges after I
smear this stuff all over. You could use spray adhesive. You could use the roller
adhesive that lets you stick it to one surface and
stick the other surface down. I've got lots of different
glues that I've used. Just test it out and see if it's really going to hold your piece of art
the way you thought. You don't want to do all this work and then
glue it down and then say, take it to a gallery
and then your piece be coming off [LAUGHTER] when you didn't intend
it or somebody take it home and it's coming off. I'm just going to get a
really nice thick layer. I'm going to make sure
every bucket is covered. Then I'm going to
take a baby wipe [NOISE] and get that off before it sticks
on there really good, and you've got a minute
to play with here. It's not going to dry
so super fast that you can't manage here. Then, I'm going to decide
which one do I want to mount. I should have decided that
already, but that's okay. Let's see. Do we want
to map this one? I do love this one. I'm going to pick it up here with my knife and make sure I've got
all the edges clean. Because I'm going to
squeeze glue out too, and I'm just going
to use the baby wipe to get any extra off
while I'm at it here. I just tried to be as neat
and clean as possible. If this is a piece that I'm
going to give away or sell, I want it to look like it
was professionally done, not like I was slapping
things around. I'm going to make sure
that my up is up. [LAUGHTER] I can't tell
you how frustrating that is to not get it up correctly. I'm just going to
place this on here. I have some [NOISE] wax paper that I have a whole thing of, and I'm just going to lightly tap it down because
at this point, I can still move it and
I just want to make sure that it's on the
board completely. See, I can still judge it, move it a little bit, and it may not be perfect to the size of the panel,
and that's okay. I'm going to show you what
we have to do for that. If you have a brayer, one of these rollers, which I have randomly somewhere
hiding from me. I could go look in
my art cabinet. You can just roll this
on here if you wanted. Just because this
piece is smaller, I'm just [NOISE] rubbing
it out to the edges. I like wax paper because
this is not stuck down. We haven't finished
the top of this. So I don't want to
put some paper there, like a paper towel
that will then pick up all my art material that
I haven't adhered down. So wax paper, it'll pick some of them, the art stuff up. You can see a
little bit of it on here, especially that pastel. But it'll do less damage if
I'm not moving it around. I'm just smoothing it out
and then picking it up, then I'm not damaging
my piece of art. Whereas a paper towel might
actually do some damage. You can still squeeze it
a little bit and move it a little bit if you
have to because when we did that, it
moved a little bit. Then I'm going to
take a baby wipe. Again, I'm just being
really careful here, and getting anything that
is squeezed off the side. Then we want to let this dry. Then if you think, well, it's hanging over here or there, like in a space or two, then we can take our cutting board and
we can flip it over. Any spot that it's
overhanging like over here, I can let it dry
before you do this, but I'm going to do it
while I'm still filming. Any place that's
really overhanging, you can now trim so that
it's perfect to your board. I would go around and do
that on all four sides if it was just slightly hanging
over anywhere at all. The reason you do
it when it's dry is because you don't want
to cut it and then it slip on you
because this stuff still slips while it's wet. Then once you've got
it where you want it, we're going to let it
completely dry and finish. [NOISE] Then we will let that completely dry. I might come back in with
my piece of wax paper and just make sure because
mine's not completely dry, I want to make sure all
the edges are stuck down. Let it stick down. Let
it completely dry, and then flip it over and
cut off anything you've got overhanging
funny on your board. Then that will
take care of that. Now to finish it, finish it, paint the
sides and let those dry. Then, you're going to have to put something over
the top of this. If you're not framing it in
a frame of glass over it, there's nothing
protecting the surface. The easiest way to do
that is with some type of archival clear coat. You can use like
Minwax, satin coat. You can use this Krylon UV
archival matte varnish. I've used the Kamar
Krylon varnish. That one, I believe is shiny. I've used Rust-Oleum
matte finish, clear protective finish. For the ones where
I've pastel on it, I actually use the
Sennelier fixative, which comes from the art store. Some of these come
from the art store and some of them come from
the hardware store. You got to be careful
of the ones that come from the hardware store, that they're archival, which means that they're
less likely to yellow. I've never had that problem
with the Sennelier finish, and this is for soft pastels, very specifically, which
we did on the top of this. We'd want to take this outside, coat it, let that dry a little, coat it, let that dry a little, and put maybe four
coats of this on there so that that finish is then going to be
permanent for later. It doesn't really change
the look of the piece. I've not had it
discover the piece. This one has the
Sennelier finish on it and you can still move
some of the product. Maybe I didn't finish this
one with the Sennelier. Now that I just did that. [LAUGHTER] But you can see, this piece I've done
probably six months ago. You can see they're still
art stuff that'll come off. Even though you put the
clear fixative on it, if you go smear it, it's possible you could smear
something on top of that. So do the fixative, maybe three or four layers, and then you could come
back with a clear finish. If you wanted to then clear coat the whole thing,
you could do that. I like matte or satin finishes. I don't like the shiny
finishes personally. You're just going to try it
out and see what you like. That is how we mount or
finish our different pieces. I can't wait to see how you decide to finish your
piece when you're done. [MUSIC]
7. Saving your color palette: [MUSIC] One of the
things that I do before I move any further, before I finish out anything and before my paint
completely dries, and I may have waited
even longer than I intended with the paint here, is that I will make
color swatch books, I will make color swatch
samples for myself. I do this in a couple
of different ways, and this will then give me later different color
palettes to go back to, that I can refer
to and then think, oh I really loved that. Here's a little sample
of the painting that I did and the colors and
the materials that I used. When you're doing this,
you could also write down the name of each
paint and pastel, if you are really on
the ball with this. You can do it in a couple
of different ways. I've done this one in
just a sketch book, which I've got paint
on, but doesn't matter, it's just my paint
color swatch book, I got paint everywhere. [LAUGHTER] See baby wipes
just clean everything off, but I've got paint
all over my fingers. The other thing I'm
obsessed with is an old book and making this
my color palette book, I absolutely love it. This is an old hymnbook
and I did not spend very much money on
it at all and I love it so much that I
have used it many times. I'll create myself
a color palette with the piece
next to it so that I could then maybe later
come back and have some inspiration from that book. I'm just stapling
this painted piece in here so if the
pages are too thin or they're about to fall
apart then I'll staple two pages together just to give me enough
strength to keep that. I will, to do this look
how pretty this one is. I love that bright, yummy set of colors for some reason that I played
with it several times. But basically what
I'll do is you don't want to paint on the
pages just like they are. You want to start off with
a page and just so it, so I will get a clean
paintbrush here. Well, I'm going to clean
one, I guess here we go. I'm going to take
the clear gesso, I don't want the white
gesso, I actually want whatever's on here
to shine through. I'm just going to gesso
this page with clear gesso. I'm going to let that dry
for just a little bit so that I have something for the paint to stick to,
I prepped the page, the paint doesn't soak
down into the page. This is page prep,
it's your primer. I use the gesso
because that's usually what you use for the primer. I'm going to let that
dry for a moment, and basically I'm going to take a little piece
that we have left over, so always want a little
piece left over. That's what I'm going to use as the piece that
I staple in here. This one that I was like this can make a beautiful bookmark, this will make a beautiful
color swatch in my color book. I do encourage you, it
don't have be a big piece it could have been
a little piece. I just want it to represent all the colors that
I'm putting on the book so that when I
go back and look at it, I can think, oh, yeah, I remember that. I do like creating my own color book and I like
it to be in an old book. If you go to the thrift store or the antique store
and you can find just a great old book
for a couple of dollars. This makes the best
color swatch book. It's so much more interesting
than just having a swatch, a white paper with colors on it. Then I can also use both sides so once I've done the one side
all the way through, I can come back just
seal this side and start my color samples on the other side so that
there are two pages, they're double thick here. But because this is one
that I've just started doing these colorways,
for this moment, I'm doing all of them on one side and then I'll come back and do all
on the other side. How beautiful do you think this book would be
to flip through, to remember all that wonderful
art that you created. This is actually doing
really good, so now what I'm going to do is just pick up each of my colors on
here that's hopefully not completely dry and just
paint that right on there. I might just grab some other paint brushes
to get the pure color. If it's too dry,
I'll actually put some more of that
color out because I'm actually dedicated enough to this idea that I really want
to see each color on here. I'll just dab a little
out of the tube of paint if my paints dry or I forgot
to do it until tomorrow. Like, I don't have, oh yes, I do, hang on. Here's that green, I just love having
this when I'm done. Then got one more paint brush here because I did have
a little bit of black. We'll put that there and we
had a little bit of white, not a big deal, and you can squish these
on with your fingers. I could have done a
lot with my fingers instead of a paintbrush,
I didn't think of it. [LAUGHTER] Instead I just
dirtied up 10 paint brushes. You know what, this is
the one which I was just telling you
about and then I couldn't see which
paintbrush it was. But that one I just told you about that I didn't think
I was going to like it. Let me just pull that back out. This is the paintbrush that
inspired that color palette. I loved it so much here on
the handle that I was like, oh, I love that and
then when I was painting and I was like,
I don't know about this. Then when I cut
them out, I'm like, oh my goodness, I love it. [LAUGHTER] You just
have to experiment and play and trust that when you're done, you're
going to like it. Then I also have used several little things like the pencil I use, so I
might put pencil on there, I've used this STABILO I have used some of this yummy pigmented pastel so I might draw some
of those in there. Got some of this pink, just
to give myself a reminder of the different tools that
we've used playing with this. Then I've got the
POSCA pens, so maybe we'll put some dots
in here because it's fun too to think of
your color swatch book or your other pieces that
go along with your art. How much more would you enjoy
it looking at it like this, and then with the
piece stuck on here, and you can even write what
each of these colors was. If you don t think
you'd remember, take a black pen and write
what those are perhaps. Or even on this side, you could have a white
piece of paper stapled to this side or glued to the side maybe with
the colors on it. You can get just
as creative with your color swatch book as you do with the pieces of
art you were creating. I'm glad I got to show you that before I completely forgot
about all my paint on here. [LAUGHTER] Then I
will staple this in here and then that
will be good for an example of some colors
that I used that I loved for the next project or
something where I need some inspiration or if I just want to flip
through and look at it, or if I just want to
show it to other people. [LAUGHTER] You now
see how beautiful my color swatch book is and what different
colorways did for me. This is also a way for you to remember if you hate
a set of colors. If you did something
and you're like, oh my goodness, I hate that, save that color swatch set too, and you notate why
did you not like it? What did you not like about it? You'll remember later oh, yeah, that's the
one I didn't like. Another thing I used in here
too was these Neocolors. I might draw on here
with some of those just to remind myself we had some Neocolor paint
in there too. I love it. How
beautiful is that? I hope you enjoy
making a swatch book. I do recommend you
get an old book or a sketch book that you can keep and carry
around with you either way. I've done both ways
and I do think that the old book is my favorite and it's the one
I'm going to continue using. Then when I'm done
with this, I'll have 200 different color palettes
that I can refer back to, to create beautiful things. But do something like
this if you've just got the white sketchbook and that
works great too. [MUSIC]
 DENISE LOVE, Artist & Creative Educator