Transcripts
1. Tutorial introduction: Creating a fully
CGI scene is far but also time consuming
job and request a lot of skills to
make everything look realistic from modeling
or finding models, texturing, lighting, post
processing, et cetera. But what if we already
have a photo or video that we just want to
extend with some elements? In this tutorial, we will
talk about exactly that, How to extend a photo with the D elements in a
free program blender. We will talk about how
to import an image and camera into blender with
the correct perspective. How to set lighting shadows and reflections to
mets the photo. How to enrich the visual, boring and low
resolution textures. Where to find and how to add overlays that will make
the scene more cinematic. We will talk about
post processing, color grading, and much more. At the end of this tutorial, you will be able to
extend any photo with any tree D elements to get more realistic renders
in faster way.
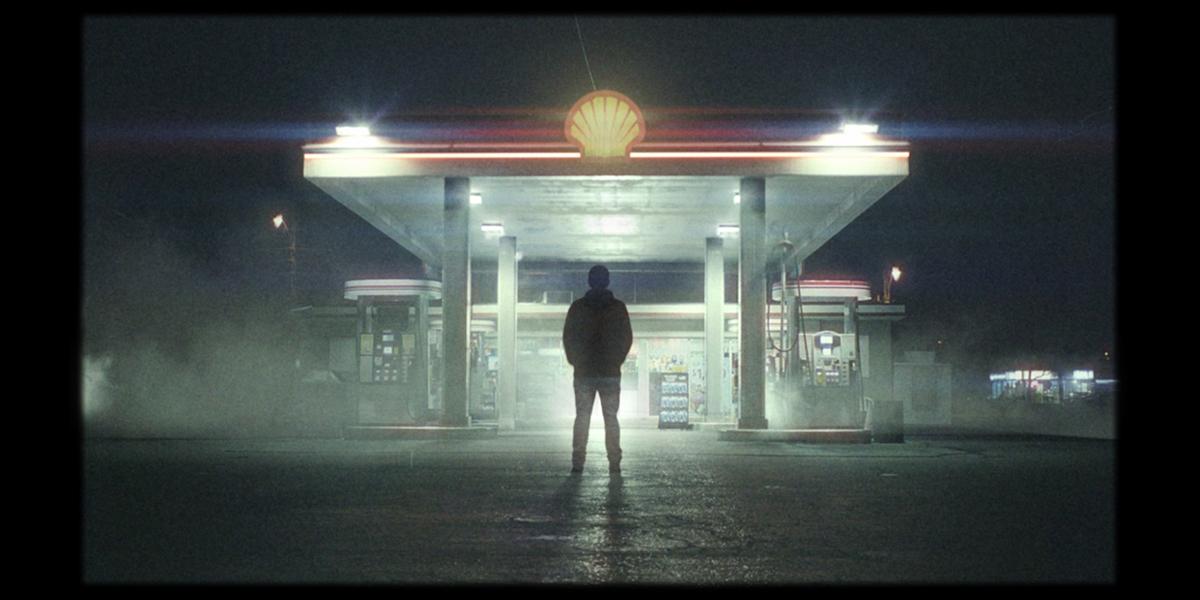
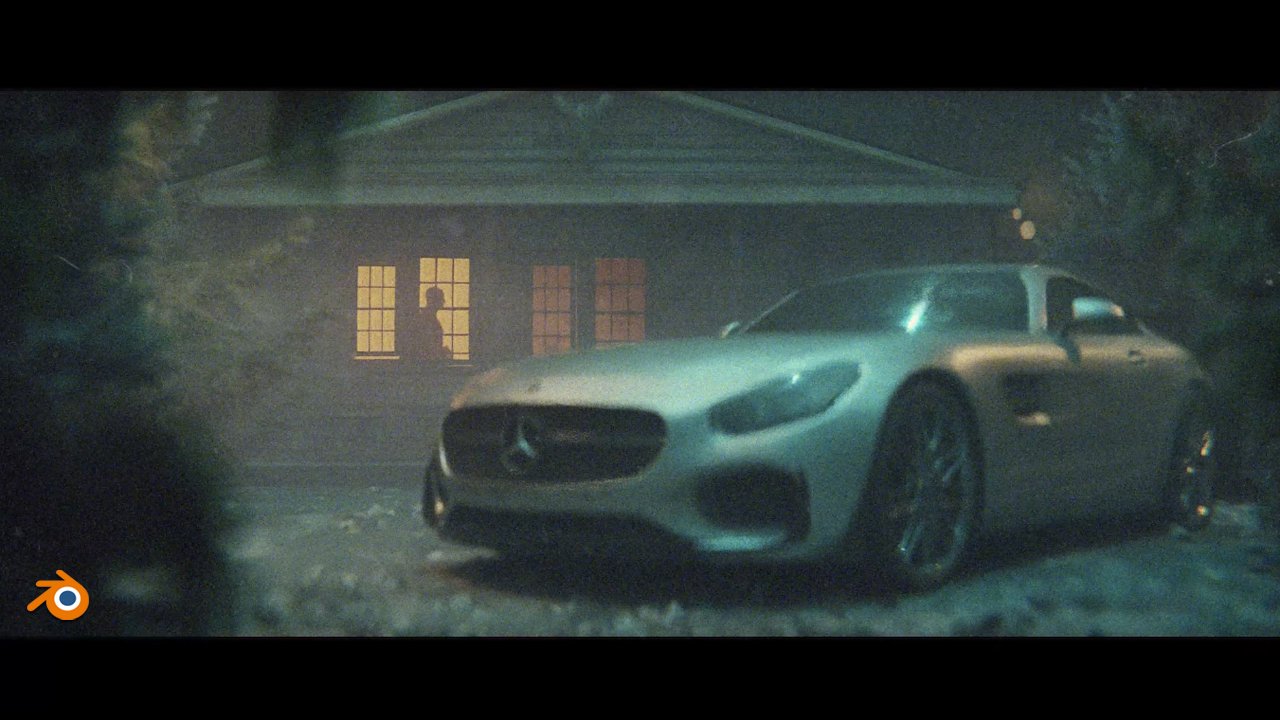
2. Part 1 - Inspiration and preparation: At the end of this tutorial, we will get something
similar like this. Not exactly this wall, because I'm not sure in which direction we will
go in this tutorial, But this is what I do last time. I will show you some of steps we will do
in this tutorial. Not exactly in this order, and there is no all steps. But just to roughly understand what we will
do in this tutorial, first step is to fund
the image you like. I will also talk
about this process and I will show you where
I found this image. But this is not so
important because you can find reference
image you like anywhere on Internet or you can just take photo on street
or wherever you want. In second step, I remove parts of this
photo. I don't need. This is before and
after I remove this with Photoshop
with Generate feel. I'm not expert in Photoshop, but I will show you also how I do this and you can see that
this is not great work, but this will not be
so visible later. I don't care. Next step, we will add some treed
models to background image. And this is roughly
models I add last time, but you can of
course, add anything you want without shadow. We even don't know where this guy is staying
in the tre D space. Glossy direction is
just artistic choice to make this scene more interested and you can
see how this looks. So we have a shadow
here and we have all these nice details and
all the glossiness here. After that, we will
create some smoke and or dust overlays. Also we'll create
this nice **** flare. This is how this look before post processing and
this is final result. I will now talk where
I found this image. But this is not so important
for you because I will share this image we need for this
tutorial with this one. And of course you can find any image you
like on Internet. You don't need to
use the sources. I will talk now,
you also don't need Photoshop for this
because I will share this edited version with you. To find inspiration for
my cinematic shots, I use this website frame set up, but I think more
popular is short deck. Bad news here is that both
of the service are not free. But if you go to Youtube and if you search for short
deck alternative, you can find a lot of
videos where you can get suggestions for
free alternatives. I think this Dow here is a
nice widow where you can find few suggestions
for free alternatives. Okay, let's back to shot
deck and frame set. I think if you
make free account, you can get one month free or some package
of free searches. And also on frame set, I think you can every day get credit for ten
searches for free. On shot deck, we
have 800,000 shots, and here we have maybe
half of this value. I think this is
reason why shot deck is more popular, this frame set. If you wonder why
I prefer frame st, the reason is that I didn't find this button for similar
search in shot deck. Maybe there is, but I didn't. But when I know
specifically what I want, I just last time go here in search and search
for gas station. I got a lot of gas
station scenes from all different movies. You can see that we get
a lot of results last time I found this image here. Then click full screen, you can get a high
resolution image. Last time I skip this step. If you click on this movie, you can also find resource
link or name of this movie. You can see that this
video is music video. You can also watch this
video if you like. If you click here, you can even get high resolution image. Here is our, we will do in
this credit for this shot, Go to these guys here. Because last time I didn't found this link where I can get
high resolution image. I struggle a little with
low resolution image here and I increase little
resolution in Photoshop. And I will show you how
I think this is not so important because we try to
achieve all camera look. And we don't need high resolution image
to achieve this look, because this is in depthitorial. I will also show you how I remove this guy and
car in Photoshop. But again, you don't need to do this because I will share
this image with you. I start with Lasso Tool and
I just select this part I want removed after. Then I go to Edit
Content Aware Fill. If you click okay, you can see that we get
pretty okay result. This is old version
of Photoshop. I don't have new one
with all these AI tools, but my recommendation is to use these new AI tools to
create generated fields. Okay, with shift D, we can de select this and I can just repeat this
step for this part here. That's how I get
this image here, which is our starting point.
3. Part 2 - F-spy: The next step, we will
use Pi D for blender. And you are probably
familiar with this Don. But if you are not,
don't panic because Pi is very easy for use. And I will also show you
in this tutorial how to install this Don and how
to use this in Blender. This Don help us to get
right perspective of image and import this
background image in blender. You can basically manually
import background blender, but I will show you why
this Don is important. You can skip this part blender. I will just show how you can
import background image. If we select camera, we can go here and enable background image if
you know on left to go to render preview and
number zero to camera view, we can just add here
background image. We have here, our image. We have here default cube. But you can see that this
is not lined up with this image because this
image is pretty 90 degrees. If you look this image,
you can see that everything is lined
up 90 degrees. Basically, we can quickly line up pretty good if we set
camera on 90 degrees. And if you bring
this camera down, we can also line up this camera here and go here with zero. We can basically pretty good
match this perspective, but we don't need to
do this manually. With P, we basically drop these lines following
reference image, then we get right perspective. If we go here to basics, we can see how this look, we have vanishing point here. This is very important when
we draw two parallel lines, they must meet in
one vanishing point. And then the spy work correctly. In this example here, you can see that this
is correct because the parallel lines will meet
in one vanishing point. These lines are two parallel, they will never
meet in one point. And this will not work. Correct. Okay, let's
now install Spy. Just click here to download. Then if you use Windows, just click here, your Windows, we start downloading and
you can find this here. After you are finished, you just need to
go to this folder. And I will now go with here
and I will fund this EC. Now we basically
install this and you can pin this to
your task bar here. And I will do this. We are ready to use pi and you
can load this image here. This is example image, but later we will
just drag this here, you can report your image here. Next step to use this
in Blender is to install Blender on pi 0. You can just click here. You can see here
reporting to Bender. Click here and go to
code download zip. And again, we download here. And just copy location
of this folder. And then you go to Blender and Edit Preferences and other Ds. Click install this folder
here and just select this pi D and install Add. After that, if you
search for five, you can find this
add on here and just click here to activate and then save references. Next time when you open der, your pi will be here. If you press and you will
not find this add on here, because we just get this
file under file in port, we get this option here. Now when we have Pi program
and Pi for Blender, we can create quickly match
perspective on this image. But I will, in case, also share my file with you. I will put this in
resources so we can find this file here. I'm not sure if this will work, but I will just quickly show you how you can import
this in vendor. But in a minute, we will also create
our file here. If I go to import, we can select this file from here and you
can see what we get. You can also in pi, go to file open, you can load this file here. And you should get
this perspective which I mentioned last time. I'm not completely sure
if this will work in your computer because we also need this
background image here. And I'm not sure if your F will be able to find
this background image. But this is not important for us because we will
start from scratch. This guy explain how to use Spy in different type of images. But for this image we need here, we can set this very quickly. I will just explain to you what this
vanishing point means. We have here option for one
or two vanishing point. You can even add three
vanishing point here. I think this guy explain how this work here
in this image. But mostly we have one vanishing point image
or two vanishing point. How to know when one
and when is two. Basically, when we have
this type of image here, we know that this is one
vanishing point image because all these lines
go to one center. This example here we
have the situation. You can see that all the
lines go to one vanishing 0.2 vanishing point
example is here. Basically, when we
have this building rotated to 45 degrees, all the two vanishing points, we have one here and
another one here. If you go to Google, it is
not vanishing vanishing. If we go to Google, we can search for
vanishing point example. You can see here a
lot of examples. All these lines go to
one middle point here. Here is an example where all this example is
perfectly in the center, but we will rarely find that all this is
completely aligned. So you can see this example here and this example also here. All the go to one point, but if you change here, 1-2 and you can
see this example, all these go from center
to vanishing point, on left and on right. This is one good example. All the go here and
another one is here. In all these two
vanishing point example, you can see this line in middle. When you see that
your building is rotating on 45 degrees, you know that this is two
vanishing point example, okay? Now we know that we need
said this to one here. For this example, I will
start new spy project. I will now this here
said this to now I will say this to y
because all lines in three D which go from
camera is y axis. I will say this to y, and I will say this to z because we have this
nice axis here. Now I will grab this
here, press Shift. You can basically
zoom this here. I will set one point
here, another here. We basically follow
this line here. Set another parallel line
here. Set this here. And. Another one here. We have one vanishing
point here. Now I will follow the line. I will set one point
here and another down. Okay, Now if we grab
this gizmo here, we can try and see how
this lined up here. You can see that this
is not pretty good. This is because focal
length also affect this. I'm not sure which
focal is this image, but I guess most of
cinematic shots or about 35. If you type this 35, you can see that this
line up pretty good. I think this is about
to be good value here. If we try all of these lines, you can see that this
match pretty good. You can see this x axis and also z axis here
line up pretty good. And also this x axis, this 11 thing which is important here where
we put this origin. It will also be
origin in Blender. If I, for example, place origin here and if you go, you can see that last
time I put origin and we also get origin
from rendering this point, this is important so we can start modeling from
this origin point. I will zoom this here and I
will in this corner here, when we start modeling later, we can just go with
shift and we can get our default group
in this point here. One last thing which is
important is this focal length. I'm not sure why this happened, but when I change this value here and
when I say this file, I didn't get updating blend. I'm not sure why, but basically what I
type here doesn't work. I found useful when
I change camera, which for example this
35 millimeter focal, It works basically because I
cannot solve this problem. I said this camera 60, which I guess 35 focal, and then this work in blend. If you know where this problem, you can write on e mail. But last time, for example, if I send this to cast camera type here 35
in for the sender. I get my camera 50 here. But when I change
this to Canon 60, which I guess 35
millimeter focal, then I get this focal 35 which I need basically because I cannot
found, don't work for me. I just che with setting
this camera here, we get result we need. When we set everything we need, I just go to file save. You can save your
file where you want. If you type here
gas station two, we can save this file. And then when you go to blend, you can go to file. Import. You can select
this file, import.
4. Part 3 - Blender, camera, and character import: Okay, Now we can start with
the blender for seriously. So you can now start
following all these steps. And I will copy
this address here. And I will go to Blender. And I will press
A to select all. And I will press Delete. We delete camera
default Cuban light because we will not
make animation. I will just close this click and Join
areas and click down. Now we can go to file, import y. I will navigate to this folder and I will use
this first py file here, import y project
and we get this. Now I will save this file, save. I already created this gas
station tutorial folder. My recommendation is
to create folder on your computer where you
keep all this file. And we can call this
just station to. Let's see what we get here. We get this basically camera, if we go with Numpazero, we go to local view and
you can also go with view. Viewport and camera, we get camera with this
background image and you can go here under
background image. You can, for example,
change opacity. If you send this to one, it will be completely visible. But I will back this 2.5
Let's change Render settings. We will use cycles for this. Let's set this to GPU. I will set the samples to
maybe 30 and Filardo 30. I will set this to 15. This is port and every
time we make change here you can see this
will count to 15 samples. But because we don't have any red this completely
in real time, we cannot see anything here. One more thing, we
get origin point completely on this here. I will now go with shift
A and I will add cube. And I will scale this all down. If for example with
shift and right click, we will change origin point. This is reason I
add this cube here. If we change origin point here, we don't need to
care more about this because we have this
cube on place, we need. Let's now start with this guy. In this final render,
I use this model. Later on this tutorial, I will show you where
you can find this model. But of course you
can use any model you have or you can
find on the internet. But for this tutorial, we will use this model
from Blends Web. This is human base mesh
because this is zero, I will also share
this file with you. You don't need to download
from this website, but I will also share
this link with you if you want to get this
full detail mesh. Because for this tutorial, I also use mesh density here. I have this file here. I will bring this to
resources folder here. And you can basically
just go open this file. What I do last time, I also animate this guy. We get pose we want. If you press play, you can
see that this guy animated. I animate this guy using. I also talk about
my past tutorial. I will not do this again. Basically, you can just upload this character
here, for example. You can also use this file here. If you delete this bone here, you will get human in pose. And if you go with amped
one to front tortographic, you just need with x n
to take this degrees. And now file export
as FBX or OBJ. Then you can FBX here. Then you can animate this guy. You can search for
any animation here. For example, walking. You can find a lot
of these animations. If you click here, you can apply this
to your model. And then you can download
this pi, this mix file. I said this last time
to 45 and I use this x 7.4 Then basically you can just import this
to blender file, Import and X, you can
make this guy animated. But I already said
this animation here. You can see that this
guy is animated. So we can choose any of these key frames
and pose we like. But again, I talk about mix some in my two or three tutorials. You can also find a lot of
free tutorials on Youtube. Now in this tutorial we just
select Bone and this guy. And we will go
with copy objects. We will back to our main scene. If you now go with
right click and paste, we place this guy here. If you open right click, horizontal split time line here, we can basically
choose frame We, I think I go here at the end where this guy look
on this gas station, this guy is perfectly on place where I put this time here. That's because I
copied this from my last file and it
should be on place. We need, but if you
want to move this guy, you need select bone. If you select this
mesh, you get this. Just select this
bone and you can rotate Z or you can
move on Y axis. So you can see this axis. You see also this
green line here. And Y closer to camera
or far to camera, you can move, will escape and I will keep
on this position.
5. Part 4 - Combining background image and render: If you go to edit mode, you can see that we
have a lot of vertices here because this is pretty
high density object. If you don't have
very strong computer, you can reduce if
you go to edit mode and clean up that m geometry. And maybe you can
type here maybe 0.5 to reduce this mesh to hull, your scene should be faster. I will go with Ump zero again. Let's see what we
get if we go with 12 or vendor render image. Okay, I see that this is pretty slow for this very simple scene, so this take 5 seconds. That's because when we port x y, we also get resolution from original image which
is pretty high. I will type here 50% I will just keep 50%
of the values here. If you now press this takes
25 seconds, which is crazy. I will now press 20. Now this takes only 6
seconds, but you can not. One thing, we get only this
guy in this little cube. We don't get anything
in background first. I will just reduce this
war color more to black. I will bring this down because we will try to match
this dark, nice scene. I want to get more
dark sky here. I will bring this about here, but we will see later. Let's see now how we can get this guy here
with background. I will go with slots two because this is
background image, we can get only this
image in compositing, I will go to compositing, and I will click here to use nodes with activated backdrop. Let's close this timeline here. If you have enabled node, regular added
preferences and Dom, just search for node
and enable Angular and select this Render
Layers and Control Shift. Click here, we can
preview this render here. I will now press to zoom this out or all three to zoom this, I don't know why I don't
see this render here, but I will press to
render this again. Okay, now I see my render here. To add this background image, we need alpha over. First I will go with Shift
and I will search for image. I will found here, this gas station, a white image. If you go with, for example, control shift and click here, we can see this image here. But I will go again with Control Shift and click here
to preview this render. And now we need alpha over
search for shift and alpha 0. Now I will say this here. Let's, for now, just remove
this composite node. We need this later
when we are done, just to not be confused. I will remove this here. Now, I will plug this
to the second input. Okay, I think we need first in this image and second
input to be render. First problem that we don't have this
transparent background, we have this gray or
black background. To fix this, you need to go to film and enable
this transparent. Now if we press 12, we now get this
transparent background. Second problem is that this
background image is too big. So we shift and
search for scale. Now we need to this
gas station image, and I will say this to render size basically with this node. We will copy this
resolution here.
6. Part 5 - Gas station modeling: Now we have this
guy staying here, but we even don't
know where he stay in ready space because
we don't have any shadow to know
where he stay. And to create read
shadow what we need first we need ground which
will be our shadow catcher. And we need lies only
lies in our scene. We have here is this color. Because this light go
from all directions, it will just create
little black spot. Do we recreate the lights
from this image here to be able to recreate all these lights we see
from this background image. We will now model basic shape
of this structure here. I will now back to
lay out one thing. We know that this cube, middle of this cube here
is this point from Spy. If we zoom this here, we can see this corner
of this column here. We can now start modeling. So first, I will close this
again with joint areas. If you now go mode, we can first select
this face here. We can go with this move tool. Or if you go with x, you can move this to
x axis to about here. I will now select
this bottom part. I will again go with num
zero to camera view. If you go here to X mode, you can see background
image here if you want. Let's select this camera here, and we can increase opacity
here to see all to one. Okay, numzero. Again, let's again select this object and go to edit mode. And we have selected
this bottom part. And I will now
bring this to here. One thing, I also want to open
this image here so we can always zoom and look to this image to better
understand this image. Okay, found this edge here. I will place this about here. And let's also select this face and line up
to this edge here. Now I will select this top face. If you cannot select this space, you can always move your camera. And now you can
select this space. Let's line up, okay, so just be careful, this is not z axis. If you need, you can always
disable this x ray mode. And then you can
select phase here. Let's now back to our scene, and let's bring this here. Okay, to go about
this part here, one thing I forget to tell you. If you press now, you can see
dimensions of this object. This is x axis 17 centimeters. If you look at this
object, I think this is, for example, bigger is
about maybe 40 centimeters. That's because we didn't
set the dimensions in Y. We can set this
reference dimensions. For example, if
you select X axis, you get this ruler. And you can set, for example,
on this column here. If you type here 40
centimeters, 40. And when you explore this, now you will probably get more right perspective
of this image. This cube will be bigger. You just need to know that all these objects will
not be real world scale. If you see the
measures of this guy, you can see that he
is also so small. But I think this is
not a problem for us because this can affect, for example, some settings
like depth and field. But we will not use any of
these settings and field and I'm not sure which other
settings this can affect. Just to know that this
is not real world scale. I also try this reference
distance in my another example. But this is not so
precise because if you move just one
or 2 centimeters, this difference can be very big. This can be helpful to match distance closer
to real world, but it is impossible to be very precise with
this tool here. But that's why I will
not care too much about the real world
scale dimensions. But one thing we should
care here is proportion. For example, if this
column, if this here, is 40 centimeters on y axis also should
be 40 centimeters. Now we can move this
into this space. For example, if this x
axis is 70 centimeters, I will type also y
axis 70 centimeters. Okay, another thing we
need, care is scale. For example, we
will now go to Edit mode and go to insert this. You can see because
scale is not one, you can see this
scale here we press, we can see what we get. We stretch this more on
y axis than on x axis. And if we apply scale
with control A, we can now go with, we can insert how much we want
in this reference. I think this is pretty too much. I will now press to back here. Now I will go with
ill withholding, stick this on z axis. Now I will click and I will
back to our reference. And let's now just move
to this point here. Now, because I know
that all these columns here are on the same
position on axis, I will just press
L. I will shift x and move this only
on x axis here. Let's now go to x ray mode. And let's try line up with
this reference image. I look on this edge here. This edge here is here. I will move it again. If you, for example, go with, you will
move on all axis. You can see we
move all the axis. Be sure to go with X, to stick only on X axis and
line up this edge here. One thing I also see on
this reference image, we see this edge here. But this column is
bigger because we have this part go down and
it is inserted in. What I will do here, I
will go to edit mode. With edge select, we can
select the top edges and we can bring this little
on x little more. Now I will press A to select all the objects and I
will go with shift D, Y because we want to
move this one y axis, shift D and hold Y. Let's now try project
to these columns here. Another thing, we know that the four columns are same
size and dimensions. Okay, next is this ceiling here. So we can grab one of these paces here
with face selection. If you go with 12 or
three on your keyboard, you can skip between vertex
edge and face selection. I will now copy this. One of these I will go with maybe up at seven
and I will go ship Y. And let's place
this somewhere in middle now we can
press to scale this. Okay, One thing I know that this little out of
this column here. So we can also a little more and let's
bring to about here. If we now go with p zero, we can fix this. I will move this on x
axis to this part here. And I will also move little out because this part which go
down is not our reference, because we will
extrude this later. Let's now move to this
point, to this edge here. And let's move lit, okay, let's do the same with
this x axis to about here, and move this little out. Let's now go with and Y and
move on y axis to about here. Okay? Now I will
select this space. Okay? Now it's a little
hard to select because of this x ray mode. Let's disable for second. I think we need press L
to select this lose part. And we need to bring this
on Z axis here, okay? We can also move this little out to this edge here on x axis. Now if we go to three, this space, we can
see where is this. And I will again select this. I will now go to extrude this
on axis to this edge here. Okay? You can see that
this is perfectly, we have some little offset here. I think that's because
of camera distortion. Maybe this is not
perfectly a line that, or maybe we make a little
mistake with this y, but this is not so
important for us now. We basically get this part here. We can now check
scales, scale one. And we can now go again, let's see, to understand
this picture better, we have this part here. We can get this with to insert this I think we can do here. If you disable this in Viewport, we can see where this line now, it is much easier to
see. It's about here. Let's again disable. We can also look on right, this edge line up pretty
good with this one. I think this is pretty good. And I will now go with and
Z to stick this one Z axis. Let's see, is this
edge here, okay? I think this line
up pretty good. Maybe a little more, so C, little more GC. I think this is now pretty good. Okay, I now disable everything
and we have our base. I think this line
up pretty good. Now we can continue modeling. We now have this small blue part and this part extruded out. Let's now go to Edit mode, and we can now select
this top part. Now we can go to
extrude Z for the axis. Let's make this part. Now I will press, just
move this little. I will, I will move
to ext small part. We can, now, if you hold, you can select all
this loop here. Now we can move it and extrude along normals
and move this out. Okay, let's now extrude this red part and this
small white part on top. Let's again select
this space, not zero. Easy to extrude this part. I think this part is too big. So I will again go to
select this, Look here. I will press, we go with, we can scale this
down about here. Maybe we can go with Z. Move this little up.
Now I will go with X. This will be a small white part. Again, you can select this look, I will go with a extrude along
normal, maybe this little.
7. Part 6 - Creating lighting and shadows: Now when we have modeled this structure in
three, this space, we know where to put the
lights on this image. We see that we have lights from this area and also the
three lights here. We can now go back to blender. I will again go to wire remote. Let's now place
origin here so we can be more precise and
holding shift and click, you can place origin here. And I will go now with shift. And I will go with what we
can do. Split this window. When you see this cross
here, you can move this. If you go with numer zero, we can enable render preview so we can see what
happened on left. I will right shift a light area, this can be like area lamp here. I can go to scale this. Let's move this little out. By default we have
ten here, values. We can maybe go with 20, but we will see later. We can also enable remote so we can see also
this background image. Okay, now I will shift x, place this to another side. We can see here this light here. I will again duplicate this shi shi Y and
move this inside. But now is inside this concrete, we need to bring this down
until we see this area length. Okay, First I will delete this on right side and I will match position of
this light here. I will go with x to
move this on x axis. I think this is about here. And now I will go
with shift and y. We now need to move
only on y axis shy and place another one here. I know that this light is
behind this column here. I will go with shave y and
place behind this column here. Okay, Now I will select all these three
lines with holding shift shift, shift shift. And now place this
on another side. So shift the x to about here. You can see that is
pretty good line up with the slides here. Maybe a little more on x axis. Okay, if we now go with Fleven, we can open this image editor
on frame one, on slot one. Last render and I
will now press Okay. If you wonder why you
get this black color, that's because in
composite we need to plug this two composite here. We can see that the lights
affect this guy here. Now we can set our shadow
catcher object or ground. I will go to lay out. I see on this reference
image, where is this ground? We can see how big
is this part here? This part here is
little more bigger. And then we have ground, we can replicate this threpace. I will select this object, go to edit mode, and
let's grab this. With saved, I will go with
Numped one we can go with. And to move this on
axis on this ground. Now I will place this
maybe on middle. And I will press to scale scale more to cover
all this image here. Let's move this on y axis, and let's scale more. We can go with x to
scale on x axis. Let's now press P and
separate by selection. Now this object is separate, object and separate from this gas station.
Let's say this. Let's now go with 12 just for
test to see what happened. You can see that we now this ground here and we have
all these shadows here. But because I don't
want put texture on this ground because we already have nice ground
here with all the Nice details and
all the lighting which are based on this image. I will now just use
this as shadow catcher. If you now select
this object here, if we go here under object properties and
under visibility here, we can check this
object as shadow catch. Before we set this
shadow catcher. This object, everything, every object we make
in three this space. But when we check this
as shadow catcher, that means that this
object is only shadow. If we now go to slot five and if we now
make another render, you can see that we basically remove this ground and we get only these shadows here J. You can skip between the slot, this is so 122 without
any shadows with three. This ground here with four. This shadow, if we
go to slot two, when we have this guy without
shadow and slot four, we can see that we get some shadows which reacts with the lights here
and this guy here. Now, it's better than before, but I'm not happy
with these shadows. I want to increase this. I can increase this,
but let's first better replicate this
lighting from this image. We can see we have
the four lights here, but we also get a lot of
lights from this shop. We can also try replicate
this in the this space. I think most realistic
thing we can do here, we can just make another plane here and
project this material. And set this as a mission to
get lights from the store. Maybe we will do this later, But what I do last time to
make this artistically nice, and I will put strong lies
behind this character here, because this light will
not be enough to add all the glossiness and all the shadow and
reflections we want. Basically, we will cheat this, duplicate this light with
shed and move this on y axis. I will go to Ump seven, and I will place on
x axis in middle of this object, this middle end. To get this nice reflection
I want put this light on. I will place this light here. And I will go with x to
rotate x to stick on x axis. Let's move this about here. Let's go with the X. Let's point to this guy. But this will not be enough to get this nice
reflection on ground. When we have light
lower to ground, we will get more
nice reflection. I will go with, she can move tool here and
I will place this here. Bring this one to ground. Let's move on here. Let's go she again. And let's place mother here. Let's maybe rotate
this about here. We will see later, but
I will keep this, okay. This is before and after. We basically get more lights
here and more shadows here, but these shadows
are not so visible. I will show you now how we can
increase the shadows here. I will go to the property and I will enable
shadow catcher, we have this option here. Now I will go to compositing and you can see that we get
this shadow catcher. But if we go with control shift, navigate to this shadow catcher, we can see that we
any information. And I will now back
to back to our scene. We just to last note here, Control shift and click here
and back this scene here. We need to basically render
this to get new information. 12, we can now again go with Control Shift
and click to Shadow Catch. You can see that we get
more information here. One thing I note that
this world here, which is pretty bright
kill these shadows. We get less information in
these shadows because we like Lights coming from all sides. And I will move this almost
completely to black. If you know, press 12, we get this shadow, catch a shadow of
information here. And I will break
this control shift and click this to Alpha. And I will go with mix here. Now we basically white color, but because factor is one, we get completely
white color here. And if we go to left, we get this image. But I will now mix this with this shadow
catcher information because we kept dark
parts of this image. We will set control sheet here. I will back this image. We need set this to
multiply, blend mode. Multiply, blending mode
will keep dark parts from bottom image here multiply and should get
some shadows here. But the factor is zero, we need the back factor to one. You can see that we
get this shadows here. Last time I increased
this with color Rem, but I'm a little confused now. When I add color Rem here, I don't get anything. This is shadow catcher. When I click to calm, I basically lose all the tails. I can increase with
moving to right. But then I get this result. I will try now with curves. I'm not sure why this happened, maybe a figure out later, but I will do it curves for now. And I will just add
few points here. If I add more white colors here, we will increase
basically this shadow. Because we remove
white colors here. We see more black colors here. But again, when I try
increase the black colors, I don't get anything. I'm not sure why this happened. I think this is enough shadow. We don't need more shadow. I will just press 12 to render this and see
how this look now. Okay, again, we need
plug this to composite. You can see this before. This is after. This
is now much better. We perfectly know where
this guy is staying in three space because
of these shadows. I think this is artistically
nice because we get more dramatic lighting
with these shadows here. I just want to show you
in my last time when I do this, Let's see, here we have this multiply, this is shadow catcher. And when I put this to colormp, I basically get full
control with this colm. I can basically add how
much shadows I want, but you can try with this color. I'm not sure why this
don't work for me. I think that's because
I'm a little tired now and I will continue
with Toia tomorrow.
8. Part 7 - UV Project modifier: Okay, now we have
two options here. First one is to
cover this object, a shadow catcher, and just continue use this
background image. Second one is to keep this
object as treed object and just project image texture of this gas station to
this three D model. Let's see what happens when we convert this object
as shadow catch. I will go to slot eight. I will now just
select this object and click here to Shadow Catch. This is before and
this is after. Now we have this
image as background, but I think it is too obvious that this is flat to the image. I decide to use second option to project this gas station
to my three D object. I will now again go with slot one and let's see
how we can do this. First, I will remove
this shadow catcher and let's turn on this
material preview, so we can see how
our texture look. To see our texture first, we need to create material. I will call this gas station. Now I will split this window here with right
click and horizontal split. Now I will go to
Shade the editor. I will now go shift search
for image texture and just select our gas station
material from we use before. Okay, and plug these
two base color. Now we get texture
projected on this object. But how we can project
this from camera, we can do this if we use
this UV project modify. Now I will select map. This map we created with Pi. Second, I will, from here
search for gas station Pi. If we go now with N
zero to camera view, you can see that this work, but it is not as we want. There is two problems. First one is we need to
fix this aspect ratio. Here we just bring a resolution
of original image here. I will go to Render out to Settings and I will
copy this X resolution. Also, go to Modify Tab
and pat this here. You can see that
now is much better. Second problem is stretch
texture and we can fix this easy if we
add more mesh here, you need more information
to line up this texture. If we want to edit more than
start adding look cuts, we will see that we
fix this problem. But because I will use
subdivision surface, I don't want too much lots here. I will add maybe
three also here. I just want to make this stretch phase on
Z axis more square. I will add here only on
x axis for look cuts and also for the rest
of the columns here. Okay, you can see
that now we line up this texture pretty good, but I will also add one subdivision,
surface modifier here. Just be sure to place this on top and choose Simple from here. I will set this to one. I think this is enough, okay? And just background image, this is when we project this
texture on this model here, you can choose both options. This is just background
image and it is more integrated with
this shop in background. But with this option, we get real thre D object here. You can see that all
these lights here, this reacts with the lights we created in our thre D scene. I think this is not correct because we already
have lights in this, in this image here. Now we have double lights here. We can basically tell blender
to react with the lights we created in three D
S. If we just select this object and if we
remove specular or to zero. Let's see what happens here. This is specular 0.5
and this is with zero. Basically we have
three D object here, but this not at all with all these lights
we created in our seen, both options are not so correct. We have here double lights here. We have no lights
from three D scene, we have just lights
baked in this image. Let's now keep this maybe 20.3 and we will see
later what we will do. Okay, this is 0.5 0.3
this is without specular. Let's bring this down to 0.2 We will see we
have another problem. You can see the black
levels here are too intense and doesn't
match with this image. We can try to fix this now.
9. Part 8 - Color matching: Let's now fix the
black levels here. If you look this image, you can obviously see that
this black color here is more dark than this
black color here. If we go in compositing, if you go with shift
with mixed node, if we select this Dropper tool, if we select this
more dark color here, you can see that we have
only 2% of brightness here. That's mean that this black part here is almost completely black. But if we now select the darker
part of this image here, let's try this part here. You can see that we have
9% of brightness here. Let's try this part here. This now go to ten. Let's select this part here. This go to seven. I think maybe I can find
maybe 5% of brightness here. Now we know that we need add about 5% of white
color in this render. And how we can do this, we can plug to this image. Now we have this slide. If we move all to left, we get a start. And if we move this on right, we basically add this
whitish color here. But we have one problem. When we move this on right, we add this white
color on render, on background image, but we want to add white
color only on render. And how we can control this, we can control with
this alpha value. If you go with control
shift and click here and go to alpha value, you can see that
we have isolated this background from our render. Basically, we can
use this as factor. If we plug this here to factor, now we have completely
white color only on the surrender part. How we can add 5%
to the surrender? We can control this
factor with color M, shift and search for color M. Plug this to factor
now with this white color. We basically control opacity. We basically control how much we want at this white color. If you move to black, you can see that we
add less opacity here. And we know that we want at here about 5% I will type here 0.00 500.05 And we can see before, if you plug this here, you can see before. And if we unplug this, we can see after second problem. You can notice that this
render part is sharp, This background image
is pretty blue. If we go with all
three, we can zoom. You can see this very
sharp edge here, and you can see this blue edge
on this background image. We can fix this easy if
we just add blue here, shift and search for blue. This second input, all the go from this
render pass this part. First input is our
background image. Now in our render will
just add some brewer. Let's zoom this in
with all, again, if we now add here maybe just
2% Now add little brewer to this render pass here and
you can see that this is now much more integrated with this
background image than before.
10. Part 9 - Improving textures: Let's now try improve little. This material, you
can see that we have pretty flat part of image
here and pretty boring. If you look, this
original reference is similar and on
my class render, I had a lot of details here on roughness and
we can now do this. I will share with you,
let's go to this texture. I will share this concrete
texture with you. So you can use this if you want or you can find any
similar texture you like. Now back to lay out and I will select this object and we have this gas
station material and I will just bring this
texture to blender on left. I will split this window here, horizontal split, and I
will open here you editor. Now because we don't
want to affect this gas station image texture, we need another up under
data properties and maps, I will create another map and
I will call this concrete. Now on this first gas
station image texture, I will add first
up the four map. I will plug this here. I will now duplicate
this map with D in this concrete texture. Plug this concrete up. Now if we go with control shift and click on this
concrete texture, we can see how this texture
is projected on this object. We can now go to edit mode, and let's first
check scale is one. Okay, Now press a to select
all and New projection. Now we can play with this concrete map without
affecting this first one. I will press a to Scale and
maybe scale this little up. Okay, I think this
look pretty good. Let's back our material with control shift
and click here. If we now plug
this to roughness, we basically get
roughness detail from this concrete texture. We can now see before and after and I think
is much better. But we need to play with
this roughness map. Basically, black parts is shiny parts and white
parts is less shiny. If we back now, this material, we can control this
shiny or not shiny part with color M. I will
go with color M here. I think I want to invert this. Will move this white
color on left, this black color on right. If we go here to object mode, then I will go here
on Render Preview. So we can preview on left, and we can work on right. This shiny part is
still too shiny. So we can control
this black color and you can basically control how much you want
this shiny part. Or you can even go
to add more than. You can play with this. So
you can do it as to scale. If we scale this up, we basically add
more these details. But this is now
too much repeated. I'll scale this down,
maybe about here. Now, I will play with
this slider here. This is before,
and this is after. I think this is much better. Now, we can try to
improve this even more. So I will go to slot six. And now we can also add the concrete details
also to color input. If we go with control
shift and right click, we can mix these two textures to add only dark parts
of this bottom input. We can go with multiply blending mode if we go here to multiply all to one. Let's go to Camera
Preview with factor zero. If we go to left, we basically have
only this image first input input all to one. We basically add only dark
part of this second input. If we now with another render, we can now see before. This is before and
this is after. We can also add
little bump details. Shift a bump bump, we need only black
and white map. I will go first with
color M. I will plug this to color ramp and now this to height
and this to normal. Now we get all
these bomb details but this is obviously
too intense. I will bring here to 0.1
and bring this strength to let this is before and this is after we get
the nice details here. I think this is maybe
a little too intense. Maybe 0.25
11. Part 10 - Creating reflections on the ground: Let's now improve also
this ground little. You can see on my last
render that I add also a lot of nice
reflection on ground. Let's now do this, but if you remember, we decide to not convert this
ground to real tree object. You can see that this
is a shadow catcher. I don't want to
change this because this ground look
pretty realistic. If we convert this
to real object, all these slides we have here
will affect this ground. It will be too bright
and we will lose a lot of details from
this image here. We need to use
another method here. What I do last time, I basically create overlay. We can use incompositor to get all the nice
reflection on ground. First thing, I will
duplicate this ground here. Now I will press, I will
just withholding shift. Move this slightly up just to avoid the intersection
with this shadow catcher. And I will now press to scale. I will move this closer
to camera about here. I will just go with
double here and I will call this GL pass. We know that this
is just gloss here. Now I will create new
material and I will call this L for glossiness. Now I will quickly change
viewport color here. When we are in solid preview, we can see that we have
another layer here. Next, I will disable this
shadow catcher for the past. And you can see
that basically we get this real tree
D object here. And I will try, move
this little more down. I will go with GC and
withholding shift, I will try this. Okay here. Now we need we can go
p bump, I found one. I like Texture.com
and I think I will share this image with you
or jostling to download. I like the details but you can use similar asphalt texture
or concrete texture. Let's now bring this to blender. Now we can plug
this to base color. I will now go with control A to apply
scale to this object. And now we can go with projection
and we can unwrap this. Now on left in new editor, I will press to
scale this until I think this is real
world dimensions. Let's scale this little
more and you can move this. You most important
thing is here. But we will plug to
roughness because this will create glossy direction part. I will go with color M. Let's now plug this to roughness
so we can see how this look. Basically, black color
will be shiny part and white color not shiny part. I think I will invert this. I will move this left. You can see this looks, so we get all these nice
details in roughness. Think I will move
this more left. This is obviously too intense, so I will bring
this more to light. We can now also
play with this Ump. So we can scale this down or up. This is before,
and this is after. You can see reason why we
don't want to cover this to real objects because
we will have a lot of job to make this realistic. We will now just save this as glossy direction pass
and we can use this in Compositor to save
this glossy directions. I will, we will layer here and I will enable
this glossy direction. Now I will go to Compositor. I will press again
12 to render this. Now. I will go to zoom out. I will go with
control shift them. Click here three times to get to go to this
glossy direction, because this is
now plug to erode, we can go with 11 and
we can type here. Now I will save this
image so we can use this later as a glossy
direction pass. Now just on your computer, you can choose
this as J peg PNG, and just save this as
G glossy direction. Now we can back
here to last node, then with control shift
back this last node here. What I will do now, I
will back to lay out, I will now this glossy
direction pass. Just disabled and also
from port if you want. And I will press 12 and I will render this without a
glossy direction pass. Next we can back to
compositing tab. We can now import
this glossy direction pass in our composite. To do this, we can just here and place this
image texture here. If we go with control
shift click here, you can see how this look. Let's now break this
last note here. Now we need to the two textures. We can do this if we
go with Control Shift, right click and just we can
now mix these two textures. Or you can just type here mix. You can plug this to first
input and this to second, and this two node, and also to composite. We want to use only
this bright part. We need to set this to
screen blending mode. You can see we get all this reflection on this ground and also
on this object here. But we have problem,
this is too intense. And you can see on
my last render, I add this glossy direction
only on this small part here. We will now do the same. We basically need a mask which will control
this factor here. How we can do this, We
can search for mask here. I will for this
use ellipse mask. If we now go with control
shift and click here, we can see how this look. I basically want mask which go from here and cover
this ground here. I will now play
with this slider. I will keep this
2.5 which is good. And I will play
with this y axis. If you hold shift
with left mouse drag, we can move this
down about here. And I will first scale this. Okay? Now we can
move to about here. And let's scale this more one. Let's now stretch
this to about here. And let's scale this also. Next axis, I think I need something like this. What we can do now, we
can plug this to factor, we can see what we get. Basically, I want to
move this litter down. Now we need blue. This a lot. I will go
with shift and blue. If I type here about maybe 500, we can see what
we basically get, This nice gradient
and transition mask. But I think more about here. Okay, let's move more down. I just want to affect
only this area here. I don't want this
foreground background. Let's move this,
let's see, 200, 200. We get more sharp
transition here. I think about hundred is good. This is too intense. So we can always
control with the color. M will go with color. I will just play
with this value. This white value is
basically brightness. So we have 100% of brightness. Now use this about here. This is before and
this is after. We need this. You can see that this is pretty sharp and our background image is pretty blue again. Go with in this second
input with blue, we need to add blue to this
glossy direction pass. And I will add maybe
here value of two. We basically blow this
a little. Let's see. Now if you want to keep
this pretty sharp, you can go with value of one.
12. Part 11 - Adding details: These slides here
look pretty flat. So we can try a three D
details on this gas station. We can go with shift, right click here, and we
can place origin here. Now I will go with
shift and let's add. Let's press to scale this down. I will go with Y to
move this Y axis. Let's press to scale this. Let's see how this look, okay. P X to scale this on x axis, maybe we can press a
X to rotate x axis. Now let's go with, I will select this space here. And I will press to insert this, let's Z to move
this on the axis. And maybe to scale this, I will press L to
select this part. Lose part and control,
maybe to level this. Now what I will do, I don't
want to add this material here to this object and later we need the
subdivision and UV project. We can basically just select this first object and
second one and control J. Now basically we convert this to one object and we also add to this object as
the modifiers text. If we go to edit mode, we can still select this
object with L. We can now go with D x and move
this on the right side. You can see that we also change UV map when we move this object here because of this
project modifier is before and this is A. And you can see that
this is now much better. Go with L and let's
go with ship Y. Now I will go with Z
to bring this down. Okay, I lose this object, but let's try just place, where is the lights here? I will look on left and I will try position this
on the lights here, Y. I will now go
with ship the Y. And let's place, where is
this second light here? And again ship the Y, okay? Now I will place L to select
all these three lights. I will also add
this on left side, ship the X. Okay? This is what we have for now. And last time I add point
lamb here on right side. Let's see how this look now. If you want to make
this character more visible and more bright, you can shift right click, place origin here and you
can add one point lamb. You can see that we get a lot of details on this character. I will bring this
up and maybe move. I don't want to make this
character bright because I want to make silhouette
of this character. Because background
here is bright, I want contrast between this
character and background. I will just keep this. Maybe we can bring this to file. Next thing we will add
here is this shell, no sign you can
see how this look. And also this line here. All this is from my Act. I will share this Act pack
with you so you can use in your future projects this new signs I create for this render. So you can find this
on my Instagram. This new sign and
also this line here. I have these assets
in my asset browser. With this pack, I will also
share Short Asset browser, but I also have bigger
asset browser totorar. You can search for that. Also, you don't
need to put this in asset browser because
you can just go to sign at back file and you can just copy the two objects. This is from my last file where I make tests
for this tutorial. I will just go copy objects. I will paste this here, okay? But if you add this
to asset browser, I add to sign category, and you can just
drop this in our. Okay, here we have
this shell logo. Now I just need to rotate this X minus night
and a Z night. Okay? Now I get
basically saying, okay, and here is this red line. But I will now deleted this two objects and you can see that this is much brighter. That's because I go to
shape the editor last time and reduce this light intensity. Maybe two, or one, or even 0.5 I'm not sure. Now I will just line up this. I will go with R, Z, and Y to move this on Y axis. This is before and after. You can see also
this light we had before and this neon sign sche Let's now update this glossy direction path because
you can see that we don't have this red color
from this neon sign. I will now update this. We need to enable this glossy direction
in port and render. And now I will press F 12 again. You can see that we get this small value
of this red color. Will go to compositing, and I will navigate
Control Shift, click here. I will navigate to this
glossy direction past, I will press F 11 to
open this image editor. And now I will search for U, because with this control
shift and click here. We plug this to node. Now I will just save this again. I will overwrite this
gloss direction, PNG Y. I will now bring this last node we
disable glossy pander. This again, we should see this reddish color on this
glossy direction path. But I think we need
update this image. You can just open this
here or you can go with 11 and search for GL. When you have opened this image, you need to go to
image and reload. Okay, now we have this reddish
color on this ground here. If you want to add
more reddish color, you can basically
just change color of this light here because
this sun is too high and doesn't affect
this ground too much. If you want more
reddish color here, you can basically just add
red color to this area, ***.
13. Part 12 - Overlays: Next thing we will add here
is this fog in background. I found a nice pack of this
overlays on this channel. Definitely check this
channel in this video. Here is link for download but I pay this link
for this video. This file I will share with you. You can download
overlay this link. This is how this cook, we basically get 12 overlays
and let's check resolution. This is very big resolution, about four K. I use this
a lot in my projects. See how we can add
this in our scene. I will copy address of this folder where I
download this pack. I will, let's go
here to Material. Preview will go with
Shift right about here. And I will go with shift A
and image images as plan. If you don't see this, you need to go to Edit
Preferences and other Dos. Just search for images as
plain and just activate this. Now we can go again with
ship image images as plan. I will select one of
these images here. Let's go with this folk. Now we have folk here, but we need to remove
this black color. I will just change
this material, I think last time with
emission and transparent. Now we can go with
control shift click. We can just mix the two shaders. I will use this
texture aspect, okay? And I think we need to
invert the two nodes. I will plug this down and
this one on top, okay? You can see that we get
this fog over here. Now, we can just
bring intensity if you bring this value down about 0.5 Or you can get same thing
if you go with color ramp. If you bring this white
color more to black, you will basically
say this effect here. Now you can just shave the
x and place maybe one here. You can also stretch. But one thing I do last time
I share under material, you can just make another
variation of this material. Last time I just
changed texture. For example, bring this
texture here, okay. And you can bring
this more background, so ship the y. I think this have more sense if we behind this column here. You just need to play
with this overlays and duplicate and make
composition you like. I also, this is after a few minutes of
playing with overlay. I also change this
Viewport display color. When you are in solid preview
you can see what is fog. My recommendation is also
to select all the overlays. If you press M, you can add this to new
collection and you can pull this fog for example. You can now disable this
collection in Viewport. This is still here, but only when we press, this is before and
this is after. Let's talk about this
anamorphic **** flare. You can see here, I create
this with paid Don. This is Don I use for this
and it is not so cheap. But you don't need to
buy this Don because you can Google for example, anamorphic **** over. You can find on Internet
similar stuff and you can Past this on video editing
program and set this overlay. If you just change
blending mode to screen, you will get only
this blue overlays. That's how you can
use this for free. For this ad, we need light. I will now go to **** flare, and when we have
selected this light, I will choose this
anamorphic blue overlay. And you can see that this react
with this three D object, but doesn't react
with this background. That's the reason I decide
to create this overlay. I will bring intensity maybe to 0.1 because this
is too strong. And you also have this option, you can customize
this **** here. Let's see what we can do here. If we disable the globe effects, you will get on the streaks here or you can just disable
here or this shimmer. Now you have
basically only globe, but I will not play now. You can also change the
intensity of any of these parts. If you click here to shape that, you can just bring
intensity of the globe, maybe two y, but I will
just bring intensity. Let's now select
this slide here. Now I will go here. I will click here
and I will go to duplicate two selected object. This one of this object
here is selected object. And I will click here, Duplicate two selected object. And now we have lines
also on another side, but I will also
bring this now maybe 0.03 Let's now disable whole collection and keep
just these two overlays. And I will also
disable this in render and I will just
render this over, we forget to disable
this fog also, I will again click here. Disable this fog in render. Now we have this
background image, so I will go to compositing. And I think if we click
Control Shift and click here, we can review only
the render layers. Okay, And I will go to Node, and I will now save this PNG. I will save this
under Texture folder. I will also share
this file with you, and you can use this
later in composite. Now we can use this PNG image, we save us over. Now we can bring this
**** overlay here. And if we now go with control shift and
right, we can mix this. Okay, now we see only
this **** flare. Because we use mix and factor is one and we want to
remove this black color. For this, I will use
screen blending mode. Okay, now we have
the lenses here. If we move this on left, we can reduce opacity here. I think this is too much. I also want to add blue because you can see
how this is sharp. And I will go with blue. I will say this to maybe two or maybe for. Okay. And I also mentioned that I will tell you where I
found this character. This character is not
for free and I found this on this procedural crowds. And if you want you
can buy this Don, but you can also find a lot of free characters and
people on Internet. This is what you get. You get all the low people
and they are not so low poly. And if you go to edit mode, you can see how this look also. They are animated. This guy is in pose, that's good because you
can import this in Mixamo and you can change pose
of any of this character. I think we are done in Blender. I hope I didn't skip any step. And we can now go
to post processing. I will now increase
the samples maybe to 200 and I will
render this safe.
14. Part 13 - Post-processing - Part 1: Usually for post processing, I use after effects. But because after effects is not free and most of you
don't have after effects. For this tutorial, I will use one free software I
found recently and I think we can do nice job
in this small free software. The software is called Cut. You can download this
program from this link, so you can just search
for download and you can download this
nice free software. I found that this
software have a lot of nice filters and effects and we can use some of
this in this project. I will just click
to New Project. I will here under Media
Import our Render. Nice thing about this
software is that you don't have any experience with
this because it is so easy. We just need to bring this
to our timeline here. Now we can just search
for filters and effects. If you click on any
of these filters, you will see preview here. But when you click anywhere,
it will disappear. If you want to add
to your timeline, you just need to click here. Or you can just this here, okay. Now we have applied this
effect here or filter. But I think I didn't find anything I like
in these filters. You can try a lot
of this and you can see if you like
something from here. But I found a lot of
useful thing under Effects can also click here and you can
preview this effect. For example, if you like
this yellow blue effect, for example, stop
here and you can just save this sickness here. Last time I think I used this edge glow effect to add
a little glow to our same. We move out of this effect, we see only our render. And if we move here,
you can see before and after under effects, you can bring intensity of this. Let's go maybe just five here. This and this is after. Okay, I'm not sure
which one of these. I also, you can
try a lot of this, but I think I use
mostly this retro tab. I will go down to maybe a little chromatic
aberration here. In chromatic aberration
50 value of 050, we basically get zero. When we move this out of 50, left or right, we get
chromatic aberration. I will go with
value of one here. You can see how much we have, you can find, you can
test any of this, and you can use
effects you like. But I will go down to, let's try this TV effects. Okay, I will search
for retro here. Okay, here we have retro tab, and you can test some
of these effects also. Let's try this one. I think this is too intense. You can always play
with these values. Okay, this one is too intense. But let's try with this
slide show effect. So you can see that
this is animated. But because we will
save only one frame, we can choose frame we like. Okay, let's now
play with filter. So this is too intense. Let's add maybe just
ten or 20% of this, okay? So you can
continue play with this, but I will now go
to adjustment tab. For this, you need
to select our image. Here, select this image. And now we have this
adjustment tab. Now we have all
these adjustments we have in any graphic
editing program. But here is everything
simple and fast. If you want, you can bring this temperature on left to get more bluish tone or you can add temperature here and get
more orange or yellow tone. I think I will go on right here. You also can change hue. I usually go on left. I don't park this pink color. I usually go on left to
add more green tone here. Saturation. I think
I will saturation. Maybe little on left. I will add little
brightness here. Contrast. You can go right
and add more contrast. Left. And remove some contrast. I think I will go on left here, add more highlights.
This is shadow. I will keep this on zero. Let's see, this illumination. I will also zero and
this is sharpness. If you want add more
details on this render, you can go on right. But I think I will not use this particle, grain, basically. If you want a grain, you need these particles and I always like grain
on this render. I will add a little here, We have this fade effect. Get on, right? We will add vignette
on these edges. Or if you, you will add white. I think I want just a little
black vignetting here, HSL. You can change tone
of specific color. This is, you can see that we
affect this red tone here. I think I will go on right to
add more orange color here. We can also bring saturation. Let's bring this little
here and brightness. Let's move this on left
with this orange tone. We also affect this
neon sign here. Also, this yellow tone
affect only this part. We don't have too much
green tones here. We can go to bluish with this. We affect this sky here. If you want a more
green tone here, you can go on left.
More purple tone. If you go on right now, we can export this. But I'm not sure how to export one image here because this
is Do editing program. When I click here, I get only options to
export this as do. But I found one solution. If you click here,
we can basically, we can see full image here. I just use print screen to
make a screenshot of this red. Now I will just save
this on my computer. This screenshot
program is wide shot, so you can also find this software for
free on the Internet. This is before and
this is after.
15. Part 14 - Post-processing - Part 2: But let's now also
jump to after effects. Because I cannot found all these effects I
like in this cup cut. I will now just open new
composition from footage and I will found this render
here last time. In after effects, I add
this light rays effect, so you can see all these lights coming from this gas station. I will show you how I add this. I will go with new
adjustment and I will call light S. I will search under effects for light
just CC light race. Let's now bring to
this effect here. Let's bring this here. Now if we change this center point and when
we play with this virus, we'll see how this works. We basically get this
light race here. You can see that now this
affect also this guy here, we can control if we get
mis pass from from Bland. I will now go to up at zero and let's go to Material preview. And I will now enable
this missed pass here if we click here and if we change
from combined to mist, we can see how this
missed pass look. I think this is pretty good, but if you want to
change the values, you can go here under
war properties and miss can change this
start and depth point. I think I will move this to one, from one to maybe 25 is okay. Okay. Now we can press F 12. If you go under compositing, you will see that we
get this node here. And now we just need
to render this. But I will bring
the samples to 50 because I don't want
200 samples for this. And I will press 12. Okay, now we can download this missed pass if we go with control ship
and click here, we get this missed past here and I will search for you node. Then I will save this. Now we can bring this
in after effects. Now we have one problem. This resolution of this image
doesn't match with our. We should do this in after
effects before this cup cut. And then everything
will match perfectly. But I will now just press
and change opacity. We can set this manually, and I now press for Scale, and we can now match this. Okay, I think now this
match pretty good. So I will press again for Opacity and we can see that
this match pretty good. Now we can use this
Mi aspect or mask we need set this miss passed
over this effect we want. I will say this here and
this under layer set this. Now this is basically factor or mask for
this effect here. I will now go to missed pass here and I will
search for levels. Now if you want to see how
this look, if you click here, because this is not
completely black, we still see some of this
race on this guy here. But if we play with
these values here, this is basically similar
color ramp in blender. If we add more black color here, you can see that we basically this light race effect, okay? But we need to also
bring this little down okay, about here. We get this problem because
we first use cup cut and we save this file
with print screen. Now this resolution doesn't
match with this one, but I think I also get
a nice result here. I can now play
with these values. I usually also
addalation effect, and we can create
this very quickly. I do this in most
of my tutorial. If we find, we can
find basically the edges and I
will now search for them because haalation
is red, I will. Reddish color. Now we need to invert this because
we want red edges here. I will now search
for past, both blue. And I will type here maybe ten. Now levels, we can reduce this red color here
to only some edges. Now I will again go
with curves so we can bring this red color up. If we now set this screen, we basically get this
red globe effect. And let's now move
this little on left. Let's play with this while, maybe bring this to five. I think I will remove
this curves for now. We can bring this
more up maybe to A. Okay, now I will press and I will bring opacity, maybe 50% We basically get some of this red glow
effect or Haalation. We can also add more
red glow here if we just go with a
new solid color. And let's try. Okay, I think I
will manually pick some this red color here. Okay, now we have everything red and if we set
this to screen, we can basically make mask on, on, on this area here. Okay, Now I will just press M twice to get
this mass properties. I will just add big
feathers here, maybe 100. And you can see what we get. We basically get this
red glow effect. If I press, I can
bring capacity maybe just 50% this is
before and after, or maybe 30% I also have paid on here another one which is called
film convert. I will call this convert
and I will search here for this is
pretty expensive, About $150 but I get
all the camera filter. I can quickly add this
look with this Adam. We can control this grain here. I think this one is too intense. Let's play with
this precepts here. Now, all these are
black and white, so I will step down to here. Okay, so this is before
this film converted. This is after I will again
press and I will bring opacity to 50% But if you
don't have this Don, you can always serve for free. Lots or presets you get from a Db will add a new
adjustment layer and I will for color correction, okay? And if you search
for momentary color, you can find here you
can play with this. Or if you go here under
creative, you get more of this. Lots, you can play with this and you can
choose a lot you like. All these are too intense. Just be sure to bring
opacity to maybe down to 20 or 30% This
is before and after. Now when we are happy with the final results,
I will remove this. We just need to go to
Composition and Safe as file. And I will change to J Peg and recite this
to Original Sites. And now I will just set this folder where
I want to save this. I will change names. This is Render four, and click here to Render Okay. This is our final result. This is when I do
this last time, and this is what we
do in this tutorial. And thank you for
watching this tutorial. I hope you'll learn something
new and see you next time. Just quick update this
man also animation. I think I will make
tutorial about this. Stay in touch and
see you next time. But I also make just one frame, so you can see here window. I'm not so happy
with this animation, but rendering this
take a lot of time. Maybe we will make animation, or maybe just one steel frame. So this is animation, but I like more in
this one play key.
 šime Bugarija