Transcripts
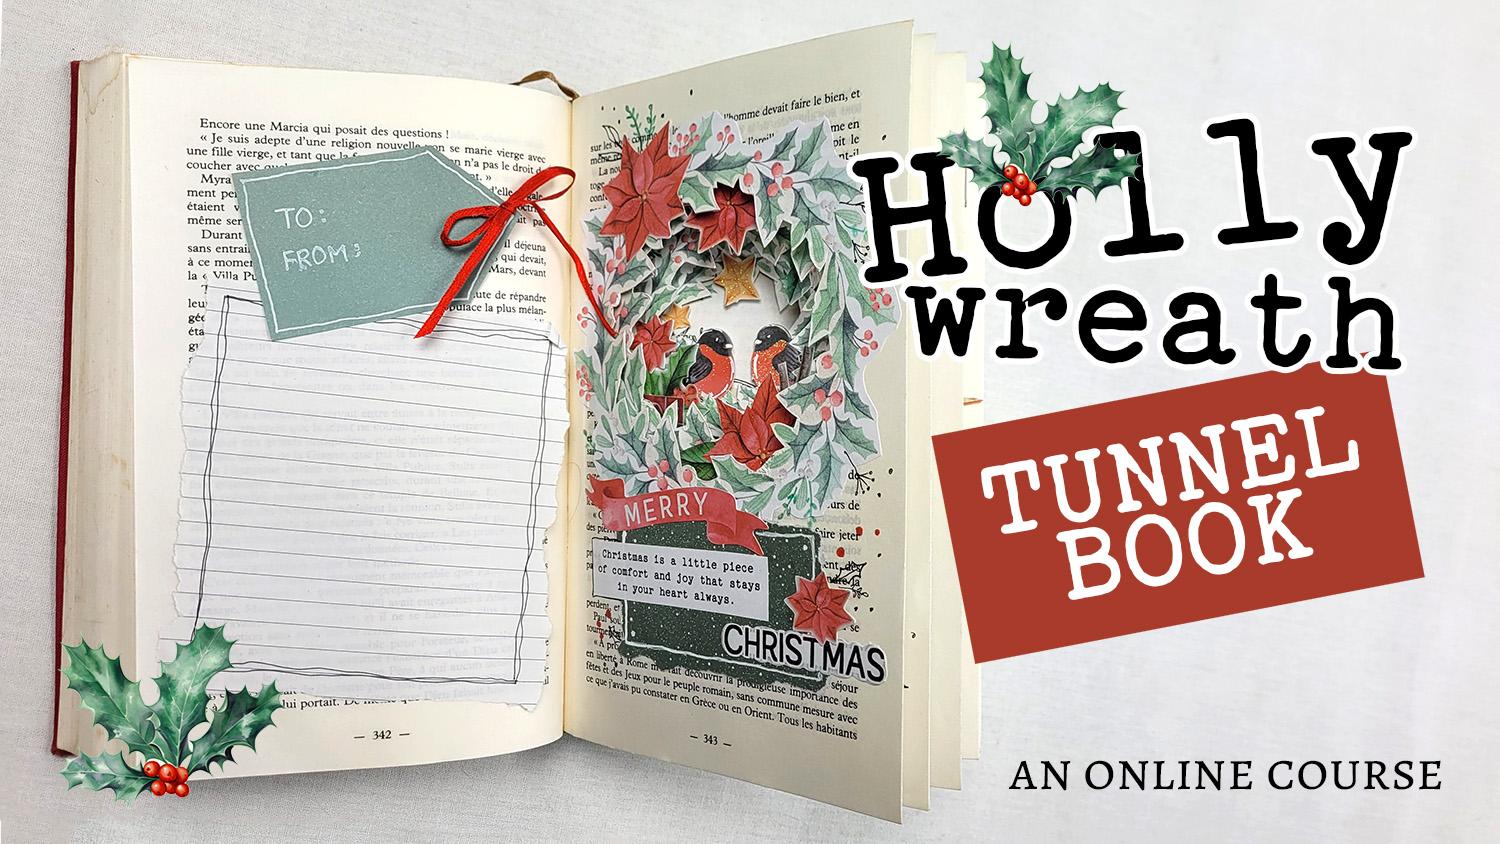
1. Holly Wreath Tunnel Book Introduction: Hello there. I'm esta
Biznack from France, and I love to make some creative artsy projects with self care and well being. I've just recently discovered the joys of creating
tunnel books, and that's the reason I'm
sharing it with you here. I thought of what better time to create one than
for Christmas, because it's a time
we all look for original and
personalized gift ideas. And we like different
and unique, and maybe not too complicated and handmade to make
it extra special. And recently someone gave me
a whole bunch of old books. And this is what inspired
the idea to make these. In case you're not familiar
with a tunnel book. It's a type of altered
book with pages that are cut into layers to create
like a three D tunnel effect. You can make them with
a whole book or you can just make it with a few
pages like I'm doing here. So in this course, I'll
show you how to create those few layered
scenes that come to life when you see them through the cut out
pages of your book. And I think tunnel books
can be the perfect way to store little gifts
and special messages, or memories and
souvenirs that you want to keep or pass on to
family and loved ones. I'm just imagining my kids or grandkids finding
these old books and opening them up for the
first time and being enlightened and excited
by this little treasure, surprise a little peak window
into an illusion of depth. And these are some books
that haven't been read for years and they just
sit on the shelf. So I'm thinking, why not
give them a new life and add joy and meaning for someone
else who opens the pages. Now I have them a
little bit all over my house and they
never fail to give me. And also those who take a peek inside a sense of
comfort and joy, or fond memory, or a gentle
reminder of a life lesson, or a fun experience. And there are plenty more
ideas of things that you can store inside
these tunnel books. If you'd like to come
on this tunnel book, journey with me,
let's Tunnel Through. You can also check
out the description below for more details
on this course and step by step of what you'll learn without further words. For now, I'm looking
forward to seeing you in class where you can create
this beautiful reef tunnel. Book bye for now.
2. Magic ingredients: Here are some of the
materials I'm using. First of all, very
important, is an old book. Here I have a couple options. This one is really old, and beautiful brown pages, even the pages are a little
thicker for this one here, it's another option,
It's a bit bigger, it's quite old and
used up a little. We actually I found
it in the trash. I figured, well, it wouldn't be too much of a waste
if I cut it up. Here I have a
printout of wreaths different sizes because that's specifically what I
wanted for this project. So feel free to print
out what you want next. Here I have a couple books that are actually made
for Christmas cards, but this will work just
perfect for this project. Really, I encourage you to use
whatever you have on hand, even stickers or little
cutouts even from magazines. Anything you have that can
help simplify a little bit, then I have here. I'm not sure yet if
I'm going to be using, but just in case I have some thin patterned
papers, different colors. I'm thinking of colors
of Christmas Eve, pretty nature patterns,
That's another thing. In case you have on
hand and want to use, of course, you'll
need a cutting board, a pair of cutters,
a pair of scissors, a glue stick, and then a black ink pen and a
white gel pen if you want.
3. Ready, Steady, Merge: In this class, we're going
to prepare our pages. Prepare our book, which
means merging some together for extra durability
and also for thickness. I'm taking my glue stick, I find the middle of my book because I'm not going to do the whole
book as a tunnel book. This is the very simple way
of doing a tunnel book. If you want to do more. If you want to do the full book, then feel free to do that. But I'm just going to dab
glue all over the side, my right side then
the page in front. I'm just pushing it down gently but completely so
that it smooths down. Just right. Then the next page, I skip a page again, put glue on the full right side because I don't know yet
where I'm going to cut. That way it makes it again, even then pushing it down again. For this project,
this tunnel bulk, I'm just going to do
five double pages. But on some other projects,
or if you prefer, you can make your pages thicker, that's no problem at all. If you want it more of a
three D look or if you want the whole book
as a tunnel book, then feel free to put three or four pages
together to simplify. I'm just going to do double. I find that double is the minimum that you
can do that I like to do because at least it thickens the pages a little
bit. It's more durable. It also gives more of a three D look than
just one single page. So now here's my fourth page. So the trick here is I
think just to make sure you glue them really well
and straight also, they open and close
well and they're not crooked in that way. It also doesn't show on
the edges of the book. You want to keep it a surprise, That's what I love
about tunnel books, little treasures
inside your book. This is basically the way that I prepare my pages
for my tunnel book. Just to confirm,
let me make sure I have the five that
I need. 12345? Yeah, that's perfect. There we have it and I'll
see you in the next class.
4. Shapes and Sizes: I wanted to start here by showing you a few
different options of shapes that you
could do here. I have random circle shapes, not perfectly circle,
which is on purpose. I like the different
shape of it. That way each one is a
little bit different, helps it stand out a bit more. You can either do
different shapes. Here's another example. This is one that I haven't
finished yet either. This is mountainous shape. What I've done here is
I've gone from small to bigger with each layer of
the mountains on this side, I went from biggest to
smallest with my cuts. This is just showing you
alternatives that you can, you can do circles,
you can do squares. But you can also get a
little bit more detailed, a little bit more adventurous, and try out different
shapes altogether. Now here's an example of starting with the bigger
size, the bigger cut. This is one that
my daughter did. She has a theme of a
snowball, snow globe. Her first cut is the biggest, and then each one
gets smaller and smaller each time she adds some different
pictures and decors. For this one, she
used circle shapes, so that's one idea, you can do your biggest
shape as your first cut. And going all the way into the smallest shape towards
the end of your book. With this design,
you kind of have the whole overview in one go, starting from the first page. Now the opposite
of that, which I'm also going to show
you an example of, is going from small to big. I made a small circle here and it gets a
little bit bigger, so it's kind of turning
into an oval shape. And then it gets quite
big towards the end. So starting small
helps you keep turning the pages to get to the
next bigger picture. And with this
weight, it also kind of keeps it a surprise what the next page will
be rather than seeing the full
thing all in one go.
5. Picture Treasures: Now moving on to
picture treasures, or also what I'd like to
call the main picture. I've chosen a holly wreath for the main picture
of my Tunnel book. For this one here, because
it's a Christmas one, it will depend on the theme you're making
or what it's who it's. I'll talk more about that later. But for now, I'm just going
to cut out the main picture. I have one wreath for each page. Now, when you do a main
picture for your tunnel book, you don't actually have to
have one for each page. But this is just the way
that I've done this one. Anyway, I've cut them
all out very quickly. I'm going to glue them first. I'm going to just place them
on each page that I want to. For this one, I'm going to
make from biggest to smallest. Just make sure they're
in the right order. I guess the main
thing about choosing your main picture is going
along with your topic, your theme more the reason you want to
make a tunnel book. And really thinking
of that because I think the main picture
is the important thing. For example, the globe idea. You have everything
related to that. Mine here is a wreath, so I'm going to have all the
pages adding to the wreath. For now, I'm just going to
glue the first wreath down. Then for the rest, we'll
move on to the next class.
6. Crafty cut outs: Now we're ready to move
on to the cutting part. Just before I do that,
depending on the shape, I find it helpful to just draw the outline of
where I want to cut, especially with
this one, it's got so many little tiny
corners and details. Then you take your cutter
and you just cut away hoops. Sometimes it does
mess up like that. And I realize it's when I
don't push hard enough. Just make sure that you
give enough pressure. Also, you want to make sure your papers are dry
before you start cutting. It does get a little
tiring to do the cutting. I have to be honest. It might also depend on the
cutter you have. I realize this is not a perfect
cutter for this project. You can find some that are easier to handle and to hold and maybe you can cut
finer details anyway. I might even touch it up with
some scissors if I want to. It's easier that way, especially for when I have
the outer edges open. Maybe just to smooth
out my lines, that's one way to do it. You can cut it directly with
the picture that you glued. Another way of doing
this, if you wanted to, which I thought of later, is a way to simplify The process would be to have just
cut circle shapes in my book pages and
to cut inside of the Holly pictures
in advance and then glue that over the
circle pictures. Now that I can see
through the cut hole, I know where to place
my next picture of the Holly because they're
all the same Holly pictures. I rotated a bit to find a different part of the picture just for
some variety and fun. Of course, I make
sure to glue it down. Well, to simplify the cut, I didn't go through
the whole process of each one because basically
it's the same thing, smaller and smaller, and I
ended up with a bigger one. That's what I decided
to do in the end. Now you can congratulate
and celebrate yourself for doing this
part because it was a big, challenging part of the project. I'll see you in the next class.
7. Additional Embellishments: In this part of the course,
I wanted to just show you a few ideas of
ways that you could add additional embellishments or additional pictures as a way to fill out your
pages even more. I'm using these two
little booklets that is for making cars. And they're already, which
definitely saves time. If you don't have any of these, you could use stickers. You could cut out magazines, you could draw them yourself. As I mentioned in the class about the
supplies that you need. Anyway, I'm just choosing a few that would go nicely
around my wreath. I'm just going to look
through each booklet and pick out some that
call out to me that inspire me or that
fit with my theme. I like using a few
titles as well. For now, I'm just placing my little collection
on the side here. And then I'll decide which page I want
each thing placed on. And picking some stars, picking different
types of things. I have some gifts. I have
a few different themes. I guess that could go
nicely on a wreath. I'm also picking the
colors that match the ones that I have on
the holly and the berries. Certain greens, I'm not choosing because they're a bit
too bright or yellowish. I do like these flowers. I think these could go really
nicely because they match the berries and they're also bigger objects
that stand out. And anything to add,
flowers and nature. I love that these are
really special too. They kind of glimmer
and shine in the light. I could add an extra
holly leaf somewhere. So these are kind of fun
and playful booklets. They're a little childish
and cute as well, so I'm not using all
the little animals. I'm kind of going with U, just a natural look. I stick with leaves and holly. Then another embellishment
would be to add some papers. This is when you can add some
of that paper if you have. This is an option, you
don't have to do this, but I'm going to do it for this tunnel book is add
something else to my page. I do like to use this paper. It brings in contrast and color and it has a Christmas
feel to it as well, with the little snowflakes. I'm just going to place this
sheet of paper in the back so that I have a clear
view of the page. I'm working on that way I
can see what goes nicely, what fits well into this page without getting
distracted from the back. I have these words,
Mary and Christmas. And just seeing where
they would fit nicely. Here's really where you can let yourself get
inspired and play around with your creativity
and design ideas. There's no wrong way to do this. Have fun. Then you can
start gluing things down. I take one page at a time. The first page is
probably the easiest one, you just make it
however you want. Then the next page, again, I'm going to put this
paper here so I have a clear view of what it looks like when I place
things down this page. The next one is I want to place things where it would also
look beautiful from the front. Because I'm going
from big to small, Each thing that I place will
also be seen from the front. That's why I pay attention to
where I place my flowers or objects that way they're
not under something. I want to show them off here. Again, I'm going to add
a ripped piece of paper. This is not necessary of course, but I like to add
little messages. I like to fill up my page. All right. Moving on. I didn't
film every little detail, but I think I'm giving each
page a different theme. The first one with flowers, poinsettas, the
next one as well. This one has some gifts. Depending on the
pictures that I chose, I categorize them that each
page has something special, something new to
look forward to. This one, I'm
definitely going to add these beautiful little
Christmas birds. Again, I want them to
be seen from the front. For this one, I'm going to use the little colored paper to
draw a branch for the birds. This shows that you can
also feel free to add in your own art, your own ideas. If there's something
that you can't find in your little sticker book or with your pictures
that you do have, feel free to use your own imagination and
creativity to make it yourself. I wanted these birds
sitting on something. I just cut out a branch, like I won't see it
from the front page, but at least I get
to see the birds. I make sure that I glue
them at the right place. Often I just put a little dab on the edge because you don't want it to glue
to the next page. For this one, again,
I'm going to use a darker paper for contrast. This screen is really beautiful and I'm going to
make an oval shape. This is just to show
you different options that you can do on each page. This time my extras
would be little stars. I have the theme
of the birds and the stars and the oval
to write in some text, I just play around,
see how it looks. Then I can glue them down. It brings out a little
yellow. I like that. Here's my last page. This is ending with
a big holly wreath. I found this little
circle message that says, Happy Holidays. Again, I'm adding
some Poinsettas, that little circle message. I think that's it for
the main pictures, and I hope you have
fun making yours. See you in the next class.
8. Freeform illustrations: In this class, we're going to do some free form illustrations
or drawings or doodles. I have here a few pens that
I've picked, black and white. And I wanted to bring in
a little color as well. I'm just going to just go with
flow and see what happens. I might add some red berries, maybe some little leaves
around the holly. This is your chance to play and have fun and get creative
and imaginative. If you want, you could
copy some ideas from some other Christmas
pictures here. I'm just making a
white borderline just for fun to stand
out a little bit, I'm going to try drawing
some black holly. I like bringing in the black
from the word Christmas. Anyway, I don't really
know where this is going, but I just take one page at a time and see what I
feel like adding to it, how I want to fill the page. This one is quite full because
it's the biggest holly. I might as well go all out
and fill it up even more. I'm going to draw a few berries. This is also the way you get to personalize it and add in
your special touch of, you might want to
paint some dabs of paint or add lots of color and really make
it how you want. This is your time to shine. I like making little
borders around my papers. Again, adding some leaves
everywhere, anywhere I can. You don't notice too much on the brown pages or especially
when it's on the text, but you just know it's there. I think it just fills
it up in some way. Somebody wants to
look at the details. Again here I'm going
to use my white. This is not a gel pen, but it's more like a
paint pen, I guess. Then I might even add some black for these
little drawings and doodles on each page. You can either match each one to the previous
one or to the other, or you can make each
one totally different. It's really up to
you. It's what you chose for your main pictures. It's also what you want to add. Maybe something that
isn't on the main picture or additional ones that
you added and you want to personalize it in another way or draw some details that are special to whoever
you're making this for or if it's for
you as a souvenir. This is where it
gets fun to play with the little drawings
that you can add. I'm even going to put
a little bit of snow onto the branch that way
it's not so cut out looking. Maybe even some pattern,
some wood pattern. You can get creative. You
can use your markers. Even color pencils I find
to work really beautiful. This last page, I'm going to add more
berries to the sides. There's no wrong way
to do this at all. You use your art style, what you're comfortable with, and you can even step out of your comfort zone a little bit. You don't have to have
it all planned out. This is really just getting
inspired in the moment, so adding more of my leaves, Filling it up as much as I can.
9. Destination and purpose: Now let's move on to
another part of this class. This is where we get
to add a little bit more of a personal touch, depending on what
this project is for. Here I'm adding some quotes. Since my page is all
about Christmas, I thought it would be
nice to have something to remind me of some
joys of Christmas. Or if I'm gifting
this to somebody, then little reminders of what
makes Christmas special. Special family times, closeness with family
and loved ones. Or special celebration moments. I'm going to cut
some of these out. As you can see here, I'm just placing them in the
little papers that I made. You could either write
little notes or you could think of your own quotes or poems that you
would like to write. Here, I'm going to
write it in pen. I think it's nice to
have some variety, you could print them out to
help simplify the process. But then it's nice to add in
your own handwriting too. Makes it all the more special when somebody
receives the message. Then if you want, you can also outline it to help them
stand out a bit more. Now here I'm just going to show you a little idea of how I personalize it to
somebody special. This, for example, is a Christmas present for
someone in my family. I'm going to cut out with
the color paper again, just to match all the greens. I'm going to cut a little tag. I'm just going to
make it look like a tag and just write
to who it's for, of course include from. I'm going to glue
it in this page. Then I'm going to take a
regular notebook and just rip out a page and think I'm going to rip out
the paper as well. Here is a place that I can personalize it even more
by writing a letter, something specifically
for the person that I'm designing
this gift for. I think we've lost the
art of writing letters. This is a little comeback for me making things personal and
making things by hand. There's something about
I ying a Christmas gift. Doesn't have to
be big and fancy. If you do it yourself
with lots of love, then it makes it
a beautiful gift. I just wanted to recap a few of the reasons why you could
make a tunnel book. You could make it to
keep as a souvenir. You could encourage somebody else by writing
something special, a letter or a quote that
you know they would need. You could use it as a
personalized birthday gift. You could make a DIY
Christmas decoration by leaving the book open. It could look beautiful on
your shelf or mantelpiece. It's a great way to
say thank you to someone or just to send
a special message. And I'm sure you can think
of many more reasons for making a little tunnel
book gift like this. If you're wondering
for who it could be, you could either gift
it to a family member, to your companion, one of
your children, or a friend. I think there's no end to
who you could gift this to. Even a neighbor here. I wanted to show you just a couple ideas to
give you example. So here is a beautiful
one made by my husband. He decided to gift me one. I've been all crazy about tunnel books and he made
me a special surprise. Look how much love
it's filled with. And I love how it's
the three D look. And these are little
Alsatian German houses where we live and he
put it behind a heart. One thing that makes it
extra special is thinking about what that person loves
that you're gifting it to. Here's another
book, another idea. This one's not finished, but it's just a little sample. Again, something that
I love is houses. I thought about making this
one as a little story. I've just made a little opening, a little hole to something
of the picture behind. This is another idea. You could just a little
peek into what it could be. And then you turn the page
and you see the full picture. These are all just houses at Christmas because
that was a theme, but really you can use
this for anything. Here are a few things
I'm going to recap. Things that you can use in the tunnel books or
add to and include, you could add some quotes
to make it meaningful. You could write a letter. You could write a story
with this previous one. You could write a poem a
little bit on each page. Or you can even write
words to a song. A song that you know the person
really likes and enjoys. All right, see you
in the next class.
10. Final results: Here is the final result, What it came out like each page something
different, a different theme, yet it all kind of
follows Christmas, the same colors, the hollies, the poinsetta, and my
cat enjoyed it too. I'm still going to personalize it to somebody in my family. Since we're each
gifting something special this year
to one another, I think this will make for a beautiful, personalized gift. I'm going to personalize
it to that person, include some things
that they love. That's the wonderful thing
about a tunnel book. I wanted to also show you a couple other tunnel
books that I've created. Again, I've just made
them very simple, just using a few
pages of the book. Although for a tunnel book, you can use the whole book if you want it to,
including the cover. This is another one. This
is an all year round. I want it to include
a little bunny because I love drawing
bunnies and flowers. And this one just leads
up to this end picture, which is also some loving
words and reminders to myself. This was like for
my own well being. Here's another one again, these really beautiful old books which I've been collecting
for a little while. I didn't know what to
use them for now here I'm full of ideas.
Here's another one. This is on the theme of rest, resting,
relaxing, enjoying. Again, this was a note to self because it's what
I needed at the time. And that's the wonderful
thing about these books. You can go back to them and remember that
little souvenir. And also, I love
to be reminded of these quotes because they're
little life lessons. And whatever I add
pictures, cutouts, and the little words, Each little thing
says something. That's what makes this
project so wonderful and meaningful and a beautiful
souvenir to go back to. That's when I've even
added a fold out page. I just love to get
creative and add any, anything different,
anything special. I love each book being a
little bit different as well. Anyway, that was it. That's the end of the chorus. So congratulations. I'm so happy that
you joined me and I'm so looking forward to
your projects as well. Please send photos. Please share the joys
with everyone here.
 Agnes De Bezenac, Designer of Tools for Wellbeing