Transcripts
1. Introduction: Hello everyone, Welcome to my class. And this last, I will show you how you can easily draw and color a cute boy in raincoat like this. For this class, no prior experience of any kind of art is required. So this class is for all those who want to learn this. One thing I would like to mention is that I'm going to use only the pencil colors in this class for coloring, but you can use any coloring medium that suits you. Also, I have shared your project work for this class and then next lesson itself, so that you can complete your project work within the class and can submit it at the end. Now, let us start.
2. Project Work: So your project for this class is to draw and McClellan, a cute boy in green code earlier on, as you learned in this class. Now, after drawing and coloring, click a picture and upload that picture in projects and resources section of this class. You all must be excited to start. So let us proceed.
3. Material Required: For this class, we need a plain white sheet. A pencil to draw with. An eraser to erase defending mistake are black. Sketch pin to outline everything that we drew. Your local jello. Blue jello to fill color into the water. And red color and pink color, black color, green color. That's it. See you in the next lesson.
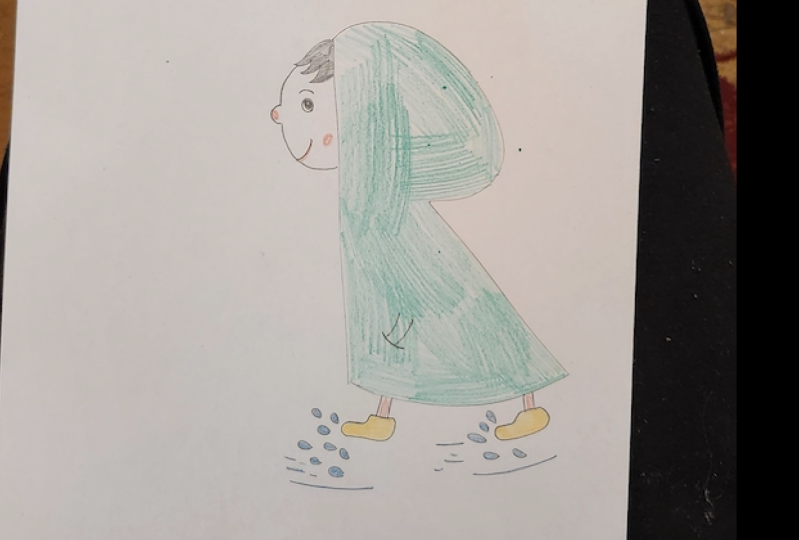
4. Drawing: Let us start drawing in this lesson. Firstly, we have to keep this sheet what typically to draw, but to draw a straight line, I'm tilting it horizontally. You can use both glue to make this straight line also. Now, keeping the sheet will typically street. We have to make this code like this, and then a straight line like this. So this looks like an initial. Now, simply join the dope points like this with.gov. Now over here, we have to draw the hill of, Oh, boy. Now draw the phase just the way I'm drawing. Or if you know how to draw a face of a boy. You can also draw like that. Now for when you draw this line to represent a pocket. And now draw lines like this to represent that the hand is inside the pocket. Now. And draw these don't line like this and do lines over like this. Elisions tilted. Okay, So these represents the legs of the boy. Now we have to draw the shoes. You'll have the Roche rules on board delays. One thing that we have in mind while drawing the feet and shoes is that the first shoe that we drew was to be drawn straight, but as they can, shoe must be tilted because the boy is walking state and laudanum standing street. Now after this, we have to draw these water droplets to show that it certainly any season. We are now done with the drawing balance. We'll move on to the polluting, but in the next lesson.
5. Coloring: Let us first start with the
outlining of the drawing. For this, I'm using this sketch been firstly outline the hill
and the phase of the boy, and then the eyes and the mouth. After that begin with
the rain coat, the arm, the shoes, and at last,
outlining the raindrops. You can also use a ruler
to outline the rain coat, but I'm doing it freehand. If you want, you can use a
ruler that's totally up to you. If you want. You can also outline the complete drawing with
any other color also. That is also your choice. Starting with the black pencil
to color the hill hill. You can also use brown color if you want to make the drown. And you're going to also use this sketch pen true,
which we outlined. Now, use the alloca load to fell into both the issue of the boy. You can also choose any
other color if you want. After yellow, pink,
the light blue color, and fill into all
the water drops that we have drawn
around the shoes. Also add highlights
to the lines that we drew earlier around the shoes
with the light blue color. Now, pick a red color and fill into the legs area of the boy. This shows that the
person is reading something which is afraid Carlo, how big the light
green color and fill into the
complete rain coat. This also use any other color you can make any other color
combination if you want. But I'm losing this
dark green gala. See Hill in this class I'm using only depends on the
fellows, but if you want, you can also use any other color medium that
you feel comfortable using. We are almost done
with the drawing, but for the highlights, I'm going to add pink and
red color to the phrase. Let's start with that. Pick up the pink color and
add some blush to the cheeks because it's a rainy season
and the boy is feeling cold, so we have to make his cheeks
and nose a little pink. Now, take black color
and fill into the eye. Make sure not to fill the complete II with
the black color, but makes them so
good inside it. And then fill the
outer part only. Now, use that add color to fill color over the line of the
lip that we have drawn. Now, I'm drawing this complete
alkylating is complete, is the final look of our drawing that we have created
in this class. I hope you enjoyed this class and I have something for you in the next lesson.
So see you there.
6. A Word with You: So guys, now you know how to draw and color a cute
boy in rain coat. So it is your time to
submit your project. Well, I also encourage
you to review this glass so that I can make my future classes based
upon those reviews. And if you don't want to miss any updates regarding my
newest classes on Skillshare. Don't forget to click
the follow button on my profile. And
this one's all. Thank you for joining, man.
 Deepa A.