Transcripts
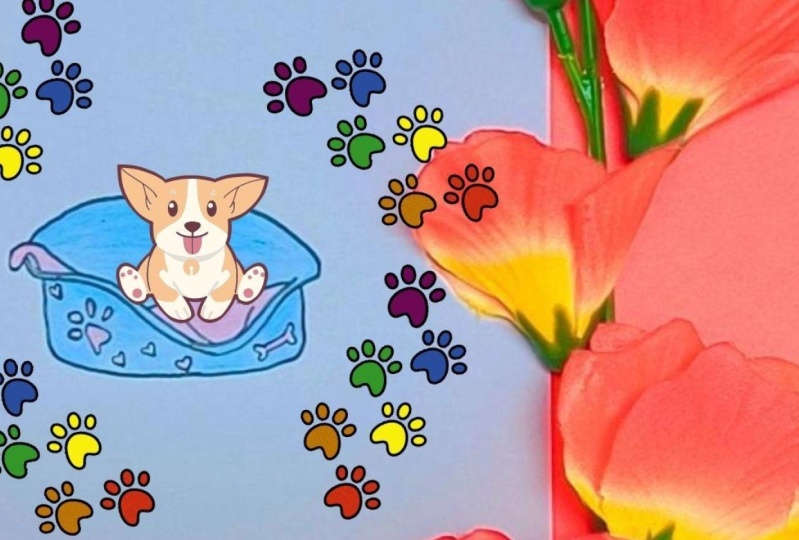
1. Introduction to Class : Hello everyone. Welcome to my class. This is for drawing
a dog with it. Firstly, I'll tell you the
material that I'm going to use and also what material you can use instead of the
material that I'm using. After discussing
about the material, we are going to start
drawing the dog bed. For this, I'll give you
a detailed explanation of each and every step
that you can follow. And also the elements
that you can add. Other than the elements that
I'm adding to this drawn. It is that you can
show your creativity and I'm sure you're going to
enjoy the drawing process. As you can add so many
cute elements to the bed. And it's designed. You can refer to various
images of dog bed to draw more elements and more
designs on the dog bed. Once done with the drawing, the next step is
outlining the dog bed. Now, I'm going to use this black pen like sketch
pen to outline the bed, the drawing that we have made. But if you want, you can use any other
color to outline this. That is completely your choice. Then going to come the best part of the class, the coloring part. Yes, I love coloring. I use some basic
mediums to color this. But if you want, you can use any
other color mediums, such as watercolors or maybe the acrylics or any
other gosh media more. Any crayons, whatever you
are comfortable with. I'm comfortable
with pencil colors. I'm going to use them. Now comes the moment of
satisfaction and admiring. Now, admiring moment and my other bed that
you have drawn. By the end of this class
we will have acute drug, but drawing in your hand for the name of
the project work, I'm sharing the yard
project work in the next lesson so that you can complete your project
work within the class. And we'll be ready with a drug withdrawing at
the end of this class. So all the best guys see
you in the next lesson.
2. Project Work: Hello. So here is the opposite torque. For this class. You just have to draw and color
the dog bed that you have learned in this last clicker, picture and upload
that picture to the project and resources
section of this class. You can complete your project
work within this class, and hence can share it. After watching the class, I'm really excited to see
what colors you choose, what design you make, and what the size of
the bed day to talk. I know that you are excited too. So let's not waste any
time and start the class.
3. Material Required: For this class, you need
a plain white sheet. You can use any
colored sheet also, that is your choice. You need a pencil to draw it. You can directly draw
with the colors, all the sketch pen if
you are comfortable. I'm also going to
use eraser to erase anything that I'm going
to make mistake with. Now, I'm going to use pink
color and blue color. You can change the colors as per your choice and ask
for your convenience. I'm also going to use a black sketch pen to
outline the drawing. You can use any other color or any other sketch pen
to outline the join. Because I'm sure you have many, many more ideas than
this particular class. So go ahead and try or created.
4. Drawing the : Hi. So now let's
finally start drawing the belt for this and keeping the sheet in this
vertical direction. You can keep the sheet
horizontally also, that is your choice. I'm using a pencil to draw. You can use sketch
when or any pens or any other thing that you are comfortable with for drawing. Now, firstly, you have
to draw a line like this and then make a
call from its bottom. Makes sure that the curve
is not very much code, almost a straight curve. Okay, then we have to
make a parallel line over here to the line that we have
drawn at the first place. So this looks like a small tub. Ok, and now we have to join the upper part but with a curve, makes sure that the height of both the lines is
almost similar. I'm not saying that you
have to use a ruler or something for making the MCU, but makes sure that they are at a particular alignment so that the bed looks proper
in proportion. Okay, and now to join the top, I'm going to make this curve over hill in this
particular shapes so that we get a space from
where the dog can get inside or into this bed. Now, you just have to draw another line parallel to
this line, this goal. You can notice that I'm using a pencil and I'm drawing
really, really light. So that if by any chance
I make any mistake, I can simply erase that
using the eraser and that will have no stains
on marks on my sheet. Afterwards. We have to make a curve like this, joining the two ends. Now this curve is
going to represent the backside of the dog bed
where the dog can rest. This folded clothes at the corner is the
blanket for the dog. We're almost done with
the basic structure of the dog with we now
have to decorate it. For this, you can draw any documents that
relate to the dog. Firstly, I'm going to draw on soft bed or
weakens the blanket inside this bed where
the dog can rest easily and feel so
comfortable and cozy. Drawing some random lines to
show the folds in the Cloud. All we can say the blanket. You can use it easily if
you make any mistake, you can simply use the
user and corrected. Now, here at the corner
I'm going to draw a bone laterally presents
the dog element. You can draw a dog toy or any small picture
of a dog if you want. See the customization, the
designing, and the colors. For these three elements, you are free to choose yourself. And you can also take ideas
from other pictures or drawings on maybe
some live thing that we have seen in your life. Now, over here on the
left side of the dog bed, here I'm drawing a dog ball. And this looks
really, really cute. You can draw it in other ways also if you know
how to draw them. I'm showing you a simple
way to draw them. Now in the space
that is left and run some small hearts in
bits I'll color later. If you want, you can draw
any other thing also. To complete the design. Drawing part is now done. We'll start coloring or
outlining in the next lesson.
5. Outline the Drawing: We have already done the drawing of the dog bed in
the previous lesson. In this lesson we are going
to outline this using the black sketch
when you can use any other colors catchment Also, or any other kind of pen if you prefer to outline the bed. When you outline, makes
sure that you are really very calm and doing
it very slowly. Because we have drawn the
elements in a very small size. You can notice that
the size of the bar, the size of the heart, and size of the
bone that we have drawn is really very small. So we don't want to fill those
spaces with a black color or the color which we are
using for outline, right? So we want to fill colors
in those elements. Now, if we want to fill color in those animals than
we have to be extra careful to leave that
particular space in that particular shape itself. When we're outlining
the blanket, but make sure that you
move your hands smoothly. Many a times we prefer not to outline first and to
go with colors first. Value coloring, we can make any simple or small
mistake that we can cover up using
the outlines Mattel, I'm not doing so cause there are really small elements in
which we have to color. So I want to use the marker, this black sketch pen. First give the shape of proper
solid outline so that we have to be careful
while coloring and we can make this
more impactful. We are done with outlining. In the next lesson, we'll
start coloring the drop bed.
6. Colouring the bed: We are halfway done
with the drawing. It's time to add colors to
the beautiful dark bed. Firstly, I'm using
this dark blue color. You can use any color
and any coloring medium. I'm comfortable
with pencil colors, hence, I'm using them. You can use watercolors, crayons, acrylics, or any
other medium that you like. Make sure that you color
the boundaries really carefully so that
nobody comes out of it. As we are already done
with the outlining part, we are not going to have any other chance to improve
our drawing or coloring. Every coloring medium has
a technique that must be followed in order to give
smooth and shiny finish. In terms of the colors, you have to follow a direction
in which you are coloring. My drawing gold. So you
can see that I'm coloring in a particular direction
from left to right. And once you start
coloring in one vertex, you cannot change the direction as the finishing
will not be perfect. You can also while or
in a circular motion. That's also very common
with the pencil colors. If you're using watercolors, then you know how to blend it, how to add water, how to add color. Say choosing the coloring
medium depends upon the kind of scenery or
the drying you are doing. Now, I'm using this
dark blue colored cell for coloring the lower
part of the bed. If you want, you can use any other color to
color this part. Now, one thing that you
have to keep in mind is that not to color the small
elements that we have drawn, because we have to
color them with another color, not this corner. You can add colors
according to your choice. All you can follow
the instructions that I'm adding to this class. Make sure that you leave no space between the colors
because that will not look good as we're drawing this in a metal
finish kind of thing. Metal finish or not like
these things like a cloth or a fabric that you can leave
some spaces between them. So you just have to
keep that in your mind. And now I'm coloring the
blanket with pink color. I like pink color. I think
dogs also light pink color. I don't know what
color you like, and you can choose color
according to your preference and your imaginations and the kind of color
that were dog-like. So that's up to you. Also coloring the small elements with this light pink color itself because I'm not adding so many colors into
just one coin. But you can surely do that. Maybe your dog also
like a colorful beds. So you can make a colorful bird, you can choose that also. So now we are done with
the coloring part also. Our dog bed is looking really, really cute, neat, and clean. I don't know what a
dog will do with this. But yes, it's look really
neat and clean right now. And it looks beautiful to me.
7. A Word with You: So guys, we are now done
with drawing the bad, outlining the drawing
and then the coloring. I'm sure that you have ready your project
work in your hands. And you are ready
to upload that. Click some pictures
and upload that and projects and resources
section of this class. I'm eagerly waiting
for your project work. Please, please,
please share soon. Seal in the next class. Bye.
 Deepa A.