Transcripts
1. Introduction to Class: Hello everyone,
Welcome to my class. And this class, I will show you how you can easily draw and color geode ice cream restrooms
on your own like this. For this class, no
grad experience of any kind of art or
craft is required. So this class is for all
those who want to learn to draw this or will
learn to color this. One thing that I would
like to mention hell, is that I'm going to use only the color pencils and
this class for acquiring, but you can use any coloring
medium that suits you. Also, I have shared
your project work for this class in the
next lesson itself, so that you can complete your project work
within the glass, and then can submit
it and the end. So let us start.
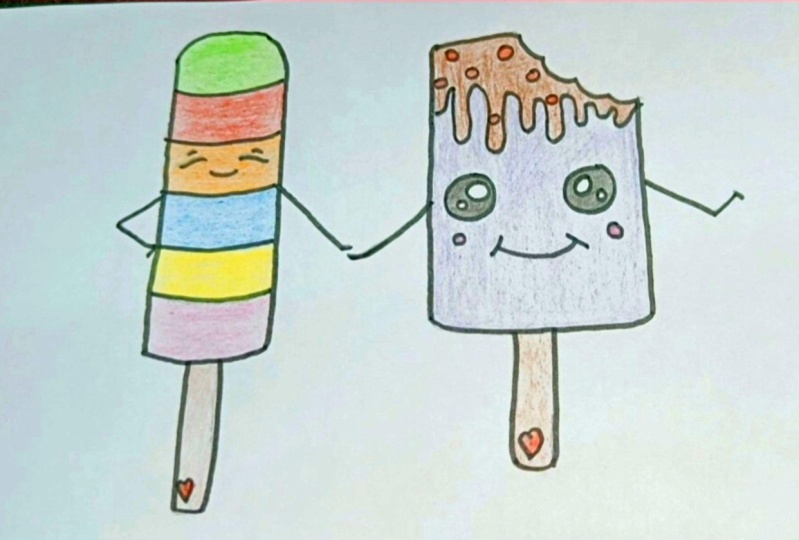
2. Project Work: So your project for
this class is to draw an ice cream friends on your own as you
learn in this class. Now, after drawing and coloring, click adds picture and
upload that picture and projects and resources
section of this class. You all must be excited to
start select is perceived.
3. Material Required: For drawing this
guilt as constraints, we need a plain white sheet, a pencil with which we can draw. And it is, if we
make any mistakes, ruler, to draw straight lines. I'm Blake sketch pen to outline everything that
we're going to draw. And a lot of colors, because this is going
to be ready colorful. You can use any coloring medium, but I'm losing
depends with others. See you in the next
lesson for drawing.
4. Drawing: To start drawing sheet
horizontally so that we can draw. Now, use a ruler to make the first popsicle
icecream like this. You can also draw
this free hand, but I am using a ruler to
make these straight lines. Also, I'm using the thickness of the ruler to draw
these two lines. Now, join these two parallel
lines with the code, like I'm drawing from
the top and the bottom, make sure that the dog or
no must be joined with a more circular circle and the bottom joins
must relate circular. Now, leave some space from this as Chrome to
the next ice cream. And then Mach some points to mark the height of the
second popsicle icecream. We have to draw wider
ice cream this time. That is why I have not
used the thickness of this case are the ruler to draw the second
line of the ice cream. But I allowed to 0
to mark the height. And then I'm not using the exact height
for the second line because we have to make the second ice-cream
slanted from the upside. Because we have to show that someone has each
in that ice cream. Join this as Graham, from the bottom, that slight go. And from the top side
make Disco like death. And then from the middle
make this design so that it symbolizes that ice
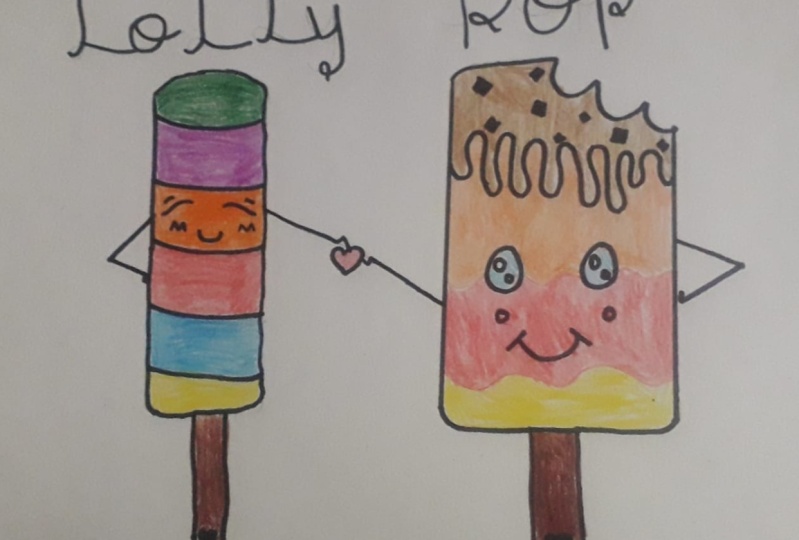
cream is already being eaten. Now on this side, I'm also drawing these
goods to show that it's in chocolate ice cream
and it's from the top. Okay, So the chocolate is
dripping from the top side. So, and now I'm
making these girls to denote the various
countries over it. Now, Hill, at the center
of the size trend, we have to draw tool so goes, this will denote the eyes. In each circle. Draw two circles, one big and one small. Make sure to make
the bigger circles closer and smaller
circles apart from it. Now, make this smile and let
cheeks up this ice cream. Now, let us move on to
the first ice cream back. And this has grown. We have to make these lines a little code downward like this. And we have to make
these lines all over. Make sure not to make these lines really
close to each other, are very far away
from each other. You have to maintain
some distance. You can also use the
ruler measurements to mount the points
and then join them. But it is not compulsory
to use the rule of order. List ends between these. And in the middle one, you just have to
draw two eyes and a cute smile like I am drawing. After this, we are to draw these lines to indicate the
hands of the ice cream. I'll make sure to draw these
lines below the phrase, the idea, like hill, I've drawn these
two below the eyes. And now one hand like this, so that this can be hold by the, another hand of another arise. After drawing this much, we have to draw the sticks dies going to six
of this ice cream. But the air, I'm
drawing these green and you can also use the
ruler to draw these. But make sure to make the
ice cream stick really 10 and according to the height
of the ice cream. Okay, WHO? For the longer I scream
for the taller as dream, I have made this really thin because of the
structure of ice cream. But then this one, this one is wide ice cream, so we have to make
an ice cream stick that is wider than
the previous one. Now for decoration, I'm drawing this little Kyoto at the
bottom of this as stick. This is totally optional, but does we look cute? Redraw it. So we are done with the drawing parts you in the next lesson for
the coloring part.
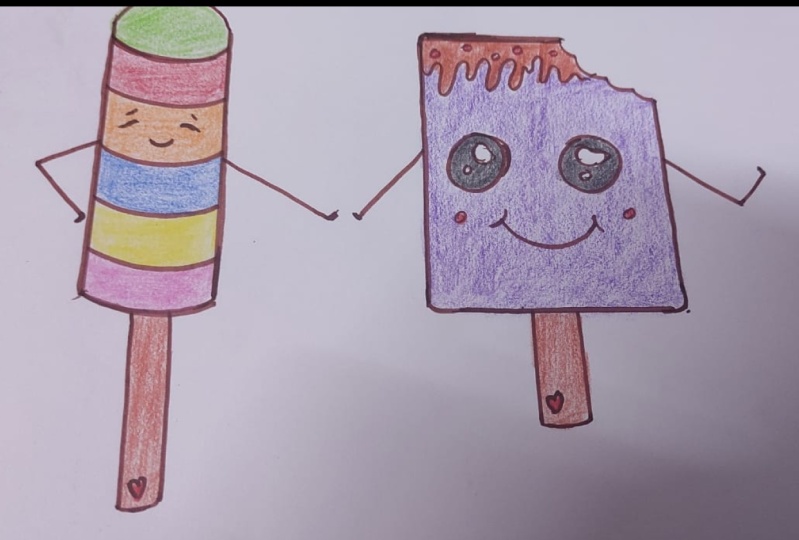
5. Colouring: As we are now done
with the drawing part, it's time for coloring. So let us start coloring. Firstly, I'm using
a light green color to further into the topmost
portion of this ice cream. You can choose any
color combination for these ice creams
as per your choice. But here I'm making
it as colorful as possible and as
attractive as possible. That is what I'm going to use. 3d scholars radius
vibrant colors. And in the next portion here
I'm using the red color. You can also use yellow. That will also look
really very good. Make sure to blend the
colors properly, far better. Finishing. In this third portion, I'm using this orange color. This is very light
and very right. That is why I have
chosen this color to be filled in this particular area. Because this is ADN, which I've drawn the eyes, the phrase the mouth
of the ice-cream. So I want this to be really
a right and very attractive. And the fourth one, I'm going to use
this dark blue color to match it with
the light color so that the light colonial make more attractiveness to the dry. Now and the first portion, I'm using this loop alone, making it really very bright. And also here I'm using the
theory of using the light and the dark sheets altogether to make them bright
colors look more right? And also to make the darker
red gas legion mole, okay, and at the last one, I'm going to use
this pink color. This also looks
really very good. Using the brown colored
to fall into the steak, but make sure not to fail it. And the part that we have
drawn because you have to validate using
another color hill. I'm filling this really very
lightly so that the color of this deck looks like only the color of the stick
and not the chocolate color. Okay, because we have to fill that color into the chocolate drooping that we have drawn
here around this, okay, and also using this
red color to fill into the herds that we have
drawn in the sticks and also in these crunches
and ranges that we have drawn over in the form of small circles over the
chocolate dripping. Now, use the light pink color to fill into the cheeks
or the ice cream. Now, again, use though Bob blue-collar to fail
and to the screen. Make sure to blend
the colors properly. If you are using
the pencil colors, you have to be very
show that you are doing the colors in
a particular area, in a particular direction
so that everything goes very smoothly and all your
drawings look really great. And why rent? Because of the Benson colors, you can just shift the colors
from one place to another, but you can just do the event, don't painting on coloring. You can also do that. I am using only
the pencil colors, but I can understand that not everyone is very much comfortable with
the pencil colors. So you can use any coloring
medium, literally, any, any coloring medium to go
with that suits you the best, which you'll feel
comfortable using. You just have to use
that coloring medium. Bead, oil-based
tools, beach crayons, be it sparkle pins be colored, pens me each sketch pens,
watercolors, acrylic colors, any medium that you
feel comfortable, good, you can use that medium. Now. Use the dark brown color, all the brown color
in a darker tone to fill into the
chocolate ribbon that we have drawn hill, hill, I'm using the same
pencil color that I have used to color into the
ice creams take below. But here I'm doing this really, really dark so that
we can differentiate between the color of ice-cream stick and the
color of chocolate dripping. Also, the color of the
chocolate dripping must be darker than the color
of the ice-cream stick. This will make your
drawing look of more relatable to the reality. Now use the black benzyl gallo to fall into the eyes
of the ice cream. But here you have to keep in mind that you have
to fill in to them outside of the dues
or both that you have drawn in the inner of weeks ago that we have drawn
for the eyes founders. You can also use the
Blake sketch pen that we are going to
use for doubt linings. That is totally up to you. Now use the brown color
to fill into that. Stick off this side,
ice-cream also. Now it's time to use
the black sketch pen to outline every stroke that we
have made using the benzene. Firstly, I'm starting
with this side of the screen and outlining
on the stat we have drawn. And now you can also use
the ruler or the scale to outline the things that you have drawn
using the ruler. If you are very much
confident that you can draw the lines
without using the ruler, only then go with this option
of not using needle low. Now, start outlining
the second screen and make sure you
are all playing. Not even a single stroke
off benzyl as visible. Once you complete
your outlining. If you want, you can
use any other kind of Michael to outline every stroke that we have drawn
using the Benzer. Hello, I'm using the black
sketch spin because I find that outlining the
small details like the eyes, the droppings of the
chocolate, that cute smile. And the circles that we
have drawn inside the eyes are very much easy to outline with this
kind of sketching. So cute eyes, girlfriends drawing is now complete and looking very beautiful and cute.
6. A Word with You: So by now you know how to draw
these as green vest rings. So it's your time to
submit your project work. I also encourage you to
review this class so that I can make my future classes
means upon those reviews. And if you don't want to miss any updates regarding my
newest classes on Skillshare. Don't forget to click the
follow button on ramp profile. This was all. Thank
you for joining. Bye.
 Deepa A.