Transcripts
1. Introduction: Sunlight shining through glass. It may be textured, colored or forced into
interesting shapes. As you walk past, the light, catches different
angles and colors, and the window comes
alive with movement. Hi, my name is Brian enrich. The last 20 years or so, I've made or repaired stained
glass windows as a hobby. Now that I'm retired
from full-time work, I'm going to spend a lot
more time doing this. And having learned a lot over the many projects I've
completed over the years, I would now like to share
my experiences with you. This course is intended as an introduction to work in
the stained glass windows. There are various techniques and the one I'm going
to concentrate on is that which uses solid
lead canes and cement. This is the traditional method for making stained
glass windows, and that's been in practice
for hundreds of years. And it's quite unlike
the technique which uses copper foil to show the
techniques involved. A new panel will be
designed, a template drawn, and then the panel
will be constructed to show the entire process
from beginning to end. There's a fair amount of
equipment that you'll need to complete this class. But don't worry, I'll
take you through all the tools and materials
that you'll need. Along the way, you'll
pick up many tips and techniques that will help you take on similar
projects of your own. In one of the lessons,
I choose a project. Once you've attended
that lesson, I would encourage you to
choose a project of your own so that you can
work along with me. Please use the class
project gallery to upload images of
your own designs. And I welcome all feedback
in the discussion forum below. See you in class.
2. Student Project: Hi there. This class is based around the creation of a
new stainless panel. And you can practice the tips and techniques that I'll cover, but conducting a
project of your own, the first few lessons cover the essentials to
make sure that you are working safely and efficiently with the tools
and materials involved. There are also some design
rules you need to know about so that you can follow them or you can bend them in an informed way if that's
what you want to do. On the practical side, there is a minimum set of tools and
materials that you'll need. And I cover that in
one of the lessons. There will be a
financial outlay, especially if this
is new to you. But the costs are
not that great. To prepare for the project, I recommend having a
look around your area for examples of
stained glass windows. You can look online, places
like Pinterest or Instagram, but on numerous
fantastic examples, your project panel
shouldn't be too large or too complicated. Initially, you'll find that straight lines are
easier than curves. And there are all
the various design considerations which
need to bear in mind, which are covered in the
lesson on that subject. But before we get there, we
need to look at health and safety and also the
tools and materials, and they form the subject. So the first two lessons, which are quite short. To prepare for the
design lesson, you need to get the
following items. Some clean white A4 paper or
larger if you can find it. Some masking tape, a ruler, a set square, or
something that you can make a right angle with. A decent pencil and a black felt-tip
marker, like a Sharpie. Please share your designs and ideas using the project gallery. See you in class.
3. Health and Safety: Hello, and welcome to the
first lesson on this course. In this lesson, I'm
going to be looking at various health and
safety considerations when making stained
glass windows with lead. Throughout the bill process, we're dealing with
many hazardous items. Glass pieces and
shards are very sharp. The tools can be
very sharp or hot. Some of the materials
we use are poisonous. And if you're using a grinder in the confined
space of a workshop, it can be really noisy, must therefore avoid
ingesting poisons. And we need to protect our skin, our eyes, and our ears. We want to make sure that everyone in the
vicinity is safe. You will need most or all of the following protective gear. So my protection,
some ear defenders, the face mask, or in this case
the half mask respirator. Some gloves. When soldiering, I have
an extract defend running gently to remove any
gases that are produced. I'm not quite sure what
the guesses are for now. I don't want to inhale them. I use a low-powered extract different because I don't
want to cause a draft. If the circulating air
cools the soldier down, it will interfere with
the soldering process and result in messy joints. We're working with the
following substances. Lead, solar, patina. The carbon graphite. Makes sure you read and
follow the instructions provided with any of the
products that we use. The lead in the
form that we use, it is only minimally
absorbed through the skin, but you mustn't consume it. So if I take a break for lunch, I just make sure I wash my hands thoroughly and I never
snack while I'm working. Of course, all the equipment and materials must be kept
away from young children. I think the overall message
is to take care and to bear in mind the safety issues
when working with glass, sharp or hot tools and
the toxic materials. If you take the
necessary precautions, you shouldn't encounter
any problems. In the next lesson,
we'll be looking in detail at the tools
and materials. See you then.
4. Tools and Materials: Hello. In this lesson, we're
going to look at the minimum set of tools and
materials that are needed. This is a construction
board made from plywood, several
different sizes. And I made all of
them myself quite cheaply out of plywood and
bleeding from a local store. A glass cutter. This one has
replaceable end piece. It also has an oil reservoir. It's a really good one I've had for years and I just replaced the cutting wheel every now and again with a new end piece. This is another glass cutter, but it didn't use this
to cut the glass. I use the weighted end to chase a score when
splitting the glass. We'll see that in action in
the cutting glass lesson. Soldiering iron. Stand with a
temperature control. Slightly more expensive
but essential to get exactly the right
temperature when soldiering. This is a grinder. May not need a
grinder initially, and it will be the most
expensive piece of equipment. So if you're a beginner,
you might want to get a few projects under your
belt before you invest. This is a plastic fluid, is used to open up the LED to smooth out
bumps in the lead, to push and shake the
legs, turn soldiering. And I also use it during
the cementing phase. It's a really good, useful tool. Horseshoe nails and
plastic stop blocks. These work really
well to keep the lead and I was in place during
the build process and the thoroughly recommended
a lead cutting knife, which are very sharp
and at the start of every project using
a carborundum stone, this is needed to
keep the cutting off as sharp as possible. We can also use the stone to smooth the edges
of the cut blouse. A hard brush. The
soft polishing brush. Led device used
to pull the lead, which prepares it for use. We'll see that in action in the lesson on cutting the lead. Lead pulling players in
combination with device. These are ordinary pliers
and they used prepare the lead for use in
constructing the panel. Cruiser Pell Grassia players. You can see how the
shape of these is quite different from the
ordinary players. These are used to split
the scored glass. Will see these in action in the lesson on cutting the glass. Here's a list of the tools. Look out for starter
kits available online or from your
local supplier, which can make setting
up a whole lot easier. Let's now look at the
materials you'll need. Plus, there are many types of glass as well as a huge range
of colors and textures. Here are a few examples. Lead came, and this
is how it comes. There are a number of
different sizes and styles. Of course, the lead
and the glass will be chosen to meet the
requirements for the project. Find steel wool. Soda alloy of tin and lead. 5050 mixture melts at a
relatively high temperature and is normally cheaper and is often used with copper foil. 6040 ratio of ten to let is more commonly used and it's the
one I use in my projects. Flux is needed for
the solving process. I'll use beeswax,
candle, cement. This is used literally to cement the entire
piece together, fixing the glass in
the lead came so they cannot move made from boiled
linseed oil and Whiting. I've always used black, but I think white is available. I don't know why anyone
would use white, although I've worked
on many repairs where I've seen that a white
cement has been used. Whiting, I'll use talcum powder. This is used to soak up any excess linseed
oil to speed up the curing process
or the cement. Lead graphite Polish used during the cleaning
and finishing phase. Blank patina, which
I don't always use. It turns the lead black
and in combination with the graphite
Polish gives a lead, shiny and deep ebony color. Here's the list of materials. In this lesson. I've listed the main tools and materials
that will be needed. It seems like a long list, but don't let that put you off. Everything can be re-used
on multiple projects. Obviously the tools
carry across, but even the consumables I often reuse either store of off
cuts of both lead and glass. And I delight in recycling these items on
multiple projects. In the next lesson, we
will turn our attention to design and finally
get some hands-on.
5. Project Selection and Design: Hello. In this lesson, I'm
going to choose a project and then
going to consider a number of design guidelines and then formulate a design. These are practical
guidelines that are intended to assist
you with the design of a new stainless
panel that are not aimed at the aesthetics
of the design as such, they're more to do with avoiding a design that cannot be
made or that would be too weak to withstand harsh
weather conditions or slamming door or window. So the first thing then
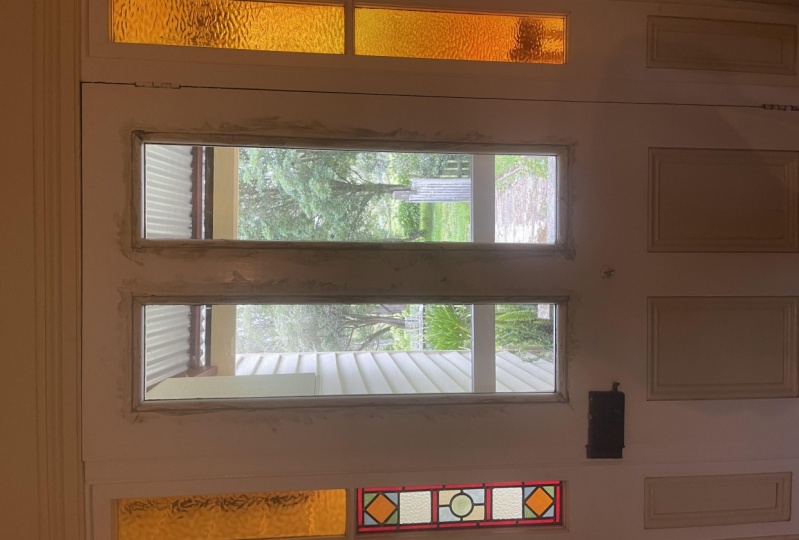
is to choose a project. My project is going
to be to make a new stained glass
panel to go in this opening in an internal
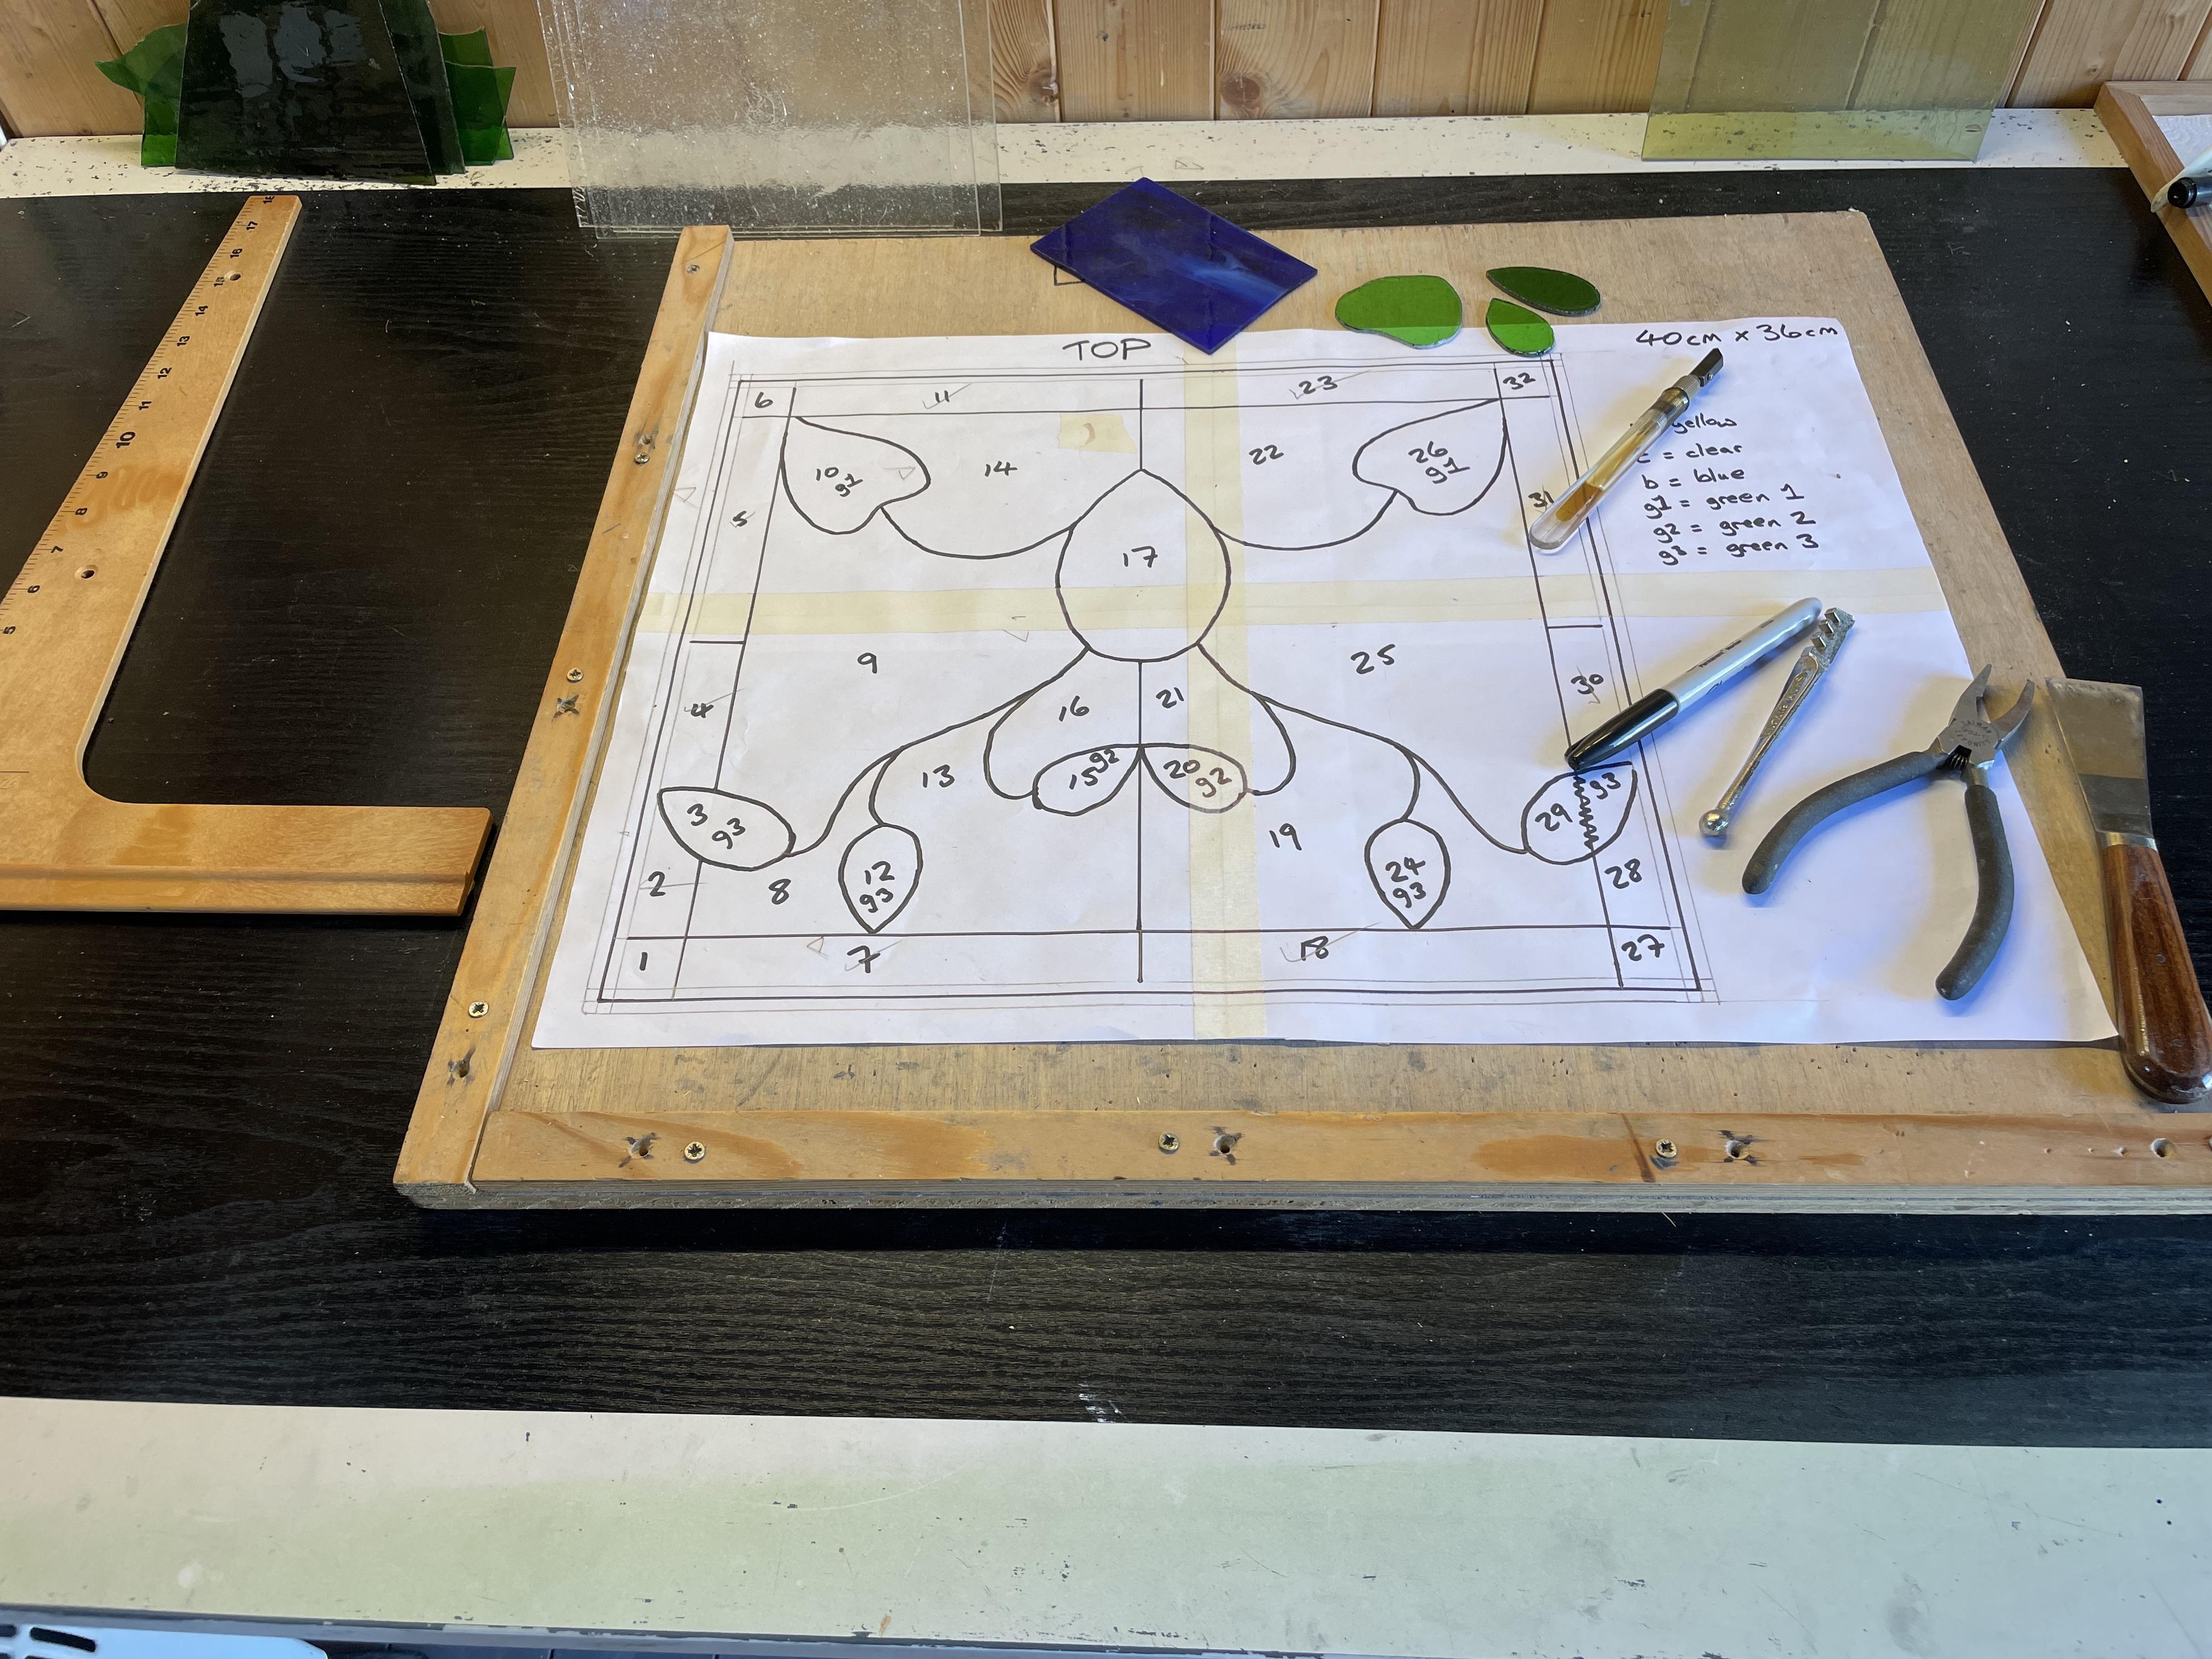
wall in this cabin. The window opening is 40.5 centimeters by 36.5 centimeters. So I'm going to make the new
panel size slightly smaller, 40 centimeters by
36 centimeters. That'll give a 2.5 millimeter
margin around the panel. The beating that keeps
the panel in place. We'll hide that small gap, provide a neat finish. Okay, That's my project. Now let's consider those
good practice guidelines. The design on paper
is called a cartoon. And it's really important to get the cartoon ride because any mistakes will carry
straight into the panel. So for example, if
this is our panel, the design consists of
straight lines like this. Outer curves. This is
an outer curve from the perspective of this
piece of glass. In a curves. This is an inner curve from the perspective of
this piece of glass. Keeping the curves
fairly shallow, at least at first, until you got a proper field
for glass cutting. Tight curves may be
impossible to cut. This is a much tighter
curve over here. I'm cutting this piece of glass. It'll be impossible to
cut out this section. We could grind it out, but we shouldn't be grinding too much. It should not be necessary. Cross pieces that are
close to the edge and very narrow will
be a weak point. They may crack during construction shortly
after installation. That point there, think about where the
panel will be used. If in a door slam shut, you want the panel to be
as robust as possible. Cost pieces that are
very long like that and on the edge maybe vulnerable
to the lead becoming loose. So be careful when handling the panel before installation. Also, you can have glass
pieces inside each other. For example, when featuring
a sun or a moon like this, it cannot go Holy inside another piece will
be freestanding. This is easily avoided at the design stage by cooperating another
part of the scene, such as the Cloud or a
piece of the landscape. To summarize these guidelines, you should draw the design
you've decided upon and then review it carefully to ensure
there are no weak points, knowing possible cuts and
no unnecessary pieces. You should minimize
the number of pieces plus staying true to the original design to reduce complexity and thereby
speed up the build process. Now, draw my design, starting with the
creation of a piece of paper big enough
to accommodate it. Getting back to our project, the new panel is 40
centimeters by 36 centimeters, and that's much bigger
than a sheet of A4. So what I'm going
to do is combine these four sheets into a
single piece of paper, which is going to be big
enough for the whole panel. If I had a single piece of paper big enough and I
would just use that. But because I haven't,
I'm going to make a sheet out of these
four sheets of paper. The parallel is 40
across by 36 down. I'm going to use this
set square to help me make that shape
accurately as possible. I've started drawing
the cartoon design now. And the lead for the border
needs to be thicker, so it has a good
amount of cement. It makes it stronger. So I've chosen ten
millimeter lead. It could have been ten
millimeter, 12 millimeter. I've drawn two lines
inside the perimeter. The first-line is
five millimeters inside and the second
is ten millimeters. First one here is at the heart
of the lettuce situated. And the glass will be
touching this line. So that's the, that's the
extent of the glass all the way across to this middle
line, top there as well. The ten millimeter line here is where the other
pieces of lead will be touching and sold it
later on in the process. So that is where the
plates will be touching. Over in this corner,
you'll notice that I've got about 1.5
centimeters from the edge. And this is deliberate so that the panel will be positioned over in
this left-hand corner. I'm going to clamp a cartoon to the construction board using
bleeding wouldn't be there. It's going to make sure
that the cartoon doesn't move pieces therapies there. And we're going to
make sure that it doesn't move at all during the entire build process
on why is it completely messes up our construction. Here's the outline of my panel. So what does my
design going to be? Well, because I'm
doing this to show glass and lead
cutting techniques. I'm going to use a very simple
design of pull together, some leftover pieces of glass
from previous projects. I'm going to put them
together to provide a design which has a
few curved pieces, but mainly straight lines, which will be easy to count
and easy to assemble. I've got four faceted tools. I'm going to put
these in the corners. This that'll give me an opportunity to
incorporate a border. Borders are very common
in stained glass windows. I'm going to measure the
width of the jewels, and that'll give me the
width of the border. Then I'll draw some curves and straight lines to
give me my design. Let's start by drawing the lines for the fester
Jones and the border. Looking around for inspiration. I've come across this small
piece of red texture glass. I love it. Heavy texture in the middle
reminds me of the Milky Way. I've got some interesting
gray texture gas also. Now it's love at fault
going through the middle. This gray glass is
very heavily textured. See there. Some, some pink, yellow
and orange class. So I'm going to
call my piece chaos at the center of the galaxy. The red piece will go center stage and I'll build
a simple design around it, transitioning
from gray. On the right, let's say two, orange, yellow, and
pink here on the left. These pieces have green. That is a direction
in the ground. And because chaos is my theme, I've got to make the grains
go in different directions. A deep red border will
be quite dramatic, I think. Is my border. The faceted joules will
go in the corners. I'm going to start with my
red piece in the center, roughly, maybe a bit
higher than center. Case I get my smooth side one, we're going to be
cutting this side. Let me get that at a nice
angle is quite nice. What I want to do is don't want this to
be completely square. I don't want to be running
the Central either. So I'm gonna move it over
a little bit and I'm going to use to do the rough out, rough outline is very
lightly in pencil. And now roughly about here,
I'm going to do a curve. So we're going to say something
like that. Shallow curve. Likewise at the bottom, I'm gonna go with the curve
on because of the texture, I'm going to follow
the texture like that, which goes slightly like that. So we're gonna go like that. And that's nice. So leave that there
for a moment. Now, top right-hand corner, I've got this piece of gray textured glass that
is also has got this kind of up and down flow can have a few drinks that
I like that a lot. So I'm going to get
this open corner. I'm putting out a jaunty angle. And again, lightly just give
us a bit of an outline here, the bits that will show because
I'm ignoring the border. And I'd like to bring
that down a bit. Okay. That's about as
far down as I can bring it down. All right. Let's just do square that off. This time. I'm can only go
from around about here. So from about here, are
we hitting the border? Gentle curve? Let's see
what that looks like. It's gonna be okay. Nice. River. Get rid
of this line here. Doesn't strike me. Now. I've got another gray, so let's start marking these up. My gray gray one, smooth side. Yeah. That's gonna be one. Down the bottom here. We've got great
too. So I'm going to fill this area at the
bottom here with gray to get that angle going
like that because then we've got to handle
coming across here and do another angle down
here. One over the border. My smooth side,
going to come down. And G2, grade one, grade two. Now, over in the bottom
left hand corner here. Now here's, I'm going
to head over to the more earthy colors. Orange. And I've got to cover. This is called a
grain going that way. So I'm going to overlap
on here a little bit. And over here, this side, this is where I'm giving her to do a curve
from about here. Heading up to my red says p. So let's go. I can
cover all that. Below here is around about here. I can do a nice gentle
curve. This b initially. Yeah, That's nice. We got some yellow. I can do a yellow and I get the grain going in
a different direction. What I can do that we can come across from
here. Let's do a nice curve. From the point. A yellow. That's fine. This
was orange. Mockup. My orange is in yellow. Yellow. Number remaining
part up top here is pink. Kinda gonna go then
different angle. That's pink, pink, pink. That's causing that
again. My red. And then the board is gonna be, that's gonna be a dark
red suddenly smoke that. I know that. Right? Let's just these lines here which
are just guidelines. That's going to be interesting.
Yeah, That's fine. Sharp angle, they're
not too sharp. And that's my design. I'm not going to review the initial design
that I come up with. Quite a simple design consists
mostly of straight lines. The curves are shallow
and will be easy to cut. There are no unnecessary pieces. There are no thin
pieces near the edge. Pieces are not too long. But there's a couple
of points here I want to look at again. So this curve here is okay. But when we get to
round around here, we've got this angle here, which is kind of in
the middle of nowhere. What I'm gonna do
is I'm going to join this up to this line. Will give us continuous
curve around here. Now. And I can just crop out that line by this
bit up here as well. Okay, nice, gentle curve. Another section over here,
this little area here. But we've got a point
going into nowhere. I mean, I'll be going to
be really difficult to cut and it doesn't look right.
So I'm going to continue. This line is straight
line around here, so just take that curve off. All right guys that carry
this one now round. That's fine. And bring
this one down to here. Okay, so it's nice and simple. It's gonna be very easy to
put together, but your own, you'll get the gist
of the techniques of cutting glass and then
doing the lighting as well. And both those phases
should be pretty easy. Now, door over the pencil lines with my black felt-tip marker. These heavy lines
will clearly show me where the glass
needs to be cut, and then we will be
ready to cut the glass. In this lesson, I chose
a project which is the building new panel to
go in and internal wall. I mentioned the
frame which gave me the size of the panel
I'm going to make and allowed for small gap around the panel so that I won't have any trouble
installing it later. Then covered the design process, describing a few features
you need to be aware of. And finally, I drew the cartoon I'm going to
use to build the panel. In the next lesson, I'll be
selecting the lead and glass. See you then.
6. Selecting the Lead and Glass: Hello. This lesson covers
the selection of lead and glass for my project. The choice of materials is
very much part of the design. Not only the
combination of colors, but also the texture and the grain of the
glass are important. Since the project involves a fairly small panel and it's going to reside in
a wall opening. It doesn't need to
be super-strong. Which is why I'm going to use five millimeter lead,
the inside area. And ten millimeter lead. For the surround. Using ten millimeter
living the interior would make the pen
stronger because there's more let involved and also more cement will be
incorporated into the panel. The panel was long,
so over a meter, then I would consider reinforcing
the lead on the inside using steel strips like this, or alternatively steel rods attached to the
outside of the panel, like this square
one, this round one. Whoever this panel
is quite small, the supports are not
needed in this case. You can see how the
steel strip fits inside. The LED came. It has a depth of
about one millimeter. So if you're using this, you
need to bear it in mind and make space to allow for this extra requirement
when cutting the glass. For both five millimeter
and ten millimeter lead, there are several variations. And I've selected the slightly more expensive
rounded came. Something that looks more
attractive and feels better to the touch when you run your fingers over the surface. Both legs are in the H style. You can see that there there
is a C-style available. I guess. I have UC lead came when making stand-alone panels rather
than the normal each section. For panels going into a window, I always use h section lead
because it's more versatile. And by that I mean, if
your panel is too big, then you can trim
the lead came to make it smaller on the outside. And I have had to do this
on several occasions. All the lead comes in
1.8 metre lengths. When choosing the glass, you must think about
colors and texture and how these attributes can
enhance the design. You saw in the last lesson how I considered the combination of colors and the arrangement
of textures and grains. When putting my design together. I was also careful to draw
the design in pencil so I could review and
adjust the design before being committed to it. Once the design is ready, I can draw the lines
more clearly using the black felt-tip pen
because I have done here, the lines are just over
one millimeter thick. That's a tiny bit thicker than the heart of the lead came. Then I'll cut the
glass consistently as close to the lines as possible. Careful cutting makes life easier when
constructing the panel. However, inevitably a piece
will be too small or too big. If it's too big and
other trim it with the glass cutter or use the
grinder. If you have one. Pretty often you'll
find that a piece of glass is slightly too small. And in this case, you will
have to pad the glass on one or both edges to
keep to the design. You can use almost
any material to pack the lead channel in order to nudge the gloss
over a little bit. Here we're talking about making a one or perhaps two
millimeter adjustment. If the gap is more than that, then you really need to cut an entirely new piece of glass. I would like to use blue tack to pack the lead because
it's firm but malleable and
sticky so that it's easy to work with to show
how this would work. Here's a small piece
of **** blue tag rose up and put it into the channel in the
lead came like this. Now when I put the glass in here will have the effect of pushing the glass
over slightly. Then I can compress
the Blue tech to adjust how far over it goes. Mostly use match sticks, which can be sliced in half long ways like that to
get a thin enough piece. Fiddling around in this
way is time-consuming, so it should be
avoided by getting the glass cup accurately
in the first place. I've got this piece of red
rolled and Cathedral glass, which can be enough
for the border. It has a fine texture
on both sides. It has a milky effects
on the surface and bubbles internally. So it's really nice to check that there's enough
gas for the board. I simply measure how many
strips I can get from the piece and allow some contingency in case
of accidental breakage. My border is 2.5 centimeters. I've got 12345678 pieces which can which
comprise the border. The glass. It's 30 centimeters. I can get 12 strips
in one piece. Forgot my eight board pieces, so I can do all eight from this piece with four over n
case. I have any mishaps. Got my facility joules, which go into corners. Now I have my centerpiece here, this lovely red texture glass. Carefully selected
various colored glass and thought about the direction
of textures and grains. That's covered the
selection of Latin glass. In the next lesson, we'll be looking at gas
cutting techniques. I'll be cutting all the
glass for my project.
7. Cutting the Glass Part 1: Hello again. In this lesson, I'm going
to show a number of glass cutting techniques.
In my design. I've got both straight
pieces and curve pieces. So it's a good example to show a number of different
cutting styles. Let's start by numbering
all the pieces in the cartoon so that we
can keep track of them. Who didn't do this. We'd
very quickly get into trouble when it comes to
the assembly process. It doesn't matter what number
is given to each piece. It just has to be unique so that the pieces
don't get mixed up. I always start from the
bottom left-hand corner and work across to the right. Likewise, if we had
a more complicated design with many small pieces, it would be important
to show the color or type of gas intended
for each piece. In my design. I've already
assigned a color to each piece so that I know
which class is to be used. There are several techniques
to cutting stain glass. All of them involve making
a firm score in the glass, falling just inside the
line of the cartoon, and moving the Cutter from one edge of the
glass to the other. Remember, if you're using
a textured piece of glass, there will be a smooth
side and a rough side. And as a general rule, we always score the smooth
side of the glass. I'm going to use this cartoon
fragment and this piece of clear glass to show some cutting techniques so that you can see
what is going on. In this first technique,
I'm going to use my thumbs to snap the glass. It's got a nice straight line. I'm using a cutting square. It has a lip along the bottom which hooks onto
the bottom of the glass. You need to line up the glass where you want to make the cut. I'm going to cut out
this piece of border. We wanted to glance
up at the bottom edge and on the side
edge to that edge. And this edge here is my cat, is going to be on the
inside of this line here. Line up the cutting square. Now I need to be very
careful and bear in mind that the cutting wheel
is not on the edge, It's in the middle
of the cancer. So I've got to line
up the wheel on the inside of the line. Okay. It looks about right. Okay. Now, coming from the
top of the glass, all the way from the
top of the glass. And firm on the cutting square. Then here we'll fill the cutter, dig into the glass
all the way through. Now to separate the glass. Each time goes
alongside the score. Curl your fingers underneath. Then firmly snapped downwards
and apart with both hands. Normally do this when
it's a straight line. And as a reasonable amount
of glass on both sides of the scored lines that
I can comfortably fit my thumbs in
the right place. Another technique is to
use the edge of the table. This is not the glass. Would use this technique
when I'm finding the glass splits
easily and again, when there's a reasonable
amount of glass on both sides. But this technique,
you definitely need to be firm and confident. So let's say I'm
going to complete the cutting out of
this border piece, turn the carting around so it's more comfortable to work with. I need to line it
up within this box. And I'm going to cut on the left-hand side
of this line here. I'm going to use both hands
on the cutter. This time. We're going to start at
the bottom and work my way up as opposed to
coming down as we typically and cutting square
to starting on the edge. I'm going to go across
to the other edge. I scored the glass. I now go across
to the table top, which I'm using this to
simulate the tabletop. Hold it nice and
firmly on the left. Line, the score up on the edge or just a little
bit on the left of the edge. And then firmly bring the glass down on
the right-hand side. And it snaps off
nice and easily. This part, this piece
now completely finished. And causing a curved
piece of glass, are most often used
the ball and cotton to make the school got all
the way through the glass. You can see here the
chronic go through. And you can then feel confident
that the glass separating accurately when you see the
score is all the way through. I'm going to cut
this curved piece here using this clear
glass so you can see it. I'm going to score the line on the inside of the
cartoon line here. Then I'm going to shear off here because it's much
too tight to go around this corner shelf here and
go off to the far corner, lined everything up already. Kind of rotate the cartoon
little bit so it's more comfortable to go from
here to the top corner. I'm going to start on one side, got all the way to the other. Holding the cutter in both hands this time
this is like a pencil. And then I'm holding the
backend with my left hand to keep the pressure up
and keep control. Of the head. Here we go. Here that is scoring last name. Say on the inside, keep it
nice and slow and smooth. Continuous. Not too
much pressure on that. Now I'm going to shear
off to the far corner, hit a little crack there. So I'm gonna release the
pressure a little bit. On. Completed the score. Now, lifted off the paper. My ball and Qatar. From this end again through you can see the crack has gone all the way
through the glass, trace it all the way to the end. Holding my left hand,
keep it nice and firm. That's fine. Can see that the crack has gone pretty much all the
way to the end. Now if I do my thumb
separation on the, on the line either
side of the line. Nice and firm on both sides. Where it goes. I can line it up now makes sure
it's nice and lined up. That's great. With practice. And the odd mistake,
you'll get a feel for how tight the curves can be before
you should go to the edge. If the curve is very sharp, you might have to use the crazy applies to cross the glass. Then finish off by
grinding the piece to get the curve in exactly
the right place. I'll use this curve here to show the crushing
glass technique. Using my cutter. Going to start here on the inside of this line and go all the
way around to the end. Let's do this in two parts. There's a very tight curve. We're going to use the score
to go all the way through. I'm going now to make
some shallow curves going from one
side to the other. Now, here's the
ball and Katrina. Let's see how we get on
with the crazy applies. Now. I can crush making a bit of a mess. Very gradually, very
slowly. Take your time. See, whittling away at it. Definitely clean up.
We do anything else? Always keep your surface meticulously cleaned
to make sure there are no chars facial to get underneath to class
when you're trying to cut it to class is likely to break just
where you don't want it. Let's now cut that
glass beautifully. When dealing with very
small pieces of glass, a useful technique is to
use two pairs of pliers. So if I needed to split this
small piece of glass here, I'll make the score
in the usual way. So it's more, it's gonna be
very difficult for me to get my thumbs in there or
any other technique. I pick it up, put the
suppliers on one side, get my crazy applies
on the other. Then as with the normal I'm pressing technique being
nice and confident and firm. When it goes. Can you just need
a little bit of tidying up on that corner there? But we done, in this lesson, I showed the most common ways of scoring and cutting glass. It takes practice to become
skilled at these things. In time you get a feel for the most appropriate
technique to use. You've come quicker. The last pieces will
become more accurate. Remember to take
care when you're handling the tools and glass. Wear gloves or this
y them until you are comfortable out them and always wear some kind of
eye protection. Keep your tools in good
condition and keep the gas and all the surfaces clean and free
from glass shards. In the next lesson,
I'll be causing all the gas for
my project panel.
8. Cutting the Glass Part 2: Hello again. We previously looked at various cars
cutting techniques. In this lesson, I'm going
to put these methods into practice and count all the
dials for my new panel. I'm not going to cut
the board at loss. Cutting the border glass
is quite straightforward. And I use the cutting square to make the cuts nice and straight. I'm going to line up my glass
with number 16 over here. In this class is at 90 degrees. So I can use the cutting square with the lip of the
cutting square. This is the smooth
side of this class. I'm going to line up the lip caught on the bottom
part of the glass, makes it nice and secure their
customers over tiny bit. So I'm lining up, lining
out the cutting wheel. Just on the inside of the line. I can see through the glass
all the way from the top. Nice and firm now
with my left hand. The school going
at the top here, and then bring it towards me
firmly. Okay, that's good. I can get my ball and cutter my thumbs on either
side of the school. But this clinically to one side. I'm going to give a quick brush, make sure they're on
those shelves anyway. Okay. Now I'm going to move the container because
what I'm going to do now is this small cut here. Line a gloss up at
the bottom again? Yes. Yes. Slightly different there. Okay. Get my Kata just on the
inside of this line here. Now, this time I'm
using both hands. Now appended to the
end of the table. This piece done.
Mock it up number 16 to multiple goals. Number 16. Okay. And then tick show
the number 16. They tick on there is just so that I can keep track
of those that I've done that I don't inadvertently
repeat the current. This will be an
important safeguard if there were many
pieces to manage. To always clean surfaces and
scrupulously tiny shot on the glass that you are scoring
can break the glass in the wrong place when you apply pressure with the cutter or
it can end up in your finger. I constantly brushing
my workbench to keep it nice and clean. Okay, Let's cut all the
pieces for the border. So now let's turn our attention to the pieces in the middle. I'm going to start
with my centerpiece. This involves lining it up with the straight lines
that I drew around it. And I just need to have
two can't see and I want to there and one there. And then that one will
be ready for that. So we don't do enough.
This is the smooth side. Just checking that
and make sure I'm in the right place.
Yeah, looking good. There's just this show I got
over here on the inside of the line. That's enough. Learning it up now. So that paper is nice and paper is nice and loose at the top there
so it doesn't get cold. Now coming from this side, hit the little folder,
so I'm going to relieve pressure and carry on. Wonderful. Tidy them
up a little bit, little bit here and a
little bit pretty content with the grinder. That's great. Yeah, just take the lid off their
little bit here. So the way to do that
is to get a felt tip so that I know where I'm
gonna be using the grinder. Okay, just this
little edge there. Middle-age there is pretty good. I'm good opportunity now to
show how to use the grinder. This is my Grindr, being very careful to lift this
up. Nice and straight. And electric grinder. This
is the grinding head. This is a tray where
we put the glass. Use a grinder to tidy
up glass pieces. It takes off any
sharp edges and makes the edge of the
glass perpendicular. Here's my center piece that I'm trying to
find in the second. So getting the edge
perpendicular, that's tray is quite important because an angle
days will push the letter away from the intended position to make sure you're
grinding the right place. As I did, I mark the area to be ground with my felt-tip
marker. They go like that. Now the Grindr has a
reservoir of water in here. Just behind the grinding
head is a little space. What you do is you put a piece of sponge in that
play, in that space. Can just get a bit
of an old sponge that's used in the kitchen. Just poke that in there. Can you just have a little
bit exposure at the top? This sponge here
goes into the water, draws the water up again. Okay, Now what will happen? The water will come
up the sponge. And then as you're using
the grinder in wet, the grinding head from
behind, just touch it. And this will have the effect of capturing the ground dust from the glass
committed to clump up together and it stops
the gas particles from falling around in the air around you and you're breathing this area, of course. Now the thing is, as you use the Brian running
head, it becomes blunt. And to take advantage of the full height of the
ground, the grinding head. I put a piece of glass here. Then when I'm grinding
the rest, the gospel, the ground on that graph, and then just touch it
for the running head. Alright, then just obviously safety advice is to be
careful handling the glass. Always wear eye protection
when you're using this. You're still going to put
some ear protection on. Then it will just grind off
those few couple of places. Okay. There it is less. Perfect. And you may
have noticed as I am, I don't turn the the grinder. Often on from the
grinder itself. I have a plug separate and
I turn it off at the plug. And this is because here's the on-off switch on the ground and you're
turning this thing off and on so many times that those switches
can go, they can fail. So instead of using this
switch on the side constantly, I have a switch on the plug. And that's how I turn
that on and off. I'm going to cut this gray one, is G1 up in this
corner over here. We've got a shallow curve here, straight lines, those three. And I really like
this little bit of texture in the middle
of this glass here. So I'm going to
shift this around. I'm going I could turn this
up in the corner like that, but I'm going to
move it so that I get as much of this
texture in as possible. I can line it up on
the right hand side. That means I've just
got to do this cut, that cut and these two cuts
here to finish this off. It's my smooth side. That's
fine. So let's keep doing it. Puts me in protection
because I'm gonna be paying him with the
ball and cutter. Just line that up. This top one. I can actually do with
the cosine square. Can you see that very
sharp edge there? Just gonna get rid of
that, but they put grinder that I caught myself. My T1. You want? Go ahead now and cut
the remaining glass. In this lesson, I
cut all the glass, my new panel to really
understand how to do something. There's no substitute
for getting hands-on. So just give it a go. In the next lesson, I'll be
showing various lead cutting techniques and I'll cut all the lead for
my project panel.
9. Cutting the Lead: Hi there. In this lesson I'm going
to show you how to prepare the lead
and to cut it to the correct length for using the lending process
in my project panel. We'll start by pulling the lead. So before the LED can be used, it has to be pulled
or stretched. And it's going to
be pulled until it can't be pulled anymore. Now has the effect of
stiffening the lead. So this is how it comes
from the stores or floppy and it's all
twisted and it's polar. Then we use the
clamp is my clamp. The clamp. Stone hammer. Sure,
it's nice and secure. Now, twist the lead so it's
all facing the same way. Just testing to make sure that the same surface at the
top all the way along. Now I'm wearing a dog
with my left hand. Because if you pull too hard, keep on pulling,
keep on pulling. That snaps. Your hand will go skidding
across the surface. And I've lost the
skin on my knuckles many times, so I've
learned my lesson. But a problem when I
found, I'm going to now grip the lead with an
ordinary pair of pliers. Person thumb, brace herself against the bench and then pull. And you can see it goes
stiffer and stiffer. That's it. Let's go completely stiff. Now. You can see all the goal of the kinks
have gone out of it. It's now ready for use. Letting phase is actually the assembly of
the entire panel, which is followed by the
soldiering of both sides. We start off by making
sure the cartoon is in the bottom
left-hand corner. And the edge is exactly
in the right place, lined up with the beading. Be fastened securely. I using screws here to
screwed a beating down. So it cannot move
or slip around. The letting starts in the
bottom left-hand corner, goes up across the
left-hand side, across to the far
side on the bottom. And then we head off up towards
the top right-hand side. We measured the line in
the cartoon, cut the lead, place it in position,
had the glass and secure it using the plastic clips and
horseshoe nails. And then we repeat
for every section of lead and piece of glass. So I'm going to start on
the left-hand side here by measuring this left-hand
one millimeter, one centimeter lead, which
I know it's gonna be 36 because that's the size of the height of the, the panel. That's 36 centimeters. Here's my cutting board. Here's the one centimeter
lead which I called earlier. Kind of cut off this side on this end piece which was in the clamp because
we can't use that. And the cutting process is to wiggle around a little
nice sharp knife here. My cutting knife,
wiggling around, cross and backwards
and forwards. To dig down into the lead. We're doing this so that
we don't crush the lead. If we crush the lead,
then we can't use it. So keeping this nice and
perpendicular. Okay, here we go. As we go now think to do
is to open up the LED, make sure that we have
an open all times. Because the cutting of the lead causes
decides to go down. We must allow that to happen. Must keep these nice and open. Now I'm going to measure this. It's gonna be 36 centimeters. I'm going to add a
couple of cents, a couple of millimeters. So we have a little
bit of excess which I'll cut off later on. All right, so got
36.2 centimeters. Now, we go backwards
and forwards. We go making sure that it stays
completely at 90 degrees. Now to the lead, my knife, blade down it goes. That's my remainder.
Put to one side. Again, kind of check to
open up the lead to make sure that it's not bent down. We'd have to bend down this way. It would be very difficult.
The glass in there. I can also use the fit
to open up a glass. I often do that. So use the backend of the food when
it backwards and forwards. Let's make it nice and open. The reason for keeping
it open is set up, let me put the glass
in there and we eventually come to put
the cement in there. We get plenty of cement around the glass and that's
that piece finished. So let's just do the
bottom part. This is good. This is 40 centimeters, but in fact we have
one centimeter here. So this is Thirty-nine
centimeters. My remaining piece of
the ten millimeter lead, now, 39, from here to here, I'm going to add a
couple of millimeters. So I'm just marked it. I can make a jiggle around
backwards and forwards. Make sure I don't
crushed the lead. Can you just turn it off?
Check both ends to open it up. Nice. Now this end, I've noticed that it's
at a slight angle. You might get to see that
a very slight angle. I'm going to shave the bottom part off just to make sure this
is nice and square. Again, it's a little
bit of data and we save those little pieces of lead because later on when we
come to soldiering the lead, we may need those little
pieces to bridge any gaps. Open it up. It's completed. The side and the bottom lead for the one centimeter or
ten millimeter lead. I can, what I can do now
for example, to show you, is put in my corner
piece lined up nicely. I'm going to secure the
top of the lead here with horseshoe nail and
the plastic clip got a nice little small
hammer, are doing that. Going in there, make
sure it doesn't move. Similarly. On the right-hand
side here, put my clipping. Now what I would normally
do as well is now clip in the glass that's gone in in principle and
that's what we would do. And then you move on
to the next piece. The next piece I would
do would be this five millimeters section here. And to do that, I need to pull the five millimeters section, 45 millimeter lead in exactly the same way I did
for the ten millimeter. And then cutting
measure it, cut it, place it, and that's
what I'll do next. Okay, Now the five millimeter
lead I'm going to use here. The measurement is
actually from this edge of the lead of the ten
millimeter Sophia. So that edge there is just down, is actually half as
half a centimeter down. And from that point to the edge here at the bottom of this line. And so that's the
distance it needs to be. So if I measure that, it's going to be essentially Thirty-four. Thirty-four point to
something like that. We're going to have to
add a little bit so that I've got a little access
and I can trim that later. So that's what I meant to do. Then after I've
put that piece on, I'm going to do the
cross pieces here, which again five
millimeter here and here. And then we'll
leave that top one alone will leave that
vacant at the moment. Because as we're going,
we're going to be moving towards that and we won't
be putting that one in until we've completed
all the assembly up to this point and then
we put the outside ones. I'll just do that now. Let's kick things off. We've got both the
left-hand side and the bottom now of
the panel done. And the next thing
I'm going to do is this curved piece
here, number six. Now the, the problem
now is of course, that we can't measure
that accurately with a ruler because
it's curved. So I use cable, bit of plastic coated
cable, copper wire. I measure that around
by just matching, mapping it onto the curve as
closely as possible an hour and allowing a little bit
extra in perhaps like that. Now bearing in mind, I'm going to take it
just to this point here. Now at this side, I've got to get the
angle right to meet up with this piece
of lead coming down. That is, I'm going to add a
little bit extra for that. So I'm going to allow
about a centimeter, centimeter and a half to
allow me to have a little bit of wiggle room here to
get that angle right. Now, take it across to
my cutting board and cut it as my, as my piece of lead. Now to get that angle, I'm just laying it on
top of the line that it has to follow eventually. And then by making this nice parallel to the
downward piece of lead, we're gonna get the right angle. So it's going to meet
that lead there. I'm going to parallel
cut like that. So what I do actually is
I mark it with the knife, then take it to one
side. Carefully cut it. Kind of spring, especially
careful not to crush the lead, wiggling backwards and forwards. Now we have it nicely lined up. I'm gonna get my number six, which is a piece of
orange out the clips. This one up a little bit around the top. When it meets here, I'm going to join up with
this piece of lead here, another piece of lead
going across over there. So I'm just going
to make sure that we cover it at this point and I'm going to cut will meet this one coming across the angle of that because
it's going to meet it can making sure
they're across the LED secured in
place with a clip. Ready to go. That's great. I will now go with spit. His fled, get this piece of glass in place,
and then move on. That's the loading
phase completed. And it all looks pretty good. All the Gospels was correct and the living has been actually
fairly straightforward. As you could see, there is a gap on this side,
the middle section. Now, we will breach that when we come to do the soldiering. In this lesson, I showed
how it's prepared to lead and how to cut it for both
straight and curved pieces. Remember, always
to wash your hands very carefully if you've
been handling the lead. In the next lesson, I'll sold at all the lead joints.
See you then.
10. Soldering the Lead: Hello. Last time I
assembled the entire panel, cutting on the lead and fixing it together
with all the glass. Panel is currently
held securely in one piece using the plastic
clips and horseshoe nails. And to fix it
permanently together. I will now sold all their joints to get
nicely solvated joints. There are a number of
things to get right. First of all, make sure
everything is nice and clean. Then we need to clean
off any oxidation of the metal with steel wool. These gray areas here are
where there's oxidation. This shiny bit here
is not too bad. And we need to get rid
of this oxidized metal otherwise it won't
be won't sold her. We need to use flux, generous amount of flux
and I use beeswax candle. Need to make sure that
the soldering iron is at the right temperature. Hot enough but not too hot
or your melt the lead. From experience. I've got a setting on my
thermostat which shows, which tells me which is the
right temperature to use. If it's calling the
workshop, I hover the soldiering iron over the left, warm it
up a little bit. If we, if you use an
extract a fan like me, then avoid a draft or the
soldier will call unevenly. And that'll make it said
unlike a very messily. So first of all, is to clean the metal with
some fine steel wool. So I will do that. I find all the lead
focusing mainly on the joints because
they have to be absolutely clear
of any oxidation. Notice a couple of gaps here. So there's one there, one here, one there,
there's three, kind of the worst
ones, tiny gaps, but I'm going to bridge them using some small pieces of lead. And I, starting with
this one over here. Okay, That's kinda,
kinda bridge. Someone can say, Look, I'm just using some
of the pieces that we held over from
letting process. Generally start with the any, any gaps that need bridging, get them out of
the way first and then the process
is much quicker. After that. I'm going to trim
this little bit here. Okay, For this middle
section there. Right now with our flux,
Maya beeswax candle. I'm going to do this 1 first. Generally I use this like
a circular motion here to make sure I've coated
the area sufficiently. Is my folder. Now we hover over the joint with the soldering iron to
take a little bit of soda. One or two seconds. One, another couple of
seconds on this side. Those two but done nicely. Now move on to this,
these ones here. Just kinda fill this one here. Okay? Same technique is
to hover over here tale for a little bit
of soda from the rod. Okay, that's done. Those
three bridging joints. I'm not going to
go ahead and wax each of these and insulted
each one as well. I carefully check now to make sure I haven't
missed any joints. It'll be a real pain
in the neck if I have before I turn this over, now, it looks like
it's all okay. Everything done. So now
I can release the panel. Okay. Now, this is a could be a tricky part if
it's a very large penalty, need to be very careful when
you do this bit because you don't want this has only
been in half so that you don't want to break
anything at this point. And this is quite heavy. And it could snap under its
own weight if it was a very, very large, unsupported panel, but this is very small, so
it shouldn't be too bad. I'm just going to flip it over. Now we're ready to
do the other side. That's cleaned up
the oxidized lead. So now I need to do a couple of bridging positions on here. Just a little minor one here. They correspond with the same positions on the other side. It's all I've done is put a tiny bit 11 each of these places. Okay. Plenty of wax. And I'll do these
three positions first. Sodium iron is
still nice and hot. Let's do that. Okay, Stan, those 3D lit, so now I will wax and some
leather remaining joints. That's completed the
soldiering process. And what I will do now
is get a hard brush and brush both sides to get rid
of some of the bees wax. We don't want that anymore. We need to know
that off the brush. Both sides. Get rid of the majority
of the beeswax. There's a lot of
brushing involved. Now. As part of the selection process
and cleaning process. Continue doing this regularly. Beeswax. Then we'll be ready. The next stage, which is
to cement both sides. In this lesson, I
mentioned a number of tips to help you successfully
sorted the lead joints. Then went on to sold on both
sides of my project panel. In the next lesson, I'll cement
both sides of the panel. Join me then.
11. Cementing the Panel: Hi again. Well, my project
panel is almost completed. The next thing to do is
to put as much cement in-between the lead and
the glass as possible. And once it's dry and gone hard, I can then fit the panel
into his permanent location. But before I can do that, I have to get my
hands really dirty. The assembly board has gone. And I've given this
initial clean. I've been brushing this
on both sides quite thoroughly to get rid of all
the flux on that beeswax. And I'm now ready to get
as much cement as I can in-between the
glass and the leg, get on that summit
right in there. Some good advice
before we start this, where your best
genes when applying the cement and cover
your work surface. So I've got this painter which has now replaced
the assembly board, and I got my panel
on top of that. Now we get a fresh garb
of cement. Here we go. Nice big loopy globins
actually is called a god. It's nice and soft. And r10. Now using
either use a feed, wouldn't one always
my plastic one, or I use my thumbs and fingers
are generally do that. I generally use my
fingers is actually the thing to do is
just to push that in as much as you possibly can. And that's what the
process entails. You just push the cement into the gap there
as much as possible. It'll actually go round the glass and come
through the other side. So the first side is kinda more difficult because you're pushing the cement around the glass and it's going to go around all the way to the other side. When we come to do
the second side, it's already mostly done because the cement has come through. Now the idea is to get as much some interference in
there as possible. And we must make sure
that we don't miss anything that miss
any any areas. Okay. This is this basically entails pushing it in
there as much as possible. And what I'll do is get
another job in a second when I run out of
this and continue all the way round
to make sure that every part of the lead, It's got as much cement
in there as possible. That is put as much cement
in as I could now to soak up the excess cement I liberally applying Whiting
or in this case, talking powder
across the surface. Now I'm just going to put up a layer of talcum
powder on here, move it around a bit to
get it into those corners. Isn't going to soak up any excess oil and help
the cement to dry out. In good notes, I had a quite a few rags
here and that's essential to to wipe
off the excess as well. Okay, that's great. Now I'm going to
flip this over and repeat exactly the same
process on the other side. I won't bother filming that because you've
probably seen enough. Okay. That's cemented
and powdered. Both sides were getting
quite near the end there. I'll leave this to dry
for a couple of hours. And when I come back
to cement will be quite firm and
then clean as much off each side of
the panel as I can without removing any from
between the glass and the lead. Then I'm going to put the
panel in the warm, dry place. The three or four days for this meant to go properly hard. So I'll be back in
a couple of hours to finish off this stage. Here I am a couple
of hours later. I mean, the first thing they say is always clean your tools. So here I'm going
to scrape off any of the cement that's on my
feed. This wouldn't fit. Plastic one. Just make sure this doesn't go
completely solid. Thing about make sure
that's good for next time. I'll carry on doing
that in a minute. My plastic phi2. If I left the cement on the lead and the glass for a long period, let's say several days, then it would become more and more difficult to remove it. The initial cleaning
stage removes as much of the excess cement
as possible without disturbing the lead
or moving the cement from within the
channels of the low. Pay particular
attention to getting spent off the
surface of the lead here and off the textured
side of the glass. Because these will be the
most difficult clean up later if this man is allowed
to solidify on them. The process involved a
lot of scrubbing with my hard brush and
then vacuuming up the dust that's
produced. Let's go. I've got to do both
sides, of course. That's completed the
initial cleaning of this, this first side, there's
still quite a lot of cement there as you can
probably see around the edges. That's fine. I just got
the bulk of it off. Most of its off the LED itself and the textured
glass on this side, it's hardly anymore Smith
on there now. That's fine. Isn't already installed this for three or four days on one
of them, the other side. And then I'll be back to
do the final cleaning. So I'm going to flip this over. And I'll do the initial
cleaning on this side. And I won't bother us
filming that because it's the same as the on the
other side. Exactly the same. Okay. The cementing stage
is probably the least enjoyable of all the things that we do in our stainless projects. But it's really important to get as much cement as possible into the lead for the long-term
stability of the window. Now we've got a break of at
least three or four days with my pattern in
a warm cupboard. Before the next lesson, which is on the final stages
of cleaning and polishing. See you then.
12. Finishing and Cleaning: Hi there. In the last lesson, we submitted both
sides of the panel and then smothered
them in talcum powder. Then after some
initial cleaning, we left the panel
on the stone for several days for
the cement to cure. In this lesson, I'm going to completely finish
my project panel. Upenn has been lying in a
warm cupboard for four days. The cement has dried
and hardened well, and I'm now ready to do some final cleaning
and finishing. First of all, I use
a window cleaning fluid to thoroughly clean
the panel on both sides. And I find that using
a damp cloth to apply the liquid and
then to rub it off with a dry towel in cloth
gives the best finish. Just experiment with
what works for you. Now I'm going to remove any excess cement from around the edge of each panelist,
each part of the panel. I'm going to use
the knife to cut alongside vertically
each of the lead km's. Then I use this bridle, stretch around and
get the layout. And then after that, I'll use the hard brush to
brush these areas, get rid of all the
remaining cement from the surfaces and just keep brushing on brushing as really important part of the process. Now, when you do this, you'll find that
your own panel and look eventually really dark and shiny and look amazing with
a really deep ebony luster. The lead goes very
dark when you're doing this, and it looks great. Eventually, there's a
fairly long process and you just have to
keep at it, keep at it. And of course, we
have to do both sides to sustain the ebony
patina in the lead. I use graphite polish. For this. I use a protective
glove and turn the fan on as the product is coupled with warnings about how harmful or the paste and the
vapor that are given off. Now using a soft forth, apply a thin layer of the graphite to the lead came on both
sides of the panel. Then I will allow that
to dry for a few hours, then polish off with
the soft brush. The result of a considerable
amount of polishing using my soft brush is that the lead has a dark,
almost black finish. And this provides a
really wonderful contrast to the light shining
through the color. The texture is
glass. Texture does. I think it looks
absolutely Great. So my project panel is now finished and it's
ready to be taken to its permanent location and then fitted a transporting
the panel safely. What's important is you
don't want any mishaps now to spoil all your efforts. So be very careful
when moving the panel around and always
orient the panel into the vertical
position before lifting it to avoid it
collapsing under its own weight. So this one is very small and there's not
such a massive issue, but with a larger piece
of geologic panel, the best thing to
do is get it into a vertical plane as quickly and as easily as
you can to support it. In doing that. Then I will always construct
a board on which to place the panel
for transportation. For this one, just as an
exercise to show you what to do, I've constructed
a board which is slightly bigger than
the panel itself. And I'll put a link down
here with some beading. Now to transport the panel and get it to a
vertical position as quickly and as easily as possible and supporting it on the
way if necessary. Lifting it in a
vertical position and then support it
as it goes down. Now, strap that possibly put a towel around
it to protect it. Strap it to the board nice and firmly on the lip
at the bottom here, and then make sure that I can
carry it around like this. And if it was in a car, it would be vertically
placed at a slight angle, so 1015 degrees so
that it's secure. And reason for doing that is to be able to get it into a vertical position
is as easily as possible. In this lesson, I completed my project panel and showed how to prepare it
for transportation. In the next lesson,
the following lessons, I will summarize all the things that we've covered
in this course. I will also fit the panel into the mall opening
where it will remain. And I'm really
looking forward to doing that to see how it looks. I hope you'll join me.
13. Fitting the Panel and Course Summary: Hello. This is the final
installment on this course. Firstly, I'm going to do is fit my project panel into
its permanent location. We can see the result
of all this hard work. Then I'm going to go on
to review all the things that we've covered
on the course. If you've got the measurements
right in the first place, then you'll penalty go into the window frame with no issues. However, if it's too big, as I mentioned in
an earlier lesson, you can trim the outside of the lead to make
it slightly smaller. I pinned my panel into the window frame using
very thin beating nails. If it was an outside window, I would use the potty on
both sides of the panel, but it's just an internal one. I just simply used wouldn't be doing which is nice
and quick and easy. It gives a very nice neat
finish. And how to look. Absolutely amazing. We covered a lot of ground in
the course lessons. Here's a summary
of that journey. The importance of
health and safety. The tools and
materials involved, the design, how important
it is to get it right. And all the time spent in the design will pay
dividends later. The selection of lead and glass, of course, depends
upon the design, the size of the window usage, and a door or window
aesthetics, etc. But again, this is a very
important part of the process. Glass cutting techniques
and let cutting techniques, soldiering tips and techniques, and cementing so important
for long-term stability. And then finally,
cleaning and finishing. Well, thank you so much
for following this course. I hope you've
enjoyed attending it as much as I've
enjoyed making it. And of course, I hope
you've learned a lot about making stained glass windows
with lead along the way. It will be great to
know that you guys have been conducting your own
project along with me, or that you intend to do
so in the near future. If you've only thing
that you can share, please post your projects
to the project gallery. Another way I look forward to hearing from you
about your progress. If I can be of any assistance, please don't hesitate
to contact me. If you have any questions. Of course, all my
comments and reviews are most welcome. I'll
see you next time.
 Brian Etheridge, Working with stained glass windows