Transcripts
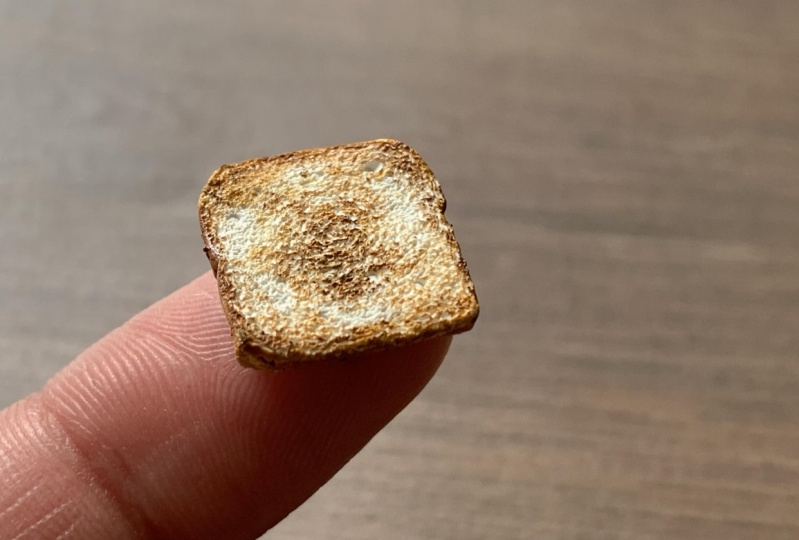
1. Introduction: Hello everyone. This is said, I am the artist who loves making miniatures using Polymer team, self-taught. And already the last few years, I have experimented and a lot of techniques to make miniatures that are like, like there is something so satisfying to me, pieces of art, so much details to it. In this course, I'm going to show you step-by-step how to create a realistic toast using Polymer. I will be sharing a lot of tips to overcome some common issues that I had when I was a beginner. Intimidating can make realistic miniatures efforts with trust me, with all the simple tricks I'm going to show you in this course. You are going to make a wonderful meal, even if you're just starting to make me a church.
2. Materials: For this course, you'll be needing polymer clay, enlight DO color. I'm using white mixed with E crew for this project. And I'm using sculpt the primal. But you could use a play that is available to you. Next, you'll need a baker will surface. Here, I'm using an old KC back by. You can work on the subsurface and use it the baker polymer K in the oven. You can use any surface as long as it's smooth and make room. Next, you'll need a rollercoaster role to play. Here, I'm using a dotting tool. Don't access to fresh a baby and irregular. It adds two different kinds of texture for our miniature. A small piece of crumpled up aluminum foil amigo tool. Here's an ETL tools that are made by myself. I just used the safety Ben door, my open. You could also use this idea to make your own needle tool if you don't have one. Unreasonably to copy your key. Acrylic paints for your miniature. Here, I'm using yellow ochre and Brian sienna and a tiny paintbrush. I've used psi 0 here. Anybody dealing brush would work fine.
3. Conditioning your clay: Domain a light colored P, We are gonna, makes us round ball, wiped clean with tiny medals, crew and stop needing it makes the take together. Easter cleans do soft and sticky, and it makes it really hard to add texture and hold the shape for the miniature. So what do you can do is take this mom visas game that you're working with, put it in between pieces of white paper and put our weight over gate and leave it for a day or two. The beavers will absorb the extra oils. That means the t really sticky instantly is to harden from me. Then you can add in a drop are to BB oil to soften it for about five to eight minutes before stopping me as the teacher. Now, you can draw the play indoor farm and it's time to start sculpting army toast.
4. Sculpting Mini Toast: Once we condition that begins in a meter stick, then using a reasonably small square of your desired size and remove any excess link. Next, using a toothbrush from the surface so that it doesn't move when we are adding the texture and adding dance on either side with a razor blade to create the shape. We will start with a baby. Once again. If you notice. This is why I use bullets. A feature branch and so that the difference in the texture adds to the realism. Now, to speed up this process and labor time and cover the entire surface and you feel it looks good enough. We use needle tune to mark the crust of the bread by making a very fine lines on the edges of the brain. Gently touch the surface of the clay with the tip of the needle to try another meat. As we do this texture, we only tiny bonds and not hose. You will start edges fashion. And then to speed up this video a little bit, this is a time-consuming process, but it's what adds to the realistic look for our toast. For me, this step took about 20 minutes. So take your time and be patient. And if you're like me, you will enjoy this part so much. It's almost like a meditation. Dj. Yeah. And then again. And then I used a baby toothbrush to add more texture. I recommend using only your baby to crush with a sight. Because the retina to brush a little more deeper. And it doesn't look as realistic as we want it to be. We're happy with.
5. Baking your clay: So basically we'll be using the instructions on the packaging. So for example here I'm using scope be primal and it says to 75 for 30 minutes per quarter of an inch. So when I was a beginner, though, many times where I had accidentally burned my clay. This could be because of multiple reasons. Maybe the temperature is a little bit often your oven or whatever. So to play it safe, I always reduce it about 5-10 degrees than what is put on the packaging for this particular miniature that we're doing, I BEG did for 40 minutes into 60 degrees. And the amount of time that you're basically doesn't matter. You can be good for as many times as you want, as long as you want. So it's just the temperature is super important here. If under beaks that Lee say for example, just for like ten minutes or less. The chances are the team will become hard and else, but they'll be super brutal and they tend to break off easily. And when you bake deftly longer, they become more flexible and durable.
6. Shading the mini: It's time to start thinking are many toast. We will be using yellow ochre and burnt sienna for this project. I will be using a science theorem brush. For this one. We will be painting this mitosis in multiple layers. First, let's start with a yellow ochre. We will start pinging the edges and the site and then work towards to sender. Okay. So thank you so much. Water in D apiece. The beam is too watery. Isn't that amazing? Then? We'll add a little bit of burnt sienna tour yellow occur and start feeding minutes between each layer so that the pain can try to do the reverse. Okay. Now for a next layer, we're be using just the burnt sienna. And the next layer, which again is a mixture of yellow ocher embarks Hannah. So the Civil War. We now have a finished piece.
7. Project: The regulations on finishing your money at least. I hope you all have a lot of fun. Just like I did. It was wonderful to create this course. And I had so much fun. I can't wait to see all of your many dose in the project section. You can also add your in-progress pictures. And if you have any questions, please feel free to leave them in the discussion and I'll do my best to answer them for you.
 Samanvitha Koduvayur Suresh