Transcripts
1. Welcome to Class!: Hey, how are you? My
name is Andy Villon. Today, you'll be
learning how to sketch and ink arrangement
of flowers or start out by sketching a shape
that the flowers will go in and then drawing the
flowers and vinees or ivy. My goal is for you
to leave this class having completed a beautiful
flower arrangement, drawing and also learning new techniques for drawing
flowers and leaves. So we'll start in
the next video, sketching the form or shape. That the flower will go in, our flower arrangement, and then we'll start
drawing the flowers. Be sure to watch the second
class of this series where we'll be coloring the
flowers using mixed medium. So I hope to see you there, too. Right now, let's start drawing
our flower arrangement.
2. Materials: Alright, welcome to the
Materials section of the class. I'll be going over some of the materials that I'll
be using for this class. Now these are materials aren't
necessary for this class. You don't have to go out and
buy them whatever notebook, pencil and pen that
you like using his fine and great
for the class. I just wanted you
to have an idea of what are we using
so that you don't feel like you missed
something and you're curious about what
toes I'm using. Now the first thing that
we'll go over is the paper. I'll be using this Strathmore Bristol
board smooth surface. It is when am I prefer papers
for doing pieces like this? Drawings using different
mediums as well, and also for doing
control sketches. I like it because this
paper in particular is very white and I really
like white, white paper. So that's why I'll
be using this size. You can see down below
is 11 by 14 inches. The second tone I'll be using. Here's my mechanical pencil
and pen sort of choice. Now, we have a regular pencil, graphite control, or any
other type of pencil. That's fine. I like this in
particular with 0.7. And it's my preferred pencil to use when doing these
types of drawings. Now there are two pens
that I'll be using. The first one is a Pigma
Micron size eight, and this is when
I'll be starting with the second one hand. My preferred pen
that I really like using is a unit ball pen. And I really like this pen
because I enjoy how it flows, how the ink flows. And I really like
these and always seemed to come back to
this pain in particular, they ever told that you need is a router every you've taken
any of my other classes. You know, I like to use a T-square and how we're
using it in this class. But again, you don't
really need to have a T-square has long as you have a straight edge
or any type of rodent. Or even if you
don't have a rotor, you can use a book or something straight just to hit
some straight lines. Natural won't be doing it at
the beginning of the class. So here we have all of
our materials, our paper, our pencil, pens, and rotor, and that's basically
all we need. And the end, whatever materials you have, anything you use, those, these are
just the ones that I will be using for this class.
3. Warm Up: Okay, so in this warm up, we'll be learning how
to draw a few flowers and a few petals and
also some leaves. So to start out, I
have my pencil here. And what I'm gonna do is we're going to learn how
to draw some petals. So we wouldn't have
petals and our drawing. You might want to start out when drawing them by drawing a line. And then around that, you can draw your hetero
following it on either side, allowing it to be a symmetrical
as best as possible. So this is like a teardrop following this middle
line to the center. So that's one type of pedal. We can draw another
type that is a bit for taking over this
as the top here, where the tip of my pencil is, where you can have
it be more trying neither as it goes
up here to the top. So that's another example. And then another one. We could have our same and nine in the middle or the center. And then we could go up, following up a nice curve to
about here on either side. And then we can go in with
another curve like that, pulling in and up. Another example is we could
have something that looks like a crown coming down. And then hand it, have a pedal that's
a bit more round. We could also have
petals that are more triangular in and wider. So they will have a
heart here at the top. So a bit of a heart-shaped
flower petal. And some might be
random it more why we, as they go down. And then in the case of orchids, he would have basic
point in the middle. And then our heart pound here. And then you would have two little petals on either
side, right in here. And then two coming up like so. Now let's take this heart-shaped
petal for as an example. Now what you might do as you
would have for your flower, the center by adding a dot. And then around that, he would form here for an
hour by adding petals. So I'll start by adding a
heart-shaped petal around here. And then we'll have another
one right or right beside it. And we'll keep going
around and around, adding more and more petals
about the same size. Now, one thing you might
want to keep in mind, and I will try this
as an example. And I'm going to draw a two-inch line marking the middle one. And then I'll draw
a horizontal line. And then when you might do
with a sensor like this one. As we can line up in the middle. And this would be the
outside of our kiddos. I'm using the biggest
circle, honest answer. So you see there I have
a nice big circle. And then overlain with a smaller circle in the middle of our cross
and draw a circle. So we have something that
looks like a doughnut. So we can use this method to
draw out our flower petals. And by being very much the case, in this case, in this class, we're not going to
use this method because I wanted to make a bit more free part of human want to and be more
careful in this case, then that's up to you. Then in the center of this, we might have some Harlan by adding little
circles in here. And then we can even go and add a second row of these
petals around here. These are behind, the second
row is behind his friend. Petals are overlapping and blocking the view I wasn't
patterns behind them. So there's another
example of a flower, how he might even have
a rose and a rose. Again, we'll start out with
a center point and then have lines curve around, spiral. That's the one in the center. That's why was around
and rounds into it. We're going to have mine
comes down and around. And this is all rows from above. So looking at it as
if we were looking down and tell the rows. So we're adding more and more, more and more loops
around this to build out our rose and rose petals. Okay, so we're going to look at one more example of
a drawing a flower. And what we'll do is we're
wanting to draw some lines. And we're going to
mark the center. So this is a two inch line. And again, I'm being very meticulous whether
they're drawing it out or do we want to be as meticulous has we're
paying right now. Where does this just to show you examples of what you
might want to do, okay? So we're going to go all
around this center point, trying to hinge lines. They don't need so many. Just enough to get
our orientation and have an idea how
long those need to be. Okay, so there we are. So now we know any of
their work all the way around here, drawing a parallel. So we have our center line similar to how we truly
are these flowers. So I'll go around and then an empty spaces. We can add a few more petals. Okay, so there's our second
example of a flower. So in the next videos, we'll start drawing our
flower arrangement. I'll see you then.
4. Laying in the Frame: Alright, welcome. So we're going to start with
drawing of our flowers. And we're going to do this
dry in a very structural way. Berlin, level by level. We're going to start with a base and build out from there. So what we're going
to do to begin is where an outline to constrain and know where
our flowers we'll go. So for starters, I have my
favorite mechanical pencil, and I also have my ruler
right here, my T-square. And this will allow me to have
some nice straight lines. I have my paper square up with the pad underneath
and there were travel use as a support. And one thing I would
like to mention is that I will be
using my easel. And this is a very
good tool to have. And there isn't
necessarily put up, there's any way you can prop up your paper so that it is
more at the same angle, heavier phase than
that is fantastic. Sometimes when drawing if your paper and your face
or at different angles, then the drawing may come out a bit out of proportion
and look funny. And the final result, okay, so the first thing that we're
gonna do is we're going to find Miro going horizontally. And what I want to
do is measured. So I know this paper
is 11 inches wrong. So half of that will be 5.5. So there's the center of my
paper going horizontally. I added a little mark. And now I'm going to
turn my ruler and make a line going cross. What I'll do is I'll
start out about two inches from the
side of the paper. So I haven't lined up with
my dark here in the middle. And then I'll go in and measure in two inches from the side, which is right there. And I'll draw a line going over two inches over is here. And so they're meeting up with the other
part of the line. So my line is about
ten inches long, right area and a little
above ten inches. So I'll put a mark
at the beginning and the end so everyone
can see it very well. So now we're going to find
the middle of this line. We know it's ten inches. So we want to have a mark at five inches right
there in the middle. Okay, So now we're going to do is we're going to draw a
vertical coordinate line. I'm lining my T-square up
with the top of my paper. So now that it's lined up, I'm going to draw a line that
2.5 inches on both sides. So there's 2.5 inches going up. And then we'll have
2.5 inches going down. All right. And then I'll put it at all. Mark right here, it's a top and a mark right
here at the bottom. Okay, so here's a base for
our flowers to the line. And what we're going to
do is this will be formed into a shape like a
diamond or a kite. And we'll build our
flowers in here. Now, you don't have
to do it this way. But it's something that I have found helps me when drawing. It helps me nowhere to place my flowers or objects
or whatever it may be. You don't have to
draw flowers with. This helps me know where
to place my objects. Okay, so now we're
going to go in and we're going to
connect all the corners. So we're going to know, starting from the right side, we're going to
draw a light line. Okay, then, so here
we have our frame, you might say, for our flowers. So in the next video, I'll start drawing our flowers
and adding the details.
5. Main Flower Sketch: Okay, So in the last video, what we did was we built this
frame to hold our flowers. We know how big they need to be. Neat, how they need to
taper off as they get to the side and be smarter. And so now we're going to
start drawing in our flowers. Now for drawing flowers, there are several options. One is you can draw using a pencil to draw the
circles of the flowers. Another option is
you could draw using a cup and put it down and
draw a circle around it. Or you could use a compass. There are many options, but for simplicity sake, we're going to draw it
using our freehand method. Now this method, is
it going to be as a meticulous and careful
as when using essential. But it will get the job
done and you don't need as many tools as he would
have been using stencil. So we want to have a nice big
flower here in the middle. So I'm going to line up right here and start
drawing the circle, has best I can. And I want to add
to my flower to be a nice core distance all the way around from
this middle point. One way that I like to
draw circles is why having little lines and joining them together
in that way, I can build out my circle, the robot at a time. And as you can see here, I'm making fine adjustments. We're making it bigger at 1, having it in there. So instead of
drawing a big circle with one fell swoop, one line, we're drawing little
lines and joining them together to make a
solid line around here. Okay, so now we're
going to go in and we're going to start
drawing our petals. And I'm going to draw
mine pretty wrong, kind of like the petals have a sunflower so they extend out. And I don't want them to
go beyond this point, how my constraint curving back around. And so we have this shaped like an oval kind of comes to
a point right in there. So I want all of my petals
be about this size. So don't stress too much if
they don't have all the same, we want them to have a variety
different than others. So that's fine. However you do them is great. Alright, so now that we've got
our outer petals drawn in, we're going to go
in here and erase lightly this line
and the middle. We want to keep our point there. We weren't going to
lightly erase these lines. And we're going to go in and add a second layer of petals. Now these can be a
bit more afraid. They don't have to
be the exact shape as the ones out on
the outer side. We're going to have them extend this inner edge right in here. And so just go and maybe around like a long
extended heart. And what we'll do
is we'll overlap. And as you can see, some are
thinner, some are bigger. They're very shy. I don't have two aren't
being the same app. You're thinking about nature, things where things are random. Things aren't always the
same size everywhere. So that's how I want this to me. Alright? And then
we're going to go on this outer edge and erase and a line out here a little bit and the edges
of the flowers. And we're going to add a
third row going around here. And these will be more of like this second row of
this heart shapes, but tell me a bit bigger. So there we are. And what I'm gonna
do is go in here and erase that very middle. And we're going to add
a field and all that, all pits upon n, right in the middle,
right in here. Alright, so there's our
first flower drawing. I got the first one then, and now we'll start working
on the ones on the sides.
6. Little Flowers Right Side: Okay, so we're going to draw a few flowers over
here on the side, or draw one right
around in here. And we're going to have a point. I'll add a little
dot for the center. I'm going to go in and draw
digital random shapes. And I'm going to replicate
them as I go around. So I'm trying to make them
the same length so as away. So this one is the same
length as this one. And I'm not punching
them up together yet. I will do that on
my second pass. But I'm just going to
go in and form maybe four or five and
a star formation. And then I'll go back and
add more petals in-between. So now I'm going back again. Now add some more
in between here, all the way around. Some overlap, others. You can be a bit longer
than other ones. We're going to add a second
Rowan vein behind as well. Alright, so there's
our second flower. We're going to add
one right about here, and this one will
make him a rose. So when just go in, add it or loops coming
out from a center point. Having around. Imagine a shout on the page, how it has its design
curving around. And then we'll have another
flower out here or down here. And we'll add a
point right in here. And then we'll have these
more triangular flowers. So this one right here is
going to be tucked him behind this main flower because we went the main flower here
to really pop out. So we're going to
just have some of these petals behind here. All right, and then I'll add another hello flower right here was a bit of a heart shape. I don't want to do is I'm
going to erase a metal and I'll draw a little circle right in the middle,
right in here. Okay? So there's another
flower and we're going to draw them out into this corner and this
triangle over here. So what I'm gonna do is have another big one right
here and then middle. And we're going to have
some nice someone to triangular shaped
for our petals. Coming out to this point. Another method that
you could use, and they may be easier
for you to do it this way is draw lines, guidelines that go
out from the flower, out from the middle point
and then draw around them in this fashion and kinda mimic this
is the center petal. So that may be a bit
easier for you to do if you need to use this method
is fine and very good. I might use them myself. And then this flower here will go on top of this
one right in here. So I'll erase this and draw this out
extending over and random. We want them to overlap
here and there and really flow over each other. Hi, all right. And
then right here to corner and I'm going
to add another one. Just hit a heart-shaped flowers. So I'll erase this
print shoreline because I know exactly where
that flower needs to know. How add a center circle. And then our trial, my heart's around there. Alright, so a finished half of our drawing and then
the next video, how many moving over and adding flowers to our left-hand side.
7. Little Flowers Left Side: Alright, so on this
left-hand side, we're going to go in and
continue to add more flowers, wearing them a bit. We might add some arcades, some daisies, just play around and we'll see what we have and what we end up with. So for the arcade, I wanted to land and add a bit of a down
here at the bottom. And then I'll add two flowers, are two petals coming out
to either side like this. And then we'll have to planet going up in either direction. Might add my guide lines
for I enter petals. I want these to be
the same length. So when I think I'll
do is I'll make a little group of resort. It's right around this
area right in here. And what I might do is make
them at different angles. So instead of having
them all pointing down straight face
at the bottom, I have this one over here. They had a different angle. So what I'll do is I'll draw
a dotted line coming out. And this is the
direction that is hetero is a heart
shaped one is going in. All right, it's showing
the area that remains. We're going to add
a nice fit flower like this one that
we ended over here, are going to add
it right in here. So we'll add a dot
right in the middle. We have our center point. And then we'll work out of here, a radius all the way around, and then a space that
remains and when it fell, my areas and with a
few more flowers, because we wanted to
really feel this and have this area that's shaded
and we'll fill it out. We went to fill it in audibly areas was
meant or designed. Okay, so that concludes our initial drawing and laying out our flowers shown
in the next video, we're going to go in
with her pen and add in all the lines and see
what the final result is.
8. Inking Process - Part 1: Okay, so we're going to start with the inking
process and I dropped my pen of choice, micron size. And we're going to start. One thing I'd like you to
keep in mind is that keep in mind of what petals
overlap other ones. So like over here I have some overlap with the space
sunflower right over here. I have raised her or
kids that overlap. There's bigger sunflower petals. So I want to keep that in mind
when I'm inking over here, the sunflower petals overlap
this little flower here. So the lines here
will go on top. And these will come
behind and won't even be visible because they're
behind this bigger petal. The same way to go for, over this way some of these
petals overlap, this work it. So just keep in mind
what pharaohs overlap other ones and know how to layer them so we don't
have a big mess. But with pen, it is possible to erase unless maybe you
have an erasable pen, but more likely you have one that's permanent
to life, this one. So keep this in mind. Once you put down a line, you have to commit and
there's no going back. So I'm going to start
with the middle flowers. And I'm going to work in here just to really write
it on my line. And as I also mentioned in the introduction video
of the materials, I'm also going to
use my unit ball. Hey, there's my preferred pen. And like I said in that video, it's an pen that you use
really doesn't matter. So if you have any pain, that's your favorite
pen, that's fine. And this one case, it is waterproof and fade proof. And I really like
how this one froze. So one thing to keep in
mind is that now is really the time where he went to make the adjustments that are needed. And there's after we ended, there was no going back. There's no fixing the mistakes. So we have to now what we're doing and be ready
to fix anything. I've just make any adjustments because there's no going back. Okay, So I'm starting over here. I'm not going to add
a dot in the middle because I may want to put
it at all design in here, but I'll just worked out
from the center point. Trace all of these lines. My pen.
9. Inking Process - Part 2: One thing I am going
to do before I go on and move on to
this left-hand side. As I'm going to make
a few adjustments to these petals
of the sunflower. I'm going to go in
and have a line. And the very middle
of the petal with the secondary smarter or
nine right above it. What this does is it
makes it look like it's kinda caving in
in the middle and curving in as it approaches the middle center
line of the petal. And we're not going to
extend this line all the way out to the very
outside of the petal, just right here in the middle. And cameras in a nice variety. And we're going to do
something similar to these middle flowers
right along here. And also to this. Today's, some of these,
not all of them, but some of these petals on this outer part out here,
these outer flowers.
10. Inking Process Part 3: Alright, so we're
gonna start over here and add in all of
our lines again, keeping in mind
which ones overlap everyone's searches in here. And over this way, so struck with her pen
and add in the lines.
11. Vines - Right Side: Alright, so the final
thing we're going to do while we wait
for the ink to dry. And before we go on to
erase the pencil marks is reminded the land with
our pencil and add a field. Lines are coming out, flowing. Cheers to feel. And on these wines we will
be adding a few leaves. So we're just having
these nice flowy lines. I have vacant flow like
waves and twist around. They can just go round. And then forever leaves. They're very simple,
shape like this. And then they have an
opposite view over here. And then they join
together like so. So, uh, you, and then it
comes out a little ways. And then we will draw
the other side of it. So there we have
our first example, and now we're printing something similar on all
these other vines. Okay, so I'll step
in now with our Pen and we'll start
inking these vines.
12. Vines - Left Side: Alright, so I didn't, that looks really nice so far. Adding these lines over here really adds a nice touch to it. So we're going to repeat
the process over on the left side and we don't
want to merit Exactly. We went to the left
and right front. We're just calling first we use our pencil sketch and then
overall red with our Pen.
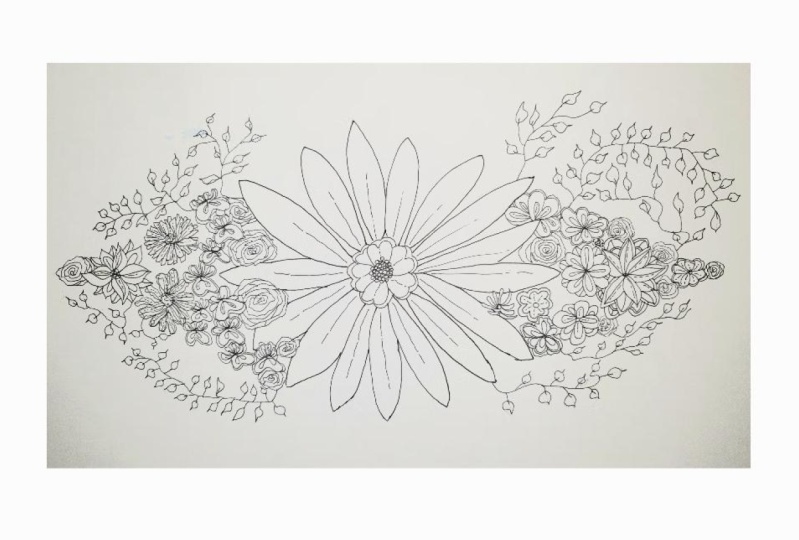
13. Final Edits: All right, I think the
final thing I'll do is I'll add another vine wrapped
up in through here. But because I want my saying my little flower arrangement
to be nice and organized. And right now it
feels a bit heavy on this side and to
write on this side. So this is something to
keep in mind when working on yours historic event. And now, right, It's heavy on, too heavy on one side.
14. Erasing the Pencil Work: Alright, so now that we've
got our line work in, we can grab our eraser
and we can go ahead and erase the lines and allowing the ink to
dry for a few minutes. Well prevented from
smudging when I go back and erase
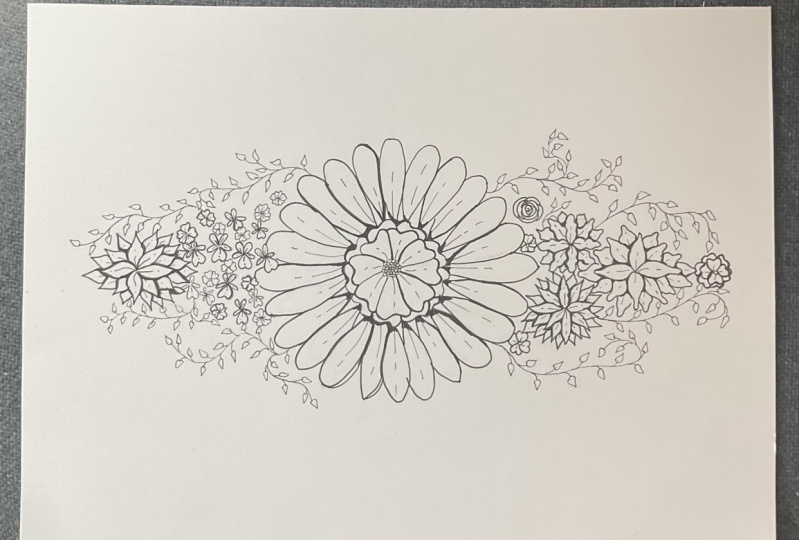
my pencil work. All right, so here is
our finished drawing. I think it really
turned out nice and really cleaned up
well with our eraser. And I really liked how you have this nice shape
with her flowers. And through here, our main
flower in the center, surrounded by our
flowers on either side. And then we have the
vines with all of our leaves on the bottom
and top on the other side. That really rounds it off. And we have it also we
learned how to make Haven and not weighing down too much
on one side like you saw, mine was weighed
down on this side. And that's why I went and
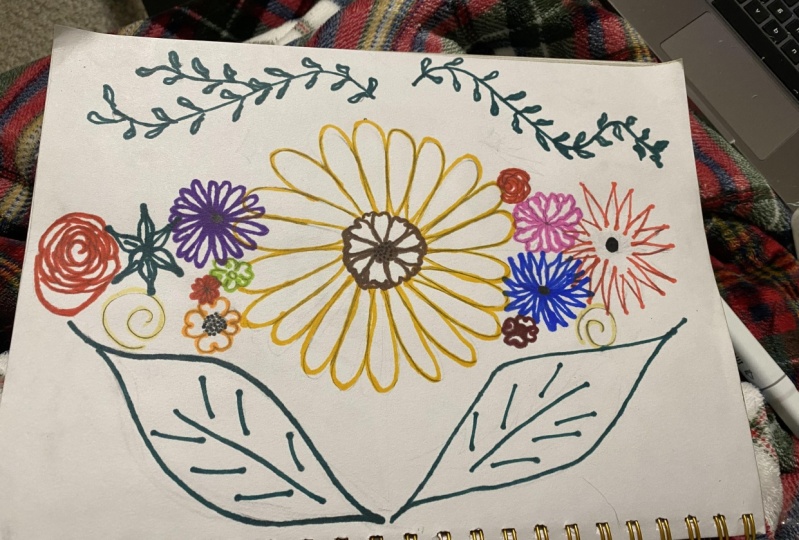
added a few lines over here. Now I've even go back and add
in some color using color, pencils, pastels, water covers, markers, anything like
that, that would be great. I think even really
make this pop even more by adding some
nice vibrant colors. So that's it for this Troy. I really hope you enjoyed it.
15. Thanks for Watching!: Thank you so much for watching. I really hope you enjoyed this class and we're able
to learn something from it. Please feel free to post a
picture of your drawing below this class so that
all of us here on Sco chair can see what you did. If you have any questions, don't hesitate to start a discussion in the discussions
tab below this video, and I will be happy to
answer your questions. Well, if you would
like to support me, please check out my website at www.andartitude.com
And feel free to visit me on Instagram and
Facebook where you can see daily updates of my artwork
at Andy's attitude. Stick around here on
Skillshare and follow me because in the coming weeks I will be uploading
more classes. That's been it for now. I hope you have a wonderful day. See you in the next class.
 Andy Villon, Fine Artist