Transcripts
1. About this Class: Hi, I'm Chris Ruff, and this is Class Seven
of mock-up Academy, the course that I created, so that you can learn
how to make mockups from any stock photo so
that you don't have to rely on buying
pre-made mock-ups or using the free ones that so
many other people are using. In this class, you're
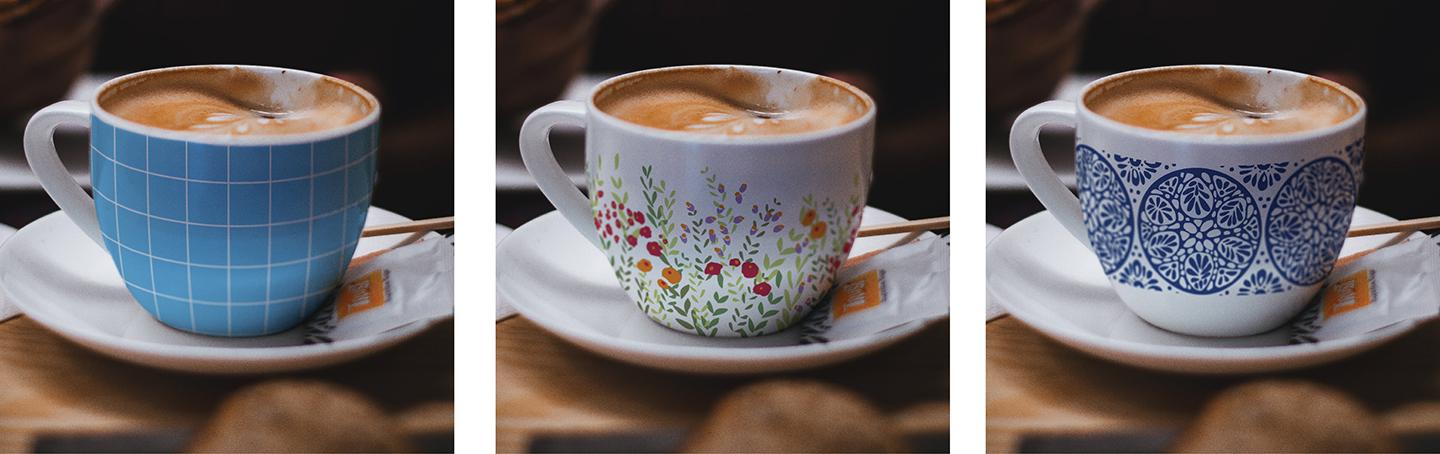
going to learn how to make this inviting latte cup mock-up. The photo is from a
free stock website called unsplash.com. And the direct link to
the free download is listed in the project and resources section of this class. So you can download it and
create your own mockup following step-by-step as we go through the lessons together. So what makes this
photo so inviting is the soft focus really makes
it feel intimate and cozy. But those soft edges also
make it a little bit more difficult to make a
realistic looking mockup. You can have just a
perfectly focused image on this soft edge photo. I'll show you how to create a soft edge selection on the cup where you
can put your art. And then I'll show you
how to selectively blur your artwork to blend in
seamlessly with the photo. And you'll also
learn how to work the artwork so that it looks like it's wrapping
around the cup. When you complete the class, you'll have an inviting mockup template that
you can use for a lookbook sell sheet or a social media
post on Instagram. And once we finished
the cup mock-up, I'll also show you
some other ways that you can add interests or highlight details in
any of your mockups by using Photoshop
selective blurred tools. Even though this is class
seven of mock-up academy. Don't worry about it
if you haven't taken any other mockup
academy classes yet, I always include a
basic concept lesson. So that will all be on
the same page and you'll have everything that you
need to complete this class. I think you'll find the
mockup academy method is a lot simpler than most tutorial show you or how pre-made
templates are set up. So let me give you a little
bit of my background. I have a degree in art and
worked in graphic design for many years and telephone
surface design and really fell in love with it. That was about ten years ago. And since then, I've made
hundreds of patterns, worked with dozens of companies, and discovered a love of
teaching a few years ago. So a few technical
details about the class. Everything I'm going
to demonstrate, we'll be in Photoshop with
the exception of when I'm copying and pasting
art from Illustrator. And you can copy
and paste art from Photoshop or Procreate wherever it is that you make your art. I work on a Mac, so any shortcuts that I mentioned
will be based on that. If you're on a PC, they
might be slightly different. I'm going to assume
that you have sort of a general working
knowledge of Photoshop. You don't have to be an expert. I make things as simple
and easiest possible. But just as long as you
have some familiarity with some of the tools,
that'll help a lot. And that way I can keep the classes moving
along pretty quickly. So I think that's about
it. Let's go get started.
2. The Basic Concept: In this first lesson, I'm going to go through
the basic concept of how you make a mockup. First I'm gonna do it
with some diagrams and then we'll jump into
Photoshop for a demo. So to start, we'll
just open our photo in photoshop and then make sure that our Layers panel is open. Now whatever that object is, I'll be referring to
that as the base photo. That base photo will automatically show up
in the layers panel. The first thing we'll do is set the base photo on multiply. And that's so that as
we add layers to this, we'll be able to see through that base photo Onto
the other layers below. Next we'll create a folder. And that's eventually
where we'll put the art that we want to
put on our base photo. Make sure this art folder
is below the base photo. Next, we'll select the area on our bag where we
want the art to go. And we'll turn that into
something called a layer mask. Now if you're not familiar
with a Layer Mask, I like to think of
it as a window. So that selection that
we made around the bag is now this little white
square on the Layer Mask. And that's the window
where the art is going to show through
the rest of it. The black area is
all blocked out. So when we add art
into this folder, it will only show
through that window. Now notice that I put
the layer mask on the folder and not
on the art layer. There's two reasons for that. First, it makes things so much simpler because now whatever
we put in this folder, whether that's different art or a background color or text, whatever it is, all of it
will already be masked. So it will already fit
perfectly on our photo. In addition, when the layer
mask is put on the folder, then we're free to
add additional layer masks onto the art layers, and we'll do that in some
of the later lessons. Okay, so that's
the basic concept. Now let's go into Photoshop and I'll demonstrate
how to do it there. I open the photo in Photoshop. And for this tutorial, I've closed up all the panels, all of the dialog boxes except the toolbar to make this as
simple and easy as possible. So first I'm going to
open the layers panel. I go to Window layers. You'll notice that
the first layer is already in there and
that's just your photo. Now, it may have a padlock
on it like this one does. If it does, just click
on it to get rid of it, I'm going to double-click
on the name and we're going to call it base photo. And that's not a really big deal in this very simple mock-up. But later with more complex one, we might have reason to duplicate this photo
a bunch of times. And so we really want to know which one is the base photo. So it's just a good habit
to get into at this point. Next, I'm gonna go up
here where it says normal and change
it to multiply. And again, that's
so we'll be able to see the layers that we
put underneath this one. Now we're ready for
our art folder. So we go down to the bottom of the Layers panel to the little icon that
looks like a folder. And click, remember that has
to sit under the base photo. So we'll click and
drag it and just pull it down below
the base photo. And I'm going to rename
that one artwork. Now we're ready to make
the selection on our bag. And Photoshop has a lot of different tools to
make selections, but it's always nice to try
the easiest ones first. So I'm gonna go over
here and I'm going to choose Quick Selection Tool. Now it won't let me do
anything right now because I don't have a layer chosen, so we want to choose the base photo and
then come back over. And I'm just going
to run my tool on the area that I
want to be selected. It missed a little bit here. So I'm just gonna go in and
drag over that area too. Now if this happens where
you get more than you want, just hold down your Option key and then go back over that area. And that will get
rid of that part. Looks like it missed a
little bit down here too. So we'll just carefully go
down and pick that as well. Once you have exactly
what you want, we're ready to turn
that into a layer mask. And to do that, we simply
use this icon down here that says Add Layer
Mask and just click on it. Now remember in the
previous example that we want the layer mask
to be on the folder. Well, it's gone and put it
on the base photo layer. So we can just simply
click on the mask itself and drag it
onto the folder. There it is, there's
our layer mask, and so this white
area is the window. And whatever we put in this folder will show
through that window. Now to make things
a little clearer, I want to give a
color to our folder. So I'm going to click
on the folder layer and you won't be able
to see this because it goes below my screen, but I'm going to choose a color at the bottom of this window. So that way we know
which is the folder. Now we're ready for art. So I'm gonna go
into Illustrator. And I'm going to
choose this artwork that I wanna put on the bag. So I'll copy it. And then go back to
Photoshop and edit, paste. And when this option comes up, always pick smart object
that we will be free to size the artwork up and down endlessly without losing
any quality in it. Then just click, Okay. There's our artwork layer. And now we just click and
drag that into the folder. And now you can see
it's orange too. So now we know it's
in that folder. And there you have it. There's our mockup. So this artwork, even though it's much
bigger than the bag, only shows through that
area that we had selected. Now if we wanted to
try out different art, I'm gonna go back to Illustrator
and try out this art. So I'm going to copy it, which is Command C, and then go back to Photoshop, paste again, which is
Command V to Smart Object. Click. Okay. And there's our artwork. Now obviously we're seeing
both artworks that all we need to do here is
turn this one off, turn off the little eyeball. And now we see the new
art on our mockup. Now we should point
out that we can also resize this art if we want. And we can do that
with the move tool, which is the one
in the upper left. Now we have these handles
show up and we can just then drag them up and down till we get the
size that we want. Or we could move it and do
whatever we want with it. And then click
Return. Now, if for some reason you want
to see all of the art, not just what comes through. You can temporarily turn
off that layer mask. And the way you do it is just
go up to the layer mask, right-click and click
on Disable layer mask. Now that puts a big x through it and we can see all
of the artwork. And then if we want to
reinstate the layer mask, we just click on it again. That's it. That's our first mockup. You can see really what an easy process is and how setting up that artwork folder
really makes things easy. Now let's go mockup
the latte cup.
3. Making a Soft-Edged Selection: In this lesson, we'll
set up the layers again, like we did in the
basic concept lesson. And then I'll show
you how to make a soft edge selection that
we'll use for our Layer Mask. But first, before
we do anything, I want to show you
how to download this image so that you can work right along with me
to download the photo. Just go to the class
page and scroll down till you see
the About section. And here is where
there's a link. Plus you'll also find it
under Project and Resources. You can use this link here
or this one down here. And once you click on it, it'll take you right
to the page and you can just click download. And if you're on a Mac, you can just click on this
Download link up here. And you'll find it in
your downloads folder. If you click on it there, it'll open up right in Photoshop and you're
ready to begin. We'll start by
setting up layers, just like in the
basic concept lessons which hopefully
you just watched. We'll click the lock to
change it from being a special background layer
into just a regular old layer. And then I'll rename
it base photo. Next we create our art folder by clicking on the folder icon, changing the name, and dragging
it below the base photo. Now we're ready to make
the selection on the mug. So we click on our
base photo layer. And last time I used the
quick selection tool. If I go over this one, it pretty quickly selects the whole thing and
that's not what we want. We want just the front. So this time I'm going to try
the object selection tool. And when you use the object
selection tool by default, this is checked up here. And so it automatically goes
and finds all the objects. Again, that's not what
we want this time. We only want the
front of the mug. So I'm just going
to uncheck this and then just click on the Move
tool to get rid of that blue. Now again, I'm gonna go click
that object selection tool. And then with the Lasso
Tool selected up here, I'm just going to very roughly select the front of the mug. That did a pretty good job, although we don't want
the top rim of the mug. So I'm going to
just go in there. And if I use my Option
key on my keyboard, that changes the little icon to have a minus in
it, a minus sign. So now I'm going to
roughly circle that RIM, which basically I'm
saying, hey, Photoshop, re-analyze this area and
don't include the rim. And that's what it does. Now it missed a little bit here, so I'm gonna go back and
do the same thing here. Get rid of that and this
little bit over here. And sometimes if
it's being fussy, I'll go back and just use
the regular lasso tool with the minus sign. And just to clean it up
a little bit manually. And I want to clean
this a little bit up manually as well. So I don't want that
little bit of the handle. Okay, So that looks pretty good. We've got a little
bit of a bump here, so I'm going to take that out too. And then I
think we're good. So that will be our selection
for our Layer Mask. But remember we don't want
a hard edge selection. So before we turn it into a
layer mask on the artwork, we're going to go to
Select, Modify, Feather. Now, depending on your image, this may or may not be five. You just need to
play around with it. But for this image, five works pretty well. So we'll click OK, and it
doesn't look any different. But when we put our
artwork in there, you'll see that it
has a soft edge. So click on the
artwork folder and click down here to turn
it into our layer mask. Now we're ready to add
our art into this. Before we use the
snowflake artwork, I'm going to start with
this grid artwork because it'll really help you
visualize what's happening. You can try it out
on your mockup too, because it's available
to download in the project and resources
section of the class. I'm in Illustrator
now and I'll copy the art which is edit copy. And then go back into Photoshop
and go to edit, paste. And when this comes up, always choose Smart Object will eventually need
to rasterize the art. But for now, if we choose
Smart Object will be able to scale the artwork up and down without any loss of quality, which wouldn't be the case
if we pasted it as pixels. Click, Okay, I'm
going to scale it up so that it covers the cup. And then we'll take
that artwork layer and drag it into the artwork folder. And you can see if I zoom in the soft edge
on our selection. In the next lesson, I'll
show you how to warp this artwork so that it looks like it's wrapping
around the cup.
4. Warping Artwork: Alright, so now let's warp this artwork so that it looks like it's wrapping
around the mug. We go to Edit and we
wanted to transform it. But you can see it's
all grayed out here. The reason for that
is we need to first rasterize our artwork
before we can warp it. So remember we brought
this art in as a smart object so
that we can size it. But now that we have at
the size that we want, we can go over and
right-click on the art layer and go
down to rasterize layer. I'm gonna go over to
the rectangle tool. And I'm going to just make a rectangle that's a little
bit wider than the cup. Then I'll go to Edit,
Transform, Warp. Now we have these
little handles and grids on our art and we can move any of them and you can see how it changes the rest of the art. You can even move inside here. But we're just gonna do a couple of little things to this. First up here where
it says custom. We have lots of other
choices here too. And for our use, we want to use arch. Now it looks like this. And the arch is going
in the wrong direction. So we can take this little
square and pull it down until this curve matches
the curve on the cup. And I'm going to move it over a little bit so that
it fits nicely. Actually, I'm going to move
it up a little bit too, just so that we make sure
that we cover the whole area. So that's the first step. Next, we're gonna
go back up here, going to go up to the
top and choose Custom. Now, because our cup has a rounded bowl shape
at the bottom of it, we're going to mimic
that by taking this corner and pushing it in. So now our shape more
closely mimics the cup. And we'll do that over here too. Again because of
the shape of this, these squares down here would
be a little bit smaller than the ones up here because they're tucking out underneath. So I'm going to just
push this up a little bit and pull this down here. Okay, so that's all we need
to do with the warp tool. So we'll click Return. Now there's one more
step we want to do and that is to compress the sides to really make it look like the arts going
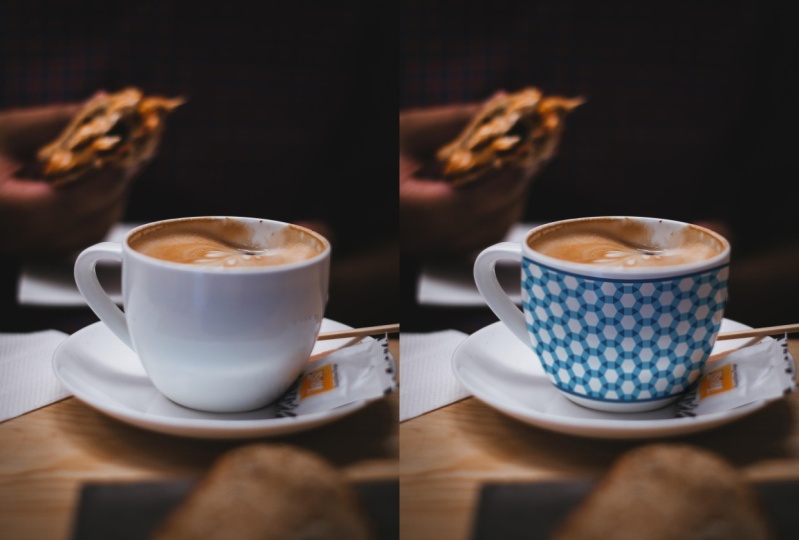
around the corner. And let me show you a
couple of examples. So you know what
I'm talking about? These two photos
show it brilliantly. Plus, we get the added bonus of a tiny puppy with his
tongue sticking out. So what I want to
show you here is if we look at this.in the
center, It's almost round. It's a little bit
compressed top to bottom. But mostly the width is round. We go over here and
it's slightly narrower. This one is even more distorted. And these two are
more distorted yet. So that distortion increases
as we go around the corner. Same here. We have this heart. And then this one
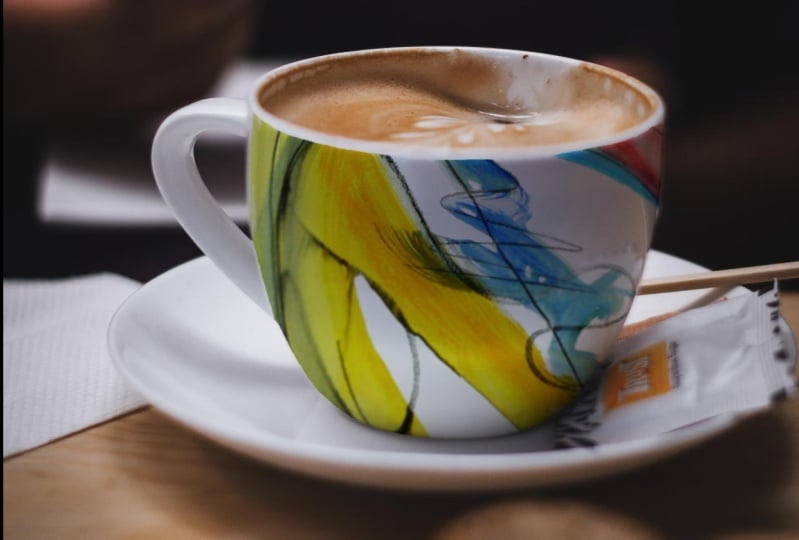
is hard to tell, but it's slightly narrower. And of course these on the edges are even more compressed. And this one over here, especially now this one, the photo is taken
almost straight on, so there's almost
no curve to it. So this line is very
straight all throughout. This one shows a
similar curve to what we have on our
photo in the front. The curve is pretty flat, but the curve increases until it hooks around to the side. So the curve here that we see is much greater than the one here. That's what we're
trying to mimic when we're doing the warping. To do that compression, I'm going to choose
the rectangular tool. And then I'm going to
choose an area along this edge probably about a
third of the way into the cup. And I'm gonna go to
Edit, Transform Distort. Now we get handles.
And I'm just going to take this one and
push it in a little. You can see as I push in, it changes the angle
of just that section. We don't wanna go all the
way because now it's going to look like a straight corner. But what I wanna
do is bringing in a little bit and
then click Okay, and de-select, which is command D. Now I'm
gonna do that again, but not go all the way. A third end, but go
about this far in. So I'm going to choose
that area again. And I'll give you the shortcut, which is Command T, that gets these lines. And then I can push it again. And I'll push in a
little bit more. And you can see
this curve is now looking like it starts
to wrap around. So I'll click Return, de-select, and then now just take this last little bit
and do the same thing. Command T. And push that in
and click Okay and de-select. Now, that curve is much closer to matching this
curve compared to over here, where it just kinda
flattens out so it doesn't follow this little
hook around the back. So we'll do the same
thing on the right side. We grab about a third of it. Command T, push in a little bit. Click Return, de-select, and
then grab a little bit less. Command T, push in, and do it one more time. So that's how the warping works. Let's do it again with
that snowflake art. I'm going to turn
this off for now. Go back into Illustrator. I'm going to choose my
snowflake art and am I copy it? Command C, go back
into Photoshop. Command V for paste, paste it as a smart
object, and resize it. Now that we've sized it, we can rasterize it
by right-clicking. Going down to rasterize layer. We'll choose an area just a little bit wider than the cup. And we'll go into warp, which we can also use a
shortcut which is Command T, that gets our transform handles. And then if we right-click, you'll see warp right there. So again, we go up to warp, arch, pull it down so it
matches the curve of the cup. And then centered on there. Go back up to custom. Pushing the sides, shorten
up the bottom a little bit. Click Return, de-select. And then we'll use
our rectangle tool and compress in the sides. So I make my rectangle go to Command T, push in a little bit. Click Return, de-select. And sometimes I'll just put my cursor a little
bit to the left. That's where I'll start
my next rectangle. Command T. Return. Placed my
cursor, de-select. Take a little bit more command T. I'm going to do one more
little bit along the edge. So that distortion
really makes it look like it's wrapping
around the side of that. And then I'll do the same
thing on the other side. So in the next lesson,
I'll show you how to blur this image so it really fits in seamlessly
with the photo.
5. Selective Blurring: So now all that's left
is to blur our artwork. Let's go back to the grid art. Turn off this one and
turn on the grid. And now we'll go
up to Filter blur. And often will use these blurred tools,
especially Gaussian blur. But this time instead, we're gonna go to Blur Gallery. And there's several
options here. And let me show you two of them. Let's start with Iris Blur, which is named for the
irises in your eyes. And how when you
focus on something, it gets blurrier as you move
out into your periphery. So to start, if you don't
see these markings, makes sure that under views, the extras is turned on, otherwise you won't see them. What we've got here is think
of this as a little dial. So this tells you how
much blurring you can do. You can change it here, or you can type in
a number or use the slider and change
the blurriness here. That target, you can move around and center it wherever
you want on the image. Wherever that center point is, will not have any blurring. Blurring goes outside
to the edges. So if I move this, let's make this a
lot smaller circle so we can see it a
little bit better. And let's make quite blurry. The circle is where the maximum
amount of blurriness is. When we change it, we're changing where the
maximum will be. This set of dots indicates
where the blurring starts. So if I bring it in
closer to the center, the area that's in
focus becomes a lot smaller because the
blur starts sooner. Whereas if I bring
it way out here, most of the image
is in focus because the blurring doesn't start until we get out to those dots. So that gives you an
idea how this one works. Again, this is a little dial. So if we want to dial that back, now we've got blurred
around the edges. So that's one option. I'm going to show you
one more option that gives you a little
bit more control. So I'm gonna cancel
this and we'll go back to Filter Blur Gallery, and we're going to
use the field blur. The targets here work
differently than in iris blur. Here, the blurriness is the
strongest at the center point of the target and gradually fades out as you
move away from it. If we analyze our
image and figure out where the sharpest
point of the image is. Right along in here
in this foam area. So I want that area to be
the sharpest in my artwork. We can use our little
pin tool and pin other places where we want
the blurriness to change. So we'll put another
pin over here because I want it to be blurry
along this edge. And I want some
blurriness over here too. So I'm gonna put a
third pin over here. So now we can change
the amount of blurriness in each
of these places. In the center one, I don't want any blurriness, so I'll bring this
all the way down to zero and you can see it
sharpens up around that. And then this one, I think I want a little bit
less blurriness than that. And I might want to
bring it over here. So I can have a little
less blurriness on this side and maybe I'll have a little bit more on this side. So again, I can change
the blurriness with this little wheel or I
can change it over here. That feels like too much. So I'm just going to dial
it back a little bit. We could even put
another pin down here if we wanted a little bit more
blurriness at the bottom. So again, analyze the image, figure out where the focus is, and then move your little
targets accordingly. I think I'm going
to leave this a little bit less blurry here. And actually you can see
this edge is pretty blurry. So even in the center part, I'm just going to
add like blurriness of two so that it doesn't
look perfectly crisp. That's all there is to it. Click. Okay. Now our artwork is blurry
along the edges and really looks like it was
original to this photograph. So let's do that with our snowflake is
I'll turn that off, turn this one back on, and then we'll choose
that layer and we'll go to Filter Blur, Gallery, field blur, and
set this one to zero. Or I said too, I think click another one over here so that I get some
blurriness along there. And another one along this edge. I'm going to dial
this back a little bit until I'm happy with
the amount of blurriness. Maybe move this up
a little bit too. And once you're happy with it, you just click. Okay. There it is. Now you have a new mockup
template that you can use. You can drop in your own art
whenever you want to show how great it would look
on a little latte cup. So now the last thing
to do is save it. You'll want to have two files, one as the Photoshop
file that is now your new template
for future mock-ups, and then also a jpeg of
this particular image. And to do that, we go up
to File, save a copy. And I have a folder
called Finished mockups. I'll put it in there and
we'll change the name. And I like to keep the name
that unsplash gave it. That way if I ever need
to reference it again, so I need to go back and
find that I can do so. So I usually add a
description of what it is and then leave the rest
of it that it came with. And then I'll add an
identifier of the artwork. So I'll call this one Snowflake. Then we'll save it as a JPEG. And we'll leave this
set to maximum. That'll give us the most options about how big we can use it. And then click Okay. And then for the Photoshop file, all we have to do is click Save. And that will save all of our layers and leave
everything intact. So in the next lesson,
I'm going to show you some other ways you
might think about using this soft focus or this shallow depth of
field in other mockups.
6. More Fun with Selective Blurring: Soft focus or shallow depth
of field, as it's called, is a tool that
photographers use to add drama or interest or even
intimacy to an image. It's a device that really directs our eyes where to focus. And I mean that literally
where to focus. So if you have a mock-up like this one that's maybe
a little bit ho-hum. We can actually add
our own drama to it by using the
blur Gallery tools. So this is a jpeg of a
finished mockup that I saved just exactly the way that I showed you
in the last lesson. So I can go up to Filter Blur Gallery and let's try the iris
blur on this one. And move things around. Me, make this a
little bit smaller. So it just kinda want the edges to be a
little bit blurred. That's maybe a little
bit too much blur. So I can change it here or
I can change the dial here. And if I want to
check how it looks without these markings, I can go to Command H and
those will disappear. So now it has a little bit
more interest and it draws your eyes into the center to really look at the
details of the pattern. So that's it. So then
we can click, Okay? Now one thing I also
want to mention is right now we've actually
changed our base photo. And if we thought, oh, no, it's got a little bit more
blur, a little bit less. We can't do anything
to change that here. So one thing I
suggest is that you make your image a Smart Object. And I'll show you why in a
minute. I'm gonna go back. I'm going to revert
to our saved image. And this time I'm
going to unlock it. I'm going to right-click
and I'm going to choose Convert to Smart Object. Now we'll go back and do
exactly the same thing. I'll go to Filter Blur Gallery, Iris Blur, and set it up again. And click Okay. You can see over
here that it's made our blur a smart filter, which means that we can edit it. Here. If I want to see
the original image, I can just turn off the
smart filter and we can see the original image
or turn it back on. And if I double-click on
this Blur Gallery word, I can go back in there
and now I can make some changes so I can make
it a little less blurry. Click, Okay, we haven't
changed the image at all. We've only changed
the smart filter. So again, here's what it was
before and here's after. So that's a great
way to preserve the original image and give
you the ability to edit it. Here's another
example of why you might want to use
a blurred image. In this example, I
made this artwork for a card and I wanted to make
sure that people saw this, this little mouse down here. So one way to do that would
be to have selective focus. So here's the result
with the Blur Gallery. Little mouse is in full focus, and then I let things
blur off here into the distance and even more so because this area
would be farther back. And then a little bit down here, let me go into the blur gallery to show you how that looks. So I put a little marker
here that has zero blur. And this one up here
has the most blur. This has a blur of 27. The swan, seven, this 122. So I wanted to really blurry in the distance and then I just altered them in
different places. So using the field blur, you're going to really control
where your eye focuses. In this example, I thought
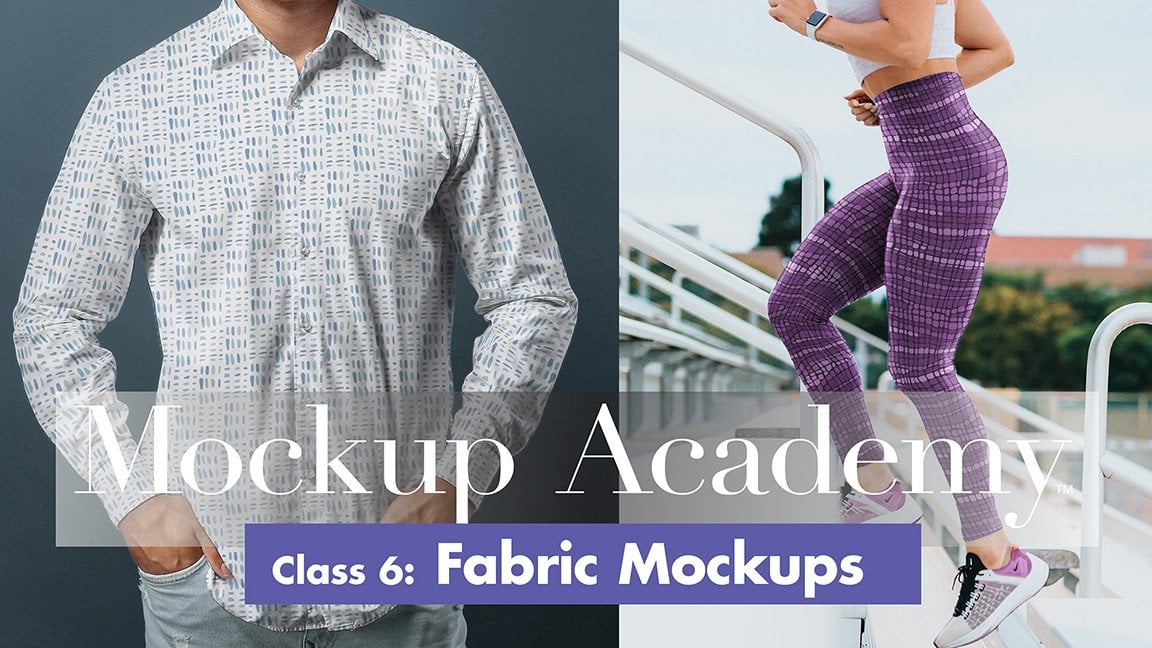
that this was a nice mockup, but it's a little bit ho-hum. It doesn't have a lot of drama. So what I did was I added
gradation in the background, which really makes
the shoe pop and also the color ties in with
the color of my artwork. I save this as a JPEG. So that's how I got here. And then I made sure to
make it a Smart Object. And then I added a blur.
This is the result. So I've made the blur look like it's going
off in the distance here and just blurred
the edges along here. So let me turn this one off
and let's redo it together. Click on my layer, go to Filter, Blur, Gallery, field blur. And here is where I want it
to be nobler, so that's zero. And then I want the farthest away areas to have
the most blurring. So I'm going to click here and continue that
along this edge. But now there's too
much blur here. So I'm gonna put
another pin in here. And I'm going to make
this less blurry here. Like this is also in the front. So I'm going to put
another one here and make that a little bit less to so I can really control how much blur there
is in different spots. So I could make this a
little bit more blurry here so that these
are more in focus. Or like here, I could add a pin and say make this
little less blurry here. Again, I can check
my progress by doing Command H to move
those out of the way. And I can see how I'm doing. And once I'm happy with
it, just click okay. And if I change my mind, I can go back in and
I'll see it's added a second Blur Gallery here
so I can go back into my blur gallery and click Command H and make
changes wherever I want. And another reason you might
want to use a blur is to minimize some of
the things around your image that might
be distracting, like this hand, this
purse down here. So first, I want to
take my image and make sure convert
it to smart object. Go up to Filter Blur,
Gallery, field Blur. And I'm going to do
the same thing here. So here I want it to have
to be in full focused. And up here I want it
to be quite blurry. I'll move this up a little
bit and down here too. And maybe a little bit
on the shirt over here. Now that's also blurring
this quite a bit. So let's put another
pin in here and say, Hey, don't be so
blurry right here. And we can bring some things
back in focus, like up here. And here's the final result. So the blur gallery can be
really fun and useful tools. You can use them to add
interest or to make a more dramatic image like
on this folded fabric. Or to highlight details like my little mouse that might have been missed on
irregular mock-up. Or to focus attention on your art and minimize
distractions in the photo, like the hand at the
back of this one. So I encourage you
to experiment with these techniques and I'd love to see what
you do with them. So please post pictures to
the class gallery page.
7. Project and Next Steps: You made it to the end
of the class. Well done. And if you downloaded
the photo at the beginning of the class and followed along in the lessons, then you've already
completed your project. And now you have a
wonderful mockup template that's just ready to
showcase your art. The first place to show it
off is in the class gallery. Just click on the Projects and Resources link on the page. Look for this bright
green button. Upload your project,
and then click Publish. I hope this class gave
you more confidence in your mock-up making
skills and also sparked an interest in learning more about making mock-ups. Mock-up academy is the
most comprehensive set of tutorials that you'll
find on the topic anywhere. The best thing about mockup
Academy is that you can learn how to make mockups from
literally any stock photo. So you no longer have to rely on just mockup templates
that literally opens up a world of possibilities
so you can highlight your art the best and
most unique way possible. I encourage you to
download my free guide called six simple tips for
making better mock-ups. It's packed with all kinds of great information that's not
even in any of my courses. You'll find the link on my
Skillshare profile page. And that will also get you
on the mailing list for my e-mail newsletters that are packed with other
great mockup tips. In the meantime, have
fun making mock-ups.
 Kris Ruff, Surface Pattern Designer & Coach