Transcripts
1. Class Trailer: Hi, welcome to Mockup Academy. I'm Kris Ruff and I'm an artist and surface designer. I created Mockup Academy so that I could teach you the skills that will allow you to take any photo and turn it into a mockup. This class focuses on fabric mockups, and I'll be using clothing in my examples. But you can use the skills and techniques that you learn here on any fabric item. We'll be using the puppet warp a lot. I'll give you an overview of how it works, and then show you how to use it on this simple top. Then I'll show you what a powerful tool it is for making your art follow the contours of your garment, even bending around the knee of these tights. I'll also show you some alternate ways to make pattern look like it's bending and folding, and there are a lot of tips and tricks along the way. The best thing about Mockup Academy is you can learn how to make mockups from literally any stock photo so that you no longer have to rely on mockup templates. That opens up literally a world of possibilities so you can highlight your art in the best and most unique way possible. Now, each of my classes starts with a basic concept lesson, and if you haven't made mockups before, I recommend that you watch that. I'll also be covering how I set up the layers. It's maybe a little bit different from how you're used to. It's a better, more efficient way to do it, and if you've taken other Mockup Academy classes, feel free to skip that lesson. Now some technical details about the class. Everything I show you will be done in Photoshop and I'm using version CC 2020. I work on a Mac, so the keyboard commands that I use will be based on that. I'm assuming that you have a working knowledge of Photoshop. That way I can keep the classes moving along quickly. I think that's everything. Let's go ahead and get started.
2. Mockup Basic Concept: In this first lesson, I want to go through the basic concept of how you make a mockup. First, I want to do it with some diagrams and then we'll jump right into Photoshop. To start, all you need is your photo and your layer's palette. Now when you open the layer's palette, you'll see there's already one layer in there, and that's your bag photo. We'll start by setting this layer on multiply and the reason for that is we're going to be adding layers underneath the bag photo, and so if we set it to multiply, then we'll be able to see the layers that are underneath it. Next, we'll create a folder and that's where we're going to put all our art and that will go right underneath the bag photo. Next we select the area on our bag where we want the art to go and we're going to turn that into a layer mask. Now if you're not familiar with the layer mask, I like to think of it as a Window, so that selection we made on the bag is now this white square on the layer mask and that's the Window where the art is going to show through the rest of it, the black area is all blocked out. Now when we add art into the folder, it will only show through that window. Now you'll notice that I put the layer mask on the folder and not on the layer that has the art. The reason for that is now when we add additional layers of art, it's already masked and ready to go. In addition, if the layer mask is on the folder, then we're free to add additional layer masks on to the art layers, and we'll do that in some of the later lessons. That's the very basics. Now let's go to Photoshop and do the same thing. Here's our gift bag photo again, and over here we have our layers palette. Now your photo might have a padlock on it like this one so just go ahead and click on that to get rid of it. Now we'll take that layer and change it from normal to multiply and now we're ready to make the art folder. To do that, just click down here and change the name and then drag it down below the bag photo. Now we're ready to make the selection on the bag where we want the art to go, and to do that, I'll go use the Quick Selection Tool and make sure that the photo layer is selected and then go up here and select ''Subject.'' Now that did a pretty good job, but it did give us the handles and we don't want that as part of our selection. We'll go to the polygon tool and use the Option key to get a minus on our icon and then we'll just subtract that from the selection and missed missed a little bit along this side. Let's zoom in and using the Shift key, we can add that area here and down here. Then I also see that we missed a little corner down here, so let's add that in using the Shift key. Then we want to take out the shadow at the bottom. For that we'll use the Option key and just go along that edge and subtract. Now we have our selection and we just need to turn that into a layer mask. We want the layer mask to be on the artwork folder, so make sure you choose the artwork folder layer and now use this icon which says ''Add layer mask'' and there it is, we have our layer mask. Now everything that we put in this folder will only show through that white area. Let's go get some art. I'm going to go to Illustrator, which is where my art is and I'm going to copy here and you can also copy from Photoshop or you can drag your art into the Photoshop layer. However, you usually get art into Photoshop will work just fine in this situation. Go back to Photoshop and paste as a smart object and now just click and drag that art layer into the art folder. There it is, it's all masked and ready to go. Now everything that we put in this folder will be masked in exactly the same way. That's it. Now you know the basics for making a mockup and you're ready for the next lessons.
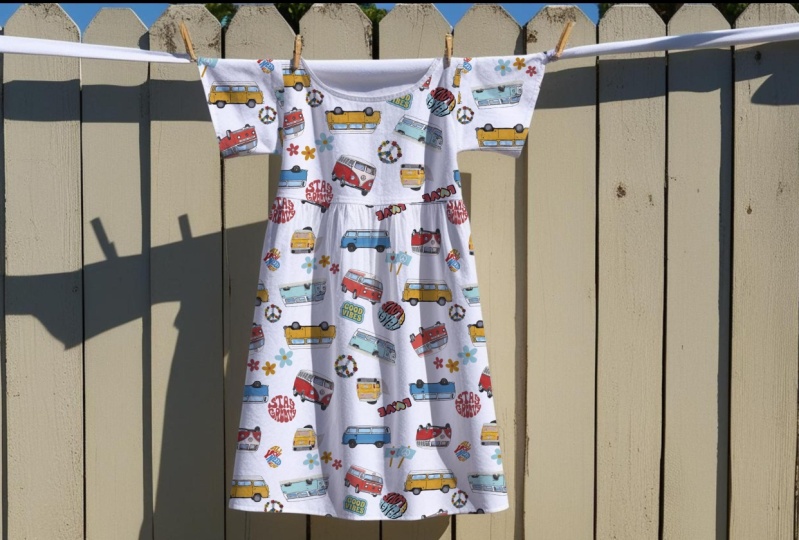
3. Smart Objects and Layers: Girl's Top: This little girl's top will be our first fabric mockup. It's still a pretty flat mockup, but the little skirt section has some folds and it flares out a little bit so we're going to use Puppet Warp to help make that shape. Hopefully, you watched the previous lesson which talked about the concepts of making a mockup and how to set up your layers. I've already started setting up the layers here. I've got my base photo and I'll set it to multiply. Then I've already made the art folder. Now one thing that I didn't mention in that previous lesson is that I always make a backup copy of the art. That way, if we make any changes to our base photo and we need for some reason to go back to the original photo, we have it up here ready to go. Just lock that and hide it. I already made the layer mask on the art folder. Now we just need to put some art in here. I'm going to go to "Illustrator", and this is the art I want to use. I'm just going to copy it, Command C, and go back to Photoshop and paste it, Command V. Whenever this comes up, always choose "Smart Object". Click "Okay", and then we'll just make it bigger. Click "Okay". Then put that art layer into the art folder. When you're working with fabrics and we're using either Puppet Warp or Liquify, I highly recommend that you use a smart object that will save you a ton of time later on. Let's walk through that. We're going to take our art layer, and right now it says vector smart object. It sounds like it already is a smart object, but a vector smart object is a little bit different. We want to change this into a regular smart object by right-clicking on it and say convert to smart object. Then I'm just going to change the name to smart object art to minimize the confusion. Let's review smart objects a little bit. Behind the scenes, Photoshop makes a separate file and puts a copy of this art in it. We can see that file by just double-clicking on the Thumbnail. Now if we want to put different art on this shirt, all we need to do is go get new art and I'm going to go back into Illustrator and pick this art this time. Copy, go back to the smart object file and paste it, and fill up that box with the art. Then I'm just going to turn off the previous layer. Nothing has happened to our art on the mockup yet. But if we click "Save" over here, now that art pops up on our mockup. The mockup look pretty good with the previous print because it was just kind of all overprint. But in this one where we have these stripes of dots, it really looks flat because the dots just go over the sleeves and are straight on the skirt. What we're going to do is we're going to break this mockup down into its parts. We're going to have one art folder for each sleeve, one for the bodice, and one for the skirt down here. I'm just going to close this folder for now. We're going to make new folders for each of those sections. We'll need the left sleeve, right sleeve, bodice, and a skirt. We'll rename those, and we'll need a layer mask for each of those. Now we don't need to start from scratch to make these sections, we can reload this mask by holding down the command key and clicking right on the mask itself. Now we have reloaded our selection all around the whole shirt. Now we'll do the skirt first and we'll just subtract the top part. There's a pretty good line in here that we should be able to follow with the Magnetic Lasso Tool. We'll go up here to "Magnetic Lasso Tool" and it won't let me do it because I need to go back to the base photo, click on that. Now go back. Use the Option key to get the minus sign and we'll subtract this area. If you go very slow, we'll get a lot more points. Then when we come to the other side we can just loosely go over the rest of it. Come back here, double-click to finish that selection. That is the selection that we'll use on the skirt folder. Click on the "Skirt folder" and go down here and add a layer mask. Now we'll do the same thing for the left sleeve. Reload this art, click on the "Base Photo", and then use the Option key and subtract everything that isn't sleeve. That's the selection for our left sleeve. Do the same thing for the right sleeve. That's the selection for our right sleeve. Now for the bodice, this center section, it butts up against each sleeve and the skirt. A quick way to select that is do what we did before. So command, load that selection. Now we want to subtract the skirt. We can just go over to the skirt mask, right-click on it and say, "Subtract this mask from our selection." That's exactly what happens here. Go to the left sleeve, right-click, and Subtract the left sleeve mask from the selection, and do the same thing for the right sleeve. Now all we're left with is the bodice itself and that becomes the layer mask for our bodice folder. Now we're just going to put a copy of our smart object into each of those folders. Hold down your Option key and just drag a copy of it on top of each folder. Now you can see things get complicated pretty quickly. One other thing I suggest is right-click on each folder and give it its own color. Now it's easy to tell that this art is in this folder because they share the same color. Do that with each of them. For now, we don't need this folder so we're just going to close it and hide it. Let's turn on the art. There's the skirt and the bodice and the sleeves. Now we're free to move each of those independently. I'm going to get my move tool and go to this left sleeve art. I'm just going to rotate it. Click "Okay". Now it looks more realistic. Do the same with the right sleeve. The bodice is fine how it is, but on the skirt, we've got a little bit of blousiness in there and a curve down here and it flares out at the side. We're going to use the Puppet Warp to do that. Make sure that we're on the skirt layer and click on the "Art". Go up to "Edit Puppet Warp". Now you get this crazy grid on the art. It makes it look really complicated, but it's not. The best thing to do here is just to hide that grid, so that's command H. Now you'll notice that your icon is a pin, and that's really descriptive because what we're going to do is pin on some spot on the art and now we can move the artwork in other ways, but you'll see that that spot doesn't move. Now when we tug someplace else, those spots stay in place. I'm going to get rid of those by clicking on them and deleting. When we do that, goes right back to where we started. The first thing to do is put down a couple of pins that we want to stay in place. We don't want this area to move. Now we can take this side and pull it out and up a little bit, and the same over here. Then up here, we want these lines to go in. We'll take an area out here and push in. Do that same here, and maybe push in a little bit here too. The top part is gathered a little bit so we might want to tug on these a little bit too. We'll click "Return". Now our skirt looks much more realistic. I'm going to click right here and go back into the smart object file and back to Illustrator. I'm going to use this art now. Copy, paste in here. Fill the box, click "Okay", and turn off the previous layer. Now when I click "Save", the art is now on the mockup and it already has that Puppet Warp. Now put this one in because this is even more geometric than the previous one but just check on how we did. It feels like this is going downhill a little bit so I want to fix that. The really nice thing about working with smart objects is the work that we did previously was not permanent. If we go back to our skirt layer now, it'll stack up what we've done to it right here. We can turn off the smart layers so we can see where we were previously, and we can go back into the Puppet Warp by double-clicking on it. Now our pins are all in the same place they had been before. I said this was going downhill so let's fix that. Let's move these up a little bit. I want a little bit more curve in here. I'm going to pull this up a little here. There, that's better. So click "Return". Now there's one last thing I want to do and you can see the pattern goes over our buttons. I'm going to make a separate layer over here for buttons. Make a new folder and I'm going to put it right at the top. The easiest way to select these is with Quick Mask. Now I go into great detail about Quick Mask in class 5. I'm not going to go into all the details of it, but here's what you do. Go over here and make sure that this is on default by clicking here, then double-click here and make sure this says, selected areas. Click "Okay". Now we're just going to take a brush and we'll make it pretty hard, size-wise, about the same size of the buttons. Then make sure that this is set to 100 and this one too. Now we can just go into our buttons and click. Actually, I'm going to turn the art off over here so we can see it better. This one is almost exactly round, so I'm going to make my brush a little bit bigger using the bracket key, and I can just click once for that one. Now we're a little bit too big so I'm going to use a bracket again and make it a little smaller, and I'm going to turn off the art and the bodice. Now we click back over here on the Quick Mask mode icon. Those turn into selections, and now on our button layer, we're going to make that a layer mask. Then we're going to create a new layer by clicking here. Then choose a color by clicking here, and let's match this purple color here. Click "Okay", and then go to "Edit, Fill". Make sure foreground color is selected. Click "Okay", and now we've colored our buttons. We'll turn our art back on. That gives you a little bit of an intro to the Puppet Warp. Now in the next lesson, I want to show you really what a powerful tool it is.
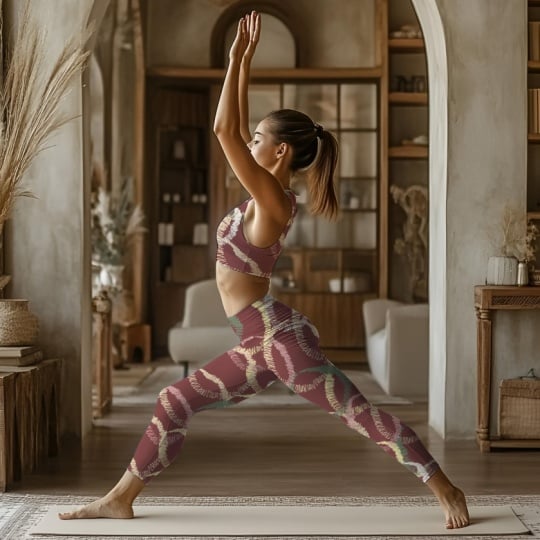
4. Puppet Warp Overview: Running Tights: In this lesson, we're going to mockup these tights. But before we get started, I want to show you a little bit more about Puppet Warp. Puppet Warp was designed as a tool for retouching. It's based on the idea of this wooden model, where you have points that pivot, and you can move the model by moving those joints. Let me show you. We go into "Edit," "Puppet Warp." Now we've got this cursor, that's a pin. If we put a couple of pins on key spots on this puppet, they will stay in position while other parts move. Now I can take this pin, and it'll rotate exactly like the joint on this wooden puppet does. For example, clicking on this ankle, and now we can move just the foot, or I could click on the waist, and since we haven't pinned down anything in the upper body, the entire body moves. Now you can see it's really easy to end up bringing a lot of distortion in when we're doing that. Another way to use Puppet Warp is rotate instead of pinning and pulling. If I click on this pin again, and now I use my Option key, and we get this little circle around here, and the icon changes. Now when I move the cursor, everything rotates around that point. There's one other mode that we can use and that's up here, and that is Distort. Now when I put a pin here and move it, the pieces will actually get bigger or smaller depending on which direction I pull it. Then one other interesting thing about Puppet Warp, is if I take this and move this by the head, it actually comes in front of the head, which is cool. But let's say I wanted that to go behind the head. Then I would go up here to Pin Depth. You have little icon here with the up arrow, and this one has the down arrow. This is saying I want this to go down a layer. If I click here, watch that hand, and now it goes behind the head. That's a cool feature as well. That's the basics for the Puppet Warp tool. Now, like I said, it's designed for retouching, so we're not going to use it exactly in the way that I showed you here, but it's still very useful for our purposes. Let's go back to our tights now. I've already started to set things up. I have the Duplicate layer locked and hidden. I have the Base Photo set to multiply. We're going to need two art folders for this one, one for the left leg, which is this one. I know that's her right leg, but for me it's the left leg. Then one for the right leg. Let's make our selections for our layer masks. Again, it's got a nice crisp line. I'm going to use the Magnetic Lasso Tool. We'll just slowly go around the edges. Then double-click when you get back to the beginning. Now I missed a little bit here. Let's zoom in. I'm going to use the Regular Polygon Tool, and click on my "Shift" key to make a plus, which means we can add this little bit here. Double-click and there's our selection. That's the selection for the right leg art mask. I'll go down here and click on "Add Layer Mask." We'll do the same thing for the left leg. Will get the Magnetic Lasso Tool, and then we'll just start going around it. Now when I get to where it intersects with the other leg, I can just loosely go into that leg, double-click. We'll do the same thing that we did on the little blouse or dress. Then we'll just subtract the other layer mask. Go over to the Right Leg Mask on the thumbnail, "Right-click," and say, "Subtract this Mask From the Selection." That takes away whatever we had here, and now we have our left leg all to itself. The nice thing about doing it that way is now we're ensured that those two layer masks are going to butt up together perfectly, so there won't be any breaks between them. I still have a little cleanup to do here. I'll go back to the Polygon Tool, and use the Minus option key, and go take that out. Double-click. It looks like we missed a little bit up here too. So this, I'll use the Shift key, and capture that little bit too. That's for our left leg. Click on the "Left Leg Art" folder, and add Layer Mask. Next step is to make our smart object. Add a new layer, and then make a rectangle that's a little bit bigger than that one leg. Then we're going to fill it with a color. So right-click, go down to "Fill," and choose whatever color is in the foreground. Click "Okay" and "De-select." Now we still need to turn that into a smart object. So right-click on the "Layer" and go down to Convert to Smart Object. Now, we're going to go into that smart object and drop in some art that's really going to help us make this mockup. Double-click on that red rectangle. Then I'm going to go into Illustrator, where I've made this grid art. I'm going to copy it, and then go back to the Smart Object file, not to the Mockup file, but to the Smart Object file and paste it. Then using Shift option, we'll pull that to make it big enough to fill that whole box, and click "Okay." Again, nothing's happened over here, so we need to save this first, Command S, and it pops up on our Mockup. Go back to that file. Now we're going to put a copy of this smart object. Let's call it Smart Object. Holding down the Shift key, will put a copy in each Folder. Then we don't need this one anymore. I'm just going to delete it. We're going to start on the right leg. Let's turn off the art for the left leg. Go into the Right Leg Art folder, click on the "Smart Object," and then go up to Edit Puppet Warp. Now in the previous lesson, I had you turn off that crazy mesh. But in this case it's going to help us, because we can't really see all of the art because of our layer mask. Go ahead up here and turn that mesh back on, so that we can see our entire area that we have to work with. We're going to start by putting the center of this box right at the ankle of the tights. Will put a second pin right her. Now we're going to rotate, holding down the Option key, until we get a new icon. We're going to rotate that artwork until the lines go straight up the shin. Now we want to keep this in place. We're just going to add some pins outside that shin to hold things in place. Then we'll put another point right behind the kneecap. Hold down the ''Option Key'' and rotate the top part until this parallel with the thigh, add more points to keep that in place. Now you see it starts to move a little bit. That's just an idiosyncrasy of this. When you put a point and things move, just use the Option key and turn it back to where you wanted it. Now when we get up to the hip, we'll put another pin right at where the hipbone would be option and rotate to go up to the waist band and then add points around it. We can turn the mesh off now so that we can see a little bit more clearly. You can turn it off up here or you can right-click and you'll see hide mesh at the bottom. This looks pretty good. Our line goes up the shin, turns a little bit at the knee, and then turns back for the waist band. Now we'll want to make a couple little changes here. Like this line isn't parallel to the waist band, which is what we want. I'll move that. Because we're working with a stretchy fabric, naturally this area would expand. Let's pull it out a little bit. I'm going to choose this line and make it go parallel to the shape of the body. I'm going to move this one up and in. Again, we can expand here because of the stretchy fabric. This pin at this point, I'm going to get rid off. That'll smooth things out. I'm adding some pins to stretch that there. That looks much more like it follows the body. Then we'll push this in a little bit so that we get it to shape more like the thigh here. Same on the other side. Again, we're doing just subtle changes here. Down here, I want to just add a little bit of a curve. I'm going to get rid of this point now because we don't really need it anymore. Just add a little bit of a curve. Tag this down a little bit in the center. That'll help our curve. Maybe add another little one here and here. Push in a little bit here. I think that looks good. Actually, I want this to go up a little bit more here because it would bunch up. Where the tightest curves are. It bunches up a little bit here behind the knee, and it bunches up a little bit here too. Then hit ''Return''. Let's do the same thing for the left leg. We're going to turn off their right leg art, turn on the left leg, click on the "Smart Object" layer and go to "Edit''. Puppet Warp. We'll turn on the mesh again up here. We'll take the center bottom of that mesh and put it right at the ankle. Put a second little point right here. Use your Option key to rotate it until it is parallel with the shin. Add pins around the shin. Then add another pin behind the kneecap. Use your Option key and rotate the top half. Then add more pins. If it moves out of place, you can rotate it back in place. We'll turn off the mesh by right-clicking. We'll take a look. There's a seam in here we can look at. We want to follow that. I'm going to pull this one down a little bit. Now that nicely follows the edge of the leg. Down here we can pull out the curve little bit. We can add a little bit of a curve down here. Let's pull out a little bit more. We want to try and get the lines to follow the curve of the leg. I'm going to get rid of this one right now. I'll pull out here a little bit more. You can see we've got a lot of stuff happening around this spot. What I want to do is add some more points here just to hold things in place. Then I'm going to get rid of this point. That'll help smooth things out. I'm going to push things together back here because things would bunch up at the back of the knee and pull this out a little bit and just make some adjustments. I think that looks pretty good. Click ''Okay''. Let's turn on the other leg. We want to just do some checking here. We want to make sure that the squares are about the same size in both legs. This looks a little bit small to me, so I'm going to go back in that left leg. Click on the'' Puppet Warp''. I'm just going to pull that out a little bit here so that they're more equal to the size of these squares over here. But these squares look about the same as on this leg. In the stretched out area, it looks pretty similar over here, so I think we're done. Now you can see that these lines aren't perfect. That's the reason I use the grid is because it's so unforgiving, but don't go overboard here and try to make every little thing work. It's in most cases not going to matter. Let me show you by putting some other art in here. I've got this artwork which is probably more along the lines of something you'd put on running tights anyway. Click "Save'' here. You can see now how nicely that looks on the mockup. It's flowing with the legs. It has a little bit of a curve to it and it definitely looks like it's bending at the knee. You really can't see those little odd hiccups and the lines. That's our finished tights mockup. Now I hope you have a better understanding of how powerful a tool that puppet warp can be when you're mocking up fabrics.
5. Quick Tips for Puppet Warp: This lesson is a lightning round of just some quick tips and suggestions for mocking up fabrics using Puppet Warp. In this example, my tip is that sometimes less is more. This dress doesn't look like it's been changed very much until you compare it to the before picture. Here it is. Just dropping in the pattern and it looks pretty flat. But it didn't take much to make it look more like it was actually wrapping around the model. Let me go back to the grid art to show you what I did. I looked at the pose of the model and you'll note that her right shoulder is dropped a little bit. By warping the patterns so that it paralleled the shoulder line, it makes it look like the fabric is bending just like her body is. Then I just added a subtle curve here and a slight one up here, flared out the skirt a little bit at the edges and then made the bottom edge follow the helm of the dress. I tucked it in just a tiny bit at the sides. Really that's all that this one needed. But it makes it look much more realistic than just flat art. These subtle changes are much better then going overboard. Now I'm not saying that you would ever present a mockup that looks like this, but it's super easy to overdo it and then the mockup actually ends up distracting from the art that you're trying to present. My tip is, it's okay to be subtle with your changes on your mockups. Mocking up these pants is another really good example of a mockup that doesn't need a lot of tweaking, it just needs to have the right angles. When I see something like this, like we did with the dress, looking at the pose of the model is a really important thing. In fact, sometimes I'll even make a little layer and draw the angles that are most important. Like on this one, we have the waist band of the pants and then the hips. Here's the angle for the hips. The zipper goes almost straight down and then the legs from the center of the leg goes up to the knee and then up to here. Then if we follow the belt loop and follow the angle of this and make a parallel line, that's how that leg goes. Then one from this foot to this knee to halfway between those two and follow the belt loop. Those are the angles that are most important. When I drop in the grid pattern, I have those lines to follow. One other thing I wanted to show you, right now I've got the angles where I want them, but I'd like to add a little bit of curve to this leg. I'm going to go into that right leg and one thing that I wanted to point out is that you can move more than one point at a time. Instead of going in here and making little curves down like that, I can actually hold down my "Shift key" and make multiple points. Let up on the "Shift key" and then I can pull all of those down together. They all stay relatively parallel to each other, but make that curve. Now on a wider area, like up here, if I do the same thing and pull down, you can see you have a tendency to get points. We don't want that pointed look. Instead, I'll go and actually put in little side-by-side points. Again, I have the "Shift key" down so that I can highlight all of them. Lift up on the "Shift key" and then pull them all down together. You can see now we've got curves instead of little puckers or little points. Here's the before and the after. Now if we put in our other art, it has a very realistic look because of those angles and little bit of a curve. Then I also added some highlights which makes everything look a little bit more three-dimensional. Now I'm not going to get into the lighting in this class, but I cover it extensively in class 4 and also in class 5. I want to take a minute to show you a situation that you might run into. With this mockup, I have already laid everything out. I have my smart object and I've already put a pattern into the smart object file. Now we're ready to go into Puppet Warp. So Edit, Puppet Warp, and then let's turn on the mesh. Now this mesh looks a little bit different. Remember how before it was one big thing and there was little triangles all over it. Well, if I zoom in here, the little triangles are on each individual element. If we try Puppet Warping this, it's not going to work. The reason this is happening is because the artwork has a transparent background. We need to fix our art before we can warp it. The fix is really easy. Go back into your smart object, make a new layer, and then go over here and make the foreground color white. Make sure you have this layer chosen. Then we'll just edit, fill, fill with the white, and now put that white behind the artwork. As long as we have both of these layers visible, now when we save, the mockup sees both the elements and the white background. Now when we go into Puppet Warp, now we have a mesh that we can use. Here's one last lightning round tip. You've got your mockup, you made it all perfect with the grid, everything looks great except you think, "Wow, I really want a different pattern for the color because it really blends in too much here." You go into your color, find smart object, double-click it, and maybe instead of the floral you decide you want to have a little gingham color. I'll click "Save" and the entire thing changed, not just the color. The beauty of the way that we have thing set up is we have one single smart object that remember we added into each separate folder. That's brilliant because anytime you want to change the pattern, you only have to go into one smart object file. But in this case we want them to be separated. There's a way we can do that. When we go into the color folder, find the smart object, and then right-click on the layer and go down to new smart object via copy. Now we have two copies of the smart object. This one, let's call Contrasting Collar, and we'll turn this one off. Now when we go into that file, we'll turn off the floral, turn the gingham on, save it, and now only the color changes. What's happen now is this smart object links to a separate file from this one. Now whenever we want to have a different color, we use this smart object. But if we turn this one off, we still have this one here. If we change this one, everything changes. Hopefully those are some useful tips. Now let's go look at another way we can make fabric look like it's bending around a sleeve.
6. The Art of Cheating: Woman's Shirt: At first glance, this looks like a pretty straightforward mock-up. Like we've done before, we'll have one folder for the sleeve, one folder for the shirt, and then we'll go in and work the art around the sleeve just like we did on the running tights. The only problem here is this is a super tight turn. Let me show you what happens if we try to warp it around that turn. I put my point in, hit my option key, and then start rotating, and you can see at a certain point, it just flips out. Literally, it goes the other way. It just will not do that tight of a turn. We're going to need a different strategy, and luckily, I've got another trick up my sleeve and it's basically cheating in all of the best ways. What we're going to do is rather than try and make the art go around the corner, we're just going to break these up into pieces like we did with the little girl's shirt at the very beginning. See this wrinkle right here, we're going to make this lower section have its own mask, and then the upper section will have its own mask. Having them join right along that wrinkle will camouflage, will hide the fact that we have two different pieces. Then there's this significant wrinkle right here. It goes almost all the way up to the arm. We're going to make that a section of its own as well. Then we can offset these so that it looks like the pattern is going behind the other section. Let me show you. I've already made those different sections. I've got an upper sleeve, which is this area. I've got the lower sleeve, which is this area. Then the back of the shirt, which is over here, and the front of the shirt, which is the rest of it. I went ahead and put a smart object into each one of them. Let's go into the smart object. This time, rather than use the grid art, I want to put in this directional print. As you can see, all of the flowers in this, all the buds are growing upwards. When we save that and put it on here, let's close up everything except this upper sleeve. We'll turn those off. All we need to do is rotate this, so that it looks like it's going down her sleeve, and we'll do the same for the lower sleeve. Just drag it over to the sleeve. The reason I wanted to put a directional print in at this point is to show you this part needs to be upside down. Rotate it 180 degrees, click okay, and now the flower buds grow up this way, turn the corner and continue to grow this way. Let's turn on both shirt sections. If you are only just doing a floral print like this, I would say this is a finished mock-up the way it is, but if you need to do a more geometric shirt, let's go back to our grid, click "Save", now it looks pretty flat. I went ahead and did the puppet warp. Let me show you how I handle each section. On the upper sleeve, I worked to make a curve that followed the cap of the sleeve, made this line so it parallels the bottom edge of the sleeve, and I didn't want this to be a straight line here, so I wrinkled up this edge so it would look less cut off, and then added some wrinkles and some curves in to make it look more three-dimensional. On the lower sleeve, I followed the curve of the cuff and then started to make it wrap around the elbow. I think it could use a little more of that. Let me go back into the puppet warp and just make that turn the corner a little bit more. There, that looks pretty good. For the shirt back, I made these lines follow the curve of the back. Gave these lines a little bit of curve to make them look like they're going around the back of the shirt, and then just made this a little bit irregular along here. Then finally, on the front of the shirt, I made the bottom edge follow the blousiness of the shirt. Gave it a little curve here to mimic the curve of the shirt, and then gave a little curve along here, again, to make it look like that's wrapping around the front of the shirt. Then just made it a little bit irregular. Let's try it with our other art. Here's our floral version and our flowers are starting from here and turning the corner. We can't really see that we've got a section here, and it also looks like the fabric on the side here is tucking up underneath this wrinkle. That all looks great. Then the other art, I think this one's looking good too. We've got the circles or these elements that are following the arm and turn the corner, and go down towards the wrist, and this follows the line of the back. These look like they're tucking up under. Overall, I think it's pretty believable. There you go. Now you know how to cheat when it comes to making mock-ups.
7. Your Project + Free Mockup Guide: Hopefully, now you have a lot better idea how to mockup fabrics using the Puppet Warp tool. Now it's your turn to give it a try. I recommend that you choose an image and then make a plan of how you're going to mock that up. Is it just a simple image like this one that just needs a little bit of tweaking with Puppet Warp? Or like the little girl's top, is it one that you need to break into parts so that you can move each one of them individually? Is there a way that you can cheat to make puppet warp easier and break it up into parts like we did on this shirt? Then consider making some guidelines on your image because that might help you while you're warping. Once you've got a plan, you can set up the layers and then add layer masks to each folder or each section of the garment. Make a smart object for each folder, and then drop in the grid art to help you rotate or warp each section. I've included that grid art as part of the class. If you look in the Resources section, you'll find that grid art that you can download and use. Next is the fun part, and that is where you get to drop in your real art. I recommend testing your Puppet Warp by adding in different kinds of art, maybe an organic piece of art, something with some stripes or more geometric art. Once you've finished your fabric mockup, don't forget to post it on the class page. I love seeing what you guys do and I'm happy to make comments or suggest tips on the projects that you post. I also want to recommend that you download my brand new free guide, six simple tips for making better mockups. In it, there's tips for how to choose a good photo for your mockups, and also how scale, and contrast, and color can really enhance your final product. You'll find a link to this 13-page PDF in my profile page. I'm also working on another class about fabrics. In that one, I'll show you how to use the brand new 2020 warp tool and how to use liquify when you're working with fabrics. Look for that. In the meantime, have fun making mockups.
 Kris Ruff, Surface Pattern Designer & Coach