Transcripts
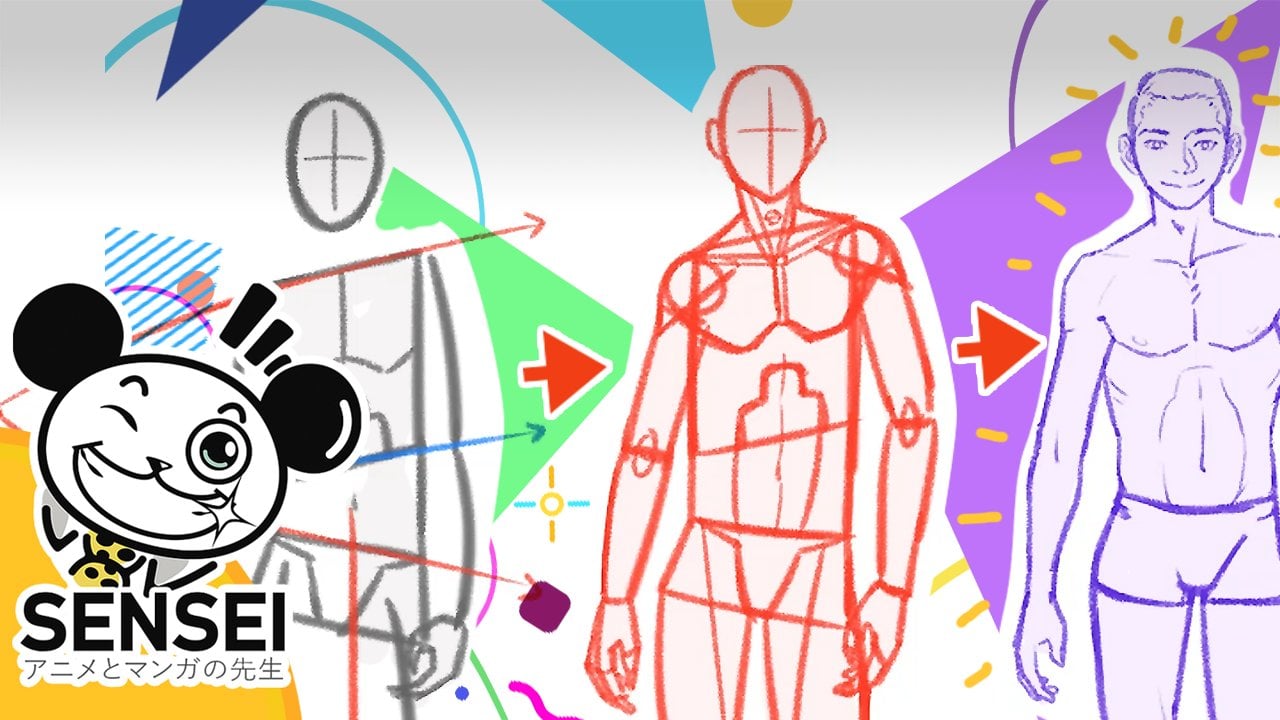
1. Trailer: Unlock the Secrets! Master Face Drawing!: Hey! This is the beginner's guide to master face drawing on anime style. We will be learning a lot of very valuable information. From the very basic stuff, such as how to successfully draw circles and lines, to more advanced techniques, such as how to draw the face proportions, structure and shapes. We will see what are the differences between male and female faces Understand how to draw them without any kind of guidelines create your own style, and dive into mastering every kind of diverse face style. The same principles taught in the class can be used into drawing anything else so even if you're not a fan of anime, this class will teach you a lot. You don't need to know absolutely anything, and even experienced artists will have a great opportunity to improve their fundamental skills. The overall goal of this class is to give you strong tools to initiate you in the world of portraits and head drawing. By the end of the class, you'll be completely capable of drawing your favorite faces from any gender, any reference or your imagination, with guides, without guides and with a lot of confidence. Everyone can learn this! So! why don't you get your sketchbook and let's start?
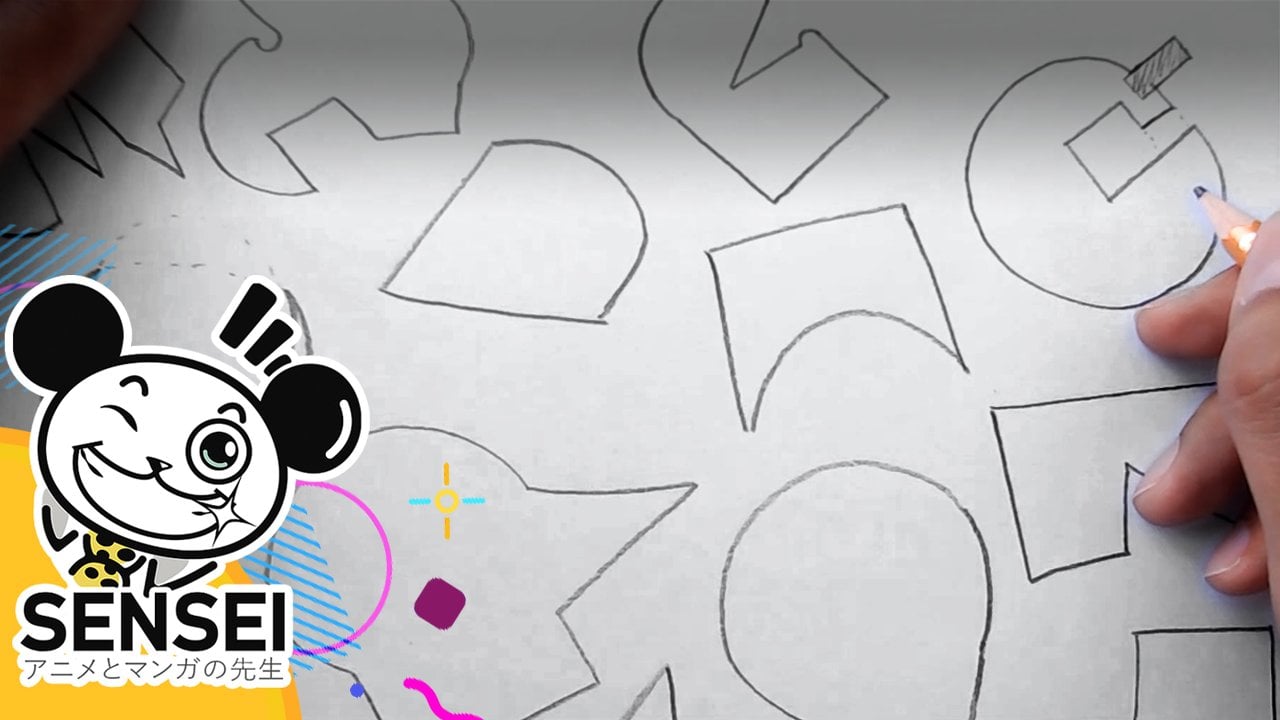
2. The Circle: Your Path to Perfect Faces: Circles are necessary to draw the whole time They help to simplify, construct and deconstruct stuff and that allows us to understand and learn to draw quickly. So, let's understand how to draw good circles. I recommend taking this class with a video day if you are a complete beginner. If you already draw, but you're still learning the fundamentals then take two video lessons per day. And if you already have experience on drawing then take it at your own pace. Okay Getting back to the topic Which kind of circle would you like your drawings to have the most? A very loose, fluffy and kind of dirty one? or one that looks as clean as you can possibly make? Of course, on regular conditions, the second choice is what most of us would like Isn't it so? But don't get me wrong, it's not like you shouldn't make any kind of circle I think every artist has its right to express as he or she wishes. I'm just focusing into the method that I'm teaching, which includes you to work in your confidence and save you a lot of time. So, we already have our intention clear but how do we actually make it right? Drawing Circles as a beginner is not something you can immediately achieve so here are some exercises I've used myself to master them. The first one, is just to draw your circles by using two steady strokes. I'm signaling in here with red color one of the strokes so you can better see the difference between each other. You can draw them on any direction from horizontal to vertical, and even diagonal. Just fill an entire page of circles and take your time doing it. A great way for you to improve your curvey strokes, is to change your hand and pen position from which we usually have as beginners of somehow 45 degrees to 90 degrees, or as a straight as your pencil can get. Try it yourself and you'll see the improvement. Great! So, the second way I want to teach you guys includes only one stroke. Use your hand with a straight and steady pen and practice completing yourself a circle. It shouldn't be perfect, that's not what we are aiming for but yes, it should be as best, as you can possibly do. Don't rush over this. Allow your hand and mind to think as one, patiently. For the circle to look okay try to start your stroke with a line that leads to be connected and not one that goes the opposite direction, closing the circle before even being complete. Practice this a few times and get a page full of all different sized circles, and you'll totally see that it will help you a lot. An extra quick exercise for you to warm up before the other two ones, includes you to trace some horizontal lines preferably all of them with different spaces between each other, and fill it with curved lines. Try to do it with rhythm, don't do it too steady or too fast. That will definitely bring you great skill so you can become a master of circles. Again, circles shouldn't be perfect they should be just as best as you can possibly make them. That will be enough. Use any of these techniques to make your own circles or even to come up with yours if that feels better to you. And whenever time you're drawing and you feel you would like your circles to get better, just get back to any of these exercises.
3. Line Mastery: Precision for Face Drawing: Lines are also a very crucial thing since right next to the point, they are the simplest expression of a sketch. Favoring to actually create more complex forms if you know how to draw them well. So how do we actually draw them effectively? For example, which kind of line would you like to be able to do? Thick and chaotic? hairy or wonky? or confident and clean? As I explained in circles, there's nothing right or wrong in here if your intention is to use them. But, if you use them because you can't draw them better then please keep an eye on this explanation. First be comfortable with your paper. It's not necessary to hold it to be 90 degrees or straight in front of you. Instead, tweak its angle as you place to make you feel better at drawing lines, which usually tends to be from 50 degrees to 30 degrees. Second thing start tracing straight and steady horizontal lines that will increase its length after each stroke. This kind of exercise helps you to get ready to draw any kind of size when you need. Since they will probably be the first you try to do consciously, there will be some messed ups, so don't freak out, accept them and keep doing them as best as you can. No need to rush. Once you have completed the first set of horizontal lines go to complete the page with vertical lines. Holding your pencil close to 90 degrees still holds true. It will increase your control over your line work. The third exercise to keep up with is to set two different points on different directions and trace a steady straight line to connect them. After that, go again with another line and repeat the process to at least ten times. Vary the direction and length of the lines, trying from vertical, horizontal to diagonal lines at many degrees. Keep repeating it until you have tried whatever combination you came up with. You'll soon start seeing how much control you've gained over your lines. And the last advice on lines, the longer your lines, the curvier it will get if you're using your wrist which is the most probably thing. Instead of using your wrist, take advantage of your full arm. Imagine that from your hand to your elbow, there's a compact tool that you're using to your advantage. Your lines will be much more accurate despite the length. The whole time you'll be facing challenges on drawing lines so get back to any of these exercises and easily improve your skill. Just be mindful about the activity and focus on quality and understanding over quantity. You'll be a recharged of experience in actionable knowledge.
4. Unveil the Mystery: Mastering the Face: We're finally into the juicy part of the class. Drawing the face To understand how to draw any subject, the best thing to do is to break it down into small pieces to can give one bite to another, until we can actually eat the meal. You can't eat all at once, right? That's why we're going to focus on this class into only drawing the front view of the head. In order to be able to effectively understand such a complex subject, and then be able to rotate the full head on different views and angles later with other classes. So, drawing can be pretty alike to learn how to speak any other language that's why by extrapolating language exercises, there's a great opportunity into understanding and easily memorizing shapes, structure and proportions which are extremely important to effectively draw anything. So, let's take a look to the following exercise. When learning the Japanese writing system, Japanese people teach their own to understand and memorize each character by a sequence of strokes, which will help them to break down a complex form into something simpler. So, for example, the following characters represent how Japan is written by the Japanese, and it's read "Nihon". Each of these characters has a specific sequence, as I'm displaying. You may think that this can be a bit squared thinking at first, but you'll find how effective it becomes the more you do it. Knowing the previous, let's take a look at how to understand and master the head's front view basic structure, shapes and proportions. So, basically what you are going to do is to follow me as I draw on the demo, by being conscious of the strokes order that you're watching don't rush, and pause the video as many times as you need while drawing. Alright, we're going to start by drawing a simple circle then, we're gonna add a vertical line right in the middle of it followed by a horizontal line, that it's going to divide the circle into four parts. Then we're going to take the previous form and trace two diagonal lines that will break the circle into a more head-like shape. Having completed this, we're halfway to now start actually locating the face features. So, right in the horizontal line that divides the circle into two parts we're gonna place the eyebrows. Then, we are going to place another line down this one that will somehow create one fourth part of the space that it's remaining of the half of the circle. And this line is going to be known as the eyeline. So over this line, we're going to locate our eyes. The line should be a reference for the eyes to be well placed, not necessary to exactly cross in the middle of the pupil. Please make sure that your eyes are being placed right in the middle of the space, that there's from the center line that divides the head vertically and the diagonal that chops the circle. Also, make sure that there is a width of another eye in the middle of the two eyes. The distance there is between the eyebrow line and the eyeline is going to be key in the understanding of the whole face's proportion so we're going to call it 1x. This will help us to can calculate the other ones accurately. Now, if we take this distance and we duplicated twice down the circle, you'll find where the nose line is, which indicates where the nose will be located. Right down to the nose, there should be enough distance to the end of the circle to be the same as 1x where we will be placing the mouth. See here how I'm indicating the size of each distance The chin is going to be located at the same distance there is from the eyeline to the nose, which is 2x. So, you're going to use the diagonal lines that are at each side of the structure and by following the cheek lines, connect the head to the chin. We're almost there! Now, the only remaining thing to do is to add the ears, which are usually placed from where the eyebrow line is to the nose line, a distance of 3x. Right now, just follow the simple ear form as I do in the demo, we'll take a better look at it in the following videos. Make sure again that your chin is actually 2x from the mouth. Great! So the last step is just to make again the whole process and see the results.
5. Beyond the Face: The Scalp and Neck: In order to complete our head's structure,
we need the understanding of drawing hair and hairstyles. Yet, I consider there should be another full class about it.
So in this class, we're only going to focus into understanding the placement of the lines
that divide the face and the scalp of the head. That way, we can have a basis from where the hair should go later. Also, drawing the neck from the front view
will allow us to start getting familiarized
to the head placement connected to the body. The closer we get to our final art, the better. I don't think many of you would actually want to draw
a single head floating around, even if it's just a portrait. So let's review the anotomy's basic structure of the neck
the shapes and general proportions. Start by drawing on a new paper, a simple head
being guided by the notes and drawings
you made from the previous part of the class. Make sure your proportions are correct
by using the lines of the structure and checking with the help of the 1x distance. This is the basic structure of the eye that I use. Eyes can be changed to the kind of eye that you like the most
but it may confuse you with proportions. So for now, please understand these basic shapes
so you can follow me as close as possible
to the class examples. For the ear shape as I'm doing on the demo,
draw it apart so you can pick up the basic shapes of how it is. It will change once we alter the angle we'll be drawing
but right now this is what you should keep in mind. Now, let's begin with the scalp. Trace a line from the middle of the ear that
is slightly inclined (tilted) towards the eye. Then trace another diagonal line,
that is almost in front of the eyebrow, and finally a straight line that goes upwards. Try to memorize this kind of "S" shape because that's what you will always have as a reference point to place different hair styles. To have a better understanding, simply watch yourself
in the mirror and locate where this division is.
It helps a lot. So you may be wondering what's the right proportion
of the final part of the scalp where both sides meet. Well, it's actually not very settled, but usually it goes from 2x to 2x and a half. It varies. Just pick up the one you like the most. And that's it for the basic scalp structure and shape guys! Let's now cover the neck part. So, place two vertical lines that extend down to the chin to 1x of distance. From there, locate 2x and a half of distance
supported by lines or dots, and trace two diagonal lines. They are indicating the muscles that connect the neck to the back and the chest. I'm gonna be showing the neck in the demo with blue. So you can set appart, what's the anatomy
and what will actually be shown in the final drawing. You can draw this basic form that indicates the collar bone. And then these two muscles that go right from the middle of the collar bone to the top sides of the neck, both known as the "sternocleidomastoids". You don't actually need to learn the names It's just enough for you to be able to recognize them. Its form goes from thin to thick in the middle and then to a middle thickness compared to the previous ones. This muscle also has another part which is attached right next to the main muscle and also follows the direction of it. And then there is the trapezius, which is coming from the back to both sides to attach the collar bone. To finish this, there's a small bump located right down to the chin that simulates part of the larynx most known as the Adam's Apple. All of these muscular shapes are very simplified and they may change when understanding this subject as volumes. These are just the frontal view forms that we get. Knowing what actually lies under the whole structure help us to confidently put the proper forms that a human being displays. Final note in here is to know that the neck width is related to the pupil. It shouldn't exceed the pupil's end.
6. Freehand Mastery: Drawing Without Limits: Drawing without guides is one of the ultimate goals of drawing which artists wouldn't like to show expertise and be quick when making their creations? But it cannot be effectively learned without understanding first the way we draw with guides. It's like when we learn how to drive a bike, most of us had to learned it by doing it first with little side wheels and then by removing them. So at this stage of the class, you're fully capable of constructing the head from a front view with guides. It's time for you now to give it a try guidelessly. Here's a quick three step process I've made to easily learn how to draw it myself and also some quick mental notes to make it easier. The first step, draw the semicircle that comes from the top of the guide circle we previously learned. Is very useful to somehow imagine this circle is there even if not visible. Then, the second step is to add the two diagonal lines that you used to do when chopping the guide circle. And last but not least, the third step is to calculate the distance from the nose to the chin mentally, which its proportion is of 3x of distance. This simple three step process give us the most difficult part of the overall process, the head shape. Now what's left is to start placing the features the face has, so place a very slight vertical line right in the middle of the face and then another horizontal one, right in the middle too. I'll make it red just for the sake of explanation. This cross here is for you to start training yourself to see where the features should be located, but you should start to look forward to imagine it instead of drawing it, and directly going for the features once you have understood the method. So this middle line when drawing the face without guides, it's where the eyes are going to be placed, it's the eye line. Thus, remember it shouldn't be confused with the eyebrow line. Then locate the eyes and the eyebrows, which are going to give you one 1x of distance. Then just by replicating 1x, every place you know it should be, you can get the nose position and the mouth. See how here I'm checking on its proportions, to actually make sure the face is well proportioned. Then just add the ears, the scalp and the neck, by remembering their proportions too. And if you feel creative enough, add a hairstyle that you like to make it more interesting at the moment. Good! Now as an exercise, I'd like you to challenge yourself and draw the face without any kind of guides. Practice it a couple of times before beginning, so you feel more prepared. Erase strokes if you need, but don't cheat with guides! And at the end, add any kind of hairstyle that you find cool from your favorite anime characters to make it more fun!
7. Face Perfection: Master Everything: So, if we actually want to create enough
confidence in us to draw without hesitating, we need to have a very clear intention and a very good understanding of the matter. And this only comes when you completely know how to achieve something. So, to allow ourselves to actually master this topic there are some things that at first glance doesn't seem to be much
important, but are actually must dos. So, let's take a look into some important stuff. When drawing the two diagonal lines that breaks down the circle and actually creates a head-like form. You should calculate that most of an ear should be fitted in there. The inclination is also very important. As simple as it may seem, if done completely straight that kind of shape will terribly deform the overall shape of the face. I've talked about the placement of the eyebrow before but I want to leave no room for doubt in this. It should go right in the middle of the space that is from the center line to the diagonal line at the extreme of the face. Moving it further from the point to any side will create an undesired expression. From there, you'll be placing the eye line which should be never confused with the eyebrow line. Most probably thing is that you will get confused about it at first, so don't freak out and just simply correct it. Please remember that the space between the eyebrow line and the eye line creates 1x, which is crucial for constructing all of the remaining parts of the head and the face. 1x should be one-fourth of the distance that there is from the middle line or eyebrow line to the end of the circle. Now, when placing the eyes, you should also follow the same logic as the placement of the eyebrows. The distance of the eyes to the extremes of the face could change depending on the style of the eye and its size. But, what must always remain the same, is an eye width between both of them. Anime is very recognizable because of the absence of much detail That's why the nose is usually displayed as something very simple. This small stroke over here helps the nostrils to define the nose better and it can go any side, left or right. Something to quickly note in here is that the nose width doesn't usually go further from what the eye width has. Thus, the mouth doesn't display much detail on the lips either. It just shows with lines where the division between lips actually is. Mouth width goes to the maximum the length of the pupil's center point. You can vary the size as you please as long as you don't make it outside the limit, which will make the mouth look completely out of proportion. On the other hand, when drawing the cheeks that will be connected to the chin, I always consider two general ways to make them. That I'd like you guys to learn too. The first one is by extending straight diagonal lines that move one more than the other one towards the chin. Leaving a bony or a strong shape to the jaw and cheeks of the character. Yet, the opposite feeling can also be achieved by very soft and rounded cheeks by extending not straight lines but curved ones. The two important things to consider in both cases are first, that the extension of the cheeks to the chin start right at the nose height. Where the diagonal lines that chopped out the initial circle are ending, and second, that the most obvious curvature of the neck that extends to the chin usually begins right down of the mouth. Changing the chin's width can also bring more variety to your character. Another very important thing here the neck can actually make your character look much more old or younger depending on how thick you draw it. The thinner you make it, the younger your character. The wider you make it, the stronger or older, he'll look. And to conclude this series of notes, there are a few things to always watch out for. One is the distance between the eye line and the nose because it will be the one that defines the length of the head. So if you find yourself feeling your drawing to be way longer than expected, get back to right the proportion of the nose, which is 2x and problem solved. The other one, the nostrils form, which should be slightly curved, reminding of actual nostrils, and not just simple lines. And the last one a slightly division of the mouth that creates more style into it making it look much more anime-like. Okay guys, I know this has been a lot! but knowledge without action is a total waste
8. Capturing Femininity: Drawing the Female Face: There are some differences between male and female faces, and we should know to draw them both effectively. The structure, it's pretty much the same, but the proportions and shapes usually vary. I'll keep the construction lines for the sake of a better understanding, despite having learned how to construct the head without guides. So, let's take a look at it. We begin by drawing exactly the same first steps as the male. Start with the circle. The cross lines, the chopout diagonals, and the eyebrow and the eye lines with a distance of 1x between them. Never forget that. And here we start seeing the first differences. As a general rule, girls have usual thinner eyebrows. You can variety if you want, but it's not the common rule. The eyes are also a bit bigger than the standard male eyes, and usually have simplified eyelashes to indicate femininity. The distance between the eye line and the nose holds the same of 2x. However, the nostrils tend to be slightly smaller to indicate also more femininity. The distance from the nose and the mouth keeps also to be 1x as the male face. And the mouth shape tends to be a bit slighter, to make her features to have more grace. But the distance from the mouth to the chin, it's a bit less than 2x. It's not like a female face couldn't have a proportion of 2x in here, same as the male. On real life, female faces are usually same proportioned as male faces. They are just a bit smaller (on their scale), but same proportioned. The cheeks are rounder, and the chin's shape if made pointier over squared, also stylizes more the face. So, as a way to reinforce a female face, these kind of shapes are a great way to go. For the ears, girls tend to have a bit smaller ones. So, the length starts from the eyebrows as well but ends a little before the nose line. The neck is also thinner than the male neck. And the maximum width that I recommend, it's only to what the center of the pupil is. Pass that, and she'll lose a lot of her femininity. The strokes that shows the collar bone and the sternocleidomastoids are also very slight. They shouldn't get too muscular, since women are usually more delicate. And that's it guys! the scalp holds the same as the male's one and the hairstyle is up to you. I'm gonna add one of my favorite girly hairstyles just to complete the drawing. If you want to, pick up some hairstyles before getting deeper into learning how to draw hair, get it from a referent and make it yours. We'll see that in other video too, soon. Alright! Up to this point, you should be able to draw great circles, lines, well proportioned faces to the neck. Proportioned faces, without guides, and now, almost girl faces. So, let's put into practice what we have just learned. Draw as the demonstration a new female face, and once you're done with that proceed to indicate with another color all of the differences you have took on consideration that a female face has when compared to the male face. That's gonna reinforce your knowledge and experience, and truly make it part of you!
9. Proportional Perfection: Master Every Face: Right now you should be able to draw pretty decent general male and female front view heads or basic faces but sure there are many other styles in any anime and manga that include many other proportions that you're still unfamiliarized with. Those that are much more stilized from real life and if you're as curious as I am, I'm sure that you'd like to find a way into how to draw them with all of those different proportions, in an easy and effective way. That's why I've made the following simple technique to my understanding for all kind of proportioned characters, and I'd love to transfer this knowledge to you too so pay attention! The first method goes linked to the general rule that we've learned throughout the whole class and consists of simply making little tweaks from it. So for example you can change the position of any feature by simply moving it a bit ahead or a bit down from the reference line, but never too much apart. It applies to the eyebrows, the eyes, the nose, the ears, and the chin. See how I can create a perfectly believable character once I've made all of these tweaks that are breaking the general rule of a proportioned face. The thing here is that we human beings are not perfectly proportionated always. We all have our own little tweaks somewhere but, what we all share is that we all tend to have these kind of proportions and harmony all over our face and body. So having a general rule to understand proportions allow us to synthesize that wide range of variations, making it so much easier for us to draw it accurately and remembering this even helps to come up with more proportions like this method, which helps a lot to always know where to get back to when we need a point of reference to correct ourselves. The second one is to mainly create your own proportions for new characters. By considering the first semi-circle, the center crossline of the circle and the chop diagonal lines to at least the eye line height, as three inmovible structural parts. And then by holding a reference distance such as 1x, which usually covers from eyebrow line to the eye line, to explore and locate the features and the chin wherever you'd like to but making sure that they are all relatable to that first distance of 1x. From there, state these new proportions by calculating how much 1x they are, so you can clearly identify them and replicate them again on later drawings. You can totally use both methods, and they can totally be applicable if you want to draw without guides. Your task is just to keep aware of the understructure and by holding it on mind, place the features and chin of your face. Just remember that the semi-circle of the top of the head the first half of the diagonal lines, the crosslines and the distance from the eyebrows to the eyes, which is 1x, should always be the same despite any kind of proportion variation.
10. Reference Magic: Awesome Inspiration: Having learned how to draw different types of proportions for your faces let's now learn how to use reference for drawing them too. Reference is something every artist whether beginner or intermediate should use. It serves us, as an important guide to give us visual information from the visually unknown things we want to draw. As you start to gather visual library for your memory reference becomes very useful. Remember, you can't draw what you don't know and reference is a great aid to know. For any anime and manga drawing, however, reference becomes not only a way to know what we want to draw, but also a way to base ourselves to use its presented elements to enhance our work. So let's take a better look at how to use reference now in action. Let's say we find a picture of a girl as the reference we'll use. To simply draw a face. The first way we can use reference for, is to simply redraw it to produce a new stylized drawing. In this case, our goal as artists when making a new art piece is not of creating a fully realistic version of the scene, or to come up with something totally new out of imagination, but to only recreate the scene by just adding our personal interpretation of it. Adding new contours, proportions, shapes, and pretty much your personal touch, is the main focus of this use. Again, we don't focus on drawing something from our imagination, but rather, on simply transforming the visual information we have in front of us, into something similar, but of our artistic touch. The use of reference in this case is not very complicated then, it is very straight ahead. We just copy from it to make it slightly different in our chosen art style. On the other hand, the second way we can use reference for is to now create something new by adding the elements we want from the reference to our work. We are now not focusing on the stylization of the picture, like we previously did, but we are now focusing on the elements we can absorb from the reference, to add on our work. This way our drawing goes more into creating original artwork from our imagination, but helping ourselves from adding elements we can get from the reference. Facial expression, hairstyle, accessories, clothing, among other elements are at our disposal. What you need to add to your work, you can search and take out of a reference. We can see on the screen how after drawing the base of a girl face from imagination, we now add the elements we like of the reference picture we already picked. hairstyle, facial expressions and accessories, of course to our like and style. Not attaching too much from the reference, but making it our own, to give our character more life and variety. Remember, in this method you don't focus on the realism of the reference or on its stylization, but on the taking of its useful elements to add interesting things to our base. As shown on the current example you can do this not only from one reference picture, but from multiple ones. Now, you can also use reference not just for copying, but for enhancing your picture. And why not? for expanding your knowledge to later draw from memory.
11. Style Alchemy: Forge Your Artistic Identity: Alright guys, we're almost done. Our last topic to cover is how to absorb reference to create your own style. We can really enrich it by feeding ourselves with every feature from the smallest to the biggest from other artists we love. Here's the demonstration on how I do it myself to develop my own style. So it can be of help for you to develop your own. Creating your style will always be a fun quest! I hope you enjoy it. Begin by finding out a couple of pictures from an artist you love. Then start paying attention into the specific things you want to learn from it. And pick up one to begin with. So here for example, I start by drawing all of the shapes the eyes of this character has. Identifying which strokes are thinner, thicker, and what kind of proportions this feature has overall. I'm not completely focusing to the relationship of the faces proportion and the features. At this stage, I'm just studying the proportions each feature contains itself. Consequently, I analyze the proportions of the characters by finding a first point of reference, which is 1x. Remembering that this distance is usually the same from eyebrow to the eye line, and the nose to the mouth. Then I just calculate how much of it there is in the face seeing that it perfectly matches with the general proportions of a female, 1x and 1/3 for the chin and 2x from the eye line to the nose. Lastly, I apply all of the learned information and venture to draw a face as similar as possible to the reference. Paying now attention to the relationship of the features and its placement over the face shape and correcting myself, all of the mistakes I find until I create the desired result. Great guys! When you feel you are ready, complete your class project. Your class project is to draw a couple of male and female faces, hopefully, guidelessly. If you need the guides at first, it's fine, you're still learning. On each of them, vary the proportions and features depending on the features you have absorbed from your favorite artists and or your imagination, just like we saw on the proportion variations part of the class.
12. Final Showcase: Perfect Male and Female Faces: (Music)
13. Bonus Lesson: Alternative Face Mastery: So, let's start by placing this oval shape. This kind of shape which reminds us somehow to an "X" shape, is the most important shape when it comes about drawing the head and the face, at least from the front view, because it helps us to simplify to its core essence how a face looks like without all of the detail that may distract us, or may intimidate us. So we draw again the same shape we previously did, which remind us of somehow an "X" shape, and then we're going to divide it. We start by dividing the height of all of the shape make sure you're dividing it right in the half. Then, what you're going to do is consider the width of all of the shape, and also divide it by placing a vertical line. As you can see, these lines are not meant to cover the whole structure of all of the shape that we just made before, but it will serve us as roughly a guideline to start placing all of the different facial features. That's why I've made it with red color, and I'm not extending it to cover the overall space of the x shape. Alright, third is step. We keep on repeating the previous steps, so we start making the overall face shape, and then we place this guideline, which crosses right in the middle of all of the shape. Once done that, I want you to consider the space that there is on the remaining parts that we divided. You can guide yourself with a horizontal line that we have placed before and by dividing this half that we already got before, we can find where we can actually place the eyes. So as you can see in here, I'm indicating with a dot, and then I proceed to do the same, to the other remaining half of the face, to just add the eyes. An easy way to understand them is to know that the pupil goes right in the middle of this. An important hint to consider when placing the eyes is to know that there is another eye in the middle of both eyes. Then, guide yourself by calculating also half of the width of an eye, and the space that remains from each eye to the outside contour of the face. Then, you can just proceed to add easily both of the eyebrows. Alright, fourth step here I want you to learn how to place the nose correctly in proportion So for the nose we are going to take on consideration where's the eyebrow located, and then where's the chin So by calculating this space, from eyebrow to the chin, we need to look for the middle of it and right in the middle is where we are going to place the nose. Now, for the fifth step we keep on repeating all of our previous steps. Easily, we draw a neck shape place the cross which helps us as a guideline to locate all of the facial features, and then we locate the eyes. By calculating the middle of the remaining space of the width of the face. Then we place the eyebrows we place the nose, by calculating the distance that there is in the middle of what goes from the eyebrows to the chin and then we are going to place the mouth which simply comes from calculating the distance that there is from the nose to the chin. Right in the middle of this distance the lower lip is located in there And so we intuitively calculate that right above it, we can place the mouth. Very simple. Now for the sixth step, we repeat all of our previous steps making sure that all of the distances that all of the proportions and placement on all of the facial features with its right distances are correct. And so we are missing the ears ears placement is also very simple, we just need to calculate the distance that there is between the eyebrow to the nose, and so we are going to use this distance to know the limit of the height of the ear. So, you can vary this height as you please, just make sure that you are never going to pass this distance. Your face and the ears proportions are going to look off and final step, seventh repeat all of the previous steps, but we are going to add this time, the neck. So for the neck proportion, we want to make sure that its height is going to correspond to the same proportion that there is between the nose to the chin. So by taking the same distance, we can have a pretty easy guideline to locate it. Now, this is the height, but what about the width? So if we divide the remaining space that there is between the overall width of the overall face, as we did previously to locate the eyes we can take this middle and replicate it outside the head, to know that this is going to be the limit from where the neck's trapezius muscle, which indicates its length is never going to pass. So yeah, you just easily extend two lines that, are around the outside corners of the eye or the pupil, then passing that you extend two diagonal lines that go outwards, making sure you're not passing this proportion. And here it is! These are the very basics of the face, which are going to help you to start drawing any kind of different face from a very fundamental level. So all of the other details to add different kind of styles and shapes are going to be reviewed on different classes, but the most important thing, the core that serves as a foundation you already know now. Doesn't it feel great?
14. Bonus lesson: Effortless Face Drawing: Great. We now have a general idea of how a face should be constructed in right proportion and how to place all of the different facial features of the face. Now let's understand quickly how I want you to conceive all of this structure that we previously learned. So in very simple terms it is good for you to understand the head on its own. This way, as I said before, we get rid of all of the different distractions and details that may intimidate us that come from the face. The second thing are the ears, which are not very evident, but we will tend to think that they are especially part of the facial features. But right now I want you to focus on them as something apart because the structure from where they are built, suggestes them on a non-conscious level as something outside the face because they are not inside of the head contour along with all of the other facial features. And last thing to consider is the neck which is as important as the head on the face, but is not always being acknowledged like that. To a certain extent it is something on its own, but if we look at the bigger picture, it is always part of a well-constructed head and face. So do not ever take it out of the equation because just a head floating around, would be pretty weird, right? So quickly in very simple terms, these are the three main parts of all of the face's structure that I want you to always keep in mind. Looking for the simplicity of the structure of any subject that you would like to learn how to draw is always key. We need to make sure that we are always able to handle complexity into simple terms. And the way to do that in a successful manner is to always break down the structure into easy to understand and very simplified parts.
15. Bonus Lesson: Amazing Line Rhythms: Here comes the last topic that I would like you to consider and that I would like to explain. Line rhythms. So, for the overall head shape or egg shape, I haven't explained on a clear way how this contour works, but on these subtleties and details, great work awaits, and I want you to be careful with this because, this besides showing expertise or experience, also shows accuracy of the head and the face. Okay, for drawing the contour of the face, I like to think on all of the different lines as separated things that are all working on its own to create a whole structure, and I like to call them line rhythms So, the first thing that I consider to draw it, is the top of the head. This top of the head is very similar to almost half a circle, then I like to extend two lines, symmetrically, that correspond to the temples and the cheekbones of the face. Passing that, there are another two line rhythms that create the jaw. Being the first, the upper part of the jaw, and the second, the lower part of it. And finally, the last one is the line rhythm that creates the chin, which connects the other two symmetric line rhythms that we have been drawing. Okay, see in here how all of them are all connected one to the other. But at the same time, they are all on different angles and different strokes. You can always draw them as soft or as edgy as you please that varies on your perception and your likes, but you should always consider them. So, you can draw the head counter very soft and smooth and not show in much all of these different line rhythms, but knowing that underneath them you always took them on consideration to create the shape that you were creating. A great way to understand them, to maintain the proportion I previously taught is to remember the thirds, which we used to divide all of the geometric shapes that are serving us as guidelines. So on the first third, we have the top of the head. On the second, we have the diagonal lines that start coming inwards, where we find the temples and the cheekbones, and on the third even part, we find the jaw and the chin. Just remember that the correct proportion of these even parts comes from half a square, because that way we also make sure that we have the overall width of all of the face contour on the right proportion. So, one more time, let's put this into practice. We first start in the first part of the drawing. By placing the line rhythm that indicates the top of the head. Remember that it's a good idea to conceive this as something very similar to half a circle or an oval. Then, on the second even part, we place the two diagonals that are showing the temples and the cheekbones. And finally, on the third even part, we place the two diagonals that go inwards that suggest the jaw and that are connected by the chin. So, this may sound very simple in this explanation, but when drawing it, getting the right angles for the line rhythms is something that shouldn't be taken for granted. So, I'm going to show a little bit of contrast on how you should be thinking about each of the parts of all of the line rhythms of the head counter. So, first for the top of the head, always consider it very circular or oval shape and a wrong way will be to try to change it by creating more angles or different straights and curves. The second line rhythm comes as a very slight diagonal. You shouldn't try to vary this angle or tilt it. And then for placing the jaw line rhythms and the chin line rhythm, see how the top line rhythm from the jaw is a slightly more tilted or angled compared to the temples and cheekbones line rhythm which I indicated with blue color. And at the same time, the lower part of the jaw is also more tilted to going in a different degree than the jaw, which I've drawn with pink compared to the one that I draw on purple. You should respect this kind of flow and angles that all of these line rhythms are creating, and not try to alter them at least at this stage of your learning process. More classes on understanding and coming up with new shapes for the head are going to be explained as a separate topic from this one. In here we just want to make sure you learn how to construct the basis and the foundation of understanding the face and the head from almost a realistic front view.
16. Bonus Lesson: Ipad Demo: (Music)
17. Bonus Lesson: Traditional Demo: (Music)
 Sensei Teaching, Find How to Draw Anime Characters for Beginners