Transcripts
1. Trailer: Enter the Human Figure!: Hey! This is the beginner's guide to successfully introduce yourself into human figure drawing. In this class, you'll be given a lot of super valuable information from the basic stuff like understanding the head as a tool, to more advanced, like how to construct the figure from scratch. If you've already tried to learn how to draw the human figure and you want to learn how to do it without relying on reference, I know you probably feel that there needs to be more than just copying it. So, you will learn the proper mindset, understanding how to break it down to master proportion, the flow of the limbs, and great posing to make your characters feel natural and look alive. You don't have to know a thing about the subject, but some experience on simple drawing is required. However, the class will be your best ally on showing you the dos and don'ts, to smoothly guide you to master this complex topic. The same principles taught can be applied on any art style. So, even if you're not a fan of Anime and Manga, this class will teach you a lot. The overall goal of the class is to get you from zero knowledge to be able to draw your own characters from imagination in a natural, thoughtful, and a skillful way. So! where are you waiting for!? Go get your pencil and let's get started!
2. Welcome: Mastering Figure Measurement: We are about to be introduced to the world of drawing the human figure for any artist that desires to create its own characters. There is going to be a lot of information you need to properly digest, so please do not rush. Take notes, revisit what you need, and practice things until you feel the presented on each lesson clicked on you. My advice is to take from one to a maximum of two video lessons per day, to practice them as much as you need. I don't recommend for this class to watch too many videos at once without practicing them. Remember that knowledge without practice is not skill, but just theory. Alright, when it comes about learning how to draw the human figure, everyone has its own way to approach it. It is simply noticeable when you search it on the internet. You can usually find all kinds of different approaches from all kinds of different teachers. Going from gesture drawing, volumetrical figure drawing, anatomy practices, or classical copying, in that order of ideas, this approach specifically focuses on giving you a great introduction to this complex subject. It is not focused on giving you all these important things to fully master the skill, which will need much more classes, but mostly to be an effective introduction for you to properly get familiarized with the most fundamental base for figure drawing. And so, to keep curious to draw more It is meant for beginners so we will learn to understand the complexity of the human figure into very simple terms. The figure has certain measures and proportions we should always respect. If we don't think about them, all of our drawings are always going to look off. In the real world, we will always perceive the human figure with specific measures. It's not like one day you have a certain height and width, and the other one just suddenly you have different proportions on your body. The body proportions need to always keep consistent. Mention that, let's start by learning how to properly see the human head for measuring, so you can learn in the next videos how to draw the human figure in great proportion. The head from now on will be our best ally, for breaking down an understanding the overall drawing of the figure. Please start the class by drawing the same as I draw. Alright, the first measure that I would like you to know, the easiest one, is the height of the head which corresponds to all of the extension from the top to the chin. I'm going to simply be representing this with the number 1 and two simple letters throughout the whole class. The first one "H" in uppercase, or as a capital, and the second one another "h" but in lower case, these two meaning head height. Then, if we divide the overall height of the head we have another two new measures which we're going to be calling half a head and are going to be represented as shown on a screen. One slash two (1/2) followed by capital H and and lower case h, this means half a head height. So, if we divide the head into two even parts, for obvious reasons, we'll get two exact measures. Now, if we take that measure and we divide it into also even parts, we will have a quarter of a head height (1/4Hh) Consider that if we sum this measure four times, will give us the whole of the head height. Great! now let's see it right in the opposite, which is the width. If I'm referring to one head width, it takes place on all of the space that goes from side to side of the head. If I'm referring to half a head width, it means to divide the head exactly into two even parts. So same as the previous, for obvious reasons. If we divide it evenly, we have two even measures, which are half a head width on each divided part. Like so, for the last measure, a quarter of a head width (1/4Hw) which is the result of dividing the head into four even parts. Now, let's quickly put into practice the learned on top of a new drawing, starting by simply signaling in here how you should consider these measurements. If we divide one head height into two even parts, then we have half a head height. If we divide this new measure into two even parts too, we have a quarter of a head height on each small fraction, very simple. Now, let's do it with the width. From side to side of the head in a horizontal manner, we have one head width. If we divide this evenly, we get a new measure of half a head width. And again, if we divide this measure evenly, we have a new measure, which is a quarter of a head width. This may look pretty simple right now, but it's of such importance that you should have it crystal clear, because it's what is going to be a foundation for allowing ourselves to properly draw the human figure with the correct measures and correct proportion henceforth, not only for the class, but for the rest of your life.
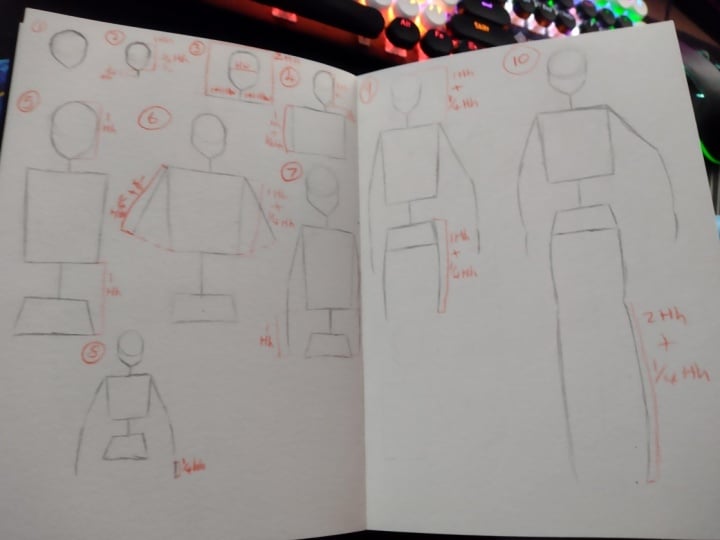
3. Introduction: The Stick Figure Secret: Now we can finally talk about the figure itself. In this video lesson, we are going to start drawing the figure, and focusing on applying the measures of the head for proportion in an easy step-by-step way. Let's start drawing the figure in correct proportion by learning how to construct it in simple terms with the stick figure. Please draw the same as shown on the demonstration, and if possible, use red and gray colors too. Step one, draw a simple head shape, similar to an upside down egg. For knowing the correct way to draw it, refer to the beginner's guide on how to draw the face class. Step two, make a head shape again. And based on the learned measurements of the previous lesson, take one quarter of a head height, to place the neck with a simple stroke that starts from the middle. For step three after completing the previous steps, consider the full width of the head, and right from the middle of the head where neck lies, extend a stroke that has one head width on each side symmetrically, which give us in total two heads width. Step four, complete the previous step to now place some strokes downwards with the measure of one head and a quarter of a head height. Complete a trapezoid like shape to make the ribcage. Notice how this new shape is not fully rectangular, but its sides are decreasing in an angle a little bit as they go down. With step number five, we draw again the previous and then by extending a measure of one head height, complete the stomach or belly with a simple stroke. And the pelvis shaped with another rectangular shape that this time its sides are a bit more open rather than closed. Notice that the pelvis width is no longer than the end of the ribcage width. For step six, we draw our previous steps to now draw the arms based on 1Hh and 1/4Hh the same height you can also find on the ribcage. As the length of the arm is placed, notice its shouldn't go totally straight downwards, but a bit opened and tilting outwards the figure. See that as the arm is opened a bit, the relationship it has to the end of the ribcage is not exactly the same, but a bit above its end. You shouldn't extend the arms length to go further the ribcage. By now, you probably may be wondering, why should I always draw all these steps over and over when I can simply do it all in one same drawing? The answer is very simple. By repeating and doing things this way, we can easily memorize and interiorize the explained concepts. It creates a compound effect in which the more we keep redoing things and learning new things, the easier we get the new skill. Please keep doing it and don't skip it. Otherwise, you won't get the maximum benefits of the whole class. Great! In step seven, we repeat our initial steps. To then draw the forearms with a simple height of one head height, see that their length shouldn't exceed either the end of the pelvis. In step eight by considering 3/4Hh, we can estimate the correct proportion of the hands. You can draw the simplified hands by doing these two strokes, one representing the whole palm, and the other one the thumb and its movement. Cool! On step number nine, we can draw the thighs of the legs down to the first articulation of the knee with a measure of one head and a quarter of a head height. On step ten, we redraw everything to complete the legs with a proportion of 2H and 1/4Hh And finally step eleven, you can finish up the feet with an estimated measure for their length of one head width. Amazing! you completed this full demonstration, I bet this is not your first stick figure, but probably it is the first you've made in a very mindful and great looking way! The key for learning this sometimes challenging topic, is to always focus on drawing from simple to complex, and not the other way around. So although simple looking, do not underestimate how powerful this practice is. Now, let's check out a few things before proceeding to the next lesson. Notice these two ways to understand the measures of the knees and the legs, which can be confusing. The length we've just learned for drawing the half of the leg down to the middle of the knees usually goes to be 1H and 1/4Hh going down to the rest of it to the heel of the feet to be two heads and one quarter of a head height (2H and 1/4Hh) But there's another way we can simply see it too. Especially now that we are preparing ourselves to start making things a bit more challenging and complex. You can also see the first part of the leg with the tights only, to be an extension of one head height. Going down from it, we can also group the part where the knees are located to be of half a head height, being right its half the place in which the articulation is fully located, to end up with simply two heads height down to the heel of the feet. By seeing the leg with these measures, it may help us too, to group easier their parts when drawing them, now is not as evident but you'll understand what I mean on the next lessons. Still not to say the first learned way is not useful, this is just an extra tip for more clarity for the whole class. Now let's finish up the lesson by quickly understanding with simplified shapes the inside parts of the torso on the ribcage and pelvis. By helping our placement with the measure of right the half of the ribcage, we can intuitively place two new measures that go just a bit above and below of it. In the first part we touch of this measure, the division of the chest or pectoral muscle is going to be located, advancing with the middle of the measure, in which we will finish up the chest proportion. From there, a simple stroke that simplifies and stylizes the ribcage curvature can be made, base yourself on intuitively copying it, and notice it is symmetric. After that, downwards on the pelvic shape, you can see the definement of the crotch and the part where the torso truly ends where the legs are attached. These simple notes on our stick figure are going to really make us things easier when drawing the whole figure, because we do now have the underlying solid base for all of our structure, it defines more and makes a transition for our figures to be later made with shapes and form rather than just these stick figures. You finished this lesson! finally having our stick figure drawing mastered in corect proportion, we can challenge ourselves with the next lessons to improve our figure drawing and so to fully draw our Anime characters!
4. Proportions Part 1: Building the Human Form: Alright guys, now based on the previous videos we're going to re-apply all of what we have learned, for improving our figure drawing. Starting from this round head, with this signaled measures as blue notes, we will construct a full figure with a more consistent and solid shape structure. Take a bit of time for drawing this head and notes and once done, continue with the rest of the video. Alright! We start by placing the neck starting by its height. You can take a quarter of a head height and then extend it downwards just like learned in the previous lesson. Divide this simple length in the middle and up to it, now, draw the tubular part of the neck with two simple strokes. After that, by considering just a quarter of a head width on both sides, we can add the extension of the neck that draws the trapezius muscles, which are the ones that attach to the torso. From there, we can extend one head height and a quarter of a head height towards below to draw the beginning of the torso with the rib cage. Then, we can just proceed to close the shape with a simple rectangle. Notice that up to this point, the rib cage shape is fully rectangular, different from the previous lesson in which we did a trapezoid-like shape not to confuse trapezoid shape with trapezius muscle. We can now take one half of one quarter of a head height, which will be one eighth of head height. And with it, close the neck with just two diagonal lines going inwards. With this, we can intuitively place two elongated rectangles that are simplifying the collar bones or the clavicles, a bit more detailed if compared to the watched on the previous lesson. It's important you are very aware of which are the measures in width and height of the head on everything as an starting point for drawing the whole figure. It may feel a bit mechanical at first, for some people, but the more you do this, the more intuitive and the easier it becomes, and the less strange it feels. This approach serve us to understand and to start making things look good, it is not the only one, but it's the one that will really give us results on the class. You may use the guidelines and measures as you learn to draw, but the more you practice this the more you are going to be able to make it yours. Great! Getting back to the construction, we're now going to place two simple circles that are going to help us build the structure of the arm, which starts with the shoulder. So, by taking the measure of one quarter of a head width from the inside of the torso, to replicate it to the outside, and also by extending this measure as its height too, inside and outside of the torso we can create a square shape in which we're going to place the circles. Notice that half of this circle is right inside the torso This is very important because the shoulders are well attached to the chest, so always remember that this circle shape, which resembles the shoulders, go half in the middle of the torso and half outside of it. Then what we're going to do is, based on the new outside extension that we have thanks to the shoulders, we're going to put them together to the edges that are at the end of the torso, right in the bottom to close it, making the rib cage of the torso to look just like in the previous demonstration of drawing the human figure as a simplified stick figure. Next we're going to fill this made structure with its inside details. To do it, we can just consider all of the extension that there is on all of the height of this part and divide it into two even parts. After that, we're going to intuitively place two small fractions, one above and one below. On the above one, we're going to place the bone that attaches the rib cage with the clavicles and the chest muscles. And on the below one, we will draw the chest shape. On the remaining distance we calculated, you can copy this shape, which stylizes how the rib cage usually displays. Don't worry about anatomy at this time, it will be further explained on upcoming classes. Okay! now based on this width, which is one head and half a head width, we can easily place the rest of the torso, starting with the height of the belly, being this just half a head height closing it by drawing a rectangular shape. And right on the middle of this is where you can find the belly button. We can now take again half a head height to intuitively place two diagonal lines that go a bit outwards, just as seen on the previous bit of lesson, and we're going to close it to create the pelvic shape. Very simple. On this part, we can now place the crotch, by intuitively starting from the middle and just copying what's done on the screen. Great! Now by considering the pelvis and where the rib cage lines we drew before are, we can link them together to give us the abdominal area. And this is how we conclude the drawing of the main and most solid part of the figure, the full torso. Take a bit of time to look at your canvas. Don't you see how much you have achieved? We're not just copying, but understanding and interiorizing with a solid base, how to draw the human figure for all of our future Anime characters. Now, let's keep on finishing the whole character on the next video, by drawing the limbs!
5. Proportions Part 2: Building the Human Form: Great! Having rested for a bit, let's go now with how to do both arms for our current drawing. For the arm, the general width is half a head width. If we are not considering the shoulder, it's usually a head height. Including the shoulder it usually goes around a head height and one quarter of a head height. From there, we can simply place a very elongated rectangle, doing it symmetrically on both sides. Now for the forearm, it goes almost the same. We can start with half a head width, extending lines of one head height, but this time not making the other side of the rectangle evenly, but a bit shorter in its width, which is half a head width. Here, I'm going to draw it better at a side, so you can have a better grasp on how the shape works. And now we just proceed to add two small ovals in between the arm and the forearm, which are a simple way to display the structure of its articulations. Now let's go with the hands. So! If we take in consideration one head height as our starting point, again we can calculate three quarters of a head height by dividing this measure into four even parts. Using it for the total height of the hand. For the extension of the width, we can use an estimated measure of a bit more than half a width of a head. This part has such gesture and a lot of movement, that we shouldn't complicate ourselves with it on this class, just try to intuitively draw it by seeing how I place this measure on screen. After finishing one, we just proceed to add the other hand by mirroring what we just did on the other side. Something good to know when you're drawing hands in a frontal palm view is that the thumb usually goes opposite to the figure, that way you can guide yourself to make things a bit easier. And that's it. Now let's go with the rest of the body, starting with the remaining limbs. For drawing the leg, if we start with the thighs, the usual measure that you can use for its width is three quarters of a head width. This one comes from dividing the overall width of the head into four even parts and just taking three parts of them. This measure can vary depending on the kind of body that you wish to draw. If you want to draw a very skinny or slim body or a more muscled one. Now considering one head height, we're going to extend two lines to create this kind of shape and so to finish our tights on both legs of the figure. Notice how this shape closes a little bit narrower from what it started. No need to measure it exactly, just try to make it intuitively. Now you can draw another shape to represent the area of the knees by using half a head height also narrower on its width of around half a head width. We can represent the knees with just a simple oval. Seen here that the oval moved towards the inside part of the leg, it doesn't go straight. For drawing the remaining parts of the legs, we can divide it into two simple parts, starting with this shape very similar to an inflated tube, which corresponds to the calves and also has one head height to close on around half a head width. From there, we extend another one head height for the placement of these last parts. And here we draw two slightly thinner tubes to the extension of around two thirds of one head height. and from there, we draw the feet thinking of the height of the feet as one third of one head height. Notice how the extension of the proportion of the leg only covers its length to the heels, and from there the rest of the feet goes to your intuition. See in here how the feet are also very simplified and are broken down into two very pyramid like shapes. Don't worry at this stage about feet drawing, another class on the basics of how to draw the hands and feet will cover the topic. All right! the ankles are basically placed on the joints of the feet and the previous tube we just drew. Something very important to notice in here is that the ankles placement create altogether this kind of triangular shape. All right? Being the ankles that are towards the inside of the legs, higher than the other ones that are on the opposite edge. So the ankles that go outwards barely displayed of themselves, sometimes they are not even visible because the pose of the feet overlaps them. Also notice in here that the feet's width goes around three quarters of a head width or a head width too. Alright! That's it for this part of the class. You now know how to fully construct the body, understanding all of the different structure it has, while also acknowledging that each of its parts also have its own measure, which are going to serve us as artists to have control over the human figures we do. From now on, we're going to be drawing consistent human figures, being able to recall them from our imagination without having the need to look at any reference, at least from this frontal view. And so to easily understand human figure references whenever you need to, congratulations!
6. Essential Tips: What to Always Keep in Mind: I know that we have learned a lot of information. For learning how to draw the human figure, depending on how we break down each of the forms and the structure, we may result with a lot of information to grasp, especially on this method that I've developed and that I want you to learn. So a great way to don't lose yourself between a lot of detail and a lot of information is to try to find the simplicity on the overall structure of the figure. So let's quickly draw it again. Paying attention to the measures and the proportions we already learned, but this time paying special attention to the three main masses that I want you to always seek and keep in mind every time, so you don't get lost into the detail, but you know on general terms how to consider things in a very simple way. We know that the measure of this head is one head height. If we divide it, we have half a head height and if we also divide this half, we have one quarter of a head height. After that, we remember that the distance of the chin to the torso where the neck is located is of only one quarter of a head height and in there we draw the torso and the first part of the torso which corresponds to the rib cage. We go with a rectangle shape which we know that its length, it's one head height and one quarter of a head height. Notice in here how I'm drawing the belly and how I drew the neck on a different tone. If we compare them, how I drew the head and the rib cage and so as I'm now drawing it on the pelvis. These three are the main masses that you should always think about, when learning to draw the human figure. Right now we're not thinking about tridimensionality but structure and proportion. But even when you're drawing the human figure and a lot of different posing and gesture, it is wise to always think about only these three shapes. If we learn to train our eye to look for this simplicity, the rest is always going to be just detail. I'm very aware that all of the limbs are also as important as the torso, because they are also part of the human figure. But you know, when you train your eye to see to perceive it this way, the main pose and gesture and mechanics of the body composed by the head, the rib cage and the pelvis are what are always going to dictate the nature of the pose, given by the rest of the body. Okay, now considering these three main masses or in this case shapes, let's review how the limbs work. The human figure can have a lot of different gesture. We have a lot of articulations or joints that can give us a lot of different motion and a lot of different poses. Even on a resting state, our limbs usually tend to have a certain kind of gesture that it is important to pay attention to, especially if we want to make our drawings to look natural, to look alive and not stiff. So in a very general sense, this is how you should think about it. Starting from the shoulder to the hand, I have signaled three different lines and in each line each one represents a different rhythm. See how each rhythm has a different degree or angle, which goes inwards. So we see that from the shoulder to the middle of the arm, we have one tilt. And from that middle to the wrist, we have slightly another tilt. And from the wrist, to the knuckles and the fingers' articulations, notice how this remains true. They're all slightly turning inward. And it works pretty similar for the leg, starting from the pelvis to the knee. And from the knee to the ankles, we can see a certain rhythm. It is not going straight ahead, like a very rigid tube, but our flesh and bone have an slightly but very visible rhythm that goes inwards. It is a great idea to look to our own bodies as a way to understand the human figure. A great exercise is you to find a mirror and look at yourself how each of your limbs are working all together and it works the same for both ways. Both of our limbs are mirroring one each other. Great! This may be obvious for some people, but I want you to see it in a very visual way. What is right, and not to say wrong because it is all subjective and depends on the context, but what I don't want you to do on this stage of your learning process. So if we were quickly to draw a new human figure, the limbs shouldn't go just straight ahead to the bottom. They should have this flow and gesture, alright? And the same goes for the opposite way. We know that we have a general and a certain gesture on our limbs, but do not over make it, alright? Please make sure you don't exaggerate too much, all of these curvatures. Because if you do it, this can be a factor of stylizing the human figure some artists tend to exaggerate them a little bit more than usual, but be very careful when trying to play with this. We need to know and learn how to play with the main rule before trying to jump to something different. So I wouldn't recommend you to think about the human figure limbs as this exaggerated. Focus on practicing them and considering them in this first way we just learned. And the last part of this video lesson I want to give you some tips into easier ways to approach it. Alright! Tip number one, this human figure approach we are learning is based on understanding the human figure with seven heads height, okay? So a good way to understand this is to know that there are three head height and half a head height from the top of the head to the end of the pelvis or the crotch. And from there, to the heels of the feet, we have the same exact measure. So every time you want to draw a human figure, it is a great idea to remember that from the head to the end of the torso, we have the same measure that from there to our feet. Alright, the second tip to finding your way successfully through all of this complexity is to know that right in the middle of the joint, where the elbow is there is a certain diagonal that connects with the belly bottom and that usually on most of the bodies also aligns to right where the upper part of the torso where the rib cage is located, here drawn and represented with green color is visible. And last tip, for knowing also the extension of the forearm in right where the hand starts is a great idea to find the relationship between the crotch or the end of the pelvis to this part, and most of the bodies will find this relationship. So every time you are placing your hands, remember that they are aligned to the end of the pelvis. It is important to know that all of the previous videos and previous explanation applies especially to a human figure that goes with the head ratio of 7 heads height. So there are a lot of different body types and a lot of different head ratios and this can vary depending on the person and depending on the age of the person, but it can go from 4 heads height to even 8 heads height. So on art this is a method to understand the proportion of the body and to break down the figure so we can make it better to understand and so to represent it. Please remember that all of this goes directly applied to a 7 head figure ratio which is the most common that we can see from teenagers to adults, around 7 heads or 7 heads and a half.
7. Gesture & Details: Capturing the Essence: So far we have learned how to consider the head for measuring all of the proportions of the body. We have seen how to construct the body, and we have also learned with all of its parts on the right proportion. We have learned the things that we must pay attention to that may look obvious, but when constructing the body are not. And we have learned also how the general gesture of the body limbs work all together. Now, we are going to put together all of that knowledge, and we are going to draw by constructing all of the human figure this time without having to make the evident measure, by just trying to calculate it intuitively. Please remember that you should be following me the whole time, drawing the same as I draw. If you don't draw, your skill won't be developed. Alright, so, as I said before, I am going to draw this time without showing evident measuring, but I am going to be thinking the whole time on all of the different proportions we just learned. Please try to do it even if it feels a bit challenging. This is the starting point of a practice that will help you develop the needed intuition for drawing the human figure, just trust the process. Allow yourself to go with the pencil, and correct yourself as much as you need. Don't be afraid of making mistakes, because when you already know the measures, mistakes are only going to tell you just what to improve. So, I start drawing the head, adding the ears. I proceed to make the rectangle that is the base for us drawing the whole torso, especially the ribcage area. I add the chest that links to the shoulders, and then the shape that shows how the ribcage displays on the surface. After that, I add the arms, and the rest of the torso. For drawing the hands, as you have seen on the previous video lessons of the class, different than the first video lesson, where you watched how they were if the figure's palms were opened, we're going to try now a more relaxed pose for the hand, and so please pay attention to the way the hands are built. Right now just focus on copying them and on trying to memorize this view, we're not going to be diving too deep into this topic. Another class full on this is going to be covering everything in better detail, so right now we're mostly focusing on how to construct the human figure. Alright, so we continue with the legs, extending down to the knees, and pay special attention here in the legs. How the general gesture we watched on the previous video lesson of this class is being applied. We keep on drawing extending down to the ankles, to end up with finally the feet. Alright, the whole time, remember that it is a great idea to consider the three main masses of the human figure, the head, the rib cage, and the pelvis. Knowing that also, check how the general gesture we also understood on the previous video lesson, is also working on this body. See how in here with black pencil I'm singling on top of each of the limbs. We're going to make more evident if we were to not apply this line rhythm on the legs, and see the difference between the left and the right. Now for this part, there are some other shapes that I want you to keep in mind, that are going to help us to understand the body better, and so now that we know how to construct the human figure on general terms, we can think about them. They are as important as everything else we just learned, but on this class they have been putted it in a way that they weren't overwhelming at first so we do now understand them. So starting with the neck. Here you can find a very simplified way to break down the neck and its muscles. And right now, just focus on copying them, and on memorizing how they work. Anatomy classes are also a very important matter, but they are not going to be touched on this specific class, we're focusing on how to draw and construct a human figure on very general terms. And now for drawing the shoulders, see how the shapes are working together. Starting from the chest and where the clavicles are, and extending down to be very close to where the end of the chest is, or the pectorals are. Now from the beginning on the legs, right on the pelvis, we're going to place this diagonal line that flows down to the shape where the knee is. And it should start, I'm singnaling here in blue color right from this distance, somehow in the middle of the space that there is between the pelvis and the edge of the leg that goes outwards the body. For the knee, if we consider a bit more of detail, inside the oval that represents it, we can place another two circles. And they're the result of considering the two bones that are working together to connect the upper part and the lower part of the limb. If you look to your knee, you will find that it's contour is very visible. And from there we're going to go to the ankle that goes inwards the legs. And this bone resembles how one of the bones of the leg displays on the surface. And that's it. Now see how in here, I'm going to check on all of the different proportions that I didn't make evident at first, but that I were always considering. So starting with one head height and one head width. After that, considering one head and a half head width for the chest, and one head height and one quarter head height. Going down with half a head height for the belly and another half a head height for the pelvis. We keep on going down, remembering that the measure from the pelvis to the shape that resembles the knee is of one head height. Half a head height, the shape that resembles the calf is one head height and the shape that goes down to complete the whole figure to the feet another head height. For the width of the leg, remember that it can go from 3/4 of a head width to even one head width. Then for the shape where the knee is located, we have half a head width and it works pretty similar to the end of the calf, almost half a head width. And on the last part, the width of the feet, we also try to same as we did with the hands calculate it intuitively, which can fluctuate from 3/4 a head width to one head width. Also same as the hand, don't worry about the feet right now, another class full on the topic is going to be available, just focus on copying these shapes. Now let's go with the remaining measure of the width. The overall width from shoulder to shoulder goes around two head width. This is the general rule, it is what usually goes some people depending on their complexity, which may be skinnier or a slimmer, could have one head and a half head width, and some others if more muscular two heads width and a half head width. For the arm, we have the height of the shoulder from around 1/4 of a head height and the height of one head height. The extension or width of the arm on around half a head width and the same for the shoulder, another half a head width. For the forearm, one head height and for the wrist, remember it narrows down to around this fraction of half a head width. And so I keep on signaling all of the measures I considered, even if they were not obvious at first. Just remember that it is super important to always consider each of the measures of the whole structure of the human figure, they shouldn't be placed randomly. If you don't want to get super technical as I said in the beginning of this video, try to go as intuitively as possible and don't be afraid of making mistakes, just every time you find something looks off go yourself and check on the measure and correct it as much as you need. Over time and experience and practice, you will start to get better at drawing the human figure without having to measure the whole time and making it look balanced and proportioned.
8. Common Mistakes: Elevate Your Skills: Alright guys, having understood the previews, we're now going to check the most common mistakes that we all tend to make once we have just learned all of the previews information. I know that all of the human figure has a lot of structure and a lot of different body parts. When drawing the circles that resemble the shoulders it is key to always draw them inside. If you are going to draw them outside, the extension and width of the torso is going to be very off. It is not very obvious when learning, but the shoulder and the arms are coming from the inside of the torso, not from the outside. You also need to think about the arm that comes from the shoulder as something that has a certain tilt. This certain tilt should be reflected and a great way to think about it when drawing it is to know that there is a negative space of a triangle from the arm to the torso. So as a quick resume, the shoulder goes attached right in the half to the torso and from the shoulder we have our arms which are not going straight ahead in a vertical position, but with a very slight tilting. And this tilting creates a very slight triangle, that we can use to guide ourselves. Right between the arm and the torso. Okay now for drawing the details of the chest for the bone that attaches the clavicles to the chest, which goes right in the middle of the torso we should pay special attention to these measures we just learned on the previous video lesson. So if we add a bit of contrast in here, the end of the chest shouldn't be aligned to the first measure that we got, which is above and we indicated here in blue color and neither we shouldn't align the chest to the one that is below or even worse passing this measure. We should think about the chest going right in the middle of all of the upper part of the torso where the rib cage is located and so this bone aligns to the first line of the first measure right above the middle of the rib cage, where the end of the chest should be located. Knowing this,now we just place the rest of the details of the rib cage how it usually displays on the surface, which aligns to the bottom line that we have right below the center of all of this measure here in blue color. Alright, now for the pelvis it is important in here to always remember that it is not to the same extension on the width as the belly is. We should think about this as something that goes outwards because in here is where the legs are going to be born and where they are going to be attaching the pelvis, so always remember that there is a certain degree in there, and that you should respect it. There, for drawing the pelvis, it is pretty common to confuse this because depending on your experience it is highly likely that you have seen a lot of different approaches on drawing the human figure and so many artists usually drawing this part something that is very similar to underwear so, please pay attention to this, here we're trying to draw with these simplified lines, the human figure as it is and so don't think about this as underwear. If you want to draw the underwear you can do it on top, but knowing what is underneath. And now for the last part of this video lesson. Remember on the previous videos where I told you that the measures are very important because, it is what is going to help us to keep on drawing the human figure consistently? so here we have a better example of it. If we wouldn't have control over them, we will find ourselves making a lot of very silly mistakes and this is pretty normal and pretty common if you're a beginner. I'm overexaggerating it in here so you have more clarity on what I'm trying to explain if we don't know which measure goes on which part of the overall body structure it is always going to be super likely that we are going to make these kind of mistakes. Where our limbs and our torso and all of the different body parts are always going to look very off so focus yourself on please remembering the measures they are going to be your best ally every time you want to draw and construct the body, or the human figure from your imagination, and without having to look to any reference
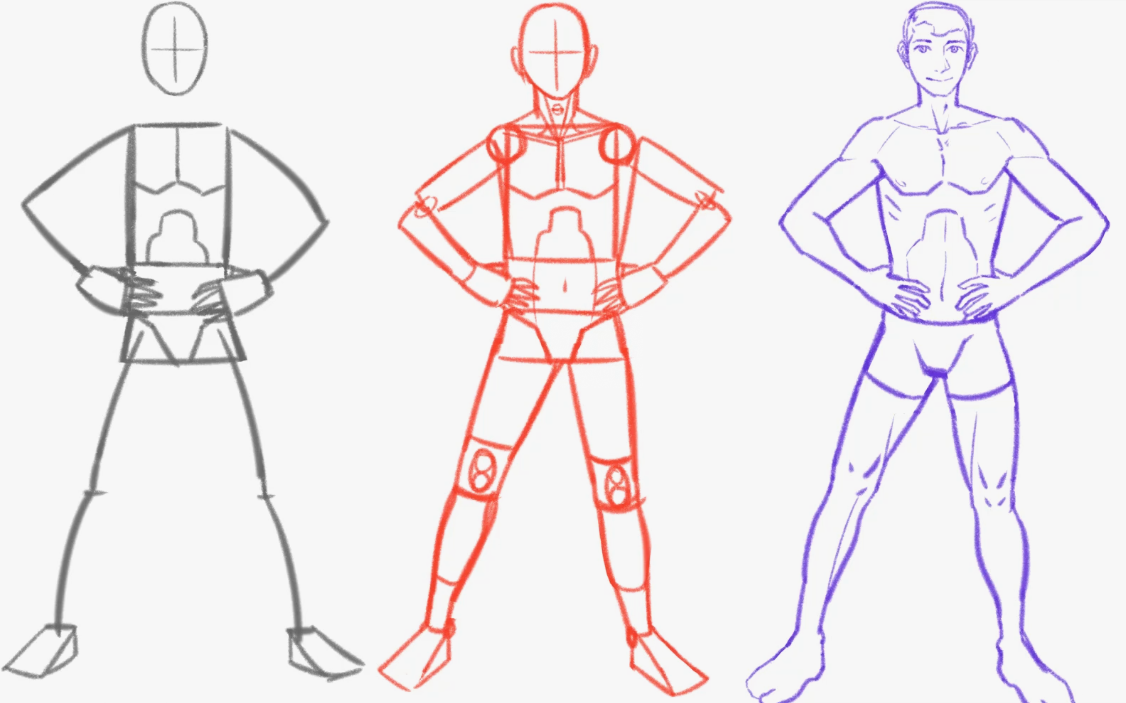
9. Line Rhythms: Flowing with the Figure: Wow, I'm really impressed you're still here You really want to become better at drawing don't ya'? So, what we're going to do now is we're going to be covering and applying all of the previously learned, but this time all at once. And I'm going to be giving you a more whole approach where I will also be including different contours to make the figure look more accurate. So I start by drawing the head, again if you haven't watched the class on drawing the head, you can always go back to it and gain more confidence for drawing your human figures. But if you don't want to, it's not a must. Having drawn the head, I start now by drawing the neck and so applying the geometric shapes that are resembling the part where the ribcage is going to be located. Adding the shoulders and the clavicles. So this time, I'm applying the detail of all of the structure we previously learned. You can see in here the simplified shapes of the neck, going down to the pectorals and the ribcage part, which displays on the surface. After that, I add the shoulder shape, just like we watched on the previous demonstration. adding the arms, adding the belly the rest of the trunk with the crotch, and now the forearms. Alright, you can see in here that even if not obvious, I'm thinking the whole time on each of the proportions we previously learned. Also, I'm thinking about a more organic flow when it comes about the contours. I'm not attaching too much to what the geometric shapes were, but instead, I'm thinking about them, allowing them to be a guide for me to help better and more accurate contours, which resemble more how the human figure actually displays. So, remember when I said that they shouldn't be the step-by-step process, but a method to study? In here we can see the results. Now I'm drawing the legs, adding all of the details of the structure we learned previously, the contours of the muscles of the leg that are going from the pelvis to the knee, the bones that are resembling the knees structure, and after that, I just go down and complete the rest of the legs by thinking on the calves and then going down to the ankles, to finally end up with the heels. So for this part of the feet, do not overthink them right now, just attach to the previous proportions we already reviewed, and just copy the shapes that I'm kind of doing in this demonstration, we're focusing on the overall structure of the human figure. This aspect needs to be reviewed on its own in another class. It is important to have clear that the current proportion of all of these figures made for learning in this class is of 7 heads height. Remember this, to don't create confusion when exploring different body types and proportions. On the other hand, this height or head ratio was chosen for this class because it is the most common to be seen on the average, from teenagers to adults, we're very familiarized with it. Although, these ages can also be portrayed in manga style drawing with different head ratio proportions as mentioned previously. This one is key to have us a starting point for learning more complex and more variated stuff later. Know that every time you're going to be drawing as you learn and as you practice you may have some minor proportion changes or mistakes as you learn to properly measure. So the 7 head ratio can be of great help to also minimize the distortion and still create balance and accurate figures. Since we can see a lot of human figures in the real world with 7 heads and 7 heads and half. So that's a great trick. Alright, now let's go with line rhythms This is my approach on understanding the line rhythms of the body. So, these line rhythms are what are actually making the figure to look more accurate and more believable. Going a step further from what we have been practicing first, which was geometric shapes for construction. Please focus on copying them, I'm signaling in red color to make them more evident and to insinuate them more alright? So the contours of the body, more than edgy, are usually curvier and you can see it here in the line rhythms. They help us to make our figures to look more alive yet, they are still just one interpretation of reality. And this can be made in multiple ways depending on the way you perceive. So this is just my approach. If you want to come up with something different or add up to this approach, feel free to do it. Something of high relevance to see and remember is the pattern here that the most prominent curvatures of all of the limbs and its parts are showing, which are usually on the outside. And see how them relate with a diagonal relationship which I indicate here with just the line. From the outside to the inside this is a great idea to know how to place the curvatures of the line rhythms of the limbs. Alright, so now that you know the proportions and the construction and how each of the parts of the human figures are related one to each other next time you want to draw a human figure, think about these line rhythms. To take the leap to make your figures, to not look as mannequins or just robotic figures, but fully alive.
10. Contours & Landmarks: Mapping the Body: Cool! Let's talk about the landmarks now So, the landmarks of the human figure are the key points and parts of the body's structure that help us to simplify and understand many of its complexity. Allowing us to navigate mentally on it to construct it on a much easier way. So here in the screen, you can see the landmarks that I like to think about when drawing the human figure. Number one, starting with the clavicles and the bone that goes on the ribcage where the pectorals are attached. Number two, the nipples of the pectorals. Number three, the joints that are located between the arm and the forearm, just where the elbows are. Number four, the belly button. Number five, the crotch. These are the ones that correspond to the upper part of the body. So for the lower part, I like to think on the knees as another landmark. And finishing going down to the ankles, as number seven. So, think about them as references. When drawing your figures, no matter if it is from imagination or construction, they are a great aid for you to make it easier to your brain, to connect all different parts of the structure and to remember how they all work together. Now, based on the previous demonstration, where I showed you a more organic and complex human figure's structure, if compared to the geometric one we started with, I want to show you how this knowledge directly applies to a real case scenario where you were to normally draw the human figure. So, this is how we think when I'm drawing. In here I'm using blue color to draw to show in an evident way how I think. Tracing over the previous drawing, but on a real scenario, I wouldn't be drawing over but directly drawing with nothing underneath. The thing is, you must consider this structure we have been learning throughout the whole class, in a mental manner. Without having to draw it exactly as learned, but allowing it to be a mindset and/or a guide for showing contour of the figure, the contours can always vary because of each character each pose, each gesture and mechanic, and nonetheless because of the way you as an artist prefer to show it on your artwork. So, these contours may vary from artist to artist but they are the result of understanding the human figure's muscles and overall structure relationships and simplified shapes that we can come up with to break down the figure in a simple and understandable way. I'm adding more detail to the figure as I have a bit more knowledge about anatomy at this point so for you, just copy it this way or better idea is you seeing yourself in the mirror or nude model photos that allow you to detail the way muscles and inside contours of the human figure display. That way you can apply them to your own strokes and your own artwork. Take a look at the neck muscles, the clavicles the shoulders, the ribcage, the joints of the elbows the legs muscles, the knees and the feet. Do you see that the strokes and line rhythms are similar to the geometry we established at the beginning? but yet they are built around them where they were placed? The dimention they have and the overall form? Use this structure to guide yourself to know to know how to draw, not to draw it exactly and make your figure drawings to look more accurate, organic and natural.
11. The Female Form: Understanding Beauty: Up to this point, we've learned how to draw the human figure through the male version. But learning how to draw the figure without learning both, the male and the female versions besides being uncomplete would be pretty boring right? So let's take a quick look at it and learn how to construct the basic female body. Same as before, we start drawing the figure by drawing the head. Done that, we go down to draw the neck, which measures is of one quarter of a head height. And here is where the first difference is. The female neck tends to be slightly thinner if compared to the male one. We keep going down to construct the base of the torso which length is of one head height and one quarter of a head height. Different than the male's torso, the female torso narrows down to the waist, creating a tighter end when comparing to the male version. Like so, the inside contour that resembles the shape of the ribcage below the chest is less angular. Completed it, we now go down with one quarter of a head height to draw rectangular shape. To then go down again with one quarter of a head height, to draw a trapezoid shape. That resembles how the waist in the female figure starts. Now, we draw a measure of half a head height to draw the pelvis and complete it with two tilt rectangular shapes on each side. Do you see the difference of the female figure if compared to the male one? In the female, the waist is tighter and the pelvic area tends to be wider. We continue by drawing the arms and the forearms symmetrically. With one head height, each. Same as the male version, we can draw the hands on the same size of approximately three quarters of a head height. Now, to draw the legs right from the end of the pelvis where the crotch is, we draw two tubular shapes that start by connecting with the pelvic shape. Remembering the inner gesture the leg displays. With a proportion of one head height if counting past the crotch, then we draw were the joint of the knees is, with a proportion of half a head. To go down exactly the same as we did with the male version, applying the same proportions as well, until we complete the feet. Great! Considering the three main masses, just like we did in the male figure, we can now proceed to draw a bit more of detail on top of the structure. To complete what defines the structure of the whole figure. The neck muscles remain almost the same, being the Adam's apple a bit rounder in the female. The shoulder shape keeps the same too, attaching to the inside of the chest and torso. And now, our new feature gets in, the breast, which shape doesn't fall straight, but in a tilted direction. Which shape isn't circular, but more alike to a pear or a drop of water. The top part of it tends to be smaller, increasing size as it falls down too. The breast barely goes outside the chest area in a regular size, and the nipples follow their tilting direction. The rest of the contours remain the same as the male one. The ribcage shape gets completed below. The tights get a curviline that connects to the knees. The knees get two circles to show the joint of the bones, to finally connect down to the feet, with another simple line to the ankles. That was a lot! right? Now, let's add the contours that make the figure more organic and natural looking. The procedure is really not much different than the male's one. We take the geometry of parts we attached to create or solid structure, and we focus on mostly the outside contours that define the form first. Then, we only add the bits of the inside contours that we want to show on our drawing. Something important to consider is that of course the breast of the female figure can change its size, to look to our like and design. We can extend them to increase their mass, but remembering that increasing them should be mostly placed towards the bottom, rather than above, respecting the gap there is between them and between the sides on top of the chest. Another important thing to consider, is that the size of the shape of the waist and hips can also vary from the previously presented general rule. The waist can become tighter or narrower towards the location of the belly button, depending on the anatomy of the woman. In the first drawing of the structure we mainly focus on an intermediate size and shape, to take as a general rule for learning how to draw first but this can change depending on your drawing style. clarified that, let's add now the facial features hair and details of the rest of the character to see our figures structure more defined and working in action. Nice! We're almost done with the lesson! In a more direct way, if we compare the male and the female figures one next to the other, we can see better their differences. As mentioned before, the female's figure neck tends to be thinner. It has breasts its waist are tighter its hips are wider its muscles are less defined and in general the figure's contexture is slimmer or thinner, because it is less muscular which is more evident on its limbs. Just remember the main differences of it compared to the male figure, by holding on your mind the most important aspect, which is the main difference between the torso, waist and pelvic areas.
12. Posing: Natural Figures: We know that the human figure has basic general gesture which can be easily identified in a very evident way, on the way the limbs are drawn. We want to avoid the stiff unnatural looking pose, we tend to draw in our beginner stage. But, there are also many other ways, where we can draw a much more natural and dynamic looking and relaxed pose. So, here you have a brief selection of poses that I want you to learn to make your figures look great not just stiff unnatural looking people. For the first pose, which is going to be explained in this video lesson, we start by drawing the tree main masses, in the regular way calculating the proportions and placing it just like we have previously observed. What is going to vary this time, different from the others is just the way we're going to place the hands and the legs. So, I start by drawing the arms, by holding the same proportion even if the posing is different, and I make sure that the palm of the hand is not going to be inside of the torso, but outside. The only thing that is going to be inside of the torso are the fingers. You can have a better idea by checking yourself in the mirror and simply putting your hand on your hip to see how the pose work. And so I go now down to place the feet, starting with the legs, and there's something in here that I want you to pay special attention to, to maintain balance. So, if there's a certain distance between feet to feet we can think about a triangular shape but, for the pose to look more natural, it is great to come up with a kind of triangular shape that is not equally distributed on both sides. So, a better idea would be to extend one of both legs just a little bit further because when we extend our legs, we usually distribute our weight in such a manner that is not perfectly symmetrical. So, this one looks more realistic. A common mistake that we tend to make, when placing the arms and the hand is to put them too much in the upper part of the torso, closer to the ribcage. And this is not a very natural posing even though our limbs have the capability to extend to that place, it is not very common that we are making that kind of pose, so always think about when placing the arms to place the hand, to do it in a way that the hand is going to be always touching the pelvis, not the ribcage. We can also see in here how I still maintain the flow that we learned that the limbs display going inwards to the body, look how the arm the forearm and the hand are all going in slightly inwards. Notice how we are just using very simplified shapes with non-details at all, as a way to delete all distraction and focus only and mostly on the core elements of the human figure. For example, the ribcage and the pelvis are just two rectangular shapes. The head is just an oval shape with a crossline on the inside, which is helping us to somehow have a sense of that there is a face in there but we are not actually drawing the face, or we are not actually drawing any muscular detail in depth. Same for the limbs. The limbs are just represented through simple curvy lines and the hands and the feet are also very simplified shapes that try to mimic on a core essence how the human figure looks but they are not full of detail. Alright, let's go now with the second pose. By thinking on the one-quarter head-height distance of the neck right in the middle, we place the upper part of the chest as a as a diagonal, and we close it down thinking about the same making sure it is well replicated. Thinking about the same, holding the right proportion right in the middle, we place the pelvis, tilting out this time. But different from the chest, the overall shape won't be skewed or distorted. It will maintain its original contour. If we compare this outcome to the previous placing of main masses, we can find this very noticeable difference. The torso is expressing now a more dynamic gesture it is not just sitting straight, as the previous posing we have been doing throughout the whole class. A great way to remember how both masses pelvis and chest are tilting, and are related one to the other, is to think about an invisible starting point from where the force of the tilt is being applied being one side compressed, and the other one extended. There's a common mistake of invert them without noticing when drawing the full figure, so this is a great aid. For placing the arms as one shoulder moves upwards the whole arm slightly moves with it too. It is easy to remember this new variation by seeing all of the arm joints, elbow to elbow, and wrist to wrist. It is also common to not consider this, and what this will create is a deformed perception of the overall pose on the arm itself so try to keep this in mind. Small details are what can create a huge difference between different artworks. For the legs, we need to consider the alignment with the torso for maintaining the balance so the belly button can be of great help. We need to make sure that at least one of the legs and feet aligns with it which in a natural pose should be the one that attaches to the upward tilt of the pelvis. This leg usually maintains the flow of both parts of the leg the tights and the calves making one big elongated shape or curved line as you can see in here, allowing the opposite leg to just relax and show a small fall given by the knee. Now, take a look at the overall pose and see how at the left side of the screen, in the figure, the chest, the arm, the pelvis and the leg, compress. While at the right, they are all relaxed down as I previously named right in the beginning of this video lesson. Please always remember that the torso needs to maintain balance with the feet. On standing poses, if none of both feet are aligned to the middle of the torso, easily seen here with the belly button our poses will not look natural at all. We need to be mindful about distributing the weight of the legs and the feet, and this directly relates, to the torso and a great way to look at it is the belly button. Now, let's see the same posing in the opposite side. By holding the next proportion right in the middle of the chest, we skew and distort a bit the chest, tilting it in a small degree. We later draw the pelvis or the crotch tilting opposite, remembering there is no need to distort it like we did with the chest, then we draw both hands, by remembering one of them is slightly above, given by the pull the shoulder creates from above. See how as I explained before, considering an invisible point that causes this force to compress one side and to extend or relax to the other one, gives us a lot of clarity over this matter then, we place the legs by remembering how one of them should align to the belly button, while the other one folds relaxed. This placement is given due the balance that the weight of the body distributes on all of the limbs to can stand naturally, as I said before, this is the placement of the weight of the body, to find balance. It is super common to get confused on this posing, while trying to juggle all of the different concepts and variables, so just focus on one thing at a time, and give yourself time to grasp each part without rush, to dissipate all confusion, and make this knowledge easily part of you. And now the last pose. This one is going to be a mix of the two previous ones we start by drawing the same gesture of the previous pose, tilting the chest and the pelvis, but we are going to draw the arm, that is located on the compressed part of the pose, touching the pelvis and not just hanging off we draw the other arm normally in a relaxed hanging way. Look at how the invisible point at one side is where all the compression comes from again, and see how the hand that is touching the pelvis is related to it. This hand needs to be there, not on the opposite where there is all the relaxation. This can create a visual contradiction. Then, we place the legs by considering the balance of the weight with the belly button, remembering that the one on the compressed side aligns to it but, what we are going to add now is a much more relaxed leg which will also extend more outwards compared to the last pose. And, here we have our great new pose! super helpful, and great looking to the viewer when coming up with our own drawings and characters. Alright guys, now let's pay attention to the following. These are the common mistakes we can make when drawing this pose. Remember that the chest tilting is given by the distortion of the rectangular shape to be skewed and distorted, and not completely tilted. Different from the pelvis, which its shapes moves as a whole, and maintaining its regular form, the pose we have as a result is over-exaggerated and not natural looking to the eye. Many artist like to use this kind of exaggerated gesture on purpose, but I wouldn't recommend it to you right now in this beginner stage, since, what we want to do is to understand how the body behaves within the natural laws we live in. Remember that the hand that bends and touches the pelvis needs to be on the side where the whole torso is compressed, placing it where all of the relaxed limbs of the pose are, will immediately create unbalance. And the same happens for the leg. If you place the leg and the feet to align the belly button but opposite where the compression is located, you will create incoherence. So remember that the leg that goes inwards to align the belly button, holds the compression. And the other one that is extended, holds relaxation. This is why each of them needs the correspond to the proper part of the overall pose of the figure. Try to think about the whole's figure gesture as one even if we have lots of details and limbs movement and mechanics, they are part of just one unit, where one side is compressed and the other one is relaxed. And just like the second pose, if you consider all of these relationships to be made in the opposite way, the pose can be constructed while maintaining the natural look. I would recommend you to make sure you become comfortable with drawing the first one successfully, without trying to draw the opposite direction first. Otherwise it is highly likely you will confuse your head.
13. Demo: Putting It All together: Ok guys, get ready. We're finally going to put together all the learned through out the whole class. So! what we're about to do in here, is we will be progressively drawing the human figure by breaking it down into three simple steps. The first one, we will draw the pose as simplified as we did on the previous video lesson of the class. The second one, we're going to redraw the same pose, but now adding the shapes and the structure of the human figure in a more understandable and accurate way. And on the third step, we're basically going to join all the scene into one final piece of drawing. So we'll start with one pose and progressively complete the other two. Without further ado, let's get started. I want to start with pose number two. The one where our character just extends with all its limbs relaxed and the chest and hip compressing at one side while extending at the other. First, I start by drawing the head as always. Second, I go with the two biggest remaining main masses. And then I just complete the pose with the limbs. I'm now making sure the chest shape is skewed. The hip is tilting in a relaxed manner, the feet are in balance, the joints are well placed, and the overall compression of the pose is working altogether. The whole point of this practice and tree step breakdown is to progressively start learning to see things in the correct way by using very simple shapes and concepts to get rid of distractions that may make things more complex. Then, by holding this same exact mindset, I'm drawing now all of the structure we'll learn for the figure, by keeping special attention to the proportion of each limb. I'm drawing this by focusing first on the tree main masses. Just like it did on the previous drawing, the head, the chest, and the pelvis. It is not that this is the best way to draw it but rather the process that we've been introduced to in this class. With practice, it will flow in a much more natural way to you, allowing you to start with the parts that make more sense to you, and in any order that feels right to you. But right now, please stay attached to the same order that I'm displaying on screen. Finally, on the third step, I proceed to apply it all. The general gesture I'm posing the overall structure and proportion, all as a mindset, rather than a guideline, to start drawing a complete character if I were to do it for a real project. I add here and there a couple details that can make it look more resembling to a real figure. And also, I fix every part of the body that I see is off, or not in proportion until I complete the drawing. And... here we have it! You can apply these same steps on different types of characters, once you already know that match the proportion, or once you can come up with that you may create. You can also come up with your own personal ways to define which kind of contours you'd like to show from your figure's structure. And also with the kind of body type that you prefer, if you want your character to look more muscular, or slimmer, or skinnier, or a bit fat, with less defined muscle. It's all up to you. So, feel yourself free to explore all of these aspects to come up with your own ways.
14. Female Demo: Crafting Feminine Forms: You now know all the steps to learn how to draw and how to practice the drawing of the human figure. Watched the previous example, let's give it another try this time with the female figure, to see how to put it all together on it too. Just like before, we start by making a very simplified drawing of the figure. Focus on the three main masses of the body. But different than the previous drawing, we are now considering the ribcage and pelvis shapes with the proper female shape. The pose we are focusing on this time is the same as the previous one. Just switching or flipping its direction to the opposite, to add dynamism. The torso is skewed, the pelvis is falling down, and the feet that gives the balance to the pose, comes from the compressed part of the figure by aligning also to the belly button or navel. Finished this simple drawing, we now proceed to our second step which is to apply all the top base of the pose into the complete structure. Thinking about proportion the whole time to respect the harmony and size of each part of the figure, while considering also the relevant changes of the female figure. The neck, the breast, the waist, the pelvis or hips, and the less muscular tone. Completed it now, we proceed to our final step to make the full drawing considering all of the previous concepts learned throughout the entire class. Just like we did in the previous video demonstration. We focus on drawing the whole structure fitting it on the main pose, but now directly thinking on the organic contours and natural look of the figure. Again, making the full drawing considering all of the previously learn, but now directly doing it on a final piece. Remember while drawing it. To hold everything learned as a mindset rather than a method with guidelines. If it feels too difficult for you, it's okay too. Just draw the structures as an underdrawing to draw on top of it, and then complete it. It is only a matter of practicing to achieve the final look. Another way to practice it is to just keep repeating these three same steps on the same drawing of the same pose on multiple different types of characters, while coming up with your personal ways of body types and drawing styles.
15. Demo: A Fresh New Pose: Great! Let's go now with pose number one. Start with the simplified posing of the character. Analyze the balance between both legs as described before. Making sure the palms of the hand are outside the torso and only the fingers are making contact with the pelvis. Then, passing the very simplified mannequin. Let's draw the more complex mannequin. So same, I start by drawing the head, but now I'm adding more detail. Thinking about the three main masses, and then going for the shoulders and the arms. I'm holding the whole time the same posing on my head locating the limbs and the rest of the figure. And I'm fixing all of the things that I consider that are off or that are unproportioned. And... now the third final step. Again guys, I'm thinking on all of what I've just previously did. Alright, so you should be trying to focus on the same thing. The whole point of drawing all of them, one next to the other, and on the same page especially, is because I want you to progressively absorb this kind of mindset. This is more of a mindset to always bare on mind. This is not a step-by-step guideline. Alright? So, you must be thinking on all of this structure. You must be thinking on all of the proportions of all of the parts of the structure. And even though the human figure is complex and has a lot of different body parts we always should be seeking to think about it as a whole, as one unit which is the sum of all of the parts. So, we don't get lost by only thinking on one or (just) some of the body parts. It is highly likely since this is a beginner class, that you're going to be giving your first steps in this kind of subject, that you're going to make mistakes. So embrace them. Think about them as something that are telling you what you should be addressing to practice and get better to improve Okay? So, make mistakes as much as you need and correct yourself until you get the desired results. Learning is an ongoing process. So, no matter the experience, we're always going to make mistakes, and we're always going to learn from them. Alright! So, I fixed all of the mistakes that looked off to me and finally end the character.
16. Demo: Reverse Engineering: Ok guys, now I want you to look at this drawing and pay a special attention to all of the mindset that I had while drawing it, alright? So first look at how I'm thinking about all of the line rhythms of the body. Starting here with the upper limbs, the shoulder, the arm, the forearm, see how these curves are related one to the other extending down to the legs, pay special attention how I'm thinking about each of the curvatures, alright? Going from the tides, to the knees, to the calves and a great way to approach this is to think about them with just intuition, alright? Don't overthink them, just allow your pencil to be very flowy, and of course to remember that the bumps or the most pronounced curvatures are related by these diagonal lines that are going from above to below, and from the outside to the inside. This is a really useful trick. Of course while also thinking about the line rhythms that aren't making our shapes more organic and less stiff or robotic mannequins, I was also thinking about the whole structure. I'm thinking about on all of the simplified shapes and especially on all of the right proportion of each of them, remember that each of them hold an specific measure that comes from considering the head, alright? Then, you can see in here how I'm signaling, basing myself from the below height of the head, we have one head height, one quarter of head height for the neck, we have one head height and one quarter of a head height for the chest, we have half a head height for both the belly button and the pelvis, we have one head height for the tights, half a head height for the knee area, one head height for the calves, and another head height from there, to the heels. Now for the upper limbs, we have one head height for the arm, another one head height for the forearm, and three quarters of a head height for the hand and the height of the head is what usually comes on mind for thinking the overall placement of all of the figure, but also remember that the width of the head is as crucial and as important as the height of the head, so let's quickly review also the width of the head, I was thinking about one head width and a half head width for the distance that there is on the neck muscles, that correspond to the trapezius and that attach to the shoulders, and from shoulder to shoulder, I remembered that there is two head width, alright? passing down the end of the ribcage we know that there is one head width and half a head width and it goes the same for the beginning of the pelvis alright? now, extending down to the crotch, since we have our tights well attached to our pelvis, we know that this extension goes a bit further, which usually extends to two head width and from there, most of the time what we are going to find is half a head width, to the end of the tights, to the end of the knees, and from there, based on that measure, we intuitively place a little bit less for the end of the calves, for the ankle's placement, and we finally end up the leg with around 3/4 of a head width or sometimes one head width, it's up to you Great! now for ending the whole figure, for the arm, on the upper part and the lower part, we have half a head width, and we finally end up with an intuitive measure of around 2/3 of half a head width, for the rest. Reviewed this, I was also thinking about the three main masses of the human figure, which are the head, the ribcage, and the pelvis and at the same time I was considering all of the landmarks, the clavicles, the nipples, the joints from the elbows, the belly button, crotch, the knees, and the ankles, even if they are not visible in here, they were helping me to navigate through all of the body proportion and structure, and at the same time, I was thinking about the gesture that each of the limbs displayed, even if on this posing they are not just extending straight head, or the arms and the hands and the legs and the feet, I was always thinking about the curvatures that are going slightly inwards, the torso, alright? so this is why my shapes didn't come out stiff or very tubular and straight head but they had more life and more shape. And for what corresponds to this pose only, I was thinking about the balance that there is between the ribcage and the pelvis, which is straight, and this is how this video lesson concludes guys. So, even though I did this review on only this video lesson, on the previous video lesson where I was drawing another pose, I was thinking about the same variables, alright, I was thinking about the three main masses of the human figure; the head, the chest, and the pelvis, I was thinking about the general gesture and general structure, I was thinking about the line rhythms of the contour of the whole figure, and I was thinking the whole time on the proportion of all of the parts and the structure of all of the posing, thinking about the height and the width, alright, so the next videos are going to be demonstrations where I will be applying the same principles, the same mindset that we have learned on each of the video lessons of this class even though they are not very evident, I will always be thinking about them, and this is what I want you to start developing on your mind, alright, every time you are going to approach, to draw a human figure, at least from the front view think about all of these variables, I know they are a lot, but if you focus on learning and mastering one at a time, you are surely going to get there, and make them all part of your work.
17. Final Thoughts: Your Path Forward: Thank you guys for having taken this class. Here are the final thoughts that I want you to keep in mind. Number one is, this is an introductory class. Please take it as you are learning the core and right the steps to keep on walking through later more complexity. It is not like, again, this is a step-by-step tutorial, but rather than that, I'm transferring the knowledge and the mindset that will be serving you to introduce yourself to keep on learning how to draw the human figure, which is a very broad topic, with a lot of different complexity and a lot of different approaches. Alright, another one is, the human figure, depending on age and genetics, can have much more different proportions and head ratios. This one approaches from the most common one for teenagers and adults, alright? Which is 7 heads high. For more variated proportions and head ratios, there are more classes on the topic that will be comming I know that all of these may seem a lot technical and academic, with all of these measuring, proportions and structure, there's a lot to keep in mind, but the measurings are a tool to help us improve the way we perceive, to develop confidence, to develop consistency and balance on the whole figure, to seek great mindset. So, keep practicing it in a mindful, conscious way, and it will always start to make sense to you, and better it will also be absorbed, to a point it will become intuitive. Also, there is no need to rush, remember that to become a good drafts person, you must consider yourself involved on drawing as a path to walk not as something to take instant gratification from. You must put the time, you must put the practice to patiently and joyfully practice each of the steps of the learning process, to make sure you digest every single topic at a good pace for you to properly learn. And finally, we have approached this through breaking down structure, simplified shapes and common gesture of the body on its limbs, and the overall placing of the weight, there's a lot more to be covered to understand this topic, which will include a lot of different views, a lot of different gesture, posing, and thinking also on tridimensionality and form rather than shapes. So again, this is an introductory class, and I hope that all of these have helped you to start now, daring yourself to draw your characters and your human figures.
18. Bonus: Ipad Demonstration - Male: (Music)
19. Bonus: Ipad Demonstration - Female: (Music)
20. Bonus: Traditional Drawing (Real Time): (Music)
 Sensei Teaching, Find How to Draw Anime Characters for Beginners