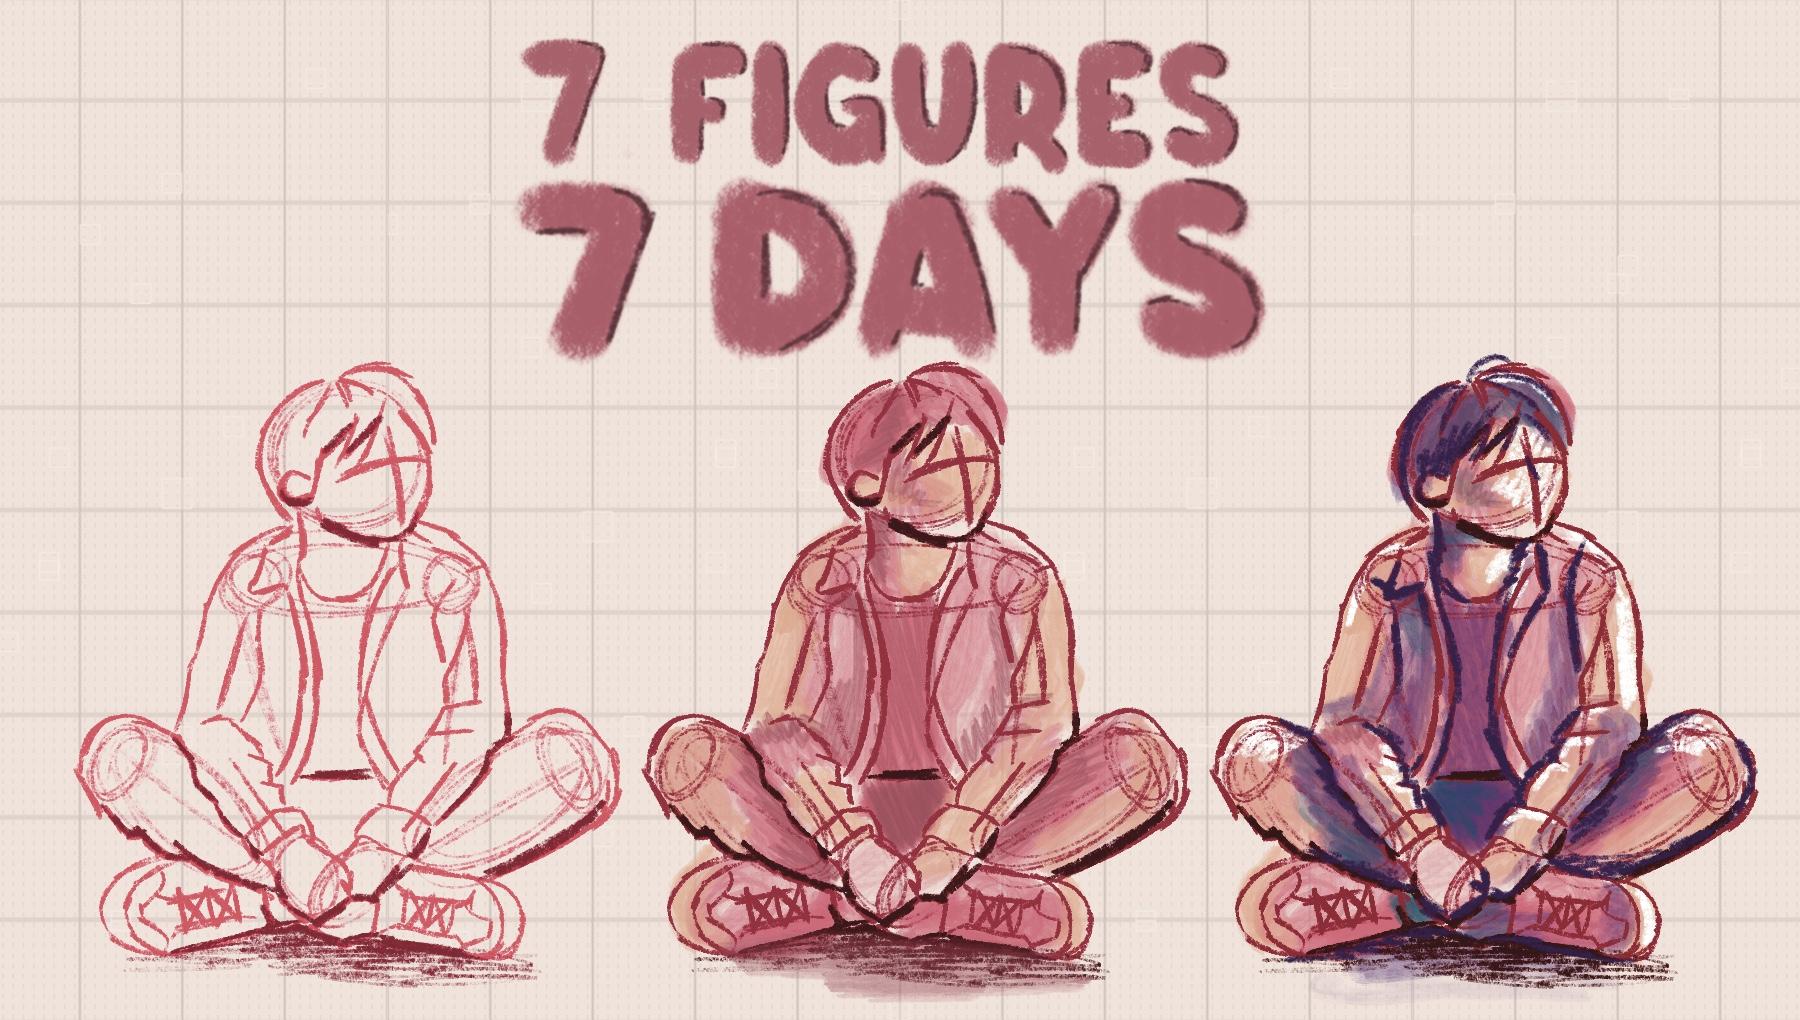
Transcripts
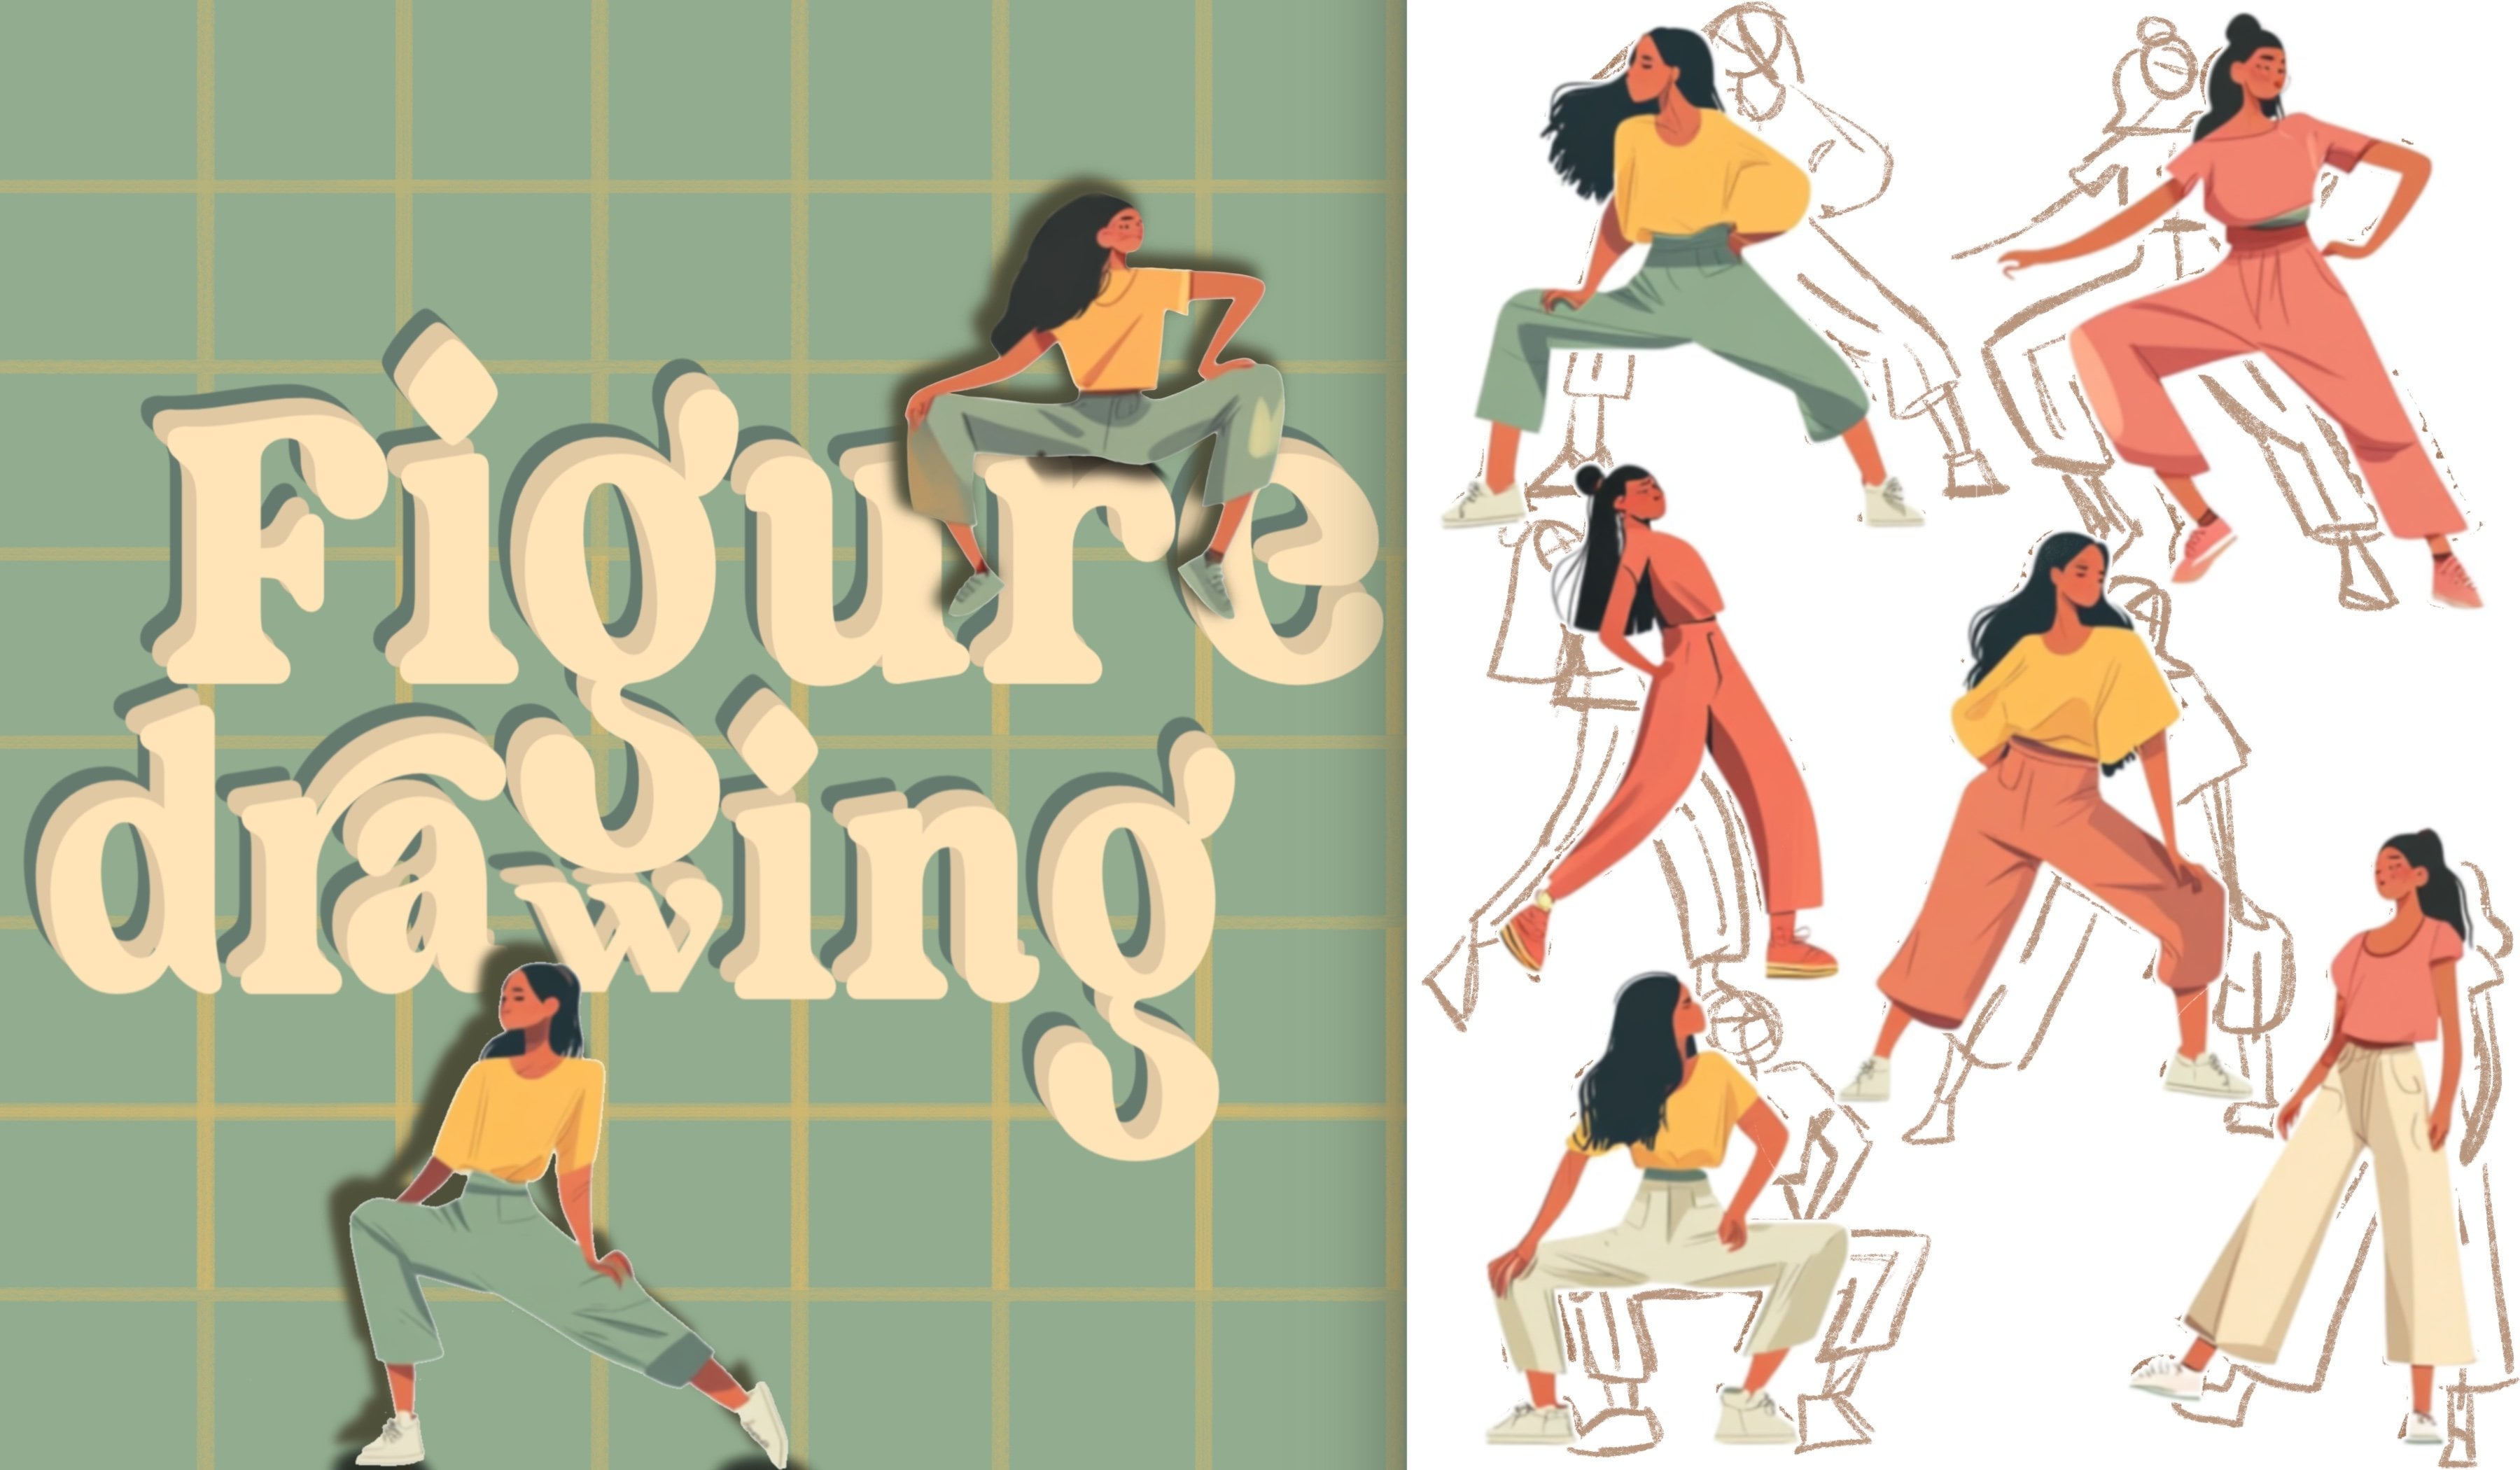
1. Welcome: Like to create call figure
drawings like these. I want to share with you
my technique that doesn't require any understanding
of anatomy, so you can jump straight into the fun part of
Sketch on call Poses. Join me in the seven day
challenge where we complete seven poses in increasing
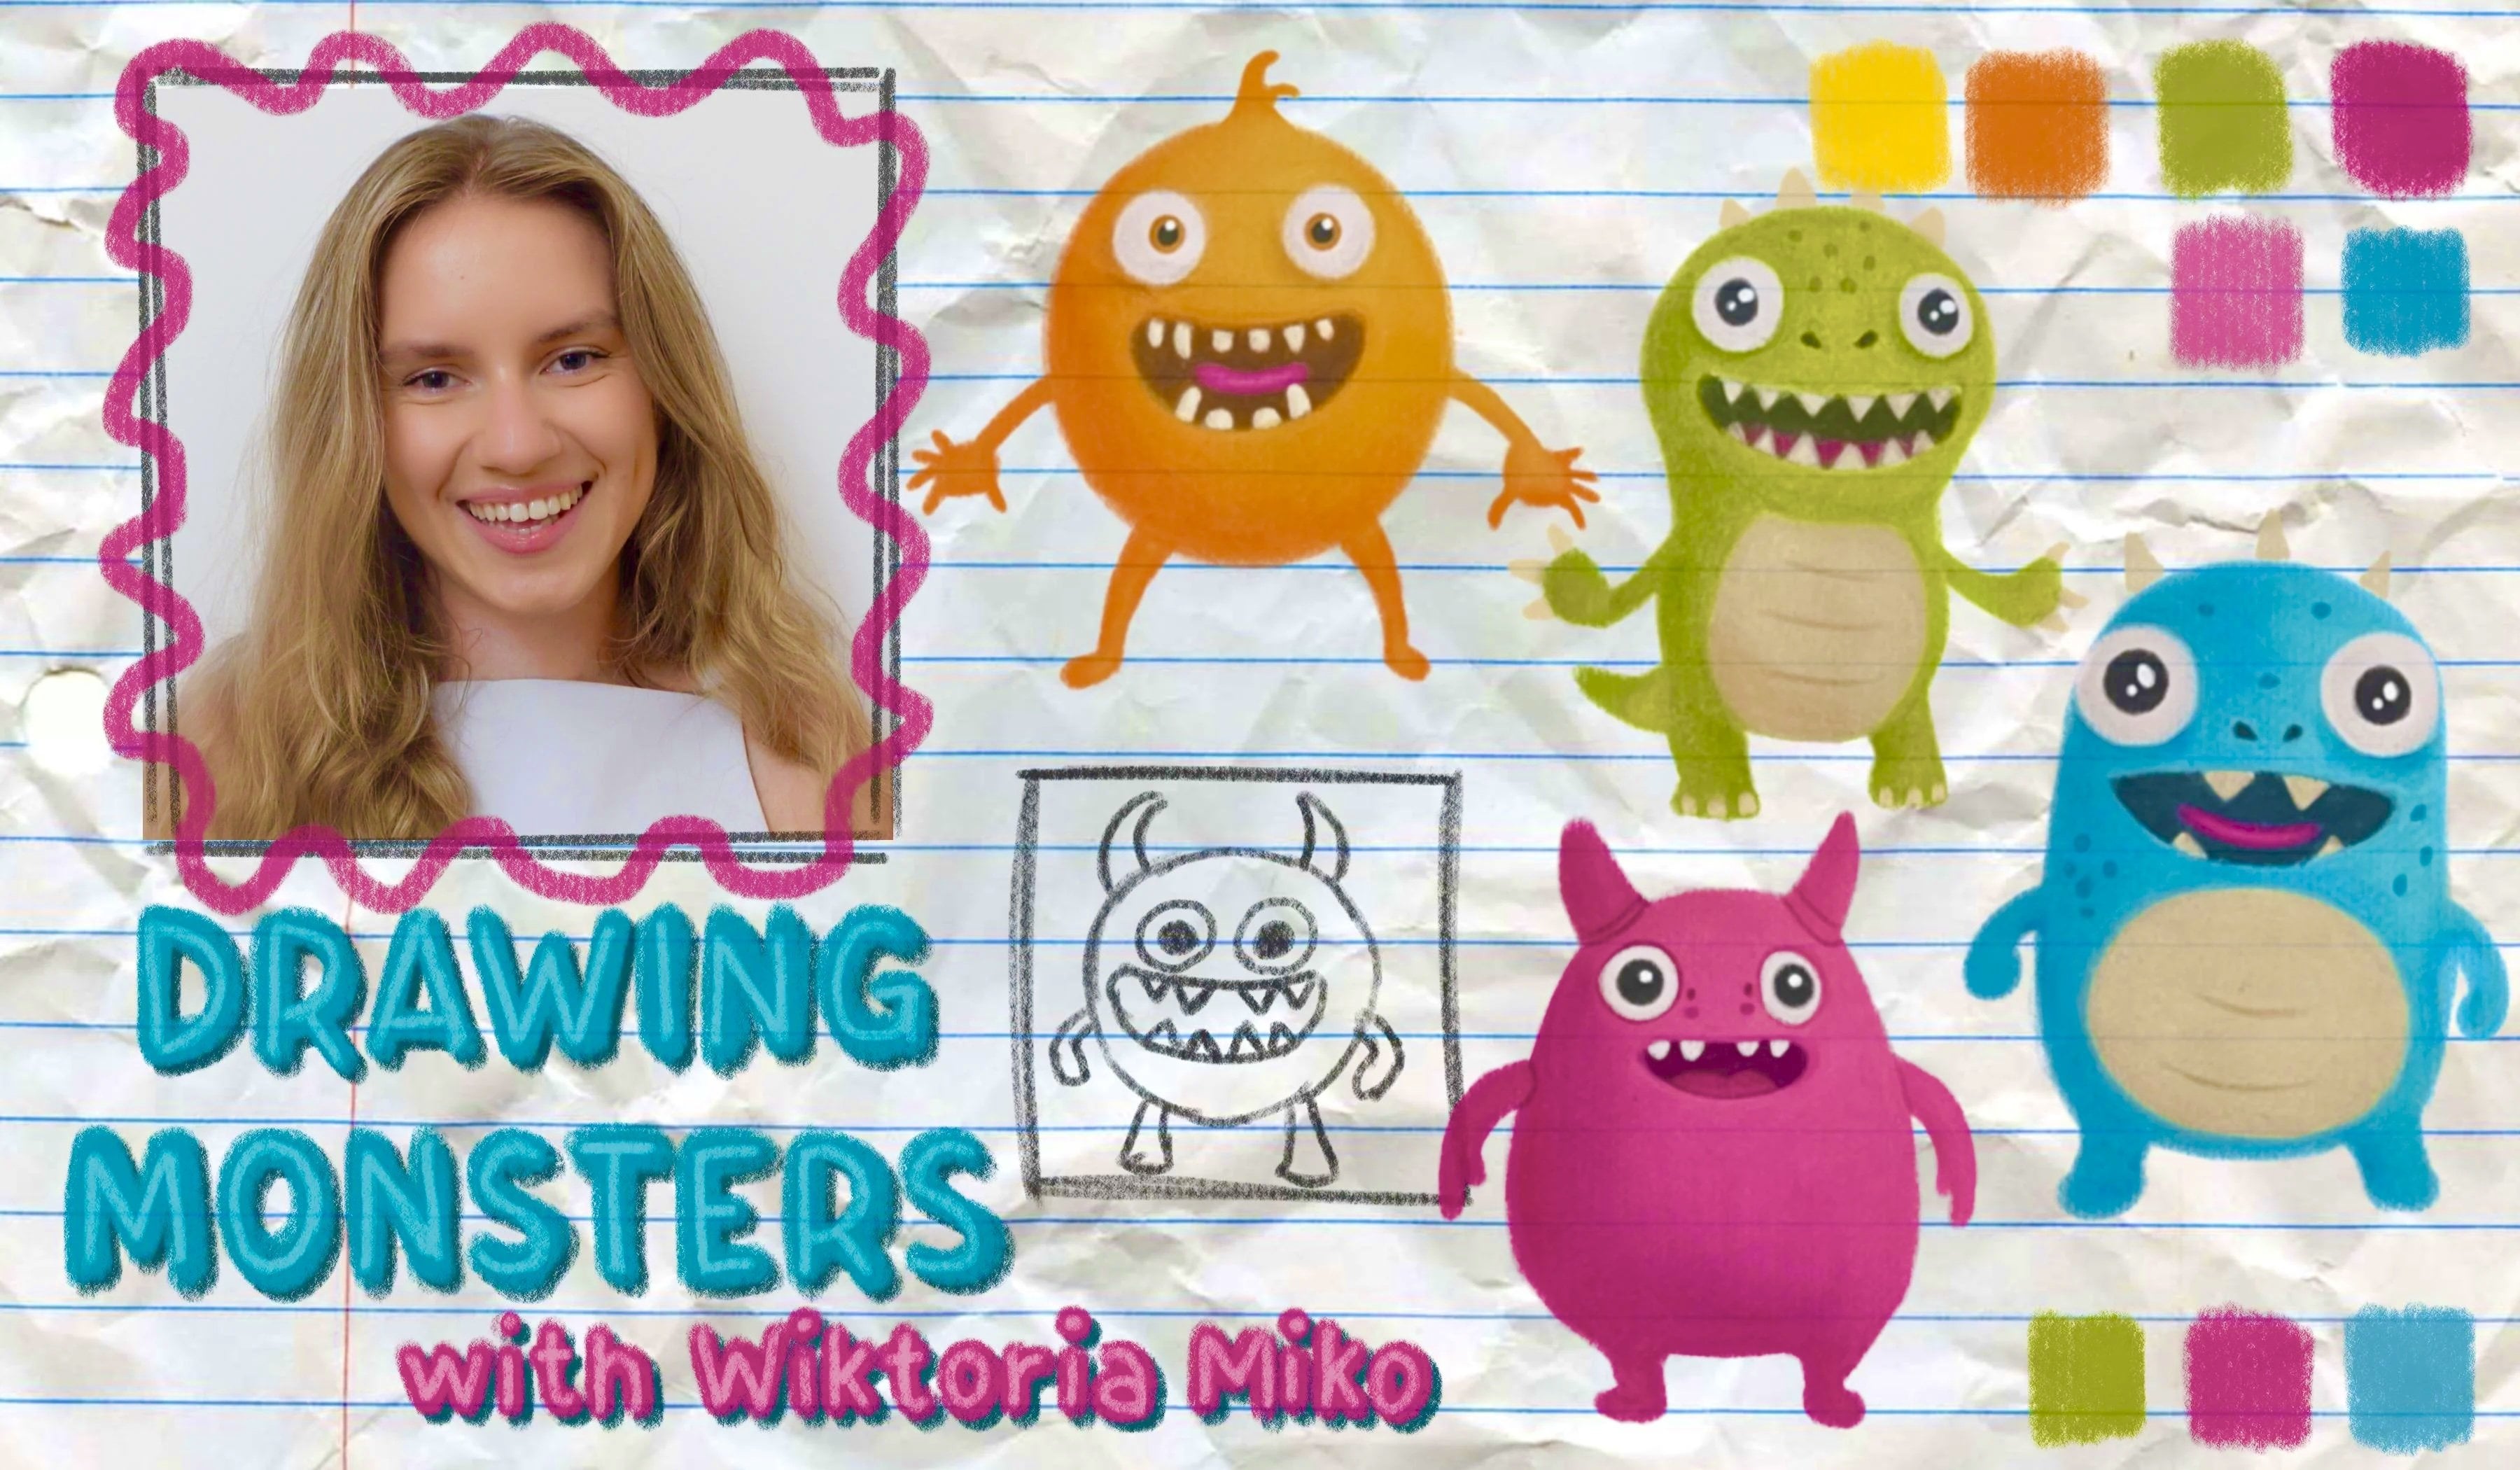
difficulty. Hi artists. My name is Victoria, and I'm a professional artist and
teacher here in Skillshare, and I love to draw everything. Realistic drawings of
people to creepy clowns, cute dogs, fun
landscapes, you name it. I have also taught
myself to draw cool figures like the ones
we are completing today. So before we begin, allow me to let you in
a little secret. I don't use the atom
to draw figures. My technique here
is like a puzzle. I start by creating one thing, and then I go back and I
compare everything to it. We will start with a
very basic pose and each day move up to slightly
more complicated figures. During them in order, we
will build up our skills from previous lessons and
gradually get better. Each lesson will be
about 20 minutes long so we should have manageable
practice sessions. I keep my fingers crossed
that you join me in this class so we can create
some cool figures together. I hope to see you in
the first lesson.
2. Basic Pose: Everyone, and welcome
to day one of our seven day figure
sketching challenge. So in this very first day, we're going to start
with the easiest pose or at least what I
consider the easiest. I think this is pretty
simple because there's no foreshortening going on,
no complicated poses. She's just leveled
off of the camera, and she's standing
straight arms at her side. So I think think
that's easiest for me. When I create these drawings, no matter how simple
or complicated, I always use the same technique. We will be building
up on our knowledge as we progress through
the challenge. Hopefully, as you create them, even though they'll
be getting easier, we'll be getting used to the
technique and hopefully, it should be a little bit easier and more
intuitive over time. The first thing that I
do, and this is true for all of my proses is I begin by creating the parameters within which I will be
creating my sketch. I create a mark at the
top and at the bottom. Top of the head and the
bottom of the feet. And now, there's two
reasons why I do this. The first reason
is that sometimes if you start by just sketching the head and you'll
do the head in all the detail and then you
move onto the shoulders, stomach, legs, and so on. And then you get to the
bottom of the page, and you realize you have no
space to fit in the feet. And then your drawing is
just hanging off the page. So the reason why I do
this is because then I try to aim for this
kind of height. I don't just use the
edge of the pages as the limits for my figure. So the important thing here
is that I like to leave on the bit of the room between my mark and the edge of the paper, because if we're drawing and we find that we exceed
this line slightly, we still have a bit
of room for error. Yes, that's the first reason. Then the second reason
why I create this is because having this distance where you can visualize
where the figure will be. Knowing what the height
of the figure is, you can also estimate the width. It's giving you a
reference point, something to compare to. When you're drawing the widest
point like the shoulders, then you'll be able
to see roughly how wide they should be
relative to the height. That's the first step. Now,
the second thing that I do. Again, this goes for
all of my drawings and we'll be doing
this throughout the class is I create a
line right down the middle. And I just do this very
lightly because of course, this actually isn't
in the photo. I just like to
create this lightly so it doesn't show
up at the end. This is another reference point. Now, I have this line because I like to divide my
sketch into easier sections. So if we have a line right down the middle
of our reference photo. First of all, we can see that this crosses roughly
the hips area. Usually with figures, if they're standing straight in this pose, then this middle line will always cut right
through the hips. So now what this tells us is
that when we draw the hips, they have to be about
here right on this line. Then the other thing that it
tells us is that we now have a smaller distance
within which we'll be creating our upper
half of the body. When you have a
smaller distance, it's easier to estimate things. For example, if now
that we have this line, we can mark roughly where the
bottom of her head will be, whereas before we had this line, it was going to just
be a little bit harder to tell because
you have more distance. When you have a smaller gap, it's for some reason
just easier to estimate. Yes, this technique does
require a bit of intuition and you need um kind
of a tape measure within your eye so that
you can guess where things are and you can
compare the distances and estimate where things should be relative
to other things. So this is kind of a
fundamental skill, but I do hope that if you
already don't have this, that it will come as you
practice these exercises more. Yes, first step, we
create these lines, then we create this middle line to kind of split
the image in half, just so that we divide
our sketch intersections. Now we'll move on to
creating the head. The essential thing
here is is we have to find out
where the head is. So if we are looking at our reference photo and we can see the line
down the middle, We ultimately try to measure. The way I think of it is, how many heads would
you be able to fit from the top of this
subject to the middle line. Usually, when you're
during a pose like this, it would usually be
about three, 3.5 heads. Now, in this case,
I would say that it's about 3.5 heads as well. That being said, you can separate this distance
from here to here, you can separate it into 3.5. If I do a light line, I'll do one line here,
another one here. Another one here. You've
got more or less 3.5. Now, again, I'm estimating
all of these lines because I'm not using a rear here. This is just intuition. Now we can see that the bottom of our head has
to be about here. Now that we have the
height of our head, it's pretty easy to
just tell the width. It's going to be about this is going to be about
how wide it is No, of course, it's taller
than it is wide. Yeah, you can just pencil in
the rough shape of her head. Don't be too fast
over this just yet. Try to simplify the shape. Now, we won't be drawing the
face details here because portraiture is another
thing that's complicated, so we'll leave this
out of this class. All we're going to
do is draw two lines just so you can
see the direction that her face is looking in. She's looking straight ahead,
so you're going to have a lie a vertical line going right down the middle and a horizontal line
going her eyes. Now, this just gives
you a little bit of information about where
the face is looking. Our head is done. This is
all we'll do for the head, and then we'll come
back and we'll fill in the details later. Then we have the neck.
Now, when we do the neck, now we're going to have
to compare it to the head because the head isn't
independent of the neck. They are all proportional
to each other. I'm looking at the
width of the head and you can see that it
is wider than the neck, like the neck probably
comes out from about. It's almost as wide as the head actually. It's not that narrow. And the next step now will be that we want to see
where the shoulders are. Now again, you can use something that you've already drawn as a reference point to
measure the shoulders. If you take her head and compare a width of her head to the
width of her shoulders, you'll be able to
see that you're able to fit more
or less two heads. Her shoulders are going to be
twice as wide as her head. You're almost going to
take this distance. You can even use this line
and create this width. Two widths of the head, and you can see that this is where your shoulders
are going to be. You're just always
going back and forth comparing different things to comparing different
things within your figure. Now we are going to
just connect our lines. You're looking at
all of these angles. Again, this requires a bit of intuition because you have to, for example, see how
low are the shoulders, to the head half using your
intuition, half measuring. It's like the way
I think of it is putting a ixaw together,
doing a puzzle. Now that we've done this, I will leave the arms
alone for now. I actually like to do the arms towards the end because
I like to fill in the torso first and
then it's easier to place the arms
alongside the torso. Once the torso is already done. The second thing that I'll
do is I'm just going to fill in the curve of her vest. I can see that her vest
begins a little bit to the side of where her neck
connects to her shoulders, something like
this. And I try to. It's almost like a
square from here down. It's almost like
a square, right? We're practically
replicating this shape, you're always measuring,
you're always comparing. Okay. Now we're going to
do the sides of he vest. Again, you're comparing
what is the width of those straps of her vest? Now you're coming,
you can for example, use how tall is from this line
to the bottom of her vest, how tall is it relative to
this neckline that we created. It's going to be
definitely longer. You just want to estimate
it would be about here. That line will look
something like this. Look at the curve of this line.
It's not a straight line. If you draw a straight line,
you figure is going to look very flat because her stomach it's actually
curving towards the camera. This is why you have
this curve around it. Almost like imagine that
you're putting rubber bands on some spherical shape
like a basketball. Then depending on the
c of the basketball, the angle you're looking
at it, those rubber bands will curve a certain way. You can almost think
of it in that sense. Now we're going to just
also compare how wide does this line go
relative to her neck? Yeah, you're just using
very abstract points. But the essence is that you're just supposed
to measure things. Whatever point you
choose, that's fine. As long as you're just
already comparing against something that
we've already done. Okay, so we will continue by adding the sides
of her stomach. Now, I feel like I am
making her a bit too slim, then she is in the photos. I'm just making
some adjustments. The thing is, my number one tip always would be when
you're creating outlines, try your best to make
them as light as possible because whenever
you're drawing anything, you're guessing in
terms of outlines, you're guessing where
things are supposed to be. You don't go in with complete
confidence that holic. This is exactly where
this is supposed to be. You're guessing. Then when you have something
down on the paper, then you can visualize whether
it looks right or not. Then you can adjust
if you need to. When you draw very lightly, it's easier, to make adjustments
than it is if you are really applying
a lot of pressure. Yeah, draw very lightly, and then the lines that
you're happy with, you can reinforce the lines that you're not
that crazy about. You can erase, or
they just won't be as eye catching because
they'll be very light. For example, I am pushing
the sports vest up, and I'm going to try to erase this line here at the bottom. Now, we are pretty much in
line with where we should be. We've reached the halfway
point pretty accurately. If you didn't, that's fine because you have a ton of space. You can definitely This is
just an approximation again. It's fine if you're
a little bit off. Now the next thing
we'll do is the hips. Of course, the hips are
going to stick out a bit, we're just going to
try to get this curve. I'm going to draw the hips
up until the crotch area, and then I'll show
you what I do next. I'm following the reference. Okay. So I only go up to about here and I'll mark where her
croach is supposed to be. My technique for drawing legs
is actually quite simple. I try to make it as easy
for myself as possible. What I do is I imagine that I'm almost like doing an
x ray of her legs, and I'm just looking
at the bones. So there's going to be
a long line right down the middle of the is
and the cups as well. What I essentially do
is I try to create a line right down the
middle of her legs. Now I'm going to just
create two lines. I'm going to separate
these because it's not the same direction
for throughout the leg. So I can see that up until
the knee, this left leg, it pretty much goes like a
little bit inwards, actually. If you start at the hip, and you can almost like imagine that you're doing an
x ray and you can see the leg, I mean the bone. You're doing an x
ray and you can see the bone in the leg. Then you're going to skip over of space because
we have the knee, and then she has her
lower leg right here. Then we have again, she's standing straight, so her legs are pretty symetrical. Another line like
this. Like that. Okay, now we have two lines. Now this is going to
be an enormous guide for how we create the
rest of the legs. Because all we have left to
do now is we just have to draw the curves the legs. We're going to ignore the hands, pretend they're not there. Now just to simplify things. And then we're just creating
the curves, and that's it. And this makes it a
little bit easier, more manageable to
create the legs. Okay. And then this is where her leggings would end. I'm just trying to
compare the height of the knees to make sure
that they're leveled. So I'm trying to keep in
mind that her legs have to be comparably wide, right? They have to be the same. Now you can definitely
see that even though I initially estimated that the
feet would end over here, I am going to go beyond them, because this line
is not too high. It's good that I gave myself
a little room for error. Now we're just draw ankles. And just the rough
outline of her sneakers. Yeah, because I'm totally not confident
drawing the sneaker, the first lines I'm making, they could come out funny and I might have
to adjust things. I start off by drawing very, very lightly, that's
very important. Okay? Okay. So there's a headaches. Now, I feel like I should make her ankles a little
ticker on this side. You can make all of your
adjustments as you go. I can draw a little knee. We have a bit more detail here. Now, the final thing we have
left to do are the arms. The technique for the arms is exactly the same as
it is for the legs. You're essentially
doing another x ray. You're going to
go all the way up until the inner elbow and imagining that there's
a line running right through the arms. Then again, this one
goes towards the body, and this one goes a little
bit outwards actually. And then we have pretty much the same symmetrical
situation here. Again, we go around the
bones and all we have left to do the outlines
the art inst we've drawn. Then for the hands, I'm just going to simplify the shape because hands are really hard,
especially at the scale. So we're just going to ignore those and we'll just
create a rough outline. But don't be too crazy
about the details. Something like this, and
that represents the hand. So this is pretty much
our entire character now. We're just going
to draw the hair. I also great is for her. Now that we're practically
done with the drawing, you can go ahead and
reinforce all of your lines. In case there are any
lines that you don't like, you can just leave
them lighter and then go over everything
else that is accurate. So this is it for
our first storing. I hope you found
this enjoyable and that you created a figure
that you're proud of. I will see you in the
next lesson. Bye.
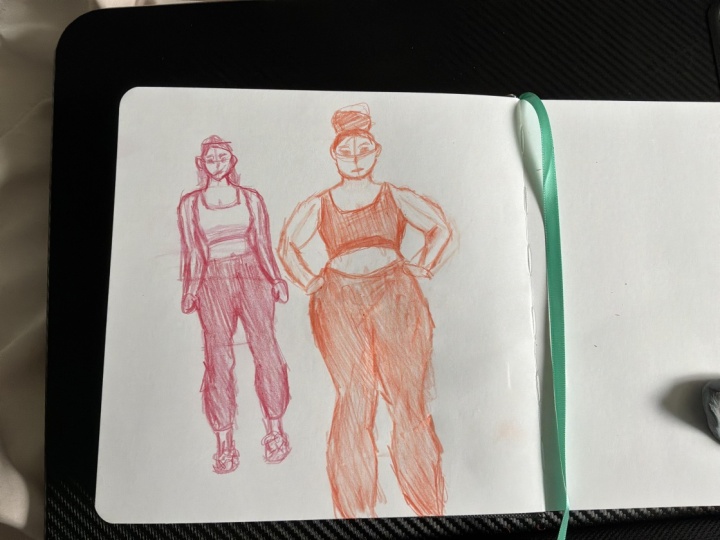
3. Hands On Hips : Students and welcome to
our second figure drawing. For our second day, we are
going to create a figure that is also standing in a pretty
simple pose because again, there's no
foreshortening going on, is just a straight ahead view, and the only complication is that the figure is
a little bit curvier, and also she has her
arms at her sides. I bely this is a
good step up for us. It's not too challenging,
but there are a couple of changes from
the previous drawings. I begin by creating
the top of the head, and I'm going to make
this figure about the same as our previous figure. I'm keeping the the same
size for all of them. The top of the head,
bottom of the feet. Okay. And then the next step, if you remember from
the previous lesson is that we split
our figure in half. Again, this requires
a little bit of intuition and we'll create
this line so lightly. And then we can imagine a line across the middle of
our reference photo as well. We can either draw
this on or you can just imagine it
either way is fine. Then what you're
going to do is you are going to try to work out how many heads you
could fit between the top of this line and
the middle of the body. If we include her had into
the head measurements, we will be able to
fit about three heads from the top to the middle line. If we don't include it,
then it would be about 3.5. To keep things
simple, let's just include it into
our measurements. There we have now
roughly equally split between the
top and the middle, we've split it into
three sections. So the next thing
that you know is, now we have the top
of the head and we also have the bottom of
the chin measured out. So now we can take
this measurement. And looking at this, we can It becomes a little bit clearer what the
width of the head should be. Really, just want to use
your intuition here again. I'm going to draw the
sides of her head, and I'm keeping the shape
relatively simple for now. Okay. The next thing I'm
doing is I will just create two lines just to show
the direction of her head. Now, you'll see that this really does give the viewer quite
a bit of information, even if we don't draw
a face in there, which I choose not
to draw a face into my figure subjects because
when they're at the scale, it's just really difficult
to create a head. It's just really
difficult to create like a realistic portrait. I just leave that part out. I'm quickly going to
give her some ears. Next, we'll draw her neck. Now, you're going
to be looking at the width of her neck compared
to the width of her face. So There's not that much space in between the width of her neck and the size
of her head as well. But there is some. It's
not exactly straight down. Then you can create a curve to show where
the end of the neck is. We've got this and
then we're able to adjust the neck
later on as well, if we feel like we've
made it too wide, too long, anything like that. Next thing you want to do
is to create the shoulders. Now, we are just going to be
creating the tall sofa now. We'll complete the
arms at the end. So let's pretend that we're just going to cut
off at her shoulders. We'll leave her
arms alone for now. So look at the angle of her shoulders and look at where her shoulders begin
relative to the neck. The shoulders begin
at the point where her neck starts to
create this curve. So We've got this curve. Then you have to also be
looking at details like, this curve where it
dips in because she has two curves above her shoulder.
Look at where it is. Imagine you almost drew
an imaginary line. If you create a line
going up like this, would this line cut
across the ear, would it be to the
left of the ear to the right of the ear,
things like that. You want to just be making
these abstract comparisons. If you do this, then you have a better reference point of
where everything should be, and we'll leave the
rest of this arm alone for now because
we'll complete it later. Then we're going to
do other shoulder. Now again, you're
looking at this, and you're imagining
a line going up. We her line where her
shoulder curves upwards, where she's got
that second curve, you are trying to
see where this is. Again, if you draw
a line going up, it's going to be roughly
to the right of her ear. Okay. Now, the next thing we'll do is we'll
just draw her vest. You're first going to try
to create a point for where the widest part of her
chest area will be okay. So I suppose I'm looking
at the sides of her chest. I'm trying to see if again, I create another line
going up from here. Is this line going to cut through the curve
of her shoulder? Is it going to be to the
left of that to the right? To me, it looks like it's quite significantly to the left. And you also want to copy down the angle of I guess
the side of her vest. And So that's going to be the side. And then we have the right side. And this area, it's kind of like I guess where the opening
of her armpit would be. So you also want to make sure that you
don't draw what is like way where the arms would be because when you complete the arms it would
look quite funny. Okay. So we have her vest pretty much done. Next, we can draw the neck, the neck line of her vest. Now you can use another
reference point to perhaps measure the
height of the stomach. If you look at the distance between the bottom of vest
and this line right here, then you can use
that to estimate in proportion how wide the stomach should be to this distance. Now we pretty much have the
top half of her body done. Except the arms, of course,
which we'll do in a second. Now we'll quickly calculate the placement of the
sides of her hip. That's the widest
point of her hip. It's going to be you're drawing like an imaginary
line and you're trying to compare
where it would be. It would be even way past
where her shoulders are. Next, I'm going to be comparing the right side of her hips. Again, if I do an imaginary
line going all the way up, I can see roughly how
much distance stair should be between the hip and where the shoulders are that we've already
measured previously. Now that we've got
that. Perhaps we can just estimate how
low the hips should be. Again. You can take a measurement that you've
already created before. For example, if you take
her head, let's do that. If we take her head, I'm using my pencil as over the herem. Trying to
compare something. I'm trying to mark
the tip of her head and of her chin,
including the hair. I'm just trying to see how many of these I would be able to fit in between this part
and the bottom of her hips. It would be about the same size, I would say, more or less. You can take this height from the top of her
head to the bottom of her chin and create
a light line here, and then all you do is, you just connect these points. The next thing we do is
we create the legs now and we'll create this using the same technique that we
used for the previous drawing. Again, we're imagining
an X ray going on. And you just have to estimate the height of her legs relative
to the rest of her body. I suppose it would
be a like this. And again, I'm
splitting up my legs at the knees because they kind of change
direction over there, so it can't be one
continuous line, okay? All right. And now what we do is we complete the
outlines of her legs. You also want to be looking
at things like, for example, the bottom of honeye
or it sticks out, it's going to be a little
bit lower than this side. Like where this
continues to go down. You want to be keeping all
of these things in mind. Okay. Now that we've
arrived at the feet, we are going to draw them in. Now you can see that
I have actually exceeded my line where I estimated that the bottom
of he feet would be. That's okay. We have
a little room left. Now we're going to
complete the arms. We can start by taking
the measurement of seeing where her
elbows should be. Let's take this little
corner of her hand, this one that should
be right here. Maybe why don't we look
at the negative space? When I say the negative space, I mean the background. We can look at the
background here and it looks like a square. Not perfect square, but if
you simplify the shape, you can see roughly what the outline of the hand
should be to create that s. So The first one we want to do is we want to measure the height of her elbow. That is going to be
below this little curve. It's going to be about here. Now we've got this, and that gives us all the
information we need. Now, all we have to do
is create one line right down the middle of her arm,
and then the other one. It goes up to her hips. And then we'll do
the same with this. Again, the height of her elbows
are pretty much similar. This one is maybe going
to be a bit higher, her elbows are going
to be about here. Again, you can look at
the negative space. This is where the inside of the outline of a hand
will be and then we'll create a line and
then going back down. I'm also going to create
this curve that she has on the sides of her chest. Okay. And now all that's left is the outlines around her arms. Okay? And then again, we can draw I guess, these mitten shapes
for the hands because we are not going to be heading this
complicated detail. So it looks something like this. And then we'll use and then we'll get started
on the second arm. Again, there's a more
significant curve Hm. You are looking at where all of these outlines are
coming out from. So now that I'm drawing
around the armpit area, I'm trying to see where
this line connects in. It goes right into
the corner of this. Again, the Mittens. All right. So now we are done.
I just got to add this little line here. Okay. Now that we're finished, we
can go ahead and reinforce all the lines that
we want to keep. Okay, so this is it
for our drawing. I hope that you enjoyed and
that you created a fi of. I will see you in
the next lesson.
4. 3/4 View: Welcome to lesson free. In this lesson, we
are moving on to a slightly more
complicated pose. Again, I think this is just
a small step up for us because it's a
pretty simple pose with the exception
that is just rotated. We're looking at it
from a three quarter. The steps for this
are the same as they would be with our
previous drawings. We begin by creating the top of the head and
the bottom of the feet. So again, this isn't
something that we have to meet. This
is just a guide. The way I explained this before
is that if we are drawing something and we just
start with the head and we create a
super detailed head, and then we go ahead and
create the rest of the body, then by the time you
get to the feet, you might find that
you just don't have enough space on your page. So this is why I always
just section of my drawing. And then not only does
it make it safer for us in case we exceed our space because we still have a
chunk of the pad left, but it also gives you an idea, if this figure is
going to be this to, then it gives you an idea
of how wide it has to be. Again, we'll draw a
line down the middle. Now, this is just splitting
our drawing into two. We'll start by working
on the top half and then we'll move on
to the bottom half. Again, if we take
his head and we see how many heads we would
be able to fit from the top down to
this middle line, then in this case, we would
get about 33.5 heads. I would say more 3.5. We'll do exactly that.
We'll create little marks. Separating this drawing
into 3.5. Maybe even lower. Now we have found the height of the head because we'll
go from here to here. That being said, we can
now pencil his head in. We'll do the very basic
shapes of his head. I'm drawing first the draw line and then it goes up slightly. Then over here, I'm going to
draw the side of his head. I'm trying to
symplify the angle of his head. I look
something like this. And then his head curves, but it also it curves downwards, so it looks like this, and then his head cards towards
behind the draw line. Okay. This is roughly his head. I am going to draw his air. And I'll draw his hair as well. Now that you've got the
basic shapes of the head, you can go ahead and fill out any detailed curves I guess. We've got his head complete. Now I'm going to draw his neck. Now neck, if you look at
where it's coming out of, you can see that it's towards the side of the head there and look at the angle
of that as well. On the other side, we
know where the neck is because we can
see the back of it. Then we also forgot to do
the middle of his face. We can see which
direction he's facing in. Now you can see that when
it's at a quarter of year, those direction lines
really do give us a lot of information about
where the head is facing. Now that we have the neck, we can draw in the opening of his t shirt of his
shirt not his shirt. You can maybe look at
where this is, again, if we draw a line going
upwards, where this would be. T. Now we've got his collar. We can even draw in this detail
here, this neck detail. Then we can draw the
bottom of his torso. Again, we'll leave the arms,
we'll do them at the end, and for now we'll
just do his shut. We can see roughly
how far is away from the middle of our draw. I'm just going to
draw a curve here to act as a I guess
for when we get there. And later on when we
complete the details here, we'll also fix this and make sure how it's supposed to be. Let's see how wide the side
of his shelf would be. It's definitely going to be if we draw a line
straight from the bottom, it's going to be to
the left of his face. Just make sure you have
that so it's in proportion. It's also going to be a little bit to the
left of the color. It's going to be
something like this. And then on the right
side, it's going to be way further even in
the back of his head. It's going to be
something like this. Now we can draw The details. We'll add
the buttons, I guess. Okay. Now let's
draw his shoulders. Maybe let's start with this one. This one looks a little easier. We can see relative to
the bottom of the shirt. The shoulder goes only a little bit more to
the left of that. Again, I'm going to use
this as a reference point. If I draw straight up, I'm trying to see where
this line would fall. So we should look
something like this. Okay. Now it's time
for the bottom half, so how about we start
off with that belt? That's going to be quite
easy to place down. So his shirt actually is a little bit
wider than the belt. And then the buckle is in
line with the buttons. Okay. Now we'll do the
same technique that we used previously for
all of the legs before. So we draw one line, and then another one, this is
going to be the lower leg. And then this leg, the angle
here is quite different. Something like this. Now we'll complete the details
around his legs. Okay. And the two x.
One you're in the end. Do your space like
a got too much. Okay. Now, let's
complete his ts. They go up over on the side of this right
leg is overlapping the left leg. Okay. We can even draw
some of the creases in his clothing as
well if we want to. Something simple. Now let's complete his
arms, and that will be it. His arms are actually
mostly out of view. The middle of his hand
would go about like this and the like this
for the right arm. Again, all we do is
complete the outlines. And look at how far
down his arms go. So they would go about here. You have to make sure that you do all of this proportionally. So his arms go like this. And then we we'll
simplify the shape. We won't draw the
finger details. We'll just keep it a
simple shape like this. All right, this again, we'll complete
just the outlines. Okay. And I think this
is pretty much it. Let's just make sure we go
over all the outlines that were happy with, reinforce them. If we'd like to, we can
even give him a pair of glasses. All right. So I guess it's all
for this lesson. I will see you in
the next one. Bye.
5. Jumping Pose: Students, welcome to
lesson number four. So it's a new day, new Pos. In the seson, we're going to
be creating a boy jumping. Now, I have selected this
one as Pose number four in our rank of difficulty because although
he's front facing, so that's similar
to the other ones we've done in the
previous lessons, we are introduced here
to some foreshortening. Foreshortening is when
something appears shorter because it's either going to the back
or to the front. So it's away from
us or towards us, it's going to appear
a little shorter. Now if I show you my pencil. I'm holding it I'm holding it sideways so you can
see how long it is. But then if I start to
turn it towards you, it appears much shorter, right? Now, the distance is about this much compared to when I
do this, it's much longer. So it's a little bit
challenging to communicate this in a two D way on paper. So that's going to be something
fun for us to practice. So yes, let's get started. So again, just like
with the other posers, I am going to create a mark for the top of his head and
the bottom of his feet. Now, in this case, his hands
are actually above his head, but I feel like I'm more used to creating this mark for the top of the head,
so that's what I'll do. But instead, I'm
actually going to leave a bit more room
between the top of the page and the
top of the head. So I suppose I'll
do this about here. The bottom of his feet
will be about here. Now, again, if we draw
a line right through the middle and we section
our pose into two areas, then that middle line will cut roughly at the top of his
trousers on his waist. Now, normally, this would
have been at the hips, but because he's jumping and his legs are off to the side, his pose appears a
little bit shorter, so actually his waist
falls at the middle. Okay. So now we've got that. Now let's measure the
distance between the top of the head and the
middle of our pose. So I would say that this
is pretty much halfway, so the top of his head
is halfway to him now. This is also a child, so
the proportions are a little bit different than
what we've been practicing. But yes, he's about two heads would fit here from the top
line to the middle line. Next, now that we've established
the height of his head, we can also guess the
width of his head. Now, if you simplified
this into a shape, you could almost see it
as a pretty even square. Look about as wide
as it is tall. Now he's also
looking to the side, so this is why it
appears that way. So we can do just that, and you can start off even
just by creating a square. You've got that width first, and then you can just
go ahead and fill out the details so
Over here in side, his head is slightly slanted
and then it goes up. Here, and then it
goes back down, and then his head is at
a slight angle as well. Then it goes up. We've got that long curve from his chin
to the back of his neck. Something like this. Then
his hair will be about here And then we'll also draw an ear. Okay. And we can also create
the direction of his head. It looks something
like this. Now we've got the head and next
we'll fill in the torso. Again, we'll forget about
the arms until the very end. And in this picture, we actually could not see
much of his neck at all, so we're going to go
straight into the shoulders. His shoulders, if you look at where the top
of his shoulder is, it's actually going
to be above the chin. So it's going to be here, would you agree with
that? It's like this. Then his right shoulder is also significantly
above his neck. And then as we know, the bottom of his shirt is going to
be exactly on this line. So we can just see that this line over here it goes about to the
edge of his hair. And then the bottom of
his shirt is going to be roughly along the same line. Then also the same
for this side. Actually, this makes it
quite easy for us to draw. I would say the bottom
of his shirt is in line with this part here, and now we'll just complete the angles and we'll make
this simple for now. Then in a second, we'll add the details. We can draw in the buttons. If you look at the
width of this line where the opening of the s chart is is more
towards the right. It's not exactly in the middle. It's more towards the right. We'll try to do just that. I following that line,
we've got a curve and then another curve and then another one going
towards the neck. Then we'll do his straps
from his dungarees. It looks like they're both exactly halfway
between this and this. This one is exactly
halfway between that and the right one is also
the same halfway between this line and this line. So, the point here is that you're just always
supposed to make these random comparisons and you can much choose anything, whatever feels intuitive
to compare to. Um For example, you could have
compared something random like the width of the
strap to the width of his ear or the height of his shirt compared to
the width of his shirt. You want to just be
making constantly very very random comparisons
of pretty much anything. Because the moment you
draw your first line, then you have to assume that that line is going
to be correct. Then if you compare
everything to it, then it is actually going
to turn out proportional. That's my technique. Draw
his little metal piece. I'm actually going
to do a metal piece on this one as well
for some reason. Doesn't have it on
the photo. I actually generated these photos using AI, so there's going to be some inconsistencies,
so far it's been good. Next up, we will draw his legs. So first of all, we'll draw the width of his
of his trousers, I mean, not. And we're going to see roughly how far down the bottom of the
trousers would be. If you take the width of his trousers up to the crutch and then
the height as well, then again, these would
be roughly proportional. It's about as wide
as it is tall. Again, you intitively have to measure like a square shape. We can see that it
would go like this. And then we'll go ahead and
we'll draw his legs in. Now, so you have to imagine
that you can see the joints. We have this angle.
Then the knee, let's say it's about here,
and then he's jumping, so the angle here
is quite different. We've got this one. The joints, I would say are
above the crotch. Just remember to place
these lines correctly. Now, the angle here doesn't
switch up that much, but it's going to
be much the length of this line because
as we said earlier, this leg is for shortened, so I'll show you how to
do this in a second. Now all we do is we
create the outlines. It would be good
to create some of the folds in his clothing. Hey, I'm going to dy here. I'm just going to outline a little hard of the
lines that I I am happy with the
ones I want to keep. Okay. And now we'll
do the second leg. And now the way to make this
look short end is you just literally have to have a lesser distance
between everything. Now we can add as many details as we like to the clothing. I think I'm just going
to do this waist line. All right. So now we're ready
to move on to the arms. So let's start with
this left one. Now, of course, we want to copy the
angle from the drawing. But then it in the angle. The next thing that
we want to compare is where is the elbow
relative to the head? The elbow to me, looks like it would for the
ear, middle of the ear. His elbow should be he, and then let's draw a line all
the way up to his wrist. His wrist is about in line
with the height of his head. So something like that. Then his other hand, his elbow is probably a little lower
than the previous arm. Then also his wrist is more or less in line with
the top of his head. So that we have it.
This is, I guess, more or less a stick
figure version of what we want the arms to be. And then all we do is
outline around them. So again, let's try to be mindful of some of the creases
of the clothing. Goes like this. And then I'm just copying the
outline of that shirt. You can also look at how high the shut is
going up on H on. I would say that they are
about at an even height. Again, just another
comparison to make. Now all we have to
do is the hand. Again remember that's going up to roughly in line off
the top of the head. Then instead of drawing
a very complicated hand, we're just going
to do the outline. Almost as though he's
wearing miittens. Could go ahead and create a little bit of an
outline just to show the fingers. And
then the right hand. And As I'm drawing this, I'm simplifying the shape, I can see an angle going this way, then it goes up,
then straight down, then down the given, and
then back to the wrist. Then you can go ahead and
reinforce or any outlines. All right, so this would
be it for the second pose. I hope this was okay.
In the next lesson. We are going to do
pose number five, so I will see that. Bye.
6. Fore-shortening & 3/4 View : Students, it's a new day and a new sketching
challenge awaits. In this lesson, we are
going to be creating a man and he is going to
be at a free quarter view. We're looking at him
slightly from the side. His arms are to the side.
There's a little bit of foreshortening going
on with his right arm. I feel like this
is a good step up from the previous drawings,
so let's get started. As with our remaining poses, we are going to begin by
creating the top of the head. And the bottom of the feet. Again, you can make this as
small or as big as you like. I like to keep my
figures relatively small because it's easier to
estimate the stances this way. That's why I choose this side. Again, now that you
have the height, it's going to be
easier for us to estimate the width of
our figure as well. The next thing we
do is we're going to divide our
drawing in half now. I remind you that
this is so that we can section of our drawing into just doing the top
first and then the bottom. And it also just helps us see
where the proportions fall. Typically when you have a figure and you're looking at
it from the front, if you're leveled
with the figure, then on the middle line, usually you're going
to get the hips, and in this case,
it is accurate. So the next thing that you're going to do is
you're going to measure how many heads are you
able to fit between the top line and
this middle line. In this case, you're going
to get a slight bit over f, so you want to divide
You're drawing accordingly. Here, now I have split from this line to
this middle line, I've split into three sections. Now I know that my head
is going to go over here. Now, I can see the height of the head from the lowest point to
the highest point. This is from the bottom of his chin to the top of his head. This also helps me to
estimate the width. I know that it's going to be significantly less wider than. Now I can go ahead and I'm going to Try to simplify the
shape of the head. First, I'm looking at
this line at the chin. You can pick any point of the
head and just start there. I'm starting at the chin,
and then I see a line. It's like a right angle
over here almost. And then I see a longer line going towards the
back of the head, and then I see this line,
and then back down. For the face, you can even
simplify that shape and you can just draw a longer
curve like this. And then just do a simple
outline of the hair as well. And then his ear. We're trying to see where
his ear is on his head. And then you can
go ahead and add any further detail if you like, now that you've got your
basic outlines complete. You can go ahead and
draw the direction in which his head is facing. The next you can go ahead
and create the neck. I'm looking at where the
neck is coming out of, and I can see that it's coming out from where this
angle changes. I'm just trying to
follow this angle, and I'm trying to
see where the bottom of his neck would be. That would actually be a little bit higher than the
bottom of his chin even. It's not that long of a line. Something like this,
and then the back, you can see his
back is about here, and then this part
of his neck as well. You can see it starts
around this area. Now let's complete
his shoulders. I am looking at
I'm trying to pick some reference point
that's going to help me measure the
width of his shoulders. For example, I can look at
how many heads would I be able to fit between the end of his left shoulder and the
end of his right shoulder. If I'm maybe looking at
the width of the heads, it would be about two heads. Or you can also just draw
like an imaginary line at the end of the shoulder and go upwards and see roughly
where you would end up. Then you can use this as an estimate for where the
shoulder would end. To me, it looks like this
part of the shoulder, the highest, the arch of
his shoulder right here would be more or less in line
with the end of his hair. And then this right shoulder. This right shoulder
would be about here. Then you can even go
ahead and draw some of his muscles if you like to. You just want to
see how far do they go beyond those lines
you've already created. This muscle goes beyond the
curve of his neck right here, and then he's got another
muscle here, right? Okay, now, we'll leave
his arms alone for now, and we'll do the
rest of his torso. So we can now go back
to this middle line, and we know that this middle
line falls at his hips. So um The trousers are going to start a little
bit above this line. They'll be around here. First of all, you
want to see, where is the edge of his
trousers on this side? If we draw a line upwards, this point over here would be roughly in line with his chin. So something like
this. You can also see that it's to the left of
this point of his shoulders. This is roughly where the left side of the
shorts would be. In the right side, it's
roughly in the straight line, of a curve to it but it's more or less in
the straight line. This right side, I would
say is about in line with this curve of his shoulder. Now you can go ahead
and complete this line, and there you have the
bottom of his torso. Now, all you want to do is
you just want to connect all of these points and
you're bearing in mind the angle of his torso. Then perhaps we can finish
off some of his muscles. Just the three obvious
lines at least. I'm trying to see where the
bottom of this muscle is. It's about where his to
also changes direction. Okay. All right. And now
if we continue to his lower half of his body. First, let's try to guess where this point is where we can see this edge right here
in between his shorts. I would say that this opening of his shorts is about the same as the distance between
here and here. We can take this measurement and we can go all the
way down here and we know that this is
roughly this opening is. Now, We can see, where
is this in line with? If we create a line
going all the way up in between the opening of his
shorts and all the way up, we're going to see that it
crosses right in between his chin and this curve of
his neck of his jaw line, I mean, it will go all
the way straight down, so this is roughly
the point where you want the bottom of
his shorts to be. Now all we have to do
is connect that line. We can even in fact see a faint line over here so we
can use this to guide us. Now I'm trying to see where is the other point of his trousers. If I'm going to draw a
line going up from here, you can see that it's
going to be and you can hover your pencil over this
part of the reference photo, just to see you don't have
to draw any elaborate lines. You can just hold
your pencil and see what would fall
along this line. So you can see that if
you go straight up, you would get the opening
of his armpit right here at the same
line as his short. So this would be
about here like this. And then you can
fill in the opening of the bottom of his shorts and his leg will come
out somewhere over here, so I won't complete
this line just yet. And then he's got
a slight angle. You can go ahead and add any details to his
shorts, if you like to. You can draw the folds, some of the folds along the
side of the trousers. So. Then we'll see we'll try to create the left short and there's a little
bit of a gap here. I'll go down and then here, and this looks like
a similar shape to this white opening. This is us looking at the
negative space again, so I'm looking at the background that I can see
between the shorts, and I'm trying to replicate
the shape of that. This looks about
right. This part, it actually appears to be lower than this right
side of his shorts. Then the width is about the same so you can
complete that line. Then you just want
to connect it. You can go ahead and
add any of the curves, the folds on the
fabric of the shorts. Next, we'll draw his legs. There's not much left
for us to do here because his legs are
covered by his short. On the left side here,
we just have to do. Remember, this is the same technique
that we've been using. We'll try to have X ray vision here and just draw a line
for the middle of his leg. I guess I estimated
I would end here, but I can actually go a little bit lower and I feel
like we have to. T Then then his right leg is going to be his right leg seems like it's a similar angle
to the left one actually, but it almost curves downwards. Now all that we have to do. You also have to remember
actually this right leg is going to appear longer because it's
closer to the camera, they're not going to
be on the same height. This one in the back is
going to be high and this makes it appear like
it's a little bit more drawn. We'll do this first one. Now all that's left is we have to draw the outlines around the legs. Something like this, and
then the back of his knee. And then he's got a big muscle
in the back of his leg. And then we'll draw
the feet in a second. Now I'll just do this right
leg, so we've got his knee. And then it curves inwards. Then he's got this muscle. That looks like this
high light like splits into two, and then it goes down. Then we've got this right side. Then there's a muscle that's
very symmetrical almost to this one. You can
see this curve. Okay. Remember, his legs on
the right side are going to be a little bit
longer than the left side. So first, let's do the
left side. We can see. We'll just simplify
the shape of his foot. No. Pressure to do
anything crazy here. It looks like his legs
are accurately measured. The last thing we've
got left are his arms. Again, same method. You're going to x ray, like this arm over
here goes down, I follows like this angle. Then we have a little bit of
full shortening going on, the length of this bone
in here will appear shorter. Then his right arm. Notice this one looks like it's a little bit highth in the left. Again, this part of his
arm is f shortened, and then it goes back
up towards the head. Something like that. All right so I'll do the left arm first. We've got a short muscle here. And then this hand
goes back towards his head. Like this. Now that we've got the outlines. We can go over the whole figure and reinforce the outlines
that we want to keep. Anything that you feel like you are guessing the lines of, you can just leave them light, we can erase them if you like. But I just prefer to reinforce by making the lines
that I like a. So I guess this would be
it for figure number five. I hope you enjoyed it, and
then it turned out okay. I will see you in the
next lesson where we complete Ava. Bye.
7. Ballerina Pose: Jenson, welcome to
lesson number six. In this lesson, we are going
to be drawing the ballerina. Now, before we start, I just wanted to say
that I did not draw all of these poses
within seven days. I've actually been
filming this class over the course
of about a month, and it's actually been a
particularly busy math because I got married
two weeks ago, and I went on my honeymoon. So I actually wasn't able to film it over seven
consecutive days. So this is, like,
every single lesson. You see my nails are
a different color. So now that we got that out of the way, let's start
the ballerina. So we start this prose just
like all the other pross. We begin by creating
a line at the top. And at the bottom of our figure, and we leave a few inches
away from the top and the bottom of the page just as room for error essentially. Now, the next thing
that we do is we try to envision a line going
right down the middle. So these steps are
always the same. We're basically
trying to dissect the drawing into more
manageable proportions. And also, when you're looking
at shorter distances, it's easier to estimate more accurately how far everything
is supposed to be. If you're looking at,
like, a very long line, it's actually harder
to tell where the middle point is than when you're looking
at a shoreline. So this is why we do
this just so that it's more accurate
and more manageable. And then once we have
this middle point done, we just choose either above this line where to begin
or below this line. And I choose above this line. And you know, I always
choose the estimate of how many heads I can
fit to create my poles. Now, for this ballerina, her ads are actually
above her head, which means that it'll be a
little bit different because her head won't begin
right where this line is. So if we actually imagine
a line down the middle. This is going to be somewhere
roughly where her hips are. And then in between the top
of her hands and her hips, I would say that her head begins maybe at like
a quarter of the distance, so I'll split this in half, and then I'll split
this into another half. Her head is about here. Now, what I'm going to do is So we know now that the top of her head begins
somewhere about here, and let's try to see now how many heads we
would be able to fit from this line
to this middle line. So I'm doing this just
estimating it without a ruler, and I'm thinking
that there would be actually about four heads
between this line here, the top of the head and
the middle of the line. And that is because
her head is distorted. She isn't looking
straight at the camera. She's actually looking up, so her head is going to
appear shortened. Now we can again
create Another line. I'm going to between
here and here, I'm going to split the half
and into another half. And now I know that
roughly the bottom of her head is going to be here. Now that I have this, I'm going to draw in the shape
of her face roughly. I'm not going to
be bothering with any complicated
features right now. I'm just trying to simplify
the shape of her head. Her face is actually over here, and then this angle goes down. This is of course
going to be altered, but this is roughly
her face, do you see, and her eyes will be
somewhere about here, and then the middle of
the face is right at the edge of the line. Maybe I'll give her
a little bit of a hairline just so that it's a bit more obvious what this shape is supposed
to represent. Here we'll have an ear for her, and that's it. Then
we'll just draw a neck. Maybe the bottom of her face, and maybe a draw
line just so that it's a bit more obvious what
this shape is, you know? Okay, that's her head done. And now we'll complete her neck. A right. That's it for the head. Next up, we are going to
start working on the tos. So Her torso is practically going to take
up almost the entire space. So her hips are
exactly in the middle, so we're going to
have to practically go all the way
down to this line. Now I'm going to imagine lines. Again, I'm going to look
at the furest point of this side of her torso and that appears
to be her breast about here. If again, we imagine
a line going upwards, how far is this line going
to be away from her face? Her chin is the furthest
point here and if we draw an imaginary line going
up, it would be a. You can see you can visualize
how much distance there is. So pt. Breast would have to be
somewhere about here like this, and then excluding her arms. This is going to be
the widest point right underneath her
armpit is going to be the widest point
on the right side, and that actually
doesn't go beyond her head because she's
leaning her head backwards, and she's at a
free quarter view. This is actually going
to cut through the ear. The furest point of the right
side will be about here. Now that we have
these guidelines within which we need
to create a torso, it helps us to
visualize what it's supposed to look like because
we have the width ready. Now we just have to
imagine the height, and it helps us just to have
those points already done. So now I'm going to see how far down maybe how far down her
breast is supposed to be. So from the top of her skirt to the lowest
point of her neck, it looks like it would be a
little bit more than halfway, like maybe somewhere like here. Like this. And then you can see her rib
sticks out a little bit. This is what we're
working with for now. Remember, you can't pull this
line all the way down to the halfway point because we're still going to have to
fit her skirt in here. Then round pits are going to be roughly at the same height. Now I'm going to try to look for the most narrow point of
her waist. Right here. If I choose the most thin point of her waist and I draw
a line going upwards, it's even going to be to
the left of the hair line. Do you see that? So she's
really thin at the wait, we to have to exaggerate
this c dramatically. So it looks a bit like that. Okay. And then her skirt is going to be something like this. And we can adjust in a second, but more or less, I'm just trying to pencil
in the shape here. Okay? All right. Now, I'm just going to maybe in some of her so that we can
put some perspective into. Okay. Maybe I'll draw the muscle as well. Okay. Okay, so we'll leave
the arms to the end, and now we'll the legs. So let's leave the skirt for now as well because I feel like the scut will be easier to place once we already have the legs. So we'll just we'll try
to ignore it for now. So Let's draw. We don't actually need
to draw her hips for now because they're going to
be covered by the skirt. I now we'll just draw
the x ray of her legs, essentially, we'll try to
draw a line right through the middle of first her
thighs and then her calves. But we'll also try to quickly establish where the
middle point would be because our
proportions are a bit more tricky because she's obviously in the ballerina pose, so she appears at taller
because her foot is upright. That will be quite important to establish I think
her knee is going to be slightly above maybe exactly on the halfway
point, somewhere about here. If we draw a line upwards, from her knee, it looks like it would meet roughly her chin. Knee, the middle of her
knee should be about here. Then it would go
down to her ankle. And they will draw
the feet in a second. Then the knee of her right
leg is crossing over, but this knee actually
appears a little bit higher because this leg is
going towards the side. So it's going to appear
a little bit like this. And then this leg is going back, so it also appears. So. Now that we have this funky
shape, funky X shape, we can go ahead and complete
the outlines of her legs. First of all, her thigh on the
side, it's hardly visible. There's really just one line. We've got there and then
we go down to her knee. It's going to be one leg. And then her leg. As we said, is crossing va. So it looks a little
bit funky right now, but you'll come together. Okay. And now, we'll draw he feet. Okay. Make these lines all a bit stronger once we finish
the entire perse. When you keep your lines light, then you can always
make alterations. I always try to do that until I'm finished
with the drawing, and then I can emphasize all the lines that I want to keep. The next thing now,
the satisfying part actually for me is
drawing the sku. This can be as wide
as you want it to be. The skirt doesn't necessarily have one kind of proportions, it can be more narrow,
it can be less narrow, so you don't need to be too
strict on yourself here. Okay. So next up, we'll do the arms. Again, we're going to
use the x ray method. First, I'm just trying to establish how high
up her elbows are. If I start with the left elbow, it's going to be slightly below the top of her
head, about here. The height would be
about here. I'm also going to try to see how he goes. And if I just a line
maybe from the leg, I'll be kind like
down from her leg, somewhere about here, down
from the cuff of her left leg. Okay. So her elbow will be
here for the left hand. So I'll just draw
a line like this. And then from this, I can see
the angle of her forearm, and it's going to be
about the same lengph, or exactly the same lenph. It's easy to estimate. And
that will do her right. Now, this one seems to be a little bit closer to her head. That's just because
of the angle. Her arms are actually
at an even height, but it looks like it's closer to her head
because of the angle. So il bow is going
to be about here. S one line, and then this
second line seems to go ale bit out like this. Now we'll draw the
outlines around the bones. I like to call these
lines the bones. Man, I do not like
drawing fingertips. I just draw Mittens. Okay. That seems to be it. Now, I'm going to go ahead and emphasize all the lines
that I want to keep. All right. So this is if
for Sketch number six. I hope you enjoyed, and I
hope it turned out okay. I know now we're moving on
to more challenging things, but I hope that
the piece is good. And I hope that the
previous drawings are lining up nicely that we're building
up on our knowledge. And every time we're trying on something a little
bit more challenging. So I hope that's
working for you. And I will see you in the next lesson where
we complete our final and difficult.
I will see you that
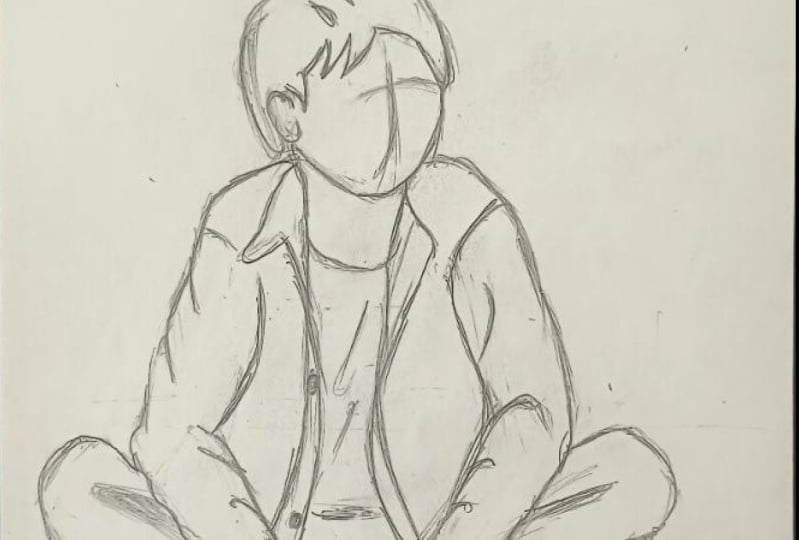
8. Sitting Pose : Students and welcome
to the last lesson. In this class, we
are going to be creating what's, in my opinion, the most difficult pose because the proportions for
our most distorted. Let's get started. Again, since this boy is sitting down and he's the length is
cropped in half, let's just make a slightly
bigger sketch of him. We'll start at the
top of the head. Again, you don't have to
base this on anything. You just decide how tall
you want the figure to be. I'll make him about
this tool, let's say. He's definitely going to be
quite zoomed in compared to the other figures,
but that's okay. This is going to be the
height of our pose. Just knowing the height
for me, at least, it helps me to visualize how wide he's going
to be as well. This just already starts to
help you build up that image of what you're supposed
to be creating and where everything is
supposed to be going. That's the height of our pose. Now, the next
thing, as you know, I'm going to start by
splitting our in half. So this is just breaking down everything that was
supposed to be drawing into two so that it's
more manageable, and we also have lesser
distances to estimate. Now, if we have a
line going halfway down between the top and the bottom, because
he zoomed in. Now our rules for the head
being there being like, 3.5 heads between this
line and this slide, they don't apply
anymore because the head is going to be much closer. So I would say that
the head takes up about three quarters of the length between this
line and this line. So it would be maybe a little bit less
than three quarters, maybe like two fads. Yeah, let's go with two ads. Three quarters as a
bit of a stretch. The chin would be about here. Now, we'll just start to block
out the shape of the head. Now that we have
the height, we can estimate the width roughly. Now, in this case, he's
looking to the side, his head isn't going to
appear like an oval anymore. I actually see a bit
more of a square, more of a tilted
square, I suppose. We can follow that shape. I'm just going to be breaking down all of the lines into
more manageable ones. And then I'll draw in his chin. And then his air is going
to be somewhere about here. And then the middle of his face, just so that we can add some more information
to the drawing so that the viewer has more I guess can see more about
which way the face is looking. I actually messed up this line a bit, it should be
something like this. Okay. Okay, now that we have the head shape, roughly, we are next
going to create his neck. His neck is going to be coming
out from behind his ear. Do you see that? Because
he's looking to the side. We can see the back of his neck. Then here as well. Then we're just going
to draw all the way down to the shirt. And then his shoulders will be his headaches kind of
relaxed on his shoulders. So his shoulders are actually
going to be quite high up. Okay? All right. So now we have all
of this information. Now, we can see the width of his
shoulders that's going to be quite
easy to estimate. But the length of his arms is going to be a little bit harder, so we'll leave that for now. Okay. Now, we established that the halfway point is
roughly around his chest, so his t shirt is going to
be slightly above that line. And then I we then
try to place in Let's just basically try
to find other points that we can see where
things are supposed to be. For example, if we look at
the height of his knees. If we separate the figure,
again, into fractions. Between the middle line
and this bottom line here, I would say that the knees
fall at about one quarter. If we split this into half, and then here into another half, his knees will be somewhere around here quite
high up actually. It's starting to look
a little bit funny. All these different proportions
that we have to find. That's going to be his knees. Now that we have
his knees so we can visualize maybe like
the inside of his shot, how low that's supposed to go. If we just draw this line. Then we can see that this line is supposed to go roughly to about here because it's
going to be below his knees. Now the second part
of his shot is going to go something like this. I should have made this
one come in a bit more. Now that we've established
where his knees are we can try to establish
where his arms are. So he's resting his
elbows on his legs. They are actually going to be
a bit lower than the knees. I would say if we do the
little X ray method, they would look
something like this. Then the side, like that. And Now we'll try to complete the details
around his arms. The reason why I'm
doing his arms first is just because I
feel like it's easier to do them before the legs
since they are infront. You can just follow the
rules as guidelines. I know typically that I
draw the arms at the end, that I feel like in this
case because his arms are just at the
front of his legs. It's just easier to create them first and then
based on them, it's going to be easier to
create the legs after that. We're changing the rules a little bit here,
but that's okay. All right, so he is his. Okay. So now we've got his
upper body mostly done. Now we're just going to
move on to the legs. So now that we've done the arms, it's a bit easier to see where the legs are supposed to go. So we've got the leg coming out from underneath
the elbow here. And if we simplify the shape, and now it's going to
look something like this. Right? It looks
almost like a t shape upside down here if
you look at it like that. Then we've
got another one. Again, a similar shape, this ti drop shape I mentioned. All right. That looks good. I'm going to just create
his hands quickly. Again, I am not going to draw the fingertips
because no thank you. I'm just going to simplify
the shape here a bit. I actually just
realized that I made this arm too high up, so I'm just going to extend his sleeve because we actually
cannot see this over here. We can't see the hand. So I'm just going to alter
this slightly. I'm actually just going
to adjust the shape of his hand because I
made his arm too low, that's fine, I'll
just make his hand over here since we
can't see anyway, so it's not going to mess
up anything over them. Next step, we'll just create
a placement for the shoes. The shoes again will go
quite far out actually. They look at how big they
are compared to the leg. They're actually large, so definitely don't under
estimate the size of them. We're going to go and just
a rough shape of the shoe. Then you have it. That's
mostly the post done, but we have a ton
of detail to add, so we're not quite finished yet. First, let's start with his. Let's go ahead and just
add a bit more detail so that he looks a
bit more freely. Since he's a bit close
we can definitely add. So I guess the shape
of the materials, curves in the So the last thing we're going to do is just fix up the outlines
around his hands, and that will be the final step. So I hope you enjoyed
during this pose with me. I actually really enjoyed doing this one because it was very
different than the rest. The proportions were
kind of different, so we couldn't really rely
on our usual estimates, but I like the challenge,
and I hope you liked it too. And I will see you
in the final video, which is the conclusion and the final project instructions. So I will see you in a second. A
9. Conclusion : Congratulations on getting
for the challenge. Figure drawing is no small feat, so you should really
really be psful yourself. I really hope that this
technique works for you. It's something that
I've kind of figured out over the years as a hack of getting around
using human anatomy. So I do hope that you
also find it useful. And on top of it being useful, I also hope that
it was fun for you participating in a
challenge like this. You did enjoy it, I would
really appreciate if you left a positive review
because that would help me get my class out there
and find more students. I would love to see
your figure sketches, so please upload your
work as a project, and I will be so happy to see your art and
give you feedback. If you are interested
in more classes, I have a portrait of class where we go through each
facial feature, and I show you how
to create them realistically step by step. Start with the outlines, and then we move on to creating the base layer and finish
off of the details. If portraiture is
not your cup of tea, I may also recommend a class where we learn the very
basics of drawing. We go over light and shadow, shading, one, two, and
three point perspective. This class is great if
you are just starting out with pencil drawing.
That is all from me. I am waiting very
impatiently to see your art. Thank you so much for following the class and enjoy creating.
 Wiktoria, Professional portrait artist