Transcripts
1. Introduction: The chips, something that
has always interested. I find myself looking
up at the sky every day and just taking
in the wonders of it. Clouds take on many
forms and shapes. And they never look the same. Some are fluffy and white, but others are dark. Install. The sky can be a
deep blue or a bright orange. Depending on the
time of the big scar is always changing and
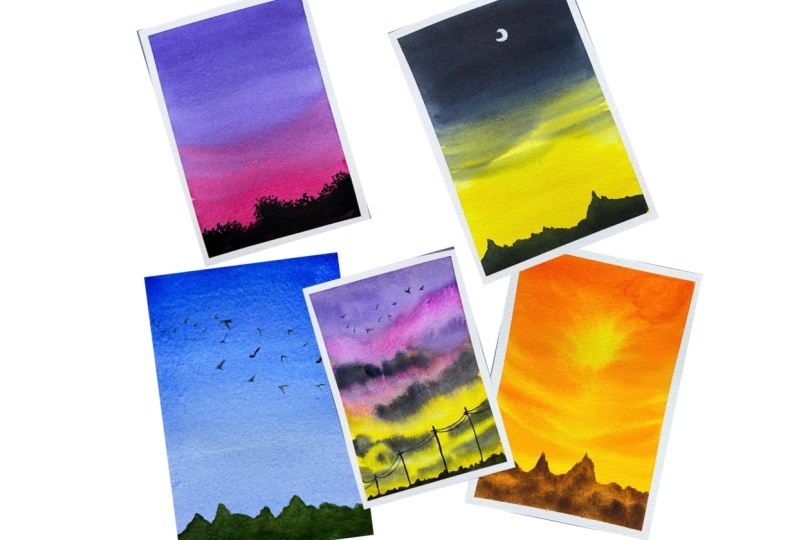
it is always beautiful. This is what I have tried
to capture in this class. Hi everyone. I'm a business consultant, watercolor artist, and
Skillshare teacher. I had always been fascinated with painting
skies and clouds, but found it very intimidating during my
initial watercolor D is, or what time with practice
and step-by-step, I am now comfortable
in painting them. Hence, this class. I have structured this class
such a way that anyone can learn the tricks and techniques to paint
skies and clouds. We will start with a simple sky and keep on adding
more elements to it. All of the projects are made
using wet-on-wet technique. And hence, by the end of it, you will be able to
master the process. So let's get all the
materials covered in the next section and hop onto a five-day
journey of learning, painting skies and
clouds in watercolors.
2. Materials Required: Let us have a look at the materials required
in this class. Starting with the paper. I will be using Saunders Waterford
watercolor paper block, which is 100% cotton,
300 GSM paper. I have this block
which is glued on all four sides with
the opening at the top to separate the
people from the blog. I have used one paper of
this block and have cut out six square shape
papers from it. We will be using these to paint
the five different skies. Another paper brand to
go for is Archie's. This is also 100%
cotton, 300 GSM paper. You would need a good
paper for painting skies, as we will be working mostly
on wet, on wet technique. Next are the colors
I will be using mix of pants and tubes
from different brands. You can go ahead with
any form that you have. Details about. The
colors along with the alternatives will be covered before each of
the class projects. Moving to brushes I will be using mainly these
three are large size, mop brush size eight. Apply water to the paper. This is from the
brand gross true. Next is a midsize brush from Silver velvet
series of size six. And the last is a
small size brush. Here I have Princeton size too. You can also go ahead
with any detailing brush. If you have, We would
need two jars of water, one clean water to apply it on a paper and other
to wash our brush. I will also be using a masking tape to tape down
the paper on the table. This will prevent
the paper to buckle as we will be working
with heavy washes. Next, I will be using a cloth, towel, wipe my brush. You can also use a paper
towel for the same, we would need a pencil to sketch some of the
elements wherever needed. And last is a pallet to
squeeze out and mix colors. These are all the materials
that you will need. You don't need to have the exact same brands to
kick-start this class.
3. Class Project 1 - Colours & Techniques: Welcome to the first day and
the first technique section, we will be painting this
beautiful clear sky for today. Let's have a look at the colors we require
for this class. First is civilian blue. This blue is usually present
in all watercolor sets. In case it's not, you can use any blue
of your choice. Next is sap green. Another is indigo. You can also use Payne's gray. And last is black. I already have this
year on my palette. Let's swatch the colors. This is settling blue. As I mentioned, you can go ahead with any blue
that you have. Next is sap green. Then we have indigo. This is similar to Payne's gray and the last one is black. The technique adding in
masking tape to the corners. This will avoid the
paper from buckling. Now seemed on the
tape on all sides. As it's wet on wet, applying generous layer
of water on the paper. Wet on wet means we will
be applying wet colors, that is activated
paints on wet surface. Hence, this step of applying
the layer of water. We will be working on
gradient wash for this class. Let me show you what
we mean by this. So here I am applying a darker shade of color
on the top of the page. And as we move down, the shape becomes lighter. It's like a gradient from dark to light shade of
the color is formed. We follow the same step
as we pick up more color. Start from the top and with the horizontal motion come
down, creating the gradient. You can go over as many
layers as you want. You are happy with the
color density of this guy. Let's wait for this
to dry before we learn how to add in
birds to the sky, the gradient wash has dried. Look how beautiful it looks. Taking the black color and
size to Princeton brush, that is the smallest size brush, we will paint the birds. There are different ways
to paint the words. This is a V-shape bird. Next is make an inverted V, and in the middle make a vertical line which depicts
the body of the bird. Next, is it picked
MCQ type of bird, make one side of
the wings smaller. Unlikely to pick
the least the brush with making the other
side a bit bigger. Another way is to make v
and a small dot on it. Now repeating these in different sizes to give
the perspective effect. If you are not comfortable to
paint the boards directly, sketch them out using a
pencil and then paint them. Okay, so we're done. Let me just remove
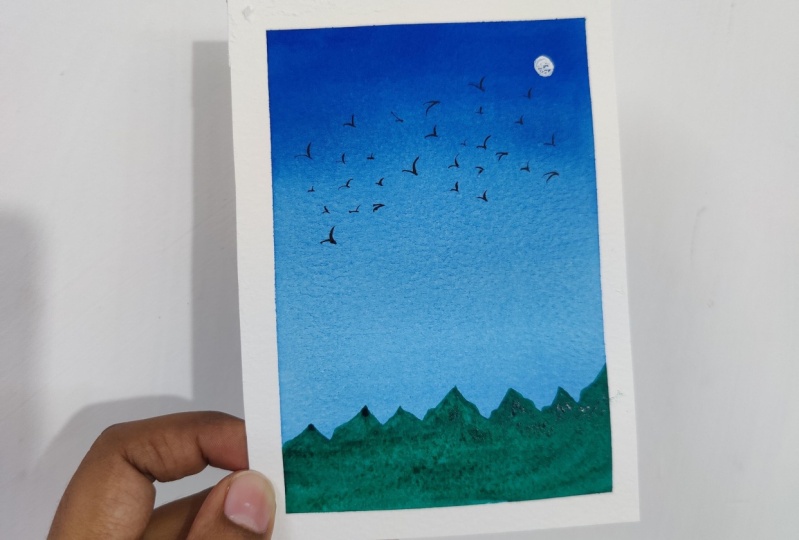
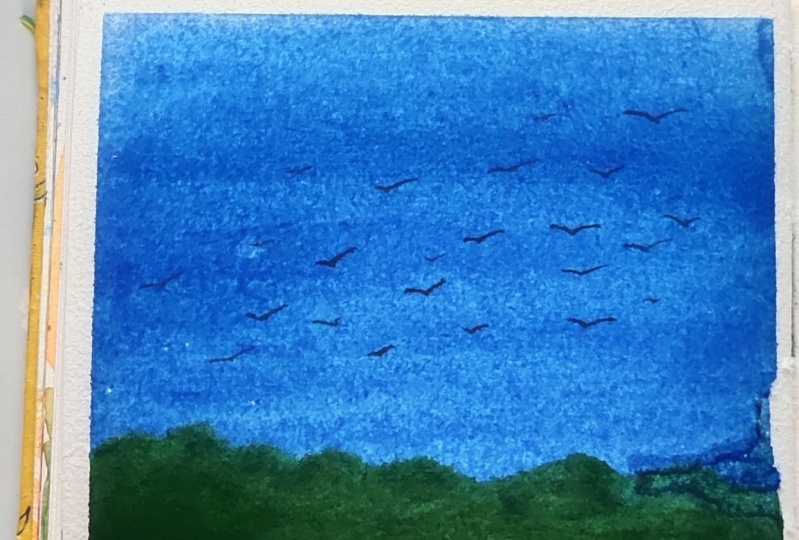
the masking tape. This is exactly what we are going to paint as a first-class
4. Class Project 1: Let us start with the
first-class project. I have my paper here applying the masking
tape in all the corners. Okay, so the paper is ready. Now as we will be
working wet on wet. Hence, applying an even
coat of water generously. Starting with several in blue, I already have the
color on my palette. We start with a gradient wash, starting at the top
with dense color, and then moving down horizontally,
creating a gradient. Just keep on adding
colors and working on the gradient fill you
are happy with your sky. I will continue to do the same. Okay, so now I'm happy with the gradient wiping off the
water from the corners. This will help in avoiding water flowing back to the
paper as the paper dries. Let's wait for the paper to
dry off before you paint on the mountains and
birds. Here we are. The paper has dried and we have got a beautiful
gradient sky. Now taking in some sap green and painting
of the mountains. Randomly create a
mountain outline and fill it in with
the sap green. To create depth, we
will Mixing indigo or Payne's gray with sap green
to get a darker shade. Dropping the darker
shade in the mountains. Do not cover the whole of sap green with
this darker shade. Just drop the color. At some places. You can see the difference when it was
just sap green versus now, doesn't it look much better? Darkening the tip of the
mountain with this shape. Let's now paint the birds like we did in the
technique section. Taking in the black color
and my smaller size brush, we will add in birds in
different shapes and sizes. If you find difficulty in
painting the birds directly, do sketch them out
using a pencil first, and then paint it with black. Welcome this very slow. Take your time and
paying the boats. Paint as many as you want. I think these many are enough. I just loved painting buds. So now our painting has dried. Let's peel off the masking tape. Here is a final
painting for day one. Simple, just one color style. But it looks so beautiful
5. Class Project 2 - Colours & Techniques: Welcome to the day
to offer class. We will be painting this
beautiful sunset sky for today. Let's have a look at the colors that we
require for this class. First is wide lid. Next is quinacridone,
Permanent Rose, Queen Rose. You can use crimson as an alternate color in
case you don't have this. And the last is black. Let's watch the colors. This is why lid. Next is quint permanent rose. You can use crimson. If you don't have this. Then we have black. Let me taped on the paper
using a masking tape. This will give us clean edges and also avoid the
PApplet from buckling. Pressing down the
tape on all sides. Applying even coat of
water on the paper. We will be working on
wet-on-wet technique. We will be working on gradient wash for
this class as well. But with two colors. We will create the gradient
from top to bottom using violet and from bottom to
top using quinacridone, permanent rose, or crimson. Let me show you what
we mean by this. So here I am applying darker shade of violet
color on top of the page. And as we move down, the shade becomes lighter. Similarly, we will
create a gradient from below using wind,
rose or crimson. Baking the darker
shade at the bottom and moving upwards,
creating the gradient. Follow this step,
adding more colors for density and continue to do so till you are
happy with your sky. Here. We are done with the sky. Wiping the converse
with your tissue, a clot to remove
the excess water. Now let's wait for this to dry or k. So our paper has dried, removing the masking tape. The sky looks so pretty. This technique is
what we will be using to paint a
project for day two. Practice this and
gathered all the colors. We will start with the
project in the next section.
6. Class Project 2: Let us start with
the class project. I have put hood and applying the masking
tape in all the codons OR gate so the people is ready. Now applying even coat
of water, generously, wiping off the corners
with cloth or tissue, taking out the colors while
it and quin rose on palette. And using a medium-size brush. Starting with, why did we
start with a gradient wash? Starting at the top would
dance colored and then moving down horizontally
creating a gradient. Now taking in Queen
Rose and creating a gradient starting from
bottom of the page. I will alternate between
the two colors and keep on working on the gradient till
I'm happy with this guy. You can also continue
to do the same while it from the top and
quin rose from bottom. So I'm happy with
the gradient now, let's wait for the paper to dry before you paint
on the bushes. Here via the paper has dried. Now, taking in some black color, will start to paint the bush. Paint randomly leaf
like structure, and fill it with the color. Adding some small
dots and leaves like stroke at the top to give
some randomness to the bush. So here we are done
with the painting. Let's wait for this to dry before we peel off
the masking tape. So I'm painting has dried, peeling off the masking tape. So here is our final
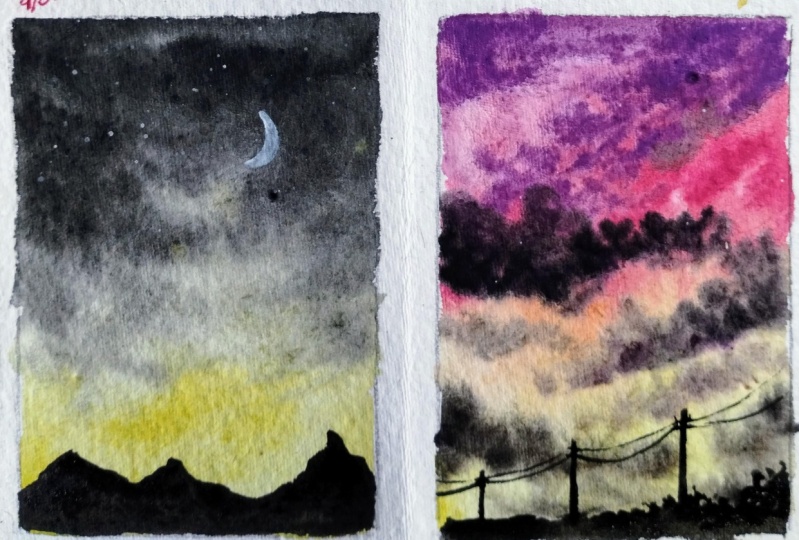
painting for day two. Gorgeous sunset sky
using to color gradients will meet again tomorrow with another technique and
another class project. There. Then bye-bye.
7. Class Project 3 - Colours & Techniques: Welcome to the day
three of our class. Vdb painting this gorgeous
bright sunsets guy for today. Let's have a look at the colors
that we require for this. First is bumblebee or yellow gamboge or any other bright
yellow that you have. This is from the brand Art Philosophy Co,
swatching the color. Next is Indian gold
from White Nights. If you don't have this, you can use burnt sienna. Is yellow orange. This is from brand
Magellan Mission. Good. You can use permanent orange or any other orange
that you have. Next is 1 million. This is from PWC. Next color is burnt sienna. And last is indigo. Payne's gray. Quickly is
watching the rest of the colors. Taping down the paper. Before we look at the technique. Again, applying even coat
of water on the paper. In this class project, we will paint the sky
randomly with the yellow, orange, and vermilion colors. All three of these colors
blend well with each other and when painted together
gives sunset view of this guy. Let's have a look at it. Starting with yellow. I'm applying the colors in horizontal strokes somewhat
in the middle of the paper, leaving some white gaps as well. Picking in orange
and applying in similar manner
starting from the top. You can also overlap
this with the yellow. Look carefully at the strokes. I'm bringing the brush from the corner to the
middle of the paper. We would ideally want to keep the middle section yellow
to get the glow effect. Adding in more of yellow before
we start with 1 million. Tried to paint it exactly
the way I'm doing. Let your colors blend
with each other. That's the beauty of painting. Wet on wet with watercolors. Now, taking vermilion, similar to the way
we painted orange, we will bring in the
strokes outside to inside. Again, taking the more of yellow and trying to
highlight the section. While working with this. After every stroke, clean your brush, taking fresh yellow, and then apply on paper
as the shade is darker, it's easier to get the
yellow change to orange. Blending the colors. Well, taking in waterfall million to highlight
some parts of this guy. Okay, so we're done
with this guy leaving the paper to dry OR gate sloppy, but has tried removing
the masking tape quickly. You can see how
gorgeous it looks. Using this technique. We will be painting
this beautiful sunset sky in our next section.
8. Class Project 3: Let us start with
the class project. I have my B put here, applying masking tape in all the corners and
getting the people ready. Okay, so the paper is ready. Let me just take out the colors that we
need on the palette. I have my yellow here,
taking out orange, vermilion and burnt sienna. Now, applying even coat
of water generously. Take your time on this step. As we are moving to
more complex guys, we would need the paper to stay wet for a longer duration. The more time you spend on this, the more time you get
to paint wet on wet. Wiping off the corners
with cloth or tissue. Now, using a medium-size brush, starting with bumblebee
or yellow gamboge, adding in strokes
across the paper. Similarly, taking in for him, adding in the strokes like we did in the technique section. Next, I didn't involve million
in the similar manner. Washing my brush and blending
in all the colors and strokes in yellow and
highlighting the middle section. Let's repeat the strokes
with the colors. Again. Baking in yellow and
highlighting the globe. Clean your brush every time
you pick up more yellow. Now, taking in 1 million and
applying the strokes again. As I move to the
bottom of the page, I'm switching between yellow, orange and darkening the
top with more 4 million. They beat the strokes for different colors till you
are happy with this guy. And now wiping off the corners of the
paper before we leave it to dry OR gate. So the paper has dried. Now taking Indian gold
and painting a mounted to give the sunset
glow effect using burnt sienna darken the mountain
at the bottom like this. So basically, the tips
and the upper portion of the mountain will have lighter shade and the
bottom we'll have darker. If you don't have Indian gold, what you can do is apply burnt sienna as
the base layer and then darken the
burnt sienna shade using Payne's gray or indigo, and use that darker shade to paint the bottom
part of the mountain. That will also give you the glow effect to
your mountains. Adding another layer of Indian gold to blend
out the colors. So here we are done
with the painting. Let's wait for this
to dry before we peel off the masking tape
at painting has dried, peeling off the masking tape. So here is the final
painting for day three. Doesn't this look amazing? The sunset glow has
come out dutifully. This is one of my favorite
paintings from this class, will meet again tomorrow with a new technique and a new sky. Until then, bye-bye.
9. Class Project 4 - Colours & Techniques: Welcome to the day
for offer class, we will be painting this
sunset sky for today. Let's have a look at the colors that we require for this class. First is indigo,
with a bluish tinge. I already have the
color on the palette. This is from brands Sennelier. Second is also indigo, but with a blackish tinge. Now both of them are indigo. One from Sennelier brand, which has pigments PB, PB 15 colon, one Pb K7. The other is from brand
Magellan mission, which has pigments, PB 29, PB 27, NPV K7 duple the
difference in pigments, the final colors are different. Next color is bumblebee or
yellow gamboge or idea, the bright yellow that you have. Next we have is yellow, orange, or permanent orange
from Magellan mission, you can use any orange. And last is black with
leaks watching the colors. First is indigo from Sennelier. You can also use
Prussian blue for this. Then we have indigo from modulo. And an alternative for
this is Payne's gray. Next is bumblebee. Alternate color would
be yellow gamboge, or any other yellow
that you have. Next is yellow, orange, or any other orange. And last is black. Gaping down the paper. Before we look at the technique. Again, applying even coat of water to the paper in
this class project, we will be applying
three sheets to the sky. The yellow and orange blend
well with each other. And we'll paint the
bottom part of the sky. The top part of the
sky will be indigo or Prussian blue in
a gradient manner, only care to be taken
is white painting. The middle portion of the sky, indigo and yellow give a tinge of green when
blended together. And we don't want a lot of
green streaks in our sky. Let's have a look at it. Starting with yellow, applying it from middle to
bottom portion of the sky, peeking in orange and
blending it with yellow. This is similar to what we
did in class project three. Do not cover all
of Galloway idea. Highlighting the yellow. Now, starting with indigo, applying darker shade
to the top and then creating gradient till
the middle of the paper. Once you reach the section
where your lowest present, apply strokes such a way it
doesn't cover all of yellow. Apply strokes like you
see on the screen. Baking in the blackish, indigo or Payne's gray and
darkening the top section. Clean your brush, wipe
off excess water, and just blend in the indigo. Also. If you see
color spreading, just blending the color, you can keep blending
till your paper is wet. Again, using a clean damp brush. Just running my brush
horizontally across the gradient and gently bringing in the strokes into the
yellow area of the sky. Do not apply more color or just clean brush if the
paper has started to dry. So I'm happy with this guy. Let's leave it to dry. The paper has dried. Now. Look how beautiful
the sky looks. Let's remove the masking tape. This is the sky that we
will be painting today. We would add in a moon and mountain to make
it look complete.
10. Class Project 4: Let us start with
the class project. I have my paper here, applying masking tape in on the corners and getting
the paper ready. Make sure the tape is formally applied and
there are no gaps. So the paper is now ready. Let me just take out the colors that we need on to the Padlet. Taking out indigo, both
bluish shade and blockage. In case you don't have
the blackish indigo, you can use Payne's gray. Now, applying even coat
of water generously. Take your time on this step. We need the paper to stay
wet for a longer time. The more time you spend on this, the more time you get
to paint wet on wet. Wiping off the corners
with cloth or tissue. Now, using a medium-size brush, starting with bumblebee
or yellow gamboge. Advocate strokes
across the middle and lower section of the paper. Similarly, taking in orange and adding in the strokes to the
bottom section of the paper. They can waters yellow
and using that to blend the audience strokes and highlight the yellow color. Now, taking an indigo and
starting with the gradient, wash with the darker
tone from the top. Creating the gradient
with horizontal strokes. As we come to the section
where we have yellow. Once you reach the yellow-colored
the area of the paper, apply strokes likely
like you see on screen. We don't want to cover all of the horizontal
section with indigo. Just want to add some strokes to give the effect of indigo
clouds over yellow sky, darkening the top section with grayish indigo or Payne's gray. You can see I pick color. I start from the top. And once I come to
the yellow section, my strokes are light tone. Once done applying indigo, using yellow and orange to blend out the sky. Why blending? Keep on wiping or
cleaning the brush as the indigo colored strokes when applied on yellow
or orange section, we're given green shade. We don't want that to happen. Hence, I am wiping off the brush after every
than being stroke. Willing indigo towards
the yellow section and making ten light strokes Now, cleaning the brush and dabbing off to
remove excess water. Using this, we blend this guy. Continue blending. You are happy with it. I'm just moving my clean damp
brush across the sky, picking up indigo, creating lines and
blending in the sky. Wiping off the excess
water from the corners. This is extremely
important to avoid water seeping back to the paper and creating cauliflower effect. Baking in clean brush and
blending the sky again before I leave it for drain gate. So the paper has dried, inking in black color and
painting the mountains. Just sketch the border and fill in the mountains
with black color. Using the smallest size
brush, detailing brush. Let's paint the moon. Baking in white gouache
or white watercolor. Very carefully,
reading the moon. If you are not confident
to paint directly, sketch out the outline, and then fill it with white
gouache or watercolor. That's it. Let's wait
for this to dry. So the painting has dried. Let's build off
the masking tape. This is the final
result. Offer day food. How beautiful the sunsets
guy has turned out. We will meet again next for the last technique and class
project of this class. Till then, bye bye.
11. Class Project 5 - Colours & Techniques: Welcome to the day five, the last day of a
class projects. Can't believe we're already
at the end of the class. We will be painting this gorgeous Sunset sky
with clouds for today. Let's have a look at the colours that we require for this class. First is bumblebee,
yellow gamboge. But any other bright
yellow that you have swatching them as we go. Next is quinacridone,
permanent rose. Odd, you can use crimson. The other is violet. Next, we have black. Then we have indigo,
blackish tint indigo. You can also use Payne's
gray as an alternative. We would also need
yellow, orange. I missed adding it to depend on the paper. Before we look at the technique, I think my fingers through with to make sure there is no gap. Bb, apply multiple
layers of water. We want the paper to stay
wet for a longer duration. As along with multicolored sky, we also need to paint clouds, and we need our paper
to stay wet for the same vibing off the water from the
corners of the paper. Now starting with yellow, applying the streaks, some
weird middle of the paper. The brush movement for
the sky remains the same as we did for class Project
three and class Project four. The only change
would be we will be using light tone of the
colours for the sky. Next, digging and while it, and applying it to
the top of this guy. You can see I'm using very
light shade of the colours. Now, taking in Queen Rose and blending it with
violet and yellow. Squeezing out some
yellow orange and using the same to paint the
bottom of the sky. Adding another layer of yellow, violet and Queen Rose. Before we move on to clouds. Clouds, an indigo
or Payne's gray, dabbing of excess water
using cloth or tissue. We paint the clouds. We apply the brush
strokes as letter C and have them paint it together to give the
look of the clouds. Similarly, from the other end, we apply the strokes
as mirror image of letter C. By leaving
a blob of cloud, you can end it with
a line stroke. This gives the field
of cluster of Clouds together with the T. Similarly, Painting the clouds below. You can see the brush movement. It's in the shape of literacy. Always start with a
lighter shade first, now, taking in more dense
color and applying the same strokes on top of
already painted Clouds. So this will give
a natural effect. We always have
gradients of the Cloud, some lighter, some darker clouds on top of the light ones. This is what we're trying to
achieve in this technique. As the color is more denser, you can see it is not
spreading much on the paper. Do not cover all of the
clouds in the dark shade, add them at some places
only, wipe Painting Clouds. One thing to keep in mind
is the water content on the brush should be less than
what we have on the paper. This will enable
the color to not spread and the strokes
to retain their shape. If this is not taken care, then the color we get into the paper and we won't
have prominent strokes. So now you can see some of the clouds have
Colours spreading. So taking a clean brush, dabbing off excess water, just run the brush on top of it and blend it with
the background. Repeat the step wherever you
feel the color is spreading. Just make sure you
clean the brush every time and dab
off excess water. I didn't watercolor if you feel you clouds
need more density. Okay, so we're
done with the sky. Let's wait for this to dry
before we add in the birds, while the paper dries, I'm swatching the yellow orange
that we used for the sky. So I paper has dried. Look how beautiful
the sky looks. Now for birds, we use black and paint them
in different shapes. V, in what did we pick MAC, we explored the birds Techniques in detail for a first printing. You can refer to the technique
section in case needed. Okay, so removing
the masking tape. Look how gorgeous the sky looks. We will paint the same for
our last class project
12. Class Project 5: Let us start with that
final class project. Getting my paper ready, applying masking tape
on all the corners. Make sure the tape is
formerly applied and there are no gaps OR gate so the paper is already applying even coat
of water generously. Again, take your
time on this step. We need the paper to stay
wet for longer time. The more time you spend on this, the more time you get
to paint wet-on-wet. Now let's start painting
using a medium-size brush, starting with wallet, adding in the strokes across the
upper section of the paper, leaving in some whitespaces. Similarly, taking in
quin rose or crimson, adding in the strokes and
then being with wallet. Now, taking in bumblebee or yellow gamboge and adding in the middle and
bottom of the paper. Using yellow, orange
to blend with yellow. Defeat beat the colours, which might not be
permanent or slightly dull. Like here, I'm adding in
yellow strokes again. Just make sure we do
not add the colours of high density or
high total value. We need this bad don't sky to be medium tone for the clouds
to pop up on the sky, wiping off the excess
water from the corners. Now, taking in Payne's
gray or indigo, we will paint the clouds. Moving the brush in
mix of letter C, strokes and lines. Paint the clouds. Make sure the color
is not what we, it will spread and you will
not get permanent strokes. The water content in the brush should be less
than that of paper. If you see the color has spread and the strokes
are not permanent, add another layer
of Payne's gray on top of the existing clouds. This will make the
clouds look more realistic with different shades and tones of Payne's gray. Keep on working on the Cloud
still your paper is wet. As you paper starts to dry
to not add any strokes as it will not blend and will not give a natural
look to the Painting. With a thin brush. Really clean off the
edges of clouds where the color is spreading and
then leave it for drying So I, paper has dried
using a scale and pencil. Let's sketch the
electoral votes. The height of the pool increases as we move from left to right. Now using my detailing
brush and black color, I'll paint the boats. I think it's Small
horizontal line at the top of each goal. And then painting the lines depicting the wires
connecting the boots. Oh, once done, adding some
bushes at the bottom. Switching to buy
medium-size brush. Now using my detailing brush, adding some birds in the sky. Add how many birds you want. If you want to add to three, add those and stop. If you don't want to add, you can totally skip
this step as well. So now we're done
with the Painting. Let's remove the masking tape. This is the final
project off of glass. It looks so beautiful. I just loved this guy.
13. Conclusion: Okay. Here we are at
the end of this class. It was a fun filled five
day watercolor journey, and by the end of it, I hope your fear of painting skies and clouds
would have reduced a bit, if not completely gone. Trust me, using the techniques
learned in the class, and by practicing them, you will become
more confident and comfortable painting
skies and clouds. Hope you all enjoyed the class. Do share your valuable
feedback on the same, and also upload
your class projects for me to have a look at it. Till then bye bye,
happy painting
 Shalika Gupta, Watercolor Artist