Transcripts
1. Introduction: Um Imagine painting beautiful
shimmering illustrations on black paper in
under 30 minutes. Sounds fun, right.
That's exactly what we're going to do in this class. Hi, I'm Fior techo. I'm a watercolor artist,
a Skillshare teacher, and I host workshops and private classes from
my little studio here in New Zealand. In this class, we're
diving into the magic of metallic watercolors with a
five day painting challenge. Each day we create a brand new illustration using black paper and metallic
paints that glow. I will guide you step by step
from sketching to deciding what to highlight to painting your own unique version
of each project. This isn't just about
following along. You will pick up
tips and techniques you can use in
future projects too. This challenge is
beginner friendly and each project takes around
30 minutes or even less. But if you're looking
for something even more introductory
and slower paced, I also have another class on
metallics on black paper. In that one, we go step by
step and take extra time to cover the basics,
including paint consistency. And it also includes a workbook. In this class, I also
walk you through all the materials and how to use them so you can feel confident, even if it's your first
time trying metallics. You don't need to be
an experienced artist. Just bring your curiosity, your creativity, and
a little patience. All you need is black paper
and metallic wa colors, and you're ready to go. Let's dive in and make something beautiful
and sparkly together.
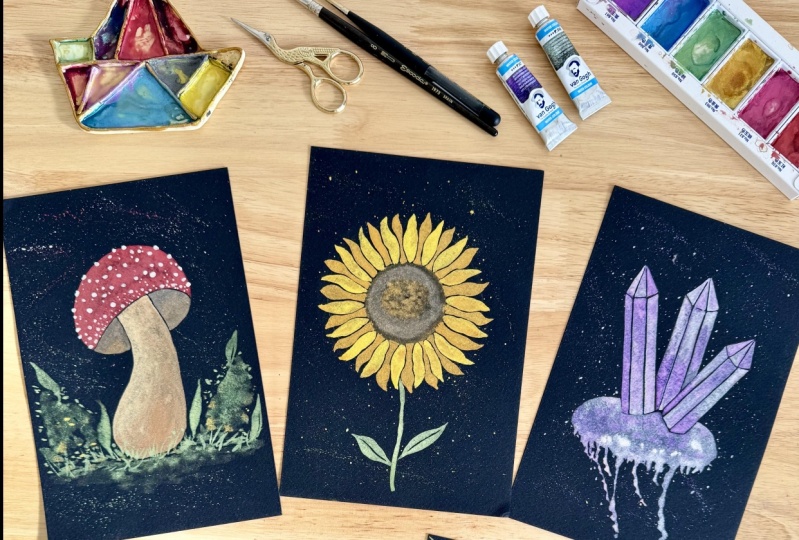
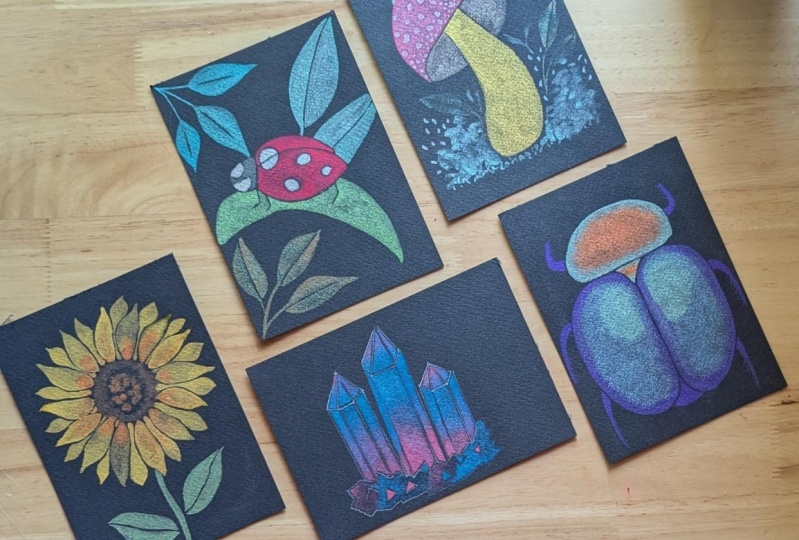
2. Class Overview: Welcome to this
five day challenge. I'm so glad you are
here ready to explore the war of metallic war
colors on black paper. Let's start by talking about how the class structure and what you will be
painting each day. The projects are arranged
in order of difficulty, gradually building your skills. So I strongly recommend following the class in
the sequence is designed. Try not to skip ahead
without completing or at least watching the
previous day's lesson. Even if it feels like you're not using the same
techniques later on, you'll still be gaining valuable practice and building
muscle memory every day. Now let's walk through the five beautiful illustrations
we'll be creating. We'll start with some
simple crystals, perfect for warming up. It's an easy project, but it creates an elegant
and polished result. Next, we'll paint a sunflower. This project is
all about getting comfortable with your brush
and adding more details. On day three, we'll mix more colors to paint
a beautiful beetle. One of my favorite
pieces in this class. Time for a magical mushroom. You know how much I love
painting mushrooms. And finally, we'll paint a gorgeous ladybug
perch on a stem. A lovely way to finish the challenge with
everything you've learned. It's a wonderful collection of shimmering metallic
artworks that you'll be proud to create. I hope this gives you a clear idea of what to
expect throughout the class. I will guide you every step of the way so you won't
miss anything. And by the end, you have completed all five
illustrations with confidence. Alright, let's talk about
the materials you'll need. H
3. Materials: Let's go over the
materials you'll need for this
class. Don't worry. You won't need
anything too fancy. Metallic watercolors. This is the start of the class. You can use any brand of metallic or pearlescent
watercolors in tubes or pans. These are the ones I use, but feel free to use
what you already have. Even a small set will
work beautifully. And on the screen, you can see the color palette for
this challenge. Brushes. You'll need a couple
of round brushes. I recommend size two and six, at least, or whatever you're
most comfortable with. A small detail brush will also be helpful
for final lines. So paper towel or a cloth for blotting and
cleaning your brush. You may want a small
palette or plate to mix your colors or get a right
consistency for your paint. Two jars of clean water, a drawing compass, a
pencil, and an eraser. We'll begin each painting
with a light pencil sketch, so a regular HB
pencil is perfect. Color swatches of your metallic
colors on black paper. With this, it will be faster to choose your color
scheme to each project. To really make the
metallics pop, we'll be painting on black or
dark tone watercolor paper. It should be thick
enough to handle water, at least 200 grams. In terms of brand,
my recommendation is this one, the
Stonehge aquaculpris. You will need a ruler
as well for sketching. As always, use what you have and don't feel pressured
to buy anything new. This challenge is
all about enjoining the process and making it
your own. And that's it. Feel free to cut
your paper sheets to the format you
will use every day. There are five projects, but we will need
one practice sheet. So get six sheets ready
to start your challenge. M
4. How to Stay Consistent: Staying committed can be tricky, even when it's something
we're excited about. So here's a little tip. Treat each painting session like a fun date with yourself. Don't focus too much
on the end goal. Make the date itself your goal. Whether you paint every
day or every other day, pick a time that works for you. It's just 30 minutes a day, so it's super doable. But to make it stick, try adding it to
your daily schedule. Think of it like an important
meeting but way more fun. Reminders are your friend. Use whatever works for
you, set an alarm, leave a sticking
note on your desk or put a big reminder
somewhere you will see. These little notches will
help you stay on track. Make a plan, set a specific time for
your painting sessions, and treat it like an
appointment you can't miss. Not leaving it to whenever, you will be more likely to
actually do it. Keep it fun. Make sure your painting
time feels achievable, but just challenging enough
to keep it exciting. You want it to feel like
something you look forward to, not a chore. Pread
ahead of time. A night before, take
a few minutes to tidy up your workspace and
gather your art supplies. That way, when it's
time for your art date, you are all set
to dive right in. Cut out distractions. When it's time to paint, try to keep distractions
to a minimum. Maybe put your phone on airply mode or turn off
notifications for a little while. You are only taking 30 minutes. And, trust me,
it'll feel amazing to just focus on your
art during that time. Quick tip. If you're watching the lessons on your
phone or tablet, download them in advance so you won't need
Internet access. Easy, busy. Celebrate your wins. By the end of each session, you'll have something
beautiful you made today. That sense of
accomplishment will release a little
burst of dopamine, making you feel awesome and
motivated for the next day. This challenge is all about
making art a yo ful habit. So let's have fun with it.
5. Day 1: Crystals Part 1: Welcome to day one
of our challenge. Today, we're starting with a
simple crystal illustration. First, let's sketch it out. I recommend using a roller. No need to measure
anything precisely. I just use the thickness
of my ruler as a guide. I'm sketching three crystals
of similar shape and size. You can follow along with
this sketch on the screen or grab the printable version
from the resources section. I know it might be hard
to see the pencil lines on black paper through the
video, but don't worry. Our sketches through this
class are really simple, so you won't need
detailed instructions. Just keep in mind that each side of every crystal will
be painting separately. So try to sketch larger defined
sections, not too tiny. This will make painting
much easier later on. You can also soft
your pencil marks with this eraser if you want to, but make sure that you can still see the pencil
marks clearly. Once you've got
your sketch ready, let's move on to
the color palette. And I have this old brush that I always use for mixing colors to
prepare color palettes. I mean, it's just a way to
look after my other brushes. For this class and for
most of my projects, I always test my colors and brush strokes on a
separate piece of paper. That way, I can adjust the paint before it goes
on the final artwork. And that is even more important when painting with
metalwa colors because the key to painting
with metalwa colors on black paper is getting
the right consistency. Think of a creamy texture, not too watery, but
not sticky either. You want the paint to
flow smoothly and cover the paper well while still giving you control
over your brush. Use your test paper to play with a paint until it
feels just right. For the crystals, I'm
going with purple. It's one of my favorite colors, and for the highlights, I'm using two silvers. One that is almost
white for contrast. And the other that's super
sparkly for extra shimmer. Once you're happy with your
colors and their consistency, especially, it's time
to start painting. I will start with my
number two brush. Because I'm right handed, I will begin on the left side and work cross to
avoid smudging. The idea is to
treat each crystal as a single shape
divided into sections. I'll start with Section one, then move to the next one. We'll blend two colors
in each section instead of painting each one
with just a single color. This adds depth and
contrast to our crystals. Make sure you're using a brush with a fine tip to stay precise. And here's a handy tip. Swap to a smaller brush when
working in tighter areas and switching to a detailer
brush here for this smaller section right here. As I keep painting, you'll see how I
blend the colors in each section and when
I switch brushes. We'll paint this entire
piece in real time. And yes, it will take us
just under 30 minutes. For the next section, for example, I'm starting
with the silver, the almost white silver, and then adding purple to make more contrast with
the first section. And I just will carry on repeating the same with each
section of the crystals. It's practice, you will notice when you need to
change your brushes. One thing I keep an
eye on constantly is the amount of
water on my brush. If you notice a drop forming or if your brush feels too wet, just plot it gently
with your towel. Even a small amount of excess water can change
how the paint behaves. And, hey, if you
accidentally paint over a dividing line or touch a neighboring section,
don't stress. Just keep going. These pieces always come together
beautifully in the end. As I mentioned before, check always your brush before take painting and
start painting on your paper. Because this painting, this
illustration is small, so even a tiny drop of water can damage our brush control.
And we don't want that. And h
6. Day 1: Crystals Part 2: And and Carry on painting. You can add, you know, like mixing the two colors. Also, the other silver, the more sparkling silver, you can add some touches. I'm not using that silver a lot. I'm basically using the
purple and the white silver. But the other silver is to add some touches on our crystals. And. Once all the crystal sections are done, we'll paint a vase. I've sketched a soft cure
underneath the crystals. And using a larger brush, I will add just clean
water to this section and then drop in our two colors
while it's still wet. This wet on wet technique creates an organic
dreamy effect. Let the pigments
flow freely and feel free to till your paper to
let gravity to do its thing. If there's too much water, just absorb a bit
with a dry brush. You can repeat this as needed until you are
happy with the effect. And to finish, we'll add a scattering of dots
in the background. I like to mix up some
larger dots painted in with my small brush and a few minutes platters for
texture and sparkling. You can tet out your
dots technique on your spare paper first if you
want to get a feel for it. Or you can do that straight
to your final piece of paper. And that's it. Your metallic
crystal painting is done. I can't wait to see your work. Don't forget to share
your finished piece in that project gallery and see
you tomorrow for day two.
7. Day 2: Sunflower Part 1: Welcome to day two
of our challenge. Today's praet is a
vibrant sunflower. Let's start by preparing
our color palette. Based on my swatches, these are the yellows I have. I will definitely use yellow
because it's a sunflower, but I want to mix more
shades on each petal. Similar as we did yesterday with our crystals with the
purple and the white, but not that dramatic. For the center, I'll
mix this color that is like a burn sienna with
black to get a deep brown. For the stem and leaves, this green isn't quite what
I want for the sunflower, so I'll mix my own green. I also have another green swatch on this small piece of paper. I'll experiment with
these two greens by mixing them together. Okay, let's activate
our war colors with a spray of water. And here's my trusty
brush for mixing colors. I haven't changed my
water since yesterday. You might notice
it's still the same. That's why I like
having two jars. One stays clean, so I don't need to change
the water every day. I plan to keep this setup throughout
the five days, actually. I'm starting with a green, since it's the color
I need to customize. I'll use this tube war color for the green for the
base of the green. We don't need much,
just enough for the stem and leaves a small cornet of
your palette will do. U Take your time to achieve
that creamy consistency. We need the paint to fully
cover the black paper, so be careful with the
amount of water you add. I think I need more of the pan work color to
warm up this green. This green looks
much better now, even if it's subtle on camera. Now for the yellows, my pun set has several shades, so I don't need to mix much. I want at least two yellows, an orange yellow like this one, and a vibrant lemon yellow. Remember to get the
right consistency. Be patient while
preparing your palette. This daily practice
will help you build a reference sheet for
your color schemes. Let's test the colors on
a scrap piece of paper. Beautiful. I love how
the yellow looks. I'm still not convinced
about a green, so I'll add a touch of
yellow to brighten it. That's better. Not perfect, but sometimes we work
with what we have. For the sunflower center, I will use black
and barn sienna. That's good. And once you're
happy with your colors, it's time to sketch. I'm using a compass for this. I want my sunflower a
bit higher on the page, so I'm placing the center
slightly towards the top. I will draw two circles
with a compass. First, a large one, then a slightly smaller one
using the same center point. So flowers centers
are big unlike many other flowers,
and that's it. That's all the sketching
we need today. It might seem intimidating, but don't worry, you'll
see it's quite manageable. We'll focus on practicing
petals strokes. Lightly erase some pencil marks. There are just a guide, but just make sure you are
still able to see them. Yesterday, we practice
brush control, which will come in handy today. But unlike yesterday, we don't have defined pencil sections. Instead, you'll explore
free hand brush work. To practice petal strokes, I'm using a size eight round
brush with a fine tip. Hold your brush
perpendicular to the paper, then press gently
as you move upward. And then lift slowly near the end of the stroke to
create a petal shape. Take your time. Don't
rush the lifting motion. You can lift petals
with organic edges or refine them but adjusting the
strokes for added movement. I often add extra paint at the tip of a petal to
give it dimension, depending on how close
other petals are. Practice a few strokes on your scrap paper and then
move to your final piece. Now we'll paint
the front petals. A Some flowers have many petals, often more than 30, but don't stress about counting. This is your creative time, so enjoy the process.
8. Day 2: Sunflower Part 2: While the petals are still wet, you can add some orange touches to a few of them for variety. Next, I'm switching
to a smaller brush, a size two to paint the petals in the background without
disturbing the front ones. And If you have cess paint on your brush, use it to paint two Petas
instead of wasting it. We don't want to
waste our paint. And When you reach tiny areas, switch to a detailed
brush for precision. Once you're done
with small details, you can go back to your larger
brush for other petals. Continue switching
brushes as needed. It's part of the process,
and with practice, you will not intuitively
when to change brushes. Uh With a petals finish, let's move on to the
center of the sunflower. I'm using a zis
eight round brush and clean water to wet
the entire center area. Let the water touch the
edges of the petals. Once the area is wet, start adding brown paint around the borders of the
center near the petals, leaving the middle mostly bare. I'm using the color we mixed earlier now with a bit
more black for depth. Add some small touches
of orange to the center. Don't overdo it. Trust the
process and let it dry. Finally, let's paint the stem. Choose an appropriate brush for this thin area near
the sunflower. And then just carry on
completing the stem. And for the leaves on
your practice sheet, try the leaf stroke. It's similar to
the petal stroke. Press your brush, drag, and lift the brush. You can create a leaf
with a negative space in the middle by painting two closed strokes
that meet at the tip. Practice until you
feel confident. Then paint the leaves
on your final piece. Feel free to rotate your paper
for easier brush control. If you like, you can also add paint splatters or dots
in the background, just like we did yesterday
with the crystals. H And that's it, day two is complete. Look at how beautiful your
sunflower turned out. Congratulations on sticking with your daily painting practice. Building the habit of dedicating just 30 minutes a day to
creativity is so powerful. I'm excited to see you tomorrow for day three of our challenge.
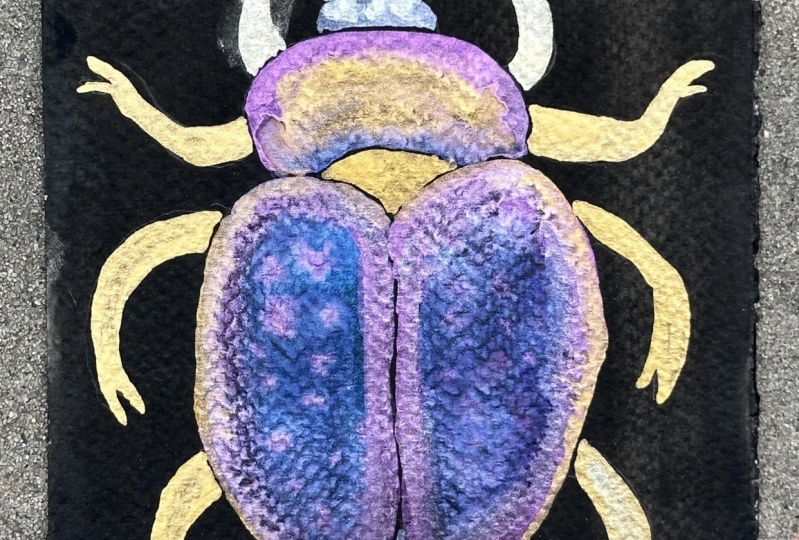
9. Day 3: Beetle Part 1: Today is day three
of our challenge. Our project today is a beetle, and we are going to make
it a really colorful one. Let's start by choosing
our color palette. The type of videl I'll paint
has an almost round shape, and here's my reference image. Remember, this is
just a reference, and we don't need to
recreate it exactly. I'll create my own
color palette. I want purple as the main color with
some vibrant accents. I'm starting by
activating my war colors. I love the purple
orange combo so I will prepare an
orange as well. Okay. Take your time to get
the right consistency. You've already practiced
this in the last two days, so you should be more
familiar with achieving the ideal paint consistency
for black paper. I'm also preparing
a red fuchsia and green because bidders often
have many color accents, and I want to play with them. Our palette is ready, so let's move on to the sketch. I'm using a compass, but you can also
draw it freehand. Remember, you'll
find the sketches in the class resources, and I'm also sharing
it on the screen here in case the pencil
marks are hard to see. Beetles are almost
perfectly symmetrical, so I'm using a ruler to measure the distance
from the center. I would do the same
when adding the legs, checking that they
are symmetrical, too. Our sketch is done. Let's start painting. Begin with your main color. In my case, purple. I'm using my biggest brush, and I'll have my orange
ready here because I want to blend these colors directly on the paper while
they're still wet. Make sure your wa
colour pans are activated so you can add
accents directly from the punk. For example, here, I'm picking the function red straight from the punk with just the tip of my brush to add a small
accent along the tal edge. If the paint is too watery, it might flow into the center, which I want to avoid. With the orange, I do want
a more fluid consistency. So it blends organically
with the pepper. Using the tip of my brush, I'll add some dots of orange
on the beetle's body. Repeat the same process on
the right side of the beetle, leave the pencil
lines and paint it just like we did on day
one with our crystals. Paint the right side as close as possible
to the left side, but without letting
the two sides touch. Once we finish with a purple, grab a bit of red again and add small accents to the
outer edges of the beetle. I'm still using my big brush, which has a fine tip. But if you feel
more comfortable, switching to a smaller brush for precision, feel free to do so. Use the tools that give
you the control you need. Now at the orange. If you run out of paint like
me, quickly prepare more. We've practice activating
metaliware color, so don't worry if you need to make more
during the process. I need my orange more
diluted than the red, so it blends nicely
with the purple. This is how our beetle looks so far. The paint is still wet, so this is a good
opportunity to add accents where you feel it
needs a little bit more. For example, here
on this right side, I want to add a
little bit more of the red directly from the
pan so they don't blend, like, with the purple. We don't want that. Just some small
accents of this color. Moving on to the head, start with purple again. I'm leaving a little
bit of space in the center of the head because
I want to add some orange, and I want the
orange to pop more. So without having that
purple underneath. So I add accents to the center and the edges
of the head, orange acens. While the paint is still wet, take some red again and add
it to the sides of the head. This part is really intuitive. I plan my colors ahead of time, but make decisions as I paint, adding accents where I
feel they are needed. For the small sections like
the area under the head, switch to a smaller brush. Use careful brush control to preserve the negative spaces. Finally, if your
paint is still fresh, you can add more
accents wherever you think your beetle
needs a pop of color. Trust your instincts
and have fun with it.
10. Day 3: Beetle Part 2: Continue painting
the small sections with your fine brush. Always maintaining
the negative space between these parts and
that bidder's body. Let's paint the top legs. Since I used mainly purple
for the bidder's body, I'll use orange for the legs. I'm still using my
small brush here, as I need a lot of control to paint these narrow sections. And, For the middle and bottom legs, I will switch back to purple. Here I need a lot of
control for the legs. So I'm taking paint
straight from the pun, as well as I don't need
to wetery paint here. As you can see, I'm sticking to my orange and purple
colour scheme. You might notice
a subtle hint of red along the edges
of the bile's body. It creates a slightly difference between the body and the legs. Now, let's paint a
crown above the head. For this, I will use orange. I want to add some of the green I prepared earlier to
the beetles horns, just to play with the
colors in this project. Beatles are a fantastic
opportunity to experiment, since they are so
fun and colorful. I'll also add some orange
accents to the horns. Now it's time to practice
some free hand strokes. On your practice sheet, try making hair like strokes. Remember, move your wrist. Don't keep it fixed. If your wrist doesn't move, your strokes will look
stiff instead of flowing. Once you feel confident
with your practice strokes, let's add these
delicated hair strokes to the beatles legs. Be patient and don't rush. We want these lines to
look fun and natural. Feel free to rotate your paper to make your
brush strokes easier. Add some hair strokes to the inner part of
the horns as well. Next, let's add a
bit more green to the antena to this part. Uh, Include hair strokes wherever you would like them. Now it's time for the final
details on the beetle's body. Using your detail brush
at some simple dots. If you would like, likely
draw a guideline with a pencil first to help
place your dots evenly. The most important thing is
to make sure the paddy is completely dry before
adding any dots. If it's even slightly wet, wait until it's dry so
the dots stay crisp. I will also add a few
dots on the head, and that's it for
the main painting. Now, with my mixing brush, I will add some
paint splatters to the background for a
shimmering effect. Finally, using the tiny brush, I will add a few
more defined dots wherever I think the beetle
needs a bit more shine. A, Bola, your shimmering
beetle is finished. Don't forget to upload your
project to the class gallery, and I'll see you tomorrow.
11. Day 4: Mushroom Part 1: Welcome to day four
of our challenge. Today's project is
a magical mushroom. I'll be painting a
classic red cap mushroom, but as always, feel free to change the shape or color palette to suit your
style. Make it your own. For my version, red will be the main color for
the mushroom cap. I have two different red, so I will swatch both to
see which one works best, or maybe I will even
mix them together. For that, I will use
my classic brush. Okay, the first red isn't
quite what I'm looking for, but the second one,
this one is beautiful. It's creamy, bold and covers
the black paper really well. That's the one I will go with. So I prepare a generous
amount of it now. Next, we'll need a dark
shade for the gills, the underside of
the mushroom cap. That area catches less light, so I will use a
rich brown and also mix in a near black tone to create some
contrast and depth. We also need a beige
or light tank color for the stem or stripe
of the mushroom. Oops, I forgot to clean my brush before
dipping into this one. But hey, mistakes happen. Just rinse your brush
with clean water, blot it on the towel, and it's good to go. No harm done. Now that it's
clean, let's test the beige. Yes, this is perfect
for the stem. And for the white dots
or scales on the cap, I will use a very
thick white paint, almost straight from the pan to really make
those details bop. Let's move on to the
sketch. It's a simple one. You'll find it in your
workbook if you printed it, and I'm also showing it on screen just like in
the previous days. And this is our simple sketch. Now I'll start painting with my largest brush
size eight round. Since the red paint, I've dried a little
while sketching, I'm just checking
the consistency. Yep, it's going on beautifully. I love how vibrant this red looks against the
black background. As you fill in the cup, your brush strokes don't need to be perfectly smooth or sharp. Mushrooms are part of nature, so feel free to keep it
organic and a bit irregular. Just make sure your
paint is thick enough to cover the
black paper evenly. Use all the body of your brush. You notice I'm changing
how I hold the brush. If I need the tip, it's more 19 degrees angle
against the paper and that. Now, let's move on to the stipe. This time, I'm cleaning my brush really well before
picking up the vase. Since it's a lighter color, I want it to be nice and
thick for solid covers. Mm If the paint feels
a little stiff, just dip the tip of your
brush in clean water. That small amount of moisture helps with flow without watering
the paint down too much. I'm also using the negative
painting technique here that we've
practiced since day one. By now, you've had some
experience with it, and you notice this mushroom has larger sections than the
crystals we painting early. So it's a bit easier in
terms of brush control. You notice I'm not painting
the whole stripes just yet. I'm leaving the right side free so I can add a soft shadow. I'll grab some brown or burn sienna and gently blend
it into the base color. It may look a bit
dramatic at first, but once it dries, it'll settle into a soft
natural looking shadow. You can already see a nice
bit of texture forming. Now I'm switching
to a smaller brush. This is a size two round brush for the gills under the cap. It's a small area, so the smaller brush will
give us more control. Starting with a darkest
color close the cap, I will paint the gills, again, using negative space
between the lines. To adapt, I will blend in
a touch of burn sienna, especially towards the edges. Feel free to add the color
straight from the punk now. You already practiced a lot
the previous three days, so you are almost an
expert doing this. M We'll repeat this on the right side. And if you feel like you need an even smaller brush
for those tight corners, go ahead and switch. Use whatever feels
comfortable to you. The next step for today will be the white scales on the cap. That's the main reason why we painting the
red section first. We need to give it time to dry before adding
any white on top. With this exercise, you will notice also what to paint first. That is something that you
need to practice a lot. Otherwise, you have to wait
too much to one section to dry if you want to add another layer on
top of that section. Our mushroom is already looking adorable,
don't you think? Next, we'll add those
final fun details and bring this magical
little fungi to life.
12. Day 4: Mushroom Part 2: Mm hmm. Let's continue with
our magical mushroom. I noticed the cap isn't
completely dry yet. So while we wait, I'm going to add some greenery
around the vase and sides of the mushroom
like little bushes or grass. For this part, I will
use free hand strokes, just like we practice on day two with our
sunflower project. So feel free to
get creative here. I'm mixing up a green
tongue and using my big brush to add some
loose, watery strokes. Nothing to define. So let's prepare the green. So I'm going to start with just these really free strokes, really watery in some cases. Even I add more water on them. So blending that base
with more water. Then I will add a few more deliberated leaf shapes
to balance it out. We practice this kind
of stroke on day two. Go with the flow. Try
adding some grass under the mushroom and some short
expressive strokes around it. I know free hand elements can
feel a little intimidating, but this is a great opportunity
to losing up and play. Some strokes are thick and
creamy, others more diluted. I'm also blending a bit
of yellow for brightness. Feel free to add other
colors than yellow. I'm adding only yellow here, but you can add
even red or orange. I'm also adding a touch of clean water at the
base to diffuse green, similar to what we did on day one with our
crystal projects. Now, back to the mushroom cap. Make sure it is completely dry before we move on
to the white scales. Using a detailed brush, check the consistency
of your white paint. You can use your
practice sheet for this. It should be nice and thick. Actually, straight from the pan. Let's start adding the scales. I like to mix large
and tiny ones, especially placing the smaller
dots closer to the stip. Move your paper to
help with control. It makes a big difference when placing these
small details. Remember, they don't have
to be perfect circles. Organic irregular
shapes feel more natural and look better
in this context. One important tip,
know when to stop. I've had quite a
few scales here, and I could keep going, but I want to let the red
background show through. It's all about balance. To finish the mushroom, I'm using that detail
brush again to add a few expressive strokes around the base and even
onto the stem itself, just to tie it all together. For that, I'm using
the same green that I prepared before
and just really, really free hand strokes, similar to the hair strokes
that we did yesterday. If you want to practice
this stroke on your practice sheet,
feel free to do it. That's why I really recommend to have your practice sheet handy. And that is how our
mushroom looks now. Oh, I almost forgot the splatter effect
in the background. Honestly, I'm really happy with how this project
looks already, and it doesn't need
anything else. But since all five projects in this challenge have a touch of shimmer on the
background as well, I will add just a bit of sparkle here too
for consistency. I mix colors. I'm taking red, and also I'm going to add first, I clean my brush and
then I'm going to add some white dots as well. You could always keep adding
more layers or details. You already know how to work. You already know how to work in second layers with
metallic paints. But remember, this is
a 30 minute project. So let's keep it simple and fun. I like also how it
looks with splatter, so no regrets here, and that's our magical mushroom. Don't forget to share your
project in the gallery, and I'll see you tomorrow for the final day of our challenge.
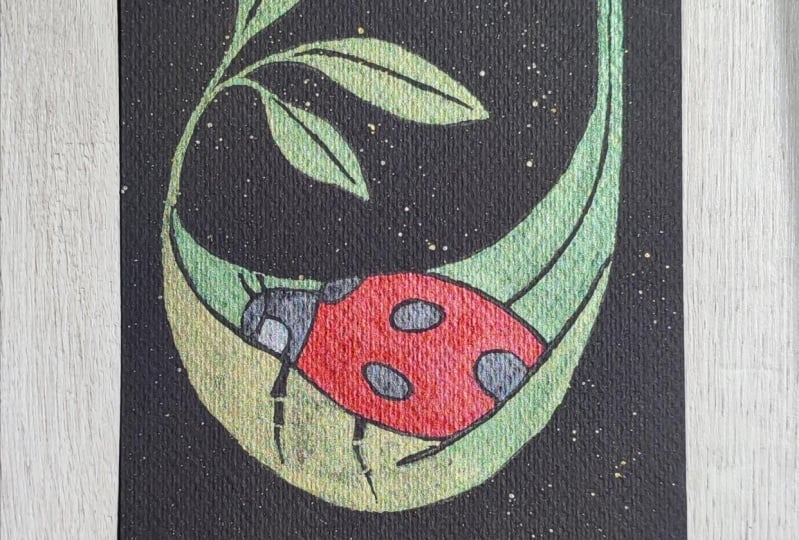
13. Day 5: Ladybug Part 1: Welcome to the final day of our amazing and
shimmering challenge. Today we are bringing
together most of what we learned over
the past four days. This time, our sketch is
a little more elaborate. It's a full composition with the lady wack on a leaf
as the central element. You'll also notice some
additional leaves in the corners of the
design, but don't worry. You don't need to sketch those. You can sketch those, of course, but you can paint them
freehand if you prefer. Just like we did with a
greenery around a mushroom. Since we'll be
painting in sections, it's important that
your sketch has clear and well defined areas. Try to avoid tiny or
light detailed spaces as they can be tricky
to paint later on. That said, we can't escape
the ladybugs tiny legs. But let's not add any extra problem areas
if we can help it. Once your sketch is ready, let's move on to
the color palette. Most of the colors I will use today are ones we have
already worked with. So let's reactiv
those war colors. I will also be using
a green from a tube. And because this piece
features lots of leaves, I want a variety of green tons. I'll have all my greens
ready and also mix a lemon green by combining
green with a bright yellow. And For painting the lady bag, I'll be using the
same creamy red from yesterday's
mushroom project. I absolutely love
how that turned out. This red is from
Kuri take brand, one of my favorite brands. I'm actually going
to Japan Zoom, so I already plan to bring back at least one new set
of Kuri take paints. Also prepare white for
the ladybugs eyes. So get that color ready too. All right, let's start painting. I'm beginning with a number two round brush for better control. The top section of the
ladybug is quite simple, but the next area
includes black spots, which I will leave painted. So I need to be both precise and able to load a good amount
of paint onto the brush. That's why I chose this brush. It gives me the violence. Of course, your brushes
might be different, so test what works best for you. And remember, you can always
swap brushes mid project. For example, right here, I'm switching to my
detail brush just to get really close to the top
edge with more precision. Then I will switch back to the other brush for
larger sections. Continue painting the
body of the ladybug. I find this part
deeply satisfying. The creamy consistency of the metallic work colours is so unique and enjoyable
to work with. The way the colours glides over the black paper feels
almost magical.
14. Day 5: Ladybug Part 2: I'm starting with a main leaf, the one just beneath
the ladybug. For this section, I'm
using my largest brush. It's perfect for covering
broad areas quickly, and it also has a
lovely fine dip that lets me reach into the smaller corners
with precision. Even though this brush is great for the area
close to the legs, I need to switch to
a detailed brush. We've practiced this
throughout the challenge. I like to think of this
project as the final test. It's where we put all that
brush control into practice. Here's my little tip. I take a deep breathing, hold it while paint around the tiny legs and
exhale when I'm done. It's like a mini
meditation session, you your brush and your focus. Once that part is done, I switch back to the larger
brush to speed things up. We've done this kind of
brush swapping before, and this is exactly why this ladybag project comes
at the end of the challenge. It brings together
almost everything we've practiced over
the last four days. The goal here is to keep those delicate legs clean
and untouched by the grain. At the tip of the leaf, I'm switching to a lighter green to add some
brightness and variation, similar to what we did with a mushroom stem in
yesterday's lesson. And And Now that the leaf is complete, I will let it dry before
painting the veins. While it dries, I will move
on to the ladybugs eyes. I'm checking my
reference photo here and noticing they're
just pure white. So I will grab a thick creamy white paint to make sure it covers
that black paper well. I'm using my number two
brush for this step. Mm. Once that's done, I will let the eyes dry and start working
on the background leaves. These ones are in the
corners of the illustration. Be careful here. Try not to touch the areas
we've just painted. The paint is still fresh. I personally
sketched two leaves, but if you feel confident, you can paint them freehand, like we did on day two with a sunflower or yesterday with the mushrooms
background foliage. It's all about finding your own rhythm and
your own preferences. For these leaves, I'm leaving a negative space
down the middle. It creates a really
nice light effect like a central vein. I love how this simple
ditta makes them pop. Next, I rotate the paper to paint the leaves in
the top left corner. So it's more
comfortable to work on. I want a fresh lemon green here, so I mix this shape by
combining yellow and green. We haven't painted this
type of stem before, one with several small
leaves along it. So let's take a moment to
practice it on the scrap paper. With confidence, I paint the main curve line for the
stem using my big brush. I use only the tip to get
a fine, delicate line. Then press down to create bold brush
drops for the leaves, leaving negative space in
the center just like before. The technique is similar to
what we have already done, just slightly different
in shape and structure. Practice it as many times as you like before moving on
to the final composition. As I paint a final version, I'm going for a
more stylized look, but the rush techniques
stays the same. Don't forget to wash your
hand position and make sure you are not touching any wet areas we've come so far. We want to keep
everything clean. Now that the top
leaves are finished, I'm preparing some
black paint to give a subtle shimmer to the
black areas of the ladybug, the head, the dots on its back, and even the legs. Yes, I know. We will
need a lot of precision for painting those
tiny and fine legs. I'm using the Dieter brush
for these small touches. I also add a few final details
to the ladies back head, then set it aside to dry. Looking at the
overall composition, I feel like the bottom of
the piece needs more green. So I will add a few
more leaves free hand, not sketch needed here, but feel free to mark
guys if you prefer. Just go with your instincts
and balance the piece. Now that the main leaf is dry, I'm adding the veins with black paint using
the detail brush. If they look too soft, feel free to go over them with a second layer to
make them bolder. And finally, let's add
our signature touch, a gentr splatter on the
background to complete this series of five metallic watercolor illustrations
on black paper. Take a step back and
admire your work. You've come a long way. Stay with me for the next and
final lesson where we will wrap everything up and reflect on the challenge. See you there.
15. Before you go: That was amazing,
and I'm so proud of you for completing
this five day challenge. This means you've learned a lot about painting with
metallics on black paper. Thank you so much
for joining me. How do you feel about
your project so far? Which one was your favorite and which one challenged
you the most? Each painting we created
took just about 30 minutes, and that was the whole
idea behind this class. My goal was to show you that even with just a
few minutes a day, you can build a created habit and continue growing
your skills. You don't need a
full day to paint. Just 30 minutes of intention, joy, and curiosity
can take you far. I hope you continue
painting on black paper, experimenting with metallics, and applying the
techniques we explore. Play with color, switch
things up and don't be afraid to try a larger
format or a new palette. Revisit the project you
found most challenging, or repeat your favorite
one in a whole new way. Love to see what you created, so please upload your work
to the project gallery. Seeing your interpretations
is always such a joy. If you enjoyed this class, I would really appreciate
if you left a review. It helps other students
to find this class, and also it supports my work. Don't forget to follow
me here on Skillshare, so you'll be the first one
to know when I publish a new class and also
when I run giveaways. Thank you again for
spending your time with me. Happy painting, and
I truly hope to see you in the next class. Bye.
 Fio Ortecho, Watercolour Artist & Teacher