Transcripts
1. Class Overview: Hi, everyone. My name is Fio. I'm an artist, engineer, and online educator from Peru currently living
in New Zealand. In this class, we'll be painting a simple winter landscape using just a few colors
with addition of white gouache. We'll explore the full
potentials of watercolors by practicing techniques
such as wet on wet, wet on dry, and lifting paint to create soft edges
and highlights. We'll finish the project by
adding details that bring everything together and create
a cozy winter atmosphere. This class is suitable for all levels, including beginners. I will guide you step by step, starting from a
simple composition and building up to
the final details. Before we begin painting, I would do a quick
rundown of the supplies, the color palette, and
the sketching process. You can paint along
with me in real time, or watch the class first to
see the techniques that I share and then paint your
own winter landscape. I can't wait to paint with you, so see you in class.
2. Materials: For this class, you will need watercolor
paper. Of course. I'm going to use
this one that is from the Japanese brand Muse. It's 100% cotton,
which is really good. It's not really heavy. It's only 220 grams, but it's really good.
It's a good paper. And for the color palette, I'm going to use
these spare sheets that are not 100%
cotton, but, you know, I don't want to to cut the
only for the color palette, if you have a lot of 100%
cotton paper, it's okay. You can try your colors on the same paper that you're going to paint your final project, but I'm going to be okay
using these spare sheets. And also, you will
need watercolors. You can use watercolors in tubes
in pans like these ones, for example, or even you
can use liquid watercolors. That is up to you. You
also will need brushes. These are the brushes
that I'm going to use. I'm going to use a flat
brush that is quite big. Also, this brush
that is number six, but is a decent size. It has a really tiny tip. I don't know if you
can see on the camera. I also going to use a number
three brush, round brush. With a really tiny tip
as well for details. So I'm going to use these
two round brushes and this one that is bigger
in a flat shape. Also, I have this brush that I use only to create
my color palette. You know, it's not
a fancy brush. It's only to mix my colors. You will need also
a ceramic palette. I recommend ceramic as the material for your palette
instead of plastic. But if you don't have
a ceramic palette, you can use a plate or even a plastic palette
to do your mixes. You will need 2 jars of
water I usually use two jars. One to load my brush, and the other to clean my brush. So I try to keep one of
the glasses really clean, and the other, it doesn't
matter if it goes dirty. You will need a towel or a
paper towel or a tissue. It's really important to control the amount of water
in your brush. Also, washy tape to mask off the edges and
keep the paper flat. I like to use a board to paste my paper and
keep it flat, as well. I'm going to use this board, so you can use one
of those as well. And I'm going to create
an outline sketch, so pencil and, of course, eraser you will need
for today's class. And for details, you will need also a fountain pen, black. If you don't have
a fountain pen, you can use these micron pens
that are black, as well. 0.5 is okay or a 0.8 And I'm going to use also a Posca pencil that is white
acrylic pencil, basically. And super important for today's class, gouache. This white gouache. I have other colors of gouache, but today we're going
to use white gouache only because we are painting a winter landscape
with a lot of snow. So we're going to use
a lot of white gouache. So get your materials ready and see you
in the next lesson.
3. Colour Palette: Before we jump
into the painting, we need to prepare
our color palette. For this project,
we are going to use only four to five
colors and white gouache. I'm going to prepare an orange for the sunlight that is
hidden behind the trees. So we only need a
bit of this color. For the orange, I'm
mixing this orange that is quite yellow with
a little bit of red. So let's try the colour. Yeah, I like it. Maybe a
little bit more intense. Yeah, like this. Now I have this gray, indigo,
and Paine's gray. So let's try this indigo. I'm going to add a
bit of Paine's gray. A little bit more. And
now let's try the color. I'm going to add
a little bit more of Payne's gray to this mix. Mm hmm. Yeah. It's
more like this color, not like this one
that is too blueish. And now that gray
that I just add here. Try on. I think it's too light, so I'm going to add more
of pigment from the tube. This color is called
phantom mist, but you can use any gray that you have in
your color palette. Still, I'm going to
add a little bit of Payne's gray to this mix. Now it's the opportunity
to play with your colors and get the
colors that you really want. Okay, this color is better. You don't need to match
exactly my colors. As long as you're happy with
your own colour palette, your painting will
turn out just fine. And now a little bit of black. Just for the last details. Black with some
Paine's gray as well. Yeah, this is okay. And also white wash that I don't need to do the swatch because I
know that it's white. But this is my color palette. Orange, this blue,
really dark blue, this gray and black. Okay, see you in
the next lesson. We're gonna start painting
our final painting.
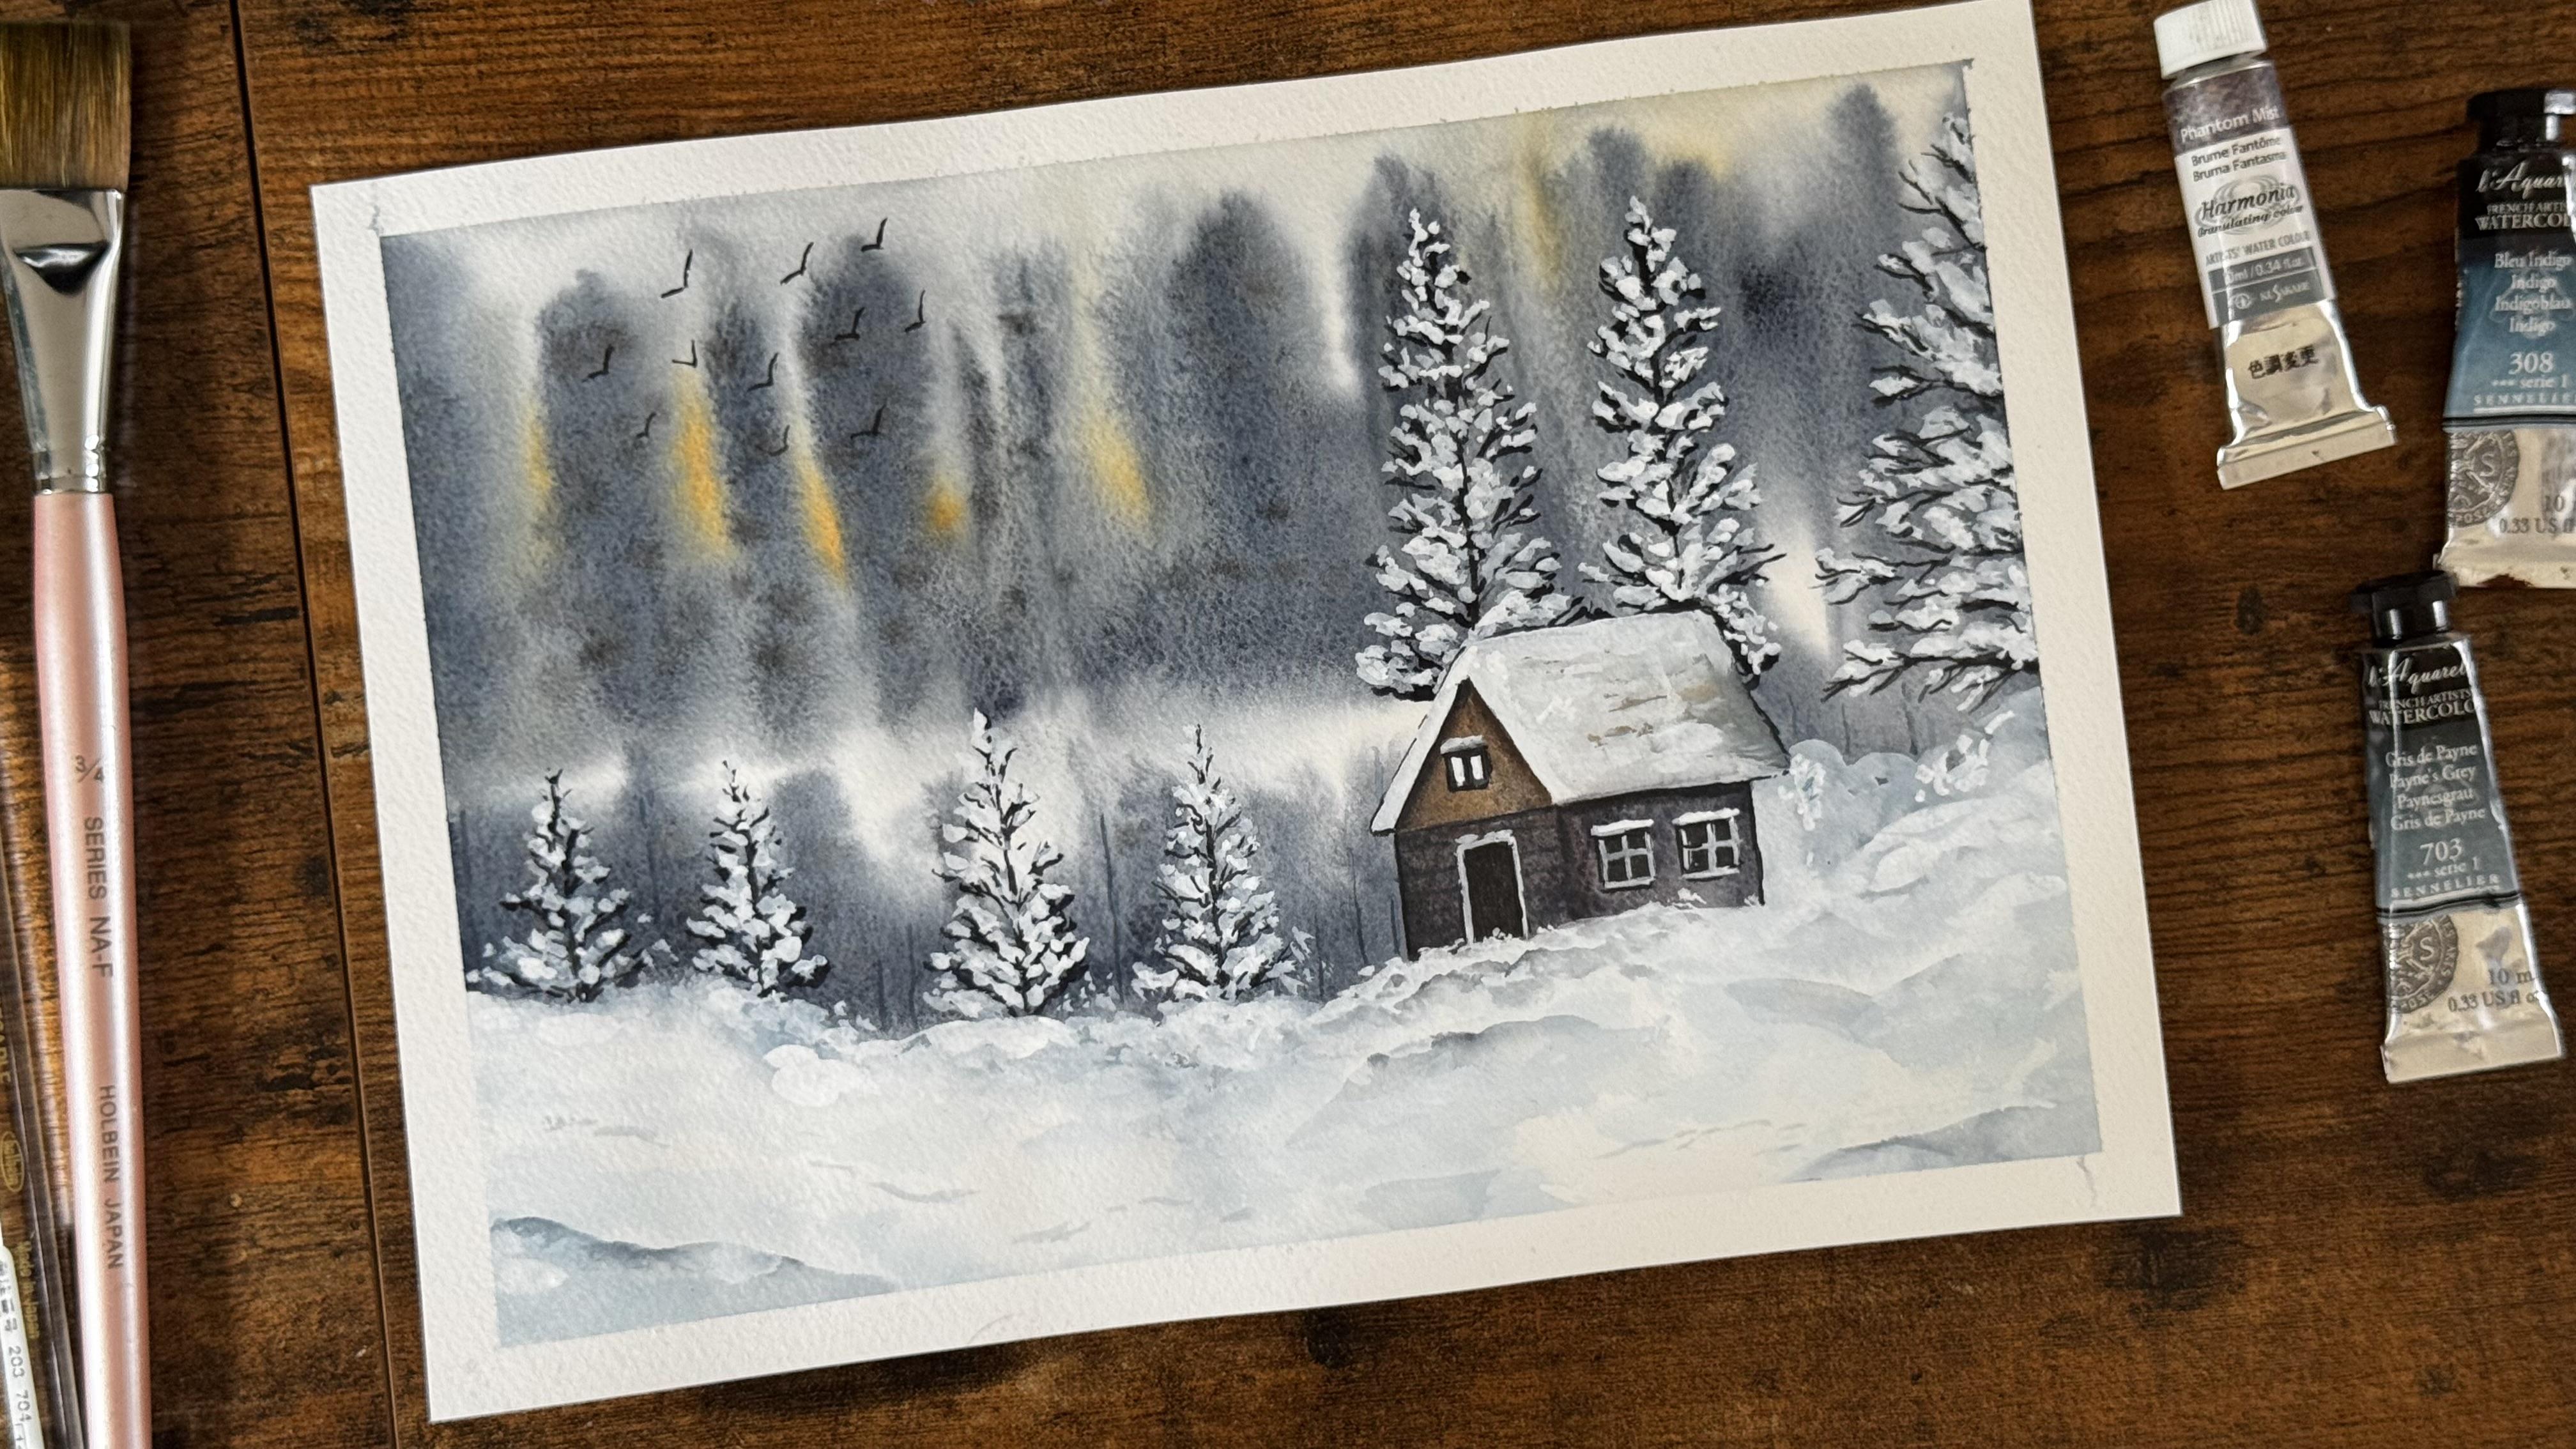
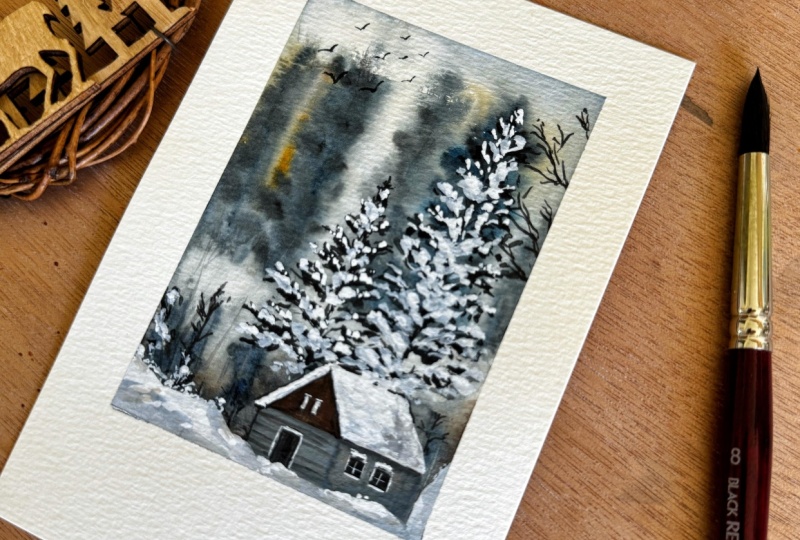
4. Sketching: First things first, let's tape our paper with some washy tape. This helps not only keeping the paper flat while painting, but also with the borders I want to keep for
this painting. I'm starting with a simple
little house illustration. I like having a
light pencil sketch, avoiding too much
pressure on the paper. I know it may be hard
to see on the camera, but the sketch is very simple. We are not going on detail here. All the details
will be added with watercolor and gouache later on. If you need a reference,
on the screen it's popping out the sketch
with bolder lines so you can trace it onto your paper or simple use it as a
better reference. I draw a couple of windows here, squares, and just it. That is the sketch that
we're going to draw today. So let's start painting.
5. First Layer: I'm going to use
this flat brush. I'm gonna wet it because to get that misty sky and that sort of really distance
mustard trees in, what I'm going to do is cover the entire page with a
layer of water first. I'm using this big
brush for this, covering the whole thing with only water inside the border that we created with
the tape, of course. I'm going to go over the house
that we just draw as well. So just cover the entire
paper with clean water. You can move the paper
to see the light reflecting of the water to see if you miss any spot or if
any spot has too much water. So I think I'm okay now. I'm going to start with
orange with a same brush, but just the tip of it. In here and here. Now I want to clean my brush and take the
blue that I created, and I go to go in
here here and here. And also above this
line, this horizon line. But I'm leaving this white part. Now I'm going to create
the trees that are behind the horizon,
just like this. I'm gonna clean my
brush with water. With the damp brush,
I'm gonna do this. And this part is
pretty much all blue. Just leave this part wet. That is like snow. I want to soft brush now
to this number six brush, but it's quite big. It's round. I'm gonna wet it in the water
and take more of this blue, wait a little bit until
it's starting getting dry. And now I want to
go again in here. I'm doing this, like, there are the misty trees. This is a little bit more
experimental process, but just try to trust on it. Don't lose this white area. Okay, now we have to
wait until it gets dry. When it's getting dry, but before it's completely dry, I'm going to take
just with a tip of my brush a little bit of black and just made
some dots in this area. Especially on this left
area because on here, we're going to have two big trees that
are going to cover it. But in here, we are not
having much detail. So I'm going to make
some dots with black. Between just next
to the orange pot. I here as well, you can. And now, yes, we have
to leave it dry. Okay, now, make sure
that this is 100% dry. This area is still
a little bit damp. But in this section, no. For me, I have to wait
a little bit longer. So don't rush, be
patient and wait.
6. Trees: Okay, now it's dry, 100% sure. So let's take some
of the Paine's gray. Really dark and
with smaller brush. I'm going to use this
round brush number three. If you notice here, it has a really tiny tip. So I'm going to wet
it, and I'm going to check this color, just from pretty
much from the tip. Really, really dark. And I'm going to start
painting the trees. I'm gonna paint two big
trees behind the house, one here, another here first, and then more trees
on this side. So with a tip of the brush, we're going to
paint some branches of the tree first the
trunk and then branches. So this one here
first, like this. And this one in here. And now just with a tip, we're going to make
short strokes. As it's a winter landscape, it doesn't have leaves, pretty much only the branches. And then later on, we're going to add some
white gouache, like snow. Saying on this one, Let's try to make
some branches shape. Really irregular.
It doesn't have to be really, like, realistic. But as we know that these trees are blurry
because they are really, really far from us. But these ones are really clear because these
are closer to us, so we can see the details. It's there. Also,
I'm going to add a couple of small trees here. This is snow, but then we
want to cover it more. Like this is tiny, tiny. If you see I'm holding
the brush really 90 degree angle to have
a really precise stroke. Like this. And another here. Take your time to do this process to
finish your branches. Just like that. We can add
an extra one maybe here. The branches and more branches. These are really,
really close to us, almost same as the house. So more details in here. Hey, that. And here, maybe just one really, really skinny, this one. The trunk a little bit
thicker and that's it. And now in this area, I'm going to paint the
snow because the snow is not completely white. We have some shadows. So I'm going to wet this brush that is number
six, but really thick one. I'm going to wet a
little bit here. Just a bit. If you see it a
little bit blue, it's okay. Was not really clean, but it's okay. It's
actually what I want. I want to add some color
here because otherwise, it's too white, and
we're going to add gouache, so it doesn't have to be
really, really white. With this one, I'm
gonna try to remove. And then we're gonna
have to let it dry. In the meantime, we
can paint the house.
7. House: I'm going to use the gray that I mixed earlier that
is already here. I'm going to use this sh. It has a good tip, so it's okay. I have the gray here handle
if I need to make it darker, just in case because it passed some time since I
make this pigment. So let's see. I'm going to paint this And now I want to paint this top part a little bit brown
that I didn't make, but I have orange here and
I'm not using more orange, so I want to transform this orange brown,
adding some gray. See, you see, it's a
little bit brown now, but I want it darker. So I'm going to take more A yeah, it's quite brown. Maybe it's too light. I want it darker, so I can get a little bit of black
that I have here. Okay, now let's see how it is. It's still too light.
I want it warmer, so I'm going to add more orange. Straight from my pan set
I'm going to add more orange and red. Okay? I think it is better. Yeah, it looks better.
It's warmer this color. You see, it's better. Okay, this is the color
I'm going to use to paint the top part of the house. For that, I'm going to
use this small brush. Just start painting here. Here as well, a little bit, maybe a little bit more water. If it mix here, it's okay. Now, again, we have to be
patient and let it dry, and then we're going to add the snow and some details
to the house, as well. So let's be patient.
8. Snow: The house is almost dry and this section
is completely dry, so I'm going to add
a little bit of more shadows here,
just like this. And I'm going to make it a little bit softer
with just water. Right with the tip a little bit as well. Because this is the snow, right? And I'm going to add a
little bit more here. And just with water, trying to lift a little bit of the war color here as well. I'm trying to soft this part. Also in the section. Just like this. Okay, now
with the smother brush, the number three drum brush, I gonna add a second
layer to the house. You know, this is the
gray that I used before. I'm going to mix a little bit more because I run out of it. So I'm adding a little
bit more of gray. But I'm going to mix it with this brown to have
a different shape. Instead of adding
just clear water, I'm adding brown from this
part from this color. So I have a really
thick paint here. I'm adding a second layer
on top of here. Slide that. And now only with water, I'm gonna just soft this
part a little bit more. Just like this and also on
this part, this area as well. And here behind the roof also. And also on this spot. Okay, now let's
wait a little bit, and I'm going to add
some branches here. Like the tree is
around this area, so we want to see only the
branches on the right side. So yes, is really
90 degree angle, so you have a better control. That because here
we're going to add some white some snow with
white wash. For that, I'm gonna prepare the wash. Now, I'm going to clean
the center puddle so that section gonna
be my wash section. I have the wash here is the permanent white
from Windsor Newton. For this part, you need to have your brush really, really clean. So you're gonna just mix so we get a really
thick consistency. And I'm gonna start
adding snow here. Just like on top
of the branches. But really organic shapes, just dots and really short
strokes. Just like that. Same here. Don't cover all the dark part,
all the branches. We want to see them. So basically on the parts that we don't have the branches, we can add the snow. Remember to don't lose the dark areas that
you already have. Here just a little bit starting to look better. Well, not much because
these are really tiny. We can add more snow later on. So just a little
bit here, not much. We want to war this
section later. Okay, now the house, you're gonna paint with really thick white
part of the roof. Try to be quite precise, but actually it's snow, so it doesn't have to
be really straight. It can be a little bit wavy, but the consistency of the
paint has to be really thick. So it looks really,
really white. Now, we continue painting here. And this path is just like that. You can see through the
snow a bit of the roof. But actually, most of the
roof is covered by snow. So I'm going to just
make a stroke that is a little bit more pressure
at the beginning and then lift lift just like that. Okay. So it's
looking better now. In here, I'm going to add just a couple of windows
that I didn't draw. They are just really
tiny rectangles, one here and another here. You can make only one square or make it round if you want. It doesn't have to be
perfect, you know, just gives the idea that
there's a window there. To windows actually for me. With a tip of the brush, you can draw the window here. If you want, you can cover
the whole roof of your house, but I like to leave it
like that or actually just clean a little bit my
brush here, remove the water. And now with just that, I go to just add some way, but this way is really diluted. It's not as thick as the other, so it won't cover a lot
the roof of the house. So it be like more water snow. Now I'm going to swap to this bigger brush and I'm
going to add more wash, more snow around this
area. Really thick. The wash is really
thick, so it doesn't has a lot of flow, and
that is what I want. Now, I can have
more water in here, but still with wash and
cover more, more here. Clean my brush and leave
it there for a while. And I'm gonna add black to
the door and the windows. So I'm gonna paint here. Really dark black. On this spot. Okay, I have the door
and now the windows. Okay. Now I'm going to
add some shallow here. There's a line in this bad. Now I'm going to
soft this line with a little bit of water
and just that. No more. And the same in this section, there's a little bit of black, and I'm gonna soft it with
a little bit of water. That's it. Here as well, under the roof to
grave some shadow, and I can soft it as
well a little bit. Just that. Okay, now
we have to let it dry and we can continue
with a small trees. Clean your brush because
it has just black now. And now we want
to swap to white. I need more wash. And
then really thick. And with a number tree brush, I'm going to add more snow
here on these small trees. Remember to don't
lose your branches. We can add more white here, there's snow on the
base of the trees. There's really irregular
brush strokes. You can also up here. Now, on this section as well, then the house really
white white really white snow because you see it
has some bluish snow here. But really close to the house, I want some irregular
shape, like, not like, really sharp, but a little bit like this. And also in here, we can add some snow like it's on the air. Not too up, just here, really close to the ground. Okay, and now with
the same brush, I'm going to make an
outline of the door. I'm on top, a little
bit thicker because it means that the frame
has more snow. Same here with the windows, the top quite thick, and now just some outlines with white and also the frame of the window with white as
well, just like that. So it looks quite
classic here as well, like it has more
snow. Just like that. We are almost finishing
our illustration. We just need to add
some dits to the house, and then we are
pretty much down. Oh
9. Final Details: I'm going to add some paints
gray, some lines here. Also a line here. I'm here with black. I don't have more black, so
I want to get from here. Are you going to outline these
windows, the top windows? Just like that. I'm
gonna add a shadow here. A little bit of outline, not in the whole house. Short strokes here. Just like that. Clean
your brush really well, and we're going
to add more snow. Another layer here because it's not really white. I notice. You see this white is white. So we can add more
than on some here. If you need to
prepare more wash, like I do, for example,
you can add more. Well, we are painting
a winter landscape, so I think that was
not a secret that we're going to use a lot
of what for the snow. We are going to add
some details now, but pretty much this is our illustration.
This is our painting. I'm gonna add a couple of
dots here. I'm also here. Yes, well, we can add some wash, more snow in these big trees. Okay. Let me know
what you think. I think we are done with this. Now, clean really
well your brush with water and take a
little bit of black. I taking from the pan, straight from the
pan because I want it really, really thick. And we can practice here. I'm gonna make some
birds just like this, like in a shape of
a really white. There's one and then
the other, the other. And the other. You see
this was too thick. So you can practice
before and I'm gonna paint some bears on this part. Side that. Then other like
different more closer V, and a few more. You can use a thicker
thinner brush. Sorry. If you feel
comfortable with that, you can swap your brush. I'm using the same number
three because it has a really tiny dip. So
for me, it's okay. I'm going to paint
a couple of more Just like that, I think.
You want more here. I want to add more
white on this bar, like, behind behind the house. This and with the same brush, but really clean from the white. Have a little bit
of indigo here. You see almost nothing, but that is what I want.
Really watery indigo. And on my piece of paper, I want to do, like, these lines. So shorters and others
a little bit longer. When they dry, will
be really subtle. Also on this part, a
little bit, as well. Just like some really
short could be nice. Okay, just like that. I'm gonna add more shadows
in this area as well. Really tiny. If it's too dark, you can just make it
softer with some water. I like that. And you see the lines that we
made almost disappear. So see. So we can make more and
maybe a little bit darker. This one, like this. I think I'm gonna
leave it like that, but I'm going to add some
ditches with black ink. If you want to use
the posca as well, that is acrylic white,
you can use it as well. I had this fountain pen, Black. That is really nice. So I
can add more details here. So short lines and to make the trunk
more visible as well. Candidca. So if you lost a lot of your dark areas of
your dark branches, you can recover it with
this front in pain. So, believe it or
not, this makes a big difference on the details. All the outlines, I
emphasize with this. My dad. You can also add
some shallow here, some details on the door, some texture or even
add extra ones. Like that. Like that. And if you want to emphasize
a little bit your beers, you can as well with
the fountain pen. And as well, if you want
to use your postcapin, give it a good shake. And you can also add more details because
this is like acrylic, so you're gonna give a really, really good white,
really thick white. We add a lot of white with wash, but anyway, you can add just
tiny details here as well. Some ducts, nothing. Not a lot because we
have a lot of snow here, but just in case you think
it needs a little bit more, you can use also your
posca like that. And now we have our
illustration ready. Let's remove the washy tape. This is one of the most satisfying
parts of every painting. Don't forget to upload your project in the
project section gallery, leave a comment if you want, saying what you enjoy the most, what was more challenging, and then we have our
winter illustration ready. Good.
10. Than You!: Thank you so much for taking this class and painting
a lump with me. I really hope you enjoy
the process and found these techniques helpful for painting your own
winter landscapes. I would absolutely love
to see what you created. So please don't forget to upload your project into the
students Project Gallery. You can share a photo of
your finished project, a work in progress, or even just a small detail
you enjoy painting the most. And if you decided to share your painting
on social media, you can also tag me on
Instagram, dot jural. I will be happy to share
it in my stories as well. Remember, every
painting is unique, and this space is
all about learning, experimenting, and
supporting each other. If you like this class, please leave me a short review. This helps me to make more
classes in the future. If you have any questions, feel free to leave them in
the discussion sections. I'll be happy to help. Thank you again for being here and painting with me today. I can't wait to see your
beautiful winter landscapes. Bye.
 Fio Ortecho, Watercolour Artist & Teacher