Transcripts
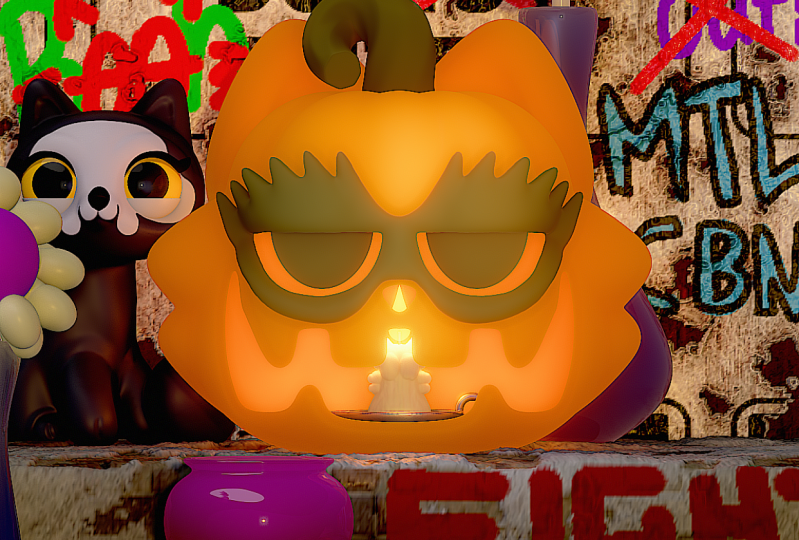
1. 3D Modeling with Nomad Sculpt: Jack o'lantern / Pumpkin: What's up guys drug via a view. Welcome to the 3D modeling
with nomad sculpt. Halloween's right
around the corner. So we're going to
do a 3D pumpkin. Also nomads cop, just
updated to 1.68. We're going to work our
way through a lot of the new features of
nomad scope 1.6. A lot of things are different. Some things are a
little more confusing, but we do have some very
cool, very new features. They're going to make your
work look so much better. So I'm gonna be using nomads
coat on the iPad Pro 2021, but no, my scope is also
available on Android tablets. Subsurface scattering is something that had
been waiting for, for a long time
with nomads COPD. So glad that we have and now I'm going to tell
you all about it. I'm going to show
you how I use it. Now you can take advantage of
it or why it's so important and why it will make
your work look amazing. I loved if you're brand new to Nomad scoped, I suggest going back
and taking my 3D modeling for beginners
class here on Skillshare, I'll take you through
all of the tools you'll be familiar with nomad. Alright, let's move
on to the next video. Class, projects.
2. Class Project: So welcome to the class project. In this class, you
have a lot of leeway. There's gonna be a lot of really cool things that you can make, including lots and
lots of pumpkins. We're gonna do a jacket lantern, but you can make a bunch of
other pumpkins as we move along through the tutorial,
justice, decorate. I wish I would've done
that more in the video. But I show you how
to make one pumpkin. And if you can make one pumpkin, then you can make
all different shapes and sizes of pumpkins. So anything that you make or any pumpkin that you
make or that you like, just be sure to save it. You can just hide it. You
can just hide the mesh, just press the little
eyeball and hide it. You might want to use it later. Also, I'm gonna make
some leaf vases, vases. So you can make a bunch of those and will scatter those
around the scene. Because anything that
you can make any shape or any any mesh that
you make that you like, that you want to use for later, just save it because you can
add it right in the scene. I'm going to include
a 3D model of a cat. This is spooky cat. If you did my other 3D class, Halloween cat, then you can
use your cat in this class. And you can use this cat
to insert it in the scene. And we can light it
and make it real fun in real Spooky, real Halloween. Also make sure to
download the environment. I usually work in one environment and it's one
that I made in Procreate. So I'll just provide
that to you. You might already
have it if you've taken some of my
other 3D classes. So I figured I would include
it so that your mesh in your sculpt can look as
close to mind as you want. But of course you can use some of the other environments to totally up to you whatever you feel more comfortable with. So of course, after class, I hope you upload
your projects to the class project
so I can see them. So all the other
students can see them. I can't wait to see
what you'll do. Let's finally get started with the next video. Getting Started.
3. Getting Started: First things first to
make sure that your updated to version 1.68. Alright, so let's start
out with our pumpkin. We're going to
start from scratch. So I'm going to hide
my original pumpkin. I don't want to get
rid of it just yet. But we're going to
add a new one by going to this menu here. And then we're going to hit Add. And we're going to go to sphere. You can see all the menus and everything is a little
bit different and make sure that your
uploaded or updated to version 1.68
and nomad sculpt, you might have to go in manually and update your nomad sculpt. So now we just have one sphere and we're going to use
radial to make our pumpkin. So we have our sphere. And we're gonna go
back to the add, back to the plus sign and then
see these sort of pinkish. We're going to tap radial radio will radiate the shape
out from the center. And you can see they're
connected by this L. So if we go to the radio, makes sure there were
tapped on radio. There's an x and then there's the radial y, and then
there's radial z. So you can look at your Gizmo. You have red, blue, and green. So you have red,
blue, and green. That's how you know
what's going to happen. That'll help you with your,
they're called repeaters. So all of these are
called repeaters. So the colors will
help you out to know what's going to happen. So once radial is selected, we can increase the green. So we'll do, let's see, we'll do six at first. And you see this
circle in there. That's circle with six points. So that's how you know how
it's going to radiate out. So we have six now, but you don't want to do
anything here because it won't work if you try to move it or
do anything, it won't work. So you have to go back here. And then instead of radial, you have to go to the sphere. So now we're on the sphere. So now let's tilt it
down a little bit. So now you can take one of your arrows and you can
see that it will pull, it'll pull the
sphere out like so. So this is great for a pumpkin. Well, let's say you
want more divisions? I think I might have. There we go. So let's say
you want more divisions. Go back into here, go back to radio, and
you can increase it. So maybe nine for our pumpkin. Okay. So once you're happy with
the amount of divisions, so then we can go ahead and
validate it. Join children. So now we validated our pumpkin. But if you go if you look
here, oh, we did validate it. You know what? So what just happened there
is I should have gone back and check to make
sure that I was on sphere. Because you can validate the whole radio thing
or just the sphere. Then I wanted to validate
just the sphere. So I just hit Undo. Because I wanna be, I
must have been here. The whole thing got validated. I just want to
validate the sphere. So I'm going to tap validate. So now the sphere
only is validated. So what that means is now I can tap on
one of my sections. You can tap on one
of my sections. And if I want to use move, it will move all of them. So depending on what shape
I was trying to go for, you know, you can sort
of move it around. And you can make like
if you wanted to make a really funny shaped
pumpkin or like one of those sugar pumpkins
or something like that. So you can kind of make a bunch of different
shapes like that. So for our pumpkin, I don't really need
to do all of that, but I just wanted
to show it to you. We'll use the gizmo and
we'll just stretch it. Like so. Maybe
something like this. I think that looks pretty good. So now I want to validate, but I don't want to
validate the whole thing. I just want to
validate sphere here. So I'm going to tap validate. The reason why I don't want
to validate everything is because once you
validate everything it makes it just one shape. I validated the sphere. So essentially this is just one sphere that's
making up all of these. So if I tap on it, tap on one sphere. Like this. I can still
use the Move tool. And I can still manipulate this. Like if there was
another fruit or vegetable or something
that I wanted to make or even like a
dumpling or something. You know, you can do a lot
of really cool shapes. Anytime you get shapes
and things that you like, you might as well
save them because you can always use them later on. And even though
you can make them, It's better to have
something that you can just access that
you've already made. It'll just save you time. So whenever you can, save shapes and things that
you like that you make. Okay, So back to the pumpkin. And then we can go back here, and then we can go to radial
and we can validate it. So now it's validated,
now it's one piece. Let's go ahead and
rename it pumpkin. So just tap the three
dots, name and pumpkin. Okay. So it looks pretty good. The only thing is
I want to look I want to look at it
from the front. So let's get the front. There we go. And you can
see I have a line through. And if you want to
have that line, all you have to
do is go to this, the symmetry button, go down to Advanced and you can show
line and show plane. I think I just have show line. That's just to
help me know where the center of my Skulpt is. So that's just the line
that shows me the center. Okay, so the next
thing we wanna do is duplicate this pumpkin
and make it smaller. And that's how we'll have our Jacqueline turn be
hollow in the middle. So we'll just take
this pumpkin here. We'll just tap these
and hit Clone. Okay, so now let's just, the pumpkin on the top is
going to be our main pumpkin. But for now, let's
turn that eyeball off. So we'll turn that off. So now we're on the
smaller pumpkin and we'll make it
smaller with the gizmo. And we'll just use this orange and we'll just make
it smaller like this. So as I bring back
the other one, you can see about how much
smaller I've made it. So now that we have
our two pumpkins, I'm going to select them
both by checking the boxes. And then the bottom one, the smaller one, I'm going
to turn off the eyeball. Okay. And of course it wants
to turn them both off. There we go. So I don't know
why that's so hard to do. I don't know why. I
just can't select like say if I have
the other pumpkin. If I select them both, and then tap the eye, I don't know why
they both go off. But you can see that they do. So in order to get just
the one Let's see. I think I have to
turn it off and then do the check mark. So
that's kind of annoying. I don't know why that is. You should be able to
just turn that one off. I don't get it, but we're
going to keep moving forward. So now that we have the bottom one off the
smaller pumpkin, we can just voxel Ramesh them. So we'll just go up
here to voxel Ramesh. If you're ever
looking for simple, simple, simple
mesh, That's join. Now, join is simple mesh. And when you do join, that means the same
thing as simple mesh. You can always
separate a leader. We don't want that. We want to do a voxel Ramesh because we
essentially want to take the smaller pumpkin and extract that whole shape from the
inside of this pumpkin. So that's why we
check the eyeball. That's how it's called
a Boolean operation. So essentially we're taking that whole shape and we're extracting it from
a different shape. So let's go back to voxel and then we'll just
remember it at 200. So we'll bring this
up to 200, like so. And then we'll just
have a voxel merge. Okay, so now our
pumpkin is voxel merge. It's actually hollow inside. So now what we have
to do is carve out the eyes and the mouth
and things like that. Okay, so this is
one of the reasons why I really like
having this line here, because it's easy for me
to see when I'm thinking about making the eyes and the
mouth and things like that. I just like to be able
to see where those, where my central line is. But first, before we do that, we want to protect the backside of our pumpkin, the backside. So let's turn it to the right. And we'll take our
will take Select Mask, and then we'll use
the rectangle. Let's just protect the
back part of our pumpkin. So something like that. So I'll just bring it
back to the front. So now that the back part of
the pumpkin is protected, we can use the trim
tool to just carve out. If we weren't using the
trim tool and we carved it, it would go all the way
through and it would cut out the front and the back of the pumpkin. We don't want that. So now let's go
to our Trim tool. And you can actually do, you can actually trim
it however you want. You can use the lasso. And that'll give us
something like this. Let's see, trying to
remember what I did. Think this looks cool. So you can use the
Lasso like that. Or you can just, if you wanted to use a circle. If you wanted to just
do circular eyes, you can actually
change the setting. I have to change the setting
of the circle. Let's see. I don't exactly remember where it is now, but you
can change it. So instead of the circle
being there, you can pull it, you can make the circle from the middle. Let's
see, where is that? It was in the trim
tool settings. I should have known that. But in the trim tool
settings, shape ellipse, so you can make it as
a circle, centered. So now it'll just be a circle. You can also change it to just the circle so
that it's not centered, but it is a circle. And you can, without
anything then it can be a circle or an ellipse or any sort of
shape that you want it to be. But I like using, I usually use a circle. So I'm going to go to
centred and circle. If I wanted to make it at home, have two circular eyes like
that, which I kinda like. Of course you could
also use the polygon. The polygon is, there's also a change in
the way that this works. It used to be that
you make the dots. Now you can't do
the dots anymore. Now you have to sort of drag it to a dot
and then let it go. And then where you want to
make this the next time, you have to drag it like
that and then let it go and then continue
to move like that. But I guess. Okay, let's try that again. So we have R. So we can just do it
three times, I believe. And then we can add nodes. I think I was doing it
the way that you do the like the tube
tool. For some reason. You can do something like
that and then you can hit green and you have
something like that. But somehow I took off the mask. And that's what happens with if you don't protect the back of your of your mesh? Okay. I don't I take off the mask. So we'll just tap mask again. We'll turn it to
the right rectangle and will protect the
back of our pumpkin. Okay, so let's use
the trim tool. I'm just going to go
ahead and trim this again using the Lasso k. And now for the mouth,
I'm just going to do, I'm going to start
here at the line. So we'll do something like that. And of course you can try it a couple of different mouths. Maybe I'll do another one. If you want to do one
like and remember, we're just using
half of our pumpkin. So if you wanted to
just do one like this, Something like that, it's
kinda interesting too. But just have fun with it. There's a ton of different
ways you can do it. I like to use smooth. Then just smooth out everything. And if you find that it's
your meshes too soft, you can just go to the room. You can go back here
and go to voxel Ramesh, send them will tap it and
just refresh it at 200. And that should make it a
little bit more resilient. Still soft, but a little
bit more resilient. But you know me, I like to
make everything nice and soft. Even the eye socket. I'm smoothing at pretty small. What 135. But it depends on how big you made your
initial sphere. So but isn't it to be that big? Okay, So I think that
looks pretty good. It looks pretty fun. So we don't really
need the mask anymore. So now let's go to Select Mask. Go here and then clear because we don't
need the mask anymore.
4. Stalking: Okay, So I usually
sculpt in mat cap. So let's just change
this to a Mac app. So let's go to C If I guess right, and
I think it's this one. Yeah, so let's go
to the light menu. And right now it's in LET
PBR, let's go to MCAT. I just wanted easy, easier to sculpt and Metcalf. So we're going to do
this curly Q on the top. One of my favorite things to do using the tube tool
and making pumpkins. I really like making
those stocks. So I'm going to try
to do it slow because the tube tool can be sort of confusing if you've
never used it, but trust me, it's worth it to learn how to use the tube tool. So let's tap the tube tool. We'll go here to path. Okay, so for now, let's just do you have
to do it the same way? So I make let me
just start again. I don't want to I don't I
don't want to confuse you. So I'm going to tap on the screen and drag and we
have two dots that appear. So now when I take it off, I'm going to start
dragging again. Like that. Drag again, drag again,
drag, drag again. And by dragging, I'm just
moving it a little bit on the screen like that in there. So now let's hit the green. Now we have something like this. So obviously that's not
quite what we want. So we're just going to
take this last node and bring it down to the middle. We'll bring it right inside
the middle of the pumpkin. Okay, So far, so good. So now we'll take, we'll change the radius here. So essentially, with
you change the radius, it changed the width. But you have some
options right now. It just changes the whole thing, which is fine, but
we'll tap it once. So that's the top of the tube. And the bottom of the
tube. Doesn't matter which is the top or the bottom. You can just change the one
side and the opposite side. So for the bottom side, going into the pumpkin
will make that nice and wide like that. And for this side, we can
make it a little bit shorter. So we have something
like that Item. Put it need to be that wide. Move this node down. So we want something like that. So now the only thing is
we want this to curl. We want this to be
like kind of curl. So you just have
to sort of take it and add nodes and
then slowly curl it. And this might be harder
or it might help. But you can do spline. Sometimes I do. I always do spline because it
gives it a nice curve. But sometimes spline might be a little bit
harder for you too. Move the nodes around. But either way, if
you don't use it, you can just, you can just
move the nodes like this. And if you use spline, then you just have to, you
just sort of stretching them. Okay, so just make
it sort of curly. You can add a node
if you need to by just touching the line. But we just want to make
a little curly cue. That actually looks kinda crazy. I think I want. And if you notice I'm bringing nodes together to delete
them because I don't really need
that much. That many. So maybe something like this. I made it ungodly big. So now I'm going to
just shrink it with the gizmo and just bring
it back to the center. Sometimes I do that,
I'll tend to like, make things that are the
wrong size for some reason. I don't know why. But something like this. So that looks a little
bit more believable. So now there's another
option with radius. So before we did the
front and the bottom. But if you tap, if you
type radius again, then you see that
each of these nodes gets a little partner node. So what the partner node does is you can
actually make it wider. I'll make it wider here to see right at the part
where it's going in. I'll make it wider. And
it looks way better. Way more natural. If you want it to make it a
little bit wider at the end maybe or
something like that. But I think I like the
way that it looks. So once you have
your nice curly Q, the way that you like it, you can go ahead and
validate it if you want. We can always come back to it. But you can validate it.
I'll validate this one. I think I like it.
Okay, so next, let's just make a little
bit of a setting. Let's just make a ground
and a little backdrop. So what they're really simply. So we have our pumpkin,
we have our tube. I'm going to rename
the tube to stalk. Okay, so now let's just hit
Add and let's hit plane. And this is just a flat plane. So we'll just make it
bigger, make it longer. And we're in orthographic. So if we hit front, so we won't actually see it. But that's okay. We can actually, we can actually get out of orthographic right now and just go to perspective. And also, when I go to
perspective, it's always on 25. I actually like it
more towards ten. So maybe we'll just do
like 13 or something. So now we'll just
bring this down towards the bottom
of our pumpkin. Something like that looks good. Another thing I'd like
to do, Let's clone this. So we have our plane here, and I'm gonna go ahead
and validate it. And let's clone it. And then let's just bring
this one out and tilt it. And it actually doesn't
need to be big. Now we have sort of
just like a backdrop. Let's meet both of these wider. Or actually before we do that, let's go ahead and take both of these planes
and just join them. So now we don't have to do both individually. So
we've joined them. That's like simple merge. So we can just
stretch like that. So now we have just like a, just like a quick backdrop. We can stretch it this
way if we want to. Okay, so now we have a backdrop. Just get it to, get it to a
place that you kinda like it. I think this looks pretty good. I can see where the
backdrop changes is in the middle of my screen. I'd like to add a view. So we'll go to this
little camera view and we'll name this one. Okay? And again that's here in camera and just
tap Add view here. Now we have or one. So if I want to accidentally go like that and I wanna
get back to where I was. I can just tap one and it
goes back to where it was. So let's go ahead and make a
candle that will go inside. Let's use the laser tool to make the little cylinder
that the candles sits on. So let's do that first. So we'll tap leaf. And actually I'm
just gonna go back to orthographic for now. And front. Now we're
on the lathe tool. And I think we just
want to use curve. You see this line that
comes in the middle. So with the layer tool, essentially, if
you draw a shape, like if I draw, if I want to draw a base, instead of going like this, like that won't work because then the
base will be closed. So if I want to draw a vase with the lieth with
the laser tool, I start from the bottom
and come up to the lip. And then if it's empty inside, I'm actually just going
to make that wall. So I'm going to come down as though I'm making
the inside of it. Then I let it go and
see now it's open. That's at the wrong spot. So let me move it with the gizmo. Whoops. It over here. And now it's open or
hollow, I should say. The only other thing that
I should have done is I should have brought this out, like this kind of thing. Just so it has a base,
something like that. So it has a base. So since I made this, I'll just validate it. Because why not? I'll keep it. Maybe it'll be
part of the decor. So that's how you
use the laser tool. But essentially we
want to make a plate. So we're gonna do the same
thing will go too late. We see there are
little line there and we're in curve over here. So we kinda wanna do
something similar. So it will just
come out like that. We'll do a little bit. So that'll be the base. And then we can
come out like that. Maybe this is our
plate or this is our little candle holder,
something like that. So now let's use the gizmo to just bring it
out and let's take a look at what we've made. So I think it looks pretty good. Can make it smaller. So I think that'd
be a decent plate. Another son with like a
like a little handle. And we can try, Let's try to make one
of those just for fun. So we'll bring this up. This is a contender. So that's a contender. Move it. Let's validate it. So now we'll go back to leaf. And the only problem is we would have to
if I were to do that, it would be on both sides. But let's, let's
just experiment. So I'm going to come out, I'm going to make
it a little bit of a thicker plate like this. I'll make a little bit
of a thicker plate. I'll bring it straightforward. And what I would do is I
probably go like this, just like shrink it or shrink it but like
push it so it's narrow. Validate it. And then I would go
to up here, add. And I would do either a
tourist or a cylinder probably will do with tourists. So we'll bring the
tourists up and back. Over here. Let's just hit Snap. So now there's the 90 there. So that way it will go
exactly 90 degrees. And there's also snap. Snap is great because it'll snap and it will
move in increments. Which is kinda nice. We don't I don't really
need to do that, but that's just what Snap is. So now let's bring it down
to the middle of this thing. Move it over. Let's, oops. Let's just shrink it
with this outer orange. So we'll shrink it down. And maybe do
something like that. Again, you have,
you have edit here. So there's these tools, like if you want to
make it thicker, Let's see how do I do it? I think there's another one. Oh, there it is. It's green. I think this is the eye.
This is the one to make it thicker and thinner. So make it a little bit thicker. So I think it would be
something like that. Let's take it off snap
so I can move it freely. And then I will just
take these two. So we have the leaf and the tourists. So the leaf and the tourists, and we'll voxel
re-emerge them at 200. And now they're together. And I can just smooth it out. So it's almost like we solder
solder them together. Okay. That looks pretty good. Now we have these two plates that
we could use for the candle. You can use whichever
one we want. Really. I think this one
probably is a bit cooler. So let's just get rid of this. And we'll just use, we'll just use this one as the winner. So let's hit front and
let's bring it down. I can even see the ground. Okay. So now let's
make the candle. Obviously we'll start
with a cylinder. So we'll just go
to add cylinder. So we'll bring it into
our little holder, will make it smaller. Will use this green dot
to stretch out the top. Okay, So I think something
like this, well, to make the whole thing
smaller for sure. But I think something
like that works. So I'm gonna go ahead
and validate it. So now I think we
can sort of make the we can use in Fleet. We can use a mixture
of inflate and clay. And let's refresh it. So let's go. Voxel
remiss it at 200, just so it's a bit sturdier. Again, smooth out these
like little ribs. And after this, I'm
going to save and then I'm going to sort of
clean up my meshes. I clean up I just
mean rename them. So I know what everything is. But it's important to say, make sure you're saving so
you don't lose everything. I better hurry up because
it'd be terrible. I get a crash right
now. After saying that. Okay, so looking
good, Let's save. Sure, that's in the middle.
And let's just name these. So this cylinder is the candle. This is the candle holder. Okay? This, I think is the vase. Okay. Plane is the ground stock. I'm going to bring stock
up over the pumpkin. So we have this candle holder, candle and the plane. Okay? So now we have our tools.
5. Stalking 2: Okay, so be sure to
save your pumpkin. I don't actually don't
have autosave on, so it's doubly important
for me to save. Another tip is you can, if you want to take
some time and make like green like vines, like sort of swirly vines. You can do them exactly
the same as this. Just make it really,
really skinny and just make some curly
binds coming off. But you would just
use the tube tool. It's so useful. I love it. Okay, so now we have
our little stalk. And there is something else
that I like to do with this, with this talk is if
you notice like on a pumpkin like their
sort of their planes, you know, everything is
like a, like a plane. And what I mean by plane is it's like there's a sharp edge, there's two sharp edges. So it's not just like
round like this. It's actually flat. And then there's
a crease and then flat. So something like this. So the way that I
pull this off with the pumpkin stock is
we'll use crease, but we'll use the opposite. Because if we're
using the normal way, it's kinda cut
into it like that. Which I mean, it doesn't
actually look that bad. But if we do sub increase, it will sort of give us that. It'll give us that plane
really, really nicely. And that actually
looks really good. So it can be a bit tricky, but you just want to try
to do it in one swoop. So like even here, like I'll just draw, I'll just make the
crease around and try to bring it all
the way to the base. So let's just try one. Something like that. You can always go back over it. If it looks funny or something. You can just go back
over it like that. Okay. And also, I'm noticing that it's not as nice as I would
like it to look. So it might actually, it'll be better if
we voxel Ramesh, the horn or not the
horn, the stock. So I'm going to undo that. And we can we can
remeshing it at 200. So I'll remember it.
You notice that it has all these sections now and we can just go ahead
and smooth that out. Okay, So it will smooth it out. And now let's try
the crease again. Remember we have sub. So that looks a lot better. So you might, it might take
you a couple of tries, but just try to get it
as smooth as you can. So I'm going to try
it one more time. Keep it in the middle. So something like
that is pretty good. So now that I've made that one, I'm going to make another one. Maybe just about here. I'll make another one. I'll come across. Now I sort of lose it up there. So I'm going to just tilt and then I'm going
to continue with it. Notice it, notice that I'm
not going close to this edge. I'm just trying to keep
some distance. Like that. Assembler is trying
to keep, keep a distance away from that one. And we'll do the
same thing here. And to make it easier, I'm just going to turn
it all the way around. And I'll just start here
and then bring it down. So we have this. And even though I lose
it kind of up here, I'll just sort of bring
it down like that. Just kinda try to bring
it up underneath. And just try to,
try to bring it up. It doesn't have to be perfect. Again, really, really doesn't have to
be perfect even here. It's gonna be hard to follow. So I'm just going to put
there's a lot of space here. I'm just going to make one just like that. So I just kinda
like just faked it. Now that if I turn this way I can actually see
where it should go. So I'll just, let's see. So one can go in
the middle there. So let's go to the middle. Try to keep it in the middle. There we go. Let's close enough. And
there's a lot of space here, so I'm just going to make
one in the middle as well. So something like this. Again, I'm just sort
of like faking. It doesn't have to be perfect, but it really adds a
lot to, to the stock. So now let's take pinch. And sometimes like some of
mine are kinda jittery. So I'm just going to take pinch. Just sort of go over
them a little bit. Sort of straighten them out. This one looks pretty good, but I'll go over a little
bit with pinch. You can see it really helps
it in like making them making a straight pinches. Another good tool that
I use pretty often. Okay. So hopefully that
wasn't too confusing. I think that it adds a lot to the Jacqueline and so I want to just show you how I
do things like that. Okay, so now we have our stalk. Everything is looking good. Let's just go to the pumpkin and just smooth it out a little bit. Because I didn't
really do that before. I noticed that it's
looking a little Ruby. So I just wanted to sort
of smooth out my pumpkin. Can't really see there.
You can see them. That's what I don't, I
don't really want those. I want it to be smooth. Even if I have to smooth
everything out and then go back over the crevices. I'm totally okay with that. But I want my pumpkin
to be smooth.
6. Candle: Okay, so let's make
this candle look a little bit more like a candle. I think inflate tool will be a great tool to sort
of bring this out. So we've voxel
reinvest it at 200. So it's going to be more sturdy, which is good for adding and sculpting and
things like that. So we're gonna be moving around
this candle quite a bit. If you notice that
you happen to do this a lot and it
starts flying around. One thing that you
can do is just go here to your meshes
and just undo the, just hide the background. So that'll make it
a little easier. So we have the inflate tool. Radius is about 60. Now we can just sort of
pretend like there's drips. So we have roundtrip and then I'll just
make like a tail coming off to the top. So pretty simple. You can also make some
bulges at the bottom. Make a lot around the top two. Notice that I just sort of
like try to build it up. Build up some along the bottom. So it doesn't have to
be extremely crazy. Perfect or anything.
You can eat, you can be perfect. So I think something like
that looks pretty good. So now let's, you know what, Let's add a little
bit more to the top. And then we use
clay and subtract. So we'll just use the
clay tool, subtract. And then we can sort of just make a little bit of
a depression there. And then we'll go to smooth. And we'll just smooth
everything out. So we'll make it
nice and smooth. You can't tell if I
went overboard with my multi multi wax,
but that's okay. I still think it looks good. Okay, so once you're happy
with your melt the wax. I don't think we need a wick. I think we can just do a candle, so, well, let's
just do a sphere. So we'll go here, add sphere. And I'm just gonna go ahead
and name this candle or fire. Flame. Name it flame. Okay, so let's find flame. Let's bring it close
to our candle here. Whoops. Okay, So this is flame. And move it up, shrink it. Maybe even a little smaller. So I want to directly
in the middle. And we'll go ahead
and validate that. Now I'll take drag
radius about one-twenty. Then I'll just drag this out. I think that looks pretty good. And you might you might be
able to flatten it too. If you want to get some. Similar to how we did the stock. But this is just a
little bit more of a primitive way to do it. But there's something
about making like planes like this that I just think
looks really good. And if you want to get
crazy, you can take pinch. You can sort of make
them look even nicer. Decreases. But we probably won't see it because
we're going to add, we're going to double up on
this layer and this mesh. And we're going to
hear that I did make this kid this candle is
is really gone through it. That's okay. That's just
gonna be my candle. I guess. It's just gonna be my candle.
I really wanted to. I could take crease. I could start going underneath. I still have sub you can excuse me. You can sort of add a
little more detail to your, to your candle with
the crease tool. Just like the smooth around it, so it looks just more natural. I do really like
the crease tool. There's always, there's always
more things that you can just give whatever you're doing a little bit
more dimension, a little bit more reality. This is another little extra that you don't
really have to do, but I don't mind. Just go in that
little extra mile. Okay. I think that looks great. This flame is it's kinda fat. Skinny it up a little bit. Oops. Okay. So I think we're good. I think we can bring this
inside the inside the pumpkin. So let's bring back our plane. We have the candle and
we have the flame. And I think we can actually
connect these two together. I'm just going to long press on flame and then wait
for that little l. So now they're just connected. So it should be
able to just take this and move the whole thing. Nope, Of course. Alright, well, they're
connected but I still have to candle flame. Oh, you know what, I have to
do the candle holder too. So candle holder, candle
and flame. There we go. So now it's altogether, shrink it a little bit. And let's move it
inside our pumpkin. Shrink it, push it back there, move it up some. So I wanted to make
sure that it looks like it's actually
touching the bottom. So I'm going to bring
it up and then down. Just with a base is actually
touching the bottom. So it's important that actually it's actually
a good position. Can see the little
flame in there. So that's a good position. Now we'll come back, we will turn on PBR and we
can start coloring things.
7. Candle Holder: Alright, so I notice that
the vase is floating. The vase is floating. So let's just move it down. Also notice this
weird thing with the with the pivot tool. It's so strange sometimes you
just have to go to pivot, reset and then pivot again. It's just another extra step. I don't know why it does that. It really bugs me, but
we're going to keep moving. Okay, so we'll put
that on the ground. Okay, So now we're good. So I'm gonna go back
to perspective. Good. I'm gonna go back to Lit. I'm just going to save. I'm gonna say shave. So I'm going to save
and then we can start coloring our pumpkin. I really liked the
glossy pumpkin. I know that he can't be glossy, but I kinda want
them to be glossy. But anyway, so let's, it's actually a decent color. So let's make him Let's make
it a little more rough. Not too rough. Like so. For the background. For the background maybe like a light purple might
be interesting. So let's make a light
purple. For this talk. We won't like a light brown. So maybe maybe
something like that. That was my alarm. Alarm because on the
25th I had to I had to get up to catch my plane at
03:30 A.M. in the morning. And I guess I didn't
turn my alarm off. I think that's a decent color. Let's take another look at it. It's a decent color
for the stock. But I'm noticing that I can
see this dark in there. So that's not something I want. So first things first, I'm going to hide the plane so that I can get
a good look at it. So this should be
fairly easy fix. First thing I'm gonna do is
just take the trim tool. Makes her either that I
have this talk highlighted. So now I'm going
to take the lasso and I'm just going to
trim it like this. So let's take a look now. I don't see it, but I want to make sure I
didn't cut too much. It looks good. No
missing pieces here. And you can't see
it on this side. Good. This does look kind of funny. So I can just smooth inside. I don t think I mind the
other the other sort of ribs, if I do, I can come in
and smooth them out, but I don't really
mind them right now. Let's bring back the plane. And so this vase, Let's call it a sort
of like the color of the color of eyes would
be but like a clay one. So maybe like that color. Brown vase. I want it to be a
little bit more red. Okay. So this do we want
it to be Gold or Silver? Maybe silver. So let's tap on the circle. Let's tap on this circle. So we have some
silver options here. They look pretty good. So let's up the roughness. We want to syllabary, looks quite nice. It's a little too shiny though. So let's solo. It. It looks nice. But there has to be
a way to sort of like dumb it down a little bit. So maybe if we take some
of the metal this off, Let's see what that looks like. Didn't really do what
I want it to do. So I'm thinking maybe, maybe we'll add some
sort of like rust to it. So let's add a layer. There's gotta be a way to
add it to kinda get it sort of like rusty gold. That actually looks nice. Let's take the metal missed off. And I kinda wanna make
it sort of rusty. So let's bring the
intensity down. I mean, I don't know what
this is going to look like, but I don't know. Let's see. I actually can't see hope somehow. I'm unsmooth was wondering
why it wasn't doing anything. So confused. Especially these
really glossy parts. Sort of dirty them up because it shouldn't
be like a clean, you know what I mean? Like it should be, you know, it's like this is this
is not supposed to be like a five-star hotel. Supposed to be kinda dirty. So we just want to weather
this a little bit. Let's save. And it'd be kinda interesting
if we put a little texture, but we don't need to
go that far into it. Let's just Let's make some really dark
gray, almost black. Let's take more mental
illness out of it. Okay, I think that looks better. So now we'll hit Solo again. And it looks much better. So for this, we'll
tap on the candle. And we want to do, I think, traditional sort of
whitish candle color. So let's take the
metal miss all the way down. Bring it up too. Maybe even just like
pure white ink, something like that is good. Doesn't have to be that rough. So maybe something like that. And then we'll tap on the
flame and the flame can be, we'll start with like a bright yellow and we'll go from there. Okay. Looking good so far.
8. Lighting: So it's looking really good. I think now it's time to
figure out the materials. So let's experiment with
the subsurface scatter. So tap on the pumpkin and we'll
go here to the materials. We'll do sub-surface, right? So now we can change the color. So when doing sub-surface, this color here is the color of like the
insides like so e.g. what subsurface scattering is? Let me turn this light off. So I have a flashlight. And so what you're seeing now, that's subsurface
scattering. So that is light underneath
the surface of my skin. And an obviously inside
of our skin is red, so that's why it's red. So that's all subsurface
scattering is. If we had green blood than
it would be green inside. So that's what this color is. So maybe we want to make
it a little more orange. Okay, so we have
subsurface scattering. Little more orange. Looking good so far. Let's do the same thing
with the candle inside. So I'll tap it. And we'll go up here and change
it to subsurface. So it can good. Now I think we're in a place where
we can start lighting it. So first and foremost, let's turn the environment off. Should be all black. Now we'll add a light here. So here's our light. The
lights have changed too. So now you have to
go to the gizmo. And this is a, this is just a directional light so it doesn't matter where we put it. So I'm just going to put here. And this is actually it
looks really good there. But we can change it
to wherever you want. That's a big change. But you'll notice that it's
changing sort of like oddly. And that's because
we're still in snap. So let's take it off of snap. And now it'll just change the way it always
changes or moves. This would be the
light from the bottom. This is the light
from the front again. In actually didn't realize that the subsurface does show
from the directional light. So that's actually good to know. I think I want it from the back. I think that looks
pretty spooky. It's kinda dark. Let's see if I can adjust
this so you can see it. So you'll have to find a
spot where you like it. I think I like it this way. So essentially, maybe
the top view will help. So I have my light
pointing this way. So hopefully that helps. You can already see
the beauty of the subsurface shining from
the back of the pumpkin. I think that looks really cool. So now let's see if we can add, let's add a light
from our candle. Sierra little candle
peeking through there. We'll tap on that. And so we have the flame will go ahead and tap the three dots
here and we'll clone it. So now that we've
cloned it, this flame, Let's change this
name to flame add. Because we're gonna make
this one an additive. So then we go back
up to this circle, which is our materials. And we'll go to additive. Then we'll go to always unlit. We can bring the opacity
up a little bit. Okay, so now we have our
little flame in there. And you might not be able
to see it that well. Sometimes you have to go to
post-process in order to really see what it would
look like if it was shining sea now you can see
it a little bit better. So let's go back to
the material and just experiment with the brightness. And this is also a good
place to experiment with the color because yellow
looks kinda silly. See that looks better. So it's like yellow with a
sort of like a halo behind it. I don't think the
roughness matters. So now we'll paint it. So I think that's a little
bit more believable. So now that we've done that, let's add another light. So we'll go here to the light, will add another light, and that's very bright. We'll do the same thing, will move this out of the way. And we might just change
this to a spotlight. So let's change it
to a spotlight. So now we've changed
it to a spotlight. Let's try to move it. Let's see where we
want to move it. Awfully bright. That's very, very bright. So I'm going to tap
these three dots here. Just lower the intensity. We might actually not need
this because we're gonna, we're gonna see what
will make sense once we, once we put a light inside, we might not even
need that light, but it's a good spot here. But let's see if we can
add another light inside. So let's add a third light. And this light, Let's
rename to candle. Candlelight. I'm not 100% sure
if this is going to work. But let's, so we
have candlelight, Let's tap on the light and
let's make it a point light. So right now it's a point light. It's very bright,
but that's okay. We'll make it really warm. So let's make it a
really warm orange. And then we'll lower
the intensity a lot. Okay, so we've lowered
the intensity. So now let's see if we can
bring it inside. The pumpkin. Looks good. Now it's inside the pumpkin,
It's still too bright. So I'm going to tap here and I'm going to lower
the intensity some more. And I can probably
lower it even more. Okay. I think that
looks pretty good. So it's right over the flame. Maybe I wanted a little higher. So I think that
looks pretty good. So now let's turn this light off and just kinda see
how we're looking. Okay, so let's turn this on. So this is very bright. I'm going to warm this light up. And I think this late
will serve us better. Even if it's pointing
towards the back. This will lower the
intensity even more. Make it really soft. Maybe just lighten up
the back. Like this. Okay, so let's turn
on the environment. And let's turn the
exposure down. Let's go back to our view experiment where we want this light might be better even
towards the front. It actually works better
towards the front because you see more
of it coming out. I think that actually
works a little bit better if the light is towards the front
of the jacket lantern. Okay. So now I'm
gonna go back into post-process and just turn
on Global Illumination. It's looking good, I like it. Okay, so we have that
light in the back. Okay, Let's use up
our last light. Now this, we can just
test this light out. See what we get. Actually looks kinda nice even
with a lighter background. I feel like this one
needs to be darker. Oops. See if we can find
that last light. I'm going to name this four
so I don't misplace it again. So you can go to four. So for this light, Let's try a warm
color. A cool color. Let's make it a spotlight. Sometimes it's nice. All of our colors are very warm. So lower the intensity. Sometimes it's nice to add
a warmer color in as well. I think that looks good. Let's lower the it's
not the environment. One of these lights is very
bright. Oh, it's this light. Let's take light too
and just lower it. Lower the intensity. Let's go back into post-process. Make sure everything
is turned on. We have ambient occlusion. So you can mess
around with that. It'll just add some
extra shadows and things. Depth of field. Let's turn that on. And I'm going to take the far
blur and turn it up. Bloom looks good. Could even maybe do
a little more blue. Since it's a candle. Tone mapping. Not really
sure what that does, but it always makes my
scene look a tad bit nicer. I think I messed with the
saturation and stuff, but it always looks better. Okay. Vignette always looks nice, especially for this
type of scene. I think that looks pretty good. I think that's a nice a
nice charcoal answer. That'd be kind of a cool. That would be kind
of a cool preview. Let's save this and view there if this
light was back home. The only problem is
this is very bright. It looks very bright. So I'm going to take the
color of the pumpkin. And I'm going to
make it more rough. Just lower that. I'm going to do the
same thing with this because I like the blue, but this is just way too. So I'm going to make it rough. Rough. And I'm actually going to do the same
thing with the ground. So I'm gonna grab that purple. I'll turn the roughness up
and see if that affects it. Which it does need to
be a little bit darker to think that looks better. Darker and just more purple. Let me turn this
line off because we're seeing the line
down the middle. I think. Yeah, there we go. I think
that looks really nice. The only other thing
that I would like to see from that angle is maybe maybe I can do something with this
light at that angle. So I'll bring it down. Lighting
is very, very important. Obviously, I spent a lot
of time with lighting. So I just want to use this to
sort of add a little more, little more something to him. So that's kinda nice how it sort of just like
illuminates the back part. Raise the intensity. Yeah, that's a great,
that's a great view. And the background
actually looks quite nice. But maybe it can be
a little bit darker. I think that looks good to view. And I think that's a pretty
good pumpkin is a good use of subsurface scatter.
I think it looks good. It looks really nice. It'd be actually be even
better if there was like stars and things like that. But we don't, I don't
wanna go that crazy. So let's, let me save. And then I'll export this. So I'll just save it. I
think that looks great. The only thing is when
I do move it around, when I move the pumpkin, I do have to adjust. But even that I think
looks pretty good. I'll go through and just see any delights can be turned off. Let's bring this one
down a little bit. We'll lower that one. And we'll make a whole
environmental little lighter. Want to be able to
see it sometimes she now, that looks good. It's a pretty good Jack Leonard. See what this looks like if
I click, if I get rid of it. Hoops. So that's just candlelight. That's just what
the candlelight, which also looks
pretty nice, I think. So as you can see, there's
a ton of different ways. Ton different ways
to light things. And I always have such a great time doing
this kind of thing. And I can sort of keep
going on forever. But it has bedtime. So I think that will conclude. We're getting real close. Just get a nice little scene. I think that looks good.
We'll save that view. Let's make sure
none of these other lights will make it look better. It is nice. It's nice to the blue
actually looks nice as well. So I think we'll
go with this one. I think this one looks
good. One last check on the candlelight levels. And maybe the color. That was good, we're headed. I think that'll be it.
Will export this as well. Should have saved
before I export it. But that's okay. Going really slow.
But that's okay. Sometimes it is.
Sometimes it goes slow. There we have our pumpkin.
I think it looks good. Owner put the cat in this scene to that definitely
has to happen.
9. Skull Cat Friend: So now it's saved. How would I even put the, let me save this. I should make a pumpkin. Frogs. What I should do? Let's open. Hopefully you
guys did the cat scene. Let's open him. He's definitely the one. So let's take we
don't need the floor. We want all of this eyelids. So that's what we want. So now let's see if we
can export this thing. I don't know what
normals are, but we're going to try to export them. So this will be skullcap. I'll try to export
this save to files. School cat. So now let's open it back up. And let's see if we can
insert, add to scene. It's cool cat and that skullcap. She's Louise. Okay. It looks good. But he's inside the pumpkin. Just makes sure that he's
sitting as he should. Now, maybe we can add a little
more light to our scene. Okay, that looks pretty good. It'd be kinda cool
if I actually, you know what, Let's
instance this. So let's take this one. The vase. Oh, actually
let's do yeah, I think instance will work. I tap instance and
then I connect them. Now it'd be nice if I
had some different ones, but for now, we just
do the same one. Let's instance again. Let's instance again. Okay, that actually
looks good too. Like he's hiding behind. I think I want to
connect all these thing. It's just a good way to
keep everything together. I'm gonna save this view. Now I'm going to
bring over one of these because this
would actually look better on the other side. So with this little dinky one. So let's go back
to the new view. There we go, that's better. That's what I'm looking for. The only thing that I don't like because I wish I could light him up a little bit
more behind there. But I think that's I
think that's good. Let's move this over a bit. Here we go. That's perfect. Okay, so Save, it's got some new friends
exported to four K. Right? And that will
complete our little scene. Thank you guys for joining me. I'll see you in the next video, the altro. Until then.
10. Thank You!: Alright guys, thank you
so much for joining me. Thank you so much for being on that journey with me making
this jacket lantern. A lot of fun. I enjoyed
it. I hope you did. I hope you learned a lot.
There's a lot there's a, there's a lot of new
features with 1.68. So it's just going to take some time for you
to play around with it and get used to it.
Be sure to check out. I have a bunch of videos
on YouTube where I go through a lot of the tools
and the new features, I'm learning them as I go. But that might help you
to learn them as well. So be sure to check
that on, on YouTube. Youtube.com slash drug-free. Dave, Of course, you can
follow me on Instagram and TikTok and everywhere else as drug-free day,
Facebook as well. But this was a fun class and
it was really cool to bring in some old scopes,
that old scopes, but to bring in a
creepy cat and I prefer to get skullcap
from the other scopes. I'm going to start
really trying to incorporate things
from classes, e.g. we did the 2D Halloween cat, the 3D Halloween cat. And now we're doing the jacket lantern and
we're bringing it in, bringing in Halloween cat. There's just so much
you can do that. It just made sense to me
to sort of incorporate things from other
classes in this class. So hopefully you took, you've taken some of those
other classes too. I think I'm gonna do
another beginners video with version 1.68
because there's so much, there's so many new
features and they're kind of confusing even
though I'm a bit confused. So I think I'm going to
make a new beginners video just for people that are coming, that are just getting
started because it is quite different than
the previous versions. So I want to make sure that
everyone's familiar with that and I just think it's
a good class to make, to sort of do a refresh and get to know other than
all of the new features. Specifically, I can
just focus on each one. So I just have so many ideas
that sometimes it's hard to wish I had more hours in a day to do as much
as I wanted to. Be sure to rate and review my class and also
upload your designs. The project and resources tab. Create Project. All right
guys, thanks again. I really appreciate each
and every one of you. It means the world to me
that you're here taking classes and spending
your time with me and learning nomads, Sculpt. If you have any issues
or concerns or if something is not clear enough,
feel free to reach out. I will do my best to make it
clear and to make it work, and to make it worthwhile for
you to take my classes and rock with me through our 3D and 2D journey here
on Skillshare. Alright, keep drawing, keep
sculpting. I'll see you all. Next video. Here.
 Dave Reed, 2D & 3D Illustrator - Brooklyn, NY