Transcripts
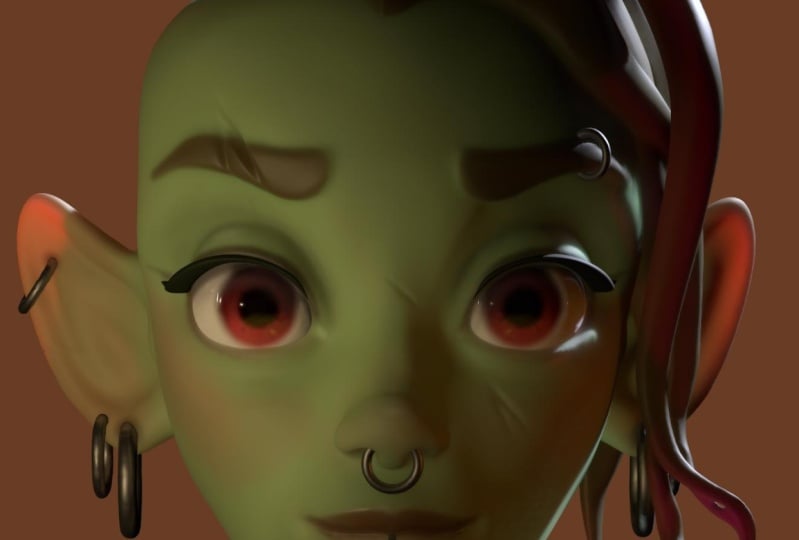
1. 3D Model a Human Head in Nomad Sculpt: What's up, guys, Welcome to
another Skillshare class with me, drug-free, Dave. So today we're gonna
do a proper face. I've had so many
people asked me to do one of my stylized faces. So now you have a proper class. I'm going to go through
everything from start to finish, from a sphere. I'm going to walk you
through all of my steps. And the best part
about this class is once you get used to making a face and the basic structure of the face, you can alter it. You can warp it to make
it look like any face. You can elongate the jaw, you can make the nose different, the lips, the eyes. But you'll basically
have an understanding of how to use basic shapes and use basic sculpting to be
able to get yourself to face. This has everything
that you're going to learn in the class. If you're nervous about doing humans or if you
haven't done humans, they're very difficult.
They're very tricky. But I'll walk you through
every step of the way. It's literally
just step-by-step, 1 ft in front of the other until we get to
where we need to go. It was really fun. I had a
great time working on it. And I know that you're
going to learn a lot. Glad that you're here with me. I'm excited to get started. I hope you're excited to get started because
we're going to make some really great 3D work today. Alright, let's move on to the
next video class project.
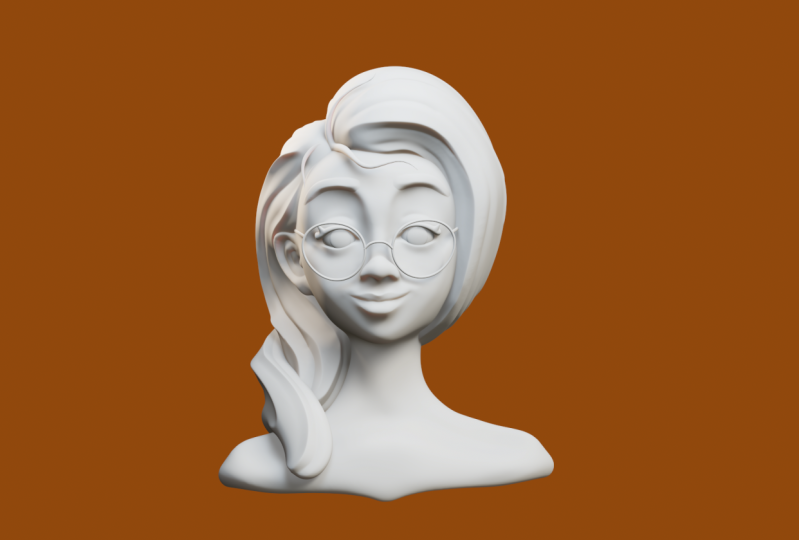
2. Class Project: Alright guys, welcome
to the class projects. So first things first, of course we're going to
make a human stylized kind of head, neck. We're going to do
the whole body this time because that would
just take too long. But maybe in the future,
I'll work on that for now. We're just gonna,
we're just going to concentrate on the face. It's gonna be very
stylistic, Disney style. You guys know the
way that I draw, the way that I create my
really fun whimsical things. I'll do a few
different hairstyles. So at least you'll have
that to choose from. And as I go along, I'll walk you through different ways to do different things and the reasons why I'm
doing everything. I think that's the
most important thing. Make sure that after you're
done that you post them to the projects
and resources tab. If you have any issues
as you're going along, make sure to just drop it in the end each class
There's a discussion tab, figure out what's
going on if you have any issues and we can just
get you moving forward. Nomads sculpt has been going through a lot of changes lately. Right now it's 1.74. But hopefully by the time
this comes out, it's on 1.75. There has been a lot of bugs. So you'll see me
have to do things like when I'm working with
nodes and things like that. They're just,
they're not working the way they should right now. But all that stuff
should be squared away. So just bear with me. And I was actually
getting over COVID. I actually had COVID when
I was making this class. Don't worry, it's not
contagious through the camera. But yeah, so give
me a little grace with my voice. Sometimes
it's a little. And hopefully I added
that I edited out all of my because that
was a big issue. So bear with me there. And also I just want to be very clear on what this class is. So we are just going to make
this woman's feminine face. Although there's lots of
different ways that you can, you can alter the face, so please feel free to do
that. You know what I mean? Feel free to change different things now or after you finish it,
you can go back. And I actually have supplemental things that you
can look at after class. And I'll show you how to make different expressions
and things like that. I show you a little bit
in these videos too. But there's just so
much that you can do. There's so much more
that you can do that. I can never just
stop with the class, so we'll always keep going. One thing that I
might have missed, make sure that when you start, you're in orthographic because I always sculpted
an orthographic. I can't remember if
I've mentioned that in the first in getting started. So I think that's about it. Let's move on to the next
video. Getting Started.
3. Getting Started : Welcome to getting started. So we're going to construct
our face and I'm going to start right from scratch so that you guys can follow
along fairly easily. So we're going to just start with new, create a new scene. And I'm just going to
change this background from this lovely mustard yellow to something a
little more neutral. I tend to like yellow. I tend to go warm with my grays. The next thing that
I'd like to do is make sure that I'm
an orthographic. So this is using this
little camera icon. And I make sure I'm
in orthographic. I always sculpt in orthographic. It eliminates any
perspective which could make things look a little bit different than
they actually are. So just remember to
go to orthographic. The next thing that
I'd like to do is change from lit PBR. So right now our mesh, this is our mesh,
this is our clay. This is our 3D object. And I'd like to change
this to a mid-cap. So we'll go, Let's
see where's McKay. There we go. We go to this little icon
here and then tap mid cap. And you see now it's
a reddish color. And essentially what
this does is it disregards any lights in the scene and the
environment lights. It just makes it
easier to sculpt because when things
are white and sometimes you won't see like
shadows and highlights, they can make it
look a little funny. Now of course, there's
other met caps here. I think these other ones
are mostly like decorative. I wouldn't use them
to sculpt with maybe like something
simple like this. But I think just
the default one. Phd clay is the one that
I would normally use. This is another
really small thing. But when you start
a new project, the sphere is 98.3 K,
which is quite big. But when we add shapes, I'm gonna go ahead and
delete this shape. So I'm in the scene window. I'm just going to delete this. When you add a sphere. This fear is only 6,000. So we're not going to
pay too much attention to keeping file size is low. We want to concentrate on
just constructing a face, but it is easier to
sculpt into block out, which is what we're doing first, is easier to do that
with smaller shapes that are smaller sizes. We don't need anything
that big right now. So just delete that and
work with this new sphere. There are some other, a few other things that might be
different about your nomad. There might be a grid. If you press the cog here,
there is a grid. I don't usually use the grid. I just have mine unchecked. There's also things
like solo and lock. I think solo is here by default, but there is lock
which we might use. So if you don't see lock there, then go to these three
little lines up here. And you can toggle
that on and off. Okay, so we have our sphere, we have Mirror Validate. And the gizmo is
obviously what will, what will move
everything around. The one thing I want to
note is sometimes e.g. if you're, if you're
here and you tap gizmo, this might not pop up and
might not pop up here. So just go up here
and you have to tap gizmo and then it will pop up. And if you just tap
gizmo but not mirror, it'll just move
from left to right, which is what we
don't want to do. We want to leave everything on this symmetry lines so we don't want to move
left and right. We'll leave it how it is. For eyes, for eyebrows,
things like that. We're gonna be using mirror. So when you tap mirror
and then you move it, There's two symmetrical ones. So obviously this
makes eyes and things a lot easier if we validate it. And then we hit Move, It's gonna, everything's
gonna be symmetrical. So that's what we want
and that's gonna be very helpful for the sculpt in
for constructing the face. Okay, so we don't need
a mirror for this because British using
just the regular sphere. So we can just validate. And now we have our first
part of our construction. For this sphere. Let's
just rename it head. Because this will be our head. And I don't know why,
but I always do this. I always make it a
little bit bigger. So just using the gizmo, I just used the orange ring
to just make it bigger. Again. I don't know why. Sometimes you just do things. You know, our cube
is now a sphere. So I'll just tap front, which is something that I
do all the time just to make sure that everything
is clear and concise, especially before
we have too much, too many things together on it. You want to make sure
that you tap front.
4. Head Shape & Ears: So the first thing
that I like to do is clone the sphere and I make
the bottom part of the jaw. So we'll just go into our
scene menu and then cloned. And for head one, let's change it to jaw. This is the bottom
part of the head. So we're already on the
gizmo so we can bring this down a little bit
and we can shrink it. So I usually make it maybe
something like this. I usually make a shape like
this and like a dog toy. And this is sort of how I start with the bottom
part of the jaw. Obviously. The sphere is
to round and the jaw, the lower jaw is a
little too round. But we're going to shape
all that stuff up. We're just blocking everything. And this is kinda how my
brain blocks everything out. So now either using the cube or just your finger like
this, you can rotate. And now we're looking
at the left side. So I'd like to bring this up because when I make
when I make the face, so this is the forehead, this becomes the forehead. And then there's the
bridge of the nose. That kind of is like this. And the nose actually will
come out to this area, and then the lips
and then the chin. So this is why I bring
this sphere out forward. Now obviously this
looks funny here, but we still have
some adjusting to do. So. I might, I might
make this a little bit smaller and bring it out
maybe a little further. Maybe bring it up a little bit. Something like this.
So you can even see that it's starting
to resemble a skull. Like this would be
the skull and this would be like the
bottom part of the jaw. So here's when I do a little just like free sculpting,
free modeling. So we're on the bottom
sphere around the jaw. I like to use the Move tool. So let's make it quite big. Because the Move tool, we'll just move everything
sort of smoothly and evenly. And we just want to make sure
that we have symmetry on. So we want symmetry on. This way. Since we're looking
at this side, we want the other side to match and everything to be
happening on the other side. The next thing that I do is
I take this sphere and I try to line up this bottom curve. I tried to make that goes straight and then
come around cleanly. So as long as you're
on the bottom sphere, you can just manipulate that. You might have to make
it a little bit bigger. Let's make our move tool
a little bit bigger. And see how everything's
sort of moves in unison. And it's a bit cleaner. So I'm literally just, even though I'm touching, it looks like I'm touching
the bigger sphere. Since the smaller sphere, since the jaw selected, it's still going to move
around the smaller sphere. So I kinda want
something like this. I just want it to be kind of a smooth transition into
this part of the of the jaw. So yeah, pretty much
something like this. I think that looks pretty good. And I will be going
back and forth because sometimes I have to go back and
forth to just make sure that my shapes are
as I want them to be. But I think this is
pretty good for now. The only thing that I might do is bring this down
a little bit lower, this part down a little
bit lower and then try to even it up a
little bit again. And even looks good when
I like I'm stretching it. So just to just to look at what the bottom
one it looks like. This is what? This is what it looks like now. Um, I think that's
a great start. This was a great, it's
more because we want it to come down here and then we
want it to go to the chin. And obviously we can still adjust a lot of these,
a lot of these parts. Okay, So I think
that's looking good. Eventually we might
tilt it as well. We might tilt it like this. But we don't really have
to do that just yet. Or maybe we do. Let's
take the head and the jaw and the gizmo. And let's just tilt it
a little bit like that. That feels a bit better. Now let's just bake it. So we'll go to the gizmo. Okay, and now we're good. Alright, so the
next thing that I usually do is add the ears. So we can, you can either, you can either use
cylinders or spheres. I've been experimenting
with spheres lately, but I don't know which
one I like better. I'm going to show you
both for a cylinder. Here's our cylinder here. Remember these are the options that we were talking about. We're going to tap mirror. And now you see you
have the mirror here and you have
the cylinder here. To make it easier, let's
just name them both ears. So I'll just tap here and just
change them both to ears. That way there's no confusion. And so we're on our ears. We have the mirror. So
let's just move them apart. Right now. Let's take snap. And now it's on snap
and it's on 90. So now we can just
rotate it 90 degrees. So if we hit front, it's
perfectly rotated 90 degrees. So now let's smush
them together. Align used to be world and which is something that I
always used a lot. So essentially align in world. And it's a bit confusing. I take it off snap, rotate this. You notice that
this hasn't moved. See, that hasn't moved. Because right now the
pivot is set to world. So this is the ultimate
up, down left, right. It's not going to
move, it's not local. But if I were to
take it off a line, and then I were to move this. See how this moves. This moves too. So the pivot is
local to the ear. So the reason why I'm
bringing that up is because as we're
moving the ear around, sometimes having a line on is helpful and sometimes not
having it off is helpful. For these cylinders. We kinda just wanna
make them ear-shaped. So let's stretch it. Really, really big ears. Obviously. We can shrink them down. And I sorta use
this center line, sort of a gauge as to where it, where I want the ears. And as you can see, they're not really
bent the right way. So I'm going to bend them
a little more that way. So they look
something like this. It will be very difficult to
just bring them in closer together because we've
moved them all around. You'd have to do a lot of
like navigating to sort of get them just to go
closer to each other. But if you tap a line, now I can just move them closer. There are a few tweaks
that you can do like Here's a usually wider on the top than they are on the bottom where the lobe is. So I might just tilt
this out a little bit. Like so. And of course I'm
going to tap a line. You can make them
in a little bit further out, a
little bit further. You can tilt them
back more or less. So there's lots of options, there's lots of
things you can do. I bring them up a little bit. So we'll just keep something
like that for now. Now. Remember, we're just
blocking them out, so we have a lot to
work with still. I'm gonna take it off a line so that I can shrink
it a little bit. Just a tad bit. There we go. Alright,
and here's the front. See again, this looks
better as the front. So that's another thing that
I do when I'm going through my faces is I tried to set the front because this doesn't really look like
the front to me. So I'm just going to
select everything. And then I'm just
going to tilt it because that feels like it should be the front.
Then I'll just bake it. Now we have a new front.
So this is a good start. You just want sort
of shapes like this is how it looks
from the side. But this is the start.
5. Ear Options: Let's go ahead and
hollow out the ears. So I like to use layer. So right now we're in the ears. We can go ahead
and validate them. And I like to use layer. Did you bring the radius up a little bit and make
sure that I'm on sub. Since the ears are mirrors
over there in a mirror, you don't have to tap me or you don't have to tap symmetry here. Because when you do one, the other one will follow suit. So the only thing
that we need to do, you notice the ear is only 1652, which is not really
dense enough. So let's go up to this little menu and
we'll go to multi-racial. And let's just sub-divide it. Can sub-divide it. I think subdividing
it once is fine. So we've subdivided once. And now I'm going to
box. So Ramesh it. I think 200 is fine. And I box down here, but that's the same thing as
if you were to go up here to voxel Ramesh and then tap it. It's the same thing as
just a shortcut down here. So now we'll take layer and just make
something like this. So essentially what I've
just done is I made the outer ring of the ear and I slept a little bit more
down here for the lobe. Again, we're, we're kind of
just like doing this rough, rough and ready, so it
doesn't need to be perfect. We're going to
smooth all this out. But this also leave some
space to where like the head, we're going to run into
the ear kinda thing. So I did I did it twice because it all depends on how
intense you have it, which is how deep you
just want a fairly deep. So I think that's pretty good. You can probably go one more
revolution if you want to. Why not? So something like this. Now I like to tap sub, to add a layer. So then I also do
something like this. Whoops. Let me make sure
you're on the ear. So this just adds to
the shape as well. And if you wanna do a
double layer like we did when we were erasing, you can do a double
layer like that as well. So now for the head, Let's go back to
these two parts. And I think that they're
in a pretty good space. I think they look pretty
good. So let's go ahead and box will remiss
them together. Let the cat out. Go ahead. Well, I just knocked my
head into the camera. Hopefully it's straight.
Okay. So let's walk. So remember these two together. So we have the jaw and the head. So we'll go to voxel and we can re meshed him
gathered around 200. I think that's fine. Okay, So now they're, re mashed. We'll take our Smooth
Tool symmetries on. And we can just try
to, we can just sort of smooth them out. They should smooth quite
nicely at 200. Okay? So the next thing that we can do is add the little,
the little piece. If you touch your ear, there's a little piece
that comes off your head. I mean, I guess the whole
year coming up the head, but there's a little piece on the head that
sort of flaps here. So for that we'll
just use inflate. So remember I'm on the
head and I'm just going to inflate and just
kind of go in a circle. C, kinda like that. Notice I'm turning it this way because I don't want it
to come up like this. I don't want it to
come up like that. I wanted to go back. So notice how I'm turning
it so it goes back. And the reason why I made
it this big and that sort of aggressive has
because when you smooth, you don't want to press too
hard, but when you smooth, when you use the Smooth tool, it's going to, it's going to kind of ease it
back a little bit. So that just keeps me
from having to like add more and smooth and
add more and smooth. So I just do a lot first. And then I can sort of
goes back to normal. This is when you adjust the size of the ears
and things like that. And if you wanted to use
the let's just hide these. If you wanted to
use the spheres, I think I told you it
was going to do both. So I added the sphere. It's gonna be a mirror on a
tap gizmo. Separate them. So I'll shrink them
sort of like this. You can position them
where ears would be, maybe even stretch it. So I'm just going
to validate these. And now I'll just use trim. And if when you use the Trim, just go to this little option
and just put these down. So now we're using trim,
let's use rectangle. So let's just put it to the left to make sure you tap left. And then you can draw your box and cut the ears like that. So once you cut them,
voxel rematch them, say around, maybe around 200. You voxel remiss them. You might want to go ahead and just smooth them
out a little bit. But now you have these sort of like dome ears, not telomeres, but more circular years like in the back,
it's more circular. Then you would do
the same thing. Just sort of bring
them into the fold. Bring them kinda where
you think ears would go. You can pull and push
them and just adjust them to where they look like they should be
mimicking a little bit smaller. And also sometimes you have
a habit of having them out. So just remember
that they should be sort of pointing back like our ears point
back on our heads. Even though it's
really fun to kinda make them poking out. And maybe I'll push
them back too. This is another instance where
where a line really helps. Because if I just want the
ears to go straight back, then I want to just
use my align for the whole scene instead of just how we've moved the years. So I'll tap a line. Now I can just
move them straight back. It looks pretty good. Maybe it'll just a little bit like that. That
looks pretty good. And then you would just
do the same thing that we just did with the spheres. You can use layer and
you adjust, whoops. Two sub you can do is pretty much the same
thing that we just did. You can make the ears
as simple as you want or as complex as you want. These are actually
kind of complex. I tend to make more
complex years. So I've just taken
it off sub and now. So I'll do something like that. And as you can see, this
is in the wrong spot. But you can probably can
probably just use move and make sure that
we're on the head now and we can
probably just move this move it to the right spot. And if it's moving
too much like that, if you want a little bit more
control than just tap drag. And then you can just adjust that to be in
the perfect spot. Now that I'm looking at it,
we don't really need like, you can adjust that to be in
the perfect spot as well. Okay. And we will adjust the head. The head is not the
right size right now. But again, a lot of this
stuff we can adjust as we go.
6. Shape Facing: Okay, so now we can slowly
start shaping the head out, making it look a
little more humanoid. Keep in mind that none
of this is set in stone. And as you get better at this, as you complete this course and as you make your own faces, you might find things
that work better for you. So just keep that in mind. Next, I'd like to add the
eyes in so we can start sort of carving out the eye sockets. The eyes and the eye
sockets are very important to where we put those. So I'd like to just add
this viewers for the eyes. So let's go to scene, and let's add sphere. And let's go to Gizmo,
will bring it out. Let's tab mirror, and then
let's break them apart. We can shrink them.
Even things like this, like if you were
making like an alien head or something like that. Like, you know, or some sort of creature you can make
the eyes really high. If you want, like a more
intelligent alien head. So there's a lot
of things you can do to really make
it interesting, but we want to keep it simple. So maybe something like
this, Of course they don't look right yet. But some of the things
that I think about is I want them to be
sortable line with the ears. Like if I put my finger
around my ears and then I bring it to the
front of my face. It's kind of the
kind of in-between. The eye is sort of in-between. So I just wanted to
kinda keep this line. So I think that's pretty good. And of course we can
always adjust it later. But the great part about having these spheres here is now
when you go to the head, we can take, I usually use clay. You have it in Sub my radius is probably about 70,
intensities, about 50. And now I just use this
as a template and I just make an arch above. So nothing too crazy. And just know that this, this piece in the middle will eventually be like the
bridge of the nose. So I just make like
this kind of shape. So something like that. One thing that I do differently now as I don t really make it that deep because I don't want this bridge to be super deep. But will flatten this out later. But I don't want it
to get too dark. E.g. like, I'm not
gonna go like this. So that it's really
dark in there. Because then it
will be, that'll be really harsh shadows
and we don't want that. Okay. And also notice that I'm letting the eyes rest a little bit below the mean like so I'm not
going like this right now. I'm kind of letting them rest a little bit, sort of like that. And of course again,
we can adjust the eyes as we like them. Let's go ahead and
smooth this out. Okay, so now we have
some decent eye sockets. Of course we can continue
to adjust those. So now let's move the eyes around a little
bit and just make sure that we have them
in where we want them. If this happens, if the ice that was actually quite strange,
that was actually strange. You saw that they
moved together. And then once I
once I let it off, it jumped to how it's
supposed to move because it's not supposed
to be moving in this way. That's very odd. That's a first.
Okay, so let's see. I think that's
probably a good spot. That looks alright. So now the next thing we wanna do is let's add another
sphere here. Because we want to add
in the cheekbones. Cheekbones is very important as we're constructing our face. So firstly, I'm
going to take these, let's take the mirror and
let's just name it eyes. And we can, Let's theme
in his eyes as well. Let's go back to the head and
let's add another sphere. And the reason why I
went to head is just because if I add a
sphere and I'm on eyes, it will go inside this mirror. So e.g. if I was to add a sphere, it goes inside here and that
can get really confusing. So we don't really need that. So we just want our sphere
to be outside because we're going to make our
own mirror Walla. So now let's do the same thing. We want to place
them in this area. I'll take them out
so you can sort of see what we're
gonna do with them. A long game a little bit. So we kinda want
them in this area. So we want our cheekbones
to be sort of like this. Probably actually
stretch them out. So we weren't our cheekbones
to be pretty much like this. And these eventually we're
going to smooth into the face. But let's go ahead
and drag them. Let's validate. And let's go to our, let's tap our mirror and our new sphere and
let's validate them. And now with drag,
Let's just drag. And make sure to hit symmetry. I'm just going to drag
this down a bit like that. Then we have a nice cheekbone. And I think that will work. So the next thing
I wanna do is sort of work on the
head a little bit. So I like to do I like
for this side to be flat. So I'm going to use
the flattened tool. I'm going to make sure
that I'm on the head. And just so you can see, my planning tool is radius is about 90 and
intensities about 50. So I just want to flatten
here kind of behind the ear. Be a little aggressive with it. Some sort of just
flattening the head out. Obviously symmetries on. So what's happening with
the other side too? And you can see the head can
you just can easily just kinda assume like
a better shape. So something like that. And also we have like
a forehead area. So I'm going to take this so we have this
depression here and I'm also going to come across
the top like this. And I want this to
be the forehead. Now I'm just going to
flatten this out a bit right above those eye sockets
and see how the, even though it's fake light, see how that light is
hitting that plane on top. That's what we want. So let's smooth all this out and see what our
head looks like. And if you notice
that it's still lumpy and you want
it to be smoother. You can always Bob, sorry, mesh a little bit lower. You can bring this
down to like 100 or something if it
gets really messy. But I don't think you
should need to do that because mine is looking okay. So you shouldn't
have to do that. If ever, you wanted to smooth something out more
than it's giving you, then voxel Ramesh it
at a lower number. I think we've been doing
about 200 mostly here. So just, just keep that in mind. This actually not too bad. We can continue to adjust. You can use move front
and then you can sort of, you know, you can just
kind of adjust things, can make move a
little bit bigger. One thing I like to
do is sort of flatten the top of the
head a little bit. If you want to bring
the forehead up a little bit more,
things like that. Maybe kind of rounded
off a little bit. So you see it's easy to really get the head
back in shape. But it's nice to just have, you know, just know that
you have those options. You can make it any
shape you want. You can make it really
big if you were doing like a different character. You can make the
cheeks really big. If you wanted to
cheats really big, you can just kinda spread
this out kind of thing. So you have a ton of options of things you
can do for characters. Okay, So I think we should. First, let's move this ear. I'm just going to
take drag and just move this a little bit more in. Since we've been adjusting, this has been sort
of moving around so you can take a minute and just adjust
things as needed. Might be fun to make his
ears a little pointier. Like if you were
doing some character that had pointy ears, you could just drag
the ears up like this. Okay. Maybe I should take the
ears back a little bit. Let's take it off the line. Let's skinny them
up a little bit. And then I'm going
to turn him back. I tend to make your
stick out so far. I do that. I'll tap a line. Here we go. I like that. I might continue to adjust it, but for now I like that. I want to try to
do everything on camera, like little changes. And one thing I noticed is
that there's sort of a, it's too much of an
indentation here. This area like a kind
of goes into much. So I'm just going to
take this piece on a put out a little bit and
just kind of stretch it up. Bring it down a
little bit there. But just so it kinda
fills out that spot.
7. Lip Service: Okay, so I think this
is looking pretty good. So let's go ahead and
voxel rematch the head. And these, these cheekbones, I think this is a good
place to do that. So let's take B, this mirror, which is the cheekbones
and the head. So let's see, let me save real quick because I haven't
saved in a while. I don't think I saved
since the beginning. K, so we save that. Now let's take these two inbox where we mash them together. And I think 200 is fine because we wanna be able to smooth
everything out nicely. So now we'll just take smooth, smooth all of this out. Okay, it looks good. Okay? So now we're looking
a little bit more, a little bit nicer. And there's a few other
things that I do there. Stylistically, I like to have chosen the plan
tool to kind of go down. And I'll flatten this out here. And I'll kind of go
all the way down to the chin. Make it a
little bit bigger. Again, I like to make
this indentation a little bit deeper here. Where there are
temples are, you know, that little depression
in the side of our head. That's like sort of behind
our RI like touch in mind, like you can see what I'm doing. But I like to do
that. I like to make this line going
from the top down. It's slate, but it's there all the way to the chin area and I'm just
going to smooth that out. These are little things that
I just kinda pick up along the way as I'm trying to figure out ways to make
my scopes look better. Okay. These are little, little pointy, but we will fix them
as we go forward. So now's another chance
to check out the eyes, make sure they're kind of
still where we like them. So let's make the, make the lips now. I think it's a good spot to make the lips lips with the
cones and things like that. But I kinda like using clay. There is something
about sculpting them. They just come out
with a nice shape. So we'll use clay. We don't need sub anymore. We're on the head. And we just have to figure
out where the top where we want the top lip. So I'm thinking
maybe around here. So here's the center. We have symmetry on. So we're just kinda, kinda go back-and-forth but
a little bit arched. So we're making
something like that. It looks so weird. When you're like putting all these
things together, it always looks so funny. And then another thing that I, that I realized that I need to do is now that you have
the area for the lip, you want to fill this in. So you want to make like
that straight slope? I used to curve it a lot. I used to curb the top lip a whole lot but it
doesn't really look good. So we want something like that. I'm just using clade. It's just sort of
give it a nice, nice, clean slope like that. Okay? And we can even take the flatten tool
and we can sort of flatten out right next to it. Sort of flatten that out. So now let's just take our
smooth and very lightly. Just smooth out everything
that we just did, just kinda smooth it out. So we have something like this. So now we'll take the flattened
tool and we want to make this plane into the
bottom part of the lip. So I'm just taken flatten
I'm just flattening out the bottom part. Okay. Here's another cool tool
that you can use, a pinch. So I'm using pinch, my radius is about 70, my intensity is about 50. Now you can sort of pinch this. And you can see how
the lips shapes. It's a really neat tool or really makes it look kinda cool. So you can really see how it kind of starts to
shape itself out. Okay, so now let's
take the crease tool. And this is another, another kind of a
little piece of the puzzle is making the
crease for the lips. So we want to start
in the middle. And I sort of
started a little bit lower because I like
to go up a tiny bit. I'm stolen pinch meant
to be on crease. We're on that word with
an increased tool. I'm going to start
in the middle. And I kinda like to
go up a little bit, see how it has that sort
of goes up a little bit. Oh, let me show you this. So the radius is 40, intensity is about 80. So I sort of go up a little bit. Then I go down, then I go up, and then I sort of
double-back at the very edge. So something like that. So once we have that, we can, we can start
to add the lower lip. Now, the thing is,
is that this might, this might change, like
we're going to have to do some smoothing
and things like that. So just remember doing this because we're going
to have to go back for it as we add the lower lip and smooth and things like that. This area is going to get, you know, kinda altered. But we'll just come back to it. And before we do that, let's
actually bring the chin out some because it should be
the lip and then the chin. So let's take move before
we go any further. Make sure that
we're on the head? No. So make sure we're on move. I'm just going to point
this chin up like that. So it is kinda pulled it out. So now it's just a nice sleek and sort of just
pokes out there. And that's, I think
that looks really good. Now we can go ahead and
add the bottom lip. So let's use clay. Me see, receive
after every lesson. Don't be like me. Dum, dum. Now we can sort of
add that bottom lip. We're using clay. We don't have it on
sub because we want to add do you want to start
adding the shape in? So I'm just trying to stay
bright under the crease. So I can just preserve
it as much as I can. But it's okay because we can just we can increase
back over it. So literally as it's kinda
look bad for awhile. I'm just trying to extend
the shape of this lip out. And even underneath
it a little bit. Again, the same sort
of thing applies. I'm a little
aggressive with it and making it really big
because when you smooth, it does kinda fall back a bit. So something like that. And now I'm using the smooth
tool but really lightly, because when you do all this stuff that
the clay gets really, really soft and
really malleable. So I'm staying really
light with it. And I might need to add a
little more here, the end, because I really want this to go to that little dimple that we made to really complete
that bottom lip. So now that we have this, there's a little cheat you
can do sometimes I'll take the lip and if I feel
like it's too small, sometimes I'll just kinda
drag it out a bit like that. And then take flatten. And this is, this is kind of
a cool little thing that I, that I do all the time. So we really, I really
liked this pinch. So for the bottom
lip, I flattened, but I flattened almost because
it's easier to show you. So I do it this way. But then I kinda
go under the lip. So it's almost flat here. So this part is almost flat. But then this part
goes underneath. And you can see you start
to see how the light start, how the light hits everything. You know. And
sometimes I'll go like a little bit a little
bit more aggressive. Can we get a little more round? There we go, So
something like that. So see how we had
that round that. And then I smooth all
this out underneath. And it makes that really nice. They're really nice shape. And then I'll take
smooth and I'll just smooth this out a
little bit very lightly because we don't want to ruin this nice sculpting
that we've done. I think that looks really nice. We can take pinch. Then you can sort of
pinch this to really get that beautiful looking
plane that like H break like that.
8. Brow Nosey: So one thing to take note of
is the shape of the brow, like the shape of the
top of the eye socket, will really determine how angry or how your
character looks. Now we use to clay and
you can manipulate this with taking out more
clay and sculpting it. But you can also use drag. And as long as
you're on the head, you can use drag and you can
sort of a little bigger. You can do this as well. Notice how as I do this, I'm just making the
bridge of the nose area a little bit smaller. They really change, changes
the feeling of the character. And it would be the same thing. If he, if he wanted his eyes to be have a
different expression, you could remove symmetry
and you could put one lower for a different
kind of look. And this is how you would do
a lot of the expressions. You could do them that way. Okay, so anything I usually do, I kinda smooth it a little bit. I like to keep
everything smooth. Sorry, I keep
getting distracted. People want to talk when I'm
trying to do cool videos. Alright, so this is kinda,
this is a bit sharp. So let's use clay and
let's take it off of Sub, make sure symmetry is on. Now I'm going to do it quicker because I'm stuck
doing it again. So we just had a little a
little bit of cheek there. And then you just
take your smooth and then just smooth
everything out. Should smooth out pretty nicely. Okay. I also might have
to adjust adjust this. It's a little bit Let's see what it looks
like in the front. Front still looks good. It looks like on the side here that looks, that
looks pretty good. Alright, so the nose, we might not voxel,
merge it together. But for the nose I
usually use a sphere. Now. I was using a cone. But lately I've been
using a sphere. So we'll bring it out. Let's shrink it. We don't need to do mirror or anything because it's just one. First it'll be a clown nose. So if anyone, any people
want to do clowns, that's how you would
do a clown nose. He would just make
it red. But if you don't want a clown nose, I usually just squash it a bit. And I kinda tilted up. Let's take it off of a line. Then I can just move
it straight back in. So maybe something like this. In a little bit more. You can make it a
little bit smaller, but actually like
the size of that. For now, I'm just
going to validate it. So now we have the nose
in there like that. I know it looks a bit funny, but it won't always. Okay. So let's make the nostrils that's sort of like flesh out this
nose a little bit. So let's use drag. Make sure that
we're on the nose. And let's rename it knows. Rename it knows C. Now we
use drag, really small. You can just drag up maybe
a little bit bigger. So you basically
just dragged up. It makes sure symmetries on. You can just drag up and
it'll just make nostrils. You can take the edge and you can drag them around
a little bit. What I like to do, I'd
like to drag them under, so it pretty much makes
nice-looking nostrils. So something like that. So I'm just going to I'm just going to adjust
the head a little bit. I feel like the head is
so it feels a bit better. So for the, for the
portrait profile, I kinda like the forehead here, but then I like this to
be a curve this way. So right now this
is the wrong way. So we could, we could
always move it. We could just go ahead and move. Let's see how that works, but it moves a lot of everything. I think I might
just use flatten. And then just flatten this out. See that? And I might just
flatten this out. And I'll even flatten the sides. Maybe like a little bit
aggressive right here, right at this corner pocket. So this is the
bridge of the nose. So as we flatten the sides, we're actually making the
nice bridge for the nose. We can sort of look. He's long as you're careful,
you can sort of just help this to sort of take shape. Just by using flattened see, I'm just using
flatten and I'm just, I'm just kinda giving
it a nice shape. And it's kinda nice and
smooth. This can come down. Remember before we kind
of flattened over here. We can kind of do
that a little bit. Just be careful to not do
it too dark or too strong. But of course, we're
still only at like 200s or mesh is nice and soft so we can just
smooth everything. So it can just smooth this
out nice and soft and just keep everything smooth
and professional looking. So that looks pretty good. The nose is still funny-looking. I want to keep it this size or do I want to make it
a little smaller? I think I like it that size. So now once we're on the face, we can use clay to attach
the nose to the face. We're now going to
voxel merge yet. But we're going to kind of do the building
blocks for that. So I'm just making this
arch towards the nose. It looks a bit funny now. And I'll just take drag. And I'll just kinda make
it a little more of a, of a curve like that. See how it's, see how it's
more of a curve here. Looks good. Flatten it out, flatten out the sides a bit. So you just want something
like this so that when we merge all these together,
it'll look good. But also here's a nice time
to adjust the nose and make any different things you
wanna do with the nose. Like if you want the nose to be bigger, you could do that. If you want it to be longer, you can still stretch it out. You can stretch it out using
this or you can just drag, you can drag it. You know, things like that, making like an Elvish character. Or you can just make
it really small. Make it smaller if you want. You might have to adjust
what we just did, but you get the point. But I think that's
actually pretty good. Now I think is a good
time to take the ears, the face, and the nose and
just kinda join them together. And just kinda smooth
everything out and just see how we're looking. Let's do that.
We've got the nose, we've got the head.
Okay. What else? We have ears here. Why are the these
are the old years. I forgot about those years. So let's take the mirror out
of we want the ears to be separate so we can just delete those. So these
are the other ear. So let's go ahead
and select both of these and validate
join children. So these are the ears,
we have the eyes. So let's take mirror,
nose, and head. I'm going to save
before I do this, unless his voxel
merge them together. But I really like
the shape of the, of the lips and all that stuff. So I'm gonna go a
little bit higher. So I'm gonna do 300. And now we'll refresh. And now all of this
stuff is together. So now just take your smooth and just smooth all
this stuff out. And you'll see it'll just
beautifully sort of come together and look
way more natural. Even this weird
year that we did. Just kinda smooth it all out. Smooth out the edges without the backward connects to the head. So we just assume
that everything out and it looks a lot better. And there's one more trick. I know the head
looks a bit wide, but remember we're
still an orthographic. So if you change from
orthographic to perspective, it becomes less,
weigh less weird. But again, I just like to
sculpt in orthographic. You can still adjust
all of these things. See, you can still
adjust like the ears. You can still adjust the head. You want to make the
head a little less wide. You can do that. You want to make the cheeks puff here and things like that. It's also a good time to just go through and just really
smooth everything. Makes sure the cheeks
are nice and smooth. In the head. Make sure
everything is nice and smooth.
9. Eye Lids: So here's your real
cool way to do eyes. I really like making
the eyes and eyelids. And I've had several
different ways of doing it. But I find that this way is pretty efficient
and fairly simple. So we are on, so
here's the head. We have the eyes here. Let's go ahead and take the eyes and validate Join children. Okay, now we should still be
able to if we tap symmetry, which is to be able to, yes. Okay. Just wanted to make sure that that
was still working. So we have our eyes here. And one thing that I noticed
that the eyes are up here, but the pivot is here. So let's do pivot reset pivot. That will set it in the
middle of our mesh, which right now is these,
is both of these eyes. So the middle is here. We have symmetry on. So if you decided
you wanted to do, I just wanted to be further
apart or closer together. You can still do that. Maybe a little bit
closer together. Okay. Maybe a little further
back in the head. Okay. That feels kinda good. So the only thing now
is that actually fine. I think I can leave it for now. So to do the lids, we want to clone the eye. And I'm going to call this lids, or I'm gonna call lid. So let's take the trim tool. Let's go back here and
make sure those are down. And we're using the rectangle
now. What's up front? So let's make the
bottom lift first. And we're just gonna do one eye. So it should, everything is that happens to this one
should happen to this one. So we'll use the rectangle
will go like this. And that cuts them both. Now notice you
can't really see it because we have the
eye that's there too. But voxel Ramesh, let's
rematch around. Let's do 200. So we'll refresh that. And we'll take the gizmo. Let's just bring it
out a little bit. So we'll just pull it forward like that and let's move it. So it kind of encompasses
the whole I like that. So we'll do the same thing for the upper lid, will clone, this, will clone the I, will name it. Up. Lid will take our trim. Now let's trim the bottom part. So remember we're trimming
from this, this shape. So maybe we'll do
something like this. We'll trim that. And then we'll
voxel re-emission at 200. Like what's the other
one? Remember again, this is a shortcut that's
the same as going up here. And voxel remeshing will take the gizmo and
we'll bring it out. And we'll separate it. And let's take our smooth and
just smooth both of these, the top and the bottom. So now these are
nice and smooth. So here's another point
where you can add a lot of expression, e.g. if you wanted to do on the head, if you wanted to do
one down like that, just make sure that
you're not on symmetry. Same thing with this. Make
it a little bit smaller. You can bring this
up a little bit. The eye up like she's
raising one I kinda thing. You can do that as well. So this is a good, good point to think about your expression. In the expression that you
want your character to have. You can always drag them up. Like if you want the
expression to be super like Aubrey Plaza, where there's this kind of,
you can have them like that where the legs are straight. But you can also you can
also take the top ones. You use your Gizmo and
rotate them back. Like this. You might have to kinda
go in and you might want to drag this down a bit. Drag that side down. You can smooth everything out. Smooth out the bottom one too. So you have a lot of options, but I think that
looks pretty good. You can always do
the same with the bottom two if you want. You can scroll them down. You can always sort of push
this back a little bit to, you can still continue to take your flattened tool and adjust this a little
more if you want. But definitely do it
with symmetry on. So just always keep in
mind that, you know, you kinda have to
adjust as you go. That's the only way to really
make it look really good. And you can use pinch to
bring back these beautiful. I like to call my plane lines. Because the plane lines, That's really where
you kind of get your separation and the light really starts to make
a difference where you can see different shadows from different
planes in the face. I'm a huge fan of,
huge fan of those. But let's add a neck. We minds will add a neck, since it's fairly
simple to add an X. So we'll just add a cylinder. And hopefully the cylinder, hopefully the nodes all work
the way they're supposed to. But let's use our gizmo. And we'll go, we'll
move it down. We'll shrink. It. Seems to be like a decent
sort of Nikesh size. So let's move it back. And now let's go, Let's tap on the gizmo again and
that'll bring back, bring up some other options. For edit C. We had those little nodes here. I'm gonna use my finger
and bring it up. You should be able
to use your stylus, but I can't right now
because of a bug. So we have that
going into the head. And let's bring this
one down a bit more. Like so. I'll go back to the gizmo
and I'll move it up. And then tap gizmo again. So radius, this will allow
you to move one end, smaller, one in bigger
or whatever you want. If we were to press
it again and we put some more nodes in
there, we can move it. But right now we just want to have the two and the radius. And again, I had to use my
finger to sort of shrink it, just to shrink it a
little bit and this one to make a little bit bigger. Again, it's way easier. You should be able to just
use your stylus for this. Okay, So just so it's
a little bit of a, so it's not just a
straight cylinder. Okay, so I think
that's pretty good. Maybe I'll make everything
a little bit smaller than the type gizmo and just make everything a little bit smaller. So something like that and we'll stretch it
out a little bit. So I'm just gonna validate it. So I want to take move symmetry. Make my move tool quite big. And I'm gonna pull this
front part down like that. Now the size I'm just going
to pull out a little bit. I'm going to pull
out and push in. So pull out, push in. Maybe I'll make it a
little bit smaller. Push in a little bit, they're pushing maybe a little
bit in the middle. Sort of like that. And I'll make it a little bit
bigger and just kinda push on the back a little bit. And then take the gizmo
and then move it back. So now when we go into here, I'm just going to use drag and just pull it out a little bit. You can take here and you
can sort of move this up a little bit because you don't want to
connect to the chin. It's not like a
street connection, but if you want to
add a little bit, something like that, make it
a little bit more realistic. Maybe you can take your move and just kinda move this
forward and push this back. So there's more of
a slant like that. Again, this is all, you know, this is all stylized. It's not really. You can always look at the neck, can look at just a human or a person or cartoon
and you can match that. But they connect
just make sense. You really have to feel things out and trust me, the more, the more you do it, the more
you'll feel this stuff out. But hopefully you're kinda
hanging along with me there. So now that we have
this, let's go ahead and put all those
parts together. So we have the cylinder
which is the neck, the lids, and the head. Just Save again. Now
I'll box, we miss them. I think I did it at 400. So we'll remeasure
all that together. And we can smooth this out. And I'm trying not to
touch the top part. I'm just trying to smooth out the area where it kinda goes in contact
with the rest of the skin. And if it feels like this
is sticking out too far, which could be, there's
a few things you can do. You can add clay underneath
or you can just use clay. And you can slowly just push this a little bit
closer to the eye. But we're going to add, we're
going to add some pupils. So we will have, we will be
adjusting this high as well.
10. Dialing in tips: So here are just some tips
on adjusting your character. There's still a lot you
can do, even though we've, we've kinda soldered
everything together. There's still a ton you can do to to continue to adjust
your character. So e.g. the nose, let's say the
nose feels a bit too round. You can take flatten I'm just going to flatten off
the sides a little bit. So you can flatten there and
then you can smooth it out. At this point in time. Any
little thing just gives it a completely different look,
completely different feel. You know what I mean? And if you feel as though like maybe this part is
a little bit to like bulbous or something. You can use clay. I like that word bulbous. You can use clay and you
can add more clay here. So you can always add more clay. Then you would just go
through the process. You can smooth it down here. You can flatten out the sides. Then you can really
just smooth it and it will bring it into play now so it's a little
bit less sticking out. But you could also, some, some people have way
more pronounced bridges. You can also do that. But what I'd like to do is just remember to flatten them out. I like to try to keep everything flat and I'll smooth
everything out, but I'll kinda take it easy and just smooth
it out a little bit. And then I might add to pinch and really try to
keep that flatness there. Something like that. So there's a lot of options for a lot
of different types of noses. Of course, you can
still make the nose a wider if you wanted to. You can just kinda
stretch it out. If you wanted to make
the nostrils wider. I think I liked them like this. You can also add more down here. You can flatten this out. Drag might not work,
but let's see. You can sort of flatten that out there and push it a little
more into the, into the lips. And if you feel like you need some more real estate,
you can take move. We can make it really big
and you can store it, it just like drag
this whole part down. You can drag that section down. And then you can sort of
create a little more space. You can take clay and you can maybe she wanted to make
that little depression. He could do that
as well and then just smooth it out a little
bit, keep it smooth. And also, as far
as the lip goes, you can pull out a little
bit from the middle. You can do it on
the sides as well, just as just a tad bit. Just to really give it some, some nice shape
under that plane. Remember what I said before? We'd have to go back, redo a lot of these things. But they're worth
it. You can redo them and they look good. But it does have to be careful. Because sometimes you can get
these funny-looking shapes. That looks better. It looks a bit better. I'm
just going to smooth around this so that it's not so so it feels a little
bit more natural. And same thing,
I'm just going to pinch your butt back around the edges to really make
those edges standout. And I'm just gonna kinda this
crease a little bit darker. Another really cool thing that
I do sometimes is you can take drag if you feel like your character isn't
smiling enough. Just use this point
in the corner. Just kinda pull it back or
pull it up a little bit. Obviously, you can
adjust the whole lip, but you can really
make subtle changes that that you can see
that are very noticeable. That's one thing about
the face is we're very attuned to the face,
to slight things. So even a slight movement like that will make your
character look a bit, um, well, change the
expression a bit. For the eyes. I feel like the eyes are a
little bit too big. I tend to do that sometimes I'll make the eyes a little too big. But so long as you
go to the eyes, you can use your Gizmo
and you can shrink, shrink them down a little bit. I think that looks
a bit more natural. It feels a bit more
natural to me. So if the eyes, I just
keep it really simple. And lately I've just been
taking the flattened tool, so we're on our eyes. I take the flattened tool, make it a bit smaller. And I really just flatten
out the whole front section. So I'm not pressing very hard. I'm just trying to stay as
even and consistent as I can. And making that circle. Now the front part is flat and you can smooth it out
a little bit if you want. Now, I might have,
I might have done a little bit too close, but I mean, it's actually fine. You don't have to do
it as I did mine. Quite large diameter,
but I think it's fine. Now I'll add another sphere. And I'll name this
P1 for pupils. So let's go ahead and
bring this forward. Shrink it up. So we want to use a mirror
because these are going to be obviously on both sides. So spread them out, push them back into the eye. Now the important
thing about these is I usually flatten
them up like this. Maybe they need to be smaller. And then I just push them back until they're on
the surface of that, I might take some googling to kind of get
them in the right spot. A little bit smaller. You might have to flatten them a little bit to sort of get them because they should be a
perfect circle on the front. So you just have to adjust them until you get
a nice circle. I think that looks pretty good. I might make it a
little bit smaller. Okay. I just really want
to make sure that I can see both sides. You don't want one side
to be going into the eye. And also a rule of thumb
with eyes as you want them to be more
towards the center. You don't want to put
them in the middle. If you put them, see now
I think they look good, but if you put them
in the middle, it looks creepy,
Electric, real creepy. So always put them towards
each other in the center.
11. Eyebrow Cheat Codes: I noticed the eyes
might even look nice. They might even look
nice if they're smaller. So I'm not sure how I
want to if I take both. What do they look like
if they're smaller? So it's smaller or maybe
it's just further back in the head. Looks nice too. The lid is is very big now, but it does look nice. I think that feels
a bit better to me. Notice how I always
say that, you know, things just like
have to feel better. Now since I push this back, maybe a solution to
this is just to use flattened tool and
flatten this out. Flatten that out there. Then maybe smooth it. I don't like it even without it. I don't know. It looks
it looks good to me. Okay. So next eyebrows. Now this is a very, I just started doing
eyebrows like this. It's kind of a new
a new way to do it. But I really like it a lot. I think it's very
kind of useful. So of course, there's lots
of different ways that you can do an eyebrow. You can add you can add boxes and you can shape
them and put them there. Which I do like
doing it that way. But I'll show you that. I'll show you this way first. So let me just save. One way is to take the
head and clone it. And I'm gonna hide
the original head. And I'm going to name
this one browse, even though it's the whole head. Just stay with me. Now we're going to take mask. We want to have we don't want it, we don't
want it to unmask. We want just regular mask. So now we take our mask, I'm gonna go in really close
and draw the eyebrows. So I'll try not to spend all
day on drawing eyebrows. Not the best at
drawing eyebrows. But that's okay. So here we
have some bushy eyebrows. But the best part about
this is we can unmask. And I'll go in even closer. Because I noticed
that the closer I do that usually the cleaner it is. So we'll do something like that. Maybe we'll clean
that up a little bit. Still a bit too.
Too much, right? So maybe something like
that even though they still feel a bit too
big, but that's okay. I'm not a lot of
eye eyebrow Grb2. Okay. So maybe
something like that. So now what I like to
do is take the mask, invert it, take the gizmo, pull them out like that. And I'm going to pull
them out that far. But pull them out like that. And then go back to mask, the mask options and
invert it again. Now, let's take a look
at the top view and then I'm just going to crop
everything around these eyes. So I'm gonna take trim
and lasso and literally just kinda stick behind them. And then just go around. And this should just
cut everything. How crazy is that? That looks so weird. I think I got to take
a screenshot of that. So you can make art, the art of making art
while you're making art. It's crazy. So I don't
think we need any of this. We can go ahead and
cut all around here. Don't need any of this. I don't need any of this. So does it make sense now, what I've what I've done. All I've done is make, make a template
for our eyebrows. You can take the
mask and clear it. We can voxel remeshing
it one-fifth. You should be fine. Actually,
let's refresh it at 02:50. Because I think when
I did the test one, Ramesh, I wanted it
to be sort of sharp. You only mean I kinda want
this to be a little bit sharp, so hopefully this works. Let's go ahead and bring
back the regular head. We're still in the brows. So pivot, rosette, pivot. Let's move these back just enough so that just the
eyebrows are sticking out. Now they're not quite
as sharp as I want. So let's try pinch first. See if pinch conservative, clean these up a little bit. So not bad. Then of course, I like to just smooth
everything out. Like so. Now we have some
decent eyebrows. And again, as with
anything else, you can adjust them. You can adjust them
if you need to. Put a matter. They were
I feel like they need to be bent. Bent a little bit. Okay. Now it looks decent. Looks decent. I'm
okay with that. So that's been the way that
I've been doing eyebrows. I just think it's easier. It's cleaner and it's quicker and it's just seems
more efficient. So far. So of course, as
far as hair goes, I'll do I'll try to do
a few different types of hair and hairstyles
and things like that, and things that I've
been experimenting with. So for the eyelashes, like I always do, I just
do those the same way. And hopefully you'll be able
to just use your stylist for this is going to be
a little bit more difficult for me unfortunately. So I'm just going
to use path reason, the tube tool path. I'm going to tap the snap. So I'm going to start here. I'll bring the first
one up like that. Boom, boom, boom, boom. And then maybe I'll
come out a little bit. Like I always do. So
something like this. So we'll tap the green,
we'll tap mirror. So we have these two
things kinda like this. Here's where it gets
a little tricky. So let's go radius. Because we want to make this one bigger and this one is smaller. So I think by the time this class goes up,
this will be fixed. But as you can see right now, I can't move with the stylus. So if this is happening, then just go up here
to your interface. So this little icon or probably looked like
these three little lines. So go here, go to gesture, and then sculpt, change to any. Now when we go back to here, we can move these as normal. But I just want to
point point that out. Normally, this
wouldn't be an issue, so you probably won't
have to worry about it. So let's make this one bigger. One smaller. Let's go ahead and tap spline to
make it nice and curvy. Now I just want to
kind of bring this into the skin a little bit. This a little bit smaller. And I want to vary. This.
Should take snap off. There we go. So I want to bury this
right in the corner. Like so. And then it just
seamlessly kind of fades away. This, I'll kind of
bend up a little bit. And of course again,
this is stylistic. Once I'm happy with that,
I'll just validate. I'll take smooth and then
I'll smooth this edge out, this side as well. Smoot all this out. I'll just take flattened
and I like to kind of add a little bit of a flick at the end. Something like that.
12. The GQ Trim: So as far as hair goes, There's a few different methods. You can just use a shape and you can sort of shape
it to the head. But I'm the one that I
originally showed you guys. Let me just save this. The one that I originally
showed you guys. This is how I did it. So I took the mask and make sure that
it's on regular mask. And on the head. I pretty much just sort
of drew in what I wanted. So something like this. They went around the ear and I cut my own hair. So it's this very specific, but since I did it, I just want to show you
exactly how how I did it. I did something like this. And of course you can
go in and clean it up. I'm not going to worry, worry about it being
too clean because I think for demonstrating
purposes, this is just fine. I'll clean it up a little bit. Don't want to leave her
with Jack looking beard. So something like this. That's how I did it.
I just took the mask. I went like this. And then you can go
into the mask options. So go into this little pencil. Go into the mask options. And shell thickness. I have 0.377, border
smoothness, I have 30. And closing actions,
shell and split. I have none and none. So those are my
options that I have. But we want to hit extract. So that's a little thick. So maybe we'll go back
to the options and lower the shell thickness
to maybe 2.65. Oh, you know what, I
know what I did before. I didn't have I didn't have the shelf Nicholas
thickness up more, but I'll show you why. So I'm going to put
it at like 2.8. So I'll extract. Now I'm going to box
a little remission. So let's voxel
Ramesh it like 250. Unfortunately, you can
see it's still a bit. Let's see if I subdivide. If that will help it at all. Now, because it's still,
it's already high. So sub-divide and now it's at it's at 02:24,
So it's quite big. But you can see that's pretty
much how I got. The hair. Had to go through and
smooth everything. It's very careful
with the beard part because it's very thin. So you don't want
to like kinda break it by smoothing it too hard. So as you can see,
decent, decent lines, you'll notice the shadow will start to creep
from underneath. And what that is, is on this layer we
still have the mask. So we just have to, so e.g. we still have the mask there. So you just go into the mask, go to the Options and clear. Now that you've
smoothed that out, the next thing I do is take
the gizmo and shrink it. Swell, shrink. The wrong thing. Let's
go back to the hair. So I'll shrink it. That way. It's it's tighter to the skin and it looks a
little bit, it looks better. Obviously, this needs to
be thicker down here, but there's so much you can do. You kinda have to
just play around with it until you get it
how you like it. The next thing I did, it's
looking a little round, so I just went through,
flattened it up. So I flattened different places. And I also like to
flatten the edges. It's a little tricky. You know, using the flattened tool. You kinda have to figure
out a nice method to get a nice bevel. That's all I really
want is a nice bevel. By bevel, I just mean
like a flat edge. Sometimes it's a bit tricky
with the flattened tool. But I think flattening it
just makes it look a little bit better or a little bit
more professional looking. You can, you can continue to smooth it out a
little bit more. So that's pretty much how I did the hair on the other one. So that's one hairdo. I'm gonna go ahead and decimate this because I want to keep it. I mean, I like it. And it might be nice
when I'm coloring it, but so I'm going to decimate it. So this is not so
huge file size-wise. I'm going to call this low crop. Get rid of that because
that looks crazy.
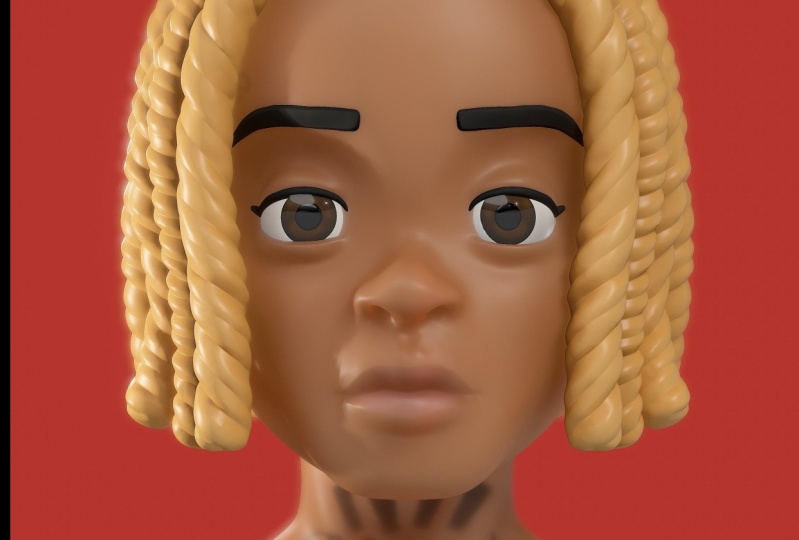
13. The Disney Swirl: So for other hairstyles, remember how we did
the line coming up. The hair just kinda
has to grep around. You want to leave area
for the forehead. But if you want
to look at images of hair and things like that, that might be the easiest. If you want to just
have fun with it. Just add, like we'll add
a sphere or a gizmo. We'll stretch it out this way. So something like this
already looks like, Let's say she has kind of a low crop on
this side and then this kind of goes down. So I'll validate this. And I'll just take this and
I'll just move it bigger. I'll just start to move
it in this direction. And kind of stretching it out. Stretch it out down here. Maybe we'll come around with it. So maybe it kind of wraps
around to this side. So I'm just manipulating the, manipulating this sphere
to make it interesting. And I brought it
around to this side. It's okay that it's touching the neck and all that stuff
that isn't that isn't bothered me because hair
touches all those places. So now that we have that, Let's see if we
can figure out how much we want to actually
be touching her head. Smaller. So we can call this with paint and
make it like a buzz. Or we can do the
other thing like we did with the mask tool. And we can make it just
like a short cropped hair. So we can do that. But we have this initial shape. So the only thing is
let's just bring it away from the scalp a bit. Let's use, let's make
this a little bit bigger. So it's just more of a
uniform. There we go. That's a little bit better. And I just want to make
a shape out of this. So let's flatten this. Let's use a flattened tool and will flatten all of
this under here. So it wraps around the face. Like so. I think that it
looks pretty good. We really don't even have
to do all that much. So I'll take, I'll
take drag and maybe I'll maybe I'll do
something like this. And I'll even flatten it here. Flatten it over here to
flatten is really great, really, really great tool. And there's also other ways
that you can kinda make flat impressions on
things like so e.g. we can use clay. So with clay, we should probably
make this hair a little bit more dense. So let's go ahead
and we'll go up here and it's subdivided once. So now let's go here and
as Box-Muller remission, and let's box a remission
it around to 50. Okay, so now it's a little
more, a little sturdier. Own a save. If we use clay, we can kinda follow this line. So let's start. All the
hair would start there. Let's make sure
that we're not on sub and we don't want symmetry. So I'm going to
start here and then I'm gonna go with the clay. I'm going to follow that
line across like this. Come across here. And we'll do something
sort of like that. Only better. I don't know why that
looks really messed up. Let's make this a bit smaller. Let's bring the intensity up. So see how I'm just
using clay and I'm just kinda dragging that back. So this is a cool way to do hair and kinda get nice
texture on the hair. Just by using clay. And all I'm doing is
just kind of going in that same direction
over and over again. I'm not worried if the
lines cross each other. Not really worried
about anything. I'm just adding
texture to the hair. So now that you've done that, you can also do things like
add, crease, like this. If there's like a ones
that are a little bit more pronounced, things like that. So you can use crease to really
bring some life into it. Now, for me, since I'm crazy, I do like to go in and smooth. I don't like those sort of
ribbit, ribbit looking things. So I'll go in and
kinda smooth this out and just keep it
nice and smooth looking. But if you want to add in
the rest of this hair, equally as easy, just
add another sphere. Let's use our gizmo, and let's just bring it up
to that section. We'll bring it up
to this section. Maybe we'll stretch
it out a little bit, flattened it like this. Now let's just turn it so that it matches up with
mattress up with that. Like so. We can go ahead and validate it. Let's call this one. We'll call this here to
my join them later on. So for HER2 will do the
same sort of thing. We'll just take this and
I can bring it down, stretch it down into
the other here, stretch it and stretch it to
looks a little bit natural. And then you can
actually just push it back behind the ear. And that gives it
that light pen. Nice Disney princess look. That one is in front of the ear. You, although you can see
the air a little bit, this one is pushed behind it. So we'll use flattened again. Because flattened
has always good to add some planes to it. Here's another way to do it. Of course you can add pinch, which I showed you before. But crease not only works
to make creases this way. What's great for that? But also you can do sub is great for doing
increases like this. So this actually makes the
crease extend outwards. Which is really nice
for this as well. So again, we can use clay. But I'm going to
voxel remission. Let's subdivide it first so we don't get those
weird marks in it. So I'm going to sub-divide once. Then I'm gonna box or
re-emission it to 50. Just smooth this
out a little bit. I see a little bit of that. You know what? Modulus
just do it the right way. So we subdivided it and now I'm going to
box will be Mesh. I'm going to sub point
a subdivided again. That should help with that. Okay, It's a little bit better. Still a little bit
of these marks, but it looks a
little bit better. Now if we want to
add clay. Do that. You can go crease. Make sure we don't do sub right now if you
want to make it. So the creases a
little bit more of an indentation. Do that. Maybe we'll just stretch
this out a little bit more. That looks great. And again, you can also add, I'm going to take
it off of snap. You can add a path
if you really want to kinda get it loose with it. When all crazy. Now I have
to do this real quick. So I can just hit
the way I want. I'm going to hit spline,
so it's nice and curvy. I'm going to hit radius. And I'm going to make
it really small. Validate it. You can use mover drag. Then actually it looks
okay. In this video. We'll just move it manually. Actually looks okay. So we'll do something like that. It gives it a little,
a little detail. You can add a few more
here would be nice. But you can do that. Of course. I love it. Hairs fun. It's literally just shapes. Got to be careful and
turn this back off. Okay, So this is very
nice, very nice. Let's take these hairs and let's just join them together.
The tube as well. Let's add that. So we'll join all this
and call this HER2. Nice, beautiful when we save.
14. Hair #3: So let's hide this. Here's another kind of
cool way to do here. You can add a cylinder. Go to my gizmo will make
it bigger, bring it down. Actually didn't have to be
down. Let's make it to there. I'll also add a sphere, the sphere up and make it bigger until it
shows matches up. So maybe something like this. Now for the cylinder,
it might be nice to use our radius capabilities. I'll make this. Let's
see if I can use. My style is I can't. Let's see if I can do this. There we go. So we'll make a, make this a little bit bigger. Let's do whole. So we'll just make that a whole. And you can adjust the
thickness of it as well. So you can adjust this, the thickness however
you'd like it. So maybe we'll do we'll try
something like that out. So now we can validate it. I'm going to reset
back to stylists. So now with these two Before
I box and merge them, I'm just going to
sub-divide them once because they're very small. This one I will subdivide once. And now we will voxel,
rematch them together. 200 is fine. Okay, now we'll just take smooth symmetry and smooth it out so you can see
where I'm going with this. So I'll take clay and just
add it around the edge, the bottom edge, like that. Smooth it out. Let's stretch this a little bit. Now I can trim out hair
like so the face is, the hairs are covering the face. So we'll just use, we can use lasso. A little crazy that look, the only thing I did is I
forgot to protect the back to Selective Mask and rectangle and you
can just protect the back. And that
will just trim again. I don't know why the trim
is acting quite crazy. That's kinda odd. And we can also take
clay sub and you can just kinda clay that
away in there as well. Let's box will rematch this. Well, let's take the mask off. Clear. Toolbox will
be measured again. Just smooth this out. Let's flatten the top screen. We'll do something like that. I just want to get it
close to the skull. Now let's flatten this. We'll flatten that, smooth this all out and make it
nice and pretty. And we can sort of figure out
we want this hairline of B. So we can use the cylinders
to make bags or you can just use a box gizmo. Going to tap gizmo there. So this will just flatten, maybe shrink it a bit. So let's validate it. And let's take smooth symmetry
and smooth it all out. Now let's take movie. We just
kinda want to bend it so we can make it into banks. Will append it like that. Maybe a little bit
more in the middle. Shrink a little bit tilted. You just kinda shrink it until it's roughly in the right spot. So maybe something like this. You can like to flatten out
the edges a little bit. And then we'll make, we'll
just use can use boxes, but I think I'll
use fears for this. Mirror will sort of bring them along the
sides, flatten them up. What's going to bring them in? Really close to the head. Oh, validate. And
then we'll just drag them into the into
the rest of the hair. But I want to make
them look like they're buddies with the bangs. So sort of like this. And actually, you know,
what might be nice. I turn symmetry
off, use flattened. And then sort of keep
the bangs a little bit of symmetrical vibe. Maybe I'll just drag this
part off a little bit. It's kinda cool. I think
that nice plane underneath. So that's just
another way to kinda do a different
kind of hairstyle. Excuse crease and do
a turn symmetry off. Have we could do a nice part. And then like we
were doing before, you can always use clay
and you can always hook. There's another way to do it. Cylinder box. So let's validate the mirror. And then let's put
these all together. So a join these together and
this will be here three. Let's decrease. So before I put
them all together, this one is very, very small. The size is small, so
that's why Chris is not looking good on there. So one way to remedy
that is I can undo them and then sub-divide. Or I can just voxel Ramesh, this one alone, like 200. But then you get these things. So let's go ahead and
sub-divide twice. Then I'll box where
you measured at 200. It's better. These
are pretty good. So now we should
be able to put all of these together, like we did. Increase should
work much better. When these up a little bit here. I think that looks good. So
we'll name this hair three.
15. Dynamic Light Demo: Alright, so that's
pretty much it. Let's go back to, let's go back to here too. And I just want
to show you how I would kind of go
about lighting this. So I'm not going to do the
coloring and everything, but we can still make
this look awesome. So firstly, let's change
from Metcalf to lit PBR. Okay, so now we have lip PBR. It's all white. So the first thing
that I would do is take the head,
hair, the brows. And we do have this
what is this mirror? Oh, that's the
that's the pupils. So I'm gonna go ahead and
validate that. And name. And name this P1 for pupils. I'll go ahead and
move, move this up, move down, move head down to
the heads under the hair. So I'll put it under the hair. So we're working on all these. I like to change it
to a matte white, so let's just do
that really quick. We'll select them all
except for eyes and P1. We don't need those
for all the rest. Tab here. We're in
the white zone. Let's just go to maybe 0.5, almost 2.6 and pain all. I just think that's
a good starting spot to call your scopes. So the next thing I wanna do is I want to put her
pretty much in the middle. So I want to get a
good a good setup. So I kinda like this. It's in the middle. I think
it looks pretty good. So now we can go to this
camera and you want to add, you want to first change
it to perspective. Okay, so I'm gonna
put it down to ten. So we change from
orthographic to perspective. Now I'm gonna do add view. And let's just call it portrait. Okay, so now we have our view. So if we change it,
if you do anything, you can always go here
and then go back, right back to your view. You can also do which
way is the best. You know, you can do
something like this. You can add another
view and make this profile things like that. So now you have your views
and you can move them around. So now for the eyes, for P1, Let's just go ahead and make sure that it's glossy. We want it super glossy. If you want to even gloss here, you can go here. So for P1, you can actually
raise the glossiness. See how I raise that up. I'm gonna do the same
thing with eyes. I'm just going to paint them. So they're nice and
glossy like that. So you have that little
bit of difference. So that looks pretty
good already. Another thing that
we can do is just add some basic, basic lights. So for lights, we're
just going to add a sun, which is used to be directional. So now it's the sun will
add a light here that'll be mainly lighting the whole
portrait of her here. We'll add a fill
light on this side. So it'll, it'll fill in this, it'll fill in the
dark shadow from this heavy light will do
a light from the back, kind of like
illuminating her hair. And maybe we'll get a
little bit on the side of her face and then we'll have
a light from the top down. So I'm gonna try to do those really quickly and efficiently. So first, we go into our lights panel and let's
turn the environment off. So that's the first thing. So we turn the environment off and then we add
our first light. And let's name this. We'll call it x1. So this is the, this is the sun. And you see that it's
already quite beautiful. Irr, I love it already
is coming from here. It doesn't matter where you move this all that matters
is pointing this way, so the light's always
gonna be there. But what I like
to do is just put it in the general vicinity. So it looks like it's
where it's pointing to. Now, obviously this is
all your menu up here. We have intensity here. So let's slide this up
to maybe even around to slide this up some to
have it at 1.9 randomly, but it's a little too bright. So maybe around here, right, but not
super, super bright. So I think that's
pretty good for now. The other thing that I
want to do is change the, change it to a softer light. So I'm going to tap
these three dots. I'm going to hit softness. And that looks pretty good. Maybe I'll bump it up
just a little bit. So the light is nice and soft on our this is our sunlight, that's our key light,
that's our main light. So now we'll go
back into lights. And I've been experimenting on when to bring back
the environment. Because I do like I do like what the environment
has to offer. Because without the environment, you don't really see that really beautiful circle on the top. And I, I really liked that, that circle on the top. So, but that's an
experiment for another day. We can kinda mess with that. So next, let's add in
another light here, and this is going to
be our fill light. So let's name this one. Fill with an F, Not a pH. Let's change this
to a spotlight. So now we can move
the spotlight. The other side of her face. Good. Some light on her. And we just want this
to be round here. You should be able to
adjust this orange one with your stylists. And fortunately, I have to use
my finger because it's bug still happening a little
bit further away. So something like this. But remember this is
supposed to be a soft light. This light isn't supposed to be. This light isn't supposed
to be super bright. So unfortunately there's
no intensity here. That would make it a lot easier, but we have to go into
the actual light itself. Can I do it here now? You have to go back
into the light and lower the intensity. Again, this is
just a fill light. So now we have the dark
shadow will be here. But now we have the fill light. That's just kinda filling in. So it's not so black. We don't want it like
completely black. So we're just bringing some
of this back a little bit and kinda lightening
it up a little bit. Seeds. So it's kinda like
lightening up a little bit. Here's the difference. That's without it. That's what, that's what that
is. That's with it. We can actually make it
a little bit darker, even something like that. And again, with
this one, I want to soften up the shadows as well. I love soft shadows. So we're going to
soften that up as well. So the next thing we'll do
is we'll add an edge light. So we're going to put an edge
light back in this area, pointed towards the
back of her head. And we can probably
clone this one actually. But let's not get cute. Let's just go ahead
and add another light. Will make it a spotlight. And we'll name this one edge. This edge light is going
to go behind her head. I think that's
probably about fine. Move it over a little
bit and now we just have to pointed towards her. So kinda slide it
over a little bit. And you can even start
to see that little edge. Let's bring it a little closer. That's the cone angle will spread this out so the light hits more
of that surface. So we're going to
raise the cone angle. Like so. See now we have that
beautiful rim light. And you can experiment with
sort of bringing your foot, maybe you want to bring
it forward a little bit and try to get a little
bit on her face two, that would be ideal. Look at that. So now we have a little bit of that light
hitting her face as well. Which is, I think looks
really, really great. And we want to this, we want this light
to be really bright. So I'm going to
boost the intensity. So maybe something like that. Okay, We'll go push
it back a little bit. I liked the spot where it's at, but I think that looks nice. Now we have a nice edge light. So for the last light, we want to make a light
from the top coming down. So let's add our last light. And we'll call
this one top-down. So we'll bring this up. I'm going to change
this one too cool. So I'm going to change
the color here. I'll put it to a bluish color. Now we're going to just make sure that it's
pointing straight down. We also want to change
it to a spotlight. Almost forgot that bit. So we'll change it
to a spotlight. We want it kinda
coming straight down. I'll raise it up a little bit. And it kinda have
to adjust it so that it's more
towards the front of her face coming straight down. So pretty much something
generally like this. So generally like this. Now that that one's
kind of bluish, I'm going to change these
to more of a warm color. Wait, did I just
moved the wrong one? This is the Sun. That's correct. I
wanted to change the sun to a little bit warmer. I'll change this one
to a little warmer. This one as well. Okay. I think this is good for now.
I'll be right back.
16. Subsurface & Post Processing: Okay, so the only
thing I wanted to do was change this light. Kinda want this to
you. There we go. I don't want it to be pointing a little bit more towards her. Maybe I'll raise the intensity
of this a little bit. Just a smidge. Okay, I think that looks, I
think that looks really good. Let's go back to our view and see what we're looking like. I think it looks great. The
other things that I would do is change the the skin. So all of this I would go in
and change to subsurface, change it to sub-surface. He might have to bring
this down a little bit. The hair, we can actually
change the sub-surface as well. So that will give a really cool look with this edge light. So that'll make that look
really, really nice. I can do the same thing
with the eyebrows. Eyebrows. Just make sure
you lower the depth. So the light isn't just like
going right through them. So I think that's good. Oh, and also let's see. I think the I think this
is also subsurface. Read that I joined
them all together. So pretty much yeah. Pretty much something like this. I think. Looks good. Play around with the lights. There's so much more
you can do with lights. I'm also it's kinda fun
to change the background. Oh, we didn't even
do post-process. Post-process is
another can of worms. When you turn that
on, you can adjust these to really make it look
how you want it to look. But here, here are my settings. If you just want to try
to match everything. Of course, depth of field, you can adjust that
as much as you want. I'm gonna leave it off for now. But yeah, those are my settings. The only other thing
that I might do is I really love this, sort of I do love this beach
or this color background. So let's see what color
is this background. So this is, you know, what I'm gonna do,
I'm gonna save this. And then I'm gonna do Save As. Now I'm free to change the color of the background and things like that. I
don't have to worry. I can always come
back to this one. It's always kinda fun to change the color to something
interesting. Maybe we wanted to like a
light color is kinda cool. So if I was to do
something like this, then I would adjust the lights, especially this this really
bright light, the edge. I would adjust this light
to match that. Hard to see. Of course. I would take this light
and I would match it. Going to find the right color. Here. It'd be something
like something like that. Just because it,
it kind of brings everything together
when you can sort of match some of these
colors a little bit. Make it really makes
a big difference. Go back to portrait.
It's also kinda cool. That's kinda nice to the
kinda little bit darker. Can adjust the
light a little bit. Beautiful. I think that looks
really, really beautiful. So I don't want to
leave you guys hanging. Here is how I would export this. Firstly, I would
make sure to save, make sure you have it
saved how you want it. And I've already
saved it like this. So I'm going to
just actually add the environment and it makes
it a little bit lighter. It still looks
pretty cool though, because it still looks
like it's porcelain. And I I kinda like that. I think it looks cool. So I'm gonna go ahead and keep
this lighting like it is. Maybe I should change now. I'm going to keep it like it is. So when I export,
you just go here. True all the way
down to the bottom. If you want it to be
transparent like just the, just the mesh, you can tap that. But otherwise you have
your size is here. And I don't really need, I'm gonna do for k. Just
remember that if you have a post-process on and you
have this all the way up, I have my back max frame
sampling if we're six, which is quite high. And I have all of these. Once you have all of this stuff, it will take a while to export. So here's my exporting in for k. That's the little warning. And you see, it just
counts all the way up to 406, then it exports. I just wanted to make
sure I got that in. Sometimes I get
so excited when I get to the end of a class. Because then I can just start, I'm finished editing it
and putting it altogether. That I just forgot to go
through this process as well, which is also important. So yeah, once it gets to 406, then you can usually either
I usually save it to x hazy, send it to my computer because
the file sizes are so big. Like this one was like,
I think it's going to be 13 or 14 mb, which is really, really big. So I will just send
this to my computer. It's 13.1 mb. So I'm going to send it over
laptop so I can add these. After I go into this little speech that I had
made before I filmed this. So let's just get to that now. And then after
that, I'll show you these beautiful images,
fully rendered. So yeah, I think I'm going to end it there
because I don't want to keep going because
otherwise I can keep going. Practice, practice, practice. Have fun with it. Experiment.
I hope you learned a lot. This was really, really fun. I'm so glad that I'm getting
more comfortable with making these types of faces because I think I just have so
much fun with them. I'm trying to think if there's anything else that
I wanted to tell you before we go into
the thank-you video? I don't I don't think so. I don't think so. I love it. I'm really happy with it. Hopefully you guys
are happy with yours. If you're not, then just keep working at it
and figure out what it is, then it's making it
different than I kinda wanna do a thing where
I can go back and forth. Someone wrote me a message. I want to figure out a
way where, you know, if you're having issues
or something like that, that I can really do some help, like seeing what you doing
is seeing what you've got and help you out. I really am hoping that
I can figure that out at some point in time because I think that might be very
helpful for you guys. And it's just, I think
it would be fun to do. Alright. So I will see you guys
in the next video.
17. Thank You!!: All right guys, welcome back. Thank you so much
for joining me. I hope you enjoyed this class. This was a really
fun one because I've been really nervous to do humans and humans style
faces and likenesses, which I haven't really
delved into yet. But I think even
after this class, I'm ready to sort of
try to do a likeness. And what I mean by likeness
is take a picture of someone or someone
recognizable or just anyone. And I do the sculpt to look like that person
has in likeness. So I think I feel like
I'm ready for that. I think that's something that you should practice
doing as well. Because it'll just take you out of sort of doodling and sort of just making up different
features of the face. And you'll have to
just match those. And in some ways that
actually makes it easier when you have, when you have a
guide to look at. But I hope you really took
a lot out of this class. Human faces and things like that were very
critical of them. We see them all the time. And human faces can
be very tricky. So I hope I took some of the fear out of
doing human faces. It's very doable. And especially when
you just think about everything as shapes. And you think about
everything one step at a time and just sort of
building things and to, to get to the shape
that you want. But once again, I
really appreciate you guys being here and
spending time with me. Of course, you can see
more of my work on Instagram, drug-free,
Dave, YouTube, I have supplemental work, supplemental material for
this class on YouTube. I've already uploaded it there. So just make sure that
you go to my youtube and you just look for whatever
the name of this class is. I'll probably have that
in the name as well. But you'll see the face. So make sure you check that out because I just keep going. There's so much you can do. I don't really cover it as I don't really cover it normally,
but I do some colors. I changed the lights around. I show you how to do those little fake animations,
things like that. So I do so much more
with this character. So make sure you take me
out their youtube.com slash drug-free
Dave, also TikTok. Tiktok.com slash own TikTok
has drug-free to aid. So find me there too. I think that's about it. I'm
going to let you guys go. Once again. I appreciate all of you keep
drawing, keep sculpting. And I'll see you all
in the next video. Be sure to rate and
review my class and also upload your designs to the project and
resources tab. Create Project.
 Dave Reed, 2D & 3D Illustrator - Brooklyn, NY