Transcripts
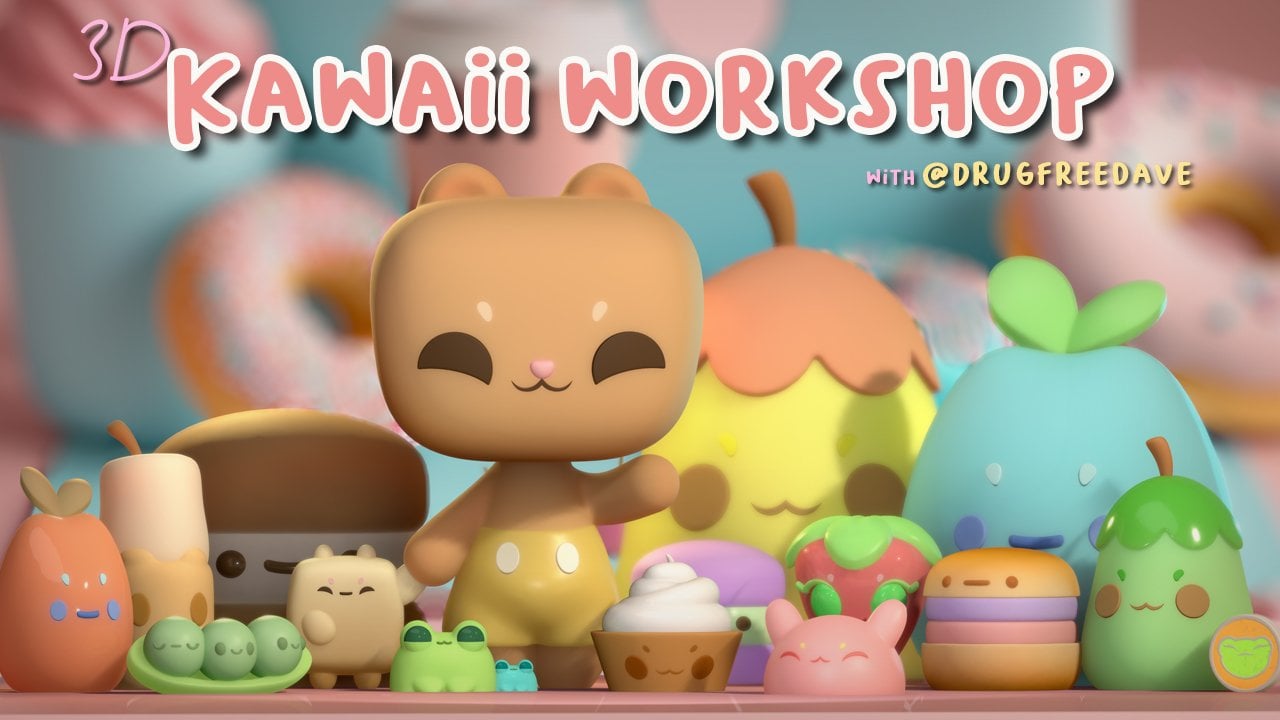
1. 3D Modeling for Beginners!: Welcome to my three
D crash course for Beginners with Nomad Sculpt. I'm Drug Pre Dave a
digital artist and content creator living
in Brooklyn, New York. So by now, I'm sure
you've seen and heard about the rise
of three D sculpting and modeling on mobile devices like iPads and Android tablets. Creating Th D art has never
been more accessible. And unlike legacy apps
like Blender and Maya, where it's a really
steep learning curve, creating throu D art with
Nomad Sculpt is actually fun. In this three D crash course, we're going to design this
cute little character that I found as a
iff on my phone. I don't know what it's from, but it's a iff, and it's cute. So it's small, it's round,
it's fairly simple, but it allows us to use a few
different tools to kind of get us used to nomad and used to navigating around nomad sculpt. We're not going to be
chiseling a sculpt out of, like, a block of clay. Cause that's what
I thought when I first started three D modeling, I thought like you have a
block, and then you have to chisel it like you're It's
not really like that. What we do is we're
going to use shapes, and we're going to
build those shapes up until we get the character we want or the three D sculpt that we want. This
course is perfect. If you want to learn how to turn your two D art into three D R, you can also export your sculpts to other
applications like Blender, and then you can really push
your creativity to the max. I love doing animations and video effects and
things like that. You can also just make
things a three D print. I love creating characters, printing them, sending
them, painting them. It's really amazing what
you can do nowadays. So once again, I'm
Jog Free Dave. Thanks for watching my
little crash course Intro. Again, this is a
Skillshare exclusive. So if you're ready
to learn three D, then come hang out with
me on Skill Share, and I look forward to
seeing you in class.
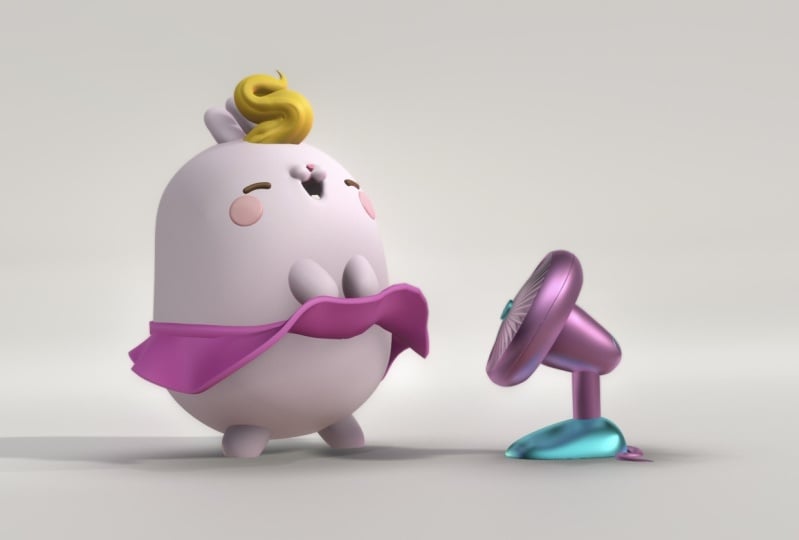
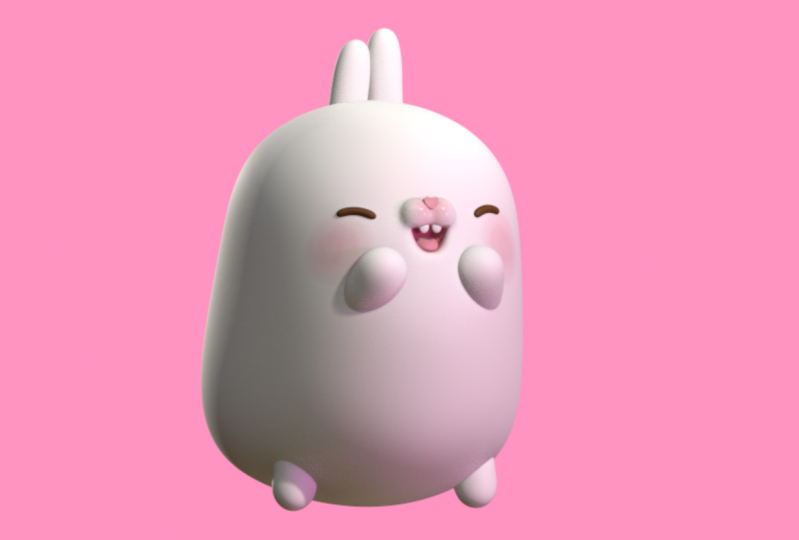
2. Class Project: So welcome to the class project. So today, we're going to make this cute little
round character. It's very beginner friendly, and it'll just teach
you how to start nomad, how to navigate nomad,
how to use shapes, how to join things, how
to use the tube tool. There's lots of fun things
that you can use in nomad that will help
you design characters. So we're going to
start from the bottom. We're going to build up our
character shape by shape. This is pretty much
how I sculpt all of my characters. I
try to use shapes. Shapes are the
cleanest way to make a character look really dynamic. And it just get to the
place where you need to be easily simple with
just simple shapes. They're actually
called primitives. But I'm not going
to go too deep into all the names and wording of three D stuff because then
it can get really confusing. I'm going to try to make this as the least amount of
confusing as I can. Hopefully, less confusing
than that last sentence. Another thing that
I encourage in my classes is that
this is your art. So follow along, follow as much as you can,
do what you can. But if you feel that you
need to change something, you need to make something
bigger or smaller. Add. You want a little bunny with four arms or
something like that. You can feel free to
make those changes. I love those types of changes. Do whatever you do to
make it comfortable for you so that you're having a good time and enjoying yourself. That's a big part of my classes, and that's something that I
really encourage in all of my classes and in just creating in general.
It has to be fun. And I'm biased. I love it. I'm obsessed. So I'm glad that you're
here and I'm excited to get started on
this little bunny. I still have to find out what
this little bunny is from. Oh, I do want to
let you know that there are some downloads
that you can download. Just go to Projects
and Resources tab. You can download
the environment, and you can download
the reference image. And, of course, just
like, as usual, I always include the
nomad scope file. So if you want to see my actual file, my
finished product, then you can at least look
at that and you can have it and you can study
what I've done and you can, take a look at it. As a way that you can see exactly what I've
created on my end. I did look up this character. The name is Mong. It's a super cute character. I think it's origins are
Korean. Shout out to them. It's always good to
do your research. I's always good
to make sure that whoever the original artist is when you're doing fan art
that they get recognized, and you give them their flowers. And don't mind the wrinkly
shirt. It's late, it's hot. And I just figured
it out what it was, so I wanted to just record
this a little bit and just give the nod to Mulg.
3. Getting Started: First, you go to projects
and resources, scroll down. Then you'll find your
download resources. You can download
your environment and you can download
the reference image. Once you have those files
downloaded on your tablet, then we can get started
bringing those into nomad. First, let's tap
thistle image here. You can tap the reference image. Tap the image, p and photos, and you can just find the
image on your device. Here's the reference image. We'll download that. Add and
it'll show up down here. As you can see,
it'll show up here. But if you want to edit it, if you want to
move it around, you can just go back into
there and it transform, then you can resize it
and move it around. I've also included my
custom environment. To download that. Just go
here to this little sun. You'll see the shading
lights environment. Go down to environment.
Tap on the image. You can see there's some
default environments. You can just tap import photos and you can import
the image that way. Once it shows up here,
you just tap it and whatever environment you have
chosen, it'll show up here. You can also rotate it. You can see the
little pops of light, and you can change the exposure. For now, I'll just
leave mine to 2.5. Let's switch from Lt PBR, which is why this is white. Let's just switch to MTCAp, and that's just something
that I always sculpt in. It just makes it easier to see. We'll tap back on
the shading window. We'll change from
lit PBR to MTCAp. I like to use PXG clay. You can tap and
choose when you like, or you can go ahead
and choose PXG clay. Make sure to save in the middle of projects
saved as often as you can, because sometimes
nomad does crash. This is our default sphere. This sphere is going to be here every time you open nomad, but it's very big, so
let's go ahead and delete it and just
bring in a new sphere. Here's how you add a new
shape or an extra shape. We'll tap here. This is the sphere that we
see right here. Sometimes I may refer to this as a three D mesh or an
object or a shape. Let's just delete this, and
then let's add a new sphere. We can go ahead and rename this. We'll tap these three dots, name, and we'll do body. You can see that the
wording is yellow, and also you can see
this validate here. Anytime you add a new shape, you're going to have to
validate it before you can use all the regular
tools in the project. Let's go ahead and validate, and now we have our body shape. I'm going to go
ahead and get rid of the grid because
we won't need it. You also might see me
hit thistle thing here. This is called a snap cube, and this is an easy way
to know that you're looking at the front
of your sphere. If I turn it, you
see it says left, but we want it on
the front for now. When I look at this, he or she is almost
shaped like a potato. All we need to do
is take the sphere, and we can use the move
tool and we can just manipulate it until it
looks like this shape. Let's take the move
tool and you can see that there's a red line
going down in the middle. This is our symmetry line. I'm not going to get
too deep into it, but symmetry really helps because you can control
two sides at once. As you can see, there's
two these little red dots. If we use the move tool, and if symmetry is on, which you can see that it
is, you see this red line, then you can pull out your clay, and anything you do to one side will happen to the other side. That makes things
really much easier. Okay Let's make the
move tool really big. We're going to up
the radius here. Then we're just
going to pull down here and make this a little bit longer. Maybe
something like that. You can see there's
a little bend here. Let's make it a
little bit smaller. We'll make the move
tool a bit smaller, and we'll just move this
in here on the side. I'm going to make
the move tool a bit bigger because I want
this all to be a bit more Rounded. I think that
looks pretty good. Let's turn and now let's
look at it from the side. Obviously, this
isn't right because the potato is not
shaped like this. We'll just make move tool a
little bit smaller and we'll just coax the back side of this tool on the back part of the clay until it
looks on all sides. I think that looks pretty good. The next thing, when we're
looking at this character, you can see that
there's a slight bend. If we look at the left side, this should be more rounded. I'm going to use move tool, and I'm going to push this
back a little bit. I'll push this part in. You notice I'm just
trying to push the whole thing just to get
that nice curve in the front. Then I'll make it
smaller because I still want everything
to be nice and round. Now I'm just going back in and making it look a little
bit more like a jelly bean. Let's take a look from the
front. Looks pretty good. Make it a little bit
wider on the bottom, and maybe a smidge
wider on the top, but I think that
looks pretty good. Let's use the smooth tool. You can raise the radius up a
bit and just smooth it out. This is something I always
do after I manipulate clay, just to make make sure everything
stays nice and smooth. Once you have your
little je bean potato, you can go ahead
and give it a save. Now we'll add the
arms and the legs. Let's go here. We have our body. Let's go ahead and
add another sphere. We can go ahead and validate it. I'm just going to move
the sphere up so you can clearly see what
I'm doing. I hit front. I'm just going to shrink it. So maybe something like that. I think that looks pretty good. Now let's go ahead and
hit the symmetry button, and we're going to hit x and z. By hitting x and z, it's just going to help us to keep this shape when
we use the move tool. We can also hit local. Let's use the. We're on our little sphere
here and you can see the blue line now
and the red line. We'll just use the move tool. Our radius is about 2:50 or so, and we'll just move this up. You can move the other
side down as well. Now I'll just turn
to the side and make sure that it's nice and round from all the
different directions. I think that looks pretty good. I'm just going to tap smooth and just smooth it out a little bit. Like I always do. Let's go
ahead and name the sphere arm. We'll tap these three
dots, name arm. Now we'll use our i.
Gizmo is like our. This is how you control whatever shape that you have selected. You can see. If I
he, it's for this. I I tap it's for that. These little arms are
in the front a bit. Let's take our gizmo, we're going to use
the blue arrow, and we're just going to
move it into the body. Maybe down a little bit. We're going to use this
red ring to rotate. These rotate in all
different directions. We're going to use the red
one and rotate it down. We can use the blue arrow, and we just want to
match this position. Let's look at it from the front. We'll move it over a little bit. We'll use this bigger
orange ring to shrink it. Probably right around there. I think that looks pretty good. We need to reset the
symmetry options and the mirror options that
are within the shape, because we mess them
up a little bit. Let's go back into here. Instead of local, let's
go back to world, and also let's tab Z so that
we only have x selected. Now we'll go here
and we see our arm. We'll add a mirror. Now that we've added our mirror, you can see that there's
a red mirror here, and we can go ahead
and label that arms. Make sure you tap the white arm and now you can move
these as needed. You can tilt them a little
bit towards each other. I think that looks pretty good. Now we want to do the
same thing with the legs. But to make it
easier, we can use these same shapes that
we made for the arms. We'll tap the arms. We have
both of these selected, we'll hit clone, and let's make sure to rename them
so we don't get confused. Now that we're on this leg, the white leg, we can go
ahead and move it down. It's going to be a
little difficult to just move it straight down. What we can do is hit a line, and now we can just
move it straight down. We can just find the
correct position for them. I'm going to go
ahead and rotate. It looks like
they're about here, and maybe a little bit. Actually that's a
decent spot for them. Maybe something like this. Maybe a little closer together. I think that looks good. Now we have the
arms and the legs. I'm going to make sure I save. Now let's go ahead
and make the ears. We'll go to our seed menu. Let's tap on body so that
when we add another shape, it doesn't go into
one of these mirrors. We'll add sphere. We can go ahead and
label this ear. Now we'll go ahead
and just tape gizmo. Sometimes it's a
little hidden right there. We'll tape gizmo. We'll move it up and shrink it with the bigger orange ring. We can move it a
little bit off center, maybe a little bit bigger. Now we can just stretch it. I think that looks pretty good. Let's turn it more to one side, and let's make it a
little flatter as well. Maybe something
like that. We can go ahead and validate it. I'm going to take
move. The only thing is I don't want this
side to be tapered. We'll make the move
tool a bit smaller, and I'm just going to
pull the bottom ale bit. We have one ear. Let's tap these three
little dots and hit clone, and now we can just slide
the other one over. That looks pretty good.
Let's angle one of them. We're going to use
this blue ring again and we'll just
angle one of them. I think that's pretty
good. Let's take a look at the front.
They're a little high up. I'll go into the s menu
and I'll select them both. I just want to move
them back, I think, and then move them down ale bit. Let's take another
look at the front. I think that might be
a little bit better.
4. Bunny Face: So now let's add a sphere, and we're going to make this
into Hal snout slash nose. So we'll add another sphere. We'll use the gizmo,
we'll bring it up. We'll shrink it with
the bigger ange ring. You see, I'm just putting
it right on the surface. Maybe a little smaller. I think that's pretty good. Now I'm going to hit mirror, and then I'm going to take the
arrow and just move it over. I think something like
that looks pretty good. Just make sure you
don't have it too high or too close to the arms. You can always just
refer to the reference. I might move the arms
up a little bit. Remember, if you want
to move anything straight up or straight
down, just hit a line. Now let's use the Tube tool, and we're going to make the
little black part here. We're we're going to use a tube to make that and
also to make the eyes. Just go to the Tube tool, and we'll use path, and
we're going to use Snap. Just make sure that
Snap is also selected. For the first one, we're just going to touch down
right in the middle of the little snoot and
then drag about there. Doesn't really matter it
doesn't have to be perfect. So just adjust these nodes. You want them to
be white. If you tap them, they turn black. Just make sure that
they're white. So we'll put one in the middle, and you can just put
one maybe around there. This is going to be
the end of that mouth. Let's add another node in the middle so you
just tap on it, and then you can pull
this down a bit. Might need to add another
one. Once you have that, you can hit this little green. The little green node. You can see we must be
inside of a mirror. Let's go to our scene, and ye, it accidentally put it
inside this mirror. Let's tap on the tube
and just put it up, just drag it up, and
we'll rename this mouth. Let's clone this and
we'll rename this. Yes. Let's go back to mouth. Now we just need to make
it close to this shape. This is actually quite
flat on the ends, we want to make that round. The first thing that
we're going to do, let's turn off snap. Let's tap these three
dots, post subdivision. We'll slide that to two,
and then two topology, tap on, and let's
put it down to five. Okay. Well, it didn't
really do too much. Let's go back in there. Let's tap on this little link. Okay. Let's put this down. Am I in the right
shape? Oh, I am. Oh This is another thing that
happens to me sometimes. When I duplicate something, I forget to hide it. Let's hide eyes and now
we're just on the mouth. Now we can actually see
what I was trying to do. You just want post
subdivision to two and you can
uncheck the link, division y three,
division x four. This actually looks pretty good. The only thing is, I wanted
a little bit longer. Maybe I'll add another
node right there. I think that looks pretty good. Now that we have that, let's
go aha and hit mirror. Now we have it on the
other side as well. Looks good. Now let's go
ahead and take our eye. The eyes will unhide it. You know, it's actually
probably easier, just to add a new tube. Let's just go ahead and delete that cute tube and we'll
just add a new one. We'll just use path, and we
can just do the same thing. We'll use this as the snap. Snap just means that it'll
stick to the surface like so. Let's just position it. It looks like it's around here. Then we can add
another node in and just give it a little
bit of a bend. And then we're going to do the
same thing we did to this. So we'll go to our options, post subdivision up to two, and then we'll uncheck the link and just bring
these all the way down. Put that one to five. Here we go. F and four
seems pretty good. What's really important
now is just trying to get these aligned to
where they are here. So let's make sure
we bring this down. It might be, I think that's
a good distance from that. But you see this is actually right in line with the
bottom part of this. I actually have to bring
it down a bit more. The left side is up
a little higher, at least it looks like it to me. I would say something like that. Now to get it on the other side, we're just going to hit mirror, and now we have one on
the other side as well. Let's go ahead and
save. Now what we need to do is give
him a little mouth. Essentially, let's just
tap the body so we can a Let's add a cylinder. Let's use our gizmo, and let's rotate it
towards us 90 degrees, so we'll just hit
snap over here. Should be on 90 by default. Just make sure you're
on the angle snap, not the arrow snap. You
want to be on the angle. Now use the red ring to
just snap it forward. You can bring it
forward and then use the big orange
ring to shrink it. Something like that. That looks pretty good. Let's
go ahead and validate it. Now let's use trim, and we're
going to use rectangle. What we want to do is make this mouth shape from the sphere. Let's go ahead and
just draw a rectangle, and whatever's in the
white is what will be cut. I think right about here. So we'll trim that. Now
we have just this shape. It's okay if this happens. If this ever happens if you're using something and
you see a color, just go to this
little sphere down here and uncheck
stroke painting. Now we want to position this, so we use our gizmo, and we want to position it right underneath our little
tube mouth here. We want to position
it somewhere in here. But you can see the shape
is a little different. This is when we use
the squash like this, and then we can even
pull it down, like so. I think that looks pretty good. If you ever want to see inside, so you can see how much
space this is taking up, just got do here and hit x ray. Then you can see you can
see through the character. I'm just going to stretch
this out a little bit just so the mouth
is a little bit deeper. Maybe something like that. We'll hit x ray again. This is going to be
the mouth opening. I'm actually going to rotate it. Let's turn snap off so
they can just rotate it. So it falls a little
more naturally on the angle of the surface. In order to cut this out, let's make sure we have
everything labeled, what it should be.
Just tap on the ys. This will be tap
on the three dots, and let's just name this mouth x. I name it x because we're
going to wind up cutting it. This tube, these are the yes. Just name the mirror,
tap on the mirror, and then tap the three
dots and name s. Same with this. This
is the mouth tube. We have another mirror
here. This is the snout. It looks like we have
everything else labeled. Okay, essentially, we
want to take the snout. Let's tap on the red thing, and both of them should select. Let's hit validate,
join children. Now we have the snout, the body, and we'll select mouth. We're going to turn
the mouth x off. We want to just
uncheck the eyeball. If you do run into problems, then just go down to advanced and uncheck sync visibility. Because if that's on,
then you might have some issues trying to
just turn off the one. Just go down to advanced and
uncheck sync visibility. Then you should be able
to turn mouth x off. All right, once you have these
three selected and mouth x hidden, we'll go down here. This is a shortcut
for Voxel remesh. The same thing is going up here, Voxal, remesh. Maybe around 170. We'll do it on 180, and then just hit remesh. Then you can see that this
is now part of the body, and we have the cut
out for the mouth. It does look a little ribby, so you can take
the so smooth tool and just smooth it out. When you're smoothing around
the nose in the mouth, just go a little softer just so you don't
lose too much of that shape.
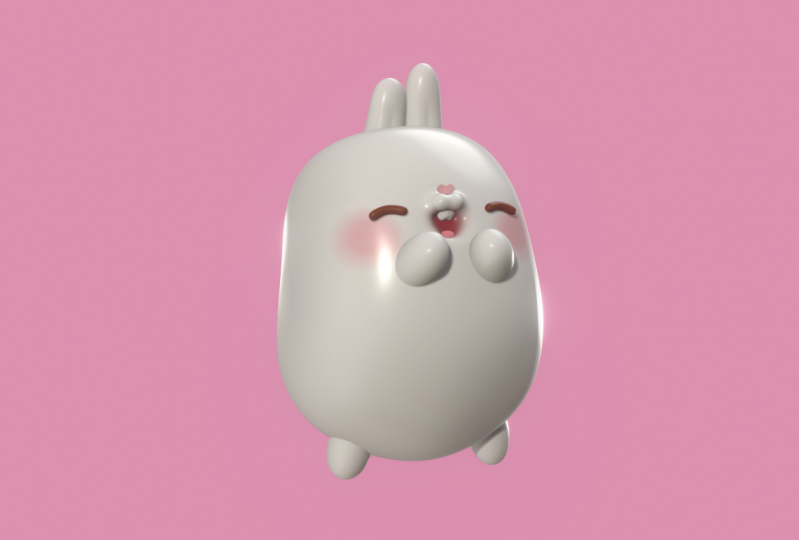
5. Lighting & Coloring: Okay, so it looks really good. There's a few things
that we can change. There's a few things that
might look a little better, but we'll get back to that. Let's do some really
quick lighting and so we can color him. Colors are very simple. Let's change the
background to pink. Tap the st of photo,
tap the color, and you can go to a reddish
color and then you can bring this up and get to a nice pink. That pink is okay, we don't
have to match it completely. That's good. Let's change
from MCP back to lit PBR. Here, MTC, we'll just
change back to lit PBR. That's what it looks
like all white. I do to light when the
character is fairly neutral. I just selected everything. I'll just tap down here. This is the color that I
usually use. You can tap here. There's a few different colors. You just want something
that's neutral. I'm using color code E 19 357. E 19357. That's the color
that I usually use. I'll just hit paint all, and now everything is this
nice terra cotta color. Let's add a light.
We'll just tap here. Let's turn the
environment off so we can just get a good look at what our lights are looking
like. We'll add a light. I'm going to hit a line, that'll just make it easier for me to move my lights around. Now we're using this
is a sun light. It's just a directional
light essentially. The light is coming
from this direction, and this white arrow, that controls where
the light is. You just want to make sure that you have your character in the position that you want
because the light will change, the light will move
around as well. And here's another tip. Let's say we like this
framing right here. Let's tap the video camera, add view, and let's tap the little pencil
and just name it one. Now we have this view saved. Let's say we wanted to save
it without the reference. Go to the reference, uncheck it, and then go here, add view, and now we have one
without the reference. So we can go back and forth. You can move it around that
way you won't get lost, and you'll always be able to
come back to this position. Okay, let's go back to our first light.
Let's just rename it. Key. Let's change
this number to two. Now our light is a little
bit brighter. Looks nice. Let's clone it, and let's name this one rim. This
is a rim light. We can now use our gizmo and
let's move it over here. Now we want to just spin
it with the green ring until we get a nice rim of
light on his left side. Something like that I
think looks really nice. Let's go back to our
lights, and actually, we can make this a little
more intense first. Let's bring that up
to three or four. Now we can copy this light. Let's drag it over
here and down, and this light will be R two. We use the green ring to spin it just so it's hitting
him on the right side. That looks pretty good. I'll put the intensity to maybe one. Let's change the color
to match the background. You just tap on the
little color wheel, and then you can
change the color. Might make it a little
bit more intense. Now we have another light. You can only add four
lights in nomad, so we'll add this light. Let's change it
from sun to spot. Now it's a spot light. You can move it
wherever you'd like. I think I usually
move it up top, we'll rotate it down.
Something like that. I just put it right where we really want
your eye to be drawn. I think that looks pretty good. You can also tap the options.
There's lots of options. You can make it a
little bit softer, make the light a
little bit softer or you can make it
like a spotlight. L et's go back to our view. Looks great. Now let's add
our background in again. We'll touch this little sun. We can add our environment. But let's go ahead and
turn it down some, so it's not so so bright. Maybe 1.5 is good. Let's go to this
little shutter and let's turn on post process. If you want my settings,
you can just pause. I'll show you my settings,
my default settings. You can go ahead and
play around with these. Ambient inclusion
is the shadows, like the natural shadows
from the environment. Depth the field bloom. I
think that's about it. So now that we have the
lighting where we want it, let's go ahead and
change the colors. So we'll tap on the body. We'll tap this little
color sphere here. If you're on a small device, you might have to
scroll to find it. And let's just put it
to white, paint all. Let's go ahead and bring
our reference back. The arms are white. We can go ahead and take the
arms and paint them white. Same thing with the
legs, we'll tap the legs, paint them white. Ears. The ears are
separate, forgot. That all looks good. The
eyes are nice and brown, so we can go and make
them a nice brown color. Maybe we want to make
them a little shinier. You can do the same thing
for his little mouth. Looks good. Again,
if you want to, you can go to the body and
you can actually paint, you can use the paint tool, then you can go up to the red. You have a nice pink
color or reddish color. You can paint that on. Can make your paint tool
a little bit bigger. So. But here's
what I like to do. Sometimes I like to add a sphere in place of
painting something. We'll use the gizmo,
we'll move it down. Let's shrink it. It'll
be something like this. We'll shrink it again and then bring it towards the surface. Can take it off of a line
if it's easier to control. I'm going to squish it, and then I'm just going
to try to angle it right underneath that eye. It takes some time to
get used to the gizmo. Give yourself some time to
get used to everything. But essentially, you just
want to have it right underneath there like
that. Here we go. I think that looks pretty good. We make it a little flatter. Then you can go back to your
paint and you can paint it. You can hit a mirror, and then it shows up on the other side. Let's make it a lighter pink. Here we go. You can also paint
the inside of the mouth. We go to the body, paint, and let's paint the
inside of the mouth. Let's see, is it the same
color? It's a little darker. We'll go back to our color. We'll make it a little and
maybe a little bit more. There's less light
bouncing off of it, and we'll just color in
the inside of the mouth. D. I looks pretty good. You can take your smooth tool. If you want to just adjust
the smoothness of the color, you can turn the intensity
all the way down. Then you can smooth
it and it'll just smooth out the
color a little bit. It's a neat little trick. Let's go ahead and reset
that, put that back up. And now we have the inside of
the mouth colored as well. There was another thing
that I wanted to tell you, and you have to really
interpret art like this sometimes because the
outline is really, you don't have to have
an outline for the mouth because the outline
is really just supposed to be the white. So the outline is like a piece, would there be a
finger or a snoot and the outline is just
to show that shape. So you don't actually have to
have this brown part here. Like, I could hide it. And I think he would
still look pretty cute. The only problem is
since this is white, I think the kelide is a
little bit too bright, so I'm just going
to turn it down. But it just makes this, let
me turn post process off. Your system is going to lag a little bit if you
have post process on. You don't actually need it. You could do
something like this. If we go back to
the body and hit Crease, you can use Crease. And make a similar shape, which might look a
little bit nicer. But I wanted to show
you both ways because there's always different ways that you can
interpret something. So I have he's a little dark. I'm going to turn
prose process back on, and I'm going to turn so I'll go here and go
to the environment. That's in the little sun tab. I'm actually going to
turn it up a more so he's a little
brighter. I like that. I'll just check my lights again. Oh, You know what it could be? It could be this last light. Let's turn that
down a little bit. Here we go. Yeah. We'll turn the key down a little bit more. It's a little bit closer. Let's go to this little camera
and let's hit perspective. You can adjust your
perspective here, which is always fun. Put it to 14 or 15. I think that's a good
match for the tw. Let's go ahead and hit save. And to export, I'm going
to go ahead and turn the reference image off,
and I'm going to save this. So we'll add view. We'll
just name it three. So this is going to
save the fact that it's perspective versus the
other one as well. You can see it changes. But now to export, you
just tap a little folder. Make sure you give it a save and then scroll down to render. Transparent background
will just export him, no pink if you
wanted to do that. Then here's just
your sizes so you can export it as to whatever
size that you want. Let's say if it's 1080, then I'll just adjust
him a little bit, maybe move him up,
and we'll do 1080. Then you just export. I
think it looks great. But, yeah, I think
that's about it. The last but not
least, the one thing I wanted to show you, actually, I should save that
one since this is the official finish
of the project. So I'll just export this. I export to my
computer, get done. Then if you want
to do a turntable. If you have an iPad,
I'm not sure about androids because androids
all work very differently. But for iPads, just tap
this little nomad symbol. And then once you're
in this screen, I think all iPads have
this control center. If not, you can set it as
one of your hot corners, but I like to have this here, so then I can just hit record, and then I go here to zero, zero, zero, and
then hit turntable. And that gives me a
nice little turntable.
6. Bonus Details & Eperimenting: So this is going to be a more
relaxed extra bonus video because I always work I always work on my sculpts
after I'm finished. There's a few things
that I'm thinking. First, I'm not really a
huge fan of this tube, so I'm just going
to get rid of it. I think I would like
it if it was flat, if I was making a real simple, but I don't think I need it. So I'll just hide it for now. So now that I've hidden that, I need to make this
a little cleaner. So I'm going to use smooth. And we're going to smooth
smooth out this part. And I need to take
paint but erase. Let me make sure that
I'm not in post process because that will
cause everything to be much slower than it needs to. We will erase here. I might actually add
two more spheres. I think that might
be the cleanest way to get what I want. I have to do this a lot.
A lot of times I wind up doing things over for
one reason or another. It's normal. L et's see. I think that's pretty cute. Maybe a tad bit smaller. Here we go. So I'm going to go ahead
and validate and use move. Now remember, we're
in a new mirror. I'm going to rename
this one S. I name. We can go ahead and just match. There's a eye dropper here. You can tap that and then
you can tap any color and it will once you lift off,
it'll just be that color. I can tap on this again, tap the color and
then tap pane all. Now it's the same
color as this part. I want to move and just adjust the just so that they
make a little more sense. I like that. Yeah,
that looks cute. I know I could leave it, but I think I want to
actually smooth it onto this. So what I mean by that is, well, there's another thing
I wanted to do as well. I'm thinking about. We have the new snout,
I'm going to validate it. Join children. Now we
just have the new snout. Let's rename mouth x, which is actually
the body, so I'm going to rename it body. These little pink things, let's just validate that
and name them Pink. We have Snot, we have the
pink, and we have the body. Now let's see what
happens when we just ox remesh all these
things together. The So Let's axle remiss
them together around 200. We have something like
this. Now we can smooth it. Before remember I told you
you can use the smooth tool and lower the intensity. Well, you can actually clone, tap on the tool,
you can clone it. Well name is smoothie. It's going to show up down here. For this one, you can put
this all the way down, and then you can tap
this again and you can save it. Then it's always there. Then you can just
tap this tool and you can smooth out
just the colors. I'm going to undo because for
this particular instance, I already have this
so I can delete it. I have it here. But
for this instance, I don't mind smoothing
the surface as well. So I'm going to smooth both. It looks pretty good. The only downside to that
is there is a downside. So I want to show you
something else, too, actually. So I'm going to take
these and delete them. And then we're going
to take the snout and the body and Voxel will
merge them together. I'm going to do it a little
bit higher around 240. Don't worry if you can't
follow along with this. I'm just doing what I would
normally do after the class. I'm moving a little bit faster, but I just want to include it
because if you're going to watch the class and
then I'm going to use this as a thumbnail
and things like that, I want you to be able to
see exactly what I'm doing. Right now I'm just taking
a look at the actual mesh. I'm going to go back to MTCAP. Just because it's a
little easier to see. I'm going to turn off
this line as well. For now, I'll just
turn that off. Now I can see it a bit better. I want to smooth it
a little bit more. I might box will
remesh it again. Smooth. I think that looks okay. Yeah, I think that looks okay. Go back to PBR. I might just take the color
of this brown ad of crease, and I want to do it, but
I want to add a layer. Let's go here, add a layer. This is going to be just
see BR N for brown. Now I'm going to uncheck this. The fact that I uncheck that, now I can use crease and it
has this color in there. Now, I can start here, go down, and do
something like this. I don't know why it
looks like that, though. I'm going to bump
it up a little bit. I'm going to go back. Now we're back to here, and
we'll take these two. Actually, let's take the
snout and let's Vox rematch this alone because
the body is 105 k, but the snout is 12.2 k. I'm going to Vox will
rematch this much higher. I rematch this to 129 K.
Now they're closer in size. Now I'm going to take
both of them, whoops. I'm going to box
remesh around 250. Now I'll smooth. That looks cute. I like it. Okay, so I do like that. Now, I want to revisit. So now let's go
to the layers and let's add. Actually,
we don't have to. I don't have to add one because
I think this is all one. It's all one color now. It's all one layer. So what I'm going to do instead
is just take paint. And let's see. Let's take it off of a race. I'm going to use color drop
and get this color in here. Make sure that all
that's colored. Color straight across.
Well, that's right. I smoothed it out, didn't I? And we can smooth. We'll
use our new smooth brush, and we can smooth
that. That's fine. Okay, great. The next
thing I want to do is add a layer and
call it reddish. Now I want to use paint. I'll make my paint brush
a little bit bigger. I'm going to make the
intensity much lower. I'm going to go ahead
and color grab the body. Now I'm going to go back to that color and just make it like a nice red like this. I'm
not going to paint all. What I'm going to do is make
sure that symmetry is on, and I'm going to just make
some round circles here. I'll make my brush a bit bigger. Actually, they should be
a little bit more pink. Now that I'm thinking about it. We'll do some pink circles here. Now we have some pink circles. Let's use smoothie and see if we can smooth this out a bit. Well, not really,
but that's okay. I'm going to go a
little bit more red. I want to add let's
go back to paint. I want to add some here as well. Take smoothie, see if we
can smooth it out at all. Not really. But the beauty
with layers is you can take the layer and then
you can do that. We can just add it ever
so slightly if we want. Looks okay. But I actually I'm going to delete this layer because I just
wanted to be smooth, I wanted to be a little
bit more smooth. The reason why it's hard to smooth it is because
it's so high, the body is 205 k, so I'm going to decimate it. But the thing that I'm
thinking about is, do I want to Voxmh the
arms and things together? I don't think I want to. I think I'll just leave them separate. The only thing I may want
to is these two pieces. So if I was going to do that, I guess I can leave
them separate as well from being honest. So my only dilemma is
what was my dilemma? Oh, here's another little
trick that I just thought of. We're using drag.
We're on the body. We'll make it a
little bit bigger. We can use drag and we can drag or move or or a small move. You can oops make sure to
turn off stroke painting. We can lift this up, which is
going to give happy vibes. Make it a little bit
bigger. Here we go. A little bit
happier, never hurt. Also, I want to
give him some TVs. I'm going to add a
sphere, shrink it, nice and small. Go. You can have one or you
can make it smaller and do a mirror and
you'll have two. I'm going to hit a line
so I can just move them straight back
into the mouth. Sometimes it's
also acute to have the two little teeth,
like that as well. I think the other teeth look
better. I think I like that. You can also add a
little tongue in there. Let's validate that.
Let's go to body. Let's add another sphere. This one we can just shrink. Smh it a bit, and we'll just
plop it right in there. Now there's a little
tongue in there. You can go ahead and color it pink. There you go. I like it. Decimation.
That's right. Let's tap on the body. Tap here, miscellaneous, can
decimate once, maybe twice. Now let's see how it looks. We'll go to the body. We'll add a layer and we'll label it. And decimating just changes the vertices or
changes the polygons, it decreases the polygons. You don't want to do it too much because then you'll
lose some quality. That's why I only did it twice. But this should smooth
a little bit better. Let's go back to this color. Let's go back to reddish, actually a pinkish
for the cheeks. So I'll add a nice
pinkish bit there. We'll go back to the smooth,
see if we can smooth it. Oh, smooth, definitely better. It's definitely better, smooth. If worst comes the worst, you can have to smudge
it a little bit. Smudging definitely
doesn't look as good as smoothie pooh when it works. But sometimes it doesn't
smooth that well, depends on the That looks good. I'm going to go back to paint. I'm going to add a
little more red, make this a little smaller, and just add a
little here as well. Looks good. Let's go ahead and just ease
off of it a little bit. Okay I like that a
little bit better. Let's bring our two back. I just want to make sure I don't want it smaller
or something. No, I don't like it.
Okay. That's good. I'm going to try and smooth it, make it a little cleaner.
That looks good. And here's the finish.
I wound up using a cylinder and making a
little heart type piece. That was really easy. All I did was add a cylinder. I used the Gizmo to
snap it forward. I use Snap, snapped it forward. I'll move it up so you can see. And shrink it, squash
it, validate it. Now I want to use
move, but I want to use the symmetry of x, x and y, and I put it on local. You should be able to see. You can see the green here
and you can see the red here. Now when I use, the reason
why I squashed it together is so it easily just will take
the other side, the far side. Then you just make
a little heart. You just make a little heart. Then you can oxo
remesh it if you want. This will make it a
little bit stronger. Vox remesh it around something like that
or not, actually. I can probably just
smooth it out. It's a little soft,
but you can smooth it, and then you get
your little heart. That's what I used for the nose. I wound up adding some
more spheres here, and then I box re missed it
really high at seven or 800, and that kept the shape of
these a little bit better. After that, I smoothed it a
little bit around the edges, and then I did the decimate, so I went here and then I
decimated down to 29.9 k. That worked out. A lot of times during
the end of my scope. I'm going to go ahead
and validate these. I usually will check
the shapes out and make sure nothing is a
really high number. Doesn't look like anything is. The body is the highest
number, which is okay. In my, my very last trick, one thing that I
like to do is take any part that's like
organic, so the ears, so the body see the ears, the arms, the legs, and even the teeth and
make them subsurface. Just go here and change
from opaque to subsurface. Here, when you have the depth,
you can turn that down. They're not so see through, but it isn't nice when
you do subsurface, I'll just give it a
more organic look. I'm going to take the teeth
and actually turn that down, so they're a little
less through, but I want him to
be nice and soft, so that's why I made
his body subsurface. Uh, now I think he looks
absolutely perfect.
7. Thank You!! : Alright, welcome back, guys. I hope you had a good time
creating this little bunny. I love creating really
cute things like this. I think starting simple is
really important because, you know, three D can get very convoluted even here on nomad. But if you just think
of things as shapes, everything becomes
so much easier. If you think of,
like, for example, I'm looking at a
camera right now. Hm. How can I make
this with shapes? You'll learn fast. You'll keep doing more and more
complex characters. I'm sure there's a lot of
you that want that have these really grand
ideas in your head. Keep them. Keep
working towards them, because you
definitely can do it. Of course, I'm on
TikTok YouTube, Instagram, all Drug Pre Dave. I'm going to actually bring
this character into Blender, so I'll show you the
blender version. But I'm going to do
that as a livestream. So you can go to my YouTube. If you don't catch
the livestream, I'm not sure exactly
when I'm going to do it. But it'll just be in my
livestream playlist. So you'll be able
to see me bringing this exact character
into Blender, just like the next
step, the next level. But if you're just
getting started, concentrate on No MAD. Concentrate on
making cool sculpts. Concentrate on getting familiar before you jump
into the deep end. Also up load to
projects and resources. I can't wait to see
your projects here. And you can also tag me. You can also tag me on
social media Instagram. I love to share my students work to my stories
and things like that. I just love to see what
you guys are doing. Check out my other classes. I have a ton of
classes on Nomad. If you want to jump to something
a little more complex, I have those classes here
on Skillshare, as well. Once again, I'm drug pre dad. Keep drawing, keep sculpting, and I'll see you all
in the next video. This is TPN, the Texas quality.
 Dave Reed, 2D & 3D Illustrator - Brooklyn, NY