Transcripts
1. 3D Character Design in Nomad Sculpt: What's up, guys, Welcome. It's drug-free day back with another 3D class in nomad
sculpt on iPad Pro, but no match Skulpt is
also on PC and Android. So if you want to do some 3D, if you want to learn
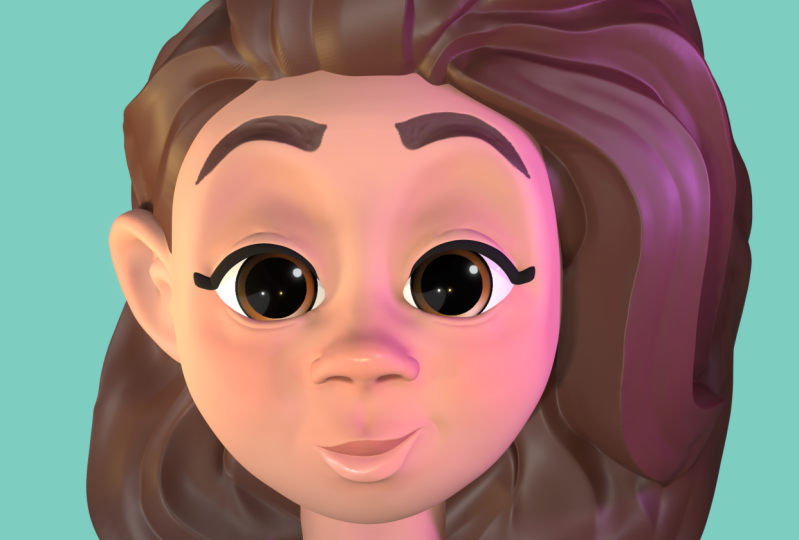
character design, this is the class for that. We're going to make a cute girl. We're gonna do the lips, the nose, the eyes, the hair. I have so much fun doing this. And I've had so many
people asked me to do like character design and do a
character design tutorial. I've been practicing
for the last week. I've just been doing
faces because I wanted to make sure
that I had a nice, fun, cute face for you guys
to do on Skillshare, step-by-step, easy to follow. We're going to make everything. We're gonna do, the
lighting, we're gonna do the post-processing. Character designs
are really fun. And the best part about it
is once you get a base, once you kind of understand
the shapes and how to use different shapes for
the nose and the lips. You can use that for
any, for any phase, I extend the faces or you can change the shapes and
you can make any face. So this is a really,
really great basic class on how to do
character design in 3D. I had a lot of fun making it, and I'm really glad
that you're joining me for another Skillshare class. I'm pretty much
obsessed with the app. Let's get to the next
video, the class project. And let's get to the next
video, the class project. Nobody's going to know. Nobody's going to know
they're gonna know.
2. Class Project: We're gonna do the class
project like we always do. We're just gonna
make a cute girl, cute nose que lips, cute hair. The hair is really fun. Like I had to figure
out a nice, nice, I had to figure out
like a efficient method to do hair because hair can
be very, very daunting. But everything you just
have to think about shapes. So I'm really excited
to show you this class. I'm really excited to see
what you're gonna do. Remember, be creative. If you want to change
the skin tone, you want to change the hair, blonde, change
whatever you want. You can do that, Do
whatever you need to do. This is your project,
this is your 3D journey. So I'm just teaching you
everything that I know I'm teaching you
Treat Tips, trips. I'm teaching you all the tips. I know so that you can get
better and you can get efficient at 3D modeling. And once you have a base, you'll be able to figure out
everything else from there. Alright, so let's get started. Let's move on to the next video. But in number three,
getting started, I think I already said
getting started tonight. Getting started. Getting started. Take to take
three hold onto your butt.
3. Getting Started: Alright, so let's get started on our human girl face
and nomad scope. This is what you'll
see when you open up a nomad sculptor. If you have a different color
background, don't worry. You can just go to this
little option here. And this is where you change
the color of the background. So you can just do whatever, wherever is comfortable for you. Okay, so another thing that I like to do is
set this to Metcalf. What a MED CAP is is it ignores the lights and it just makes
the light very consistent. I find it easier to work with. So we'll go up here to the
little shading window. And right now, PBR is the normal one. And
we'll just go make Cat. And I use this one right here. Nike clay read gloss. That's what I always
used to sculpt with. So the next thing that I
want you to pay attention to is see this little
cube right here. This is important because when you're sculpting certain things, you just want to make
sure that you tap front. And this is the front
most view of the world. Of course you can change
it to look right? And this will just be very
helpful when you want to snap to different
views of your mesh. Another important thing
is see how my grid here, you can see the perspective
of it going back in space. We're going to change that
up here to orthographic. And now it's a line. And this is just
easier to scope with because we're not dealing
with perspective. We can just deal with
how things look flat. And it'll just make it
easier to sculpt with. So we're just gonna do
a pre general one m and try to keep it
as simple as I can. So the first thing
that I want to do is just sort of make the face a little more pointy at the bottom where
there's like a chin. We'll do some ears over here
and we'll slim up the head. But the first thing that we're
going to do is deal with the chin and the
lower, the lower jaw. It's gonna be very
stylized. As usual. I like to use the Move tool. And if your tools
don't look like this, you can press this little
option here that might be long. I find it hard to find things. Also that it doesn't show
everything on my iPad. So I always like to
use this little box like this with the move tool. I like to use it
very big as well. So as you can see,
this large circle. So that's the size of the
brush or of the tool. I like to. I like to use
it pretty big that way. It moves everything. Oops. Go back to connect to the front. And that way, so it just
moves everything in unison. And it doesn't pull. If you have it small,
it'll pull like this. We don't want that. And if you have any issues, I go back to a normal circle. If you have any issues, you can go to the brush options. So let's validate this again, I don't know how it
got invalidated. So we're in the move tool. And you can go to the settings here and see I don't have
any of these checked. They can get kinda confusing, but I just leave them unchecked. So then I can make my
brush pretty, pretty big. Okay. So the first thing,
as I was saying, we're going to do like
the chin, the lower jaw. And so we'll just pull down. It can make our brush
a little bigger. My brush is about 250. And I'm just going to pull
down a little bit on the face. Just a little bit just to
give us that that little bit of a point at the bottom,
that's gonna be the chin. And where you can get
creative with it is like eventually you can
make different shapes, different shapes where
the face is like that. You can make it a
very wide face. So there's lots of options
that you can do. For now. I'm just gonna keep it simple, sort of round chin. So the next thing, when
you're doing a face, you have to think about
obviously how the face, how the shape is
going to look in 3D. So I'm going to turn it to the right and now
I can just tap right. So then it snaps to
the rightmost view. And you can see the, the, the chin is way far back,
so we need to move it up. We're going to use
the same tool. We're going to use
the move tool. And we're just going
to drag this up. So we'll drag it up. Just so it's about, even with the rest of the head can move
this up a little bit, move it up a little further. So something like that. So it's a little bit, it's not exactly parallel
with the rest of the head, but I think that's a
pretty, that's pretty good. I'll make the brush a little
smaller and I'll just, I'll just puff out me tap right. So I know it's perfect. And let me just tap
this out a little bit more, something like that. So now I'm gonna turn
it back to the front. And I'm going to use the
smooth brush pretty big. And anytime you, anytime
you manipulate the clay, anytime you use tools
and things like that, it's going to get a little bit. It's going to buckle,
it's going to move, It's going to fold. So what I do is I like to
smooth everything out. After I use certain tools. I'll bring the intensity down, make the brush a bit bigger. I'm going to press too hard, but I'm just going to go
over it and just keep it smooth and you'll see
me do this a lot. And it's because I
really liked my meshes to be nice and
smooth at the end. So you have to constantly
smooth once you manipulate it. So now I'll go
back to the front. And you can see
this a little bit. It kind of changed the
shape a little bit. So I'm just gonna go back to move my brush a little bigger. I'm just going to just bring it out just so it's a little more a little more round like that. Okay, Let's check
out the side view. Side view looks pretty good. So we'll go back
to the front view. I think this is a good start
for the shape of our face. So now we can do the
nose and the lips. And we can just sort of the nose and the
lips will help us figure out where we want the eyes and the ears
and things like that. So the next step, I usually do the nose and we'll do
that in the next video.
4. Nose: Okay, so for the nose, I usually like to use a cone. And kinda sounds strange, but I like to use shapes to
make different elements. Shapes are nice and
clean and precise, and they can be a lot
cleaner than sculpting the nose out of out of a shape. You know what I mean? It's just, it's better to use
a shape that's closely related to whatever you want to make and then just manipulate it using
the drag or move. Because when you
use these symmetry, it will move everything equally. So don't worry if that doesn't make any sense
now, it will in a minute. So let's go here. And right now we have this, we have this, we only
have the sphere. So let's rename that to head. It's always good to keep
track of our our layers. And again, you just tap
this to change the, change the name,
the little pencil. So the cone here. That's what we're going
to use for the nose. So let's tap on the cone. And you notice
these little dots, these little edit dots you
can play around with later. We don't need them now, so I'm just going to
tap edit up here. That way they go away and you don't have
to worry about them. So let's bring it up.
Bring it forward. So now we'll tilt, we
use this red line and our gizmo would just
tilt it back like this. And then you can see
it's sorted even looks like a nose already. So now we can just
slide it back. And of course we need
to make it smaller. I can slide it forward, make it even smaller. Or we can just squeeze it
together sometimes too. So don't forget to
use these tools. These are to move them around. And does these little spheres, they stretch and pull the shape. So let's look at the right view. So we'll pull it
out a little bit. And we'll do
something like this. So we can go ahead
and validate it. Okay, so that's a decent
spot for the nose. And we can always adjust it and move it around a
little bit if we need to. So the first thing that
I always do with a nose is I'll use the move tool. I'll make it a
little bit smaller. And obviously with our cone, we want to make the
bottom of the nose too. So just make sure that
you're on your code. You don't want to be on the
head because then it'll be, you know, you're
on the wrong mesh. So just make sure
you tap on the cone. Make it a little bigger. And let's pull down
on the underside. And this will just
pull the nose out. And you can see it
just really starts to look like a nose
once you pull that out. And also you might have the option to where if
you touch one mesh, the other meshes go dark. So if that happens,
dark unselected meshes. So that way if you can tap and whatever you're not
working on will turn dark. Personally, I don't like that, but I just wanted to show
you where that is in case. Maybe you want to try it without that. So let me turn that off. Again. That was settings and
darken unselected meshes. Okay, so back to the nose. Let's use the smooth brush
and we'll just smooth it out. They started on the ridge. Do something like that. And we'll just keep
it nice and simple. Another option that
you can do is you can use drag. And drag. I usually work with a little bit smaller, maybe around 75. You can use drag,
just make sure that you're on your nose, your cone. Let's change that to nose. Nose. Okay, so now we have
the head and the nose. And if you're on your nose, you can tug up where
the nostrils would be. So you can sort of just tug and make it a little bit
bigger or smaller depending on what
you're going for. You can just talk up a little bit to kinda give
you those nostrils. And then I'd like to smooth
everything out again. I like to keep everything
sort of subtle. So you'll see me
smoothing out a lot of, you'll see me making changes to the mission
and smoothing it out. And also another
option that you can do is you can use
the flatten brush, which I really loved
the flatten brush. So you can use the
flatten brush. Intensity is about 60 size. We'll go, we'll start
with about 100. And you can just
turn to sort of go around the top of the nose. And it just makes it a
little bit more round. You can kinda round
off those edges. Like so. That's pretty key. In the last trick that I do
for the nose is using drag. And what I like to do with drag is obviously our
nostrils are here. So as long as you're
on your nose, you can take drag and you might have to
adjust the size I'm at. I'll go with 75. You can drag this
up a little bit. And it will really, it'll kinda give you a
little more detail on the underside of the nose. And then as always,
I just kinda smooth everything out. Like so.
5. Lips: So for the lips, we're gonna do the same thing that
we did for the nose. We're going to use a
cone for the upper lip. So now we have our cone. Go ahead and can adjust
it a little bit that way. And once you move
it into position, Let's move it up and back. And once you start to
move it into position, you can kinda see the
shape of the mouth. So I'll just use the sphere so I can just shrink it a little bit. You can play with these two. You might want your mouth a little bit bigger or
a little bit smaller. If you want a bigger, a
bigger lip or a smaller lip. And that's where your
creativity comes into it. Okay, so I think this
looks pretty good. I'm going to go ahead
and validate that. And I think that looks pretty
good for the upper lip. We can do the same thing that we did with the underside
of the nose. So I'll use move. Remember, everything
has symmetry on. I'm keeping symmetry
on for everything. And then we can just make
sure that we're on our lip. And we can just pull this down. To give us that nice upper lip. We can use smooth brush. We can smooth it out. Like so. And I think that's
a pretty good upper lip. The lower lip, you
can actually do the reverse of this shape. You can make a cone and you
could do it the opposite way. I've been practicing a few
different ways to do it. Let's take the cone and we'll just flip it the opposite way. It will make it smaller. And once you drag it up
into position is sort of just really shows how the shape itself is pretty
close to what we're going for. Loops, though it's tilted a little bit more,
make it smaller. You can use the front view
to line it up with your lip. And it doesn't need to
go all the way up here. You can bring it down
to about the edge. You can squeeze it
together like so. And obviously, when this is the importance
of changing it, changing the direction
that reviewing it, we can move it back. So I think that
looks pretty good. I'm gonna go ahead
and validate it. And I'm actually
going to trim off this part because we don't want we don't want that actually sticking down
through her chin. And that's really easy. Just make sure that you're
on the right shape. Grab your trim tool and you can either use lasso or you can
use any of these shapes. I'll use the Lasso. So then you just draw
around it and it trims. We can do the same
thing that we did on the inside of the lip. We can go to move, make sure we're on our cone. Make my brush a little bigger. And then just pull up on the
inside of our lip a little bit so we can smooth it out. I like to use the
smooth to even move, move my shapes sometimes
when I need to. Okay, So we can smooth that out. Then we can just use move
and a little bit bigger. And then we can just sort of
make sure we're on our cone. Then we can just
bring these together. You just sort of match them up. And just so you can see
that shape alone, let's, let's, let's do low lip. And then back here
we'll do a blip. Okay, and if you want to
see what those look like, these are what the
shapes look like. If you want, if you want
to be really efficient. See how we have all these, all these extra, that
extra shape there. You can actually trim that off. We can go to Trim. Go to the front view. And as long as you don't, as long as it's not any of
the parts that's showing, you can just trim some
of this off loops. It makes sure that you're
on the right mesh. So I'll trim some of that off. I'll go here, I'll take
a look at the head view. So we have a lot of extra stuff. So makes sure I touched that
mesh or touch the upper lip. Will just trim that. Go back and make sure we didn't cut anything else we need. And then we can go to this one and we can just trim
the back of this. We don't need it. Don't need the back
of this either. So we'll just trim this off. Okay. So now we can go back here and then we can take a
look at our head. And we essentially just
made it a little bit more efficient by getting
rid of extra clay. But I think this is a very
good start for our head. And I think next we
can do the ears, the eyes, maybe we'll
do the ears next. But I think we're, I think we're doing well, this
is a good start. And don't forget to be creative. You can make a really big
nose, really small nose, big lips, lips,
things like that. And just make sure that
you have fun with this. If you want to go
crazy, go crazy.
6. Ears (HeadTrim): Okay, So things are gonna
get a little crazy. But hang in there with me. And I think I said we're
gonna do the ears, will do the ears. But first, I think I want to tackle something that
might be a little tricky. And so I wanna, I
wanna get that over with and get you guys clear
on what I'm what I'm doing. So as you can see, I just moved to the
right side of the face. And what I wanna
do is I want to, we're going to use the trim
tool and we're going to trim a line straight down but
pretty much like a j. And then we're going to
come out on the other side. So I'm going to show you
what I'm talking about. So Trim Tool, lasso, and I'm going to use the top part of this mountain,
top part of the nose. That's gonna be my point
where I start here. I go in, not too too far. I go in and then I'm gonna
come up and go around. So just watch the shape. Because this is going to
really give the forehead and the top of this head the right
shape that it has to be. So I'm starting here. I'm going to come straight
in and I'm going to come up. And then I'm going to
sort of come around, sort of join that circle. Then I'm just going to
bring it all the way out and back down. So it's gonna be a
shape like this. I trim it. It looks weird. But these are gonna
be our eye sockets. And you can see our nose, we've cut into our
nose, but that's okay. For the nose for now. Let's just tap on it. Go to smooth and just
smooth out the top. So it doesn't look so atrocious. And it's okay if
it eventually goes below this ridge, that's fine. So we'll just leave
that there for now. Make it a little bit smaller. Okay, so I think that
looks pretty good. So the next thing I want to do is we're gonna take
the flatten brush. And we're going to flatten
out here and here. So obviously everything
is still symmetry. So that's why I'm willing, I'm only doing certain things
on one side because it, it will match on the other side. So essentially, I just
want to flatten this area. So flattened tool. I'm using my flat
and tools at about a 100 and not too intense. I usually keep my intensity
around the same spot. So now I just want
to flatten this out. Oops. That's one thing that I
have to be careful with. Make sure that you
touch the head. Now I just want to
flatten this out. You can see I'm not going
to too close to the nose. Just flattening out. Like so. So something like that. See, I just made these
two flat kind of like so. The next thing that we'll do
is we'll just use our clay. And we want to make
sure that our clay, we don't want it
to be subtracting. We want to add some clay. Clay tool will make it
a little bit bigger, maybe around 90 or so. And we're just gonna
make sure you tap on. We're just going to make like a sort of like a nose
ridge in the beginning. We're still on symmetry. So just make sure these
two dots aren't too far together or else you'll
start going off like that. So just make a nose ridge like
this, something like that. Now we have a nice center point. And let's just smooth
everything out. I'm not pressing very
hard with smooth. Pressing pretty lightly. Smooth in this half. You can see it's very, very warped and we'll deal
with that in a second. Okay, nice and smooth. It's very softly. I don't press too hard because when
you press harder than it will really
start changing the shape. That's pretty good. So that's a good start for now. Let's leave this here and
actually get to the ears. So let's tap front. So the ears, I want to be sort of in the mid
point of the eye, maybe like maybe right
in line with the nose. We're gonna use cylinders
and we're going to keep the ears nice and simple. I like my ears
nice and cartoony. So we tapped the scene. We add our cylinder here. We'll bring it up,
bring it over. And we can just tap mirror. That way. We don't
forget to do that. That just makes another
one on the opposite side. So now we'll use the
blue ring because we just want to turn it
on its side like that. And then we'll take
the red sphere and we'll just shrink it. Let's move it a
little further out so we can see the whole thing. So we'll shrink it. And I think it'll give her a
little bit smaller ears. So now we'll take the
green and we'll just, we wanna be able to see
the inside of the ears. Even though it might not,
It's a little less realistic, but it's very cartoony. I like my character
is be very cartoony. So something like this. And remember this is very high, this is in line with
the eye socket. So let's bring it down. And then we can bring it
in a little bit closer. Like so. Check the size. That looks pretty good. We'll check the side view and we'll bring it
back a little bit. So it's sort of in the
center of the head. Not the center, but I just want to move it
back a little bit. So something like that. I'm
gonna go ahead and validated. I think that looks pretty good. Now the next thing
that I'm gonna do is just smooth it out. So I'm just going
to lightly smooth edges just a little bit. I'm gonna press a little harder where it connects to the face. Okay. That looks pretty good. Soften up. This is ridges on the
bottom, something like that. So now it makes sure
that there were on our ears and let's just rename them Ears. Alright, so now we're going
to use the layer tool. And the layer two can come
in very, very useful, actually use it
for veins as well. So on the layer tool, Let's see what's a good size. Okay, so we'll do maybe at about 40 for the size
of the layer tool. And we'll make sure
that we have sub. So that's going to subtract. So that's going to subtract like a layer's worth of depth. I know it's weird, but it seems to work
pretty well for me. So we're going to start here
and we're just gonna do a circle around with
our Layer tool. Will make a nice little. You notice I don't pick
up my hadn't picked up the tool because once
you pick it up than it does a deeper, deeper layer. So you have to be
careful with that. Okay, so something like that. Now I'm going to
do the opposite. So I'm going to tap sub. And then I'm going to make
another little curly cue here inside the ear. Like so. Then I'm just gonna take smooth. I'm just going to lightly
smooth everything. You'll notice it's
starting to look just like a nice, cartoony ear. I'll take my move
tool that a 160. And I'll just sort
of just sort of tug on the ear a little
bit on the bottom. Just to give it a little
bit more of that ear shape. If you want to it
sometimes you might want to redo this. You can redo this. Sometimes if you want to
make it a little deeper. You want to really
work on the crevasses. And I have a little trick to do, the little bit that
attaches to our face. So I just wanted
to make the little crevice has a little deeper. So now I'll just smooth
that out as well. Get everything nice
and smooth and soft. Think that looks good. So
now when I make this little, the little bit that
sticks out from our face, I'm gonna do it on the head. So make sure you
tap on the head. Go to clay. And we're going to
add the clay here. Remember we're on
the head layer. So we're actually coming
up from behind the ear, actually do it a little bit bigger because
then once I smooth it out, we're going to lose a lot of it. So something like that. I think that's a
decent simple ear.
7. Eye Sockets: Okay, so now we'll work on the eye socket area
and we'll fix up the nose a little bit
just to get this nice and looking a little
more natural. So as you can see, the eye
socket area is a bit small. So a little cheat that
we can do right now is use the move tool. And I'm at about a 100. Tilt the head down a
little bit forward. So we want the eye sockets
to be almost like a, almost like a I get D shape, like backwards D shape. So I'm just going to
cheat this a little bit and just pull this out. I'll make the brush
a little bit bigger. And I'm just going
to start that shape. We're going to start that
D-shaped a little bit. Hopefully that makes some more sense and it looks more like an eye socket. Now. And we just want to have
some space for the eyes. So the next thing that we'll do, we'll use the same tool that we did for the inside of the ear. The layer tool, which I
again comes in very handy. And remember just to do not to take your Apple
pencil off the screen, because then it will,
it'll have reset. So what we wanna do is match this D shape really
close to the bottom. But we'll leave a
little space on top. And if that's confusing,
I'll show you what I mean. So make sure that your subbed it makes sure
that you're on the head. So now we'll go straight up. Kinda keeping on the
outside of that, the bridge of the nose will
come around for a D shape. And you see, I'm coming
right to that ridge. At the bottom. Left a little space on top. But I came right to that
ridge on the bottom. And the reason I do that is
because sometimes when I make eye isn't things like that, I tend to make it a little bit. Sometimes I tend to make
the eyes a little bit too high and they shouldn't
be that high. So something like this is
what we were looking for. So let's do a second layer and just essentially just
making it deeper. Again without, without lifting up the pencil would just do that one clean, deeper layer. Something like this. So now we'll just take smooth and we'll
just smooth it out. Make it a little bit bigger,
and we'll just smooth. Okay? Now the next
thing I'm gonna do is we're going to
actually adjust the nose. So I'm going to tap right and see how this
nose is sloped down. We want to bring it up so that
it's coming out straight. So we'll use move. My brush is about 135 or so. Maybe we'll make it a
little smaller by 120. And I'm going to
tap on the nose. So we're on the right mesh. I'm going to pull this up. And I'm going to push
down a little bit, pull this up, push down a
little bit, pull it up. Here we go. Because I just want
it to be I want it to come out
straight, like so. And then we have the
underside of the nose. So that's what we want. Again, we can use
flattened a little bit and just tap on the head again. Just flatten this down
a little bit here. But we can we can just
smooth everything out. Again. Tap on the nose, nose
looks pretty good. I don't need to really
worry about that. So one thing I noticed
that I want to change. You can see the
ears, the lobe sort of comes out pretty
far from the head. So this is just a
small adjustment, but I'm always looking for
little adjustments like this. So I'll just turn to a
nice angle so I can use my move tool and pull
this closer to the head. And it's okay that it's
going into the head. I think that looks a
little bit better. I like her big ears. And also we still need a little bit more
space for the eyes. So I'm just going to tug,
I'm going to use move. I'm gonna make sure
I tap on the head and I'm going to move this up. You notice I'm
keeping it straight because I don't want
to push it back. I just want to I just wanted
to sort of pull it out. And I'll do the same
thing with this. Sort of pull that
out because I like to make really big eyes. So I think that
looks pretty good. I think we can add some eyes. So we'll start that
in the next video. I'll take a look at this and make sure
there's nothing else that I want to adjust
before we go into that. But I think it
looks pretty good. This out a little bit. I think everything
looks pretty good. You can see I'm just taking
flatten and I'm just sort of flattening out this area here just to sort of give that sort of ridge
on the outside of the eye. So I know this is slowly, slowly becoming not simple, but it's just so hard to not
do things when I see them. So yeah, I just made
the flattened tool and just sort of flatten
it out here. And then I'll just,
just smooth it out. The head shape is
very, very important. But I think that's
a good place to stop to begin
working on the eyes.
8. Eyes: Okay, So eyes are very fun. I love working on eyes, but they can be tricky. And the most of this, most of the point where I
come into problems with the eyes is the depth which
they are in the head. So that's why we, we
carved this out like this. Because we're going
to set the eyes pretty deep in the head. We also need to give
her a forehead, but we'll worry
about that later. I know she looks weird, but
she's very characteristic. And I'm confident that it
will look cute and the end, hopefully, eyes, we're just going to use spheres
will bring them up. Hopefully you can't
hear my fiance. She's a loud talker
on the phone. But we're gonna we're gonna
get through this mirror. Either that or I'm just going
to start the video again. So I tapped mirror because
obviously two eyes. Here we have our
spheres and we can bring them a little
bit closer together. I think, a little bit lower. Whoops. Bring it
forward a little bit. I think there might be a
good spot for the eyes. So let's go ahead
and validate that. And then we'll just take a look. Okay. I think they look pretty good, but I do think that
they're a bit high again. So I'm going to tap on them. Make sure I go to the gizmo. I'll tap on them. And I think I'm just
going to lower them. I think that
actually looks a lot better when they're lower. And we can always, we can always adjust actually
look pretty good. So I think I'm just gonna,
I'm just gonna stick with that and let it ride from here. I think it's a good depth. So I think that's a
good spot for the eyes. So just remember, we don't
want the eyes to be too high. I like that There's still
in line with the ears. We don't want the eyes
all the way up here. You can do that, but that's when it changes your characters. So much small details like the eyes being too high up
and doesn't always look bad. But the more you do it, the more you'll figure
out your, your aesthetic. So another thing that
I'm seeing is I want to, I want to sort of
separate this bridge now. So I'm going to use, I'll use
clay and we're going to use subtract and see
this ridge here. And we can just sort
of break that up, make sure you tap on the head. I was on the eyes. So we're going to
use the clay to just sort of start that and
then maybe flattened. Flattened is a
little less harsh. And I'm also going to
flatten out this part here. I really just like
using the flattened. And then I'm just going
to smooth everything. You can see the clay is
getting very, very warped. So we're going to
have to rematch the remeasure everything soon. But for now it's okay. Another thing I'm doing
is I am just going to push this up a
little bit using move. I'm just going to push
this up a little bit. A little bit there. Okay. So let's flatten this side. I'm Mike Flynn, bigger. So we're going to
flatten this because see how round this is. We don't really need that round. So I'm just going to flatten. So we flatten that. And we can flatten down here as well. Okay? So then we'll just
sort of smooth, smooth it out a little bit. Okay? I think it's looking
pretty good. We might be at a spot. We're pretty close to be able to remember and connect
all these things. But I think first I'm going
to bring out the eyelids. And we're gonna do that
on the head layer. And we're going to use clay. And we don't want it to be sub because we want
to add the clay. Obviously we're
still in symmetry. So for the eyes, I don't really want them
to look like just spheres. I want to give them
a little bit of a, a little bit of an almond shape. So the way I'm gonna do that
is built up behind the eye. In a certain way. So as essentially
going to be like this. So I'm just going to
try to cover this top right sort of part of the eye. So again, make sure
you're on your head. And if you want,
you can lock it. If you don't see a
lot button here, you can go to where is it? Yeah, you can go to this option. Add shortcuts. You can tap Lock, and then it will show up here. And what that does is it will
lock the mesh so I can't accidentally tap on another mesh and accidentally mess
with another mesh. So we're on the head and
we're just going to build up a little bit of the eyelid. So you can see I go
back-and-forth and I lift up. Like so. It looks very, very weird. But now we'll just
smooth it out. Again. Very light. Very, very, very light. And sometimes I'm not
sure why it does that. Why there's a
difference in the side. I'm not sure what's
up with that. Should be exactly the same, but sometimes it does
those little things. But it looks like it's
okay as long as I smooth on both sides. So that's pretty good. I'm just going to repeat it. You see how I'm
favoring the inside? I'm favoring the
inside of the eye. Smooth it out. That's really strange. So I'm not going
to worry too much about too much about it because we're going
to need to rematch. And we'll be able to smooth all this out once we refresh it. So the only thing that I wanna
do is maybe add a little more to the nose
bridge using clay. And I think I just want to
add a little bit more here. And then just smooth loops. And just smooth it out. Okay? Okay, I think it's looking
pretty good so far. So I think on the next one we will remeasure all of
this stuff together. So just make sure take a, take another look at your nose, your lips, make sure that
it's how you want it to look. Make sure the ears or
you, how you want them to look and make
sure that the depth, if you want to make you make this deeper, things like that. So you can just make any
little glass adjustments. In the next video,
we will join all of these shapes and
except for the eyes, we're not going to add the eyes because we want the
eyes to be separate. And then we'll, and then
we'll go from there. I might add on a little bit
of forehead, but we'll see. I need to think about it.
9. Forehead & Remesh: So this may be even
a little crazier, but I actually
think this is fun. I love using the clay to
just do some real sculpting. And that's we're gonna do.
So let's use clay tool. Brush is about 100
symmetries on. So we're gonna give
our gout forehead. So it makes sure that
you're on the head. It looks like it's still
locked. Which is fine. We can leave it locked for now. And I'm sure later
on I'll be like, Why isn't what can I
choose another mesh? And I'll have to unlock it. So we're just going to give her forehead so we don't want it we don't
need it that big. So I'm just going to use clay. And then we're just
going to see I'm just adding clay
to the top here. And I'm going to do software
and just sort of bring it up to this ridge. Like so. Now I'm just I'm not
even being that I'm just I'm just adding
bands across. I'm going to add some
more bands here. The back of the head would
be adding more bands, just going
back-and-forth. Like so. You come in a little bit, a little bit behind the ears. Okay, something like this will add it and make it a
little bit higher. Let's take a look at the front. That looks pretty good. I'm just going to add
a little bit more. Because when we smooth
it, I know it's going to bring it
down a little bit, so I'm making it a little
bit bigger than I want it. Okay. So we haven't really
messed anything, so we still have some leeway. Let's bring up, put a little
bit more on these sides. So something like
that. So you basically just want to make
the circle bigger. And there's a few ways
that you can do it. We could have used the
Move tool and just sort of puffed out the mesh. But sometimes I just
like using clay. Sometimes I just you just
got to get your hands dirty. So just make your make
your forehead area here. Something like that. Nice lumpy head. And then you just smooth it out. You just let this, let this smooth brush do
all the hard work. Symmetry is still on making sure that you're
keeping symmetry on. Just smooth that out. Okay, and now she has a bit
more of a forehead shape. So there's a couple of
other adjustments I want to do before we mesh this together. He noticed on this view that
the face looks really weird. So me to pull out the cheekbones which
would be about here. So we can just do
that with move. I'm going to bring
the brush tool. Let's see, It's too small. A 145 or so. And I'm just kinda pull
out the clay here. I'm pulling it out a
little more than I want it because again, when you smooth it is
going to bring it. So I'm just going to
pull out the cheap, the cheekbones a little bit and then I'm going
to use flattened to sort of does flatten
them, flatten it out. Because I want to
add, what I wanna do is have it flat here, flat here. And I want to, I want this to sort of flatten
out underneath. So hopefully that
makes some sense. Some bring this out a little bit more to kind of show
you what I mean. I'm flattening out the side. I'm sort of not really touching the front too much
because I want to have that nice,
something like that. So I'll flatten this out here. And then I'm going to
flatten out here as well. Just a little bit more. Okay. We can, we can flatten a little bit this sort of
temple area that we have. I'm just going to flatten out
a little bit there as well. Then I'll just smooth out what we just worked on and
it's a little bit better. I do apologize. I said this was gonna
be really simple. But once I get sculpting, it's just so hard to not fix things when I see
when I see issues. So let's jump to
remeshing the head. We want to add more of the head. She's going to have hair,
so I think that's fine. If you want to. You can take the Move tool and just make sure
you're on the head. Just sort of make
the brush very big. Just sort of pull this
out a little bit. Because we actually have
large, very large skulls. So then when I turn it to front and then I can just sort of fluff out the back of
the skull a little bit. Something like this,
something like that. So let's go ahead and
remember all this together. And then once we do that, then we can start
working on the eyes. We can simulate all
this stuff out. So we don't want to
remember the eyes. So let's find the
eyes here, the eyes. I'm going to put those on top
just by dragging up here. So we have all of
these, the head, the nose, the lips, the ears. I'm going to select them all. I don't want to have
the I selected. So once I have those selected, then I'm going to bring
mesh at two fifty. Two fifty. You can
see I don't have keep sharp edges or anything to 50. Box will merge. And you might want to save. Let me go back because I
should have saved. Let's save. You can name it something
shorter than this. So now I'll do the
voxel rematch at 250. And now you can just go ahead
and smooth out your mesh and feel free to
make any adjustments that you think you
might want to make. I'm actually going to
tilt the head forward. So when I saw the
front view is actually the front view because
right now she is facing up. So I'm going to take
both of these layers. I'm going to tap on the
gizmo and I'm just kinda put the face forward. Here we go. Okay. And the only thing that I might
want to do is tap on the, so this is going to
be the head now. So we'll change this
whole shape to the head. It's locked. The only thing
that I might want to do is make this a little
bit more curved. Make it smaller because
I don't want it to affect too much of the other shapes of the face. Just a little bit more
purge in the cheeks. I think that's good.
And we can just smooth. Make sure there's no ripples. Okay, good. I'm happy with this. I also might make this deeper, but we can do that later on. Well, actually let
me just do it now. So I'm gonna go with layer again and inner layer. And then I'm going to
actually do another circle in here just to sort of essentially, Okay. This is alpha. This
is obviously extra. You can just, you know,
just keep editing. You can change your ears if you if you feel
like you need to, you might not near
the hand just can't. Sometimes I just can't stop. I can't stop. Okay. So she has very big ears. I might have to do
this little bit again. Just to make that
little section again. Okay, Good. So I think that looks good. And next we will will
accentuate the eyelids, will put some creases, kinda fix up the little
bit of the details. And then we can move
forward from there.
10. Face Details: Okay, so let's dial in some
of these details on the face. The first thing that
I wanna do is we'll, we'll do some edits
on the upper lip. Now, there's a few ways
that you can tackle this. This one, I'm not going to
use what I'm going to show you how useful it can be. The pinch tool. Pinches, great. I have high-intensity
brushes around 100 and pinches good. If I wanted to just
make these lips look a little bit more together. Pinches, great. Pitch is great for that. It actually looks so good
that I'm in a minute. We'll just keep it. I don't know if I'll pinch the bottom
to the bottom a little bit. I want to add a little bit
of of connector tissue here. So I'm just going to add, I'm just going to use clay. And I'm just going to
add a little bit of connective tissue here because I don't like how the
skin comes down. And then you can kinda
see where the cone was. I don't really like that. So I'm going to
add a little bit. I'm not going to add it in the middle because
we can actually, we can actually sub, subtract. And you can actually depress that a little bit because that's what
we have on our lips. We have that little
depression in the middle. So I'm going to tap
sub and I'll add a little bit more out here. And then I'll just smooth. And I'm just being
careful not to really go over the
ridge with the smooth. I just wanted to,
because I don't want to really ruin that ridge. I think it looks really good. There we go,
something like that. So now it looks a little
bit more natural rather than coming down and
then the lip coming out. Another thing that we
can do just to sort of bring out the
lips a little bit. We'll use crease. You probably won't
have this problem. For some reason. My tools, they always have
the color settings, so I'm going to turn that off. It should have the
little line through it. If it doesn't, then just tap
it and tap stroke painting. What stroke painting is, is when we color this
in and we want to, we want to do
another crease here. If we add a darker color, it'll just add some depth. So you can use the tools, um, which will do what
the tool does, but it'll also paint it. So that's what stroke
painting is that I want to turn off because we're not at the
coloring stage yet. So crease tool, I don't need it that
big, maybe like 30.5%. Intensity. And symmetry is still alone. So now I'm just going
to just accentuate this line. In the middle. I'm going to dip it
down the slightest bit. On the, on the outside. I'll maybe try to make
it a little deeper. So something like that. I wanted a little less pointy, little more round. There we go. That looks good. So while
where we have decreased tool, we're just add some definition to the outside of this nose. So we can just use crease tool. We can bring it around up into where the
nostril would be. I'll do another pass going back. Just like that. And it just adds a
little bit detail. And I just softly smooth it just so we don't have
those like jagged lines. But it really adds some
details to the nose. And we can take
flatten and we can do what we did very early on. We can just sort of
flatten out the top part, leaving that nice
ridge, like so. And then we can just
smooth, smooth it out. Okay, I think that looks good. Now for the eye details, we can pretty much do the
same thing we did before, but since we rematch the head, the clay is going to
be a little bit more, a little more sturdy. So it's actually going
to look a lot better. So just make sure you're
on the head layer, which I still have locked. The brush can come down. So now we're just
going to build up this clay behind the eye. And again, I'm going to start here and I'm going to
come right to the, not all the way to
this part of the eye. We're going to go a
little bit further up. So I'm going to start here and I'm going to come
around like this. And I'm really going
to bring that out. Really bring this
eyebrow out a little bit more than I would want it
because smooth is going to depress some of the
clay that we brought up. So now I'm using the
smooth tool symmetry of course is still on. And we're just gonna go
ahead and smooth this out. There's just some of my favorite
parts to in this kind of stuff at this stage. Really smoothing it out. Well. So it looks like
the eye is set inside. So now we'll do the
same thing with this lower this lower section. So we're going to
go back to Clay. I'm actually going to make
it a little bit smaller. And I'm not going to start
right on the inside. I'm going to start right
on the middle part. I'm going to start
a little bit lower. I'm gonna come around. And you see I'm mostly
working for items like on the inside of where the eye is because I don't want that
to come out too, too far. You see, I'm just
going to build it up. I'm going to build
it up like so. And then I'll take smooth again. And you just want to
smooth all of this down. Just so that it's
nice and subtle. Because it's really the
subtle, sometimes it's the, it's the subtle
details that really gives it a nice, a nice look. So I'm actually going
to flatten this. This is very, very sharp here. So I'm just going to flatten, flatten that part of the head. Then I'll just smooth it. Okay, and we can actually
flatten the top of this too, just so it's not so, so it doesn't stick out so far, doesn't really have
to stick out so far. I'll flatten out the top. Press a little harder. Maybe go and it looks
a little bit better. So now I'm just going
to smooth that out. You might have to
do something like that a few a few times until it really looks like
even this little bit. I'm so I really, really pay attention to any little change in the
service of the sculpt. It just I need to have
it as perfect as I can. And we can flatten up
this little space. So let's use the
flattened brush. We can just flatten this space up here because this would be obviously the area between
our eyebrows is flattening. And then we can smooth. You
saw I just kinda flatten out the rich to which
an x it looks okay. Okay. And now I'm
just going to flatten out the forehead a little bit. I'll just bring this up,
just sort of flatten out that area at the
top of the skull. You can see I'm sort of
pressing in a little bit here because this is
the flattest part. You can see I'm
sort of just making a little sort of
rectangle on top. But you just want to
like just flatten out that forehead a little bit. Then you can just smooth
everything out as usual. But it's the subtle shapes
that really make a difference. And that's why you can see like sometimes it's
really hard for me, I can't not do them. So I think that looks
pretty good for now. I think when we, the next video, we'll do some eyelashes
and eyebrows. And I think after that
might be able to color it. Who we'll see. We'll see what happens.
11. Eyelashes & Cheeks: Okay, So I'm going to add
the eyebrow eyelashes, which I always do
with my characters. And I'm going to
use the tube tool. And I'm going to tap curve here. And the two tools,
great for this. It can be a little tricky. So I'm going to start here
and I'm gonna bring it up and around and around. Then you will see that
it makes the tube. And sometimes it'll, you
won't be able to edit it. So you just have to
change this little, just tap Edit there. And you can see all these little points
where you can pull it out. And the tricky part is sometimes
you have to turn it like this so that you can actually pull these out
to be able to see them. So now we can see
our whole tube. So essentially you just want
to make a nice curve by, by moving these little nodes. And just be careful. If you tap them, then
they'll turn black. It'll be like a, like
a, like an angle. So we just want to keep them
curved so we don't need we don't need any
of them black yet. You just tap on them again. If they do change. On the bottom here. I'm going to take
this last node and I'm going to turn
it up like this. Because I always do
those little wing tips. This one I'm going to make
black because it's a I want, I want that to be, I don't want this to
come off on the end. So open this up a little bit. So it's looking pretty good. Now with a tube tool, you can tap radius here. So when you tap radius
and it has the two dots, that means you can adjust
the different sizes. And you can change the sizes, see how it's only
changing this left side. So this one I'm
gonna make smaller. This one I'll make it
a little bit bigger. That looks pretty good. And the way that I want this to look, I don't want the end
to be that small, but I don't want it to be,
I don't want to see it. So I'm going to make
another node by tapping on the white line. And this one I'm actually
going to bring into the mesh. This one I'm going to bring out a little bit just so we have that nice curve, just this. So see, I put it inside. So that curve kind of comes down and just sort of
disappears into a point. You have to make sure that
your two is touching, that there's no space there. You don't want any space. So we'll just move
everything back. It looks pretty good. I
think that looks great. So the tube might
take a little bit of getting used to, but
just be patient. I think that it does really, really make the eyes look
better when you have, we're going to make this black, the eyelash, and it really just brings it
down a little bit. So I'm going to make sure
that you mirror it that way. We have it on the other
side and then you can validate it. And I
think that looks great. I'm going to take
smooth and just smooth out the end of this, and we'll edit this a
little bit more later on. There is another option
that you can do. You can do the same thing on the bottom. And this is extra. You don't have to
do this. I actually just started doing this. But you can do the same
thing on the bottom. The only thing that's different is I usually just make
it a little bit thinner. Let me bring the two
out so I can see it. I'm going to mirror it for now
and we'll come back to it. It might be a little
easier once we color this. So I'm not going to
validate them yet. I'm just going to leave them for now so we can come back to them. We can go to the head. Now. It doesn't really
matter which way we go to. Now let's change it to o. Let's start coloring
this because we pretty much have all the
details how we liked them, and now we can color them. So we'll go back into
this layer, PBR. And you can see we have like a nice little super
white sculpt. And we can choose a color. I think I'm going to use a nice like milk chocolate brown. Something like that. And I
don't want it to be glossy. I don't want it
to be too glossy. I should say that.
So we'll paint it. And now we can go back
to these these lashes. So we'll go to the top lashes. Let me unlock. I knew
that was going to happen. So we'll go to the top tubes and then we'll just
call them black, like a very matte black. So we want to turn roughness all the way up so those are black. And then we tap pain all. Okay. I'm seeing that
this is a little bit. So I'm gonna take
symmetry off and I want to try to
move this as well. Maybe drag. Here we go. I think drag actually
worked a lot better. And as I was saying before, that we were going
to edit these. So I just wanted to, I'm going to go
back to symmetry. And I'm just gonna kinda
smooth that out a little bit. And I'm going to use
drag and just change the shape to
something like this. I'll just smooth it out again. So I just sort of made it
a little bit more curved. Like that. Somebody
got the back of this. Here we go. Okay, So here's another
detail that I want to make sure that I show you. The cheeks are a bit hollow, so it looks a bit
weird from the side. So I'm just going to use the
move tool and I'm just going to puff out this
cheek area here. So brush probably
about a 160 or so. And I'm just going to puff out. You may need to Brent make the
brush a little bit bigger. So I'm going to give
her some cheek areas, a notice the way that
I'm looking at it model. I'm going to make the brush
a little bit smaller. And then I'm gonna puff out this area here and a little
bit bigger than that. Push out little
bit here as well. So just sort of puffed
out the cheeks. That looks better.
Then I'll just smooth. Smooth everything is usual. There we go. That
looks a lot better. I like it a little more
punchy or more fuller cheeks.
12. Face Colors & Lips: Okay, it makes sure that
you're saving, saving, saving. I think the next thing we'll do is we'll do some lip colors and then we'll do the eyes. So for the lips,
Actually we can do, we can do, we'll do the
facial color first. We will add some
redness to the face that will make it look
a lot more realistic. So we'll use the paint tool. And we'll change the
color here to to read. And the roughness is fine. So we want to change
the color to red. We want to make sure that
we make a new layer. So we're on the
head. Make sure that you're on the head. Mesh. We want to tap here
for layers, Add Layer. And we're going
to call this red. Okay? So the base is what
we already have, and this is gonna
be the red color. So now that we're
on our painting, we don't want to erase. That will not be helpful for us. Brush at about 90 to
start in intensity, we're going to turn down to
like twenty-five percent. Brush might need
to be a little bit bigger, maybe like 125. Okay, so symmetry is still on. So now we're just going
to do softly at all. It's still very, very dark. So I'm going to lower
the intensity to 15. We're going to add some
redness on the nose. A little bit going up the nose will add some redness
on the cheeks. I'm just trying to do it. Circular pattern
that a little bit to the mouth area and to the, to the ears, to this
top part of the ears. If it was a whole body, I would add some to the
fingertips and toes. The elbows. Looks pretty good. Now we have our little
bits of redness. And you can use the
smudge if you feel like you want to sort of kinda smudge the color
around a little bit. But don't worry if it's a little if it starts to look makeup B. Because since we used it, since we did it on the layer, we can go to that layer and then we can lower the opacity. So I'll lower it to about
a little more than, a little more than halfway, so it's there, but we
want it to be subtle. Okay? Another trick with the lips. If we want our character
to look a little happier, we can use drag. I'm going to turn symmetry off. And I'm gonna go
back to the base. So I went back to the
layer and the base because I just want to keep it on
the base layer for now. Anything you do on layers above will be affected
just on that layer. So let's see if I can
drag this lip up. Just to give a
little personality. Might have to smooth
this out sum. And then we can
use the drag tool again and just drag it up. So something like that. I think looks pretty good. Just sort of smooth
that out a little bit. So now we have at
least a little bit of a little bit of happiness, just a tiny bit, a little smirk. We can add some lip colors. So let's do that. So
add another layer. And this is gonna be up lip. And we'll add another layer. And this is going. Hello. I'm gonna
put uplift above. And I'm going to
tap on that layer. Now we can figure out
what color we want this. So again, I'm gonna
go to paint that. I'm going to long
press the color of the lip and I'm just going to make it
a little bit darker. A little bit darker, maybe
a little bit more red. Like so. And I'm going to
put paint all the way up. And I'm going to
lower the size of the brush just so it's
easier to paint with. And I'm just going to
paint the upper lip. Okay, here we go. So we paid the upper lip. Now I'm going to
take smooth and I make the brush really small. And I'm just going to
smooth out along the edges. I'm not going to press too hard because we're still
affecting the clay. We don't want to affect
the clay that much, but we just want to have a nice smooth paint
job on the lips. Paint that center crease or smooth out that
center crease. Okay, I think that
looks pretty good. And now for the lower lip, so we'll go to the lower
lip and our layers. And this one, it can be
a little bit more pink. So let's just go to a pinker color, something like that. And we'll go back to paint. Will just paint
in the lower lip. And remember this layer is
underneath our upper lip. So we don't have to worry about
painting over that layer. Might be a little too pink. But again, we can just lower
the opacity of the layer. Okay, just make
sure that you come right to the end of the lip. So another little Passover. So something like that. And then we'll do the
same thing with smooth. And we'll just sort of
smooth out lipid the bottom. If you need to, you can erase. You can go back to the Paint
tool and you can erase. You can erase if you
think you've you've come down too far with the pink, can you erase it and then
just smooth it over again? I probably should have
done a little bit more of a natural pink color. But let's see how it
looks when I lower the opacity of that lip. Think it actually looks,
actually looks good. As long as I lower the opacity, I think it looks it
looks pretty good. So something like that.
13. Eye Details: So now let's do the eyes. And our scene isn't really
that big right now. So we're going to tap on the
eyes and let's rematch them. So we tap on this little grid. We go to voxel and I'm gonna
read mesh them at 250. Or actually I'm gonna
reinvest them at 300. And then I'm going to smooth them out with the smooth tool. And then I'm going to
paint them a glossy white. Paint them a glossy
white. Hello it. And there's two ways
you can do the pupils. The first way is you can do selective mask and you
can use the ellipse. So Selective Mask. And then the ellipse right here, symmetry is still on. Now, if you want your character
to be looking at camera, looking straight, you want, you want the pupils
to be a little bit further in towards the center, not cross-eyed what you want them to be a
little further in. So using selective
mask and the ellipse, CEO, I start my circle a
little bit more on the inside. Then I make my circle like that. Now, this is only a mask. So let's say we're on the
eye layer and we want to add pupils one. So will they P1? Because we liked these pupils, we still have to
actually paint them on the eye, like on this layer. So we'll go back to up here. So we're in selective mask. We're gonna go to the
Options here. Invert. So now that just inverted. So now the open
space is the pupil. And then we'll tap here
and we'll just go to black with no roughness. We want to we want
a glossy black. And then we'll do pain. All. You notice the gray is still there so you have
to make sure you go back to your selected
mask in clear. And then you can see your eyes. And I probably could have remastered are
subdivided it more. You can see it's a bit jagged, but I think I'm just
going to smooth. I think I'll just smooth it out. Instead of subdividing. It's a little bit of a cheat. Whoops, I did make sure
I was on the eye layer. There we go. So that's
what it looks like when it's not at 198 K.
Sometimes, I don't know why. It takes, it takes a very, very dense mesh in order
for it to be really clear. But since we're here,
let's try that out. So we're going to, I'm
going to close that. So I went back to
the layers and I just you can turn the
layers off and on. I'm gonna go to the eye and
I'm going to sub-divide it. So we've already rematch to it now I'm going
to sub-divide it. So I'm gonna go
back to the grid, back to multi-rate sub-divide. So now it's huge. Now it's really, really big. So let's see how the selective
mask looks with the lips. See it's very, it's
a lot clearer now. So I'm going to add a new layer. I'm gonna go to this selective
mask options Invert. Now I'm gonna go to my color. I'm gonna go to penal. Take all the references out. Now I'm gonna go back to
these options up here. Then I'm gonna do clear. See it's a lot smoother. But the only thing
that you're giving up is this is a lot, a lot bigger. This is 792 K, so it's a lot bigger of a file. And personally, I don't I don't think I don't really think
you need it that much. So I'm just going to undo. But I was just wanted to
show you the options. Because we might even
be able to paint. The eyes are back at 198 K. I, I got rid of the sub-divide
by just hitting undo. And let's actually
see if I paint it. Let's, let's go to
our glossy black. And let's not be on a race. So now I'm back to that first layer p1 because
I got rid of the other one. So let's see if we can
paint it a little clear. So now I'm actually
just painting it and it's fairly clear. It's not bad. And this may take some time to, for you to get the, you know, just get a clear. Make sure your pupils
are nice and round. You don't want any
funny-looking pupils at a ruin your sculpt. I think that looks pretty good. Another thing that
I do with the eyes, I'm gonna go to the, I'm
going to add a new layer. I'm going to name it shadow. And I'm gonna go to this layer. I'm gonna make it 50 or half
the opacity of the layer. And now I'm just going
to go back to a mirror. I'm already in paint. Brush doesn't have
to be that big. So I'm on the eyes, symmetry is still on. And now I'm just going
to make, Wait a minute. How did I get to the head? I layer. Make sure I'm on the
right layer I am. So now I'm just going
to make this black. It's black. Remember I lowered
the opacity of the layer. Now we have a
shadow on the eyes. Nice. And also since we're here, I just wanted to use
the crease tool. And I'm actually going to want
to use an increased tool, actually want to use the color. So I'm going to
tap on the color. Then I'm going to long
press on her skin. And I'm gonna make it
a little bit darker. So I tapped again on the color. I made it a little bit darker. You can see it's
affecting the eyes even though it's not
gonna be on the eye. Let's make sure that
we tap the head. Now I'm using crease. You can see the color here
and it's going to be darker. See how the creases darker. But the head is only 198 K. So it might be worth it
for me to sub-divide it. So let's go ahead
and sub-divide. So I'll use the grid. The head is only 198 K, So let's subdivide it. So now it's 795. So it's a lot tougher. So let's do the same crease and see it's a big difference. Actually let me erase
this, make this smaller. So if you notice what's
happening, it looks clear. And then once I let it go, it's becoming blurry and I know why it's doing
that. I think. Yeah, So the reason why I
was doing that is because I'm on this layer and this
layer has low opacity. So that's just a good example of being aware of your layers. So I'm going to add
a new layer on top. And I'm going to call it darker. This is, this will be where
all the darker elements. So now when I make the crease, it's not going to get
blurry like it did before. I spent many a time pulling
my non-existent hair out, trying to figure that
out, that decrease. So something like that. And I'll just smooth it out. So it looks a little
bit more natural. Now I'm going to
do the same thing. I'm going to make the crease. I want to make the crease
a little bit bigger, decrease brush or Tool. And I'm just going
to bring this around right into there, like so. And then I'm gonna
make another one here. Like so. Then I'm just going
to smoothies. So they look a little
bit more natural. And unfortunately I
didn't have symmetry on. So I might have
to do them again. It's now I'm just going to
repeat everything I just did, but I have symmetry on, so yeah, you gotta be
careful with symmetry.
14. Finer Face Details: So here's another small
detail that I want to, I want to add, you
don't have to do this. But when I'm looking at it, I think it'd be nice
to add a little more of a lower eyelid. You really can't see
the one I've made that. Well, so when I want
to add more to that, so I'm going to go to clay, make sure that I'm on the head. But I want to make sure
that I go down to the base. So I wanted to do it
on the base clay. You have to be careful
on these layers. You want to do it on the base. So now I'm using clay. And let me just save, because I haven't been
saving as often as I should. I'll save. And I'm going to hit Lock just so I don't accidentally
hit anything else. And again, just
like we did before, I'm just going to draw this out. But if you notice, I'm assertive trying to trying to add it to the eye so that it actually skinny is up
the eye a little bit. Okay, I think that looks good. I think that will
make the character look a little bit more, a little bit more happy. So now I'm just going to
smooth smooth out the clay. Okay. I think that looks
a little bit better. Okay. I'm just going to
add some darker nostrils. So I want to make sure
I'm on the head layer. And we're going to add
them to the darker layer. And we'll just use clay. We sure that we're on subtract. And I'm going to choose
a color that's here. And then I'm just
gonna make it darker. And then I'm going to
turn up the roughness. Okay. So now with our clay brush, we're just going to sort of just just make a little
nostril and then maybe I'll just
go over it again. Just to give, just
have a little depth. Like so. And then I'll just use smooth and just smooth
it out a little bit. Let's see if I can
smudge this color a bit. Smudge seems to be working
well to kinda just just smudge the color and make it a little
more natural looking. Okay, I think that
looks pretty good. So I do want to add
some eye lid creases. So I'm going to use
the crease tool. And I'm going to highlight
this color again. And I'm going to make
it a little bit darker. Crease tools, nice and small. And I'm actually going to,
I'm going to start about here a little bit up
from this eyelash. And then I'm going to bring it down and I'm going to press harder once I get to the end. So the beginning is
gonna be very light. I'm going to press harder
as I get to the end. Then I'm actually going
to come back and just sort of make it a little
bit deeper at the end. Then I'll smooth. Just to make it a
little more natural. I think that looks pretty good. Another quick detail I want
to do on the lower lip. So low lip, I'm gonna make an amine to
make a new layer actually. And I'm going to
name this one gloss. This is just gonna be
for the lower lip. So I made this new layer
and made it gloss. I'm going to bring it down to low lip, right above low lip. So now I'm going to tap here and I want to get this
color of the lip. So once I have the
color that pink, I want to go to Paint and I
want to change the gloss. So I'm going to bring
the roughness down, see how it gets very glossy. I want to change, I want to put the roughness
down and then I'm going to lower the opacity,
lower the intensity. Pretty low. And about 50% for the brush, I'm going to turn off symmetry. So remember we're
on layer and where we made a new layer called gloss right above
that lower lip. So now we can add we
can slowly add more of a gloss to the lip because the lip would
have more moisture. I'm going to turn the intensity
up a little bit more. You notice I keep going
over this one bit. So really have that nice
gloss on bit of the lip. This just a little
trick to just make the lip lip a little more life. And while we're doing
that with the lip, we need to read darken. So let me grab this color. And I'm gonna make it
a little bit darker. And I'm going to
grab the crease. And let's go back on dark wool. Let's actually do
it on upper lip. So we'll do it on the upper lip. So now we're increased
again and you see, we just need to re we just need to give this slip
a little bit more detail. So I'm going to start over here. Come in. Remember symmetry is not on
because this side goes up. So we'll bring this around. And then it'll bring it
up to this smile here. Make it a little bit
more of a depression. At the end. I think it looks okay. Feels a bit off to me. I think I made the line
a little bit too low. So let's try that again. But I'm going to make the
line a little bit higher. I think it looks a
little bit better. So I'll just smooth out a little bit just to keep
it looking natural. And it actually might just erase just erase some of this darker color that sort
of bled onto the lower lip. So erase some of
that darker color. And then I'm just going to
smooth it a little bit.
15. Eyebrows: Okay, so we can
add eyebrows now. So head layer will
make a new layer. We could actually
use darker, darker, or we could just use a new
layer. Let's use darker. And then we'll make a new layer. We'll make a new layer to maybe darken up in these eye sockets. But for now, I'm going
to try to speed this up because I completely, I have so much fun doing this. I hope that you're hanging with me and learning a lot
from these little tricks. This is how I think
about every Skulpt. Okay, So let's use clay. Now. We don't want it
to be subtracted. And we want this is
gonna be for eyebrows. So we want them to be fairly
dark, pretty much black. And I think this
roughness is pretty good. So let's just take a
look at how that looks. I think that looks pretty good. The reason I'm using clay is
because I want to add some, some, I don't want
to just paint it on. So we can do symmetry because it should be
equal on both sides. And we try to put this
straight for the eyebrow. It's gonna be something
like coming off like this and then coming
down and getting in. Then I make my pressure
a little bit lower. So we come off and
come down a little bit, something like that. So that's your basic shape. And it's sort of using using this ridge that we made before. Sorry for the neighbors
slamming doors. As usual. I'm just going to
smooth out the edges. And let's see if I
can make this smaller and I'm going to
turn symmetry off. Sometimes it's nice to just have a little bit
of a difference. Who I meant to be on Clay. Let's see if I can just add a
little difference to these. Just so they're not
super identical. Or you can just have
them identical. But I do sometimes I do like
to have them different. But it's not a big
deal either way. I think I might use clay
to maybe polish off. Just add some little bit
more texture like this. I didn't have kids symmetry
on, but that's okay. Just gonna do the same thing. I'm just adding a few lines just to add some texture
to it like that. And can smooth this out. We might be able to use crease. Let's get rid of
the color though. We just want to use
irregular crease. Let's see what happens if we move this out. Okay, I think that
looks pretty good. And of course you can make
them bigger, thicker. I kinda feel like maybe she
needs thicker eyebrows. So I might do them I might do them thicker, but we'll see. Oh, and I still didn't
have symmetry on. It's okay. We'll just have to
do it manually. Okay, I think that looks decent. And we'll just smooth just
so it's a little bit softer. So it looks a little
bit more natural. If you do want a
more simple look, you can always undo all of this. If you want a more simple look. And you can just make the
clay a little bit bigger. Turns symmetry on. And then you can flatten, you can flatten this out. It's a bit more of a
simple with simple color. I'm just going to use clay
just to square off the edges. And I'm sort of making it
the same as I did before. Okay, so now I'll just
move to the same thing. Just smooth the edges and flattened will
make it to some more. Another little stylistic thing. Okay, so I do want to
add a little bit of darkness to the eye sockets. So the way we'll
do that is we'll just go to the head
layer, add a new layer. We'll call it I darker. So now we'll just
grab that color. Let's make sure we're
in the paint tool. I'm gonna grab the
color of the skin, will make it a little darker. And then we will make
sure that symmetry is on. And we're just going to
paint this upper section. We're going to try not
to paint below this, below this line loops. So we're going to paint
over this section. Sorry, the neighbors are
slamming doors again. We'll paint over this section. And then we'll use
the smudge tool. And you just want to smudge,
you can turn this off. Okay. I guess doesn't
doesn't matter for smudge. So now I'm just going
to smudge around the edges just to
give it a nice blur. Okay, that looks pretty good. Now it's very dark now. So again, we'll go to that layer and see we can
change the opacity. So we don't want it that dark. Maybe just a little bit. So maybe half. I think
that looks pretty good. The only other thing
I can think of is add a little gloss to the nose. So let's go to,
we'll go to gloss. Will go to gloss or
grab this color, the color of the
tip of the nose. And then we'll change
that to a little bit. Lost here. Paint. Although the intensity
so doesn't go too crazy. And we'll just add a
little bit of gloss. Will turn symmetry off. A little bit of gloss
to the end of the nose. Maybe it will just smudge
around it a little bit. Just to give the tip of the nose a little bit
of gloss as well. I think it looks pretty good. I'm pretty happy with it. I think we can do some hair. So we'll move on to the
hair in the next video.
16. Hair Shapes: Okay, so for hair, Let's start with a cylinder, regular cylinder, and we'll
go ahead and validate it. We want to make the color dark. Decent amount of roughness. I don't have a pitch black, but it's pretty close to black. You can use black if you want. But I just have a
little bit. No black. So I'm gonna make
the sphere round and I'm gonna sort of lining
up with her head, make it wider, and
then stretch it out. So something like
this is a good start. So you can see it's basically just a sphere that I've made. But it's a good
start for the head. I'm going to use the Move
tool and symmetry is on. And I'm just going to
bring the top-down. Maybe just stretch out
the back a little bit. I think that's a
good shape so far. So now I'm going to
drag these sides, make the brush a little bit
bigger. Symmetry is on. And I just want to drag these
sides down a little bit. Can you think that looks good? Let's see. Can bring
this up is back. I just want to get
a little bit of that that little bit
of hair line in there. Just a little bit. I think that looks great so far. So now if we want to
add a little bit of, make your hair a little
bit more dynamic. Let's use a cylinder. So the cylinder, we can go
ahead and validate it and we can tap on the color
and we can just paint it the color that we want. So we'll bring the
cylinder up to the top. We'll turn it, shrink
it up like this. And for the first one, we'll bring it down like this. We'll move it over a little bit. Move it down a little bit more. Now let's make it bigger. And then we'll just
stretch it with this blue stretch it
and move it back. So we want to have
something like this. So now we go back to our gizmo and we're
going to tilt it. When you use this read. To tilt it, we're going
to make that corner. So it's pretty much in
the middle of the head, maybe a little bit over. Like so we'll move it back
and something like this. So we have a nice tilt to it. And then we can use the
move tool to move this back and just stretch it out
into the rest of the hair. I think that looks
cute. Now we'll tap on that cylinder again. We'll tap the gizmo
and then we'll clone. And when you clone
and then you move it, it will create a second
one. Clone that one. So let's skinny that one up
using that green sphere. And it's tilted so that this
one goes straight back. It's tilted a little bit off. Hopefully you can
see this clearly. What tilted a little bit more. Stretch a little
bit more, lower it. Move it back some. There we go. Then let's do the same thing. We use the Move tool
and we'll just sort of bring it down to the head. So I think we need a third one. So let's tap our gizmo
tool will clone, will bring this
off. Skinny it up. Some, will move it back over what tilted
a little bit more. And then we'll use this
blue to get that nice tilt. I want to bring this over. Almost all the points are
almost at the same spot. Like that. Make it a little
lower. Move it over. Then we'll do the
same thing. We use the Move tool and we'll just stretch this into the
rest of the hair. Like so maybe we'll even like
bring it over a little bit. And maybe since we're doing it, let's, let's add another one. Let's clone it again. This one, we'll bring it
off, we'll bring it back. Let's make it smaller,
a little bit smaller. We'll tilted a little bit more. And then we'll push
it back, stretch it. Maybe something like this,
then we can move it. So it sort of looks like it
comes down behind the ear. You can see I'm just
maneuvering with the move tool and just move
things back and forth. Very useful. I do that a lot.
I think that looks good. Now I'm going to tap
on the sphere again. So this is the hair. I'm going to rename it here
so we don't get confused. Air Base and all the cylinders are these little flowy things. But I want to tap on the hair and I want to move
the hair down. So symmetries on and it's fine. Now I'm just going to
drag this hair down. I'm going to drag it
out a little bit. Whoops, someone who had
stepped on something else. I'll stretch it
back here just so it's got some volume to it. I'm going to turn symmetry off. I think I'm going to
bring this side out more. I think it looks cute. I think that looks
cute. This side. I can even bring in a
little bit just so it has a nice little difference with a little bit
of the ear showing. Now I'm going to use drag. I'm going to use drag because
I want a smaller area and I just want to bring this back. So it looks like it's actually
going behind the ear. Since we made the ears,
we don't want to totally, we don't want to
totally lose the ears. Since we spend that, since we spend time on the ears, right? So we'll move that back
so it goes behind. I'm just going to use clay
and I'm going to use subtract and make sure that I'm on
the head, the hair base. I'm going to lock it so I don't accidentally hit something else. So now you can just kinda clay away that one spot,
that problem area. And I'm going to solo the hair so I can get rid
of that problem area. There we go. That looks pretty good. So now I'm just going to use drag
symmetry is still off. Because the hair is no
longer symmetrical. I just want to drag the
hair out a little bit. Maybe I'll use flattened
and see if I can just, here we go. So
we'll flatten that. Let's see if I can do this
before I rematch the hair. I'm going to use clay,
makes sure I'm on here based it's still locked. I don't wanna be on
sub I'm going to add. So let's just see what happens when I
try to add some clay. Okay, so eventually I knew I was going to have
to rematch the hair. But that's good because
we're going to refresh this all together. So I'm just going to take
another look at these. Unlock it. Maybe I'll just
drag this out a little bit. Here we go. Tap on this cylinder. You can bring this one
around a little bit more. I think it looks great. It looks good. The only other thing I'm
thinking of is we could add another cylinder kind
of going this way. That might be cool, but I
think I might be able to do it with. Let's go for it. Let's add another cylinder. We'll paint it right away. Bring it over here.
I think I want it. Stretch it out, make it
nice and stretched out. Skinny it up. And I'm just
going to position it. Position it here. We
can bring it close. So something like this. So I'm gonna go ahead
and validate it and then I'm going to
use the Move tool. And I kinda want it
to go sort of like a not an S-shape but kind
of like along the shape. So if you watch, I push and pull and push and
pull until I sort of get it. How I want it to look. I'll do the same
thing down here. Push, pull, push, pull. Sometimes I have to make
the brush a little smaller. Just push it and pull it
until I get a nice S shape, which is what I'm going for. So just remember just lots of push and pull and push and pull. And you can really get, and it's nice that it's
a cylinder because it maintains this nice shape
all the way through, which I think it looks
really, really nice.
17. Hair Details: Okay, So I think the hair
looks really good for a base. I think what we can do now is voxel, remember
it altogether. So I'm just going to save. Then I'm gonna go to the hair base and all
of these cylinders. Then I'm going to
voxel, merge them. I think I'm going to do it
at 300. Let's go crazy. 300, voxel merge. Let's see how everything looks. Everything looks pretty good. Now I'm just gonna go ahead
and smooth everything. I'm going to turn to Symmetry
off with the smooth. But I just want to
smooth everything out. I've actually meshed a
little bit higher only because there's so much
detail in these cylinders. And I just want to maintain
as much of it as possible. But I don't want to
go too high because i then the numbers can kind
of get out of control. So but I think it still
looks pretty good. The hair is essentially one shave made out
of many shapes. I think, as long
as the base looks good and the general
shapes look good, then you're doing
alright with the hair. So just get rid of
all these ripples. Sure, these are nice
and blended together. Okay, Looks cute. So now the next
thing that we can do is we want to add
some creases just to, just to kinda break
this up a little bit. So we'll go to crease. Make sure we're honor her hair. Let's rename his hair. And we'll add a little bit of a crease like that just to
give it that little bit. And we can add, if you wanted to get crazy, you can actually add
some creases like this. Really make it really
make the hair special. So Chris is probably one of
your best tools for doing this as those little breaks, which really make
a big difference. Okay, So now for this
area, we want to use clay. And even though we
made the crease there, we're going to use this clay. Oops, let's make it a
little bit smaller. We're going to use this clay
to come down like this. And again, we're going to make it really make it
look like it's gone. Behind the ear. We'll do another
one coming up like this. Like so. You can continue to fill out the hair using clay. You can fill it out as much
or as little as you want, depending on what
kind of, you know, what kind of look you want to, you want more detailed. It is good to still
smooth and just kinda keep everything in check. And also Use the crease tool to really divide some of the lines within country here, I'll
just do some crease. I just wanted to make
sure you smooth away those extra those ribs. Now add some clay Mac here. And you notice that
I'm just sort of, um, kinda following the
same sort of directions. I go like everything here comes from the center
point and then it comes around like so. Plan this. You can also
flatten some spots. They start to get
a little crazy. You can plan. You
can use the crease. Actually quite therapeutic. I think doing here like this. I always like doing
here like this. Some swirls. I think that looks pretty good. And one thing that I also
noticed on the head, kind of a wide forehead. So I'm just going
to use flatten. And I'm just trying to
sort of flatten this out, sort of at an angle. We turn on symmetry. I just want to flatten this out. Okay, and I'll just
smooth that over. Now. Last but not least,
let me just try to add some small details here With crease. Just sort of trying to
enhance those a little bit. I think that looks great.
I'm pretty happy with it. And if you think
this looks funny with a little bit of
here and then you can just stretch this
down a little bit. I'm kinda cover that
ear a little bit more. Okay. That looks pretty good. Now, the next thing that we
can do is just light it. It's pretty much done. Hopefully you'll stick
around to do some lighting because that can really
make your sculpt standout. So in the next video, we'll
get to do some lighting. And then we'll start
exporting our head.
18. Lighting the Scene: Let's do some lighting. So first, we want to turn off all the lights of the scene. So we just go to this little sun window
and then we just uncheck, the environment should be black. So now we can add
our first light, which will be a world light. And if you want
to see the light, you can tap on this
little color here. And let's just make it
white to start with. So this is a directional light. Okay, where is the
directional light? I have it hidden. You can go to the settings here and you can just tap the lights. Option. Same thing with the grid. I'm
going to turn off the grid. This is our directional light. It doesn't matter where
the light is positioned, but I'd just like to move
it so it's easier to grab. So it's not on the face. So the weight is where the light is actually coming from
and your whole scene. So as you see, as you move that around, the scene will
change drastically. I think this looks pretty cute, just coming down from the, from the front. Let's see. From the other direction.
That's cuter, I think. So. I think that
looks pretty good. With the directional light. You can move it around until
you, until you like it. But I think I like
it coming kind of illuminating the face. The rest of it we can
eliminate other ways. So the next slide, we'll tap on that again. We'll add another light. And I'm just going to make it yellow. Make it sort of warm. And I'm gonna do, I'm gonna
have it be a spotlight. So let's tap on the spotlight. I think we'll have it. I think we will have the
spotlight coming from let's see. We'll put it on
this side for now. You can see it's very close. So as you can see, the cylinder is what
the light is hitting. You can tap this
little box right here and your options come up. So let's take the cone
angle and make it bigger. You can see it's
just light more. So we'll make that bigger. Waves the intensity
a little bit. And we'll make this a
little warm, more warm. Okay, So maybe we'll make this will push it further
back because I kinda like kinda like the light to be coming from the side or more towards the
back of the head forward. That usually looks good for. Oh, another thing
that we can do as well, which I almost forgot. We can go, Let's
see, where is it. Here? We can go to this
little camera option and then we can hit perspective. Right now I have her at 10.2. I might I usually
have it at 12.92. So let's see what
that looks like. I can see somehow the way that the light
is hitting her cheeks. It's making your cheeks
look a bit funny. So I might have to
light up her face. I think that looks pretty cute. And I move it a little
bit further back. So it's not so bright. And let's adjust. Okay, I think that looks decent. And I'd like to add
another color light coming from this side. So we'll do add
light and we'll make this one a cooler color, like a blue or purple. And we'll tap on the actual light itself
and move it over. And let's tap on the
Options here and make it a, let me get rid of this,
will make it a spotlight. So we'll bring it back. Angle it. Let's bring it back. Here we go. Now you can see it on her hair. So I'm going to put up the
intensity a little bit. I think it looks really nice. It looks really good. Sort of just like lights up
a little bit of this hair. So now for the last light, sometimes I tried to
save the last slide. What you can do is
you can go back to the lighting menu and you
can turn on the environment, which there'll be very bright. But you can scroll
down to exposure. So I'm going to turn the
exposure all the way down. And I'm just kinda
see what it looks like if I bring the exposure up, accidentally hit Rotation. Sometimes the exposure
can sort of make your, make your sculpt a little
more clear like that. And let's change the
color of the background. Most take with a darker color. I think it's easier
to see on the video. I would like to do a brighter
color but darker colors. Okay, so that's pretty
decent for the lights. And I'm going to
use the last light. I'll use it as a spotlight. I'll make it a little warm. Now, move it back, move it up. And I just want to point it
right directly at her face. It's like the
center of her face. So I'll move it
back and then up. Let's see. I want to make it look better if it's coming straight
in front of the face. Something like this. Now I'm going to hide the light. So we'll just tap the light icon so we
can hide the lights. That looks pretty
good post-process. So we have ambient occlusion. And you can really play
around with all of these ambient inclusion kind of touches on the natural light, shadows from things that
are touching each other. But once you play
around with it, you'll quickly see differences. Depth of field bloom. Let's see what it looks like
if we turn them bloom up. There's no, I don't really
have any really bright spots, but Bloom would really
blow out the light spots. All right, I think it
looks pretty good. Okay, so let's save this. So I'm going to tap on the
camera here and hit Add view. We'll name this hero. Make sure it's
directly in front. And the last but not least, usually when I export, I go to the settings and I
make sure they're render resolution is raised
as high as it can be. And then I go here. Let's just save
it one last time. And we'll go down. Export it as screen. But you can export it to
whatever size you'd like. Go Export, Save Image. Then we have our
little character. Alright, hopefully
that was useful. Hopefully you picked up a lot of my little tricks that I do
when I'm making 3D characters. This one was really, really fun and I'm
probably going to do some edits on it because
I just can never stop. But that's the fun
part about 3D. So I appreciate you
guys hanging with me. I'll, I'll say goodbye
in the next video. But I hope that I hope that this character
will challenge you. And I hope that a lot of
the things that you learn making this character will carry over into your
own characters. You can make, you can use this, you can adjust it and make bigger noses and
stretch the face. There's so much you can do. And I can't wait to see
what you're gonna do with this character and with your own characters
in the future. Alright. See you next video.
19. Thank You! : Alright guys, so we're back
here at the last video. I'm glad you hung with me.
I hope you had a good time. Thank you so much. This
was really fun for me. I've been making so
many faces lately. So I was really excited
to just kinda nail one down and just get everything clear and
concise to make a class. Of course, I love you guys. You guys are loving 3D, 3D sculpting and 3D modeling. So that's why I'm doing
more classes because there's so many people that are really, really enjoying it. And I love it. I'm absolutely obsessed. And I use my 2D, I use my procreate stuff to figure out what
I'm going to draw. It all helps. It all goes
hand in hand at all, helps. You can do anything. I actually worked for the first time I did
a collaboration. Someone sent me someone
sent me their 3D model. It was like a Volkswagen camper
van and stuff like that. So I did the lighting. There's so much you
can do and there's so many aspects that you can, you'll learn the more
your 3D that you do. That's what makes us this
whole thing. So amazing. Each scope that you do, the better that you get is
just the time you put in. You just have to put
in a lot of time. It'll come back, it'll
come back to you. Make sure you follow
me on Instagram, TikTok or YouTube,
all that good stuff. I have a Facebook
Procreate group. Tiktoks been, been really like I'm having the most
fun on TikTok lately, so make sure you
follow me there. Tag me. If you have
your work tag me in it, I will share it to my 3D page or my regular Instagram page because I love sharing
you guys work. So please tag me in it so I can see it also makes sure
to join me on alive. I do lives all the time. So if you have
questions, of course, you can ask them here
and I'll answer, I'll answer your questions here. But also, I go live. So if you go on live
and you asked me, Hey, I got stuck at this, can you
show me how to do this part? Can you show me why my tool isn't working the same
way that yours is, or how you did this
or how you did that. I'm happy to show you. And it's just a lot
easier to do it on live. Because then I can directly communicate with you and
you can see what I'm doing and we can get you through whatever
struggles you have and if you have any issues with any other thing
having to do with 3D, having to do with nomad scoped. Just asked me and asked
me on live, it's easier. I think that's it. I really appreciate you guys
as always, it's a pleasure. Make sure to keep
drawing, keep sculpting. And I will see you guys all
in the next Skillshare video. Alright, peace.
 Dave Reed, 2D & 3D Illustrator - Brooklyn, NY