Transcripts
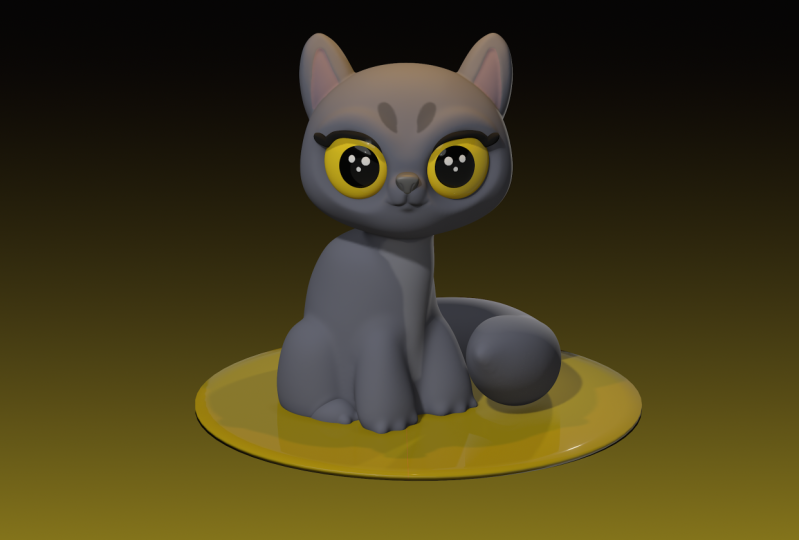
1. Halloween Cat 3D! - Nomad Sculpt Tutorial: What's up, guys,
drug-free tape here. And today we're gonna be 3D modeling the cat
and nomad scopes. I'm gonna be using
the iPad Pro, but no, my Skulpt is also
available on Android. So just make sure
that you can use it before you take this class. Also, if you're brand new to 3D, if this is your first 3D class, if you want to learn
3D and nomad scoped, definitely go and
check out my 3D for beginners class
here on Skillshare. I go over all the basics, the tools, the lingo. I don't know all the lingo,
but most of the lingo. So in this class we're
going to start off from the very beginning
from a sphere. I'm going to show you how I plan everything out, block
everything out, merging everything
together, just turning it into a
nice clean sculpt. This is part of a bigger scene. And then later class,
I'm going to make the pumpkins and the backgrounds
and things like that. For this class, we're just
going to focus on the cat. And then we're gonna do
some really fun painting. I'm going to show
you a few examples of how I paint the cat, but that's the best
part of making a really cool sculpt is
that you can paint it, you can play with the lights. You can really go crazy and
have a lot of fun with it. That's what I want you to
get out of this class. But the key is you have to
have a nice smooth 3D model. Once you have a good model, then your work is going
to look great. Alright, so let's get onto the next video,
the class project.
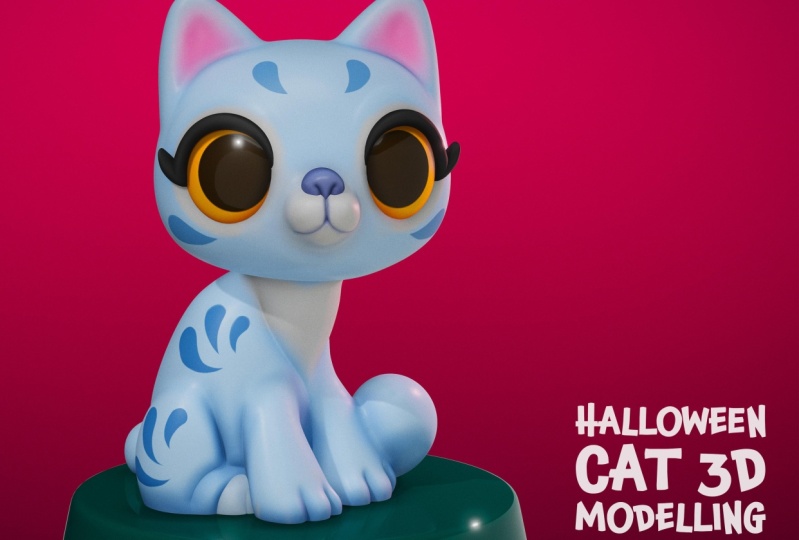
2. Class Project: So welcome to the class project. Of course we're gonna
make it 3D cat obviously. But the real fun comes once you've finished sculpting
and modeling your cat, you can paint it
whatever you want. You can play with the lighting. You can play with the
colors, patterns. You can make it really glossy, like a, like a porcelain cat. You can make it really rough. You can mix the two. You can do refraction
and things like that. You can really explore
nomad sculpt once you have something made
because you'll learn a lot from just exploring. So hopefully after you finish, you'll be more than
willing to share your cat with me with the class. You can upload them to the
project research project and resources, projects
and resources. Upload them there so I can see, so the class could see, I
can't wait to see what you do. So let's move on to the next
video, Getting Started.
3. Getting Started: Alright, so let's
start sculpting. So the first thing we wanna
do is bring in our image. So we'll just go to the little picture icon and
we go to reference image. You can see already have
the reference image here. If you need to find
it, just go to the little plus sign photos and then just find
it in your photos. Once you have chosen, you can just hit Transform. And then you can just shrink it. I think I'll shrink
it and put it here. And then just tap.
And now you're back into regular
sculpting mode. One thing to note, the sphere, the default sphere is
actually quite big. So sometimes I just delete that sphere and
I make a new sphere. This sphere is only
6,000 vertices. And the other one, e.g. this one is 98,000, so it's quite a bit
bigger than 6,000. This a little, a little
thing that I noticed. Alright, so let's start
making this little cat. So first thing, his head
is pretty much spherical, but it's got more of a slight squared off sides to little oblong,
little elongated. So we'll go ahead and make
that with our sphere. Let's move it back a little bit. And notice when I move it back, I tilt it a little
bit and I hit front. Because sometimes if you
try to hit front and it's directly forward,
it's directly flat. He hit front. It'll hope it's not doing it. Sometimes it'll do that,
it'll move it off the screen. So if I want directly
in the middle, I'll just kinda angle it
all and then hit front. That way it doesn't
move on the screen. The first thing we wanna do
is just stretch out the side. So I'm going to
use the Move tool. I'll make it quite big. And I'm just going to
stretch out these sides. Flatten out at the
top a little bit. Just get it so it's
pretty much pretty close. So once you have it
to how you like it, I'm going to just make the
size a little more flat. This makes sure that
you have obviously you want symmetry on. So it does everything
on both sides. Here we go. I think that's good. Also, you want to make sure
that you're in orthographic, but always start everything
in orthographic. I'm sure if you've taken
any of my classes, you know that we always go, we always start in orthographic. Because otherwise
perspective, it won't. It'll be more difficult
to sculpt and to see things as they
are in perspective. Because perspective
you can adjust the focal lengths and
things like that. So just started an
orthographic, it's much easier. Okay, so let's turn it to
the side and just make sure that the back of the head
is looking decent as well. So I think for the
back of the head, we'll use the move tool as well. Symmetry is still on
because the symmetry, right now the symmetry
is down the middle. So I'm just gonna
kinda show you. So let's put show plane. You don't have to
do this. I'm just, I just want to show you how
the symmetry is working. So this is the plane, this
is the symmetry plane. And right now, when
we made the head, everything we did here
is happening over here. That's why you see
these two dots. So even if we turn it like this, and we have moved and
we manipulate the back, it's still manipulating the
back on the other side. Make the move tool a lot bigger. As I'm moving the head back. As one thing that's important
when you're making a head. You want to make the back of
the skull like you want to make the head around
like the gleich. If you're making a head,
if you're making a school, don't forget about the back. And especially cats. Cats have actually
really long heads and their ears are fairly
far back on their head. Most of them. Excuse me. Okay. So the back of the
head looks pretty good. You just want to go
ahead and make sure that the front still maintains
the shape that you want. So I was like does come back and just readjust a little bit. So you want to make
sure that the front is how you want it to look and make sure that the back
is how you want it to look. Okay, that looks pretty good. I'm just going to smooth off. Let's turn off this plane. The planes are good. If you want to see how
your symmetry is working, it's a good thing to play
around with symmetry and get accustomed to symmetry
because it's very, very useful in times
that you need it. And the more, the more
you know how to use symmetry and use the tools, the more you'll be able to
take advantage of that. Okay, so this looks pretty good. I'm not going to worry about
these two little points here because
eventually we're going to we'll remeasure it and add different parts
on the body so it's okay, don't worry, don't really
worry about the details too, too much at this point. Okay, So now let's do the ears. The ears, I'm just
going to use a sphere. So we'll go to this little
icon here, the scene. And we'll add sphere. So we'll just move it up. And over. We'll do the Mickey or things. Then we'll hit mirror will
just make it smaller. Move them back into around
where we want the ears. And then I'm going to
turn it to the side. And I'm going to actually
move them back with the blue arrow and move them back around to where
I want the ears. Okay. We can go ahead
and validate them because we can still make them bigger and smaller and stretch them even if they're validated. So let's get a headstart
and label all of these. So this is ears. Again, you're just
in the scene and we're just pressing this
little pencil here. So this fear is the head. So we'll just tap
this little pencil and we'll just label this head. It's a really good idea to label everything as you go
because it's really, really easy to get lost. Okay, so now we can use
either move or drag. Let's try move first. So we're using the Move tool. And now I'm just going
to make sure I tap on the ears. Just pull them up. So something like that.
You can adjust them. His ears are slightly pointed out a little
bit so you can just take the take the Move tool
and move it out a little bit. You can take drag and
make it really big. Adjust. You'll find a drag and
move are fairly similar. But you'll get used to adjusting with it with those tools. Move, I tend to use with I really want to
move whole sections. Like drag is if I
make drag smaller, it's more like that. With move. It still moves
everything around it. So that's the main difference. So the ears are
looking pretty good. I think I might shrink them a little bit with the I'm just using
the gizmo now. I move them a little
more in maybe. Let's turn it to its side. Let's move them up a little bit. Something like that. I think that looks pretty good. Again, you can use move. You can make it small
if you want to. Make the ears a little sharper on the top or
anything like that. So feel free to make it
make it how you want it. I think that looks
pretty good for now. Okay, so next close to the body. I think for the body, we could probably
use one cylinder for the neck area and
then maybe another cylinder, a bigger cylinder. And then we can, we
can put them together, sort of give him the field
that is body has here. So let's make a base, because it's always easier to create these
characters with some sort of base that we have the bottom
in which they're sitting. So we can say it needs to have some weight on
whatever the base is. Let's just use a leaves
a cylinder for now, since we're using cylinders. So I'm just gonna
make it bigger. I'm just flat. And maybe
something like this for now. Okay, and that's probably
about the right distance. But you can adjust the
distance, the distance later. So I'm gonna go ahead
and validate it and I'm just gonna
call it the floor. Feel free to call it ground. Okay, so let's make
a new cylinder. And this one will be the neck. So let's make it thinner. We can stretch it out, or
you can use these nodes. If you're using Edit, you'll see these, these
buttons, these nodes. So those all, there's all
chains, separate things. So you can just adjust it to
the head and to the base. Now when we turn it to the side, you notice that
it's very high up. So we'll just slide it back. Head would be inequity
would be about here. I think. I think the width
feels about right. So I'll go ahead
and validate that. Well, it's like a pest dispenser for the rest of the body. I think, I think a
cylinder, my work, I also want to try a
square might also work. Let's try cylinder. Since
I mentioned that first. This will be neck
label as we go. Let's make a new one. Body one. So we'll bring
it down, move it back. Obviously the neck goes into
the sort of chest area. So maybe something like that. Kind of works. When it's
actually a decent size as well. Maybe it can be a
little bit thinner. Like so. So just a little bit,
a little bit thinner. But obviously, you
can make your cat is chunky or as thin as you'd like. So let's validate this. Will continue to
see if this works. I'm going to take Smooth
about half intensity, fairly big, not
that big of a deal. Symmetry is on. And I'm just
going to smooth it out here. And I'm going to
try to smooth it to sort of get that nice bend. It might be easier to
just use the side view. We can even use move to
sort of help us out here. I'm just moving, moving it to
try to get that nice curve. I can sort of smooth
everything out a little bit. So we have that
nice curve there. The only thing is you don't
really see it from the front. So in this instance, I'll probably just rotate
the body a little bit. It looks good from the side. So now we know that at
least we have a good curve. So let's see if
we can rotate it. Because we're seeing we're
seeing his face in the front, but his body is
obviously turned C. I didn't make a mistake here. I went and rotated the
neck and the body. But you don't want
to rotate until you do the arms and the legs, because you can still
use the symmetry.
4. Arms & Legs: Okay, let's get to
his arms and legs. So for these, we're just
going to use spheres and we'll stretch
them as we need. My defeat these as well. So let's add sphere
for the legs. Move it over. We'll mirror. Make it a little bit smaller and maybe we'll stretch
it out a little bit. And we don't want
them touching yet. Because once you validate
if they're touching, you won't be able to
separate them. So e.g. you don't want to have it
like this because if you validate them and then you
will try to move them away, then you have that gum. You stepped in, Gmb
sort of thing going on. So we don't want to have
them touching first. So we can go ahead
and validate them. And then we can make
them smaller as we need. Now is a good time
to figure out. I guess this looks pretty good. His body looks a bit tall. So I'm just going to shrink
his body up a little bit. Shrink his body up. That looks a little bit better. We'll take the neck
and just move it up. Move these little,
little, little legs up. One thing that I see often
with the 3D characters is that sometimes you have to
make sure that see this wouldn't be this wouldn't look right for feet
touching the ground. So we'll stretch these. So let's move them a little
bit closer together. Oops. Let's move the legs a
little bit closer together. And we'll stretch these up. Let's stretch them up
towards the body. Like this. Smooth move over a little bit. You might have to
do it a couple of times just to get it right. Probably a better idea to
maybe do it from above. Here we go. Sometimes you just have to find the best way
to do something. You know what, I'm
going to shrink this because it's getting in
the way of my reference. So I'm going to give him a small little boogie board to be on. So this is going to
be his little legs. And let's make them a
little bit smaller. Let's move them back. Maybe a little bit smaller. And it will stretch
them out a little bit a little closer together. So what I was saying about the the legs is when something
is resting on the ground, it's sort of flattens out. So you see how his legs here. So there's a couple of
ways that you can do it. You can either bring it down until the wide part
is on the ground. For a lot of times
I just will take Move and I'll just sort
of bring out the bottoms. So I just try to
stretch out the bottoms and see this bottom
part right here. I'm just going to smooth that. So just something like that. So it looks a little bit
flatter on the bottom. I'm just going to smooth
out the whole thing. Just keep it nice and smooth. And I'm also going to just press it a little bit more here. Like that, something like that. So for the back legs, we're going to do very similar. So we'll just add a sphere, bring it down over,
make it smaller. I can actually make
it bigger and then we can stretch it a little bit. Notice I bring it down
through the floor. I'm going to stretch
it this way. Then I'm going to bring
it in, move it back some, and then I'll just
continue to adjust it until I have it
somewhere I like. So maybe something like that. You can always bring it
out and doesn't have to be that close to the body. You can always bring
it out a little bit. Okay, I think that looks good, so I'm going to mirror it
so it's on the other side. And then I'll validate it. And another way to get rid of the bottom is you can just go to your trim tool right
here, rectangle. Then you can trim. You don't have to worry
about the bottom. And now for his little feet would just do pretty
much the same thing. We'll add another sphere, bring it down over, shrink it. We'll mirror. Now we'll just make
this so it's like a little tiny half dome
for his little foot. Something like this. And you can put it in
a so it's close to his other is 0 back leg
or his front leg. So I think something like
that looks pretty good. The only thing I
might want to do is just bring this
in a little bit. The drawing, it's just
in the slightest bit, it's coming straight down. It looks like okay. In the back the back of
this looks like It's okay, something like that looks good. There we go. As you notice, I
continue to adjust it. Always keep adjusting. Just make it look as good as it can. Okay. Take a look and it looks cute. Okay, so now I'm just going
to smooth out the bottom of validate those
two little CDs. And I'm just going to
smooth out the bottom just to bring them up some. And it's okay if
they don't smooth. Not a big deal. You can always just trim them. So now it's just important
to see what changes we want to make to the body
and to the legs and things. Because it's always
going to be easier when you're in symmetry. So we might just bring the
body and the neck together. Maybe make his little
toes, things like that. So little things that where you want to maintain the symmetry. So we'll come back and we'll, we'll work on that together.
5. Tube Tail: Okay, a few other little
adjustments I want to make. First, I'd like to bring in his little shoulders
a little bit. So I'll just use move. Just sort of just sort of
bring these in a little bit. Okay, So I'm going to
actually start the tail because I don't even think
I need to rotate the body. I can just rotate the head. So I'm going to leave
the body where it is and it will do the tail. The tail, we use the tube
tool and we use path. And so the tail comes
out and comes around him in comes a little
bit in front of his leg. So we're using path, so we'll make
something like this. And then we'll tap, tap
the little circle and you get something crazy
like this, which is fine. So then you tap on it. Because you still have
all these options here. You can move this node
back to a decent place. And it looks pretty good so far. We can probably use the gizmo and just bring it
up a little bit. Now, just adjust it. So it's like going into the body and just put it
in the general position. Let's get rid of this gizmo by hitting the tube option here. Because sometimes it gizmo can get in the way if
you don't need it. So we'll just hit to begin
something like this. Then we'll just make it thicker. And then we can
sort of figure out what we want to be different. So we want the end to be
a little bit bushier. So I'm going to tap radius. And radius gives you one yellow node here to be
able to pull, and one here. So when you tap radius
and it has the two dots. So then you can pull in
this side will be bigger. And you can make this one
smaller kind of thing. But I think I only need
something like that. I don't really need it that big. Now that I have it there, I do want to make it
easier for me to get this round that at the
end of the tail round. So for that I'm going
to tap radius again. And it makes one of these
points on all of the nodes. So I'm just going to stretch
this out at a new one. And I'll make this one smaller. Bring it in. So I'll just
make that one smaller. Maybe we'll make that
a little bigger, maybe we'll make that
a little bigger. Something like that. So once you have it pretty much
the way you want it, of course we can still edit it. We have all the nodes. I'm
just gonna hit spline. So that makes it nice and curvy, which is what we
want and I'm still going to bring it up
a little bit more. So let's just use the gizmo and bring it up a little higher. So it looks like it's
resting on the ground. And we'll tap to begin. It looks great. So it's pretty
much something like this. Let's bring that in
a little bit more. Which round? I think
this looks good. I can bring it in a little bit just so it's sort
of touching them. Cats usually have their tails
wrapped around themselves. And it's actually on the
ground and the drawings. So you can choose to have it on the ground or you can have it up. It's up to you. You just have to adjust all of these little nodes
so that it matches. So I think something like
that is pretty good. So actually another thing
that I'm seeing is the tail. I might need another node here. Okay? Maybe I'll make this
a little bit bigger. Shrine where it goes
in his little body. Here we go. The last one, the one going in, I just angled it up a
little bit just so it looks like it will come down and it wouldn't be
going directly in like that. It's sort of be like going in sort of a curve because it's kinda goes
in where their back is. So that looks pretty good. Okay, So once you have
it where you like it, you can go ahead and validate. Then you can smooth. Just be careful
sometimes you can, you might change the shape
a little bit too much. But it looks like it's
smoothing pretty, pretty well. You might have to flatten
it a little bit on the end. Sometimes I'll flatten it
and then smooth it out. So I'm actually
going to rematch it. So I'm gonna go here to
this little grid voxel, remeshing it to about 175. And then I'll smooth it out. So the reason I remember
it is because it stops it from changing
shapes so drastically. I think that's pretty
good. So it'll be something like this
and I'll rotate his head. But I didn't want his head
to be a little wider. I'm noticing I'm noticing that
it can be a little wider. So let me go to front Move tool and just want to make
it a little wider. Okay. Looks good. I'm going to
just make the back a little. Okay. Here we go. You see how in this one, like the neck area is usually
a little bit bigger here. There's a little bit
more of a curve here. So I'm actually going
to use the neck and I'm going to pull it out
with the move tool. I'm going to tap the neck here. And then I'm going to
pull it out like so. And then I'll just
kinda spread it out. But then I'm gonna put
closer at the bottom. So sort of like that.
It looks pretty good, actually. A decent curve. You can bring it
in a little bit. Like so. I think that just has
a better shape here. And also if you want
your tail to be thicker, you can grab your Gizmo. Can tap on the tail. You can actually just stretch it out and then drag
it up a little bit. I think I like
that a bit better. A little bit more
of a fluffy tail. Now if you do that, just
remember that you have to bring the base of
the tail down a bit. Okay? I think that looks pretty good. So the other thing I
wanna do is you see how the bottom of this
shape, the body shape. I want to sort of push
it back a little bit. So smooth might work. Here we go. So smooth works pretty, pretty well to push it back. But we are seeing
the neck, I think. So. I tapped on the neck. I'm still using smooth
and I'm just going to try to push that
back a little bit too. Here we go. Now, if I push this back some, so they kinda just keep
going back-and-forth. But I do wish one a little
bit more depth there. Okay, so I think
that's pretty good. I'll push back here
a little bit more. And also in the back here. Here we go. The reason why I'm pushing back. The reason why I
use smooth to push that back is because, you know, it just it just helps with
the shape of the, you know, the butt and the bottom here
because you don't want to just flat because then it
just looks like a cylinder. And that's actually, you know, you can do more simplified cats. It's very hard for me because I always just want
everything to be perfect. But, you know, but I'm just trying to explain
why I do certain things. And I do like the space
that it goes back, that it has that space going back behind the legs
and things like that. So another thing I noticed
is I want to stretch. The little feet ease out.
So I'm just going to stretch and then drag them over. Here we go. Something like that.
6. Voxel Merge: We might be able to, to
voxel merge these hind legs, the body, the neck,
and the arms. It might be time for that. Let's see. We'll
go here to scene. And actually didn't label
these, I should have. Okay, So this is the tail. We have our VDS. So this is the hind leg. So let's tag the hind leg, front legs, the body, the neck. I think that's it. That's all we want to
voxel emerge for now. We'll Vox and merge
them together at 200. So now you can see as all one piece and
you can go ahead and smooth Smooth tool
to smooth it out. And as we voxel merge them, he saw that the shape isn't
going to change much. Just enough to get
a nice smooth mesh. Just to get a really
nice little shape. I like it. I think it looks
really good so far. I hope you guys are enjoying it. I love these little
legs and the front. He does have little little toes. So there's a couple
of weeks to do them. If you want to keep it simple, you can just take crease. And I might, I might do this
in an n and a further step. I'm not quite sure right now. But you can take the
crease tool fairly small. Let me get rid of this. This should have a
line through it, these ******** of
lines through it. And you can kinda just
make them like that. Actually looks pretty cute. Then you will do the same
thing with this back here. Hopefully we don't have to. I think it looks pretty good. And just see you will see
the way that I'm doing it. I'm starting and I'm
actually curving it. Doing a slight curve in. I'm not going straight down. History down could
work, but I don't know. I felt like I needed to put a little bit of a curve on it, but still holds these shapes. And this is just a nice
little detail that it matches the, matches
the drawing. Another thing you can do
is you can take an fleet. You can just inflate
a little bit. Excuse me. You can inflate a little bit. I want to smooth everything out. And you can have like little
little knobs like that. You don't even have to
have the creases and then really you're gonna do inflate. But also when you inflate, do it towards the bottom because you don't want to
run into the same issue where it doesn't It looks like the toes aren't
resting on the ground. So do it towards,
towards the bottom. Smooth them out. So you can do
something like that. But I tend to just
like the lines. Just so you can see
what I just did there. I didn't voxel merge
the feet because I think we're just going to
put like a skinfold here. But since I didn't
merge the feet, I can tap solo and
then I can just see the feet that way I
can get underneath. And also another thing if
you want it to lock it, you can tap Lock
and then you can't do anything else
with any other mesh. So you can't do something by accident and then you unlock it. So then you can choose other
meshes and things like that. And if you don't
see the lock here, you can just go up to, I think it's this
little option, right? Add shortcuts to bottom and then you can
just tap Lock here. If it's not there, then you tap it and it'll show up there. So I think it actually would be nicer if the tail was box
will merge with the body. But I'm going to wait until we finish the head, turn the head. Then we can box will
merge the head to the body and also the tail to the body. But we don't want it. We don't want to rotate
the head yet because we want to use the symmetry
to do the face. And then once the face is done, then we can voxel, merge
everything together. So long story short. Next we're gonna do the face, wide eyes. I like it. I'm going to go
ahead and tap front. And I like to use
clay, subtract. Make the radius around 40, intensity, maybe around 60. And let's just make some
round spots for his eyes. So they look like, whoops, make sure you tap on the head. They look like see if
it's going to finally. Sometimes it is doesn't want to work the way I want it to work. Okay, so as you can see, I'm just making some
round circles here. Think something like
that looks good. The reason why I
just deleted that is I just want it to
be a bit rounder. Look like it was it was coming off a little
bit too much here. I just want just regular
round round circles. So that looks pretty good,
maybe a slight bit bigger. Just trying to keep
it nice and round. And I think that
looks pretty good. So after that, maybe you
can go a little bit, a little bit deeper
in the middle. After that, we
just go to smooth, which is smooth,
round or circles. Then we have those nice
smooth depression's. Okay. I think this looks pretty good. Now is a good chance
to see if you want the eyes to maybe
be further down. Sometimes I undo
and I'll just do it again and see what I think.
I think this is pretty good. And the drawing, he has
a little bit more space up top when it's
on his forehead. So maybe I'll just try to stick to that. You
don't have to. But let's just see
what that looks like. I tend to teach the way that I just the way that I sculpt
naturally in a lot of times, things that I do naturally
is just experiment. You have to just experiment
and you have to just see sometimes if you like something better
or different way. So now the eyes are a lot
lower and I'll stick with it. I think I like it better. It looks fine before. But those little
details that really make a difference
in your sculpt, just always pay attention to those little details
and don't be afraid to experiment and to try things and to erase and
to make mistakes. Okay, So that looks pretty good. So now let's just take
some ice in there. So we'll go here, sphere
and bring it forward, shrink it, bring it over. Mirror. Then you can just place it
where it's supposed to go. Make it a little smaller
and bring it forward. So you don't want them to come
out of the head too much. Sometimes you might have
to bring it up and then you might actually have
to flatten it some. You might even
have to rotate it. Let's go ahead and validate
because we can still, we can still edit and
just see what we have. It look like they
should be bigger. It looks pretty good. That looks pretty good. And you can actually, if you, if your circle is
not circle enough, just remember you can go
back to the head and you can actually you can adjust
around the eyes. If you think it needs
adjusting at all. I just wanted to make the
circles a little bit bigger. So I just kinda tissues the
clay was still in subtract. It has made them a little bit
bigger. Okay. I like that. So normally I would add
clay and add a little. Let's see what that looks like. I'm just gonna use clay. I'm gonna take it off sub. I'm just gonna go around
here a little bit. This might not need it. But usually that's
what I usually do. You really just wind up using, That's how you kinda get
a style because you wind up just doing things
over and over again. I don't think that I don't
think that hurts at all. So let's go ahead and add the, let's add the nose
and the snout. Okay, so let's figure
out how we want to do the nose and the snout. There's a few different
ways to do it. I think the best way would
just be to add a sphere. So we add the sphere will
make it really small. We'll bring it down. Maybe it will stretch it
a little bit like this. Maybe we'll bring it out. Something like this. Let's just validate it and
see what that looks like. I think something
like that might work. Because then we can just we can add the lines for the mouth. We can add a little
nose here as well. So this is a good spot, I think to pause for now. And we'll come back
and we'll work some more on these details.
7. Snooty Thangs: Okay, So there's
a few ways that I do this sort of
snouts and noses. And we'll start with this way. But there's also another
way that you might have seen me do it before
in other videos. Where instead of
adding that sphere, I just take inflate. And I kinda go like this. It's very similar. And
then I just smooth it out. And then I make the nose
and the mouth underneath, sort of like this,
that kind of thing. Of course it'll work better
once I rematch the head, because as you can see now the tools don't really
work that well. But I'm gonna do, we're gonna do the sphere. We're going to use this
fear, but we want, want it to be curved, like kind of curve out. So I'll just take flatten, I'll tap on this. Let's rename it snooze. You can rename its
snout if you want. I prefer snoop. And then I'm just going to flatten
out at the top a bit. Something like that. I think that's good. Then what would happen here is you have a line here and then
he has his little mouth. And I'd just like
to put it in with a crease so we can always go
over the crease more later. But I like to just put it in and sort of like when you do, when you sketch, you just
sort of symmetry is still on. I'm gonna go ahead
and hit front. I'll tilt it a little bit. It's easier to see. So
when I'm using symmetry, you can tell those dots. They keep getting wide. So you just want to
go in the middle. Let's say this is
the middle line. And then let's say the mouth
is coming off like that. Go ahead and make
that a little deeper. So there you go. So you kinda have the
little bit of a shape here. All the stuff going on
here. It looks great. Try and I try not to
overthink it too much. Of course, you can make the
sphere bigger or smaller. You can stretch it out. You can make the eyes higher. And that's all it takes to
make different shaped animals, different shaped heads,
different shapes, newts and noses,
things like that. So I think that
looks pretty good for now for a little cat. We can adjust it a
little bit more later. Let's add a nose to this party. So we'll just add
another sphere. I like to use fears
as you can see, I like to use smears,
spheres with everything. So we'll shrink that. Bring it down. Its
nose isn't that big. So we'll bring it down. So it's kinda like
a button nose. Bring it back into the
head a little bit. Maybe we'll it
looks pretty good. I'll just tilted a
little bit so it's like something that we can go ahead and validate
it and take a good look. So something like that doesn't really look like
a cat's nose yet. But what we'll do is we'll
make it sort of triangular. So I'll take drag,
drag this down. Like so. Maybe we'll drag
this out like this. Starting to look better. If you want, maybe you
can have a little bit of a coming out a little
bit like this. Maybe that looks weird. You go. That was just trying
to drag this back. His little nose. So now we've pretty
much have the shape. Maybe I'll make it
a little bit wider, something like that. And you can actually
use the pinch tool, which is one of my
favorite tools. So we use the pinch tool. Intensity is about 50, radius is about 70 or so. And then you can just go
across the top and it will actually give you
some nice edges. You just go around the edge. And it really makes
it look good. Have a cat that keeps
running around. I keep having to stop. Class for the cat. So it's crazy how
life does that. So let's just go back
to the drag tool. And I'll just drag this
out a little bit more. You can also flatten the nose to flatten it up a little bit. I think that looks pretty good. I'm going to smooth it out some. I think they want it
to be more triangular. So let's just use the flatten. Let's just see if we can. Here we go. I like more of a triangular nose like that. Let me just bring it
down a little bit. So the only other thing
that I'm seeing is I kinda want these to
be a bit rounder. So I'll use drag will
tap on this newt. And I just want to bring
this out a little bit. Just make it a little more
round. I think that's good. So we'll also do the ears. You could flatten them up, but
I actually don't mind that they're kind of Cornish. The only other thing that
I would do is maybe use the flattened tool quite big
and just sort of flattened. Flatten the side that faces
font. Something like that. But I don't really
mind it either way. I'm doing it because
I told you about it. But either way I think
it looks pretty good. You can also use pinch to, if you want to add
some edges. Like this. Pinches great for that. Even if the edges are faint, they really can
make a difference. I'm going to keep mine
round. I like that. Now let's take layer. And so we're using sub layers, actually a pretty
cool tool as well. I'm going to bring
the radius up. Let's see how that
looks on the ears. Well, let me get
rid of this color. And we'll just use this
to make the inner ear. Let's do a triangle.
Just keep it simple. So just looking at the
profile of the cat. And I just find that I think I want the the shape of the
head is a bit funny to me. So I'm going to actually bring out the snout,
the snowed a little bit. So I'm just going to tap, this is just the nose. Let's rename this nose. Sometimes I do have to redo
shapes as I go along because I add certain things and things start to
change the way they look. So this is a normal
part of how I work. And I'd like to
include even the parts where I guy make
mistakes or big changes. I could go back and fix
it and not record it. But I just think
it's important to show every aspect of why
make certain decisions. So I'm gonna, I'm gonna
get both of these amines, the gizmo, and I'm going
to bring it forward. Then I'm going to grab
his face, his head. Maybe drag. I'm going to drag
that forward as well. Doesn't really change the way
that it looks in the front. But I think it drastically
changes how it looks on the bottom, or may not mean on the profile. And actually, sometimes
it looks good. Bring this down a little bit. Another thing that
I did, I tend to do is make this a
little bit big. So let's just make sure that
the size is how I want it. Because sometimes
it, it will look cuter if it's a
little bit smaller. We're a little bit higher
up, things like that. So I think I like the size. I think I like the regular size. I think I like that better. So you know what?
Let's smooth out. Smooth this a little bit. And then we'll
just drag the nose a little bit further back. I think I like that
a little bit better. It's always important to make
sure that your scope looks good from most angles, some angles you can get away
from, you can get away with. But it's, it's always better
to make it to just scroll around and make
sure it looks good through different angles. Let's see, Actually
just want to drag up the eyes a little bit. Here's a little bit
more space on his head. So I'm actually going to
go back to move and maybe just pull it down a
little bit, flip forward. And also when I look
at it like this, it looks like his head should be tilted
back a little bit. Let's see. Head, ears, nose. Let's just see what
it looks like. We forgot the eyes. Let's grab the eyes
to Head, ears. Oh, I didn't add and
rename them. That's why. Let's just move his
head back a little bit. Let's see how he looks. Okay. I think that looks
good. Now I think it's safe to we can re mesh the head, the head, the snout,
and the ears. We don't want to turn it yet because I still
want to do a lot of details to the face
still with symmetry. So let's take the head, the ears, and the snooze. Let's just voxel,
rematch them at 200. Just smooth it out. Of course, symmetries on. So we're just smoothen
this whole thing out. And just be careful
when you smooth here. I tried I tried to be very tender when I go around the bottom
part of the mouth, I want to keep this line even though it's
not very defined. I just keep it so I
can go over it later. With decreased tool, I'll use the crease tool and I'll use a darker color to whatever color we make the
case that if we make it gray, then I'll use the crease tool. I'll make it a darker gray. Okay. That looks good. Nose looks good. Nose could
be a little bit wider, so I'm just going to
drag it out. Here. We go. Maybe a little smaller. It looks good. Okay, So, um, one
other cool thing that you can try out is flattening out the
bottom part of this eyelid. So I have the flattened tool. You can see I pretty much keep my flattened tool settings the same. Let's see how that looks. Like it. I just don't like the wind. It's really round around
the bottom of the eyes. I didn't really like that. I think this looks better.
So let's add a crease. Let's take our crease
tool and let's just go over this one more time. So we'll make this center line, and then we'll make these lines.
8. Strike a Pose: So now let's use the tube tool and we'll add in these
little eyelashes. So tap path. And we'll go 12345.
Maybe that's it. We can always adjust it later. And you notice I recap
this one to make it black. That's just so there's
a sharper right angle. Tap the green. And we get this
ugly looking tube, but we'll make it pretty. I'm just curve these out. Now we'll hit radius. And we'll pull this side bigger. We'll pull this side smaller. I can tap spline to
make it nice and curvy. Make the size smaller. And I'm just going to run
this into sort of like into the unto His into the crease. That way it just looks,
it's very clean. Hey, everything
else looks pretty clean. You can tap on it again. This is go to the tube here. So our options come back
up. It can mirror it. And then if it's how we like, maybe we want this a
little bit thicker. The drawings and
they're very thick and the drawings still
looks good there. Then we can go
ahead and validate. So let's just smooth it. We can try to make this shape here and we don't have
to be super, super. I don't know why I
say super, super. My fiance just told me
that I say that a lot. We don't have to be extremely precise with this because this
is gonna be a matte black. So as long as we have the shape, then it will show because there won't be any shadows
or any light on it, it's just gonna be black. So let's take flatten
and it's a curve. So I'm going to flatten
this bottom side and smooth it to curve and then smooth
and cardiac and smooth. So that looks pretty good. I'm going to flatten
this top side too, just so it's a little pointier. Something like that.
It's flattened the back, which is flattened this
up a little bit more. There we go. So now it looks nice and pointy. So it's resembles that. What I meant by eight. It tends to be to clean. It doesn't have to
be too like it's a little it's a little muddy. You can smooth it
out a little bit, but as long as you have
that shape, you're fine. Even this crease, I don't think will make a
big difference. You can try and smooth it out. But I think it's fine
up and before we leave, there's just one thing
that's bugging me. Here at the top of his head is rounder and here
it's more square. So I want to use, I think I'm
going to use the Move tool. And I kinda wanna see if I can bring the head
and a little bit. It's tricky because we
have the ears there now. But it will bug me
if I don't try. I think that actually
looks better. I think that it looks
a little bit better. See, I'm always
looking at things like that. I mean, it looks fine. And last but not least, I'm
going to get remember what we did with the with these eyebrow that
the the clay tool. Let's just do a little
bit more of that. The clay tool and
then just smooth it because we lost some of it
when we smoothed out the head. So we can add a little bit
more of that detail back in with the clay tool and not having its sub
subbed, obviously. But I'm always there's
always little details. I don't want it to. Okay, so let's go ahead
and turn this and get his, his pose, right. So this is the front. I think I just want to turn the body instead of
turning his head. So let's first off, let's label this. Eyes. Should have been
doing that all along. Everything else I
think is labeled. These are the lashes. Are lashes. Okay. So we have the floor, the feet, the tail. And what else do we need? The neck, which is the body now. Okay, So I think all of these feed is the
tail of the body. So lets just grab those, the floor of the feet,
the tail, the body. I think that's all
that we need to spin. So let's just go to gizmo. Then we'll just refer
to turn it until we have what we want. I kinda wanna show the tail, but I'm not sure. It might be his
body might be too. I'm not sure if I
can show the tail. I like it. I mean, that
actually looks okay. Part of me just wants it to be sort of like this. Instead. I think I like that instead, because you just
can't see the tail. The tail is too far back. The only other thing
we might see it if we do perspective, maybe. But I think I like this. And ultimately you have
to just make it how you want it until you're happy. I think this is what I like. So let's turn it. And this just makes sure
that his head still looks right from all the angles and it actually
looks pretty good. I think I'm going to
voxel merge the head, the body, and the tail. Let's try it. So we'll go here. We can
take away the floor. You can take away the feet, the tail, the tail, the body, and the head. Where's the head now?
The head is snoop. Okay. And then we'll
just go ahead and box swimmers that
will do it at 02:30. Alright, so we have it voxel
merged, moment of truth. You can see our little lines. All we have to do is just
smooth everything out. My favorite part. Because once you're
smoothing everything out 0, notice that the smooth
I have symmetry, but it's not really
working that well. And that's because these
shapes are now together. At least, like the head is. The head is together now. We are still, I still
want to paint this. I think I'm just going
to make it gray. Because I can't really paint. I can't really use symmetry, which is gonna make
everything more difficult even if I do local. It's still different.
I think it's gonna be lined up with the head. See the local symmetry is
lined up with the head. I think we can still
do things when the eyes and the mouth
and things on the head, we can still use symmetry. But I think that's about it. But that's okay
because he's gray. So we're gonna make them gray. If you want it to
color him and do other things like details
that you would need symmetry. You would just have to do
that before you rotate it and before you voxel merge
the head and stuff together. But he's gonna be gray. So
we're gonna be a. Okay. So let's go to this minute, which is now the body. Just move this out
and I seem good. I think that looks
great. I like it so far. And I do like how he looks with seeing the
tail on the back. So I might do the eyes. So the eyes are looking
in this direction. I also like it like this, so
I'm not sure what all do. We have options. One thing that I
wanted to do is make the skin flap over the his feet. So let's take layer and
I'm going to have to do that without symmetry. So I'm going to use
not layer, layers, the wrong tool in
Fleet me use inflate. I'm going to bring
the radius down some. And I'm just going to
try to bring it over foot. There's
something like that. So it looks like a little
a little skin flap. And we don't have to
use the other one because as you can see,
it's sort of buried. And also as you can see, the tail has really done
a number on that leg. But that's okay
because it's it's it's it's attached
and now it's all one. So I'm just going to
smooth just to get rid of that ugly sort of texture
that happens when they touch. I hate that. So as long as we get
rid of that, I'm happy. I don't mind too much
that it's there. That's just the nature
of what we're doing. So just know that that
happens sometimes. And it's just part of it. The only way that we'd
be able to prevent this isn't the tail
wasn't attached, but I think it just looks better with a tail attached here. It looks more realistic. It wouldn't look right if
the tail wasn't attached. So sometimes you have to
make those concessions. Alright? Now, if you want to, you can make some, you can do some other little
details like this. One here. I loved doing all these little
kinds of little details. You can smooth it out
just so it's subtle. But you don't have to. I think he's looking
really, really good. Let me let me see if there's
anything else that we can do before we move on
to the next steps.
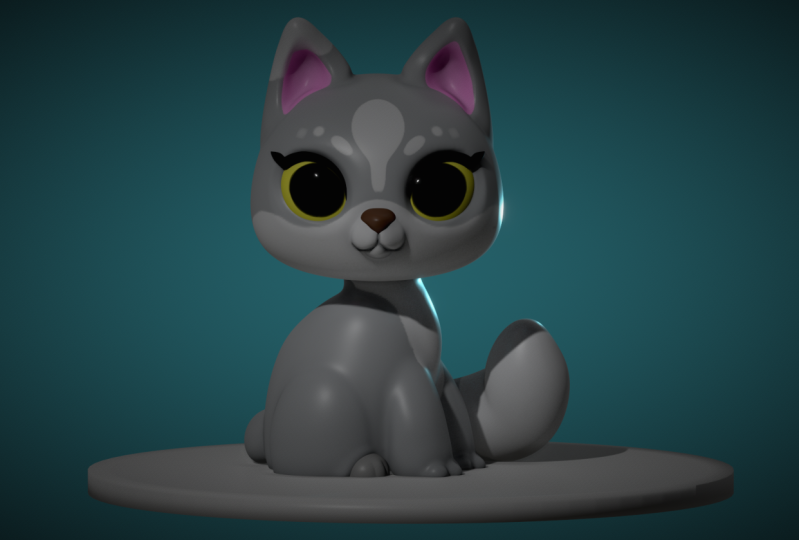
9. PBR Style: Alright, so let's
change this to PBR. So right now we're in MCAT, which I always work
in makeup is to read. But now we're going
to change it to PBR. And it looks like a
cool porcelain thing. And another thing that I
like to do is I like to make a version that's like
a mat, a matte white. So let's take the floor FETs, not the eyes, and
maybe not the nose, the lashes and the Snoop. See this globe here. So I'm going to tap that and we're going to make
this sort of rough. Let's tap the white here first. Bring this up to white. Then we'll just
up the roughness. Just so it's a
little bit glossy. Maybe something like that. The eyes, zero roughness, paint all the nose. Can be it can be rough. Put a little more
glossy than the skin, but not as glossy as the eyes. Okay, I think that
looks pretty good. The next thing that we'll do is just turn off all the lights. Because that's how
we're going to light as how we're going
to light this guy. Let's turn off, actually
he's gonna be gray, but I think it's better
to do the lighting first. Let's turn off all the lights. So I'm going here to shading and I'm turning off
the environment. So now it's completely black. We have a nice silhouette. And then we just add
the first light. Looks great. And let me save. As you can see, this was my
first time shaped saving. And I have to make a
note in the beginning of this to remind you to save after every video because
you don't want to crash. I think this looks
really, really cool. I love it. We rename this. This looks so cool. I love it so far. So I'll show you what I
do with all the lights. First of all, let's bring
this up to run shading. This is the light panel, these are our lights, and
here's the light options. So here you have the
color of the light. You can see it's
sort of grayish. And you can see that it
is a directional light. A directional light is
sort of like the sun. It's all encompassing. You have spotlight and
you have point light. But we're going to
use directional light for the first one. I usually like to
bring it up to white. And it doesn't matter
where you physically move the light doesn't make a difference for the
directional light. Well, it makes a difference
is moving things like this. So this just moves the
direction of the light, really fairly straightforward. So assisted direction
of the light. So I like to put it in a place where maybe something like this. I'm tempted to do
something really dramatic, but I don't think, I
don't think I need to. So maybe just something like this where it's sort
of coming down. But it has some
shadow over here. I like to have a shadow on one side because
then I'd like to put another light back here. So you have a dark
shadow and then you want a super light, rim, rim light here. So of course there's a couple
of ways you can do that. And also before we, before we move forward, I think we can go ahead and
change it to perspective. So I'm going to tap
this little menu here, this little icon. And from orthographic
we're gonna go to perspective. So
right now it's 25. I'm going to bring that down to ten is the lowest it can go, but I think I'll bring it to, you know what, I'll
keep it at ten for now. So now we're in perspective. And I'm going to save this. I'm going to save this view. So first let's go to our
picture thing and just get rid of the background,
the reference image. So let's tap reference image and then tap the camera
again, then add view. So let's just name
this one front. So now we have our view. We can go back and
forth when we need. So e.g. if I if I
move it around, I can just go here and
go to front again. And then we have our model. So let's quickly add
these other lights in. Let's go. Where's the light? See here? So we'll go to the shade,
this little light panel here. We'll add another light, and let's make this one. Let's go up to white. So same thing. This is our second light will tap on the color.
We'll make it white. And let's change
it to directional. So let's move this out a bit. And where's my
directional light? Sometimes, sometimes
if you can't see it, you just tap the light here
and you can just tap on that light and the
gizmo will show up. So now you can move, it. Can see the white area is
where the light is pointing. So to make it really easy, I'm just going to
turn it to its top, to the top view. So we want to move
this behind him. Now I'll turn it so
it's level with him. Then we can use the
green to turn it so it's on him like that. So I'm going to move it back. And now I'm going to
tap on the front view, just make that smaller. So now using the gizmo, I'm just going to move it around until it's exactly
how I want it. And how I want to is just I don't want the light
too much on the floor. I just want it mostly on him. See a slight bit
more behind him. You get that really nice light. Only problem is I don't
really get it on the ear. So you can go to the options, the light options you
can get to from here. These are the same options. You know why my, my
lights are disappearing. This COG light icons. That should be on
for you by default. Sometimes I go to this
COG and I turn them off. But let's just turn those on. The same options are here. This whole black window. So if you tap on each light, you have this little
black window. I tap on this, and
that's the same thing. These are the options. You can open up the cone angle so that makes the light wider. So maybe I can just
angle it up a little bit and I'll get the ear. I want to get that
year in there. Doesn't look like
it wants to show. Maybe if I open it really wide, I still don't get much ear. So maybe the ears
not going to happen. And that's okay. I'm okay with it. You can only do so
much with your lights. I think that looks good. So we'll only use two lights, but we also have
the environment. So the environment gives you essentially like
an ambient light. So we're back in the lighting and I'm just
going to tap environment. And then right now it's
way, it's super bright. So this is actually my own environment and
I'll include this. Obviously you can upload this, just hit the plus and then
find it in your photos. But as you can see, there's all of these environments as well. Oops, let's cancel. There's all of these as
well that you can use. And they all really give it a different look in
a different field. But I like to use, I
like to use this one, which is the one that
I was using, this one. But it's way too bright. So the exposure, you can turn down the ambient light
when you're seeing. I think something
like this is good. So once you have something
you're happy with, you can sort of do
a little bit of a kind of check it out
with post-process. Think it looks nice. Post-process, there's
a lot of options here. Ambient occlusion. Sometimes this can be
a little bit too much. And so you might want to play with the ambient
occlusion a little bit. See you kinda softens
that that blackness. So that's one thing that I
really pay attention to. For something like this. I keep these all on. My iPad Pro can handle it. I don't if you have an issue, these are some of the
things that you might not want to have on if
you're doing post-process? I don't really I don't I don't I've never
really turned them off, so I can't say how much
they affect things. But I just keep them
on. If he could keep more and just keep them on. Depth of field obviously changes the background
to be soft. We don't have much
of a background now. I'm just going to leave it off. Bloom. See how this is shining. When we do bloom and sees
his way less of a shine. So bloom is kinda like that. That ambient sort of like
shine that sort of glows. That's balloon. And that's pretty much,
that's pretty much it. You can play around
with the other ones, but we don't really
need anything else. So now let's just
give him some color. So let's rename snoop to body. Body will bring these up, bring the fetus down. So the body and the fetus, the nose, the lashes, the eyes, spring lashes above eyes and the flu or we can
leave up there, that's fine. So let's color, Let's save. First of all, let's
go ahead and save. And I like to save
a copy of this, so I'm just going to Save
As and then add a plus. I like to save a copy
of the version just white because I think
it looks really nice. So let's figure out how, what code we want to make him. Let's bring back our reference. So he's gray. Pretty simple. So we'll go here,
we'll go to gray. He can be a lighter gray. He can be like a little
bit of a blue or gray. Cool gray, which might be nice. I think I like that. Of course, he could
be like a warmer gray to do like a warm gray, but will make him a cooler gray. It's sort of it's
almost Halloween, will make him a cooler gray. So maybe something like that. And you can see that It's
fairly, it's fairly shiny. But we don't want
them to plastic you looking unless you do. But I wanted to up the roughness to maybe
something like that. Maybe even a little more. I like a little bit
of shine because I like it to look
like a 3D character. Maybe something,
maybe right there. We'll do pain all. And the balloon is a
little hot for me. There's two things I can
turn balloon down here. I could turn bloom down, or I could go to this light
and lower the intensity. Okay, So he looks pretty good. Feel free to, you know,
at this point in time. Check out some other colors. Maybe you want a darker, maybe you want to go through
and maybe make him a warm gray or brown or tan or even like
a crazy color. You can do whatever you want. I'm not judging. But once you have a
color that you like, you can go ahead and
tap on the feces. Let's grab this color. If you go to paint and you hold your finger over anything, it can be here, it can
be the background. Hold your finger over it
and it'll grab the color. So let's go to the
VDS. Tap here. Penal. Let's go to the nose. We'll call it the way we
want to make his nose. We want his nose to be pinkish, like a pinkish color? Or do we want his nose to
be closer to his skin tone? So painted his skin tone, but we'll make it darker. I think I like that better. And how we can tap
on the lashes. And I always make
those a matte black. I have it saved here. So if you have the color, like if you go to black and you go the roughness
all the way up. And then you can save it. You can just press the
Plus and it'll save. I'm gonna go here
and then paint all. Those are nice and black. They're supposed to be. And
he's pretty much colored. We can change the ground
to something else. Let's change the ground to
a dark just like a dark, navy blue or something. Grayish blue. He kinda
looks black and white. So next we'll come
back and we'll work on the eyes because I is going
to be a little bit tricky. So I think I'm going
to do a whole video just on the eyes. Probably not. Maybe I'll try to keep
them simple. I don't know. My brain is always
in 1 million places. But either way, we're going
to come back and continue working on our little
Halloween cat.
10. Scut Farkus: Alright, let's do some eyes. So do we want to make
the eyes yellow? So once you tap on the eyes, Let's work with layer. So I'm going to add a new layer. And I'm going to
name this one P1. Whoops, not p, q, p1,
like I always do. That just means pupil, one layer option is here. To add a new layer. You just hit Add
layer right here, P1. So this is our first layer. We can put the pupil
there, the base. That's the base. So that's the, right
now the base is white. So we're on base. Let's change that to yellow. And disregard didn't
topo I was trying out some stuff while you were
gone or while I was gone. So I'm just gonna go
ahead and turn that off. Pretend you never saw it. So we're on the I run the base. We want to go to our color here. Tap that. And you just want
to go to yellow. A nice rich yellow. Bring this up,
something like that. You want to bring
the roughness down, make it really shiny. Since it's the base
paid all looking good. Eyes are nice and yellow. Of course, you can adjust it if you want them
to be a little bit lighter than be a little
bit lighter, not as rich. And do that as well. I think it looks good.
It's a nice match. For pupils. For pupils will go back to our layer
and we'll go to P1. So that's gonna be pupils. So there's a few different
ways to do pupils. I think for this one we will. Let's, let's see, what
do we wanna do it? Okay, So this is the
way that I normally do. Eyes are round objects. So for the paint tool, tap on it and hit Clone. You can do paint circle. So now you have a new Paint tool on the bottom paint circle. So when you tap on it, oops. Okay, so just make sure
that the new circle, paint circle is selected. And then you can go up
here, not much here. Go to the next option. And now you're into
these settings. Surface. Fall off. You want to tap the fall off
and go to the straight line. Scroll down stroke type that you want to change that
to grab dynamic radius. And that's it. White square, nothing
else should be good. So now we go to eyes. Make sure again we're
on p1 symmetry. So then you can still
on the yellow color. So I'm just going to hit Undo. Even though you can't see it. I can't tell if I anyway, doesn't really
make a difference. So we're on P1 and l will change this to a black or whatever color you
want to make the eyes. But I like to go with
a nice glossy black. We can go like this. And I'm not sure what
happened to symmetry, but we'll turn it back on. And now it just
makes a nice sphere. Like so. You make the eyes as big
or as small as you want. I tend to like big eyes. I just think they're
really cute. But one thing to note
is when you do eyes, you want to, you want to lean
more towards the middle. Because when they're too much in the center, it looks crazy. So you want to lean towards
the middle, like this. And here's another
trick you can do. This circle is, is terrible. You can make it clear if
you were to sub-divide or voxel merge the actual, well. But if you go here, where is it? If you go to this little
grid and you go to den topo, then you enable it like this. Okay, so now we're in, we're still in our
Old Paint Tool. Let's go to the original
one, the regular one. Turn it on, so we have
our little diamond. So now dynamic topology is on same color as the
I were stolen P1. But if you zoom
in and go around, you'll see that
it's a lot clearer. So it's a lot clearer going around and you can
sort of clean it up. But here's another tip. You can go to the options and find the lazy
Rope Stabilizer. You could turn it
up a little bit. And that will hopefully make your lines a
little smoother. I think that's pretty good. It's not bad. If you find that it looks kinda weird or something looks messed up. You can just kinda go
over it and fix it up. So as you can see,
dynamic topology raised the eye to
be pretty high. And it still is. If you go really close, you can still see
it's a little bit has a little bit of artifacts. So you know what? Let's just erase that. And we'll take this AI
right now it's 12.2. So let's go ahead and
let's voxel remission. At 200, 200. We'll make it nice and solid. We can go ahead
and see what see, this is a weird thing
that happened here. Just go to the layer and
just merge that down. So now we don't have any more
layers is just the base. Now I'm going to hold
my finger over it, go to the Paint tool
and then hit panel. So essentially all I
did was painted yellow again by holding
my finger over it, grabbing that color, going
here and doing paint off. That's all I did. But if we go and
close so you can see that it's a lot smoother. So let's take black and
let's just do a little test. So if I take black, the glossy black, just
see how that looks. Let me make this
bigger. Okay, it still looks pretty good. Okay, so now our eyes are 52 k. Let's see how it looks
with dynamic topology. So now let's go back
to dynamic topology, will turn it on,
see how it looks. Make it smaller. It looks pretty
clean. However, it looks more clean if we don't, if we don't use
dynamic topology. So let's take this
eye and subdivided. We'll tie raise, sub-divide. Now the eye is 208 k. So now we just use
paint, no dynamic topology. And it's actually really smooth. If we make it small. It's about the same as it would look with dynamic topology, except for it's still glossy. It's not, it's not causing
it to kinda get weird. So the eye is big. It's a big size. So it all depends on
what you care about. If you want lower, if you want to lower vertices, a lower file size, then you want to probably
do it the opposite way. Or just maybe like live with an edge is being a bit blurry. But he wasn't really clean. Like if you're just
in it for the optics, for the image, then this
might be the way to go. So I'm just going to
keep it there because I like my mesh is clean. And I haven't figured out a
way to have the IB really, really low res and
still get it clear. So sometimes it's
what you have to do. So I'm gonna go
back to the circle, my new brush, the paint circle. And I'm going to go to
the layer, add a new one. So we have a new P1. You know, what's interesting
is I kinda have to go through that
sometimes with eyes because I forget what works best
every now and again. So sometimes I have to
just work through that and just figure out a
method of what works, what work, what works
best, and what looks best. You can see the eye is even, even just that is much
clearer than it was. Now you can just figure out
how big you want the eyes. And just remember what I said. Just sort of air on the, on the on the inside. But his eyes are quite big in the artwork. That's
maybe too big. I kinda like that,
but I just said I think I want them
a little smaller. I think something
like that is good. I can go back 1 million times, but we have this. So the only other option I kinda wanna show is let's turn off. P1 will add a new layer, p2. This is a little bit
more difficult to see. Let's if we hit straight,
straight is like that. But I did like the tail. So now I'm going to turn it so that the back of the tail shows. And I'm just going
to save this view. And we'll name it
three quarters. We're live with three Q because it's sort of a
three-quarter profile. But the eyes I'm
in paint circle. And let's say we want the eyes
to still be looking at us. Obviously we don't
want to use symmetry. So we'll just have
to do one-by-one. So something like
something like this. And I might have to go through sometimes IS can
be a bit tricky. So sometimes I have to
go through and adjust, but I think that
actually looks okay. So three Q these eyes
might be good for three. Q. So we'll keep it will
keep them there for now, because I think they
look pretty good. And I'm not going
to sharpen this up. I'm actually going to use smooth and make sure I'm on the eye. I'm actually going to just
smooth it out a little bit. Because I think that
looks better than when it's very jagged. The next thing I always do, we'll go back to the eye layer, add a layer, and then we'll
call this one shadow. I always add a shadow. And this one can be symmetrical. So we'll turn symmetry back on. We'll go to paint. Shiny black is fine
or glossy black. Now we're just going to
paint a nice shadow. You see how it's slowing up. That's because I
have post-process on and we can turn that off. You don't have to
you don't have to work with post-process on. I should have said you
can turn it off before. But now it's off. Sometimes. Sometimes I'm a little slow. So that's our shadow. But we'll go to the
layer and we'll, we'll take the layer
down to about 50%. So now we just have
that nice shadow there. I always have fun doing that. Yellow. He had yellow wise, so help me. Yellow.
11. Face Details: So here's another neat trick
that you might want to do. You can use with any
of your character work something that
I do all the time. Tap on the I. Go to your
layers and duplicate it. Change this one to eyelids. Now we have eyes and eyelids. So now we're on eyelids. Go to the layer, delete everything, delete,
delete, delete. So now go to the Paint tool. Paint. That way we can grab
the color of his skin. Alright, now tap the eye again, so you have to make sure
that you go to eyelids. So we're own eyes go to eyelids. What's your eyelids? Tap on the little
pain, severe pain. All should match. Should match this. So now, whoops, you notice I just tapped
it and then went back to eyes and make sure you're on eyelids. Go to your gizmo. Make it a little bit bigger. Something like that. You
could turn it on its side. Now, take trim. I like to use the rectangle. You can make a
rectangle like this. And boom. So then your cat
has lower eyelids. If you want them. You can do
the same thing with the top. You can use other shapes. It doesn't have to
be straight across. Things like that. You can also use drag if you
don't want it to be or move. If you don't want it to be
exactly straight across. You can sort of, you can
maneuver it, make this bigger. But you get it, you
know, you can maneuver it the way that you want it. I'll leave them street though. I'll leave them straight. And i'll I'll just I'll
just hide them for now. Oh, and somehow I noticed
that my shadow is not 50%. Not sure what happened there. I must have accidentally hit it. Okay, so another
thing that we can do is now we can darken
up the mouth. So let's tap on the body. Let's make a new layer. And we'll call this
one mouth crease. So now I'll go to paint. Tag this color which should
already be highlighted. I'll tap on it and
just go lower. Also going to bring
the roughness up. So now I just go
to my crease tool. So what I'm going
to tap this color. So now we're gonna decrease
with the darker color. I always looks amazing. Would've been nice to do
symmetry, but that's okay. So I just wanted to do
something like that. You can do it more straight
like him, but I kinda wanna, I always make my character
smiling at least a little bit. I think that looks pretty good. I'm just going to take smooth, lower the intensity and just smooth out a little bit of that. And then go to den topo again. So ten topo, dynamic topology. We can bring the color. Let's
go back to the paintbrush. So we'll select dynamic topology will take it off of a race. So now we're just
painting again, but we're using
dynamic topology. And let's see how it looks now. It's a lot smoother. Little lip looks a lot better. I think that looks good. The only thing that I'm
seeing is I might want the crease of the mouth
to mouth to be darker. So I'm gonna go to crease. I'm gonna make this even darker. Bring up the roughness. I'm going to use
dynamic topology, but with decreased tool. And I'm going to just see
if I can get this darker. Here we go. I like that. And we could also could also increase
going up if you want. I kinda like that, but I think I might want
not as much. That is dark. So I'll grab this color and I'll bring it
down a little bit. I might not even need
dynamic topology. Let's see what it
looks like without. So that's what it looks like
without dynamic topology. I actually think it looks fine. Let's see width, which is much more precise
with dynamic topology. Little smooth out,
never really heard. Alright, I'm really
happy with this so far. I think it looks great. But take your time. This stuff is like this stuff
is sort of tricky. You, this is the stuff that
you kinda have to figure out. But once you do it
just, it really, really helps. Moving forward. You know, all these little
details and how you do them. We can also add some little
nostrils for the nose. So let's grab this color.
Let's go to paint. Let's just grab this
color of the nose, will make it darker. I'll turn the roughness up. And now we can use crease again. So the nose should
still be maintaining its symmetry because we haven't. Did we move it? I guess we did. But I think it I think it should match. Yeah,
it looks good. So we can still use crease. And I think just like
a little bit like that I think goes a long
way with his little nose. Let's see. It was when I
went a little further away. Then I think I might like
it a little further away. Let's keep two.
There's some animals that have noses like
this. We know how is it? I think it's like bears. I think bears have
noses like that. You'd have to like,
really darken. So there's a lot of different
options you can do, but I do just like
using the crease. And we can just use, just do
a simple nose for r little, r little kitten, which
I think is cute enough. So there's another
detail that I always add to my animals and
cats especially. So I'm gonna go to the
body, add a new layer. And this is going
to be these little, these little, little
tips right here. I'm going to actually
get a Mexican to use dynamic typology.
I still have it on. I'm gonna grab this color. I'm gonna go to Paint,
make it darker. Let's see how that looks. Okay, that's not bad. So I'm gonna go to paint. You don't want to erase
or anything like that. And unfortunately, symmetry
is not going to work. Symmetry is not gonna be even. Otherwise. Lava raison. See symmetry is not
going to be even close, but it's not quite there. You can see it if I go like
this, It's not quite there. But that's okay. We're
using dynamic topology. We can turn symmetry off. So this is when just drawing
skills comes into it. So we kinda want it here, Something like that, then
we want to match it. It's kinda thing they can
be tricky without symmetry. I'm going to turn erase on
now and just clean these up. Make them a little sharper. Really a lot sharper. Okay, I think
that's pretty good. I can probably make this one a little
fatter than the side. I don t think anyone really noticed the symmetry difference that now I can take the
layer and lower the opacity. So it's not so. So poppy wanted to still sort
of mesh with his, his five. Okay, cool.
12. Final Touches: Thanks so far it's
looking pretty good. Let's take a look
with post-process. I think it looks great. Here's a few things
that you can do if you just want to jazz
it up a little bit. So the first thing
we're going to tap on the body and we go to the layers and just
add a new layer. And this can be, you can call it anything you want.
We'll call it design. So I'm in the body
at a layer design. I'm going to bring it down
so that it's lower than the mouth crease and
the digital layer. So now we'll go to paint. I'm going to grab the
color of his skin and we can go lighter. I'm going to turn den topo off. We don't need it. We
don't need it right now. Symmetries off because
symmetry is not going to work, right? So symmetries off. So now we can, we can give him sort of designs
that are unique to him. So let's say has, let's see, he has
some white here. You know, something,
something like that. It will cut off the
top a little bit. Something like that. You can also paint a little bit
on this little chin. You can do something like that. You can also, let's say he has some some animals have
like a spot over there. I maybe he has like a spot or some
sort of design reside. You can do that. Too aggressive with it. You can do something like that. You can give him a
little tuxedo thingy. I'm not sure what it's called. But tuxedo cats have it. So you can do
something like that. And then you can
Something like this. I would just go back to
smooth with zero intensity. You can just kinda
smooth out the edges. Make it look a
little more natural. You can do things like that. And of course you
can put like spots are things around his body. Again, if you want it to be
concise and very precise, you can, you can turn
on dynamic topology. If you wanted to give
them some sort of design is very precise. Just get close. You can give them some sort of design or something like that. Maybe we'll go pink. And you can always add a
new layer, add a new layer, bring it to the bottom, and
you can lower the opacity. So we use pink. We don't need den topo. You can just color inside his little ears
something like that. You can lower the
opacity of that layer, which is really, really
great about using layers. I'll go to my smooth brush with zero intensity and just smooth, just smooth this color out. Something like this. So
there's a lot you can do with your cat. You can put stripes on the tail. Let's go back up to our design. You can grab the
color of the tail and you can go a
little bit darker. You can put stripes on the tail, things like that. And you can use erase if you want to get it a
little bit more. Sort of like specific. Like this, you can just you can just sharpen it
up a little bit. He saw my ties, Tasmanian tiger, if you saw my thylacine, that's how I did the
stripes on his back. Just give them a little more
shape. Something like that. So there's a lot you can
do. A lot you can do. Last but not least, the only other things that
I might do to this cat is, again, grab the color of the skin and make it
a little bit darker. And I might just add another
layer and call it darker. I would only do this if I was sure that I wanted to
make it this color. Let's bring this underneath. So darker will be
all We underneath, right above the base. I also like to get it off erase, so we're just using regular
paint with a darker color. I like to just color in-between. Color parts that are like
shadows were shadows would be. So this might take some time
to sort of get used to. But all of these areas, maybe even a little in here. Maybe I'll lower the
opacity of that a little bit and just do
around the bottom. I think that's pretty good. Maybe around the bottom
of the paw as well. Maybe in a little Paul crevices. And we can actually
do the crease tool. If you want to make the pause
a little more prominent, you can do the crease tool, but I don't really know
if he if he needs it, then the tail would just do around the bottom of the tail. This is very similar to ambient occlusion
in where you're just dealing with
the small shadows and light bounces and
things like that. Like adding in a lot of these little shadows
and things like that. And then taking my blur, our Smooth tool with
zero intensity. Size is fine, little
bit bigger size. Just smoothing,
smoothing all this out so that it looks
like natural light, shadows, you know, like
light falling over, you know, skin and
things like that. I love adding details like this. I just think they
give it so much. You don't want to you
don't want to have to rely on post-process. I can actually turn it
off and continue this. It doesn't really
matter. But you don't want to rely
on post-process. Like you want it to
look as good as he, as good as it can get. You want to do all
the details, you can. Let's go back to the foot and just bring that
out a little bit. Okay, that looks
great. I'm liking it. Okay. I also wanted to change so many things
I always want to do. So I'm just going to chain,
this will be the last thing. I'm gonna do a new video
or we'll make some, will make the pumpkins. And we'll do the background and the moon and
stuff like that. I don't want to
tack it onto this because it'd be easier to just jump to a
new video that way, if someone wants to just make pumpkins, we can make pumpkins. I do want to adjust the
background color so we'll tap this little
picture icon here. Well first let's hide
the reference image. Let's see, I feel like we want
to make this like a darker it'd be like a darker
blue a darker blue color. Maybe even like an orange. That's kind of Halloween. I kinda like that. I've been making I've been
making my colors a bit more orangey lately. I'm noticing if we do
an orange like this, which I kind of like I might
do a purple version as well. You can actually change
this bright color this late to like an orange. That'll make it like blend into the his, his surroundings. Which is a cool thing
that I like to do. You can lower the exposure of the environment a little
bit more if you want. But there we have it. I think he looks
great. Hope you guys liked this, hope you
guys enjoyed it. And make sure you check out the new class that I'll
do with the pumpkin and the background and stuff
when we can really make a really great scene
for are located here. So this is basically just some extra that I wanted to
include in the class, but it's a little
too long to really actually put the whole
video in the class. This is just me working through doing some
different paintings on him, changing the lights up. Things that I love to do
after I finished the sculpt. And I just wanted to
include it to sort of give you some ideas of the vast array of designs and patterns that you can
make with your 3D scopes. Of course you can do
this with anything, but I always feel
like seeing something visually and seeing how I transformed the cat that we made into just a cat
with a costume on, with some face paint, some really interesting
colors and things like that. There's so much
you can do that I really felt that I needed to add this to the
end of this class. So hopefully, you
guys will just, hopefully it sparks
something that you can change the colors and make your own patterns and
make different shapes. Just change it to what you want. You can copy what I'm doing. If you want to see this in real time because this
is actually quite long. I think this is maybe
an hour of footage that I fast forwarded or sped up. So this is about an
hour of footage. If you want to see this
footage, Just let me know. I can make a video on
YouTube and just post it. The audio is not
obviously I'm not speaking or anything
while I'm doing this, but I'm more than happy
to post this footage on YouTube so you can
see what I'm doing. You can see how I'm
changing the color, isn't changing the lightings
and things like that. So that's it for this class. We'll see you in the next video. I'll just give a nice official. Goodbye. Nice official, thank you. And goodbye. I'll see you in
the next video. The outro.
13. Thank You!: So once again, thank you
all so much for being here. It's always a pleasure
to teach you guys. And I really, really love
seeing what you make. You guys are fantastic. Please be sure to rate
and review my class, but also upload your
projects to the projects and resources tab and
create project. Let me know in the comments or discussions if you
have any issues, please don't hesitate
to reach out. I'm more than happy to help. Don't forget that this is
part of a bigger class. So look out for the classes making the pumpkins backgrounds. We're going to have
more fun with 3D. We're going to have
lots of fun with 2D. Please keep posted, key posted. Keep an eye out for
the next glasses. They'll be coming soon. Be sure to check me out on
social media, instagram, TikTok, YouTube, all drug
per day, and also Facebook. There's some really great
Facebook resources for nomads, sculpt and procreate, including my own group procreate
tutorials and guidance. Alright, keep drawing,
keep sculpting seawall. In the next video.
 Dave Reed, 2D & 3D Illustrator - Brooklyn, NY