Transcripts
1. Introduction: In any art for mastering
the fundamentals are key to growing as an artist
wants, this is locked down. The canvas is yours to
deliver your message. Imovie, I'm a Senior Animator
in the video game industry, would have 18 years experience. I've worked on AAA titles such as heavily
soiled motor storm, apocalypse, Harry Potter,
the Born conspiracy, and a series of lego games. This class is very special to me as it brings back
memories for me when I was first learning animation and why the bouncing ball was
so important to learn. Whether you are a beginner
or seasoned professional. I believe we can all pick up something from each other
and learn something new. This class will cover
all the ingredients needed to understand the absolute fundamentals
animation is short and sweet
bite-sized lessons. We will cover the importance
of the bouncing ball. Simple bouncing ball exercises, weight, light in heavy
bouncing ball, hips. The concept as a bouncing ball. The motion trail points as the Belgian Blue ankles concept as advancing the risk
concept as about symbol, nose concept about the upper
torso in arm comparison. And at the end we will
conclude on our lessons. So come join me in this exciting introduction
to animation journey, and I look forward to seeing
you at the end of the class.
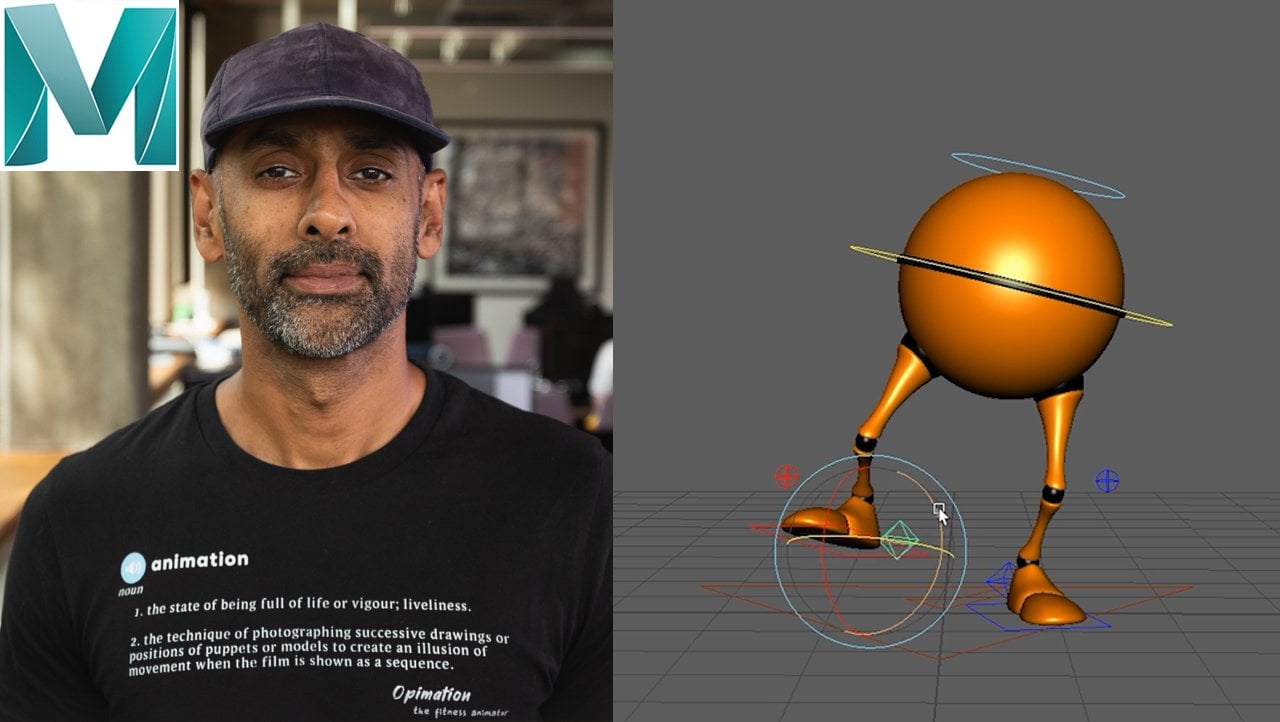
2. The Importance of The Bouncing Ball: All right guys, So welcome to the importance of
the bouncing ball. Why is it important? So again, I'm going to refer
to this to the hips. That's the main thing
on the lessons coming. You've got the
wrist, knows ankles, but the hip is the
most important. And if you look at my Fundamentals
course on Skillshare, it goes into more detail, but this is more of
an introductory. Why, why is important? E.g. the animation here
of the bouncing ball. Now, students will happens is a lot of the times
we can fall victim to moving the hips a lot and not figuring out why our animation isn't smooth, why
it isn't working. This is a central
group. The hips, everything drives from there. So e.g. if I want, I'm going to do,
it's going to copy this animation over to the hips. I'm going to select the
hips of the character, set a keyframe, y
translation, just paste. The same animation
will be on there. Right? Now what I'll do, I'll just come in here and
break the tangents. It's going to move
everything down. So it starts at the
same level as the ball. So it's just easier to make. Okay. So as you can see, when the hips are smooth
and then moving smoothly, everything because
moving smoothly. Now in student debt
is what I used to do is to put keyframe here. I'll add a keyframe there. Or let's make it
go higher there. And I just used to have
like all these keyframes. But you can see how if the hips, this example is to
show the hips are not organically moving
in nice curves. It affects everything that
is affecting the torso, middle torso, upper the head. Even though you've got
animation on that, like I could have nice
animation on the head. So I could just have
a keyframe here, a keyframe there, then
a keyframe back, right? But it's moving up and down, but the whole arc is
like shifting, right? Like the head is moving
forward, then back. Even though it's a smooth
animation going up and down, it's still because
their hips are messed up is
affecting everything. So what I just do,
what I normally do, I just delete all these
extra keys so you can see all the keys are there that are making
their own jaggedy. So if I delete that, you see the head stays
in the same place. Everything is smooth and nothing above the hips
has been affected. So that's the main, one of the main things
that we need to kind of grasp as early as possible for your animation
to start looking good. And the other thing
could be like, if you look at the trail, if you go to Edit Mode motion trail you see is
exactly going up and down. Right? Now what I could do is I
could have put a keyframe. I could make go up there. And then when it comes down, it goes that way. Make it start for you. So you just got that nice arcs. That's what we're looking for. Moving the hips around
even going forward. So we could, we could do
going forward. Same thing. We select the hips. Again, I'll just delete the
animation that we just had. Smooth arc can be
exactly the same. When I just unmute this. We can meet selected. Yeah. Okay. So say like e.g. you might be doing a walk. If I just delete
these animations, she could be doing a walk going forward like this animation. From here to here, we want the character
to go forward. This is moving forward and up. Obviously in a walk,
there is a high point, then there's a low point, then there's a high point, and there's even a
higher point, right? But anyway, that's just like a trajectory we're going for. And then it goes back down. You've got a bit of
a walk motion there. If you create editable
motion trail, you can see right here. We could have this
a bit forward. We're going to break down. And we could have this back. And then maybe that a bit
forward and then down. So you're getting
that arc, nice arc. That's the whole point of the bouncing ball
related to the hips. Now, the other thing we'll
be talking about later on is seeing the hips or the
bouncing ball in CG, basically. I'll explain in more
detail. But these dots that you're seeing, they are the bowel syndrome. In the old days, they
would literally just put the bouncing ball here. And they were, they were
just trapped the ball, the ball, the ball
track newborn. But really explained
in the other video, the ball is the point. That point is very crucial. This one, you can move up and down here, how you want as well. You can edit. We come back here. You can edit the curve and remove some very powerful
tools that you can use. This other advanced ones on the net that you
can check out too. But the actual
bouncing ball is dot, dot, dot, this dot. You want to make sure it's creating smooth arcs if they're, if they're too close, sometimes that can happen. You see, depending on the
animation might want that. But the general gist of this
lesson is this is how you relate the ball to the hips as the bouncing
ball to the hips. These dots are representing
the bouncing ball. That's all you need
to take from this and try and grasp that concept. And also, it's not
just in that axis. And then the top axis, when you walk, your
weight shift comes here. Then your weight shifts
staves like that. Then it comes back and then your weight shift
goes the other way, right? So ******* get there. Like that yet so
that you're also looking at a top view of
your trajectory as well, as well as the side view, as well as the side of you
who are in that dust, dust. The main essence of this lesson, you want to take the balancing the hip to the bouncing ball. And then when you start
animating stuff from the top, it won't, it won't really
get affected as much. So if I just do a quick key
frame like this going back, you will see that because the hips has moved,
everything else, you can start offsetting and breaking down as you're
doing the animation, which we'll go more into in the fundamentals
course on Skillshare, which you can check out as well. But that's the main
thing with the hips you, and really make sure the hips, those points are representing the bouncing ball and
you're tracking it, making your conscious of it. Again here. E.g. this is a
pose that point is oppose, that point as opposed, Opposed. Suppose that was opposed. You're posing your character
out at the same time. You're checking to
make sure you're conscious of the trajectory, of which way the
character is going. Forward, sideways up. You want to make sure
you're blocking that. That's awesome. Because when it comes
to refining later is much more easier than your body. Your character will be
unbalanced. You have to check it. Everything would pose as you're getting older,
good poses in. At the same time, you're making sure you're conscious
of the hips. Is it moving smoothly?
Is the arc nice? Is the weight in
the right place? Which way is the character
Balanced? Left or right leg. This body mechanics are all things that
you're thinking of. Slowly, slowly when you
keep doing the animation, this will become second nature. Is deposed readable,
is a silhouette. Good. Is it posed correctly? Like we said, is a weight on
the right side of the body. The balance right
between the center line. All of these things will
start coming into effect when you study more
and animation. When you go through,
you can go through my Fundamentals course and all the other courses
that go Scotia, they shared the same thing. Alright guys, so that's
the bouncing ball. In a nutshell, how it's
related to the hips. Remember those points are
representing the housing boom. I'll see you in the next lesson.
3. The Motion Trail Points as the Bouncing Ball: So here is an example. It's a bit more of a
complicated example, but not really if
you break it down. So think of the hips and the previous video lesson
as the bouncing ball. Like we said, this
is an animation which I did when
I was a student. Animation mental now are focused on the hips a lot
and I'll explain to you. What I mean by it is that pantomime
exercise I have to do. But what I'll do, I'll
just disliking this null. Alright? Now, what do I mean? With the hips? So let's
select the hips, right? And let's go to our favorite. Okay, now, what you see now, it looks very complicated, but it's really
the bouncing ball. That's all it is. So if you look up, look up
this the arcs in the top left, right there moving everywhere. Now this was like 12 years ago. So I can look, I
can already see, I can polish a bit
more like e.g. here on the character
comes up here. Okay? So please see a conflict that they will look. There's loads of places
here where I could add another ones like here.
See this is straight. Straight. So I could basically, I could add a curve which is
going more more like an arc, so little things like that. But I just like to give you
this example to show you. You can see where
the points are, where how the hips are working. They're all, it's all
over the place, right? And then it comes up here. Because unlike arc
going up here, this arc here, I wanted it to go down and then up and
then come around. And then up here, you're
holding the pose. So you can see the
pose here being held. All this food Select, select. The hip controller. You can see right here, that's where the
character has been held. C has been held like a curve. And you can reduce
it as much as you want or make it
high as you want. So he's always got a
little movie house. So when we play it, you can see like the hip
trajectory is going everywhere. Down, up does a good,
a good example. So if you'd like to
see at the end here, he's looking, he's
looking at the telescope. And then comes, this
is a big arc here. So you can see point, point, point, point, point, point here. A point here. I could, I could bring
this down a bit more if I wanted to quit moving up. When I get here, maybe I
could move it forward a bit. But if I moved it forward, this leg was locking out. So that's why I didn't but
then I can always compensate for that by moving the leg. So I could get more
smooth arc there. Sometimes you can go in-between this and create another
to make it more smooth. I see this. I was learning back then. So, but again, you can
create smoother arcs. And then here you could
bring it down a bit. Are, you could bring that out
a bit to create more arcs. And then it comes back down, and then it goes back up. Here. I know it looks a
bit complicated, but it's not really, it's just like you can see. The other place. The other
thing I would say is to 17. So if we go to 217, we look here sticking out
so we can bring that in, bring it in, and it
creates a cleaner arc. We can bring that in. The
reason I didn't do it this way because my camera was fixed. So I made everything look perfect the way
the camera was fixed. That's the one thing
with 2D. You can just polish it exactly. Even though you
should look at all the other angles as well. Which is good practice. But if you've got
a fixed camera, it's good to animate to that
and make sure it's polished. Maximum to that view. Because all you're gonna see,
but in games is different. You have to do freely
because in a 3D world, you have to make sure
that poses working with all freely angles. But dust. That's how you
use the motion trail. This is what the lesson is
about the motion trail. And we want to use that
to track the dots, which are like we said
in the previous lesson, the bouncing ball and seen some scenes can be
like this as complex, but what you do, you break
it down into sections. First section, I want to plan the analyst idea is suppose this is going
to be like this. Trajectory is going
to be like this. Then you move into the
next section, section, section as at a time, sorry, section at a time. And then you can go back and start polishing
section at a time. You can do it, then you can
redo it over all paths. So this video lesson is
more to do with just showing you a more
complex movement. While I will say, I
wouldn't even say complex, I would say more
more happening in a scene and don't
let it overwhelm. You just work in little
sections at a time. You block everything out. When you're blocking
everything out, you're thinking about
all these things. If thinking about how is the
hips moving generally first, then what I did was I block
this out generally, dan, I refined it more
and more potent in breakdowns, more
and more in-between. But this is an overall
just to let you know about the motion
trail to and how it's used and how it's so
important when it comes to just tracking your arcs and breaking down your animation even more to get
nice smooth arcs. Okay guys, I hope you enjoyed that and I'll see
you in the next lesson.
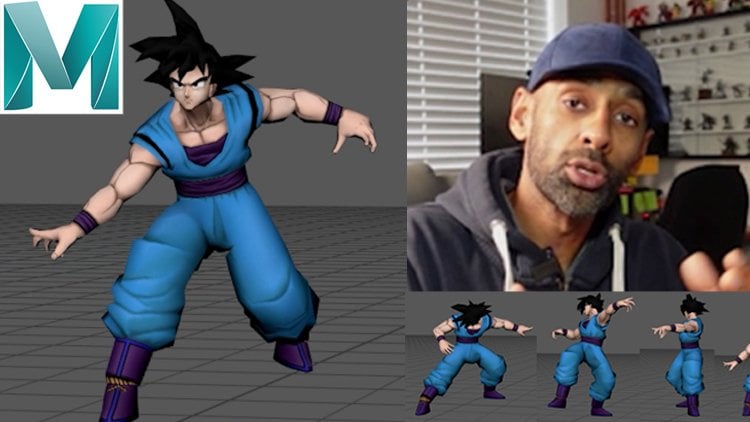
4. Simple Bouncing Ball Exercise: Welcome back to the next lesson. If you want to know
more about Maya, go check out my Maya
Fundamentals course. It goes into more
depth about Maya and you know how to use the
graph or what have you. Then you can come back to this class and then
do the animations. Or you can come along with me
because these are gonna be quick fire just to show you
how to do about symbol. So e.g. let's check this out. We've got a bouncing ball when literally just going to
select this control here. Just to show you how quickest the bouncing ball
do a keyframe here, go to the end, 24 keyframe. And all you're doing, you're gonna go to
middle, say 12th. Actually, let's make this 00. I will just shift,
click, move this back. Go to 12, and we're just
moving the ball up. And all we're gonna do
now is we're going to go into the graph
editor, select the Y. We can go to curves
weighted, weighted. Then we can go to break, will break in them.
So we've got control. And then we're just
moving these handles up. We're going to create more of hang time in the
air by moving this up. So spacing, we're playing
with the spacing here. And now if we play
the animation, there'll be like a
bouncing ball animation. And it's as simple as that. And then now, if you
really want to refine it more and get
your graph editor, you can have, you can even
move it, make it higher. Then with these, you
can even have it more sharper the way
it bounces down. So you can see here
you're getting more of a sharper balance. You can bring it down
lower, higher as well. You can give it more
hang time if you want. Because it's a lighter ball. That's got more time. India was a heavier ball, will have less time in the air. So in a nutshell, that's how you do a bouncing
ball, simple exercise. Next video we'll cover. We'll do a bouncing
ball going forward. Heavy one and a
light one will edit both of them in the
same, same scene. Okay, so in a
nutshell, the graph, That's how you do the
bouncing ball with the gravity and keyframes. I'll see you in the next video.
5. Weight Exercise Light and Heavy Ball: All right guys, we're
going to do bouncing ball. So we're gonna do, we're
gonna do a light one first. Lift this ball up. We'll just have it on the
edge here. Like this. You can have it rolling, but we'll just do it
like this for now. Okay, quick way. I'm gonna do this to show you is come here in
the graph editor. And let's say at the end
we want the ball to end. Let's have this a light one. Yes, it's going to end
around maybe here. Just e.g. say, so we'll just do a zero in the y here so we know
it's on the ground. Okay, so now what we
wanna do want to go, let's say every four
frames key, key, key. Okay, every four frames, yes, I will bring that to 28.
So let's have a look. Okay, now we want to make sure the forward direction
is constant so we can delete
everything in-between. Go to linear here, so it's
going constantly, right? No 0s. Ease in, ease out. Okay? And then we're going
to look at the why, what we wanna do at the start. We obviously want it at the top. Around here. Yeah, so let's check this out. Let's just put it there. Now we know the next
keyframe is gonna be down. So we're going to zero that
the bouncing ball exercise we did up and down. So literally just gonna
get every other frame. Move it up. That dialog. Actually, we can delete that N1, so we're going to
have two bounces. I reckon, 24, which is fine. For everything. Delete that back. Bring press Shift
and middle button. You can bring it back so it's all straight in line like
this. Actually, sorry. No, we want it on
the one on 24, 20. Yeah. Okay. Let's bring it back. Shift, middle click and shift. If you do middle-class
shift, it brings it back. Normally you want to
go in here and do it. You should really do it in here. Let's go back. So that keyframe.
So what we'll do, we'll go to 30 here. So we've got 28 there. We'll bring that back to 24. Does how we should do
it. Even even to 20. Yeah, because look, it's
all same timing there. Alright, so what we'll do, we'll do 20.20 here. Now let's check out the timing. Okay, that's pretty quick. So what we'll do 25 will just grab everything
and move it to 25. Snap. That's better. Yeah,
we'll leave it at that. Okay, 25. 25 because the light ball, now what we're doing,
remember we now get the way. We'll make sure
this is all zeros. We'll do, we'll
select everything, go to curves, weighted tangents. And then we're going
to break here. Now, this is gonna
give us control. So we want our ball
to have a big impact. So again, like in the
bouncing ball exercise, we're bringing these curves
up to give us that bounce, sharp pounds and a
bit more hang time in the air because it's a lighter
blue light or an object. We want to move
this tip forward to hear because that's where
the ball is going to fall. So we've got a little bounce
happening there now, right? Okay. You're happy with it
for enough what we can do, you can carry on, but I'm thinking maybe just move it up and
maybe a bit more time. Okay. Okay. So you've got a bit of a light bolder and then we can come in here
and just move it forward. That's all we wanna
do is add axes. Want to just keep
moving it forward. It doesn't intersect,
which is fine. Then we get the
inner control here. And all we're gonna do
is just go forward. And then we'll just start
rotating straight ahead. Then as the ball
hits the ground, rotate has the ball comes
in the air and the apex. Rotate. As it comes down, rotate, as it comes up, apex, rotate and then down, rotate. So we just want
to get an idea of the rotation, see how it feels. Now we can go into
our graph editor, kept that control
and have a look. Now, let's see if we delete
this all and make it linear. Our data's fill. See, that? Feels pretty cool. If you want to control that, all you need to do is
select that end keyframe, press Shift middle button,
and go up and down. Does that feel too slow? Is that like if we do
it really extreme, that's really fast,
that I look at that, that doesn't go with
the timing, right? So what we can do, we can play around, that's
a powerful thing with Maya. Then you can move it back
a bit too quick too. So if we move it back,
that feels good. Maybe a little bit more. So if we look at
that bouncing ball, you can see that's
the light board. Right? Now. We want a heavy ball. All we do. All we need to do now this is
exercise on timing, right? So we select the whole ball and then we can move
it back to say 20, or we can keep it. Now, what we'll do, we'll keep this the same. The only thing we'll do
is recall to select. Now with the heavy ball. We know from a big drop, it's not going to
bounce that much. So we've reduced the
hang time because the heavy ball is
not going to be in the air for a long time, right? So it makes sense that
the handcuffed and then we want to make sure it's not going to
bounce as much either. So we want to make
sure the balance is not as high either. So let's try and
make the trajectory. So that is not going
to bounce too much. Hang time isn't that much. If we look now. Now the
other thing we need to do is the distance is not
gonna be as my TV. So we could close
the distance to OK. And now we know we can
bring these down a lot more to go in a bit more. Closer. Into the graph editor, you
can really refine each. Press F to go in closer. And then we can really start bringing these down
as well. Okay. So we bring it down,
bring it down here. And it's just a matter of
going back and having a look. So if we look back now
and also the rotation, the rotation is not going
to rotate that much either. Then it's just a matter of
playing with the timing. But you can see just from, so even here, we
can do is delete. Just move it forward a bit. Is it intersecting? Move it forward a bit. So it's just touching the lead.
That's not what you want. Really. Want this to just be
rolling off the ledge. That's me. That's fine. We could even start
moving this back. I even think there's too
much hang time there, so we can bring that down. I think that's too high as well. Bring that really try
and make it heavy. I would even say
it's more like you can bring it down more like that. If we look now, I would even what I would do is even get this
timing more closer. 21. Yeah. Yeah. That feels a bit more. Maybe a little bit of
hang time, not too much. Maybe that was a bit
too acute angle, but let's check this. I'll also what we
can do is select everything and think, alright, maybe I could bring
this back a frame, this timing to 20. Yeah. It's just a matter of
playing with the timing. And you can see, you can see by that it's much heavier because we made the
distance shorter. And it's instant comes down
and then it's a short bounce. And we've squeezed
the timing as well. And we've made the hang
time less as well. So this is a really
quick way of editing an existing bouncing ball to
a light one and a heavy one, just a little example. And then you can go into
the graph editor and just refine it more and more. These exercises are
really important because we're going to think of this bouncing ball
as the main character. A big guy, He's jumping
or big woman is jumping. You know, how's it? How's the hips can react to it? It's going to react like this. This is going to add more
weight to your character. Was it gonna be liked
skipping in the air? So that's why the
bouncing ball is very critical to understand, very critical to just really grasp that
concept because it will be the thing that
we're thinking about a lot all the time when
you're animating. All right guys, I'll see you in the next lesson in
the next video.
6. Hips as the bouncing Ball: All right guys, welcome
back to this lesson. This lesson, it pretty much goes over what we were talking
about in the other lessons, the bouncing ball as the hips. But this is just going
to hone in a bit more on how to use that concept
in movements all over. Just not just the bouncing ball, but as in the hips, we're going to concentrate,
concentrate all, and then we'll do more examples
on the wrist and ankle. So this is an example of an animation that
I did when I was at school, animation mentor. So it's basically
a weight exercise. And you can see the hips are
all moving quite smoothly. This was about 12 years ago, so I'm looking now, I could probably
polish the buildings, but what I wanted to show you was when you select
the hips here. And again, we go to
our famous tool, visualized editable
motion trail. Now you'll see a
trajectory here. This is basically how
the hips are moving. Now when I look now
seems or I could just move a few curves
are a bit more. So it's more rounded. But this is the
overall trajectory. So we'll go to, and it's
fixed to this camera. So this was like I was dedicated in every
art to this camera. You can see how it all works. So if we come to perspective, we write the character comes
out of the scene. Lands. Just get rid of everything. Show polygons or NURBS, curves. To say, get this right. Motion carries, Okay. Now if you look
actually if I go back, let me just select the hips again and then get rid
of NURBS surfaces. Keep that in there. Okay. So we look at the
hips, how it's moving. The character comes up and
we're looking at these dots. Look at the dots. You see all these dots, 23, 24. So I'm going right
in and I'm trying to polish the curves. The curves don't have
to be like this. There could be really
small, narrow, but you're getting a
nice curves inside. These are the type
of details when you go in and start
polishing your work. This is what's going to really refine the movement in the hips. So it's not all jittery
because sometimes, like I've mentioned before, as students we can end up doing, we end up doing a
lot of just random. Moving up the hips like
baby, jittery, right? The zigzaggy like jittery. Then it really messes
up everything. So if we look here, if we
go back and we play it, there's all that movement
you can see right there. You see the head
going pulled back. So it's all a little
jittery stuff that happens. So if I just undo
that, that will happen when you start first
our animation, you're wondering
what's happening. That's because we
really need to think about each pose clearly, what it's doing and not moving
stuff for the sake of it. Really concentrate on this pose, that pose, the hip, the trajectory of the
hips, how's it going? Then you will start seeing the animation get
more cleaner because you're conscious about the
arcs and the flow of the hips, which is really important. That's one thing to just really think about when you're
even learning animation. Now, I can bring this back here. Even though this line here. If I look here and I go back, I could even add a little curve like this when you go
back in just to give it a bit more of a nice transition C. And you see I've got
killed on every frame, but it won't matter because
the arc is nice. Going back. So it's coming up like this, up. And then maybe in-between
here are couple. Alright, I want the arc
to be coming back a bit. And then you go in-between that. Then you try to add another arc because look now it's
getting smoother, right? So you don't have to do
this to all the keys, but if it's like one area, so then you can go
back when you've added the key and you can be, alright, That's a
nicer arc coming in. And then this one, you
could bring it down. And then here in-between, because it's linear, you
might not want to linear, you might want the arc to
still be a bit smoother. So now you're seeing this
smooth arc and then you can move this out to quite nice arc like
that coming back. And then here you've
got these streets want, you could even go in
the middle of this one. And you can add an arc here. And then have a look. You can go back and have
a look at your animation. That's the kind of
stuff you wanna do. And then obviously you've got big movements like this
last subtle movements. But then you've got big
movements that are here, which are showing, look
at the points here. If I just wireframe, this might be there. So if you go down and
look at all the points, is hitting all these
points, the arcs. And then from here to
here we see it as a jump. And then there's a
nice arc winding up. So you can see it here
is the overshoot. And then it comes
down and then back. So there's all that's all
it is is just a arcs. Arcs. And then you got small arcs. That's all you're looking
for does this is this normally comes when you're
polishing right at the end, but you're thinking about
this at the start as well when you're blocking
or your animation. Because you're thinking, Oh, the trajectory of the
whole character as well, and the arc of the character, which you'll see more of that in detail on my
Fundamentals course. But this is a breakdown
of a simple breakdown of when you're
starting animation. It will give you a bit
of a headstart to know these are aware of these things
that we have to look at, the arcs of the hips, we have to make sure
everything's moving correctly, smoothly. And this will help you
progress more quickly. So this is very, I found this very important. I wish I'd known that
when I learned animation, when I first started, I
was never taught this. So that's why I would like
to stress this a lot more. Because if you're styling
animation journey, you can grasp this concept of
the hips moving correctly. Planning to move the arcs
are nice and smoothly. That will help you a
lot moving forward, okay, to really try
and grasp that. And we'll do an exercise
for this as well, which I'll show you
what you can just practice on creating arcs. So we'll talk about
that as well. And I'll show you
some quick exercises on that as well that you can do. And I'll show you that
in the next video.
7. Arc Exercises: All right, my friends,
so quick exercise. Now imagine the bouncing
ball as the hips. What we're gonna do a
quick exercise is figure eights, zeros round wherever. Yeah. So normally the hips, they always move up in a in a nice flow when
you're walking or when you're doing a game, there's always a kind of round, nice, round little
curves going on. Orders, failure rates as well. Coming back when you're
doing like combat idols, there's always this
kind of movement. These are known as Blue Ox. So when you get the root of the movement working correctly, then you can work from the
up and the down of the body. So this is a good
exercise to do just to, just to practice arcs. So while normally
do is when I would start when I first
add animation. So I put a keyframe here. And I put a keyframe
at the end, right? And then in the
middle, I'd go up. So you've got this kind of up, down, up, down like a
bouncing ball right? Now you might be like, alright, When I come here to number ten, I'm just going to move
it out to the left. As it comes down. Number 30, I want to
move it to the right. And then you've got this nice little arc that you're
working with right? Now. What we'll do here, this is
just a little practice I do. I'll just go to cycle, cycle. So you're cycling on this side and recycling
infinity on the other side. And then, because
in video games we do this a lot where if
you look when you cycle, you can see these events
happening at the end. And I mentioned this
on some of my courses. The video against
courses is to match the tangents like this.
So it's matching. So this basically what it does, it is cycle smoothly
to the smooth, but it won't be like a
slow if I undo this. If I can undo it, yeah. Now if you look at
the animation here, when it comes down,
is a bit of ease and a pause there at the
bottom, isn't it? Now what you do if you
just make this linear, like smooth does move. And that's okay. So
we've got animation on Z and Y, That's it. Now, you notice this
mover That's tasks, what that does, the cycle. So it's very important,
That's my run cycles is very important to know that
in run cycles and idols. Because when you
come to the end of your idol in a video game, you don't want to see that jerk because that will catch the eye. Players would see that
this is always good to keep everything
seamless. That's a must. It's just have to
do as a formality. Now, we've done this
animation here. Now what should we do?
Let's go back to our tool. And you can see that right now. We can do, you can just go
in and edit if you want. Just have these the same. Even like the distance here. You could have that the same. So that's your typical arc. So you would have
that in the hips luck expanded the last video. Now, you can also
change this right? So you can deselect everything. Not sure you can scale it, but you can either. I normally do it in
the graph editor. So if I come here, I
believe this outcome. So if I just bring this down, if I look at the movement, side-to-side movement, where you can do is you can go to Z. You can actually select
European peasant. Okay? It's selecting everything.
Why is that happening? That should be
happening. Because I had the curve selected as well. Okay. I had the points selected.
That's why that was happening. So unselect, Select the
actual main controller. What I would do if
you want to scale, decide Besides bit,
make it go smaller. So the semicircle smaller. All you do is you go to select all the points,
go to the first bay, press Shift and middle button and scale it
from that first point. If you scale it from, if I scale it from the top, it's going to scale
upward from that point. So you want to go
from the origin zero, but just put your
cursor there and then press Shift middle
button and scale. And if you look now, you
see how that's changed. You can see in real time, right? So if I scale it back up, look at as changing
the blue bit. So you can have subtle curves that are like this. Really thin. Idols, walk, combine ideas. What have you, whatever,
wherever it is. And you can also be like, Okay, maybe you want the top
bit to be scaled down. This smaller arcs like this. Then you can start doing
your breathing exercises from the top or bottom down. And then you can practice all
kinds of different curves. So then what we can do
is we can go back here, delete everything,
will go to zero. Let's delete everything. And then Explorer, you can dilute the motion trail
that you've created. So it will look
clean scene again. And everything is zeroed. And what you can
do now is you can practice different arcs
so we can do that, okay? One is there at five, I want it to be figure-eight. So we might want it up here. Keyframe nine. We want it down. So we'll just quickly do this. And then here, we'll
just put in all these, let's just put in
all these poses. Then we can fix it later. Coming back here. And then the end
pose is here, right? So you've got this kind
of messy at the moment. But what we'll do, we'll just go into the visualize
tool again. And we can see
here, there's this. It's not exactly a figure eight. But we can start
playing with this now. We can go through all the
keyframes we just went through. And go in and be like, okay, we want this to be in the
middle coming up here. So we're trying to
make a figure eight. Then push this back. Push this up to just trying to get a figure eight going here. This would be in the middle. And then this can be
like around here. And then the start pose, we can bring that
down, and then we can copy that to the stock. And then we can bring this in. Okay. Still it just refining middle. I would even say this middle
one. Bring this back a bit. We've got one, we've got 123. Guess we can move this one here. So we've got, we've
got five points. So maybe we need
another point in here. We've got equal
points both ways. Okay, So you've got a
little arc there happening. We look here, put that 0040. Okay, so we'll just
move this back. Just put this on
on falls, right? All of these unfolds. Let's just move all
these keyframes. Hit in fours. And that's hitting four is like, Yeah, okay, that's cool. Now what we can do,
we can go in here. So if we delete
these middle ones, will start to just
make things a bit more smoother than even
here. We look here. Just so I could use. So the cycling. Then
we can be like, okay, we kept this
value to this value. Copy, we can copy these over. We're copying this value here because at the
low end to this value. So the same also with the top. If we look here,
this is what, no, 0.3, we copy that,
bring it here. And then slowly, slowly
digested the top end, no, 0.5. So we would say this
one, copy it there. Same head, this one.
Copy that over here, just copying the values
that all you're doing. Then you can supply in this as well by pressing this line. Makes with the tangents
are smooth as well. And then slowly,
slowly you will see the curve getting more
smoother as well. See the circle here. And it's like a figure eight. Then you can just
refine how you like. But these are just little
exercises you can do. And that's how you got to think
of the hips and the body. And then we move on
to the upper torso. We start talking about that,
how that connects to it. You can start animating that. But the main cog, central
gravity is the hip. So this ball, the ball, but
it's actually this point, luckily with stress is this point that you're
looking at in Maya, even when you do this
in the transform. So if I get rid of the handle, whenever you are transforming, you're looking at
this point right in the middle when
you're polishing? Not the overall ball. I used to be confused
with the overall ball. You can see the hips
or the overall ball. But if you can master that
polishing that point, when it comes to
polishing animation, you will see a lot
more of your work really polished with
all the good poses in. And then at the end, you
start polishing orders. Alright guys, so this is just an exercise that you guys can do. Rigs in the description
and everything, or you can use your own rig. You can use a character rig, just hide everything in this. Use the hips if you like. But I think the balls
are good way over. And then when you make it, I was going to show you
actually, when you do it. Again, when you do that, you're like, okay, I
want it to be thinner. So then you select everything. Again, go to the
first point here, select it, press Shift middle
button and R for scale. Same, same way as you
would put scale here. Prescott rotation. So again, you go back,
select everything, wrote R for rotation, scale, then shift
middle, mouse button. Say you can bring it, you can have your curves even
smooth, subtle like this. Now what do I mean?
What do I mean about like the idol here? Well, let me show you.
There is an example here. Okay, guys, so does
the power you have. And then when you go to this, you can scale the z2 and it will bring it sometimes
you want on the spot. But it's still the
same. Moving to say. So do these exercises
and then go back in and scale how you'd like. Just really get used to this. And then you can start
applying these to your models, which we'll see later on in the courses as
well in this class. Sorry. Okay guys, I'll see you
in the next lesson.
8. The Upper Torso and The Arm As The Pendulum: All right guys, welcome back. So this is an example
of syrup I've animated. This is a pendulum. So we talked about the hips being
the bouncing ball. And now we're going to animate the hips and then see
what the upper body does. And the example we're going to use is this pendulum
model we've got here. So you can see this
simple model is called face on it.
Really cool model. So I'm gonna play this, I've animated to it, but check
out the animation on this. The roots moving first. And then when it stops,
it follows right. Now what I've done,
I've flipped. The pendulum is
normally the other way round from the heavy
from the top-down. Flipped it because I want you
to think this as the hips. This is the hips. The face
just turned upside down. And then this is the spline, a spine or heat
splines planning. These are all the vertebrates basically there's three of them, is, most ribs are very simple. Myers-briggs will have three or four controls in the upper body, which is standard nowadays. Really think about this like the main center of
gravity is moving first. And look how this is being
dragged back now, right? So this graph has been dragged
back and when it stops, then there's the dragon settled movement
that's happening. That's basically in a nutshell. That's what you're doing
with your upper body. All you're doing
in the front seat. In the front, it might be
going this way as well. Same thing. It's just
going on a different axis. That's all it is. But this side is
just an example to show you breaking it down. Now what I've done,
I've applied this to the model and I'll be
showing that too if I just unhide the ok. Now if you look at
this now, same thing. This is the root
and these areas, these bind controls here. And the head that's controlling, That's basically
these controls here. Just copy the
animation over an IP. Have a look. What I'll do. I need to do is unmute
everyone first for Kami. Unmute selected and
this one as well. Yeah. Okay. So if you look now, it's exactly the same
thing I'm doing. And you've got the
overlap as well because I offset the keys. So that's basically
this example is just to show the root and the spine, how it's connected
to the pendulum, how we can simplify the understanding of
how the body works. It's really simple when
you break it down. So that's what we're
trying to do with these examples is breaking down how the body works. Like an animation. We talked about
simple shapes also. This is very simple controls. That's all you're
doing. And all I did was I animated these. If I select all of
these controls here, I literally just, if you could see in
the graph editor here, I animated up to the point
where it's going to stop. Then there was so animated it just rotating back to the point where
I'm going to stop. Where I stopped, I just
animate it forward. And then going back, they
were all on the same frame. All I did was go to each each of the axes and just offset
by one frame to frame, see what happens one
after the other. That's how you get that
kind of drag an overlap, but I did it on
the head as well. The head is offset as well. So then it stops lost. You can see there this
is just a video to show the understanding of
the spine and the pendulum. And then now we will
also show you the arm. I'll show you the arm as
well how that relates. But we're going to rotate
the pendulum around. So what we'll do, we'll
just rotate this around. So we'll just go ahead and zero that also zero the y, so
we're bringing it down. That's how the pendulum
normally is, right. And we're rotating
it the wrong way, so we'll just flip
it the other way. So what I'll do, I'll get these. All I'm gonna do here now, you'll see a select all the y's. I'm literally just slacker. I finish pass. All. Again, go to the store here and just flip it
the other way round. Like that. Hopefully this should work now. So you see, that's how
quickly you can edit it. What we'll do here is we'll
just delete everything here. Again, we'll come in here. We'll just delete everything. And then keyframe at the start. And then what I'll do here, I'll get rid of the head. Okay, so now what
we're doing here, again, we just copy this. So we'll copy all
this animation. Edit, copy. And we're going to do the
same thing for the arms. So we'll come in and
just edit, paste. So we've got the animation. Well, we should have
had the animation, but it's not on there. What happened there? Is it muted? It's not muted, is it will do. Okay. We'll do that again because
I know I'll copy this. Copy. Go to this and paste it there, okay, but we need to bring it back here
as well we wanted. Alright, so this arm is
moving now to right. You can see now why is this 124? That's why. And I know we're going
to do same as last time. We don't really need
that one actually. We can hide that. So if we select all
of these controls, again, go to the
rotation y here. Select everything. Go to Copy, make sure your time
is at zero copy. And then literally just going to select these controls here. Keep keyframe at the start. We just want to see the
axis here like what axis? Okay, So we know is y. That's cool. So if we go to y,
it should copy and paste the animations and
then we'll just cycle this. Yet see is again the same
example we're using. Then you can obviously animate right down to the
fingers if you'd like. But that's overall. The difference in this
one is the armies. The root is at the top. So imagine that as the hips
and this is the spine. And this is the lowest point. Exactly the same concept, but with the hips going up, the pendulum was
reversed going up. So this is, these
are the key things. And the same thing with legs. You've got your legs up here. When you didn't IK normally, sorry, when you didn't f
k, you will have those. It will be like this bleeding. Ik obviously it's like
you're pulling or pushing. Legs are normal IK you will use inverse kinematics
and forward kinematics. You can learn a lot more about that on my foundation's course, the different types of ways
we can switch our controls, the inverse and
forward kinematics. It goes into much more depth, but it's exactly the same thing. So these are the main key. So if we break the
body down into simple bits like this,
easier to understand. So that's, that's in a nutshell. How you need to think
about was one way of helping you think about the
body parts in simple forms. The shoulder top areas that
work in this way down. This is going to
drive the motion than the elbow is going
to follow than the rest. It will make your
animation more organic as well and natural. That's
what you're looking for. And always come back to
the pendulum for that and for the hips is just reversing the pendulum
from the bottom-up. You can keep it this way for
the bottom down to the legs. Are our guys a simple
get your models. You can find the links for these models and just
practice this stuff. Just get the pendulum,
move it around. Move the controls will below around and just enjoy practicing
these kinds of things, even this exercise
that you can practice. Okay guys, I'll see you
in the next lesson.
9. Ankles as the Bouncing Ball: Okay guys, in this
simple example, I'm going to show you
how to track the ankles. Ok, So quickly what we'll do, we'll just set this to zero. Select the foot, go back, say, go back to units, keyframe that go to 24, go to minus two keyframe
that will Turkey. And in the middle,
we'll just bring it up. So now we'll bring it up. But then at the end, we
need to make that zero. Okay, so if we look now,
we've got this happening. Now with the control selected. Go to animation, great
editable motion trail. And there you go. You see the track is
a track in the ankle. If you notice, remember
we talked about the vowel symbol
is not literally, you're not literally
going go decibel. Decibel, decibel
is these points. That's all. We'll look at that. I mean, that looks
like a ball, right? Dot, dot, dot. That's the bouncing ball. And thus what it's tracking, that's what you
need to make sure the curves are
really fine tuned. Even a top view, top view here. The leg but becoming out there. So you might want to
move it out the leg. And then obviously at the end, not one to zero that back in. So as you walk in as arc, an arc that happens as well. But those are kind of
is a simple example. I mean, these arcs
could be crazy. There could be going
all over the place. I mean, we could have
we could have like an in-between a where the
art comes up here. And then here, it goes down. And then it comes. You've got, but you still got a nice arc, but it's going up and down. Let them it forward a bit. So these could be
everywhere and it could be going in different directions. So it could be more like this. And then out more.
Then coming in. We will now we could add another in-between hair to
smooth things out. So as you can see in all
freely, these nice arcs. Obviously it's an
example of an animation, but this just to show
the different angles, you can look at
the arcs as well. And that's just a
simple we'll just wait. Let you know what spot you
need to track and start ankle. Okay. That's a quick way of how you can
track your ankles. Will move on to the next
one, which is the arms.
10. Wrist as the Bouncing Ball: This is the same example, but we're using the arm. So we'll just go in here. So e.g. at zero, I'll just bring it out
here, which is what? -35 is two minus five. Then we go to 24 and
then we'll go to the E5. So we just got the arm moving. Actually that will make that here and then we'll get acid. You've got the arm
moving like this. Now, all we normally
do is we select the slip, the risk control. I didn't go to the same thing. Visualize. And there you go. You can see you can
see the motion trail. So that's how you track
the arc of the wrist. And then obviously,
we know this can be it can be coming
up like this. I mean, it doesn't have
to stay like this. And kind of on the same path. It might come back
on a different path and then come back like that. But this is just one example, just to show you what
spot you're looking at. Because again, when you look, when you select the spot, is that middle bit
there, right there. Oops. So that's a simple, the simplest form how you
can control the wrist. Okay, guys, I'll see
you in the next video. We will be tracking the
notes for the head.
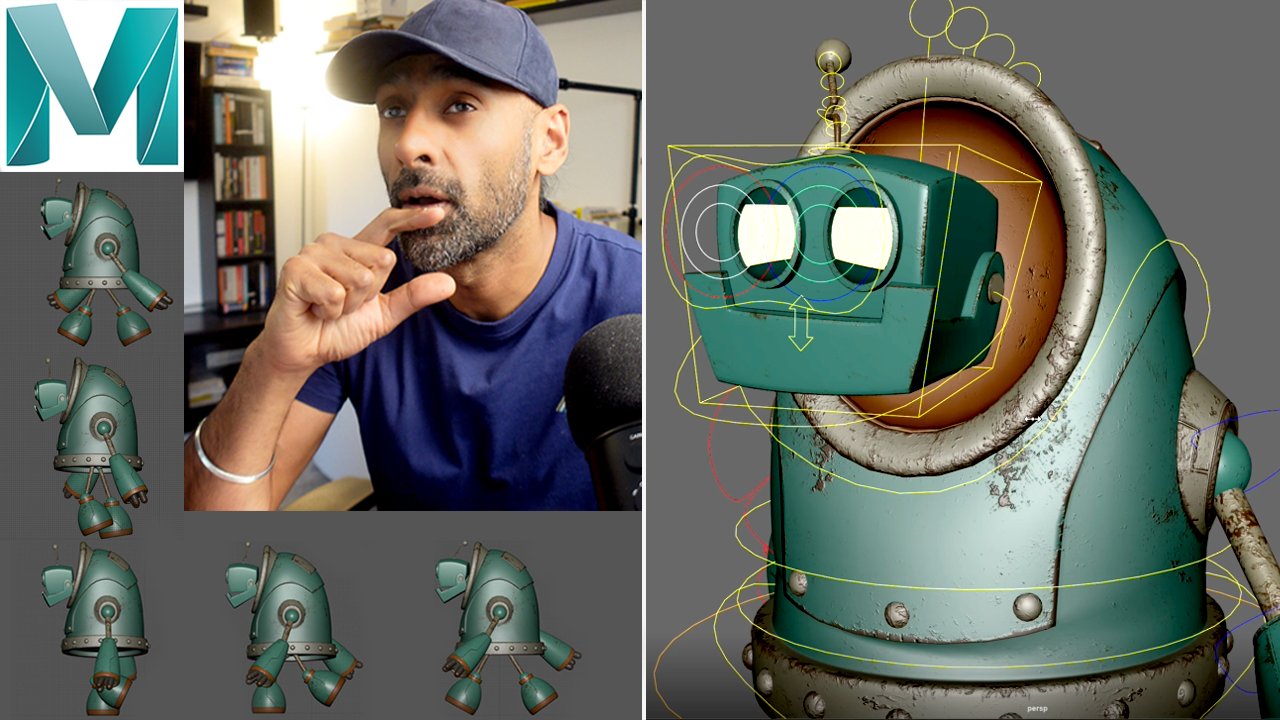
11. Nose as the Bouncing Ball: All right guys, so this
model I've loaded, I'll put a link in the course
so you can get this model. So what I've done is I created a locator, or as
you can see here, I've gone into the
explorer and I've put it in inside the head controller, so parented inside the day. So whenever the head moves, the law code is going
to move with it. See, we use that to track it. You create the low
located from a locator. And then what it does,
it creates the origin here. Just bring it up. And he just place it on the
nose wherever you want and use apparently
under their control and will always stay with that. Now let's take this
for an example. Okay, So this is a character. And let's do a term from this, from this pose. It's gonna be this
way. So what's that? -40 as an example, and then we'll go the other way. 40. So it's looking for one way or the other right in the middle, there's going to be eroded or hide less to
Glasgow for a dip. And then it comes back up. Okay. What we'll do is we'll
select the locator. We'll just hide everything.
I'll select the locator here, which I've got, as you can see is they're all I'm doing
is the same thing. Visualize editable
motion trail and show. Motion trail right there you can see and is create a
nice arc in the nose. And that's literally
what you're doing. Now when the character
is looking up, moving around the nose, most professional
animators use the nodes. You can track with our zero. But the nose is really good because you can
use the chin area. But because it's moving a lot, it's not really that accurate. But the nose is
always going to be, you're probably your
best bet because you can track the arc squaring
nicely on that point. And you can hold a pose
with their nose and come back and do all
kinds of gestures, like for lip-sync animation. So in a nutshell, that's how you track the notes. So just normally you
put located under it, turned it to a head control and it will always stay with it. Then you can just
move the head around. So then you can go back in here. So say e.g. I want to move the head up. See that nice arc created there, then you come back down. You might want to
have it really down. And then maybe here
it comes back up. And then you can start, see, you can start adding
some imitability. But the Kleenex that
you can clean more, maybe you can move the
time and a bit more. But that's basically how you create arcs and track the
head animation head pose. Even when doing body mechanics. So it's a very
useful tool to know. All right guys, I'll see
you in the next video.
12. Conclusion: Congratulations, you have made it to the end of the class. You now have a full
understanding of the fundamentals of
the bouncing ball and why it's so important. So if we sum up the areas
that we have learned, we have learned the importance
of the bouncing ball. We have learned simple
balancing will exercise the heavy and light
bouncing ball the way the hips as a concept
of the bouncing ball, the motion trail of the points. We've learned that
critical analysis of those points that represent
the bouncing ball, which is so important that
you can edit as well. We also learned
about the ankles and how you can track that
as a bouncing ball. All the curves and arcs. We also learned about the wrist, will also learn about the nose. So the same points we're
using to track everything, and the upper torso and the arm and how that's
related when we think about the root of the arm
and the root of the body, the central gravity,
and how that works all the way up and how it
works all the way down, which is essentially
the same thing, but it's just
opposing this way up. And in this way, for more of an in-depth look
at these topics, head over to my
Fundamentals class. We'll be going more deeper
into these concepts. And along with that, there are some fun exercises
to do with that. Work at your own pace, take your time and
really try and grasp that concept of
the bouncing ball. And also this isn't
the end at Skillshare. You can connect with me here. You can connect with me
on YouTube or Instagram, just typing the fitness
anime or on YouTube. I talk a lot about
my fitness journey. Analyzing films,
analyzing games. I do walk through or games
or do review on books, even give tips on
animation as well, short and sweet little videos. So there's more
classes income folks, but in the meantime, happy
animating and stay healthy.
13. Maya Animation Mastery: Hi, everyone. Congratulations. This
is just something after the conclusion
that I just wanted to put into all my courses. If you're really serious about leveling up
your animations, I have a brand new course
that you can enroll in. It's called Maya
Animation Master. This course, I've redone
it with four K Good Audio, came out in January 2024. And this course is
designed in a way how I would have liked to be taught animation when I started. So It basically gets rid of all the pain pain
pressure points that I had when I
started animation. So I want to get rid of those
frustrations and give you a direct line to what that aha moment was for me when my mentor Steve Gagnon Kati taught
me about animation. Something just clicked, and
I teach that in the course. So if you're interested
in enrolling, you can go to the about
me page where I'll have a link there called
My Animation Mastery, and you can go
through the webinar. Then the course breakdown.
You can check that out. And then if you decide, you can enroll, if
not, that's fine. There's a private
Facebook group. There's a link in there
about me for that as well. You can join that
where we get feedback, and there's a nice
community there. And also, when you enroll, there's a private
Myers Mya animation Mastery inner circle
group where it's just exclusive for students
where we give feedback. So, have a look at that webinar and let me know your
thoughts as well. If not, you can join the Facebook group to
the private group. Obviously, the inner Coco group is for people who have enrolled, students who have enrolled,
but check it out, and it's just for
leveling up, and really, it's got all the
theory and practical, heavy on the practical
stuff, video game stuff. If you want to learn
about how to get a shot from reference to
blocking to splinding, to polished, show real level. It goes
through all of that. And also, I talk a lot about networking and
how to get jobs and context that I have within the industry that I can
ph your work out there so at least it's in the right
hands and people can see and at least consider
you for applications. F of my students who
have already got jobs in the industry going
through the course, so have a look at it. And yeah, let me
know your thoughts. So enjoy your animation journey, stay healthy, and
I'll see you around. I'll be around on the
Internet on YouTube and a giving tutorials as
usual. I'll see you later.
 Opi Chaggar, Senior Animator + YouTuber