Transcripts
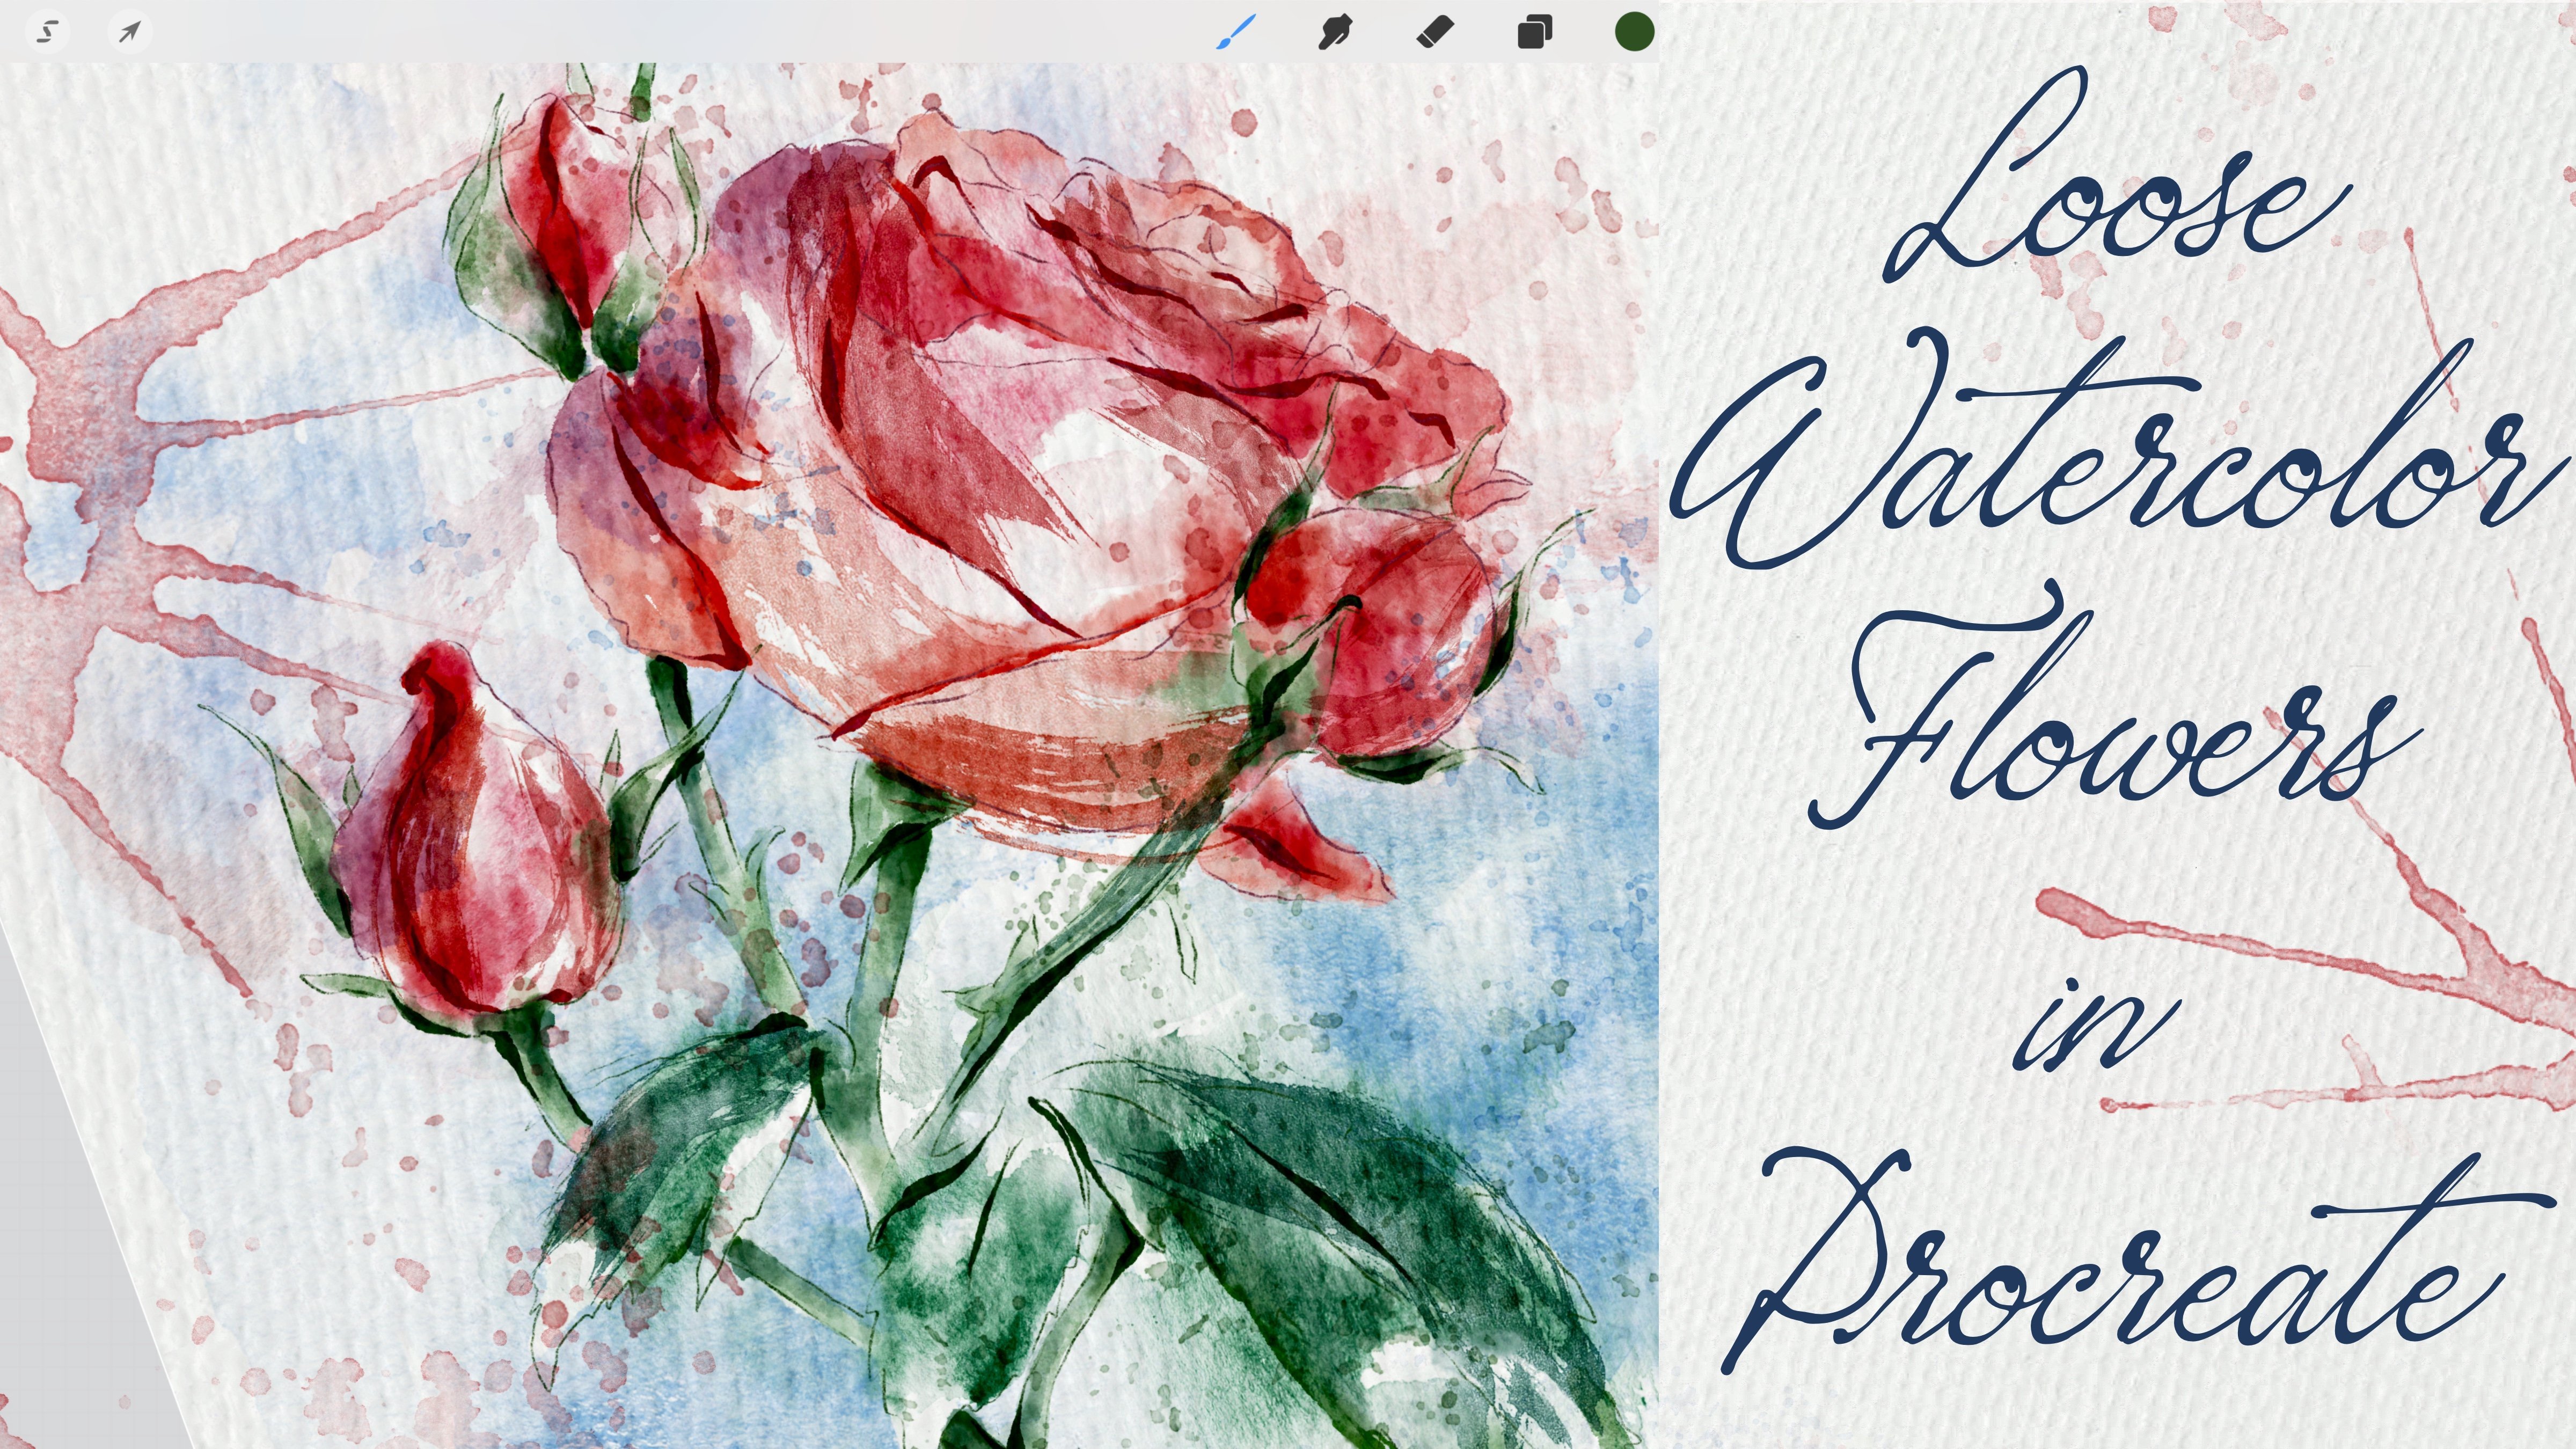
1. Introduction : Hello, my dear art phallus. During my today's class, I will show you how to paint
lovely seamless patterns. And we're going to append three different
seamless patterns. I will show you the whole
process of making them, and that will be fun and useful, especially if you
want to sell them on websites like
Society six or Etsy. And the topics for our patterns will be
beautiful flowers, cute animals, and
delicious fruits. And in the end, I will shave is using mockups that I
created specially for our class and how
to use a small caps for the presentation of
your lovely patterns. My name is Zynga. I am
freelance illustrator. I'm obsessed with watercolor,
magic, enqueued themes. And during my classes, I teach my students how to use Procreate in a fun and easy way. And in my classes, I like to share some useful tips and tricks how to use Procreate. I will take you through
the whole journey. I will show you how I create
my seamless patterns from the sketch to yield an
actual ready-to-go pattern. I will show you three
different ways, how to create seamless patterns, how to avoid making mistakes, and how to arrange different elements on a
canvas in a beautiful way. So I hope you are ready. I'm going to focus on painting beautiful and cute compositions
as a final project. And your project will be
same to create pattern in any way you like and
choose any theme you want. And as a bonus, I will show you how to create watercolor illustration
without texture paper. I will shave is your
new custom brush set, color palette, more
caps that I created. I will also add file of
my pictures that I drew. Feel free to use it for
your own art projects. This class is great for
intermediate level, also can be useful
for beginners. If you've watched
my previous classes and experienced
artists probably here, you can find an inspiration and new ways how to create
seamless patterns. I really want you
guys to join me. I tried my best to make this
tutorial, fun and creative. Completing this
class will help you to learn three new ways, how to create patterns
in watercolor style. And also to get general
knowledge about composition. How to wisely use space and turn in your paintings
in source of income. And how to use mockups. Of course, I can't wait
to start this class, and I definitely can't wait to see what you upload
to project section. Please feel free to
enroll and let's enjoy painting process together.
2. Creating Canvas : Hi guys. During our today's class, I will show you how to create beautiful
seamless patterns. And we'll have a few
options how to do that? And raise each new option
will explore new theme. So I hope you are
ready to start, crave your iPad, Apple pencil, and let's start our
creative journey and speaking about the themes. So our first pattern will be about paint and lovely florals. Second one will be about fruits. And third pattern will be devoted to some lovely,
cute animal illustration. And what's interesting
to remind today's class, I don't need any texture paper. What's interesting
is that we will have some special brush
set will help you to add this watercolor texture. And it's so simple. But before we start painting
our lovely patterns, I want to tell you
how to find all the previous and how
to create canvas. So first of all, if you
need to go to procreate, and then as you see, we need to tap Plus
and tap square. You see we have two thousand, two thousand pixels and
that's pretty much it. Okay, perfect. So first of all, you need to open my
class in browser. It can be Chrome or Safari. Please do it in
browser because if you opened my class in
Skillshare app, my freebies might
not be visible. And then we need to go to
Projects and Resources section. And in the right corner, and there's a
headline resources. You can find and download
all my freebies. So when you download freebies, Xavier will be
automatically downloaded to Downloads folder that you can open through the file's app. So guys, here's the option how to export all our freebies. So you split the screen and from the right side
we have procreate. From the left side, we
have our file's app. I have art classes folder, but your folder
will be downloads. And then what you should do
it you just need to drag and drop all our
freebies into froms, a file's app into procreate. I'll show you how to dose it. For example, if you have
seamless patterns, swatches, we just drag and drop and automatically is inputted
into the Procreate. This is our color palette. And guys, What's
interesting about this color palette is that it's not just one color pallet. Actually here, I divided this one color palette into some kind of blocks. So each five colors, this is a one color palette. We have first one, we have pretty lovely greenish
colors and very muted. Second color palette. We have vibrant, lovely, sunny summer themes, colors. Bucky sun. Next color palette, as you see, we have this violet colors, 12345 from very gentle
P21 to dark blue color. Same here. We have another color palette where
we have some lavender colors. Altogether, we use
yellowish one, and orange. The latter two color palettes, we have the greenish one
altogether with peach colors. And it's really like
this color palette. It can create very beautiful
color combination, especially if you decide to paint some abstract painting 17, or maybe some graphics. So it's up to you. Of course. I will give you some options and I will
show you the brushes, which is our next step that will help you to create
lovely illustrations. So next step we
have ZBrush said, which is called
seamless patterns. And we have so many brushes that I created for you
for this class. We have lots of botanicals, lots of leaves here. I'll show them to you. Like says. And for now they're
not entirely out. What calories like,
of course they asked, is like some texture. But we don't have this
authentic feeling. But don't worry. I will show is a magic
tricks that will help you to actually add watercolor
effects to your artwork. We have stem. Next, I decided to paint for
your some lavender. So we have some petals
here or we have flowers. My axis. We have some regular
flowers as it's very cool if you want to add
some additional elements. So next, dragon
fruit, once again, switch the colors and
later I'll show you how to play with those fruits, how to arrange it
in a beautiful way. Strawberry here. We have two parts
of strawberries. This is like inside. Next, we just have simple
dots that can help you do. Also lovely some
abstract elements to your pattern like this. Now I'll show you
the second one. As you might see. And the third, we have
just simple dots. And let me think which
color I want to add. Also, if you'd like, you can
increase the size thing. We have different elements, it might be useful
for your artwork. Next, we have lovely stars. You're also can play this size. And we have two types of stars. This is a second one. And as you see, I already added some watercolor to this tab. Also, we have such
kind of star actually, if you want to
have, let me think. Yeah, Alexis, if
you want to have already some black
watercolor feeling, you can combine this
two brushes together. And same with clouds and clouds and nodes
it like bluish bad. I just wanted to show
you what we have. As you see, the
watercolor effect is very, very authentic. This one. Here we have moon. Maybe it's kinda dark. And as you see, it already
has this watercolor effect. So here we have some also
lovely cute animals. I'll show you this now, the rabbit and bear. I think I will use this barrier
because it looks so cute. And we're going to use it
in our last illustration. Also, if you want to use Cloud, we already painted
some face expression. So it's up to you. Also they have bear here and as you see in
this illustration, I have the outline, but I decided to
paint it separately. Like to create two brushes
because you see it as a brush, is without feelings
because you might not like the outline or you might want to create a truly
watercolor painting, so it's up to you. Later. I also will
show you how to create watercolor illustration
by using this brush. So next we have mercury brush, its native procreate brush. You probably know of the brush. I like to use it. And it's truly cool for adding some details and whatever
you want. Dof leg. It's also native
procreate brush and it's very cool for adding
some watercolor ethics. Gouache brush. Also we're going to
use it and also why I like this project because
with each new stroke, you might have different
color variations. Bergosh blender that you also might use it as a brush itself. So it's up to you. Boss flashes and new brush
that I created. Very cool. If you want to add some watercolor splatters and you're going to use this brush. Here we have two brushes that
actually will help you to add some watercolor effect
to your illustration. You see it has this watercolor
texture, some stains. And I'll show you
how to do it here, saying we have more
textured watercolor, Abu Simbel Sam seven to add some lovely dots
to the background. If you want. You can experiment,
use your creativity and create lovely,
lovely, seamless pattern. And also, I decided to add
some lovely animals that you might use if you don't
like the bear and rabbits. So you might grab
another rabbit or hedgehog or Starfish Baby, or crabs or whatever you like. Wait, let's put it here. Or whale. Whale is one of my favorites because
It's so cute and fat. Cell and tomorrow, lovely animals is baby
octopus and seal. You also can add them to your seamless pattern
illustration. So I think we've done basic explanation of our
brushes and our color palette. And the last step that
I want to show you is what we actually paid. So as the first illustration and guys speaking about
say illustrations, each new illustration we're
going to paint in a new way. So you might choose it
techniques if you like, more scientists, more suitable for you and easier to follow.
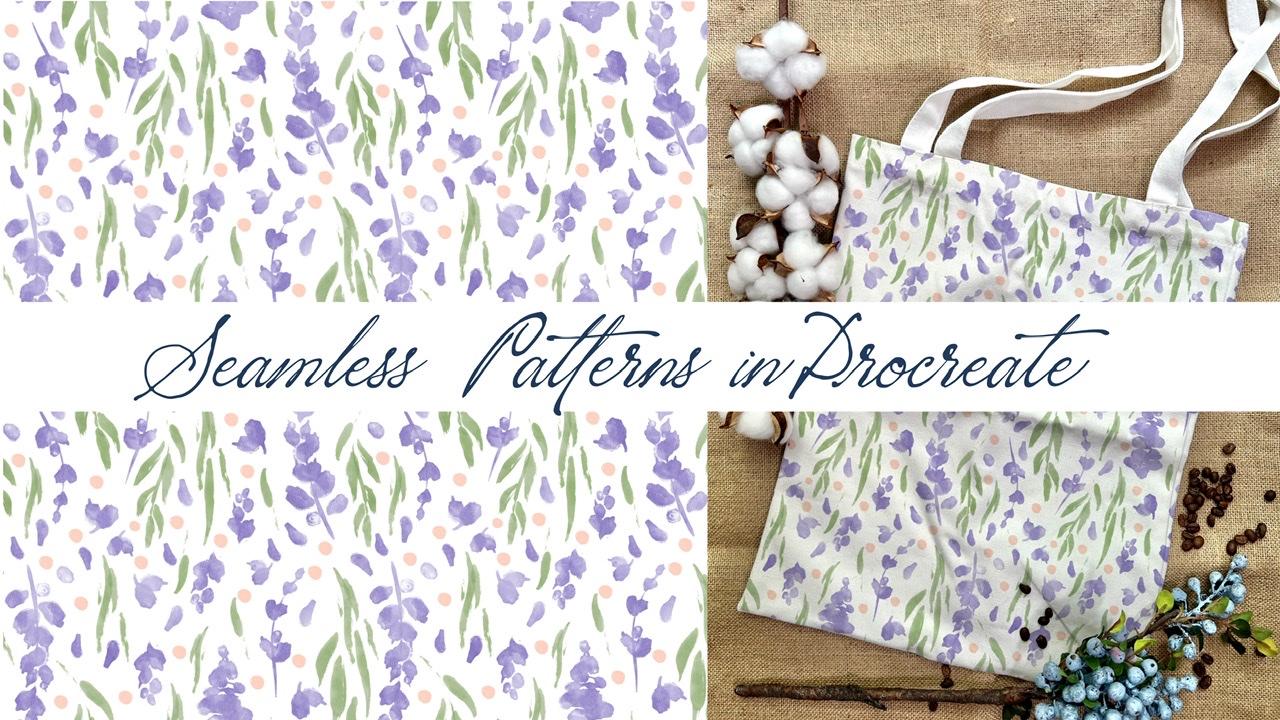
3. Painting Pattern with Flowers : So like I told you the first illustration,
build business. Lovely bear. If you'll bear. So
you think like, and I don't really like
this color palette. And I'm going to use
this color palette as you noticed, the second one. Next, we're going to
paint this lab roots. And in the end, we will receive such
kind of pattern, which also looks
very, very loudly. And as you see, we have this watercolor texture
on our artwork. So I'm going to show you
how to do that. Next. As you might see, we have
this lovely floral pattern, which also very like. So we don't need it, just, it was just an example. And let's start creating
our lovely illustration. First of all, I
think it would be great to pay in some
lovely florals. So first of all, we actually need to create
a design. For that. We need to go to
the Actions button, go tap Canvas and tap reference. After it go to Image and open our illustration,
our reference picture. And we're going to use it as
a base here. Yeah, perfect. So this example then as you see, I combined different
brushes altogether. So as you might see, I will not change the color, I just want to keep it wide. And next we'll
create a few layers. And we're going to paint as
those layers if you want, we can rename it and write
something like paint here. Let's just duplicated. Yeah, like sad. So let's start
with a longer one. And as you see, I'm going to use some lavender colors is fine. Next, let's go and
grab some plurals. And your white,
don't worry later, we cannot get rid of a positive
because you see for now, the color is pretty,
pretty transparent. If you want, you can
start doing it now. Make it more colorful by
duplicating the layer. Go to the new layer, grab new flavor. And painted. Also my duplicated in order to make it brighter and
less transparent. Because later we're going to
add some watercolor texture. Now let's try to think
how to arrange it. Plays it to a different
place and if you want, you can change the shape or change the size,
change the direction. Those petals are
amazing because they might feel some white gaps. And guys, what I
want to tell you, this pattern is already
finished, this one. So that's why we have some parts of leaves that went
beyond the lines. But when we create our pattern, you need to pay attention
and you don't need to overlap or go
beyond the borders. So try to stay away from
the edges of our artwork. So in the end we will
have this illustration, but we need to follow some
steps in order to do that. So first of all, try to arrange some elements that
bad, don't play Sam. I am, I might show to
place them to the edges. Because if you do it in
this way, we will not. It will be hard for us to
create seamless patterns. It can rotate, flip
vertical or horizontal. Now I want to add some leaves. Let's merge everything together. Later. Real jazz, move some of the
objects if we need. So. Now think about the colors. I likes this olive color
and I'm going to grab it. And now let's think what kind
of leaves you can I use? I like so sleeves
because say have very toothy Sharpie edge lines. So I truly like it. Go grab free form
and you might make Sam leaves a little bit
smaller or thinner. If you want, you can
erase some parts and move our lovely lemon third
two to the sites. Here I want to remove
some of the leaves. Next, go to the selection tool and moves the petal
and little bit likes. You see I don't touch the edges. I'm trying to be
very, very careful. Also, if you want, you can
grab some of the parts of lavender and as more like CS1, select after the three
fingers down and press Copy and three fingers
down and press paste. Now we have this lovely
lavender on in separate layer. We're going to edit
to some parts. Maybe here. Make it smaller. Marriage together,
merged together. This part. Let me look. Yeah, I want to erase it. And place leave sanctuary here. I'll say see, I
think here we have very blank space and
hence this area. I'll merge that together. Next I want to go and
grab this part of leaves. Now I'll press Copy and Paste. Now it's on separate layer. And I'm thinking
where to place it. Tilted. Duplicate. Place it here. What else? Maybe in some
areas, merge together. Go to florals. Grabs this lovely leaves
and press Copy and Paste. Praise, Praise. Here. Play some
bearings. This area. I think looks very lovely. Kate. Make it smaller. Merge together. Go to leaves. And think, yeah, Hi Alexis,
leaf, copy and paste. Lovely Kate. And I think this area is
kind of empty. Same here. Flip horizontal. Make it smaller. Like this. Now we move to our petals. I like this one. I'll copy and paste
it and put it to different areas that I think would be suitable
for our petal. Maybe as this area petal. Let's think, maybe in this part and tiny,
tiny petal here. So next step, I want to add some dots as you
see. Peachy ones. And I think it would be
the color will be lovely. We will go to this peach color. And finds a dot here. Law versus size, as
you'll be shipped course. And place it in some areas
that you think are empty. As you see, I don't
touch the edges. I'm trying to be very careful. Truly, very loudly. I came than with this part. Next, I finally want to
add some kind of texture. Before we start to insert, let's make our
illustration a little bit more colorful. How to dose it? Go to the lavender. Does it go to adjustments
and press curse, and use it things to curse. We can make our illustration
a little bit brighter. Same Vitruvius leaves,
go to Adjustments, press curse, May, and add a
little bit greenish color. So now next step, I'll show you how to get rid of transparency because
our lovely florals, there's still a little
bit transparent. You see, if I turn off the background color
is still sees a grid. This is not actually
good because if you want to add some texture, watercolor texture,
we need to end. If you want to use clipping
mask that I'm going to use, we actually need to
remove the transparency. In this case, I duplicate the layer and go
to logger layer, go to Adjustments, press hue, saturation, brightness, and
increase the brightness. So now we have wide with duplicate a layer
merges together, can merge together lavender. We'll use this white lavender. Now, when we turn
off the background, you see our leaves are
still transparent, but our florals or not. So let's just say with leaves, go to lock your layer. Hue saturation and brightness. Brightness to maximal. Duplicate it two times, merge together and merge together with
original leaf layer. Now, when we turn off
the background color, we don't have the
transparency anymore. And now it's time to add some watercolor texture.
How to dose it? Let's create one more layer and we need to press clipping mask. Next, I want to grab me find
a watercolor new stamp one. And I will grab slightly
darker lavender color. And as you see now we
have our lovely floral. When we add a stamp, it creates, it adds some authentic
watercolor texture. If you want, you can
press, multiply the value. Press multiplies is
a textual clearly, and authority is a calorie. You think it's too dark. We still can use curves
and make it brighter. But thanks to his brush, we can add this watercolor
texture, what we did here. Now, I truly likes away, How's it looks for now? If you want, go to curves, can make it brighter like this. It looks very beautiful. Now we're going to do same ways. Leaves, clipping,
mask, multiply, grab slightly darker color, and just say, Just as to the part where we don't
have watercolor texture, we added some texture. Go to curves like this. And think which color you like. For me, I think it's
just too bright. I like Zoe, how's it looks? And I think we've done
our first pattern. So the next step didn't
nice reference pictures. So let's go to the Canvas
and turn off the reference. Now, I will show you how
to make seamless pattern. Most important part. So what we're gonna do
this our illustration, but we're going to
merge together, merge together all of it. And next we need to
select all layers. How to do that? We select
one layer and after that, we need to swipe right? And we selected more layers and After the
neutral press group. But because I want to keep the
group on a separate layer, I duplicate it and make
this layer group invisible. And speaking about
is this one group. I just want to merge
everything together. So I will just press flatter. And now we have our lovely
design on a single layer. And we need it for creating
our seamless pattern. So the next step,
what do we want adult male turn off
our design for now. Let's grab, I don't know. Let it be this peachy color. Create one more layer. And I want to have
this lavender color. So the next step, we need to duplicate this lavender color two times and peachy
colored two types. Turn off visibility. Okay, perfect. Now we need to
separate our square into four equal parts.
How to dose it. So as you see, after that, you go to Actions button. After that, we need to go to Canvas and turn
on drawing guide. Next, we need to press
Edit Drawing Guide. You see, and we need to press to decreed and press symmetry. Next, we need to press quadrant. So once again, tab to degree symmetry quadrant and make sure that you are Assisted
Drawing Guide is turned on. After said, Hi my suggestion
Moses, thickness to maximum. And a passage also
met almost maximum. And make sure you don't press
here because in this case, you will have just
very white color. So go and grab some darker
color and press Done. So now we need to, as you see, we have the square, it's separated into four parts, but we need to create
for equal selections. And now I'll show
you how to do it. We need to turn on
our first layer, say swan necks code
does a transform tool. Guys make sure that uniform
is turned on and snapping. Snapping and magnetics
is also turned on. Distance is maximum and
velocity half-life 50%. Once again, not free form. You need to make sure that
it's turned on to the uniform. Next, we need to
shrink. Be careful. We need to shrink our square. And as you just saw, I'll show you again. We need to have this line, vertical line going
through the center. And when you snap z square, you will see the gold
lines. Like this. It means it's accurate
than resist part. Now I go to another
square and Aldo say, I will just move it here
and okay, call them lions. Perfect. Now we have this layer. We need to go and
grab selection tool, move it towards the edges. Next. Same here. Okay, golden lions. And now we have four
separate squares. So now we need to save all
our squares separately. So what we're gonna do, I need to press select that
layer and press Select. After that, press Enter and
press Save and Lod tab plus. So we have selection one. Next we need to turn
off our selection. Go to this other layer to
the next one, next square. Also need to press Select, save and load and
tap second time. So we have second selection. Turn off, our selection, go to the third layer. The same. Select, save and load, tap plus we have
third selection. Next, go to the fourth layer, makes sure that turned
off the selection. Because in this case is the selection will be
just the previous layer. Okay, we're on a new layer. We need to tap, select, tap, Add, tap, save and load. Tap Plus. Now
foursquare is selected. Turn off Selection Tool. Perfect. For now, we don't need those layers anymore
because we saved them. Okay, perfect. The next steps that we're going
to do, once again, I want to duplicate our painting just in case
if you make some mistakes. So we are just on one layer. Now, we need to cut every element from
our seamless pattern. So first of all, we are on a layer. Next we go to the
Selection tool. If we go to press and press, save and load and depressed
for selection, this one. Okay, perfect. So next, after we selected
the first selection, what we should do if
you need to go to our Actions button and
we need to tap Add, and we need to press. Next. Paste grade. Now turn off the transform tool. Next step we go to
the selection tool, tap, save and load
tap Selection tool. So you see second
squared is selected. Girls, same. Go to the Action button, tap and tap Paste. You see I made a mistake. I was on a separate layer. And we need to make sure that we're staying on our
original layer is this one. So once again,
what we should do, we will go to our Transform
to go press save a lot and tap Selection here to
have cards, tap, Paste. Great. Let's return to the
original layer. Same selection tool. After that, press save
and load selection three, cut, paste, and great. Finally, we have all our
selections separated. Next step. So guys, in order to make a
seamless pattern, they need to move this part of our pattern from the
left to the right. And this part from the right
to the left after that, from the top to the bottom and from the bottom to the
top. So let's do it. We actually have one
more way how to do that. We can do it
separately one by one, or we can just select elements like each of
the elements together, like two elements together
and two elements together. So I'm going to select first
third parts of our pattern. And I'm going to move
it to the right side. Once again, we have
snapping turned on. Make sure that you have
golden lions all around. Perfect. Called nights. You see
everything is correct. Be careful. Now, we need to move the top to the bottom
and bottom to the top. So first, fourth, we'll move
to the batter. Not snapped. You see? Now it's called same second, third hours that
it's Colton. Next. Key, perfect. So now guys, as you might see, we have some blank spaces that we actually can
feel altogether. Okay, great. So guys, what else we can do? We can merge together all
the elements if you want. So all we can just group
it like we did before. Likes it and duplicate it
again and flatter. Yeah. So now let's just, first of all, let's just feels a
caps how to use it. We need to grab some offset
elements and copy-paste. Rotate it in some way. Maybe is this lovely petal. I want to place in this area. We can turn off
snapping for a second. Here. Once again, don't go beyond
the edges. Like I told you. Maybe I want to have in place
some dots in empty places, like in a middle, you can place
everything you want. Paste in the middle. It's fine. It can
cross alliance, but don't go beyond sit. Okay, Perfect. Let's
just merge it together. And I think our
pattern is ready. If you want. We can turn off the
assisted drawing guide. Like says, go to Canvas, turn off Drawing Guide. And this is our lovely
floral pattern. But we need to make
sure that it's accurate and it's
working perfectly. So how does, in this
case, wait a second. I still want to
add some elements. Copy and paste. I think here I want to add more elements like
this part together. More petals, copy and paste. I want to put it here. Replicate this area and I
think says part is so empty. Like sad. Okay, Perfect. Now, merge that together. Now we can check whether
our pattern is accurate. In this case, I will
duplicate it five times. One pattern I want to keep in order if I make some mistakes, so it's built in my
extra saved layer. Next, I still want to
turn on drawing guide. It will help us to know
where to move our pattern. And now we need to shrink
the elements to the edges. I'll show you how it was. First layer. We can turn off the rest. Go to the selection tool, make sure it's
snapping is turned on and let's move
it to the edges. Yeah. Okay. Snapping is good. Now another one. Does its part. A case snapping
is on saying this says pattern likes. Okay. And the last one here. Hey, let's just move it. Ok, you guys. And as you see, Ve created seamless pattern, and it looks wonderful. So I'll merge that
together. Likes ahead. So our original seamless
pattern was likes ahead. And after that,
when we check said, thanks to the selection
and transform tool, it looks very, very,
very beautiful. You might see it
here. Once again, thanks to the snapping, thanks to the drawing guide, we can make sure that
our lovely illustration is ready for Boston in
any place you want. It can be, I don't know. You can make some kind of
pattern and sell it on some print on demand websites by exercise to six or at baba. Okay, So now we're ready to move to the
second illustration.
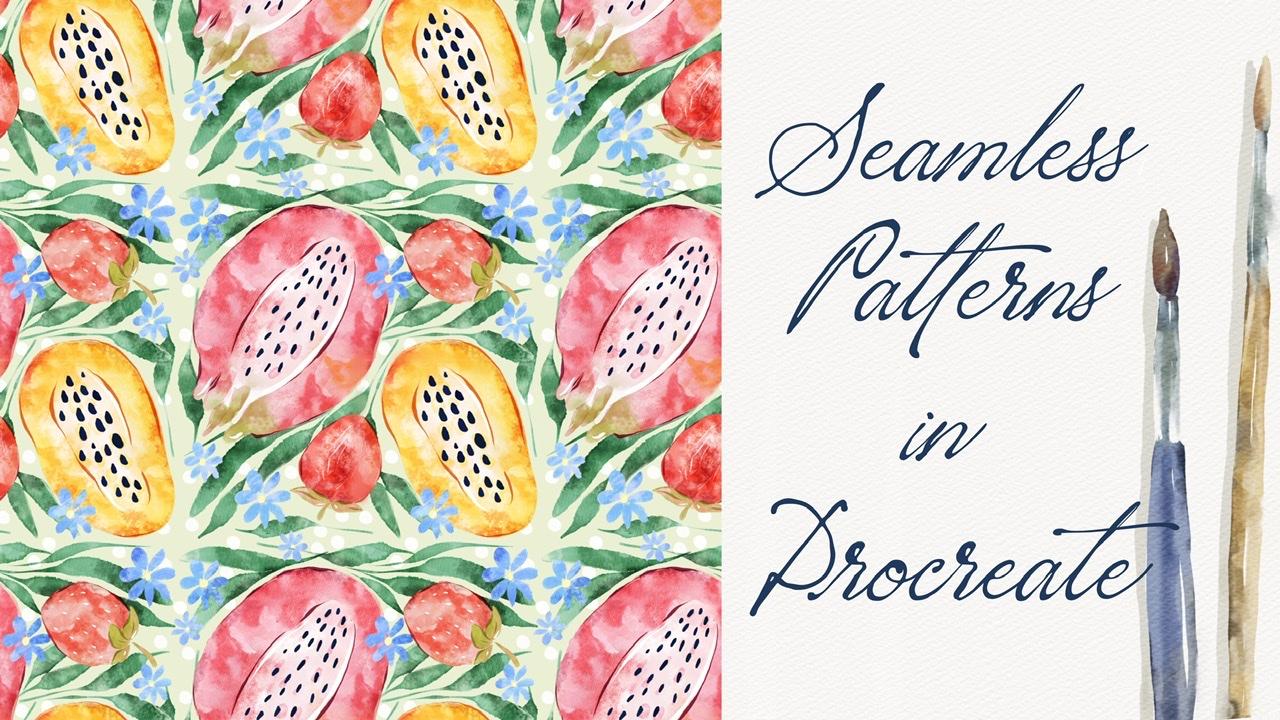
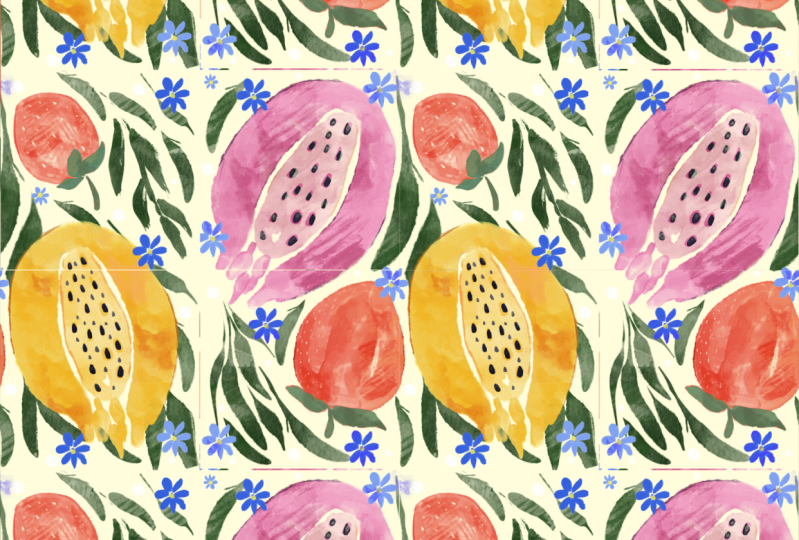
4. Painting Pattern with Fruits: So guys, our second
pattern will be easier to create because we
already have the base. So first of all, I want
to select all of it, our first illustration,
I want to group it. And as you see, I have
grouped in group and we can rename it and right
leg first pattern. Now you're going to
pay in second pattern, I will duplicate some
layers like sad and grade. And why it's easy
because as you remember, we have in save and load, we have four selections. So we already have our
rectangles and now we need to create some lovely
illustration. Let's do it. Guys, speaking about
the reference, what you're going to paint, I'll show it to you now. Canvass reference. You're going to paint
those lovely fruits. And here I'll show you
how to create shades, how to use lots of
brushes in order to reach watercolor texture
without watercolor paper. So first of all, the Krebs
is lovely green color, and I will fill the
layer with green color. Next. Then the kids a layer. Now grab even more orange color. And we need to grab,
say, papayas, tap. Raise our papaya.
Nice. Make sure that you turn off snap it. We don't need it for now. Now, dragon fruit, I decided to select the fruits
that I like most. You might grab a reddish color, go to more pinkish one. Lucky, I think pinkish
one is better. Dragon fruit increases sides. And we will have
tiny strawberries. Strawberries are
very, very peak. Omega. We can make
sense even a reddish, because we need to keep
our layers separately. And I want to select two
different brushes for sad. And this is the first one. And the second one, I will grab strawberry. You might think about the
composition, you might rotated. Think we try and go a
bit bigger and smaller. So guys, we need to create
competition, of course, but you don't need
to place everything like very close to each other. And as you see as those layers are also pretty,
pretty transparent. So our next step will be we need to get rid of transplants. Maybe I want to make our
dragon fruit even bigger. Okay, so next, I want to lead
me think, add more leaves. As you might see, some leaves will be slightly smaller and
ZigBee adds a background. I will go and create
one layer and in need of everything and I
truly likes is green. So I'm gonna keep it. Then I decided to grab
different leaves. Don't worry for now
it's transparent, but our aim now is to arrange all the elements
in a way that we like. So first of all, think
about transparency. Just think where you
would like to place. All our leaves. Also remember you can't go beyond the lines,
beyond the edge where we can place. Okay guys, next step we need
to remove the transparency. And second thing,
we need to make this black bottom of
source pros wide. And I think the easiest way is actually create one
layer underneath. Grab white color and
grab goulash brush. Or if you want mercury brush, It's up to you and just
fill this layer with white. Now strawberry. Okay, perfect. So now we can merge together
this wide color altogether. Visit fruits and Ian, old way, we can remove
the transparency. These are leaves,
WK, It's a layer. Go to lower layer tap
adjustments and tap hue saturation brightness and
more brightness to maximum. Fabricated two times and
merge everything together. But once again, as you see, we also have this
lovely florals. And I'm going to add some here. And for this we actually
will use bluish color. And think where you
want to put it. Next color else would be
on top of everything. Okay for now, it's fine. Later we might add more, pretty mostly transparency
in a bold way. Merge together and
merge together. And I want to add some
white dots as you see here. Pick careful ton coal beyond K laterally. Now, as he sees a meter of
our floral yellow circle, grab yellow color, go
and grab mercury brush. And I just wanted to feel some
middle, this yellow color. Now it's time to add some lovely shapes and
watercolor texture. But once again, as you see
before they start to inset, we see our strawberries, The leaves are not green, and we need to actually
make some green house. So how to do that? We need
to go to the Selection tool, grab free hand, and select cell leaves
from the strawberry. And three fingers down
and press cut and paste. Those same way. Three fingers down and paste. Now, we can merge together
as a team of six ones. And I'll create
one layer on top. And now press clipping
mask and move to multiply. So now we are on layer
where we have our leaves. You go to Adjustments,
press color patterns. You see it's all green. Make it brighter, brighter. Now it's time to
add some texture. As you see if you can grab
olive color, grab darker ones. The watercolor Stan, one. Don't make it too
bright or too dark. I said we can go to Curves
and play around and think, what do they like more? I don't want to make
an exam too dark. So I really like this color. It's pretty natural. Okay, does say on this
the rest of our fruits clipping mask go to Multiply. I want to add some texture and be careful of is a
size you shouldn't touch, for example, this
yellow color yet. But as you see, our dragon
fruit is not yellow. So make sure that you don't
press it down, tap on fruit. You can, of course, actually is very lovely. But still remember the colors. I like zipper pi here. It's pretty textured. Reddish color for strawberry. You see it's so easy
to make some texture, watercolor texture without
having actual paper. And papaya POP Schwann cells. You remember this part
is a little bit green, but not sip bite. So I'll also one more thing if you want to
make it brighter, go to curves and play this
curse like what we did before. Some merge together,
merge together. Let's go to leaves, press clipping mask,
and move to multiply. Grabs this green color. And we'll say here, I might not afraid of the size because like we had just
leaves on this layer. And it's truly so-called colors. You can make it brighter
and make it brighter. Lovely fluoresce, clipping mask. Go grab, multiply. If you want to grab
the same color, just tap, Oh wait. Yeah, bluish one maybe
a little bit darker. And you can add some texture. If you want. You might grab a little
bit purplish color, grab watercolors stamp tool. And the little bit of texture. Go to curse and
play around with. If you want, you can
go to hue, saturation, brightness and still think rich color you like
more for your floor. If you want, you can
make it lighter. Still clipping mask. You might add a little bit of texture here, but
it's up to you. I can merge together as well. Now next step is you see we
have some seeds and I still, I want to add Sam to our
lovely illustration. I'll place it on top. Next, I go grab this
dark purple color. And I want to grab
book goulash brush. Like sad. And for SASE
fruits, dragon fruit, it should be smaller, thinner. I think. I want to ask now you see it's very lovely when its
worth of calories. But I still think that I
want to add some lines like here to separate main elements. So let's go and grab mercury
brush by survey data lake. I want to use this brush. And how to do that. We
go to our fruits here. And I will grab Clipping
Mask Mode to multiply. Grab a little bit darker color. And when I go to edges here, I can add a little
bit of shades. I think it looks very beautiful. Same here. A little bit of
shade since this, because it helps us to
it even more texture. I exact same we can do if
you want these leaves, clipping mask, go grab, multiply and dark color. In the query as well. We have a few objects
next to each other. You might have some sheen. Can merge together. Go to the
layer on the top. Multiply. Now I need to clip it. I just want to show me some
mercury brush set main lines. So you don't need to
write it like everywhere. You think it would
be more suitable. And it would have been lovely. Now reddish color. And also I forgot to add some
seeds to the strawberry. So by eating little
bit, I'll do it. My lap leave. No convenience color
and I want to show. So now let's add some seats. Grab white color, create
one more layer on the top, because if we have
a multiply layer, it will be not visible
like the white color. And here I want to add
more texture like inside. I create one more layer. I'll click. Wait a second. Here. Clip it. So you can use
clipping mask if we are on top of the layers
that we need to use. White color. And I've got to use Daft deck. Like sad. It's very lovely if you had some kind of highlights as well. Example here. And you're
going to use darker color. For SAD. It might go and
grab a darker color. And I still want
to use Multiply. So it's an a Clipping Mask Mode. So guys, as you
see, if we create one more layer in between of the clipping layer and
our original layer here. Automatically, it's in
a Clipping Mask Mode. And I just need to switch to multiply a blend layer, mold, likes mercury, show some TROPOMI. You also can use the same brush. Is a downlink brush.
As a planter. What's left? I think nothing. The rest is very beautiful. Once again, you can
do say obese, fluoro, clipping mask, multiple,
hi, bluish, purplish color. Grab data, lake brush. Or if you want, you might
grab a bright color. Because I like some
colorful pictures. So they don't need
this picture anymore. And we go turn it off like this. And I think mercury brush and
I will merge it together. And I think I want
to feel this area is highlight the TLB
it saying here, I liked and its part. It looks cool. And now it's time. I merge everything together. Also layers. Likes it bad, except sad background color. So the next step, I will duplicate it, a cave. So if you have one
layer separated, either make it invisible and
move it to the lower layer. Now, I can merge it together
with our background color. But before I do that, I'm on a layer and appropriate
one to make it brighter. So I go to curves. I can play around. And think whether
I want to make it brighter and I really liked
the way how it looks here. So now I'm ready to merge
everything together. So now it gets time to
create seamless pattern. How to do that? First of all, what we should do,
it's very interesting. Yeah, on our layer. Next we need to go to the Selection Tool and go
and press Save and Lord, make sure that the
ad is turned on. Grabs it first selection, you see it's selected. Next we need to go to the Transform tool
and flip vertical, flip horizontal, like sad. Next, we need to desk
deselect everything thing. Again. Next step, v, go to the selection tool again, saving lot, select
second selection. It's here. Go to the Transform tool. Flip vertical, flip horizontal. Deselect it again. Next, go to the selection tool, save and load selection three. This one, transform tool, flip vertical, flip
horizontal, deselect. Go to the selection tool. Last one, selection for action for transform tool,
vertical, flip horizontal. And we've done this
how illustration. But as you see inside, like in the middle, I still, I think I want to
add some kind of florals. In this case, as you see, I already have one
of the selection, I'll previous layer where
we have our follows, separate it from the ground. So I will make our lower layer, this one visible, grabs
selection tool and carefully, carefully select a plural
and press Copy and Paste. Turn off. First layer. You can grab the eraser. And if you have some parts
that overlap and just erase our selection on top, turn on original layer. Let's think where we can place. We can shrink it and
make it smaller. Let me know it
looks very loudly. And I'll create one more layer. And I will grab dots. Think it would be nice to add a couple of new dots all around. Like sad. Next, AIGA merge everything together and how second
pattern is ready. And of course we need to
check whether it's correct. I will duplicate it and I want
to save our original one. Here. Let's try to
shrink it again. So in this case, if you want, you might go to action button, go to Canvas and turn
on drawing guide. And he see we have some
lines and it will help us. Don't forget about snapping. Turn it on. Once again, you need to duplicate our
layers, four types thing. And let's just shrink it up. Okay, golden. Mean? Golden. Yes. Let's make it here. Last one. Tendons and turn off
our drawing guide. And guys, our
pattern is amazing. Now let's move to the
last part where I'll show you how to create
lovely patterns, seamless pattern B
is cute animals.
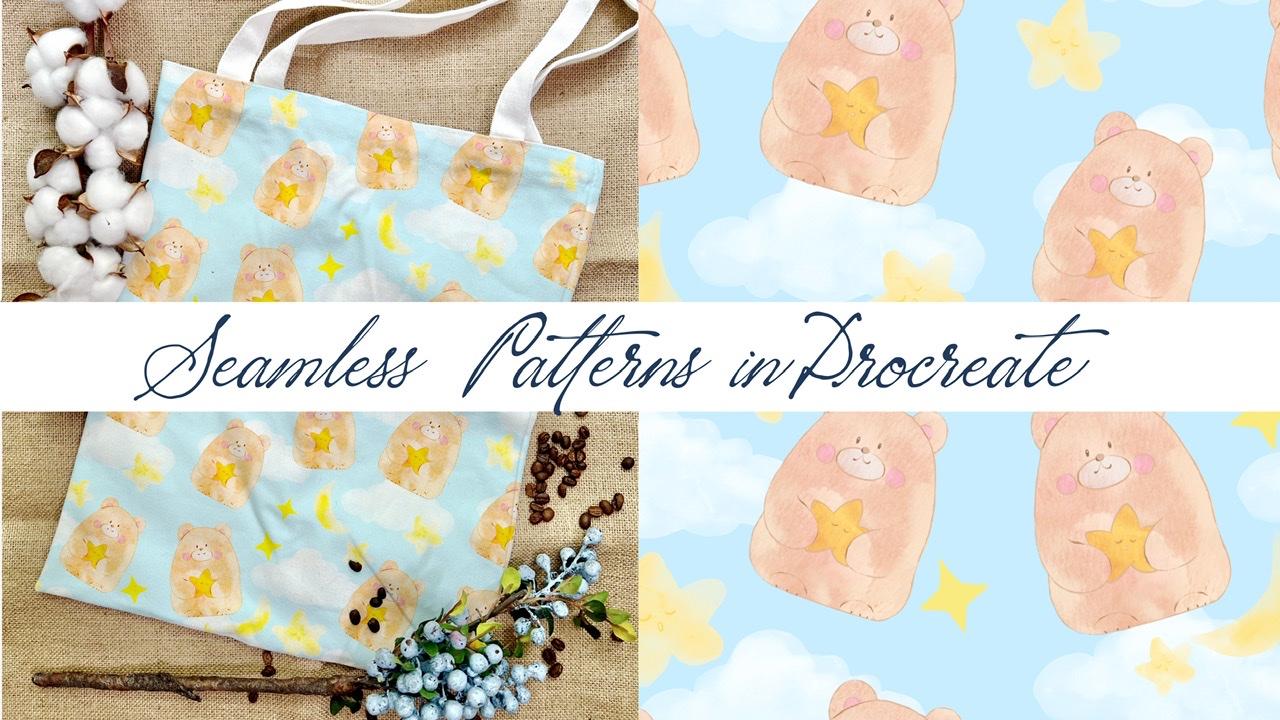
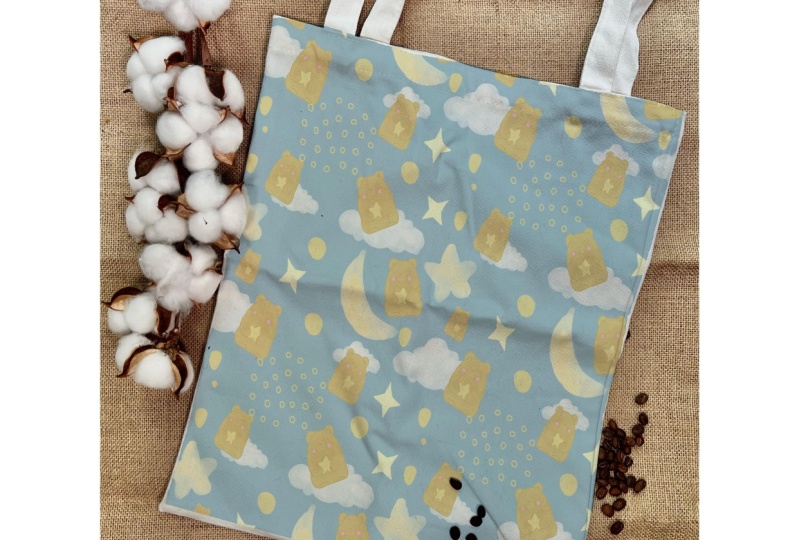
5. Painting Pattern with Animals: Well, I hope so. If Dan is our second
illustration, I'm going to move everything to one group and I will rename it and ride like second pattern. Like a cool. So now we
will turn off this layer. In our last tab is
we got to create last illustration,
B's lovely animals. I'll show you the
reference picture. Who go to Canvas tab reference in paragraph ends at our bear. Or a lovely colorful
illustration, that one. So here's just a reference. What we're going
to do is be ready, as you remember, have
our squares separately. So we skip the first part. And now I'll show
you the third way how you can create
seamless pattern. So now, first of all, let's create an illustration. Lovely blue color. Next, I'll create
one more layer. Grab white color. And I want to use clouds
because they look so lovely. And I will place them
in different parts. Also, as you remember, I don't touch the edges. Now, I will duplicate them. Now you see some clearly. Next, I'll create
one more layer. I'll grab a yellow color. And I want to add more. Make sure that the
snapping is turned off. And once again, I
need to make my moon transparent because
it's through the, behind the mod vc, the sky and it's
not what we want. So I duplicate this layer, go to logger letter, press hue, saturation, brightness, and
more brightness to maximum. And merge that together. I will add another
element is loudly star. Also, I will make it
less transparent. Follows the same procedure done. I'll create one more
layer and I will go and grab star one brush because I want to have this
lovely eyes all around. Now, but I don't want
to have edges now. I will just erase edges. But as you see, I
keeps a mouth and every marriage sat together. And now we have the third star, that type of star. Let me find it here. Smaller. And I think I want to
make it not so dark, like we have all the elements. Now I want to paint bare. And here we have
propelled by air, but I wanted to have a brownish because I
think it's more natural. And in this case, I will grabs this transparent bear, that one. And now I will show you how to create a lovely
watercolor texture. I'll create one layer
underneath our bear. And I'm gribble, gouache
brush, coconut, lighter color. Yeah. I keep blending tool as a blender. I'm a grandpa cohosh plant
and bad looks very loudly, but I still want to
make him kind of a lighter peachy color,
hue, saturation brightness. And move to the colors
that you like. Maybe said. Same. I will take this outline covers because I don't want
to have it set up right. Grab eraser. And dark is the sharpest line. Just erase many paint and you see that some
lines he sees say, we have some gaps, don't worry about it. I'll show you
another magic trick. What else you can do? So you see now that outline, it's not that important. It's still here of course, but they don't pay too
much attention to that. But once again, I
just want to have the outlines which has
not said reasonable, but you might think in another
way. So it's up to you. Now, like I told you, these have tiny gaps. What else we can do? We go to our bear here, go to adjustments
and press liquid. I select Push, Interests,
push a little bit. But it's so simple. Loudly, loudly bear. Now we need to add our
watercolor texture, what we did before your
members, That's right. I'll create one layer on top. I'll press clipping mask
mode to Multiply red, pinkish color and grab
watercolor new stamp one. And you see it's all cool. And it help us to create this
watercolor texture easily. Matt, I still think it's good, can be lethal bit brighter. Not that dark. Outline also can be
slightly darker. Now, I like the texture and I want to make our star yellow. You, my grep mercury
brushes, It's fine. Create one more layer. It's an clicking Mask Mode. And because it's underneath
our watercolors stamp, it's also in watercolor style. So you see once again, it's automatically in Clipping Mask Mode
because I created a layer in between Clipping Mask Mode and
our original layer. Next, pinkish color. I want to make lovely
cheeks, lovely ears. Let me think this part
would be too dark, I think. Can make it darker.
Not so beautiful. So let's make it brighter. So about the size is around
1% in mercury brush. Let's make ice tiny, be darker. We go to outline layer and we actually
need to make it Lexus. Mercury brush as
eraser, likes away. How's the nose also
can be kind of darker. I keep out our star and
our bear is ready. I like. So anyhow he looks. Now let's think what
else we might do. If you want, we can
add more texture. But I think it's fine for now. Also, if you think this part
is a little bit too sharp, we might go to liquefy
controls the size. Make this part notes. So be like roundish. Hi, you still can
keep mercury brush. Create one more layer on top, and finish adding tiny details. Because this is bear, we have some pubs and clubs. If you add, if you want, you can add tiny bit
of darker shades. And it will help you to make our illustration
even more beautiful. Oh, lovely berries, ready? I heard said together, they replicate our
baring few times. And let's think where
we want to place it. I think we don't need
our reference picture, so let's turn it off. Some barriers can
be brought bigger, some bears can be smaller. Make sure that we don't make this circle because it
would look very strange. If you don't want, you might not rotate a bear. He would look like. So don't forget about our stars. Let's think wet place. Came together stars here and merge together
our lovely bears. Now let's think, I think
for now it's fine. Yeah, lovely stars around
and illustration is so cute. So I think we can group it
like what we did before. Nab located by k guys, so he made the design. And next step is we need to
turn our lovely illustration, our loudly pairs, into
the seamless pattern. And here I'll show you
a way how to dose it. It's kinda a little
bit more complicated. Compare it to another
ones because you need to follow the golden
lines carefully. So let's try to
do it altogether. As you see, I have
the background layer separated from the
actual painting. And guys, the next thing
what we need to do need to merge together all the
layers, Saville patterns ADD. And once again,
make sure that you don't overlap with the edges. I got duplicate
it one more time. Turn off one of the layers, and I will turn off our background color
alone with another layer. So it's just one
layer is turned on. Why does it? Because that's
important for snapping. So turn-on snapping,
turned on magnetic. Also you might use
Drawing Guide. It might help you.
That will be fine. Another thing, what else
you might do if you want, if you're afraid that
you might make mistakes. I'll show you later. We can just delete it. Grabbed mercury brush and
write something like this. Here, here, here. And here. It will help you to be careful
with our distribution. So now I will duplicate it four times and water can enter, guys. Actually, we need to
take each part like this painting and Moses
parts to the edges. So if you want snippet, snippet, we want to shrink it, but we just need to
move it to the sites. This is a third way how to
create seamless patterns. So once again, turn off the
rest to stay this one layer. Uniform snapping. And carefully. Scenarios to golden,
golden perfect. Turned off, turn on
another golden golden. Me see if I could turn it on. It's pretty clear. Turn off turn off branches one. Remember coltan? Yeah. Correct. Now two last one. Moment to the edges. I look at the golden
lines are correct. Now you can turn on the rest. And I think it's fine. Now let's merge together. In a meadow. We can
erase this part. Peter needs if anymore. Now, we can turn on our
background and look so lovely. Bad guys here I think we can
add some other elements. Go to the group layer and maybe choose the
elements that we might need for power for finishing
our lab data striation. Likes them all here, and I want to make sure that snapping and magnetics
is turned off for now. Like to place it here. And you see it. I caught one of the
stars. But it's fine. It's not a problem. I'm going to place this somewhere here. Maybe one more
star in this area. Next, let's merge
everything together. And our next step here. So we need to double check whether our lovely illustration. He's correct. So you see
we turn on drawing guide. This is our seamless pattern. Once again, thanks to the Transform tool and
thanks to the shrinking, we will double-check
how it will look like when we minimize the size. And we will make sure we should make sure that our pattern, he is working correctly
without any gaps. I duplicated it and
turned off another layer. Now, I need to duplicate
it four times. And like I told you
for our Selection tool for snapping or we need to
turn off all the layers. My suggestion, you might
use Drawing Guide. You can remember
about golden lions. Golden, golden perfect. Turned off or turned off. Golden, golden calf. Okay, Perfect. The same here. So make sure that the lines are not blows air cold
and like here. Once again, your morbid carefully and we have golden
lion and golden line. Last one. Then. Now let's turn on Sarah hist, and it looks perfect. Turn off Drawing Guide. And you see we have our lovely
bears without any gaps. And now we can turn on
our background color. And it looks just perfect. Guys. I will merge together
all four layers. Now you see how our
lovely pair looks like. You might use this
pattern for decoration, baby pillows, some other things, maybe for the wallpapers, for the baby rooms or
in any way you like.
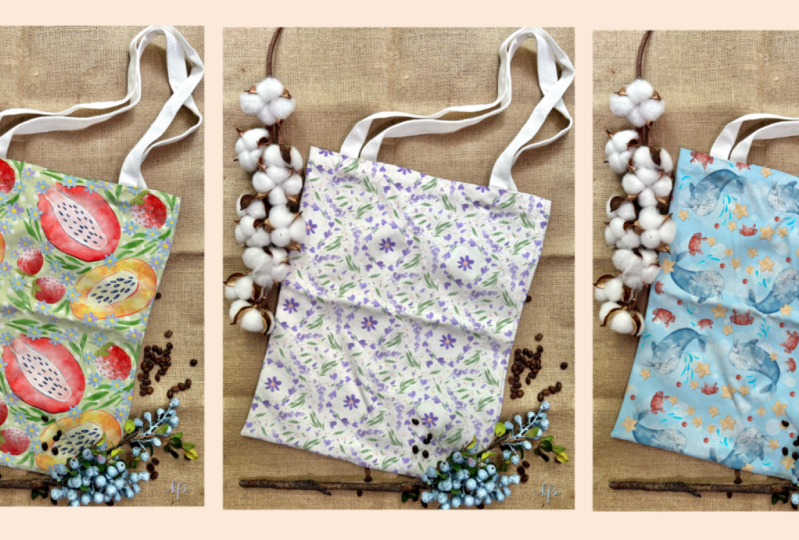
6. Using Mock-ups: Hello guys. Now we move to the next part where I
will show you how to illustrate our seamless patterns in our mockups I created. If you mock ups, especially
for our today's class, E, is they are free for
personal and commercial use. So please go ahead and you sell for your own art projects. And let me show you actually
is a mock-up. Stay prepared. Okay guys, so here we have our first mockup that
I prepared for you. You can, you can demonstrate
your seamless pattern. Next. This is the second one. As you see, we have
different restrictions, different pictures
all around like here. We have one more. So during our first
illustration, I decided to demonstrate bag. So you can place
your object here. Next. I have for
you another one, and here we have just Canvas. But you also can place
your lovely pattern. And this is another one. So we have this rectangle and this is a vertical version of, this is a painting of the same. So choose the one that you like. And please also expert
it into Procreate. And let's start using it for the demonstration of
our lovely patterns. And once again, you can export our mockups rise into Procreate. You don't need to create
special Canvas for said. You also can simply
drag and drop it from our downloads folder where you saved also pictures
into the procreate. So I go to my gallery and
here I have our mockup that I decided to use this one because it
has different shades, Alliance and I think it would
be perfect for our mockup. So let's get started. First of all, what we should do, we need to create one
more layer above. We need to grip white color. Then grab mercury
brush or you can grab Bu Qu wash brush
any price you want. And then we need to
outline our back. Those carefully. If you make mistake, just erase if you went
beyond the lines. Hockey, don't paint
on our coffee seats. Almost done, guys, I
decided to attach handles, respond because they're
not that important. Okay, Ron, default. So next, we need just to fill
this area with color. You just check it, you have some tiny gaps. So at first you
might think, this looks so terrible, that is fine. Next we need to go to Blend Mode and switch it to Multiply. You think now it's not
reasonable, which is cool. Then need to create
one more layer above. And we need to press clipping mask than
weight clipping mask. Then we need to
export our patterns. One of them or all observes that we just created
into this Canvas. Sergei speaking
about our mockups, how to say Sam. So what you should
do is we need to go to Actions, button, tap, Share and that jetpack and afters and choose
where you want to save it. You might save it
to camera roll, you might save it to your
files app, whatever you like. And after say that,
because experts, those patterns had to be
created into our mockup. How to export our mockups
into the procreate. We also need to go
to Actions button. But then we need to go to Add button and tap,
insert the photo. If your picture is in camera, roll and tap, Insert a file. If your picture is in the files. So this is how pattern and guys, we don't need our snipping tool, so we need to turn
it off, turn it up, and keep in mind, I
have uniform turned on. And you might just place
it in any way you like. And for me it looks
just perfect. And as you see, thanks to the multiply
blend layer mode, we keep all the shades. We killed all those
imperfections on our tote bag. And it actually creates
an amazing feeling. This is pretty authentic, already printed and
ready to go to, I don't know, to some
kind of store back. So let's try this and
as seamless pattern. How to save it? Also, if you want to do it, go to Share button, tap G pair can save it
in any place you want. After that, I wanted
to clear that. So you see we still have our
clipping mask turned on. And I just wanted to
insert another pattern. You might, once again, if you choose free form, you can distort the proportions. If for you It's fine. It's okay. If not, you can just use uniform tall for me free form
for now it's predefined. Again, this is our back. This is how it will look like. Also very lovely. Okay, Let's save it to
clear and let's export. The last one. Is this
patterns so loudly, you see I have uniform tool I decided to use to
keep the proportions. So, so lovely highlights
really likes the colors here. If you want to enhance it, you still can go to Curves. And what I told you to draw, you can change the colors
or do whatever you like. I like how it looks, you see it blends a texture, blends into our pattern
and it looks so realistic. Then you can go to hue,
saturation and brightness. You can play with colors and think which
one you like most. So it's up to you. Okay guys, if you've
done this our class, and during our next class, I'll show you how to paint lovely illustration in
the watercolor style, in Japanese style. And I hope you've
enjoyed as well. Let's see each other soon. Barriers. That was it. Our today's class five. Now you know how to create
lovely seamless patterns. How to avoid mistakes, how to experimental
is topics with different elements on a canvas and how to get some inspiration. Guys, I hope my class was
inspiring and of course I would be glad to see all your artworks to
give my feedback. And of course, if you have
any questions, suggestions, recommendations, you might leave some in discussion section. And let's see each
other next class. Bye bye.
 Inga Yoon, Digital illustrator and teacher