Transcripts
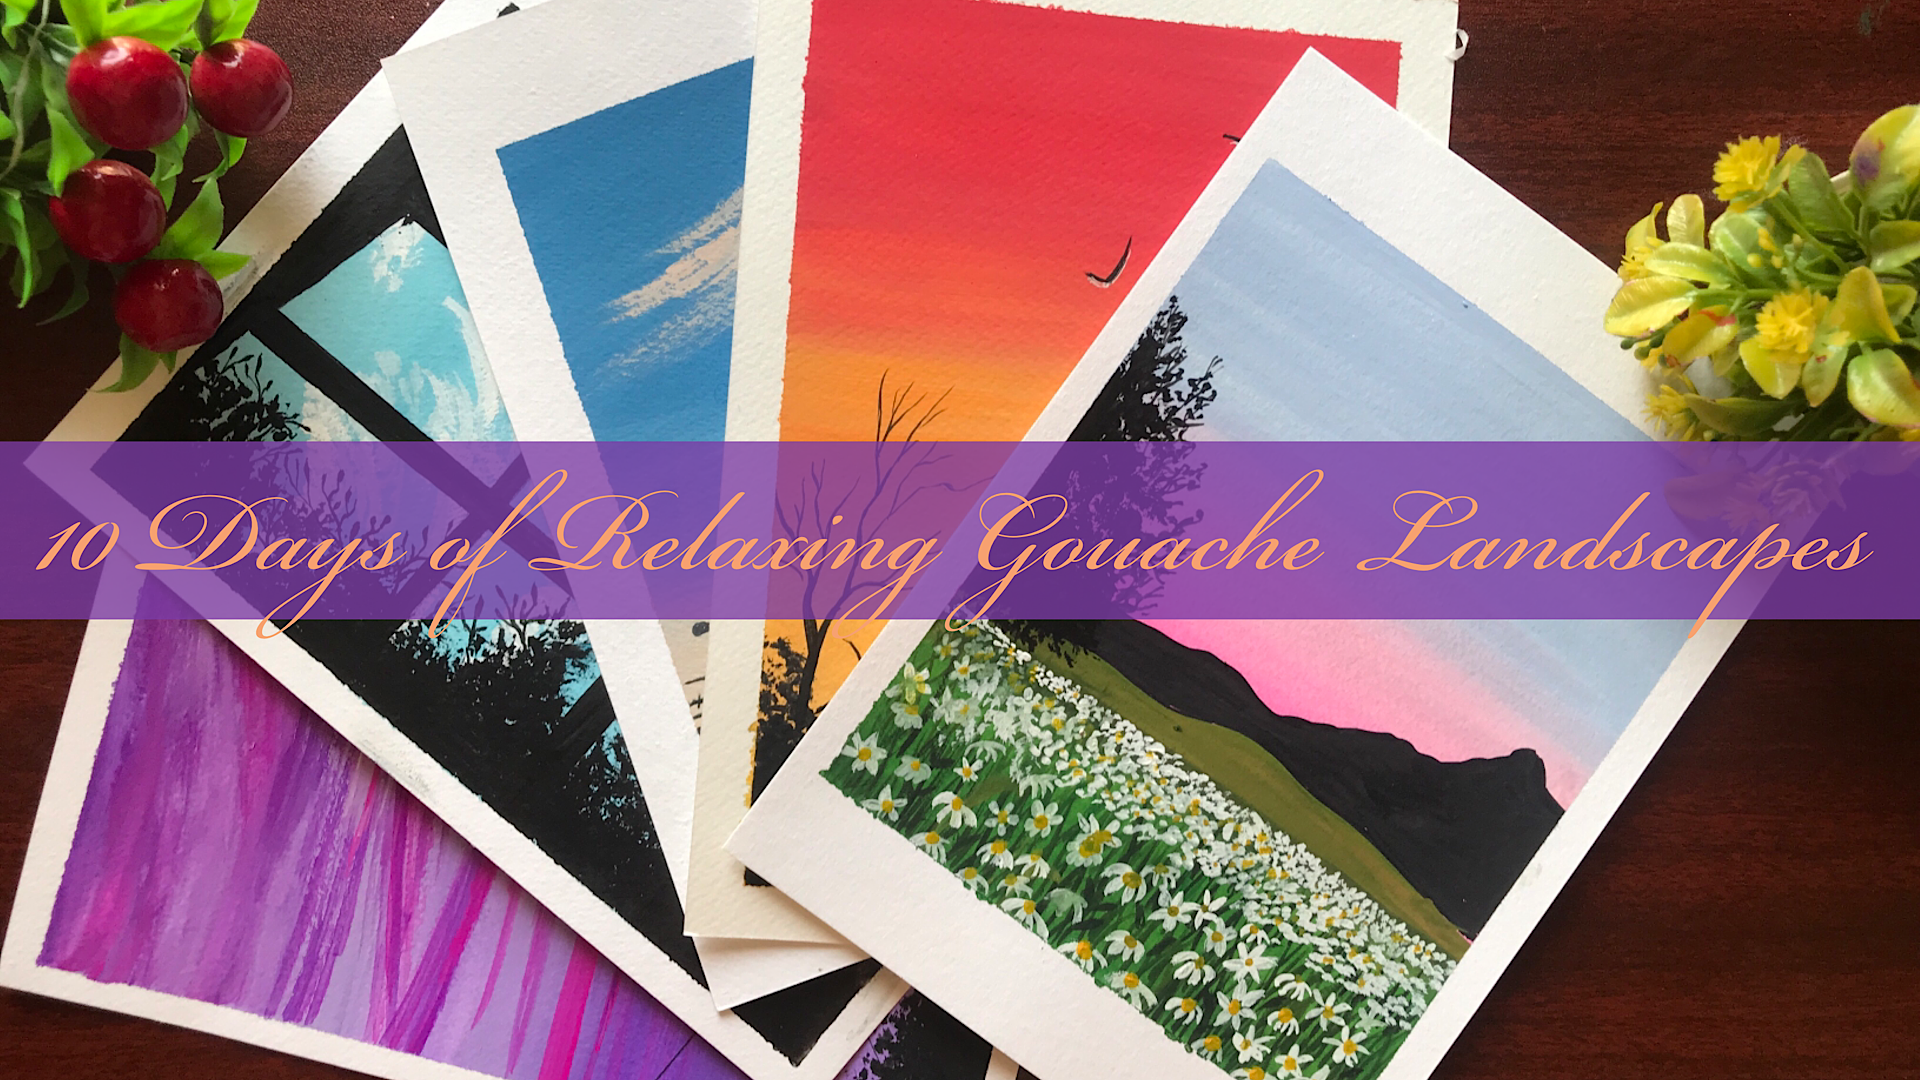
1. Introduction to the Class: Hello everyone In myself, richer and welcome back to another amazing
sculpture class of mine. And it is all about quash. Yes, you had to try
this glasses standards of relaxing gorgeous
landscapes will be learning ten beautiful landscape and easy step-by-step
process learning different depths and
techniques of gouache and how to apply them
without any delay. Let's get started with
a beautiful class. And thank you so much
guys for joining me in.
2. Art Supplies: Hello everyone. So let us know the art
supplies we need in order to create beautiful
landscape in this class. So I'm going to use a 300
GSM watercolor paper. It's twenty-five percent cotton. And I'm going to use
the smooth side, not the textured one. If you have this kind of paper, you have to use the smooth ER, smooth ER side of this paper. We need some synthetic brushes. This is a flat brush number
11 from Bruce shore. Dessert round brush number
three with a pointed tip. In order to create
such fine details, round brush number two. And we need to find the Taylor. Whatever you have. It will do the colors
that I'm going to use, these flash paints,
gouache colors. And there are many, but
I do have gouache colors as they are also
available in tubes. They are also available
in jars and Cops. Whatever you have if
you don't have gouache, then you can also work
with bolster colors. Okay, let's move on
to the next chapter.
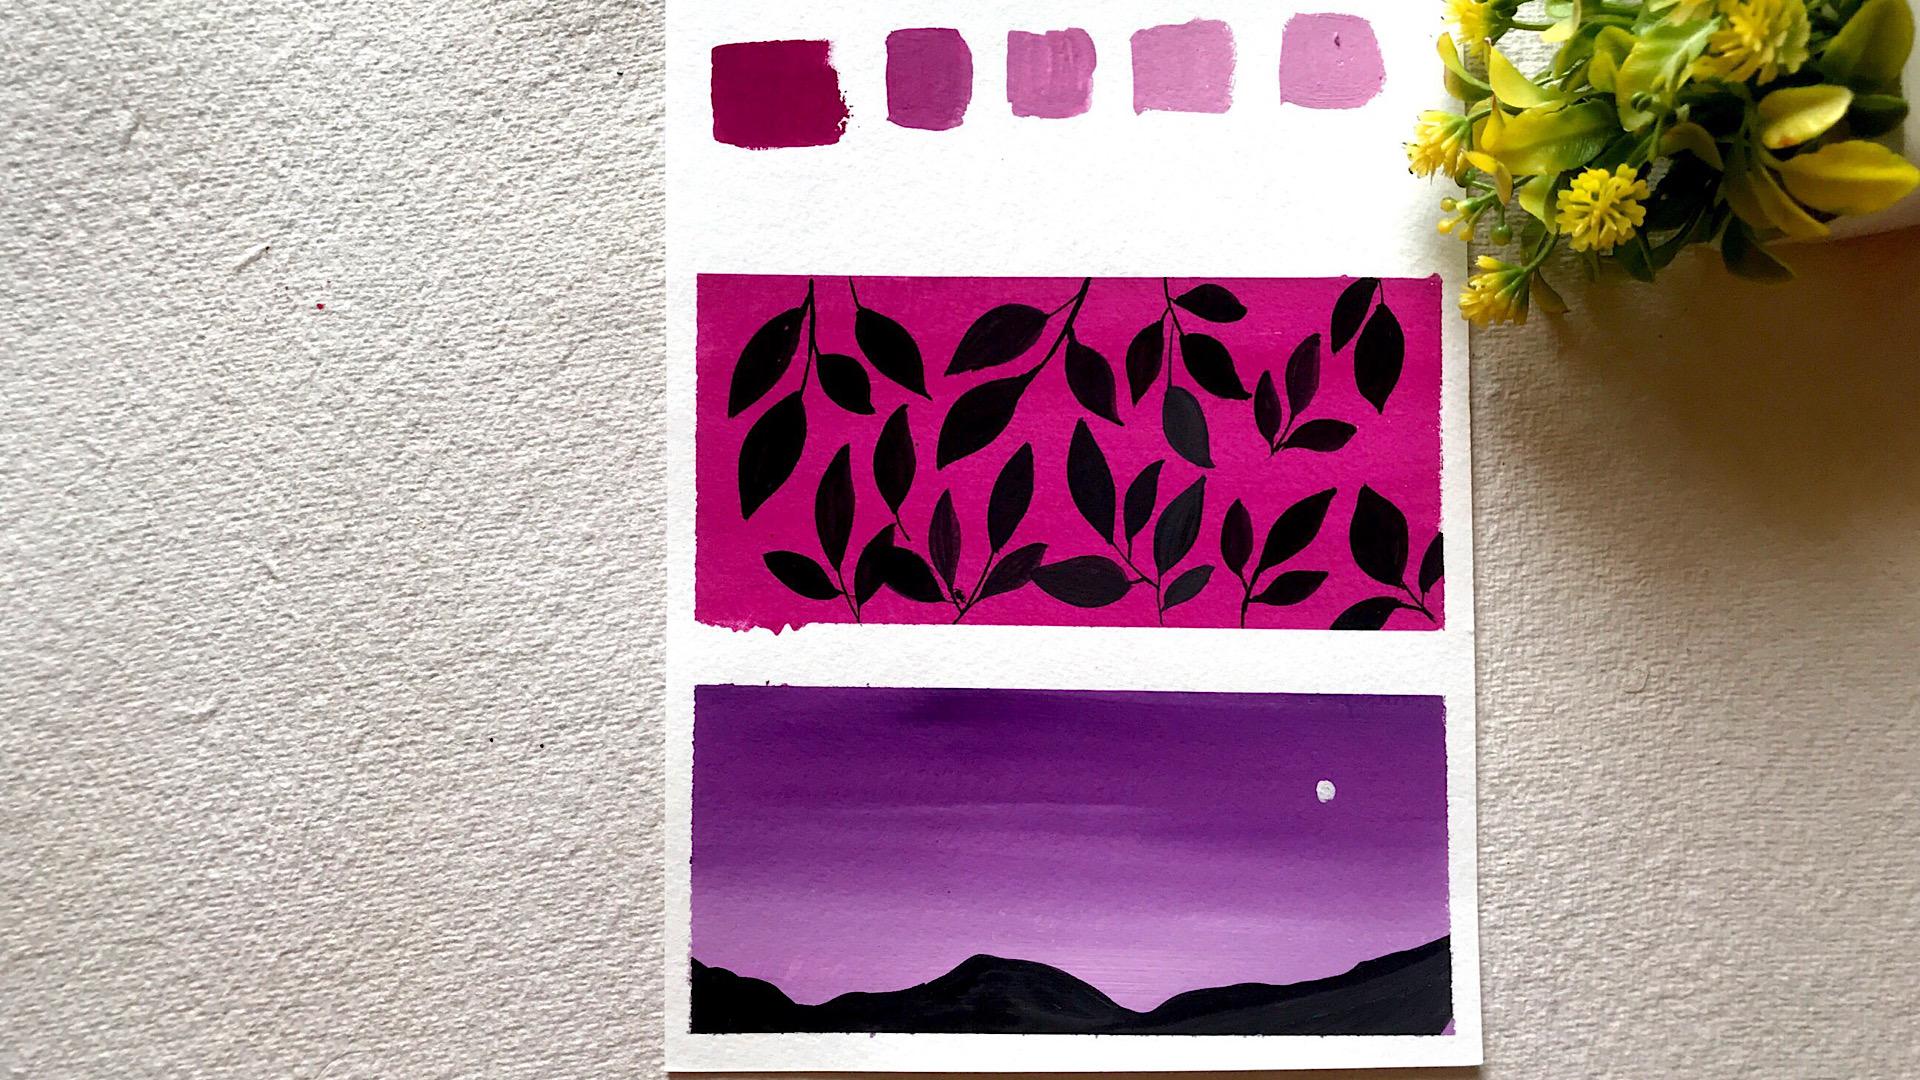
3. Basic techniques of Gouache: Hi everyone and welcome
to the basic techniques. Of course. In this section we'll be learning tonal
values, hunt Rajiv, different tonal values
and how we'll mix two colors and blend two colors with the help
of a white gouache. And we'll be creating a
flat gradient and will be creating a Flat Bush and a two-color gradient
without any delay. Let's get started. So I'm gonna take whitewash from rostral morph color from Art Philosophy and rose
color from Bruce, true. Okay, so first we will learn
about the tonal values, how we will achieve
different values of the same color in gouache. When we're talking about
different tonal values, we will achieve them by mixing
white and the base color. In this way, we will get
different tonal values. So here I have taken rose color and Bitcoin cash in
my color palette. And I'm going to
mix these colors on a creamy texture consistency. I'm going to dip my brush. Make sure your brushes damp. It shouldn't hold too
much water otherwise, the Gershwin work
as an watercolors. Once you have your damp brush, to just put it on paper towel, dab it like the way I am doing. Okay. You have to just
dab it on the towel and gently mix the colors
like the way I am doing. So I'm gonna put the darkest tonal value of
a color that is rose color. And this feel like
the way I'm doing this docker is tonal
value of our color. To achieve the lightest and to achieve the next tonal
value of this color, I'm gonna mix white
with my color. And gradually when eventually
we'll get one tonal value. And after that, if you wanted to get another line will
mix white in that. So in this way we'll get different values of
the same colors. Now for the third tonal value, I'm gonna mix a bit more
white to my base color. In this way, we will
get done tonal value. We're gonna repeat
the same process in order to achieve our
next terminal value. Let's start with
the blending brush like and watercolors in guage, we also have a flat wash
blend gradient wash. That means a board
single color background. And I'm just going to add a bit of water in my
brush and I'm going to get my paint to our
texture and consistency. And C, We are gonna, I'm gonna use my brush here. I'm going to create
nice background. Whenever you want, just creating a flat green flag wash.
Make sure you are just taking your brush in one direction so the brush
won't leave any strokes. Like the way here I have done. We have achieved welfare. Single flat wash. For
the one color blending. I'm gonna take some more
color in my palette. I'm going to dip, dip
my brush in the water. I'll remove the excess water and prepare my color
on a creamy texture. I'm gonna start from the
top of our painting. You can see I'm going down. I'm going to dip my
brush in the water, just the upper part of my brush. Brush because we weren't
up to us to be damp. I'm gonna act some more color. Now I'm going to add by it. The bottom part of our being gonna have a nice
gradient background. From light purple
too, dark purple. Brushes dry. My color is red, so I'm gonna dip my
brush in the water. I'm gonna do it. So if you feel
your colors light, you can add a bit of dark shade. The topmost part. We have a nice
gradient background. Light bulb Bu, too dark. Let's see what we can create
with these backgrounds. So I'm gonna let it dry for some time and I'm
gonna come back and let you know what we can do with these
kinds of background. Let's see what we can create
on our first backgrounds. So this kind of
backgrounds are also used to create guage patterns, saw, lead the BSD clear, dry, otherwise you will
reactivate the base layer. Make sure your colors
perfectly dry. There was black in
my color palette. I'm gonna use it to create
some leaves pattern. I'm going to use my round brush. Let's create some
folder bathroom. Gouache is one of the most, was the dye medium. Traditionally that's
opaque, meet matte finish. Watercolor activated. Like this, we can create different
types of pattern. Unlike watercolors, it is reusable and not
water resistance. Whenever you are
creating these kind of pattern to create the stem, always use the tip
of your brush. Gently draw the leaf
part and just press your belly of your brush. Just complete the leaf. What are the
qualities of garage? It's opaque, matte,
quick drying, water mixable, and can be
reactivated with water. If you add too much of water, it will activate and
evoke like a watercolor. So if you warn the velvety
matte finish off your watch, you have to use it in
the right creamy texture where you just have to add a little bit of
water in your color. Get that consistency. Only in that consistency you
can work in multiple layers. Otherwise, what
happened if you're not using it in a
climate consistency, your base layer
will be activated and it will spoil
your whole artwork. If you don't have
gouache colors, then it's perfectly fine. You can also work with
bolster colors as it have almost a similar
qualities of kwashiorkor. So in this way, we can draw a leaf
pattern on a flat. Wash off. Gosh. Let's see what we
can create here. We can create a landscape, we can create a mountain, and let's do it. It's just a simple landscape is completed. You will have a nice landscape with the background
that we have created. In our technique section. I'm gonna wash my brush. Now, paternal paper towel. I'm gonna take some white
and I'm gonna create a little moon here
to complement. See how beautiful it's looking. So let's remove the tape and
see how our creations look. These are the tool
miniatures that we have completed in our
techniques section on, as you can see that a
zone defense phenomenon. This is all that we're gonna
do in our project section. So let's move on to some more techniques that we need in order to
create our landscapes.
4. Basic techniques of Gouache-2 2: Hello everyone and
welcome back to the basic techniques
of garage part two. And in this we'll
be learning how to create a tree silhouette bushes, and hard to create
goodwill clouds. Without any delay.
Let's get started. So I'm gonna use my
dry brush technique, it's run mine and
everyone is using, so I'm gonna use my mop brush. This is a small mop brush and I have just dip the tip of
the brush in the water. Then I just dab some
brush in my color. And I'm going to dab
it on the paper. As you can see, it's
a random process. There is no particular way, but in this way you can get there naturally
effect on your bushes. Once you have done dabbing, grab a liner brush
or 0 number brush, show one number on brush, and start adding
some mini leaves. The hearing deal
with small ranches. Once it is done, you'll have a nice looking natural bushes. Now let's paint a
tree silhouettes. I'm going to use my
two number noun brush. First, I will draw the stem, the trunk of a tree. And slowly when I'm
moving forward, I'm going to tune it out. Make sure whenever you are just drawing the branches of
your tree silhouette, use the tip of your brush to
create thin branches, right? So it will give
more natural look. You can read down P0 dash, dash on the tree branches to
create the leaves effect. Now we will learn
how to paint clouds. I'm going to paint
a minima ground using the lemon yellow
and dark pink color. Now I'm going to use dark pink in the bottom
part of our painting. And we're gonna mix it. We're gonna blend it. Okay? I'm not gonna use white color because these are the colors that
compliment each other. So we don't use
right here, right back down, does DD solvable now paint the
clouds and I'm going to use two number round brush
to paint the clouds laid. I'm gonna dig dark paint
to paint my clouds goes. We are showing a contrast here. And the pink is
up, isn't perfect. And trans through
the lemon yellow. You'll have to draw linear
lines very light handedly. Don't put too much
pressure on your brush. Just randomly. Start, join many
lines, ten lines. And we're going to
draw diagonally. And we're going to
drag it from left to right because we are showing that our clouds are
flying from left, right to left, sorry. The brushstrokes that we will do will be from right to left. As you can see, our clouds are
getting sheep as we are just doing the brushstrokes, the right to left. And it's not a rocket science, you just have to practice
it before applying. So I'll suggest just
practice it in this way. Paints a miniature
backgrounds for your clouds and practice on
that like the way I am doing. And once you are
confident enough, then move on to the
painting project. Now I'm going to paint a little mountain silhouette
on the horizon line. Once it is done, we will do the shading
part in our water to shoulder reflection of
our beautiful evening sky. The color that I'm gonna
use is lemon yellow because the shades of this guy are dark pink and yellow and our
water is already pink. So I'm going to use
lemon yellow and the brushstrokes I'll be doing is from left to the center. Like this. The way I am doing, I'm just dragging my brush
from left to the center, but don't put too
much of pressure. Don't put extra
water in your brush. Your brush should
be damp enough. Unite and once it is done, you'll get it right. Painting exercises
almost complete. And once it is done, I'll be drawing a small son
just above the mountains. I am doing. Once it has done, our basic techniques of
the Gaucher complete and I hope you guys have enjoyed decisions utilizing
the next one.
5. Sunset silhouette Day 1: Hello everyone and welcome back. Today we are going to
paint a beautiful sunset, silhouette landscape and
the colors that I'm using. Lemon yellow, dark yellow, acromial, if you have read. So I have started painting from the bottom
part of our painting. And I have post use
the lemon yellow, then I have used
the chrome yellow. And I'm going to blend it nicely because these colors belong
to the same category, so we don't have to
use white color. And in that I'm using now, I'm going to blend the colors. But the dam dash, okay. Blending part is done. And we have created a beautiful background from light yellow to dark
yellow and then to red. So once again, I'm going to apply the colors in the
second layer because I want it to be a bit on the vibrance side
and darker sheets. So I'm going to apply
the colors again. And now once we are done with
creating the background, now we will be doing
the silhouettes. So this is the exercise that I have told you in the basic
techniques part two. We have to follow
the same procedure for creating the bushes
and the tree silhouette. And I'm going to use the
black color. Silhouette. Painting is almost
some little buds. Josh, if you're not comfortable
drawing it with objects, you can also use them
to create the buds. Okay, I'm going to
add white highlights with the help of a signal
jail white gel pen. It will look more realistic because the light is
shining on the buds. Once this pandas done, we will remove the tips and we will do will
the final painting. And I hope you guys have
enjoyed this session. Thank you so much
for joining me in and see you guys
in the next one. And don't forget to upload your projects in the
project section. I would love to share them on my Instagram. Thank you guys.
6. Sunset Hues Day 2: Hello everyone and
welcome back to the second day of our
garage beginner's class. In this will be
painting a beautiful evening sky and the
colors that I'm using, Prussian blue, flesh tint from Bruce shop, and lemon yellow. Chrome yellow, if you
have any of the colors, white, gouache and backwash. Here I'm mixing my color. I have taken one bud off, Persian blue and two-part
off, white gouache. And make sure your color should
be on our climate action. And if you don't have
fleshed in sheet, what you can do is
take one bite of garage and makes one or two drop a little drop of red in it and you'll get that
color flesh trend again. So once our colors are
really, will start painting, aren't colors are ready
and we will start painting the top part of our
painting, the sky. And I'm using Persian
blue mixed with white. And the second in the bottom
part of our painting, I'm going to use flesh tint. So make sure whenever we are
just switching your colors, clean your brush
properly in the water. Okay? These are the colors
that compliment each other. So I'm not going to use that
patch of white to blend it, only a little bit of it to
give it a perfect Glenn. And I'm going to take
invite street on my brush. So if you're not comfortable
with this technique, you can take the white in
your palette and mix it, mix it, and then you can use it. Once we will have the nice
blend like the way I am doing. I'm going to add
some chrome yellow. The bottom part of our painting. Blending is a key
factor whenever you are just working
with gouache. So you have to go easy
and take your brush and slowly just blend
your colors in advance. You feel that your gradient is perfect and let it
dry and then move on to the foreground layer or layers that you want to use. Here I have added a chrome yellow and the
bottom part of our painting, and I'm not going to use white here because we have fleshed in DOD mixed with both of
the colors very nicely. Once it is done, we will start
drawing the clouds. And to paint the clouds, I'm using the color fleshing that's available in my palette. I haven't added
too much of color, so I'm just using the remaining color
that's in my ballot. Finally, our
painting, the clouds, make sure your brush
doesn't hold much water. It should meet damp, just only damp enough
to create the clouds. Okay, otherwise,
what will happen that you will activate
the base layer and board of the color
will mix up on one, give that effect, that
desired effect that you want. Right? Now I'm going to draw the silhouette of our painting with the
help of a pencil. And once we have completely then use a black
wash to add the ADD is. And what you can do
is you can also use a black font color to
create the fine details. Blake wash in my palate to draw the silhouette
of our painting. And those will be
the final step. And after that morning,
our beautiful sky. Using the full ground
off our painting, you can use any gel
pen or fine line. What do you have?
That's completely okay. If you want to join mid-quarter,
that's completely fine. You can do whatever v
you are comfortable. The painting is almost complete, so see you guys on
the third day and I hope you guys have
enjoyed the session. Don't forget to upload your projects in the project section. Would love to share them
on my instinct now, thank you so much guys for
joining me and thank you.
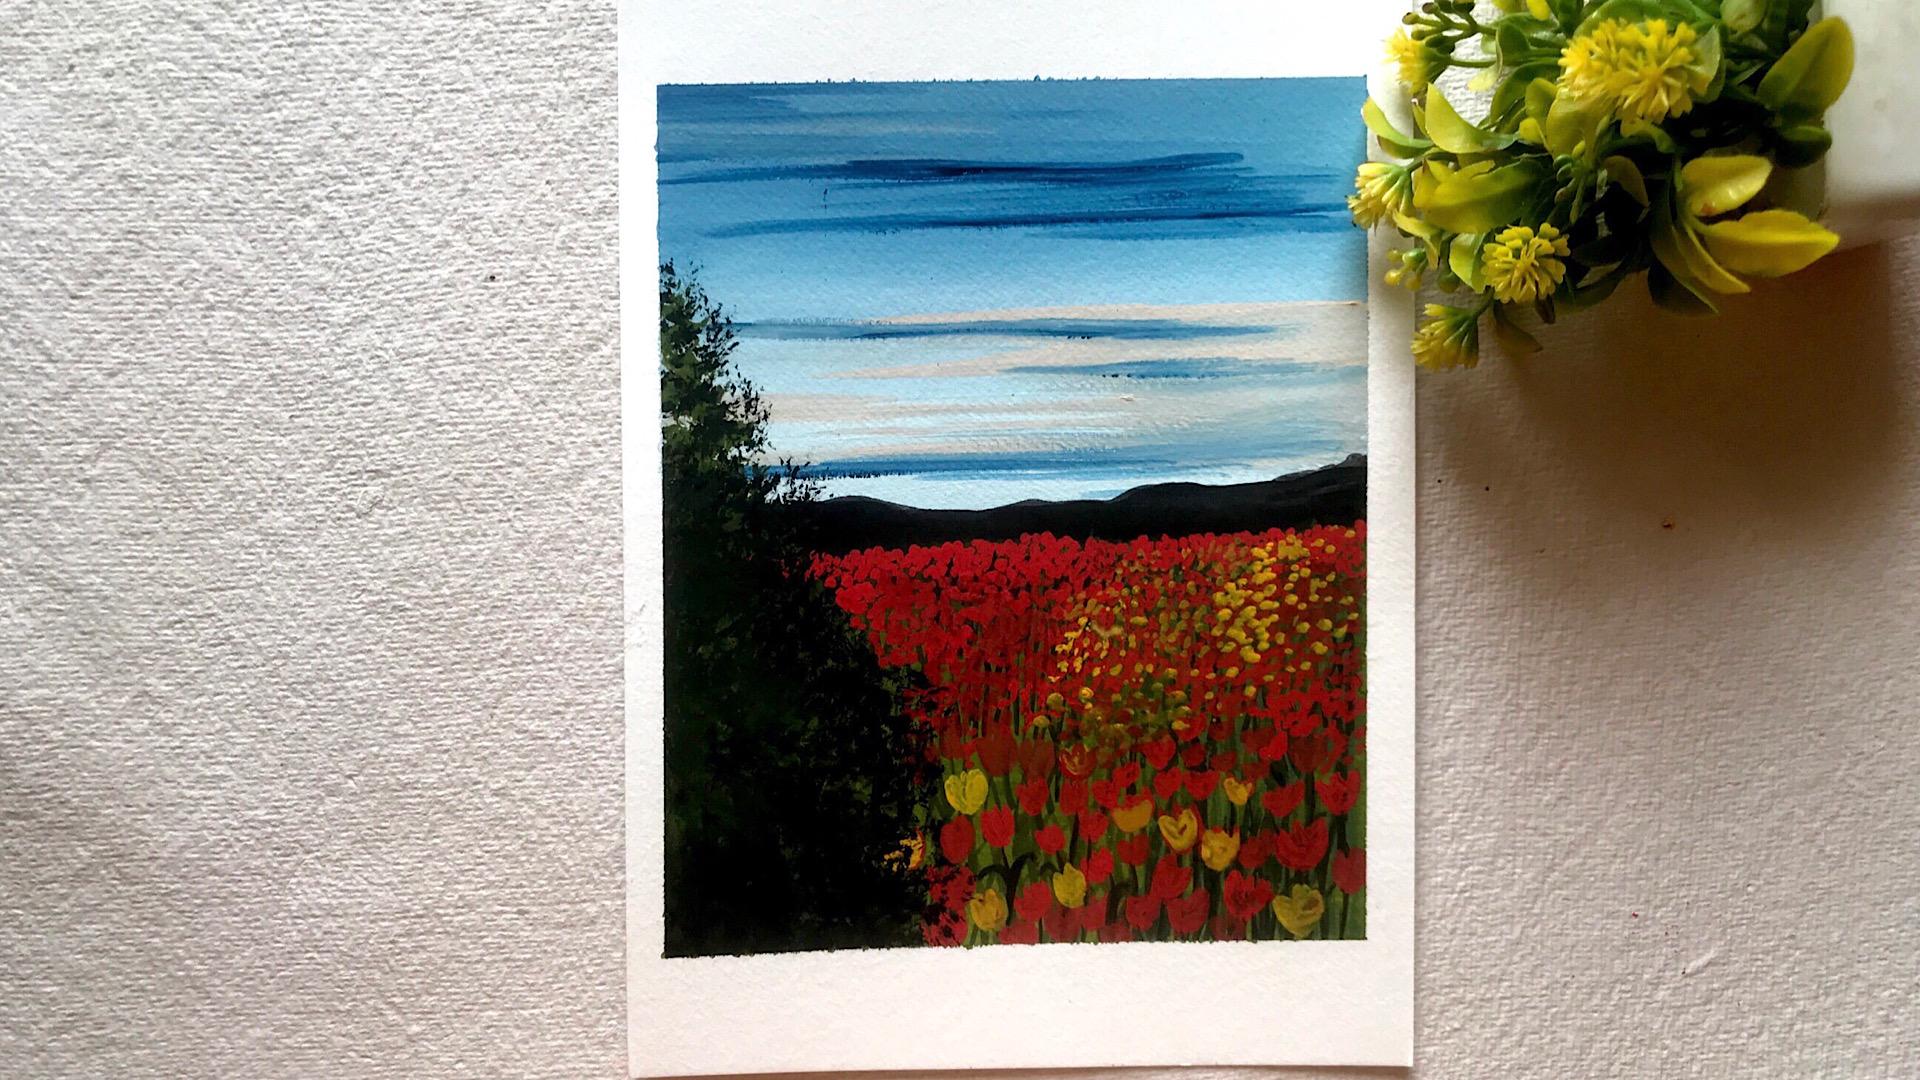
7. Poppy flower field Day 3: Hello everyone and
welcome back to another chapter for offer
gouache thickness class. And today we are going to paint a beautiful poppy landscape and the colors that I'm going
to use a deep green, red green watermelon,
burnt sienna Bush in blue, white gouache, and black wash. Without any delay, let's get
started and mix our colors. So I have taken one side of
Persian blue and a two-part of white gouache
to make our sky. Let's mix up the colors. Remember that we have to make some color at a
creamy consistency. It should not be w4 tree. Okay, don't add too much. Water. Color is ready. And I have divided my
paper into two parts. And in the top part
of our painting, we will be painting sky using the color that
we have created. So do not add to mature further, your brush should be damp, just damp enough to get the
colors nicely on your brush. And I will start beating from the top part
of our maintain. And in the midsection I'm going to add a bit of white because on the horizon line beam on to make us guy a little
lighter, blue shade. Now I'm going to blend
both of the colors nicely from downwards
to our first see. We have a nice gradient from
dark blue to light blue. And it looks so beautiful
when you have created it. Now I'm going to take
a bit of flesh dent. It is from rostral and if
you don't have flushing, then that's completely fine. Take one part of guage and add one or two drops of red into it and you'll get
the fresh date sheet. Okay, So we're gonna use
it to create the clouds. And once we'll paint the
clouds with flesh tint, I'm gonna highlight it with
my NDA, dark blue shade. Those shows that I am doing. These are the diagonal
strokes that I'm doing. So these will be the most simpler way to paint
the clouds if you want. The most easiest
way that I feel. I love fitting in this week. Once we are done
with flash sheet, we will add our
highlights to our clouds, blue and the dark blue. Now I'm going to add
the highlights from the color that we have
created in our palate. Okay, you don't have to
add too much of glue, just a very light
shade of the blue. And the dark blue shade we
will add on top of the clouds. Suggest to give it
that contrast club. In this part of the painting, I am going to add dark blue
contrast color in the clouds. It will give a contrast effect. Definitely it's gonna
look so beautiful. This guy part is done. We will remove the tip and paint the mountains on
the horizon line. Now, our mountains Florida has done and I have taken
the deep green color. You can take sap green if you have that and palate,
that's completely fine. So we'll make Sakalava
creamy consistency and vivid paint. The base layer for our tulip feeling August. So obviously, if
this layer is ready for her to live P and I'm
gonna take mid green now. I'm going to add a
bit of deeply in, in that and we will create the grass and the second
layer for our two live feed. Okay. It also added burnt sienna and my palate. So we can add the highlights and the grass field to create
the puppy floss and dad. Now we're gonna create
the second layer. Take the second two number
round brush and start making those strokes from downwards to avoid it like
the way I am doing. And we have to create these strokes and
the complete field. So our second layer for the truly p will
be trading. Okay? I'm going to speed up this process because this is the same thing that
I'm going to repeat. Here. I have added
a bit of black in my green mix because I was, I'm having a feeling that the
green color is very light. So in order to add
the highlights and our grass field
for puppies for, for p plus, we have to take
bit darker tone of green. While you are
painting this grass, you can also add the
burnt sienna highlights between here and there
to highlight the grass. In the distance AD on
the auto mountains, the grass field
will be very small. And when we are
coming towards the downward by painting the
grass will be longer. Our second layer is complete, and I have taken
vermillion in my palette. And I'm going to start
painting the puppy flaws in the distant area
near to mountains. The flowers are not visible. So we are going to just put, put small dots there in order to give an illusion of
the puppy floss. And when we are coming to the download pod off our
bottom part of our painting, we will paint some small
tulips hearing there, and I'm going to
use red and yellow. I have started painting small tulips and the bottom
part of our painting. And I have speed up the process
because this is gonna be the same thing that I'm gonna
do it in repeat motion. If you feel like
that It's too fast, you can slow down the
speed of the video. I have to live free
lives almost ready. And now we have to
create bushes and the bottom part of our
painting left corner. So we're gonna repeat
the same process that we have a practice
in the technique section, but the color that
I'm going to use here is a mix of dark green
and a mid-plane. And we will create the bushes. And once the first
layer will be dry, I'm gonna add some
black highlights in the same way over the green color to give
it a complete look. Now I'm gonna add DPLL chromium. If you have, let me
use it to highlight some the yellow
tulips here in there. So it is a random process. There is no particular thing like doing in a particular way. We just have to create
small dust hair and dead. And the red you looked at, we have painted in the
bottom part of a painting, I'm going to paint some
yellow tulip also. We will be painting some bushes with the help
of the green that is in our palette using
the technique that we have learned in the
technique section part two. As the base layer will dry, I will add some
black highlights, the same as we did in
the technique section. And once it is done, our painting is complete. And I love you guys have
enjoyed the session. Don't forget to
upload your projects in the project section. And thank you so much
guys for joining me in. So let's remove the deep and
reveal the final painting.
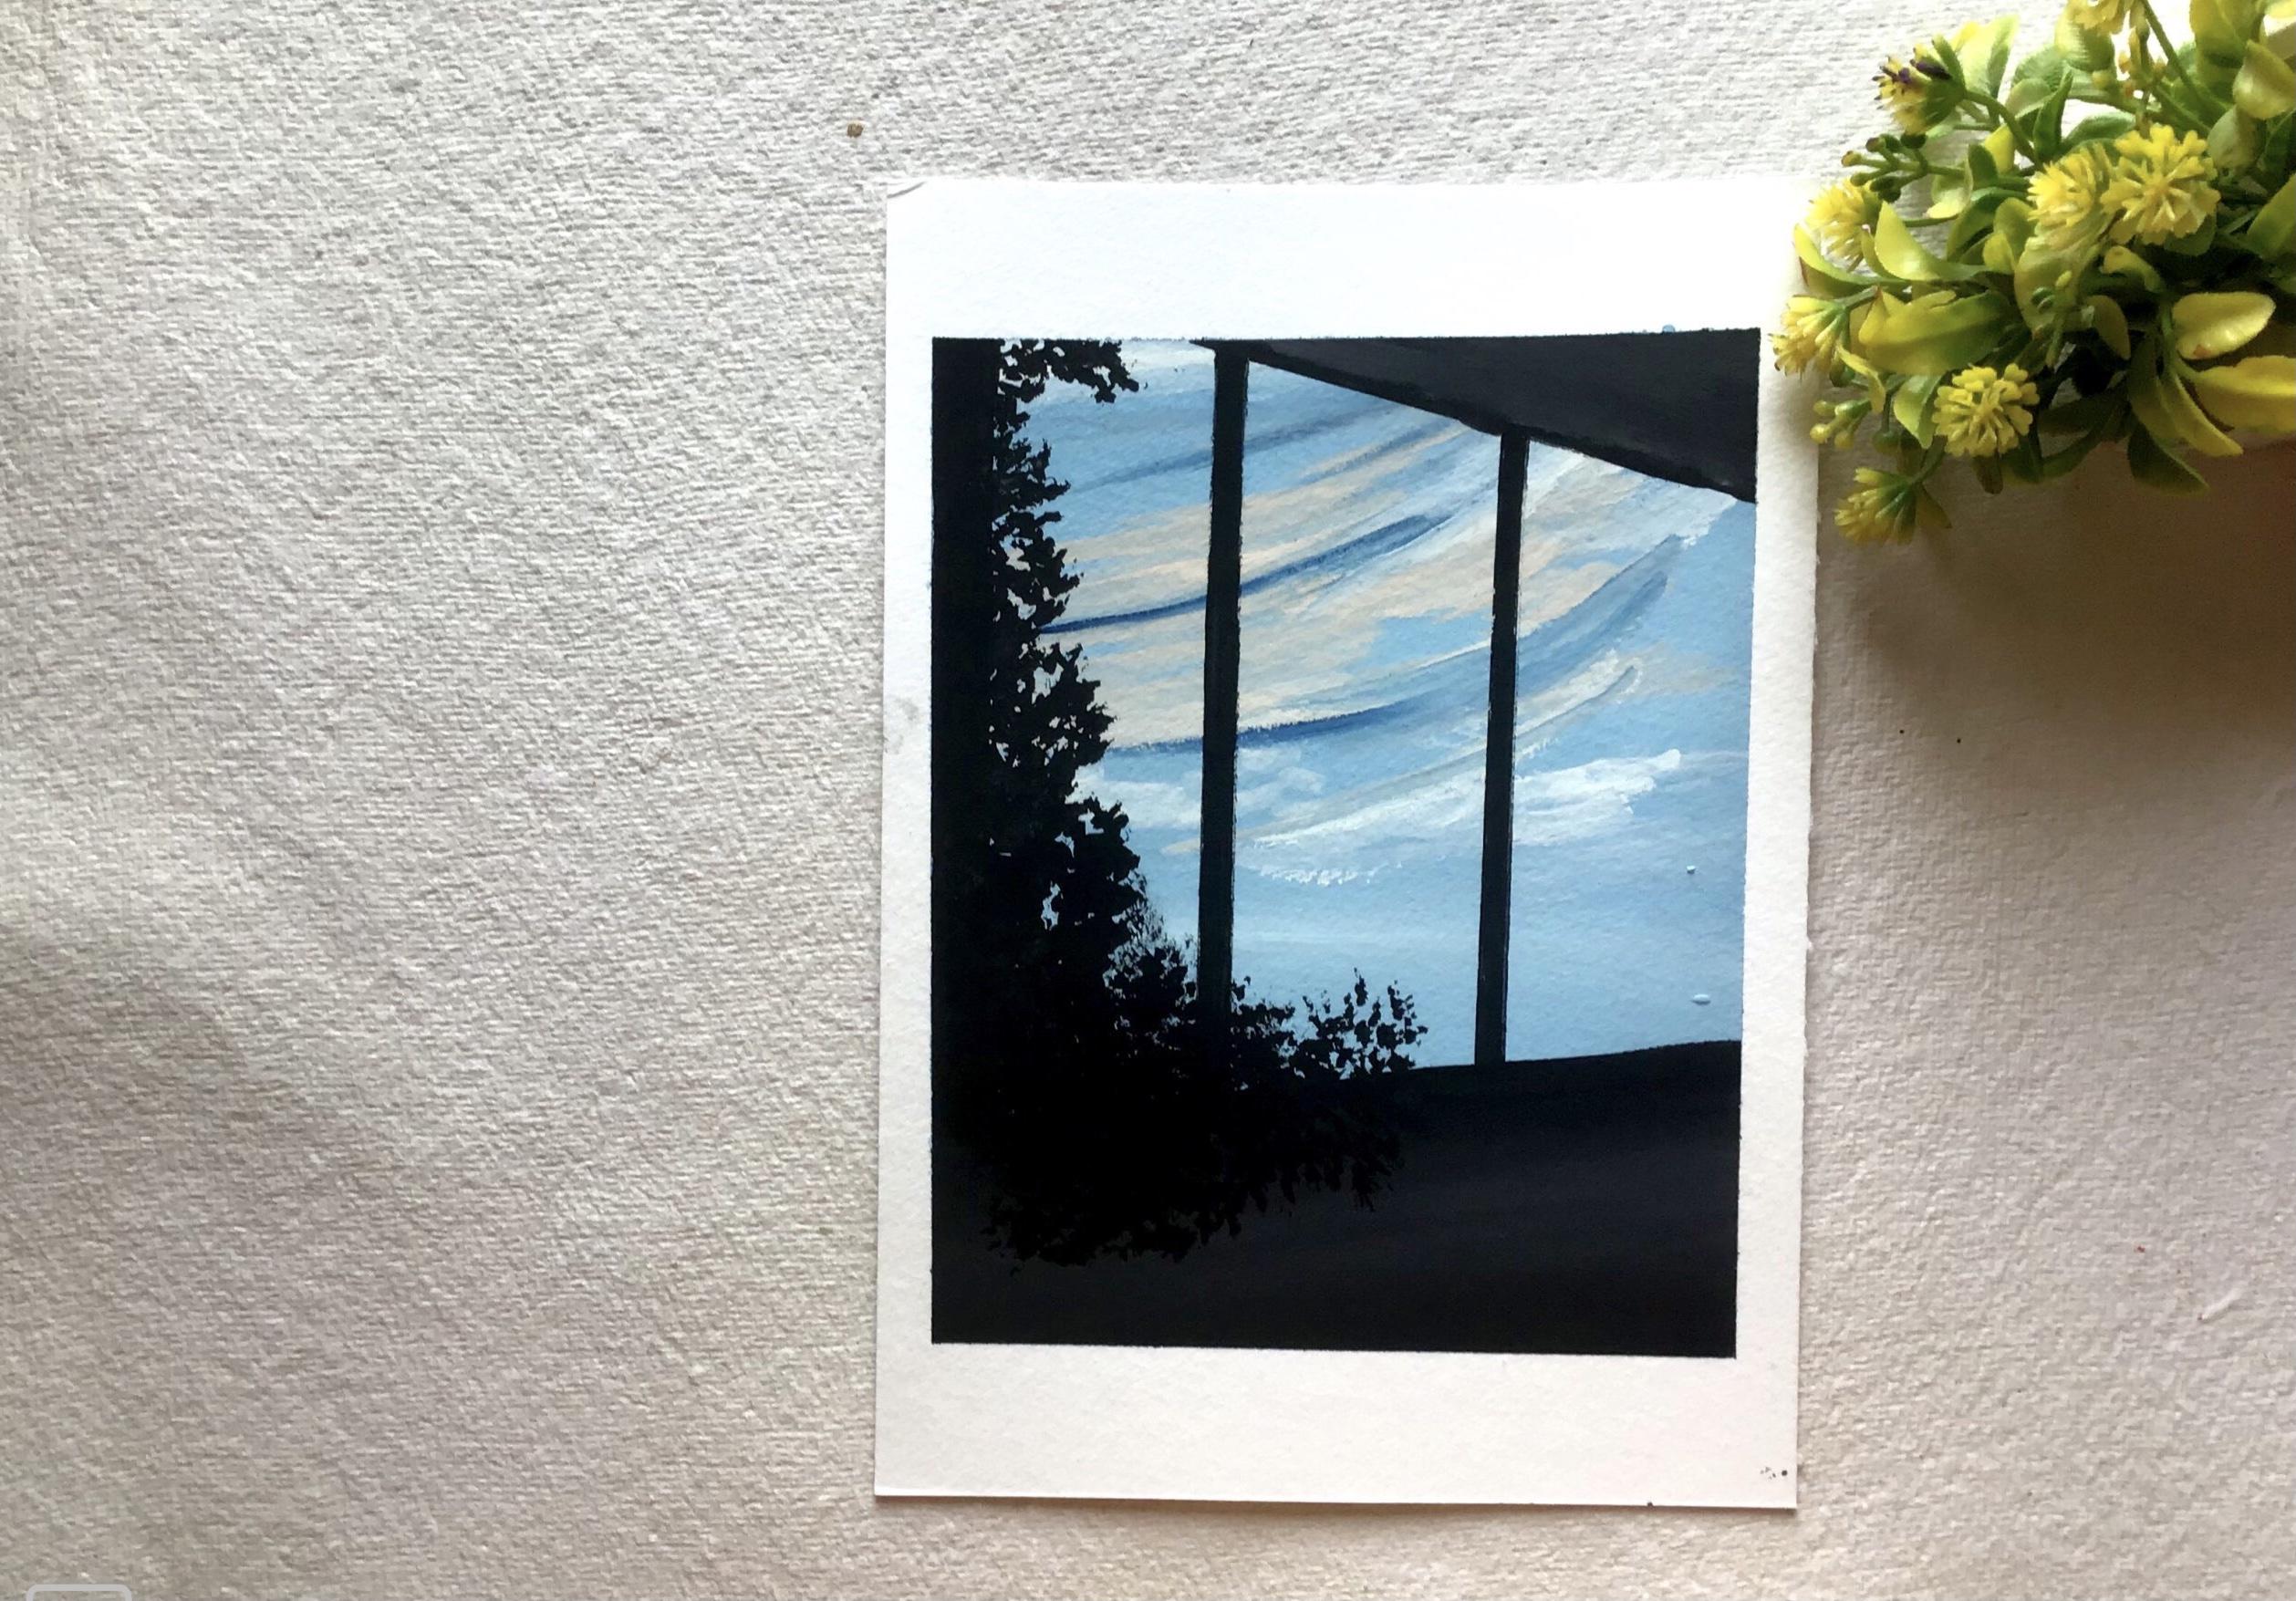
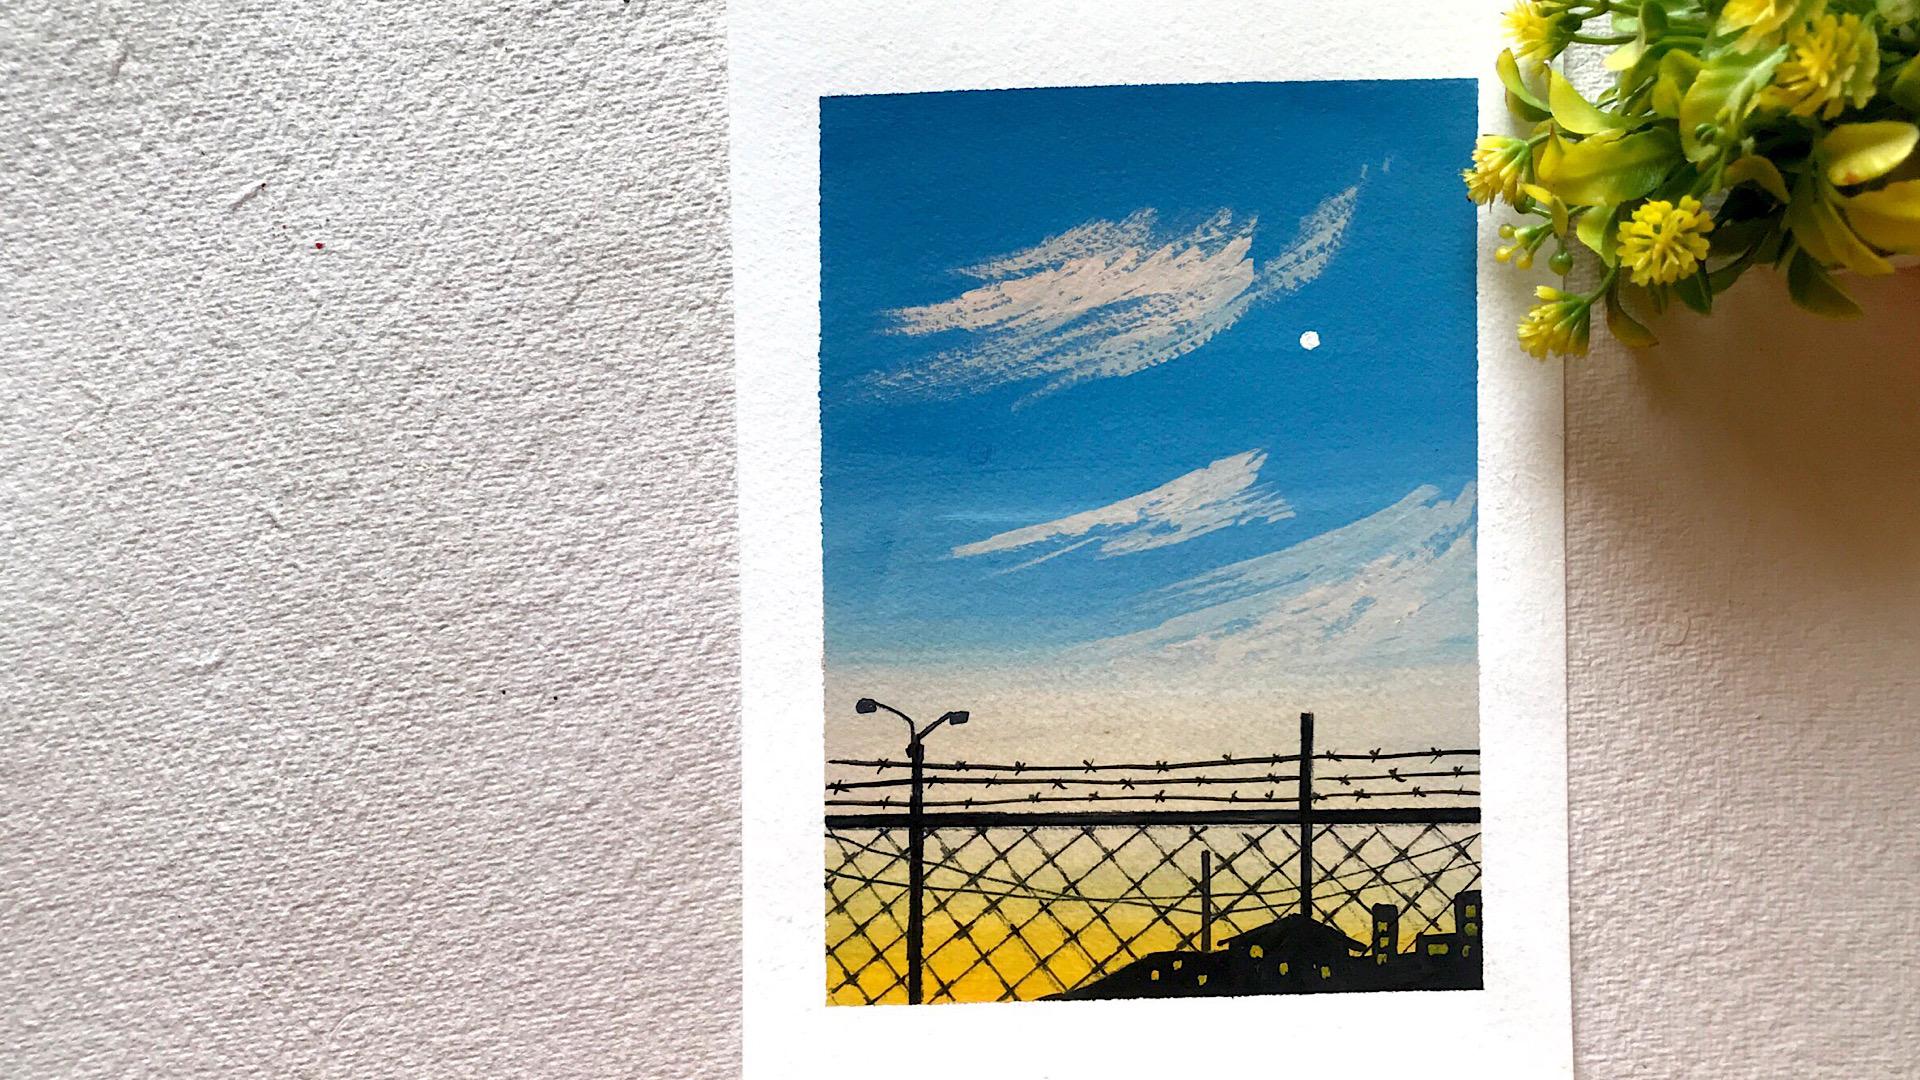
8. Window Scenes Day 4: Hello everyone and
welcome back to another amazing chapter of ten days of relaxing washcloths. And today we are gonna paint a beautiful sky scene
from the window. And the colors that we're
going to use our potion, blue, one part of Persian blue
mixed with two parts of white and a shade of flesh dent. If you don't have, then just mix one part of white gouache and one or two drops
of vermilion or red. That will be perfectly fine. As a color is ready, we will now start painting
our sky in the background. And we're going to use this guy blue color
that we have prepared. And in the bottom
bottle feeding, I'm gonna use a bit
of white gouache. Highlight the light sky shade that I have taken war
straight from the tube. If you're not comfortable, you can also mix it in your palette and you
can proceed further. Background is released, so I'm going to make splashed in color. If you don't have this color in your palate, that's
completely fine. Pick one part of the garage
and add one or two drops of red color and you'll get both flashed in she'd and amount. So when I use the
dark tonal value of Prussian blue to give the
highlights too well Clouds. Okay, Let's mix a color on a creamy consistency model of order because if
you add too much, if the garage will lose its opaqueness and
the MAD finish. Once I color is ready, we will start
painting the clouds. So we're gonna start
painting the clouds. And I'm going to
make the strokes from those right
to the left pride. In order to give clouds
a distinctive shape. I've been invited
highlights to our clouds. It should be like
the way I am doing. Start adding the blue
highlights for the Cloud. Still give it a contrast look. Once our background. I'm gonna use postcard Windows. Once we will, we will use the black garage to draw the
silhouette or five window. Paddles done now it's time to add some bushes and
we are gonna use it. They think that I
have to learn the techniques section
part to just dab your brush and the
color and start dabbing it on the paper to
create a double dashes. There is no pulse. I didn't create
all these bushes. It should be random. It shows the VIM doing
follow the process. This completes, remove
the final painting. And I hope you guys have
enjoyed this session. Thank you so much
guys for joining me. I hope you enjoyed it
and see the next one. Thank you.
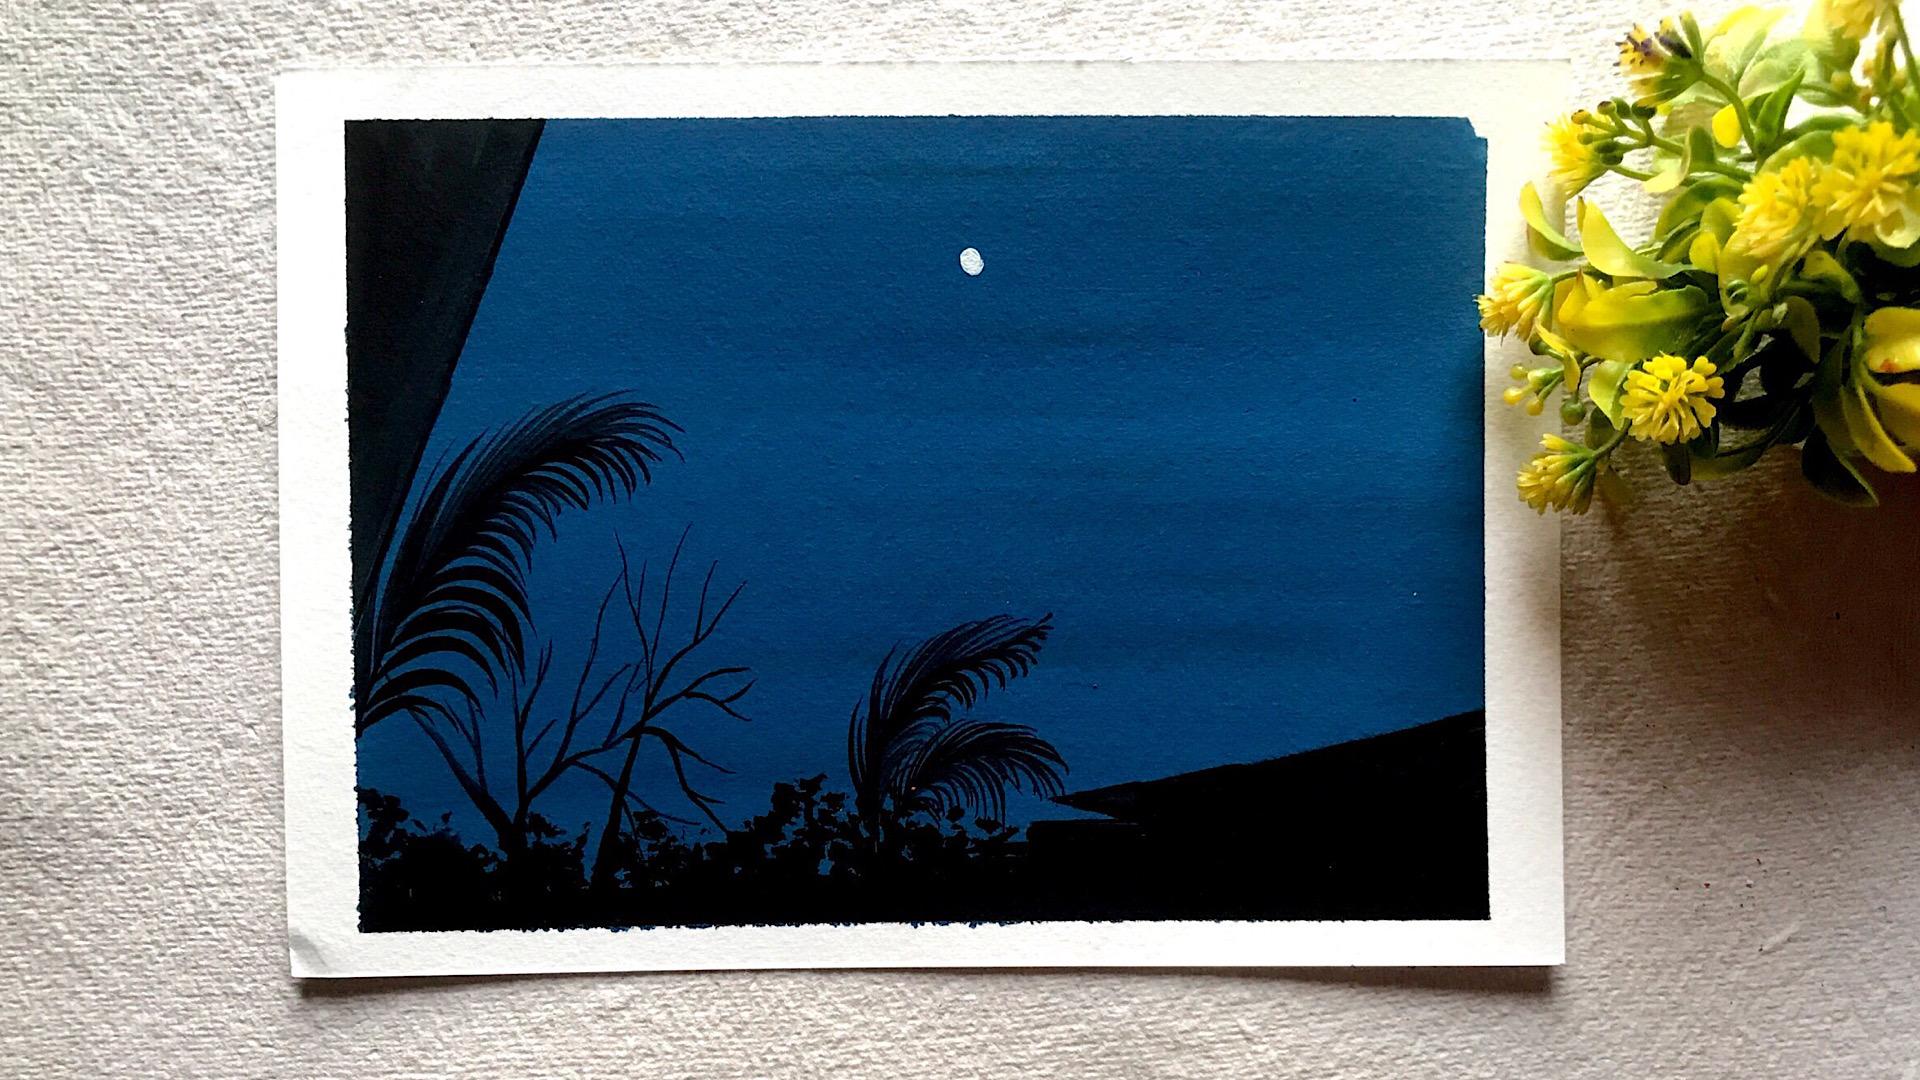
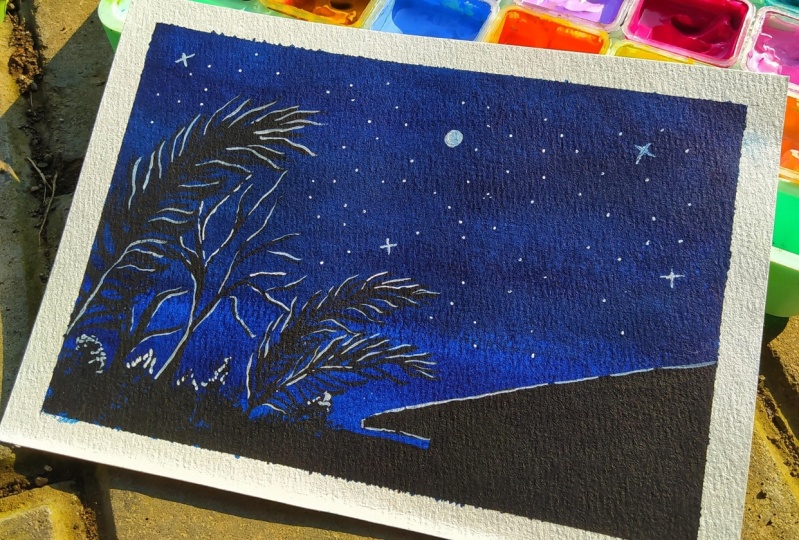
9. Bold Night Sky Day 5: Hello everyone and
welcome back to another amazing chapter or per ten days relaxing
Walsh landscapes. And today we are going to paint a beautiful bald night
sky and the colors that I'm going to use
our one part of Prussian blue and dupatta, right? And we'll be using dark
bank or rose color, whatever is available
in your palette. We'll be using black color
to draw the silhouette part. Let us prepare a color
at a creamy consistency and it will be light tone, a medium tonal value
of Persian blue. We can see that our color is prepared and we will also
prepare the pink color. Then we will start
painting our background. As a colorist prepared. So let's start painting
our background. And I'm going to
use the blue color, the medium donor evaluate or Persian blue that I've created. And once it is done, we will start painting the clouds and make sure you
don't add too much of water. Otherwise it will quash, will lose its
opaqueness and madness. Background is prepare. So let's start painting the clouds and I'm going
to use a dark ping to add clouds as these colors compliment each other
very beautifully. So the clouds, we will be good. It will be enough.
Pinkish shade. Now iCloud part is done. Let's add a gluing mourned. And I have taken white gouache
and very light texture. And we're gonna paint
a small circle. Make sure when you are
painting a glowing moon, your edges should be solved. Lake it shouldn't
be a hard edges. So once will have soft edges and then we
will paint our moon. So now I'm owned by those down. Let's add those silhouette but with the help of a black wash. When you are drawing
the right floors, make sure you are using
0 number brush or your detailing brush to
draw the fine details. Known as dry. So we're
gonna add white shadows to the clouds to give the effect of the more light that is reflecting
on the clouds. Once this part is done, we will start completing
our silhouette. It is almost complete, so let's remove the tape and
reveal the final painting. And I hope you guys have
enjoyed the session. Don't forget to upload your projects in the
project section. Would love to share
them on straight up. Thank you so much guys for
joining me in. Thank you.
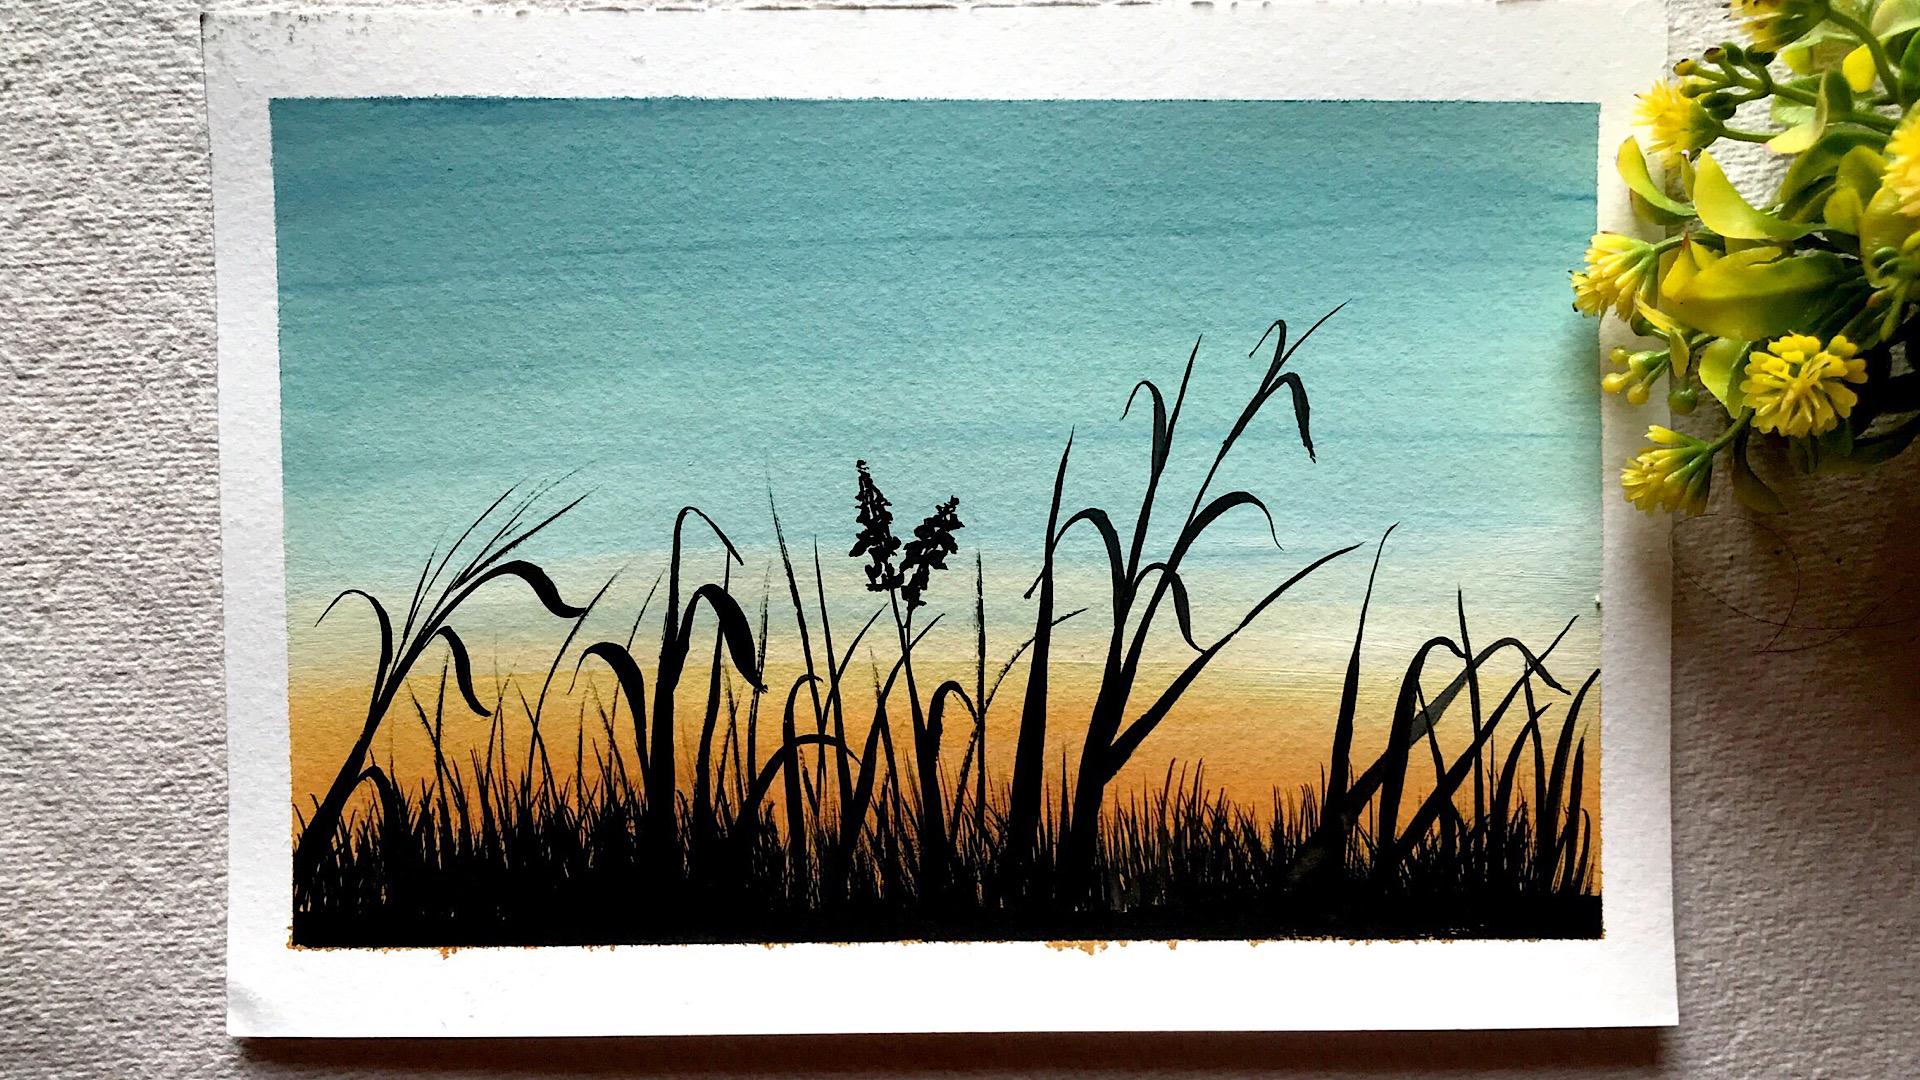
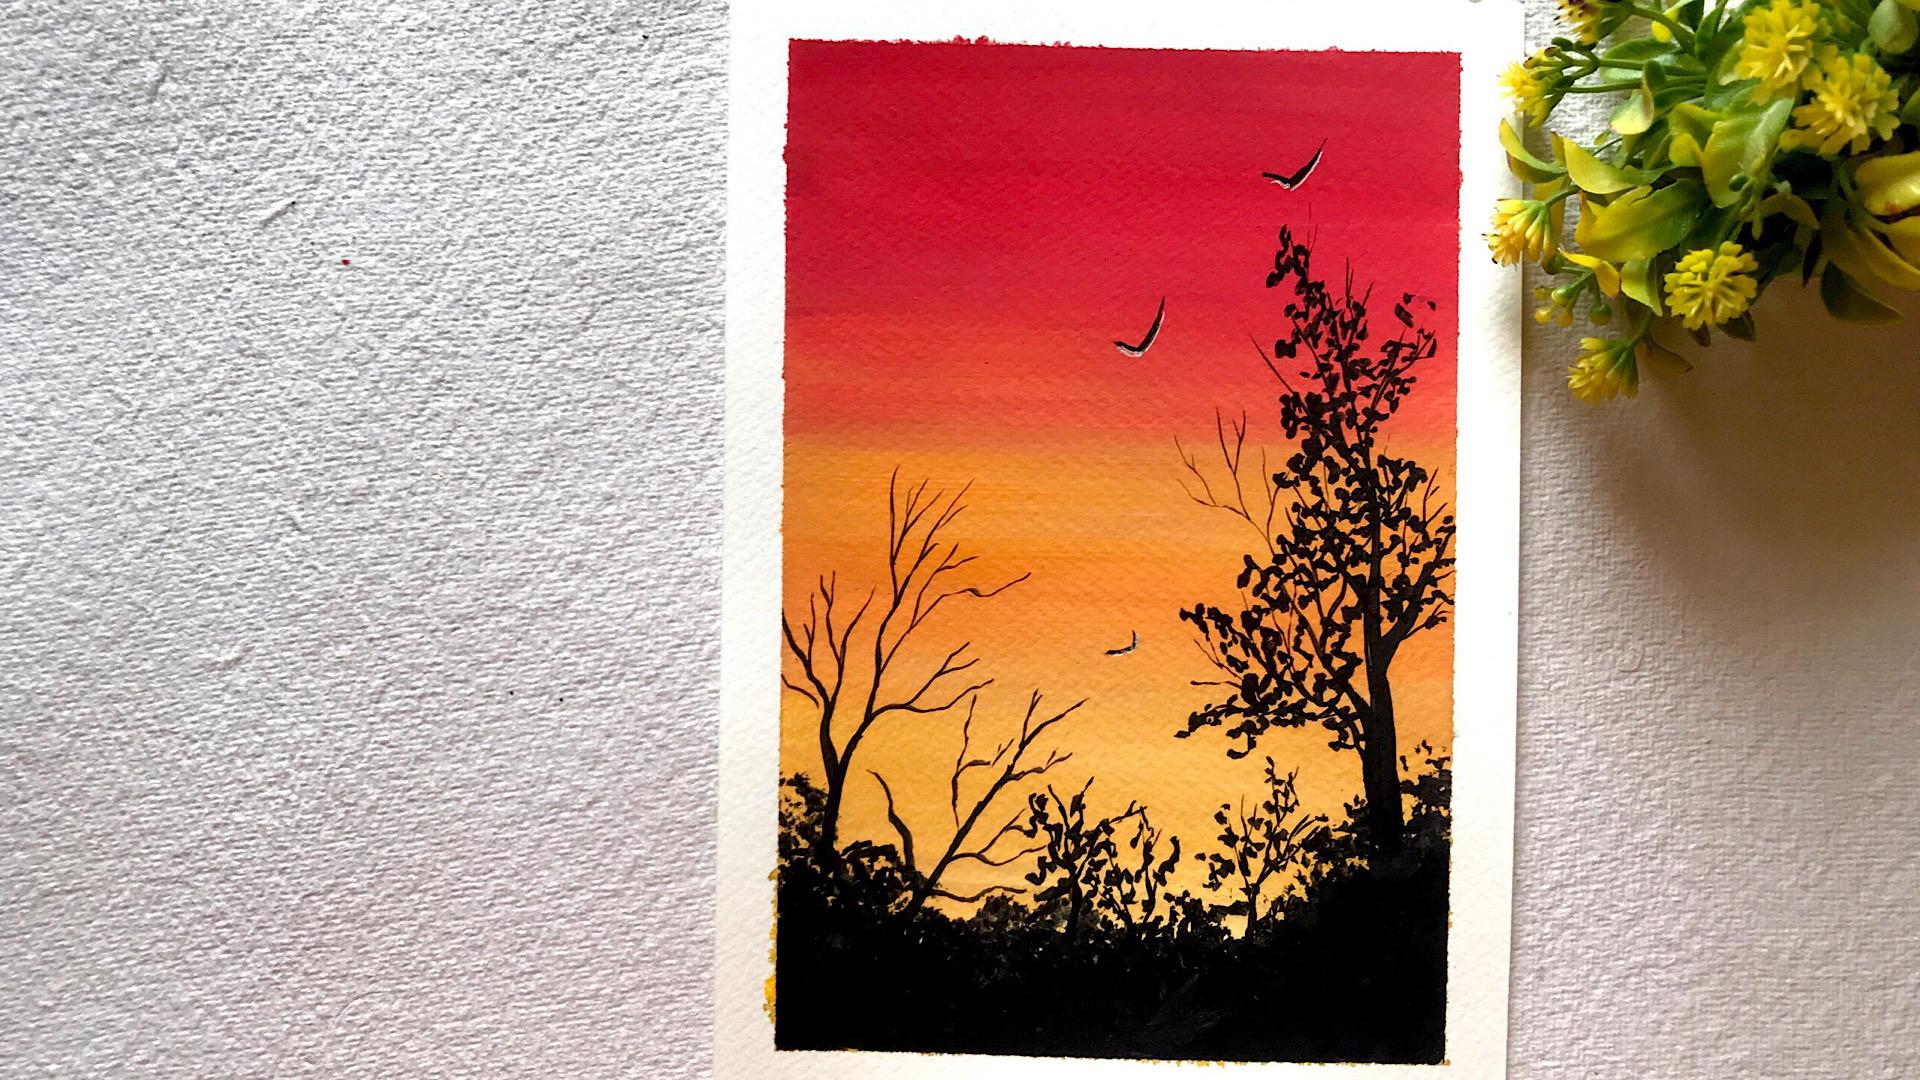
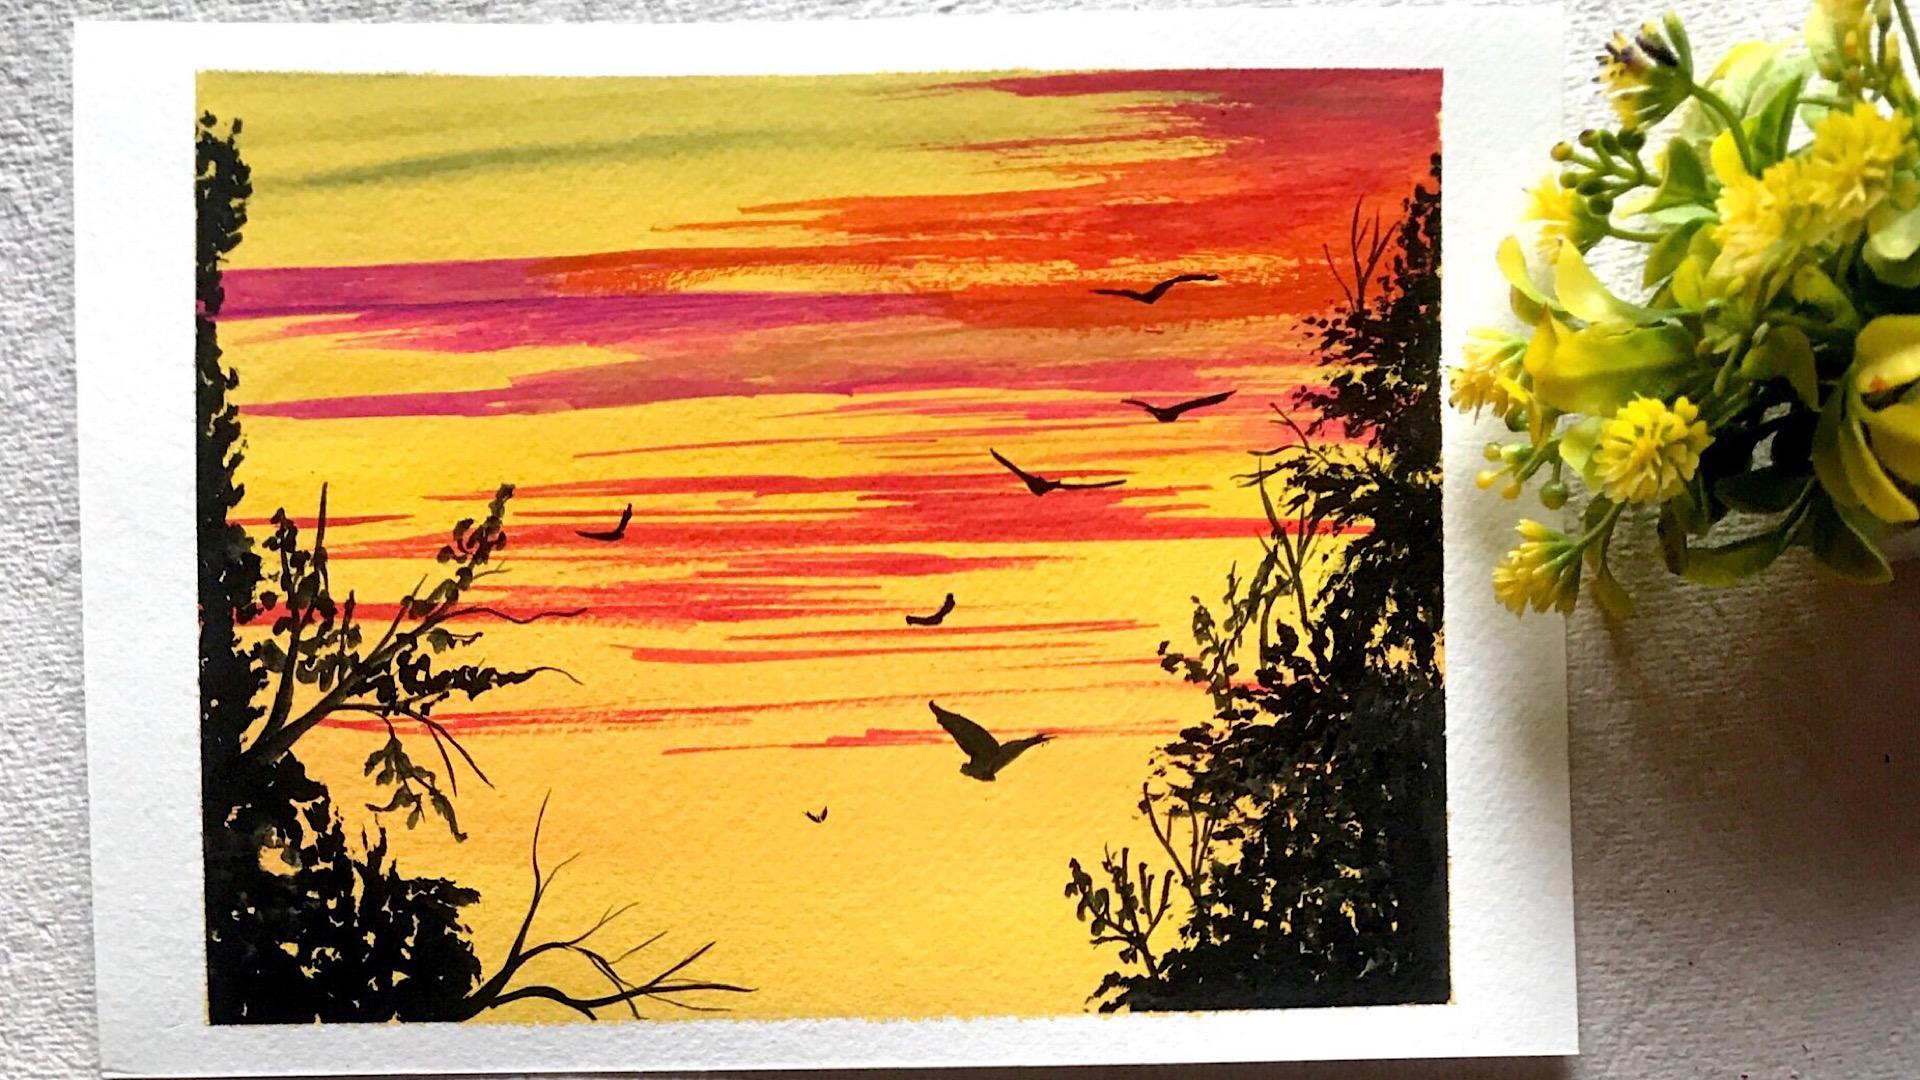
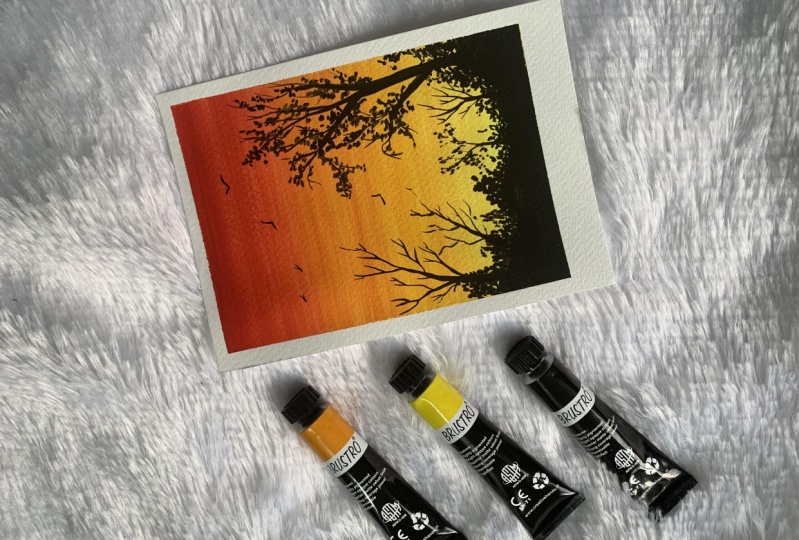
10. Sunset and birds Day 6: Hello everyone and
welcome back to another amazing chapter are
far garage weakness class. And today we are going to paint a beautiful sunset scene
with flying bird silhouette. I have taken chromium one
bond and run by DO, right? And we're going to
mix these colors. These will be the
base for us guy. And the highlights that I'll
be doing is of the dock, Benkler, watermelon and red. Colors. Ready, so let's
now start painting. So this will be
the flag worship, the yellow color that
I have prepared. Once the background will be dry, then we will add the clouds. I'm going to add a slight
tone of a light tone of orange in the bottom part of our painting to
give it a sunset, you under arrest, we
will do the flat wash. So we just have to just slightly changed the color in the bottom part
of a building. So don't use too much of orange. Just a hint of orange. As our background is ready. I'm going to add
the clouds and as Guy and I'm using
a dark pink color. And we're going to create some horizontal lines
like the way I am doing. So you just have to do it
away with a very light hand. Hit Enter. We are going to
use the orange and the red shade to give the
highlights to our cloud. Was done and it's
looking so beautiful. Now we're gonna create the
silhouette of the bushes. As I have dueling the
technique section, we are gonna apply
the same technique. Okay, so once the
silhouette is done. Whenever you are creating the
vicious uses your number. Detailing brush with a fine
tip because it gives you the most precise that we wanted. Now let's paint some
cute little birds. Painting is almost complete. I hope you guys have
enjoyed the session. Let us remove the tape and
review the final painting. Thank you guys.
11. Golden Hour Shadow Day 7: Hello everyone and welcome back to another amazing chapter of our attendees of
relaxing wash landscapes. And today we are gonna paint
the Golden our shadows. So the color that I'm
gonna use, our ocher, yellow and burnt sienna, and we'll be using
white gouache. So let's prepare our color. I have taken one bar
DOF yellow ocher, and one part of white gouache, and one part of burnt sienna. So let's prepare our
yellow ocher color first. We will start mixing our colors with a
few drops of water. And once it is on the
creamy texture consistency. Move forward. Now I'm going to prepare
our burnt sienna. So I'm going to take one part
of burnt sienna and one bar DOF white gouache to get the
light tone of burnt sienna. Color is prepared. So let's start painting. I'm gonna use first
two yellow ocher from the left butt and we'll be
moving to the right part. And it will be a flat
wash off two colors, yellow ocher and burnt
sienna. While mixing. Blending these
colors, make sure you blend it very nicely
with a very light hand. Because these colors
almost belong to the same category once we
have added white to them. So the blending
won't be a problem, just you have to be a little patient and
just follow the process. Now our background is ready and we're gonna first
paint the shadows. So I have mixed a bit of
white in the burnt sienna, and I have taken my liner brush and I'm gonna draw the shadows. And it should be random. There is no perfect way
to draw the shadows. You just have to follow
the process and that's it. To paint the flowers in the
shadow area via when I use the DAB Deck beam that I have taught you
in the second chapter, I'll be sick washing techniques. Packages, dip your brush in the color and just
dab, dab, dab. He had to give the effect
of the wildflowers. Now I showed her part
is complete and I have taken the darkest
tone of burnt umber. And I'm going to draw
the flowers just a bit on the right
side of the shadows. It will give the effect
that the shadows are reflecting from the
sundries in the evening. We're gonna see in
process will be the same. We'll draw the branches first, tiny little branches, and then we're gonna draw some way
flaws by dabbing method. Okay? Flowers, I have taken white gouache in my palette and I'm
gonna adapt my brush and just as the same process that we have done many
times in the class, such as dab, dab,
dab, That's it. Painting is almost complete. So let's remove the tape and
reread the final painting. And I hope you guys have
enjoyed this session. And don't forget to upload your projects in the
project section. Would love to share
them on my Instagram. Thank you so much guys
for joining me in.
12. Farm Sunset Day 8: Hello everyone and
welcome back to another amazing chapter,
Alpha gouache class. And today we are going to paint a beautiful farms and sit
and the colors that we are going to use that light sky
blue and a bit of chrome, yellow, and orange color, over a million,
whatever you have in your palate, that's
completely okay. Let's make that color. So I have taken one part of sky blue as it is already
prepared in my palette. But if you don't
have this color, then what you can do is
you can take one part of ultramarine blue and
two-part off white Gausian. You can mix it and
you'll get your shade. If it is still dark, then you can add white
gouache as reference. So let's prepare our color
on a creamy consistency. Colors are ready, so we will paint the top part
of our painting with the light sky blue
color that we have created in the bottom. But we're gonna use the groom yellow that we have
prepared in our palette. I. And we are gonna
mix these color. We have to leave a white
gap in-between board of the colors to blend it with the help of
the white gouache. Back down to his almost ready. I'm gonna take black color in my palette and I'm gonna have
to bet on a team meeting. And then we're gonna
paint our silhouette pod to paint the grass spot. I'm gonna use a fan brush
to create the grass effect. Okay, So just dip your
brush in the water, removed excess water
on your paper doll, and then just dab it in the
color and just start creating strokes from upwards or downwards to upload area
like the way I am doing. Now let's draw some writing and flaws as in silhouette to
complete our painting.
13. Moonlight Day 9: Hello everyone and welcome
back to another chapter of a big meals garage
15 days challenge. And today we are going to
paint night scape void, beautiful night scape and
we're going to do a flat wash. I have taken for ocean blue and two parts of Persian
blue heart photo flight. And I'm going to mix it. And I'm going to add just a light hand of black to
give it a more dense look. Once our colors prepare, we will start painting. Make sure to prepare your
collar on a creamy consistency. Don't already don't
add too much water. Let's start painting. And as I see that
it is a flat wash Soviet not doing any
gradient effect, so we're not gonna
add any Cloud. So KVL gonna just
do a simple flag. And then we're gonna draw us silhouette on the
foreground of our painting. Basically it is steady. So I'm gonna take some black to create the silhouette
of our painting. And I'm going to mix it
on academic consistency. So before drawing
the silhouette, I'm gonna draw it roughly with the help of
a black permanent marker. I'm using a black marker to draw the outlines
of a silhouette. Let's spend our silhouette and the foreground
of our painting. For brushes, we are gonna
be the same technique as we are doing in the
previous chapters. In this, we are going to
add some families also. Let's paint a little morning sky and I've been doing
is almost complete. So let's remove the tip and
reveal the final painting. And I hope you guys have
enjoyed the decision. This is one of the
most easiest painting we have done so
far in our class. And don't forget to upload your projects in
the project section. I would love to share
them on Instagram. Thank you so much guys
for joining me in.
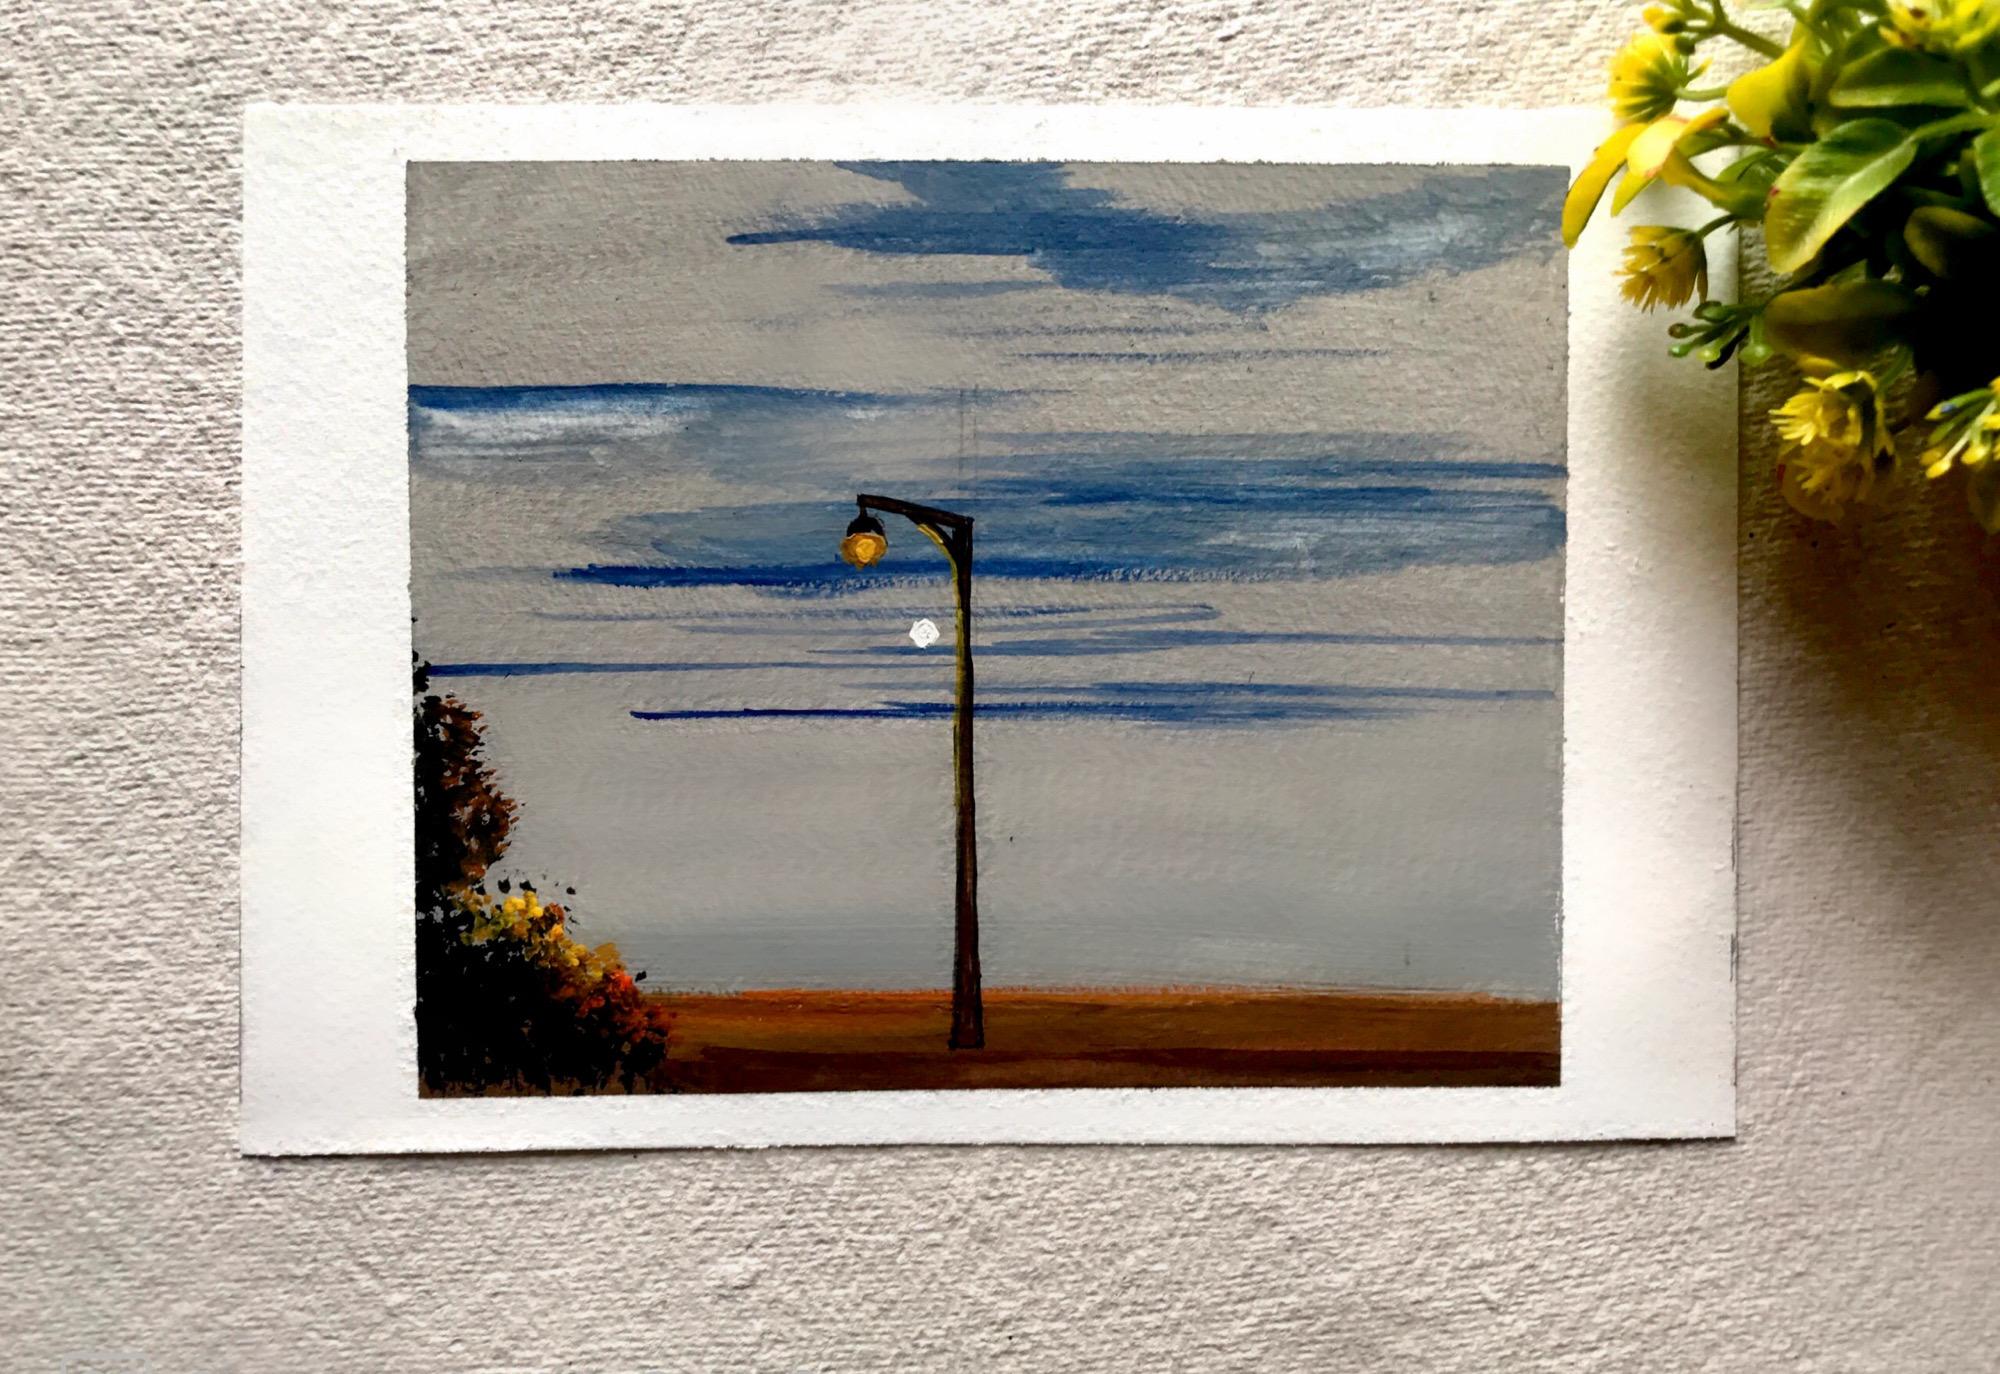
14. Street Lamp Day 10 & Thank You: Hello everyone. This is a lousy of our attendees of
relaxing guage landscape. And today we are gonna paint
a street lamp ninth view. And the colors that
I'm going to use, our Glee, blue, right? Chromium yellow and
orange and burnt sienna color on the creamy
texture, consistency. And I have taken gray color that is already
prepared in my palette. And I have taken Persian blue. So if you don't want our
grid and what you can do is add half part of black
gouache with a two-part off, white gouache, and you'll
get the gray tone. Once you have the desired color, prepared him, prepare
them and adult creamy consistency and
bonds. It is done. We will start painting
our beautiful background. Solid's started preparing
our background, and I have started painting
it with gray color. This will be a flat
wash of gray color because we need a night sky
background for our painting. So we'll be painting the background with
gray color completely. Okay, So once we are done
with the gray color, then we will start
adding the color clouds and shades of light
gray and Persian blue. Mcdonald's daddy and
I have mixes slide the part of Prussian blue with the grid that was
available in my palette. I have start painting
up the clouds. So I'm going to paint
the clouds with a mix of Goody light blue and the dark tonal value
of Prussian blue. When you are painting
your clouds, make sure your brush
should be damp. If there is any bit of water
in your brush that is extra, then you will reactivate
the base layer and you won't get the desired
result that you want. Any art painting makes sharp to use a damp brush whenever you
are painting your clouds. It's now I'm thinking
burnt umber. And I'm gonna take
chrome yellow, one part in one part per
million that is orange color. We will prepare our colors and we'll start painting
our street lamp. Gonna apply, spin
the street lamps. So basically the light has been reflecting
on their part please. So it should be a mix of
vermilion and dark down. Okay, so we have to
highlight the pod. The light is reflecting, right? So it should be the upper
layer of the poetry and the bottom layer of the
partners should be dark. Now, I thought completely dry. Let's stick a
mechanical pencil and draw the outline
for us treat LAM. Ones that are China is done, but we'll take the darkest
tone of burnt umber in the fall of the street lamp, the darkest tone of burnt umber brands. We are done painting
the lamppost. Then I'm gonna take some
black in my liner brush. And I'm gonna do that a very
fine line on the lamp posts. Sugar it a more precise detail. Now, I'm gonna
take some chromium and I'm gonna be
intelligent dot, dot on this sheet lamp. And I'm gonna make some
little bit of orange and that shining globe. Once it is done, I'm gonna take some chrome
yellow in my fine liner. Josh. I'm gonna paint pen
line on the lamppost. Gives the effect that light is reflecting on that
particular part. Once a lamppost part is done, now we'll start painting
of the bushes using the same technique that we have learned in the
technique section. And I'm gonna use a black
color to paint the bushes. And then we're gonna add some little highlights with
the help of a chrome yellow, and orange color to give the effect that glide has been
reflecting on the leaves. I'm going to use orange
plus chrome yellow on the tip of the bushes to show that light is reflecting that. And give us a very
beautiful, a vague plan. The whole painting
will be completed. I'm going to add a boot off colonial law and light hint of orange on the pathway just down below the lambda show the
reflection of the light. Now I'm going to
darken the lower part, the bottom part of the pathway, and a bit darker dawn. And I'm using the darkest
tone of burnt umber. Painting is almost complete. So let's add a little moon
just below our lamppost. And once it is done, where will you
remove the tip and reveal the final painting? And I hope you guys have
enjoyed this session. Don't forget to upload your projects in the project section. I would love to share them
on Instagram and thank you so much for joining me
in this class guides. It really means a
lot. Thank you.
 Richa Saxena, mandala & watercolor artist