

How to Draw Cats: A Step-by-Step Guide
New to drawing? Learn how to draw different kinds of cats in this easy-to-follow guide.


You might be interested in learning how to draw a cat because you grew up with the sweetest black cat or an adorable tabby and have loved cats ever since. Or you might just be a beginner artist who is looking for a versatile and compelling subject to draw.
No matter if you dream of selling personalized cat portraits on Etsy one day or just need an art challenge today, you’ll discover the basic steps, tips and resources you need to master drawing a cat.
You’ll start by learning how to draw a cat using a simple line art technique that’s great for beginners and a fun drawing exercise for advanced artists. As you work through your animal portrait, you’ll also discover how to draw hair and fur and how to draw cat noses.
Next, you’ll learn to draw watercolor cartoon cats that you can customize to be either realistic or more abstract. The teacher will walk you through a simple cat shape that includes learning how to draw legs, ears and tails. Finally, you’ll finish up with a realistic tabby cat drawing exercise.
Materials Needed
Beginner artists can complete each drawing exercise with paper, pencil and tracing paper. You can also gather up some watercolors, colored pencils and blank ink pens if you want to add more color and details to your cat drawing.
If you’re a digital drawing enthusiast, grab your digital tablet and your favorite art app, such as Adobe Fresco or Procreate.
How to Draw a Cat in 4 Steps
Find Your Reference Photo

One-line art is a great technique to start with when you’re tackling a new subject. This one-line cat drawing tutorial comes from Attabeira German’s class on animal portraits, where she teaches how to draw dogs, cats, fish, birds and bunnies all while using the one-line illustration technique.
To draw your cat, you’ll first need to find a reference photo. A good reference photo will have a plain background so you can better focus on your subject. If you’re a beginner, you can try to find a reference photo that is a close-up shot of the cat’s head so you don’t have to worry about learning how to draw bodies, legs and tails just yet.
Tip: The easiest subjects will have their heads slightly turned to the side.
Start Tracing Key Features like the Fur and Nose
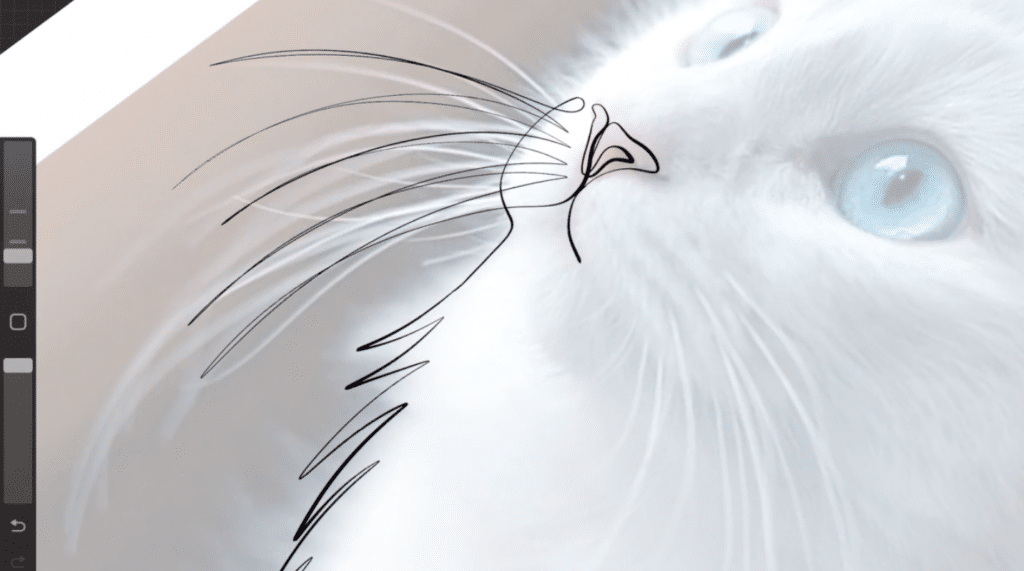
Next, you’re going to start tracing the key contours and elements of your cat. If you’re working on a tablet, you’ll just need to turn down the opacity of your image and then create a new layer and start drawing.
If you’re working with paper and pen, you’ll need to find tracing paper or just keep your reference photo next to you as you try to replicate your cat’s fur and button nose. You can try to experiment with different line thicknesses as you move from the face to the whiskers.
At first, you might want to pick up your drawing utensil as you go, but do your best to keep your pen down for as long as possible. Loops and curves will help you easily move from one area to another.
Finish Up with the Ears
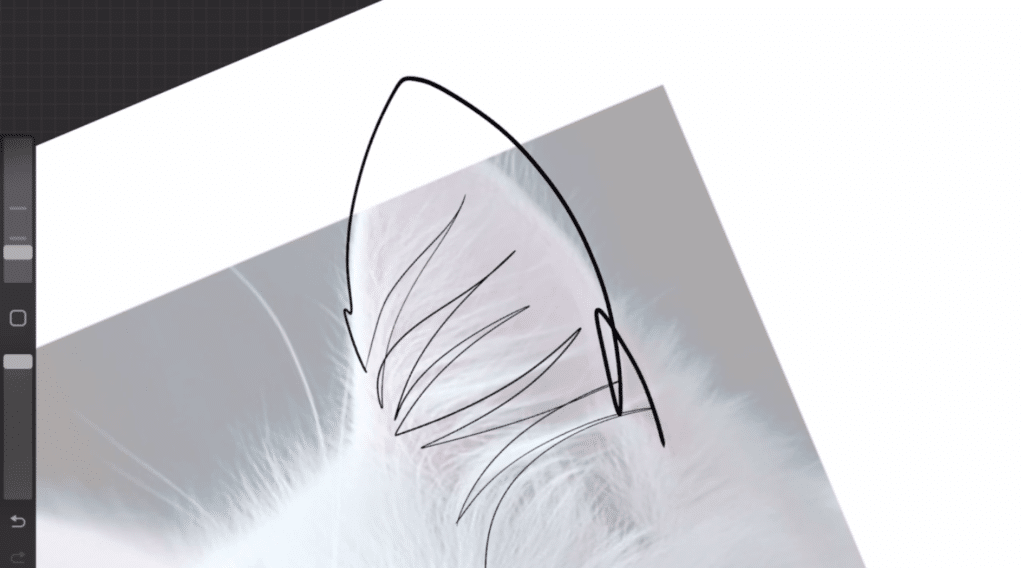
For the ears, you’ll want to focus on mimicking their pointed shape. Notice how Attabeira doesn’t trace every single piece of fur. By only drawing the bigger chunks of fur, it’ll keep your final work of art less messy while still properly portraying your subject.
You can use thicker lines for the outer contour and thinner lines for fur and whiskers.
Complete Your One-Line Cat Illustration
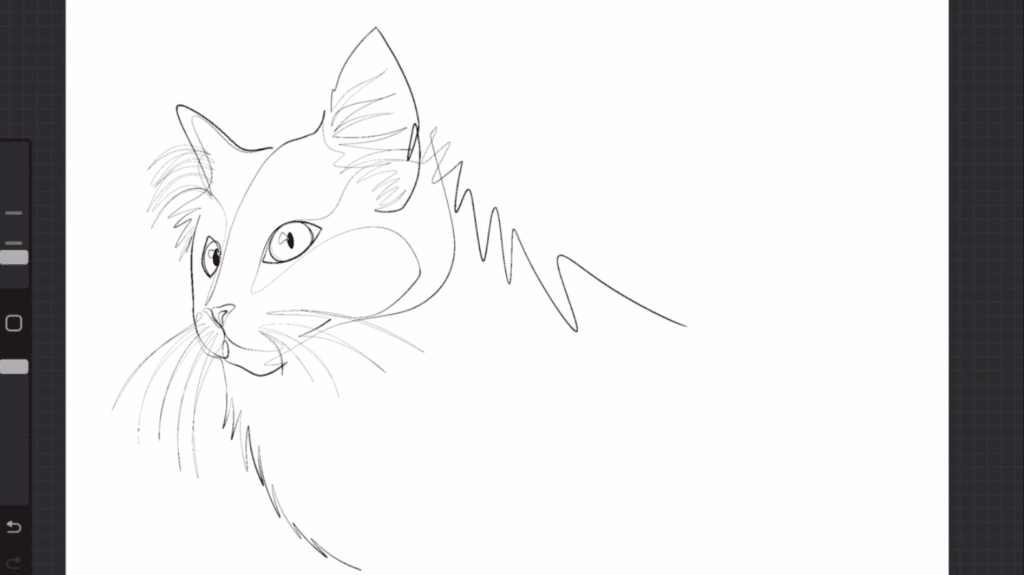
If you have tried one-line art already, you’ll know that it can get really crowded with lines. To avoid your illustration getting too crowded, you should identify key elements and plan your line route visually before you start.
You won’t have to stick to your line route at every turn but visualizing where you think your lines will go will mean you’ll be less likely to start over. If you have to start over, don’t worry about it. One-line art will take a few tries to master. Just remember to focus on key elements, use thinner lines for less important details and find the best line route for you.
Bonus: How to Draw a Cartoon Cat
Draw or Paint Your Cat’s Outline
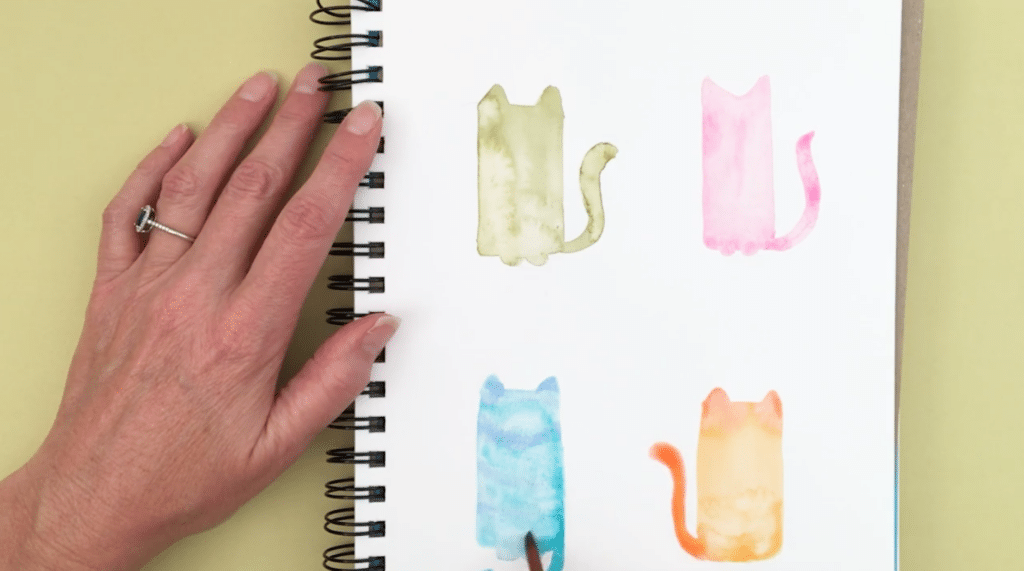
Illustrator Portia Monberg will make you believe you can turn almost any shape into a cat. In her class, Let's Draw Cats Using Simple Shapes, she shares how you can create a cat drawing from a triangle, horizontal rectangle, curved shape and vertical rectangle. Here’s a look into how to draw a cartoon cat from a vertical rectangle.
Portia uses watercolors to create her cat shapes, but you can also use colored pencils, a blank ink pen or any other drawing tool you have handy. First, draw a vertical rectangle. Next, add two triangles above the top right and left corners to create your cat’s ears.
Then, you can add an “S” shape to one of the bottom corners to give your cat an adorable wagging tail. Finally, add two little ovals on the bottom edge of your rectangle to work as feet.
Add Your Cat’s Eyes, Nose and Whiskers

Now, it’s time to give your cat shape a little character. You can start by adding a mouth, nose, eyes and whiskers. Portia adds little dots between her cat’s mouth and whiskers to add some extra cartoonish details.
Add Your Final Details
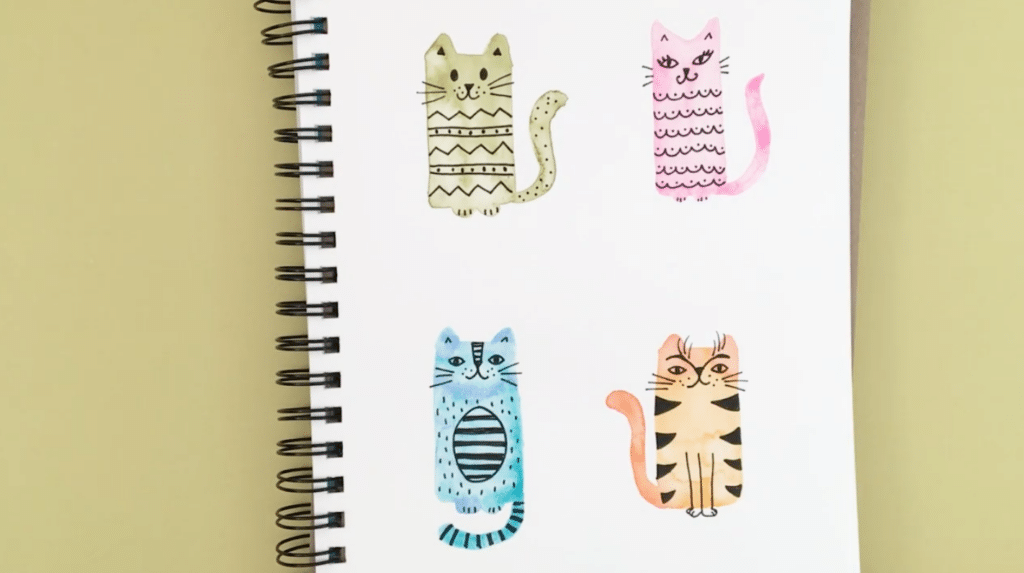
You can make your cat as abstract, silly, girly or wild-looking as you like. Portia played with a few different styles and added eyebrows, stripes, eyelashes and polka dots to some of her cats to give them even more personality. If you’re not sure what style of cat you’d like to create, try finding reference photos so you can get inspired by different pictures of cats and patterns.
Bonus: How to Draw a Tabby Cat
Draw Your Cat’s Silhouette
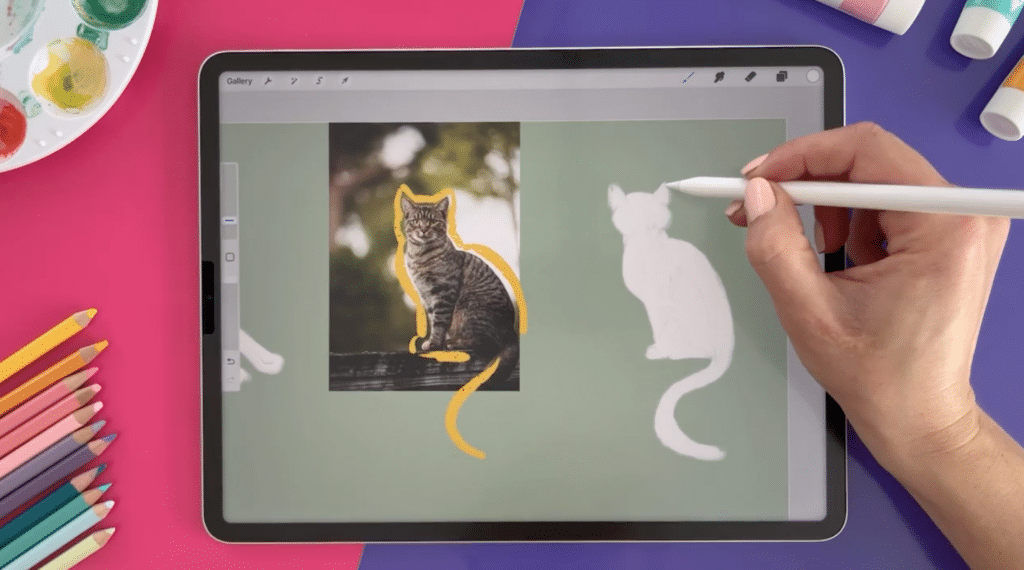
Top teacher and illustrator Iva Mikles will walk you through how to draw a tabby cat using stylized shapes and silhouettes. Iva uses Procreate to draw her cat, but you can make your own kitty drawing in both digital and traditional formats.
First, you’ll need to find a reference photo. You can use Iva’s reference or find a clear photo of another tabby cat you love. Take a moment to observe your cat’s shape and sketch its outline right over your reference photo. You can do this by printing out your picture or using an art app like Procreate or Bazaart.
Once you have a good idea of the curves and key features of your cat’s silhouette, it’s time to replicate its shape. You can focus on the curve of its back, shape of its tail, ears, head and feet.
Add in Details and Shadows
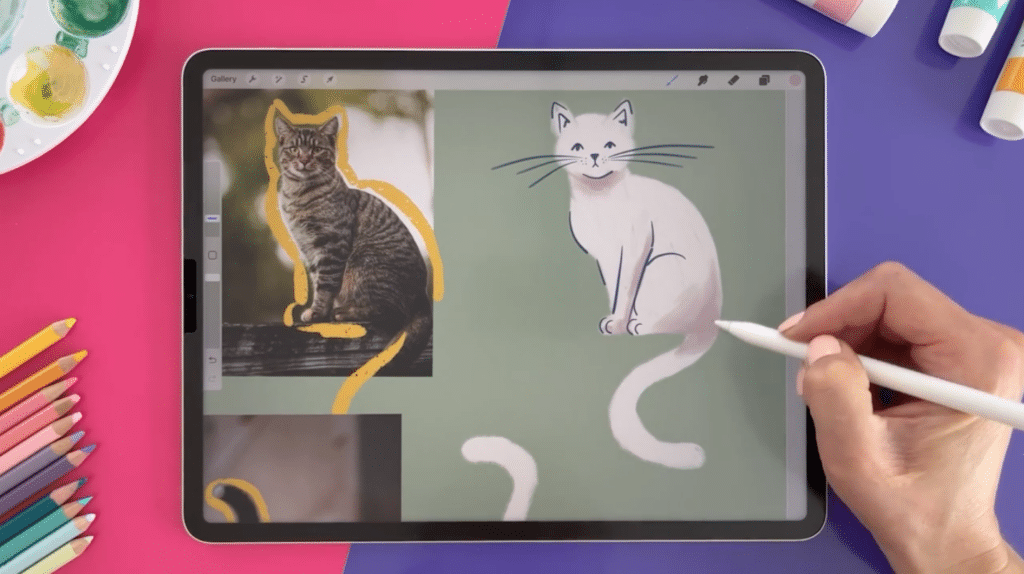
Now, you can add in key contour lines, details and shadows. On your cat’s head, you can add the inner and outer contour lines of its ears along with its eyes, mouth, nose and whiskers. You can also add contour lines around your cat’s paws, legs and chest.
Before adding shadows, you’ll need to consider where your subject’s light source is. You can do this by finding the darkest and lightest areas of your cat. On Iva’s reference, you can see the cat’s hind end and tail is more shadowed while the hair on its chest is lighter.
Adding shadows can make your cat look more realistic, but you can skip this step if you’d like to create a more cartoonish cat.
Finish Up With Your Cat’s Stripes
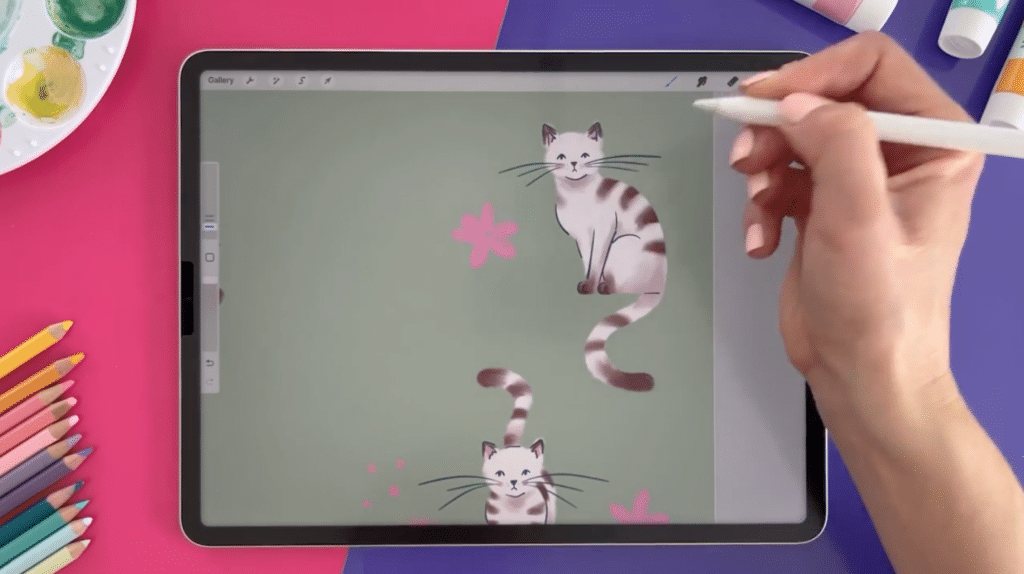
Every tabby cat looks different from another so the stripes and patterns you add will depend on your reference photo and your personal creative style. Iva added simple, thick brown stripes but you can add flecks, lines, stripes, swirls or bands of color to your kitty. You can also experiment with different colors to draw a red tabby cat or a white tabby.
Common Mistakes (& How to Fix Them)
Attempting any new art project will always come with a few mistakes. For one-line drawings, beginners will often end up with too many overlapping lines or accidentally skip over key elements. You can avoid this by ensuring you know your line route before you get started.
When drawing cats in general, a lot of new artists will end up with an asymmetrical final product. To avoid drawing a cat that doesn’t look quite right, try to look at each element of your cat individually and in reference to one another. You might notice that your cat’s ear is about the same size as her paw, so you should try to keep that sizing the same while drawing.
A cat’s fur can also be tricky because it’s full of details like shadows, patterns and tiny strands of hair. If you find your work looking muddled once you start working on your cat’s fur, you might choose to start over and then only add the main details of the fur like a tuft of hair on the chest and a few stripes on its tail and back.
Tips for Drawing Cats
If you’re feeling overwhelmed or self-doubting about your ability to draw a cat, these extra tips can help. You can start by breaking your cat down into key features like the nose, eyes, whiskers, mouth, ears and tail.
Grab a blank sheet of paper and try filling it with a bunch of different examples of noses, eyes, ears and tails. Once you feel confident that you can draw each of these elements on their own, you can put them together in a complete pet portrait.
You can also start your cat drawing journey by tracing a picture of a cat or by drawing simple shapes like rectangles, triangles and circles.
As always, remember that working on a new skill takes time and every new cat you draw will bring you one step closer to drawing cats with ease.
Learn to Draw Cats & More with Skillshare
If you’re looking for even more guidance on drawing a cat or want to explore drawing other animals, you could check out this class on animal pencil drawings or this one on how to draw mice.
By learning from professional artists, you’ll be able to build a strong artistic foundation from the start and avoid pitfalls that more seasoned artists might have experienced earlier on in their careers.
Above all, the more energy and time you give to learning a new skill, the more positive results you’ll see. If you really want to commit to learning to draw a cat and other subjects, try creating a reminder to draw in your calendar or making a list of one hundred things to draw to keep you inspired for weeks to come. By creating a little bit each day, you’ll be drawing like a pro before you know it.
Related Reading
Calli Zarpas
Producer & Writer by occupation. Ceramicist & Newsletter Editor by avocation.
Level-Up Your Drawings and Illustrations with Skillshare
Start Your Free Trial Today!- Drawing classes for all levels
- Digital and traditional drawing styles
- Unlimited access to all classes


