Transcripts
1. Welcome To The Class!: The principles of storyboarding. Storyboarding is the
art, imagination, imaging the shots
before the big blaze, imagining the camera
movements before they occur. When it comes to expensive
movie production or expensive ad production
, animations, or even Skillshare classes. Storyboarding is a skill
needed to save resources. Resources like time, like effort, like money, even resources
like peace of mind. Storyboarding is the art of drawing the scenes needed to be captured to communicate
to the viewer of your storyboard how a
a shot will take place. Whether he is in that scene, or even if he was just setting-up the camera equipment for that particular scene. Storyboarding is a tool used to minimize mistakes and miscommunication.
In this class we are going to cover mostly the principle of the storyboarding the science behind
the terminology used by professionals
in the field. We will cover topics
like camera movements, camera angles, frame sizes, display systems, arrows, and much, much more
related to storyboarding. That's it. And i will see you in the
next lesson where we are going to actually cover a
really important topic, which is camera angles.
2. The Basics: Now I'll give you a
little example and you have to imagine how
the camera movement, how are* the camera angles
will play out, like let's imagine,
00:00:08.250--> 00:00:11.205
a seven-year-old kid
just waking up from his bed, then he starts looking for his
phone, then he grabs his phone and he starts playing like pubg
on his phone. That little short story I just told, you have
imagined it in a way. I did not imagine, your point of view will be different than mine
will be different than the director's point of view. and that's why we need to have a clear line of communication. You might have imagined
doom as a tool kit, you might have imagined
them as a short kit. You might have imagined
him in a poor household. You might have imagined
him in a rich household. And that's why we need to
establish a clear description of that kid's background, of
the location where that kid is. Now we storyboarding, you don't have to
be the best artist. You don't have to draw
the perfect human being. All you have to do is
just to try your best. Now, there is no specific software that you should use. You can just go
with the default to paint software that comes
with your operating system. Or you can go with something more advanced, like Photoshop. And even if you don't have
any device to sketch on, you can always go back to an ordinary sketch paper and just start storyboarding, you don't need the
best software, you don't need the best
design and art skills, all you have to do
is just to start. And I have included this storyboard templates
that has nine scenes for you to download, in
the material part of this class. So let's imagine, a tall building. That building
is an average household, which with lots of satellites
on top of that building. And in all the windows, there is like laundry getting dried out
in the hot air, the camera will
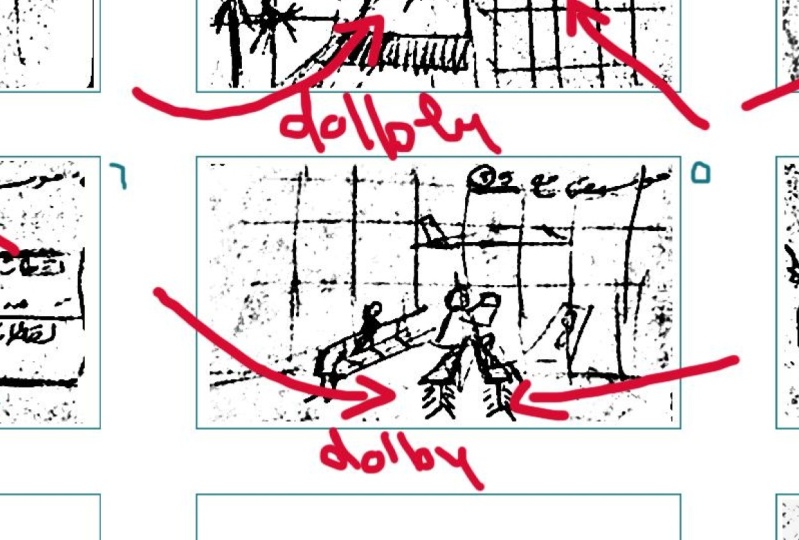
start zooming in. So we will use our arrows
to explain what zoom-in is until we are zoomed in
at a particular window. That window, for example, is the window where were the mark of
the zooming in. First of all, resides. so that The camera can
enter Ali's window. Now that we're at the window, we have found a little bird
standing on that window and all the camera banned
that little bird. That little bird,
started to fly outside the frame. Now that the camera inter Ali's room, the camera seems a bit far away. and Ali sleeping on that bed, then Ali roughly wakes up from
his bed, and opens his eyes while he is sleeping, as you
are seeing right now, then we're going
to take a shot of Ali jumps* inside the frame, looking in front of him when he got out of bed and started searching for his phone until he
found it over here on that desk, so he reaches down and grabs his phone and we take
a shot of Ali's hand while it's taking the
phone from that desk, then we bend the camera
back on the bed where Ali is sitting and
playing Pubg on his phone. We make sure to capture
Ali's happiness and detect the sound of the game that he is
playing, what just happened with the
(Dramatic Sequence) which explain everything that
happened individually. For me to probably make
a dramatic sequence, I have to have a
broader knowledge of when the camera inters and where it looks at
of something jump in inside the frame or
outside the frame, we need to know what arrows
are and how to use them. And do we also need
to differentiate the types of shots we get, so that the viewer doesn't
get bored-out. Now we can see the first shot of the building
is from the outside, which is still the first shot, but we're gonna
call it shot a, because the shot is continuous, the camera doesn't cut. Then the first one is a, and after we do
Zoom, now it's B. We have reached the window and the bird just flew away. Shot number two is the one
where Ali is sleeping on his bed. But I'm getting
the frame from far away. You might ask, when do I know
if it's shot one shot two? You can know that
when the frame changes without camera movement. Now we call that a new shot. Now after that in shot three, Ali sleeping on his bed. Shot number four is clear frame and the
Ali jumps in, shot number five is Ali entering* the frame and finds
his phone. Shot number six is Ali reaches
out and gets his phone. Shot number seven is Ali entering* the shot again and sit down on
his bid to play Pubg, we have established
a clear sequence of storyboards. We don't need to do that much explain it during
the shooting process. That's it. And I will see
you in the next lesson.
3. The Different Types Of Shots: The frame size is basically the size of each object inside the frame of the storyboard I'm
drawing, like the size of the talent compared
to the background. That's why we need
to know the name of the size of the frame
we are working with. And there are lots of
different frame sizes. inside a movie or even a short movie. So,that the movie doesn't
feel dull and boring. So, I need to understand very well which frame size I'm
working with in this shot. I'm drawing this basically
the size of the frame. The size of the frame
is basically like the TV screen or computer screen or whatever
display screen are using. Let's say I have the talent is standing inside the
screen on a mountain, but far away within a flag
as the camera basically. And these too far
away that you can tell the exact
features of his face, but we can know for
sure, that there is someone standing there, waving with
a flag in that exact size. that shot is called extreme long shot
or extreme wide shot, you can call it long or
wide they are the same thing. Now let's say there was
someone standing in the frame and we are capture in him all the way
from head to toe. And we can clearly tell
who that person is. Now, it's called a long
shot or wide shot. Now, let's say that the camera
is coming a bit closer to that person and
it's getting him all the way from his head to his ankle. Some people call that a
medium long shot, and some people call
it an American shot. let's say that's the talent who
standing in and the camera was getting him from
his head to his torso. Now we call that a medium shot. If we come a bit closer to
that talent and we started to get his head to his shoulders now can
call that a close shot. And if you come a
bit closer to his face, now it's called an
extreme close shot. And some people call
it a very close shot, some people even call it a big close shot, and they are all just names to identify
this type of shot. Now let's say that the talent standing with
back to the camera. And the camera is over
the shoulder of that talent. And pointing at another talent that is in front
of the camera. That standing in the medium frame Size, now is called
an over shoulder shot, and sometimes we call
that shot a Morth. And we can even
increase the frame Size of the person standing
in front of the camera. And it can be an over
shoulder long shot. It depends on the shot
you need to take. when you see two people standing in the same frame with
a medium-size. We call that medium
two because we have two tunnels in the same
size inside the frame. Now let's say we have a
particular story, when The talent is looking
away in the distance, let's say in the
middle of the shot, it was looking at a
clock or something. Now we back the camera
to the left to look at that clock that
he was looking at. and the shot of that clock is
also, another type of frame. Now, let's say that
I have a clock hanging on the wall
and I'm looking at it, now that's a Pov
shot or a point of view shot. Pov is me point at the camera that the talent
is looking at it, and that's mainly all
frame sizes we might use now have noticed there are many different frame sizes. Just the viewer doesn't get bored watching the
content we are provided. We always
try to play on the curiosity gap of the viewer. Like, if you are looking at a
clock or something. the viewer would be curious
to look at that clock. Like let's say you looked at
that object then you looked, at the camera again then you looked
back
00:03:21.770 --> 00:03:23.270
at another object, the viewer would be intrigued
to find what caught your eye, and that's why we
need a story bored to get those specific
shot because if we didn't the movie or
the project we are working on is going to
be extremely dull. That's it. And I will see you
in the next lesson.
4. Camera Angles & Camera Equipment: The first thing we
need to learn about on jumping into cinematography
is camera angles. Now let's say, I was designing a room and making a
storyboard over, let's say, says that room, I
wanted to draw, I wanted to draw using a
top view camera angle. Let's say it was a bedroom, let's say there was
a bed over here. Let's say there was a
cupboard over here. And let's even say that was
the main door of the room. Maybe a chair here, maybe a chair over there. What I'm basically doing
is just draw cubes. In vision how the location
looks like, this drawing you are seeing right now is basically, a top
vision of the location. What's important about a
top view is that you can learn where to place the camera and
where is placeable. And to learn about placement
of the camera, we have first to go through
learning about camera angles. Let's say I had a camera, that looked horizontal, and this is what sees
and the talent is standing in front of the camera
in this place right here. And we call that
a normal camera? A normal camera is basically
on the eyesight level of the talent, but if we raised the
camera a bit higher up now it's called
a high angle camera. If we moved the camera
a bit down and angled it so that it
looks at the talent. Now it's called a
low angle camera. this is basically, All the main
camera angles that we depend on in cinematography. And there are a few
other camera angles we can learn about like the top camera angle, if there is a lot of people
that are walking by, we can get a top
camera angle for that. We can even get a down
camera angle basically if there is like a glass floor and the people are
dancing over it, we can get the camera underneath the glass floor and
pointed up so that we can get the feet of
the people don't think we can even get a
moving camera angle. Like if there is a camera
guy that is holding the camera on his shoulder
and walking by with it. And he is filming
the talent all around. Now we call that a free cam. A free cam doesn't have any
specific angles. he can just be recordings
the talent on the eye level, you can even go and sit down so that he gets him
from another angle. So, if you've got
something from that, is that there are lots
of camera angles is up comes into play when
we are storyboarding, but I just declared
it up for you. The main camera
angles we normally use to get a shot
of the storyboard. Now you might be wondering
what are the tools we are using to adjust
the camera angles. Like let's say we had a talent standing in the
center of the screen. And if I had for example a camera on
the same eye level as him. A tripod is basically a
camera holder with three legs. A tripod can have many uses, like we can get the tripod and
install wheels to it. So, that the camera is moving all around the location, a tripod
with wheels is basically called a Dolly. A Dolly is a moving camera that can move all around the location. Another thing we can use in the camera angles is a track dolly
a track dolly basically has the same iron bars that the train walks over and it gets
installed in certain locations. Where is the floor is uneven. Like let's say you were
filming in the desert and the ground is
not stable enough, then I can't use a dolly
and I have to use a track dolly. So, that we can
get all the shots we need, even slow mood or in any different angles
we need to get. We can have a
straight track dolly. We can have a
circular track dolly, which is basically
like the bars of the train, But circling around talent. If I want to get a shot,
that is circling around him. Another camera angles
you might have seen before is a
steady cam. A steady cam is basically a camera
that has been installed to a special vest that
the talent is wearing. We mostly use steady cam in action scenes when
there is a lot of movement and the camera
man can't keep up with all the movements that
is happening in the scene. That's when we use the
steady cam so that we can have stability in the shots
we get through that. It doesn't have much shaking or innocent or any of that
from the action scenes. Sometimes we might use
a special camera angle, which is basically
the camera man is holding very long bar
with a camera attached to it, which is called a crane. We use it when we are
in big locations. Or if you want to take a special camera
effects, or camera, is travelling a huge distance to the
talant is that creen is the same bar and it has a place for the camera man to
sit with the camera. And the camera man can
control the camera using a lots of tools
that he can use. and there is a lot more camera angles
and camera tools we are using and we are discovering
each single day. And that's it for camera angles. And we are going
to move on to the second part
of cinematography.
5. Camera Movements : Now we're going to move
on to the second part of cinematography. In the previous part, we had already studied
camera angles. Now we are going to move on to camera movement when
you are shooting a movie and add an animation
or any of the other stuff, we must have a storyboard
to save resources. Storyboards capture
camera movement if the camera is moving
towards the talent end, or if it's moving away from him, or even if the camera
is circled around the talent, all of that is different
camera movements. And now we are going to
live in depth into them. We have the same talent
standing in the same location. We always have. standing in the location and
plain his part. There are lots of camera
movement that is happening. We can have the camera
standing still. in a sit place standing on a tripod and the
tripod is standing steady. And then we had the
camera man breaches, for the camera lens
and starts to zoom in on the talent
when you zoom in the size of the talent increases and
if you did the reverse, to zoom out the size of
the talent decreases. Using those two basic movements, we can zoom in or zoom
out on the talent And if we had the same tripod, but with wheels
now it's a dolly and if the dolly moves
towards the talent. Now it's called a dolly in. And if it moves away
from the talent, now it's called
a dolly out. Now a question on your mind, what is the difference
between a using a dolly in and a dolly out and
zooming in and zooming out, zooming in, it changes the depth of the background
behind the talent. When we zoom in, we feel that the background is
stuck to the talent But if we use a dolly in
their camera stuck to the dolly in
starts to recalibrate. It calculates the distance and using that it assigns
the depth and from that. We can learn that the dolly in is better than zoom in
because they keep the depth. of the background
behinds the talent. And now let's say we have
a talent or basically like just a building or just a normal guy
standing still, and that camera is pointing
towards the building and he starts to tilt that camera
up that he scans the building up. What we just did was Tilted up the camera
and you can even do the reverse and tilted down the camera to scan the
building from top to bottom. And those were the main basic camera movements that you might have seen used in movies
,animations or even ads. Now we're going to move on to the second important
part of camera movement, which is the camera itself. and if there is a car
bus in by, in front of the camera, in that way the
camera is getting it and it starts tilting
towards the car. While the car is busing By
decided what just happened. with cold band or a pan aroma Now we're bringing the
camera left or right, depending on the movement of the camera from right to
left or from left to right. We have been through Ban in
the camera tilting it up, tilting in down in
zooming, in, zooming out. Another important thing we also do is that let's
say is there is a building and there is someone
fallen from that building. or he just jumped
Like superman for example in that way we use
a camera is that is moving down with them
or moving up with him, when the camera is moving down with him or moving
up with him, that is called tracking. Tracking is basically when
the camera is following a particular object or a particular thing and moving with it in the same movement, let's say is there was
a race and there was a horse moving in
front of the camera. We can just stick a
camera to a car that is moving with the same speed that the horse is moving at. And we can call
that a track camp. That was camera movements
that we know really fast
00:03:32.060 --> 00:03:33.620
and that we need to learn when to use those camera movements. Because each of those
camera movements has a particular use
in the storyboard. The last type of cam we
are going to mention is free cam
the free cam is basically like just a camera man holding a camera on his
shoulder and just moving randomly
trying to get the best shots he can we
can't call that just tilting it, tilting the camera or
banning the camera because it's moving that is tracken
someone or something. And the free cam can circle around the talent and the move in any direction the camera man would like to get a shut off. Another thing we can move
on to is multi-cam. a multi-cam is
basically, when you have organized camera movements, like when you are zooming in and ban in right at the same time. That's what we like. to call multi-cam that you are doing 2 camera movements
at the same time. We just covered
camera movements which we very need in a storyboard. because when we storyboard, we need to capture all the camera movements so
that the camera man understands exactly what shots to take if the camera
is standing still and they, you need to take as zoom in
or zoom out shot or if it's a moving camera
and they need to take a dolly in or a dolly out. Maybe they need to take at tilt up,
or tilt down shot, maybe even a ban right or
a ban left shot. Maybe they need to track the moving object so that the
camera moves along with him. Maybe we need to
use a free cam or even a multi-cam for
that specific shot. That's it. And I'll see you in
the next lesson.
6. The Usage Of Arrows: Now let's start. that I am in the sea and
there is a glass bottle then a shot of the island far
away and nothing from, with no special details
sticking out. then the camera starts
zooming in to that island. Now I'm going to tell
you how to go there using the arrows that
we are in the island, I find that person
with a long beard and with lots of messy hair
all over his body setting in the island very skinny then from the back
of that person. I started to look at
the scene front of me. And in the sea
that glass bottle stars approach
in that person. So, he reaches his arm inside the frame to grab that glass
bottle out of the water. And he finds inside the
glass bottle a message. And he gets that message
out of the glass bottle and holds it with both of his hands
like you are seeing right now. And after that, he grabs
that message and grabs it was both of these ends like you're seeing right now. I'm just trying to draw quickly, the storyboard
that we understand how the sizes of the frame will be then we find that he
got the message with both of his hands. Then he walked away a bit and just looked at the message. And he will be surprised
from the content
00:01:01.135 --> 00:01:02.630
of that message. So, we do an extremely
close shot of his face. Then we take a shot,
of his back while he is standing, looking at the message and the content inside it
the sequence, we just story boarded
of the guy setting in the island and
grabbing the bottle is a very clear
dramatic sequence of the guy grabbing the
bottle with his left hand, and showing in the
frame that is grabbing it with his left hand to
avoid any racore, And then he sticked out in the frame for an entire sequence until we reached the end where
he read the message. And all of those special
shots come together to create a dramatic
sequence a full scene. Now we're going to
move on to how to use arrows to explain our frames. first, we are going
to start changing the color of the
brush we are using. Like if I want to draw
with a different color then I have the bottle that
is floating in the water. I will draw like lots
of arrows over here. The glass
bottle is floating coming up and down
inside of the water. And if I looked at the frame, I will find it pretty
obvious that it's floating. And if I want to zoom in on the island then
I draw an arrow, like if I want to zoom
in on that island, I will draw an arrow that
is tilted into the frame. so that It's pretty obvious that I'm
zooming in on that island. or the camera is
moving towards the island. Here we can draw
it so that we can tell that the person is coming
from outside the frame, into the frame so that he figures
out what is happening for the bottle if we drew an arrow over here and
arrow over here. this is obvious that you are
coming close to sure that person his hand just
went inside the frame. So, we draw an arrow of
the direction of the hand, communing inside of the frame. And then he grabs the bottle, gets it out of the water. So, we'll draw an arrow in
the direction of the bottle. Common outside the
frame so is pretty obvious for anyone who
are readings the story reward how it happens
the scene exactly that the hand will follow that
arrow common size a frame, and follow the other arrow
coming outside the frame. Here you will find that
there is no movement. But we can do a zoom in after he takes a bottle
for zooming in, the arrows are the same
size as the frame, as you can see right
now on the screen. And then the hand with
the letter comes inside the frame and the
person hides, and read the message. Besides the arrows I just drew, I put the description, which is a glass bottle that is floating inside the
water with a message inside of it to a
camera that is moving towards the shore of the
island really fast, three a person jumps inside the
frame and look surprised. That is the description,
of course, and the numbering of the scene, like here, the shot number one. Now we move on to shot number two. this shot number three, this is
four and there's five, and so on and so on, of course. we don't forget that I write down over here the
name of the work. I'm working with, and here I'm
writing down number of the scene. If there is lots of
scenes and at the end, I can write it directed by So that we know who's the director
we are working with. And over here, we must
not forget to put the page number because
00:03:52.520 --> 00:03:54.350
the storyboard
can be like 1 page, 2 pages, or like even 100 pages, depending on the scene
who are working with depending on the work,
who are working with, if it's an ad, if
it's a long movie, in all of those words, we need a storyboard. With storyboards, we tried
to the best of our abilities to make the viewer live
inside of the scene. So, when we make our storyboards, we need to figure out
exactly each scene we are drawing, where it's filmed, what are the accessories that
is in the scene? The type of the camera is used, the type of camera angle
is used as a camera movements used when
exactly those each shot end. so, we need to be extreme focus to the
storyboard we are drawing. We need to know
what racore means. Do we need to know what
dramatic sequence means? That's it. And I will see
you in the next lesson.
7. Final Thoughts : That's it. Hopefully
you enjoyed the course. I would love and I would
really appreciate it for you to go down and deliver
a view on this course. Just say honestly,
what you felt like. Did you get valuable
information of the course? What bars do you think, we
should improve on next. And for the class project, just leave the storyboard
you just draw share them with
other students who are watching this
course to get inspire started working on
their own storyboard. that's it make sure you leave
a follow because I will see you on the next course.
 Gamica