Transcripts
1. 1) Vellum Goldleaf Intro: It's not men. Hi, my name is Joanne benzene or and I'm a fine art photographer from Travelers Rest, South Carolina. As a fine art photographer, I've printed a lot of photographs and substrate has always been the primary area of choice. My initial choices included archival inks, fine art papers in Canvas. And let me tell you the first 500 or so. Awesome. I can't tell you the feeling of satisfaction I have the first time I saw my photographs, printed, mattered, framed and hanging on a wall, and even better the first time I actually received money for doing it. Unfortunately, as with all things that are done repetitively, it began to feel stale after a while and thus began my quest to find more interesting substrates. In this class, we're going to print on vellum and then add boldly. So I invite you to join me on this journey from standard to the gold standard.
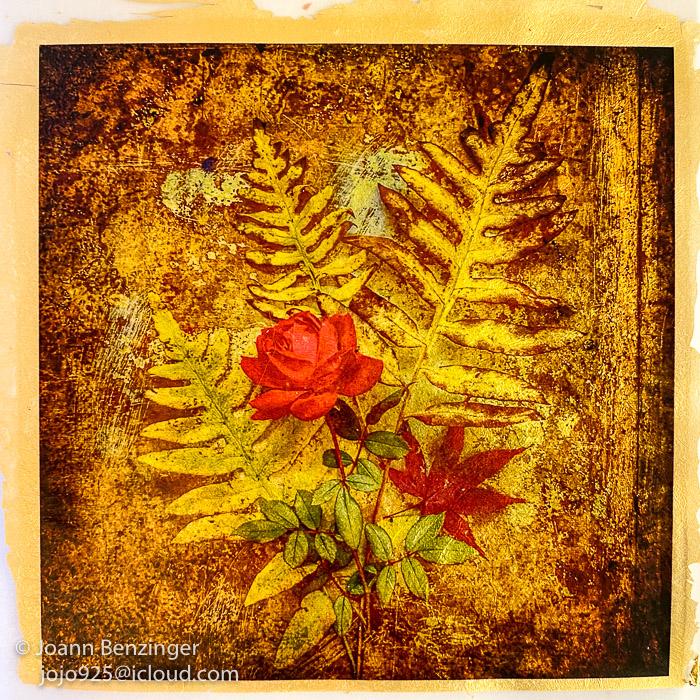
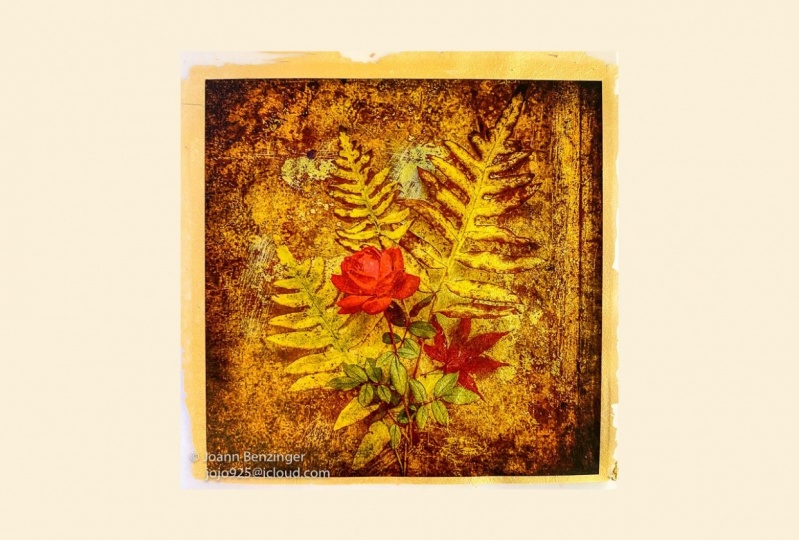
2. 2) Supplies: This is a standard photograph printed on a pretty basic paper. It's called, we wanna take our photographs from something like this to something like this. This is a photograph that's been printed on vellum and then has gold leaf applied to what? So the vellum, as you can see, it's a very sheer paper. So that's what we're going to learn in this class. And I just want to walk you through a few must-have items. Let's take a couple of minutes and talk about supplies. So one of the first things you're going to need is a piece of craft paper. You want to put something down to protect your work surface so that you don't end up getting spray varnish or glue all over your desk or your table. So viral of craft paper, it'll save you a lot of heartache later on. The next thing you're going to need is some vellum. Now, you might think that any brand of vellum will do, but such is not the case. The brand and that I use is butler Bearden and the ink jet ink will absorb into this vellum really nicely. I have tried other brands of vellum that I've picked up at the store. And the ink just sits there and eventually it starts to smudge all over the place. So do yourself a favor, get good vellum. If you decide not to use this brand of vellum, I'm going to talk about a process a little bit later that may help you out. You're going to need to get some gold leaf. You do not have to get 24 carat or 18 karat gold leaf. This is a composite and it works great. You could also get the copper leaf or the silver leaf. What kind of metal you use doesn't matter at all. It's just a matter of preference. Along with that, you're going to want to get their spray adhesive. We will need a Breyer And we're going to need a soft brush. This is just a real cheap brush. It's going to be for smoothing out the sheets of gold leaf later on. Just something real soft. It's not something I'm married to. You are going to need Bristol board. Reason you're likely to need that is to put in fastened to the back after you've got your gold leaf on it, you don't fascinate to Bristol board. It curls. You will need to get some adhesive. These are two different brands I've used. We're going to need some spray varnish. I used the cry lawn brand of spray varnish. You can get semi gloss, satin, a high gloss, a math. That's your preference. You'll also want to have some wax paper on hand. If you want. You can pick up rice papers. I cannot guarantee this is going to work, but we're gonna give it a try because nothing ventured, nothing gained, right? So you just pick these up at a craft store? I was just looking for something with some texts or think this one would be really nice. And I need to try that one. I also have some cheaper vellum that I had picked up at a store somewhere. And while I know this does not work, running it through my printer, I did think that if I use a special coding that I have on it, then perhaps the ink would stay put. These are buy ink aid. You do not need the s. If you get your vellum from Butler dear to him, that vellum works just fine. But if you use any other vellum or for these rice papers, we're going to code it first with this precocious ink aid has a number of wonderful products. You can spread on almost any kind of substrate and they will run through your printer and retained earnings. And when I print out aluminum cans are Muslim, and we're going to try it with the rice paper.
3. 3) Coating & Printing 1: Typically when I do this process, print on vellum, which is a very lightweight paper. You can see through it. And that's what makes this iridescence from when I put the gold leaf on the back side of it. Today, I thought I'd experiment a little bit and try using some different papers. Thought I would try some rice paper. So I picked up a few sheets from the local art store. And I've cut them down to a size that I find manageable. They come in very large sheets. I cut line down to eight by ten because when I run them through my printer later on, I'm going to have to take them down to a carrier sheet that's going to be 8.5 by 11. So I went with eight by ten and I should be able to print a nice piece in here that will work real well for the gold leaf process. I'll either do five by seven or four by four, five-by-five something along those lines. So on order to make the ink for my printer adhere to this paper, I'm going to have to coat it with something and I've got a product by Inc. aid. This one is called iridescent, pearl gloss precocious. They have quite a few different kinds of pre Colts. Basically what they do is when you spread them on any surface, it allows you to use that surface through your ink jet printer and the inkwell adhere to that surface. I've used it on aluminum cans. I've used it on vellum, a different kind of vellum than what I typically use. You've used it on Muslin and just remain just a wide variety of different products. So I'm thinking that it's going to work real well with this paper, although I've never tried it before. I've got my pieces ready to coat. I've got them all step together. And I'm going to keep them stacked this way because they're all really thin material. And when I wrote this with the ink aid product, some of it's going to bleed through. So I might as well let it bleed through to another piece that I'm going to quote anyways, that way I can make better use of my product. Before I start any of this, I'm going to use lint remover, first of all, on this little sponge so that I don't track any cat hair, dog hair, dust. Little particles come going to do the same. Each of my pieces of paper because if that's stuffed, adheres to the paper after I put the coating on it. It's going to be part of my art. And I am going to do both sides. You see, I did actually pick up some pieces of land and fuzzy song glad ended up. Alright, and I'm going to stack these back together again. And then I'm just going to cope all three of these. And I am just making sure you get a nice thorough coat on each one of these. And I'm setting it aside to dry. And like I said, this one already has a little bit on it because some of it leached through backside of my last piece that I did. You want to make sure you code it real well. If there are places that don't actually get any of this pre coat, the ink is not going to adhere properly since all you may be disappointed. And on the other hand, it may be that you actually like that sometimes things happen and they can be very pleasing even though they weren't what we had expected initially. And I am going to make sure that I do not leave this sit on this pile of engaged product because it will lead here itself. It's just like glue. So I don't want it to stick to that. Do you lay down a sheet of plastic to put these on? They'll come up real nicely. Im going to give this one a little bit of extra because it just didn't feel like I gave as much to it to the first one. Since I have some left in my little palette here, I might as well use it up. There we go. There all coded. I'm going to leave them to dry. And the next part of the process will be best selling them to a carrier sheet and sending them through the printer. Have a few more pieces of paper i'd like to experiment with and found this beautiful texture. That's another rice paper. I'm going to do a couple of those. And and I also have this vellum. I'd like to just see if I coat it with something, if I can get it to work nicely. I'm going to use this ink aid product called iridescent gold and give that a try. I've never used it before, but I think it's worth a shot. I'm gonna put that on the piece of the rice paper and a piece of the velum. And then I think I'll use the clear coat, the standard clear coat for a couple of other pieces of the rice paper. I've taken this and I've gently just turned it back and forth a few times. A not shaking x, I don't want to introduce bubbles and I can't get it open. Okay. Yeah, it's got a seal on it. So coded this entire paper. It's questionable whether I really needed to or not. Okay. Yes, it didn't leave through. So I'm glad I put the carrier sheet or the other sheet underneath it and look at how my velum has curled. All my goodness, that's going to create a challenge. Well, that's why it's an experiment, right? Okay, I can already tell you this film is not going to work. While would almost made it. So my rice paper wouldn't work. But I think the rice paper is going to be okay. But that's going to be a bit of a challenge. Just finished coding at. I don't know though, I don't think this is going to be okay, but I want to use a lot. Not hopeful on this one. All right. We'll leave that to dry.
4. 4) Coating & Printing 2: Okay, it has been a couple of hours and my paper seems to be dry. This swan is little tacky, so I'm gonna just set it aside. But for these two, I am going to go ahead and take them to the carrier sheet. If you look at it a little closer, I don't know if you can see it on here, but it does have kind of a pearlescent Xin. I'm really looking forward to seeing what it looks like when I print on it. It may work. It may just be who? Chaotic with all of these empty spots. You know, it's who knows what's gonna happen with this, but it'll be fun to try. Let's experiment. So as I said earlier, I cut this to an eight by ten size 8.5 by 11 paper. This is just plain old copy paper and I am going to take these each to a sheet. The reason I do that is because when I send it through the printer, if I send it through just like this, it's gonna get caught on the gears in there and I'll probably get paper fibers and all sorts of things jammed in my printer. I have an expensive printer, so I really don't wanna do that. When I print this, I am probably going to go five by seven, or maybe a five-by-five inch square. So that's the only criteria I have for what I have left over in here. I want to make sure that I've got enough space to to actually print on, so I don't want to put more tape on them. What I needed, what I have in here looks to be about one inch Artist's tape, three-quarter range would be fine. You can use whatever you have on hand. If you're worried about the, the tape actually tearing your paper. A good trick is to take off a piece of tape and then I can't show you, but I'm gonna tell you what I am doing. I am going to take the sticky side and I'm going to just put it on my shirt and it's going to gather up a little bit of fuzziness. And that will keep it from tearing my paper. Kinda take some of the attacking itself. This is a little bit far away for me to actually do this well. So I may have to put my head under the camera. Alright, so what I'm gonna do is I'm going to tape this down here. Okay? All right, so I've got this one this one done. I'm going to have to trim it later. But what I did was I just made sure that the edge of the tape doesn't go past the top of the paper. Because if I've got sticky on this side of the paper, that again is going to cause problems in my printer. I am trying to make sure that this paper that we have is as flat as can be. Anything that's sticking up in there is a potential snag. I'm going to use a knife to trim off the ends of this tape. I'll do that after I get the other one taped down. When you tape these down, you wanna make sure that the sign that you put the pre coat down on is facing up because that's the side that you want to be printed on. So just be aware of which side is up. Incidentally, I suppose it's not the best thing in the world to keep touching the surface. Just like any other art paper. Usually. The fewer times you can touch it the better because our hands heavy oils on them. And you don't want those oils and any other residue. You could certainly use cotton gloves that might help you a little. You could potentially leave this end open. This would be the side that gets fed into your printer. Not totally necessary that you'd tape down this last edge, but I'm gonna make sure I don't leave anything to chance. I'm going to run get my exact on life, I'll be back. I've got my straight edge, my cutting mat, knife, and glasses. I can see what I'm doing. That one looks pretty squared up. Swans a little messier. I'm not trying to change the dimensions of the paper. I just need to cut these little tales of tape off. If I change the dimension of the paper, that could potentially be problematic when I run this through my printer. So if I tell the printer that my paper is 8.5 by 11, but it's actually eight by 103 quarters. It's not going to know exactly where to put the the printing. So the measurements could be slightly off. Incidentally, when you set this up in your printer. And I'm using Photoshop, and I will be telling my document when I send it to the printer to leave probably a 2-inch header. And the reason I'm gonna do that is because this first inch right here is take. Okay. So if I start down here, let's see. Okay, well, that would give me a five by seven. And that would make sure that when I hit print, the picture is actually going to start way down here and don't want it to start up here on the tape. If the printer starts printing up here, I'm not going to get the complete picture. Alright, that looks pretty good. These two are ready to go. I'm going to take them and print them. Hopefully fingers crossed everybody. Hopefully, it'll be something pleasing.
5. 5) Varnishing: I've printed on our coated paper, I've allowed them to dry for at least 24 hours and now I'm ready to take them off of the carrier sheet and prepare them for varnishing. There are a couple of different ways you can get the paper off of the carrier sheet. You could just take this tape and peel it off. And if we've done everything right, it's not going to damage the underlying paper that we've printed on. Alternatively, that one's coming up pretty nice. Alternatively, we can trim it using a ruler and some kind of tremor, whether it's an exact or naive or one of these round. I don't know what they're called. But this works really nice. Whatever way works best for you. The main thing you want to remember is that ultimately you're going to have some gold leaf underneath here. And you're going to create a mat that is going to go around the perimeter. So you wanna make sure you don't trim your paper two quotes. This is going to have to be mounted inside the mat or so you wanna make sure you have enough of a boundary here so you can fasten that to the back board when you get ready to mad it. So at most I would trim it at the edge of the tape. But for this one, I'm going to just continue with the peeling and see if that works. I'm tearing the tape away from the paper this direction out. Ok. The reason I'm doing that is so that I don't accidentally create tears. If I tear it this way, I'm more likely to tear my paper. Alright? Now when I lift this off of the carrier sheet, it's going to appear that the image is a lot lighter. See some of the ANC did actually go through to that carrier sheet. But we've got a pretty good image. And remember when we back this with gold and then again on another sheet of white paper, There's going to be nice contrast. So don't panic if your image seems really liked. That one worked pretty well, it's ready to be varnished. The reason we want to varnish at us so that we don't scratch or damage the image. I'm just going to set it aside and take the tape off one of the others. For this one, I'm going to trim it. I always like to pull that up before I move the ruler because I'll never get that ruler back in the same place. And I am just kinda lining this up with the edge of the tape. This is gonna give us a considerably smaller piece of paper to work with. So you want to, again, make sure you have enough of a perimeter so that you're going to be able to fasten that down underneath your window met. You may like more of a gold border than I do. My gold doesn't usually go out much further than the edge, but I do like to have a little bit of it. It looks really nice and organic and it definitely says this is something that's somebody made by hand. This is not a machine processed thing. This is something somebody put some thought into and all the little inconsistencies are what make it beautiful and special and Matt duplicated. Yes, I might print this image again, but the gold leaf is never going to go down on it the same way twice. So each one is going to be a little unique. So I've managed to get that off again. You see there's a little bit of ink that went through and it's through these fine areas on here. And that's fine. This is gonna look great. Once it's got the gold leaf behind it. I'm going to try tearing this one again because I just feel a little bit happier with I have more paper to work with in the long run. They can always trim it down if I want to. It's a little bit harder to add paper later. Easy. Does it see there it started to tear a little bit. So I'm just gonna go down here. Pull from this side, see if I can get it started from this direction. You start tearing something. A good solution to try is just go from the other direction. Sometimes it will release better from another direction. And there we go. I would say the reason this started to tears because it was taped down in one of those. When I coded this. I think I pointed it out on the video. When I coded this, the paper weakened a little bit, and when I picked it up, I damaged it. That's why it started to tear. Another good reason for you to always make sure you give yourself enough room to work with. Alright, there we go. I think that looks pretty good. We are ready to varnish these. Okay. So I know these probably all look like they're a little bit dark to you, but remember that they're laying on a dark piece of four, Micah, and they're very transparent. So when they get back on a lighter surface, they are going to be just fine. So this is just a piece of old for mica that I use when I need to have a surface that I'm not concerned about damaging. So the reason we want to varnish thes is to protect them from scratching. So I'm going to give them just a light coat of a spray varnish and like to use this brand, this is cry Elon you the archival varnish. This one is a satin. It comes in a gloss and a mat as well. Your choice? I like the semi gloss, but this time I'm going to use the satin and we'll see how we like that. I'm just going to give it a nice even coating on all three of these and that's going to give it some protection. We are later on going to have to use the varnish again. After we've put the gold leaf on it, we're going to also need to protect that side. So we will be back to this work surface and back to the varnish at a later point in time. But for right now, make sure you're in a well ventilated area and give their varnish a good shake. It's a really good idea to give it a test spray somewhere because if it comes out in a splat, you're going to have a mess on your hands. You want to have a nice even fine mist and mine is looking good. So I'm just going to start at the top. And you will find that giving your photographs of coat of varnish really makes the colors pop. I think you're going to like it. So we're just going to let it dry and we'll come back in a little while when it's time to start the gold leaf.
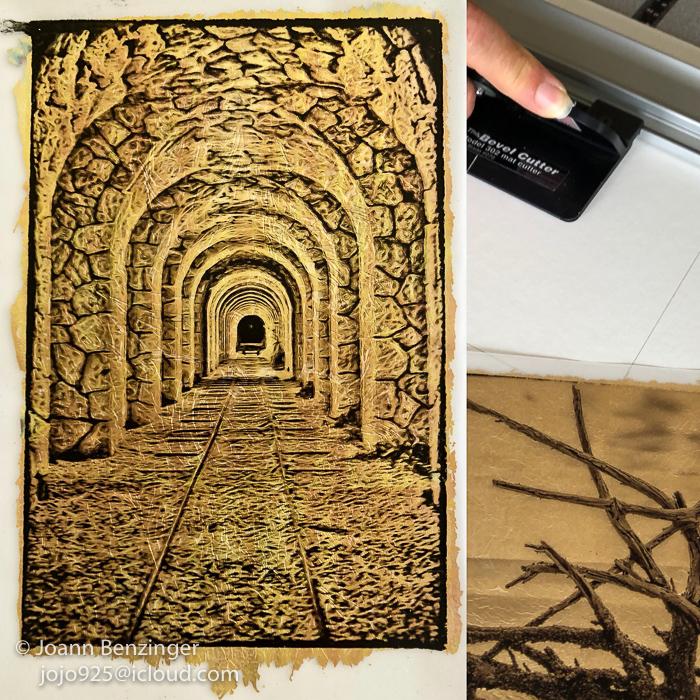
6. 6) Applying the Leaf Part 1: Welcome back. I'm glad you've made it this far. So we've already varnished everything. All of these pieces of vellum and the rice paper, everything has gotten a coat of varnish on it to protect it a little bit. If you're worried that they look a little pale, I'm just going to set them on a piece of white background so you can kinda get a better idea for how they'll look ultimate life. So when you look at it like this, it's a little hard to make. The image never fret. Once we've got background, it's gonna look completely different. This one is on vellum, where the other one was on a rice paper. Same image. Alright, so everything is varnished. So from here what we need to do is we're going to flip them over and we're actually going to apply the gold leaf to the back side. I'm just gonna do one or two of them for you on camera so that you can see how I do it. And then we'll meet back here after they act. Now, as you can see, this one is curling a little bit. So when I lay it down here, I'm going to just be mindful of whether or not it's gonna lay nice and flat. It does seem to be just fine. If I had any concerns at all that would use some tape and just secure it that way. For the supplies for, for this part of the class, we're going to be using this speed ball brand spray adhesive. And again, I've got a speed ball metal Leith. I've chosen the goal. I have some extra little small pieces from projects in the past that may be good fillers. I have a soft brush that I can use to help smooth down the gold leaf after it's been applied. Another piece of wax paper to help me lift the gold leaf from the tablet. And I have, this is a mat board that I cut apart. This is going to help me when I sprayed the adhesive, is gonna help me avoid over sprite. I am going to want to leave a little bit of a border because I liked the torn pieces at the end. So again, this is the front side. We're going to apply the gold leaf to the reverse, struggling to lay it down, face down. Alright, the gold leaf is In this little packet. There's a clear plastic piece on top of it that protects the first piece and then after that it's got tissue in between. Okay. When I chose the size that I printed, I made sure that I printed it a little bit smaller than the gold leaf. So for me, the gold leaf is 5.5 inches and I believe I made these five inch square. That's going to allow for just a little bit of a border. When I lay down this piece of math board. Just wanna make sure that there's a little bit of edge showing so that there'll be a little bit of tear. When I release the gold leaf. We're just gonna spray this down. We want to have a nice even coat. That should be a great plenty. Going to remove this and set it aside. There is over spray on here, so good. There's over spray on here. So it is going to be sticky. Be careful what you set it down on. We're going to wait for a little while. Usually they say about two minutes before you actually apply the gold leaf. So while we're waiting for that, I'm just going to show you a quick little tip. So here's this piece of gold leaf here. It's really hard to pick it up with your fingers. Fingers have oils. We sweat, we get sticky. You can use cotton gloves. But easier trick is actually to take his piece of wax paper and set it down on a and voila, it'll lift right up. I'm just going to let it rest here until it's time to put that down. Alright. So the whole, I am going to just place this over the image. And once it hits, that was not good guys, that was not good. I am so sorry. Alright, well, sometimes you learn how not to do things before you learn how to do them. There's not much I can do once it hits that. That he said She's a done deal guys who's a done deal? That's alright. That's alright. They will do better on the next one. Kind of amusing. I am going to take out some of these extra pieces that I have and just apply them to the places where I messed up. That was really sad, you guys. I am so sorry. Well, that's just going to be an exercise in don't worry, be happy. Don't worry. It'll all be fine. It'll all work out. Yeah. No sweat guys know SWACH. It's not what I would have necessarily wanted to do. But so what's going to be my worst enemy is these little places where the seam, here, there's a seam. That's a little sad, but maybe it won't look bad. We'll see. Alright, let's turn it on and take a look. Hey, see now, it's not so bad. It's all good. I thought I had a little catastrophe, but it's alright. I'm gonna take this brush and just scrub a little bit of the edge off here if I can lift it. Because I like it to be a little bit more ready than that. But I'm gonna say this one. This one's a keeper. All right. I'm going to let it dry face down, so I'm just gonna set it aside. We are going to have to come back to it later on and give it a coat of varnish and then glue some Bristol board on the back of it. Because if you don't glue it down to some Bristol board, just curls. Ultimately we want to have like this, see how this one, because the velum, the gold leaf and then on the back. And after I varnished the gold leaf, I glued a piece of Bristol board down to it and that just gives it some stability. Alright, I'm gonna do another one and hopefully not bomb. Let's see how it's done the right way this time. Let's just get rid of all of these little scraps here. And as you can see, if I have good size scraps, I saved them because we never know when you're going to need them. Let's try this one because I'm curious how this on this paper is going to work. Alright? We're going to get bored back. A little bit of a border. No, look for my fingernails. Am I like that? Awesome? We're going to let this wonder I till.
7. 7) Applying the Leaf Part 2: I am quite nicely messed up. This work surface. It's sticky with adhesive. It's got a little bit of varnish on it. So I'm just going to put down this nice clean piece of it's just a piece of cardboard that was probably stuck inside some papers that I bought to keep everything nice and flat. And want to continue with, I want to continue with fascinating my gold leaf to the backs of these. I'm going to do a bigger one to C. You can see how I do that when I need more than one piece of gold leaf. So remember, this is the front side for attaching the gold leaf to the back side. While I'm waiting for the adhesive to set, I just wanted to show you a pair of these cotton gloves that you can pick up. They're really nice to have on hand for anytime that you're touching fine art papers. Or if you're working with old documents and you don't want your hand oils to get on them. There are nice to have a couple of pairs around just for situations like that, you can also use them to pick up the gold leaf. Because like I said before, there are oils on our hands and they sweat and sometimes the gold leaf just sticks to what? I'm going to continue using the wax paper that seems to work for me. And we are about ready. So what I'm going to do is I'm going to take the first piece of gold leaf and I'm gonna try and get it at the top. And then I'm going to take another piece of gold leaf and fill in the bottom. I'm going to go up to this top one that's got some damage to it. And it looks like I'm going to damage it even more. No mercy. Okay, it doesn't want to release from that cellophane. That's okay. We're just going to move on to a different piece. There we go. Much easier. And I'm gonna make sure that I get this up above the seam line. And then I'm going to try and pull this part of it off. And I'm going to just leave flat piece there. Don't rob real hard on this for fear that you will tear your gold leaf. This piece is going to go in this little jar here. For now, just to give myself some nice rough edges. We're gonna REF that up a little bit. Just along the sides. That'll do. Alright, I'm gonna set this one aside, let it dry, and then later on will varnish that.
8. 8) Varnish and Bristol Board: Time to put a coat of varnish on the backs of these. I'm going to use this crime on UV archival satin varnish on here. The reason I varnish it is to keep the gold leaf from tarnishing and to also protected so it doesn't scratch. I'm just gonna give it a quick coat. It's already been shaken. As with anytime you use varnish, you should use this in a well ventilated area. After I spray varnish it, I'm going to set it aside and allow it to dry. And once it's dried, we'll come back and we will attach the Bristol board to the back of it. I just wanna give you a little bit of the lay of the land here before we get started on this next part of the process, we've got a nice flat work surface going here. I've got a little bit of foam board laid out and I've put my photographs face down with the gold leaf facing up on it. The reason I chose foam board is because it's kind of a soft surface. I don't want to damage or scratch my prince. I've got some really nice heavy books because I'm going to want to lay them down on top of it after I have put the adhesive on the Bristol board, which I've got right here. And I'm going to use this adhesive super 77. It's a nice strong adhesive. We're going to spray that on the Bristol board, put it down on the photographs, and then I'll put books on top of it to make sure it gets a good adhesion and that it stays nice and flat. Meet you back here in a few. What I'm using for this process is just plain old Bristol board. It's nothing special any brand will do. It's just something that's got a little bit more of a structure to it and it's going to help keep our photographs from curling later on. So I have gone ahead and pre-cut them and I'm just going to show you this is the size. This is the photograph. This is the gold leaf side. And I cut this roughly the size of the photograph. I don't want to extend it beyond the gold leaf because when I paste this down, I don't wanna see that edge. I want that behind the gold leaf. I just wanted to add a little bit of structure to keep this nice and flat. Alright. So all I did to cut them was I measured my photographs and I made, I just use a ruler and an exact knife on a cutting surface. They're all ready to go. Some of them like this one. It's a different size. If you're a little bit more consistent than you can cut them all the same size and it's pretty easy. All my squares are four and a quarter for the size photograph that I've got going. So I'm just going to lay these out here. I'm gonna give my I'm going to give my adhesive just a little test spray because of a globs. I really don't want it on my Bristol board. Yup, it's good. Alright, so I'm just going to give a nice solid coach here. If I don't give it enough adhesive Lake, it seems to be running out. I might have to go get another brand. If there's not enough adhesive on here, they're not gonna sick and eventually they'll start coming up. And if you sell these, you don't want that to happen to your customers. So make sure you give enough if pieces. Alright, this is gonna be about the end of this cam. Incidentally, if you are doing this with varnish and it starts doing that, stop immediately. And they didn't worry about it globbing so much with adhesive because it's yeah, it's glue is glue. All right. I'm going to move the camera. I'll be back with you in just a minute. Here we are. All set. Okay. So we want to make sure that you take the card and put it on the right picture because if you put it on the wrong one, like I showed you before, you're going to end up having pieces of the cards show through the back of the vellum. It's see-through. So this is kind of important. I'm got sticky side here. I'm going to put it face down on the back of my gold leaf. I've got a Breyer roller here. And I'm just going to flatten it down. I'm going to press pretty hard. I wanna make sure that thing is sealed on all of its edges. Sticky side, face down. And now I'm going to nice heavy buffers. Just set bows down on top of the photographs. And then we're going to let that set up, come back a little while and turn them all of our See how we like on they'll be ready for manning them.
9. 9) Matting: While you guys, are you ready for the final unveiling? I think everything is adequately dried, so let's take a look and see what we got. This one stock there. No harm done. All right. So here we go. Taking a look at them. I have to say, I think I probably like the velum, the Bast. This kind of rice paper isn't bad. This one, I don't mind. This one I'm not real crazy about. So you can see the difference between the original photograph and what I've got here. This just looks a little bit dingy. Saw. I don't know if I really like this kind of rice paper. That's okay. That's alright, it was worth doing. That one's kind of pretty, that's again, this weird paper that has the holes and then this was another kind of paper. Yeah, that one's nice. You can't see the gold through it as well. The goal really add something. So I think I like seeing the gold a little bit more. Alright, so now we've got them all. Let's just call them aside because what are we gonna do with them? And I'm gonna put one in a Matt. And I tell you, I'm not going to teach you how to cut maths and hopefully something you either know how to do or you know where to get them done. If you use a standard size, you can just pick up pre-cut maths. Or if you go to map boards plus that's mapped boards plus, you can give them specific sizes of the window opening. You want to have cut and they'll do it for you. If you buy in bulk. It's really a pretty good deal. I have such non-standard sizes in all of my photographs, I usually just cut my own. So let's take a look and see where this is going to work. I'm just going to open this up so you can see how I've got it. So I've got a plain flat vet 4d. This is called a window hinge. And this is a window mat. Look just like this only it was black and I cut the hole in it. Alright. And that's how it will look when it's mad if I rather like it. I'm just going to show you on another one where I sign it. I like to use pencil on this velum and I just sign it wherever there is a place where it's going to show up, usually down at the bottom. To secure this in place, I use Artist's tape. Okay. This is acid free. It's not going to cause any yellowing on my art work. And here's how I do it. So I'm going to just line this up so that I'm happy with where it sits inside the window. Thing. Great about there. This is a slate coaster that I've covered in a sock. Because I'm gonna set this down on my photograph covered in a sock because I don't want it to scratch the image. That's going to hold it in place. Then I'll open this up. I think two pieces of the artists take I'm going to tape them from the top and let gravity do its work. You don't want to tape it down here because it could cause buckling. You just want to let it fall to the bottom, let gravity do its thing. So I'm gonna close that. And there we go. It's all set.
10. 10) Final Thoughts: Well, that concludes this class on the gold standard, using vellum and gold leaf to embellish your photographs. I hope you had a good time. I hope that you will learn something that you can take into your own workflow. And I hope that you make some really beautiful creation. I'm excited to see what it is you come up with and ways that you use this process. So be sure to post something in the class project section. I just want to let you know that this class was actually the direct result of another student asking me about a process that they saw in one of my other classes, they wanted more information. So if you see things that I've done, maybe you'd like more information or maybe you just know of something you've always wanted to try. Maybe I know how to do it. Go ahead and post a comment. I look at all the comments in the answer them in. So who knows? Maybe you'll help me figure out what my next class. Thanks again for taking my class. Enjoyed, happy creating. See you next time.
 Joann Benzinger, Fine Art Photographer, Teacher