Transcripts
1. Introduction: Hey, it's Clayton in this class. I'm going to show you how
to convey emotion through the expressions of your
character's facial features. Will be covering happiness, sadness, anger, and shock. And I'll be showing you
the more subtle forms of these emotions as well as
the more extreme versions. We'll also talk
about how to draw these different facial
expressions from a number of different angles. Alright, let's jump
straight into it.
2. Happy Expressions: What we're going to
be working on in this lesson is
facial expressions. And we're not going to be
drawing full heads for this. There's no need for that. Instead, what we're going
to start out with is just some basic plot
points for Willie I as a guide to go where
the nose will see it in the mouth, et cetera. And we'll be covering a number of different
facial expressions. I think we'll start off with one of the key
facial expressions, which is the expression of happiness or a
smiling expression. Although it might also
be worth to just do like an idle expression for as well. So what does the resting
phase look like? And then comparing that to one that is actually expressing
some sort of emotion. So we'll just do a basic resting face expression first and then we'll
work from there. And the way that we're
going to set it up, I'm going to do a top row and a bottom row here so that we can fit as many on the
page as possible. But we're going to
start out with a line. We'll mark off the
bottom of the line. And the top of the line. And the top of the line is going to represent
our brow line. While the bottom
line will represent our chin line
in-between these two. If we remember back to how we divide the face up
in order to get it speeches proportionally
placed properly. We're going to
divide the distance between the brow and
the chin in half. So I'm just going to
label this so that we know brow, chin. Then we've got the nose here, which sits between them. And then we've got mouse
which sits below the nose. And in order to find the
positioning of that, we're going to
divide the distance between the nose and
the chin into thirds. And we're gonna do our best. And when it comes to that, I'm not always perfect with it. I think that looks about right. We'll make some adjustments
later on if we need to. Then of course, as
for the eyes, well, they're just going to
sit right underneath the browse at about
this distance. Of course, we don't have
the whole head there to measure out exactly
where they should go. Since the I sit at
the midway point of the overall
length of the head, but I think this will
do us just fine. I'll shrink that down
just a little bit. Hopefully you can see
what I'm working on here. Okay. All right. So we've got our facial
features plotted out. Now let's loosely draw
on the facial features. We don't have the
polish these up. That's not what the
exercise is about. It's more just
learning how we can manipulate them
in order for them to express one
emotion or another. And remember that we're doing
the resting phase first. So let's start off by
drawing in the eyes, again very loosely
and very quickly. So one thing that's really
good to try and get into the habit of is actually working with
a little bit of haste. And this is something that
I learned much later on. But I realized that I did my best work when I was working with some
speed behind me. There's two reasons as to why you would want to
go down that route. The first one is
because when you're working with some haste,
you're thinking less. Okay, so the faster you work, the less time you have to actually think about
what it is you're doing and that you would intuitively
believe is a bad thing. But in actual fact, it's not, it's a good thing. Because after a
certain point when you really figured out the
proportions and you can use your eye to judge where the features need to go
on the head and that kind of thing and their
shape and whatnot. And you've done all that study. You don't want to keep thinking about it because what
ends up happening, It's really interesting is
the brain tricks itself. If you start to think
about something that you already have learned
and become competent at, and you're consciously
monitoring what it is you're doing. Well, what ends up happening is your brain believes that in
fact it hasn't learned it. That still needs to pay
attention to what's happening before it can
use those skills properly. So that's when you find yourself stumbling
or not turning, not having the best
result left on the page after you set
out to draw something. Alright, so we've got the
eye is drawn in there. We're going to try
to keep thing. Symmetrical. And then
we've got the nose, so we'll draw that
out real quick. And it's also good
to work loosely too. I think if you can work loosely, what that does when you combine
it with the haste is you really do start to
find your lines become more energetic
and full of life. And that's something
you want to preserve throughout the entire process from the beginning to the end
presentation of your art. So we got the nose, we're getting a bit of a
recap on everything that we learned about with
the facial features in the previous lesson. We'll place in the mouth now. And we'll draw the opening of the mouth all the
way out to the corners, which should align just short of the midway point of
the fate of the eyes. And don't worry, I'm
going to go over some of the basic proportions to keep
in mind in just a moment. We'll place a little
dash there to indicate the bottom lip rendering
for the top of the chin in some lips. And yes, we will be doing
some facial expressions presented on an angle. Wrap this lesson. You'll get the
full, full dynamic experience when it comes to
drawing facial features. Okay, cool. And as for the eyelashes
and that kind of thing, we can very roughly
scribble those in. We won't be too
perfect with them. It's funny how these more
rough lines that are a little looser can sometimes
look better than when they're all polished up and inked with clean line work. I haven't worked out why
that phenomenon is so yet, but seems to be the
case sometimes, like usually I'll get
more attention for my preliminary work than
I will for my final work. In other words, if
I posted online, I'm going to get more likes on my rough sketches then I will on the finished illustration
of slaved over four hours. Alright, cool. So we've got our basic
face drawn up here. Now, if we were to go
ahead and start to mark out some of the
proportional relationships between the facial features. The first one that I want to
point out is just the eyes. So if we look at one eye and
its width and the other eye, what you'll notice is
that in-between them, we get about one
eye width of space. Okay. So the entire head really from I measure it
from one year to the other, is about five years wide. So if we were to stretch
this out one more eye width, that would be the sides of our head or the
sides of our ears. Really, I didn't like doing it to the edge of
the face because I feel like it leads to a fat looking face.
For my characters. I like to measure it from
one ear to the other. Now, you'll also notice that if we continue this line downward, the nose is roughly one
eye width wide as well. Okay. So it sits directly in-between the eyes and takes up that one either with space in
terms of its own width. Now, as for the mouth, well, that's going to, as
I mentioned before, it's going to stop just short of the midway
point of the eyes. You can draw the corners
of the mouth all the way out so that they line up exactly with the
middle of the eyes. And keep in mind, that's the
middle of the eye-opening, not the iris and the pupil which move around and can be anywhere. So we're actually measuring the, measuring them out to the middle of the eye-opening itself. As I said, you can you can measure it all
the way out to here, but I just find that that's
a little bit too long. Sometimes it makes the
math look too wide. But that's our basic
resting face. Okay. So it, it was a good one
to just loosen up with. Now let's actually give how
faces here, some expression. Let's draw out our next phase. Alright, we'll start with a line that'll run down
the middle of the face. This is a great way to practice. Just use the
proportional guidelines here to do your
facial expressions. You don't always have to do
a complete, an entire head. Alright, and then we'll draw out our brow
line up the top. Simple enough, tried to make it symmetrical on either side. And then we'll lay in the chin. And we'll divide distance between the brow line
and the chin in half. And then the space below it into thirds to find the mouth. Then we'll add in the eyes. Now you'll notice that
I haven't actually plotted out where the
ears are going to go. And that's because the ears really don't express anything. They just they just hear things. Some people can wiggle
their ears around, but it's not really
anything that you're going to end up illustrating. It may be in a really stylized, like if you're drawing cartoons
or something like that, you might have a year's flapping around the place and whatnot. But, or perking up. Because maybe a
character is aware, but you're drawing a
realistic character. Usually you're not going to be observing that stuff
because it won't be as exaggerated. Okay. I'm just going to
write down a bit. Alright, so let's
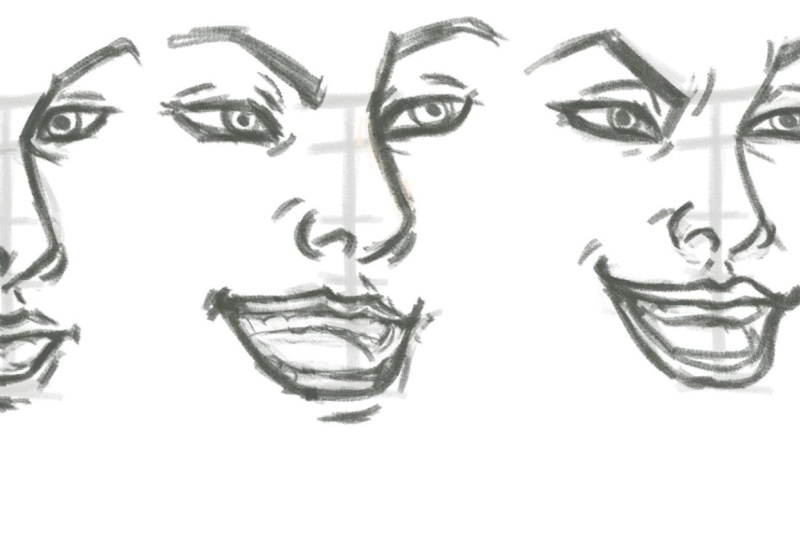
tackle smiling. When it comes to a
happy looking face. What you'll notice is that all the facial features
are affected except for really the nose when it
comes to facial expressions. So it's really going to be the eyes and the mouth that
we want to look out for. When we're smiling,
when we're happy. And by the way, there's,
there's degrees of these facial expressions that you're going to want to observe. And I'm going to show you an example of that
in just a moment. But let's just say
that we're looking at a character who's
moderately happy, where I am going to start
to smile just a bit. What ends up happening
when you smile? Because we are stylizing
things here just a little bit. We're not over-exaggerate
with them, but we are stylizing them. Is your eyes start to
arch a little more. Okay, so this shape is
actually going to change. And one of the ways in
which they will arch is the bottoms will
start to curve upwards. And the AI will
always start to close a little bit, right? Because it becomes relaxed. Good feelings shooting through the body when you're
feeling happy. Happy, happy chemicals are
being released in the brain that cause you to
de-stress and to relax. And so I'm just making
this up but I'm assuming that that's why your
eyes would start to become, you know, more rested looking. And people can experience emotions for all
sorts of reasons. You might have a
villain who's happy because of something
terrible is just happened. You might have someone who's happy because they're in love. Or you might have
someone who's happy because they've just been given a promotion or
something like that. In the context of
story often provides the context of the emotion that's being felt
within a character. So you can really add depth to the emotions and expressions that your characters
are feeling, of course. Alright. Just going to move these ions a little
closer together here. Yes, I'm cheating. I know. Alright, there we go.
So we've got these, these arched eyes here. And the other thing that's
going to happen is the muscles around the eyes are actually
going to be affected too. Okay, so I'm going to add in
just a few little details here to describe that
surrounding an anatomy. And one of the key things is
the muscle above the eyelid. On the underside of the brow. You'll notice that there's
even though it's sitting on top of the bone and
it's relatively hard. There's still a little bit
of cushioning muscle here that helps to provide different
expressions for the eyes. And when it comes to showing a smiling character
or a character who's happy. By the way, these could
very easily be sad eyes. It's just that we're
going to be giving this character a smile to go with it. So it'll change it once again, it'll change the way we
interpret this emotion. But usually what will
happen is there'll be an upward angle to the brow, at least the
underside of the brow that sits on top of the eyelids. Right? And again, you can see that the
eyelids are pretty much sitting over the top
of the eyes here, so it really gives that
rested appearance. Then, as for the
eyebrows themselves, what will happen is
they will upturn. And they will also start
to arch a little bit. So there'll be turned up a
little bit in the middle, but they'll also
be arched upward. Something that looks like this. And you can just play around with the shape
of the eyebrow, play around with the shape
of the eyes and tweak it. It doesn't have to look exactly like what I'm showing you here. This is how I would express
emotions through my style, but you could certainly
try out your own. See what you can come up with. The eyebrows are slightly raised and they're also arched as well. I certainly don't
want to make them look like angry eyebrows. And that's the last thing I
want for this expression, unless it's like a maniacal
smile of some kind. So again, you can, you can mix and
match all of these. You can certainly take these ideas and put them on
top of different expressions for the mouth and create a whole completely whole
emotional context. Pull a set expression. Eyebrows drawn in there. They're looking pretty good. Now we can go ahead and actually placing some
eyelashes for these eyes, start to darken them
up a little bit. You can see that I'm, I'm just
scribbling them in there, trying to capture
that rough shape. All right. There we have it.
As for the eye, so the eyes look very relaxed, the eyebrows look
relaxed as well. And you almost get this
sense of happiness. Or at least the character
looks chilled out. Just from the eyes alone. Eyes are very expressive. There's an entire ring of muscle that surrounds them
and allows for those micro-expressions
to unfold or to be shown on the face. So we'll draw in
the eye and iris. And usually what happens
as well when you're happy is your pupil will widen and you get a, you get some extra reflections happening in the eye as well. Leases what you can show just to really get the point across. Again. And that's because of
the happy chemicals that are going through
the brain when you experienced something
enjoyable or happy. Alright, great. So we've got our
eyes sorted out. Now let's tackle the nose. And of course, the noise is not going to be
doing a whole lot. So we're going to get a lot of practice at drawing
the nose here. From this particular view. The nose and the
ears are probably the least expressive facial
features on the head. Once you've drawn that in, we can now go ahead
and lay in the mouth. The mouth is actually quite easy to draw in different
facial expressions. Because it's just a line. It's just a line that runs from one side of the
face to the other. But you want to think about is the trajectory of that line
and the bend of that line. And also consider that when the mouth smiles,
it's actually stretching. Okay, so rather than aligning with the midway point
of the eye here, It's going to
extend beyond that. But because it extends beyond the midway
point of the eye, it's going to start to
flatten out the lips, okay? Because the mouth
opening is stretching. The lips along with the mouth opening will
stretch with with it. And so they won't be as full.
That'll become thinner. So once I've outlined the mouth opening and then go
ahead and draw an ellipse. Remember that they'd been
flattened out a little bit. They've stretched
out with the mouth. Now they will likely still, the lips will still come down
to where they should be. It's just that they'll
look stretched because the mouth is now wider. And you'll notice that the
mouth is still close to you because they're smiling, but they're not, they're not smiling so much that
any teeth are revealed. In the next example, however, we will certainly demonstrate that and I'll show
you how to tackle it. Okay, now, the other
thing that you're going to want to maybe add in here is a greater indentation at the corners of the
mouth because there's actually some little muscles
that sit around the mouth. And you could think of them as precisely being the
bean shaped muscles that are able to
extend the mouth and make it wider so that they're pulling on the
corners of those mouth there. But as the mouth
starts to widen, the corners of the mouth
curl up next to those and those grooves that we end up seeing become deeper at
the sides of the mouth. You can certainly
add those in there. Something else that you
might see from time-to-time when it comes to smiling
faces is a little dimple. Ok. Now you don't have to add
in dimples TO characters, but you can, if you like, it really does depend
on the character. But other than that, that's, that's really all there
is to it when it comes to drawing smiling face. So try to keep in mind those observations
that we've made, such as the watching eyes
and the arching eyebrows. Now of course, what
controls all of these facial features
and their composition in any expression that they might come together to create is
the underlying muscles. Now, you don't
really need to know those underlying muscles
and what they are. It's, it really just makes the entire process more
complex in my opinion. But certainly understanding that the mechanics that are going on underneath the
face in order to pull the features into various
expressions is worth knowing. It wouldn't really help
you draw them any better, but understanding it is
certainly a good thing. What you do want to do, however, is visually become at least familiar with what the features look like in
these major expressions. Because as you're about
to see, once you do, you're able to push
those even further into more intense emotions. So you might go from
smiling to laughter, right? Smiling character, this is feeling kind of good to one
that's feeling ecstatic. So let's push this expression
even further here. We'll start out with the
middle of our face again. Going to get a few opportunities to repeat this process
multiple times, which is always good
for practice purposes. And as I said, you could fill multiple pages up in
your sketch book. Going through this
very exercise, I would highly
suggest that you do. It's going to not
only become LA, to become well acquainted
with facial features, but it will also
allow you to be able to breathe life into the
faces of your characters, make them a look alive. So we'll go ahead and
divide the distance between the brow line and
the mouth into two halves. Then we'll add in a dash for the mouth and another dash
for the top of the chin. And then we'll play
see in the eyeline. Okay, there we have it. Alright, so what's
going to happen as this face becomes
even happier? Well, not only might the eyes
completely become arched, but they might be also
close at some point, especially if the character
is laughing really hard, we won't do that just yet. We'll Lum, was slowly ramp
up this particular emotion. Alright, But here
you could call this, if the first one was a
face that looks satisfied, the next one might be a
face that is full of joy, That's ecstatic
and really happy. Alright, so I'm
going to go ahead and what's going to happen is these eyes are going
to almost start to completely close up. So everything that you're seeing in the previous
example is being exaggerated. Basically. So quickly draw out. The shape of the eyes here. You can see that on
top they're really arching now and they're also arching up on the
bottom as well. So the reason for that is that the cheeks are
starting to raise up. I think it helps to really
try to feel the emotion. I know that sounds a
little bit airy fairy, but try to feel the emotion that your character is feeling
as you draw them out. And when you're drawing
from that place, it'll I feel like it adds a little bit
more believability. It's almost like method
acting for an artist. Okay, cool. So once we've done that, we can go ahead and actually
eyebrows some more as well. Let's tackle the eyebrows here. So in order to
capture the eyebrows, I'm going to draw a line first just to
nail their trajectory. So the biggest thing you're going to notice with
the eyebrows and this expression is that they're raising up off of the eyes. Then they're arching up and
then around to the back. Okay. So if you're having
trouble drawing them, you can do what I just did, which is, start out
with a line first, just to get an idea as to
the direction you want them to flow in. Wonderful. Once we've done that, of course, we can add in some of the
surrounding facial anatomy. And just as before,
we're going to see that that top muscle, the eyebrow is almost going
to start curving down on top of the eye socket where the top eyelid meets the brow, creating a crease in that area that we'll draw in some eyelashes
around the eyes. We're just pushing the shape
that we were working on before for the eyes and we're
exaggerating it some more. You know, there's so many comic
book artist who will draw the same face over and over again in the same idle position. And I think that
when you're able to show expression through
their facial features, like not just one expression, but a wide variety
of expressions. It makes them so much
more compelling. And it really sets you
apart as an artist. Because I don't know if it's that At certain
artists can't do it. I just think it's, they
don't maybe think to do it. Like I said, it can make your characters
look so compelling. What I'm also going to add in here is just a little bit of a fold underneath
the bottom eyelid. And again, that's because the cheeks are
somewhat coming up, but also that the
eyes are almost squinting riot like
they're starting to become seized up almost
the muscles around them. Because of the excitement
that the character is feeling when they're in
this emotional state. And then it will draw the
wide pupils once again. The IRS sitting around the pupils and the reflection
in the eyes like so. Once we've done that, we'll lay in the nose just as before. The nostril. On either side. Little indentation at the
top of the nose bulb. Again, that's all we need for
the front view of the nose. It's a very, very simple. So you should,
hopefully you'll be a total pro when it
comes to drawing those noses from the front
by the end of this exercise. Okay, great. So once we've got
that placed in, what I'm going to do now is just gotta get
my eraser around. And I'm actually going to, well, I'm actually going to give the mouth a little
bit more room here, but first let me draw
it in and then we'll see what adjustments we
actually need to make. The top of the
mouth really isn't going to change too much. It might raise a little bit just to reveal the
top set of teeth. But it's still going to
start out as a line. And this time the mouth is going to stretch out even wider. So it's almost, it's
almost a lining with the shorter the end of
the eyes this time around. Okay, so what does that mean? Well, it means that the
lips are going to be even more stretched out around
the opening of the mouth. And of course, the
opening of the mouth. The teeth within the
mouth are going to be revealed as well because the
mouth is actually opening. The mouth opening is opening. Right? Okay, so I'm just going to
sketch that in there like so. Now because we're seeing the mouth open just
a little bit here. But that's that's more
like the lips, right? It's not it's not actually, the teeth is still going
to be clenched together, which means in fact
that the face itself isn't going to extend, right? It's still going to the chin won't lower in order to
actually open the teeth. So we'll just leave it as is. But what will happen is that this crease where we see
the top of the chin, that's going to become much darker and much more significant because now it's being pressed riot against the
bottom lip here. I'm going to draw an ellipse. And once more they're going
to be very stretched out, even more stretched
out than before. But it's the bottom
lips and the top lip. Now let's talk about
teeth for a moment because it can be very easy to draw scary-looking teeth for your characters that
don't quite look right. One thing that most artists
in the beginning will set out to do when they
draw teeth is I'll draw a line straight across and then I'll draw in all the teeth. But as you can see, that immediately
makes your character look quite terrifying. So what you wanna do
instead is you wanna go ahead and just hint
at the teeth, right? And usually the way in
which I'll do that, I'll draw in a little bit of the divide between
the bottom teeth and a top teeth
around the sides. And maybe hint of it in
the middle of the mouth. Ab. But I'll leave it at about that. Then I may come in if the if the teeth and
really being revealed. And I might add in
some gums up the top, but really there's not the
opportunity to do that here, so I'm just going
to leave it as is. And that's all you
need to do for teeth. So you don't need to do
anything too fancy for them. It's certainly the case where
less is more for teeth. Now the corners of the mouth, no doubt going to end up
having even deeper pockets. Now, we'll draw those in. And that completes us out of
our mouth or our, our face. That's even more full of joy
than the previous example. So now let's go ahead and draw out a face
where we're actually seeing the mouth open properly so the teeth are actually
going to extend, well, will now be set apart. Alright, so you can think of
this one is like laughter. Alright, so go ahead here, place in the middle of the face, had in the brow at the top. And the cool thing
about this is that because it's not a full
head, we're drawing out. It's pretty low key. You can practice this and do a facial expression
was in just minutes. And it doesn't require
a whole lot of time. Just whatever time
you've got handy. It's a great exercise if
you just want to warm up, even got how eyeline drawn in just underneath
the eyebrow there. Okay, great. So this time around, not only are the I is
going to be arched, they're going to be
completely closed. So something like this. And you'll notice, rather
than curving downward, like you would see on
a sleeping character, they're actually curved upwards. We might draw in some
eyelashes around them. Just a second, I'm
up a little bit. And of course we'll have some folds around the
bottom of the eye. I'm a little so go
ahead and place in the top eyelid a line
indicating the crease. The top eyelid as it folds up against the underside
of the brow. Okay, and now these
are all part of the same emotional family. You could think of it as.
They're all happy emotions. In a moment, I'm
going to show you some examples of not
so happy emotions. And how they can equally have a dial that can be turned
up and down, right? So it's not just learning about the one emotion
and how to draw that, but also how to push
it even further when, when the time is appropriate, when the time comes that
your character needs to experience a more powerful
version of that feeling. Okay, cool. So now that we've done that, we can go ahead and place in some lines for
the brows gaze. So now I'm arching up the
brows even more here. So here we go. Great. So we've got our eyes
sorted for the most part. Now let's go ahead
and draw in the nose. Now, if it's a face is
really becoming contorted, maybe the nose may
move a tiny bit. But in this example,
I didn't think so. Like maybe if there's a lot
of laughter going on them, the nostrils might
flare open somewhat. Some snorting might be involved. With this example. I think we'll just
keep it as default. Then here's where the real
change is going to happen. Alright, we're going to join
the opening of the mouth. And it's actually
going to be wrapping around that's top
set of teeth like really stretching
around them, the mouth. And going to go ahead here. And I'm actually going
to drop the chin a bit just because now the
jaw is actually opening. So we'll draw in the
opening of the mouth. And we'll draw the
teeth as well. We can't forget those. We'll start with the
top set of teeth. Then the bottom set of teeth, which will only just be able
to see down here, right? And then we might also be able to see the tongue
in the back there. Some mouth is open now. Okay, cool. And of course, those pockets, there's little indentations
at the corners of the mouth. Well, they're going to be super exaggerated at
this point, right? So we're really going to start to see some folds
on the face occur. I'm starting to realize my mouth isn't completely
symmetrical, but that's okay. Alright. And might have some
real dimple starting to occur on either side of
that little muscle there. As for the lips, well, as I've said in the
previous examples, they're going to be very, very stretched around the mouth. Even more stretch
this time around. Sometimes they might
get so stretched out, you can barely see them. You know, people have
different lip shapes to them. Drawer in the bottom lip. There we have it. Now I'm just going to go over the top of the mouth that I
drew in and start to line the lines for the teeth. Now here, we can actually
start to maybe add in some divisions between the teeth toward the back of the mouth. We can certainly indicate
the gums at the top. That's all there is to it. We can fill in the
back of the mouth, show that it is indeed open. That is our first set of, You can call them
emotional expressions, facial expressions.
3. Angry Expressions: Okay, So next up, let's do some more. Let's do some less
happy expressions and something that's a
little bit more angry. So starting from basically
someone who's a little bit agitated to
someone who's enraged. So, alright, start
out down here. We'll draw a single
line, top to bottom. This will be the brow line
and the chin down here. And we divide the distance
between the two of them. Get the nose. And we'll divide the
bottom up into thirds. You can see once
you get the hang of this, it's going very, very fast to actually set up the eye line here. Okay, great. Alright, so you might, someone, you might start off
with, somebody is just looking a little grumpy. Right now, their eyes
are going to narrow out the shape of them. The height is going to change so the tuples on the top of the ball will
be fairly straight. Then the bottom is going to
come up and almost squinting, like Hey, started, I
really annoy me, right? And you can come up with
little scenario is if, if it makes, it, makes
it more fun for you, more fun of an exercise, different scenarios
that your characters might be involved in. Maybe a conversation with
another character or just some tasks that they're undertaking may or may not
be really annoying them. Putting these emotions
in contexts is certainly going to increase the believability
of them. Alright? Now this will be one
expression actually where we will see in somewhat of a noticeable change
within the nose. Usually when
someone's in a rage, their nostrils are
going to flare up. The bull from Looney
Tunes comes to mind. When I think about
enraged characters. Like blowing the
smoke out of it. Where he's blowing the
smoke out of his nostrils. Steam coming out of the ears. Right now that's not going
to happen at this point, but it's we're heading in
that direction now I forgot to actually placing
the eyebrows here. Again, we can use
a single line to figure out the trajectory that we want the eyebrows to go in. Just to start off
with figuring out the direction we want that
basic eyebrow shape to go. Once we've got that
drawn in there, we then got to do is
follow that line. As we sketch in
the eyebrow shape. You can see that I'm using, I'm sketching in
all my single lines here rather than actually
sketching them in. Sometimes I'm sketching them in. But I'm also trying to get some energy behind the lines
that I'm throwing down. That's just a general
drawing tactic that I like to
invoke every now and then in order to push the
energy of my drawings. Okay, cool. So we've got
the eyebrows and course, we can bring those
eyelashes to if we want. Now I'm, I could be drawing
male character here. I could be drawing
a female character. I've tried to keep it fairly ambiguous because
you can apply these, these emotions to either roll all these expressions rather. Some people are really good
hiding their emotions. They can have a completely
different look on their face. In comparison to the
emotion that they're actually feeling that
gives nothing away. That's what poker card
players really good at. The top of the brow
is going to be fairly close to the top of the
eyes here. Oh, sorry. The underside of the
brow will be fairly close to the top of the eyes, which is in stark contrast to the expression
that we had before. And you'll notice that. Pupil is also going
to be less dilated. So it's going to be smaller. And you might also want to make the reflection within the eye look a little sharper as well, is to increase the
intensity a bit. Remember that when
you're drawing eyes, you don't want to leave
them as just a square. You actually want
to sculpt that out. And you want to make the
bottom a little more rounded, right? Just a little tip. Okay, cool. So once we've done that, or how does the mouth shape appear when we're
looking my drawing an expression which is more grimaced while it's not gonna
be a happy looking mouth. The sides will be
downturn somewhat. Look something like this. It's basically your typical
bad our superhero type look very sort of generic. The sides of the mouth
are going to be fairly downturned. Draw an ellipse. So very light outline for them. And I would say that the
top of the bottom lip, up of the chin will actually push up against it
just a little bit. It's something that
looks like this. Now we have it. If you wanted to
add more details in around an
expression like this, you certainly could just think about the sort of
character that you're drawing. I think that's the
key. It doesn't require that much detail. Is an older looking character is a younger looking character. Is that a man? Is that a woman? Is it, is it a
creature character? Could be anything really? And all the different
little details that you're going to add in will ultimately determine whether or not that's coming across
in the right way. We could also add in just a few lines underneath
the bottom eyelid. Again, just to show
that the contortion of those muscles sitting
underneath the eye. And like I said, I
think this is like doing an exercise
like this is so much more valuable than
getting you to sit there for an hour or two, drawing in the muscle
groups across the face. This is this is in reality what you're going
to be doing when it comes to drawing facial expressions. I think honestly
sometimes that stuff can be a bit confusing in complicate the situation
needlessly. Okay, great. So that is an example of an annoyed face like
someone who's grumpy. You don't really
want to push this particular characters
buttons unnecessarily. So we'll shrink that
down just a little bit. There we go. So next example, we're going to turn up
the heat a little bit. So we'll start out by
establishing our middle point. By the way, if I'm
going too fast, there's heaps of
opportunities to actually draw out an
angry looking facie. I'm doing about four examples. So just take your time. You don't have to necessarily keep up with everything
I'm doing here. All right. Got Chen
bottom of the chin there. Divide the distance between
the brow and the chin and TAF, bottom into thirds. And then add in the eyeline. Very simple steps. Great. Next up. Let's go ahead and well, I guess you could call this one. This wouldn't be all out
anchor, but this would be, this would be getting
toward this is like the transitional point. So teeth may be bad here. It's almost like
when someone's about the gorilla you for
doing something wrong. Right? So what's
going to happen? Well, the eyes will
actually widen a bit funnily enough. But there is still going to be. Now they're not relaxed. This could almost be
like an angry looking surprised expression
for the eyes. Right there. Anything
but relaxed? They are wide, they're alert. I mean, it's, you know, it looks like a lion's eyes
light like a predator, write some kind
of deadly animal. As I said, you want to try to almost invoke a little bit of that emotion within yourself. Not actually feel enraged or
angry or anything like that, but just get into that mode a little bit
when you're drawing. Okay, so now the
eyebrows are going to come down even further
on top of the eyes, but you don't have to necessarily keep things
symmetrical this point, you could have one
eyebrow that's more angled than
the other for sure, and that would work as well. Now, once we've got the trajectory of the
eyebrow drawn in, you can lay in the shape. And you'll notice
how far down it's coming on top of the eye. There we go. I'll just go over the top of that eyebrow
shape to darken it up a little bit and make it look
more defined, more refined. And as for the eyelashes, we'll add in a few of those. Now I'm going to make
those pupils even smaller and see how terrifying
these eyes look. Now. That's just not, that's not just angry. That's like, okay, get out of my way. Now I'm really annoyed. We go. The other thing I like to add into an angry
expression is of course, these lines that are going to come up around the eyebrows. And these are of course, underlying muscles
and taunting and squeezing together in order to create these creases
within the face. Especially on a male character. I will typically really tried
to push these a fair bit. I'm going to add in that under that bottom eyelid,
wrinkle and fold. Even push a few more of those lines up around
the eyes a bit. There might be turning the
emotion up too much here. For the transition will affect, believe it or not, we can
push it even further. So the nostrils would be starting to flare at this
point just a little bit. You can imagine smoke
blowing out of them. Then we're going to have
the open mouth here. Let's go into look a
little bit like this. You'll notice that
I'm not making it completely symmetrical
on either side. It's almost like a sneer. Honey, I must draw a lot of
angry characters because I feel very comfortable drawing
this particular expression. It's really the
happy expressions that I have the hardest time where
it's because something, sometimes they end up turning
out really weird looking, scary, looking in some
cases scary as an angry, even the angry face. Alright, so draw the lips
around the mouth opening here. And we're really going to push that bottom lip against the top of the chain
as it raises up. The chin itself
might even start to get all wrinkled up and stuff. Then as for the teeth, I'm going to just start to indicate them on the
science just as before. We're still not going
to go ahead and create divisions between
each and every one. You can go ahead and add
in some gums at the top. And maybe even around the
bottom. Teeth are being bad. Again, it's a very
editorial gesture, I would say When a dog bears, it's t value. Alright? So that's, I guess you could call this
the growl expression. Alright, we'll do
another one here. And this is, this is what
you would call angry. This is someone who
is proper angry now. And not only will
the test be bad, but the actual face itself, while the mouth itself
will start to open up and the teeth will divide apart as we get closer to a completely
enraged hog type of motion. Okay, So we've got
the chin there. Then we'll make a division between brow line
and the chin line. Divide up the
bottom into thirds, then add in the eyeline. Okay, Great. So what's going to happen from here
on out is the eye as they going to start to get
angrier and angrier looking. And part of what we'll push that effect is the shape
of the eyes as they widen. And the amount to which the
brow comes down on top of the eyes to create a very strong layer
of very heavy brow. Alright, so I'll sketch in
the opening as Lee I first. Then what I'll do is I'll draw
in the trajectory of that. I want the eyebrows to go on. Okay, So that's getting, its
angle isn't really changing, but I do want to sit it even closer to the top
of the eye here. Now that eyebrow is almost it's sitting right
on top of the eye. It bringing it all the way down. And we'll do the same thing on the opposite side of the face. A big heavy brow weighing
down on top of the eye. We'll do that on both sides. There we go. Once we got the eyebrows drawn in, we'll jump back
down to the eyes. And you'll notice that
I've actually extended the line indicating the bottom of the brow out over
the top of the eyes. Sitting down very close to them. Defining the opening of the ions with a
darker outline here. You'll notice I'm
using a combination of straight lines and curved lines in order to get a nice vivid shape for the eyes. I'll add in some
eyelashes as well. You'll notice that those pupils
are getting more and more pinpointed as the character becomes possessed with
ever greater levels of rage and anger. And could even make the, you could even make the
iris smaller as well. Even though that
wouldn't actually get bigger and
smaller and reality, you may get smaller in your comic book or your
stylized art work. When it comes to angry
looking characters, it can be very effective. Then of course, the wrinkles in between the eyebrows are going to be pushed
even further too. So we can enhance those further. I got a lot of wrinkles
going on there now. Maybe too many. It's
very easy to get carried away with them within an
emotional expression like this. Once that's done,
we'll tackle the nose. And here we again, we're going to see those
nostrils start flaring big time. We're going to pull
them up a bit. Because they're being pulled up. They're also going to create
some additional lines around the nostrils, some
additional wrinkles. Then we'll go ahead and
now tackle the mouth. And here because the
mouth is actually starting to open up, we will see the chin end up extending downward
ever so slightly. And what's, what's
interesting here is the mouth really isn't
going to widen a whole lot. It's more dropping down, so it's extending vertically. So I'll make a selection
just around the bottom of the chin there,
extended downward. Now we've got the teeth. Just going to sketch those in. And then we've also got
the bottom set of teeth, which I'm going to sketch in. Then I'll define the outline of the mouth with a darker outline, really solidifying its shape. And I will refine the
outline of the teeth, the shape of the teeth. And here we are
actually going to see the gums really start
coming down into them. T's being bad. And remember you never want
to define every single tooth. Only as the teeth start
going back inside the mouse, do you want to start
dividing them up? You can see I'm doing that there with the bottom set of teeth. Alright, now you might be looking at this
and going, well, I can see that the mouse
looks angry and I can see that the nose and
the eyes look angry, but it still doesn't feel
like it feels a bit fake. Like it's the reason
for that is because there's still a few
more muscles and wrinkles that I need
to add in here. Because you face does
start wrinkling up and creasing in different ways when you have a strong
emotion like this. So one of the areas you'll find is that when you're very angry, you will get some, some creases
up here around the nose. Especially as the mouth extends. In. This mouth probably
could have been wider, actually. Okay. That'll do. Theirs are angry looking face. So now let's do a final
example here and turn it, turn this emotion up. One more degree, will
now see the face become extremely pushed to the limit as far as the angular
motion is concerned. Okay, So we'll start out
with our middle line first. Once again, brow line. You'll get really, really
fast at setting this, this face model up. Especially after
the end of today, after the end of this lesson. The brow line, we've
got the chin line. And once again we'll
divide that up. Mouse, chin and then eyes. Okay, so what's going
to happen here? Well, the eyes are gonna be
really crazy looking now. We're going to have
a very strong, hard downward angle
across the top of them. And that'll be the
case on either side. That's almost like you
want to really try to wrap the bottom and top eyelid around the eyeball
itself because these eyes, you want them to almost
start popping out or look as though they're starting
to pop out of the head. Alright, so I'm
just sculpting out the opening of the eye is here. I'm liking how the
right eye is doing, but I'm not liking the left one exactly how I want it to be. There we go. It's
looking much better. Now as I'm completely
symmetrical, Leila. I move this one
over here further. Great. Now we'll go ahead and create some
pinpointed pupils there. Notice that I've placed
them down lower, you know, either toward the bottom of the eye or
the middle of the eye. Now, as for the brow, well that's going to sit right
on top of the head here. You just shrink this down a bit. Make some more
room for our face. Right? So the eyebrows are going to see basically
right on top of this head. Will this face. I've got their
trajectory figured out. It's just a matter
of then placing the basic eyebrow shape
onto that trajectory. So we've just managed to
fit the eyebrows in there. We've got this very
powerful muscle system underneath our face that really configures, that, configures it into a multitude
of different expressions that we're able to
use to be able to convey how we're feeling
and what we're thinking. And most of the time we do
all of this subconsciously. It's important not only
that we're able to express these different
emotions visually, but it's also important for
us to be able to read them. And that's why it's great to show them within
a comic book character. Because all of a sudden, if you know how to present the way a character is feeling
or what they're thinking. In the depiction of their face, they become, they become
emotionally relatable. Which is a very powerful
connection that you can allow your audience to
make with your characters. Okay, great. So we've got the
eyes sorted out. Let's add in those
wrinkles around them. I think the biggest change
that we're going to see here is probably
in the mouth. It's really going to
drop down now and open. See the bottom eyelid really
start to crease now as well. Because again, these
powerful emotions, everything starts
to seize up and scrunch up the nose. See that flare up even more now? I'm adding some wrinkles even along the bridge of the nose. I did that before, but really trying to push
it this time around. Then finally we've
got the mouth. Certainly isn't going
to be a happy mouth. Dropped wide-open. Can see that it's extended or
right past the chin there. Have the teeth bed. But the top set and the
bottom set this time around. And I'm drawing
the bottom set of teeth back into
the mouth as well. Once we've done that,
we'll go over the top of the mouth and
define its outline, making it clear what it is we're actually
showing on the page. Course, we're barely going to be able to see the lips because they've stretched around
this big open mouth. Very dark outline up
underneath the bottom lip. As the Chinn raises, creates a much deeper fold. It's kind of fill in the
back of the mouth there to some shading, darker tones. And you'll notice that
I'm not just using a straight line, by the way, to lay in the shape
of the teeth. I'm actually using one
that's somewhat jagged. See, I've done the
same thing for the bottom teeth here too. And once again, that the
biggest difference here between this example and
the last example is this, that the mouth is now
really wide-open. And what you're going
to get is of course, some much deeper folds around side of the nose
and around the mouth. You might also even
get some up here. Now, the face is
stretching big time. Cool. Might even get some wrinkles
up around their chin. Again, a much more pushed,
exaggerated emotion. That's an extension
of the previous one. Alright, so we've gone
from slightly annoyed. You just enter
completely enraged. Right? And that
completes our set of happy expressions and our
set of angry expressions.
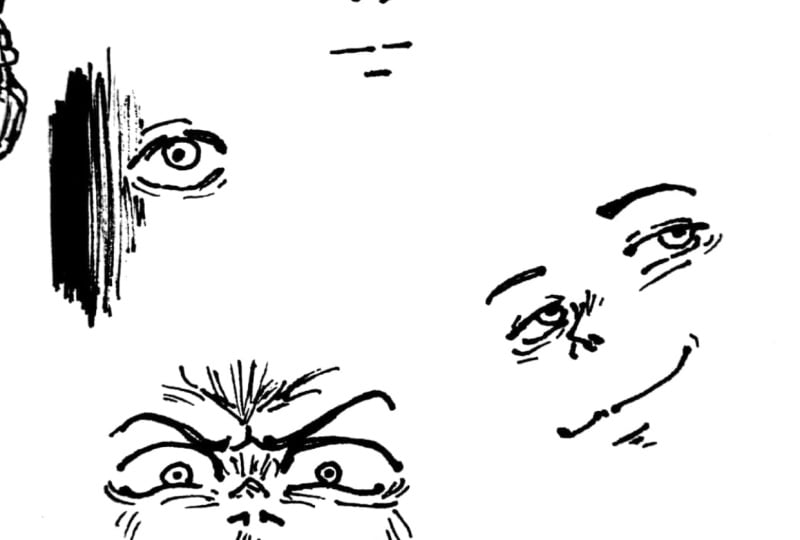
4. Sad Expressions: Next up we're going to be doing some facial expressions
on various angles, various dynamic angles,
you could call them. We'll start out with just drawing a
default face on one of these angles and
then transition into more, maybe a sad looking face. We could do, we could
do a face that is expressing a feeling of disgust. Sometimes that's one. You also want to represent. All surprise or all
three of those. There's a lot of
different expressions we can experiment with here, but let's start with just
a default one again, we'll do a couple of rows here. So we're going to start
out with a line again, just a single line that's
going to represent the front of the face or
the middle of the face. Then this time around
we're going to be looking at the head on more of a downward
three-quarter angle. Okay, so we'll get the brow
line drawn in here first. And then we'll get
the chin drawn in. And then we'll define the
distance between these two. Now remember, we're
going to see some foreshortening take place here, which means that
middle point division is probably going
to be placed just a little bit lower
than it would be if we were looking
at it at a level, at a level view, then the bottom will be divided
into thirds with the top third having the
most amount of space. Second, third a little bit less. The bottom third having
the least amount of space. Okay, So this basically sets up the perspective of the face that we're going
to be drawing up here. Now, of course, we can't
forget our eyeline, so we'll lay that in about here. Now let's go ahead and draw
in the facial features. Now remember this is just
going to be a default face. Okay, so the reason I'm gonna do a default face first is because it's a good
place to start, just to give us a
reference point for the expressions
that we're going to start to add onto the face. Now this might be a
little bit harder than the facial expressions
we were doing before. But it's when things are hard, it means our brain is working in order to learn something new. All right, so we'll draw in
the features real quick. Remember that all my drawing
the eyes on this angle, it's the bottom eyelid that's going to have
the most amount of curve plates to it, while the top will generally start to straighten
out a little bit. That's going to certainly
be the case in most of these expressions
that we're going to be doing from this angle. Next up we've got the note is, well, actually let's
tackle the Browse first. So the reason that
I was thinking about the nose is because, well, the underside of the
brown and those are kinda join onto each
other on this angle. Drawing the eyebrow here, the far side of the face. Then. But the eyebrow on the side of the face
which is closest to us. You can see I'm adding in
little guidelines there. Give me an idea as to what direction the eyebrow
is going to flow in. If we didn't like the
shape of this eyebrows, I'm going to fix it
up a little bit. Okay, and that's a bit better. I like to make some
tweaks. Along the way. I'm a sculptor and a drawer. A drawer or a sculptor overdraw for once we've got the
eye opening drawn in, will they in the eyelashes, the bottom set and the top set. As a little reminder that
we're going to see more of the bottom eyelashes than the top eyelashes at this angle. Top-down three-quarter
perspective of the face. And remember that the noise is, it helps to think of it
as a block on my drawing, a face on this angle. So as I'm drawing it out here, that's gonna be
thinking about it. This is great because
we're going to be drawing some facial expressions
at this angle, which means we're going to get some practice not only at the facial expressions
themselves, but also the angle of the
face when it's presented. In this view. There we go. Looking pretty good. So this angle is
even a little bit more challenging for me to draw. And it really does get your
brain working when you take the phase from that flat
two-dimensional representation into something which is a
little more complicated. Next up, we've got the mouth. We'll draw that in here. Remember that it's
going to align with the midway point of either eye. And usually it'll have a bit
of a curve to it as well. I forgot to put in that curve. I should have done. And will draw on the top lip. And we'll draw in
the bottom lip. Cool. And probably this top I
here are the far righ. I would say that that could be taken in a
bit to sit behind the brow is remember that
the eye is actually sit back inside the head on this angle and you get
a good look at it. You're looking at
the headedness view. So that was my mistake,
but that's okay. Especially when you're
working digitally, that's very easy to fix. And if you're working
traditionally, you're just pull
your eraser apnea. Do some read jogging. That's looking much better. Okay, cool. Next up, what we'll do is
we'll lay in the iris. The people that will just about do it. A little bit more of
a tricky wrangle. Worry. We're about to get a decent amount of practice
with it, I promise you. By the end of it,
hopefully you'll be much more
comfortable drawing it. Next up, let's do a
representation of the face where it appears as
though it's sad or upset. We can start this out as just
a face that looks a little, I guess you could describe
it as melancholy. Maybe longing for something
or thinking of a sad memory, or I'm thinking a
sad thought, right? So let's go ahead and lay in
our little setup for that. Now for this next set of phases, we're going to be
looking at them from the downward angle
in the next set, will look at them from
the upward angle. So we'll start off by drawing in our brow line and the chin line. That will divide the
middle of them into to lay in our mouth, then laying out eyes. And what I want you to really understand is that
the facial features, they truly do sit on a
fairly straight plane, a fairly flat plane like
the woman drawing up here. And then just so that we get
the eyes right by the way, I'm going to go ahead and just
draw it in a plane around the far side of the face just to see where
the brow would come down and then join onto
the top of the cheekbone. That'll just give me
an idea as to where to place it as high as we could even mark out roughly where they
would go here. Okay, So it would following that angle as represented by
the underside of the brow. Alright, but once we've
got that drawn in there, what we can do next is go
ahead and draw in those eyes. Now we're thinking about kinda sad looking
melancholia eyes. The biggest thing
that you're going to notice is the top of them. Because the top
of them are going to go in a downward direction. Have basically sad
eyebrows, sad eyes. That's how they go into look
up in this little diagram. Then you're also going to
have a completely sad mouth, but a fairly non
expressive mouth, right? So that's what we're aiming for. But a little diagram
up here for you just to show you where we're
headed with this. Alright, so again, it's not going to be in
an extreme expression. It's going to be one that looks
kinda sad and a mournful. The biggest challenge
here will be representing the correct shape on these
more dynamic angles. But it is important
to be able to show character emotion when you're representing the
head in perspective. Because oftentimes
the camera angle, especially if you're
talking within the context of comic
books or storyboarding. And the camera angle
is, isn't going to be situated directly on
the front of the face. I'm just kinda sketching
them out here. It looks like that.
And then once we've got the eye
shape drawn in, we can go ahead and place in a guideline for the
trajectory of the eyebrows. And you're going
to be flowing in a downward angled trajectory
toward the outer, I say something like this, might be a little bit
challenging for you to get ride. That's why we're practicing this stuff in the first place. Now a lot of these exercises
I'm showing you they're not only meant E to do once. Ideally you want to practice
them multiple times over. Similar to the example I
did in the last lesson. I showed you how to practice
eyes as an example. There we go. And then
drawing the eyebrow wrapping around the brow, the underlying brow
form there. Great. Let's see. That's the I is taken
care of most part. Now go ahead and run the iris. And the pupil. Start off with the iris here
and then drawing the pupil. We go. You can really ramp up the
reflection in the eye with these more sad looking
facial expressions as well. Except what I'm going to do
is draw in the nose and we get event now we can
place in a little bit of a fold underneath the eye
here too, if we wanted to. We've got the nose.
So lay that in. Remember that's
going to drop passed down the point at which we mark, initially marked for it. It's going to come
back into the face. You want to be careful about
bringing it out too far. Otherwise it'll
make the nose look bigger than it
actually should be. Something like this works well. And it's not going
to change at all. It won't be emoting anything within this particular
set of emotions. And as for the mouth, well, it's just going to be, it's going to be very
subtle expression. It's not gonna be
happy. Okay, to be sad. This guy to be very, very rested in some
lips around it. Remember as well,
when we're looking at the head from this
particular angle, the mouth will curve
somewhat around the cylindrical underlying
form of the skull. You'll notice that it
looks a little bit smaller when you're looking
at the mouth on this angle. And the reason for that is
because it's further away from us while the eye
is a much closer. And so what that is, it's the effect of
foreshortening. So that's kind of sad and
not say happy looking face. Next up. We'll push that. What you could consider as like a face that's
essentially crying. Or about to cry. Drop another example over here. Once again, starting with
our straight center line, Jordan, the brow line, and the chin line. Divided into recently I align. Then the mouth. See me just placing those down
really, really fast. Again, once you get
the hang of this is very basic model
that we're using here. You'll notice that
you get quicker and quicker at laying down that
initial drawing for it. I think that looks pretty good. Next, I'm going to place in some guidelines for where
we'll position the eyes. Thanks, that's
working pretty well. Now here we'll, we'll actually, we might close the
eyes for this one. As the emotion intensifies. Remember that because
we're looking down on the eye is here, the curve of that contour that represents the
opening of the eye, which is now closed, is going to be
pushed on to really give the feeling as though those eyelashes are wrapping around the underlying eyeball. A great. Next up, we'll draw on the eyebrows. They going to be dropping
around the eyes. I'm giving them a
little bit of shape. This time around. We go. Having them follow
along that trajectory. I'm also going to be sitting closer to the top of
the, I would say. This is this could almost
be an angry expression. It's an intense one
though, either way. In gray. And we'll also see there'll be a good
possibility that we're able to see some of that crease created by the top eyelid and
the eye socket. So we'll indicate that. But remember as well that the muscles around
the eye are going to be weighing down pretty
heavy on top of it. There we go. Next up, I'm going to go
ahead and draw in. The nose. Might even tweak
the eye is here. I feel like I want
to really push the, the intensity of
this expression and those ions are just
looking way too relaxed. Let's draw in the nose. It's going to drop down. Ask the point at which we
initially positioned it. But it will come back
to about that point. Now as for the mouth, I think we'll make this mouth
actually have a drop open. And this is where things
are going to start to get fairly difficult for us. Actually. Remember the mouth
wants to follow that curve. But at the same time it's also going to have its own
shape to it as well. We're not just dealing with
a single line here for the opening, dealing
with multiple. And we've got to make sure that on these more
dynamic angles, we represent the facial
feature is accurately as we can to get across to the viewer that indeed
features aren't flat. So we don't actually
want to make those features look like they're wrapping around the
form of the face. So I'm going to draw
in the teeth here. And the bottom portion
and the mouse. Now we've got the bottom lip, which we'll add in as well. And it will certainly
be, once again, it's going to be pushed up against the top of the
chin as it raises. And the I is still an
area which I would like to really go ahead here and push in terms the intensity of the
emotional impact that I want them to give off. Again, I'm not I'm not
really feeling it. If you're not feeling
like the right emotion is coming across or it
could be more powerful. Go back and have a
mess around with it. Facial expressions or
something that you can really spend a long time tweaking in order
to get them right. Even professional artists
can have it hard time. There have been doing
this for awhile. They even they can
have a hard time with. David Fincher was
talking about how he has a difficult time making his characters smile without looking menacing and terrifying. So it is, it can be a challenge. It can be a major
challenge to get these emotions the right emotional impact
within your characters to come across. Okay. I'm going to add in just
a little indication of the bottom eyelid underneath. And you'll notice that it's
being pushed downward. We can also add in
some more wrinkles. Again, the more stronger the emotion usually the
deeper the creases are going to be
around the eyebrows, especially as the face creases up and around the forehead, especially on a sad
looking character, you'll see some
wrinkles occur too. And that can often make it an, a face look more
emotionally intense. Just by adding in those
few extra details. Okay, great. That's
looking a bit better. That's a sad and upset phase. And once more, if I was to do like a little
example of how the, the front of this expression
would look just next to it. You'd have your eyes. Well, they would be closed. You'd have your eyebrows
down like this. And then the mouth. Once again, is probably the most prominent area
of this expression. Now, we can actually push this, this sad expression
even further. So let's go ahead and do that. As an example. This could be like just
a completely break down, like what you might call grief. Okay, So we'll start out
with the middle of our face. Drawing the brow line. We'll draw in the chin
line, line, line. Then of course we've
got the eyeline. Hey, great. We'll add in a little
indication to show me how far back the
eye should come. Once that's done. We are ready to, once again, we'll draw in the eyes
now they're still going to be closed this time around. But they're just going
to have more wrinkles around them because this is like a really intensified
representation. Of sadness now. And so with that comes an even greater emphasis on the way in which
those muscles are really clenching up. The visual representation
we get of that, of course, on the surface of the face
is ultimately going to be the folds that
we see in the skin. And you'll also notice
that the eye is, they start to well up. They start to know
if you've ever seen someone who's been
crying for hours on end, their eyes, they start
looking pink and swollen. And he can tell
you can tell when somebody's been crying, right. So next up, we'll push the
eyebrows even further here. So they're going to come right down over the
top of the eye. And it'll almost
appear as though, and it's an angry expression. But it's not, it's just
really upset expression. We'll do that on both
sides of the face. Okay, So head drove
out the eyebrows. All right, great. Once again, we might actually see
that the crease of the eyelid folding up against
the underside of the brow. And we will certainly see a lot of folds within the skin
start to come about. And really the same folds
are going to be there. It's just that they're
going to become deepened and more noticeable. Next. Then of course, the mouth, which is
going to be at one of the main point
of expression here. This particular phase. The top of the mouth is
really going to push in wood. That's going to come down. It's going to be even
wider this time around. Remember, we really want
to stretch the sides of the mouth down around
the bottom of the mouth. Because we're looking at
the mouth from above. I don't want to see it curving around the underside of
the underlying risk, a cylindrical form of the skull. Okay, so now both
at the top T is n, The bottom teeth
will be buried here. And what you also might
see is that this, this top lip, sorry, this bottom lip is kinda
come right up and it's, it's like pocket upright against the bottom set
of taste in the mouth. Now I'm reshaping the
bottom of the mouth to wrap around them around
that cylindrical form. Trying to make that
that skin around the signs of the math
look toward mouth, opens up and does that
more extreme expression. We'll draw the lips
around the mouth. And now they're going, especially
the bottom set of lips. Even though we can
see more of them, they're really squashed
up above the chin. There we go. And of course you could draw like tears coming out of the eyes
if you wanted to, wanted to add that extra effect. Can't remember the last time I drew two years on a character. And I think I ever have
come to think of it. Recognize it looks
something like that. Okay. There we go. That is kind of sad, too. Extreme being extremely upset. Okay, now, the other thing you might want to
add in here too, this one is, of course, just some folds
around the sides of the mouth just to intensify
the emotion a bit. But other than that,
just about does it. So again, starting out
with a standard face from sad to kind of upset to
really, really losing it. So if I was to draw up a basic representation of how that would look
from the front. It'd be something like this. So again, you'd have the closed eyes and then you
would have the eyebrows, then you'd have the nose. Then you'd have this really
upset looking mouth. Okay. Just re-size them. That is the face from the top-down
three-quarter position. And its various sad expressions.
5. Shocked Expressions: So this time around,
we'll do some examples of the face from the
bottom up perspective. And I think will represent, Let's see, I think we
can probably represent a surprise or shock, right? So again, a different
set of emotions that you can start with a character that it
looks kind of alert. They heard something
behind them or, or near them, and it's
got their attention. Then that might lead into being a bit more curious and wondering
what the heck that was, then surprise and
then shock, right? Just ramping up that
level of emotion. Then that way you can
pick one expression along that line of increased
exaggeration. Okay, Cool. Says go ahead and just
jump straight into it. I'm going to start out just
with a single line as before, representing the
front of the face. The face refer. And I'm going to draw
in the brow line, chin line on here. We can lift that up a little
bit actually to about there. And remember, perspective. It can be all aligned
on the one plane. Or it can start fanning out. Depends on the perspective
that you've chosen to go with. So go ahead and divide the distance between
the brow and the chin up. But because we're looking
up at the head now, that line, dividing line is going to sit up
here a little bit. So this is going to be a really challenging one
because we're going to be drawing the nose from the bottom-up perspective
multiple times over. And I know it's kind of
annoying and it's kinda difficult while we're trying
to study expressions. But it's also fantastic
because it means that we get that extra practice in drawing a nose on a
more difficult angle. I can tell you the only
reason that I can draw faces, and it's something that my drawings to get
complimented on a lot is in particular the face
is due to the fact that I just drew these
things so many times over. And the reason I drew them many times over is because once upon a time I wanted to release it pre-recorded course
on drawing heads. And I just couldn't
get them right. They weren't looking
the way I wanted them to a folder for the course and order dialog
I was coming up with. I wasn't happy with. And so I would just redraw
them over and over again until I got it right. And that's why I'm so
comfortable at drawing them now, but we're basically doing the same thing here is repeating the process over and over again until we're completely
comfortable, ideally. Alright, so we'll split up the bottom portion
of the face up into thirds in order to find the
positioning of the mouth. And then we've got the eye line, which is going to sit
below the brow line. Drawing some little guides. Show where the,
roughly the eyes might sit about, right? Wonderful. Okay, So first up we're going to have a character that's just a little bit alert, right? And then this more dramatic
angle That's going to the angle that you represent
a head app can intensify the emotion that you might be portraying on the
character's face. I'm sketching this out
really, really fast, but the same rules still
apply that we went over in the facial features
lesson where we were drawing them from
these more dynamic angles. The bottom of the
eye is going to now straighten out a little
bit more while the top, it curves upward in
an upward direction. So the eye is actually going to, well, it's going
to be quite open. When it comes to this
particular expression. The character is just heard something wondering what it is, What the heck was that
it gave them up maybe a little fright, for example. Or maybe they're on an edge. Or maybe they've been staying up all night watching
scary movies. So now the refrigerator
goes off and it makes a big buzzing sound
and it freaks them out a little bit.
They're very alert. That's the kind of expression
that I want to try to get across here on this
particular character. And so what's going to
happen is the eyebrows, as a result, is going to
raise up a little bit. So it's almost, it's always
going to be a surprise look. A bit, a subtle, a subtle look of surprise. Hey, there we go. And as for the top
eyelid will see that creasing against the
edge of the eye socket. We can also add in some
eyelashes here too. We'll make this a
fairly ambiguous face. It could be a female face, can be a male face will be
fairly feminine at this point, I think probably
because of the big eyes and the, the eyelashes, but of course, the pupils are actually going to become really pinpointed. When you're, when
you're freaked out, when you're a little bit scared. That's what happens, is all of a sudden you
become super alert. Well, in your, again, your iris or endure people will become the people in particular become
the size of it. A little needle
hall. Okay. Next up, we'll go ahead and
place in the nose. Now remember this is going to
be a fairly subtle emotion. And drawing the nose
from this angle is always a little
bit challenging. So what I'm going to do is
just start out with the base, because that always
seems to help me out. I'll draw it a nostril opening. And I'll get my eraser
out here and just erase back some of the details. Some of those construction lines that I had on the nose bridge. All right. That's
looking pretty good. I'll leave it at that. I'll quit while I'm ahead there. Then of course we've
got the mouth. The mouth is just going to
be pretty much arrested. Okay. So I'm going to be
a whole lot going on with it or have it wrapping around the
cylindrical form of the underlying skull. Following an upward
facing curve. Lay in the lips. Okay, so fairly
subtle expression, but you can see how
much it changes the what the effect that
it has on this face. Like it really does
look like this. This character is
alert and stroke, was raising the
eyebrows a little bit. Making those pupils nice
and sharp and small. And why adding meaning to get widening of
the eyes somewhat. Okay, cool. So that's example number one. Move on to example number two. For example number two. We can call this one. We can call this
one wonder, right? Because it's almost like the look on someone's face
when they see something, but then quite sure
what it is yet. Maybe they've they've walked into the kitchen after
hearing that refrigerator buzzing and there's a green glow coming out of the
refrigerator door. This would be the expression
that they have on their face hint that
particular situation. All right, so we're going
to run the brown line, drawing the chin line, make IT division
in-between the two. Right up the bottom portion
of the face into thirds. The eyeline ranges just a
few little guidelines there. Helped me position the eye
is later. Okay, great. Let's do it. So the eyes are actually
going to widen, quiet a lot in this
particular example. Even more so before. By widen, I mean, I don't mean they
going to stretch out along the horizontal axis, but rather they're going to
grow in terms of height k. But still the bottom is going
to be still fairly straight while it's the top that
really arches upward. We'll do this on either
side of the face here. Remember that we want to try to, in order to maintain symmetry, especially in these
perspective shots, want to make sure
that the eyes are sitting level with one another. On that perspective
line that we laid out. It's very important. There we go. And the
eyebrows are going to even, they can be even more
raised up this time around. We'll draw that out. And I guess this
time I'm just not having them come down at so far the middle to really raise them up
in order to increase that look of wonder, that look of surprise. We haven't quite made it
to surprise look yet. That little crease.
The top eyelid will meet the
underside of the brow. We'll draw in our eyelashes. I like so. And then here we're
going to really see the, the iris and the pupil being
exposed and k. So now that, that top eyelid is
raised so much, now we're going to see a lift up off of the top of the iris. Okay, cool. So now
that that's done, we'll draw in the
nose once again. I'm actually pretty
excited that we get the practice the nose so much from this angle
because I need it. Make far too many mistakes drawing the nose
from this angle. There we go. We're in the nostrils there. On either side of the nose. A great Alright, again, I'm going to quit while I'm
ahead on that knows, it's doing the job. It's doing the job it
needs to do at this point. And now the mouth, where the mouth is
going to drop open just a little bit in this example. And drop open probably isn't the right way
to describe it. It's going to open
just a little. Okay. So just a tiny bit here. Lay in the top lip. And we'll also go and that's probably opening a little bit
too much to be honest. It's going to bring that
bottom lip up a bit. That's better. That's
much more what I'm after for this expression. Alright, and we might see the top teeth being
revealed here just a bit. That's about it. Okay.
It isn't the look of wonder over I guess,
alertness almost. If I was to draw well, if I was to draw both of
these from the front, we'd have the eyes,
the eyebrows, and the mouth there. For
this facial expression. Well, it'd be a lot more subtle. You'd have this pretty
much the regular eyes. There. Might be a little bit open. The biggest difference
is that the eyebrows would be raised slightly. Abdomen. So, alright, next up, let's do a
proper surprised face. Start out with our center line. Once again. The brown line. Drawing the chin line. Position the nose and the mouth. Then we've got the eye is
drawn in there as well. But at where the
eyes are going to sit on the head at this angle. Great. So this is going
to be a surprise to look. This could be a happy surprise, it could be an
unwelcome surprise. But what is certainly
going to happen is the eyes are going to be
even wider this time around. Okay, So they're going
to really open up. So we're pushing it
even further now. And I think that it's wonderful to be able
to see exactly how far we're able to push these facial features as we pull them into
different expressions. As I said before,
when it comes to drawing the different
expressions on these angles, you really want to passion and shape the features in a way that makes it less like they're just glued onto the front of the face
and more like this, this three-dimensional sub forms that are sitting on top of
the major form of the head. Great. That's looking pretty good. Next up, I'm going to
go in the eyebrows. Now they're going to be even mean they're still going
to be fairly raised up. So not a whole lot, it's
going to change there. We could push the height of
the eyebrows here, I guess. Let's go ahead and do that. All right. We'll define the shape
of the eyebrows. Once we've got them
loosely sketched in there, then we can draw in some eyelashes around
the opening of the eyes. Something stylistically
that you can do is you can actually
darken the eye is when they're looking this surprised
in order to really draw your attention to
the, their intensity. And of course, the iris and the pupil is going
to be even more exposed. Now, this is what can happen if, if you unintentionally
don't place the iris and the pupil somewhat underneath the top eyelid is
what you'll find. Your character looks
surprised. There we go. So there's some very
surprised looking eyes. Even without the mouth,
we can tell that. Alright, next up, let's
get that node is drawn in. And I'm just going
to start out with the base of the nose
here to begin with. So we should all be getting a decent amount of practice
on the nice today. And when you creating this
division on the bottom plane, you want to make sure
you bring it all the way back to
that center line. Hey, there we go. Great. That nose is looking pretty solid. Now it's time to move
on to the mouth. And the mouth here, it's going to be I mean,
got smacked right. Like the mouth is
going to be open. But it's not going to be open
in the same way that the, the sad or grieving face was going to be dropping
open a little bit, a little bit more than
in the previous example. It's not going to be super
extreme or anything. I see this top set of teeth maybe just a bit
because the top lip is still hanging over the top
of the mouth somewhat. You'd certainly see the teeth going back inside
the mouth here. You'll notice that the
angle of the sides of the mouth different, right? So they're generally
going in this direction. So keep that in
mind when it comes to drawing the mouth on
this particular angle. Because the door is actually swinging back just
a little bit here. Alright, and now we'll draw
the lips around the mouth. Now they are going to stretch around the
opening somewhat, but this isn't really a
representation of the mass where it's shown as being
super wide open. Okay, So those those lips won't hang hanging too far open. I mean, sorry, those lips
won't be stretched too much. Alright, great. That's
looking pretty good. And I think we can
leave it at about that for our surprised expression. Lastly, the next one we can do is what you might
describe as shock. Okay, so an even more
powerful version of surprise. I'll move this one over here. It nice and neat and
tidy little presentation that we've got going on for our different
facial expressions. Alright, so next up, we'll go ahead and let
me resize this one. So we've got some more room here for our shocked expression. Alright, so LE now
vertical line first, brow line, in line. Then we'll create
a division here. I'll show us where the
noise is going to go. So we'll place that
toward the top. Tour in the mouth or a indication of where
the mouth would sit. And then placing the eyes. I'll quickly plot out where those ions would
go very roughly. And now we're ready. Okay, So this isn't going
to be that different to the different versions
we've done up already. We're still going to be seeing
the same characteristics. So looking at eyes
that are very, very wide open at
this point, Hey, top eyelid and
bottom-left eyelid is set quiet a fair way apart. Almost looks like the BI is a pumping out of the head here. I'm just going to take
time to make sure that I'm nailing the shape, the eye-opening while moving on. Then we've got the
eyebrows really arched up. You can just see the
intensity of this expression increasing with every phase
variation that we do here. Alright? Now because the
eyebrows are raising, of course there's going
to be more wrinkles on the forehead that we're
going to be seeing. So if we were able to
observe the forehead from this perspective that
we're drawing up now, that it's certainly be the case. Just like with all the
most dramatic versions of these emotions, that the face it crunches
up in different ways. In order to pull the
facial expressions into the most extreme, extreme expressions that the facial features
into the most extreme, extreme expressions possible
to really get that to come across. Okay, Cool. So next up, we'll
draw in the eyelashes and we'll get those
pupils and IRS drawn in. Alright, so they're going to be sitting right around
the middle of the eye. And this is almost
identical to the previous of facial expression
that we just don't have it. Some slight changes, right? So the eye is a slightly
rounder, slightly wider. Eyebrows had been
raised up even further. So it's just a more
intense version, really. Okay. Then we might indicate
that top eyelid as it folds up against the
underside of the brow. Of course, we've got the nose. So we'll draw that in. Hopefully you're all
finding the nose a little more comfortable to
draw this angle. You'll notice that it
hasn't really changed at all throughout these
different expressions. Really the, the nostrils
are only going to flare out when you're dealing with a
very angry, fuming character. Okay, great. That's
looking good. And now the mouth is just
going to drop down further. It's basically that
the only real change or the change that we're
going to see here. Same expression, basically
just pushed to the extreme. Alright, so I'm just
messing around with this. And I get the mouth
to look right. I think abundant
up a bit actually running on the lips around
the mouth opening here. Getting out my eraser, trying to make it look the
way that I want it to look. We've got that bottom lip which will wrap around the
base of the mouth. And remember, we really
want to make sure that when the mouse is
dropping wide-open. The sides are going to
straighten out a little bit. Now I want you to
observe something here in particular as well. Notice in these bottom up
perspective views that the top of the mouth and
the upper walls of the mouth are actually the
most reveal their case. They're going to be
the longest, right? Whereas Oh, that's actually the same with the bottom down perspective. So there you go. I thought
it changed, but it doesn't. It's really going to be yes, there's really only one wall for the mouth when
you think about it. So you've got the top and then you've got the walls of the mouth and then you've
got the bottom of the mouth. Really. Sometimes the bottom of the
mouth can come down so far that actually do get what
appears to be two walls, but it just depends on what
the situation is calling for. Okay, so sculpted out the shape of the character's mouth there. I'll go ahead and they
send the top set of teeth. And I might even reveal the bottom set of teeth
ever so slightly. Let me can even hinted
the tongue as well. Especially if the character
is yelling or something. But again, if we were to observe these facial expressions
from the front, is how they would look. So we would get the wide eyes, raised eyebrows, get that wide open mouth. This one would be, just be a less dramatic example of that. We've got the eyes, the raised eyebrows, nose, and the mouth, which is
slightly more or less open. You can see it's a
gradual increase. It's almost like an
animation unfolding, right? That's what we've created here. So I'll just go ahead
and resize this. And that completes our
bottom-up three-quarter view of Let's set of expressions showing
the character going from somewhat alert
to outright shocked. Then we've got the bottom, the top-down perspective of the face going from
kind of somber, kind of sad, to all outcry. Alright, so basically,
that's how you represent human emotion in perspective and a dynamic range of views.
6. Assignment: Hey, thanks so
much for watching. I hope that you enjoyed
this class and that you got a ton of
value out of it. Now, it's time to put what you've learned into
action and we're going to do it through the
assignment for this class. So open up your sketch book or a new canvas and your
favorite drawing application. What I'd like you
to do is to draw up a new series of different
facial expressions. They might redo
those we've already covered throughout the
lessons in this class. But I'd also encourage you to venture out and to try to
come up with some new ones. For example, you might draw
the facial expression of fear or attraction
or joyfulness. See how you do and when you've
completed the assignment, submit it in the project section of this class for feedback. Alright, that's it. Good luck until next time. Keep drawing.
 Clayton Barton, Harness the Power of Dynamic Drawing