Transcripts
1. Introduction: Hey, it's clayton, Welcome
to my class on drawing ears. Ears are very complex facial
feature to tackle because so often we place our attention on the features that sit on
the front of the face, such as the eyes and
nose and the mouth. These features also
express a lot more, which means the ears get even less attention than we
would otherwise give them, even if they were on
the front of the face. And so they'd become
more difficult to draw since we're less
familiar with them. Which is why I've dedicated this entire class to showing you exactly step-by-step
how to draw the ears, not just from the side
view and the front view, in the back view, the key
standard points of view, but also those more
difficult dynamic angles such as the bottom-up
and top-down angles. I hope that you'll join me in
this class and follow along with your sketch book or
favorite drawing application. So that by the end of it, you've got your own set of views right there on the
page in front of you. Well, if you're ready,
let's get started.
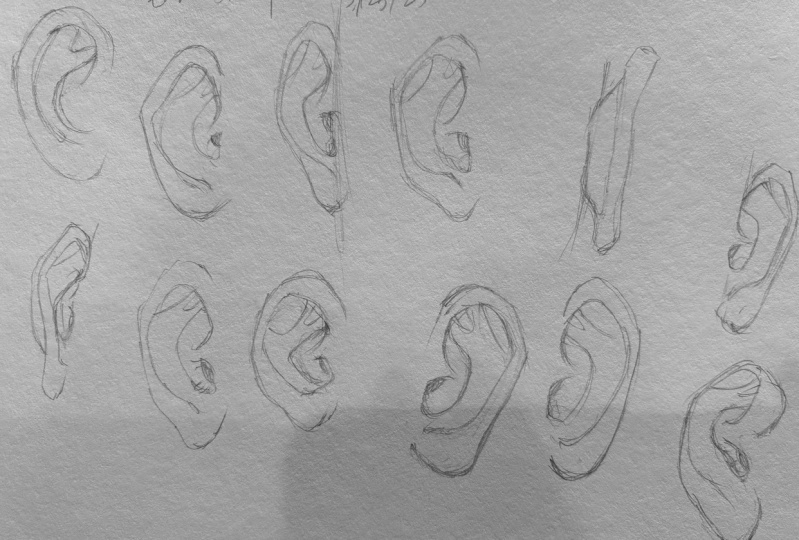
2. Side View of The Ear: Let's begin with the side view. Why are we beginning
with the side view of the ear instead
of the front view? Well, it's because the side
view of the year is actually the best representation
that we're going to get of how it's anatomy
looks like a, it's kinda a flattened out
diagrammatic presentation of the interior ear anatomy. And once we know what
that consists of, well, it becomes much, much easier to be able to take that particular
viewpoint of the ear and start the foreshortened
at different angles. So let's start out with that. Now. The basic ear shape is
what I like to draw first. So I'll actually,
because this helps me to figure out how large the ear is going to be in
the first place. So I'll draw that out. What you'll notice is that it's basically almost
an upside down pair. So you put a little
outline around it. Looks like an upside down pair. Or you could also think of
it like a light bulb right? On drawer, a little a little diagram over
to the side here. And for a red outline
around it too. So that's the basic shape of the ear that
we're dealing with. Okay, cool. So once we've got the outline
of the year established, and I've drawn that in
very, very lightly. Hopefully you can see
what I've done there. What we can then do
is start to draw in what I like to refer to
as the interior frame. Interior frame of the ear. It looks it looks a little
bit like a question mark. And then here's what I mean. Right? It's going to hook into
the ear at the front. And it's going to
run up and follow along the shape of the ear
that we established earlier. And by the way, if you do
this repeatedly enough times, you'll just remember
it off by heart. It's going to run back
toward the back of the ear and then down
into the ear lobe. Now, what you're left
with at this point is almost what looks
like a fish hook, at least to me. Right? This sort of fish
hook like appearance. Right? So that's the shape that
we're dealing with now. But the actual line
that we've just drawn. Well, it looks a bit like, as I said before, it looks a bit like
a question mark. So that's an easy
way to remember it. So once we've made
it to this point, we're then going to
go ahead and place in the interior of this cartilage that we've started
to draw route, I call it the Y-shaped
piece of cartilage. It could also be described
as something that looks like a chicken bone or
like a wishbone. But again, you'll see what
I mean in just a moment. So we'll pull that
out from the front of the ear and then draw it down
into the base. Look it up. And then around into
the ear hole covering. Right. That's probably the
most confusing portion. When drawing the ear. Let me just fill that in. So we can't forget the ear how we got to put that in there. Otherwise, there would
be no purpose to all this complicated anatomy
that sits around it. And once we got that
drawn in, well, we've got another
little piece of cartilage that we can bring in, once again to the ear here. But for the most part
that's pretty much it. The only other thing that
we need to add in is this little dip at the top of the Y-shaped
piece of cartilage. And this is why it looks
like the letter Y. Because once we divided at the top with this little pocket, this little indentation,
that's pretty much what it looks like. Is the letter Y. Or it looks like it could
look like a twig, right? So it looked like this. Are again, as I said, like a like a wishbone is another way that
you could think about it. Whatever is the easiest
metaphor for you to remember. I always like to associate
different aspects of a drawing to real-world things
because for me it just, it makes it easier
to remember and hopefully it'll make it easier for you to
remember as well. Okay. So we've got the shape of the ear overruled that
we start off with. And then we've got
the interior anatomy, which is the complicated part, the messy part of the process. But if we can get that right, this is really the
hardest of view. All the ear that you're going
to end up having to draw. Because all the other
ones are just, well, they're foreshortened
representations of this, squashed representations
of this. So we'll label this. So this is the side of the ear.
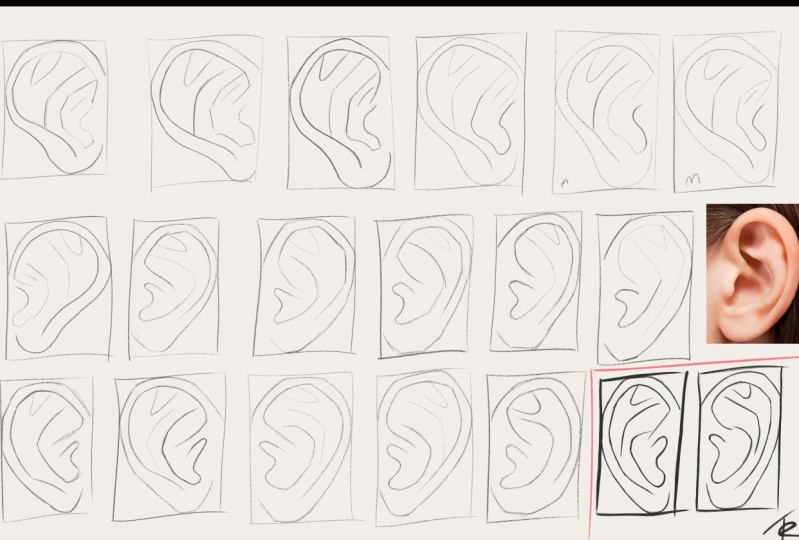
3. Front View of The Ear: Now if we're looking at the
ear from the direct front, well, what happens
is this, right? We're still going to start, we're still going to be
following the same process here. Things are just going to
look a little bit different. We're going to start with
a squashed representation of the initial ear shape
that we learned about. Say that this is the
side of the head here. Let me go ahead and do that. Now, some people's ears, they stick out at the
sides more than others. It depends on the kind of
character that you're drawing. Here's a sit further back. Alright, now once we've got
the basic shape outlined, what we can then do is we can go ahead and
draw in the frame, the interior frame of the year, as I like to call it. That's basically the same shape. It's just that this time around, this Y-shaped piece of cartilage is actually going to
pop out of the ear a little bit and then come
back into the ear lobe. But again, it's still
that, still following that fish hook type or that call that question mark
representation. And then we've got the interior
of the Y-shaped piece of cartilage into wrap around, hook up and form the ear
covering of the ear hall. Like so. Go. Alright, now really, probably this particular
characters ears sticking a little bit
too far out here. But this kinda hits the point home that we're still dealing with the same anatomy. It's just now it has been
distorted, it's been squashed. And this is what is going
to continue to happen. As we represent the ear from every conceivable
angle that we can think of. Right now, we can't forget this little pocket that sits at the top of the
Y-shaped piece of cartilage. There we go. That completes the front
representation of the ear. So when you're drawing
the head from the front at either what
you'll be drawing.
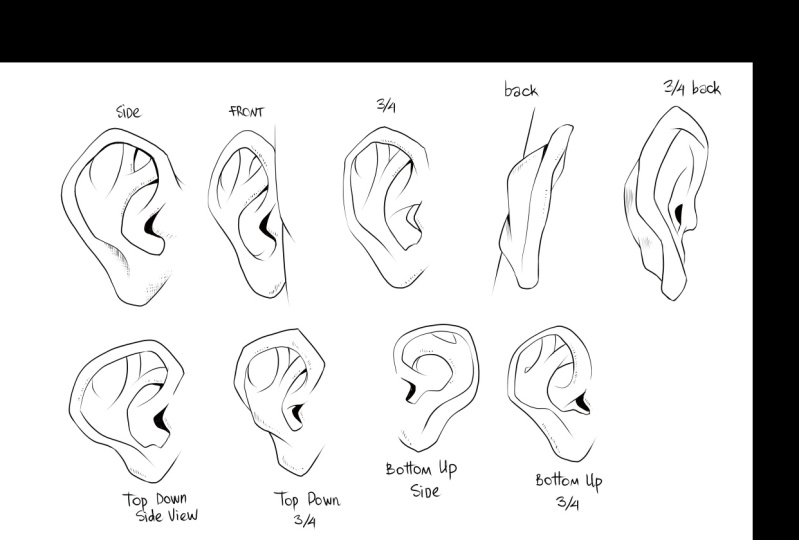
4. Three Quarter View Of The Ear: Alright, next up,
let's take a look at the three-quarter view
representation of the ear. And it looks like, well
something between these two. So we're still going to start
with the outside shape. And what's amazing
is that even though the ear is quite complicated, the demonstrations that we're
doing up for it seem to be, seem to be flying through
them fairly quickly. Alright, so once again,
we'll start with the outside shape of the ear. You'll have to judge and
determine exactly how squashed or wide the ear-shaped
is going to be. Will depend on the angle of
the head that you're drawing. Except we'll draw in that
interior frame once again, it's going to run
around the outside of the ear toward the back. And it will, it'll pretty much touch the back outside contour that we defined
previously for the ear, and come back in toward the
bottom of the ear lobe. Once we've done that, we're out that y-shaped
piece of cartilage. Bring it down into
the base of the ear, and then up again. Cover the ear opening. Alright. And then we can bring this top bit
of cartilage in further. With this one. It's done. We create the little
dip at the top. Separating this
massive main piece of anatomy into two
bits, two halves.
5. Back View of The Ear: Let's talk about the really
tricky view for the ear, which is the back for you. Yes, the ear, unlike the
other facial features, actually has a back view. So this is where things
could completely thrown out of whack because the ear is drawn very differently
from this point of view. So let's say that this time we're looking
at the back of the head. The ear actually sits on
top of this cup shape. I like to Wanli referred to the ear is a cup of cartilage. Essentially. That's really what it is. Alright, so I'm going to
start off with the cup. I'm going to draw in
the top of the ear. And then the side of the ear and then the bottom of the ear, which will be the ear lobe. And that's all there is to it. This, this two pieces. There's the outside
frame of the ear, and then there's the
cup that it sits on. And that's really about it. The ear actually sits on
to the rest of the head. Like so. Alright, now of course
we can't see any of the interior cartilage that's happening within the
ear from this angle, it's all hidden because the E
is actually angle forwards. Fact, if we're looking
at the ears from above, Let's say that the
head over here, the ears are actually
being pushed off the head on an angle
due to those cups. So we're looking at
the head from behind. We can see the cup and we can see the see the
frame of the ear, but we can't see anything
that's sitting in front of it.
6. Three Quarter Back View of The Ear: So what about the three-quarter
back view of the year? Well, that's a
really tricky one. So let's take a look
at it because we are able to see some of
the interior cartilage, but we're also
looking at the cup. Right? So I like to start off with the frame of the ear first. I'll sketch that out. By the way, I'll provide
references to all of these so that you're able to take a look
at them more closely. We're starting out with that fish hook type
shape when we're presenting the ear from the
back three-quarter view. And it's going to sit
on top of the cup. And then as for the
interior anatomy, come in and curve
around into the ear. And in fact, the shift
this down a bit, bringing the bottom
of the ear back. Now of course, we will also
see the ear Hall as well. On this angle. You got
a good look at it. And possibly we won't be
seeing as much of the cup. Be able to see a glimpse
of it, but not too much. And we will still divide that
up a piece of cartilage. This is a weird angle
to draw the Iran, but it is a necessary
one to learn because sometimes you will find that you're drawing the
head from behind. Especially when you've
got one character talking to another character. Okay, cool. So we've got our different
IO views drawn up. We've done a pretty much an entire turnaround
of these years. In fact. What we'll do next is
we'll take a look at how the ear appears in a more
dynamic points of view.
7. Top Down Side View of The Ear: Let's observe how the ear
looks when we're looking at it from above on as well, from there directly on the side. We're still going to be
looking at all these shapes, of course, using the same shapes we'll be using
the anatomy and whatnot. Except this time around, it's going to be squashed
and the vertical axis. Okay, so let's go ahead
and start out with the outside shape of the ear
first. We'll draw that in. Now if I'm going too fast, just focus on one of the
interviews that we've covered and focus on finishing that one off before
moving on to the others. Be able to go back and pause
this recording as many times as you need to to follow along with the other examples. Okay, so once we've got the
overall shape established, we will then go
ahead and draw in the interior frame
of the cartilage. Now, what you'll notice is that we've actually thickened up the top area of cartilage on the ear when we're
looking at it from above. Just define the line around
the outside of the ear. Here we go. And we'll continue
that interior outline. Will then adding
anatomy of the ear, leading it down to the ear lobe. And you can see the
foreshortened effect that I've given this
particular area. It actually looks
like the bottom of the ear is receding
away from us. Alright. Except I'm going to draw in the Y-shaped
piece of cartilage. Going to curl down up and around into the ear Hall. We have it. Okay, Wonderful. I'm just going to tweak
this shape just a little bit to get it looking
exactly how I want it. Now I'll separate top of this Y-shaped
piece of cartilage, writing the little dip in the middle that
gives it its name. So that's how I add represent
the ear from above. I go in here and just pull
this outline out further.
8. Top Down Three Quarter View: So next up, let's take a look at how the ear looks from above, but on a three-quarter angle. Alright, so I'm going to start with the
outside shape again. So if we can capture
this outside shape, really, we're off
to a good start. Because that's the key. As you can see there, I wasn't capturing a
good shape for it, so I started again. Alright, and that's why it's especially if you're
working traditionally, just keep it light. Keep it loose. And you'll find that
it's much easier to make any changes
you need to make. If you do, make a
boo-boo along the way, I make plenty of
boo-boos. So it's okay. In fact, I think a
lot of artists do. And they just don't realize
that other artists too. And that it's okay to mess up. Okay, so once we've got the
overall shape established, so I'm going to go in
now. I liked the shape. I've got the outside of the ear. I'm going to just
darken it up there. Once we've got it established, we can then go ahead and
lay in the interior frame. On this angle, we're
actually going to see the interior
cartilage pop out of the ear and then curl back
down into the ear lobe. And that's what gives it
that 3D effect that it has. Because remember
this is cartilage, it has recesses and it has extrusions that we want to describe when we start
presenting the ear, especially in these
more dynamic angles. It is a very complex
facial feature though, for a feature that really doesn't do a whole lot
except here things. Again, it has no real
form of expression. Some people can
wiggle their ears, but that's not really
something that you live in need to illustrate. Wonderful. So it will fill in
the ear hole there. Great. Looking, good. Once again, we'll separate
the top of the ear here, splitting it into two. We have it three-quarter
view of the top-down ear.
9. Bottom Up Side View of The Ear: Next, let's go ahead
and take a look at how we would draw the ear from
the bottom-up perspective. When we're looking at it
directly from the side, we're going to see the opposite
effect end up happening. We're actually going to see the ear lobe expand quite a lot. And so really what we're
doing by the way, has, if you want to
represent this just as a line in order to
think about it, we're just foreshortening this fish hook type shape or this question
mark type shapes. So if I'm looking
at it from above, then that question
mark type shape is going to look
larger at the top. If I'm looking at it from below, that question mark shape is going to look larger
at the bottom. Alright, so that's
essentially what's happening here as
we flip the ear around and represented from all these different
crazy angles. Just going to refine the outline that I
laid in initially. Then I'll go ahead and lay in that interior frame, wring it out. This time around,
we're going to see a little more thickness on the outer cartilage in the
bottom portion of the ear. The ear lobe is also
going to look gigantic, gigantic from this perspective, which is exactly what we want. Okay, now we'll see that
that y-shaped piece of cartilage actually curl
into the ear there. And we'll bring it
out and around, hooking it up and
covering the ear hall. Like so. All right
there we have it. Next, kinda go ahead and do what we've done and
all the other examples. Splitting the top of
that cartilage in half, dividing it like a like
a split in the road. And that's looking pretty good. So for the final example, we're going to do another
bottom up view of the ear, but this time we're going to do it from a three-quarter view. So we'll move this one
over just a little bit.
10. Bottom Up Three Quarter View: So in a three-quarter view, we're going to see very much the same effects being applied. You going to see the bottom of the ear expanding toward us? Let me read the exact shape. I'm not quite happy with it. Again. Sometimes I need to finesse what it is I'm
laying down onto the page. And other times I need to completely get rid of it
and start all over again. So we're looking a bit more
at the front of the ear here. We might actually see
that y-shaped piece of cartilage pop out
the top of the ear. Take it all the way down, bringing it back into the ear. Rest down toward the ear lobe. These are some
pretty crazy angles that we're drawing the ear on. And if they're a little bit too difficult
for you to tackle than just focus on
getting the side view of the ear affected. Because I think that once you're able to get
a handle on it, that's really the
key to being able to draw these other
wacky perspectives. Because as I said, it's just skewed versions of that side
representation of the ear. Okay? Alright, next up
I'm going to draw in interior Y-shaped
piece of cartilage and hook up at the end. Whoops. Actually kill that
around just a little bit more over the ear hall. And we'll bring these little
bits of cartilage that curl around into the front
of the ear even further. I'm actually going to mess
around with the shape here. That main piece of anatomy. It's popping out of the ear. Because I think we can
probably tweak that and make it look a
little more accurate. Here we sort of messed up with the perspective
on this. Just a bit. But nothing that can't be fixed. There we go. That's looking
a little bit better. Believe it or not, I actually
have fun making mistakes. I have fun rejig things. It's kinda like a really enjoyable jigsaw
puzzle of some kind. I like, I like the feeling of conquering a
drawing that's been difficult for me to
put onto the page. So when you make mistakes,
don't worry about it. Have fun with it. Your learning when
you're making mistakes. Providing you're
able to spot them. And it's, you know, it's also giving you that
that additional level of engagement that you might
not have otherwise had. Trust me, when things go
smoothly, becomes very boring. Just like hearing that
conveyor belt mindset, when you're just knocking out, drawing up the drawing and nothing's really
challenging you anymore. Embrace that. Embrace that there's always
something more to learn, something more to get better at. And, and you find that it becomes a much more
fulfilling act for you, just the act of drawing ears. Alright, so that is our different points
of view for the ear. Now completed, we've
got the side view, the front view to
three-quarter view, and the back view and the
back three-quarter view, and then the top down and bottom up versions of the ear as well. So remember the basic symbols
that we talked about. We get the pear shape for the
overall shape of the ear. We've also got the fish hook and the wishbone slash Y shape with the main piece of
cartilage that you're going to want to take note of when it comes to
drawing the ear. But other than that, that's
really all there is to it. Just practice,
practice, practice.
11. Assignment: Hey, thanks for watching. I hope that you enjoyed
this class and that you got a ton of value out of it. And hopefully, as you go on
throughout these lessons, you've been following
along and putting what you've learned into action. And if you have,
then your assignment for this class is
already done and you can submit it in
the project section for feedback from me. But if you haven't, that's totally fine because you can start the
assignment. Now. You can recap on all
the lessons within this class to remind yourself of the steps
that we went through. And then put pencil to paper. Actually draw up your own ears from the various points of
view that we went over. And if you're
feeling adventurous, maybe even some of your own. Good luck. And as I said before, once you've completed the
assignments submitted in the project section of
this class for feedback. Until next time, keep drawing.
 Clayton Barton, Harness the Power of Dynamic Drawing