Transcripts
1. Introduction: Hey, it's Clayton in this class. You're going to be learning
about how to draw noses. First, we're going to discuss the fundamental building
block of the nose. Then how to draw it from the front side and
three-quarter views. Also, the more dynamic
representations of the nodes from the top-down
and bottom-up perspectives. By the end of this class, you should have the confidence and competence to
be able to draw noses from almost any
angle you would like. Alright, let's jump
straight into it.
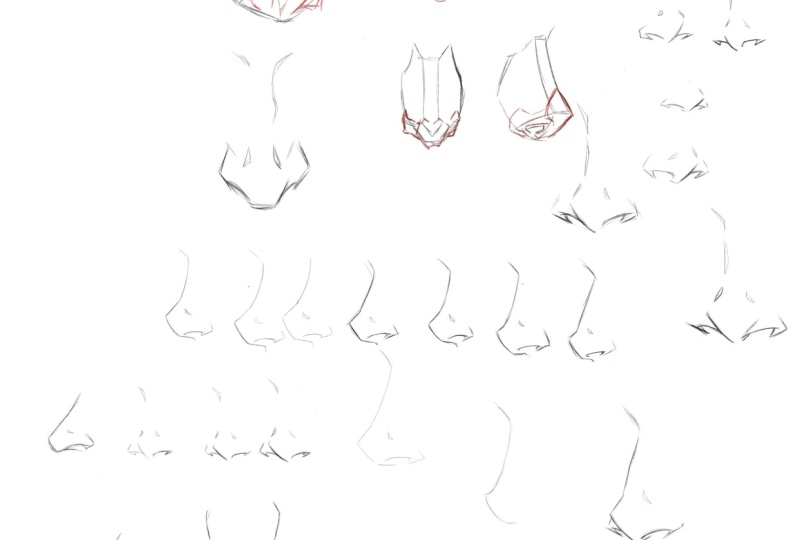
2. Nose Block Form: What I want to introduce you to is this block formation
that I like to think about what the nose and the reason as to why I would like
to show you that first is because for me, it just helps me to be
able to turn the nose around in space a little
easier fitted onto the face. And also as the head turns, how the nose actually
turns with their head. So here it is. It's, I'm going to just do a little diagram up the
top of the page here, just to start out with, but this book formation, it essentially it looks
a little bit like this. And you can practice this
on its own if you like. It's quite an easy
shape to draw. What it represents is you've
got the front of the nose, the front of the
bridge of the nose. You've got the underside
plane of the nose right here. And then you've got the
sidewalls of the nose. So try to get used
to just drawing. This is very basic, very fundamental block
formation of the nose. I'll provide some
references for you to take a look at this in
closer detail as well. I also add some little divisions around the base of the nose too, is how it looks from the front. We've got the underside
plane of the nose, we've got the
sidewalls of the nose. Those sidewalls, you notice that they don't just
go straight back. If we were looking at
the nodes row above. Say that we had our front plane
here for the nose bridge. Side noise planes, they
actually come out a little bit. Right? Now. You can also add some anatomy to the nose if you wanted to scribble that in
there as well just to know what's going
on underneath. And I'll do that right now with just a red pen real quickly. You've got the bulb
of the nose here, which is one main
piece of cartilage. And then you've
got the nostrils, of course, that also cartilage. For the most part.
Sometimes you'll see the nostril on
the opposite side of the nose here as well. But the rest of
these sections here, they're actually bone.
For the most part. You'll notice that the tip of your nose is really squishy, handy for when you have a
habit of bumping into walls. And then the rest of your
nose is very hard and solid. That's not very
malleable at all. I like to think of
the bulb of the nose is it almost looks like a, an apple that's been
divided in half. Then you've got the nostrils
sit on either side of it. And then again, you've
got these the top area, you've got the front plane of the nose and you
got the side planes. When we're looking
down at the nose. And what you end up
seeing for the most part is just the bulb and you've
got the nostrils there too. Now, this anatomy isn't going
to be all that defined in the final drawing
of the noise that we're going to be
demonstrating here today. This is just what's
going on underneath the surface so that,
you know, it's there. Right now if we're looking at the nose side view
and you can practice all of these diagrams as
well for yourself. For sure. That'll certainly help you too. Quibi, develop a memory bank of references that you can draw upon when it comes to drawing the nose if you ever get stuck, this is what these are good for, is that when you do
get stuck drawing a nose and you don't quite
know what's going on. You can think back to this
stuff and you go, Oh, okay. Because this is
the fundamentals, this is the basic structure of the noise that we just
want to keep in mind. Not something that
we're going to draw every time that
we draw the nose. Certainly not. But
it's certainly, it's something that we can
think about help us out. Once again, controlling
the anatomy on top of our block form. They're read to
understand what's going on. It's pretty much hit. All right. So with that in mind, and this isn't going to
come in really handy later on when we start to draw the nose from above
and from below. That's when all of this fundamental knowledge
and the goings on of what's happening
underneath the skin is really going to come
in quite handy.
3. Nose Front View: So let's start off with
the front of the nose. Now for me, this is
very, very simple. It's like insanely simple case. So if, if I'm drawing
like a male character, I might add in a few
more details here, but honestly, let's say
that we've got our, our head drawing and we're at the point at which we're
ready to draw the nose. What I'll typically do
is I will simply lay in a line at the
bottom of the nose. And usually this
line is going to sit on the dark
side of the nose. And it's describing
the bulb shape, right? So you can start with that. And then from there I draw that. I draw out one nostril opening, a little bit like this. And on the opposite
side of the bulb, I draw out the nostril open
and other unnatural opening, giving us two nostril openings, which indeed we have. Then I'll add in
sometimes a little line, is to describe the
top of the nose bulb. And that's about it. Especially with a
female character. Usually I'll only defined
the bottom of her nose. I certainly won't define the bridge or
anything like that. However, on a male nose, that is something you
certainly can do, or on more of a creature, the type character where
you want to kind of emphasize those details like
the cheekbones and whatnot. Certainly. Sometimes what you might do is add in a little indication
of the nose bridge here. Then. Describe the nose
around the top. The shape that you would
be dealing with as it transitions into the
underside of the brow. Because at the top of the nose, really what's happening is that the noise is merging into
the underside of the brow. And that's as, that's
as complicated as I make it when it comes to drawing the
nose from the front. Now of course, this
is assuming that the light source is shining down onto the noise
from the left. If it was shining down onto the nose in the
opposite direction, then I would simply
go ahead and instead define the other side of the nose bulb with a darker
line with a single contour. And you can really practice this shape as many
times as you want. As I said, it's really
just the base of the nose that we're
dealing with there. So go ahead and practice
this over and over again, repeatedly until
you get it right. And it's, hopefully it's not going to be hard for
you to memorize. It might be a little difficult to capture the
shape you're after. Again, you can swap the area
of the noise that you're defining over depending on the direction of
the light source. Again, what we're
really describing here. If we draw in our
underlying anatomy, is the nose bulb with
these random lines. We've got the nostrils on either side and this this piece of cartilage
just below it. Okay. So that's the
front of the nose.
4. Nose Side View: When it comes to drawing
the side of the nose. Well, that's also
pretty easy as well. I mean, from the side
you could almost simplify it down into
a triangle like this. It's probably a little
bit too simple. Obviously, we're going to
be adding more shape to it, but this is how I
would go about it. Now, the other
thing that I should mention is that the
shape of the nose of a man is significantly different to the shape
of the nose of a woman. So we'll start off with
a male nose first on what would be a classic
idealized male knows, it's going to be fairly
straight along the bridge. Then what's going to
happen is it's going to shut out a bit at the end, and this is where the
nose ball begins. Then what will happen? So lead down into the
base of the nose, then back into the mouth. Right now, I'm drawing
this at a large scale, so take me possibly a little bit of tweaking to get
it exactly right. Let me start that again. Okay, to take my previous
advice and just keep it looser. Start out with, there we
go, that's much better. So I'll go over the top of that. Defining the nose
bridge once again. Again, when I loosen up, it's, it makes
such a difference. The finished outcome
of my drawing. So it's something I'd highly
recommend for you as well. Okay, Great. So that's the basic
shapes that I go with for the side representation
of the nose. And then as far as the
nostrils are concern, I don't draw them all
the way back here. I draw them fairly close
to the front of the nose. In fact, they actually come
back to sit inside the face. And they look a
little bit like this. Again, it's really
just three lines that I've used there in order to create the nostril opening. So I think that you're gonna get this as soon
as you try it out. Then we might add a little
bit of an indentation here where the nostril cartilage
meets the bulb cartilage. Let's kinda their meeting
place right around this area. Then. See that that is a finished
and nose, right? Sure. Absent of any heavy
shadows are rendering, but really it
wouldn't want to put any heavy shadows or
rendering there anyway. Now let's talk about
the differences between a male nose and a female now is, and what they're
going to consist of most of these
differences, by the way, you're going to see
in the side view, typically a more
feminine or female nose or even a younger looking nose. That's less, less mature wood is going to have more
of a curve to it. That's the main difference. It's going to have
more of a curve to it. And it's also going to be
sitting up a little higher. Okay. So something more like this, I would say go over
the top of that. You'll notice that it's simply not as straight along
the nose bridge. It's much curvier. And it just, it
produces a little bit more of a acute look
for your character. You could say. It's less chiseled, it's
softer and appearance. And overall or less
intimidating knows. Okay, once we've got the
basic shape established, what we can then do next
is lay in the nostril, and that's pretty
much going to be the exact same approach that we took previously
with the male nose. Bringing it back to
sit inside the face. If you get a nice curve and hooking it up
back up at the sides. You can add in a little bit of an indentation where
the cartilage of the nostril meets the cartilage
of the bulb of the nose, the tip of the nose
in that top corner. And then that's it. So that's
the front of the nose. Well, actually let's do
an example of how I would draw out the female nose from the front here
just for a moment. So we'll get rid of this one. And we'll make some space here. Again for a female nose as
represented from the front, I simply do something
along these lines. For some reason I always place the bulb shadow on the
right side of the nose. I start out with that. I'll draw in the
nostril on either side. Then. Yeah. That's that's really all. I do not have a lot
more than that. Again, I might add in my little indentation
up the top here, where the two bids
have cartilage at the tip of the nose meat. But other than that, this whole section where the
nose bridge resides, I leave bare until I get to the brow region where I might add it a little
bit of rendering. Okay, so that's really
the key differences. Probably this area here
is when I include that, it turns it into more of
a masculine looking nose.
5. Nose Shapes: Let me talk about the different shapes of the nose that you can get because you can
certainly get a lot of them, especially when you're looking
at the nose from the side. Now, we'll be
getting into this in a later lesson
where we talk about adding variation to your faces. But just while we're on the
side view of the nose here, you can get pointy noses that look a little
bit more like this. You can practice those. Okay, So I want to show you
that you can really push and pull this shape in whatever
direction you like. You can get noses that
Hope down really low. That'll work just fine. You could get pencil
noses. Alright. So experiment and mess around with these
different nodes shapes. From the front. It'll be the exact same deal. Whole bunch of different nodes. Variety is happening
if you want. You want to have
some fun with it. And I suggest Certainly
you always have fun with your drawing. Make some room here for
some front nose variations. You could have a Gavin, nice to find a pointy nose. And really, as far as
nose variation goes, usually that's going to work. Turns as the statics probably better on a male character
for some reason, you can really
characterize a the face of your male characters and
have them still look, look like male characters. You can actually have
very unattractive, undesirable looking
male characters and somehow get away with it. When it comes to
the ladies though, for some reason or another, like if you were
to add this nose here to a female character, it just would not sit as well. For some reason, at least
in the classical sense. And again, you might
have a very pointy nose. You can certainly
characterize a female face. Certainly. I've done it. I've actually done it
throughout this workshop, in the later lessons. And it can work quite well, but it does add a very
cartoony appearance to them. Okay, so, yeah, mess
around with it. Have some fun and
experiment a little.
6. Nose Three Quarter View: Alright, next up, let's talk about the three-quarter
view of the nose. So this can be a
little more difficult, but not that much more
difficult because it's very similar to drawing the
front of the nose. So we can we'll start out with the top of the nose this time around where
the brow would be. And then we'll draw out
the bridges or nose. It get down to where
the bulb would be, which would be about here. I think. We can drop it and curl it around
back into the face. Now this almost looks like a side view representation of the node is at
this point, right? But it's not. It's actually a mix between the front view and
the side view. And I guess it makes sense. So you would get the
three-quarter view when you combine
those two together. So we'll draw in the
nostril opening here. And then sometimes you'll see
the opposite nostril just peeking out from
behind the tip of the nose is too big here. But the tip of the nose
is actually obscuring. Much of that nostril on the
opposite side of the face. Because remember, not only is the front of the nose
protruding out from the face, but the opposite nostril is actually going back
into the face. So they're just getting
further away from one another. Which is why you see such
an obscured representation of that opposite side nostril. And probably I'm
showing too much of it there so we can get
rid of some of it. You only want to see a little hint of that
opposite nostril. Once we've done that
and we can go ahead and place a little indentation
at the top of our nose. And other than that, there's not really a whole lot more to it. You can of course, darken up the bottom of the
nostril opening a bit. And you'll notice that the bulb of the nose is actually hooking up underneath the
nostril starting to. But that's a three-quarter view. All the nerves, again, actually not that different to the previous views
that we went over. Now let's talk about
how female nodes would look in the same position. And again, you're not going
to see that much variation with the eyes when it comes to drawing them on
both men and women, except for the whole
eyelash thing. But when it comes to noses, you start to really see some anatomical
differences when you're talking about the
idealized representations. This stylized representations
of them on top of that. Comic books are very stylized. So stuffs are worth mentioning in terms of capturing the look that
you might be after. So we'll start at the top
of the brow once again, except this time around
rather than using a hard outline for the
bridge of the nose, we're actually going to
break it up at a very thin, will draw it a very light
line that curves up at the bottom and back
in around the nose. But what I'm trying to do
here is make sure that that nose bridge
nice and curved. And we want it to
look soft and we also want it to have a little bit
of energy to that curve. Two scoops up at the end. Now I'm going to erase
the middle of it. And the portions of the nose
that I really wanted to find here are up at the top
and then around the base. And even if I join the bottom
to the top of the nose, I want to keep the joining
outline very, very thin. So it's extremely subtle while making it
thicker at the base. And the reason for
that is, again, it just has a list
chiseled look. All right, It gives a certain
amount of softness to the face when we break up
the outline like that. But just as before, we're going to draw
in the nostril. Okay, so we're still
adding in the same stuff, just representing it a
little bit differently. We might actually go ahead
and just lift up the nostril. But it's sitting slightly
higher their intestines. So there's our three-quarter
view of the female nose. Well, the more feminine
looking nose, if you prefer. Again, you could
easily add either of these noses to either
a man or a woman and it would produce
different effects of course, but certainly not
against the rules.
7. Nose Top Down Views: Here we won't be doing too
many variations of the nose. I just want to show
you how you would turn the basic form and
presented in space. So let's jump straight into it, starting with the top-down view. Now, this is when I
actually start to use that block formation that
I was showing you before. And I will actually start out by sketching it usually
just so that I can get the structure
down to begin with because it's it's
kinda hard to wing. So go ahead and start with the front view of the top-down
representation of the nose. We'll start with the base. And remember I'm
using the, the very, very standard block form
that I've come up with. All right, so I've
got that established. Just keep in mind
the proportions of the nose when you're
drawing it on its own. Usually you can judge. Usually you'll get
it sized up pretty well when you've got the rest of the face to consider because we know what its proportions
are on the face. But when you're
drawing it on its own, it can be very easy
to draw it either too long or too short. So just keep that in mind. I certainly have it
guilty of that before. Okay. So once I've got the front of the nose
bridge drawn from this view, what I'll tell you
is that you can't see the bottom
plane of the nose. It's actually
completely obscured. And so what you end
up being able to see is this the front of the nose and the sidewalls of the nose and then the
tops of the nostrils, but you can't see underneath it. Again, a very lightly
sketched in that basic box. In fact, to be honest with you, that's probably mess me
up more than anything. So let me see if I can
freehand this one. See certain views I
need the noise box for. Other view is I've got a bit of a shorthand
technique for it. So I'll start with the
base of the nose here. Draw out the nostrils
on either side. And honestly that's
that'll probably do it. I might bring up
those bulbs somewhat. This to indicate that, uh, putting my little
indentation where the nostril cartilage will
meet the front of the nose. Okay, Cool. So that was a
really good example of how the underlying
construction can actually mess and confine your, your approach to drawing
certain facial features. And it's great for
when you've got nothing else to work with. It's a great way
to think about it. And I will be using it in a moment when I jump onto
the more difficult views. But right there just, it really messed me up. So the same thing can be said about the overall structure, the underlying structure
of the human head. When you're using
the Loomis method, I find that it can be
very confining sometimes. And if I stick to
it too rigidly, I just don't get what are these I'm after I
can't capture, right? So the other thing that we
can add in here is of course, a little bit of an indication
of the nose bridge. And then at the top of the nose, we can add in the brow
joins onto the nose. But that's an example of the top-down representation of the node is presented
from the front. Can actually move this up a
little higher. There we go. Cool. So next, let's do a
three-quarter view of the nose presented
from this angle. Once again, I'm not I'm
not really going to use the block
formation here either. I think that
probably it comes in most handy when I'm drawing
the nose from below, if I'm being quite
honest with you. The top-down three-quarter
view is actually quite similar to the
three-quarter standard view. So let's take a look at it. Basically, what I'm
going to be doing here is drawing it all the way down the tip of the nose. This is before where
we're running along the bridge and I'm
keeping it loose as well. And this time I'm just
going to take it up, take the nostril up
a little higher. I'm going to give it
more of an angle. So it's actually not
all that different. But if you think about the
initial block formation that we were dealing
with and I'll actually go over the top of this nose, drawing with it
in just a moment. The reason that I'm drawing
the nose look this way, this particular
way is because of that basic understanding of
the form that it consist of. All right, so what will
end up happening In fact is that the front of
the nose will sit lower. Okay, So essentially we
will be seeing the top of the bulb more so
than the bottom of it. So we'll get this sort
of shape happening. And we wouldn't be
able to see any of the nostril on the opposite
side of the nose here will indicate again that little
dip the top of the nose. But other than that,
this is how I would draw the three-quarter view of the nose when we're
looking at it from above. And of course, this angle can be pushed further and further. So you know, if you're really
looking down at the nose, it might look more like this. And you can really just, you can push everything to the extreme, especially
these angles. Let me go ahead and
do that properly. So you're really looking
down on the nose. Might be how it appears. Okay. Alright, next up, what I
wanna do is just really quickly draw out
the block formation here so you can see what I'm
thinking about as I draw it. I'm just not
actually drawing it. I'll move this over a bit. I'm thinking about the
nose bridge, of course. The sides of the nose are actually coming
back like that, right? And that's, that's even simpler really than the initial
model that I came up with. But on a fundamental level, that's essentially what's
happening is we're taking that block form and we're
just turning it in space. If you understand
that, it'll give you a little bit more room to move when it comes to
drawing the nose.
8. Nose Bottom Up Views: So now we've got our top-down
views of the nose sorted. Let's take a look at
the bottom-up fuse. And this is where I'm going
to use my block structure for the nose because otherwise I just run
into too many problems. I can't win this one guys. So I usually start
out with the base. Okay, so let's say
that we're drawing the bottom-up representation
of the nose from the front. I'll start out with
the bottom plane. And this is like the skeleton of the drawing really that
I'm placing down here. And then I'll go ahead and
I'll draw in the nose bridge, taking it up into the brow area. And then I've got the nose walls which I also sketching as well. Make that a little bit bigger. Now the other thing
that I'm going to do is I'm going to make a middle division of cartilage here that runs straight down the middle of
the bottom plane. Then I'm going to roughly sketch out the nostril
openings based on that. Okay, So we're
getting, we're getting a good look right up into this, this character's nose right now. Once I've got that basic sketch
placed down on the page, I have an understanding of the three-dimensional
qualities, all the nodes at this point. And with my knowledge of
its anatomy over here, which we went over before, I can start to go in
and describe things like the nose bulb, for example. Indicating that. That says
I'm doing right here. I'm going to go ahead and
draw in a hard outline. This cartilage that runs
along the base of the nose. Then what I'll do is I'll start to sketch out
the opening of the nose. Because we can see up until
those nostrils again, not a very flattering
view of the nose. We're able to see that the shadows that
collect inside them. And that shadow is
going to look like, um, let's, let's just
fill it in there. It's going to look like a comma. The number six. That's
easier for you to remember. And we'll do the same thing on the opposite side of the nose. My palette, our eraser just to tweak that shape
ever so slightly. And in fact, I'll erase some
of these construction lines here that we no longer need. And then I'll draw in
the rest of the details. There is a few points of
articulation that we need to represent here as far as defining the
noise and it's anatomy. We might even render in the rest of that
nose opening here. Just to darken it up further. I'll add in a little crease
at the back of the nostril. And I'll define the
nose plane separation between the tops of
the nostrils and the underside of the nose. This angle is actually quite
difficult to get right. So even though the other point of view of the nose
are a fairly easy, this one maybe not so much. So I feel like my nostrils aren't quite looking the
way I want them to look. So I'm just going to erase
them here and redraw them back in. There. We're just looking a
little bit too wide. Okay. That's looking
a bit better. I'll erase that portion. You know, sometimes I can draw noses really well
from this angle and then their release days where I just have no idea
what the heck I'm doing. That just goes to show you
that even though you've got a process under your belt, you can still run
into some problems. And I think that little challenges
that always keep you on your toes
as an artist are. It's a good thing we have
them because otherwise, we would just get bored. I know I certainly would. Every time I think I've
made it with my art, I all of a sudden lose a lot of motivation and I start to
procrastinate big time. So be careful of that. It's easy to run into. Alright, so I'm still sculpting
out this nose bit by bit, trying to get it to look the
way that I want it to look. Now if you're unfamiliar
with how the nose looks with a stylistically
or realistically, it doesn't hurt to actually
get some reference material and practice it a few times just to become
familiar with it. Every artist is going to have their own interpretation
of course. So it's good to learn
from other artists and how they represent noses, faces, and really the
rest of the world. But it's also good
to come up with your own based on actual real-life
reference material, you can take photos
of your own nose from different angles. You can do a simple
Google search and find a bunch of references online if
you'd like as well. You've got references
at your fingertips. The wonderful age
of the Internet. But certainly do a
few studies from life and just help you out, of course, represented
in your own style. And try to develop a technique
for drawing it in much the same way. I have. Now we can't really
see the top of the nostrils in this viewpoint
because we're actually, we've set the camera
down quiet low here. And in fact, at this vantage
point than the nose bridge, would it be even
more foreshortened? This area would ultimately
connect onto the mouth. And in some cases, we would actually start to
see the top of the lips here, depending on just how far
up the head is looking. Contrast. So our view. Okay, So that's all right, front view of the bottom-up
representation of the nose. Let's go ahead now
and turn it on its side to look at a
three-quarter view of the nose. Right? So I'm going to go
ahead here now. I'll start with the nose bridge. But then I'm going to draw out that bottom underside noise
plane just to start with. And I'm going to keep
it loose for this one. What I'm doing here as I lay in the bottom
underside noise plane. As I'm really trying to describe the 3D representational
the nose accurately. And So I'm looking
at the angle of this underside nose plane in comparison to
the nose bridge. And I want to make
sure that both of them is correct as I can get them. I feel like I'm
seeing a little bit too much of the underside
of the nose here. So I'm just going to
arrow out its height. And this is why I use this
basic box model to begin with, because sometimes it can be tough to get the
look that you're after. I didn't have this structure
and I was just winging it. I don't know. I think it
would take me a really long time to get it looking the
way I want it to look. Alright, so once I've
got that sketched in, I'm going to go ahead and
draw in the nostrils. And heck, I might
even sketch in mind little nose bulb here as well. To help me capture
the correct shape at the end of the nose that CS the bottom-up
representation of the nose is a tough one. There's actually a
lot more going on. You can see more of the nose. The nose is complex anatomy. You're dealing with nostril
openings as you're dealing with the outside walls
of the nostrils as well. And all from a viewpoint that is relatively
unfamiliar to most of us. Here what I'm describing
is the base of the nose cushioning a little bit at the end, made of cartilage. And so understanding
your nose anatomy, it can really help you out. In these instances, especially
when you run into trouble. And that cartilage actually curves inward
underneath the nose. Example drawn a nose
opening like so. And we'll fill it in. There we go. And we can do the same thing
on the opposite side, we may be able to see the opening far side of the
nose from this vantage point. I'm going to bring out the tip of the
nose some more here. Just tweak the shape
of it. Burleigh. Then bring it up into
the nose bridge. Okay. So there's a little
bit of sculpting going on and a lot of tweaking. This is how I would
actually work. In fact, on a daily basis. I make a lot of
mistakes along the way. A very, very small mistakes that are quickly
tweaked and fixed. And I think what I'm showing you here is
probably an ability in and of itself because it took me
a long time to be able to spot out where I was going to wrong and what I needed to fix, how I needed to fix it. And so getting to
the point where you're able to just fix things on the fly and pick them
up in the first place. It's a good skill to develop. And I think that it's really based on
observational skills and putting yourself under
scrutiny. A lot of the time. Looking at your work
with an honest i and in seeking out the
areas for improvement, it's not always an easy
thing to do because we really want to do the best
work that we've ever done. And so criticizing ourselves,
that can be tough. But then again,
at the same time, there's a lot of artists
out there who are their own worst
critics and they go in the opposite direction
there too self-critical. So you want a nice balance. I think as an artist, you want to be helpful and constructive criticism
that you give yourself. But you certainly don't want to parallelize your progress in any way. Okay, cool. So what I'm going to do
now is just once again, try to indicate
that cartilage has a scoops in underneath the nose. I'm going to erase away some
of the nostril opening in the middle there because
they were sitting a little too close together, will make a small division here. Just to indicate
the plane change from the sides of the nose
to the bottom of the nose. And I think that'll
just about do it. This is one view of the
noise that I could keep on tweaking and messing around with all day. That's for sure. We may even be able to do
up another example for of it just to get some
practice in here. Because I think it is
an important one to draw multiple times
and to get right. So we'll do another quick one. Sometimes I need a little
bit of a test run just to just to get a feel for it. And you'll notice that sometimes you're
more comfortable at drawing the nose from one
angle but not the other. So it can be good to just swap it around from time to time. Alright, let's see
how we go here. So very loosely sketched
out my underlying drawing. Going to go through and start to outline the nose
bridge the tip of the nose. Also go ahead and place in
some shadows for the nostrils. Then we'll outline the nose, giving it a darker outline, really defining that contour. To emphasize its shape. And around the sides of the nose will bring up the
back of the nostril. We'll get around to the base. Then of course, define that plane separation between the top of the nose
and the bottom. And we'll leave it at that. So that is our various
knows examples presenting the nose and the
standard point of view, the front side and a
three-quarter angle. We've got some
examples of the nose looking at it from
above and from below. So we've pretty much
covered all the bases here.
9. Assignment: Hey, thanks for watching. I hope that you enjoyed
this class and that you got a ton of value out of it. But now it's time to take
what you've learned and put it into action with
the assignment. First up, I want you to open your favorite drawing
application or just a good old
fashioned sketch book if you'd like to
work traditionally. The first exercise is
going to involve you drawing up a series of examples showing the basic
block formation of the nose from a range
of different angles. And I want you to do
this enough times that you become
completely comfortable drawing this
fundamental nose shape from almost any perspective
that you can think of. Part two of this exercise is
to either place a piece of tracing paper over the top of that basic nose foundation that you've done up a
range of examples for. Or if you're working digitally, create a new layer
in your application. I want you to draw
straight over the top of these block formation
noses laying in the anatomy of the nose and
then the final outlines. So you'll be placing in
the bulb of the nose, the nostrils of the nose and redefining the bridge of the nose to give it a
little bit more shape. If indeed you want to introduce additional character
to your noses. And by the end, what you should have is an entire range of finished noises that
you have drawn up from a multitude of different angles. See how you do with that. Good luck. And once you've completed
the assignment, be sure to submit
it for feedback. All right, until next
time, keep drawing.
 Clayton Barton, Harness the Power of Dynamic Drawing