Transcripciones
1. ¡Hola!: Hola. Mi nombre es Nikki Parsons Soy un líder de marketing y
autoprofeso fanático de Asana y hoy, voy a mostrarte los
fundamentos Asana es una herramienta increíble
y muy popular para la gestión de proyectos Es fácil de usar, pero
al comenzar, todos necesitan un poco de ayuda solo para entender cómo funciona y acostumbrarse a esta nueva forma de
organizar su trabajo. A menudo, cuando las personas
empiezan a usar Asana, se meten en ella
y aprenden sobre la marcha Pero tener un poco de imprimación es útil para que
puedas
ponerte al día más rápidamente y entender todo el
potencial de la herramienta. Asana no es solo una lista de verificación, y hay muchas
características increíbles que pueden ayudarte a que tú y tus equipos
sean más
productivos y alineados He usado a Sana extensamente
y no solo personalmente, sino que la he implementado en varias de las empresas en las
que he trabajado, así que soy un gran fan de la herramienta. En esta clase, cubriremos
los conceptos básicos de Asana. Entonces veremos la interfaz,
cómo crear tareas, cómo establecer plazos, cómo organizar todo
en los proyectos de Asana Mi objetivo es que termines este curso sintiéndote muy cómodo con Asana para que puedas
salir y empezar a
usarlo de inmediato. O si ya tienes un poco de experiencia en Asana, que recojas algunos consejos
y trucos para compartir con tus compañeros y realmente
maximizar tu uso de la herramienta En esta clase, voy a discutir
las características básicas de Sana, que significa que todo lo que
hablamos en esta clase es posible en
la versión gratuita de Asana Entonces espero que se unan a mí. Empecemos con los
fundamentos de Sana. Bien.
2. Qué es Asana y por qué los equipos lo usan: Asana es una plataforma de
gestión del trabajo. Permite a los equipos mantener todo
su trabajo en un solo lugar, facilitando la colaboración en proyectos y la comunicación
sobre el progreso. Lo que hacen estos
sistemas de gestión del trabajo, ya sea asana, monday.com, Trello,
la lista continúa,
es ayudar a las empresas
a reducir el trabajo sobre el es ayudar a las empresas
a Cuando usas Asana de
manera efectiva como equipo, pasas menos tiempo
en correos electrónicos y menos tiempo rastreando la
información internamente Las empresas usan Asana para
desglosar metas e ideas en tareas procesables y
comunicarse en un solo lugar Esto trae una mejor colaboración,
menos trabajo sobre el trabajo y más transparencia en la
forma en que
los esfuerzos individuales contribuyeron a lograr los objetivos generales. Digamos que ya usa una serie
de herramientas en su empresa. ¿Dónde encaja Asana? Aún así, querrás usar tus aplicaciones de
documentos para crear, compartir y almacenar archivos, por ejemplo, una unidad. Aún querrás
tener una aplicación de mensajería para mensajes rápidos,
anuncios. Por ejemplo, MSTams
holgura o correo electrónico. SAA encaja justo en el medio como una plataforma de
gestión del trabajo Se trata de crear planes claros y medir el progreso
hacia las metas. Todavía necesitas los
tres y cada compañía combina estos tres
a su manera única.
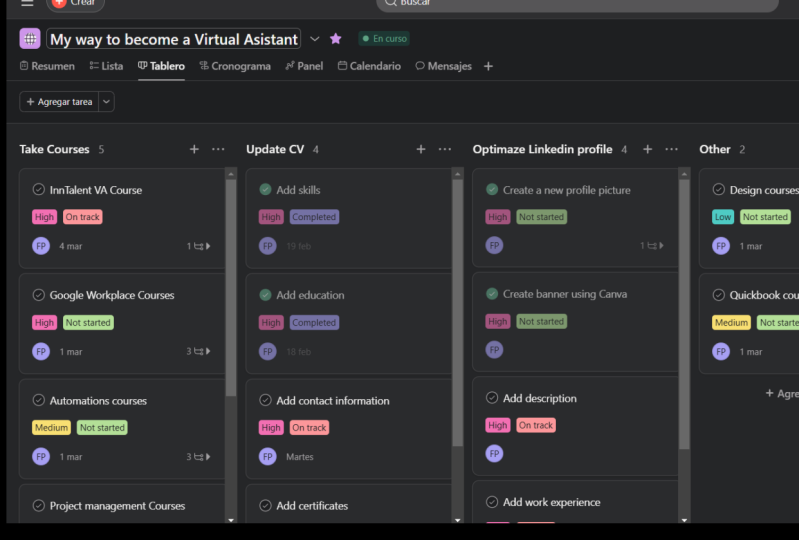
3. Cómo está organizada la información: La información se organiza en
Sana en un formato jerárquico. En la parte inferior,
tenemos las subtareas. Las subtareas
dividen las tareas en piezas de
trabajo más pequeñas y se pueden asignar a diferentes miembros del equipo
y se les dan fechas de vencimiento A continuación, tenemos tareas. Las tareas de Asana representan las acciones individuales
dentro de un proyecto Nuevamente, deben
asignarse a los miembros
del equipo y
darles fechas de vencimiento. Los hitos de Asana son los mismos que hitos
en cualquier gran proyecto Son puestos de control que
identifican cuándo se han completado actividades, grupos de actividades o una
tarea particularmente importante Y todas estas
subtareas, tareas e hitos viven
dentro de los proyectos de Asana Un proyecto de Asana es para un gran esfuerzo coordinado
dentro de un equipo de Asana Están trabajando en una iniciativa
común a lo largo del tiempo. Opcionalmente, entonces
tienes portafolios, que son colecciones
de proyectos, y eso te permite
monitorear múltiples
proyectos en un solo lugar Eso es particularmente útil para los gerentes de
proyectos o
gerentes en general que pueden necesitar una visión general
de alto nivel de un grupo de proyectos. Por último, pero no menos importante,
todo está conectado con los goles de Asana Este es uno de los aspectos
más destacados de Asana para mí porque la
gente puede ver cómo su trabajo diario
impacta el éxito del departamento de alto nivel e
incluso los objetivos de
la compañía de primer nivel Entonces ojalá, esta jerarquía tenga
sentido para ti, pero para agregar algo de claridad extra, quiero compartir un
par de ejemplos. Digamos que tiene
un objetivo de nivel superior de garantizar seminarios web atractivos
y atractivos Seguramente tendrás
algunos resultados clave o KPI detrás de este objetivo, pero a un nivel amplio, eso es lo que el equipo quiere
lograr este año Como jefe del equipo de eventos, quiero poder
ver el avance
de los diferentes webinars que
tenemos en proceso Así que el equipo hace una cartera de todos los proyectos de webinars, así que es fácil para mí ver
cómo están progresando Uno de esos proyectos es un próximo webinar llamado
top digital marketing trends. Ahora empezamos a
entrar en los detalles. ¿Cuáles son las tareas hitos o subtareas que entran en el
equipo que prepara este webinar Bueno, uno de sus
hitos clave va a ser tener la página de
registro establecida. Ese es el hito clave porque significa
que ahora pueden iniciar la fase de promoción ya
que tenemos un enlace con el que los asistentes
pueden inscribirse. Si no tenemos el enlace con el que los asistentes puedan inscribirse, literalmente no
podemos
avanzar a la siguiente etapa. Entonces por eso necesitamos
tener esto como una tarea clave. Por eso
lo marcamos como un hito. Por supuesto, esta página de
registro necesita otras cosas para estar lista. Necesita confirmación
de los ponentes. Se necesita una copia para
incentivar las inscripciones,
y por supuesto, algunos gráficos
pegadizos de Para tener esos gráficos, nuestro diseñador tiene que crear un banner de Zoom y nuestro
líder de marca tiene que aprobarlo. Veamos otro ejemplo, esta vez viniendo
desde un ángulo diferente. Uno de nuestros principales proyectos en el equipo de marketing digital este año es una actualización de
sitios web corporativos. El primer hito en
este proyecto en realidad
va a ser cuando nuestros
desarrolladores y diseñadores web, esos proveedores clave para el
proyecto sean contratados. Nuestro equipo tiene que
sentar las bases para esto haciendo tareas más pequeñas, subtareas como
redactar un alcance de trabajo e investigar a diseñadores y
desarrolladores
potenciales antes de que
puedan llegar a proveedores
potenciales Posteriormente, tendremos
muchas otras tareas como analizar a los proveedores, revisar ofertas,
poner una orden de compra en el sistema o involucrar
compras. Todo ello hasta llegar a
nuestro hito de tener confirmados
los proveedores. Nuevamente, todas las subtareas, tareas e hitos son parte
de una iniciativa más grande, actualización de
nuestro sitio web corporativo, que es
una iniciativa lo suficientemente grande como para que sea
su propio proyecto de Asana Ahora, como somos una gran empresa, tenemos muchos
proyectos relacionados con
la gestión web y el SEO, no solo esta actualización continua. Entonces, para asegurarnos de mantener
la visión general de primer nivel, tenemos una cartera
de SAA de todos los proyectos web Y al final del día, ¿por qué estamos haciendo esta actualización de sitio web
corporativo? ¿Para qué objetivos nos
ayuda a trabajar? Bueno, en este caso, la
compañía lo está haciendo para lograr un crecimiento anual de la
búsqueda orgánica del 30%. Por lo que la actualización web está directamente conectada para
apoyar este objetivo. En este curso, nos
vamos a centrar en todo lo incluido en
la versión gratuita de Sana. Las tres áreas de esta pirámide en las que
vamos a entrar en detalle son proyectos,
tareas y subtareas Sin embargo, creo que es
importante entender
esta jerarquía completa porque a esta jerarquía completa porque medida que creces en tu uso de Sana, es más fácil cuando entiendes
cómo se conecta todo.
4. Comprensión de la interfaz: Aunque la
interfaz de Asana es fácil de usar, es bueno tener una
visión general para que podamos hablar el mismo idioma al hablar de las
diferentes características de Aa La primera zona que tenemos en la interfaz está aquí a
la izquierda, la barra lateral. Desde aquí, podemos
acceder a nuestra página de inicio,
nuestras tareas, nuestra nueva bandeja de entrada, reemplazando o minimizando el correo electrónico, ojalá, y proyectos en nuestra
organización o espacio de trabajo. En la parte superior, tenemos nuestro encabezado, que contiene las
acciones y vistas para la
tarea del proyecto en particular o la vista actual. Por encima de eso está la barra superior donde podemos buscar
una serie de cosas. Tareas, proyectos, personas. Usa el botón omni, hablaremos de eso más adelante, o incluso venimos a
cambiar nuestra configuración Si hacemos clic en una tarea, abrimos la bandeja derecha. Tenemos la sartén principal
y la sartén derecha una al
lado de la otra. El centro de la pantalla es el panel principal que
muestra las tareas, conversaciones,
progreso del calendario o archivos. En este pan derecho,
vemos subtareas, otros detalles de la tarea,
comentarios, et ce. Tenemos estas cinco áreas clave de la interfaz de las que
hablaremos en este curso, la barra lateral, el encabezado, la barra superior, el
panel principal y el pan derecho. No te preocupes si no
recuerdas los nombres en este momento. Una vez que nos metamos en la realización de
proyectos y tareas, vendrá de forma natural.
5. Decidir entre un espacio de trabajo u organización compartida: Lo primero que debes
hacer al
configurar Asana de tu equipo es decidir si vas a usar un espacio de trabajo compartido
o una organización Cuando te
registras por primera vez en Asana, creas una cuenta Pero una cuenta es un espacio de trabajo personal
gratuito para ti por defecto, por lo que solo estarás viendo proyectos y tareas
que agregues a partir de ahí. Para poder
interactuar entre sí,
compartir estos proyectos y tareas, compartir estos proyectos y tareas, lo
haces compartiendo ya sea tu espacio de trabajo o
creando una organización. Entonces, ¿por qué importa cómo
configuramos nuestra cuenta? Bueno, diferentes características están disponibles
dependiendo de lo que elijas, y también hay
precios a considerar. Si solo vas a
compartir algunos proyectos, entonces puedes configurarlos en tu espacio de trabajo personal
y usar una cuenta gratuita. También puedes mantener un
espacio de trabajo solo para ti para proyectos que quizás no
compartas con nadie. Podría ser algo
así como recados en el hogar, o simplemente podría ser una forma de
administrar algunos
proyectos independientes en los que estás trabajando Si quieres aprovechar al
máximo
las características básicas de las características básicas de Sana y realmente
colaborar con otros, entonces necesitas estar en un
espacio de trabajo u organización. Si eres un equipo pequeño, entonces querrás
configurar un espacio de trabajo e invitar a tu equipo a convertirse en
miembros de ese espacio. Esto significa que
podrán ver todos
los diversos proyectos,
tareas y conversaciones. Es útil a la hora de administrar
una cuenta ya que
simplemente agregas a alguien
al espacio de trabajo y
éste tiene visibilidad, para
que no tengas que
agregarlo proyecto por proyecto. Un ejemplo de por qué podrías
querer usar un espacio de trabajo. Porque si estás trabajando en varios proyectos de marketing
para tu empresa, un nuevo lanzamiento de sitio web, administración de redes
sociales
o un rediseño de marca, y quieres que todo el equipo esté en un solo lugar con visibilidad
sobre el panorama general Si vas a invitar a invitados para trabajos específicos en proyectos, pero no quieres que vean cierta información o proyectos, siempre
puedes tenerlos como miembro de acceso limitado para
mantener el control del espacio de trabajo. Si eres una empresa de tamaño mediano a
grande, definitivamente
querrás
estar en una organización. Uno de los principales beneficios es que puedes configurar equipos dentro de SATA. En lugar de dar permisos
individuales a proyectos o espacios de trabajo, le das acceso a todo el equipo y los equipos pueden tener
sus propios proyectos, sus propias conversaciones,
sus propios objetivos de departamento, claramente conectados con
el trabajo que están haciendo ¿Cómo funciona en
términos de precios? Bueno, los espacios de trabajo de hasta diez
miembros por equipo son gratuitos, y después,
tendrás que pagar para actualizar. Las primeras actualizaciones pueden ser un poco dolorosas si eres un
equipo pequeño porque pasas de que
todos tengan
cuentas gratuitas a pagar una cuota mensual por usuario por lo que
puede parecer un gran salto. La buena noticia es que el límite de
equipo es
lo suficientemente grande para la mayoría de
las pequeñas empresas y autónomos Si eres particularmente sensible al
precio, tienes algo de tiempo para ver el
valor que aporta de antemano. En mi opinión, tener a
todos trabajando más sincronizados hacia la
meta realmente vale la pena. Si tienes dudas en esta
etapa de lo que quieres hacer, espacio de trabajo u organización, te
recomiendo
configurar un espacio de trabajo. Posteriormente, siempre puedes
actualizar a una organización, y te puedo mostrar
cómo hacerlo más adelante.
6. Cómo configurar un espacio de trabajo y una organización: En esta lección,
veremos cómo configurar un nuevo espacio de trabajo u
organización y Asana Primero, hacemos clic en
nuestro icono de perfil, este pequeño ícono de círculo aquí en el extremo derecho
de la barra superior. A partir de aquí,
vamos a seguir adelante y hacer clic para crear un nuevo espacio de trabajo. Todo lo que tenemos que hacer
es darle un nombre y opcionalmente, podemos agregar algunos miembros. Entonces solo llamaré a este
espacio de trabajo de prueba para que
podamos diferenciar. Entonces como dije, puedes
agregar miembros ahora o después. Entonces elegiremos hacerlo
más tarde solo por simplicidad. Por lo que ahora va a crear un
nuevo espacio de trabajo vacío. Y claro, vamos
a saltarnos cualquier oferta o cosa que esté
tratando de vendernos porque estamos en la
versión gratuita de Asana Y ahora estamos aquí en
nuestro nuevo espacio de trabajo, y si queremos volver
al otro espacio de trabajo. Nuevamente, simplemente haremos clic nuestro icono de perfil en la
parte superior derecha de la barra superior, y luego podremos alternar entre los otros espacios de
trabajo que tenemos. Ahora mismo estamos en el espacio de trabajo
de pruebas. Quiero volver al ejemplo de enseñanza
en línea, donde estábamos antes. Entonces aquí un ejemplo de
enseñanza en línea. Ahora por alguna razón, se
abre en una nueva pestaña para nosotros, y estamos de vuelta
exactamente a donde estábamos. Si quieres volver
exactamente a la misma pantalla en la que estamos, tenemos esta abierta. Esto probablemente le resulte familiar. Estamos aquí de vuelta en nuestro espacio de trabajo
original. Bueno, ¿qué pasa con las organizaciones? Entonces, como ya tenemos un
espacio de trabajo configurado, podemos simplemente convertirlo
en una organización. Así que de nuevo, vamos a ir y hacer clic en nuestro icono de perfil, y vamos a dirigirnos
esta vez a la consola de administración. Permítanme regresar a este espacio de trabajo vacío para
mostrar cómo funciona esto. Voy a volver otra vez
alternando para probar el espacio de trabajo. Entonces ahora mismo, voy a
entrar en la
consola de administración esta vez. A partir de aquí, entramos en ajustes, y luego tenemos
esta opción aquí. Convertirse en una organización. Necesitas hacer clic y agregar tu correo electrónico de trabajo a tu cuenta, y solo entonces ¿puedes convertir
realmente? Porque recuerda, una
organización tiene que estar conectada a un dominio de correo electrónico
personalizado. Una vez que esté verificado,
ya está listo para ir. Si aún no tienes una cuenta de
Asana,
puedes crear
una cuenta de Asana directamente con la dirección de correo
electrónico de tu empresa Una Asana
creará automáticamente una organización para ti si eres
la primera persona de tu empresa en registrarte Si por alguna razón,
crea un espacio de trabajo
para ti, probablemente signifique
que
alguien más de tu compañía haya usado
Asana en el pasado,
así que solo comunícate con el soporte de Asana para pedirles
que conviertan tu espacio de trabajo
en una organización
7. Agregación de un colega al espacio de trabajo: En esta lección, quiero
mostrarte cómo agregar nuevos compañeros
al espacio de trabajo. He seguido adelante y me agregué una pequeña foto de perfil
aquí en la configuración, pero todavía estamos aquí en
nuestro espacio de trabajo de prueba. Viste que podíamos
agregar nuevos compañeros directamente en el mismo momento que creamos nuestro espacio de trabajo. Pero también puede
ser que tengas un colega unido más adelante
en el proyecto. Muchas veces,
los invitarás después de que todo esté configurado. Sigamos adelante y hagámoslo ahora. Voy a pasar el cursor sobre
mi espacio de trabajo de pruebas de equipo, y voy a seguir adelante
e invitar a compañeros Todo lo que tienes que hacer es agregar
su dirección de correo electrónico. Tienes que hacer clic
en Enter en tu teclado o en realidad hacer clic en este
texto resaltado azul que aparece, y aquí ves ahora se acepta
oficialmente este correo electrónico. Puede agregar múltiples correos electrónicos
y agregar varios miembros. Si tuviéramos la configuración del proyecto, entonces
podrías especificar los proyectos a los que
quieres agregarlos. Pero ahora mismo tenemos
una SSA bastante vacía. No tenemos ninguna tarea.
No tenemos ningún proyecto. Vamos a invitar a Andrew
al propio espacio de trabajo. Voy a seguir adelante
y pegó enviado Bien. Entonces, ¿cómo
procede Andrew desde aquí? ¿Cómo va a
quedar para él? Bueno, si voy
a su correo electrónico, va a conseguir algo que se vea un poco así, que lo está invitando
a unirse a nuestro espacio de trabajo. Tiene que seguir adelante y
aceptar la invitación. Entonces, de hecho,
tendrá que crear una cuenta de Asana si
aún no tiene una para que luego
pueda unirse al espacio de trabajo Digamos que este Andrew aquí, va a continuar con
su cuenta de Google para seguir
adelante y hacer una cuenta de Asana Sí, quiere crear una cuenta de Asana, está de
acuerdo con todo Saltándose todo esto. Va a entrar en
nuestro espacio de trabajo de pruebas. Este es el que
acabamos de crear. No quiere hacer su
propio espacio de trabajo personal. Quiero decir, él puede. Él puede hacer su propio espacio de trabajo y luego también ser parte del nuestro. Pero creo que personalmente
es más fácil si simplemente va directo a nuestro
espacio de trabajo. Es un poco confuso porque
se llama espacio de trabajo de prueba. Pero saltemos todas las
opciones y finalmente, él está dentro. SC ahora aquí en Asana, y esta es la casa de Andrew
ahora, buenas tardes, Andrew Se puede ver que ahora hay varios miembros
de este espacio de trabajo. Aquí tenemos a Nikki
y tenemos a Andrew. Siempre que
inicies
una cuenta ***, siempre va a tener
estas pequeñas tareas iniciales y cosas así solo para darte algo con lo que jugar. Eso también es algo a tener en cuenta si estás invitando a
colegas que no están tan familiarizados como para que vayan a ver una pantalla
así, y probablemente sea agradable
si solo se deshacen de estas tareas de prueba en el
camino. No son confundir
8. Primeras impresiones: página de inicio, mis tareas y bandeja de entrada: En esta conferencia,
vamos a ver en detalle las tres primeras opciones
aquí en la barra lateral, el hogar, mis tareas
y nuestra bandeja de entrada. En primer lugar, porque voy
a ir a lo largo de este curso, ida y
vuelta entre la visión que tiene Andrew y
la vista que
tengo, voy a seguir adelante y
agregarle una foto de perfil también, y esta vez,
te voy a mostrar cómo hacerlo. Estamos aquí en la configuración, y solo queremos seguir adelante
y subir. Foto para él. Simplemente encuentro este toque
muy agradable cuando tienes un equipo más grande. De lo contrario, solo estás viendo
estas iniciales de todos, y es un
poco impersonal También a veces resulta confuso si la gente tiene las
mismas iniciales, así que siempre es agradable
con una pequeña imagen Voy a deshacerme de todas estas tareas iniciales
aquí también, solo para que no
tengamos todo este chillido. Haga clic ahí en
lo incorrecto. estas cosas simplemente nos
distraen. Básicamente, eliminemos todo
ese widget. Bien. Entonces aquí en la página principal, tenemos nuestras tareas, nuestros proyectos, y las personas con las
que colaboramos. Aquí hay algunas
opciones diferentes. Puedes ver,
por supuesto, tu próxima, tus tareas atrasadas,
y ya estás terminado Entonces solo tenemos esas
tres tareas de prueba de las que nos deshicimos antes. No tenemos ningún
proyecto en este momento. Los ves por aquí
también si tuviéramos algún proyecto. Gente, estamos ahora mismo Andrew,
yo y yo en
este espacio de trabajo. A mis tareas? Nuevamente, no tenemos
tareas entre las que filtrar, pero automáticamente se
colocarán en estas cuatro secciones
predeterminadas. Por lo que recientemente asignado vence hoy vence la próxima semana
y vencido más tarde. Te mostraré más adelante
en el curso, cómo hacer secciones tú mismo. Y si quieres estar filtrando las tareas una vez que tengas
algunas tareas aquí, es un poco como en Excel, solo
tienes que seguir adelante y dar clic. En el encabezado de columna, y luego seguirá adelante y filtrará las cosas
que ves aquí dentro. También tienes la opción agrupar tareas en función de la fecha fueron creadas y por
quién fueron creadas, y también puedes ordenarlas. Aquí hay bastantes
opciones y puedes personalizarlo según cómo
prefieras mirarlo. Y luego tenemos nuestra bandeja de entrada, y te das cuenta de que ahí
estaba ese pequeño punto
amarillo que simplemente
desapareció cuando hice clic, y ese puntito nos
está diciendo que tenemos mensajes en
nuestra bandeja de entrada de Asana Entonces tenemos mensajes porque
hemos sido invitados a este equipo. Entonces, obviamente, es
solo dejarnos saber, aquí hay algunos proyectos a los que
podría interesarte unirte, que no creo que nos
vaya a poder dar nada ahora mismo porque no
hay ningún proyecto. Pero si vuelvo
a mi vista de Asana, también
tendré un
mensaje en la bandeja Verás, de nuevo,
aquí tengo
este pequeño punto amarillo que va a desaparecer en
cuanto haga clic en él. Y eso definitivamente me
va a hacer saber que Andrew ha aceptado
mi invitación para unirme. Eso es siempre lo que
pasa. Siempre que invites a alguien a
tu espacio de trabajo, cuando finalmente acepte, recibirás esta notificación que aceptaron tu invitación. Y puedes verificar el estado
de las personas que invitaste a tu espacio de trabajo
entrando en tu consola de administración. A partir de aquí, serán
una ficha para los miembros. Aquí ves que esta persona
es miembro y miembro. Si hubiera recibido la invitación, pero aún no aceptada,
diría algo así como invitación pendiente. Eso es exactamente una invitación pendiente. Así es como puedes hacer un seguimiento de cómo realmente
se unieron a tu espacio de trabajo, tal vez te perdiste algo
y estás esperando cuando alguien realmente está iniciando
sesión y uniéndote al equipo. Ahora voy a crear rápidamente un proyecto y agregar
algunas tareas ahí dentro, así que tenemos algunas cosas con las que
jugar en esta conferencia. No te preocupes por
cómo hacer eso ahora. Entraremos en detalles
sobre eso más adelante. Todo bien. Ahora bien, si
volvemos a nuestra casa, vamos a ver algunas de estas tareas empezando
a poblarse ahí dentro Entonces estoy aquí en Mysana
y voy a mi casa. Y ahora empiezo a ver
algunas tareas próximas, y puedo ver que forman parte de este proyecto, el desarrollo de nuevos
productos. Si entro en mis mis tareas, veo la lista completa y
puedo ver que
están aquí en la sección
recientemente asignada. Si la fecha comenzara
a acercarse, automáticamente
pasaría a la sección correspondiente de D hoy con
vencimiento la próxima semana, con vencimiento posterior. Si creas una tarea desde
aquí en la pantalla de M tareas, automáticamente
va
a ser privada para ti. Por eso lo he dicho
ahora como proyecto para que también
pueda asignarle algunas cosas
a Andrew. Pasemos a Andrew's
Asana y veamos qué está viendo ahora en
su casa y sus mis tareas Así que vamos a entrar en el hogar. Aquí, tiene cuatro
tareas que se le deben. También los tiene en asignados
recientemente, y ya ves que tiene este
pequeño punto azul junto a él. Eso es único. Eso
no lo viste en mi perfil porque soy yo
quien creó la tarea. Mientras que porque
esto es por Andrew, es solo una
pequeña notificación extra para él de que alguien
ha hecho algo para él. A lo mejor si iba a su
Asana esta mañana, ya
le hizo un rápido
vistazo a lo que había ahí dentro, y luego regresa por
la tarde y va, Oh, hay un pequeño punto
azul en este Este es realmente asignado
recientemente. Y nuevamente, tiene
algunas notificaciones aquí en su bandeja de entrada
porque tiene otro punto amarillo, así que vamos a leer. Y vemos aquí que le enviaba una pequeña notificación cada vez que creaba una tarea para él. Sigamos adelante y
limpiemos esto un poco. Sigamos adelante y leamos
estas notificaciones. Verás cuando pongo el cursor
sobre una notificación, tengo estas tres
cajitas extra apareciendo En primer lugar, puedo
seguir adelante y archivar
la notificación. Eso básicamente es
marcarlo como rojo. Ves también aquí,
tengo dos opciones. Tengo la actividad
y el archivo. Ahora mismo,
no hay nada en mi archivo. Todo está aquí
en la actividad. Pero digamos que
leí eso, ya veo. Nikki's me asignó una nueva tarea para lanzar y recopilar comentarios.
Tengo tiempo de sobra. Llegué hasta agosto. Voy a seguir adelante y
archivar esta notificación. Eso lo quita y lo pone aquí
en el archivo. Si alguna vez archivas
algo por error, solo
tienes que entrar aquí y
literalmente haces clic en lo contrario. Volviendo a la bandeja de entrada. Eso va a
reventarlo aquí en tu bandeja de entrada y volviste a ver la
pequeña notificación amarilla. Vamos a archivar algunos
de estos. Bien. ¿Qué más podemos hacer?
Podemos marcar una tarea. Esto puede ser útil si
quieres volver
a ello más adelante. También puedes crear una tarea de
seguimiento o
dejarla como no leída para que puedas volver y
analizarla más tarde Por ejemplo, si quería
crear una tarea de seguimiento, eso es bastante útil
porque en lugar tener
que entrar en
el proyecto y luego encontrar la tarea y luego
construirla ahí en las subtareas como
vas a encontrar cómo hacerlo después, solo
podemos ir directamente, tengo
que ordenar y probar muestras. Rápidamente quiero crear una tarea de
seguimiento sobre esto para que recuerde comenzar a indagar
en eso dos semanas
antes de la fecha límite. Pero la mayoría de vas a estar
archivando directamente todas
estas notificaciones. Sigamos adelante y hagámoslo ahora. Ahora tenemos una bonita bandeja de entrada
limpia cero. De nuevo, si necesitas regresar, no te
preocupes, solo tienes que volver
ahí al archivo. Si notas que estás recibiendo
muchas notificaciones,
tal vez de una tarea en particular y no te interesa
mucho, encuentras obstruyendo tu bandeja Entonces siempre puedes
dejar de seguir esa tarea, y te mostraré cómo
hacerlo en un futuro video
9. Cómo agregar rápidamente una tarea: En esta conferencia,
voy a mostrarles lo fácil que es crear
una tarea básica. Estoy de vuelta aquí en
mi espacio de trabajo de pruebas, y la forma más rápida de
crear una tarea es subir aquí a la barra superior y hacer clic en este botón
llamado botón omni Voy a elegir Crear, y después voy
a elegir tarea. Y ahora te van
a presentar una plétora de opciones y todo tipo de cosas
que puedes agregar a esta tarea para realmente
darle un gran contexto Pero en su forma más sencilla, solo
necesitas darle
un nombre a una tarea y asegurarte de que
haya un propietario asignado. Muy rápido, hagámoslo ahora. Voy a asignarme una tarea, demostrar cómo agregar
rápidamente una tarea. Es por defecto
asignado a mí como propietario porque cuando
creas una tarea de esta manera,
así es como va a funcionar, y te voy a mostrar en
la siguiente conferencia, si quieres
reasignar la propiedad o simplemente eliminar al
dueño, cómo hacerlo No voy a
agregarlo a ningún proyecto. No voy a añadir
ninguna descripción. Veremos eso
más adelante. Esta es realmente la forma más rápida de agregar una tarea
realmente rápida y sencilla. Solo dale un nombre y
asegúrate de que haya un
dueño, básicamente. Debería ser por defecto, pero si no, si estás creando una forma diferente,
dale un dueño. Entonces voy a golpear Crear tarea. Es solo confirmarme
que está haciendo esta tarea. Se puede ver también
aquí en mi próxima. Pero vamos a echar un vistazo en mi mis tareas ver cómo está llegando
eso. Ahora aquí en la sección recientemente
asignada, tenemos esta tarea aquí, demostrar cómo
rápido en una tarea. Si quiero ir
y echar un vistazo a todos los detalles de esta tarea, lo que hago es hacer clic
en algún lugar de la fila de la tarea, no sobre el texto
porque así es como editaría el texto y el nombre de
la tarea, pero en realidad simplemente haciendo clic fuera de eso y
dando clic de nuevo, en
algún lugar aquí de esta fila, y eso
abrirá la cacerola derecha. Por aquí, tenemos toda la
información sobre esta tarea. Por supuesto, tenemos nuestro
nombre de tarea que escribimos antes. Nos tenemos a nosotros mismos
como cesionarios, pero no tenemos fecha de vencimiento Esta tarea no forma parte de ningún proyecto.
No hay descripción. Por no
estar en ningún proyecto, esta tarea es privada para nosotros. Ninguno de nuestros compañeros
en el espacio de trabajo
lo ve porque no es público
y ni siquiera ninguno de nuestros compañeros que
están trabajando en un proyecto en particular con nosotros lo
puede ver porque no está
en ningún proyecto en este momento. Entonces vamos a echar un vistazo las próximas conferencias
sobre todas las opciones y cómo
asignar la propiedad, fechas de
vencimiento, etcétera.
Vayamos ahí ahora.
10. Propietarios de tareas para la firma: La parte más crítica de
usar Asana de manera efectiva es
garantizar que haya una apropiación
adecuada de cada tarea y una fecha límite
para que las tareas se completen Si quieres administrar adecuadamente a tu equipo, ver en qué
están trabajando, obtener un
panorama completo y preciso de lo que está pasando, entonces necesitas asignar
la propiedad y dar plazos. Empecemos con la propiedad de la tarea. Simplemente puede agregar un propietario en el momento en que agregue rápidamente una
tarea desde el botón omni Eso lo vimos en la
última conferencia donde nos agregaron como
dueños por defecto de la tarea. Pero vamos a crear
otra tarea y ver cómo funcionaría eso si queremos asignársela a otra persona. Esta vez, digamos,
finalizar las notas de la conferencia, y asignemos esta
tarea en su lugar a Andrew Lo que voy a hacer es hacer clic en mi nombre aquí en mi
nombre aquí en la tarea. Yo seguiré adelante y buscaré a Andrew. Y lo que tienes que hacer
es dar click sobre su nombre para confirmar que son los
nuevos dueños de la tarea. Este es un
error común que veo que cometen las personas ya que simplemente escriben el nombre y luego hacen
clic en otro lugar, por ejemplo, si hago clic
aquí en descripción, y eso no es cambiar el dueño. Sigo siendo el dueño.
En realidad tienes que hacer clic en Andrew y ahora ves su pequeña
foto adjunta y confirma que él
sería el dueño de esta tarea. La tarea finalizó las notas de
conferencia, eso está asignado a Andrew, y sigamos adelante
y creemos esa tarea. Si voy al perfil de
Andrew, entonces vayamos a sus mis tareas, y él ve
entrar esa nueva tarea , finalizar las notas de la
conferencia Bien. Volvamos a mi Asana Entremos en el proyecto de
ejemplo. Yo había establecido algunas conferencias atrás. Te voy a mostrar otra forma que puedes cambiar
el dueño de una tarea. Hemos analizado cómo crear una tarea completamente nueva
y asignar propietarios. Pero, ¿qué pasa con
las tareas existentes? ¿Cómo cambiarías al dueño? Estoy aquí en uno de mis proyectos. Te voy a mostrar cómo asignar fechas de
vencimiento en la próxima conferencia, pero di que quiero
cambiar de dueño aquí. En cambio, quiero asignar esta
tarea de necesidades del cliente a Andrew. El proceso es exactamente el mismo. Simplemente hago clic en el nombre. Voy a registrar a Andrew. Lo ves siempre
apareciendo como uno de mis frecuentes colaboradores Voy a asegurarme de
hacer clic en su nombre, y ahora esa tarea
se le asigna. La tercera forma es en realidad
entrar en el detalle de la tarea. Hagámoslo por competencia
de investigación. Si hago clic aquí en el detalle de la tarea, realidad
puedo seguir
adelante y otra vez hacer clic aquí y ahora
asignarlo a Andrew. Otra cosa que podrías
notar desde esta vista, que es muy útil, es este botón asignado a
varias personas. Esto es muy útil si tienes dos personas que necesitan
hacer la misma tarea. Por ejemplo, digamos que tienes
dos nuevos empleados en tu empresa y ambos
tienen que completar el proceso de
incorporación, que consiste en
ver una capacitación Ahora, cuando configuramos nuestras tareas y potencialmente
nuestras subtareas, queremos asignar a esos dos
nuevos empleados, la tarea para completar
el proceso de incorporación Es posible simplemente duplicar una tarea y la
cubriremos más adelante. Pero la duplicación
por sí sola no es ideal porque hay que entrar
y volver a cambiar de dueño. Para evitar esa molestia, es mucho más fácil simplemente configurar una tarea y luego
asignarla a varias personas. Simplifica el
proceso para ti. Entonces veamos eso ahora, cómo funcionaría eso
con esta tarea. Digamos que tal vez Andrew
y yo tenemos que
investigar la competencia. Entonces lo que voy a hacer es
seguir adelante y hacer clic en mi nombre. Ahora, voy a golpear esto asignado
a varias personas. Quiero seguir adelante y asignarle
eso a Andrew y a mí. Ahora voy a dar con una señal. Ya ves que esa nueva
tarea entró aquí ahora Creé esta tarea
a partir de este proyecto, por lo que se agrega automáticamente la otra tarea a este proyecto. Ves que tienes competencia de
investigación para Nikki y nosotros tenemos
competencia de investigación para Andrew Ambos tenemos esta
tarea asignada a nosotros.
11. Fijación de fechas de vencimiento: Ahora pasemos a las fechas de vencimiento. Establecer una fecha de vencimiento podría
ser solo una fecha específica
en el calendario. Vamos a crear una nueva tarea creando de nuevo desde el botón
Omni. Esta tarea puede ser lo que estábamos diciendo antes, completar el proceso de
incorporación Vamos a asignarle esto a Andrew. ¿Y para cuándo debería
completar esta tarea? Ese es este pequeño icono del
calendario de aquí abajo. Sigamos adelante y
digamos que necesita
completar eso para
fin de semana. Ahora voy a seguir adelante
y golpear Crear tarea, y vamos a ver cómo le está
mostrando eso. Nuevamente, tiene su nueva tarea, completar el
proceso de incorporación, y
ve que eso vence el viernes Si alguna vez quieres
cambiar la fecha de vencimiento, digamos que el viernes no
funciona para Andrew, solo
tienes que hacer clic en esta fecha de
vencimiento y cambiarla. Digamos que quiere hacerlo a finales de
la próxima semana
en lugar de esta semana. Y eso
actualizará automáticamente esta fecha de vencimiento. Esto podría suceder si
te demoraste en completar una tarea o
tus prioridades cambian. A lo mejor mueves una tarea
al backlog o trabajas en otra tarea más urgente en
su lugar. Sucede. Ahora bien, ¿y si tienes una
tarea que necesitas completar en un momento específico? Tal vez, por ejemplo,
estás diseñando un volante, y necesitas enviar el diseño a la impresora en
un momento específico. Tienes un plazo
duro para poder hacer estos volantes para
lo que sea que los necesites. ¿Cómo establecería un
plazo para el momento? Bueno, de nuevo, basta con hacer clic en la fecha de vencimiento de la tarea para
abrir este pequeño calendario, y verá aquí este pequeño icono de
reloj. adelante y hagamos clic en eso, y digamos que esto vence las 5:00
al final del
día hábil del viernes. No sé por qué necesitamos un plazo
tan duro para el entrenamiento de incorporación, pero usa tu imaginación. Y está guardado,
sólo voy a hacer clic fuera de eso. Ahora se guarda el 8
de marzo a las 5:00. A medida que
se acerca esa tarea, demostrará que aquí
también en la columna, lo cual es realmente agradable
cuando intentas
organizar tu día de
¿con qué necesitas empezar? Lo que es más urgente. Si
vuelvo a hacer clic en la tarea, Bien. También lo veremos aquí. D el 8 de marzo 5:00. Por último, ¿qué sucede si tienes una tarea recurrente que ocurre
diariamente, semanalmente o mensualmente? Por ejemplo, tal vez
tengas un reporte mensual que necesites terminar antes
del último día de cada mes. Bueno, tomemos ese
ejemplo y ese, me voy a montar yo mismo. Volvamos a
Mana, esta vez, creo que voy a
crear esto en realidad a partir de mis mis tareas porque esta
va a ser privada para mí, así que voy a agregar una tarea. Voy a seguir adelante y
decir, crear informe mensual. Voy a decir
que esto vence el último día de cada mes. Pero voy a venir
aquí después de haber seleccionado el siguiente último día del
mes para que eso se repita. De esta manera, una vez que marquemos
la tarea como completa, automáticamente
se
mostrará nuevamente con la fecha de vencimiento en
el intervalo de tiempo que seleccionamos. Veamos cómo
queremos que esto se repita. Las opciones que tenemos son semanales, mensuales, anuales,
también podemos tener una personalizada. En este caso, queremos que
esto se repita mensualmente, y queremos que se repita
el último día del
mes. Eso es. Simplemente haga clic fuera de esto,
y eso ahora se está repitiendo. Una vez que marque esta tarea está hecha, va a aparecer otra vez diciendo que vence el
último día de marzo. Sigamos adelante y marquemos
esta tarea completa ya sea marcando
aquí o marcando Se ve que automáticamente, esto pobló una nueva tarea, crear informe mensual que
vence el 31 de marzo. Registró que tenía
la otra tarea completada, y automáticamente
duplicó esta tarea de mi tarea anterior para establecerla en la
fecha que decidí. Puedo dar click aquí y de
hecho me llevará a la antigua tarea terminada donde
tengo la configuración establecida.
12. Adición de una descripción de la tarea: Por último, ahora hemos hablado sobre propiedad de la
tarea y las fechas de vencimiento. ¿Qué hay de aquí? Bueno, esta es la caja de descripción de la
tarea. Es solo un
campo abierto donde puedes escribir las notas que
quieras sobre la tarea. Al hacer clic en este campo, verás que aparecen todas estas opciones de
formato. Realmente
te recomiendo que los uses cuando
estés escribiendo contexto para
tu equipo sobre una tarea. Si estás usando balas o
estás poniendo en negrilla información
importante, va a ayudar a
tu equipo a digerir lo que necesitan hacer en lugar simplemente escribir un párrafo largo A menudo también veo
personas escribiendo en el espacio como si estuvieran
formulando un correo electrónico, pero no es necesario
escribir un correo electrónico largo. Solo necesitas dar suficiente
contexto sobre la tarea, vincularte a los recursos
que alguien pueda necesitar, y tener claro
lo que debe hacer para cuándo. Entonces, vamos a darle contexto a Andrew sobre esta capacitación de
incorporación Volvamos a la tarea de formación de
onboarding, y esta
vez voy a
buscar esa tarea para poder
mostrarte cómo funciona esto Si busco el onboarding aquí, me
va a dar alguna tarea
relevante, proyectos o incluso
personas si hubiera alguien con la palabra
onboarding en su nombre Los va a mostrar aquí. Vamos a hacer clic en el proceso de
incorporación. Eso nos ha llevado al perfil de
Andrew. Todavía estamos en nuestro espacio de trabajo, pero podemos ver lo que hay en el plato de
Andrew, lo cual
es realmente útil. Se abre automáticamente
esta tarea de proceso de incorporación, esta que vencía en dos
semanas al final del día Vamos a darle a Andrew un poco de
contexto sobre qué carajo es
este proceso de incorporación o tal vez una mejor capacitación de incorporación Por lo que este entrenamiento de incorporación te
llevará alrededor de 2 horas. Hay tres videos
en el entrenamiento. Por favor, presupueste su
tiempo en consecuencia. Vamos a enviarle cómo
puede encontrar los videos aquí en una unidad. Vamos a vincular eso para usar
nuestro bonito formato. Solo enviémoslo
a Google para hoy. Bien. Y ¿qué más le podríamos
dar como fondo? Tres videos en el entrenamiento, puedes encontrar los videos aquí
y hay un quiz, quiz. Necesitas completar. Puede ser un poco complicado. Así que presta atención sobre todo
a re o video dos. Aquí, voy a
destacar eso para que realmente vea eso
y preste atención. Creo que aquí tienes
la foto. Simplemente dale a la persona
tanto contexto como puedas sobre la tarea. Una práctica recomendada es realmente agregar muchos detalles a las
tareas que estás creando. Esto realmente ayuda si tienes
una situación, por ejemplo, si tienes un miembro del equipo
que está enfermo
porque es fácil para un gerente
o sus compañeros echar un vistazo ahí para
ver si hay algo
urgente que deban reasignar o si las tareas pueden esperar hasta que la
persona regrese nuevamente De igual manera, si
tienes tal vez un equipo de diseñadores y un diseñador
está realmente sobrecargado, entonces puedes cambiar fácilmente
la tarea entre ellos, así podrías reasignar esta
tarea a quien quieras Sólo me lo estoy asignando
solo para tener un ejemplo
de lo rápido que es eso Eso realmente ayuda porque si tienen toda la información de
fondo, el contexto sobre una tarea, puedes equilibrar con bastante facilidad carga de trabajo de
un equipo a medida avanza
el día o a
medida que avanza la semana. Incluso si crees que
es probable que una
sola persona complete la tarea, es útil agregar
un poco de antecedentes en caso de situaciones como esta. Incluso otras situaciones,
por ejemplo, cuando podrías tener que repetir una tarea y no
puedes recordar cómo hiciste porque fue hace dos
años y hace tanto tiempo, es muy útil poder buscar una tarea antigua y duplicar una tarea antigua si tienes todo el contexto y los enlaces
a los recursos ahí dentro. Entonces realmente
te recomiendo que te tomes el tiempo para poner un poco de detalle de tarea en
la descripción de la tarea. Cuando trabaje en equipo, tenga en
cuenta que cualquiera que tenga acceso al
proyecto
en el que se encuentra la tarea puede venir aquí y
actualizar la descripción. A pesar de que creé esta tarea, Andrew puede venir aquí y
puede cambiar esta descripción. Él puede editarlo de la
misma manera que yo puedo. Así que solo ten en cuenta eso y también sé consciente de la
visibilidad de tu tarea porque en este momento esta tarea está disponible tanto para mí como
para Andrew para verla porque la
hemos estado asignando ida y vuelta a
diferentes personas como dueños Pero no está en ningún proyecto. Actualmente no es visible
para la organización. Si lo fuera y tuviéramos a
alguien más en el proyecto, también
podrían ver esta tarea, y también podrían
entrar y actualizarla. Así que solo tienes que
ser consciente de que gente puede editar a veces
sobre tu tarea. Siempre se puede ver si sucedieron más cosas con esta tarea, quién hizo qué en la tarea. Entonces sí tienes una historia si
algo se estropea. Bien. Es diferente
con los comentarios a continuación porque solo tú puedes
editar tus propios comentarios, mientras que la descripción,
cualquiera puede editar. Si escribiría un comentario
ahora de comentario de ejemplo, y voy a darle un comentario aquí, y vuelvo a AndrewSaa entrar en su bandeja de Ve mi comentario, pero
no puede editar mi comentario. Sólo le puede gustar y
hacer algunas otras cosas. Fue en realidad puedo entrar en mi comentario y editar mi comentario y cambiar
lo que estaba diciendo.
13. Adición de archivos adjuntos y revisión del historial de tareas: Es hora de ir paso a paso
por todas las diferentes opciones
dentro de una asignación de una tarea. Esto te ayudará a obtener una mejor visión general de
lo que puedes hacer con la tarea más allá de
simplemente asignar un propietario, dar una fecha límite y
una descripción de la tarea Entonces puedes pensar en
cómo configurar mejor proyectos, tareas y subtareas
para tu equipo. Comprender las opciones que
Asana te ofrece te
ahorrará tiempo y hará que tu
espacio de trabajo sea más organizado Estoy aquí de nuevo en
mi espacio de trabajo de pruebas, y voy a ir a
mis tareas y abrir esa tarea completa de
capacitación de incorporación que veo toda la información
por aquí en la sartén correcta En primer lugar, por aquí
en la sartén derecha, tenemos el botón marcar
completo. Es bastante autoexplicativo. Ya me has visto usarlo
en este curso. Hacemos clic en esto cuando se complete la
tarea, y podemos
marcarla aquí en la bandeja derecha o por aquí junto al nombre de la
tarea en la bandeja principal. Si accidentalmente marca
una tarea como completada, no entre en pánico porque no solo
puede desmarcar esta, sino que siempre puede buscar tareas
pasadas en la barra superior En el momento en que lo hagas, si estás completando tu
tarea desde la sartén principal, incluso
tendrás esta
pequeña notificación de deshacer que podrás
marcar rápidamente. Sigamos adelante y echemos un
vistazo a ambas opciones ahora. Digamos que marco esta
tarea como completa. Dice, has marcado que esto está completo y antes de
que eso desaparezca, voy a golpear deshacer, eso me lo ha hecho
reventar aquí Sigamos adelante y golpeemos Marcar
completo desde el panel derecho. Bien. Se nota que no tiene la poca notificación
indebida, pero no para preocuparse si ya me había
cerrado esta tarea, que digamos que ¿Dónde puedo encontrar esta tarea? Bueno, obviamente puedo
desfiltrar para solo ver todo lo que ha estado
actualmente aquí en mi lista Aquí también se ven muchas otras
tareas, y yo podría
desmarcarla a partir de ahí, y luego volverá a aparecer Pero digamos que
volví a poner ese filtro estándar y no lo veo. Puedo buscar
aquí arriba en la barra superior y la búsqueda completa de formación de
onboarding Veo esta tarea,
aquí está completa. Sigue adelante y haz clic en
eso y nos ha devuelto la
tarea, todo lo que tenemos que hacer es hacer clic aquí completado para que eso se
desmarque esté completo Aquí abajo, veremos la historia de lo que
hemos estado haciendo. Entonces podemos ver que justo ahora
marqué esta tarea como
completa y más adelante, en realidad la
marqué como incompleta. Entonces esto es bastante útil si ves que tal vez
alguien ha marcado algo tan completo
ya sea por accidente o no ha entendido completamente la descripción de
la tarea, y tal vez estás entrando y estás
aprobando su trabajo,
y
en realidad tienes que
comprobarlo como no completo y
pedirles que hagan un poco más de lo que sea que sea que consista la
tarea Ahora continuando viendo las otras opciones disponibles
para nosotros aquí en el panel derecho. En primer lugar,
simplemente nos puede gustar una tarea. Esta función es agradable
pero se usa muy raramente. Como gerente,
daría un like si se completara una tarea que estaba
siguiendo, y la vería muchas veces desde mi bandeja de entrada AAA y a partir de ahí me
podría gustar. Pero la mayoría de las veces utilizaría la función de
apreciación, que mostraremos
en un video posterior. También te puede gustar una tarea, casi como un pulgar hacia arriba
a un mensaje como tarea recibida o simplemente si estás emocionado la tarea en particular finalmente
se está priorizando
porque tal vez
veas que la fecha de vencimiento ahora se está moviendo hacia arriba y estás realmente
entusiasmado con eso Te puede gustar esta tarea y varias personas les
puede gustar la tarea. También lo ves aquí
desde el pin principal. Esta notificación como también
aparecerá en la bandeja de entrada de Asana de cualquiera de
los colaboradores de tareas Mucho más útil es que podemos agregar archivos adjuntos a una tarea. Puedes agregar un archivo desde
tu computadora desde Dropbox,
desde Google Drive y otras plataformas de
almacenamiento de archivos similares, muchas de las cuales tienen
integraciones con SNA Si quisiera seguir adelante y subir este documento de Word ahora, lo
verías subiendo Y ahora que está subido, si hago clic aquí, puedo seguir adelante y
eliminarlo si eso fue, por ejemplo, un accidente. Entonces de otra manera puedo
adjuntar documentos. Si no quería simplemente
venir aquí es que puedo arrastrar y soltar. Entonces déjame abrir mi buscador aquí, y luego voy a
seguir adelante y arrastrarlo, y ya ves como ahora
tengo este tipo de resaltado de la tarea. También, si
quisiera, podría ponerlo aquí
en la descripción, pero va al mismo
lugar en esta tarea. Así que sigamos adelante y dejemos caer eso. Y nuevamente, lo vemos subiendo. Una vez que agregues un archivo adjunto, volverá a aparecer en el feed de
actividad aquí abajo y puedo ver quién subió ese documento y
cuándo lo hicieron. Bien. Recuerda, este feed de
actividades es muy útil porque si no
estás seguro de quién creó una tarea o qué está
pasando con la tarea, puedes venir aquí y
decir: Oye, Andrew, creaste esta tarea, qué está pasando con ella,
aunque en este caso, soy yo, quien creó esta tarea. Eso definitivamente me pasa mucho cuando alguien
ha creado una tarea, pero
tal vez no han puesto una fecha de vencimiento o no han
escrito claramente la descripción, y muchas veces estoy
mirando alrededor y solo
veo este tipo de tarea
poco clara y luego
puedo ir a la persona que la
creó y preguntarle de qué se trata
esa tarea o comentar de
qué se trata esa tarea. Ahora, en cuanto a archivos adjuntos, no
hay
límites de adjuntos a Sauna, por lo que puedes subir tantos archivos como necesites
y no caducarán. Solo hay un límite de 100
megabytes por archivo, cualquier archivo que se cargue
directamente Obviamente, para sortear eso, solo
tienes que usar uno de los sistemas de almacenamiento de
archivos como Dropbox o copiar y pegar un enlace aquí en la descripción de la tarea si
está alojado en otro lugar.
14. Desglose del trabajo con subtareas: A continuación, nos encontramos con subtareas. Ahora, muchas veces una tarea se
compone de varios pasos. Deberíamos agregar estos
pasos como subtareas. Puedes hacer clic en este botón aquí debajo de la descripción de la
tarea, Agregar subtarea, o puedes usar el atajo que nos está
recomendando ahora pestaña En realidad solo
voy a destacar algunos atajos en este curso, así que definitivamente es
útil para recordar. Así que sigamos adelante y
agreguemos una subtarea aquí, y verás que sale esta pequeña caja de formato muy similar a lo que
estamos acostumbrados de nuestras tareas donde podemos
escribir un nombre de tarea, darle una fecha de vencimiento
y asignarle una persona Sigamos adelante y solo digamos
subtarea uno para esta subtarea. Quiero agregar más subtareas
adicionales. Por supuesto, puedo presionar
otra subtarea de agregar. Puedo hacer tabulación S, o si estoy en alguna
de las subtareas Actualmente estoy aquí
con mi scroller. Solo puedo presionar Enter
en mi teclado, y eso
saldrá otra subtarea Ahora tengo la subtarea
uno y la subtarea dos. Cada vez que quieras eliminar
una subtarea, es lo mismo. En realidad tienes
que asegurarte aquí con tu desplazador y luego presionar retroceso
hasta que desaparezca Hagámoslo de nuevo
ahora y solo
volveremos a cero subtareas Tomemos un ejemplo sencillo. Salgamos de esta tarea
en particular. Digamos que estamos organizando
un taller de equipo. Para poder ser sede
exitosa de esta reunión, esa es la tarea principal
para acoger la reunión. Vamos a crear eso ahora en la tarea, organizar la reunión del equipo. Tenemos que hacer algunas tareas
administrativas, más pequeñas, subtareas Acabo de darle un nombre a esta
nueva tarea, y permítame darle un clic
para abrir la sartén correcta. Recuerda, se
te asigna
automáticamente como propietario o a mí como propietario porque lo
hemos creado desde la sección mis tareas. Demos a esto una fecha
de vencimiento de dentro de dos semanas. Recuerda que tenemos todas las
mismas opciones que antes, acabamos de crear una tarea
diferente. Pensemos en
lo que tenemos que hacer para organizar una reunión de equipo
con éxito. Primero, necesitamos
tener una idea de qué hablar
en este taller, así que tendremos que preparar una agenda
aproximada para la reunión. Al menos tenemos una
idea del momento. Sigamos adelante y golpeemos la pestaña S
y preparemos una agenda aproximada. ¿Qué más tenemos que hacer? Bueno, a continuación, tenemos que
agendar esta reunión. Cosas que tal vez necesitemos poder hacer para
programarlo sería revisar los calendarios de todos y si hay una sala de reuniones
gratuita. Entonces quiero agregar
otra tarea a esto. Si quiero agregar
otra subtarea, puedo hacer clic
en Agregar una subtarea o bien puedo presionar Enter para seguir adelante
y crear una segunda subtarea Entonces ahora quiero
agendar esta reunión. Bien. ¿Y qué más podría hacer? Lo último tal vez
sería que si hay algún pre trabajo antes este taller o de esta reunión de
equipo en sí, queremos seguir adelante
y preparar y enviar los materiales pre leídos. Entonces golpearé Enter y prepararé y enviaré materiales preleídos. Importante a tener en cuenta aquí es
que para cada subtarea, también se
puede agregar una
fecha de vencimiento y un propietario Muchas veces en nuestro trabajo, tenemos la
responsabilidad de la tarea principal. A lo mejor es mi
responsabilidad
asegurarme de que el equipo tenga
la oportunidad de conectarse. Pero no siempre es
que seamos
responsables de todos los elementos
que entran en esa tarea. Por eso
lo desglosamos también en subtareas
porque facilita dividir
las responsabilidades de quién está haciendo qué básicamente. Entonces digamos en este caso, quiero preparar
la agenda aproximada. Voy a asignarme
eso a mí mismo. A lo mejor quiero hacer
eso para mañana. Pero digamos que Andrew se va a
encargar de este tipo de trabajo
administrativo de programar la reunión y preparar
los materiales pre leídos. Por supuesto,
primero tengo que
darle la agenda para que sepa
cuánto tiempo tiene que durar,
etcétera, y qué tipo de
materiales podrían ser útiles, pero a lo mejor él va a
encargarse de eso por mí Entonces aquí, voy a hacer clic en él, y le asignaré las
subtareas a Andrew. Puedo poner esto tal vez
ya para el miércoles. Otra cosa que quizás
hayas notado es cuando estoy en la tarea o si estoy
rondando sobre la tarea, tienes esta pequeña burbuja de
discurso apareciendo Ahora, a pesar de
que es el mismo icono, es realmente diferente a
lo que hay aquí en las tareas. Aquí, ves que esto está demostrando que hay un
comentario sobre la tarea. Pero cuando estoy en una vista de tareas, Esto en realidad me está permitiendo
ir un nivel más profundo
en la jerarquía. Recuerda, cuando vimos la pirámide en uno de
nuestros videos anteriores, vimos que las subtareas eran la capa inferior y las tareas
era una capa justo encima de ella Entonces esta es una tarea. Y si quiero bajar
al
nivel inferior de la pirámide, entonces tenemos las subtareas Pero a lo mejor necesito darle a Andrew un poco más de
contexto sobre la reunión. Bueno, voy a dar click aquí en esta pequeña burbuja de discurso que
abre aquí en la sartén derecha. Otra muy similar
a nuestra vista de tareas, vista de una sub tarea. La única pista real que
tienes aquí de que eres un nivel más profundo son estas
dos líneas aquí. Ves anfitrión de la
reunión del equipo. Es la tarea. Pero en realidad estoy en mi sub
tarea de agendar la reunión, que se le asigna a Andrew
y hacer el miércoles. Es muy agradable porque
similar a una tarea, puedo agregar mucho contexto aquí, puedo agregar archivos adjuntos, me puede gustar, etcétera Es fácil imaginar un proyecto muy
complejo ramificándose como un árbol porque
tienes un proyecto con muchas tareas, tal vez
una tarea, tiene muchas subtareas, puedes ir
más profundo e incluso puedes tener quizás las subtareas más
importantes,
tener otra subtarea tener otra subtarea Se puede complicar
un poco. Creo que es muy importante solo te
mantengas al tanto de tu Asana, asegúrate de que tu equipo
entienda cómo está configurado
tu asana para
que las cosas no se
oculten en demasiadas
capas porque demasiadas capas no benefician
realmente Por suerte, siempre y cuando
hayas asignado correctamente los propietarios y los plazos para las subtareas, son
fáciles de encontrar También tienes la barra de búsqueda, para que puedas localizar cualquier tarea
o subtarea que necesites.
15. Filtrado con etiquetas: Sigamos hablando las otras opciones que podemos
agregar a nuestra propia tarea. Hasta ahora
hemos mirado la marca completa, el botón, los archivos adjuntos
y las subtareas, y la descripción de la tarea. Por cierto, otra
forma de agregar subtareas es haciendo clic
aquí arriba en este botón adicional Ya ves que se ha creado
una nueva tarea y
voy a retroceder solo
para deshacerme de eso El siguiente es copiar enlace de tarea. Y esto hace
lo que dice en la lata. Va a copiar un enlace a
esta tarea en particular de Asana. Eso hace que sea muy fácil compartir una tarea específica
con compañeros de trabajo. Y eso me parece
particularmente útil. Si estoy en medio
de platicar con alguien en Slack
y quiero
vincularlo a mi tarea para
que puedan ir y
tal vez podamos continuar la discusión en base la tarea particular de la
que estoy hablando. A continuación, puedes
alternar esta tarea. Ahora mismo, recuerda que está
aquí solo en la sartén correcta, pero a lo mejor queremos
tenerla a pantalla completa. Eso es particularmente útil cuando quieres escribir una descripción
larga, y es solo un poco
complicado verlo justo en el lado del
panel derecho aquí mismo. Ves que hay
mucho menos espacio. Cuando estoy en la vista de pantalla
completa, también
puedes alternarlo a
solo una vista de descripción y realmente hacer tu vida mucho más simple si quieres
escribir muchos detalles. Voy a cerrar eso de
nuevo. Bien. A continuación, tenemos estos tres puntitos, que nos dan una serie
de opciones adicionales. Primero, podemos agregar esta
tarea a un proyecto. También puedes hacerlo justo encima de descripción
de la tarea,
agregar a los proyectos. Los proyectos aparecen aquí a
la izquierda en la barra lateral. Ahora mismo, solo
tenemos este proyecto, desarrollo de
nuevos productos. Si hago clic para agregar al proyecto, va a seguir adelante
y avisarnos directamente porque ese es el único
que nos podría ofrecer. Si tuviéramos muchos
proyectos diferentes, podríamos empezar a escribir y
se los pueblan para nosotros. Recuerda, tienes que hacer click en él para que realmente seleccione, y ahora esta tarea forma parte de este nuevo proyecto de
desarrollo de producto. Se lo agrega a una sección
sin título. No te preocupes por eso.
Vamos a hablar de secciones en un video posterior. Ahora para que esto sea un
poco más fácil, voy a entrar en
el propio proyecto. Vamos a ver esta
tarea ya ahí dentro, porque recuerden que la
acabamos de agregar ahí. Y lo tenemos aquí en la parte superior. Volviendo a nuestras opciones
adicionales, tenemos otras
características útiles como dependencias, hito de
Marcas, aprobación de
Marcas Como se trata de funciones de pago, voy a saltarlas
en este curso de fundamentos. A continuación, tenemos etiquetas, lo que ayuda a dar contexto
adicional y permite
agrupar tareas similares. Creo que es útil decir, una vez que estás en una
versión premium de Asana, encuentro que las etiquetas no
son tan útiles porque
podemos lograr todo
con campos personalizados en su lugar No tiene sentido usar
tanto etiquetas como campos personalizados. Bien. Así que las etiquetas son realmente útiles cuando estás
en la versión gratuita. Como ese es nuestro enfoque, vamos a echarles un
vistazo ahora. Una razón por la que
podrías querer usar etiquetas es para realizar un seguimiento
del progreso del proyecto. Cuando tienes una lista completa
de tareas dentro de un proyecto, ¿cómo puedes saber rápidamente qué tareas
está trabajando alguien? Bueno, podrías agregar una tarea de en progreso a ciertas tareas. Eso
facilitaría
a un gerente de proyecto mirar un proyecto y
ver en qué estás trabajando. A veces solo ver fechas de
vencimiento o ir al perfil individual de
alguien no da la imagen completa. He hecho clic en Crear etiqueta, he escrito el nombre de
la etiqueta que quiero crear,
y voy a seguir adelante
y hacer clic en Crear También puedes agregar un
color a estas etiquetas. Te mostraré en un video posterior
cómo eso es útil. Sólo voy a hacer click
out por ahora y confirmar que esa es la etiqueta que
quiero agregar a esta tarea. Ahora, digamos que quiero ver todas las tareas en este proyecto
que están en curso. Aquí no es súper intuitivo. En realidad tienes que hacer clic en la etiqueta que acabas de crear
o en una que tal vez te hayas metido en una tarea para que te muestre todas
las demás tareas con esta etiqueta. Si hago clic en esta tarea en
curso ahora mismo, obviamente, ya ves que esta es la única tarea que está
actualmente en curso. Solo agreguemos
algunas etiquetas más a estas otras tareas en este nuevo proyecto de
desarrollo de productos, solo para que tengas un poco
más
de comprensión visual de cómo está funcionando este impuesto. Digamos que determinar las necesidades
del cliente también está en
progreso. Vamos a agregar una etiqueta. Vemos ahora
ya nos está incitando con la
etiqueta en progreso que acabamos de crear,
así que simplemente puedo hacer clic
directamente en eso Digamos que tal vez competencia de
investigación. Este está pendiente. Vamos a agregar etiqueta y esta
apenas está pendiente. Quiero crear una nueva etiqueta. Aquí si hago clic en pendiente, solo
deberíamos ver este concurso de
investigación. Bien. Perfecto. Si vuelvo a mi proyecto y para determinar las necesidades de
los clientes en curso, ahora
vemos las dos tareas
que agregué como en progreso. También puedo editar esta etiqueta. Si quisiera cambiar el nombre de la etiqueta, podría hacerlo desde aquí,
si quisiera cambiar el color que he
asociado o establecer el color. En este caso, podría
hacerlo desde aquí. No tengo que
entrar en cada tarea para cambiar el nombre de la etiqueta. Otra cosa importante
a tener en cuenta con impuestos es una tarea puede tener múltiples
etiquetas asociadas. Entonces, si hago clic de nuevo aquí, ahora mismo, solo tengo
la etiqueta de en progreso, pero tal vez
también tendría una etiqueta para todas las tareas relacionadas con la reunión. No sé si eso
podría venir bien. Solo quería
asegurarme de que no me estoy olvidando de
ninguna reunión próxima, entonces también podría
tener esta otra etiqueta. Entonces eso puede venir útil. Pienso particularmente para mí, los más útiles
son cuando intento agrupar todo tipo de impuestos, como si tengo mucho
impuesto relacionado con el diseño, pero luego también quiero
tener la prioridad. Etiqueta también. Importante
aquí es que todos en tu espacio de trabajo puedan estar
agregando etiquetas y eso nuevamente
puede tener el potencial de
ensuciarse un poco Es bueno tener un sistema de qué etiquetas tienes y
cuándo deben usarse.
16. Seguimiento y duplicación de tareas: A continuación aquí en las opciones adicionales está
la tarea de crear un seguimiento. Esto es genial si una
de tus tareas es algo así como tal vez
una llamada o para
llegar a alguien para
algo y necesitas una tarea de seguimiento solo para
recordarte algo, o tal vez solo para
asegurarte de que
comienzas con mucho
tiempo antes de tu fecha límite. Simplemente continúe y
haga clic en esta tarea de crear seguimiento y se llena automáticamente este seguimiento y luego dentro de
los apóstrofos, el nombre de
la La tarea original es el
anfitrión de la reunión del equipo, y esta tarea de seguimiento es el
seguimiento
del anfitrión de la reunión del equipo. A lo mejor quieres que eso
en tu personal lo haga solo por ti mismo. Agrega un enlace a la tarea original en la descripción de la tarea de
seguimiento, lo
que facilita
volver a la tarea completa. Voy a salir de esto.
No voy a guardar eso, y volver a las opciones
adicionales. El siguiente útil
es convertir dos. Voy a ver eso
en el siguiente video. Por ahora, tenemos tarea duplicada. Esto me parece muy
útil cuando he completado una tarea y
luego unos meses después, tengo una tarea idéntica que hacer. Tomemos nuestro ejemplo de
incorporación. Encontremos esa tarea donde
agregamos una descripción bastante grande. La primera vez
que configuramos esta tarea, fue un pequeño proceso de
aprendizaje. Tuvimos que escribir un pequeño texto. Tuvimos que enlazar a los videos. A lo mejor dentro de un mes,
vamos a tener a otra persona
nueva a bordo. En lugar de tener que volver a
escribir todo esto y subir el archivo adjunto
y proporcionar el enlace, podemos simplemente duplicar
la tarea anterior. De esta manera, tienes toda la
inteligencia de lo que hiciste la última vez y no tienes
que recordarlo de
la parte superior de tu cabeza. Simplemente acelera el flujo de trabajo. Entonces, si quisiera
duplicar esta tarea, vengo aquí, golpeo
Duplicar tarea, y es bastante similar
a este seguimiento estructura de
tareas porque
va a decir duplicado de, y luego aquí,
dice la tarea original. Y luego eliges qué
cosas quieres copiar. En nuestro caso, queremos
copiar la descripción, pero tal vez no queremos copiar
al cesionario porque
vas a asignársela a otra persona Incluso puedes copiar las
subtareas y las etiquetas y la tarea principal si
se trata de una subtarea que
estás duplicando Hace la vida realmente fácil. A continuación, en estas opciones, también
puedes imprimir una tarea. muchas personas les gusta tener una lista de verificación física
en su oficina, por lo que siempre puedes
imprimir esto fácilmente para tu
escritorio en la oficina, y puedes hacer que
esta tarea sea visible para todos en tu espacio de trabajo
u organización. De esa manera, aunque estas personas no
estén en tu proyecto, tendrán visibilidad de la tarea si están
en el espacio de trabajo. Personalmente, rara vez uso esta función porque
las personas que necesitan visibilidad casi siempre están en el proyecto o en
el equipo relevante. Y por último, por supuesto,
puedes eliminar la tarea. Puedes eliminar la
tarea ya sea desde esta opción o recordar si
vas al panel principal, puedes simplemente retroceder. Solo voy a seguir adelante
y eliminar esto, demostrar cómo agregar
rápidamente una tarea de tarea. Y esa tarea se ha ido, igual que cómo se
elimina una subtarea. Es de la misma manera.
También si vas a una subtarea,
vamos al anfitrión, a la reunión
del equipo, y luego
aquí en la agenda aproximada, por supuesto,
podría
retroceder para eliminar Pero también podría,
si recuerdas, profundizar en la jerarquía, hacer clic en esta pequeña burbuja de discurso, y voy a tener las mismas opciones. Aquí también, puedo seguir adelante y eliminar esto como una subtarea
o eliminar la tarea, que es lo que realmente
quería mostrarles
17. Convertir una tarea en una subtarea: Por último, de estas
tres opciones, tiene esta opción de convertir
a subtarea Tomemos un ejemplo para platicar
por qué esto es útil. Digamos que tenemos una encuesta de
satisfacción que enviamos después de
cada reunión de equipo importante. A lo mejor hacemos esto
primero como una tarea. Enviar encuesta de satisfacción. Entonces nos damos cuenta, en realidad, que estaría mejor ubicada como una subtarea dentro de este anfitrión
la tarea de reunión del equipo. Queremos seguir adelante
y convertir eso. Vamos a entrar en la tarea, golpear los tres puntos,
convertir a subtarea A partir de aquí, ahora
tenemos
que decirle
a qué tarea queremos conectarlo. Obviamente, lo podemos ver aquí. También podemos comenzar a escribir, organizar la reunión del equipo.
Y haciendo clic en eso. Ahora tenemos este panel derecho que nos
muestra que
en realidad somos una subtarea, ya
no una tarea porque tenemos un nivel superior anfitrión de la reunión
del equipo Si entramos en eso,
podemos ver que se le agrega aquí abajo en la
parte inferior de las subtareas Pero a medida que mueve
las cosas, puede notar que
las cosas cambian o aparecen en un orden ligeramente
diferente. Te mostraré en un
segundo la gota de dragón, lo que realmente te ayudará a ver las cosas como te gustan. Pero hagamos lo
contrario de lo que
hice convirtiendo esa tarea
en una subtarea por ahora Porque digamos que tienes una sub
tarea que dices, en realidad, ya
sabes, esto es
lo suficientemente grande como para que yo quiera jalarla un nivel más alto
en la jerarquía. Quiero que sea su propia tarea. Sigamos adelante y hagamos clic
en una de estas subtareas. Bien, tal vez agendar
la reunión. ¿Quién sabe? ¿Eso es
realmente complicado? Nosotros nuevamente, damos click en
los tres puntos. Esta vez
lo eliminamos como una subtarea. Al eliminarlo como subtarea, se
puede ver que esas
dos líneas desaparecieron Programar la reunión es ahora
una tarea por derecho propio. Ya no es una subtarea. Volviendo a
reordenar las cosas, voy a entrar en uno
de los proyectos aquí Creo que
va a ser más fácil mostrarte cómo se mueven las cosas. Si quieres arrastrar y
soltar ciertas cosas, puedes ver cuando
estoy flotando sobre, aparecen estos seis pequeños
pensamientos Entonces si sigo adelante y en realidad me
aseguro de que esos estén apareciendo y luego
voy a hacer clic y mantener presionado, y ahora puedo arrastrarlo a donde quiera
en este proyecto. Ves que esta
línea en negrilla está apareciendo. Eso es clave porque si no lo vería, por
ejemplo, aquí, no lo veo y
solo trato de soltar, no
va a ir a
ninguna parte, esta tarea. Pero en cambio, si lo
sostengo, lo arrastro hacia abajo y digo, Sí, quiero poner esta
tarea entre competencia de
investigación y desarrollar concepto y diseño de
producto, solo
puedo lanzar y
ahora se ha movido. De igual manera, dentro de las tareas,
puedes hacer esto con sub tareas. Por ejemplo, si por alguna razón
quisiera, preparar y enviar
materiales preleídos para que sucedan primero, podría seguir adelante y pasar el mouse sobre Ves esos seis puntos. Haga clic ahí, arrastre y suelte. Recuerda esperar a que aparezca
esta línea
en negrilla y luego suelta Otra cosa que puedes hacer para
mover tareas de sub tarea a tarea o de nivel de tarea a nivel subtarea es usar
esta gota de dragón. Por ejemplo, si quisiera esto preparar y enviar materiales
pre leídos
que acabamos de mover, en
vez de ser una tarea derecho
propio,
tienes, por supuesto, la opción de entrar en la tarea para
eliminarla como una sub tarea. Pero otra cosa que
puedes hacer si solo vuelvo al nivel de tarea es pasar
el cursor
sobre los seis puntos Haga clic y arrástrelo y suéltelo
aquí a la cacerola principal. Otra vez, ves esta
línea en negrilla y la voy a dejar caer aquí, y ahora es una tarea derecho
propio.
Míralo apareciendo aquí Ya no es una subtarea en el anfitrión de la reunión del equipo. Lo contrario también es cierto. Tienes que
asegurarte de tener esta cacerola correcta abierta para la tarea de la que quieres que esta nueva
tarea sea una sub tarea de. Por ejemplo, si
encuentro un fabricante, como tarea, y
quiero mover orden y probar muestras para que sean una subtarea,
busque un fabricante Tengo que asegurarme de que encontrar un fabricante está abierto aquí a la derecha
antes de hacer nada. Entonces tengo que hacer clic en arrastrar y colocarlo por aquí
en esta sección de subtareas Una vez más, vas a ver aparecer
esta línea en negrilla Sabes que está aquí porque estás por aquí
en las subtareas Es un poco más
difícil cuando
no tienes una subtarea apareciendo, pero sí sabes que está
aquí. Deja eso por ahí. Ahora tienes como subtarea ordenar y
probar muestras. No funciona de otra
manera si te estás imaginando, estoy aquí en busca de un fabricante, y solo arrastre y suelte algo sobre esto,
no pasa nada Tienes que
asegurarte de tener
la tarea que quieres abrir como principal y luego arrastrar la otra tarea que
quieres que sea una subtarea dentro de ella
18. Agregación de comentarios y colaboradores a las tareas: Algo que solo hemos tocado
brevemente
es comentar las tareas
con los colaboradores Los comentarios son realmente útiles
cuando se trabaja con el equipo para hacerles saber
el estado más reciente de una tarea u obtener sus comentarios. En este nuevo proyecto de
desarrollo de productos, digamos que una de nuestras tareas es adquirir un nuevo dominio de
sitio web. Y quiero recibir comentarios de Andrew sobre el dominio
que planeo comprar. Entonces, por supuesto, podría escribir alguna información
en la descripción, pero en realidad quiero
esencialmente no platicar con él, sino pedirle su opinión. Entonces, tal vez la diferencia
aquí entre comentar y chatear es si
necesitaba comentarios inmediatos, entonces Slack es definitivamente
la herramienta a la que quieres ir para obtener comentarios rápidos
e inmediatos Si quiero pedirle
sus comentarios, pero estoy dispuesto a esperar similar a un correo electrónico
hasta un día, entonces seguiré adelante y
le dejaré un comentario aquí en Asana Así que pensando en
comprar google.com. Cualquier pensamiento Ahora mismo, este comentario antes comentar no le
va a ir a nadie. Andrew no figura actualmente en la lista como colaborador en esta tarea, por lo que no
lo va a conseguir en su bandeja de entrada de Asana Si quiero hacer
ping directamente a Andrew específicamente, es similar a
cualquier aplicación de mensajería, vas a tener una
aplicación y luego comenzar a escribir el nombre de la persona y luego asegúrate de hacer
clic en su nombre. Esto ahora va a enviar
alerta básicamente a Andrew, un pequeño mensaje de bandeja de entrada a Andrew que le he
pedido su opinión. Sigamos adelante y comentemos esto Ahora pasemos
a Andrew Sana. Ahora estamos aquí en Andrew sana, y tenemos una notificación. Vemos que hay esta tarea, comprar dominio de sitio web
creado por Nikki hace 1 minuto, y ella me está preguntando, Andrew, que está pensando en
comprar google.com Voy a decir que me suena
bien. Y comentar. De esta manera, puedes tener
una buena conversación, obtener muchos comentarios. A veces esto se pone tanto que realmente
necesitas comenzar
a fijar ciertos comentarios en la
parte superior porque tal vez ese sea un comentario particularmente importante o quieres
asegurarte de que todos lo lean, o tal vez ya has encontrado una resolución a esta discusión, y entonces solo quieres anclar
la resolución para que la gente no
pierda el tiempo
interviniendo en algo
ya lo resolviste. Y para tus propios comentarios, puedes editar tu comentario
o eliminar tu comentario. Recuerda, estoy aquí
en el perfil de Andrew, así que no puedo eliminar ni
editar el comentario de Nikki, solo
puedo editar
o eliminar el mío propio Un poco más sobre colaboradores de
tareas, porque ahora
ves que Andrew es oficialmente un colaborador
en esta tarea porque ha sido incluido en el hilo de la conversación
aquí en esta tarea Si quieres agregar a otras
personas como colaboradores, puedes simplemente dar click aquí y similar a lo que hicimos
cuando etiquetamos a Andrew, solo
puedes escribir su nombre y luego agregarlos aquí también. Agregar a alguien como
colaborador en una tarea de Asana es similar a ver ver a
alguien en un hilo de correo electrónico Pueden leer el correo electrónico pasivamente o la tarea de
Asana pasivamente, pero no hay nada
que requiera de inmediato que requiera De esa manera, si no están directamente involucrados en
ninguna de las subtareas, aún
se les está notificando de cualquier cambio en esta tarea en su bandeja de
entrada de Asana Vamos a archivar esta notificación ahora que Andrew's respondió a eso. Bien. Entonces, por ejemplo, si tuviste un colega
que no está en el proyecto, pero es útil que
estén al tanto de
lo que sucede en
tareas o hitos clave, puedes simplemente agregarlos
como colaborador en esas dos tareas De esa manera, se les notificará de cualquier actualización de la tarea. Recuerda, si quieres que
alguien haga una acción, no solo envíes un comentario sobre esta acción que
quieres que haga. En realidad establece un *** en una tarea. Aún puedes comentar
pidiendo esta acción en particular, pero asegúrate de crear una tarea. Incluso puedes enlazar a esa tarea en el comentario o viceversa, enlazar a este comentario en la descripción de la tarea de
la tarea que crees ahora. Ahora, por otro lado, si eres colaborador de una tarea que no
te importa mucho, puedes venir al mismo lugar donde
agregas un colaborador Si vuelvo a
mi perfil de Asana, el mismo lugar, donde
agregas un colaborador, y puedes seguir adelante y pasar el
cursor sobre y ves esta pequeña x apareciendo
sobre Recuerda que el plus es
sumar más gente y la X es quitar a
las personas como colaboradores. Y eso es bastante útil porque entonces no te envían spam con notificaciones de bandeja de entrada
AAA de cosas que no son
relevantes para ti, y tal vez eso solo te está
ralentizando Entonces podría hacer esto, por ejemplo, si configuro una tarea
para un compañero de equipo, entremos en una de estas tareas que creé para Andrew Quiero que Andrew cree esto, pero en realidad no
necesito supervisarlo Estoy confiando en que es bueno. No necesito recibir actualizaciones
constantes. Iré a mi
pequeño perfil, y lo haré. Ahora ya no soy
colaborador en esta tarea, lo que ojalá me ahorre un
poco de poder mental cerebral
19. ¿Es una subtarea, tarea o proyecto?: Hasta el momento, hemos cubierto principalmente tareas y
subtareas en este curso. Antes de pasar a los proyectos, quiero hacer una pausa rápida y solo recordarte
cuándo usar qué? ¿Debería ser un proyecto, una tarea o una subtarea? La respuesta realmente
depende de lo que estés tratando de lograr y cómo quieras ver la información
y a qué jerarquía
debería ir. Debes crear
un proyecto cuando
tengas un gran esfuerzo coordinado con un grupo de
stakeholders trabajando en una
iniciativa común a lo largo del tiempo. Por ejemplo, si estás
planeando un evento, lanzando una campaña o
desarrollando un nuevo producto. Debe crear una
tarea cuando tenga una acción específica o entregable que deba
completarse Recuerde que las tareas son las acciones
individuales dentro de un proyecto y deben asignarse
a los miembros del equipo dadas las fechas de vencimiento y
realizar un seguimiento para el progreso, como escribir una entrada de blog o
organizar una sesión de capacitación. Si tu tarea no encaja dentro de uno de tus
proyectos, está bien. Una tarea también puede simplemente
estar flotando como tarea. No siempre necesita
ser parte de un proyecto. Ahora, las subtareas son para esos
pasos procesables más pequeños dentro de una tarea más grande Descomponen las tareas en piezas de
trabajo
más pequeñas, y como sabes, también se
pueden asignar a
diferentes miembros del equipo, como crear el primer borrador de un puesto de bloque o aprobar
el puesto de bloque Recapitulemos esto
con un ejemplo, un pequeño ejemplo de quiz Entonces tengo tres
temas a la izquierda, un calendario editorial para publicar una entrada de blog semanal y recopilar cotizaciones de
clientes para incluirlas en la entrada del blog. ¿Cuál debería ser una
tarea o proyecto de subtarea? Tener una idea rápida. Sí, entonces el calendario editorial
debe ser un proyecto, la publicación semanal del blog es una tarea y la
recopilación de cotizaciones de clientes es una subtarea Pasemos ahora a los proyectos.
20. Cómo crear un proyecto: Tener proyectos dentro de Asana te
permite organizar todas
las tareas para un
objetivo específico en una vista compartida, ya sea como una lista, un
tablero, un calendario, et Una de las
formas más fáciles de crear un nuevo proyecto es que lo
adivinaste el botón omni Vayamos ahí ahora y
creamos un nuevo proyecto. Esto te llevará a
una pantalla donde puedes comenzar un
proyecto desde cero, usar una plantilla o importar desde
otra herramienta como Excel. Comencemos nuestro
proyecto desde cero. Voy a pegarle a proyecto en blanco. Tendremos que ingresar un
nombre de proyecto, elegir nuestro diseño y establecer el nivel de visibilidad
que queremos para este proyecto, ya sea que
sea un proyecto público, visible para todos en el espacio de trabajo o
privado solo para nosotros. Por supuesto, estamos usando
Asana para colaborar, en este caso, queremos
que se comparta con
el equipo visible para todos en el espacio Vamos a
elegir esta opción. Vamos a darle un nombre a este proyecto. ¿Qué podría ser este proyecto
sobre una nueva campaña de marketing, algo en torno a una nueva campaña de
marketing Y vamos a
mantener la vista predeterminada como una lista porque eso es lo hemos estado viendo
hasta ahora en este curso, por lo que nos va a quedar familiar. Así que sigamos adelante y
golpeemos Crear proyecto. Ahora tenemos nuestro proyecto en blanco, y quiero pasar por
algunas de las opciones que vemos aquí en la cabecera. Primero, podemos ir a
esta pequeña
flecha hacia abajo justo aquí junto
al nombre del proyecto, y desde aquí
podemos editar parte de la información básica del proyecto. Duro podemos hacer más
también desde el panorama general, que hablaré más adelante. Podemos crear una
combinación de colores para este proyecto. Entonces tal vez queremos
ver este proyecto en azul, por ejemplo. Y eso mostrará este
color en nuestra barra lateral. Cuando empezamos a tener
muchos proyectos, la coordinación del color
definitivamente puede ser útil. Podemos copiar un enlace
al proyecto, podemos duplicar el
proyecto, y por supuesto, puedes importar y
exportar este proyecto si estás usando una sana en
combinación con otra herramienta. Por último, podemos archivar
o eliminar este proyecto. Normalmente,
querrás archivar un proyecto cuando hayas
terminado con el proyecto porque entonces puedes
referirte a él y sus tareas más adelante en el
futuro, si así lo necesitas. Simplemente está oculto a la vista. Versus Eliminar proyecto. Si borras un proyecto,
se ha ido para siempre. No puedes volver
a referirte a ese proyecto. Así que rara vez uso Eliminar
solo si
realmente hay un proyecto único que estoy seguro de que
no voy a necesitar de nuevo. De lo contrario, en casi todos los casos, estoy archivando proyectos cuando
termine con ellos. Una vez que realmente te pongas en
marcha con la sauna, posible que
encuentres que tienes muchos proyectos por aquí
en la barra lateral. Por el momento,
solo tenemos unos pocos, así que es fácil estar
al tanto de ellos. Pero si tuviéramos
muchos proyectos aquí, una buena manera de mantenernos en la cima es marcar uno o
dos como favoritos. Para marcar un proyecto como favorito, simplemente
subimos aquí junto
a esta pequeña flecha desplegable que hemos hecho clic antes
y golpeamos este ícono estrella Al hacer clic en esto,
el proyecto
se activa y desactivará como favorito. Y luego el proyecto
aparecerá como favorito en tu barra lateral. Hagamos clic en eso ahora,
y verás de inmediato tuvimos una sección protagonizada que
aparece aquí. Si vuelvo a hacer clic en
eso, va a desaparecer. Además, desde tu página de inicio, puedes tener eso personalizado para
que te muestre directamente en lugar de
tus proyectos frecuentes
o tus proyectos clicados más recientemente,
que te pueda mostrar
tus proyectos estelarizados Cuando tienes varios
proyectos marcados como favoritos, también
puedes arrastrar y
soltar entre ellos. Si voy y elijo ese nuevo desarrollo de producto también
es uno de los favoritos. Ahora tenemos a ambos aquí.
Está un poco duplicado porque
solo tenemos dos proyectos. Pero si querías que la nueva campaña de
marketing se mostrara por encima del
desarrollo de nuevos productos porque realmente es la cima
de tus favoritos. Simplemente puede hacer clic
y arrastrar y mantener presionado. Recuerda, nuevamente, lo
mismo que mover tareas y
subtareas alrededor, tienes esta pequeña línea apareciendo y puedes
simplemente moverla ahí Ahora tengo la nueva campaña de
marketing como número uno en mi
lista de proyectos de inicio.
21. Agregar miembros del equipo a los proyectos: Ahora, un proyecto no
sería muy útil para tu equipo a menos que tengas a
alguien con quien compartirlo. Entonces vamos a subir aquí
al encabezado de nuestro proyecto, y podemos ver que ahora mismo soy el único
en este proyecto. Sí, es visible
para todos los miembros
del lugar de trabajo de Asana donde vive
este proyecto, pero
los miembros reales del proyecto soy solo yo. Entonces, hagamos clic en
este botón de compartir e invitemos a Andrew a ser parte de este
proyecto también. Si quieres,
también puedes
escribirles un pequeño mensaje para explicarles por qué
los estás invitando a este proyecto. Oye, Andrew, este es el nuevo proyecto para la campaña del
Black Friday. Todavía en medio
de configurarlo. Tenemos que elegir
qué permisos tienen como miembro del proyecto. Será editor por
defecto, o si lo preferimos, podemos convertirlo en administrador del proyecto, y luego también puedes tener
permiso para hacer cosas como eliminar el proyecto o
archivo del proyecto. La persona que primero
creó el proyecto es de cualquier manera automáticamente
un administrador del proyecto. En mi caso, tener a Andrew como
editor funciona bien, podrá agregar tareas de
edición y eliminación. Lo dejaré en ese nivel y seguiré adelante y le enviaré una invitación. Si eres miembro de un proyecto, vas a
recibir notificaciones, cada vez que alguien agregue una
nueva tarea al proyecto, para
que no tengas que
ser colaborador en cada tarea individual Como miembro del
proyecto, por defecto, cualquier cosa que suceda
en el proyecto, vas a ser notificado de. Pero si no
quieres que los miembros del equipo reciban todas esas
notificaciones, puedes venir aquí para administrar las notificaciones de los
miembros y desmarcar las casillas de las notificaciones que no
quieres que reciban Digamos que no quiero que Andrew
reciba un mensaje de bandeja de entrada de ASA. Cada vez que se
agrega una nueva tarea a este proyecto. Pero por ahora, dejaré
mensajes y actualizaciones de estado encendidos. Llegaremos a esos
más adelante en el curso. Hablando de
notificaciones, aunque Asana fue diseñado para
eliminar la necesidad de correo electrónico, por defecto, envía
muchísimos correos electrónicos Si alguna vez quieres cambiar esto, sube aquí
a la barra superior, haz clic en tu pequeña foto
de perfil y entra en tu configuración. A partir de aquí, entra en
notificaciones, y luego configuración de correo electrónico
o notificaciones de correo electrónico. Puedes elegir qué tipo de
cosas quieres que Asana te
envíe por correo electrónico o tal vez
ningún correo electrónico en absoluto Yo recomendaría
al principio cuando
seas nuevo en Asana, mantén activas estas
notificaciones por correo electrónico durante tal vez una semana y una vez que tengas el
hábito de
revisar Asana todos los días, y luego no necesites
el recordatorio por correo electrónico, entonces vendría y hacía clic
aquí y eliminaría todas las notificaciones
por correo electrónico También puedes establecer el valor predeterminado para tus propias notificaciones de
proyecto. Entonces eso es lo que acabamos de
ver en términos de
que los proyectos individuales se configuran para la nueva campaña de marketing. Seguimos adelante y apagamos las notificaciones de
Andrew
cuando
se agregan tareas a ese proyecto. Pero en realidad, cada miembro del equipo
individual, puede establecer su propio valor predeterminado, que luego se guardará. Entonces, si Andrew, por ejemplo, tenía sus tareas agregadas desactivadas Entonces si lo agregué a
un proyecto más adelante, eso automáticamente estaría apagado. Así que las personas pueden tener sus
propias preferencias personales, que son las primarias, pero siempre se puede cambiar
para ciertos proyectos. Simplemente vas exactamente como
vimos en el proyecto en particular, en las personas, y puedes
hacer clic en notificaciones administradas. Entonces esto siempre es a nivel de proyecto
individual. Pero si Andrew tuviera habilitada su configuración
predeterminada, en el momento en que la creé,
habría sido desmarcada.
22. Tener una descripción del proyecto: Hemos analizado algunos
de los conceptos básicos del proyecto, como cómo establecer un proyecto como favorito y cómo agregar miembros
del equipo a los proyectos. Volvamos a mirar las opciones que podemos
ver dentro de un proyecto, comenzando con la pestaña de visión general. Aquí es donde puedes
poner una breve descripción de lo que
trata este proyecto. Similar a agregar una descripción de
tarea, puedes formatear esto
muy bien y darle al proyecto
mucho contexto. También puedes agregar enlaces
a documentos importantes, y por supuesto, también puedes agregar nuevos miembros del equipo
desde la pantalla. Verás ahora mismo a los miembros
del equipo que forman parte de este proyecto, y a medida que
creaste el proyecto, vas a ser el propietario del
proyecto por defecto. Antes teníamos
algo diferente. Vimos que éramos el
proyecto Admin. No confundas al
propietario del proyecto y al administrador del proyecto. Project Admin es para el nivel de permisos
dentro del proyecto, y varias personas pueden ser el administrador del proyecto en un proyecto. El propietario del proyecto se está
comunicando con todos en su espacio de trabajo que
realmente son responsables de este proyecto. Entonces, si no eres la
persona responsable que impulsa esto hacia adelante, entonces vas a
querer seguir adelante y agregar un rol a quien sea. Y este es un
campo de texto abierto, esta característica de rol. Así que realmente puedes agregar
el rol de la persona en la forma en que tu empresa lo
tiene configurado de manera única. Por ejemplo, tal vez
este proyecto sea lo suficientemente
grande como para que haya
un rol de diputado de proyecto, o tal vez haya alguien
del equipo de liderazgo que
se une a ciertos proyectos, y tiene un rol de mentor. Entonces hagamos de Andrew
nuestro diputado de proyecto. Ahora cualquiera en nuestro espacio de trabajo de Asana
que venga y eche
un vistazo a este
proyecto idealmente
tendrá un poco de contexto de lo que trata
este proyecto Tal vez un enlace a un documento
importante como un resumen de proyecto o información de
proveedor, y ¿quién es responsable dentro nuestra organización de
qué en este proyecto? Los roles y
responsabilidades claros son solo una base para una buena gestión de
proyectos. Si tienes una
versión premium de AsAna, tendrás aún más opciones aquí en la pantalla de descripción general,
como los objetivos de Asana Esos no son visibles para
nosotros en la versión gratuita, razón por la
cual tu pantalla podría
verse un poco diferente.
23. Usar secciones para mantener los proyectos organizados: Regresa a nuestro encabezado, y tenemos todas las diferentes vistas
para este proyecto,
una lista, la vista del tablero, tiempo es premium
y una vista de calendario. Voy a agregar algunas
tareas de ejemplo aquí en nuestra lista ahora, y luego podemos ver cómo comparan
estas diferentes vistas. Primero, sólo voy
a agregar una lista de tareas. Ahora, recuerdas que
siempre estoy repitiendo que las tareas necesitan un dueño
y una fecha de vencimiento. Para acelerar ese proceso, en lugar de ir uno por uno, puede usar la selección múltiple
y asignar propietarios y fechas de vencimiento para diferentes
tareas al mismo tiempo. Entonces, por ejemplo, digamos que aprobar las fotos
tiene que venir de mi parte. Haré click en esta tarea. Y ahora voy a mantener presionada mi tecla de
control o comando, y voy a hacer clic en la otra tarea que
quiero asignar a
la misma persona. Digamos que estoy
aprobando las fotos, estoy aprobando el resumen del proyecto y estoy aprobando el contenido
final de la campaña Estas tres tareas son ahora, solo se
puede ver un poco que están resaltadas
en este azul profundo, que es muy similar
al negro. Lo he hecho haciendo
clic en la tarea manteniendo presionada mi tecla de
comando o control. Ahora tengo este pequeño tipo
de caja de herramientas
multi select aquí abajo, y puedo seguir adelante y elegir asignar estas tres
tareas todas a Nikki Entonces voy a seguir adelante y hacer
eso ahora y ya ves cómo automáticamente se
pueblan ahí Y puedes hacer lo
mismo con fechas de vencimiento. Entonces, si quisiera que las tres tareas
fueran
la misma fecha de vencimiento, podría seguir adelante y
asignarlas todas para vencerlas el 3 de mayo. En nuestro caso, eso no tiene mucho
sentido, pero solo quería
mostrarte esa herramienta
porque realmente ayuda a
acelerar tu flujo de trabajo. Así que permítanme continuar y
terminar esta lista de tareas ahora con cesionarios y fechas de vencimiento
más precisas A. Y para que este
proyecto sea más interesante, voy a compartir el acceso
con otro compañero. Así que vamos a invitar también a
Lela a este proyecto. Recuerda los permisos, recuerda las
notificaciones, y si
quieres agregarlos a todo
el espacio de trabajo o solo
al proyecto en particular. Y ahora que Lala
aceptó nuestra invitación, sigamos adelante y
terminemos de
asignar la propiedad. La vista de lista con la que
estamos familiarizados, es un poco como una lista de
verificación grande en este momento. Pero podemos dividir
esto y darle un panorama realmente agradable
usando secciones. Las secciones son una excelente manera de
mantener tu proyecto organizado. Te permite agrupar visualmente
algunas de las tareas por cualquier categoría que elijas para que puedas tener
un mejor panorama general. Para crear una sección,
haga clic aquí
abajo en este pequeño botón de sección de
anuncios, o aquí arriba junto
al botón Agregar tarea, tiene sección de agregar. Tab es otro atajo muy útil para
familiarizarse. Así que vamos a configurar un par de
secciones aquí en nuestro proyecto. Mirando las tareas,
tal vez queremos
separar este
proyecto en fases, una fase de configuración o planificación, una fase de desarrollo y luego una fase de implementación Entonces creémoslos ahora. Sigamos adelante y hagamos
clic en Agregar sección. Y vamos a escribir la fase de
planificación de configuración. Crearé otra sección en desarrollo y otra fase de despliegue de
sección Permítanme recordar aquí
la fase de palabras. Contamos con fase de planeación de configuración, en fase de desarrollo
y fase de implementación. ¿Cómo puedo trasladar ahora las tareas existentes a
sus secciones relevantes? Hay dos maneras. Primero, como ya has
visto en este curso, podemos arrastrar y soltar
desde el panel principal. Entonces, por ejemplo, si me desplazo
aquí hasta la tarea superior,
complete el resumen del proyecto, si quiero hacer clic en eso, y
quiero arrastrarlo hacia abajo y simplemente pop eso aquí en
la fase de planificación de configuración. Esa es la primera forma.
Esa es sin duda una manera fácil de seguir adelante
y mover las tareas. Una forma alternativa de
poner una tarea en la sección correcta
o moverla entre secciones es abrirla. Entonces aquí en la sartén derecha
en la sección de proyectos, puedes ver tanto a qué proyecto está conectada
esta tarea como
a qué sección. Ahora mismo, esta tarea se encuentra
en una sección sin título. No hay ninguna sección asociada. Si hago clic en este menú desplegable, entonces puedo elegir pasar esto
a la fase de planificación de configuración. Cuando empiezas a mover
tareas así, podrías terminar de todos modos
teniendo que venir y usar la gota de dragón solo para
meterla en el orden exacto
que te gustaría. Esto va a
ser mucho más útil cuando tienes muchos proyectos y es posible que quieras mover una tarea a
otro proyecto diferente, o quizás quieras asignar
una tarea a varios proyectos, y llegaremos a eso más adelante. Permítanme seguir adelante y trasladar todas estas tareas a sus secciones
relacionadas. Todo bien. Este
proyecto se ve mucho mejor ahora que
le hemos agregado algunas secciones. Esto realmente le ha
dado un poco de estructura. Si quieres perfeccionar información específica, incluso
puedes alternar estas
secciones abiertas y cerradas. Cuando empiezas a
tener un proyecto con realmente muchas
tareas y secciones,
eso de nuevo, acelera tu vida para mirar lo
que te interesa. Ahora, las secciones no son
exclusivas del nivel de tarea. También puedes poner
secciones sobre subtareas. Sigamos adelante y elegimos
una de estas tareas ahora, tal vez
fotógrafo freelance superior. Y si queremos seguir adelante y
agregar algunas subtareas a esto, vamos a tener Creo que podríamos tener fotógrafos potenciales de
investigación obtener cotización de dos proveedores
y fotógrafo contract Tenemos tres subtareas
aquí similares a las tareas. Podemos seguir adelante y
resaltarlos usando control o comando y clicando, y podemos asignarlos
todos en este caso a
Lela y a todos tal vez
para el día anterior Pero digamos que queríamos poner una sección a dos de estas tareas. Entonces, ¿cómo podríamos hacer eso? Aquí, en realidad tenemos que usar la pestaña de acceso directo más N. Aquí no
hay ningún botón para agregar una sección. En realidad hay que
tener esta tarea abierta, estar aquí en el
panel derecho y hacer clic en la pestaña. Desde aquí, se ve que se ha creado
una sección, así que quizá podamos decir
aquí, fase de investigación. Si vuelvo a presionar tabulador, entonces puedo crear una
fase de finalización, tal vez en este caso Solo quiero arrastrar y soltar mis subtareas a
la sección correcta. Y claro, en este caso, con tres tareas
con tres subtareas, debería decir,
realmente no necesitas dos secciones Pero a medida que los proyectos se vuelven cada vez más complejos y
tienes más subtareas Esto de nuevo, hace que la vida sea
fácil de afinar en dónde se encuentra
realmente en el proyecto, dónde se encuentra en el proceso. Para eliminar una sección,
es realmente lo
mismo que eliminar una tarea o una subtarea Simplemente continúe y haga clic aquí y vuelva al espacio hasta el final.
24. Vistas del tablero de proyecto y del calendario: A continuación se encuentra la vista del tablero. Esta vista solo es útil cuando
tu proyecto tiene secciones. Porque como puedes ver aquí, nuestro tablero está organizado por
las secciones que acabamos de configurar. Esta sección titulada siempre se
completará si estás agregando
tareas antes de tener secciones Sigamos adelante y eliminemos
esta sección sin título. No nos sirve. Tenemos todas las tareas en
diferentes columnas con el encabezado de sección como encabezado
de columna. Podemos agregar fácilmente una tarea en una sección en particular haciendo
clic aquí en agregar tarea. Aún tenemos que darle un título a
la tarea, asignar un propietario y
darle una fecha de vencimiento. Pero entonces esta tarea se guardará automáticamente
en la sección correspondiente. En este caso, fase de roll out. Vamos a crear otra tarea
aquí para la fase de lanzamiento. A lo mejor el encuentro
retrospectivo completo podría ser uno de los últimos, y Lela aún puede encargarse de esto y aquello a
finales de Si volvemos a nuestra vista de lista, veremos que esta
información se está transfiriendo. Entonces aquí bajo fase de roll out, también
vemos la tarea de reunión
retrospectiva Si queremos agregar una nueva sección, podemos hacerlo aquí también. También podemos hacer clic en
siguiente para agregar tarea, lo mismo que en la vista de lista. Y también podemos ordenar las tareas entre cada sección
o entre secciones, simplemente arrastrando y soltando En este caso, no ves estos seis puntitos que
estás bastante acostumbrado a ver. Es simplemente hacer clic en cualquier lugar
de la tarea y arrastrar y soltar. También puedes filtrar, ordenar, agrupar por, igual que
puedes en la vista de lista. Otra forma agradable de visualizar tu trabajo es con
la vista de calendario. Déjame poner esto a
una vista mensual, y tal vez vayamos a mayo donde hay
bastantes tareas más. Aquí puedes ver todas las
tareas del proyecto. Incluso las tareas que acabo de agregar, van a aparecer aquí
los días en que se deba algo. Desde esta vista,
puede pasar el cursor sobre una tarea, y luego puede comercializar como completa o hacer clic en la tarea para abrir el
panel derecho habitual donde
puede editar los detalles
de la tarea Otra cosa buena de
la vista de calendario es que puedes hacer clic y arrastrar
y soltar tareas, y luego la fecha de vencimiento cambiará
automáticamente. Por ejemplo, ahora, si
vuelvo a las fotos aprobadas, la fecha de vencimiento será el 8 de mayo, no el 7 de mayo, y tienes todo el historial de actividades aquí en tu tarea
igual que de costumbre. Esta es una manera muy
agradable de venir y mover las tareas con bastante facilidad si estás
jugando con cómo van
a encajar
las diferentes tareas en el proyecto. Nuevamente, si volvemos
a la vista de lista, la
tarea de fotos aprobadas habrá tenido actualizada
la fecha de vencimiento
en esta tarea. Ya sea que prefieras
verlo en una lista, un tablero o una vista de calendario, no te
preocupes, todo está sincronizado La vista del calendario es
genial si quieres
evaluar cuánto trabajo hay en el plato de alguien en
una semana en particular. Por ejemplo, aquí el 26 de abril, tenemos bastantes
tareas para Lela A lo mejor queremos mover algunas
de esas tareas, así que no hay tanto en un día y la carga de trabajo
se distribuye de manera más uniforme. También puedes agregar tareas
directamente en esta pantalla. Si solo quería agregar una
nueva tarea aquí el 25 de abril, simplemente
hago clic en cualquier lugar aquí
en este espacio de la celda. Entonces esta caja se abre y
aquí puedo agregar ejemplo. Ejemplo nueva tarea. Golpeé Enter para
guardar eso como una tarea. Entrar. Ahora podemos pasar el cursor sobre, podemos dar click para agregar todo el detalle que
sabes me gusta la asignación, la fecha de vencimiento, tal vez
un poco de contexto, alguna descripción a esta Sigamos adelante y marquemos que esa
pequeña tarea está completa. Ahora mismo, este calendario
es un poco soso, agreguemos algo de
color a nuestras tareas Esto aún mejor nos dará una representación visual
de lo que está pasando. Podemos hacer esto con etiquetas. ¿Recuerdas cómo agregamos etiquetas? Revisemos ahora
entrando en una de nuestras tareas. Por ejemplo, aquí en resumen de proyecto
aprobado. Digamos que queremos tener
todas las tareas de aprobación con la etiqueta de aprobación, y luego le asignaremos
un color a esa etiqueta. Entonces entremos aquí hasta
las más opciones, impuestos, y aquí vamos a
seguir adelante y escribir en la aprobación, y crearemos una etiqueta para
aprobación y la marcaremos en rojo. Y ahora, creo que ya se puede ver cómo este
calendario va a cobrar vida aquí cuando
agreguemos muchas etiquetas y
diferentes colores. Entonces déjame seguir adelante
y hacer eso ahora. Todo bien. Entonces ahora todas
nuestras tareas tienen una etiqueta asociada con al
menos un color, y ya puedes ver
qué tipo de impacto tiene para nuestro
gerente de proyecto, para nuestro equipo, y para ti también, porque
puedes venir aquí y obtener un panorama general muy rápido de lo que está pasando
con el proyecto. Y por ejemplo,
este día 26 de abril cuando vimos que Leyla tenía
bastantes tareas, podemos ver que una es solo una
especie de administrador relacionada, y no es tan importante. Entonces eso ya
visualmente nos ayuda a tener una idea de esta carga de trabajo. Y ahora sabe por la
conferencia de hoy sobre la vista de lista, la vista de tablero y
la vista de calendario. Diferentes tipos de proyectos se inclinarán naturalmente
a diferentes puntos de vista. Por ejemplo, en mi
trabajo en marketing, si quiero crear un horario de
publicación, entonces tener la vista de calendario
funciona increíble para planificar contenido porque tengo una visión general de primer nivel de justo
cuándo van a salir las cosas. La vista de tablero me parece más
útil cuando se trata de un proyecto sin una gran cantidad de tareas
y una configuración muy simple. Por ejemplo, a lo mejor
mis secciones están pendientes en curso y bloqueadas. La vista de lista tiende a ser la predeterminada para la mayoría de los
otros proyectos, pero es necesario
hacer un buen uso de las secciones para
asegurarse realmente de que la vista de lista
pueda aportar algún valor.
25. Mensajes del proyecto: Veamos las últimas opciones que tenemos en este proyecto. Repasaremos el
flujo de trabajo y el tablero, que son opciones premium
e iremos a los mensajes Mensajes es donde se puede
ver un registro de los mensajes invitados que han sido enviados a los miembros de este
proyecto, así
como actualizaciones de estado, y solo un registro de toda esa
comunicación en un solo lugar. Te mostraré cómo hacer
una actualización de estado más adelante, pero enviemos un mensaje ahora. Puedo hacer clic aquí para enviar
mensaje a los miembros. También podría ir
al botón omni y crear un mensaje a partir de ahí Pero hagámoslo desde
la pantalla de mensajes. Voy a hacer clic aquí. Esto se abre muy bien en un mensaje de pantalla
completa para mí, y es similar a enviar
un correo electrónico, pero por supuesto, puedes hacer referencia a
todas las tareas,
proyectos y personas de Sana muy bien. Digamos que soy el gerente de
proyectos, y tengo una importante
reunión con los VP esta semana para discutir la
nueva campaña de marketing Solo quiero darle un poco de
idea al equipo sobre cómo fue
esa reunión y si
alguna acción salió de ella. Mi tema va a ser el
seguimiento de la reunión de VP. Bien. Y por defecto, lo va a enviar a
todos los miembros del proyecto ya que creé este mensaje
desde la pantalla del proyecto. Pero si quisiera
enviarlo a diferentes personas, podría simplemente seguir adelante y hacer clic
aquí y enviarlo a personas
individuales o miembros
de otra campaña,
perdón, otro proyecto, o incluso a todos desde
el espacio de trabajo de prueba. Entonces para mí, es simplemente
perfecto para enviarlo
a todos los miembros del proyecto de
la nueva campaña de marketing. Sólo quiero
darles un poco de perspicacia. Entonces déjame seguir adelante
y darle a eso aquí. Voy a escribir hola a
todos quiero hacerles
saber que la reunión de VP
fue muy bien. Quedaron impresionados con
los avances hasta el momento. Gracias por su arduo
trabajo. Ahora intentemos etiquetar algunos de nuestros proyectos o
tareas de Asana para
mostrarte realmente el valor de eso Acordaron que podemos tomar
una semana extra dos para hacer lo que golpeó la aplicación y luego
podemos seguir adelante y referencias proyecto de tarea, mensaje de
compañero de equipo, et. Veamos qué
tenemos algo de
aprobación podemos tomarnos
una semana extra para tal vez aprobar las fotos ya que actualmente
estamos bloqueados
por En lo que fueron bloqueados por tal vez
por el casting de los modelos de
sesión de fotos Podemos tomarnos una semana más para
aprobar las fotos ya que
actualmente estamos bloqueados por el
casting de modelos de fotozapatos Digamos que Lela
actualizará las fechas de vencimiento de las tareas en
consecuencia más adelante Habla más tarde en el acurrucado diario. Esa es Nikki. Todo bien. Entonces puedo, por supuesto, agregar un poco de formato
a esto si quiero, pero creo que ya te
dan la foto que cuando envíe este mensaje, gente lo recibirá
en su bandeja de entrada de Sana y pueden dar click directamente en las cosas a las que he
hecho referencia para ir y echar un vistazo a esas
tareas con más detalle. Entonces sigamos adelante
y mandemos eso ahora. Enviar. Y ahora, claro, hay un registro de este mensaje en el nuevo proyecto de campaña de
marketing, si alguien va aquí a
la pestaña de mensajes. Pasemos a Andrew
Sana para ver qué
tiene ahora en su bandeja de entrada.
Deshazte de esto. Por lo que ahora ha sido notificado, seguimiento de la reunión de VP, y ha visto todos los detalles que
le he enviado, y por supuesto, puede
hacer clic directamente en esta tarea para abrir el proyecto y ver un poco más de
información al respecto. Entonces solo me parece una manera
realmente útil, en lugar de enviar un
correo electrónico con un enlace a Asana, todo se mantiene dentro Asana y hace la
vida realmente fácil Bien. Entonces volvamos a Masana digamos que he olvidado qué
mensajes he enviado Sabes, ¿cómo puedo
encontrar esa información? Bueno, puedo ir a la bandeja de entrada de Masana, y
aquí está esta otra pestaña, mensajes que he enviado Entonces, ya sea que hayas
enviado un mensaje en un proyecto a un
grupo particular de miembros del equipo del proyecto, ya sea que lo hayas enviado a
una persona individual, siempre
puedes acceder a
los mensajes que has enviado desde aquí desde la
bandeja de entrada y luego esa pestaña. Entonces esto también es muy útil porque cuando
empecé con ISAA, recuerdo cuando empecé a
enviar mensajes, estaba realmente perdido en
cuanto a, ya sabes, ¿cómo puedo encontrar
los mensajes que he Estoy seguro de que le he enviado un mensaje
a alguien, y simplemente no podía recordar. Pero recuerda, si necesitas que se haga
una tarea,
necesitas alguna acción. Quieres asegurarte de que lo
dijiste como una tarea de Asana, y no solo estás enviando un mensaje de Asana y luego usando el correo electrónico Recuerda, los mensajes no son como de texto a alguien en
una plataforma de chat Si los necesitas
con urgencia, nuevamente, no
debes enviar
un mensaje de Asana,
comunícate con ellos en
la otra plataforma El mensaje de Asana es realmente más útil cuando está conectado
a un tipo de trabajo, una lluvia de ideas de sincronización A o una pregunta general o
comentarios que pueden esperar Por supuesto, puedes
poner esa retroalimentación o esa pregunta directamente
en una tarea relevante. Pero a veces es más una pregunta general sobre un proyecto o un
proceso en general, y así tiene más sentido enviar un mensaje
al equipo completo
del proyecto por separado y no tener eso como
comentario sobre una tarea de Asana
26. Archivos y limpieza del encabezado: Así que volvamos a nuestro proyecto, volvamos a la nueva campaña de
marketing, y tenemos esta
última pestaña para archivos. Una vez que hayas agregado
archivos al proyecto, los
verás todos
poblando aquí Si planeas usar equipos o enlaces de una unidad
en tu Asana, no
vas a ver todos
esos enlaces de documentos aquí Esto es solo cuando subes
un archivo real a Asana. Con eso, has pasado por todo, desde la
visión general hasta los archivos. Ahora quiero darte
uno de mis mejores consejos. Esto es cuando estás
configurando un proyecto, ven y quita cosas
del encabezado que no te están
aportando valor porque eso solo agregará más confusión a los miembros
del equipo de tu proyecto, y ven todas estas
opciones y se sienten un poco abrumados cuando tal vez
eso no sea súper útil Por ejemplo, Como no tenemos
ningún archivo en este proyecto. Y digamos como práctica, este grupo va a estar usando una unidad para almacenar
todos los documentos. Aquí sólo vamos a estar enlazando
a esos documentos. Nunca vamos a agregar
archivos a una sauna. Así es como
decidimos usarlo. Entonces realmente no
necesitamos esta pestaña, así que puedo golpear estos tres puntos aquí
mismo y puedo
seguir adelante y eliminarlo. Lo voy a quitar aquí. Y ahora ya no
tengo esa ficha. Me ha llevado a la siguiente
pestaña, que fueron los mensajes. Si eso fue un error, siempre
puedo darle al plus, y puedo seguir adelante
y volver a agregar archivos. Entonces no ha desaparecido, sigue ahí
si
lo necesitamos, pero simplemente no está
ocupando ningún espacio en la cabeza. Ese es definitivamente
uno de mis mejores consejos es eliminar cosas
que no necesitas. Como hablamos antes en uno de
los últimos videos, ya sabes, sobre las diferencias
entre list board y
calendario y cómo
ciertos proyectos inclinan hacia ciertas vistas. Lo que también puedes hacer es
eliminar realmente vistas que no
van a agregar valor. Entonces digamos que en este caso, la vista de tablero va a
ser un poco quizás demasiado simplista para este
proyecto porque aquí hay bastante en
la fase de desarrollo, así que preferimos que nuestra
gente la vea en una vista de lista o
en una vista de calendario Entonces voy a
seguir adelante y quitar la vista de tablero de aquí. Bien. Y por supuesto, vimos algunas cosas que
eran características premium. La línea de tiempo, el dashboard del
flujo de trabajo, no
hablamos. Vamos a
sacarlos de aquí. Esto no es agregar ningún valor. Vamos a quitar. Vamos a
quitar y vamos a quitar. Creo que ya entiendes
la idea, este es un proyecto mucho más simple, estamos manteniendo a nuestra gente
enfocada en las cosas en las que
necesitan enfocarse, el trabajo que hay que hacer, la comunicación, y la
alineación que tiene que estar sucediendo y no
preocuparse por lo que es esta pestaña? Dice que es una
característica premium. ¿No lo tengo? Estoy en el plan adecuado para
nuestras empresas, etcétera. Lo único que
diría es que a veces la gente sí tiene
fuertes preferencias, por lo que podría valer la pena
dejar los tres. Como por ejemplo, a lo mejor
prefiero ver las cosas como una lista, pero sé que Leyla prefiere ver las cosas en
una vista de tablero y Andrew no puede sobrevivir
sin la vista de calendario, entonces tal vez me vaya los tres Pero en general, yo
diría que la simplificación facilita mucho la vida de
todos si estás viendo la
información de la misma manera Pero eso realmente depende de ti y cómo trabajas con tu equipo.
27. Cómo hacer una actualización de estado: Las actualizaciones de estado son
realmente importantes y a menudo pasan
por alto por los equipos del proyecto Esto está dando una instantánea rápida
de la salud del proyecto. Es el proyecto en pista en
riesgo fuera de pista o terminado. Aprendamos a hacer uno ahora dirigiéndose a la visión general. Aquí está la sección donde puede crear una actualización de estado, y el propietario del proyecto debe actualizar regularmente el estado. Debe quedar claro para todos
cómo va el trabajo. Como somos el dueño del proyecto, digamos que nuestro proyecto en
este momento va por buen camino. ¡Oh! Entonces iré ahí, y voy a dar click en la pista. Y eso me envía a esta vista de pantalla
completa donde
puedo agregar un poco más de detalle
a esta actualización de estado. En la versión gratuita,
somos bastante limitados, pero solo un titular de
actualización de estado y una breve descripción
ya es suficiente para garantizar una
buena comunicación del proyecto. Por favor, por favor actualice
este título de actualización de estado. No se limite a dejarlo aquí en esta actualización de estado
19 de abril. Eso lo veo muy a menudo, y eso es realmente frustrante cuando tienes
muchas actualizaciones de estado, y quieres
hojear rápidamente cómo fueron las actualizaciones pasadas Por favor, dé un poco de descargo de responsabilidad de
nivel superior sujeto de esta actualización de estado. Es solo un tono
de ascensor de lo que quieres que la
gente se lleve. Puede ser algo así como una fase de configuración
terminada o preparándose para unas
intensas semanas de diseño y
algo así En el resumen,
por supuesto puedes formatear en detalle como lo harías con una descripción de tarea o una
descripción general del proyecto. Me gusta usar la
función de balas en el resumen
porque me parece agradable
dar un poco de sabor para qué tareas
clave se completaron
o si algo está bloqueando el proyecto o tal vez
para agregar algunas o al equipo. Digamos que en nuestro proyecto de
campaña de marketing, la primera sección, se completa la fase de
configuración. Así que sigamos adelante y anunciemos eso básicamente a la fase de configuración de nuestro
colega. Terminado. Por supuesto, el estatus va por buen camino porque
ya hice clic en
eso. Yo soy el dueño. No hay fechas
asociadas a esto, así que puedo seguir adelante y
eliminar eso si quiero,
solo para hacerlo aún más simple. No es necesario agregar
ningún archivo adjuntado, y vamos a agregar
algunos resúmenes. A lo mejor El trabajo de base finalmente
está terminado, y ahora tenemos tal vez
el escrito
aprobado, el resumen del proyecto aprobado
terminado, aunque no lo hagamos Ahora, digamos, tal vez algunas
felicitaciones a Andrew y yo
voy a aplausos emoji Sí, definitivamente. Felicidades a Andrew por
hacerlo todo a tiempo siguientes pasos son lo que fue la siguiente fase,
la fase de desarrollo. Empezando por y
no recuerdo cuál fue la primera tarea que tuvimos
en la fase de desarrollo. Entonces intentemos pensar que
teníamos que aprobar las cosas. Estábamos haciendo fotos. Sólo voy a decir algo otra vez
sobre el casting de modelos de reparto. Y sigamos empujando. Hagamos otra MOG solo
porque estoy loco así. Por lo que esta
actualización de estado se enviará como una notificación a
todos en el proyecto, y también tendrán
un historial de la misma desde la descripción general del proyecto y
desde la pestaña de mensajes. Puedes alternar este recordatorio de actualización de
estado, y luego te pondrá como propietario
del proyecto una tarea cada semana solo para recordarte que debes actualizar el estado del
proyecto. Entonces no quiero eso, así que
voy a apagarlo. Depende del
tipo de proyecto que estés haciendo si
necesitas una actualización semanal. Para la mayoría de mis proyectos, cada dos semanas o una
cadencia mensual estaba bien Desafortunadamente, no hay forma personalizar este recordatorio
a una cadencia diferente Solo tienes que
configurar tu propia tarea tarea
recurrente si
quieres hacer eso. Voy a seguir adelante y
publicar esta actualización de estado, y ahora ya ves cómo se
ve aquí a un lado. Tenemos nuestra actualización de estado. Puedo dar click aquí y
se abrirá la pantalla completa. Una vez que tengas más actualizaciones de
estado, todas se
poblarán aquí Entonces tendrás un hilo completo de todas las actualizaciones
para este proyecto, lo cual puede ser muy útil si tienes gente
en el proyecto. De nuevo, tal vez tienes un miembro del equipo
ejecutivo y solo necesitan actualizaciones
ocasionales. Pueden venir aquí
y van a leer tu tipo de
frase destacada aquí. Por eso, de nuevo,
creo que la frase destacada es tan importante
más que la actualización de estado, 19 de
abril, lo que no
agregaría mucho valor. Cuando los veas todos
aquí, tienes que dar click para ver cuál
fue la actualización. Solo dale un poco de encabezado de nivel
superior. Entonces entremos en la sana de
Andrew, y veamos qué
tiene en su bandeja de entrada. Y ahora ves que
obviamente recibió nuestro
mensaje de antes, y ahora tiene nuestra actualización de
estado. Vamos a deshacernos de este mensaje. Bien, puedo seguir adelante y
como su actualización de estado. A lo mejor quiero enviarle una de estas pequeñas calcomanías de
agradecimiento que suele recomendar. Entonces digo, Si,
ten algunas flores. Demuéstrale aprecio. Y de vuelta en Masana ahora también
tengo una bandeja de entrada que Andrew mostró su agradecimiento,
lo cual es agradable
28. Agregación de una tarea a múltiples proyectos: Otra cosa que
quiero mostrarte son las tareas
multi homing en
múltiples proyectos Entonces, ¿qué quiero decir con eso? Vamos a entrar en uno
de nuestros proyectos. Y veamos si aquí
hay una tarea que también podría estar relacionada con
el desarrollo de nuevos productos, tal vez lanzando esta campaña. Digamos que lanzan la campaña de esta campaña de
marketing, no sólo
es relevante
para este proyecto de Asana,
sino también para el proyecto de
desarrollo de nuevos productos porque tal vez una de las tareas
aquí dentro es la misma que una
de las tareas que hay ahí dentro En lugar de tener
dos tareas duplicadas, lo que realmente no
nos hace la vida muy fácil porque tenemos alguna información sobre una tarea y
otras en la otra, podemos seguir adelante y elegir
que una tarea sea realmente homed Vive en dos proyectos
diferentes. Entonces hagámoslo con
el lanzamiento de la campaña. Si abro esta tarea, recuerda que tenemos
esta sección de proyecto aquí donde tenemos
que esto está en el nuevo proyecto de
campaña de marketing y está en la fase de
despliegue de la sección Bueno, ahora también podemos
decir, ¿sabes qué? Esta tarea, también quiero
agregarla al proyecto de, en este caso, desarrollo de nuevos
productos, y luego también se le puede dar
una sección. Pero claro, ese proyecto, no
tenemos secciones. Entonces esto es realmente
útil si tienes diferentes equipos tal vez
y todos están con su propia configuración diferente
de un determinado proyecto. lo mejor tienes un equipo de diseño, tal vez tienes un equipo de
ingeniería, y a veces están
formando equipo en ciertas tareas, pero no quieren tener que
aprender la configuración del otro Entonces solo tienen la tarea
que vive con ambos, y entonces tal vez un equipo tenga su proyecto como vista de tablero. Otro equipo tiene su
proyecto como una vista de calendario, y todos pueden tener la configuración que quieran y las tareas compartidas. Lo único relevante de
esto es lo
importante es que si
alguien va a marcar esta tarea como completa, también
está completa en el otro proyecto
porque es literalmente la misma tarea. Entonces echemos un vistazo aquí. Lanzar la campaña está
en la fase de despliegue, y si me dirijo al desarrollo de nuevos
productos, también
tendremos
lanzar la campaña, nuestra nueva tarea
aquí mismo en la parte superior Por eso también es clave entender esta
información sobre cómo agregar cosas a
proyectos en una
sección en particular desde aquí, porque si
te acabo de enseñar la gota de dragón, bueno, eso no te va a ayudar
mucho cuando quieres
agregar una tarea a múltiples proyectos. Y por supuesto, si
quieres eliminar cosas de mostrar
en múltiples proyectos, también
es importante
asegurarse de que la gente no esté marcando esto como completo
porque quieren que se elimine
de su proyecto. Sólo tienen que darle a
la pequeña X aquí. Entonces, si quiero eliminar esta tarea de este proyecto en este
momento, le pegué a la pequeña X. Desaparecerá de aquí, pero la tarea sigue siendo
buena y viva,
y está de vuelta aquí en
su casa original
del Proyecto de Campaña de Marketing.
29. Prácticas recomendadas para Asana: En esta última lección
antes de tu proyecto, quiero revisar algunas de las
mejores prácticas de Asana En primer lugar es obviamente
asignar fechas de vencimiento y
propietarios a las tareas. De esa manera, ¿todos saben quién
es el responsable de qué? Por supuesto, las fechas de vencimiento permiten todos los miembros del equipo
presupuestar su tiempo. También quiero
recomendarte que agregues
colaboradores a las tareas donde
sea que pueda mejorar la alineación. Recuérdele y recuérdele
esto a tu equipo porque
aunque parezca básico, absolutamente sucederá que las tareas terminen entrando en proyectos sin una persona o una fecha de vencimiento o los
colaboradores adecuados asignados, y por lo tanto, es una
tarea privada que nadie puede encontrar. Lo siguiente es usar los
títulos de tareas de manera efectiva. Deben ser concisos, específicos y orientados a la acción. La forma más fácil de hacerlo es comenzar la
tarea con el verbo, que indica claramente
lo que hay que hacer. Para mí,
lo principal es que debería ser obvio sin
leer la descripción, más o menos de qué trata esta tarea. De lo contrario, los miembros del equipo
van a perder el tiempo teniendo que descifrar de qué se
trata esta tarea Por ejemplo, no se limite
a escribir una entrada de blog. En cambio, escribe el primer
borrador de la entrada del blog. Esto proporciona un
poco más de información. Sería aún mejor si hubiera el tema
de la entrada del blog. En lugar de gráficos, escribe sobre el
gráfico específico que planeas hacer. El icono de diseño para
el café es mucho más específico. Crear una estructura de
proyecto clara. Usa secciones para aportar
claridad al proyecto. Usa etiquetas, para que los miembros puedan
filtrar fácilmente entre tipos
de trabajo o prioridades. Usa subtareas si ciertas
tareas son grandes o requieren que varias personas contribuyan y oculte
pestañas irrelevantes de tu proyecto Hazlo lo más fácil
posible para tu equipo. Finalmente, mantenga la
comunicación
fluyendo asegurándose de que
cada proyecto tenga una breve descripción general
disponible y que mantenga informado al equipo
con actualizaciones de estado. Anime a las personas a
comentar sobre tareas y subtareas y no tenga miedo de usar la función de
mensajería.
30. Tu proyecto: Bien, es tu
turno porque gran parte de esta clase se trata de entender
los conceptos básicos de Sana, que usarás y personalizarás con tareas de tu
propia organización. Puede que no te sientas
cómodo compartiendo con todos las tareas
reales y los proyectos reales que estás
configurando y eso está perfectamente bien. Como resultado, tu proyecto para
esta clase es bastante sencillo. Primero, si no te sientes
cómodo compartiendo públicamente un proyecto, ya
lo has configurado, simplemente configura un proyecto falso con al
menos cinco tareas y
dos secciones diferentes. Todas las tareas deben tener una fecha de vencimiento asignada y un
propietario, aunque sea solo usted. Comparte en tu galería, una
captura de pantalla de este proyecto y explica el razonamiento detrás de por qué lo
configuraste de la manera que lo hiciste. Si estás dispuesto
a compartir públicamente un proyecto real que hayas
configurado, entonces de nuevo, toma una captura
de pantalla del
proyecto, explica qué es y por qué
lo has configurado de esa manera. Quién sabe, tal vez incluso
podamos darte comentarios sobre la configuración
para que sea aún mejor.
31. Conclusión y próximos pasos: Gran trabajo para llegar
al final de esta clase. Tengo la confianza de que ahora
entiendes cómo usar Asana para que tú y tu equipo sean más productivos y mantener a
todos alineados Si aprovechas al máximo las funciones que
Asana te ofrece, puedes personalizar tu espacio de trabajo completamente para ti individualmente, tu equipo y las necesidades de tu
empresa Así que toma lo que aprendimos
hoy y sal ahí y empieza a organizar la gestión
de proyectos de tus sueños. Si estás interesado en
aprender más sobre Asana, gestión de
proyectos en general, temas de
marketing o liderazgo, entonces por favor sigue
mi perfil para recibir notificaciones de la próxima
vez que tenga una nueva clase También puedes seguir mi blog o redes
sociales para obtener más
consejos y trucos. Por último, solo
quiero darte las
gracias por
acompañarme en este viaje. Has aprendido
mucho, pero realmente
aprecio que te hayas
quedado hasta el final. Así que muchas gracias, y realmente espero
verte en una futura clase.
32. Conferencia adicional: Asana en dispositivos móviles (iOS): Si tienes IOS 16 o posterior, puedes usar la
aplicación móvil de Asana en tu iPhone o iPad Tiendo a usar solo la app de
Asana cuando estoy en un viaje de negocios en una conferencia
o si estoy en un taller, y solo puedo revisar mi teléfono
rápidamente entre descansos Puedes hacer la mayoría de las
cosas que miramos en este curso, crear
tareas, proyectos, crear
actualizaciones de estado, etcétera, pero me parece que puede ser un
poco engorroso Entonces, para mí, me parece mejor cuando uso la aplicación de Asana
solo para registrarme, ver qué está pasando y
responder rápidamente a cualquier comentario
que puedan haber recibido Voy a
recorrer un
poco la aplicación ahora para que puedas
sentirte cómodo con ella. Reconocerás los proyectos lo que hemos visto
en este curso, que
te ayudará a entender cómo se compara la versión del navegador que
hemos estado
viendo con la versión de IOS. Todo bien. Entonces aquí
estoy en mi iPhone. Tengo instalada la app SAA. No voy a
guiarte a través cómo instalar e iniciar sesión. Creo que eso es
bastante sentido común, pero vamos a seguir adelante y abrir la aplicación y ver
qué estamos viendo. Entonces primero, tal vez aquí abajo en la parte inferior es el lugar más fácil para simplemente mirar visualmente. Entonces tenemos el hogar, mis tareas, tu bandeja de entrada, una búsqueda, y luego un conteo
donde puedes alternar entre tus diferentes espacios de
trabajo. Entonces ahora mismo, estamos
aquí en la casa. Y tiene algunos
de estos widgets. Son ligeramente diferentes a lo que vemos en el navegador, pero creo que vas a
estar familiarizado con todos ellos. Entonces solo tenemos una
pequeña notificación que tenemos una tarea que vence hoy. Desplazándose hacia abajo, tenemos
esta sección saltando de nuevo, que son las tareas en las
que he estado o creado más recientemente, así puedo
navegar rápidamente de nuevo a esas Tenemos nuestra vista de proyectos, y podemos alternar entre
nuestros proyectos favoritos o nuestros proyectos recientes.
Desplazamiento hacia abajo. Tenemos nuestras tareas M. Y nuevamente, podemos alternar
vencidos o hacer pronto, y podríamos dar click aquí
para ir a mis tareas, que se abrirán
aquí abajo en la parte inferior,
también, la pestaña mTasks Desplazarse más
hacia abajo en la casa. Tenemos nuestros comentarios
mencionándome. cual es simplemente agradable
porque como dije, cuando estoy usando
Asana por teléfono, normalmente solo
estoy
respondiendo rápidamente a los comentarios y
viendo lo que está sucediendo Así que esta es solo una pantalla muy
bonita para mí donde puedo ver si alguien
necesita algo de mí. Sabes, si ese día he estado
lejos de mi laptop, entonces puedo desbloquear rápidamente a
cualquiera que necesite ayuda. Y luego más abajo, tenemos equipos y otra vez, a proyectos. Teams no es muy
útil porque estamos en la versión gratuita de ASA
no estamos usando esa función. No tenemos una organización. Instalado aquí,
solo estamos en un espacio de trabajo. En realidad, si hago clic en Equipos, no me lleva a ningún lado, no
tengo ningún otro
equipo para elegir, pero así es como se configura
esta app. Si quisiera navegar
a los otros espacios de trabajo, iría aquí a dar cuenta
en la parte inferior derecha Y luego desde aquí,
puedo alternar a nuestro espacio de trabajo de tierra de cookies donde estoy ahora mismo aquí
en el espacio de trabajo de prueba. Vemos que hay
este pequeño punto amarillo, y eso es solo hacernos saber también
hay notificaciones que deberíamos estar viendo
en el otro espacio de trabajo. Pero también hay aquí en el espacio de trabajo de tareas,
el punto amarillo. Entonces sabemos que aquí también hay
notificaciones. Si voy a la mitad de la parte inferior aquí en la bandeja de entrada,
podemos ver cuáles son esos. Esos son exactamente
lo mismo que vimos en realidad en la página principal de esos dos comentarios que
estaban pendientes para mí, uno de Andrew
y otro de Lela Si hago clic en este de
Andrew, podemos echarle un vistazo. Qué dijo. ¿Todos estamos listos para la agenda de la
reunión inicial sabia ¿Debo pedir algunos refrigerios así
como es una reunión de
dos horas? Puedo simplemente avisarle rápidamente. Sí. Esa es una gran idea. Bien. Ya ves por qué no soy
muy buena en el teléfono. Por favor hazlo. Perfecto. Ahora tiene eso y está
desbloqueado y si vuelvo, podemos echar un vistazo a
lo que Leyla nos dejó saber. Ella está trabajando en esta tarea de modelos de sesión de
fotos del elenco. Siempre inmediatamente
aparece al comentario. Ese no soy yo al
teléfono arrastrando hacia abajo. Eso es en realidad Asana
tirándolo hacia abajo. Entonces ella está lanzando modelos de sesiones de
fotos, y tiene unas dos modelos
que ha seleccionado, y me ha puesto un enlace
en una que es genial Voy a tomar Voy a echar un
vistazo a eso más tarde. Gracias. Todo bien. Ahora regresando y
regresando al hogar. Ahora no tengo ningún comentario me
mencione aquí porque he seguido adelante y resuelto
toda esa información. De vuelta a la bandeja de entrada, ahora
puedo deslizar hacia la derecha y eso
archivará esas notificaciones. Aquí arriba en la parte superior derecha, podría golpear Archivar todo si
tuviera muchas notificaciones, y no quería estar
constantemente deslizándolas, pero en este caso, solo
tengo dos Así que voy a seguir adelante
y deslizarlos. Ahora mismo, estoy en la actividad. Si quisiera
volver al archivo, también
puedo presionar este
botón aquí de archivado, y luego podría seguir adelante
y desarchivar eso de nuevo, deslizando hacia la derecha Así mismo que en el escritorio, siempre
puedo ir entre la vista de actividad y
la vista de archivo. Así que déjame
seguir adelante y archivar esta otra notificación de Lela y luego tenemos
una bandeja de entrada limpia y agradable Entonces ahora vemos desde
esta vista de bandeja de entrada, podría crear una
nueva tarea a partir de aquí, también
puedo hacer eso desde la vista de mis tareas, a la
que voy a ir ahora. En la parte superior de las escrituras, puedo seguir adelante y ver
esto como una lista, un tablero, un calendario. También me gusta mucho este modo
compacto porque simplemente acerca todo un
poco más. En realidad no hay ningún cambio en la información
que vemos aquí. Es solo hacer que sea
más fácil para mí verlo. Entonces, si le
vuelvo a poner eso a lo que era, ya
ves que es solo
menos información, y para mí, puedo leer bastante
bien con letras minúsculas. Así que estoy bien teniendo
esto en modo compacto. Y verás que eso es lo
mismo cuando estamos viendo los proyectos en aC que también
puedes acercar y alejar. Entonces, claro, podemos seguir adelante
y tener eso como estaba. Y aquí abajo en la parte inferior izquierda es en realidad donde está
la función de ordenación. Si quieres ordenar
esta información, ya
sabes, en base a fechas de vencimiento, si quieres ordenar
esta información en
función de me gusta o lo que sea, puedes seguir adelante y hacerlo
ahí en la parte inferior. Así que vamos a seguir adelante y
crear una nueva tarea ahora, y solo veremos
cómo se ve eso. Entonces en esta primera vista, es solo darme la información más importante
que necesito para darle una tarea, un espacio para darle un título a
esta tarea. Es asignármelo como siempre
lo hace cuando estoy creando una tarea desde mi vista de
tareas por defecto, pero puedo cambiar
eso y una fecha de vencimiento Pero si quería darle más detalle a
esta tarea, como sabemos es una buena práctica escribir una descripción
detallada de la tarea, realidad
puedo darle aquí y
simplemente desplazarme hacia arriba en mi pantalla, y luego puedo seguir adelante y
agregar esta tarea a un proyecto,
darle Uh, tal vez un enlace o algo más o
tal vez agregar un archivo adjunto. Puedo hacer todas las cosas que
estamos bastante acostumbrados a hacer, agregar seguidores,
colaboradores, etcétera Entonces sigamos adelante
y creamos una tarea. ¿Cuál podría
ser la tarea crear Woop, crear agenda de reuniones para anuncio de resultados de
inversionistas Claro. Vamos a asignarle
esto a Andrew. Pongamos esto debido en un mes. Asegurémonos de que esto
no sea solo en una tarea privada, sino que lo pondremos en un proyecto. Por hoy, podemos simplemente ponerlo en este proyecto de
tus sueños uno. No hay secciones
en ese proyecto, pero como sabes, puedes dar
click y dar una sección. mejor deberíamos ponerlo
en un proyecto diferente solo para que
podamos practicarlo. Aquí y hago clic aquí y podría ponerlo en fase de roll out. Claro. Realmente no tengo mucho
sentido. Aquí podemos agregar una descripción. Y podríamos agregar
subtareas si queremos agregar archivos adjuntos a alguien. A lo mejor quiero agregar también Leyla
como colaboradora en esto, y puedo crear la tarea Y en realidad, ahora, si
vuelvo a mi vista de casa, tenemos esta tarea que acabo de
crear en el salto de nuevo porque esa es una de mis tareas tocadas
más recientemente. Entonces, aparte de mis tareas, ¿dónde están los
proyectos aquí, verdad? Entonces los vimos desde
la pantalla de inicio, pero ¿cómo podemos crear
un nuevo proyecto? No queda claro de inmediato. hay que
saltar a proyectos de CO para
poder hacer eso. Y ahora aquí en
la parte inferior derecha, también
tenemos un nuevo botón de creación de
proyecto. Y aquí podemos crear un nuevo proyecto ya sea en
una lista o en una vista de tablero. No podemos crear un
proyecto desde el teléfono. En vista de calendario. Podemos ver un proyecto
en la vista de calendario. A lo mejor sólo voy a volver
y mostrarte eso. Entonces entremos en una nueva campaña
de marketing. Y de aquí arriba a la derecha. Podemos seguir adelante y
cambiar la visión, así podemos ver este
proyecto como una pizarra. Podemos ver este
proyecto como un calendario. Pero puedes, por
cualquier razón, crear un nuevo proyecto en la vista de
calendario desde el teléfono. Entonces, si quieres esa
vista, puedes simplemente crearla como una lista
o como un tablero, y luego puedes entrar al proyecto y cambiarlo más tarde. Entonces volvamos primero a crear
un nuevo proyecto. Entonces, ¿qué podría
ser este proyecto quizá por supuesto de Asana? Podemos agregarlo a nuestro espacio de trabajo de
tareas. Simplemente podemos crear una vista de lista. Y aquí tenemos un proyecto Asana muy
básico. Y claro, está resaltando
cómo agregar una nueva tarea. Entonces tal vez Tarea uno. Oh, estoy tan mal por teléfono. Tarea uno, crea
una tarea muy básica, sin fecha de vencimiento, sin dueño. Pero vamos a poblar
esto un poco. Y entonces tenemos
tres tareas aquí dentro. Entonces nuevamente, desde esta parte superior derecha, podemos alejar el zoom, y luego tenemos
las tres columnas que se muestran aquí en la vista de lista. Déjame regresar solo para abordar
eso encendido y apagado para que veas la diferencia cuando tenía el
predeterminado, que es acercar. No vemos la tercera columna. Y la única manera de ver la tercera columna cuando
estás zoom es que no
puedes hacer clic
en ninguna parte de esta primera columna de nombre de tarea y seguimiento
porque no hace nada En realidad hay que en
la columna del cesionario, poner el dedo ahí
y arrastrar hacia la derecha Entonces es bastante molesto
para mí cuando estoy en el zoom de esta vista, me parece bastante irritante, así que siempre estoy en el zoom out. Y la cosa es
desde la vista de tablero, no se
puede hacer este
zoom in Alejar. Entonces si vuelvo a
la vista de tablero, ya
sabes, piensas, Oh, no
puedo ver todas
las secciones aquí, pero aquí
no tienes forma de acercar el zoom. Entonces es un poco jugar con esto y ver qué funciona para ti, cómo es más fácil
para ti ver la información. Pero normalmente, no estoy creando
proyectos desde el teléfono. Entonces este escenario por el que
te estoy guiando es solo que sepas cómo hacerlo
en caso de que tengas que hacerlo. Pero de manera realista, te
sugiero que saques tu laptop, crees
rápidamente el proyecto,
hazlo como te guste, y luego solo puedes decidir jugando un
poco de prueba y error en el teléfono qué vista
te gusta si quisieras entrar y
ver qué estaba pasando Entonces déjame volver a salir de esto. De manera realista, quieres estar haciendo lo que me
viste hacer antes, que es responder a los comentarios o ver lo que está pasando Y si
entras en la vista del proyecto, lo único que creo que
podrías querer ver es probablemente el estado. Entonces si entro en nueva campaña de
marketing porque esa es la
única que tenemos con un estatus. Pasemos a esto
en la vista de lista solo para ver un poquito. Esta es la vista ampliada,
recuerda, y aquí es
bastante agradable, aunque probablemente sea
muy pequeña dependiendo de, ya
sabes, cómo es tu
propia visión Entonces déjame entrar en el estado de vista. Y esto es bastante agradable
desde el estado de vista. Entonces si estoy al teléfono, solo
quiero ver cuál el estado es muy fácil para
mí venir a echar un vistazo. Bien. Entonces, ¿qué más
podría ser importante Lo último aquí
es esta vista de búsqueda. Es lo mismo
que lo que tienes en el navegador, pero creo que lo estarás
usando aún más aquí en el teléfono porque a
veces realmente
tienes que jugar con cómo
puedes encontrar algo dentro un proyecto y realmente no
quieres estar haciendo clic Bien, sellar proyectos, entrar en el
proyecto, entrar en la tarea. Así que normalmente solo buscas algo
rápidamente. Entonces echemos un
vistazo a esa tarea de
agenda de reunión que hice antes, si no pude encontrar tan fácilmente. Simplemente puedo buscar rápidamente
y ahí lo tengo. Volviendo a la vista principal, tu vista de casa es
tu vista principal, y aquí es donde
vas a pasar la mayor parte del tiempo respondiendo
pequeñas preguntas, solo verificando el estado. Si tienes algo grande, solo te sugiero que
saques tu laptop si tienes que crear un proyecto. Y te mostré cómo ver una actualización de estado, pero
no cómo hacer una. Solo volvamos
a los proyectos, y volveremos a practicar eso. Así que mira todos los proyectos. Vamos esta vez al desarrollo de
nuevos productos. Y digamos que quería crear una actualización de estado para esta tarea, así puedo ir a establecer estado. Puedo seguir adelante y
agregar la información igual que puedo en el navegador. ¿Qué tipo de estatus
podría tener para esto? Quizás nueva campaña de marketing, lista para ir por el nuevo producto. ¿Qué se ha hecho? Entonces
agreguemos algunas de las tareas. ¿Qué tareas teníamos aquí? ¿Algo con
campaña de marketing? Claro. Perfecto. Tenemos esto listo para ir. Y ahora estamos trabajando
en este pequeño a, tal vez algo de lanzamiento
en la campaña. Y ahora tenemos una
pequeña actualización de estado. Eso es bastante fácil. Definitivamente diría que crear una actualización de estado es bastante
fácil desde el teléfono,
mirar actualizaciones de estado, mirar actualizaciones de estado, responder a los comentarios de la gente,
dar me gusta, colaborar. Pero si necesitas estar realmente pensando y planeando algo, probablemente solo saca la
computadora portátil y hazlo ahí.
 Nikki Parsons, Marketing Director