Transcripts
1. Intro: Are you an artist? Do you want to learn how to sculpt characters in 3D? Hi, my name is Mike, and in this course I'm going to walk you through the process of sculpting stylized characters in ZBrush. This course will take you step-by-step through the process of creating a character of your own from scratch, we'll go over the basic anatomy of the human body and use reference to study the human form and help give you the tools you need to create more believable characters on your own. This course is designed to walk you through every step without skipping any details. No jump cuts, and you get to see every tool and every decision we make to create our character so you don't get left behind. You'll begin by learning the basics of blocking out your character and creating a model of your own will gradually move through each lesson, teaching you how to create clothing, hair, and armor for your character. The theme for this course is Cyberpunk. I get a lot of inspiration from my ward, from sci-fi and fantasy art. I love creating stylized characters, and I've dedicated years of my life to studying and creating characters in 3D. This course will require that you have a working computer that can run the most current version of ZBrush and a license for the software. You can sculpt using your mouse, but even purchasing a simple digital tablet can greatly improve your accuracy and stability when sculpting. As we progress through the course, you'll learn about the essential tools for a 3D artist and how to deal with things like UVs and texturing and ZBrush, by the end of the course, will render our character by exporting from ZBrush to Photoshop to create a high-quality image that you can use for your portfolio or your business. Feel free to reach out to me if you have any issues with this course. I want you to learn as much as possible, and I want to be able to continue improving these courses over time to deliver the best possible results for everyone. I hope you're ready to start creating. Let's get into it.
2. Getting Started - Setup & Interface: Hello everyone and welcome to sculpting stylized characters in ZBrush. So this is a beginner friendly course. However, if you are not familiar with the user interface of ZBrush, I also have my other class, Z brush for beginners. And I invite you to go and watch that class because if you're not familiar with the user interface and sculpting basics, that class goes over a lot of the inner workings of the program and it will help get you oriented and kind of just teach you a lot more about what ZBrush is capable of and kind of how to navigate it. It's kind of a strange interface, especially if you're not familiar with it. So I invite you again to go and watch that class if you have not already. But for those of you that are comfortable where you're at or if you are already familiar with ZBrush. We're gonna get started. And when you first open up ZBrush, the light box is already open. And I just selected a DynaMesh sphere under project right here. So project DynaMesh sphere. So when you're sculpting, it's important to have a lot of different tools kind of setup in your user interface in a comfortable way. So we're going to get some of the buttons and menus and things and put them in places where we can access them quickly because that's going to save us a lot of time. We're just going to go in here and dock these on our interface. So to do that, we actually have to go to Preferences. Config. If you click Enable Customize. This allows you to open up any menu. And we can go down to any button in any of these menus, hold Control and Alt. And we can click and drag those buttons and we can dock them in any of the available spaces that are highlighted in white like that. So turn on Enable Customize. First thing I'm going to drag is I'm going to go into my geometry menu, go down to DynaMesh, and I'm going to hold Control and Alt and click and drag my DynaMesh up to here. Right below DynaMesh is the resolution slider. So I'm also going to put my resolution slider right here. I might as well just grab these buttons as well to Groups button and the Polish button. Another super handy shortcut is if we go down to visibility, which you see right here in the middle of the tool menu. And hide part and show part are extremely useful. So the hide part, click Control and Alt and drag that and hide that appear. And same thing, show part. I'm going to put that right here. And if we go back to our geometry menu and go to the Modify Topology menu, I'm going to grab the mirror and Weld button and the delete hidden button and the Close Holes button. And if you're already familiar with ZBrush and you already know a lot of the shortcuts that you like to use, like in the sub tool menu. There's a couple of good menus down here, like for merging and splitting. You can take any of these and just dock them anywhere in the interface that you want. So if you want to have the duplicate button down here or any, any menu, you can put any button anywhere that you'd like. So let's say that you take a button and you place it here and you're like, I actually don't want that button, so I want to get rid of it. All you have to do is hold Control and Alt, click and drag it into your Canvas and it will disappear. Also, another thing to note is that on the left side there's this other divider and you can double-click on it and it opens up a whole other set of menus. And any of these menus on the top, the brush menu or anything else, have this little wheel icon and you can click and drag the wheel and drag it docket left. Or you can dock at all on the right. And you can do that with any of these menus at all. And if you want to get rid of the menu, just click one time on that little wheel icon, and that menu goes away. And now that we have all of our buttons setup here at the top, we also want to put some of our brush shortcuts. So I'm gonna open up my brush menu and I'm a docket over here on the left, open up my divider. With our brush menu docked on the left here, it shows a preview of any of the brushes that you've selected recently. So I already have this setup here because I've already opened all these brushes. So you're going to actually have to go through, click on clay, go through, click on clay buildup, click on Damian standard. He'll actually got to go through and just click on each one of those. And then they will appear in your menu here on the side. And then you can just hold Control and Alt and click and drag them down here wherever you want. I like to have at least three or four of the main brushes that I use all the time, like pick, lay, the move, clay buildup, et cetera. Each polish is one of my favorite brushes. I'm definitely going to have that flattened brush. So we're just going to play around with these brushes because these are the clay brush, especially in the Move brush, are the two main brushes that we're going to use probably the most once you have all of your buttons in place and set off, these are just a few that I use that saved me a lot of time, especially when I'm sculpting characters and things. Go back to Preferences. Turn Enable, Customize off. Then it will close the gaps and any space that you aren't using. And you can go into save UI and just select the folder on your computer that you want to save that user interface on. And it will actually store all of your buttons like this. And once you have saved it, you can go to store config, and it'll say OK, and that means that you should be good to go. That means that your configuration is stored and ZBrush will load up this way, the same way every time that you open it. And of course, if you ever mess up and you just totally drag your interface all over the place or you mess up something and it's gone and you can't find it again. You can always go back to Preferences, go to initialize the brush, and initialize is going to reset ZBrush back to the factory settings so you can always go back and hit initialize ZBrush and restore everything back to the way that it was. So I'm going to know, but if you ever mess up, you can always go to preferences in initialize the program. So we're all set customizing our interface. And in the next video, we are going to set up our reference images. And I will see you there.
3. Setting Up Reference: Welcome to video 2 where we need to set up our reference for sculpting. So I'm gonna go to my internet browser and type in pure ref, all one word. Pure F is a program that is completely free. You can also donate to the platform because they do accept donations. So if you can't afford that, I highly encourage you to because this is an excellent program, it's super powerful. It's a great resource for artists. So if you can't afford to just donate a couple bucks or even a dollar. I'm sure every little bit counts. And this is just a great program and they really deserve the donations. Basically, what pure ref is, I'll open it here. I already have it open on my computer. So these are all reference images that I selected myself and I click and drag them into pure ref. So pure ref is just viewer that sits on top of whatever is on your computer screen. So you can zoom in on these images. You can click and move the images around. You can scale them, rotate them, and organize them however you want. And if you double-click on one image, centers that image, you can zoom back out and middle click to move around. And so this is just a really great program for using reference. So even if I open up ZBrush, you can see the pure ref is still sitting on top of everything on my screen. And you can go to the borders of the window and you can size it up, can make it as big as you want, or as small as you want. What I like to do is just make it just the right size to fit in this little corner here so that I can still see my head here in ZBrush and maybe a little bit smaller here. That way I can still see which direction I'm facing with my camera. And this way, I have my reference images, Andy, I can just move around and I selected a lot of different reference images from different angles because it's important to be able to see the side of the face, the bottom for the bottom jaw. And angle's kind of looking down or just different angles of whichever face you're trying to sculpt. And these are reference images that I actually purchased on gum road. So it's a check the license on these, it says that it's okay to use these commercially so I can show these, but I can't give them to you. So It's your job to go onto Pinterest or onto Google and find some reference images of male or female character depending on what you're sculpting. And I just get a different set of angles like, you know, side and top and bottom and as many different angles of the face as you can get because it's going to help you with your, with your sculpting as we go. So a pure fopen, you can actually right-click on it and move it anywhere around on your screen. If you're not sure about the navigation or you get stuck and you don't know how to undo something, you can always right-click on pure ref and hit help. And there is a list of short commands here. Or you can also just go into Google and type in pure have shortcuts. And there's a bunch of different guides that show you all of the different shortcuts for manipulating your images as well. So something that I hear all the time from artists and creators in general, is, is it okay to use reference or is it cheating to use reference? And the answer to that question is no, it's absolutely not cheating. And yes, it's absolutely okay to use reference. If you want to learn how to build a car, you have to know how to assemble a car. So you have to know what all of the pieces of the GAR are and how to put it all together. Same thing if you're wanting to Sculpt characters are do likenesses or portraits or anything like that. You need to understand the building blocks or the, how the human body is put together. So using reference is how we achieve that because our brains are not good at just coming up with things out of thin air or remembering information. It doesn't stick. So it's a good idea to always have reference on the screen. Also, another really great resource for anatomy is a book called Anatomy for sculptors, and I would highly recommend it. And we'll actually go to their website here. Anatomy for sculptors. By the way, if pure RREF, if you can't get it to minimize on your screen, you can always go down to your toolbar down here at the bottom and click on the pure ref icon and it will minimize it. But this book, anatomy for sculptors, isn't excellent, excellent resource for anatomy. If you haven't picked up this book, I highly recommend it because it has a ton of reference images for the human body and the muscles and the skull, and all of the muscles and everything inside. So it's an excellent, excellent resource for anatomy. If you are not sure how to get started, this, I would highly, highly recommend. I believe they're also on Instagram and you can go on there and look up their page because they advertised by posting pages from the book. So you can actually get little previews and snippets of the book to kind of see what it's all about. So that's also a great way to get a free preview of this book. Anyway, that is pretty much it for setting up your reference. Just make sure that you have some kind of way to set up a reference image on your computer. So let's say you can't use pure ref for some reason you can't download it or it doesn't work with your computer or something like that. And you don't have another monitor, but you still want to have a reference image up on your screen. So you can go up to texture and you can go into import. And ZBrush actually allows you to select an image from your computer. And if you can just double-click on any one of these here, and it closes the menu. So open texture menu again. And now you'll see that the image you imported is right here. So click on it one time and then down into the right. If you hit Add to spotlight, that reference image will pop up here in the spotlight in ZBrush. So now this image can be clicked and moved around. This little wheel here is your menus. You can scale the image down or up or move it around. You can also click over here and it will center. This uses little red arrow to collapse the edges of it. Just kind of a fancy move. And if you want to turn the spotlight, wheel icon off, hit Z on your keyboard. And if you want to turn the spotlight off completely by making this go away, hit Shift and z together and it disappears. So to bring it back, just do the same hit Shift Z and it'll come back up and hit Z to get your little menu back. So z turns off the little menu and Shift Z turns the spotlight off completely, altogether. Something when you're sculpting that you have to do when you have the spotlight open is you have to go up to brush, go down to samples, and you have to disable Spotlight Projection. What Spotlight Projection means is you are allowed to sculpt on your object as long as this is turned off, ZBrush will allow you to take your brush and sculpt on your object. So if you have Spotlight Projection turn on, It creates issues and it makes it so that the image gets in the way of your sculpt. So make sure you go to Brush, go to samples, and turn Spotlight Projection off. And what the spotlight, of course, you can add more than one image. So if you go back up to texture, go to Import again, you can select another image and open texture menu again, click on the new image and hit at spotlight, and it pops up as the new one and your other one is still here in the corner. So you could still, if you really needed to drag this, scale it up and rearrange your images on your screen. However you see fit. And you can add as many images to the spotlight as many times as you want to import new images. So that is just a couple of the ways that you can set up reference images for ZBrush. And in the next video, we're gonna get into some sculpting and I'm excited to get started. I'll see you there.
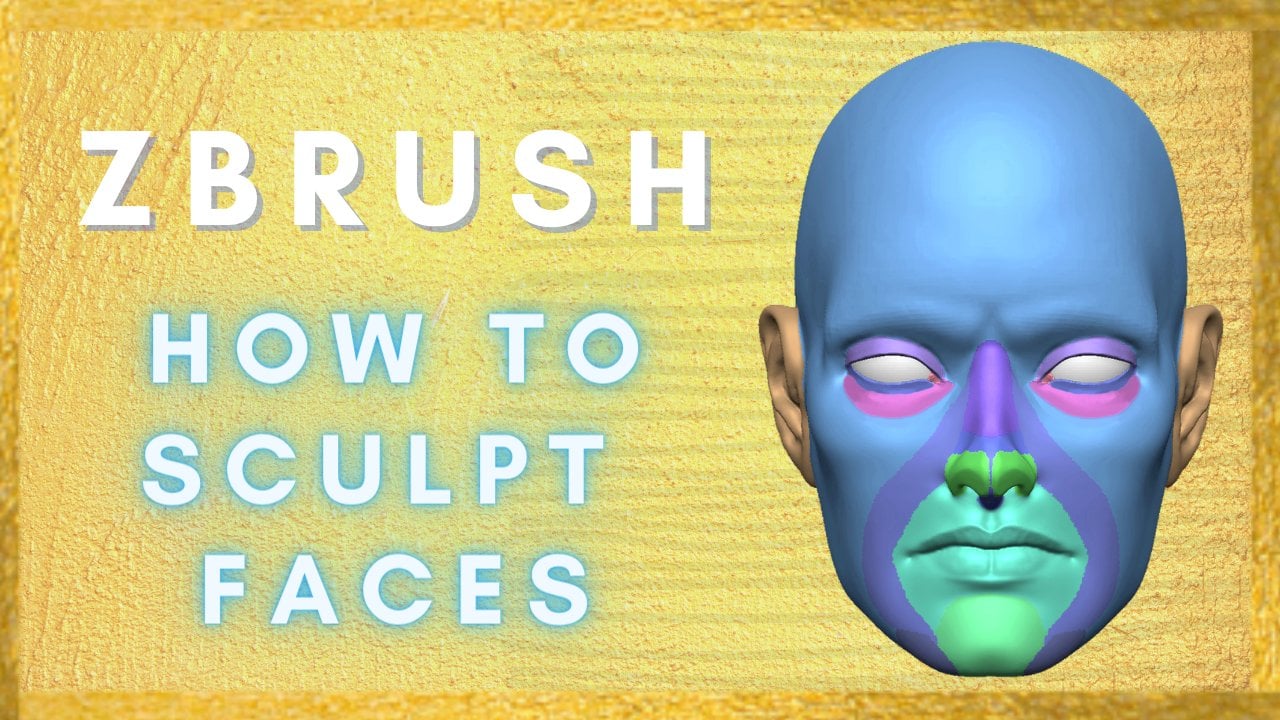
4. Quick Lesson - Learning the Skull: If you are an artist and you want to draw or Sculpt characters or people in general, you need to know the basic anatomy of the human skull. The skull sits just below the muscles in your face, and a lot of these muscles are actually extremely thin. The largest and most prominent parts of your skull are responsible for the way that your face actually looks. Most important parts that we're going to talk about today are the zygomatic, that temporal ridge, the brow bone, the nasal bone, the maxilla, and the top teeth, and the bottom jaw, and the bottom teeth. For those of you that are interested, I've put together a free reference guide and this guide will help you follow along with this video. When you're drawing a skull on paper, you can generally get the proportions in place by drawing a circle, dividing it in half both ways. Then drawing another point below the circle, about a half a circles distance below, and joining the circle with the bottom point with some curved lines that make up the jaw and the eye sockets sit right about the top of the nasal cavity. And in between that and the center line dividing the circle. So this is just to give a general idea of the placement of all of the big bones in the skull. Now we're going to take this into ZBrush. If we go to sub tool, append and append in a new sphere, we're just going to carve out our eye sockets with the clay buildup brush just below the center line of our circle. From the side view, I'm just going to use my Move brush to pull the back of the skull out just a little bit, and I'll just mask off a portion of the bottom and use my Move Gizmo to move this down and this will be the start of my maxilla. We need to pull the front of the skull out using the Move brush. And this is going to be our nasal bone and where we're going to carve in to create the nasal cavity. And again, we want the bottom of the nasal cavity to be add about the bottom of the circle or the sphere, like we did in our drawing. Now we'll use our clay buildup just to build up some of the sides of the maxilla and pull it out to where it meets the zygomatic at the bottom of the eye sockets. And again, just moving my camera around from different angles, making sure that my skull is the right shape from the side and from the back. Now we're going to build up our zygomatic bone here that's going to stick out where the cheeks are and the zygomaticus actually flat facing forward and it's almost angled slightly down and forward. I'm just using my H polish or by flatten brush to kind of flatten out the front face of that. Our nasal bone is kind of sinking into the face. So I need to pull this out a little bit further. It's important to remember the nasal bone actually sticks forward out of the face so that nasal cavity is kind of like its own shape, sitting on the front of the skull. Zygomatic actually wraps around the outside of the eye socket and travels back toward the center of the skull, where it connects right next to where the ear hole is on the skull. And you can see that little wing along the side of the head there that connects to the zygomatic building up around the eye sockets here to create a nice little ridge. And if you're having trouble with your clay buildup or any other product, if it's too thin, you can always go to Brush, auto masking and turn on back face masking. An important part of the shape of the eye sockets. Is there space between the back of the eye socket and the skull where it indents and right around your temples. And there's actually a nice little corner of the eye socket there where the zygomatic and the frontal bone meet, as you can see on the chart. So here is a handy trick for how I did the bottom jaw. So I append in a new cylinder and I just scaled it down on the y-axis to kind of smush it into like a little hockey puck. Now from the top view, I masked half of the cylinder and I guess I switched my mask so that the front-facing part is masked and the back is not. Then you can go to visibility, click Hide part and it hides everything that's not masked. And I go to Geometry, modify Topology and delete hidden. And what you're left with is just this simple strip of polygons. It's difficult to get the shape of the jaw correct. So I just wanted as few polygons to work with as possible so you can mask off part of it and just move one at a time. And actually if you turn on your poly group or Line Fill button, you can actually see how many polygons you're working with as you creating the bottom jaw. Don't forget that it has two little wings that connect just below the zygomatic bone and below the temporal bone right near the ear hole and a little socket. And you can see that on the diagram. Once you get your shape just about the way you want it, you can go into your brush menu, go to Z modular and hover over any polygon face. Hold space, select Q mesh and select all polygons. And when you pull on any polygon, it'll add some thickness to your whole bottom jaw. The forehead is generally divided into three planes, one in the center and one on each side. So you can use your H polish brush to flatten out the center and then mildly flatten out each side. And notice where the corner of the eye socket meets that outer plane of the forehead. This leads us into the brow bone, which is right above the inner corners of the eye sockets. There is a little bit of an indentation of the brow bone on the forehead right there and you can just carve in slightly just be sure that there is still the ridge along the outer corner of the eye socket traveling up into the forehead, and that's called the temporal ridge. We want to make sure to preserve this part because it's very crucial to the structure of the eye sockets. First, I want to make sure that my nasal bone is lined up properly so I'm making an indentation because the brow bones actually faced slightly forward and down and the nasal bone comes out from the face slanting downward and the top of the nasal cavity actually curves in a little bit. And if you look at a three-quarter view, it comes forward and then curves back in toward the skull before meeting at the bottom. The bottom jaw is a really unique shape and it's hard to get right. And this is where the chart is going to come in handy because looking at multiple angles is going to help you get that shape right from the bottom. It's sort of a horseshoe shape. And from the front there's actually like a protrusion where the chin is, but on the sides there's like these little wings that come down like a wedge shape. So there's all these unique complicated shapes within the bottom jaw. And it's nice to be able to just see it from all different angles. Notice how the sides of the jaw come down and wrap around to the front where the teeth are. So it's almost like two little handles that come down and forward and wrap around the front of the chin. The bottom jaw is just to kind of a difficult shape in general. So just use your Move brush, use your age polished, kind of flatten out the outer part of the jaw. Make sure that the teeth connect at a level flat angle going back. As you can see from the side view, be sure to be looking at negative space here to, from the front view. There's actually a little bit of negative space between the bottom jaw and the maxilla and the teeth right there. And from the side view there's the same kind of negative space between the teeth and the bottom jaw. If you're using your moved brush and you're having difficulty getting things to travel at the right angle, you can go to Brush curve and turn on ACU curve. And this actually allows you to drag and pull things and it follows your cursor rather than the Move brush, kind of warping it as you move it around. Now I'm going back to the chin. There's a nice little bump where the chin is and it curves back and in toward the skull before traveling back out again where it connects to the bottom teeth. So there's like a little indent just above the chin. Now we're going to go back and finish the shape of the eye sockets. So from the side view with accurate curve turned on, I'm just going to grab and pull back that corner and it makes a nice little point. And that corner of the eye socket actually sits a little further back from the side view. So look at the shape there, how it comes up and then out and forward and wraps around toward the nasal bone. Also notice the nasal cavity and how it sits on the maxilla and how the maxilla travels around and down toward the teeth. The bottom of the eye socket is kind of a combination of the maxilla and the zygomatic. And it travels in an angles, sort of curves down toward the top teeth. Anyway, these are just some of the tools that I've discovered for learning the basic anatomy of the skull, breaking it up into simple big shapes and trying to figure out how those shapes connect. I hope that you found this video helpful. And in the next video we're going to go on to creating our base head for our character. And a lot of the points in this video are going to help with us creating our base head. In the next video, I'll see you there.
5. Sculpting the Base Head: So for this video, I am going to show you how to start a basic character head. So it's important that we get the shape of the head correct as we go forward. What I'm gonna do first is I'm going to hold Control and Shift and click on my brush over here and select the trim rectangle, brush and trim rectangle. If you hold Control and Shift, click and drag, it just cuts whatever it is that you have selected out completely. So I'm going to cut about that far into my sphere. So I'm going to go and find my mirror at well button and click mirror and wealth. So once we cut our sides off of our head here like this, we want to go to our side view, hold shift and click and drag to snap to side view. And if we just hold Control and click outside of our object, it will mask everything, hold Control and Alt to unmask and unmasked just this portion here. So if we look, that's pretty symmetrical. Do that one more time just to get rid of that little piece right there. There we go. So from the side view, use our Move brush and just pull this down. And if you want to change the size of your brush on the fly, you can hold S. So once we dragged down the channel a little bit here, we'll go to the front of the face and we're going to pull this in just slightly and hold Shift to smooth this out a little bit. Now if we unmask everything and we look at our head, It's looking pretty thin. So we're going to stick with our Move brush here and get our size pretty big. And pull this out to the sides. And like that and just use our smooth brush just once or twice. Kind of when we're looking at our head here, I'm actually going to be looking at sort of like a side angle here. Also for reference when you're starting ahead, you can use this little icon up here in the top corner. It's also a very good way just to kind of see that general proportions of where the planes of the face and sort of a general idea of how the head is shaped. So, so even from this angle here, now, now we're just going to kind of go around our object and use the Move brush to get things in position, kind of in the correct shape that they should be, doesn't have to be exact. We just kind of want to make sure that the skull has the peak here at the top. And that at that back at angles down. It goes back in here. We're just looking for a site of those identifying angles and some of the main some of the main parts of it. Sorry, talking and sculpting is a little difficult to do at the same time. So the top of the skull here is a little bit of a point. The nice thing about cutting off the sides of the sphere is now you see this line coming down here. This is going to become our temporal ridge, where we are going to start sculpting in the eye sockets. And, and I want to identify kind of where the middle of the faces because the eyes are always in the center of the face. That's just a general rule about face proportions. So just take the Damian standard and I'm just going to carve in a line right about, kinda eyeball it like right in the center of the face and that's going to be my eye line. So this is a great way to identify where your eyes are going to be in a great way just to kind of start the head in general. So now that we have our eyeline identified here, let's just put a little bit of something in the middle here for the nose. And this is just going to be right where the nose sits, doesn't have to be an actual nose. So it's really important to work low poly like this, especially starting out. Because if you were to subdivide your model, like if you hit control D can see that your poly, your active points quadruples. So if I were to hit Control D a bunch of times because I'm like I don't have enough geometry. The downside to this, to having too much geometry is your brush has less effect. And also you're left with a lot of extra geometry and it makes your model look kind of lumpy. So it's important to just start low poly and use very simple brushes like the Move brush to just manipulate your shapes. And kind of put things in place like that. Like the nose can just be a simple, a simple set of shapes doesn't even have to be complicated. And just using the Move brush, I can get all these kind of a place here. Can even start like making use of our nasal bone right here. Get that into place. I'm just using the Move brush just to kind of get the, the basic shape of the nose. And if we look at our reference images here, we can see that the nose is thinner at the top and it tapers out toward the bottom a little more of course. So also with the nose, which we'll get into another video. The nose should always have a bottom plane like this, or a bottom basing set of polygons. So there should be an angle to it like 60 degrees or so anyway. Now, we just need to take our clay brush and put in a little bit of a buildup right here, which is going to be for the mouth. Also with the zygomatic. You want to come up here along the sides and underneath where the eye sockets are going to be. And you're just going to build up those cheeks a little bit. And I'm just using the clay brush, just lightly kind of building this shape as we go. The zygomatic is the cheekbone right here, and it is part a, the widest part of the face. And it travels back a little bit here toward the ear. And we were looking at the skull or the head from the side of the ER, always lands right in the center of the head right here. So we're just for now, just going to place a little marker. The ear always lands up at the top of the eyebrows, right here, and around the bottom of the nose. So for now that's just going to be my marker for the ears. So I'm just trying to get all of my place markers in. I'm starting my head. I'm not trying to do any details. I'm just trying to block out the big shapes first and make everything, get everything into place. Now if we take our Move brush, make this a little bigger. That temporal ridge, which was supposed to be up above the eye sockets which appear right here on the temples. You can pull that in just a little bit and it creates that nice, nice little ridge right here. And the shape of the skull. So it really is just using a ton of reference images and practicing this. Obviously I've done this a lot of time, so it's a little easier for me to just kinda get on autopilot and just kinda keep going and blocking everything in. But if you're having trouble, of course, just remember that you're only trying to put placeholders are not trying to do any detail at this phase. There should be no details going into your sculpted. It's only trying to get a foundation for the head. So now from the side view, just going to pull this in, get that shape up the back of the skull coming down. And this when the skull wraps around here, it lines up kind of at the bottom of the year. So we can just kind of pull this up and shape our jaw just a little bit here. And on female characters, the jaw is a lot softer of an angle. And you'll notice here too in this reference image, if we zoom in on this, the angle of the jaw lines up with the ER so that you're actually travels down in this direction. And so does this angle of the jaw before it turns here at the corner. So the angle of the ear matches the angle of the jaw going up this direction. And then of course, a soft angle at the corner, they're traveling down. Now we need to get our eye sockets into place. So let's look here at some of our reference. And the eye sockets. So the eyes when your scrap that clay buildup brush at the eyes are always about. And I'm just holding Alt and just carving in here. The eyes are always about one eye distance apart from one another. But when you're doing this skull, that's a little bit different because the eye sockets for the skull are rather large. So they are actually going to sit underneath this brow here. Wanna make sure that our eye socket is kind of preserved because that's going to help us sculpt the eyes later. It's like it just kind of get this general shape of the eye sockets in here. And we'll pull the cheeks out a little bit and notice her cheekbones are a little more prominent here on the sides. So this looks so bad. But that's okay. That's normal. When you're sculpting anything, you're always gonna go through a phase of it looking kind of awkward, looking kind of bad for a while until you get things in place. And that's why it's important to get your foundation correct before you move forward with any details because then the rest of your sculptors just going to be that much better. I think at this point, we have some of our landmarks in place, enough of them to sub-divide up. So right now I'm at 2000 Act of points. So I'm going to hit Control D. And that's gonna give me a little more geometry. The nice thing about going up in subdivision like this is it creates a subdivision level. So if you're not familiar with ZBrush treats subdivision. Under geometry, you have your subdivision level. So as many times as you press Control D, it creates a subdivision level. So I can go back down to Level 1, that 2500 points. Or I can click and drag and go up to level two whenever I want. And the advantage of this is I can work on slightly higher geometry on my higher level for a little finer detail. And if I feel like something is out of place, I can always just go down to level one. And you can switch back and forth between your subdivision levels by hitting D to go up or holding Shift and pressing D to go down, a subdivision level itself up, press the Shift D goes down. And so it's really nice to be able to switch between the low poly and just being able to move things around really quickly. And then pressing D to go up and getting slightly higher geometry. So we're just going to go around and smooth out a little bit of this. I'm on my second subdivision level. Also from the side, I want to make sure that my brow comes out a little bit from the face and that this angles down at this sort of an angle because the skull, the eye sockets are shaped at sort of a downward angle. And it's okay if you just if you're always going to have to make adjustments, it's okay to just be constantly adjusting because sculpting takes a long time. Just takes a lot of looking at reference and a lot of time and patients. So not just learning the shapes, learning the shapes is hard. It's not easy to replicate this stuff, especially if you haven't done it before. So it just takes a lot of looking and practicing, making sure here that this outside corner of the eye socket is coming up and then over and then connecting to that temporal region, the forehead right here. For right now, I just want to make sure that I have a good a good foundation moving forward because it's going to make it a lot easier for us later on. So we got this nice little corner here for the eye socket. And it comes in here at the corner of the eye and back out at the cheek again. Built that up a little bit. And from the nose. You also have this that wraps down and around the mouth. So we want to make sure that we just have a little bit of volume. They're coming down. Oops, pull this stuff back here. Sorry, I'm just staying focused, staring at my reference here, making sure that I'm checking when I'm doing. That might everything is kind of in the right place here. And I'm just using the Move brush, not going crazy, just, just tiny, tiny movements, tiny tweaks. You can always add. You can always go back. And just taking my time and making sure that my foundation is good. And if it's too difficult to move something, it can hit Shift D to go down and subdivision and just use my lowers of division level to move my points around if I feel like the nose is out of place or isn't working right or, or something. The zygomatic or the cheekbones are kind of flat, facing forward and a face forward. It almost kind of a downward angle, but there's also fat on top of that. There's no way you can almost carve that end by doing that. The shape of the mouth right here, coming in at the front here and then carving out and sort of like a T-shape, almost like that to come up and out to the sides. One and very important thing moving forward before we go into the next video is make sure that shape of your skull is correct from the front here. So if you don't have that arch, the temporal ridge from this corner here of the eye socket. Make sure that you get that in there. And it's a very gradual, It's very soft. The way that it transitions from this corner here up into the skull. But it's very important that you have that because it's one of the major identifiers, one of the major bony landmarks of the face. And make sure that it curves in just a little bit. Make sure you have your cheeks in place. And make sure that the mouth is sort of Bolding out a little bit in the front. Watch the angle of your jaw here to make sure that it travels at a not a 90 degree angle. It's not straight up and down. It's back at like a 45 degree angle. And same thing with the jaw traveling to the front here. It's not it's not a 90 degree angle, it's not straight. It comes down and forward at about a 45 degree angle. And look at your chin from the bottom. Makes sure that the shape of your bottom jaw here is accurate and it's in a more of a horseshoe sort of shape or like a boomerang sort of shape. And from the side view, if you're looking at your skull, it's more of an egg shape. Traveling back toward the back of the head like this. It's not perfectly round. So if your, if your sphere is still very, very round, you know, if it's, if it looks more like this, just make sure that you are pulling out the back of the head a little further because this, this is called the widow's peak or one of the top of a forehead or basically the hairline. And it travels up at an angle up to the highest part of the skull, which is at the top here, near the center. And then from the center top travels down and back and has sort of a sharp sort of angle here where it changes direction and comes down in like that. So the skull has all of these subtle shapes in it. But it starts here at the widow's peak, travels up and back, and then at the top of the skull travels down and back. And you can see that from a lot of reference images. And even in this little demo had here at same angle that travels up and down and around and curves in toward where the neck connects at the base of the skull. So this right here is where it curves in.
6. Sculpting the Eyelids: In this video, we're going to go over how to get the eyes into the eye sockets and how to sculpt that the eyelids around them. So I noticed a mistake that I made in the past video. You see that the control and shift and I selected the trim rectangle brush. When I sliced off the side of the head, it created this poly group. And you can see your poly groups by turning on your poly frame here. And there's a lot of triangles in here. So in messed up the geometry. So that messed with my subdivision levels. So now I'm not I can't have subdivision levels which is going to be a problem for us. So if you have this issue, I'm gonna show you how to fix it. So we can fix this by going to geometry. Going down to 0 measure and clicking on 0 mesh. And you can just leave all those settings alone. So when we 0 mesh, it's going to take everything here and recalculate the topology of the mesh here. And it's going to bring it down to about 9 thousand points. So that's a good thing. I wanted to be lower. So now when I hit control D, sub-divide up, you can see it. Now I have a higher subdivision level again. So if your subdivision levels got messed up and you lost them like that, go to your geometry menu, go down to 0 measure and just run Z remeasure. And if it gives you too many active points, you can always turn the target poly count down lower by default is set to five. And that should do the trick. But if you need, you can turn it down lower. If you need even lower poly and just run Z remeasure. So let's get into the eyes. So if we look here, there's obviously a lot of fatty tissue around the eyes up here on the eyebrows. So we have to go over to sub tool. And we're gonna go down to append. Click on append and append in a sphere. So if you can't see your sphere at first, it could just be that you have solo mode turned on. Also, I have click to turn solo on and off, which is a preference thing for some people, you can go to Preferences and go to Edit and turn on. Allow click to solo. So what that does is normally you have your solo button over here on the bottom right, which I took mine away because I wanted more space for something else. And I go to Preferences and I turned on Allow click to solo. So that means if I click one time, if I left-click, it turns solo mode on or off. For me, I just like that. I like having the shortcut for that. But some people like having the Solo button down here in the bottom right. My preference, I like to just have clicked to solo on, so you can choose to do that. I appended in this sphere, we're going to hold Alt and click on it to select it. Press W, or go into move mode here to bring up your Gizmo. And we're just going to scale this down. Snap to our side view and move it forward, scale it down. And the size of the eyeball inside the eye socket is usually on a, on a human skull. It's usually about there, maybe even a little bit smaller. The eyeballs are actually not that big, but because we want this to be a stylized character, I'm actually going to make the eyes a little bit bigger before putting it back here into the skull. So We have one in place and now I'm just going to snap to my front view and move this sort of center just so that it's generally in the right place and you can scale it up or down. Now right after I do this, I want to go up to Z plugin and I want, I want this to mirror over to the other side. So to do that, I'm going to go up to Z plugin, preseptal Master. Oh, it's big. It's because pure ref is in the way. And I move my pure ref over here. So Z plugin, sub tool master and select mirror. And make sure x axis is selected and hit. Okay? And it's going to mirror or eyeball. Of course the other side. Now, make sure that you turn on symmetry by pressing X. And then click this little check mark icon right here. And it will place your Gizmo in the center of each eyeball. And that way when you scale, they scale uniformly. If you have symmetry turned off, they scale kind of weird because it's scaling based on where this 3D gizmo is. So make sure that you have symmetry turned on. And you go to the center here, the mast mesh center button. And it will scale and also move correctly when you have symmetry turned on like this. So I'm just going to place our eyes kind of in the center of the eye sockets like that. Also, look at the distance here from the side view. If we look at the distance of the front of the eye and the nose of the bridge right here. The bridge of the nose. Man, I can't talk today. It's been a long day. Sorry guys. We wanna make sure that there is some distance here. So the distance from the front of the eye to here is, or I guess I should say, the distance from the bridge of the nose right here to the inner corner of the eye, which we can't see you because the eyeball is in the way. The distance from here to the inner corner of the eye is very close to the distance from this part of the nose out to the tip of the nose. So. Here to here, here to here are very similar. So we can use that as kind of a measurement for when we start putting in our eyelids. Here to here is going to be similar to here and here. And these are all just things that you learn over time from looking at reference and hearing from other people. And we'll just kind of figuring these things out. So we're going to do something kind of tricky. I'm going to select the eyeballs and I'm going to mask just the top half, make sure you have symmetry turned on. So at the top half-mast, we're gonna go over to R sub tool menu, scroll all the way down. And at the very bottom is extract. And actually I dragged and dropped my Extract button up here because I use this a lot. So extract is very handy. First you want to adjust the thickness by default it's set to 0.02. We want it to be a little thinner. So maybe 0 to hit extract. And it actually pulls and creates a copy of whatever you mast on top of the object. So if you like that thickness, if you move your camera that it's just a preview and it will disappear. So you have to hit extract again to see the preview. That looks okay. It's a little bit thin. Maybe I'll do a little thicker. 0-zero for extract should be fine. Actually, you know, we're gonna do is a little thicker. We're going to do 0.01 extract. Okay, that looks better. So a nice thickness to it. And that'll help us sort of shape this whole eye a little better. So if you like the way that it looks, just hit Accept. And now you have this nice little extract. So before we go on to doing anything with that, we're going to re-select the sphere. And if we go into solo mode here, we can just see this. I'm going to hold control and click outside of it to invert the mask. And I'll be like this. And actually I'm just going to make this mask a little smaller. Like that. That looks okay. Yeah, that should be fine. So there's a little bit of a slip between them. So now we're just going to extract that bottom lid again, same thickness as the top one and hit Accept. So when we do this, extract creates a sub tool out of each of these. So these are now their own sub tool, which is really nice because now we can isolate these before merging anything together and make sure that we get the shape of the eyelids correct. So and a clear eye mask and go to the bottom and let's click the Mask. And I'm gonna go to my eyeballs here and clear that mask as well. Make sure you clear your mask so that you don't accidentally mess up your geometry. So go to the top. Let's grab our brush. And let's just sort of look at art reference here because that's going to help us the most, I think, the shape of the eyelids, It's really important that this brow up above sits on top of the island. The islet tucks underneath that. So part of our job here is to kind of get this shape correct and make sure that the inner corner of the eye, it's going to meet correctly here, right in here. And we can hold Alt and switched the bottom lid. This just gives us so much more control over shaping the eyes. And it looks really weird at first, but I've been using this method for awhile and I'm fairly comfortable with it. Just feels like you get a lot more control. So I'm just going to do it this way. And we will get some results here in a minute once we mess around with this enough. So now we're just taking the Move brush. Pulling these parts around. As a general rule. The I'm going to pull on it, make sure there's a little more space here. The bridge of my nose, the right shape here. To kind of push this in a little bit. Already, I can see that my eyes are a little too close together. So go into actually going to select my eyeballs and move them out just a little bit and then select the bottom lids, move them out as well. Turn on symmetry. Go to unmasked mesh center. That, move those out a little bit at the same for the top. Make sure symmetry is on unmasked mesh center and move that over. So there's little more space here. So the general rule for eyes, the eyes are about one eyeball distance between and that's these are a little bit wider, a little bit bigger. And that's okay because this is a stylized character. So like anime characters have big eyes. That's okay. It's okay if the proportions are just a little bit exaggerated or a little bit different for stylized characters. That's kind of the fun of it as you get to play with the shapes a little more. So now I'm just going to grab the the skull and sort of move this out a little bit. And then maybe just moving the bridge of my nose a little bit. So we're just using our Move brush and switching back and forth between all these different pieces and trying to get them all into place. And you can use your smooth brush to smooth things out. As a general rule, the inner corner of the eye is lower than the outer corner of the eye. So we want to raise this up a little bit. And bring this inner corner down a little bit. And then the inner corner, there's always this, the eyelid, it has this little part that comes up right here, just before that corner right there. So it kinda arches up and over and down into sort of a shape. Just trying to get this as close to right as we can here. And now we can select our skull. We can grab our clay brush and just kind of add into this a little bit, kind of thicken this up. And if we want to go into solo mode, can see a little bit better what we're doing here actually. So I'm just adding a little bit of thickness to the inside of the eye socket here. Also with the skull, something that is a, another general landmark. The upper part of the brow sticks forward just a little tiny bit more than the bottom part of the skull under the eyes. So this part here is a little bit, little bit ever so slightly more forward then where the lower lid meets the cheek right here. So that's also another nice little guide. I like to overlap the top lid over the bottom lid because then you can get a nice natural sort of curve like this in that corner right here where the caruncular comes in for the tear duct, for the inner corner of the eye right there. And now for the inner corner of the eye, I'm going to move to sort of like a three-quarter view and grab it and pull it in so that it wraps around this eyeball here because there's some space in there. I don't want that. We actually want to pull that back just a little bit so that it's wrapping around the eyeball. Same at the bottom lid. Just get it to come into that natural backwards sort of position so that it's wrapping around the eyeball. And you want that on both sides. Think what I need to do is I need to merge the eyelids with the main part of my head here. And that's going to just give me a nicer nicer look. We do it this way first because then the foundation is correct and then we can go in and tweak it later. So if you want to make any last adjustments, like if you want the eyes to be a little wider, open, can do that now. Feels like one step forward, two steps back. That's just kinda how it goes sometimes. So, so far, the proportions of the eyes are looking more on the side of realistic because they're not large characterize. But we can fix that. If we were to just go to our eyeballs here, what I'm going to do is go into, go to merge, sorry, I'm gonna go to the sub tool menu. Sub tool, go down to marriage and click Merge Down. And when I click Merge down, it's going to merge these eyeballs down what the sub tool that's right below it. So merge down, hit Okay. And now the eye lids are merged with the eyeballs. And I want to merge the top eyelids two. So I'm going to select Bibles again. Select Merge Down, hit, Okay. And now the all the eyelids and the eyeballs are all one sub tool. The reason that I merge these altogether, I'm going to clear my mask is so that I can scale them all simultaneously. So before I do that, make sure that symmetry is turned on. Go to unmasked mesh center. And then we can move them all around as one piece and scale them as one. If I want my character's eyes to be bigger, now I have the eyelids in place and I can make the bigger but the eyes closer together, I get even. Angle them a little bit up or down, whichever direction I want. I can rotate them in or out. Rotate them a little bit for now. I think that that is okay. And we'll get into refining the shape a little bit more in some of the next videos. For now that should do it for how to set up our eyelids, right? I'll see you in the next video.
7. Sculpting The Nose 1: Welcome back. In this video I'm going to go over sculpting the nose. So I've got my reference images open here. And we have one from the side of you and one from sort of a three-quarter view. But if we need, we can also look at the front. All of these will be useful when it comes to sculpting the nodes. So the nose is kind of a tricky shape. It is comprised of a bottom plane. So there's always going to be one plane on the bottom that's facing down and outward. And the two nose wings on the sides here. So if we look at the shape of the nostrils here, that bottom plane comes up and then the wrap around here to the wings that come out to the side. And you can see that a little bit better here in this reference image. So the wings are kind of the tricky part, but there's also sort of where these wings wrap around. It creates almost like a bowl but on the front of the nose. So we're going to try to do that here. So I'll grab my cloud brush here. And we just want to start by creating the tip of the nose. Just a little bit of a bulb right here on the end. And you can see on her nose here, if you squint your eyes, you can see the shadows right here. There's actually like the way that this wing shapes up and down and over like this. So it's actually like a from the tip of the nose that comes up and over and down. So if we try to get that in there, It's almost like it begins here. It comes up this way. And then down, over here, out to the sides. And we want to build up the bottom plane a little bit more. So once we get to this point, we can kind of smooth this out. I'm going to move up in subdivision so that I have higher subdivision level here. And the shape of the nostrils is kind of a weird shape. But I'm just going to carve that in right here. Just sort of a starter circular sort of shape. And make sure that you leave a little bit of a gap right here because this is where the nose connects to the upper lip. So and enough space here on the side for the nose wings because we're also going to just slightly build up those nodes wings, the nose wings connect here, come up, over and down. And they wrap around. Here we go. So this is obviously a really big right now. It's noses. So the enormous knows. So we're going to sort of smooth this down and grab our Damien standard brush. Kind of carve in here. Turn up my intensity. Carve in and around the nose here. This is way too big. There we go. Kinda get that sticky. Yes. Okay. So I'm gonna make this a little bit smaller now. And this is just general. We just want to get the general proportions correct. So I'm going to carve around the bottom a little bit, run the outside going up. But I'm not going to carve this line right here because that's actually going to be a fatty tissue. So just around where the wings come up and down and connect and going down around the bottom of the nose. Smooth all this out. Now I can take my brush. Just kinda pull this part down here. So you can see here this is, this is the shape I was talking about with the wing of the nose here. There's this little bulb here at the end. And it kind of connects to the wing of the nose that comes up and over and down and up. Just using the Move brush to do this. I really like the Move brush. It's one of my favorite brushes. It's just so much easier to kind of put everything in place with it rather than using clay to build. You're actually just sort of, it's like using your hands in a way. You're just moving the clay around. So I like that sort of feel that you get with the Move brush and just tiny, tiny movements. So now I'm trying to create an exaggerated shape of the nose first for my foundation. And then we can go into a refined shape later. The bridge of the nose is generally pretty even. Create here. For her, it's like the bridge of her nose is actually a little bit higher like this. And it actually it's so strange that just connect straight into her forehead. That's kind of unusual. She has sort of an unusual face which isn't bad. It's just different. I'm just not used to seeing that. When it comes to how the brow connects to the nose like that, It's typically with a character with the brow. You have this shape here of the outer eye socket coming in or the inner eye socket, I'm sorry. And it is at an angle that's facing forward and down like this. It's like this. It's not like a 90 degree angle but like forward-facing and this angle of the brow faces down and forward toward the ground like this. And then the nose connects right there to it. That's the typical sort of structure that you see there. But for her, it's very different. It just goes straight up into her forehead and that's I I'm not used to that. Just something else to note as we go on. So making sure that we preserve the shape of our brow bone here. Just going to do exaggerated first because I want that structure to be there. But pull this in a little bit, make sure that I keep that shape of the bridge of the nose and that shape inside where the eye sockets are here. I want to make sure that I preserve the shape of the eye sockets. So otherwise it can start look and really weird, really fast. Okay, so back to our notes here. Getting off topic. So I'm gonna make sure that I have enough space for the wings. So this shape is pretty close. I'm just going to use my damien standard two sort of force that shape right ear, outer wing will carve in like this. So I guess Damian standard actually I probably should have just done this from the start. This works better than clay buildup, that advice. So now we're starting to actually get a shape that looks more like a nose. And that's a little too big. So not just gently. Pull it back here and smooth it out with our shift. So it's really important that you keep the stickies, that you keep the bottom plane of the nose facing up at an angle like this. And at this point what I like to do is take each polish. If we take our age polish brush, it's under H in your brush menu. And we just flatten out this bottom plane coming up. And we're going to widen that tip of the nose out and bring it down just a little bit. So now we're just looking at general placement. General placement of the general placement of the nose and sort of the width of the nose. And if we look at our other reference image here. So her nose, It's actually a little bit wider. So I'm just going to pull this out. Pull the tip in more. For Grab age polish. You want to polish just the bottom parts of the nose go like this. Kind of polishes in and over and down. And you can also reverse the Polish by holding Alt and it will build up. So you can actually create a nice little bridge like this on the bottom of those. Same but this part here. Now we actually have more of a bottom plane to our nose. And this isn't quite right. But it's getting there. Just takes a little time. Noses are tricky. Just keep looking at your reference. Make sure that you're checking back and making sure that the shapes are correct. Got nostrils are a little too wide, so we're going to smooth that out. And we'll make our nostrils little smaller. So that the nose wings can be wider. There we go. Okay. And then started to look like a nose. And again, that bottom plane. So wanna make sure I preserve that. Will bring this forward a little bit to get that shape of the nostrils little better. And just carving around the outside teeny bit. Making very sure not to smooth the nose wings, but just the cheek area. I'm smoothing. Very last just to make sure that we get the shape of the nostrils correct. This bottom part of the nose sort of comes down like this. Add curves back. So it's almost like a nice little triangle like right here at the bottom plane of the nose coming down. And that actually shapes the front part of the nostril going back. So it's tricky to get this shape. Just takes a little time and patients, and you're doing it from scratch. But eventually it's a practice, of course, just sort of figure it out. Can see that our eyes are at a different place here. Kind of throws off the proportions of the eyes where the nodes are. So I'm actually just going to move these eyes back into the head a little bit further. So that the relationship between the eyes and the bridge of the nose looks a little more natural. And we'll actually move the eyes out just a little bit further. So as we're going, it's important to just constantly be mindful of all of the pieces and how they work together and how they fit together. The nose, the eyes, the mouth, all that. It's okay to go back and just constantly be making changes. Because this is a stylized character. I'm actually going to sort of pinch in the cheeks a little bit more because I want that dramatic sort of look to the face. Very, very, but when he cheeks. And of course we'll probably change that a little bit later. And also remember I have accurate curve turned on my brush. And under under curve, I have AQI curve turned on. So it actually pinches and pulls. You can almost see like a little spot where it starts when I move like this. There's almost like a sharp point right there next to my cursor. That's because of vacuum curve. And the curve creates almost like a divot when you're using the Move brush like this because it's pulling more accurately from that point. So I like hockey curve with the Move brush for this sort of thing because you can use it to shape and sort of pin your shape in the correct way. Little easier. This is probably a little too extreme for the cheeks, but we'll fix that later. I'm just trying to go now, now that we're actually getting the eyes and the nose and things in place. Now we can start to play with the other shapes, like the cheeks and things. That's, that's all I'm doing right now is just sort of experimenting, seeing kind of how everything fits together. And playing with the cheeks, playing with the overall proportions. But the Move brush to try and get something that looks a little more unique. Rather than just doing a direct copy of what I'm looking at. And this is where it starts to get fun. Because you can actually just sort of begin to tailor your character to look the way that you want them to. And again, I'll just start pushing this in around the corner of the eyes right here. There's a lot of, a lot of this comes into play with how the scholars shaped and just understanding where those bony landmarks are. We know here that the zygomatic is the widest part of the face and it comes out to the side here with the cheeks are. And this part of the zygomatic travels back, like we showed it in the other video. Which is what creates that wide sort of cheekbone. So I think that's going to do it for the nose for right now. And we'll adjust it more as we move forward. And in the next video, we are going to begin sculpting the mouth. I'll see you in the next one.
8. Sculpting the Mouth: So in this video we're going to go over sculpting the mouth. As a general rule, the top lip is comprised of three parts. There's the center, and then there are two wings that come off to the side. This kind of forms what's called the cupid's bow. And spacing wise, the line for the mouth. If you look at the distance between the bottom of the nose and the chin, it's about a third of the way down from the nose. The mouth is comprised of the top and bottom lip. At the top lip has three parts. There's the middle section and two parts on the sides. And the bottom lip has two little pads that sort of form the bottom lip that meet right in the center. This is just one way to kind of divide it up like that. So you have two pads for the bottom and then you have all the top lip. You have three sections, one in the middle, one on each side. So when you're working low poly or lower poly like this, it's a good idea to just start with the center line for the mouth. So I began with a sort of a V-shape for the center part of the top lip. And then draw down and out at an angle using my damien standard brush down and out to create that shape for the top lip. But you get the idea. So a V shape here and then down and out to create that top lip and at the corners, depending on the type of character you want. You can slant this angle up a little bit. And this is going to help you later on because the bottom lip actually tucks underneath the top lip, rather than carving in the bottom lip like this, I'm actually going to grab my age polish brush and I'm going to flatten the bottom lip. This is because from the side view, the top lip generally sticks out further than the bottom lip. So I actually want to create a plane that is facing sort of upward right here for the bottom lip, I'm doing that with my age polish brush. So we're just going to flatten this out, smooth that area around there. Now we can grab our clay brush and just very, very slowly build up those two pads for the bottom lip. And this will be good because we want this to tuck underneath. So where this shelf sort of sticks out for the top lip, we're just going to kind of bring that bottom lip out from there and then smooth these edges down. So now we want to work on the top lip. Just take our clay brush and build up above creating that upper border. And the philtrum right here, there's always a little divot right below the bridge or the base of the nose there. And it's narrower up toward the nose and a little bit wider as it gets toward the top lip. So it's always going to be this little indentation right here. And it will take our Move brush and actually force this shape of the top lip using our brush. So for doing this low poly, it's going to make this much easier later on when we sub-divide. Because our foundation is going to be nice. And already we're starting to get sort of a mouth shape here. Below the lower lip. There's actually this little indentation right here, like you can see in this reference image. And you can see where the lower lip actually kind of comes in a little bit, curves in towards the chin. And what that does is it creates a nice little shadow below the lower lip. So we can take our clay brush and just holding Alt just kind of carve in underneath where the bottom lip is to create that little indentation right there. Available. Smooth this out from the bottom lip. There's the center and out about a third of the way you want to carve in and down. To create the shape of the chin. Is the shape actually wraps around the chin. And the reason that we're doing it this way is because the bottom lip also has this sort of fatty pad that sticks out from the back bottom corner right here and comes down. And if you look here, you can sort of see the line of the shadow of that. So here's that indentation as it wraps down and around this way. And then connect it to this back corner out to about a third of the way here, there's this fatty sort of pad that connects the bottom lip to the bottom corner over here. We're just going to sculpt that in a little bit, smooth it down. And already you can see how Bottom lip, if we take our Damien standard and just cut it right down the center, it's supposed to be cut right down the center. There's It's just two pieces. And these little dots, little fatty pad here on the side actually comes up as part of the bottom lip. It just doesn't look like it, but it's actually sort of one shape. So it starts down here, wraps up with the bottom lips and the two pads meet right in the center. So at this point I think I'll take my in-flight brush and just gently sort of bring this up with my inflate. And same thing for the top lip. I'll use my flat brush and we'll just build this up a little bit on top. And we'll take our Move, brush, move brushes King. Here we go. So the lips are, if you look at your eyes, the corners of the mouth are going to meet, generally where the pupils are on the face. So the corners of the mouth or not quite wide enough. So it actually needs to come out for it. But instead of pulling out further this way and giving it the crazy duck lips, I'm actually going to turn to like a side view or almost like a side three-quarters view and pull the corner of the mouth back. So if we're at a three-quarter, it's actually going to accomplish a more realistic look if we do it this way. Because you're pulling it back into the face and making the lips are wrap back and around in a more natural sort of shape. So this is more. And now we're going to push the outer corners of the top lip down. So here's where it gets tricky because the bottom lip is supposed to tuck underneath the top lip. So here's where we have to kind of get creative. Get our clay brush build up on top of the top lip without making it too thick and smoothing it down. And see now we're just getting this. It's because my brush is too big. The smaller brush size. Just making this come up and around. And now I can see that I exaggerated cheeks a little too much in the last video. So I'm actually going to sort of fill in some of the space here because I want her features to be soft and round. Not like what I was doing before is actually a little more masculine. So what, that's not what we want if we're doing a female character. Want the proportions to be softer and rounder. I'm just going to build up the cheeks a little bit and build up the cheeks below the eyes, where it sort of connects to the nose. Just barely. Just enough so that it's more soft and round and not as Angular, not as extreme. And again from the zygomatic coming down toward the teeth here. This is all one shape that t-shaped like we talked about before. And this shape wraps up from the nose and around the mouth. So there's this shape and there's this shape. And they kind of meet together to create this sort of unique sort of face shape. Get our cheeks a little wider here. A little bit more. Okay, So that's starting to look more like a face. As you go. You're just going to have to exaggerate and play with the shapes. And the more that you understand anatomy and the way that the face is put together, the simpler it becomes to see those shapes. But I'm getting a little off-topic. So begun, we can make adjustments all day long, but we have to get back to sculpting the mouth. So see what I did here with the cheeks. We built it up and then just below, smooth it down so that it creates a sharp angle. And that gives us this sort of sharp looking, angular, sort of like chic look to the face. Very stylish. So now I'm going to take my damien standard and just carve in under the lower lip to just kind of force that shadow on the bottom lip. We're also going to take our Damien standard. And if you hold Alt on the Damian standard, it builds out, makes a nice thick edge like that. So if the shape of your bottom lip isn't quite right, you can use Damien standard hold Alt. And it creates a nice little shelf. I'm just going to try and get a basic shape first. Before turning on DynaMesh. Because that's going to help me a lot. Rather than turning on DynaMesh and just trying to start over, we're going to try to low Pali block in my shape here first and see how I'm just using as few polygons as possible to try and create those shapes. Here. It really just doing yourself a favor by trying to stay as low poly as you count for as long as you possibly can. Don't give in, don't give into the high poly. I used to do that every time, especially when I was first learning how to sculpts faces and characters in its edges. And going, Hi Paul II is and is not always the answer. Here we go. So now we have that top lip sticking out further than the bottom. Bottom lip is now tucking underneath the top lip. Okay, so now we're going to leave that alone for a sec and just focus on the chin here. Chin is very important the way that it fits in with the rest of the mouth. So again, I'm going to carve out a space below the lower lip and make sure that I have these fatty pads over here on the sides where they attached to the lower lip. That's very important part. And we'll carve down around, pick that sort of shape for the chin. And now one of my, one of my least favorite things is trying to get the shape of the bottom jaw, correct? So on the female anatomy, it's it's a software angle. So at it's never going to be a 90 degree angle. Ever. Unless, I mean, unless you're very old and here and your jaws shaped at 90 degrees, but that's very, very uncommon. So it's generally that's not going to be a 90 degree angle. So to help me kinda get the shape correct, I'm going to shape out the bottom of the skull. And now I'm seeing that my eyes are looking a little too close together. So I'm going to hold Control and Shift and click on the eyeballs and mask them. Control and shift and click again to show everything so that just the eyelids are showing and I'll use my Move brush to kind of move those in a little bit more. And back and end so that they wrap around the eyes born. And the face proportions are always going to be changing. And that's okay. So if we go back to our chin and to take my Move brush and maybe push this in a little bit. And the bottom of the bottom jaw that looks about right. And I'll put this little indentation in here, sort of force that shape of the chin. Maybe bring this down a tiny bit. And something to note. On realistic characters. The chin is not a point, it doesn't come to a point at the bottom. On a realistic characters like real anatomy, your chin is not shaped like that. It's shaped, It's very flat from the front. So some people, it's a little closer together, that gene is a little smaller, but generally, for, when you're talking about real proportions are real anatomy. The chin is slightly flat, right here in the very front. And a little bit rounded, but it's not pointed. Like if you look at anime characters and cartoon characters out of them have these angled jaws that are like, you know, like a perfect little triangle like this, where it's a very sharp angle like that. And that's not that's not as accurate for when you're trying to do realistic type scopes. So fortunately for us, this is more of a stylized sculpt, so we can kind of find a nice in-between there. But I like to kind of stick with semi realistic because I like to, I like to study realistic proportions. And I also like stylized characters as well. So we're just going to smooth that out, make sure that we keep that shape there that at sort of boomerang horseshoe shape for the bottom jaw. And that's looking that's looking okay for right now. So see how this shape of the cheeks, how we forced that to come across and down from the front, you can see some shadow on the cheeks right here. And that's because these cheekbones are very wide. So it creates that shadow for us, which is nice. So back to the mouth. Now that we're at this point here, if we hit control D and go up, now we have a 156 thousand points. Rather than using DynaMesh, I'm just going to go up a subdivision level, but that's entirely up to you. Personally, I like finding as foundation in low poly like this and forcing it in low poly and then going up a subdivision level because then the geometry is much more even and you can even see it now. The fatty pads here or standard out pretty nice. The chin, the shadow underneath of the bottom lip there. So all of our building blocks are in place now. And even though it was lower poly here will move up. It actually falls into place quite nicely. At least I think so. I think it looks okay. So I'm going to stick with this and now we're starting to get kind of a wide face. So I'm actually going to walk back down by holding Shift and pressing D, gonna go down subdivision levels. Because now you just have complete control over your sculpt or if something doesn't look right, you can go down to a lower level and adjust, adjust from there. And then when you go back up to a higher subdivision level, it looks a lot better. Okay. We have our mouth. It's looking okay at the moment, we again take our demon standard and carve even further in here, if we want to really force that separation between the top and bottom lip, pull the corners in and back rather than pulling outside. Decide we pull in towards the face and back, down and forward slightly, and then back and in toward the face as it wraps over the top. So that's a very as I feel like that was almost accidental that I got that on the first try. And I feel like it takes a long time to get that shape. So but we got it and it looks okay at this point. So now I'm just going to inflate the bottom lip. And the bottom lip is made of two pieces. So we can inflate it and then just cut it down the center. You don't want to cut to the bottom, you just want the cut to go in toward the top lip like that. Also this center part of the top lip. You can separate that by carving it on the sides of it to really pronounce that. So bottom lip, There's a line right in the middle. Top lip, lines on the sides of the center section. And again, we'll just use our flat brush just a little bit. So you just sort of have to play around with this. And we'll use Damien standard and just hold Alt to make that nice little shelf for the bottom lip like this. And very lastly, I'll just pull this in and back toward the face so that it tucks underneath there. But the bottom lip, you never actually see where it ends on the face. You'll only see where it comes out, but you don't see where it actually ends because it is tucked below the upper lip. Then we'll just inflate this a little more. Alright, I think that's looking good for now. So we have our mouth, we have our nose, memorize, getting everything into place, making sure that our character has a good foundation before we go too crazy, I will see you in the next video.
9. Sculpting the Ears: Welcome back. In this video, we are going to sculpt the ears of our character. So you can see I have my reference already set up here and impure href. If you want to move your image around, you can hold Control and click on an image and it will rotate it. If you want to get this at a more of an upright handle, for me, this will be just fine. And because we're doing a stylized character, I'm not going to go for an exact look of this realistic ear. We're actually just going to do a general shape with the most important parts in place. So to start, we need to go to sub tool, go to append and append in a cylinder. And Alt click to select the cylinder. And we'll just scale this way, way down. Snap to our front view. If you hold Shift in your front view, if your snaps to front view, hold shift, and click on the ring on the outside. And as long as you're holding shift, you can see the number below this ring shows you the number of degrees that it's rotating by. So I'm going to rotate it over to the right by 90 degrees. Pull it over here and scale it down so that we have a disc and this sort of shape here. I'll bring this over to the side of the head. So if we look at our reference here, the head, the ear is always lined up the top of the year is always right about where the eyebrows are, the bottom of the ears, always about near the bottom of the nose, or I guess in her case That's right about where the nose wings are. So if we stamp to our side view here, just want to place this where we can see it. So we can even just move it into place like this that looks actually about the right size, maybe a teeny bit smaller. And line it up with around the bottom of the nose. And the top is right around the eyebrows. And we'll put it here. And the ear always sets at just about the center of the head. So you have this shape here, it's right about the middle. Last thing to keep in mind is you want to angle this with the head, the same sort of angle that the side of the face is at. And we want to scale it down this way or rotate it back so that it matches this angle of the jaw. The jaw is going up and back at this kind of an angle. We want the ER to follow that same angle. So what do we do now? This is a situation where DynaMesh is going to come in handy. So I'm going to hit Q to go back into Draw mode. Closer sub tool menu. Let's go to Geometry. Find our DynaMesh menu. Dynamesh, and turned on DynaMesh. So you can see our active number of points is about 6000. And if you want to see the polygons, you can always turn this on. When I'm working on stuff like this, I like to keep poly frame turned on because that helps me to understand sort of what I'm working with here. All right? And actually what we'll do first before we start is we will go up to Z plugin, sub tool master and subtotal master and select mirror will mirror this over to the other side. So I'm actually going to work on this side first and make sure you have symmetry turned on. So that works on both ears at the same time. I'm gonna work on this side because that's the direction that my reference is facing, that I'll make it a little easier for my brain to kind of figure out what's going on here. So in our brush menu, if we select the standard brush or go to our brush pallet here and select standard under S. Let's just turn our intensity down. And we want to begin with this outer shape of the ear here. And actually at, so we just want to draw a very soft sort of shape or around the edge of the ear. And if we look at it from the side view, you can see it kind of bubbling out a little bit. That's okay. We want that. And I'll smooth this down around the edges. Not on the soft part that I just drew, but actually these sharp edges that are still here from the cylinder, smooth all of those sharp edges down. So it's a very soft, very round form. Now for this part here, there's this little piece that connects right where the, where the RBI they are hold is in the middle of the head. And this little part sticks back. So we're going to pull this back just a little bit. And we'll use our Move brush to kind of fill this out. That year has a couple of specific angles. So at the top where it starts at this as Archer angle at the top, it goes up and back and then up and over to sort of like a peak right here if we look at it straight on this way. So it goes up over to a point here and then down and back, and then curves around the backside of the air. So the angles should actually be the angle of the ear here. There should be kind of like a flat rate. They're teeny little bit of a flat right here. Oops. I'm using my age polish brush to get this. And then even a little bit of a flat rate here. And it's not flat, I guess I'm just using flat as an example to show you the angles that this actually moves out a little better. So the ear actually has this sort of shape and just bear in mind, it's up and back up to this point here, down and back to a point again here. And then there's even another flatter sort of angle here. And then it swoops down to the ear lobe, where, and in her case, the ear lobe actually connects. There are two types of ear lobes, or the ear lobes that connects to the head and their ear lobes that do not, that actually hang down and are separated from the head. Like that. This person's case. She actually has your labs that are attached. So I'm just gonna go with my reference and kinda stick with that. And we'll pull this up a little bit, maybe make these a little bit bigger. We don't want yours to be too small because then the look funny. We don't want that. So it will start to get the shape here. We get this arch up here to the top, arch, down to this little spot in the backward connects. And that can even be a little bit lower. She has very round ears. Maybe that's just a more of a female trait, but it's hard to see the angles on her ear. Maybe this isn't the best reference. So we're just going to go off of our reference. If you're ever in doubt, just go with the reference image. Don't try to guess. Just try to recreate what the reference image looks like. That's always the best way to do it. So now that we have this sort of buildup that we used our standard brush for. I'm going to use the Move brush to kind of push up and around and down. And it creates this nice little shape, this nice little shelf. And gives us more of a natural look for that cartilage and how it sits. And from this side angle, I'll move it in towards the head a little bit more. And then I'll start to, begin to form the inside of the ear like that. So we're just thinking about negative space here as well. Looking at the shape of the outside and the negative space of the shape and the inside of the ear as well. And notice here where the ear lobe connects, there's a large section here that connects to this back edge of the ear. So we want to try to keep that. I want to try to keep this section down here nice and thick. Before it connects and thins right here at this back edge before coming up and around again. Okay, that looks all right. Now if we hit W or via, sorry, go into move mode or hit W on your keyboard. And if you can't see your Gizmo when you press W, it's probably because it's on the other side. You can always hold Alt and tap somewhere on your mesh when you're in move mode, and it will bring your 3D Gizmo to that spot. So hold Alt and tap and you can move it around to any spot that you want. I just like to do that if I can't see it. And then you can hit unmasked mesh center button here. I'm going to hold Alt and hit this little reset button. And it's going to reset the orientation of my gizmo back to the world's origin of up and down. And we're going to use this just to rotate our ears a tiny little bit and move them out away from the head a tiny bit. Because our ears, if we look at our ears straight on there, they're not perfectly level with our head. They actually angled out a little bit. And I will also use this to rotate them full word just slightly. All right, Now we'll take our Move brush. I will keep working this shape here. So since we already pushed to this in the inside of the year, it's kind of sticking out the back, but that's a good thing because we're going to grab it from the other side and pull it toward the head. And that's just sort of how it will sit attached on the head like that. Creates that shape where it's actually connect to the head. And I'm going to switch to my head. Now. I will pull the geometry in where the ear is to make space for the year. That doesn't look great. And we just need to be mindful of where the jaw is here. And if we go back to our era, we might have be able to move our ear forward just a little bit and change the angle just a little bit. It's a lot to play with that a little bit until we get it just right. So now we'll use our clay brush on our ear, holding Alt to carve in and smooth some of this out because it's getting a little stretched out. And we have DynaMesh turned on. So we can also just click and drag, click Alt and drag outside of our object anywhere. And it will read DynaMesh. So now our topology is a little more even and we can just go in here and do some more sculpting to try and get the shape right. I'm just using the clay brush and just being really subtle. Very small, very small brush strokes to try and just very slowly get the shape right. If you do big movements, chances are, there's a higher chance that you'll make a mistake if you're making big brush movements. So very small, subtle brush movements are usually better. Especially if you don't understand what you're looking at. It's really easy to be looking at reference. And then stop looking at her reference and forget what you're looking at and lose perspective. And then all of a sudden you realize that it looks nothing like what you're trying to make. So just work slowly and patiently and just keep using your reference here. And we'll grab the head again. Sort of move that geometry out of the way for the head. And we don't want the air to be 2D. I think that's about as deep as it needs to be. That's actually probably a little too deep. So we'll smooth that out a little bit. Okay, so now we actually have a decent little outline for the IR going here. We had this part here. So that's in place. Next, we need to create this sort of this little fold that comes up and around down. So it's kind of difficult because it's, it's actually a series of folds. And again, her ear anatomy here is a little different than what I'm used to seeing. So this is, again, this is kind of a surprise, but this is good because it's just better practice to be able to see something different that we're not used to. So to get the shape, we can either use the clay brush and slowly build it. Come in and around. And you see how it comes in and down and actually sticks out pretty far. So we're just going to begin creating that shape here. And once I get about halfway to where I want, I'm going to take my ADME and standard pressure and hold Alt so that it builds the shape out and up. That doesn't look great. Actually carved this in right here. And then hold Alt to draw a nice sharp line. Smooth this out a little more. I'm not getting the sharp line that I want just because the geometry is not straight. Smooth all this out a little more. And Tresca. So you just sort of have to fiddle with. This is, this is my topology is so important. And why people make such a big deal about topology, because it is quite literally the ground for your, for your brushstrokes. And if you don't have good topology, you can't get good brushstrokes and you can't make things flow in the correct direction. So that's starting to look better. Vault. Kind of draw this up and out. Starting to look more like the shape that we want. And again, just holding alt and then carving and here to keep this down. And then we'll carve in here. Make sure that this is out of her way. Okay? So because the clay brushes so subtle, I actually need a little more force in this situation. So I'm going to grab my clay buildup brush. And before I do anything else, I'm going to DynaMesh and see how it kind of messed up our geometry. I put a couple of holes in our mesh. We're going to hit Control Z and we're going to turn the resolution up. It was at 128, so I'm gonna put it at 250 and read DynaMesh. And we're still getting those holes. So what we can do is grab our inflate brush and just once or twice, just barely inflate where those holes are. Then if we DynaMesh again, it will close those holes. That's just because the geometry got to thinned out on the backside, I think so. And that can happen. So we'll just inflate three DynaMesh, inflate three DynaMesh, and then just smooth this out a little bit. This'll be a little easier now that we've turned our resolution up to 250. For your resolution, it might be different, 250 might not work. It just depends on how big your object is in your scene. So ZBrush calculates DynaMesh based on the scale of your object. So if your object is really, really big, it's going to affect the way that DynaMesh read apologizes. Or if it's really, really small, then the resolution slider is going to read differently than what I have here. So just be mindful of that. Use our standard brush to kinda get back this round outer shape. And we go and we missed a spot here. So we're going to inflate this three DynaMesh, inflate DynaMesh and smooth it out. And now we can take our Damien standard. So actually it, let's draw a curve from here and the center coming down first. Think this will make this easier for us. If we draw this fold first. And just smooth it out a little bit and redraw it again. So we have this. And now we can draw this fold where it comes in and across right here. So we're looking at this negative, this negative shape right here. So this piece connects on the inside right here, comes up over and connects to this here. And now we'll take our clay buildup at just sort of force that shape in and then smooth it out a little bit. But just barely smoothing because we want to try to preserve the shape that's there. We don't want to get rid of it, but just want to smooth it out a little bit. So because the back of this ear is kind of messed up here, what we need to do is we need to smooth it out. Because the geometry is to Fanon's getting pulled through on the other side. So once it's nice and smooth, it's going to smooth this side, which is okay, because I can just build that back up again. But before I do, I want to move my reference. We need to go to brush and go to auto masking and turn on back face masking. Back face masking is gonna make it so that the geometry and this side is not affected. Sorry that the geometry on this side is affected, but it doesn't pull the geometry through from the backside. So back face masking is extremely useful. There we go. That's working better. So now we're not destroying their geometry on the other side there. So this actually comes down and around clay buildup. This actually comes down into here. So this wing comes down and connects above the ear lobe right here. I'll go and I'll use my Move brush to just sort of get this shape a little further down. Get that angle the way that I want it. So this is good enough for now. I think that's going to be close enough. Because honestly, we're probably going to be putting some hair on this character. It's probably going to cover the ears up anyway. And because it's stylized character, we don't even have to have realistic years if we wanted, we could just have deaf pointed ears because all characters look cooler with pointed ears, right? If we wanted, we could even angle these years out a little more. Even make them a little bit bigger, put them into place, and just kind of have fun with it. It doesn't have to be anything. It can be whatever we want it to be. And that's the beauty of having stylized characters is you can ignore some of the rules of realistic elements. And just, it just makes it a little bit more fun and a little less strict to just sort of play around with the shapes like this. So if you're not worrying about realism, you can just go nuts and just have fun with it. That's really, that's ultimately that's the goal, is if you're not having fun doing this, then I think there's something wrong with the process. So if you don't enjoy doing realistic, maybe emphasized more. If you don't like doing stylized as much and you like realistic, that's great too. It just depends on what you like to do. All right, Great. So that's, that's pretty good for now. And in the next chapters, we're actually going to get around to touching up our model and making this look more like a stylized character in a lot of different ways. So we're probably going to go back and adjust our eyes or nose or mouth. And even just the shape of the head, the eyelashes. We're just going to get into all that stuff in the next video. And I will show you sort of how I do my stylizing for my character's. See you in the next one.
10. Stylizing Your Character - Part 1 : Welcome back. And in this video we are going to talk about how to stylize our character head. So to begin with, what exactly is stylized? If we open up our handy search engine and we actually type in stylized, the literal definition of the word stylized is depicted or treated in a mannered and non-realistic style. So this means anything that is literally not realistic is stylized. So if you go into Google and type in stylized character and go to images, you can just scroll through this and just find tons of inspiration and reference of stylized characters, cartoon characters. And it's really awesome to just take inspiration from some of your favorite characters from movies or video games, things like that, and adding the elements of those characters to your sculpt. But I encourage you to just go and find as many reference images as you can. You know, maybe 10 or 15 reference images of different stylized characters that you'd like all different styles. And take elements from each one of them, like the hair from one, eye, lashes from another one. And sort of decide the style that you want to create for your character and for my character. I'm going to go with sort of a cartoonish sort of style mixed with a slightly realistic style where you can see the eyes and other elements of these characters are inspired by a stylized sort of, but they retain a realistic look at derive a lot of inspiration from him. So very cool stuff. So back in ZBrush, I have my pure ref for my basic references here. And on my other monitor I actually have a lot of reference images of stylized characters that I like from different artists that I like open on the other monitor. So I have tons of reference while I'm looking at this and this is going to help us sort of shape and decide what sort of style we want our character to look like. So let's get started is difficult to know where to begin when you get to this stage. Because you have all your elements in place and you have to adjust all of them for stylized characters. One thing that's really fun to do is kinda the Disney look where they have this knows that sort of comes down and in like this sharp angle of the nose doesn't look quite right. But if we get it up like this a little bit, they have this very specific bend to their nose like this. Does very stylized that angle of the nose like that. So that's sort of a fun style to do for stylized characters. But this means that the tip of the nose, it's going to be a little softer, smaller. I'll smooth this out a little bit. And I'm just trying to be careful not to mess up any of my features because I don't want to have to go back and redo a ton of work. I just want to reposition things to look stylized. Little bit less realistic. We're just moving our nose down a little bit here. And I'm just getting ideas for this from the reference images that I'm looking at right now. It's the characters that I'm looking at habit knows similar to this. Like the nose a little bit smaller on the bottom. And it's nice to using the Move brush here because if you see what I did here, when you grab this just below the nose and you push this up, it's going to create sort of a natural curve of the top ellipse, which is good. We get that nice natural shape, how it comes out of the face. And even here, we can use this to pull this back and create that natural shape of the cheeks where it connected to the nose right here and comes down and across. Because there's actually, I'll just draw it on here. There's actually a shape right here, like we were talking about before we made the nose and the mouth. There's actually a shape out wraps down and around the mouth like this. This is exaggerated. This isn't how it actually looks, but, but this is just sort of the line of where that wraps down. So we want to try and have the cheeks kind of puff out here. The mouth is an interesting shape. It's difficult to get that correct. Sometimes you just have to use your standard browser or some other Clay brush and just kind of hold Alt and carve in here to create that indentation and then smooth it out. And this is a little too exaggerated I think. But I'll just keep it there for now because I don't want to don't want to commit to that shape just yet. Then grabbing our Move brush, messing around with the cheeks a little bit more, bringing those cheeks out because we kind of destroyed them when we smooth everything out. Still trying to preserve the brow here. And in fact, I think the shape there is a little bit wrong. So I'm actually from the side, I'm just going to move this forward a little bit to try and create that temporal ridge, smooth it down. And I think my eyebrows need to be positioned down just a tiny bit more. And in the eye socket there. That's pretty extreme, but that's okay. Let's go back to the eyelids. So we're gonna take our Damien standard brush. First. Let's smooth this down just a teeny bit more. So the eye lids, this is an okay shape, but it could be better. So I'm going to hold Control and Shift click on the sphere. Mascot by clicking Control and clicking outside, hold Control and Shift click again to hide everything else. For in solo mode here, the edge of the eyelids, if we use our Damien standard, hold Alt and drag and it creates a nice sharp line. And this is more what we want. We want a nice sharp edge so that it looks more like this, like a straight sort of angle coming down. Because eyelids. Think if we look at our reference here, with that, the eyelids wrap around the eye. And I guess I can't find a good one here. There we go. If we look here from the side, it should come down at sort of like a straight angle that follow that curve of the eyeball. And then the fatty tissue that comes down from the forehead and the eyebrows sort of covers that and creates this line right here. So we're trying to replicate this look where there's actually that fold right here in the eye, on the eyelid where it tucks underneath this part of the eyebrow. So if we take our clay brush and I'm I my skull right now, I'm actually just going to draw. And I mentioned this in an earlier video two. Just going to draw this little corner of the eye, slightly larger on the outer corner like that coming down because there's actually some some fatty tissue right there that creates that nice little angle. And we'll go back to our eyelids them. Let's do the bottom eyelid. So with Damien standard, go into solo mode. In fact, I'm just going to show this by holding Control and Shift and clicking on just the bottom eyelid. It's just going to show that and nothing else away. I can just work on this and that's anything out. Hold all drag along this edge so that you get a nice little flat shelf right here. And if it's not flat enough, you can also take H polish or trim dynamic is another good brush. Just run it along the top. Trim dynamics a little too harsh. And we'll use age Polish. And you can just run it along the top. The small brush. I've determined intensity down here. It's a little too strong. There we go. So now you have this nice flat little shelf for the eyelid. So you need to move this in and up. And when you're working in 3D, it's a good idea to have the eyelids be a little thicker there. Especially if you're animating animating eyelids, you need some kind of thickness to them because it's like a it's like a little shelf and has to be able to move. So having some thickness there is definitely okay in 3D. Because it's got to be able to, it's gotta be able to have some, some movement to it. If it were just a flat plane, it could it could push through the eyeball or have some glitches while when you're animating it. So having a thicker I laid on the top and bottom is okay. And it makes it a little more pronounced. So from further away you can actually see it better. Now my eyes are looking too small. That's okay. I like this sort of slanted eyes like this sort of like coy, smile, sort of look. I think that's going to work really well for our character. I'll even scaled just the eyelids hub. I asking this sphere will do that. Some people prefer just to work on their eyelids. When they're making characters. They prefer to just sculpt it directly onto the face and that's okay too. I just prefer to do it this way with some tools. And if you, even if you wanted to, what you could do is hold Control and Shift. Click on the sphere of the eyeball mascot. Control shift click to show everything. And you can go to sub tool and go down to split and hit Split Mask points. And it will split the eyeball off into its own part. So that sphere is now its own sub tool. So the eye lids are just their own. And you can actually just take your head and duplicate it. Hydra other one as a backup just in case we mess something up. And same thing with the eye lids. We're going to duplicate it, hide the original. We can actually move it down R sub two a list by using this arrow. Hide the original. We want to keep the original because it has its undo history. So in case we mess anything up, we can keep that. I'm going to take this which was the copy of my head and this which is the copy of my eyelids. So I'll select my head. Go to merge and hit Merge Down. And it's going to merge the sub tool, the head to the subdural right below it. Now these are one and the same. So you can crank up your resolution really high. We're at a 188 thousand points. That's a lot. Dynamesh now, or at a million points. But if you turn on DynaMesh now, I'm just using this as an example. You can use DynaMesh to merge your eyelids. And this is another way to do it. And so now you can take your Damien ST header brush. And you want to carve in here, the corner of the eye. And in and down and over here, the outer corner of the eye. And that's actually not correct, that doesn't look right. I'm going to take our Move brush first and move this back, out, Back again. And just being very careful to keep these shapes together as one. And not to lose any of the detail that we've worked so hard to create here. Smooth this out and carve in here and the inner corner of the eye to get this shape in here. And then read DynaMesh. So this is just another way to do this. The nice thing about this too is now that you have these eyelids attached as you can use your Damien standard and just draw a nice sharp line here and a nice sharp line here. And you've got some, got some islets going on. And then of course, if you want to just draw on a mask with your mask tool, mask off the top eyelids, and just use the Move brush to sort of shape your eyelids a little more. So this is just another method, just another way of, of doing this. Some people prefer it this way, but personally I like to just keep my islets separate as they're an object because it gives me more control and it ends up looking less lumpy in the end because then I don't have to DynaMesh at a high resolution or I will turn the intensity down. And I want to trace this bottom lid and the way that it looks. Get a rounder shape right here and smooth this out. And you'll notice on my cheeks kind of create like a shelf right here. I don't really like that. So rather than inflating, I'm going to try my Move brush. First. I'm going to draw a mask on my eyelids because I don't want them to move, just want to move the cheeks. So we'll mask off this part, go into solo mode. And just using the Move brush. Bringing these cheeks up so that it creates a more round sort of shape. Underneath the eyes of these cheeks are so much bigger than I want them to be. And if we enter our mass care. Now just using the Move pressure, these cheeks are a little too puffy for the way the rest of the face looks. And that's not what we're going for. We don't want puffy. So I'm interested in what characters you guys are working on or what stylized characters you're using for reference. Because I honestly, I really like a lot of video game characters. I'll have classic characters. It was a big video game buff growing up and I'm a total nerd when it comes to video games. So I love that your game characters. And in some of my best inspiration comes from that kind of carve this line right here above the eyelids, coming up and down and don't do what I just did. Try to make it one stroke, one continuous line. And if, if you're jittery, if it's like this, if it's, if it's too difficult to make one single stroke, can, you can go up to stroke and you can turn on the lazy mouse. So lazy radius is naturally set to one. What happens if you set the radius to 50? Is it creates this little drag to your mouse. So it's like towing a trailer. It gives you a greater range of stability behind your brush. So you can even set the lady that you can go to stroke, set the lazy radius up to a 100 or 200. 200. And you can see that line is much, much longer. And this just allows you to see where your line is going before you draw the stroke. So if you're not getting an accurate enough curve, can always go in and use lazy mouse. So by default, lazy mouse is set. The lazy radius is what affects this. So lazy radius is normally set to one, which just means it's drawing right where your brushes or you can set your lazy radius up to, I usually set it up to like 40 or 50. And that gives me just enough to sort of trace the shape the way that I want. And already that's creating that nice little edge. For the eyelid carpus in one more time. Sort of just trace our retrace our our line going across. Right? Not bad. And of course there should be another line in here somewhere where this comes down from the face. Another way to get really interesting shapes is to mess with the brow and the bridge of the nose. So say, if I wanted this character to look really different, I could build up this bridge of the nose right here, really big. Build up the eyebrows so that they're very straight. And even take my slavish and just get in here like this, create a very prominent brow. And already this is creating a very stylized look to my character, which is just really fun to play around with. And that's sort of the part of the fun of doing stylized characters is finding new shapes. The new interesting looks. Taking things from different types of characters that you maybe haven't worked with before. And just sort of incorporating it into a new character. Now that we have the very, very last thing that I like to do to really solidify that extra stylized look, is we need to go to our brush menu and we need to go find the curb strap snap brush. And what this brush does, it's very neat, is it draws, draws a curve, and then it creates a strap in the shape of the curve the way you draw it. So the reason we like this brush is it's excellent for creating eyelashes or creating a nice little trace along. Almost like eyeliner on your character. So this is a really cool way to add some extra style to your character. Just draw a light curve on here, like this. Again, if this is not drawn straight, I'm actually going to go to stroke and turn on lazy mouse. So when you turn on lazy mouse, it affects just whatever brush you have selected. So before I had lazy mouse turned on for my damien standard brush. It's probably still on. Yeah, it's still on. So it actually for the Damian standard, if I don't want all I'll have to go in next time. It's like Damien standard end. Put the lazy radius back to one, back to one. So we'll go back in and get R's curves, strap, snap, go up to stroke. Turn lazy radius up to 60. And this allows us to draw a much more accurate curve like that. That's thick enough for now. So once you draw your curve, hold Alt and click on the head and it will make the curve disappear and it finalizes that curve. And what I like to do now is go to Select Tool and go down to split and hit Split Mask points, split masked. So now this is its own sub tool. So we can just work on this independently. But before we do that, I'm going to select the head again and I'm going to draw a curve for the bottom eyelid. And it can be the same thickness, maybe a little bit thinner. For the bottom. We'll make it the same. So for this one, have lazy radius turned on. You just want to follow that curve of the eye and stop just before you hit the other eyelash. Or it will overlap. Perfect as exactly how we want it just like that. If you go too far, it'll curve will overlap with the over the other eyelid. And it will put it on top of it, which is not what we want. So that actually worked perfect sense. If you hold Alt Tab on the face. And I'm gonna go back over to split as points. So sub tool, split, split mass points. And when you draw a curve like that, it masks everything else on this. I'm told that you have selected. So that's why we hit Split Mask points. Because then it's taking just what we drew. And everything else from that is mast is split into its onset tool. So this is now its own sub tool. Next we need to go to the top eyelid, top eyelash, and hold Shift and drag the intensity of our, of our smooth brush down to two or one so that it's really, really light. And I'm just going to hold Shift and smooth the edge of this down. Go to my bottom eyelid and do the same thing. And we'll do it on this end as well. Top one, smooth it. And you just want it to be a nice gradual, smooth. And what we'll do now is grab the Move brush. And I'm gonna go to Brush curve and turn on accute curve. Accurate curve is really going to help us out in this situation because the Move brush by itself isn't really designed for what we're about to do. So it makes your AGI curve is turned on. And it's going to increase the accuracy of how this moves so we can get it to contour to the shape of the eye a lot better. So move it down and up and out. Like so. So that it's sort of a nice little wing sort of shape are coming up off of the, I will zoom in here. Get this into place like this so that it's just touching the inner corner of the eye. Make sure that you have it sit just a little below the eyelid so that it covers up the eye lid. Using your smooth brush again, our Z intensity when we hold Shift is at two for a smooth brush. So we're just changing the intensity of our smooth brush so that we can smooth that down a little bit. I'll go back to the bottom. Eyelash, do the same thing. Thin, thin, thin. It should be a thinner line towards the inner corner of the eye for the bottom. When you're doing eyelashes just a little bit thinner earliest I like to do it that way because it looks a little more accurate to the way that people do makeup when they put makeup on their bottom eyelids. Because the bottom eyelid is very thin right there. Now we're just using our Move brush to bring this up and create that. Nice. There we go. If you can't see it, you can go into solo mode and just bring the tip of this out so that it meets just below the other part there. And we want this to close around the eye. So we're just using the Move brush, just try and get this shape the way we want it. I'm switching back and forth between the top and bottom eyelash. And for this shape, you can just experiment with it. And it will, depending on how you create the shape, it will dramatically change the way that your eyes look. And very next thing that I wanna do is I want to grab my color picker over here. So whatever color you have selected, because I haven't selected a color for any of these sub tools. I haven't applied a color. It's just showing me a preview of whichever color I have selected. So if I send it to white, you know, everything is white or if I set it to red, everything is read. It's just a preview. So I'm going to set this first, I'm going to select, set this to white, going to select my bottom eyelid eyelash. Select black. And then we're going to go up to color. And underneath color there is fill object. And actually I drag that down here underneath my color picker because normally it's not here. But for my shortcuts, I put it here because I use this pretty often. So I'm going to go to Color, hit Fill object. And what that did is it filled the bottom eyelash with black. So if I go back to white, only the bottom eyelid is black and my previews showing everything else is white. So now we can do the same thing for the upper eyelash. Just hold Alt and click on it. Go to black, hit Fill object, or go to Color it fill object. And now it's filled with black. So if we go back to our white, you can see that just the eyelashes are filled with black. And already this is looking, it's looking like a, more like a character now. And for now I think I will leave that alone. So we want to fill these eyes with a material. And what we can do is go to our material picker, and we can go down to the material called toy plastic. So toy plastic is extremely shiny and reflective and it's great for stylized characters because it makes the eyes look very reflective. So we have this, but it's affecting everything. We just wanted to affect the eyes. So with toy plastic on, we want to go up here where it says RGB. We want to select m right next to that, and that's M for material. So just like our color picker, we can now go to color and hit Fill object. And it will just fill those eyeballs with a material because we had M turned on. If we turn RGB on, it'll do color. If we turn em, it'll do material. So you can switch freely between filling an object with RGB for color or M for material. So now that I've filled my eyeballs with this material, hi again, go back and I can select the skin shade material which I like because it's a very soft mat to look at. My eyeballs are still filled with the toy plastic, which is very reflective and keeps our character more of a unique sort of character look. And now let's take the M. M will turn on RGB instead. So now we're switching from material to color mode RGB on. And change our color over here to read. And it will grab sort of just change this color picker over here to the top right. Move it slightly to the left and down to get sort of a skin tone. Now if I hit Fill object, it will fill my character's head with a skin tone. And same thing I'm going to grab my ears. Fill object. Go to material, go to my material. Skin shade is on, Fill object. So now my ears and my head r tilde with the material for skin shade and filled with the color of like a fleshy skin tone color. So now we are looking like a character. This is very cool. So this is good for where we're at now, in the next video, we are going to create the neck and shoulders, and we'll move on from there. I'll see you in the next one.
11. Stylizing Your Character - Part 2: All right guys. So for this video, I decided to make this video a time-lapse because my character face still needed a lot of work and there was a lot of sculpting to be done. So rather than walking you through it for another couple of lessons, I decided to create a time-lapse and just explain my process as you sort of see what I'm doing here. So a lot of the work around the mouth and cleaning up the geometry there was just done using the Damian standard brush and the Move brush and simple brushes like the clay brush. Just a lot of looking at the cheeks on the character and smoothing and using the Move brush to pull those areas out. Did a lot of adjusting to the jaw and the chin as well. So I use the Move brush and just checking my angles from the front and from the side. And just smoothing out and reapplying with the clay brush or Damian standard brush to get a nice, clean, sharp angles because this is a stylized character after all. So I do want it to look a little cartoonish. I like that sort of stylized look where everything has very defined features, very harsh angles are very clear definitions between angle changes and plane changes. So the mouth is a really difficult part to get correct. And I made the upper lip, I exaggerated it a lot. I really went overboard and made the upper lip a little too big when I was sculpting this, but that was just to make it easier to get in some detail, be able to inflate the lip out a little bit more and sort of work on it a little bit better. Same thing with a lot of the features on the face. I try exaggerating those shapes as much as possible. And when I say exaggerate, I mean, really take the Move brush or the clay brush and just make the shapes really big and really prominent. Like overdo it, do it a little too much. And it gives you an idea of what the character is starting to look like. And it allows you to either go further with that and push even further. Or if it's too much, then you can always dial it back and smooth it down and make the shapes like a little smaller, a little less defined. So it's a good idea when you're first starting out with a character like this. Try to get in there and do some features on the face, the cheeks, the mouth, the nose, all of that try to really play with the placement, you know, the how high or low they are on the face and, you know how prominent each of those features are like are the cheekbones are really, really prominent? Does the nose have a really wide angle at the front? Is the bridge of the nose extremely flat or does it stick forward really far? How big are the lips? Does the top lip stick out more than the bottom lip? The chins tuck forward or is it a smaller software chin? Just try to look at all of these things and look at lots of reference and use as many different types of faces as you can to give you inspiration and kind of understand the different shapes that you can play with and how you can really experiment with your character and try to push those shapes to create something unique looking. Even something as simple as adjusting the nose and mouth can make your character look completely different. So there are dozens of ways for you to mess with every single part of the face and experiment with the shapes they're getting it accurate is very difficult at first, especially if you're new to sculpting, but just remember, It's supposed to be hard. If you haven't done this before, It's going to be a challenge, but stick with it. Just take one piece at a time. Do the mouth, then do the nose, then do the cheeks, then do the chin. Focus on each part individually and it will help you understand every separate piece much better in order to bring them all together as a whole and make a character. Anyway, don't lose faith, especially if you're having difficulties sculpting a particular part of the face, it's just gonna take a little time and practice. Be sure to study by looking at reference and asking other people for advice and help. And don't be afraid to ask for feedback and ask your friend or somebody else who is going to be honest with you if you want an honest opinion on your work, just ask them if it looks right or if it looks off and what about it looks wrong? Use that to improve on your work and get better next time. In the next video, we're gonna get into creating the neck and the torso for our character. I will see you there.
12. Neck and Torso: Hello everyone and welcome back. We are going to get started on the neck and shoulders in this video. First thing right off the bat that I can see I have to make some adjustments because my head is way too tall. So we're going to take care of that first really quick. We look at the side view, side view, the proportions like okay, it's just, it's just too tall. So and if we turn off perspective here, it's definitely too tall. So we're going to fix that. So we'll just got my Move brush. And from the side we'll just bring this down a little bit making sure that I want to keep the shape of the skull. Correct? Yeah. So that looks that looks all right for now, let's get onto the neck and shoulders. If you just can't seem to get the shape of the shoulders and you just can't seem to get the shape of the chest when you're pulling this down with Remove Brush or any of that, like if it's just not working for you. But another really great way to do this is to turn on Sticky Keys, just getting. So another great way to do this is to go to sub tool and go to append and append in a cylinder. You can do this for your neck and just use your Move Gizmo and snapped a side view. Scale it down, scale it up, and just put it in position like this. Some people love to do it this way. Because then you have something super low poly that you can just pop into place and just have ads to your neck. And then you can do the same thing for Mexico. Just going to hide this. We'll select our cylinder so we can get this in place really quick. And if you want, you can go to append again and appended another cylinder and just grab it and move it down. Get it into place. For the torso. The torso. When you're doing a stylized character like this, generally is made up of a few pieces. And a really great way to get those shapes into place really quickly is to use a cylinder and to make your brush size really big and then smooth it down. And that's obviously really low poly, so it's just going to smooth out super fast. So if we just very gently smooth it, move it into place. You can get the angle of the chest coming down like this and the angle of the back. Use your brush to pull out the shoulders here. The advantage to this is that now you can get the natural pose of the ribcage. Like this. Am just by pulling this down. And this is where knowledge of anatomy comes into play. Where just knowing where the ribcage begins and ends and where the next part of the torso is supposed to begin as well. So with this place, from here, what I've seen a lot of character modelers do is they will then append in another cylinder, snap side view, move it down and change this angle here. For the second section of the body, angling it slightly forward where the ribcage meets the abdomen or the abdominal muscles. So you can get this into place very quickly. And then if you want to append in a new cylinder or just hit Control Shift and D to duplicate your current sub tool and just pull this cylinder down and back. And very quickly, you can just get all of your shapes into place. Now the shoulders. In fact, I should have a reference image up for this. But for the shoulders. What we want to do is we want to go to sub tool and go to append again. And this time I'm going to appending a sphere, right? Grab that sphere, move it down, scale it down. I'm going to place it here at the end of where my shoulder should be. And these are the deltoid muscles. So the deltoid sits on top of shoulder right here. And if we grab our clay buildup brush, the clavicle or the collarbone. This is pretty low poly, so I'm going to hit Control D. I'll hit Control D one more time. So I have a little more geometry to work with. So the collarbone is sort of that V-shape right here and it actually comes across. And generally collarbones are very straight. It doesn't angle down like this. It's not a V, It's in the very center of it. There is like a V-shape, but the collarbone actually connects here in the center is 2, two separate pieces that connect in the middle and then come straight across. At least in a relaxed posture, come straight across to the top of the shoulder and connects with the scapula or the shoulder blades and comes back around this way where the shoulder blades, our shoulder blades are here. And the shoulder blades are kind of like a triangular shape like this. This is very exaggerated of course, but I'm just showing you this, this really basic anatomy so that we understand how all of this is connected. And if you look at pictures or you look at reference of your collarbone, it actually makes a nice little triangle going from the center of the ribcage here over to the top of the shoulder where it connects to this other bone that is connected to your shoulder blades or your scapula. So there's two pieces that scapula with its own little piece here and the collarbone. And they connect on the very top of the shoulder. So to get this nice little triangle going here, it's going to give us a much better map for what the shoulders and the neck are supposed to look like. And now we turn on Sticky Keys. So this little sphere here is going to be my shoulder muscle or the deltoid muscle. So I'm going to go up to Z plugin, subtotal master mirror, x axis, but it's on both sides. And I will just got the Move brush. And we're just going to make this into a half sphere so to shape. So this is, this is kind of what the shoulder muscle is shaped like. It's like this but it's elongated, it pulls down like this. You've probably seen this a lot in comic book characters because they have, they're very muscular or they're very buff. You know, they have big shoulder muscles. A great way to make your character shoulders look correct is to give them the proper anatomy. Give them the muscles in the right place. That's really all that anatomy is. And if we know where the muscles are and the bones are, or at least the most prominent ones are the most visible ones, then that's going to help us the most when we're making a character. So let's pull this down a little bit of the neck. Actually it looks little longer because from the front it's looking pretty short. I guess that's just the angle of our character. That's okay. That should be all right. So we'll pull this forward like this, match the jaw. Little better. And we want to get that curve, how it curves back from the front, the front of the ribcage curves back in and up and forward into the Dragan. And that looks okay. Next on the neck, we're going to hit Control D couple of times to get a little more geometry there. And we'll grab our Damien standard. Now, the sides of the neck, there are these, there's one on each side. It's the sternocleidomastoid. It's this big muscle that runs from behind the ear and comes right down and meets right at the collarbone on the neck. So there's a couple of ways that we can outline this. It's one of the big defining features of the neck and it's really important to put it in there and just block in that shape. Can grab our clay or clay buildup brush and just draw it. Just draw a line straight from what happened here. Sake, I lost some symmetry on this. Loss symmetry on my neck. So I'm going to go over to mirror and weld. I already put that up here. Mirror and world. Mirror and wealth can't be applied to an object with multiple subdivision levels. Of course 0 geometry, going to delete my lower subdivision because I don't need it. And now I will mirror and wealth. There we go. There we go. So sternocleidomastoid you can draw with your clay brush like this, which is okay to do. But then you're left with this kind of bulky sort of look. So what I like to do is grab my damien standard brush. And rather than drawing it in, I just carve in our round where it's supposed to be. And this makes the neck look a little more natural. Because then you're not just building shapes on top. You're actually taking the shape of the neck AND accentuating the shape of the muscles instead. And there's also this where the or the back muscles come up and connect into the neck as well. There's another place right here, so I'm just going to carve in right there. And down, smooth that out a little bit. Now we're just going to slowly work on each part. So the deltoid muscle is separated into three parts, the center and two sides. So we're just going to gently cut in that shape. Let's move this down a little bit. And it doesn't have to be a huge, huge cut or anything. It's just to kind of give it the shape that we want. It looks fine. And now we're going to switch back here to our clavicle. Make this look a little bit better. Also, if it's too much trouble to be working with so many different sub tools, you can also just merge these pieces together. I'm just avoiding doing that until I block in kind of where my muscle placement is first because then it's going to look better when I merge it altogether. Let's just about doing the foundation right? Before you move on to details. Again, grab my cloud brush, get this scapula sort of in place. Scapula is actually a little bit longer than this. And this is where reference really comes in handy, especially anatomy reference, like the book anatomy for sculptors is an excellent, excellent book for reference, for anatomy, for all of this, for the whole human body. Excellent. And it's really nice because it shows you 2D images, 3D images. So it really gives you a breakdown from a lot of different perspectives of what the muscles are supposed to look like. And it gives you some perspective to kind of gives you a way to think about it. It's sort of designed for taking something from 2D and translating it to 3D, which is why it's called Anatomy for sculptors. Of course. That's great book. I would highly recommend it and learned a ton from that book. And I still use it for reference, especially when I need anatomy and stuff like that. It's it's excellent. All right. I guess what I'm saying is, don't do all this without reference. Don't do it without any reference because that's what we want to cut corners and we want to take shortcuts naturally. But the, at the end of the day there is no better way than just doing it right. And you could spend hours with no reference doing it wrong and not realizing that you're doing it wrong. And then when you do look at reference, like say you work on this for a couple of hours and then you finally go and you're like, okay, that looks good. And then you go and you look at your reference and you realize that it's completely wrong, then you just wasted a lot of time. And that's just, that's just too bad. You don't ever want to have to just be wasting your time. And now what we need to do is we need to get our Move brush or the clay buildup brush. Either way, I'm going to take the Move brush for this one and just pull this part up that's above the shoulder blades. Because this is actually the muscles in your back come up and connect to the back of your head right here. Like so. And there's actually two of them. There are there are two sides. The left and the right side also comes down and over across the shoulders like this. And you see bodybuilders and guys that work out this muscle a lot and it sticks out a lot. Especially when they hunch their shoulders forward. It's because it's actually a part of your back muscles that come up to the back of your neck and across the back, top part of your shoulders. And connects sort of covers the back part of the scapula there where it connects to the collarbone. Looks like our character's pose. Maybe it's just the way the camera angle or something. Looks like she's kind of sticking your shin out a little bit. There's something wrong with this front pose. Can't quite place what I did there. That makes this just look wrong. It doesn't look right though. I need to fix that. It could just be the angle of an act, could be the angle of the torso and the neck. The relationship to those could just be everything, gets a little bit everything. Now that we have our ribcage and we have our neck muscles, and our back muscles and our shoulder blades. Now we can take this part which will be torso or because they abdomen. And we'll hit Control D a couple times to give us more geometry. So symmetry turned on, smooth this down a little bit, and I will move this in just a little bit to get the arch in the back right there. You can see how these pieces slowly start to fit together. And and it just takes practice, the more, the more you do this kinda stuff, the more you start to just see these shapes. It's just about really just studying, practicing, and watching other people's videos and seeing the way that other people do it too. So that you're not just doing everything the same way every time, just try to get as much perspective on the matter as possible so that you're experimenting and always coming up with new ways to see things. So really if you know where the muscles are, where the most important muscles are, then you know how to make a person there, you know how to make a character. And we're just doing a bunch of tiny adjustments. And this angle of the shoulders is really important. This angle coming down and across here. And we don't want our characters neck to be too thick, to be nice and elegant, want our character to be more feminine. So I'm making sure to try and control those angles as much as possible. Let's get the torso lined up here. So in a lot of like cartoon styles, you'll see that the girls have incredibly thin waists, obviously. Which is very unrealistic and that's fun to do. But it's also incorrect to do. So I don't know. I I prefer to just kind of stick with more realistic proportions because I think it just looks more interesting. Instead of just exaggerating the heck out of the, out of the shape. So realistic proportions. The torso, the rib-cage comes down, meets just above where the hips begin. And it's not this extreme angle like this, more almost straight down. And then at the top of the hips is where you get that dramatic angle change. So for a right here, I'm just going to do that. They're just pull this up a little bit more. And we'll pull this forward for the belly a little bit. But for the abs that just pull that down and that's good enough, that would make a nice stopping point right here. Because that will keep it looking very statuesque.
13. Torso Continued: All right, what I've done here is pulled up a reference image from my same reference back to kinda show some of that anatomy that I was talking about. So of course we have here the collarbone, how it connects and connects up to the shoulder here. The next important thing is we have to get into creating breasts for the character. So append a new sphere. And it's very easy to get this shape wrong. A lot of people, if, especially if it's your first time ever making this sort of shape, it's not perfectly round. You don't want it to look like. You don't want it to look like this. Or or this because this is not the correct shape. So female breasts are actually more teardrop shaped. So if you grab your brush, grab the top and pull it up and back. This is more the correct shape. And now you can press W and angle it back and in so that it sits more like this on the front of the chest. This is more than natural shape that you're going for. And now it's just about sort of angling it and putting them in position. The angle is kind of tricky, but generally shaped up like this. Going back and toward the body, like straight toward them, back toward the body like that. That looks about right. And then putting them into place. And they don't. The most difficult part about doing this is getting the gravity. Correct because obviously this is very fatty tissue, it's very soft. And so it falls very naturally. We've gravity. So getting that shape is very hard. Getting, getting it correct is very difficult because it's not a round shape. It actually sticks out and forward more from the body like this. And almost sort of flattens out at the bottom little bit. So it's very difficult to get that shape correct. But just be mindful of the effect of gravity on soft fatty tissue like this and how it sort of affects the way that it falls and the way that it sits. Otherwise, it's just not going to flow or curve naturally. And you'll end up with something that looks kinda weird or out of place. Once we have a general shape for this in place. When I like to do is you can see here in the reference how where the breast connect here on the chest. It's actually also connected to where the pectoral muscle or the PECS across and wrap over and into the upper part of the armor here. So to show that it actually come across and up and over like this and almost meets at the base of the shoulder like this and comes across. So it wraps around and over like that. And there's actually sort of like a concave shape for the armpit right underneath that. That's how you get that armpit shape. Armpit shape. And it's been a long day on Monday, but it feels good to be sculpting. So anyway, that's sort of another shape it to keep in mind is how this comes up and over and across and into the arm as an exaggerated version of it like this, up and over and across. And that's how it connects. And the same thing on the back, it doesn't look very similar. So one way to just sort of block that Shapin is to just kinda do the same thing, like from the shoulder blade. Just carve that shape up and over and across. And it gives it a very a good natural sort of flow with how the back connects to the shoulder like that. So that the armpit is naturally formed from this. If you put an arm in there, then the armpit is already made. You don't even have to do any other work. It's already made from the front part that connects and wraps forward. And this front that connects as well. So it's almost just a natural sort of shape just by knowing that these two muscles connect, one in the front and one in the back. And at this point, we just sort of have to play around with the shapes. Until we get something that looks more natural, something that fits a little better. Because right now it's pretty rough, but it's gotta kinda mess around with this until it looks right. And that's not quite right. Quite yet. Just smooth this down. Bring this in. This angle, can come in a little more here, out a little more on the sides. And just keep using your reference. Just always be, always be looking at reference. Here's our inflate brush. Smoothest down. Way too much. So I'm not talking too much, I'm just staring at the reference trying to get this correct. This is difficult. It's not a, it's not a simple shape, It's a very complicated shapes surprisingly. And it just makes it all the more complicated when, when you try to think about gravity. And that's a very hard thing to do, is to sculpt things affected by gravity. But that's why things like figure drawing and figure sculpting are so difficult. Because the human form is very complicated, has a lot of different turns and angles and it's just difficult to get things like that correct. Takes a lot of practice. A lot of higher. Angle this out a little more. These were facing inward a little too much, so we need to rotate them and move them outward from each other a little more. That's good enough for now. And we can always go back and change it later if it's not the way we want it. But for now that looks, that looks fine. That's fine. And a good way to tell is when you can switch to another sub tool and you can just sort of see the shapes merging into one another smoothly. That's a good sign that your angles are starting to line up. Things are starting to merge together more nicely like that. So that's looking better. Now, very last what we want to do here is we want to make sure that the ribcage. And if you look in our reference here, you can barely see the outline of her ribcage. Rib cage just comes just below with oppressor and goes down at over and back right here. So it comes up in this central arch. So actually my ribcage is not low enough. So I'm just pull this forward just a teeny bit down. More like this. This looks about right. So we get this sort of shape, sort of like wing-like shape. Comes down and forward. It's very round, a very round shape from the back. And it comes down to it's little rounded point there on the side of the body. And make sure that we keep the roundness curve of the ribs sticking out from all angles. And we'll use our H polish just to flatten this down a little bit because I think I rounded it out too much. That's okay. That's fine for now. Add clay clay buildup to sort of so the top of the ribs actually have this sort of distinct. You can kind of see it right here. It's almost just like this little like it's the top of the ribs. So it stands out almost like a little like lip or a little shelf that sort of sticks out like that. So I'm gonna get that natural look sort of like that. And this allows us to go into the abdomen. We're going to pull it forward a little bit so that it matches curve of the ribs. Just have it sitting just just inside of the ribcage like that. So the ribcage 64 just a little bit. But the belly. Comes forward even more. And it's very natural for something that a lot of artists miss, or something that you don't always see is where the belly sticks forward. Right here, right around where the belly button is. And it creates that natural line or natural curve. And just to show you an extreme example, you can see where her abs are here. So you have 44 abdominal muscles. You have the top. Second, third, which is where the belly button is, and then below that is the last set. But the bottom of the third add muscle is where the belly button sits. So I'll just outline this very generally. You can, from the middle point here, from the ribs, you can just kinda like draw a nice circular shape going down. So if we had our hips in here, you can see here the her here. The hips meet up with the bellybutton. Top of the hips meet the belly button. So because on this character, this is about where the top of the hips are supposed to be. That's about where the belly button supposed to be. Any more geometry. So I'm going to hit Control D. It's got a little bit more. Belly button is supposed to be right about there. And actually I did this wrong. First, I'm going to go back here, hit Control D one more time before a curve, this line in. So we'll draw the belly button first, That's right about here where the top of the hips were. And then we'll draw this abline coming down like this. And the last set of the abs, the fourth set, goes right below the belly button. So we have another set there and other set there. And these shapes are very approximate. This is not, this is not super accurate. I would say pull up a muscle chart or pull out your book and enemy for sculptors or something like that to get the shapes of these abdominal muscles, correct? This is just a really loose block out for this, but it's not going to matter for this character sculpt, because we're most likely going to cover up the stomach with something anyway. So it's still just a good thing to know about and to keep in mind. When you're working on a character like this though, the placement of the abdominal muscles, stomach comes forward like this at an angle. It's not a straight down, It's actually bends out and forward naturally with the curve of the back like that. And then of course, the hips are up in here, right about where the belly button is. So if we go back to our shoulders, this is separated into three parts. And actually the center part is larger, much larger. You can't really see it on her, but this muscle, the shoulder muscle here, comes across and down and wraps over the top of the of the arm like that. And from here, what we can also do to get the arms into place, we can just append in a new cylinder. Use our move tool, scale it in one direction, scale it down. And just with snapping our camera angle from side to front to side. Now, if we put in an arm here, we can just move this shoulder muscle into place, make it look a little more natural so that it's sitting just on top of the shoulder and just on top of the upper arm like that. And that is how it's supposed to sit. And you can also see the armpit is already formed there from these other muscles though, where it connects in the back, connects to the front. You have that natural muscle formation there for the armpit. So that's already in place. Anatomy, studying anatomy is, is key to all of this and all makes sense. Now, when I first started studying anatomy, I thought it was I bit off way more than I could chew and it's a lot of information. But really, once you get to the point of just understanding the most visible muscles first, like the shoulders, clavicle, muscles in the neck, you know, the ribcage, the abdominal muscles, just the most prominent muscles like that. The ones that you can see on the surface most those are the ones to focus on first. And that will give you the placement. And I'd put all the pieces together and then you have all the building blocks. And it makes your job so much easier from there. Now from here, upper arm and lower arm are going to be the same length wise. So we can hit control shift and D with our ARM selected and then hit W to go to our move tool. Turn on symmetry. Go to our move tool, and it just duplicates the upper arm as another piece that becomes the lower arm. Can just rotate it, get it in place. And now we can just pose our character however we want. All right, so we've got ourselves setup now we have the neck and the shoulders. We even blocked out the arms, hand, main part of the torso there. In the next video, I will show you how to get on to creating the eyebrows and the hair. I'll see you in the next one.
14. Starting the Hair: Welcome back to another video. And in this video we are going to do the hair for our character. Before we get started, I want to talk about hair shapes. So what we need to do is we need to go and look at a couple of other reference images that I have set up here. So for hair shapes, it's important when we're thinking about, when we're thinking about sculpting hair that we look at things in as few large shapes as possible. So as you can see in this, she has bangs that come down to this side here. And it's important that we highlight, or in this case, I'm just going to trace over these large hair shapes. So this is all one large hair shape here where the bands are separated in her hair here. That is also sort of a dividing line there. So there would be another big shape on the other side going down. And then all of this, the bulk of this part of the hair is all one big shape as well. And then of course the button Is a couple of smaller shapes like this. So you get the idea. What I'm doing is I'm trying to break down my hair shapes. And this is going to help us a lot when we start sculpting because it's going to help us see a general shape. And then on top of that we can layer larger shapes. And looking at hair from different angles, of course, and trying to figure out that contour, the directionality of the lines and how the hair is actually moving is super, super important as well. So this is just a good practice. Take some reference images from Google images of different hairstyles and trace the shapes. Try to break them down and simplify them into as few large shapes as you can. And that is how we're going to start our hair sculpt on our character. Okay, So when we are creating hair on a character, we want to break down our hair shapes into larger sections. So first, take a couple of hairstyles or one hairstyle that you like from Google images as your reference for your hair cell. I have a couple of reference images up on my other monitor, but I can't show them because I don't own the rights to those images. And we're going to hold Control. Get our mask lasso brush so that you can draw a nice lasso shape. And let's select our character's head. Go into solo mode. And we're just going to draw out a shape with a mask in that shape of the hair line. Just a general hair line like that. And if we unmask it, that looks approximately where we want it to be. The hairline can be a little bit lower here in the front. So add that in a little bit. And this is different. All hair cells are different. All characters are different. Can even go into your mask pen. And we'll get this to cut in at the right angle here. Like that. Now that we have our general hairline shaped out, we want to go to extract. Or you can also go to Geometry, I'm sorry, sub tool, scroll all the way to the bottom and extract his down here. I'm gonna change the thickness to be 0.03. It's just showing me a preview image of it. Okay. That's about the thickness that I want. Like that, like in real world measurements that's about an inch sticking up off the top of the head or what you eyeball it it looks like an inch of hair sticking up off the top of the head. So that looks okay. So without moving my camera, I'll hit Accept. And now this is its own sub tool. Can clear my mask. So we want to change our color to white so that we can see this. So it's not the skin tone. And oops, before we use the curve alpha brush to create hair strands, we have to create to block out the basic hair shape. So if I go into solo mode, you can see all of this is, oops, what happened here? So it looks like I had some bad geometry on the top of my head there and it extracted it into itself somehow. But that's okay because what we are going to do with this hair, even if you have bad geometry, can always fix that by going geometry and turning on DynaMesh. With DynaMesh active, you'll have lower active points and it'll be easier to just smooth out your geometry light work. So I like to do this and just immediately just run this MOOC brush over everything to kind of soften out all of this main base shape. The reason we're creating this shape first is we're going to put our hair strands on top of it. And it is going to make the hair sit more naturally on the head. Because otherwise if we just drew hair strands directly on the skull, it would look pretty flat honestly. So it's important this just kind of builds up the volume. Our hair shape and gives it something to sit on top of. Because what we can do now is go into our brushes and grab our snake hook brush. Make sure symmetry is turned on. And I'm just going to pull this all the way down. In fact, what I'll do is grab my mask lasso first. And we're going to mask everything on top of my hair and everything in the front so that the only thing that's allowed to move this back portion here. So if I grab my snake hook brush and I pull that straight down, It's just going to create a nice straight pull. Anything about snake hook to this brush is great because you see the way it stretches this geometry. Well, this isn't necessarily a bad thing. This is actually creating a more of an interesting shape. Then we could originally create, sometimes even more interesting than we could create on purpose. So snake hook is really great for just creating unique shapes. Again, this is where reference really comes in handy. So important to just look at the way the hair falls and the way the hair sits. Because obviously it doesn't just go straight down through the character. There's a lot of, wait, a lot of gravity to hair because hair is extremely thin and light. So this is something too. It's just gonna take a lot of time and practice and, and looking at shapes and just, you know, studying. You just got to study it. I'm liking what this nick brushes doing here because if I DynaMesh now, I get to keep all of these cool looking shapes that it's stretched out. And if I smooth it down, it even gets to paving it to keep it a little bit. I think it looks pretty cool. So I'm gonna keep it like that. I like that. Creates a nice a nice look. I'm just trying to block in the how much hair I want, how long I want it, and just the general fall or general curve of the hair too. So because gravity is important, we want to make sure that our hair is not completely straight, that it's not just going down at a perfectly straight angle. Want to make sure that there's some movement to it, some, some flow to it. And this will make our character look much more interesting and will make the silhouette a lot more interesting to. And you can always pull down this your little silhouette window on the side here to make sure that you're getting the shapes that you want. Another thing to keep in mind when you're looking at the silhouette of your character, is make sure that the shapes don't interfere with each other in the silhouette too much. So if I made this super wide like this, if I look at my character from the front and well then it completely changes the silhouette. Now you can't see the contour of the body at all. So by making sure that the hair is staying kind of behind my character, I'm still retaining the Silhouette from multiple angles of the body. From the side, I want to keep a little bit of a gap between the back and the hair so that you can still see the curve of the back here. Just something to be mindful of. Now, I got all this here. All right, I'm going to show you a little cheat that I figured out here. And it is using the mask lasso. So if we look at our hair, one thing about a hairstyle like this, I'm going to turn off Perspective mode so that I get a perfect side view, snap to side view. I'm going to use my mask Lasso just to cover the front portion right here. And you would see this if a girl is wearing like a like a hair like a hair band on top of her head like this that tucks and behind the ears. So imagine that this line where I drew this mask line is like a hair band. What happens to hair? When you do this? And in popular hairstyles, if you go to defamation and goes to inflate and just inflate the back part of the hair. And it raises it up like this. This is a more interesting shape that's a little too extreme the first time. Like that. Something like that. This is a more interesting shape to look at. At least I think because it gives the hair more body, more volume in the back and allows you to separate from the front section. So there's actually a distinguishable line between the front and the back section like that. And it just creates a little more of an interesting silhouette even from the side. It kind of creates more volume to the side, to this back part of the head here. Just on more unique and interesting shape. And other characters that you can see. That I have this r characters like Zelda from Legend of Zelda. She has hair that sticks out at the back like this because she has her crown and it's separated by the hair. The hair is separated into separate shapes like this. So anyway, that's just a nice little cheat. If you want to have a cool little separated style of hair strands like that. Now we need to get some bangs and we need to get some side subside hair going side here. Know what I'm talking about. So in order to do this, I'm going to have to mask off all this here. Grab my snake hook, or just going to pull this down on both sides. This will be this will be the placeholder for when we create hair strands using our hair brush. And it's going to be a lot easier. But this here, to just draw the strand coming straight down because it will rest on top of this. And then we can just get rid of that later. It's just a way to guide the hair strands to where we want them. So because I'm having trouble moving this right now, I'm going to go up to brush curve, turn on ACU curve, and grab my Move brush is allows you to just pull things at a much straighter angle. Means that everything is going to follow the directionality of your mouse cursor a lot better, a lot more accurately, or go. All right, that's good enough. So that's just going to be a place holder for the hair strand and it doesn't have to be long because the hair strand when we draw, is going to sit on top of that and I'll show you what to do with it. After that. We just want to make sure that I don't mess up this where the hair is supposed to be sitting on top of the head like this. Okay. So identified the large shape on the top of the head, a large shape on the back of the head here, where the hairstyle sort of divides into a larger back portion. Now I want to do my bangs. So to do that, I can either I can either go back to my head and mask off another area there and hit extract again. Or I can even append in a new object like will be the easiest to deal with here, maybe a sphere or a cylinder. Let's do a cylinder because the cylinder is already well cylindrical. So I'm going to scale this down. Get it to just about the height of the bangs, how I want them. And then we can scale it out this way so that it will look like it'll wrap around the front of the head a little bit. Angle this back. I need to turn perspective mode back on. So I'm just using the shape of the cylinder to create a bank's core, to create the start for some banks like this, when you are looking at a cylinder from the bottom, one thing you can do is hold Control, Shift and Alt at the same time. But make sure when you hold Control and Shift that you have selected a rectangle on. Control shift is your select your others like crush that you can hide parts with their show parts with. So Control and Shift, turn on select Rectangle and Control Alt Shift and get her red box and cut off the back end of it like that. And now with this part, what I just did, this red box, it hides whatever is inside of it. Similar to like control and shift and doing this, just isolating a certain part of your, of your selection like that. So Control and Shift just shows Control Alt and shifts hides whatever is inside of the selection box. So I'm going to Control Alt and Shift and hide the bottom part of the bangs like that. And then with that part hidden, I'm going to go into Geometry, modify Topology, and delete hidden so that the part that is hidden is now gone. I deleted it from my cylinder. And then I can go over to Close Holes, close that up. And now I just have half of a cylinder. So it's very quick little trick for just taking a base shape. Hiding the half of it, delete, hidden Close Holes. And now I just have half a cylinder to mess with, just great. It's a lot easier to mess with less shapes like this. Less geometry, I should say. Rotate it to place. Going to get this proximately how we wanted. And again, I'm looking at reference on my other screen right now. So I'm not just not just winging it or I'm trying not to to just wing it right now. Trying to get all my shapes as close to my reference as I can. Try to get these cool bangs in here more, right? You can see where I'm going with that. Tuck this back shape into here so that the banks stick up more. Yeah. Now it looks looks approximately, right. That's looking more correct. Now, if your smooth brush is too strong, you can hold shift and turn down the intensity. Alright. So now we're starting to look, you know, what I'm gonna do right now. Then I forgot to do in the last video is we need to hover over the color of our face. Press C to select the color of the face and I need to fill the neck and the torso with some kind of color other than the color that it is right now because it's too close to the hair color, so it's kind of distracting my eyes when I'm looking at it. In fact, I'm just going to color the body with a dark kinda color just to sort of fade it out a little bit. So the body, make sure RGB is turned on. Go to Color, Fill object. And same with this part of the body. And I have my fill object button over here. I dragged it over with my preferences button. So just going to fill the rest of the body like that. Yeah, this way I can change my color back to white. So you get the idea. That took a lot longer than I thought. Sorry. So now my hair is a lighter color from everything else, so it's less distracting. You can also just fill the object with white, and then it will stay that color even when you select another object. Now it's much easier to see my hair shape. In general. This is probably a good place to stop for this video. And in the next video I'm going to show you how to create your own hair brush so that you can save it and use it whenever you want. And that will allow us to create our hair strands for our model. And it's pretty simple once you've done it a few times. So in the next video, I will show you how to create your own custom hair brush. I'll see you there.
15. Creating a Custom Hair Brush: Okay, so now that we have our base for our hair sculpted, we have all of this laid out. What we need to do is create hair strands. And to do that, I'm going to show you how to make your own hair brush. What we need to do first is go over to our scenes over here near where that simple brushes and this little palette, you have your main scene and you can tell that you're being seen because of the number of sub tools. It says 18 right here. If we look in our subtotal list, we have 18 sub tools. So this is our scene that we're on right now. You can click on any one of these other scenes. I just call them scenes. It's like a separate folder essentially with just whatever sub tool you put it in there. So we can click on these primitives. You should already have a star and a cylinder. If you click on the cylinder. And that's the only sub tool in your scene. So what you can do, and if you don't have a sub tool in your scene, you can also go down to sub tool, go to append, and select a sphere or a cube or a cylinder, and just put that in your scene. So what we wanna do is we only want one sub tool selected. So I'm going to select this sphere that I append it in so that it's the only thing selected. And let's go down to initialize. And we need to change the 0 to three. Or you can just type it in. And the y raise to 131. And let's go and hit q cube. So what happened when I press Q Qb is it turned this into a little rectangle based on the specification here. Now if we go and turn on our line fill poly frame button, we can see how many polygons this is made of. So this is 24 polygons. So this is perfect because it's separated into three sections. So if we're looking at our poly groups, we have a lot of them and we want this to be one poly group. So we're going to hit Control W with everything unmasked and it be all becomes the same poly group. Now we need to go up to the top views or looking at the top of his head here, hold shift and snap into top view. I'm going to turn perspective mode off. And what we need to do is we need to group this, this, and this as their own poly groups. So holding Control Shift and Alt, I'm going to draw out this red box. And this red box hides whatever's in my selection. I'm going to hide that top section. Hit Control W to poly group at this whole piece here. And then hold Control Shift and Alt like again, drag your box out over the top section again so that everything else is hidden and now hit Control W one more time. And to show everything again, hit Control and Shift and click outside your object. So what we did is we were hiding one section at a time and poly grouping each section as we go. So now we have three separate poly groups. And if we're looking right at the top here, snaps to the top view. I'm sorry. Let's switch over to the side view and snap with Shift. I'm going to hit couldn't, I'm going to hit W to bring up my Move Gizmo. And just scale this a teeny bit so that it's not quite as thick because this is the thickness of our hair strand. Right now if we look at the top view, this is going to be the top of the hair strand as we draw it out. This is going to be how thick they are strand is. So let's snap back to the top view here. Now that we have this all set up, what we need to do first is go into our precious and we need to go down to the bottom and select, Create, insert mesh. So now that this is going to say, do you want to create a new brush or append it onto the existing brush that you're on. So let's hit New. And you can see here I have a brush selected that is the name of my current sub tool. So it's called PM 3D sphere three. That's because it took my sub tool and it literally just turned it into an insert mesh. So if you wanted to change the name of this, like if this were, you can, you can hit. If you go back to brush again and go to Create insert mesh again, you can hit Append and it will create a new shape again on that same brush. So if you've ever used a custom brush like this before, you can see that people can select the different shapes here are like what any of the other IMM pressures and ZBrush. So that's how you would create additional strands. You would make changes to this. And then go back into brush, create, insert mesh. And if you want to add it to the current airbrush that you have right now and create a new one. Hit append. And it will create geometry from quite literally whatever geometry your sub tool is and turn it into an insert mesh brush. Okay, now that we have the insert mesh pressure made, what we need to do is select the one that you want. We need to adjust the settings of the brush so that it works properly. So we need to go to stroke, go to curve, and turn on curve mode. Then we need to go over to brush and go to modifiers. And we need to make sure that try parts and weld points is turned on. Weld points is going to connect each section of this and make it into a complete curve. So makes sure tripods, well-paying, it's wild points are turned on. Then we need to go back to stroke, go to curve modifiers. If we turn on size, there should be a little button that says curve fall off. And if you click on it, it will give you this graph. So right below size it should say curve fall off, just click that one time. So this is actually the taper of the hair strand. Right now it's actually flipped from the way that we wanted. So this point on the right, I'm going to grab it and bring it all the way to the bottom point on the left. I'm going to grab it and bring up to the top, but it's just below the top with a little bit of space. So this represents how thick the hair is on the beginning point that I start drawing, and this represents the end of the SharePoint. So if this is slightly down from the bottom, that means that there is going to be some thickness to the hair strand. And then it's just going to decrease and decrease until it's at a fine point at the end of the hair strand here. So now that we've got all of our settings adjusted the way we want, and we have the hair brush selected. We can just draw a curve and it draws on little hair strand. And this is where we decide whether we want to. We can also change our brush size. If you change your brush size outside of the curve before doing anything else, as long as the curve is still there, you can click on it and it will change the size of the curve to your brush size. So don't, don't change your brush size when it's blue like this. If you do this, it won't change anything. You need to hover your cursor outside of the mesh, then change your brush size and then click on the mesh. And then it will change the thickness like that. Also, when the cursor is blue, you can click and hold. And then if you hold, Shift, whichever direction you move your cursor, it will smooth the hair strand along the curve, and it can go and go until it completely straightened itself out. This is extremely useful because you're not using your smooth brush. You're just straightening out the curve. So it's not collapsing the geometry. It's just making it so that the hair strand is straightening out without deforming the mesh at all. Which you're, it'll be really, really handy later on. Because if I use my smooth brush, it does this. It, it, it destroys this strand completely. So just click on the curve first one, it's blue and then hold shift and you can drag in either direction and that straightens out your strand. Sometimes they get tangled up or they stuck to other objects. So this is, this is absolutely necessary for us to be able to use click and then hold shift. So now that I've shown you how to make a hair brush, I am actually going to make a slight modification to this brush. And we're just going to append on the modification and it'll be part of the brush that we've made just now. So you don't have to delete anything. I'm just going to hit Control Z and go back to where I am here just with this left. And I'm going to select my current one here. And I'm actually going to name this. I'll name it. And I'll just name it hair brush one. This way. When I append it onto this brush, it'll be named hair brush one. And that'll help me sort of distinguish it from these other things that I've made here. Now this is the way that our hair strand it would look if we don't do anything to it. It's kinda ordinary. I want to do a little bit more. So what I'm going to do is create a new hair brush from this strand and I'll show you what to do. So let's snap to side view, sorry, top view. If we hold control and we mask off just this set of points at this set of points that will leave the center open. So they snap to the front view and use our gizmo. We can just move the points in the center. We can move it or we can scale it. I'm actually going to scale it and then drag it up just a tiny bit. So it looks like this. And this will just give our hair strand a little bit of roundness across the top. Like so. So let's clear that and we'll I think we can work with that. And I'll show you a kind of why I just want this general shape. And you'll, you'll see what I do when we start making our hair strands. So once we have our shapes setup the way we want, we have to go to brush and go to Create insert mesh. Hit New. And it will create a new object or a new brush out of our sub tool here. Now we need to go and change the settings of this brush that we had selected and then we're going to save it. So stroke, curve, curve mode on brush. Well points and try part's turned on. Back to stroke. Curve modifiers. Click on Size and click curve fall off and it will open up this grid. And the grid is messed up like this. You can always just hit Reset right down here and it will reset it. Like say you accidentally add in a bunch of points and mess it all up. You've got reset. So we'll drag the right point all the way to the bottom and the left point just below the top. So now all of our curves settings are set the way they should be. We've got a nice little hair strand yuan. So now that we've made this curve brush over here, we can go back to our menu and we can go down to Save As. And this allows us to just save our brush. And then we can open it every time that we open up ZBrush. I guess we can just name it hair brush one. Hair brush one. I'll just save it to my desktop. And now we have a hair brush. So really the, whatever the shape of this geometry is, whenever you go to Create insert mesh, it just takes the shape of that sub tool and turns it into a hair strand for you, or it turns it into an insert mesh. And then of course you have to go to stroke, adjust the settings of the brush and turn on her fall, often, wild points underbrush and all of that stuff. Once all that's turned on, then you're actually adjusting the brush itself. And then you can go to here, add, Save As, and then save it as a hair brush. And it will save all of the, all of the settings that you have adjusted for it, like the thickness of the strand and any other brush settings like you can also go to brush and go to depth and change the depth. The depth was turned to really high. So this little black dot represents your, your mesh that you're drawing with your curve. And the black line through the center represents the actual object that you're going to draw onto. But this airbrush. So if it's right in the center, that means that it's going to draw out your hair strand starting right on the surface of your model. If you go down below the dot or below the line, that means that it'll draw the hair strand inside of your mesh just a little bit. And up top means that it will draw the hair strand raised up off of your mesh. So I like to, when I'm doing hair strands, I guess I like doing it just a little bit up off the Mesh, not super high before it was up here, which was way too I like it just a little bit off the office surface like that so that it sits with a late arrests a little bit above. And now that I've changed that I'm going to go to Save As and save my hair brush. So now my hair brush has all the right settings. Psych, it's going to be okay. Now that we have this hair brush, we can go back up here above sub tool to our original scene with our 18, some tools in it. And go back to our character. And let's start making some hair strands. Now that I've created my hair brush, whenever I open this, my brush menu, my hair brush appears at the end of my brushless. So these are all the other ones that I was just sort of messing around with when I was hitting append. This is the newest one that I have, which is why it's important to name the sub tool when you create the brush, because then you're naming the brush itself. So this is my airbrush. And we're going to get into it.
16. Drawing The Hair Strands - Part 1 : So looking at the directionality of these lines, the way I drew it out, I'm going to select this sub tool and I'm going to go into Solo Mode. Turn DynaMesh off for now. So in solo mode, it's very important because if I have solo turned off, if I draw this strand down this way, it's going to cling to anything it touches, like the ears or anything else that gets in the way. So it's important to just select the part that you want and just go solo mode and hide everything else so that they are strands stays nice and straight when you draw it out. And based on the size of your brush, it's going to make a bigger or smaller strands. So we'll just test this out. And I'm going to select a color other than gray right now. I'll have white selected so that when I draw this out and masks everything else and you can see the white a lot better. So I'll draw a little bit. Hover right by the end of my curve. And you can see a little red line connecting my cursor to the curve at all. Click and drag and what? That'll continue strand. And I'll do it again. I'll just hover near the end to lessee, that red line right there. Click and drag. I want to get this as far down as I can. And that looks fine. So I'll grab just below the front of my curve here and try to pull this in towards each other a little bit. And now we're going to use that trick. I showed you a holding the curve by clicking on it and then holding Shift. And it'll straighten up this strand. Actually that's not good. Occur. Curl that a little bit. I don't want my hair strands to twist and I'll bell create issues for me. So this is good for now. And I can always use the Move brush later to put all this in place. So once I've drawn my hair strand, I'll just hold Alt and click on my original mesh over here and finalizes the curve and gets rid of it. So now this is just a strand with no curve inside. But it's still a part of this sub tool. What I like to do is first I'm going to take this sub tool and I'm going to push it down to the bottom of myself to a list. You can move sub tools by using these arrows. And if you hold Shift and click the down one or the upper one, it sends 0 sub tool that yet selected to the bottom or to the top. So you can hold shift and click to shoot that sub tool to the top or bottom. I'm going to put mine on the bottom because while this hair strand is drawn, I can hit Split Mask points which is under sub tool, split and split mess points. When I split mass points like this, it just makes this its own sub tool. So now I can switch freely between this and this, and I can just adjust these strands without messing with anything else. So we'll select our original sub tool again. And something I want to try to do is I have to cover up all of this empty space that I see. I don't want any space between the hair strands, so I'm going to have to create these larger, starting out. And larger is okay. As long as it doesn't do that. I don't know why it's getting that weird effect at the top. There we go. It's, it's just sitting inside of the mesh a little bit. That's fine. Click the curve hold Shift to kinda straighten it out. And I'll hold Alt, Click on that and split mass points. And I'll use my Move brush now, if I select this and now I can just move this forward. While I'm using the Move brush with hair strands, I like to go to Brush curve and turn on the curve. Because AGI curve is going to make it a lot easier to get the direction of your hair when you move it with the Move brush, it actually follows your cursor. Whereas if you have ever actually curve turned off it, it does not behave the same way. So, so super handy for moving hair strands. So just kinda, I'm going to get this into place like that. And then you can just continue to manipulate this with the Move brush a little bit to get it into place. Same thing with our first strands here. Right? Then we'll just switch back to our hair brush here in the menu. Go back to this original hair mesh, her hair base, sculpt here, and draw out another strand. You'll notice if I draw the strands too close together, they kind of merge and do this twist, which is, which is bad. I don't want that. So I'll start my curve like here. Instead of written the center, I'll just start a little further away from fresh eyes is a little too big. Start about there. Try it down. Looks good. Just going to grab the end of this little red line again, extended out. I guess it doesn't have to be that long. This is probably a good length actually. Just a little bit longer. Although click on that. There's just going to be a lot of repetition. Split mass points on a repetition, just creating your base strands that you want to cover the head. And then using the Move brush to sort of get them into place. And then turning on Sticky Keys. I'll switch picked here. Also if you have custom brushes set up, like if you went to Edit Preferences, Config and turned Enable, Customize on. If you have one of these open down here, you can replace it with any brush by just clicking on it. And it opens up your brush menu and any brush that you select, we'll replace that. So what I'm going to do is take my move topological. I'm just going to take my standard brush and replace it with my hair brush. So now the hair brushes just right here on my little Dock menu here. Or you can go to Edit Preferences and Enable, Customize and just hold Control and Alt. And click the hair brush from your brush menu with controlling all and drag it down here. So that's just an easier or faster way to switch back and forth between your hair brush. I'm drawing my strands down the back of this part here because if I, if I draw out in the open like this and there's nothing to touch, it's gonna just kinda guests and do its own thing and it's just going to end up not straight. And that's not what we want. So That's why I keep drawing hair strands down this way along this back part and then moving them forward just so that I can get a straighter hair strand, hold Shift, drag this out. Actually just clicking on the curve a little bit. The nice thing that they've updated about curves is that they're kind of affected by gravity now. So if you click on a curve and drag it down a little bit, it affects anything below your cursor down towards the end of the hair strand. And sort of kicks in with some like natural weight or gravity to it like this. So it sort of falls more naturally if you just move this around. Can also get kinda messed up. So it's something that just kinda play with. Drag this up and over. Okay, we're just going to hold Alt, click there and split mass points. I'll grab my Move brush. And I'll get these. Go on here. This point needs to be behind the ear, this strand. So it's not natural for it to be front of the ear now. So we'll just hide a portion of it behind the ear. Print the string in front, bring it back. I'm just loosely trying to use up all the space here and cover any holes that I can see between the hair strands. There we go. Boof. You can also, if your geometry is just driving you crazy. And the reason that I have these hair strands so low poly like this, is so that we can manipulate the shape in the center of the curve really easily. Especially for stylized hair. It's really nice when you can just have a nice bevel shape going down the center of the strand like this. And like this, you can have full control over every directional point of the hair. So you can, It's, it'll look a lot better like this. In the long run. Once we once we completed our, you know, the structure with all of these hair strands, it'll be a lot easier to make it look the way that we want and make it look really cool and stylized with fewer points to deal with like this. Because it gives us a much smoother transition all around. Here I go. And clicking on this polygon makes it easy to see any gaps in my hair here. I know that I have to pull this up. It's it's too low to fill that space there. Pull this up a little bit. Pull a couple of points down here. This is all just with the Move brush. So I'm just paying attention to the silhouette of the hair shape here. Right now it looks a little boxy, So I want to try to round it out a little bit, make it look more round. And it's a little bit. And we'll just keep fixing this as we go. Let's switch back, grab our airbrush. Now that I've got hair strands coming down the sides like this. The way that I want this hairstyle to go now is that this is going down and back. This part of the hair begins to fall down and back like this. I'm doing a very bad job of this. Like my strand smaller, there we go. So I want the strands to start coming down and around like this. Click on this strand and hold Shift and it'll straighten it out. That's fine like that. Let's hold Alt click and then we'll split masked. And instead of messing with that right away, I'm just going to switch right back and do another strand. This one needs to be longer. Needs to come right down along the sides here. Because I want to try to cover all of that. Care. That's fine. So I'll click Split mass points. Select the hare, paste it again and do one ferry. Similar actually, instead of doing one very similar, I'm just going to select this one that I just drew, hit Control Shift and D to duplicate it and just move it back. And I'll do that a couple times because that's just going to save me a sec on this transition that I'm trying to create insight at the top of the head. Control shift D again. See how much we can get away with here. So hair strands can be kinda tricky like this. If you crossed the line of symmetry, they merge or the crossover and then there's no separating the strands. So be careful of that. That's a, It's difficult to deal with this strand here. We're going to extend it down and continue extending it down. And I might have made the hair a little too long for this. My my base mesh is a little big. So that's okay. I can just have the hair come down to here and instead of all the way down. And that'll that'll make my life a little easier as we go. That's fine. Hold all click on Split Mask and I go back to this and draw another strand can come down here, grab my Move brush before I do anything to the curve. And just move this over here to make sure that it's going to be kind of the right size. Yeah. Yeah. I want to go back to my hair rush transcript, Russia As again. And my curve is still there because I didn't I just went to my Move brush and move this around. And so my curve still exists so I can go back to it if a, if I want, extend it down again. And extended down again. Yeah, um, hold Alt and click and then split masked. Just move brush. This is a, this might seem like kind of a relatively boring process. But you know, if things like this and things like doing topology and our kind of I don't know. They're, they're very involved, but they're also kind of mindless. So in a way, there's sort of like a Zen sort of aspect to just hunkering down and making some hair or hunkering down and doing some topology and ZBrush because all the movements are all very simple. And you're pretty much just replicating the same few steps over, you know, dozens and dozens of times. So you can really just kinda get in the zone and put on some music and, you know, get to, it. Can be kind of relaxing and sounds silly, but I find this relaxing. Just doing this for extended period of time. I can just focus on this and making sure that it looks right and get all the moving pieces in place and it's relaxing and reminded. It's busy work, but it's not, it's not hard. It's mostly just about staying focused. Some people make absolutely hate this. Some people might look at this and be like, oh, that's my nightmare. Yeah. I don't I don't want to sit here for hours and hours or however long it takes you. They're just messing with each individual strand, but there are probably plenty of things out there that can make hair strands for you and do Old.stuff is you don't have quite the customizability. But I like this. All right. Got all that in place. So, um, that's kind of important is to kind of break up your symmetry to and I'm just trying to get everything in place first, but later on, we can select these strands and then turn symmetry off X and just move one side at a time. And it will, it will sort of make this a lot more interesting to look at. It's, the less symmetrical is more believable. But if character stuff and you don't want everything to look perfectly symmetrical. So we're gonna keep symmetry on until we get this whole head covered with hair strands. All right, Let's draw out the hair strand. Get our brush. And notice when I'm starting, I'm always trying to start up here in the center because of where the part in the hair is and how it travels back. So these are slowly reaching down and around the back of the head and this will kind of follow this direction like that. And then eventually all we'll just create a single one down the center. Like this, all the way down to just, That's right. We'd have to turn symmetry off and just troll and none of it all. But anyway, the directionality of the hair is very important if you want it to look more believable. Let's grab the curve and move it. A little easier to edit. I love that they added this feature in with the curve brush now that you can just click the curve and add it and just move anything from this point down. It's so nice. It's more flood easier to deal with in past versions of curves in ZBrush. Just extend this down. Oops, I just did this down, down. And needs to be longer than that. There we go. Goes and click on the gravure and shifted, smooth it out. And it's twisted. Can't have that can have a twisted strand. That's fine. By the way, if you haven't saved, don't forget to save.
17. Drawing The Hair Strands - Part 2: When I can do also, I can click on the very end of this curve and it will move the entire strand without bending it. So I'm going to click on that end. Just move it in like this a little bit. W, rotate it. Now that's weird. It looks like I accidentally duplicated the strand. That actually kind of works. I'm just going to, I'm just going to be okay with it. I guess I duplicated this trend. This one ended. Now that's why I'm moving here is the one beneath it, which was an accident, but, you know, it It's kind of a nice little accident because it's just going to save us time. And we go. That can even use your inflate brush turned on your strength way down and just sort of gently bring up the thickness in any parts where you just need a little bit more to fill the space. In this case, I want to leave that alone. So I've got most of this back part of the head covered here. Most of it pretty even. So what I need to do now is draw one more hair strand, but right down the center, right here. So I'll go back to my airbrush. And if we go in the center with geometry, turned on the dots, I forgot to split this split masked. Go back to our head here. There we go. So if the dots are met it right in the center and you draw strand, just draw as one single strand. But it actually looks like it's trying to draw too, which is really weird. I wonder why it's doing that. So maybe this isn't, maybe this isn't what I wanna do. That's weird. I can't figure out why it's doing that. So for now I'm just going to wing it. Turn symmetry off. We'll draw a curve down the center. And it's a little bit crooked. I can hit W and use my Move Gizmo, center this, move it like this. And just move it over a tiny bit. And then I'll continue drawing my curve down and will continue even further. So actually I want this middle point to be at my longest point here. I'm going to go back. Actually, I think this is a good length. Yeah, that's fine. All right, so when I write down the center like that, and we'll hold Alt, Click on our mesh, split mass points, just have this left. Now what I'll do from here is I will hold Control Shift and press D to duplicate it and then I'll press W to bring it might be moved gizmo and hold alt tab up here somewhere so that it moves my gizmo up there. Or just go to the mask center button and hold all and hit the reset button on my orientation. And then I can just rotate this and move it over so that it's sitting like that. And I could go back and duplicate this and do that again. Or if I want this to be perfectly symmetrical, what I can do is go to Z plugin, subtle master, mirror and hit Okay, and then it'll mirror it. So this is all ones that tool. Cool. Well, we're getting there. We're almost, almost to a point where we can start messing around with this, making it a little more interesting looking. Almost. First, I want to block out the general shape here. And this is where this silhouette here really comes in handy because you can tell what the actual head shape looks like without distracting your eyes as much. So I want the back of the head to have some roundness. Roundness. Also, if you go back to your your hair base here and hide it. I'm going to put it up at the I'll just leave it there I myself to listen. But if you hide it and those which is something else, this gives you a much better idea of what your hair actually it looks like. It's right now. It's pretty it's okay. We got to mess around with it a little bit. It's okay, but it's not great yet. We want it to be great. So we're just going to mess with these shapes, try to get some fuller shapes. A little more volume in this hair. I'm just trying to fill in any gaps where I see them. So now it looks okay. Still have to do the bangs, but we'll get to that in a sec. All right, now I'm just making sure this is kinda look, okay, just kinda inflate this and then turn our shift brush down to two and inflate and smooth this out a couple of times and it all even out the geometry a little better. There we go. Same with this. This is like a little crinkly, so inflate this real softly. And then my Shift brush is set to two. So if I hold shift and change that down. And as it just kind of to even this strand out because I thinned it out a little too much on certain points. That's looking better. That sticky keys, I can promise you that I I never want to turn that on. If anybody knows how to turn off the option for sticky keys on my computer, would you leave me shoot me a message or something and leave a comment in the chat and the glass or something. And say, Hey Mike, here's how you get rid of sticky keys forever. Thanks. All right. Let's click on okay. For the moment. Getting all our strands into place here. Okay, Let's do the bangs. Bangs are fun, but bangs are also kinda challenging. So let's switch to this sub tool. Grab my hair brush that I could just do banks like this. And because, because I have multiple subdivision levels on this sub tool, my hair brush does not work. So if you have multiple subdivision levels, you need to go to geometry and either free subdivision levels or to leap your lower subdivision levels so that all your, all you have is one subdivision level. Otherwise your your insert mesh will not work. And this is, so bangs are kind of, let us wage a big, kinda fun, but also kind of challenging. You have to make some decisions on sort of how you want the whole thing to look and I'm having issues there. This is just kind of, you know, I'm actually not really loving this style for the bangs, so I'm going to change it. And what I'll do for that. And it's actually I'm just going to hide, just going to hide the banks that I made for right now. This can be turned on poly frame again, this can be fixed a little bit. And so can this. And I'm just using inflate for this just to bring the geometry a little closer together. You know, what I think I'll do is in this particular situation, what we can do is take this set of hair here, That's the front, it Control Shift D, or go to sub tool and go to Duplicate. And with the duplicate piece, make sure symmetries on, turn-on, go to MS mesh center. Rotate it and move forward. It's pretty silly. Yeah, it's perfect. We'll do this one more time. Control shift D, rotate this, move it back. And now I'm just, now I'm, I'm quite literally just improvising. Head seeing what looks good and what, what works and what doesn't work. This is where it starts to get fun, where you, you can actually just take hairstyles that already exist and just play with them. Just start, you know, make your own hair styles. So I'm gonna make sure that there's not too much of a gap in her hair line right here. Bring these forward a little bit, bring those points in toward each other. What we're gonna do is we're going to take these points and move them away from each other. Same these there we go. This whole thing was intersecting and that's bad. I didn't want that. I can mask this half. Whoops, turn symmetry off. We can mask this half. I can just move this half. So I'm going to do this instead. Because I think that bangs are a little more interesting when they swoop down to one side. And it's less symmetrical. So I think it's just more interesting. And we'll go back to turn on accurate curve under curve here. So that we can grab this and really tweak it. Allowed argue curve. It doesn't move, brush can only do so much. So wacky curve is just a way of sort of forcing the hair to go where you want it. There we go. Get that into place and smooth it out a little bit. And think we're going to do something really similar to these other set of bangs here. Only I'm going to move this back. And over a little bit. The hair's brushed back a little bit. Okay, so here's where a style choice comes in. You can really start to play with where parts are now moving over and under one another here. So I'm going to tuck this piece back and under. And we'll have this sort of come down over the top of it. In fact, I'll duplicate that and move forward. So but it's also intersecting coming over the top. I'm just looking at a ton of reference. My other monitor, I have a whole screen full of women's hairstyles up. So I'm just looking at the big pieces and where they go and how they overlap with one another and intersect phone and other stuff like that. And just sort of coming up with my own design right now because I didn't really like what I had before. So sort of playing around with this to create something that I think looks a little more interesting. Flip our mask and keep doing this here. And if you turn off poly frame from time to time and just zoom way back and look at your metal as your model. Metal, like it, your model. Just looking at it from farther away helps give you some perspective. Or if you have a second monitor, maybe dragged ZBrush over to that other monitor. With ZBrush kinda collapsed down a little bit smaller so that your eyes can see it from farther away. Is this is something that a lot of art teachers tell you to do to look at your work from far away. And it's very helpful and changes the perspective. And you can see things as a larger shape and a more unified piece. So it really allows you to see things that you wouldn't normally see if you're looking up close at your piece the whole time. So if you're zoomed in really close and you're working like this the whole time, you're likely to miss a lot of mistakes. If you don't just zoom out once in a while and take a look at the overall shape of everything and what's going on. And now it's coming along, it's coming along. Gotta fix the fall of the hair a little bit here. We can do all of that individually or I can wait till I merge things together and I think I'll wait just a little bit. Because eventually I will merge the hair strands together and it will give it a much, much more unified look. So now I'm just trying to block in this shape on the forehead here so that it looks a little more like it was like the hair strands are coming together here and then separating into that part on the top of the head. Arrow go. Thinking of hair like this and big chunks is really the only way to to get your shapes accurate. I guess. The otherwise, you know, if if you want to make realistic hair, if you want to use something like x Jan or something in Maya, that's great. That's awesome. It's a great program, but totally different style. Now it's realistic and each hair strand you can see like it's, it's like it's real. So this is stylized. So we think in larger shapes. Same thing for identifying the body of the character or any other parts, you know, just thinking in larger shapes. Okay, So that's starting to, starting to look more like what I want. I want this clear divide. Yeah. Where you can see the hair coming out and forward underneath like this. Yeah. Yeah, that's starting to look better. Because this strand that it was kinda missing. There. There we go. Now started to look more like I want. So even just having a few pieces overlap, what goes on the top, what goes on the bottom. Even just simple overlaps like that can just add a whole new sort of dimensionality to your hair and make it look a little more believable, little more interesting. I'll turn on poly frame because they can't see what I'm working on here. And don't forget to save. I just realized this character doesn't have any eyebrows. I need to fix that. So if we're giving our character eyebrows, I'm going to select my head. And I'll zoom way in here. Easiest way to just create some quick eyebrows is to draw a mask, hold control and select the mask pen. And just hold Control and just draw out. And then hold Control and Alt. If you want to be able to trim your mask. And you can get an exact shape for how you want this to look. And that's okay. When you're drawing your eyebrows, you don't want it to be right along the top of this eye socket. You want it to be if you look at your own eyebrows, like if you raise the outer, outer corners of your eyebrows a little bit. It sits just above the eye socket, the bone on the socket there. It's interesting how much eyebrows really add to the face and how you get it wrong, how weird it they can look. So I just gotta kinda zoom out a little bit. See how they look. No, I wasn't either. So I guess I just can't seem to figure out the right way I want to do these eyebrows. That's good enough. Looks good. So now we're gonna go to extract or go to sub tool and go all the way down it, extract, change our thickness to it. We want it to be really small. I guess we can make it 0 something 0.004 and then hit extract. That's pretty thin. Oh, it looks like I missed a little bit there. Let's get rid of that section. There. There we go. Now it looks like so that looks fine. So we'll hit accept. Our eyebrows are a little boxy and that's fine, but it's not great. And we can kinda smooth it down and it'll look a little better of it. Just being careful that we're not distorting the overall shape and then just grab the pinch brush. Pinched down this end here, this end here. Just using the pinch and the smooth, really quick to kinda just sort of play around with that shape and get it to look the way you want. Can have the eyebrows down or serious. Although we don't want that because she's not actually making a face. She's got kinda just a plain expression on her face and see how I browser. So important. And they really, if they don't look right, you can, you can tell right away, which is why people with no eyebrows look very strange. Because eyebrows sort of frame your eyes. Frame your face a little bit. So yeah, that is how you create basic hair and a hair brush. And now in your brush pallet, you have your hair brush here. You can select it and then go to Save As and save your hair brush for later use or you can create an entirely new hair brush. Nice thing is you don't have to limit yourself to just one strand. If you were to create this shape here and then layer a few more like duplicated and then move it up on top of itself. You can essentially create a hair brush that's made of multiple strands and appended into this brush or just create a new one. So that is something that's really fun to play around with, but we'll continue to make adjustments as we go. In the next video, I'll show you how to use a very handy tool for shaping the hair even further and give you more control over the way that it looks using the Move Topological brush. I'll see you in the next one.
18. Shaping The Hair : Now that we're at this point with our hair, all of our individual strands are all still separate. Sub tool is right now. So what we need to do is merge all these together. So I'll go to sub tool. Fortunately, I have them all marked here because I moved my original hair base mesh to the bottom. So I'm going to take my original base here that I sculpted for my hair. Hold shift and click on the up arrow and it's going to move it to the top of my subtotal list. This way I can just look at all my hair strands here and it looks like some of these are old ones. So I didn't make sure that I'm starting at the right place. So if I my first strand, okay, that looks like it. And then I'll just go down and make sure that none of these are anything other than just the hair. I don't want to merge with parts of the body or anything. So these all look like hair strands. So I'm going to select the one at the top of all of these. And then under subdue a logo down to emerge. It's like merged down. And it's going to say, I'm going to hit always, okay. Because then I can just hit Merge Down. And it will just continue to do it without asking me if it's okay every time. Just be careful when you're doing this because you want to make sure you're not accidentally merging with something that you don't want to merge with. Cool. Now all of my hair strands are single mesh. What we wanna do now is go down to poly groups. And it's top of the polygon menu is Auto Groups. When it turned that on, auto groups is going to turn every strand into its own individual poly group. It's gonna make it so that every one of these is a poly group of its own. The nice thing now is we can grab our Move Topological brush with Move Topological selected. Now I can just click on poly group and it will only move that poly group and else nothing else. So whereas with the normal Move brush, it would grab everything that it's touching. Move Topological, which is just under your brushes under M, is only going to move one poly group at a time. So now that everything's merged together, it makes it super easy to just go through and adjust all your hairs with one brush and just kind of fill in the gaps. Get the shapes to look, right. So Auto Groups and then use Move Topological to get all these hair strands the way that you want them. You can also hold Control and Shift and click on Apollo Group to isolate that one. If you're having trouble, just make sure that the cursor is hovering over one of the points and you can see the red dot on that one. And then that when you hold Control and Shift and click on it, That's the Pauline group that you'll get. So just sort of play around with the settings and mess around with the hair until it looks the way that you want it. Honestly, hair can be pretty frustrating, but it just takes time and practice. You get used to it eventually get used to how the brushes work. And the first time it had hair, it was it was awful. It was horrible and hated. It. It was a really rough experience. And even now I still struggle with getting the hair strands to sit in the right place and look right. Anyway, we're going to move on to the next video. Next, I'll show you how to merge these parts of the body together and we'll start blocking out the rest of the characters body, which will be the foundation for our character. Moving forward. I'll see you there.
19. Blocking Out The Legs : In this video, I want to show you how to start blocking out the legs for the character. But before we do that, we need to merge all of our existing parts for the torso into one mesh. So first thing we have to do is the neck and the body, and all of these pieces are still separate pieces from each other, so we have to merge those together. It's going to go over to my SAP tools. And first thing I'm gonna do is hold Alt, click on the one that I want, and then hold shift and click the up arrow underneath myself to a list. And if I hold shift and click sends it to the top. So I'm going to do that with the body pieces, that neck, all of these pieces and the shoulders. All of that goes up to the top. So now I've got them all lined up here in a row. I don't want to lose any of these. So you can either duplicate all of them before merging together or just rely on poly groups after you merge them altogether. Personally, I like to duplicate them. I know that that leaves you with a lot of sub tools and it's a lot of extra work, but I like to do it this way. Now to save myself more time, I'll click on every other one and hold Shift and move it to the top at the body that now the torso. So I'm going to select the neck. And because I already clicked Okay, I'm going to merge these down and these are just going to connect one at a time and I'll hide my original parts. Looks like I still need the shoulders that I made there. It's all merge this down with that. Okay, So we merged down. Now this is all one sub tool. So what the whole thing merged in order to sort of combine all these pieces together when each turn on DynaMesh. And all the pieces are sort of merged together here. And I'm just going to go around and sort of smooth out some of these edges where all the parts were connected so that actually it looks more gradual and not like such a harsh transition. Especially in here. Just to look smoother. And just smooth out these edges here, just barely. So right now I have the skin shade material selected and it's kind of a good material for when you want to render or when you want to show off the paint that you've done your character about for sculpting, it's not the best. So I'm going to switch my material over here to the basic material. I like basic material while I'm sculpting because just makes it easier to see imperfections while I'm sculpting. So basic material. And we are going to go to sub tool, go down to append. And append in a sphere. I'll hold Alt, Click on that sphere selected and we'll press W. Use our Move Gizmo to move it down here into place. So I'm actually going to do the legs first just because I don't want the arms to get in the way while I'm trying to do legs. So I'm going to move this sphere into position here. So we have our hip joint or more hip, sorry, not hip joint. Select the torso again. Go into solo mode. This is approximately where I want my hip to start. So if I use my Move brush, I need to finish the shape of the torso. So I'm going to make my brush a little bigger and I'm just going to pull the bottom of this down, maybe not that far down. So if we pull this down just a little ways, this is going to create this shape here. So the stomach is coming forward and out and then it bends and tucks back in between the legs here. And then you have your hip right here. And in the back we can actually grab this, just sort of push this in and it creates this V shape in the back. I'll make my brush a little smaller. So what we're going for is this sort of a shape in the back because the muscles actually go in this sort of shape in the back. So back on the rib-cage comes up here and the muscles that surround it sort of travel up in this direction like this. And then these muscles come down. And this sort of shape here. This is a poor example, but you know what I mean? So that's, that's sort of the shape that we're looking for. We want this V shape right here, because this is the top of the hips, comes down in the back, like that. So if I go out of solo mode and I grabbed my sphere, I want my sphere to be right about here. I'm going to grab my gizmo and just scale this sphere up in size or up and on this axis. And we'll move this into place like this. And I wouldn't need to do is just grab my Move brush. We're going to pull this top part back. And it's nice because this shape gives us the shape of the legs as it comes up and connects in toward the hip right here. So you'll see what I mean by that as we go a little further. So all I did was grab my Move brush and just grab the back part here, pullback, kinda push the front back a little bit to create this back sort of angle right here. L will grab this and pull this in until it's just around the center like this. And the thing to remember when you're sculpting legs on female characters is at the hips. It goes out a little bit wider. And right at the bottom like where the crop is, is where the widest part of the leg is going to be. So that's going to be right about here. So I can grab this and move it inward. So with my Move brush, just move it in a little bit. And I'm just snapping from front view to back view. It's doing this and now we'll go, I don't want this to be on, I'll explain. So now we're just going to bring the back side. And if we look here, our characters facing this direction. So the back of the leg is going to come in a little bit and just go down straight. Same thing with the front of the leg. It's going to come forward and felt that shape. So it's this sort of shape like that from the side as just a basic shape to start with. So now we'll smooth this out just a little bit and just move this into place a little bit. And of course all body types are different. So what I'm doing right now is on my other monitor, I actually have reference pulled up on Pinterest just for muscle anatomy and skeletal anatomy. To sort of inform what I'm doing here and show me the shapes and the way that I want them to sit in place. So if you haven't already pulled up reference, just get on Pinterest and type in anatomy or anatomy female or any of those combination of different look at different muscle charts and bone charts and try to figure out the different shapes there. And that's, that's, that's essentially what I'm doing. And I'm I'm talking you through it, but it's also better. Best if you can see what I'm talking about while you're doing this. So so this roundness here are about comes over and comes up and meets with the hip right here on this side. General shape like that. Smooth this out. It's starting to get her leg shape a little bit. Now to make sure that this is going to look correct. Very last thing that I need to do, something I want to point out is the width of the leg comes down from the hip. It doesn't just come straight down. It kind of comes out and over and down as you can see in this shape right here. So if we take the clay brush, I'm going to show you an example of just what the muscle looks like coming down from the torso. So here's the belly button of the character at there. And halfway between here and the hip is where this muscle connects and starts coming down in the thigh. So it looks kind of funny from here. This is kind of a weird example, but I'll just carve this in here. So the muscle actually comes from the center right here, down and it wraps around and toward the inside of the file like this. This is really extreme example of S, but, and if we smooth it down like that, and then there's another muscle on the side here that comes down and comes forward. And there's another muscle above the knee like this. So this is just like a general idea of the shapes going on there. And the reason that we're putting the muscles n is because that's literally the right below the skin. And so that's what we're actually seeing is just the skin wrapping around these muscles. And that's going to help you get the more correct shape for your characters likes. So I'm going to undo some of this and just try to do a better job. But I just wanted to show you that as an example. So I'm also comes down ramps in toward the inside of the leg. And then we'll just use the Move brush to kind of get the correct shape there. And on the inside of the thighs. There's always, for, especially for females, there's usually a gap right here. So what we'll do to make this easier to see it, we'll go to Z plugin subtotal master and go to mirror with the x-axis with our legs elected with the x-axis turned on. And when we hit Okay, it'll mirror this to the other side like that. This making it a lot easier to see if we're getting the shapes right. So from the side here, stomach it comes down and forward. Lower back kind of pushes in at that same angle. So we need to pull this forward a little more. And where the hips are, the legs actually come up here like this. And there's this angle here from the hip comes forward and then down. That's sort of like a rounded angle for the legs. And that's how you get that natural shape in here. That natural V-shape. Also make sure you have symmetry turned on, which I did not. Alright, here we go. Let's turnover symmetry turned on. So we're just going to get this shape in here quickly as possible. Nothing perfect doesn't have to be perfect. Get that shape in the back. Bringing the front of this leg forward more to exaggerate that angle, that forward angle like I was talking about. And this is all just from looking at reference. You kinda have to just figure it out the first few times you do this. But the more you do it, the easier it gets. Now what that muscle that was talking about in the thighs, how it comes down and forward like this and to the inside. A quick way to get that shape is if you're already to this point, describe your mood, brush. And just gently, gently, just barely push this directly from here to here, just pull outward. And it will sort of create that shape for you. That indentation of the muscle coming forward on the top and this sinking inward in the middle. So that's just a decent general shape for now. So now we need to continue block not the legs. And the femur is actually the thigh bone. The femur is actually the longest, one of the longest bones in the body. So the upper leg is going to be longer. And the lower leg by just a little bit. And be sure to look at this from all angles. Make sure that one part isn't extremely thin from one angle and just kind of move around. So to start out, these legs should just be pretty much the same distance all the way around but thicker at the top. And then slowly, slowly, gradually getting a little bit thinner towards the knees where the needs are going to be. The way that I like to block out characters. I like to just append a new sub tool for every piece and then merge them all together because that gives me more control. Because otherwise, you know, some people like to say take that move brush and just pull this down for the rest of the leg. Well now, not only does it stretch out the geometry and if you turn on DynaMesh, you can go and mess with that, but it doesn't give you as much control over the whole shape it. And I just see things better when I can just append in a new shape and merge them all together later. So that's the method that I'm going to go, go with for this video. And to get this shape here, you can grab the skin below where this curve is here for the butt and just bring it up with the Move brush. And if you push up like that, it's going to create this crease for you a little bit, so it makes it a little easier to get that shape. And also the muscles here. The muscle isn't perfectly round. You know, it's not like this sort of shape. And it's and if you look at muscle charts or anatomy and stuff like that, the gluteus maximus. But actually comes down and out and over like this. When it's, when it's relaxed, when someone is just standing still. It actually isn't that sort of shape. And that gives you a more natural sort of gravity sort of feel to it. So it's not a round shape. It's around it, but it's not like a circular or spherical shape. And then as this comes up, this is a little bit flatter coming into here into the lower back. So we're already very quickly starting to get our normal shapes here. I can just go into solo mode here, and I can just carve this in here if I want this to look more, attach the right way here. So we're just working very slowly. I'm trying to get her shape and approximately the right place and will merge this altogether later. Right now I'm just working with separate sub tool. So now if I want, I can go to the body, grab my Move brush, and if the hips aren't wide enough, I can make them a little wider. And the body here. And it's good to have this V-shape here in the back because like we were talking about before, that V-shape that comes down because now there's just goes right into here. And now your lower back is connected to the legs. Just like that. And you can tune that up however much you need to to get it to sit properly there. And this is a really tricky shape. It's really hard to get this right, to get the way the legs connect here to the abdomen to look right. And it just takes practice. And just looking at reference. And just sort of studying the shapes and trying to understand what's actually, how it's actually curving and connecting to the body. Another great way to study that is to look at 3D models of other artists. You know, if you can look at a turntable of a character being turned around or whatever. So before we get too obsessed with one specific spot, we're just going to move on and then we'll come back to this and try to 2D it all up. So I'm gonna go back to append. I have my shortcut for append here. If you want, you can go to sub tool and scroll down and append is right here. So I'll append another sphere. Select that sphere and press W, and we'll go grab it, bring it down here. I'm just gonna put it right in the center of my leg right there and then scale it up again in this direction. This is going to be my lower leg. So I'll start by making it about the same length as this section of the leg. And then move it down. And now for this part of the leg here, I'm not going to line it up straight with the leg like this because if you look at a person standing from the side, this part of the leg is actually just slightly back and tilted forward. Just a little bit. So if you make these pieces intersect like this, That's going to give you a more natural look for the way this phi comes down into the calf and the knee is right here. So so when you connect these two, just line them up like this, where there's sort of just, just touching one another like that. And you can exaggerate that more or less or however much as is to your liking there. So maybe about like that. So now that we're at this stage here, we're just going to 0 mesh it. Make sure it's symmetry is turned off. And 0 mesh. And now we're down to 3000 points. So, okay, so this is much easier to smooth out now. Okay? So we're going to smooth this so that we get sort of like an icicle shape, like a like a pointy pick leg sort of shape. It's kinda weird. Anyway. So looking at at the way that knees bend and the way that the lower leg bends when a person is standing, it's not perfectly straight. Usually, depending on the way a person's knees curve. If I select this here and I've got my Move brush, some people's knees bend inward like this, and then the lower leg is tilted outward like this. Just slightly. So it needs come in shin and the rest of the leg bends outward like that. But that's not the case in all people. So it kinda depends on the way you want your character to look when they're standing. So look into that and just be aware of that. So I'm going to bring my knee forward just a little bit down because I want this knee to angle in and then sort of back out again to match the angle of this lower leg the way that it is. That's what the kneecap will be is right there. Just like that. That's that's fine for right now. Switch to our lower leg. And the reason I'm doing this side alone first is because if I mirror to the side, it might accidentally merge them together again. So it's going to mess up the angle a little bit here. And at the top we'll smooth this down so that it's not so thick. And we'll try to get this calf muscle in here. Just a bulky shape for the calf. That's fine. So now let's go to Z plugin. Go to mirror x axis my head. Okay. So it didn't merge them again, this, and that's good. I'll just angle this just a little bit more. And it'll make more of a neutral stance for the feet. Okay, that's fine. So you're just going to have to keep playing with these shapes as you go. It's going to be a lot of just back and forth, figuring out what looks right, what works and what doesn't, you know, does the does the lower back sit correctly? Does the front of the leg come forward enough? Is the angle of this leg is sort of like a forward arc. But then the back of the leg also has muscle on it. So there's also a little bit of muscle buildup back here. So you get this sort of bulge in the middle of the leg. So there are all these little shapes to keep an eye out for. And it's just about working with the shapes a little bit at a time. And then looking at it from far away. And that's going to give you a better idea of what it actually looks like. Our eyes are not very good at interpreting things when we're too close all the time, we kinda get lost in the detail. But when you zoom buyout, or even minimize the brush and put it on a different monitor where it's even further away. Then you can really see like here I can see my proportions are pretty off. The legs are a little too long. So what I'll do is just press W and scale them down just a little bit and then bring them up even more and maybe even scale them even more. And I'm bringing them up like that and that's looking more more correct. Maybe even angle this a little bit like that. There we go. Now we're starting to get that to look a little more natural. And then we'll bring our bottom part of our legs up. And I'm going to angle this forward a little bit like this and move it into place so that it's sitting against the back part of the knee right here like this. This is just kind of a trick for lining up your legs to get that shape, correct. And then you get the really defined shape in the knee there. And you also get that stylized, cool kind of curvy look. To your character here. With the back of the leg and the way that it's shaped like that. Yeah. Then it gives you that that's kind of cool, curvy look. If you line up the knees and the bottom part of the legs like this. So that's always fun to just kind of play with shapes like that and look at the silhouette of your character. Because if you look here, it's not a straight line. It's, it's, it's more of a curved line for the character, for the legs. So these are the kind of things that are important that make your character readable and make it more interesting to look at those, the shapes and how they, how they play together, all as one. So this is not a straight line. And the S-shape of the spine here and sort of that counter S shape of the legs coming down like that. So, so this is working. So we'll just kinda keep going with this. It's not perfect, but it's just going to take time to get to that point where we can call it perfect. It's not perfect. It'll, it'll never be perfect. But that's okay. So now we're just trying to get all of everything to fit together here. And the nice thing too about this is if you're sculpting your character base to just look anatomically correct, then you can add clothing later in the clothing is going to fit the character really nicely and it's just going to look even better. Here we go. Legs connecting here to the obliques. The obliques are like on the side of your abdomen. It's like this muscle that sits right here, right above the hip. So that's looking okay. It's not perfect. That's fine. That's fine for now. So now let's block out our feet. So we're gonna go back to append or sub tool append. And we'll append another sphere and use fears for everything. Select that sphere, press W, and we'll bring it down to where the foot is going to be. So I'm not going to go for a realistic foot. I'm actually just gonna go for the shape of the shoe that the character is going to be wearing, or the boots that the character is going to be wearing. So for this, I'm just going to use my gizmo to scale this in whichever direction I want it. So scale it in this way. Make it a little thinner to kind of match up with the width of the leg a little more. And this shape is okay. Okay. I'm just going to use the Move brush. Bring this forward. And when with the angle of where the ankle meets up with the foot here at the joint of the ankle. The foot actually travels down and like a wedge sorter shape. So we're going to push this in, in the back and just make sure that it looks it's going to look terrible at first, but we'll fix it. So we just want this wedge shape that sort of comes down and out. Pull this down and that's where the here the heel is going to be. I'll pull this front part forward. So what I'm going for is just this ugly sort of block, sort of shaped like that. And that's fine for right now. And now that I have the shape, I'm just going to make a basic foot shape. So the ankle here, ankle comes down and out. Push that in, bring the back of the heel where the back of the heel is going to be out and back. Front of the foot. Just pull it forward. Pull this part up, this part down. Now if I hold Control and just mask off this bottom part of the foot, you can only control and top out here to flip my mask. If we go to Visibility, Hide part, and then we would go back to Geometry, modify Topology, and delete hidden. And I have those shortcuts up here. I have height part and delete hidden already on my shortcut menu up here. So it was really helpful because I use those a lot. So how do we have that were then under the modified topology menu, there's also Close Holes, so we'll hit Close Holes and it closes the bottom of the foot. How much turn on local symmetry there so that anything local symmetry is great. Because then whatever you're working on is the central focus. And you rotate around that specifically when you have local symmetry turned off. So anywhere that you touch with local symmetry turned on is where the camera is going to rotate it around. So now the bottom of the foot is nice and flat and it's closed up like that. So that's what we want. Now we're just gonna use the Move brush here to manipulate this, pull it way up. Try to get more of this wedge shape here for the foot. And this is going to be a stylized boot to for the character. So it doesn't have to look like a foot right now. Because we're going to we're going to play with the shape and make it look way cooler than it looks right now. So because this is sort of a futuristic character, we can play with the idea here that maybe this comes back and that there's maybe going to be some sort of like wing or some sort of surrounding shape for the boot like this. At the top. Again, just, just playing with the general shape to try and create something interesting that looks nice in a silhouette. And we can scale this down because it's way too big. Try to get that boot shape. Some got a basic shape out of this. And then I have this. I can just hit W and just widen this out on that axis a little bit. That's a real basic shapes. So we'll go Z plugin, mirror, x axis and turn it on. So now it actually looks like her character has something for feet just for now. And then we'll come back to that and we'll fix the feet later because it will turn them into Boots or something really cool. Gets some extreme angles going on in here to make this look a little more interesting. And before I move anything down here, I'm just going to mask the bottom of the foot like that so that it stays still so that I can still move this part of the boot around. Or if I want, I can just grab my inflate brush, go to the tip of the shoe and just inflate it like that. And the bottom of the shoe is just going to stay still. And that makes it a lot easier to just manipulate this and get a good shape. And if it's giving you trouble, if the geometry is messing with you, you can always turn on DynaMesh. Under Geometry and the data measurement, He was right here and crank the resolution of higher if it's not enough polygons or lower if you want less polygons. So we can even just unmask this and try turning on DynaMesh right now. Of course, there's the problem with DynaMesh. If these are too close together, they're going to merge together. So for right now, I'm okay without DynaMesh because I don't want to I want to merge these together and I want them to stick. So I will leave that off. But it is always an option. Dynamesh is great, especially in this early phase of moving shapes around and trying to get things in place. And I can always flip my mask by holding Control and clicking out here and smooth this doubt if it's touching too much or if I want the bottom to be, you know. All right, for now, I'm just going to leave this alone. In fact, I can scale this down again, a little too big, bring it down like that. So my silhouette looks better. Now. That looks that looks fine for right now. Okay, I think that's gonna do it for this video. And in the next video we're going to show you how to block out the arms and we'll get started on the hands. See you then.
20. Blocking Out The Arms : All right, In this video we are going to block out the arms for the character. So we are going to do the same method as before, where we're going to go to sub tool and append and append in a cylinder this time. The reason we choose a cylinder, It's because it is kind of already a natural shape that's closest to what we want the arm to be anyway. So we're just going to scale it down, scale it up on this axis here. And we'll line it up with the nice thing about previously in the other videos, we already sculpted this shoulder, the deltoid, into play some part of the torso. So that'll kinda help us figure out where are we going to place the arm in here. So we're actually just going to shove it up into the arm pit. And if you're not sure about the armpit, like how the armpit is supposed to look. The armpit is naturally formed on the back and the front. There are muscles connecting for the pectoral muscles. Here on the chest. They connect in the center here in the on the clavicle, I'm sorry, on the sternum. And then they come over and across and connect down in here. Just below the deltoid on the actual upper arm are on the forum. So that creates this sort of like flap of muscle that comes around the front like this. And on female characters, this connects along here, on this side. So where the breasts are connected here, it actually is all one continuous shape. So along the bottom edge of here comes up, follows the pictorial muscle over underneath the deltoid right here. And on the back it's really similar where the scapula or the shoulder blades are pretty much right here. And the muscles on top of the scapula are wrapping almost exactly the same way Up and over and across. And what you get is you get this concave shape in the center here underneath the deltoid. That is actually the armpit. So the armpit is really just the space between this back muscle here wrapping over the shoulder blades and this front muscle here connecting from the pictorials across and underneath the deltoid right there. So if we look at our arm, we can actually just move it into place right inside of the armpit. So it's nice. It just gives us the placement for it just by sculpting that those muscles in the front and the back and the shoulder, you get the natural shape of that armpit. So as a general rule, with the elbow, if you're not sure how far down the elbows should go. The elbow. If your arms are down to your sides, the elbow is basically where the bottom of the ribcage is. So if we look at our torso, remember clay brush, the ribs. The line of the rib-cage comes along here and down to about here because this is the hip and there's very little space between the ribcage and the hip. So we can just kind of guess for this. And the ribcage goes around and wraps up around the back like that. So the bottom of the rib cages right about here, which means that our arm should come to about there. And it's okay if there's a little extra sort of still in there, I'm going to angle this out so that the arm is kind of away from the body, a little more like that. So that we can get sort of a pose. And that'll help us pose our character later. So I'll go back to my body and hit Control Z to get rid of that. So I don't want that drawing on there. So so that's about how long it should be. The elbow is about at the bottom of where the ribs come down. And if you're not sure how far down the ribs come, just look at some anatomy reference and that will help you figure out the placement there. So now that I have this in place, I'm just going to hit Control Shift and D. And that duplicates the sub tool. So now I can just grab it and move it down. And this will be the bottom half of the arm, level, lower half here. So the, the arm has a lot of interesting shapes in it. There's the bicep on the front, the tricep on the back, and then there's the elbow. And then for the forearm, you have your muscles that kind of wrap down that connect on this side of the arm, on the upper arm and come down and wrap around the forearm. So there's kind of this interesting bulging shape on the lower arm or bulges out like this, out where the elbow is. And that's because there has to be room for those muscles. Actually, if I go into solo mode, I'm just going to pull this out like this and just smooth it out. And maybe cricket, that didn't work. It didn't work. Here we go. So we'll do this and we'll make sure that it's relatively straight from all angles first. And we'll look at it from the front end. Just move it down a little bit there so that we have that exaggerated, exaggerated Look. For the muscles of the forearm. And we can move this down a little bit. So blocking out can be kind of tedious if you haven't done it before, but it's all about just learning the most visible shapes, the most visible muscles. So for the forearm, you know what direction to those muscles go? It's like a muscle chart. Find out that the elbow is kind of this knob that sort of sticks out here. I'm just using the Move brush to just get it into place. Just an approximate doesn't have to be perfect. All right, that's good enough. And then you can just either sub-divide up if you need more polygons or turn on DynaMesh, tiny meshes, really good. Go to geometry DynaMesh. And so to smooth it out. And that allows you to take your clay brush or something else end right here where the elbow is, we're going to carve in, smooth it out. Because the upper arm has the bicep going to turn our DynaMesh for the upper arm as well. I'll smooth it out. Just gently smooth the entire thing. And I want to make sure that it stays straight and I'll want my arm to bend. And that's why I start with a cylinder because it's easier to just keep the straight, straight angle of the arm. And let's see, kinda made that cricket. So the bicep is facing forward. It's on the front of your upper arm. If we grab our clay buildup here. And when I'm sculpting this, I don't like to go down in the direction of the bicep. I like to go across this and move down because this gives me more of a natural buildup look. So we'll just slowly get in that bump for the biceps on the front. Hurry and it doesn't have to be a lot, just, just subtle, subtle shapes help. It turned out my DynaMesh resolution here. We've got a few less polygons to deal with. And now the tricep sits on the back of the arm higher up than the bicep. So it's up here. A little more like that. That's an extreme, That's an exaggerated version, but it sits a little higher like that. And kind of sits this part on the inside of the arm bulges a little bit more. And that's going to change depending on how the arm is bending and how the muscles are contracting. But just in a general rest pose like this. I'm just gonna do that for more, more shape. And we'll just build up our bicep a little more here. This needs to be a little thicker because it's got to fill in that space. Here. Are all the muscles connects to the shoulder. Split that up and in like that. So this is a good opportunity to select your torso, grab your clay brush, and make sure that this this muscle line that we were talking about before comes up and around and over, over the top to make sure that it really blends together nicely there. And then try to sculpt the national, their muscle, the deltoid a little more and make it a little more prominent. So it's a little small looking and those will actually sit on top of everything else like that. So it's like a little shoulder pad. We're going piece almost like armor away. And if you're ever doing this and you're not sure, just look at reference. That's what I'm doing. To make sure that your shapes are in the right place and the deltoid comes down. And in fact, I think the deltoid, that's better. So let's make it so that it's not sitting out so far that it actually looks like it's blending with the muscle here a little more. Clearly, this doesn't look like armor. So I actually want this to look more organic. We'll put armor on later though. Good. Character, look cool. So go back to this upper arm here. And we'll get this bicep. So the bicep is actually made of two pieces. It's separated down the middle, it's two sides, which is why it's called the bicep. Let's di, meaning two. If we take our Damien standard and turn it way down to something real low, just kinda cut in that shape. Because it is in fact two muscles. And they taper down here toward where the elbow is, where the arms connect. And be sure to be looking at the directionality of the entire arm. Not just is it a straight line, but the bicep and tricep create this inner and outer curve this way. And this way. And that's going to really affect the shape of your arm and how, how the pieces fit together. A little big, scale that down. All right, and of course, once you kinda get things in place here, we'll go up to see plug-in and go to mirror on the x-axis. Same thing with the lower arm Z plugin. Your x-axis. Already starting to get a nice block out for this character. So this'll make this much easier. Moving forward will be able to do the clothing a lot easier. And anything else blocking out all of the shapes of the body like this is typically the first thing that you do when you're sculpting a character, at least from scratch. If you're making it yourself and you would typically do the body first and all of the arms and legs and hands and all that stuff. You block everything out and in general shapes and then you just slowly refine all of those pieces and you eventually merge them altogether. So now I'm looking at all my, all my parts as they're coming together and I'm looking at proportions and how things are lining up and asking myself if they look correct. So some of the things that I'm seeing here is the angle of the arm needs to be back little more. And the arm when it's in a relaxed pose, It's never straight like this. That would mean that they were that you are flexing your arms to be perfectly straight. So actually the arms bend at a natural angle forward, ever so slightly like this, the elbow bends forward. The top of the rib cage sits on top of the abs. And then the outside muscles here like the obliques that sit outside of the abs. If you look at it from the side view, they line up with the line of the leg roughly. So if your leg from the side is not looking right, check the angle here. How the leg is supposed to come forward here, and then traveled backward. And it's supposed to meet up with this line that travels here along the outside edge of the abdominal muscles. So from the side view that's kind of a check to look for the like. Okay, so this is actually lines up with that. And it meets that curve and look at reference because it's kind of an interesting curve. It's, it's difficult to get that shape right. And to get that all to line up correctly. And same thing with the ribcage coming down to here and the hip muscle or the hipbone being right here. Also when you're looking at the legs, look at the the pelvis, is this here in the center? And the widest part of the leg is generally down here, right about here. So like, which is also a good measurement for where your wrists should be if you're not sure. So that all kind of lines up. So if your character arms or if you're figuring out the length of the arms and you can't quite figure it out. Straighten the arms straight down and the risks should be read about here. And that's also the widest part of the legs. And that's because from the pelvis the femur comes out this way. And the pelvis is not the femur I'm sorry, is not completely straight. It's not a bone that starts here and goes down. It doesn't just travel down the leg like this. The femur actually comes out. The bone actually comes out here. And this is a hip ball joint right here that comes down. So this is actually the shape of that bone. It comes out from the pelvis and straight down like that are down in in sort of an angle like that. But that's the bone, not the muscles. So that's why we have the widest part of the hip right here or the weight is part of the legs, I should say, because of that bone actually protruding out a little bit from the rest of the muscle and then coming down in it and it creates that shaping. So that's another thing to look for. And just to be aware of more of those bony landmarks as, as a lot of professionals call it, bony landmarks are the most visible bones and landmarks of the bones on the surface that you can see right away. So learning those is going to help you with your proportions in your placement a lot, a lot better. Okay. So this forearm is looking pretty pretty bad. So we're going to try to fix it. And what I'm doing is I'm just gonna go look for reference. If you're ever not sure, just immediately lookup reference and that's going to help you. It's hard to memorize all of this. It's, it's difficult to to know what to, to be able to memorize all of the muscles in the human body. It's, it's very difficult. So we're just going to type in forearm anatomy. And we'll just look at a couple of muscle charts and things here and try to use that to kinda guide what we're doing. So there's sort of this kind of shape in here, like a V sort of shape, right where the Where are the arms connect? And it looks like there's one. And there's quite a few muscles. But to simplify this, I'm just gonna do this in big blocks. I'm not going to try to do every single muscle. So first we're going to get that elbow into place. The elbow kind of sticks out right here. It's a little too big. We'll just grab this and move this part up here. That'll sort of mirror where that elbow supposed to pay. So the elbows right here. And it's kind of this like knob sticks out from the rest of the arm like that. So for starters, that'll be fine. And it looks, it looks like it turned off symmetry, so I need to fix this. So rather than deleting or going back and redoing it, I'm just going to mask off the part that I want to keep. Go to Geometry arm. So I go to the visibility menu here, hit Hide part, and then go to Geometry, modify Topology and hit Delete Hidden. And now that I have this piece of the arm here, I can go back up to Z plugin and go to mirror and x axis. And now I'll turn on symmetry. So now we've got this setup for both sides. So my damien standard brush, I'm just going to carve in the main muscles that I see here, the main shapes. So this one comes around and sort of down the side. So that actually connects from this outside part of the arm across diagonally around the forearm and sort of wraps around like that. And this muscle comes in and disciplines underneath. I'm going to smooth that out so it doesn't look so, so bad. And then we'll just grab our move brush and start pushing stuff around here. And the nice thing about stylized characters too, is you don't have to do a super realistic Sculpt. If you want, you can push stylized as far as you want and you can play with the shapes. And what I mean by that is like the elbow. If I don't want my elbow to look realistic, I can just take a brush like the snake hook brush. And because it's Cyberpunk, I could just turn this into armor and just pull this shape out like this and say, pin pinch brush. Just make it small and just play around with it and say, okay, that's my elbow. If I really wanted to, I could just say like, okay, this character is going to have armor, so It's actually going to be a spiked elbow or something later. And so that's, that's the, that's the fun of having stylized characters and sort of playing around with the choices that you make. There's a lot of freedom in it, because it doesn't have to be a 100 percent accurate. You can sort of just make stuff up and and play with things as you go. Because that's what I like about it. I think it's a lot of fun to just not be focused on a super realistic sculpt, but be focused on the shapes and making it look interesting. Rather than trying to make it look perfect. So I just use my Pinch brush here because I realized that this arm is a little too wide at the top, the upper arm. So I'm just from the front view, I'm just dragging the pinch brush. And I'm gonna do the same for the lower arm and deselect it. And will pinch this. Let me get that dramatic sort of diamond shape flair for where the elbow comes out right there. And that creates a much cooler look and angles a little off. So I'm actually just going to rotate this outward a little more. And that's the thing with arm two is the angle this way. The angle in this direction should be a nice straight angle. But from the side it can be many angles. So just make sure you're lining up your arms correctly. All right, that's looking good enough for now. So we're just going to smooth out this wrist here. So that's just a basic block out for the arms. And in the next video, I will show you how to create hands. I'll see you then.
21. Blocking Out The Hands : Welcome back to another video. In this video I'm going to show you how to create hands for the character. So something that I have to do really quick. I noticed that my forearms are a little too high up on the character. So I'm just going to select my forearms, press W, and pull them down a little further on the character. And we'll get back to detailing the arms and figuring out proportions that stuff later. But for right now, I just wanted to point out that I kind of messed up the proportions there. So make sure that you're checking that distance. So to create hands for your character, there's a lot of different ways that you can do it. You can create a lot of sub tools and put them all together. But what I'm going to do is I'm going to show you how to use Z spheres because these fears are really excellent for creating complicated rigs and bases for your match. So the way we're going to do this is we're gonna go over to sub tool and scroll down to append and select Z sphere. And when you select it, you're not going to see it because it's actually at the very bottom of your sub2 a list. So if you scroll all the way down by grabbing this little slider, pulling it down on the side of yourself to a list. Click on disease here at the bottom and go into solo mode. So you can see your Z sphere. Now my sphere, it looks like it put it right about where the head of my characters. So this is a Z sphere. And what do Z spheres do? So for those of you who don't know Z spheres operate in a really simple way. You have Draw Mode, move mode, scale mode, and rotate mode at the top here. So you can switch between those by using Q, W, E, and R on your keyboard. So Z spheres only operate withdrawing, moving, scaling, rotating. That's all you have to worry about. You know, use any other tool That's just those simple methods. So when you're in Draw mode, you can click on any existing sphere and draw a sphere. You can also click on a segment between these two spheres that I just drew in Draw mode, and it'll create another sphere. Now if I press W and go to move mode, I can pull on any sphere that already exists that I've already drawn, can move them around, pull them out, and just mess around with them and create joints and things like that. So press Control Z here to go back. And of course, scale mode, if you go into scale mode, it will just make your spheres bigger or smaller and you can work on them one at a time. And rotate mode, I generally don't use because it's going to mess up the direction of the joints. But we can worry about that later. You can use it. It's just, I generally don't use it. So to create a hand, this is actually going to be the base of our hand, like the pol, essentially of our hand. And if we were going to treat it like if we're looking at it from the top view, the fingers are going to come out this direction here. Like that. Sort of. This is a terrible example, but you know what I mean? So this will essentially be the top of our hand. So if I snapped to the front view and go into Draw mode by pressing Q on my keyboard, we're going to create the thumb first. So right about the center here on the left side in front view, just going to draw one sphere like that on the side. And that's going to be where our thumb is. If you see inside of this, if I have this sphere selected, you can see this cone. And that cone is actually a bone like if you've worked with rigging or in Blender. That's what that is. And it's telling you the direction of that sphere and where it is and how it moves. So if I press W on my keyboard to go into move mode and I click and move this sphere around, it'll show me that bone. Same thing. If I click on a different sphere, it'll show any bones attached to it. So that's how you're going to be able to see the direction of this. And it's transparent bone that you can see at the base of this. At the base of this little bone is a circle. And that circle is going to help me connect all of these fingers to the base of this palm here. So what I mean by that is if I snap to front view, I have my thumb joint over here. What I wanna do is I want to rotate my camera so that where I'm drawing the index finger is facing directly forward right at me. Like I'm looking right down on it, like it's a cylinder. And I'm going to click on the center of that little cone in Draw mode. So if I press Q and go in and draw mode, and I click on the center of that and draw out one more. This is going to be my index finger. And because I clicked on the center of that cone, now this is connected perfectly centered to the POM part of the hand like that. So to create the next finger, I would just move my camera views of that. I'm looking straight on at what's going to be my middle finger and draw it. Then I'm going to move my camera. Click on the center of that cone again. This'll be the ring finger. And then move my camera will more time. Click on the center of that little cone. And this'll be the pinkie. So that is how we're going to set up the base for all of the fingers right there. And it doesn't have to be exact, just kind of in this pattern and that'll help us lay out the fingers a lot easier. So now that I have thumb and all my fingers all set up, now I'm going to make the next joint for each finger. And this part is a little bit faster. So the thumb only has one joint, of course, where the normal fingers have to. So the thumb, I'm just going to draw one more sphere by clicking on that. And if I hold Shift while I'm drawing, it's going to duplicate the size of the sphere that was placed right behind it. So this creates a consistent shape as you're drawing your fingers. So this is nice because now if I want to continue making my fingers, I can draw hold Shift and let go, draw hold Shift and then let go. So now I have 123 spheres right here and that is a finger. So I'll do that again for each finger. Draw hold Shift, and then let go, click and drag. I'll shift like a And now have three segments for the finger. Draw, hold, Shift, hold, Shift, hold, Shift, hold Shift. So that my fingers are totally ready to be extruded out here. So all I have to do now is press W on my keyboard to go into move mode and pull this one out. And pull this one out here. And this will be our thumb. The thumb sits a little bit lower, so we're going to pull this down from side view. By the way, this goes without saying, of course, I'll always be looking at a reference image, especially when you're creating hands, because hands are super complex, very complicated shape to deal with anyway. So from the side view here, I'm just trying to lengthen out the fingers here. So this is the nuchal, this is the center here, and then this is the tip of the finger. But I'm not going to worry about putting another joint there because I think that's just going to complicate it too much and I can actually just sculpt in that detail and that'll be a little easier. So now I'm going to pull up the tip, the middle finger, and that pull up that joint in the center. And from the side view it looks like the knuckle on the middle fingers, little low, so I'm going to bring that up. And now the ring finger will pull this out. Pull this out as well. It kinda try to make this look more like it's in the shape of a hand. Nice thing now is to I can actually just, if this isn't in the right place, I can just pull it over and line it up to make the knuckles line up a little more accurately. And obviously not this pinky is way off to the side, but that's okay because we can just move it. See how if I move these two close together, they become transparent. That means that the data is not going to transfer correctly once we turn this into a match. So that's bad. So try not to get these two close together. If they're too close and you need it to be really close to the other one, what you can do is hit E to go into scale mode and you can scale it down, scale down this one sphere. And then it might help ZBrush understand that. That's what you're trying to do. Oops, it went out of solo mode here. So if you were to scale this sphere down, it gives you a little more wiggle room to be able to get closer without it turning transparent or, you know, being an error essentially. But the way I'm going to fix that actually is just moving the rest of these fingers over instead of scaling anything. Because if I scale my fingers right now, it's going to make it harder to, it's just going to mess up the, the width of the entire finger all the way down the length of the finger, and I don't want that. So instead I'll just shift everything this way and that'll make it easier. So I'm just using move mode W on my keyboard and just moving these over one at a time. Okay, so now we have a really, really, really basic rough shape for our hand. Super basic, but that's okay. And you can play with this as much as you want. The nice thing about Z spheres is it's just so easy to create really complicated shapes are really quickly. And even if, if you're like, Well, the base of my hand shouldn't be shaped like this. I can press Q, going to draw mode and then just draw another sphere like this. I can hold Shift and it will make it the same size as this. And this gives me more of a, more of an accurate shape because now this is two spheres instead of one. So you can just add spheres on wherever you want. Move them around. Makes it super easy to just manipulate your shapes and create a base for whatever it is you're making. So people like to create characters this way too, when you're starting out. Making a base mesh for your character. Sometimes it's really easy to create the legs this way are the arms this way. Some people love using Z spheres for a lot of things. I like using Z spheres, but I don't like using it for everything because I don't know my my brain just works differently for I like to be able to just append in as many sub tools as I can. And I also think it's a little faster when you're working on a whole character. Just append in a bunch of sub tools and then work on each piece individually because then you're just sculpting. And I like sculpting. That's just a preference thing, but that's not the, necessarily the right way to do it or the best way to do it. And it's just how I like to do it. Alright, so now I'm just going around my model at a bunch of different angles. And if you look at your finger, There's sort of a length, the difference from one segment of each finger to the next. So the first segment here is the longest. The second segment here is actually slightly shorter. And then of course, the third segment, which we're going to have to draw on for each finger here, which I should have just done. Draw one more and then I'll hold Shift and draw one more hold Shift, hold Shift and hold Shift to give us our last segment. And we're not going to do one for the thumb because the thumb is in shape like that. It doesn't have that second choice. Actually, you know what I lied? That's actually completely not true because. Starting over, starting over. And we're gonna go in and draw one for the thumb because the thumb actually does curve down at this sort of an angle here. That's a little too far, but you know what I mean? And you'll see that if you're, if you're looking at a reference image, the thumb here, I'm going to go press E on my keyboard and scale this part of the thumb up a little bit because this joint here is a little wider. And then we'll go into move mode and we'll move these down. And full word to try and really get that shape of the thumb correct. And now we're just going to worry about each fingertip here. So the tip of each finger is the shortest of course. And the tip of the finger kind of bends down and forward. It's got this weird little like Scoop sort of shape, which is partially due to the fingernail, of course. So we're going to scale the tip of each finger down just a little bit to kinda help achieve that. Look. Alright, so this is starting to look okay. And this knuckle is a little bit big, so I'm going to scale this second knuckle down just a tiny bit for each finger. And be sure to look at top and bottom view and side view. Now because I want this character to be in some sort of pose. For right now. I'm not going to worry about posing the hand, but this is, this is an opportunity if you want to have your character be making a fist or doing something like that, this is a good opportunity to pose the hand like that if that's how you want it to look. But for me, I just want the hand to look like it's completely open at the moment because it's probably going to be a more casual pose for my characters. That's what I will do with that. So at this stage here, if you want to add in more detail for the hand or the shape over here isn't correct. You can press Q. And if you see these segments between this sphere that I've drawn and the main sphere. These are all just segments that you can't edit unless you press Q to go into Draw mode and then tap on one of those segments. So when I tap on it in Draw mode, it creates another Z sphere there. And then I can press W and move it around or scale it or do whatever I want and see you soon as I created it. It created an error here because this is transparent. So I'm either going to have to move this a little bit or scale it to make it fit properly. I think I'm actually gonna move it in this way more to try and get that bump. Like that bump of the poem. Which of course that can also be sculpted in a lot of these details. I try not to worry about detail too much. I just want a general shape that looks right. Because we're about to turn this into an actual mesh that we can sculpt on. And then we can add in a lot of the other details much quicker that way. So Z spheres are good for blocking out or creating a general shape first. And then just turn it into a mesh and sculpt it from there. Because that's what I like to do. So W going to move. All right? And you can tinker with this as much as you'd like to try and get it to look as accurate as possible, but try not to spend a terribly huge amount of time because we are going to alter this as soon as we go into sculpting mode, an upbringing that knuckles. Move those up further because they don't look correct. The hand is not long enough. Notice here how when I'm trying to do this, I'm accidently clicking on the bone and moving the bone. And what that's doing is it's actually straightening out the entire finger. Excuse me. It's actually straightening out the entire finger. So if you click the bone and pull it in the direction that it wants to go, it will straighten out all of the joints along that direction, which is not what I want, but it's just something I wanted to point out. Also, if you want to bend the entire finger, you can hold Control and click on that bone. And it will actually bend all joints or bones in that direction all the way down to the end of the chain. So that's a really fast way if you're like, Well, I want to bend both of these at the same time. Hold control and you can move them both at the same time. We've got the bone like that. Got them like that. That's a really fast way. Instead of having to rotate around your camera angle and pull it in move mode manually. So from side view I'm holding Control and clicking on one sphere and it's affecting the spheres that it's attached to. So now I need to fix the length of my joints. So this first segment is longest, second segment is slightly shorter and the third segment is the shortest. This can eat up a little bit of time because obviously it's takes a long time to make sure that all of your pieces are correct and everything is proportional and that it's not cricket from the front or from the side or any of that. But Just got to take some time and just sort of commit to it. And your mesh will look better in the long run if you just put in the time to make sure that it all looks right. And that's at is the hard part, but it is also necessary. Okay? This is looking okay. This isn't great, but it's looking okay for a hand. And I'm just going to print that out. So I've got a really neutral posts my head. I'm keeping space between the fingers for right now because I'm going to sculpt on this. So I'm gonna kinda have to mess with that a little bit and add a lot more detail. Okay. I think that's that's going to be good enough for now. And I'll scale down the tip of the thumb, press E, scale it down just a little bit. Okay. Starting to look like a hand. So that's good. And I move this back and move this forward. And I could do this for hours. Just trying to perfect that shape, but it's, it's hard. It takes time. All right. I'll scale this down, scale that down, scale this tab. Something to be aware of when you're doing your thumb and you're doing your fingers. So in the hands you have these tendons that run from the wrist out to each finger. And the one for the thumb is a straight line all the way down to the end of the thumb. And if you look at your own hand, you'll totally see it's just a straight line from the wrist down to the tip of the thumb. If you're looking at it directly from a side view like this, look at your own thumb and you can see that line. So this is a good way to help you line up the angle of the thumb. Sometimes you see people when they create thumbs, they tried to create this cool like stylistic arche bend to their thumb. That light comes into the inside like this or something. And that's, that's not a good representation like like this. And this is this is not correct because the thumb is actually a straight line. The thumb comes straight from the wrist, comes down at this sort of angle. So it actually be in a line with the with the wrist. Sort of like at this sort of an angle as I'm trying to draw. So just something to think about. Proportions for hands. Trying to get that angle correct for the thumb. And there's all these tiny little details that you learn over time or that people show you or that you learned in class about anatomy and the bones and the muscles and all data. It just comes over time. You just sort of accumulate these little, little tidbits of knowledge to kind of help inform your decisions over time. All right. That's going to be good enough. I know I keep saying that there we go. And we can actually make the tip of the thumb bigger because the thumb is not that skinny and not like other fingers. There we go. Okay. There we go. So this is our hand. So if I want to make this a mesh that I can sculpt on, what I need to do first is I need to go to the right menu, scroll all the way down to adaptive skin. And inside of the Adaptive Skin menu, you have preview and you have density. So if I turn preview on, it's going to show me based on the density that I have selected and the DynaMesh resolution. It's going to show me what my hand will actually look like if I turn it into a 3D mesh. So this is a good time to check and say, Does this look right? And of course my answer to this is no, this doesn't look right because well, side of the hand is not the right shape. And lot of other like little proportional things are kind of the wrong shape. But generally the fingers and the thumb are in the right place and going in the right direction. So for right now I'm actually just going to say this is fine. I'm not going to spend a ton of time nitpicking this with Z spheres because it's actually harder to fix those details than it would be if I just go in and sculpted. So if I turn preview off, I can turn my density up higher and in turn preview back on. And it'll show me the act of number of points that I have up here. A 100 and 33000, That's pretty high. I don't need that many points, so turn preview off an alternative density down to three. I don't know about that either. Oh, I'm sorry, the active points are actually not accurate. That's based on the DynaMesh resolution. I'm sorry. So I'm going to turn my DynaMesh resolution down and then turn preview on. And that will show me more. So 40 thousand, that's plenty to get lots of detail in here. I didn't fact I could even use less. So I'm going to turn DynaMesh resolution down to something, turn preview off and turn this down to like I was manually type this in to 80 and then turn preview on 13 thousand points. That's really low. That's plenty. And I can always just divide up or, or turn up the resolution later. So okay. So I'm gonna go with that DynaMesh resolution is at 80 densities at two. I'll turn preview on. So now if I go down to this button, this is make adaptive skin. And click it. It creates a copy of my hand up here. So above my subtotal menu, there are these other sub tools and other scenes. I like to call them, where you can create new objects and import things and put them in here. So this is my original scene with all my characters pieces in it. And then right here is the Z sphere skin, the Adaptive Skin that I made. And that is actually now its own sub tool. So what I can do now is I can go back to my original scene, and I can go back to sub tool, go to append. And now that hand that I just created by hitting make Adaptive Skin, I can just append that in. And now it's its own sub tool. So now this is its own sub tool. The reason that I did it this way is because this original one that I worked on is still an adaptive skin preview. So if I go back to Adaptive Skin, I can turn preview off and I still have my, my Z sphere model of my hand right here. And if I want now I can just go to my subtotal list and just click on the new hand that I created. And it's its own sub tool, separate. So if I want to go back and edit my hand, I can still do that. I can still go back here and edit the hand and do changes are proportional. I can just mess with it as much as I want and then just go back to make it up to skin and create a new sub tool that I can just append in as its own subtotal here. So it's sort of a non-destructive way of working. So you always have this rig here and you can always edit it whenever you want. And then the hand here is separate. So this is actually what we're going to be sculpting on. And we're going to leave this Z sphere alone so that we can come back to it in case we see something that we messed up and we want to fix it later. So I'm going to hide that and then select the hand here. And now we've got this enormous hand in our scene. So the nice thing about sub tools is can just press W, move it down here toward the wrist. And then we're just going to use our use our Move Gizmo to put it into place, scale it down. So if you're not sure how big your hand should be on your character, look at your face in the mirror and hold your hand up to your face. And you know, generally your palm will fit over your face. So that's sort of a good point of reference if you're like, Wow, is this hand too big, too small? I'll just put it up to the face of your character. Sort of put it in place like that. And generally the palm should just cover a portion of the face about like that so that it looks about right. It's maybe it's a little too big, but my MS with that. And that's about Alex, pretty silly. Like a hand is grabbing your head. But that's about where you want to be. And don't worry about the thickness. We can fix that later. So just worry about just the sort of general size and how big your hand is in relation to your face. That's a good way to kind of gauge the size and how you want to make your hands now big, they should be. So now we're just going to move this down, move it into place. And we'll move it up on the arm a little bit here. And again, the wrists should be right around here at the widest part of the leg and around the groin. This is the sort of like landmark for where the risks should be. And you know, I think those hands like a little too big. And it's like sausage fingers. It's a pretty big. What you can also do is if everything looks too thick, hold control and click on Scale and it will deflate your objects same if you go the opposite direction, it inflates. So this is similar to like going to the deformation menu over here. And selecting inflate or deflate. You can do that simply by holding Control and clicking on scale and dragging up or down. So if everything looks like it's man, those fingers are way too thick. I don't want it like that. Hold Control. Click on scale and scale it all down. Then you get a little more, a little bit of a deflated mesh. Now that we have our hand all set up, we can just go right into our clay brush or into whichever sculpting tools we want to use for it. And we can start adding details.
22. Detailing The Hands : So now that we have our hands in place, we're just going to have to get our proportions right? So from the wrist here, it's the hand is just a little bit wider than the wrist as the risk connects. It's a little bit of a bump right here for where the thumb comes out. And I'm just using the Move brush. I'm gonna speed some of this out. So because we did the adaptive skin preview and all of that, we already have DynaMesh turned on here. Or you can go to geometry and turn on DynaMesh if you don't already have it turned on. And I cranked resolution up or down however much you need. So now comes the more challenging part is the sculpting part of the hands. Hands can be tricky, but, you know, just, just takes a little bit of practice and observation. So there's a couple of key things that friend of mine kind of helped me realize about hands. And one of the major things about a hand when you're looking at it straight on from this angle, is it's going to be wider on this end, then it is going to be on this end over here. So there's almost like a wedge sort of shape and there's always a curve to the hand like this. So if your knuckles are straight across, That's generally not correct. So we need to actually just, and I probably should have just fix that with my Z spheres before, before coming in here and tried to do this with the Move brush, but we're just gonna do a little bit of pushing and pulling. Grab this forearm peas and just sort of smooth it down and move it out of the way. So this wrist is in the way there we go. That helps a little more. So but the hand selected here, we're going to bring this section. It's going to be a little bit thinner on this side like that. And this end of the, this side of the hand is going to come out and come down a little bit more. So let me get that taper, that sort of arc to the hand like this as everything kind of moves. And if you look directly on at your own hand, you can sort of see that shape. The base of the hand is got this sort of curve to it. So getting that initial shape right first is going to help us sort of land all the other parts in the right place. Scale to smooth this wrist out a little bit and we can always come back and fix that later. All right, so this is starting to look a little more like it actually fits. I'll just grab this and pull it in, pull it down, try to merge this with the wrist a little bit more. And this is all just with the Move brush. I'm not trying to sculpt in just yet. This is technically sculpting, but I'm just trying to push and pull rather than add any clay right now. If I add, it's going to make it a lot harder to mess with the shapes. Ok, and we'll smooth this out a little more too. All right. Get this box sort of shape for the hand and make sure that this thumb joint comes up to there. Yeah. And I'm just looking at my own hands and looking at reference whenever I'm trying to get some kind of point of reference for any of this stuff. Just just looking at reference. It's nice that we all have a pair of hands because we can use it as our own reference. If you aren't sure how something looks, you can always just look at your own hand. Okay. So now all the fingers look about the right width and the knuckles or Alright. So now we need to fix the knuckles and all that stuff. So now I'm going to grab my cloud brush and I'm gonna hold Alt and kind of carve in here to sort of flatten out the back of the hand. That's a little too much termites density down. Now we have to be real careful. So I don't wanna do this too much. I don't want to destroy my hand that I put all this time and energy into Control Z though. It's always that. So I'm going to flatten out the back of the hand a little bit and grab Damien standard and maybe just cut into here a little bit. And this webbing on the hand is a very, very strange sort of fold in the skin because you get this crease here. But then you also get these wrinkles of skin that come out and around. So you can even use by holding Alt on the Damian standard brush, you can kinda create the disillusion that the skin is folding out and around like that. And then we'll just switch back to our clay brush. I'm going to flatten down this little pad of the hand. So as for example purposes this across here has all sorts of one flat part of the hand. There's also a section that comes down along this side right here. And then there's this part of the thumb, the base of the thumb, that's that thick fatty part before the thumb right here. So these are like the three sections that kinda outline the palm of the hand like that. So the center part is going to be a little, a little more sunken in. And this is actually all too big. But generally this part up here and this part right here. And sort of on the side, this side is more subtle. It's not that extreme. Are the outline for the hat. So I'm just using my brush to kind of build those up. Some of them down, try to get them in the right shape to look at least somewhat right? So from far away, it's obviously, the hand is obviously really big and made it a little too large. But we can always just scale it down. And I'll expiring. Might be a little small. Gotta keep playing with it. As you mess with these shapes, it's going to affect the entire size and shape of your hand. Do so. Clay brush. Now the side of this knuckle, it's not a straight line. It actually comes at an angle from the thumb. Over on this side, over here. A little more of an angle and like that. So from here travels in toward the index finger. So we've got that shape in there. It's like my fingers got a little bit crooked. So what I'm going to have to do is hold control and select my mask lasso. And select the tip of the finger and flip my mask so that I can straighten some of this out because it looks like some of it got a little cricket. That's why it's dangerous to use the Move brush. I probably shouldn't have done that. So I'm gonna have to go in and do a little bit of manual fixing because some of these fingers are a little bit crooked but that's okay. I can we can we can fix it. Could just sort of go in and use the inflate brush. Very low density, density. And just sort of build up these build up the knuckles in the center here because the knuckle is a little bit wider. Build up the knuckle there. They're here. And here. There we go. And then we'll use the inflate to just sort of fill in any of this space on top. That's not the right shape. Because you don't want your fingers to dip in before it looked like it was sort of caved in. I had like this kind of curve to it, which is cool stylistically, but it's also kind of wonky looking from other angles. So just trying to fix the tops of the fingers a little bit. And I can even take them move brush1, mask these other fingers alongside it and just try to move this knuckle a little bit with the brush. So from here we're just going to have to continue messing with our shapes just one at a time and just being patient to try and make our hands look decent. There we go. And slowly it all starts to come together. Just focus on 11 part of the time. Try to get the fingers to look the joints to be in the right place at the right angles so that they're not too extreme. And I'm just using the Move brush, just trying to get these into place and masking the other parts of the fingers so that they don't affect those. Ever go. There we go. That's kind of a nice little cheat. So before the finger was angled like this is completely straight, which isn't correct. So what I did was made my radius just about the size of the tip of the finger and then grabbed this backside and pulled it down this way. And if you look at your fingers, there's actually that that's sort of the direction that they bend in. The knuckle swoops down like this. And the pad of the finger kind of rounds down and back toward the rest of the hand like that. So that actually worked quite nicely. I'm going to mask all of this, soften my mask a couple times, and I'm going to bring my gizmo here by holding Alt and tapping there. If you hold all of them tab, it'll move your Gizmo and then just rotate the finger just a little bit to make it evenly spaced with the rest. And I can even rotate it this way because it looks like it's a little cricket that helped. And we'll just use our Move brush to get this back into place. Let's take a long time. So it's going to be like some artists describe like Flip Normals if you've watched their hand tutorials, he, he describes sculpting hands is sculpting little tiny statues. Because hands are just so detailed, There's so much going on and they are day articulate and move in such specific ways. There's a million different ways that you can pose a hand. So hands are very intricate. So it just takes a lot of time and just kinda breaking down the shapes and what you're seeing and trying to understand you know, what it is that you're looking at. So now I'm just taking the Damian standard and just carving and these at the bottom here, rather than trying to sculpt in the joint, I'm just trying to make it look like the skin is folding a little bit. And that's going to give it a more a more believable look that in there. And then on each side of the knuckle, just a tiny, tiny bit. Cool. So that's actually starting to kinda look like a finger now. And I'm just going to do that for each one here. It's kinda go in to the slightest amount of detail. And I'll grab my Move brush again and pull this part of the finger back and down again because that creates that natural swoop of the finger from the fingernail like that. Make sure that it's wide enough on both sides. Now we'll do the same thing for these other fingers to this brush a little bit bigger and a mask all this off around it so it doesn't affect the other fingers. Grab this and just pull it down this way. This is its finger got really messed up somehow. That's okay. It's not ruined. It's still still salvageable. It's still fix it. It's just about getting the knuckle in the right place and making sure that it looks straight from one knuckle to the next. We can even conflate the tip of this a little bit. Go to looks relatively consistent the whole way down. Smooth that out. All right, Damon standard it, just get that curve in the wrinkles. And now the pinky grab our move brush and just pull this down this way. Try it again. All right. Oops, going to unmask the rest of that finger. And we'll just treat null. These parts are still pretty cricket. And then we'll inflate the fingertip. Okay, so just a short amount of time. We've already been able to really just get a decent pace for our hand going like this, and we can mess with this as much as we want. But for this tutorial, I'm not going to go crazy and depth because I don't want it to look super detailed because the rest of the mesh is going to be stylized and not super realistic looking anyway. So I think for this video that's going to be good enough. Just gonna make sure the last couple of angles here look correct for the thumb and other parts of the hand. Make sure that things are sort of in place the way that I want them. Make sure the angle of the thumb is right. If you go into solo mode here and make sure we didn't mess up that straight angle from the wrist going down to the tip of the thumb here. Looks generally correct. It's not bad. Maybe it will pull up this fatty pad of the thumb a little more. And then use the Damian standard brush to just carve in a little bit of definition right here and down here. And then smooth it out. Just so we have a general handshape that looks correct. And we can even grab my Move brush and pull this down. Because in actuality that's more what that looks like. And, you know, there is one other thing that I forgot to mention that can't believe I almost forgot this. Super important. So hands have these tendons that traveled down the length, this direction that travel from the knuckle down to the wrist. So a really good brush for this is the clay buildup pressure to low intensity. Because you get this nice defined line. So just draw a line from each knuckle down to the wrist and they all kind of converge together at the base of the wrist. Rare. Having a hard time drawing straight lines right now. And same thing for the thumb. Knuckle down to the wrist. And if we smooth these out, it's still going to have a little bit of definition, but it also looks really, really nice. It just adds a little more depth to your hand like that. And you can even these, this tendon and also travels all the way down the finger because it's how your fingers contract. So you could, if you want at a very low intensity, just draw that in on the finger and it's weeded out. And it adds even more definition periods. It's just going to make it look even more believable. And this is just like that. And then we'll try this one more time to this. That'll really create that tension. Sort of look like there actually is some depth there and then just very, very lightly smooth it out. So the definition is still there. A little bit like that. This is just one more thing to help really show off that shape of your hand. And if it's in, if it's in the correct shape, if it's got that arc to it from one side to the other, it's going to look a lot better that way. Very last I want to mention, between each finger, the shape is not correct. This is not right. What I did here. Actually between the fingers, there's sort of this like indentation like a pit that comes between each knuckle and up toward the hand like this. So I'm just taking my damien standard and I'm carving and a little triangle from one side and then the other side like this. And then going right up the middle to sort of bring it toward the hand like that. And if you look at your own hands, just sort of relax and have your fingers sticking up straight. You can see that because the webbing of the hand that comes out here is actually it's very it's flat right here along the bottom. And then this little dip that I'm sort of talking about here comes all the way down to the palm of your hand. And that creates that sort of shape. So this is, this is flat on the bottom here. And in between the fingers, there's this, this little sort of shape, depth, almost like a little hill that comes up in-between each finger. So the indentation needs to be there or your fingers are just not going to look right. And that's because the webbing of your hand that's down here on this part obviously is very loose because it has to bend a lot. And the fingers and the knuckles sit more on top of that part of the hand. So this is all, this is all one connected piece that sits and sort of connects into place on top of this flat, Paul. So that's sort of the way I like to view it like that. And that just gives you another layer of definition that gives your hands a little more believability. If we want our hand to appear over to the other side, what we can do here is with our hand selected, go up to Z plugin, go to mirror, x axis and hit. Okay. Now we have a hand on both sides and make sure to turn on symmetry so that anything you do on one side is on the other. Now we need to line this up at the wrist. So I'm going to, with symmetry turned on when I look from the side view and I'm going to rotate my hands sort of face down a little bit like this. And sort of a way line this up so that it's straight with the wrist. But then from the side here I'm going to just just push it to where it's sort of faced so the palms are facing straight back. Because I think that's just kind of a cool sort of look. And also more of just a natural relaxed pose. And if you're creating a character for a game or anything like that, if you pose your hands, you want to make sure that nothing is twisting or rotating because when you give it to somebody to rig it or put bones in it and make animations for it. They're really not going to like if, if any of these fingers are twisted or if the wrist is twisted, say if the hand we were facing this direction, you know, like if it were facing like this because that means that the bones in the arm are going to have to twist to meet the hands and the fingers are also going to be twisted. So as a general rule, but I'm modeling a character. I just like to be in the habit of having everything in a very neutral pose. And the angles of everything are very straight. And it's okay to have it facing back a little bit like this because that can, that's still from the side view. It's still only it's only it's only rotating in this direction, front and back. Whereas if it were like this, then the forearm would actually have to twist to match the angle of the hand, if that makes sense. So anyway, that's why I'm trying to line it up with sort of a straight angle like this. And I'd like to point the palms back a little bit because apologists, I think it just looks cool and it's not going to mess with any of that. So also when you're lining up the wrist, the wrist is going to be thinner than the hand because the hand widens out. So there's always this little bump on top of the wrist and I'd like to take the base of the hand and line it up with the wrist like that so that there's just this little bit of bump where the bones all meet and all the tendons converge like that in the wrist and in the bottom of the risk and sort of go into the hand like that. So it's a little bit. So there's sort of this dramatic sort of like bulge of the hand coming out from the wrist like that on the bottom and the top. It's just this little Baht. Okay, I think this is good enough for now. And we're gonna go on to the next video and continue to finding our other parts and proportions. So I will see you there.
23. Creating The Boots - Part 1 : All right, welcome back. And in this video we are going to do the feet for the character. So where we left off last time, we had this sort of ugly boot shape. And these are pretty terrible, but we're going to fix that. So before we get into doing the shoes, the feet are too close together because of the way that I modeled the pose. So what I need to do is select my upper leg. And if you've been working like I have with separate sub tools, you should be able to just select the legs and have them be there on sub tool. And I'm just going to pivot my hold Alt and click on your 3D gizmo. And you can move the gizmo and just put it right up at the top of the legs. And then we can just rotate the legs outward just slightly. And then I'm gonna do the same thing for the lower legs. Hold all my 3D gizmo up to the top of part of it and rotate this outward. And that will allow me to then switch to my feet and move them outward. This is gonna make it a lot easier to just model my feet in general. And the lower legs here are still these calf muscles are kinda going to have to do a little fix in here. We'll get around to that eventually. So anyway, we'll get, we'll get around to that. So we have to fix these boots and make them a little more believable. So the general shape of a shoe is pretty simple to get down. The pattern is kinda the same for a lot of boots and this character is going to be wearing boots. So what you can do is you can actually go. What I'm going to do to find reference for my shoe is I'm gonna go to unsplash.com. So from here, if you go into Google and you just type, type in Unsplash, and they have all kinds of images of different types of styles of shoes and boots. And these are royalty free. So, you know, if you wanted to use these for project or something, you know, you could, you just can't sell these images because that's part of the license agreement, but you are allowed to use them and use them as reference, which is nice. So I will select a couple of different boot images here from Unsplash, and I'll use those as my reference images. And I suggest that you do the same so that you can look at the patterns of the shoes. And you'll notice most of these boots have the islets for the laces here. And this part, this section here that's sort of outlines or around the ankle and comes up to the top part of the foot. And then there's usually like a little heel piece like this boot hit here has it. This little Doc Marten looking boots have this sort of like patch that goes along the outside back part of the heel. And then this is again like this part here on this side part that wraps around the front where the laces go and then wraps around the back. And then the toe of the shoe sticks out from underneath that. And then of course the soul is so Don as a separate piece. So we're going to make all these pieces separately. And I'll show you how. So rather than using pure ref to drop my images, my reference images into, I'm actually going to use the spotlight so that it's just sitting over here on my screen all the time. So in order to use the spotlight, you have to go up to the Texture menu and go to Import. And when you select import, it'll allow you to go and find your reference image and import it from there. So for this, I've selected this boot image. Now that I've imported that image, I can click on it here in the Texture menu. And down that, down to the right, There's add to spotlight. If I click that and that image will open up here. Now with the spotlight, I can click and move this little wheel menu around. Or I can press Z to turn it off, or I can hold Shift and press Z to turn the spotlight off completely and then bring it back to the same thing. Hold Shift, press Z and it brings spotlight back and then z to turn the little menu on and off. So in my menu I want to do a couple of quick fixes. Like I want to crop this image, so I'm going to click right here, and it's going to this little red line right here. And you'll see that you have this up and down or left and right. So this is the green axis for the y-axis. And what that does is it crops the image based on the central location of your ring. We'll wherever you clicked on the image. So I can up here, click the Y, extend, and just bring it down and it kind of cut off some of my image there. So you kinda have to play with it to get it just right, but you can do that and it will just crop your image a little more, make it a little smaller. And you can also do this on the, on the, I guess this would technically be the horizontal axis. So if you need to crop it either way, you can call up the edges like this by doing horizontal, or you can do the vertical if you want to crop it that way. Now to move the image, just click on the image and drag it around to move it. And then you can scale it by using this little radial menu here and scale it down in size if you need. And we can just put it anywhere on our screen that we'd like. And then to get rid of the wheel menu, press Z, and now you're back here. The last thing to do if you're using the spotlight and you want to continue sculpting is go up to the brush menu and go down to samples and turns spotlight projection off. Make sure that that's turned off. Otherwise you won't be able to sculpt. So now we have our boot preview loaded up here. And I just like this boot because I like that it's got a toe tip cover and I kinda like the generalists that I put the zipper on the side. So I'm going to use that as my reference for this. And I'm going to modify that boots from there. So if you didn't get to this place already where you have just a general shape for your shoe. I get to this place either append in a new sphere or something and just kind of get a general blocky shape for your foot. And I'm going to start shaping these sort of in the shape of a foot. So what we need to do first is actually just create the outline of the shape of the foot inside of the boot like this. This is going to allow us to use extract to pull the pieces off of this base and actually create something that looks like a shoe. Alright? So we're getting our general shape and you get the idea. We're just trying to make this in a really general shape of a shoe because we're actually just going to extract our other shapes off the top of this. All right, That looks okay for now. I don't like the bottom of this, so I'm actually just going to mask it. Flipped my mask. Flip my mask, and then we're going to go to visibility and click Hide part so that the entire bottom is hidden and then go to the geometry menu modify Topology and we'll hit Delete Hidden. And then in that same menu hit Close Holes. And it will close the bottoms. And I'll very, very gently just run my smooth brush over it once or twice. And select my mask pen tool so that I have a perfect square mask brush going on here. Actually, before I do that, what I'm gonna do is I'm gonna go to geometry and we're going to turn on DynaMesh. So with DynaMesh turned on, these are going to be a lot easier to work on. All right, There we go, starting to get a actual sort of general shape of a shoe here. And I can just smooth this down. We don't want this to be as chunky as it is pretty chunky. And I'll use my mask to mask the top, flip the mask, hide part, delete, hidden Close Holes. Again. I use this all the time. That's why I always set that to some kind of shortcut. And I will DynaMesh turned on. This is going to be a nice clean cut. Flip the mask, hide part, delete, hidden, Close Holes one more time. Now that I've closed this up before I smooth it out, what I'm gonna do is mask the bottom to about there. Flip the mask. Now if I press W on my keyboard, I can use my Move Gizmo on that gizmos little cricket. So I'm going to hold Alt and click this little wheel arrow icon. It's going to reset the direction of my gizmo. So if your gizmos ever off tilt like that, you can hold Alt, click on this little arrow and it resets to the world's axis up and down the direction of your Gizmo. So once I've reset the direction, I push down this part of the shoe here and it's going to, it's going to force that down, all that geometry. Then I'll have something to actually kind of looks like a boat or at least a little more like a boot. We'll get there. I'm just gonna make this a little thicker because this character is going to be Cyberpunk. So I want those, what those boots to be really big and want them to be goth boots would be cool. All right, so now we're going to unmask DynaMesh, like Control and click and dragging out here so that everything is nice and smooth. Now I'm going to mask the bottom part that I want to be the sole of the shoe. That's going to be about belt like that. And then we're going to smooth down the unmask part just a little bit. And we'll grab our move brush. And just try to get this sort of taper of the foot in here like this. Now I'm starting out with just a general shoe shape. But what I want to do is I want these boots to angle down and forward. And you'll see what I mean in just a sec. So what I'm going to do, unmask all this this up, get the tip of the toe a little more round like that. So it kinda like Final Fantasy boots. So once I'm to this point, what I'm going to do is grab my mask lasso. And I'm going to mask off just this section of the boot where it's essentially the back portion of the soul where the heel is going to be. So just like this. And I'll press W on my keyboard and hold Alt and move my gizmo right here to the center hold Control. Click on my mask a couple of times to soften it. And then just bend the foot down at about 45 degree angle. And then I'm going to move the put sort of back in into itself. And now I'm going to mask everything all the way up to the partner here where the toe is. With my gizmo to that line hold control. Click a couple of times my mass to soften it. And then bend the toe forward. And I'll line it up with this bottom line again here to make sure it's straight. Okay. Just like that. And then I'll pull the toe back and into the Buddha little bit. What that'll do is create a nice little crease for me right here. And it will make the foot look like it's too long. So with this, I can clear my mask and DynaMesh. And it'll smooth all this out a little bit. So this creates the effect of heels like that, just that raised heel in the back. And then I can just mask off the entire portion of the bottom section here. Flip my mask, press W and then bring it down a little bit. And this will be my heel of my boot. And then we'll just scrap the last section right there and bring that down. And we'll use this line here to sort of line it all up. That's good enough. Now if I switch back to my mask pen, I can use a straight mask like this, flipped my mask hide part to lead and Close Holes. Now we've got a nice flat bottom to our shoe. Got a nice raised heel like we wanted to move this down and n raised up too much right there. And the foot has sort of a triangle shape from the base of the toes going up toward the leg, there's sort of a triangle shape. So you could even exaggerate this a little more by bringing this in. And it's just going to create more of that wedge shape and make it look more like a shoe, more like a foot, I should say. Smooth all that out. Okay, So we're starting to get an actual shoe. Go on here. And I'll grab my age polish brush and just flatten this down. This is where the laces are going to be. The tongue of the shoe comes here, so that needs to be flat. And maybe I'll run this along the outside edge a little bit. And one last thing that I wanna do is I want the back part of the heel to taper in and down a little bit. So what I'll do Is a mask off this section here, flipped my mask. And actually I'll draw in just with my mask pen here. I'm just drawing in a little bit more of a mask. I don't want there to be a nice fine line right about here. And then I'll press W on my keyboard, move my gizmo by holding Alt and dragging it over to here. And I'm just going to scale this down and n, Yeah, perfect. It's creating that effect that I want. So it's gradually sort of pulling in for toward that heel. And I could do a better job. So I'm going to clean up my mask just a little bit on this part right here. And because these polygons are stretched in, these aren't, That's how it's creating that effect. So I can just sort of play around with this to get it to look the way that I wanted to. Try this again, my gizmos all the way at the bottom of the hill and they'll scale it down. It's okay. That looks that looks about like how I wanted it so that the heel is narrower than the front of the foot of the hill, a little bit like that and make sure it's straight. Cool, close enough. Number of DynaMesh to smooth everything out and then use our smooth brush to take care of those stray polygons. All right, cool. So now this is starting to look like a pair of boots with the heel on him. So at this point it's okay that these boots look very plain. Because in the next video I'm going to show you how to actually create all of this extra trim and extra pieces on the outside. And it's actually going to make it look like a real shoe. So in the next video, we'll go over all that. And I will see you there.
24. Creating The Boots - Part 2 : All right, In this video we are going to create the shoes or the pieces of the shoes. So let's get into it. So the first thing we need to create is this section where the islets lace together. And to do that, we'll just grab our mask lasso. And we will mask off almost at the top of the shoe, all the way forward. And inner shape down like this. So this part goes down towards the heel and it merges with the sole of the shoe. So we're going to stop right about here and go up and over the top of the foot and then leave the top part on mast as well. Because we don't want to mask this top section of the shoe that's going to mess things up for us. So that this section open here. I'll switch back to my mask pen, make it a little smaller here and just carve out the mask in the center. And I'll just clean up this original mask because I think I made this part too big because it's covering part of the toe and that's not what I want. So I'll do more of this sort of a shape so that it's select this and delete this old one. Yeah, so we'll try this sort of shape there and we'll try hitting extract now. All right, That looks better. So we'll hit Accept. And then we'll go back over to the deformation menu. And you polish my features a few times to really clean up those poly group edges and it looks a little cleaner. Yeah, that looks that looks okay. Right now I can switch back to my main shoe. Excuse me. And we'll grab mask lasso. We're just going to mask off this part on the front or the toe is and then clean up the bottom so that it lines up with the bottom of this part here. And then it extract. Yeah, that looks better. So it'll hit Accept. Now on mascot Polish by features a couple of times. And that looks that looks decent. Yeah. So there's an equal distance here between these two pieces going all the way up. And that makes it look nice. So if we zoom back, it's actually starting to resemble a little bit of a shoe. Now, if I switch back to my main shoe here, I'm just going to mask off the very bottom, which is just going to be the sole hoops. You declare my mask first and just mask up the very bottom. So making sure that these parts are sort of overlapping with that part. And this time I'm going to dial my thickness up to something like 0.1 head extract. That's way too big. About 0.01. And it extract. Yeah, that's better. Extract. Yeah, that's about the thickness that we want. 0.01 looks pretty good for the sole of the shoe. Select except if I unmask. Now I have this and I can go to, I can press W on my keyboard, and I don't see my gizmo, so I'm going to find it here. There it is. I want to move my gizmo down here, so I'll hold Alt and tap on that part of my model. And we'll go to the unmasked mesh center. And now if I hold Control and scale up, it will thicken between each poly group here. So when I hold Control and do this, it's going to inflate everything. It's the same thing as doing inflate over here and the deformation menu. Or if you were to do q match with your Z model or tool, see modeler brush. So this, I just want to thicken up that soul a little bit so that it's maybe like that. Nice and nice and thick. Big boots. Cool, So that looks good. So now that that's thick and I'll do polish my features couple times, 345 times. And that really cleans up the edges between these polar groups, except for the bottom there for some reason. That's interesting. So a quick fix for this. If the bottom of the shoes feel and look and really wavy and edgy like that. I can press W to bring up my gizmo hold control and tap on this poly group and it'll mask everything else. And then from side view I can snap to side view and then just scale down while I'm dragging my scale in this direction up. And what that's doing is it's forcing all of these polygons down and making them perfectly flat. That's a nice little trick for flattening and the bottom of something. So I scale the other way at all, obviously push it up into it when I'm dragging down. So if I drag up as I'm dragging up and scaling down toward my gizmo. It's essentially forcing all the polygons that lie completely flat on this axis. That's a nice handy trick for flattening things out like that. Can we just unmask and everything's nice and flat. Geometry is a little uneven, but we can fix that later. I just want it to be flat for now. Alright. Now if I did Polish peg groups, actually it should just pick Tycho away or Polish my feature. By feature, Polish PEG group, similar. There we go. So now it's nice and flat. Okay, I'm going to select my main part of the shoe again. And we have the toe, we have the part for the islets, we have the soul. So now actually, I need to select this portion of my issue. And we need to make the section that covers the heel up local symmetry turned on. This is behaving super strangely. Not really sure why. There we go. Okay. Now we need the section that covers the heel. So I'm just going to mask off that. It looks. And oh, that's way to fix that, we need to change the thickness back to points 0, 0, 5. Hit extract so that it's consistent with the rest of the pieces here. And that looks okay, so we'll hit Accept on mask polished by group or I'm sorry, Polish by feature. Published by feature and Polish by group are really similar. It's just, they just behave slightly differently. It just kind of a situational thing I like polished by Fisher for this because it tightens up the edges of the groups. Okay, cool. So that's all the main parts of our shoe. All right there. And now we can do is describe our Move brush. And just go to each individual piece. And just kind of just pull it out along the edge. And also pull it back in toward the bottom. Or even grab our standard brush and turn the intensity way down and just draw a nice line or on the outer edge here. And what that does is it creates a nice little bulge. So it looks like an actual piece of leather that's sitting inside of that soul and being held in there. It's easy to overdo it though you don't want to do too much of a bolt. It's just kind of a nice little added effect. Just a little bit of a line to make it look like it's bulging out. Just for added effect. Just adds a little more, a little more dimensionality to it. Some people like that. But you don't have to. All right. So that we've got a nice base for our shoe here. And now we need to create the tongue of the shoe. So I'll select my base again here. And I'll switch over to my mask pen tool. And we're just going to draw a line straight up in the center. Sort of clean that up. And I'll make sure that it's nice and long. So that should be fine. Ash, call it extract. Oops, I accidentally changed my thickness. Extract. And we'll hit Accept mascot polished by feature. And it's nice and cleaned up. And if you show all again, I can just tuck that down in-between this part here and then pull the tongue up. So I'm just using my Move brush to kinda move it left and right to really sandwich it in between the main part of the shoe and the laces are gonna go. And this looks like it's sewn in underneath the toe. They're there and they're still nice little edge right there. It's touched down into this. Right? Cool. That's like an RA And now the top part, I'm actually just going to grab in both directions and just kinda force it out and then pull it up like that. There we go. And hit Polish by features a few more times. 0, strange. It looks like I grabbed another section of a poly group right here. So it's kinda, kinda of a weird shape there because there are multiple poly groups on the tip of that. That's a mistake. It shouldn't have done that. That's okay. That's, I can just see Ramesh it. If you go into geometry and find 0 measure and just hit Z ring mesh, it should clean up that geometry a little better. Actually, you know, it's, it's out rather than doing that. Because then it all becomes one poly group and then I have less control over it. I'm just, I'm just going to leave it alone. I could obsess over those little things like that, but I'm just not going to because it's just going to take too much time. Alright, cool. Then we got the tongue of the shoe like that. All right, so we have this, we've already got a nicely can shoot here. So next I want to go back and select this section of the shoe again. And I want to create a porter. And to do that, I'm going to have to do a little trickier. So I'm going to hold Control and Shift and click on the outside poly group so that it's the only thing showing. Then if I go up to stroke, I can go to curb functions. And I'm going to turn poly group off and leave border, turned on and hit frame mesh. And you'll see a curve appears all the way around the edge of this. So I can only do this when this poly group is showing and nothing else is showing. Now what I can do is go into my brushes and go to curve tube. And if I change my brush diameter to be something really small, like 10. If I, oops, if I tap on that curve, it then puts a curve tube on that curve. All the way around the shoe are all around where it where it framed like that. And then two, if it's not the right size, like if it's too small or too big. Don't change your brush size when the curve is blue. Move your cursor away from the curve, change your brush size to something bigger or smaller, and then tap on the curve again and it will replace it with that bigger or smaller tube like that. So I think that actually it looks better. Just that nice small little tube. Looks good. I'm okay with that. So if you're okay with it, just tap anywhere else on the mesh and it will get rid of the curve. And then I like to go to sub tool, hit, split the split menu and go to split unmasked points. And that's going to split this little tube away from the rest of the shoe. So it's its own sub tool now. So it looks, that looks decent, unlike the way that looks. So I'm gonna do the same thing for this UP tool as well. So if I turn poly frame on this time, instead of how it will hold Control and Shift, click on the outside poly group like this. Go back up to stroke, term poly groups off, leave border on and hit frame mesh. And then with our curve to brush already the same size. Now I can just tap on that once. And it looks like it's the same size as the previous one. Tap somewhere on the mesh to get rid of the curve and then hit Split mass points under sub tool. And now it's its own sub tool. So it just adds a nice little effect to the shoes, gives it a much more three-dimensional look. By the way, if you haven't saved, be sure to save. And next I'm going to select the sole of my shoe here and we're gonna do the same exact thing. But this time I'll tap on the poly group here that is on the top edge. So this blue one here. When I hold Control and Shift and click on that. There we go. So this one is going to be different because you can see that there's an outside edge border at that. There's also an interior edge Porter. So when I go up to stroke and frame mesh, there are two curves. So when I take my curve to brush, I'm gonna make the radius a little bigger, something like 12. Tap on that. It's going to create two curves. But that's all right because I can just get rid of them later. So I think thickness wise. Looks that looks okay. I think that's a little too thick. So I'm going to change my brush size down to something like ten. Tap on it. Yeah, that looks okay. Yeah, I think that's fine. So now we'll tap on the mesh over here so it makes the curve disappear. And now I will go back to sub2 all the split menu and hit Split Mask points. And now this is its own sub tool. It looks like there are double vertices going on in there. Why is that? They're totally are it drew it twice? Not really sure why it did that up. No matter I can just mask it. Will control shift, click to show the click and drag to show the opposite, and then just delete hidden, and that is gone. And then this interior little too by actually don't need so I can hold Control credibly mass lasso tool and just mask the interior section. So think I got some of that right there. And then flipped my mask, hide part, delete hidden. And now we're left with just this one too. And of course, it's not matching up with the outside part of this shoe exactly. So I could even grab my Move brush and just move it down a little bit. To match with that. I guess I made this soul a little too wide. We can just we can just push that into place with the Move brush and it'll be fine. All right, and then to make this part of the soul match as well, we've got to move brush and move that in as well. And smooth this out to make sure that I keep nice, clean geometry. Can even go back to deformation and just polish by feature a few more times there. And it'll smooth that out. And then we'll do the same thing for the inside. Right? Cool. Starting to look like boots. And very last, we want to go do this same trim effect for this poly group here. So if I just have this showing, I'm going to hold Control Shift, Click on the outside poly group. Grab my curve to brush, go to stroke. Poly groups off borders on frame mesh. And we'll make the brush size, think it was something around five. For the other parts. Tap on that. For some reason it looks like it's doing it twice and I'm not sure why it's creating two tubes. Now. I'll troubleshoot that later. I don't know why it's doing that. But either way, I'll tap on this, tap on the mesh and it'll get rid of the curve than I can remove brush. And I'll just show this poly group mascot will control and shift on, show everything else, and then split mass points again. So that just this as its own polygon, sorry, its own sub tool. So now if I go back to this part, I can get rid of that pesky curve, shied partially hidden. And if your tube isn't thick enough, you can always use your Gizmo hold control and scale it up to make it look a little thicker. So the boots are actually looking more like boots. Now, the trim got all the parts, the tongue of the shoe. Now the very last thing we have to do is create the laces that rather than laces, we're just going to do in certain mesh because this is a Cyberpunk character and I want it to look a little more hard, surface, easy and cool. So I'm actually going to look through some of the IMM brushes that we have available. It could gun parts for some hard surface things like this is cool. I wonder what that would look like, That's pretty cool. Could even just use this instead of laces. So I think that's a cooler look. For Cyberpunk character. Can even scale this down and just put it like this. And then rather than drawing another one, I'm going to hit Control Shift D to duplicate that one. And we'll bring it down and just rotate it and move it into place. And will control shift D one more time, move it down. Rotated place there. So rather than laces, I'm just using metal insert parts. Because I think that that fits the theme of the shoes a little bit better. Cool. So I like that. I think that looks pretty cool for the style that we're going for. So now we've got shoes on our character. And in the next video, we are going to merge these body parts together and start creating other clothing for our character. I'll see you in the next one.
25. Sculpting The Body : So in this next video, we need to start merging our body parts together so that we can start creating the rest of the outfit for the character. So what we'll do is go over to our subtotal list and duplicate off a couple of these body pieces and then merge them together so that we can start sculpting and doing some final fixing on the arms and legs before we start creating the clothing. So what I'll do to do this is hold Alt and select each piece of the body that I want to merge together. So that's going to be the torso, arms, hands, and legs. So I'll grab the torso with all can click on it. And then I'll hold Shift and MS up to him and you click on that down arrow and it will bring it all the way down to the bottom of my list. And then I'll do the same for the upper arms. Hold Shift, down arrow. The lower arms hold Shift, click the down arrow, the hands hold Shift, click the down arrow. And then the legs will do the same thing. Down to the bottom, down to the bottom. So now all these body parts, starting with the torso, down to the arms, the hands, two legs, the lower legs are all at the bottom of my subtotal list. Now this makes it easy for me to just grab each one. And I can go to I sub tool menu and go to merge and hit Merge Down. And I'm just going to merge all of these into one sub tool. So now if I go into solo mode, this is all one single sub tool, but they're not merged together just yet because we're going to use DynaMesh to do that. But before I do DynaMesh, I want to make sure that I duplicate this sub tool. And if I go back here, you can see I still have my undo history. So I could actually go back if I need to. And I'm just going to hide that one with my undo history it in case I mess anything up and I'll work on this duplicate copy of everything here. So they go out and solo mode. Now I'm working on my duplicate and the head and the boots are still separate for everything. So let's try our DynaMesh resolution, 128 and see what happens. So if we go to Geometry, find DynaMesh 128. And we turned it on, we're at 391 thousand points, which isn't a bad thing necessarily, to have so many points. We'll see how everything looks when we start smoothing parts out. So now everything's merged together because they use DynaMesh. And I'm just going through and I'm already seeing a problem right here. I need to rotate those arms out a little bit because otherwise, if I try right now, it actually merged the armpit to the body. So that's a problem right there. So we're going to go back and go back to where we have all these. And instead I'll hold Control and Shift. Click on this mascot. And the same knowledge as to mask off the rest of the arm. And then I'll flip my mask so that only the arms are unmasked. Move my gizmo to just up here at the top of the arms and move them out just a little bit. So there's some space in here and I can always fill that in later, but I'd rather that there's a little space left than having it all stuck together with DynaMesh because DynaMesh kid seriously mess up and create a lot more work for us if I do it that way. Okay, so for now I'm just going to have my character pose like this. And I'll mask off shoulder will more time. And just rotate this down a little bit more. Okay. So that looks pretty good. So I'm going to unmask everything. And now I will turn DynaMesh on and it will merge all my parts together. So let's see what this looks like. Yeah, that looks okay. So I'm going to grab my inflate brush and just kind of fill in that armpit and then DynaMesh and smooth it out. Again. Same thing along the back here. Let's just do that. Dynamesh, smooth out. So now I'm just going to have to go around my mesh and sort of fix up any imperfections that I don't like about the body or the arms are legs or any of that stuff and make sure that I get this cleaned up. Because now we're going to start creating clothing on top. First, we'll go around and just smooth things out and make sure that things look good. Grab Remove Brush. Who those armpits up and in a little bit. All right, and now we're just going to have to do a little bit of 3D sculpting, which is normal, usually when you have to DynaMesh or do posing or anything like that, you have to go back and re sculpt some details. That's one thing about ZBrush or AS just about sculpting technology in general is, it's not perfect. It's not, you know, there aren't tools in place yet so that we can automatically snap back to the saved position and not have to lose the detail if we want to go and pose our model. So that's just part of the process. This is the way it's always been and that's, you know, so we're just kinda get used to it. Alright, fix up these lines here. Let's get rid of their legs. And now we're going to have to fix the legs a little bit because these legs are fine but they're pretty street and they're not a very natural bent them. So we're going to bulk up the calf muscles. So I want the legs to have a little bit of a twist toward the outside. And you'll see what I'm talking about in just a second. We get that. So I want this to kinda yeah, I want that calf to flare out a little bit. Fleet this a little bit. And we'll take our mask lasso will just mask off the legs, entire leg, all that, and flip our mask. There we go. And we'll grab our gizmo, hold Alt Tab and move it here and then just widen the stance just a little bit here. It looks like there's going to be some problems there. So I'm going to mask this part to her go almost. So we'll grab our mask pen and we'll just draw that mask on. I probably should have done this before I merge all these together, probably would have saved me time. But in OA 0, well, at one time. And then we'll try this one more time. It's kinda working, kind of not. So we'll grab the Mask lasso one more time and interests. Clean up that mask. And I'll hold Control and Alt and tap on the mask to make it harder of an edge. And now we'll try this. Rotated from the very top of the hip here. It's still creating that stretching. Interesting. Oh, that's okay. We'll just, we'll just roll with it. We'll roll with it. So we're going to smooth this out. Nothing we can't fix. We can always read sculpt this. And we'll grab Damien standard here. And just really sculpt this line in here. Sometimes you'll find that if you have to go back and redo things like this, it just can't turns out better looking anyway because you had to reassess it and clean it up. And sometimes that's for the better. So sometimes the geometry just needs to get re sculpted, cleaned up anyway. Smooth this out. You can still see lines from one. This was lower resolution, smooth all that out. Now you just take our inflate brush, come in here and bring that together. So I'm trying to get a different pose going because I want this character's feet to be wider than wanted to be more of like a powerful stance. So it's good to get this right shape here. And this will allow us to make the legs the correct shape too. So maybe this is a good thing. Clay brush, low intensity here. So this is normal to have to go through and just do all these 3D sculpting. Sculpting is very normal. So this is good. This will actually allow us to create the right shape for the legs. So the legs, if you see here, mind just go straight down on the inside. That's not correct. It shouldn't look like that. The muscle that starts up here, right in the middle between the hip and the groin, comes down and over and end like that. It's a little too big down and over and in like this. So from this angle, we can actually use our clay brush, wrap that down and in kinda like that. And we'll build it up one more time. And you notice how my smooth brush isn't really doing much. You can also go up to the light box, go to Brush, find the smooth folder. Where is it smooth? And there's a smooth stronger brush. And if you select that, it's going to replace your smooth brush with smooth stronger, Smith Stronger is just exactly what it sounds like. It's just a stronger smooth brush so works better when your polygon count is really high, like almost 400 thousand right now. So I need a little extra strength for my smooth brush. So let's move stronger is my solution there. So let's try this a different way. I'm going to try to build this up on the inside of the knee first. Smooth that out. And then we'll wrap it around this way. There's muscle here. This pattern of muscles comes down. And the front of the leg, it should be sticking forward just a little bit more to create that roundness of the leg. And now we'll grab our move brush and just push this will just pull the inside of the knee in a little bit more and then smooth it down. The leg should have more of this sort of look to them. Especially if the if the feet are further apart like that. Slight bend, slight bend toward the inside. And then we can grab our inflate crash and inflate the interior. So the total exactly half its roundness to them because they actually look correct. There we go. Now we're getting that bend so it spends in and then inward and then back in toward one another and then back out towards the knee again. So that's more of a correct shape. It's more get it, It's getting there. It's getting to more what it's supposed to look like. And these are just anatomy things, things that you study just from figure drawing or, you know, picking a reference and trawling and or sculpting or any of that stuff. Figure sculpting, figure drawing fell into practice and just putting in the time, studying the angles and just doing it over and over again. And really using observation to see, to actually study what it is that you're looking at rather than just letting your brain tell you that it's a circle or a square or whatever. But actually looking at the angles of the muscles and how everything is as a whole shape versus everything is individual shapes. So it all just comes with practice. Never go. So that's looking a little better. And that's a cooler stance. I think. That's going to allow me to create a just a more interesting composition with the character. I think posing the character is hard. So I'm trying to just do a little bit of work right now to get it to look a little more believable before I go into a full character pose. There. Yeah, that's looking better. So now that I've sculpted the legs in this pose, I'm going to have to grab my shoes. I'm going to have to merge all the pieces of my shoe together so that they open up the draw menu. Close that. So now I have my shoes and make sure that I have all my pieces down below it. So I'm going to merge all these down. Urge, down, urge town, urge town, town, town, Israel, parts of the shoe. Merge down. Just be careful when you're merging down because if you accidentally merge with something that's not what you want, then you're gonna have to find the poly group and separate it mascot and then split it from Split Mask again to get it. As its own sub tool. Again. Cool. There we go. So those are all, That's perfect. They were all lined up already. Now the shoes are one sub tool. All right, so now that the shoes are all one piece, I can just move them however I want. So I can just move them onto my character's feet. Now we just need to fix it the arms a little bit as she's pretty buff. So I'm actually going to change that a little bit and a smooth down this part of the arm. Now that you can't be both, but I think she's tube. So it's going to change that a little bit. Smoothing this out. Just looking at why we'd be both, but this character doesn't really match the rest of the body if she's that puff terms. Okay. So, so rather than sculpting minds in, I'm just going to add a little bit of volume for the triceps in the back. Triceps come up like a horseshoe like this. And down just a little bit. And I'm going to carve this section and just a tiny bit. But the clay brush, smooth it out. Move brush to kinda put that where we want it. Because we don't want the definition of the muscles to be all crazy. So we're about to add some armor to these arms anyway in just a minute. All right. Now it looks okay. Yeah, it looks okay. The thickness is pretty much the same all the way around, just a little bit wider this way. Like arms get more fix that shoulder a little bit. Deltoid over in town. Well, way too big. So the deltoid is made of three parts, the middle, anterior, posterior, so metal run back to that. Mental back, front. Just kept those must shapes in there and then smooth it down. And then will smooth out our clavicle, redo that as well. Clavicles, two bumps me go forward and back up into the shoulder like that. Smooth this down. It's a little too much. And at this point now I think I can hold shift and change my smooth brush back to the regular smooth. If I can find my smooth brush in ER, smooth regular Smith, there we go. And if I want smooth stronger at silver here at the end of my brush list because I already used it once. So I'm just going to switch back to regular smooth because I don't want my smooth to be as strong for this particular part. Clavicle. That's why clavicle sort of that boomerang shape. Smooth it out. And it looks like we get some. So we're just going around the body. I'm just trying to fix up any imperfections here to make this more believable. So we had some pretty wonky geometry because the hair was hiding this part in the back of the neck and some other parts that we couldn't really see. We're just trying to fix this up a little bit because my Move brush here, try to get that slant of the shoulders come down a little more. I liked it the way it was before. Yeah. There we go. So just keep looking at reference. And some, you know, some people may, excuse me, move. Some people might find this part a little bit boring, but this is just the stuff that takes a lot of time and practice and just observation. You've heard it all before. I've said it all before. Now the back we're going to leave the back alone because we're probably going to cover that up with armor and hair anyway. The arms we want to look nice because if they have the right shape and we extract armor pieces off of it, it's going to look really good. So we want the arms to look nice. Wrist, wrist is little straighter. Okay, so we're going to take an H polish here. Just flatten this down on risks because it's a little too high up. Create that nice transition between the wrist and the top of the hand. And the wrist always has this outside little bump, which is actually the one of the two bones that runs through your forearm. Ends right here on this side. And there's always a little bit of a notch, like a little bit of a bump right there at the end of the forum. On the outside. So on the pinky side. Now we're just going to take our Damien standard and looking at reference, I'm just going to gently trace some of the forearm muscles and the direction that they go and elbow. I'm gonna make that a nice triangular shape so that it looks almost like it's coming out, like up bones to come out. So that'll be kind of cool. Same thing. Go up to here like this. And I'm just using Damien standard, just carving and the shape of that elbow there. So that these two muscles are all the muscles around the elbow wrapping around it like that. So you get that nice shape. And then this are part of the forearm muscles here. Here. That's fine. Get this little inside pit right here are the muscles come down and this little triangle here. So zoom way out every once in a while and just look at your Skulpt from far away. That'll really help you identify if you're getting any shapes wrong or if anything is standing out as incorrect. And it seemed that always helps a lot. These muscles on the side of the forearm here come up and connect on the side of the between the bicep and tricep kind of school do that sort of outline. That line for muscle comes up like this. Here we go. Starting to get those. That's starting to look like these muscles are traveling and wrapping around. And this is just a really general shape. There are so many muscles in the forearm, it's kind of ridiculous. I'm not gonna do all of them, but I'm just looking at a reference image or two and tracing the direction that I can see of some of these lines and where they start and where they end. So my reference images are from different angles of the forearm. It's just forearm muscles. And I'm just looking at where they start and where they end. It looks like there's another here. It comes and it goes down and then there's another muscle like in between here. This is this is a lot I don't have you don't have to do this level of detail. I just want the forearms to look really cool because we're going to sort of extrude some cool armor off of them. So if we put a little time and energy into them now with a little bit of extra detail, it's just going to add to that effect and make the armor that we pull off in there look extra cool. And you'll see when we get there. All right, so this is obviously way more detailed than the rest of the body, so I need to smooth it down a little bit. Otherwise, it's just going to stand out as kind of too detailed and it's not going to match the rest. I'm just going to gently smooth out in the direction of my lines. Just gently smooth some of that detail away. Cool. And we'll just add a little bit more of a cut where the deltoid comes down that shoulder muscle. Like that. We're just trying to define acyl groups. A little more. Ribcage. Maybe I don't need that. If you just a tiny bit, a tiny, tiny bit. The haves and the obliques. That'll look cool and we extract there. So that's, that's okay. Alright. Now the body, the legs, the arms, the hands all have some detail. So everything should, the whole body should have similar level of detail. And it doesn't have to be super detailed because this is just going to be covered up. But I do wanted to I did want to add some detail to start with because we're extracting parts off of it. So it's just going to make it look a little cooler when we get to that stage. Okay, and we'll stop there. And in the next video we'll get into creating the outfit on our character. I'll see you there.
26. Armor - Cyber Suit : All right, Welcome back. In this video I'm going to show you how I created these cybernetic lines on the character's body. And we'll get to that in just a second. So I accomplish this just using a simple mask. So really all you have to do is mask the entire body of your character by holding Control and clicking somewhere outside and it will mask everything. Now I just hold Control and Alt. And with my mask Pen tool selected here, if I hold Control and select my mask pen, I can just change my brush size to something like 15. Hold Control and Alt and just draw these lines manually. The lines are kind of shaky and you have to find the right brush size because if you make them a little too big, it's going to look too chunky for different parts of the character that might be more appropriate, but it's really up to you how you decide to draw these lines. So a helpful tip if you're having trouble getting really clean. Nice straight lines is you can go up to stroke. And if you hold Control, it will turn on your mask brush. So while holding control and go to stroke and go to lazy mouse, turn lazy mouse on and you can change your lazy radius up to something like 50 or a 100. And what lazy mouse does is it just creates that trail behind your cursor so it allows you to draw more precise, more accurate lines. So lazy mouse is a really useful tool. I use it for the majority of drawing these lines because it really helps you get straighter, more accurate curves. Now, you could just draw lines at random. Or what helps is if you look up some reference of Cyberpunk images or of cybernetic designs or even machinery, things like that to give you an idea of sort of the angle of some of these lines and how the pieces fit together. I wanted this to look like it was a cybernetic character. So a lot of my lines are at 45 and 90 degree angles from each other. So I'll never, when I'm drawing these lines on the character, I'll never just do a line in one direction and then draw a straight line over to another. I always like to, when I'm starting a new line, cut in at about 45 degrees and then change directions and do a 90 degree. And then another 45 degree or another 90-degree before connecting back to another line. And this just creates a more machine-like look for the character. So also think about clothing. And the line should kind of outline the body parts similar to the way that clothing wood. So for this part, this is like almost like a part of a body suit in a way. So these will outline the top part of the leg and the bottom part of the stomach. And these lines can come up and outline sort of the bottom of the rib-cage. Even you could do that. Go back. So you really just get to be creative with this and then throw in another one of those 45 degree angles to create a nice flat connection at the top there. So it's nice having your lazy mouse on because it gives you a second to kind of gauge what you're doing. And you can even use that red line as a guide to say, do I want to go this direction or this direction? So it really helps. So we're just going to draw in some more of these lines. So right now I'm just holding Control and Alt and my whole model is masked. And I'm just essentially subtracting my mass. But you could do it the opposite too, if you wanted to invert your mask, hold Control, click outside of your object and it will invert your mask. And then you just have to hold Control. You don't have to hold Control and Alt. I just like using it in the negative like this because it helps me see the lines a little more clearly when the model is dark and the lines are bright like that. So I just like doing it this way. But you can also just flip it and just hold Control if it's less trouble and just do it that way. So now we're just getting into essentially making armor on the character. Because these lines are pretty much like I said before, just like a body suit. So look at characters that wear armor, video game characters, space characters, sci-fi characters, stuff like that. And those characters are, are typically wearing armor or wearing some sort of suit, our body armor of some sort. And that is always good inspiration when you're trying to create designs like this for some sort of body suit. So we'll just continue here. And you can get as elaborate or as simple with this as you want. Personally, I think it's nice to cover the entire character. But we don't have to get super crazy on the chest because we're going to do some changes there anyways. And we don't have to get super crazy on the legs either because there is going to be some armor on the outside parts of the legs. So we just need a few simple lines to show that something is going on here. Now the curve of the up the top of the leg here, I'm going to follow that same direction with another new line down here. And then I will follow that down and then cut across with a sort of 45 and then another 90 degree angle like that. And then going to the back. You don't have to make it wrap all the way around the character because otherwise it just kind of falls flat. Sometimes the design, if it's just wrapping around the leg, if that's the only real aesthetic to it. So we're just gonna make it end, end over here on the back and then wrap around to the center again right here. And it's difficult to get these inside parts of the leg for the masking. But if you get your angle, your camera angle just right. You can still still just get in there. If you're, if you're absolutely unable to get like if, say if you put your character's legs too far together, like if they're touching, what you can do is hold Control and Shift and select a portion of just a leg here so that this is the only thing showing. And then click and drag and show the opposite. So that just the inside part of the leg is showing like this. And what happens is now you're not seeing the backside of this part. You're actually able to look through it. So you can just hold Control and mask to pull through like that. So that is helpful if you're just not able to see, like if these two parts are too close together, just hold Control and Shift and hide the outside part of the leg so you can turn your camera angle so that you can see just this inside part. And then when you mask, you see that it mask it to the other side as well. And then hold Control and Shift and tap out here to to show everything again. Sorry. So rather than me talking about all this and just slowly drawing lines all over the body. I'm going to go into a brief time-lapse this. So you can just see how we got all of our lines on our character and where we ended up. Okay, so now that we're to this point with our character here, you can see that I've indented these lines into the body a little bit and I'll show you how I did that. So if we, first of all, while this is still a mask on our character, because this is just drawn on with my mask pen tool. All you have to do is press Control W on your keyboard. And it will turn this into a poly group. So you'll see it changes the color of the entire mask, purple in this case. And I did that also with this bottom mask. I, it doesn't really help that the body is sort of its own. There. They're very similar. So this, these lines are, it's their own poly group. The body is a different poly group. And then these lines up here are all their own poly group as well. So all I did was when I masked off this area, I press Control W, and it turned all those lines into a poly group. And then same thing with the upper lines here. Mask them off. Hold Control and press W on my keyboard and it turns my mass selection into its own poly group. The nice thing about that now is you can just select your poly group by pressing W on your keyboard and then holding Control and clicking on that poly group. And if you can't see your poly groups turn on poly frame over here. So when you press W and bring up or gizmo and then hold Control and click on a poly group. It masks everything except for that poly group. Then all you have to do is hold control and scaled down or scaled to the left, I believe. And it will indent all of that poly group into your model. So it's essentially deflating that poly group from its normals or the direction that the faces are pointing. So it's basically just pushing it into the mesh a little bit. And if we turn off poly frame, you can see that it creates this cool sort of cut in effect. And now my active number of points for the entire body is about 400 thousand points right now, if you wanted these lines to be a little bit cleaner, you could bring your, your poly count up just a little bit higher if you want finer detail. But because this part of the body is going to have stuff over it anyway, from this distance for the final image, you're not really going to be able to tell with that level of detail. So I think this works okay for our character. And if we turn on poly frame, we can see that the lines are different color from the body, so it's its own poly group. And the reason I did that is so you can hold Control and Shift, click on the lines of the body like this, and select a darker color, like a darker gray and hit Fill object. And now if we hold Control and Shift and tap outside, our object shows everything. And it just adds a nicer aesthetic. If we fill those lines with a darker color because then it actually looks like they are wires or veins or something running through the body. Okay, so very quickly you are able to create a cybernetic suit for our character. And this just adds a lot of detail. So I may add a few extra lines down here on the legs just to sort of fill it in and just a couple of lines on the backs of the legs. But for the most part, this looks pretty decent. And if we go into solo here, I even did a little bit on the back here because I know the shoulders are going to be exposed and the chest is going to be exposed. But it didn't bother with any detail in here because we're actually going to put in a chest plate, sort of covers this area up with the parts of the character that are going to be sort of showing through where the armor is going to be on. Those are the areas that are important to put lines in anywhere that's going to be revealed. Like this character will be wearing some kind of shorts. So there's no need to put anything back here. But you get the idea. So this is the makings of our cyber suit for our character. And in the next video, I will show you how to start creating armor on top of this cyber suit, and I'll see you in the next one.
27. Armor - Shorts : So this character, before we start extracting any armor off of it, we need to put it in some kind of pose because if we put a bunch of pieces on it and then try to pose it later, it's just going to create more work for us. So at this stage I want to pose my character and I'm just, I'm just gonna go for a simple pose. Nothing too complicated because I don't think that it's going to need a really complicated pose. And inevitably when you do posing and ZBrush, you have to really sculpt some of your detail if you pose your character. So say I mask off my arms here and hold Control and Shift and flip my mask and then I'll hold Control, click on my Mac a couple times, some sort of soften the edge of my mask. And then press W, bring up my gizmo, and I'll hold Alt and grabbed the gizmo and put it right on that center of the mass line. And then snap to my side view, hold Alt and move my gizmo to the center of the shoulder right here. So now I can just kinda drag this, drag the arms down. And I think I'm just going to leave the arms in a simple pose. Because if I were to if I were to drag this out and bend the elbows, bend the wrist and do all this. I would have to go in here and manually raise sculpt aware where the geometry got twisted or bent or, or messed up. And that's just a lot of extra work. And I don't really think it's necessary for the final image of this character. At least not for, for what I'm going for. So For what I'll do here is just the arms down. So they're in a simple pose like this. Now, a word of caution when you're doing posing like this. Also, see how I move the arms in close to the body. So now the inside of the tricep, bicep is touching the ribcage over here. It's going to be extremely hard. If I decide that I don't like this pose. I say later like say I clear my mask and I think later on like, I want to move the arms back. It's going to be really hard to get in here and mask off this part of the arm again without touching parts of the body. And you'll have to go in and just do a bunch of manual clean up and shrink the mask and grow the mask and still a part of this as touching the body and it's just a huge pain. It's a giant pain. And even some stretching is happening over here that will have to sculpt. So rather than going back and having to do that, once you put your character posed like this, be sure that your lines, the cyber suit lines are already filled in with the color that you want. Because what I'll do is hold Control, flipped my mask, just the arms are masked off. And then just hold Control, press W on my keyboard. And if we turn on poly fill, it will turn the arms into their own poly group. And that's just going to make it so much easier. If I decide later, like, I just want the arms a little higher or a little different and I won't have to go into the mask and redo that. And the easy way to mask that again is to hold Control and Shift, click on the arms as their own poly group. And then I can just mask the entire arm. Hold Control Shift click over here. And I'll just the arms are masked perfectly, even that part that's touching the body and I won't have to go in. There won't be a giant pain. So I might just have to mask a little bit more on the top like that. But you get the idea. Because then you can just flip your mask again and move his arms and it's nice and clean for this character. I'm just going to stick with a simple pose. I think this is fine. The arms are at a natural sort of bend. It doesn't have to be a crazy complicated pose. And at the end, we can even just tilt the head a little bit and add a few of things, like one leg further forward than the other. And that'll be enough for the pose. I don't wanna get into crazy posing because it's kind of a pain and ZBrush. And we aren't going into any of their programs to do any rigging or posing like that. So for this, I'm just going to stick with a very simple pose. So let's start creating some armor on this character. One thing to keep in mind is that we have multiple poly groups going on, on this, the arms and the body and all that. So first thing I need to do is go over to my sub tool menu and just duplicate the body so that I have a backup plan in case I mess anything up. And I'm always going to make sure that the one that has my Undo History is not the one that I'm working on. So I'm actually just going to move that down a step and hide it. And then I'll rename it backup backup body. So now we have this as a backup and it has our undo history in case anything gets messed up. I can always go back and work on that later. So now I'm working on a duplicate of my body that I can do whatever I want. I don't have to be too nervous about messing anything up. So there's always that. And don't forget to save. Now the easiest way to go about this is I want to make sure that all my poly group lines have all the color that I want. And what I'm gonna do with the body now is if I turn on poly frame, I've still got my multiple poly groups. I am actually just going to leave the arms as a separate poly group for now because it's all one color. I'm going to hold Control and Shift and click on the arms so that it's the only one showing and then hold Control and Shift, click and drag outside of the arms and it shows the opposite. So now it's showing the entire body, including the poly groups for all the lines. And I'm just going to hit Control W, which is going to turn everything into one poly group for the body. So once you do this, you can't really go back and fill in those lines. There is a way now that you have the color in there, you can always go down to the masking menu if you need to go back and re-select or recreate poly groups out of that. So if you were to go down to masking and select mask by color, mass by poly paint. You can go in here. And drag this first slider up. And you'll see that it masks only the color of the lines, which is a darker color than the body. And then if you hit OK, it actually masks all of those again for you. So if you needed to go hit Control W again and turn those into their own poly group. You could do that. So that's one way if in a pinch, if you're needing to change the color of those or do any kind of editing to those lines on the body. You can do that just so that you're aware that that's an option. Mass spec color is a great way to go back and edit that even if you were to change the poly groups on the, on the body. So the reason that I turned this Intuit's into one poly group is because if I were to mask this, say I want to make some shorts on this character. If I were to go to extract and tried to extract this off, if there are multiple poly groups, the poly groups are going to extract has separate pieces and the geometry won't be connected. So it's really important that this is all one poly group. When we do extract to start creating our armor. Otherwise it's going to just create a whole bunch of problems later on. And it's not going to be, It's not going to be in our control to create pieces of armor. So make sure that the part that you're masking off before you use extract is all the same poly group or it'll get messed up. So we're going to create some shorts on this character. So since it's a Cyberpunk character, I'm in a sort of create like a high-rise shorts like this and draw out the bottom and shorter on the bottom like that. So I've created a pretty simple method for making armor and ZBrush. And it really is just masking off an area as long as it's all one poly group, this will work. So mascot the area for the shorts. Then we go into sub tool, go down to extract and I'll change my thickness to 0.005. But you can put it at any thickness that you want just for this, I want it to be 0.005. That's pretty small. And hit extract. And we'll turn poly frame off so we can see a little better. So if I had extract that looks like a good thickness like that. So I'm just gonna go ahead and hit Accept. Now the shorts are their own sub tool. And if I clear my mask and a turn poly frame back on, you can see that there's an outside poly group and there was this edge polygon, and then there's an interior poly group as well. So what we need to do is hold Control and Shift. Click on the inside poly group so that only the inside is showing. And then we need to hold Control and Shift, click and drag outside and it will show the opposite. So it shows everything else. We want to keep this top edge because that's going to help us out a little bit when we do this whole process. So the inside poly group is hidden now and everything else is showing. So we can just go straight to geometry and then modified topology and hit delete hidden. And it's going to delete anything that's not shown to the interior poly groups gone. So the next step, once we've deleted the inside poly group as we go to edge loop and hit Group loops. In group loops is going to clean up the edges and make everything a little bit tighter. So it's basically just putting in more edge loops and bringing everything together and it kind of smooths everything out a little bit too. Next, we need to go down to 0 measure. And I'm going to drag the target poly count, just drag that slider all the way to the left. So it says 0.1 and hit 0 mesh. And because I have about 80 thousand points, it's going to take just a sec. And depending on your hardware that you're using, it's going to take a minute to 0 mesh because that's an awful lot of points. So we're setting this as low as possible, because when the geometry is lower, when your key, especially when you're creating armor, it makes it much easier to deal with. And it actually gives a kind of a cooler look. It looks more, more like armor. So now that Z remeasure has completed it as reduced the geometry count by a lot. So it's at 417. So this is great. This is actually looking really nice. And with geometry as low as it is, after running 0 measure, you can go back up to edge loop again. And if you don't like the result of what you have, you can just hit Group loops again and then go back to Z remeasure. Turn all the way down to 0.1 and hit it again. So you can just kind of flip back and forth between 0 measure and group loops until you get something that you like that's low poly and nice clean edges like this. This is going to help you out a lot so and you don't always have to keep that top edge loop. It's not necessary to keep it. So if that disappears, don't worry about it. It's not a big deal. So I actually liked this because I like the shape of this a little bit more. So I'm just gonna keep this. I think this looks good. Once you get your geometry in a shape that you think looks decent. Doesn't have to be perfect and it doesn't have to fit on your character perfectly, even if it's a little smaller, you can always move it back out. Once you're at this point. You're gonna go up to edge loop again, go down to panel loops. And under panel loops you can choose how thick you want it to be. I usually leave it at point 0, 1 because that's fine. And you can choose the number of loops. I usually just leave it at five and that's fine. And when you once you hit panel loops, it's going to I'll just show you. So once we hit panel loops, it's going to create. Interior geometry again. And it's going to create an edge loop on the top with however many loops we tell it to create here. So as that number is five. So if we were able to zoom way, way and there are five edge loops going around this top edge right here, which is nice, keeps it really clean, but it does create more polygons. So you could hit Control Z and you could even turn the loops down to three and hit panel loops. And it's still getting gives you a nice result like that. So panel loops is going to create the geometry that we want to make this a closed mesh. So it's something that we can actually work on and actually create like a real piece of clothing out of. So once we're at this point, also notice that panel loops significantly reduced the size of my it used to look like this and now it looks like this. So it's smooth that out. And that's not good because I want to keep this shape. So before I hit pad ellipse, I'm going to hit Control Z. And below panel loops is the polish. And it's automatically set to five. I'm just going to turn it down to 0 because the polish is a natural thing to kind of smooth all the edge loops and get them to fit together nicer, but you can also just turn polish to 0 and hit panel loops. And now I have this same shape. If sort of it just freezes your mesh in the shape that it's out. So if you liked the shape, turn the polish to 0 and then hit panel loops. All right, now we have some shorts and now if any, geometry is not right in the right place, describe remove brush with symmetry turned on and just sort of move it around. This actually fit pretty well, surprisingly. So now we've got some, some shorts for our character here and then actually worked out. Okay. And if you want, you can also change to a dark color and just hit Fill object, go to color, fill object. And it just fills it with a darker color so it's easier to see on your character like that. So now that we have these, this is going to be a lot easier to work on because our geometry is super low. And we can just create edge loops and edge loops or are the best way to work on clothing. Especially things like shirts and pants and things like that. Because you always want to be able to create part for the Belt apart for like the bottom of the, bottom of the legs. And that's what we're gonna do next. So go into your brush menu and find Z modular. And we are going to work on these shorts. So if I hover over space with z modular and hold space, sorry, I hover over the face and hold space. I can select poly group for my action and for my target, I can select poly loop. So what that's gonna do is when I click on poly group or I'm sorry, when I, when I hover over a face, you have this little orange bar that points in whichever direction see a modeller wants to go. So if I want to do this Pauli loop, I'm just gonna do it in this direction and click once and it will turn that edge loop or that polytope into its own poly group. And then I'll do the same thing for the bottom one here. So these two bottom poly groups are their own poly group like that. And then I'm going to do the same thing for the top edge of the shorts. Let's do it this direction so that it goes all the way around. And you can also grab the Move brush. Or you could do, you could do it with C model there as well. You can take your Z modeler and move each individual point around. But I like to just kinda, you have to do a little bit of fixing on your own sometimes if the geometry is a little bit off like that, to just get things to look a little more even. And it's nice to think like this because it's kind of like Box modeling. Where you have control over all of the points. And it's a little bit of extra work, but it just got to make your sculpt look that much better. In my opinion, if you just take the time to sort of clean up the edges and keep your poly groups nice and clean. It's just going to become sculpt look that much better. So we'll just go around and sort of tinker with this a little bit. And in fact, I wonder if I could just go over to deformation and do Polish by feature. That destroys everything a little bit. Polish by group. So same thing. Or Regular Polish? I guess not. Okay. Well, it we'll just leave it like that for now. So if I grab my Z modular brush again, now I can hover over a face and hold space. And I'm going to select Q mesh poly group island. And what this will do is if I click and drag off of that poly group, it's going to create, well, it's just going to extrude it in the direction that the normals are facing. So whichever direction these faces are pointing out, That's what Q mesh is going to do. It's just extruding that poly group. Extrude that out. So this is a cool way to create a border around the tops and bottoms like that has a nice sort of 3D effect. So now these are actually starting to look like a real piece of clothing or move brush. And just This into place a little better. And I'll hold Shift and turn my smooth brush intensity all the way down to something like two or three. And that way I can hold Shift and just smooth this out really, really gently so that it fits a little bit better without just crushing the mesh and destroying it. All right. So for now, that looks fine. So I'm just going to leave this alone. And now that I have this low poly version of these shorts, if I want greater detail or if I want to do any extra modelling or sculpting on them, I can just hold Control hit D and it subdivides it. And what the subdivided model. Now, you can go in and create detail if you want to, and if you want to move back down to the low poly version hold Shift and press D, and it will go down. So I always want to work on if I'm using z modeler, I always want to work on the lowest subdivision level by holding Shift and pressing D, going all the way down, excuse me. And then when I'm doing any detail or anything, I'm going to push D to go up to the higher subdivision level and do any sculpting or anything that I wanted to on that. So for now I'm just going to leave this here. So that looks good. And we'll start adding more armor onto the rest of the body. So we'll switch back to our body, go into solo mode and it's clear our mask so that we're not going to, so that when we use extract, it doesn't extract the shorts again. And now, if I look here, the shorts are sitting on about right here. So I'm gonna go back into solo mode. And I'm just going to extract off apart like something like this because I want this to sit near the top of the hips, so maybe a little bit higher? Yeah. Something like that. Yeah. That looks okay. And now we're just gonna do the exact same thing over again. So I have my shortcuts set up here, so I'm going to use my shortcuts and I recommend, you know, just setting a few of your Extract button on your 0 mesh button somewhere in your UI up here, because it saves you a lot of time and you can do that by going to Preferences, Config and then hit Enabled Customize. And that allows you to go to any menu and grab the buttons like for group loops, hold Control Alt, and then just click and drag. And you can set it anywhere on your UI. Anywhere that there's space, which is where I've put all these brushes and everything else. And when you want to get rid of something solid Control and Alt and grab it, drag it into your Canvas and just drop it and it'll disappear. And then when you're done, of course go to preferences in turn, Enable, Customize off. And then you can save your UI however you want as an actual file and then make sure to hit Store config and it will automatically load up that yet that custom user interface. Next time you open ZBrush. Alright, so from here I already have my thickness set, so we'll extract. And that's fine except clear our mask. And same process as before. So I'm going to hold Control and Shift, click on the interior poly group or Control Shift, and then click and drag outside of the object so that everything else is showing. And then we'll go delete hidden so that everything on the interior poly group has been deleted. And now I can go to Z remeasure, turn it all the way down to 0.1 and hit 0 mesh. So that's like an okay, It's a little crunchy. So I'll go back over to edge loop under my geometry menu and hit Group loops. And that'll soften it up and sort of smooth out some of those imperfections. And then go 0 mesh at 0.1 again. And it's still looking a little chunky. So I'm going to do it one more time. Group loops, 0 mesh at point 1. Okay? So this is looking much cleaner now. And it's looking like it's sitting inside my object a little bit. So I'm going to grab my Move brush, make the brush radius really big. And just very gently move this out so that it's sitting on top of the shorts a little more there and it doesn't have to be perfect because we're going to create some interior geometry in a second anyway, so it'll be a thicker object anyway, just a sec. Now that I have this, I'm actually going to play with the shape a little bit and make a little more like it's wrapping around the leg a little better. Yeah. Something like that. I think that looks better. Cool. It's another word here. Maybe even grab the pinch brush. So you can just, you can do this for hours. Can just take forever. It's all just very gently pinch the front of that. There is another shape. It's just a little more like pointed on the hands around the center. There we go. I like that better. So now that we're to this point, actually because I changed the shape, I'm just going to 0 mesh one more time. And that'll clean up my topology a little better. Maybe I'll just group loops and then 0 mesh one more time. Yeah, even better, even simpler. Cool. Now that I'm to that point, I'm going to do my panel loops. And panel loops will create my interior geometry and my nice edge loop border like that. So that's looking good. And now what I'll do is press W on my keyboard. And if you can't find your Gizmo, when you press W, just push F 2 times on your keyboard and it will zoom out and show you your Gizmo. Then you can just hold Alt. Dragged her gizmo down to your object like that. Or you can find that, go to unmasked mesh center button here. And it will snap it to the center of your object. So making sure that symmetries on, I'm going to hold control and scale up. And this is just going to inflate the object. So it'll make it a little bit thicker. And I'll grab my Move brush and drag it so that it looks like it's actually attached to the body a little more. We'll bring this part out and up. So now we're just going to play around with this. But the shapes, the armor. And this is going to be the basis for how we're going to create a lot of these pieces. Some of it's just going to be experimentation and just playing with the shapes and seeing how the negative space fills between the body and the arms and the hips and the upper body and the legs and all that. So it's really just using your eye and using the silhouette here on the top-left as well, is very helpful for just seeing the overall shape. And if you like the shape or not. Because a very useful tool for that. I'm just going to clean this up at the pinch brush a little bit. And it looks like my smooth brush is still at 2%. So I'm going to hold shift and drag my smooth up all the way to a 100 percent. I can smooth this out. Cool. So I'm liking the way this is looking. So let's move on to another part. So I'm going to switch back to the body. I could even save time by just switching back to my shorts. Hold Shift, press D to go down to the lowest subdivision level. And if I grab my Z modular brush, I can just hold Alt and paint a poly group on my object however I want. So like this, if I'm holding Alt, I can just drag my pen across. And it will actually just draw a poly group on whichever faces on my pen is touching. And now I just have this polychrome so I can hold space when I'm hovering over a polygon face and go Q mesh poly group island. With Paul, you're violent. I can just pull this out. Oh, interesting. So because I have another subdivision level, I can't use z modular, which is a big hub. I forgot to mention that earlier. So I'm actually just going to go to geometry and hit Delete higher because I don't need that upper geometry right now. I'm actually just going to stay at a low, low resolution until the very, very end. So keep that in mind. I should have said that earlier. That's that was my bad. So now I can hit Q mesh and pull out this part. And that will just save me time. Because now this is just part of the shorts and it still looks cool and it's its own poly groups. If I want to fill it with a color, I can add it. It's still just a separate part, but it still adds to the character. So let's go ahead and switch back to the body. And I'm going to mask off apart like this. Something like that looks cool. So now we're just playing with negative shape, negative space shapes, and trying to create something that is visually interesting. So same process, mask off apart, extract, hit, Accept. And we'll click the interior poly group. Click and drag to show the opposite with control and shift and then delete hidden. And then we'll go a group loops, 0 mesh. Oh sorry, it's 0 mesh at 0.1. And that's looking all right. And I want this part to sit on top of the shorts because it's just going to be an added layer on top. So group loops one more time, 0 mesh at 0.11 more time. That's again, okay, I think I need to smooth that. And I like that it's creating some natural wrinkles in there because of the way that the geometry is bending. But it's also kind of a cool effect. So I'm just going to leave it like that. Now if I press W on my keyboard and I can hold Alt and tap on my object and it'll bring my gizmo to it. Now you're just with no interior poly group, just hold Control and scale up and it will thicken everything. And that's too much. It's going to thicken it just a little bit like that. Yeah. So that it's sticking out more and it's on top of the shorts. Now I can go over to panel loops, my polish all the way to 0 because I don't want to lose the shape and hit panel loops. And now we've got this nice interior geometry. And everything's all closed up. Cool. And now I'm going to go to a dark color and hit Fill object goal. So in a really short time, we were able to create just a very unique shape for the shorts. And so just play around with this method. And this is just a really fast way for creating armor. And if you don't like the way that this looks, just go back to Edge Loop. It, group loops again and it will smooth it all out for you. And then go back down to Z remeasure picture. It's at 0.1 and has the refresh again. And it will clean up all that topology. And then when you have this, you can just move it around, move it out, put it on different parts of the body. And I just grab Remove Brush to sort of force the shapes into whichever position you want. So that's gonna do it for this video. And in the next video we'll just continue building our character and creating more armor. And I will see you in the next one.
28. Armor - Torso : All right, In this video we will continue working on the armor for the body. So with our body selected, make sure we clear any masks that are left. And for this character, I'm really just looking at a lot of reference. So I went on art station and I went on Pinterest and looked up a lot of Cyberpunk and a lot of fantasy and just inspiration from characters from video games and things like that, like dead space or, you know, any kind of outerspace. Sci-fi fantasy stuff is really cool inspiration for Cyberpunk. So I'm just going to use a lot of reference and I encourage you to do the same. Just get on Pinterest or on Google images or on art station and just start looking up at some people's finished works to try and generate ideas for some of the armor and some of the designs that you want to see. That's basically all that I've been doing to create any of these patterns or lines or anything like that. So I've masked off the body like this, sort of like a corset sort of shape. And I'm going to make sure that the center is unmasked because I want this to look like it's two pieces coming together like that. And that should look cool. Generally, I think it's a good idea to keep things separated on halves of the character for symmetry. And it just looks more interesting if it's not wrapped all the way around the body. So we're going to do this and same as last episode or same as the last video. We'll extract this as the thickness is okay, then will it except clear the mask, interior poly group, flip it. And then delete hidden. And then we'll go on to group loops, 0 mesh and Z remeasure 0.1, excuse me. And then same thing, just group loops and 0 mesh again. So it cleans up are probably call really, really nicely. Now we're at 260 polygons, so that's great, nice and low. And it's still a form fitting piece of geometry. Now that we're here, I'm going to hold control. Sorry, I'm going to press W on my keyboard. Hold control to scale this up a little bit so that it's just a little thicker. And actually that's too far. So hold Control, scale up so that it stays in this same shape. If I use my Move brush right away, it might, it might distort it and I don't want that. This looks okay. I'll just use my Move brush to just fix those little spots that are intersecting with the body. All right, so that looks good. Now we're gonna go to panel loops and see what it looks like here. So smooth that out too much. So I'll just turn panel loops polished down the pen ellipse again and nice. So it kept its shape really nicely like that. And now I can press W and hold Control and scale up just a little tiny, tiny bit. And it will create some thickness, which is really, really nice. And it makes it look a little more like an actual piece of clothing. All right, Now we're going to switch back to our body, clear our mask. And for this, I'm going to draw a nice sort of V-shape on the character going down. I want it to go right to the bottom of this piece right here. So I'm trying to follow the lines of the other pieces of clothing that are already put on the character. So the top of the shorts have this angle that goes in this direction. So I want the bottom of this shape to follow that direction. That's sort of just a nice guideline if you're not sure how to create the shapes that you're looking for is just follow the lines that you've already created. So a lot of the times that just takes creating one piece and then just building off of based on that one piece, just building more pieces that follow that shape. So that's what I'm doing here. So I'm going to create a V-shape here. And actually I don't really like the way that looks. I'm going to bring this in further and then clear my mask like this. So you see that the, the angle of this is following the inside shape here. So that's sort of, I'm talking about this angle at the bottom here follows the angle below it, which is the shorts. The angle of this new piece that I'm making is going to follow the inside edge here of this vest that I've already created. And that's just a more aesthetically pleasing way to make all your shapes flow together a little better. And I have to be careful with magical ASA or it's going to mask off my whole, a whole like part of the arms like that and because of this angle. So instead I'm going to switch to my mask pen and just draw by holding Control and just drawing. It looks like this might have mastiff part of the arms. So what I'm actually going to do now is hold Control and Alt and just drag this box to unmask everything on the back half of the body because I don't want anything in the back masked off yet. Just want to work on the front. So now if I ask Pat, I'm just drawing. More mask. And it looks like I still have lazy mouse turned on, but that's okay. Now we'll make this come up from the center and maybe come out like this. Sort of wrap around and contour with the body like this. And same thing, we'll just do this one more time. Same sort of pattern. And yeah, so it's almost almost like a ribcage on the front, sort of look. And we'll see how it looks once we actually extract it. We'll see if this actually it looks like it's any good. So with this set here, I'll set my thickness here to 0.005 again for extract, knucklehead extract. So it looks a little blocky at first, but I think once I clean up the geometry, it will look better. And actually what I should do is I should clean up this in here because it looks like this is the same width wise as the line above it. So we're just going to clean that up. We drag this up into here and drag that over. So we get a sharper angle there. And try to snip off the ends over here of this mask. So I'm just holding Control and Alt and just trimming the edge of my mask there. And we'll try to get this shape to look the same all the way across like that. So it's a little more even little more consistent. And had extracted see what that looks like. So it looks a little better. It's still a little blocky. The thickness is a little high, so maybe even point 000 001 and extract. Yeah, that's, that should be fine. So I'll hit Accept. And if I missed any geometry here, I can just masked off, flip my mask. I had part to the hidden. Now I need to hold Control and Shift click on the inside or the back facing poly group. And then hold Control and Shift click and drag to show the opposite. So the front showing like this. And then delete hidden. So the back Pauline group is gone. And it looks like I missed a few tiny little spots here too again. So look for any of these little stray pieces of geometry that are sticking off and just mask it. Make sure you don't mask another part of your object. Ask that flip your mask, hide part deleted. Just a little bit of clean up. Alright, so let me get this. So now we can just do this whole process. Group loops dragged Z remeasure to 0.10 mesh. And same thing, group loops one more time. I'm going to hit Group loops that smooth that out a lot. And I don't like that. So group Loops has a polish as well. So I'm going to grab my G polish. It set to 50 by default, but I'm going to drag it all the way down to 0 because I don't want this to get smoothed out. And then I'll hit Group loops. And then hit Z remeasure. C refresher at 0.1. Okay, there we go. So this is starting to look better. And let's see what happens if we hit panel loops, smooths it out quite a bit. I don't want it to be that smooth, so I'll drag my panel loops polished down to 0 and hit panel loops. And now I have my back facing geometry. I'll just smooth out any parts that look like they're a little too crinkly or an all like they don't look correct. So so what I'll do is clear my mask and I will hold Shift and start dragging and then let go of Shift, and then drag my cursor and it will just swing the angle of my object. So this is a nice way to sort of change. If you just want to line up this edge, nice and straight like that so that it, now you can take your mask, mask off these polygons, flip the mask, hide part and delete hidden. And now that's gone. And then I can just hit Close Holes, which the Close Holes button is also under Modify Topology, under the geometry menu, along with the height part, sorry, delete hidden. So that's all nice and closed.com. And if we want, we can do that with these parts as well. If there's any other parts that are sticking out that are just, you know, it's not straight or not flat or not even. Just mascot, flip it, hide deleted and Close Holes. Just like that. So it's nice and closed and nice and even. And just to make this even with the rest of the parts, I'm just gonna do the same thing for that too. Cool. Clean that up. And we have this nice little piece on the front. And I grab my Move brush and just move it into place. Now I'm just going to start playing around with the shape of it. If I turn probably frame off, and I can even just fill the object, I can a little bit darker. Going to take just this piece that I created here, hold Control and Shift and hit D to duplicate it. All right, so now that I have this sort of Like sternum and rib-cage thing going on here. I need a piece that's going to sit underneath it because I want it to look like it's connecting these two parts, like the vest and the chest piece together. So there's a couple of ways we can go about this. I think the easiest way is just going to be to take the duplicated one of this. And if I just mask off the sides here like that and then flip my mask, I can hide those delete hidden and hit Close Holes. And then just smooth this out a little bit. Like there's some extra geometry there so I can do the same here, Hyde Park deleted and proposals. So, and I'll just going to press W on my keyboard. And I'll need to find my mask. Sorry, I need to find my gizmo hold Alt and drag it down. And then we're just going to scale this object out this way using our little red scale on the x axis. And then we can just grab, Remove Brush and move it out. That's good enough for now. It doesn't have to be perfect. So as long as it's filling in that space between the center B and the sort of on the outside part. Grab this and hold Control Shift and press D to duplicate it. And then I'm just going to press W on my keyboard. Go to unmasked mesh center. And I'll hold shift and rotate this a 180 degrees so that it's flipped upside down. And I'm just going to move it to the back and use it to fill in this part on the back as well. I just like doing things like this because it's a little faster. Then. Sometimes it's faster, sometimes it's not faster. It just depends on what you're doing. But if I just want to fill in a spot really quick, sometimes it's easier to just duplicate this up tool and then use the Move brush to get it into place. Because it just in a few seconds, I can just, you know, without having to go back and extract and use group loops and then 0 mesh every single time that I can just duplicate it and existing subtotal and then just move it around really quickly. And the back isn't the most important because for the final image, we may not even see the back of the character. So that's something to keep in mind as well. But I am going to try to get this to look a little nicer. That looks okay. All right. So now that we have this vest set in the front and in the back where there was a piece connecting both parts. Now we need to fill in this corner here because these straps are kind of coming up and they just sort of disappear or they stop right here and there's nothing touching them. So that's that's not going to work. So I'm going to switch back over to the body. And I'm just going to use my mask pen to draw out a selection right here. This will be essentially like a connecting piece that's going to hold these in place. Part of the clothing will just make sure that I clear any other masks that I have actually first before I do that, draw this out and just clean up the top and bottom edge. And to make this even easier on myself, I'm just going to mask over this way and just close this off here like that. And this is what's going to connect it to. This is what's going to actually connect it to the best. So since I still need this space filled right here, now I can just get creative and just mask that off as well. And that will fill that space down there. And we'll drag our mask here so that it connects. Just want to be sure I want to be careful not to mask any part of the arm. And then we'll clean up our mask a little bit so we don't, we don't have any extra geometry. Land around. Clean up these edges. Let me clean this up even more here. And I want this angle to be a little more sharp right there. Then maybe even like that. So I'm trying to create shapes that are wrapping around the different sort of contouring with the body. A little more. I will cut that, they're cool and that mask still goes in behind this part of this object here. So that looks okay. So we'll hit extract. It accepts. And then we'll go through our whole process again inside polygon flip, it. Looks like I got a little bit of the armor here too. So I'm going to, since I already flipped my mask, now I can just hold Control and Shift and click on anything I don't want and it'll hide it. So that hit that, that pen hit that part too. Cool. And the way that that works is when you have a poly group and you hold Control and Shift and click on it. If you hold Control and Shift and click and drag and show the opposite. Now you're in subtractive viewing mode essentially. So you can hold Control and Shift, click on any poly group and it will hide that poly group. That's how that works. So now I'm just hiding these parts that I don't want. And now that they're hidden, I can just go deleted it. And any of those parts I didn't want to go. So just another way to sort of speed up that workflow. So now we'll go to Group loops, 0.1 loops again 0 Michigan. And I'm going to 0 mesh just one more time. Go. That's looking good. And I'll just use the Move brush to bring this out so that it's not sitting inside of a character. And I'm wondering if this will look better if I sit it on top of these straps and let the straps go underneath it. And this is just another design choice where we get to just sort of play around with the design and see what works and what doesn't. So if I bring this out on top, then it's almost more like a, this is a sort of a style similar to like a medieval women's top, like leather armor or something like that. Which is kinda cool aesthetic. But it's Cyberpunk. We can still works. Medieval and Cyberpunk can kind of combine a lot of elements to both that work together very well. So now we've got this and I'm just using the Move brush to push this around a little bit, get it the shape that I want. And making sure that it fits right on top of the geometry there. Because I don't want it to be sticking out too far. Okay. That looks good. So now we're just going to go panel loops, but I'm gonna turn polish at 0 and hit Enter. Oops, That looks good. I can maybe just push this in a little bit over here so that it's underneath that outside part of the best. Cool. And then later on we'll insert some insert meshes or just put some buttons or something on there to make it look like it's closed up a little more, that everything is connected. And I'll switch back to this and just drag that shape around so that these fit together better. Just using the Move brush. I'm just inspecting this from all angles, making sure that the edges flow. Angles flow and everything lines up properly. So next, I still have a duplicate of my torso back from when we were merging all the body parts together. So I just made a simple mask on this part. I'm just going to flip my mask by holding Control and clicking like that. And I'm going to fill this with a dark color, like a medium gray and just hit Fill Color. And then if I clear, I'm asked like that. Now I have this cool pattern in the shape of that mascot Azure earlier. And you can also do that. If you don't have this body saved, you can just take this torso and mask off the top part right here. Just mascot. And go to sub tool, duplicate this body, and then mask this center part of the torso, and then hide part, and then delete hidden so that you only have this center torso part right here. And then draw a cool design on it with, you know, using your mask brush or your mask padding, you know, draw something out that looks cool. Because these are essentially going to be like tattoos on the character, the way that they're drawn out like that. So something that looks cool, like some cross straps or anything like that. And then you have your body and the duplicate. So make sure you duplicate your body first of course, don't, don't delete your body. Your original body. Make sure you make a duplicate of it. But because I saved this original torso, I'm just going to use that because it's already a skin color. It's already got a cool pattern on it. We already did all that work. So why go through the motion of creating more work for yourself when we already did this earlier. So from here, I will just select my body, cyber, cyber body, the cyber suit. And if there's any part that I don't want showing, like on the chest. I can just use my brush to just sort of pull it in and down so that it's not showing the shoulders out because I think it looks good where it connects on the shoulders like that. So we're essentially just hiding the cyber body inside of the human part. Just for this part of the character. And because this is just going to be our render as a final result, it's not necessary to try to combine the two, although if you wanted, you could use DynaMesh, can combine the two together, but not gonna do that because they don't want to mess with the resolution. And this is just going to be a final rendered image in the end anyway. So topology isn't the most important thing for this, for this particular Skulpt. So I'm not going to do that for this one. But it'll still look pretty cool when we're finished. And body is still sticking out through here. So I'm actually just going to select, select the human torso and use the Move brush and just barely pull it so that it's sitting inside of this cyber body here. And same thing right here. And we're going to grab just this chest part and your brush and just pull it up so that it's, it's more naturally on the human torso. Actually, rather than doing that. Moving all that about, I'm just going to move the human torso in so that it's sitting underneath it. Because we already shaped the torso the way that it's supposed to be. So I think it will look better if we do it that way. It just depends. You'll have to sort of play around with it to see what works best for years. All right, cool. So now, OK, there's stuff in the back here too. So we're just going to push this torso, human torso with the Move brush, just hide it inside of the rest of the object here. And if I hide my hair for just a second here, will allow me to see the back of the character. So I can push this in and then grab the suit and bring it out on top a little bit more. Because I want to keep this cyber part for the neck a little bit, not the whole neck, just like the back of the neck. Because I think it looks cool. All right. But we're not gonna see anything. There's going to be covered by hair anyway. And I think it looks cool. So it looks like it got a little wonky up here. Just took all that in there. That's fine. We'll fix up later. All right. Now that this is up here, to make this look like it's going to fit a little better. I'll just grab my clay buildup brush and just go along the border of this here. And this will create more of like an edge. So it looks like the human skin is sitting inside of the cyber suit like that. And we'll just move this up. And then alter my brush density way down and do it again. They're creates a nice little edge. And if we really want to get crazy, You know, we could go in here and just slice this whole part of the torso off and then go on to this part, go on to the human torso and just, you know, if you don't want all this extra geometry here, you can hold Control and Shift. Select your trim rectangle. And then just hold Control and Shift and drag it up to here. And it'll just cut that off right there. If you just don't want that extra geometry there, could always just do that to get rid of it. And actually it looks like the neck is kind of in a weird place here too. So you just have to do a little bit of messing around with this because it looks like we did some changes after we continued with that body and started sculpting on it. Okay. So that's starting to look or like we want it to. So we've got our human part of our character and our cyborg part of our character as two different elements now. And very last, what I'm gonna do is hold Control, grab my lasso, and on the torso, the human torso here. I'm just gonna create a few more lines because I just think it will look cool. So sort of like lines like this. I will drag this across here. Maybe a little bit thicker. So I want this character to be a little more, little, little more, little more attitude, little more punk. So straps are always cool. So we're just gonna do this, this. So it almost looks like raps going around the characters, neck and shoulders like that. And then maybe we'll just do one more like this. So it looks like they're coming up the back and up the front. Just sort of play around with the mask so that it looks the way you want it like that. And then I'll hold Control, flip my mask. So that all made up part is showing like that. And we'll fill the object with the dark color like that again. Although that's not quite the right color. So I need to hit C on. I'm hovering over this because this is the color that I want. And I'll Control Z back again to here and then hit Fill, fill object again. There we go. So now it's the same color as that, although the line isn't as thick. So what we can do is while we're like this, before we hit Fill object, hold Control and Alt click on your mask a couple times and it will harden the edge of the mask like that. So now when I hit Fill object, lines are much clearer, much darker, like that. There we go. That looks much cooler. And it's also just kind of covers up some of the geometry a little bit. Just makes the character liquid the more interesting. Alright. So we are getting into, are starting to get a bit more of this outfit and a bit more of our character sort of fleshed out here. Show the hair again. All right, that is going to do it for this video. And in the next video we'll continue on with the shoulders and arms and creating more of the armor. I'll see you in the next one.
29. Armor - Upper And Lower Arms : All right, so in this video, we are going to work on the shoulders and the arms. And in previous videos, we had separated our body to separate poly groups. So the arms are all one poly group and the torso and legs were all its separate poly group. And we've been using this method so far because we don't want the lines to interfere where extra poly groups to create separate geometry. But we're actually going to break that rule in this video and I'm going to show you how. So because the arms are already a poly group and we just did that by masking it and holding Control and pressing W. And it creates poly group to the arms are all one poly group, hold Control and Shift and click on that poly group. Make sure that you, if you hold Control and Shift, make sure that you have select, rectangle selected and not one of your trip brushes or your control shift functions might not work properly. So Control Shift, select rectangle. So with the arms showing and nothing else, what we can do is we need to get the Pauline group back for these lines going through our cyber suit. So to do that, because they're a different color, we can do that very easily by using masking. So we can scroll down, go to masking, and select mask by color and mask by Pauli paint. So if we zoom way in on these arms, you can see that nothing is masked right now. So if I drag this first slider up and drag the tolerance up to like 40, it'll automatically mask the first color that it can find, which in this case it's the dark color there. So then I can just hit. Okay. And now that's masks. So the color on the arms is mast. Now I can press Control W and it will create a poly group out of it. So that's a really quick and easy way to just get that poly group back. And I'll show you what it's gonna do when we use the Extract Method with this poly group here. So now we can just hold Control and draw out a mask and whatever shape we want. And I'm going to avoid this line right here and this line down here, because I just want this panel in the center separated by these lines going down through it like that. And I'll probably clean this up here in just a little bit more. So I'll get it into shape that I want. So I wanted to sort of contour to the arm a little better. Yeah, that'll follow the edge flow of the muscles in the arm actually. So that'll that'll make it look cooler. So it will come up over and up like that. Sort of follow the bicep and the tricep separately. And again, just avoiding this line up here and this line down here. The reason I'm avoiding those lines is because it's just going to create another separate piece that I'll have to delete later if I don't like it. So I'm just avoiding those for that reason. And I can do this and just get a nice or around or even extraction like that. And the top shaped like that a little bit better. Okay. So this is the shape that I like. So now I can just go set my thickness to 0.005 for extract it, extract like we've been doing for all the other armor. And if I hit Accept, now it's its own sub tool. The nice thing now is because I masked off multiple poly groups. It extracted them as multiple separate pieces of geometry from each other, like this. So what we would ordinarily do in this situation is hold Control and Shift click on the interior poly group. Hold Control and Shift click and drag to show the opposite. And that's the first step. Now we want to hold Control and Shift and click on the lines and they will disappear. Because I, like we talked about in the previous video, this is the way to go into the subtractive viewing mode. So now if I hold Control and Shift and click on the interior poly group for the lines it will disappear. And I'm going to do the same thing for these lines up here so that they're not connecting. And for this green poly loop around the top, we'll do that also. And it doesn't look like there's one on the bottom which is good. So so now we're just left with this nice shell of the exterior, the out of the arms. And it's all, they're all separate pieces from one another. So this is kinda cool. Now we can play around with this and it will mimic the shapes on the arm without us having to go in and mask them all individually and extract them all as separate pieces. It's just a faster way to get that result. First, we'll have to delete hidden and delete hidden as under Geometry, modify Topology to the hidden. So now we're just left with this. And then we're gonna do the same process that we've been doing for the rest of the armor. Go to Geometry, put edge loop, hit Group loops, and in grab our Z remeasure at 0.10 mesh. And actually that cleaned it up really nicely, really quickly too. So if I show everything here, loops, I'm going to switch back to my body, hold Control and Shift and click outside to show the rest of the rest of the body. It looks like it was still hidden there. Cool. So now we have these plates on the arm and then I can just go back to panel loops under Geometry, Edge Loop, panel loops and turn the Polish down to 0 so that it stays in this shape, hit panel loops. And now the interior geometry is back. And this is all closed up and nice and ready to work on. Or I can just, you know, I don't even necessarily have to work on it. I can just leave it the way that it is. And now we have these nice plates of armor on the arms. Then we can even press W on our keyboard, get our gizmo, as do the infamous hold control and inflate just a little bit so that it makes it a little thicker. And then it actually starts to look more like armor on the surface of the arms like that. And the ticker move brush and maybe just move this up a little bit and play with the shapes till it looks the way that we like it. So this is just a fast way to save some time and still get a really cool Look at the same time. And then if we want, we can go in with our paintbrush. Justified our paint here. Select a darker color, like a middle gray or something like that. And actually a lighter gray like this. I'm going to fill the entire object with like a middle gray and then take this down to like a little bit darker of a color and just paint each other piece. And if I paint every other piece, it'll create a nice little staggered effect like that. So this creates a nice contrast where some parts are dark and others are not. And if you don't like the way that looks, you can always just go back and say, I want to paint this part dark instead. That might look better. Actually. We're just sort of playing around with the idea is now seeing what works and what doesn't. Cool. And actually I like that. I like that better. I think that looks better from the front view and from the side view. So I'm going to leave that, that way. Cool. That's looking nice. Now we're just going to do the same exact thing for this part of the arm. If I switch back to the body, make sure that you clear your mask so that it doesn't extract that again for you and for the forearm because this Let's see. I think because this is going to be sort of a racer, I'm actually just going to go and make this all one poly group again by just holding Control and Shift, clicking on this part of the arm. And then I'll click and drag with controlling shift to show the opposite. Now if I hold Control Shift, click on this the lines it will hide them that just the torso is showing. And then Control Shift, click and drag to show the opposite. So now just the arms and the lines are showing. And I can press Control W, and it's all one poly group. I guess I could have just saved time by just holding Control and Shift and clicking on that and then showing the opposite they're either way. So now that this is all one poly group, I won't get separate pieces of geometry. Now I can just mask this off in whatever shape I want. Something like that looks cool. Maybe we'll do like that. So now we're just playing with the shapes. I really, you know, it's the fun part of, of messing around in ZBrush is just experimenting and just seeing what works and what you like and what you don't like. And I'm going to hold control, switch to my mask pen and hold Control and Alt and just draw. Let's see, I still have lazy mouse on. If I want to turn these emails off, I can hold Control goes stroke. And with control held down, it's activating my mask brush. So make sure you're holding control. Go to stroke and then just turn lazy mouse off right here under the lazy Mouse menu. So that makes it a little faster for drawing masks. Just going to make sure that the bottom side of the hand is unmasked because I don't want this wrapping all the way around. Not on the palm like that there. And then we'll just continue this over here. Alright, and clean this up around the elbow so that it's not intersecting with anything and just clean up our edges a little bit so that it's nice and straight. So really armor is so easy. Once you just get a process down for it. It's really just about extracting the parts. And then working was super, super low topology. As clean of a shape as you can possibly get. And using masking, just using adding and subtracting to get nice clean angles, cuts and but I like this. I think this is the relaxing part for me. You know, another, yet another relaxing part of working in ZBrush like this. Creating armor is fun because I just like playing with shapes and things and experimenting, kinda figuring out what looks cool or what works. For me, that's fine. Right? So without getting too carried away, It's trying to get nice clean edge around all of this. So that looks good enough. So now I'm just going to go to extract the same thickness as everything else. If points are 0, 5, 0, Let's see, I need to change my color to white first so that it starts out white. And then hit Accept, go. And now we can hold Control and Shift. Make sure you have your select Rectangle 1, 0 Control Shift. Click on the inside poly group, flip your selection, delete hidden, and then group loops and Z remeasure at 0.1. That looks like we missed a little piece of geometry right here, so we can mask this off. And if this is too close to the other geometry, like if you just can't seem to mask that off. Another way to help get rid of that is going to your brush menu and find your Move Topological brush. So Move Topological works a little differently than the regular Move brush because it will only affect one Pauline group at a time, or also only one poly Island at a time. So because this set of polygons is separate from this Move, Topological is only going to move this and nothing else when I touch it. So that's a really great way if you're just like, Oh man, that little pieces stuck and I can't get it away from all the rest and I just need to get rid of it. Grab, Remove topological brush, and just make the brush rate is really big and just grab that piece and then force it away from the rest of everything. And that way you can just mask it, Flickr mask and then hide it and delete hidden, and then it's gone. Okay, cool. So that's looking cool. I like the way that looks, so I'm gonna keep it. And I don't want it to shrink down. So my panel loops, I'm going to turn the polished and a 0 at a panel loops. And this looks good. Cool. Yeah, I like the way that looks cool. So we're going to keep that. Okay. So that is going to do it for this video. And in the next video, we will get on to doing the face and the head and making it look a little more cyborg, cybernetic, just like the rest of the body. And so that the rest of the character matches. And we'll do some painting on the face as well, and probably do the eyes and other things as well. So I'll see you in the next video.
30. Face And Eyes - Hand Painting : So in this video we need to paint the face and do the eyes. And really that's a pretty straightforward job. Earlier in this series, we just filled the face with a plane skin color. And we've just been sort of dealing with that ever since. It's just been a, a plane sort of look. But we want to make this actually look a little more skinny, fleshy, toned. And I will show you how to do that in this video. So if you have any brushes, Dr. down here, you can grab one of them and change it to the paint brush. By clicking on this brush will open up your brush pallet. And then if you click on the brush, it'll replace that one with whichever brush you click on it. So I have my paint brush here. And I also have fill object. Set my and my preferences over here below my color picker because it's useful just have that there whenever I'm doing painting. So when we're using paint, we want to be aware of our RGB intensity appear. So automatically it's set to 100. So I'm going to set it down to two because it will make the color come out a lot slower like this. So if I'm putting red on the phase, it's going to come up much, much slower. If I had it at a 100 percent, it would be really thick and really difficult to control. So I'm gonna go into solo mode. And generally when you're painting a face to make it look more like skin, the face is separated into thirds, so the top part is generally sort of like a yellow color. This is an extreme example, so yellow center is more red. Also the ears are more red down into the nose and upper lip like this. And this is very extreme. We're not actually going to paint it this dark. And then the lower section of the face is, has a very, very light blue tint to it like that. So yellow, red, and blue like that. This is a really fast way to get sort of a realistic flesh sort of pigment sort of going and for your character. So if I hit Control Z and go back. So we're back here with just our plane face. Let's go over and we'll grab a yellow color and drag it all the way to the right so that it's fully saturated. Left is desaturated, right is fully saturated and drag it up to the top. So it's a much lighter hue. And at 2% RGB intensity with the paint brush, we're just going to gently paint on the forehead and the eyebrows just a little bit like Just like that. It doesn't take much. For the ELA. We don't want our character to look like they're ill or sick. So just a little bit of yellow is fine. And maybe blend a tiny bit up to the top of that to this also kind of mirrors like a makeup effect on the character's face. So now our color picker on the left change it over to a dense red, and then drag this over to the right so it's fully saturated and up toward the top. So it's just like a reddish pink kinda color. And we're going to fill in our cheeks very softly. And just gently with a really big brush radius. Just gently drag a few times like this so that there's some red. And I'm even going to add some of that red to the chin and the lips. So the red is going to be kind of the bottom half of the face. Now and he blew, somebody grab this, and I'll grab a darker blue actually, like in-between this azure blue and this lighter blue, just right in the middle, that's fine. And drag this up toward the top right. So you get sort of a lighter sort of hue. And we'll just barely, barely add a little bit of blue. So I only drag that twice, just like the tiniest bit. So and you can also put a little bit of blue. Now, let's, that's fine. You don't want to overdo it. You don't want your character to live to blue. So now that we have yellow, red, and blue, when I hover over the back of my skull here where I still have this skin tone per C on my keyboard and it will grab that skin tone color. And I'll make my brush radius is really big. Now that we're here, what I'm going to do is press X to turn symmetry off. Because symmetry is kind of the killer of all things when it comes to paint. So I don't want symmetry on when I'm doing this because I don't want this to be perfectly symmetrical. It just looks more visually appealing and more interesting. Things are less symmetrical. When it comes to painting the face. Because then it looks more natural like an actual skin tone or so. Just take a second to kind of paint this skin tone back over the top of the yellow and over the top of the red and the blue. So we're just blending this color back in. And what we're left with is sort of this multi toned look like this character, still a little yellow on the top here. So I'll just blend it a little more of that skin tone on the yellow and a little bit of blue is still showing here. It's pretty, pretty dense. So we'll just paint on a little more of that skin tone. So once we're at this point, this sort of separates the face a little better into pieces or bought, sorry, into sections like that. Now I'm going to go back to red and grab a nice light reddish pink color. Just very, very lightly color each cheek a little bit red. So it's like a little bit of blush like that. And then I'll also do this on the bridge of the nose. Just barely. Because these are the parts of the face that have more blood in them and that's why they are a little bit more red. Ncaa I did it. It's easy to overdo it. I did a little too much right here. So I'm gonna hit Control Z to go back and just give it one pass. It doesn't need very much. Can also put a little bit around the eyes. Like that. Just a little bit, little bit goes a long way. Alright, now we need to do the same for the ears. So my ears are separate objects, so I'm just going to select my ears. And I make my brush really large. I'm just going to do red on the ears. I'm not going to bother with yellow and blue because it's not necessary to, the ears are not going to get that much tension. They just need to match sort of the red of the face a little bit. So it doesn't take much, just a tiny bit of red to show that there is some blood in those years. And it will sort of blend with that skin tone. And I'll leave the back of the ears alone. I just want the inside and front-facing parts of the year for a little bit of red on them. Okay. So that looks that looks fine. Now, if yours doesn't look quite the way that mine looks, I just have under my material picker here. I'm just using the basic material. You can also use the skin shader material, which is also really good for skin on your character. It's really good for showing, especially when you paint. Em want to see a nice-looking skin tone, skin shader, skin shade for, is a really good one for a material. Now because this face and ears, I want them to, I'm actually just going to fill them with this material as do that. I have skin shade for material selected. And up here next to RGB, I can grab em and turn em on and turn my RGB intensity all the way to 100. Which means that when I go back over and I hit Fill object, it's going to fill that object with just the material at 100%. So now this, even if I change to a different material, is going to stay skin shade like that. And I can do the same with the body here because this is also going to have skin. So switch to Skin Shade. Make sure the RGB isn't 100 m is turned on and hit Fill object like that. So now I can just switch back to my basic material. And the character skin is all the skin shade material. And we'll do the same for the ears as well. Okay, So now the ears, the head, and the torso, the skin, torso are all filled with just that skin shader material. And now that I want to continue painting, I'm going to turn em off and switch over to RGB, turn RGB on, and then I'll bring mine density weight back down again to something like two again. And if we zoom in on our face, we want to create a little bit of a shadow like hand paint, a tiny bit of shade in certain parts of the face. First, we also, of course, we need to paint the lips too, but we'll get to that in a sec. First, I want to select black color, like because just all the way to the bottom left so that the color picker is black. And if we zoom in on the nose, we want to put a little bit of black inside of the nostrils. And for this, I do need symmetry turned on. So make sure you press X and turn symmetry back on. And then we're just going to paint a tiny bit of black in each nostril and maybe a little bit coming down. So that way for looking up at this angle, we're not going to see that geometry in there as well. It'll, it'll just be dark, so it just kinda mimics real nostrils so that you can't see up in there. And there's little more black. It doesn't take much. That's easy to overdo it, but so we just want a little bit like that so that you can't see up there. Even that is a little too heavy. So I'm actually just going to go back and redo that a little bit lighter. So I don't want it to look like It's completely black in there. Just a little bit darker. Even around the edge there. Okay. So that's fine. Now, even the bottom plane of the nose, if we just swipe once, just one time, just one drag and you can, It's a really subtle difference, but even it at RGB intensity at two, if I just drag one time down, that can make a really big difference. Because that's without, with, without and with. So I like just having this little bit of shade on the bottom of the nose because it kinda helps separate it from the rest of the face and create a little more. Depth. So we'll do that. And for this part of the head, I'm going to very lightly just paint a little bit of black above the eyes like right on the upper eyelid. Almost like eye shadow. And then maybe just a little bit darker. But I don't want to go too dark. You don't want them to make it look like they're wearing clown makeup. It's a little bit eye shadow there. And that kind of also adds to the realistic shadow of just the brow covering the top eyelid a little bit. And you can also put a little bit on the bottom eyelid, but you don't have to go too crazy because it might look a little weird if you make it too dark. And that's also because we have this geometry here, sort of lining the bottom part of the islet anyway. So I might not even be necessary to have that. It's just sort of a preference thing. If you think it looks good, then do it. If not, then they'll do it. Okay. Now, so now that's starting to look a little more like a face. Cool. So now let's paint the lips. The lips. We can grab, press to see when you're hovering over any part of the face. And it will grab that color and just dragged it your color picker where it left off. Just drag it down a little bit. So it's just a little bit darker because you don't want them to be bright red because that's kind of unrealistic. And the lips are sort of the same color as the rest of your face. Just a little bit darker. So I'll just I'll slightly deeper skin tone like that. Or if you want, you could grab a special color, you could grab purple or red, or it's a Cyberpunk character, you know, good, have fun with it. If you wanna grab black, you know, you could just make it look like they're wearing black lipstick. Either way. Maybe that would look cool. Now, play with it, FM with that. Just see what works for your character because that's ultimately it's yours and I can't tell you how to make your character and you can do whatever you want. Well, it's kinda cool. It will keep that. Will lighten this up a little bit. Right? So one thing that you can do to make the lips look more detailed is once you paint in a darker color like that, switch to a slightly lighter color. So say for this, we have black selected, painted in this at a low opacity. So drag the slider up to like middle gray or even a little bit higher. And now paint in the direction that the lines of ellipse go just very gently. And this will create even more depth, but leave the outside border darker. So you're painting a little bit lighter color in here and leaving the exterior lines, the outline of the lips darker like that. And this just creates more depth and makes it look more interesting. So it's not just one solid color because they're naturally, there are going to be shadows in here too. So you could even grab the black and just hand paint in some shadow and then hold shift and smooth it. Just be aware if you're holding Shift and smoothing, you're also smoothing the geometry there. So be careful with that. Like the line between the lips here. Just paint that black. And now we can even just take this black color and just outline our lip, the upper lip here with a black color. Really, really dark. And that will just make them stand out even more. It's like a lip liner. Yeah. That looks cool. That now we have a goth punk, cool again, makeup setup for our character. And now let's do the eyes are the quick. So I'll show you a very fast method for creating eyes. So select your eyes. Make sure you have symmetry turned on, hold control, and select your mask. Perfect circle brush here. Well, this does, is if you hold Control and draw out a mask, it makes a perfect circle, which is perfect for eyes. So you can even just look right here with everything showing and just draw out a circle. And depending on how you want your character to look, you can make the iris bigger or smaller. And this is something that you get to sort of, that you just sort of have to play around with it until you make your character cross-eyed. Make character's eyes out here. So you just have to play with the shape until it sits in the right spot because it all depends on how high your eyes are in the eye sockets and how big you want the eyes to look. So nice thing about this. And now that I have this masked off, I can just rotate my cameras so that it's facing directly at me. Hold Control and Alt and draw out another circle that didn't work. I want it to be right in the center so that I'm creating a nice perfect little ring. And so I'm holding Control and Alt, drawing a circle like that so that it creates this nice mask ring. Now if I hold Control, click outside of this, it's going to flip my mask. And I have this part unmasked so I can grab my paintbrush now. Select black, make my brush release radius really big, and then just turn my RGB intensity up and paint in that black circle. Now if I clear eye mask, I just have a black circle like that. And I can fill in the rest by doing variations of what we just did. So we're going to zoom in. Make sure that this eyeball is pointing straight at me with symmetry turned on alignment brush up so that it's right in the center. And it's easy to do that if you change the brush radius a little bit like make your brush radius same size as this circle right here, and just line it up at that circle. And then hold Control and drag out a circle. I could put that right at myself a little more. Control. Trial this. And actually what I'll do is mask off this right here. And now that I have my red selected, oh, I'm sorry, my black selected, I can just flip my mask. Just very lightly paint in some black. Actually, this is a Cyberpunk character, so we're going to select gray and just lightly fill in some gray like that. Now if I hold Control and click, it will soften the edge of my mass. So I'll click a couple times and then just paint really lightly. I like this because it leaves a little bit of a white ring. And because these are going to be cybernetic eyes or like cyborg guys. It's kind of a cool effect. So it's gradually, gradually just using your mask circle tool to create rings, consecutive rings going from the center outward. So you have to sort of play around with it. Just will control, draw your mask or hold Control and Alt to subtract the mass. So you can keep adding or subtracting and draw a mask once. And then maybe even subtract like that, flip your mask and then draw in whichever color you want. So in this case, now that I have this gray, I can also just now I can just make this really cool and painted a red color here. So when I clean my mask, now my character has this cool cyborg read like robot eyes. And we'll just keep doing this. So now we'll make the pupil. And that will just be, I'll make a tiny circle here, flipping mask, grab black, and just paint in the black color until it's completely opaque. Like that. Then if I clear my mask and my character has these pupils. So that's looking, it's looking cool but little creepy but, but also cool. And my eyes aren't quite straight. For whatever reason they look like they're slanting downward a little bit. Just the way that I made my made my eyes. So I'll go into what I'm doing here is just press W on your keyboard to get your Gizmo and then use this go to unmasked mesh Centered button. And you can rotate your eyes as long as you have symmetry turned on and you press this go to unmask center. It will center the gizmo in the center of each eye or one of the eyes like that. So the symmetry you can rotate them. Which is also useful if you want your character look down through what this kind of dramatic angle with her staring down at you or, or whatever. So that's a really handy way to move the eyes. I'll do this so that they're looking straight forward for right now. And now. Lastly, if you wanted to paint in the iris of the eyes and make this sort of gradually blend out toward that read. Like you would for a normal character, you can mask off the pupil and hover over your red. Press C on your keyboard to grab that red color. And I would start by brightening this up a little bit, drag it up so that it's a lighter color and just paint in a lighter red. This doesn't have to be perfect. In fact, it's better if it's not perfect because eyes are, are very random looking. There's never a perfect clean line around it. So kind of blend this border a little bit and it will look more natural. That and now I'm going to grab a darker red and drag this over to the left so it's desaturated and down, so it's darker. And then just paint in, ooh, that's a little too heavy. So we're going to drag our intensity down to two and make our brush size really small and just draw in lines like this. So a good way to start with this is make a T-shape. First or a plus shape first, this way, this way, and then up and down. And then do the, just separate each section in half again. So go this way diagonally and look in between these two lines, in between these two lines, in between these two lines like that. So you're separating it like this. And then do it again, but make these lines half the length. Go all the way around. And then even take a little bit of that dark color and just fill this in a little more all the way around. And then even grab a black or a dark color. Now if we unmask this and we draw around our pupil here, because we don't want it to be completely black. On a blend of this. I'm just using black and just drawing around a circle like that. And now from the center drag outward a little bit. But a couple of strokes and do this in-between the lines of red. And eventually you start to get this starburst effect. And then you can also grab red again, like a nice saturated red. And start following these lines are going in between them. And if we zoom way back out from further away, it looks really cool. So you just keep building on that. And keep playing with that, with the mask, circle brush and creating, you know, nice patterns like that. And it makes it a lot easier when you're doing eyes, when you just use the mask circle brush like this. You can even just flip the mask there. And if you want the red to come out to here to the edge a little bit more. You can just paint around the red here that turn your intensity up. You just have to play around with it. This is a, this is a fun way to do eyes. Then even soften the mascot couple times if you want the red to come out to all the way out to the edge of the black. And just fill that in. And then it's just more of that starburst effect going out. Obviously this, the iris of this is really big. So I would have to draw that starburst way out, all the way out to the edge where the black is. But you get the idea. That's, that's just one way to do it like that. For my character, I'm going to keep it looking a little more cybernetic unless human eyes. So I'm actually going to go back and maybe just stick with simple, simple look like this. I think this looks fun. I like the look of that. And we can always change it later too. If we don't like the way it looks, I could just go with something simple or even just a simple, lighter and darker. The very last thing we need to do with the eyes is grab a black color. And we need to paint on the shadow of the brow covering the eyes. So just with black selected. And our opacity down to our RGB intensity, down to two or three. We're just going to draw this line really gently like that. So arching from the inner corner of the eye, over the top and toward the outer corner of the eye like that. So it doesn't take much. In fact, don't do it too dark like that because it's done, it's going to look weird. It looks like something is in front of the character's eyes. Just a tiny bit. And keep your undo history. Because if you decide you want to move your eyes later and if you want to slap them down or something, and you can see this line right here, and you can just say Control Z and undo that shadow. And then it's, then the eyes will look fine. Okay, so we're making progress. This character is actually starting to look more like a character now, just really cool. Switch to different materials. The face and the body is still stay that skin color or we can select like a metal color. And everything is starting to actually come together and start to look more like a character now. And in the next video, we'll get into actually making the face look like a cybernetic face, like the rest of the body. And I'll see you then.
31. Face - Cybernetic Lines : In this video, we need to fix the character's face to make it look like the cybernetic body. And we need to put these lines like these sort of robotic circuits or lines on the character's face. So to do this, it's going to be the same sort of method that we used in order to make the cyber suit. And we're just going to be using our mask tool and maybe using lazy mouse to draw in those cybernetic lines. For a lot of Cyberpunk characters, you often don't see a lot of these lines. But what those lines imply is that there's either some sort of enhancement installed on the character's face. Or that phase is divided into panels. If it's a completely robotic character, some of those characters have these lines on their face because they are, have panels or something that can be removed or replaced on their face. In a way it's almost like being able to change out your face and replace it with a different one. So some of these characters had multiple identities or there's, there's a lot of different explanations for these lines on character's faces and bodies. But some of it, what I like to think of as just that it's interchangeable parts. So we're going to try to create lines that separate the face into sections for the character. So it looks like there are panels that can be taken off and replaced on the character's face. So we're just going to take a hold Control, grab our mask pen tool. And then while holding control, we're going to go up to stroke and go to the lazy Mouse menu and turn on lazy mouse and then turn up the lazy radius as high as you'd like. I like mine around a 100 because then you get a nice long trail behind your brush stroke, which is really helpful. So And really all we're doing is going on Pinterest. And I like everything. Like before I know I talk a lot about using reference, but really it's just so important to use reference and change my brush size to something really small, like around 10. Actually this is six, this is working pretty nicely. So find a size that is comfortable to you. And we'll start drawing some of these lines. So a lot of these lines, I like to have similar style to the way we did the lines on the body. Where a lot of these lines are not super curved, they're more straight. But for the face because the face is really soft and has a lot of round angles. I'm going to throw in a couple of curved lines like this one down here that follow the line of the jaw and the cheek. Because I think it's important to sort of follow the contours of the face to add to the appeal if your character a little more. And sometimes you see these little spots like this that intersect with where the lines go through. So this is essentially going to be like a like a button on the phase that you could access, removing this panel by pressing that button, something like that. So I like the idea of having a nice little spot right there that looks a little bit different. So this is looking kinda cool. I like, I like this look just the one line across the nodes is enough, comes across the cheeks. And then we have our button here. And so let's continue this. Let's say I'm going to try to follow some of the lines that I've already drawn. So this is going this direction. So I'll draw this going down in that same direction, but then coming forward to wrap around the jaw. I'm really just making this up as I go and seeing what works and what doesn't, that doesn't really work. Not a direct enough line. You just have to play with it until you get sort of the shape that you think looks interesting enough or, or works. And this is looking okay, but I don't really like fat little corners sticking off in the front, so I'm going to clean that up. All right. So I like this, I like the simplicity of this. I think it's, I think it's fine. I think that'll work. Let's put something on the chin because I like it when you can see like a like a robotic part on something like on the chin. And it will fill part of this n Actually let's redo that. So for the chin, we're just going to do a nice simple like almost hexagonal, like half of a hexagon sort of shape. And they'll have an interior part that follows that same shape. Something like that. And from the front That's subtle enough where it's not taking up the entire chin. So it's not going to be in front of the face. The face still looks very natural from the front, but at a lower angle you can still see that there's something there. So it just kinda adds to adds to the mystery of the character a little more. Yeah, we'll keep that for now. And instead of this, I'm just going to finish this piece through on the bottom of the jaw. So I'm really just using a simple mask. Not even I'm just holding control with lazy mouse turned on. Just really simple strokes. Trying to clean up the mask here. Alright, we'll just clean this up a little bit more. Make sure that there's none of that left there. Alright, so we have this. Now let's do the forehead and the upper part of the face. So this face were divided into panels. I'm going to assume that the back of the head is all one piece. And then all the parts of the front of the face are all going to stay separate and be essentially removable panels on the front. So for the forehead, I'm going to just sort of play around with this. Let's try a line coming up from the eyes up to the top of the brow bone and then up and over on the forehead. Also, don't forget to go out of solo mode from time to time till it's just to look and see how the lines look on your face and if you like it or not side, I'm going to change this forehead because I think that's too close together. So maybe this line to come up and then go out and over. Something like that. That's getting better, but it's still not quite what I want. I don't want this line to be lined up with the pupil as much because that's going to draw my focus from the eyes up to this line at 0. I don't really think that's going to work. I don't like the way that looks. So let's try this one more time. Do the light a little further out and going out more of an angle and then coming up and in. I like that better. I think that's better. Because then it frames the eyes a little bit. These lines coming down kind of sort of draw my attention to the eyes and not away from the eyes because it's framing it a little better. So that's good, but I messed up that line on top. Let's try this again. Do this even a little further out. Will try like that. Yeah, so something, something along this line is going to work really well. I think this, I think this is kinda work. I'll do this one more time, but I think I just need this a little closer and I just keep messing up these lines there. I think that's good. So we'll leave it like that. Now this panel, all of this is going to be one piece. So I will put another line going out this way and maybe following this pattern a little more. And then coming down to connect this panel over here. So you can't see it. But once we move the hair around or if we tilt the head or something, we might be able to see those lines there, but the fact that they're there just really just completes the concept of having these panels on the face. So now the forehead and the eyes are all one panel. The cheeks and the front of the face are separate panels from one another like that. And then we have this little essentially like this button that would open out those panels if a character wanted to replace their face with a different shell or a different panel of some sort. So I like this. I think this is good enough. I don't, I don't want to put anything around the mouth. His character's mouth is. It's easy to make your character look weird if you put things around the face, like the mouth or the nose. And I think that's good enough, simple as good for this. I think this is going to work because I don't want it to be too complex. So now that we have this, Let's turn on our poly frame button. And we're just going to hit Control W. And it will turn those lines into their own poly groups. So it turned my mask into a poly group of its own. Now we can hold Control and Shift and click on that mask or I'm sorry, on that poly group to just show it and nothing else. And if I go out of solo mode, I can find a color on my character like this dark gray hit C on my keyboard and it will grab that color. And then I can just go to color and fill object. Make sure that RGB is, well, I guess, make sure that M is not turned on or it won't do color. So now hold Control and Shift and click again. And it will, oh, everything. Very last. We need to mask this and then we need to inset it like we did with the rest of the body. So hold Control and Shift, click on the line poly group again. And then we're going to hold Control, click to mask the whole thing, and then Control Shift and click to show everything. And then I will hold Control, click to flip my mask. And then hold, bring it my gizmo here. And hold Control and scale inward just a little bit. And it doesn't take much, like just, just enough to have a little cut. Looks good. And if you wanted this to stand out even more, you can also go back to when you just have the lines unmasked and the rest of the phases massed. If you wanted to add a material to this, it would make it stand out even more. So let's try adding metal material. So I'll select my metal material and with just the lines on masked, I can sell my gizmos open so it won't let me. So if your gizmos up, press Q on your keyboard or go into Draw mode, turn on m, and then hit Fill object and it will fill it with just the material for em. And when we unmask here, it's going to make that a really shiny metallic sort of color, which is cool, but at the same time the resolution is kind of bad. It's kinda cutting these vertices pretty bad. So I would think that material is drawn attention to that. So maybe I won't fill it with the material. Maybe I'll just fill it with a slightly darker color. So I'll change m to RGB and hit Fill object. Or I could even just turn RGB off and just fill object. If we wanted this to be white, we could fill it. We don't need RGB turned on. Maybe just a darker color. Let's see how that looks. I think that looks better without the shiny material that are shiny material kind of pulls out this, the jaggedness of this line in the face a little more and I don't like that. So for now I'm just going to leave it with just color in the face. Okay. I think that that looks pretty good. And if we wanted, we could add some of those lines to the ear, even just like one or two. But other than that, I think I would rather just keep it simple and leave it looking like that because even from far away, those lines read pretty clearly. And I think simple works really nice like that. So that is going to do it for this video. And in the next video we'll get onto creating some more of the armor. I'll see you in the next one.
32. Armor - Shoulders : Okay, welcome back. In this video, we're just going to start creating some additional armor on this character. So using does cyber suit as the base, I'm going to be masking off parts of it and creating more armor. You can see on the, on the shorts on this part of the character. I created these pieces in an earlier video, but I made them a little bit more stylized looking by giving them this nice edge. And I want to show you how I did that, but I'll show you as we go forward creating some of the armor for the shoulders. So first we need to select our body. And let's check out our poly groups here because we want everything to be one poly group when we're doing shoulder shoulder pads, excuse me, guys, if you have multiple poly groups, it's going to break it up into separate pieces and I don't want that. So as long as the arms R1 poly group, that should be fine. So I can Control Shift and click on the arms, just make sure that that's all one Pauline group. And actually, I'm just gonna hit Control W to be sure because I can't tell because of the dark color if those are two poly groups or not. So I just hit Control W animate everything visible into one poly group. So I'm going to keep that there. And now I can just show everything and use my mask lasso to just draw out a simple square-like selection like this on the arm. I want to avoid touching multiple poly groups with my mask because then it will create multiple pieces of geometry that are separated and I don't want that. So I'm just going to ask on the arm and just a simple square shape like that looks fine. Set my, my thickness to 0.005 and hit extract except. And then we'll go through our quick process here of showing the opposite, deleting the interior poly group and setting 0 measure to 0.1. And I'm going to Geometry Edge Loop, group loops to smooth everything out and then 0 mesh again. And notice that Z remeasure is at 0.1 at the lowest possible, setting. Angry flips again. So I'm trying to smooth this out as much as possible. And that looks okay. Now I can use my gizmo to just move this up, set it into place. And even if I hold Alt and click this arrow, it will reset the orientation of my gizmo to the world. And I can scale out this way, move this forward just a tiny bit. And sorry if I'm if I'm going too fast, I'm just trying to keep these videos as short as possible. Because if this is a lot of repetitive work, but if I'm going too fast, you can always slow down the speed of the video. I apologize if I'm going too fast, I am just trying to keep these lessons under a certain time limits so that it doesn't drag on for too long. But I'm trying to keep it trying to explain at least at a pace that everybody can follow. But deliver the information in a way where, you know, if you need to go back, you can always go back and look. And so I apologize, I'm going too fast. All right. So we're just going to use the Move brush to sort of get these shapes the way we want them. Like a nice shoulder pad like that. And that's looking fine. And then I'll just 0 mesh this one more time. Now that, now that it's in the shape that I want it, I'll 0 mesh it maybe a couple of times just to see what Z remeasure is thinking here. The direction that it wants my edge loops and everything to go. And so now I'll hit Group loops on more time. And then 0 mesh again. There we go. That's looking more like I wanted. So I want the topology that even out and go in lines from top to bottom, left to right. And that's why I keep using group loops and 0 measure because it's going to eventually get the idea that these are the directions that I want my lines to go in. Because that's going to help us really shape these and make it a lot easier to make armor out of them as we go forward. All right, so now what we can do is just pull these parts. Now we can start creating shapes. So I'm just using the Move brush to create a little bit of a corner right here to allow some movement for the arm. And this part that pulls n will be sort of where this armor connects toward the armpit or like right in front of the arm pit. They'll do the same for the back. So pull in this corner here to give more range of motion for the head and the shoulder. And then pull this back where it will connect to the, either the suit or to another piece of armor. Something like that. That looks okay. And we need to leave some room for the arm to move around here. 0 mesh that one more time. Go. That's looking good. Lighter color. That's why. So the lighter color, this is easier to see. So maybe I'll do a style choice here and just pull this down. Try to get a nice little 45 degree sort of dip going on right there. And that looks good, okay. And just play with the shapes, try to get it to match. Other aesthetics of the body. And look at the negative space. Look at the silhouette here. How there's space here between the arm and the shoulder pad and between the shoulder pad and the head and all of this, all of these things matter when you're looking at your character. It's, that's the fun part. Creating a silhouette that looks, that looks good is really important for your character. So that's what I'm doing. I'm just messing with these shapes to try and get some interesting contrast of, of negative space. Okay, so I think this looks good enough for now. So now I need to close everything up so that I have an inside poly groups. I'm, I'm not going to want to lose my shapes. So for panel loops, I'll turn the D polish down to 0 and then hit panel loops. And now it's all closed up and it's the same shape. Now, I can hit Control Shift and D to duplicate this and move it up. Because I want this to be a layered effect. So I'm gonna move this shoulder pad up. Make sure your snapped to front view. Because it makes it easier to just use your Gizmo using these corner arrows and snapped side view. And same thing. Just kinda speeds up the workflow little bit. So I want this to be layered, so I'll grab my Move brush again. And these two pieces are going to connect with one another in the same place. So I want to bring this part down here and here. So they're connecting. Going to pull this top part out and away from the face so that the character can actually turn their head without hitting their shoulder pads. Like that. Cool. And that's looking cool. Looking like I want it to all line up these shapes here so that they are matching. Falling down the shoulders like that. And these are looking pretty round in the silhouette, but I might be able to change that later. Now, I'm going to do this one more time Control Shift D to duplicate it, bring this last, this third one out and up. And do the same effect so that the character has this triple sort of shoulder pad going on. And same thing. Omit this part down so that it's all connecting here at the same point in the front end and the back. Line this up so that it's going down at the same angle. And now I want to show you how I created this nice crisp edge because we're going to do that on this top piece of armor. So grab your Damien standard brush and make your brush size like Medium. And we'll just hold Alt and draw a line across. And just follow that line a couple of times forward, backward. And doesn't have to be pretty just follow the same line. And eventually it will start to stand up and have this nice sort of like blade point sticking out like that. And really tried to accent, accentuate that. There we go. So really build it up. Get it to stick as far up as you can without it looking too wonky. Try to keep a nice arc though, don't, you don't want it to be Jaggard, you want it to be fairly even. That. Okay, Let's close enough. Now we need to grab our H polish brush under H and our brush menu. And we'll just smooth out on 1.5 of the brush radius that's just about as tall as this little ridge itself. And then submit that on the other half. And now if there are individual points that are sticking out, you can grab your Move brush, grab 1 at a time, and just get them into place the correct way so that it actually looks right like that. So now you have this cool looking sort of disc sort of shape coming out of the shoulder pads. And you can also just smooth down at the base a little bit if you want to help disperse the geometry up into that a little better. So I'm not submitting the top, I'm smoothing down here. And that's just relaxing this geometry down below and bringing it further up on the object. And that creates a more gradual curve on the whole shoulder width. And we'll fix this with the Move brush. Right? So that's the basic idea. So you get the idea there. And we'll just smooth that out too. And now this is a little too round. So I'm going to grab my Pinch brush and just go into solo mode and just come in on this edge along here on the inside and pinch it. And then smooth this out a little bit so that this has more of a pointy look to it, unless of a round look to it. So I want all my shapes to sort of match. I want anything to be too rounded, right? And now we'll use our gizmo hold W or sorry, press W and then go to unmasked mesh center here and just rotate these a little bit and maybe move them out away from the face a little more. And I think these are looking good, but there's just a little too far out from the body. So I'm going to move the middle one and the top one down and in toward the body more to make them a little smaller and the silhouette. I think that looks good. Something like that. Cool. Yeah, I like that. Now I need to grab my bottom-most piece of the shoulder pads here. And I'm actually going to pinch this part in because it's not looking quite right in that silhouette. It looks like this is sticking further down and that's not what I want. So now you just have to sort of play with the shapes to make them all fit together in the right way. And maybe even move this one and more and rotate it out like that. So just trying to make it look like they're spacing between all three of them is even. And it makes sense the way that it lines up and look at the tips over here and make sure that they go to at the same fall off this direction. And the inside part here also has a gradual fall off like this so that it's not just a dropped straight down, it's a curve in the same direction. So this is looking better. I like the way this is looking now. So because we made this part so big, I am probably going to end up putting a little more armor on the arms to make it. So it just so that the shoulders don't look so enormous by themselves. But that is a general way to create a really simple, good-looking shoulder piece. And from here I could even just take this bottom innermost piece and hit Control Shift D to duplicate it and just move it down and use that as an upper arm piece, something like that to just scale it down a little, move it into place, and line it up with the arm a little bit to just give a little more bulk to the upper arm so that the shoulders don't look so huge by themselves. And we can really just keep that simple. It doesn't have to be connected or this complicated piece because it's all part of the character anyway. So as long as we can just put on like a bolt or something somewhere where it looks like it's connected, then that's all that that's all that it needs to be convincing. This and just went out and I like doing this because this matches the shoulder armor too. So it actually looks like a like a pattern or like it's part of the armor. Like this. So having the same pattern going down the arms can also be really cool, really aesthetically pleasing, and match the character better. And then we could even just hit control shift D one more time and just use that same part, but I'll put it underneath. Sort of move it in and rotate it into place until you get the idea. So we can just play with those shapes. And that is going to do it for doing these shoulder pads. And in the next video, we'll get onto continuing the armor and sort of piecing everything together. I'll see you then.
33. Armor - Legs : So now that we have completed some armor for the shoulders, we need to go on to the legs. And on the legs I want to add some armor on the outside, but I also want to show you how to model a piece that you can just sort of put on the, on the legs to create an even more Cyberpunk effect. And change my material here to basic material to make this all it easier to see. So same method as before. What we were just going to do is start masking parts of the leg. So the upper legs are already kinda busy with all of this going on. So instead I'm going to turn on poly frame, make sure that all of this is one poly group because I want this all to be one piece. And we are going to just mask off a section on the side of the leg like that. And maybe clean up the mask a little bit so that this top edge is a little sharper here, something like that. And had extracted 0.005 except. And then we'll clear our interior poly group 0 mesh at 0.1 and then go over to Geometry, hit Group loops one time and 0 mesh again, so that we get this nice simple geometry here. If we turn poly frame off, That's looking pretty cool, something like that. And then we'll just use our brush to push it out a little bit. And I'm going to make it flare out at the top a little more so that it really looks like it's armor. Because that's just going to add to the dynamic shape of the character and make it a little more interesting, looking like for the silhouette here, because this part is wider here, it creates more of a silhouette, so I like that. Okay, and I think that looks good enough. So then we'll go to panel loops, turn the polish to 0 at Penn a loop. So now we have our interior geometry. Now I'm just going to grab our Z modular brush. And we'll go around this on a few spots and just sort of add a hold Alt so I can start drawing a poly Groupon. And I'm going to draw it all the way around, but not to the very edge because we're going to use that edge later. Something like that. And then a smaller Foursquare's there, couple of squares, there are a couple squared is there. And then hover over a face. Actually maybe I'll draw one, will make this bigger poly group on top here. Then hover over a face hold space. Select Q mesh, polygraph Island. And we'll just pull this geometry out, something like that. So now this is really starting to look interesting. And this shape is going to create more of a silhouette on the character. And we can worry about connecting it to the leg later. We'll, we'll get to that part. What I also want to do is switch back to the body here and will go out of solo mode. And then I'm just going to hold control with my mask and go to my mask pen. And oops, I'll hold Control and turn lazy mouse off under stroke. And we're just going to draw a mask around the knees. Because I want that to be a separate piece that sticks out from the character also as just extract. So just a nice simple part like this and then we'll do the same thing, delete the interior geometry, and just say remeshing. Angry bloops, see Ramesh. And one more time group loops, mesh. And then I'll just hit panel loops at the polish all the way down. So this is looking good, but it's not perfect because it's still pretty round. So what I can do is hold Control and Shift, grab my trim, rectangle brush. If I go into solo mode, I can rotate this to the side and just trim off the top by holding Control and Shift and dragging that box out to cut out a perfect square like that. Now it's only doing it on one side. So what I can do is mask. Turn off symmetry and mask, decide that I want to keep and then hide that part, delete hidden. And we're just going to go to Z plugin subtotal master and hit Mirror on the x-axis and it will mirror it to the other side. So now we have this nice perfect little square like that. Now if I press W to bring up my gizmo and hold Alt and tap on it to bring my gizmo to the center. I can just rotate this. Oops, make sure symmetry is turned on and rotate this to be exactly the shape of that knee pad. And then scale it up, move it into place and then hold Control and scale up and it will inflate it and make it look more like an actual metal plate. Let me just need to rotate it into place so that it sits properly. Something like that. I'll scale it down even a little bit more because it's a little too big. And then we can just scale it in this direction. Right from the center so that it pulls forward like this. And that's not going to work. Maybe not. So what I can do here is because I want this to be more of a beveled look. I can grab my Z model, their brush, and just paint this interior, this poly group right here. And then use my cue mesh polygon Pylint again to just bring all that forward there. So you get the idea, just getting that into place to make it look right. So now that we have this in place and we have this, let's continue something for the upper leg. And I'll show you how to model something that we can just essentially shoved into the characters leg to make it look even more Cyberpunk. So first thing we need to do is go to sub tool, append. And append in a new sphere or any object. Actually, you know, rather than a sphere, I'm going to delete that sphere. Instead of a sphere, go to append. And let's append in a cylinder. So if we append in a cylinder, just press W and move it down because it's going to be a part of the leg. So if I hold Shift and I rotate it 90 degrees to the right and it's lined up at a nice 90 degree angle. And then I can scale it in this way. And let's turn on poly frame because we're going to need to be able to see our poly groups. So if we go back to our brush menu and grabbed Z modular hover over a polygon face hold space and slightly inset. And we'll select poly group all. Before we do anything, we need to hold Alt, need to paint this entire piece of the cylinder as its own poly group. So now when we tap on that face, we can inset it like this and create a border around here. And I can do the same thing one more time, about the same line, same length and size. And then I'm gonna just to do one more for the very center That's a little smaller like that. So now we have all of these poly loops that we've created. We can hold space and say Q mesh and select our target to Paul a loop. And this will allow us to drag each Pauli loop up or down. If we select the correct direction going in this direction. I'm a difficult time getting that to work. There we go. Like that. So something like that. So that it looks like it's cool. Circular disk of some sort. And you can mess around with this as much as you want. But it's fun to just insert some poly groups. And if that's not working, we can also set Poly loop like that. And then just use q mesh Pali loop to push and pull and create these inset lines like this. And it doesn't have to be perfectly even. You can get as crazy as you want with this design. You can make it symmetrical or a non symmetrical or whatever you wanna do. But this is just a basic way to use the model there to create some cool patterns using a simple shape like a cylinder. So now that we have this shape here, we can press W and use our gizmo to push it into the leg, just rotate it into place and then scale it down. And you'll see this in a lot of Cyberpunk and fantasy and stuff like that, like futuristic fantasy, sci-fi fantasy. Scale this up so that it's more like an oval shape. But characters have these plugs or these, these like disks or like nodes essentially on their bodies. So this is always a cool aesthetic to add. When you're making armor for a Cyberpunk or fantasy character, we may need to scale it out and make it a little thicker so that it sits correctly. And if it's just not fitting on the body correctly, you can also change your camera angle. Press W, so you have your Gizmo up and click on the gear icon here. Go to bend the arc and shift over to the side view and just bend it to make it fit the direction of the character's body better. There's a few ways you can do it, but that's a taper. That's what I'm looking for to make it wrap around this direction. So I'm grabbing the green arrow and it's just bending on that axis to make it wrap around the body a little bit better. Yeah. Something like that. And you can just experiment with it and just play around with the shapes until it looks the way you want. But that's how you would get a nice little nice natural bend out of the object. So now I can use my gizmo. And when you're done with the gear icon, you can either just press W again to make it go away or press W to go back to the current tool that you have to adopt. And if you want to finalize it, you can click on that gear again and go over here and hit Accept. And then it will finalize that band dark. All right, so some of the poly group is still showing through the, some of the leg is still showing through there, but that's okay. It'll still that works. So now that that is, now that that's in place, we can go up to Z plugin, go to sub tool master, go to mirror x axis and hit. Okay. And now it is mirrored over to the other side. And we have this cool leg piece. And if you want, you know, it's, it's already its own set of poly groups. So you could even turn poly frame on and then, you know, grab a different brush rather than Z model here, hold Control and Shift, and click on this interior poly group and you could fill it with a color like red. And then hold Control and Shift to show everything again so that it's this cool red node, like a red light or something like that. Man, we can also fill our other armor parts with a similar color to the other parts of armor on the body. And for this new iPad, I'll fill this poly group with an even darker color. So I'm just messing with light, dark, medium, light, medium dark, all throughout the character. Let's try and get a little contrast going. For all, all of my poly groups like this. And I like to just do this as I go because it gives me an idea of the direction of the character is headed. And it kind of helps you see the armor better, creates more contrast. So I like just switching up the color light to dark. When we're doing this, blocking out phase like this. Okay, so that is a quick one on how to do the legs. And in the next video we are going to finish up blocking out the rest of the armor and putting on any pieces that need to be put for like, you know, bolts or connecting pieces to make them all look like they actually fit together. And I will see you in the next video.
34. Armor - Bolts : Alright, in this video, since we already have most of the armored blocked out, we need to start making it look like some of these pieces actually connect together with some bolts and other pieces similar to what we did on the leg down here. And as you can see, I've just duplicated this part here that was on the leg and put it on this part of the boot. Because I thought that it just looked a little more interesting and adds to the whole dynamic of the shapes for the character. So what we're going to do first is let's just select a subtotal like any sub tool, like the shoulder. And we're going to go to sub tool and go down to append. And we'll append in a cylinder. So with this cylinder, I'll change my color to white here. So with this cylinder selected, it's just snapped to the side view here. And I'll press W and hold shift and rotate this direction 90 degrees. And it will show you how 90 degrees there. And I'm just going to a pancake this down a little bit, make it a little smaller and I'm going to move it forward so it's in front of my character so I can see it better. So with symmetry turned on. Let's go in and turn on poly frame. And we'll grab our Z model airbrush and zoom in here on all these edge loops. So there's all these extra edge loops that I don't need. So if I hover over an edge with z modeller and hold space, I can select, delete an edge loop complete. And I'm just gonna go through and delete every other, every other edge loop in here. Because I really don't need all this extra geometry. In fact, I can delete more than that. I'll do every other one again. And maybe even just delete those because we really don't, really don't need all that extra geometry. I want to leave one here for this bottom bit here, and then one here that's next to the top edge. So that's really all that we need. Now, this is going to be similar to the piece that we made for the leg. So we're just gonna do kind of the same, repeat the same steps that we did for the cylinder piece that we did for the leg. So hold Alt and sort of paint to your poly group here. Because I have symmetry turned on. It's messing with the model there, so it turns imagery, offer it out. So hold Alt and just paint this as poly group. I'm just holding Alt and clicking and dragging. And then we can hover over a face and then hold space and select inset poly group island. And then we'll end the set this by clicking on the polygon face one time. And then we'll click again one more time here and make this one a similar distance like that. Now that I'm to this point, I want to separate these into their own poly groups. And z modular can be a little fickle sometimes. And one way to do it is to have a river, a polygon face, hold space and select poly group Pali loop. And sometimes this works and sometimes it doesn't like you can see it's not changing this Pauli loop to a different color, so it's actually not working. So a way around this is to hold space over polygon and then select mask, Pali loop. And now if I mask and misdirection masks just that poly loop and I can press Control W on my keyboard and it makes it its own poly group. And same thing, I'm gonna do that for this outer edge here, mask Control W, and then this interior one, I'm going to try to do the same thing. It's kind of a weird direction like that. So that's mast and then Control W. So now these are all separate poly groups. So now we need to hover over polygon face, hold space. Select Q mesh poly group Island. And I'm gonna show you a cool little trick with the modeler. So if we push this interior poly group down, and then we grab the little one that's the next ring next to it and grab it and pull it in. It snaps automatically and creates this really cool Bevel effect. And this is just kind of a trick that you can do with Q mesh if there are two edge loops right next to one another like that. So I'm going to pull it down to where it's as high as it can go. And then I have this really cool Bevel effect like this going around. And I'm very last. I'm going to grab this outside ring and just Q mesh it up so that this has a little more of an edge to it. So it's a nice way to get a quick unique shape out of that with this cool bevel. Now that I'm to this point, I have to do one more thing because I'm going to fill this with some color. So I need to hover over this face here, hold space, select inset. And I'm going to select Pali loop for inset. So let's go this direction and just inset this. And we're just going to create a border like this, a tiny, tiny, tiny little border around that edge. Now if I hold Control Shift and I click on this inside poly group here, it hides everything else and then I can select a color like red, or if you want blue or any other. Color like that. And then it just hit Fill object or club to color. And if the object, so now that is red and if I hold Control and Shift, click out here, everything else is showing. And because I created that edge loop around this border right here, it made it so that the red color didn't bleed into these polygons here. Because if I hadn't created that, the red would also be partly on these polygons and that's not, that's not what we want. So that's what that actually plus 4. Now I can hold Control and Shift and click on these. And it looks like it actually group these together. So we'll go back and we'll go mask Pali loop, and we'll mask this and hit Control W. There we go, Control W to make that its own poly group. So now if I show everything now I can just click on this, fill it with a dark color like that. All they did was grab a dark color, fill object and then control shift click to show everything. And then I'll show this poly group as well and fill it with a slightly lighter gray color. And then control shift here, show everything again. And when it did that it bled into this. So I'm going to have to redo this centerpiece, fill it with red. There we go. So that's how I want this to look. And we'll leave the outside white. I kinda like that contrast at the light to dark. And then down into the red like that. So now we have this nice simple shape and we've reduced our poly count by deleting all those edge loops there. So there's a nice quick way. And we're just going to duplicate this a bunch of times and use this throughout the mesh as our bolt for our armor or, you know, some kind of peace to hold all the parts together. I'm just going to scale it down, move it into place. And I want the first one to sit right here on this part of the armor on the shoulder here. And it's really important when you're doing this. Grab your Move brush, and then grab the shoulder pad and make sure that there's enough of the shoulder pads sticking out for this to sit on. And you can just kind of manipulate the shoulder plate like this limited. Because if it's too small, if it's like this, then this part is going to be sticking out and that's not what we want. So we're just sort of moving the points around to get this. So it actually looks like it's a part of the armor. Now I will switch back to this, to my bolt or my, because it's not a bolt, but you know what I mean? Now I want this on the other side symmetrically. So I'll go to Z plugin, go to mirror x axis and hit Okay. And now it's mirror to the other side. And it still looks a little bit big, so I'm going to scale it down just a tiny bit. Oops. Symmetry. Symmetry turned on. Go to unmasked mesh center right here, and then scale it down. Oh, I see. So it's scaling to award the center axis. That's why it's moving and when I scale it like that, but that's okay. So I'll just hit this to go back to the center of my mesh again. I just moved over. And actually it needs to be a little bigger. So just play around with the size. It's all, it's all dependent on how it looks for your character. So I want it to be about that big. I think that looks fine. Maybe a little bit. Just play around with that. Okay, That looks good enough. Now what I'll do is hold Control Shift, press D on my keyboard. And that one is going to be my backup. So now I'm going to hit Control Shift D. Actually, no, I'm sorry. Press W and start just moving these into place on the other parts of the armor. So now we're just going to repeat the same process. Just go to unmask center so that it's right in the middle. Make sure symmetry is turned on. And just change our camera angle and use our Move Gizmo to push this around and put it into place where we want it. So I don't want one right here. Isn't even. That looks good. And then we're going to hit Control Shift D plus W. Move it over and pull it out here. And just get that into place. And then one more time control shift D. And use our gizmo to move this over here and get it into place. And I want these all lined up relatively straight with one another. And I want the same distance between these two and these two. So this can even come over a little bit more. And just making sure that it's set into the object, into the shoulder pad. Same amount for each one. Go. Real simple. Works nicely like that. Now I like the way that looks. And then last we'll do this one more time control shift D. And move one over to the back. We'll move this onto the shoulder back there. Something like that so that it's holding all of those pieces together. So it looks like these are all jointed right here and they're kind of hinged together or move together so that if the character were to move their shoulders up, these pieces would have some freedom of motion to them. So we're just creating the illusion of that by making it look like these are all joined at this spot right here. And then these of course are for more, just for more flair. But I think, I think it works. So I'm just going to keep it like that. Alright, so these should all be at the bottom of myself to a list because I appended something in and it usually puts it at the bottom. So I'm going to find my first one here. Because I want to copy it because I'm going to use it again. I'm going to hold Control Shift D one more time so that I have a copy. Where to go. Oh, I think I duplicated the wrong sub tool. I duplicated the wrong sub tool. So right. So what I meant to do was this. So I'll grab my one that I started with here. Hit Control Shift D so that I have a duplicate of it. And you can see if I just switch between these, it's the same exact thing. So the top one is going to be my duplicate. So I'll select the one below that. And then I'm just going to merge it down with all these other ones. So under sub tool down here, you can hit merge down and hit Okay, Which town, okay. And if you want merged down to not ask you every time you can hit always, okay? But you have to be careful because then every time you hit merge down, it will warn you. It'll just say it'll, it'll just merge. But so I like to leave that off unless I'm absolutely sure. And okay. So now if I look at this, they're all all five of these are together as one sub tool. So I don't have to switch between them all. If I just want to make an adjustment, I can just go in and masculine off and move it around on the same sub tool. All right, now I have my original here. And I'm going to use this to decorate the hands and other parts. So let's go ahead and hit Control Shift D one more time. We'll move this down over. I might even scale it down a little bit. I'll put one right here with the arm. Something like that. That is for the arm. So it looks like it's holding those arm plates together there. And Control Shift D and hold shift and rotate it a 180 degrees so it's facing backward and move it to the back. So this is a pretty simple process, just takes a little time, but these decorative pieces really make a difference in your final render when you're making characters. It's just, it's just small detail, but it stands out a lot. And it actually, it directs your eyes in a different direction. And then if you didn't have them, because here when you're looking at this, these are lined up. These are lined up. So this creates lines that draw your eyes in different directions that if you did not have them at all. So I think it's important to have little elements like this on the character. And it looks like at one and that one, I'm going to go over my sub 2 a list, merge those two together and hit Okay. And actually I'm just going to merge all of these together. So now every one of these is one sub tool, just to keep it simple for myself. And I can always mask them off and go to if you want to split them apart again, you can go to sub tool and go to Split and hit Split Mass parts are split unmasked parts if you want to separate them as separate symptoms again. So it's easy to separate them again later. All right. So now let's put one of these on the gloves over here, so I'll grab my original. And Control Shift D. To duplicate it. Go to unmask center. And we'll just use our gizmo to pull this down here. And you'll see in a second why I deleted all those edge loops from the cylinder when we first created it. It's going to save us a lot of trouble for this that we're about to do. If you want to change the direction of your Gizmo hold Alt and then rotate. And it will just shift the gizmos direction. And that allows you greater freedom to be able to rotate your object if it's just at a funny angle there, something you hold alt and then rotate the Gizmo if you want to just push it in a certain direction. All right. So that's looking good. So I want to line this up with the two center knuckles here. And I got to the middle of the wrist. And I want to see as like a placeholder sort of where the middle is right about there. So, so let's grab our Z modelling brush. And the shortcut for that is B, z, m. And turn on poly frame. And the center lines up with this right here. So if I zoom in and go into solo mode, yeah, so I'm going to paint, I'm going to hold Alt with z model aircraft, IZ modeler brush. And I'm gonna paint these three vertices as a poly group. And make sure that I have q mesh poly group islands selected and just pull these out. Yeah, so that looks like it's centered. That's fine. Now I can hover over an edge, hold space, select, Insert single edge loop. And then I can click on that edge and put an edge loop in here wherever I want, slope right there. And then I'm going to hold Alt, tap on this here to make a poly group. Go to the other side, hold Alt Tab on that to make poly group. And then because I have q mesh already selected, I'll just pull it out. And then I'm gonna do the same thing one more time. Hold, tap on that. Old I'll tap on that and pull it out one more time. Just for a slightly different look. Because I like the yeah, I think that looks cool. And it looks like my color somehow my color got a little messed up probably when I did something that Z modular. So it's because it deleted my edge loop on the inside. So space inset, Pali loop at CSM all iterated go in this direction. I wonder how I did that. I accidentally deleted this poly loop. Strange. Well anyway, I need that probably loop there so that now I can hold Control Shift down this filled with gray and then show everything. Control Shift, click on this and fill it with red. There we go. Now it's fixed. And if I want, I can also fill this poly group with maybe like a dark gray so that it's a different gray from the gloves. Like that. Cool. I think that works. So now it's up to you to just sort of play around with this aesthetic and space these out all over your character. Or on certain parts only, you know, like for me it's just the shoulders, upper arm, while on the hands. And then there's elements of that on the legs already. I could try to put one more like I could even just take this one on the hands or Control Shift D to duplicate it and then try moving it down here. Just to play around with it. And it never hurts to just try just to see how it looks. And if it makes sense on the character. And you might as well just, just try it, just have fun with it. There's no, there's no wrong answer for how your character should look. It's entirely up to you. Yeah, something like that. Then I think that's cool looking. I think it works. So and other works we can keep it. And later on if we don't like it, it's its own sub tool so we can just go in and delete it. It's no big deal. Okay, So that is gonna do it for this video. And in the next one we're going to get to the hair and sort of making the hair look a little more punk. Look forward to that, and I'll see you in the next one.
35. Hairstyle - Cyberpunk Hair : Okay, So we've gotten this far making our Cyberpunk character, but are separate. Pump character needs some punk hair to make it a real official Cyberpunk character. So we're going to mess with the hair in this video. And I'm going to show you how to change your hair from this to something a little more cool. First thing that we need to do is make sure we don't have any subdivision levels, which I think I do. So if I go to Geometry, yeah, So I'm gonna go to my lowest subdivision level here with this slider or you can hit Shift D on your keyboard. And I'm just going to delete my higher. So I only have one subdivision level. I have it at the lowest geometry. So I'm just going to keep it as low as possible for right now. And I'll worry about subdividing later. So on my hair, when I hold Control and Shift, click on one strand here. And it's going to show just that strand. So then I hold Control and Shift, click and drag outside of it and it will show the opposite. Now I can just hold Control and Shift and click on one strand and it will hide anything that I click on because I inverted my selection. And if you can't already, if you don't already have automatic poly grouping like this, the reason that it's doing this is because every strand is its own poly group or it's a different color. If you don't have poly groups already like this, if all of its one poly group, like say your whole head is all one color like this. You can go over to your right side menu, go to poly groups and it auto groups. And as long as you drew the strands the way that we did in the earlier videos where they're all individual strands. This method should work. Auto Groups should separate them all into their own poly groups. So that's what we need for this. In order for this to work, we need to every strand to be its own poly group. Because now all I need to do is hold Control and Shift. Click on each one. Because once you invert your selection, Anything that you click on is going to disappear. It's going to invert again. And now I'm just going to make these invisible clicking on them. A lot of Cyberpunk characters have like a shaved head on one side or something cool like that. So that's, that's kinda the look that I'm going for with this. The question is, how far back do I want to go? Because we could just go half like that. Just do the back half of the head. I think for now I'm going to do it like this. So this entire half, I'm just going to hide. And because I'm on my lowest subdivision level, now I can go over to geometry, modified topology, and go to delete hidden. And it will delete all those hidden strands. And if your hair strands or if they're too long, you can trim that off and hide part Close Holes, whatever. Just make sure that you get it all set up so that everything is nice and closed up and that you have poly groups set up like this. So what we're gonna do now is hold Control and Shift and press D. And it's going to duplicate our current sub tool. So I just duplicated the hair like that. And I'm just going to move it slightly up, grab, Move brush. And now we're just going to push it into place, like so. And actually I'm going to turn off symmetry because symmetry is making it so that I can't drag this over my center line at all. And I kinda want to drag it to the center of the head so that it's overlapping. The first set of hair that I had. Because I want this hair to have a little more volume that's on top. So I'm trying to push this part up, pull this part out, something like that. I'm going to turn off poly frame while I do this, this will make it easier to see. So it's almost like storms hair for max-min, but it only looks that way because it's white. So we're just going to try to move these tips a little further in than the original hair tips and then pull them down into the head. So it looks like the hair on this side as being flipped up and over this way. If that makes sense, they would go sort of like that. And you'll have to play around with it a little bit to get it to look right, but generally that's the idea. So I'm just pulling the tips of the hair down inside of the head so that they're hidden. And that's generally fine. You don't have to get crazy with it. It doesn't have to connect to the scalp or anything. It just just hide the tips inside of the head like that. Make sure that this looks okay from other angles. Go something like that should work. So now we've got this big flip do. It's like Mohawk, shaved, flip over hair. But that's what punk is all about. If you haven't ever shaved your head. I mean, I can't recommend it, but I would say. I don't regret it. Don't regret doing it at least once. It's not. That's not advice. Don't don't shave your head just because they said that because of me. I don't that's not Don't listen to me. I'm just just talking right now. Trying to have something to say while I sculpt so that it's not just dead silent. Right, cool. So that's starting to look better. More correct? Now, if we go into our brush menu, we can find our Move Topological, which is right next to the Move, brush, Move Topological. It's super useful when you have poly groups because it only moves one polymorph at a time, you, no matter how big your brush radiuses. So if I just want to move a couple of strands out of the way so they are not touching the ear. I can totally do that with move topological. I'm just going to grab these strands and put them behind the ear a little bit like that. And this one will push in front of the ear. And I think we'll keep these years because I'm going to switch to this original set of hair that I had. And just keep moving this so that the ear doesn't have any hair intersecting with it. Doesn't have to be perfect just just so that it's obvious that there isn't a hair just like sticking out like that, like sticking out of the ER. It's kinda hard to get this there. There we go. So something like that. Cool. Now it actually looks like the ears sticking out. And we can make this even better if we just switch back to this hair up here and just pull some of these over. So they look like they're resting on top of the ear. Just a little bit like that. Cool. All right. I don't want to be doing this forever. So I'm just trying to get a really quick, really fast, something that looks decent without getting too carried away. All right, and now I can use Move Topological to just move a couple of strands individually, kind of space them out from one another so that it looks like hair is flowing a little bit like that. And same in the back of the hair, I can do the same thing. Let's grab the Move brush and then use Move Topological to just separate the hair is individually a little bit more. All right, Cool. Not going to get too crazy with this, but you get the idea, just trying to make it so that the hairs are not all just laying in the same direction, just using Move Topological to get a little bit of space between each one and distance between each one. So I'm going to turn symmetry off because symmetry keeps making it so that I can't move anything beyond the center line of this part of the head. And that keeps messing with the hair. Alright, and this part is taken up a little too far. So we're just gonna bring it back down just a little bit. And we'll look at our silhouette here too and just see how it looks. This section right here in the middle is really low compared to the rest, so I need to bring that up. That's like on a little more even. Alright, let's try to get even roundness all the way across the head here. Thought anything sticking out too far in one spot? Right? Now here's the thing kinda ready on the ends here, but we'll fix that in just a sec. Now I want to take the front of the hair. I'll use Move Topological, just pull a few of these strands forward and maybe down a little bit. And after I, after I get those ones forward, I'll just smooth them out a tiny bit because we can always reinforced them later. For now, I just want to be a little bit smaller, a little bit easier to manage. Something like that. And if you're not sure how to make the hair look, to look up references of Cyberpunk hairstyles. And another really good reference for really crazy hairstyles is Japanese hairstyles. And Japanese rock bands, Japanese metal bands, things like that are really cool inspiration for hairstyles. If you just want to come up with one of your own. And people come up some pretty amazing, pretty creative stuff. Especially in Japanese culture, they are a lot of showmanship goes into their performances, especially in the music industry. So a lot of the persona's or people that are in our musicians, they go really over the top for some of their costuming and hair and all that stuff. So it's really cool to get inspiration from that. Think this needs to be bigger here. So we want the banks to come up and swoop down almost like sort of like anime hair. Get that nice big scoop in the front. And we need more volume on the top. So we're just going to move each strand individually just to fill in that shape leg up. And then we can always move it down because we can use to inflate too. Bring back the size and the thickness of the hair slider. So I'm just switching back and forth between the main set of hair and a duplicated set of hair. And just trying to create a balance with both. And when we need to inflate them, we can go over to the right side menu, go down to deformation, and grab our inflate slider here near the bottom and just drag it up a little bit. Rather than using the in-flight brush because the brushes just going to create an uneven, It's not going to smooth, it's not going to inflate the entire strand all at once using the slider. And this menu is actually a, a more, um, or even way to inflate the hair strands. All right. So we're almost done at this point. I just want to add a little more curve to the hair in front of the eyes. To add to that smoothing effect. Where the bank is go up and come across the face here. And we'll just inflate one more time to make them a little more thick, more even with the rest of the hair. So let's work through this point. Or once we're to the point where you want to continue with the hair, once you get the style and the shape, the way that you want it. Now we need to put some color in this hair because it's just plain white. There's no actual colors. So for Cyberpunk characters, this is where it gets a little fun because you can actually just throw in whatever color you want. And since we have poly groups to set up for each individual strand, you can isolate every single strand and fail each individual strand with color. So to do that we just hold Control and Shift. Click on one strand. What go into solo mode. And then if you hold Control and Shift, click and drag, it will show it'll reverse whatever you're looking at so you can see the opposite. And now by holding Control and Shift and clicking on any strand, it will hide that strand. So we can use this by hiding every other strand. And we're just hiding each one here as we go. So by hiding each other strand, now I can just fill this selection with a color of whichever color of your choice. We can do like an electric color like purple or pink color like this. And then hold Control, Shift and click. And it will show the opposite or it will show everything. So now you can just fill half of the hair with one color. And then you can select your duplicated hair that's sitting on top. And go through the same process. Hold Control and Shift and just hide one or show one strand. And then click and drag to show the opposite. And then anything you click on with control and shift will be hidden. So just hide each other strand and fill your current selection with a color or click and drag to show the opposite and fill that selection with a different color. And in a really short time, you already have some really cool stylized looking here. So you just have to play around with the colors and just sort of play around with whatever you think looks good for the character. Because ultimately it's your character and you can do whatever you want with it. So just look at some reference, look up some images online, Pinterest or Google images and just find something that you think looks good. Or certain style or any particular piece of art that you think is inspiring to use as reference. All right, So I'll just stick with that for now. So now that we're to this point, the rest of the head yz plane, it's just completely blank. There's nothing on it. So we're going to add a little bit of detail by just adding a simple mask. And you can hold Control, select your mask in the top-left. And with the mask pen I'm just going to draw out had an Alpha turned on there. So with the mask pan, I'm just going to draw a few large selections like this. And then hold Control and Alt and de-select center of each to create this sort of effect. And if we hold control and tap over here, it will invert the selection and just find a darker color like the color of the touches here on this part of the body. Press U on your keyboard and it will grab that color. And then you can just fill that with that same color. And we can just elaborate on this. We can just do a few more like this. And you can get creative with it. You can just start creating patterns like this. And I think it just fills in the space a little more. And using colors that are similar to the hair are going to just complement the overall design of the character. And you can also add custom shapes if you want to use Alphas for masking. So if you hold control, it brings up your mask tool. If I want to have the mask pen selected, if I change my stroke from free hand to drag to drag rectangle, I'm still holding Control. I can select an alpha from the menu here, like the star. Now when I hold Control and click and drag my mask, it's going to drag out whatever alpha I have. Problem with this, of course, is that alphas operate on a flat surface and this phase is curved, so it's not going to draw a smooth, perfect star. So the way around that is take the part of the face that you want to draw the alpha on the pointed directly at your camera or directly at you. And then outside of your object hold Control and drag. And you can see your star alpha right here. So if you're holding control and dragging this box out, hold the space bar. And now you can just drag that alpha around wherever you want. And when you let go, it stamps a perfect star on the object. Just make sure that you're doing it with the camera pointing right at you. Because if you don't, if you, you know, if you draw it out like this and you stamp it over here, say, you can see that it stretches based on the camera angle. So just be aware of that. Yeah, you can get creative with it. You can even grab your mask perfect circle and draw out some circles and then cut into them, create something cool like a crescent moon. Or you can create all kinds of patterns using alphas. Alphas are a really fast way to just create custom shapes and sort of unique patterns really quickly. So that's just another thing to play around with. Okay. This character is coming along and we might tweak with the hair just a little bit more, but it's up to you and the style that you decide on ultimately. So that's gonna do it for this video. And in the next video, we're going to get around to doing some more of the armor and getting closer to detailing parts of our character. I'll see you in the next one.
36. Armor - Trim And Details - Part 1: All right, In this last video, we went over doing the hair and completing that look for the character. And in this video we are going to go over finishing some of the detail for parts of our armor and mostly using the Z model error. And I'll show you a few tricks on how to do that. So let's go to our brush menu and get z modeler. And we'll start with the armbands. And if we zoom in and turn on poly frame, we can see that we have a couple of poly groups. We have the interior and the exterior poly group. So if you hold Control and Shift and click on the exterior. And it will just show that poly group. And if that's not working for you, you can always choose a different brush because sometimes the modeller interferes with that. So I just grab my Move brush, hold Control and Shift. Click on the red Poly Group. And all the other poly groups will be hidden. So from here we can take our Z modeler brush and hold Alt and paint on any of these polygon surfaces. And it will change the color of it and make it its own poly group. So for this, I'm going to select an area of four by four and hover over a face, hold space, select Q mesh poly group Island. And just like we've done before, and we're just going to pull this up a little bit. And now in the surrounding polygons from that group that we just pulled up, let's hold Alt Hamel paint a row around on each side, but not on the corner spaces adjacent. And if we use Q mesh now and pull this up, it will automatically snap to the top most edge and create this nice Bevel effect. So this is sort of a cool trick with z modular. If you want to get a quick Bevel effect like that. And if we just want to increase the amount of distance between the gauntlet and this piece that we just created. We can hold alt here, paint these top polygons, and then hold space over polygon and select, move Poly Group Island. And if we pull it up, and we can just move that section higher or lower, rather than having to go through the trouble of moving each point individually. So this is just a quick way to create a little more dimension on the armor and give each piece a little more depth and dimensionality. And then you can go in and clean up these points manually. Like if they were sticking out too far in one direction, like this, just using my Move brush to sort of fix any of these stray pieces that are sticking out like that. So just simple tricks like this are really great for just adding another layer of depth with as few polygons as possible. And we can always subdivide up later and worry about how many, how dense are meshes. But the lower polygon count we have, the easier it is to deal with this kinda stuff, especially when you're using the similar like this. Then the last thing. So we're going to be doing this on all of the different parts of our armor as we go throughout the entire model. But the other thing that we're going to do to this gauntlet before we move on to the next piece is we need to create some trim around the edges. And a quick way to do that. Since we already created some poly groups here, we're going to have to hold Control, Shift and click on the inside poly group. And then hold Control and Shift, click and drag to show the opposite so that everything else is showing. So now this is just the exterior shell of the glove. And if I press Control W on my keyboard, that will make all of this just the same color or the same polychrome, which I think I'll do because I don't see the need to go in and change anymore if that was the modeller and if I do, I can always just paint new poly groups. So with just this poly group showing in the interior is hidden. You can go up to the stroke menu and go down to curb functions. And under curve function is there's this button, this is frame mesh. Automatically border poly groups and creased edges are all turned on. But if we turn poly groups off and hit frame mesh, this nice curve is drawn around the outside of our entire object. And this only works if part of your mesh is hidden. So it's important to hide the inside poly group first and then hit frame mesh. And this curve will appear around the edge of whatever poly group is showing. The next step is we go into our brush menu and we can either grab the extruded profile brushes or if you're in a different version of ZBrush and you don't have extrude profile. You can always use a curved tube. Curve tube is exactly the same as long as it's some sort of insert or IMM, brush that works with a curve. You can change your brush size to something really small, like 10 or 15, and then just click on that curve and I will insert here, inserted mesh along the curve. So that's. A fast way to create trim on the armor, just by inserting an insert mesh brush along a curve. After you frame the outside poly group. And then when you're ready to finalize, if you say you draw this on the curve and it's too small and you want it to be bigger. Hover your cursor away, hold S on your keyboard, change your brush size to something bigger, and then tap on the curve and it will update the size of that curve that you drew. And if you want it smaller, same thing, hover your cursor away. Don't do it when it's blue or won't change it. Just hover your cursor away and make your cursor smaller. And then go back and tap on the curve and it will change the size. So just get that to the size that you want it. And try to remember the brush size that you picked because we're going to use the same setting throughout the armor on the other pieces as well. So for me, it looks like some of this is not lining up at the edges. There's I needed a little bit bigger. So maybe 15 or 16. And that looks that looks decent. So I think I'll just go with something around 15 from a precise. And actually what I am going to do is go to Extrude profile and go all the way to the left and grab the half cylinder. Because I like the way that this looks when you use this as a curve. Insert mesh brush, especially for armor just because it gives a nice crease around the edges like that. It almost looks like leather. So I kind of like the look of that brush. And I'll grab my Move brush and just move it so that it's covering any of those corners that it didn't quite bend over correctly. And my curve is still here. So I forgot I need to go back to my original brush that I had for true profile. And when I'm done drawing my curve, I can just tap anywhere on the mesh and the curve will disappear like that. And at this point, if you want to just unmask everything and keep that as part of your mesh you can, or while it's mask, you can also go down to sub tool, go down to the split menu and hit Split mast or hit split unmasked points. And it will make this its own its own sub tool so that you can manage it individually without having to mess with it will, It won't be a part of this current SAP tool. But for now, I think I'll just keep it as the same sub tool because that's, it's not a problem. I can just select the Pauline group and delete it again later if we have to care. So that's good for the gauntlet there. And then let's go on to the next piece. We don't want a frame mesh on every single piece of armor because it's going to, you know, it's, it's not necessary. It's just going to create more detail. And in some places it's even, it's not the best idea to have it on every single piece of your armor because it might start to look a little repetitive or overlapping parts that it shouldn't. So we're just going to sort of pick and choose pieces rather than doing every piece. This. So with just one poly group showing stroke, curved functions, polygraphs off and hit frame mesh. And then I already have my Extrude profiles selected. Brush size down to 15, like it was for the others. And just tap on that curve one time and it will frame the entire border. And when I'm done, I can just tap somewhere on the mesh. And it will clear the curve and the curve is gone. And we have this nice looking border all the way around. And now I just need to use my Move brush to kind of adjust this because some of the pieces of the other parts next to it are sticking over and overlapping with it. So I'm just using my Move brush to get all these into place. All right. I think we're going to do the same thing on these pieces as well. So it's just the same process. Select the interior poly group, Control Shift and drag to show the opposite stroke, curve function's frame mesh. And then just select your IMM brush and set your brush size to the same size like that, and then just tap on your mesh somewhere when you're done. Unmask everything. And I will just use the Move brush to get this into place. Again. They're, so this is starting, this is finally starting to look a little more complete. And the armor actually starts to look like it's all connected. Because now the borders are all framed. You can see where the edges are, how everything fits together piece for piece by piece. There we go. Let's sort of cleaning up my surrounding parts there. So occasionally you'll run into this where the curve is framed around the outside of the object. You user IMM brush. And the curve just can't bend around sharp corners like this. So you get this overlap that's kind of leftover. So to deal with that, you can just hold Control and Shift and click on the actual edge or the insert that you got from the IMM brush and then just mask it. I'll control and shift and click again to show everything. And then user move brush. And it looks like here it actually doubled my insert from my brush for some reason I can't really figure out why it keeps doing that. That's been an issue. I think just with this new update, something like that. So I'm going to hide that part and delete it. So if I hold Control and Shift, click on my trim part here that we drew end with the IMM brush, mask it all off. Men hold Control and Shift and click to show everything else. I can just grab this corner, Bring it down inside of the trim right here. So you may have to do a little bit of manual adjusting, but that's normal. That's just part of the process. You just kinda have to go through and see if there are if everything is lining up correctly. And kind of do a little bit of cleanup. And you can also flip your mask and do the opposite. Like in this situation, rather than pulling this corner here, I can just make my brush size is really large and just pull the trim up instead of the armor. And again, here at the very bottom. And I'm gonna do that in this case because I want this bottom corner to stay far down like this. I want it to stay nice and sharp. So I just have to be careful not to make this look too distorted when I'm using my Move brush. Because this polygon density is higher than this part over here. That looks fine. So that'll different app. And we'll clear our mask and we'll just sort of TOC these parts in and make sure that they are overlapping correctly with one another. Now we need to do a little more detail on some of the other parts of the armor. And we're going to use Z modeler to do this. So for this we're going to turn on our poly frame. And if we zoom in really close, make sure you have local symmetry turned on so that it hovers around whichever object you, you were working on last. So the geometry for this pieces, okay, but we could make it a little bit better. And I'm going to hover over a edge hold space. And as long as I have insert single edge loop selected, I can either insert edge loops by clicking on an edge, or I can take edge loops out if I hold Alt, tap on an edge and it just deletes that edge. So I can delete both of these. Actually, we just need to delete one of these. So I have these two edge loops here going all the way around. I can just hold Alt, tap on that and it will delete it. Now I'm going to take my z modular and hold Alt. So I can just paint this poly group onto here. And then hover over space here and select Q mesh poly group Island. And we'll pull it up just about that far, maybe a little farther. Pull it up to about there. That looks good. And then on this space here next to the polygraph that I just pulled up, I'm going to pay that Q mash it up. And again, this is that cool little trick I showed you before, where Q mesh creates this beveled edge by snapping to the nearest edge above it. So we're going to do that and then we'll grab our move brush and just move these two points down to create more of an even curve for this part like that. And I'm going to do the same thing on the other side. So I'll grab MSI, modeler brush, hold Alt Tab on this polygon here and then pull with Q mesh poly group Island. I'll just pull it up and it will snap to the edge above. And I can just use the model or I guess to move these points individually. I just I like to avoid using Z model there because if I accidentally miss and I tap a face or edge instead of a point than it does that action instead. And then you have to press Control Z. So rather than doing that, I like to just grab the Move brush because the Move brush we'll only to move points. Alright. So like that. So now we're starting to create more of a silhouette for all these shapes. And we're starting to just create more ECS, just more accents based on the shapes that we already have. So we're working with these diagonal lines and we're following that same curve with additional shapes. And something else that I'm seeing that I'm going to fix here really fast. So if we, it seems like this part is competing and sort of covering up some of the shape here. So we're just gonna get rid of this point. It's a fast way to get rid of this part is just switch to your mask lasso tool and just mask off the part that you don't want to make sure that you don't mask any other part of the body there. And just flip your mask by holding Control and clicking on your canvas and then hide part, delete hidden and Close Holes. And hide part is under visibility on the right over here. Visit visibility menu hide part. And then you would go to Geometry, modify Topology, and select, delete it, and then Close Holes is written next to that. So we're getting rid of this because in the silhouette of the character, It's actually competing for space with the rest of the armor. And when you're looking at silhouette, it's really important to leave negative space between the different parts. So if there are overlapping parts, are parts that are essentially just competing for space, it's good idea to just separate them out from each other. And then we're just going to use our age polish to clean up the edges so that it looks more like it's part of this suit here, like that. And to make it even to just cover this up and make it into something that looks more like armor. I'm just going to mask off this section here. Just mask this. And it doesn't have to be a large selection, just something small like that. And extract. And then we'll do our same armor making technique that we were using before. Just make sure that you have your trim rectangle tool selected to hold Control and Shift. Select the select rectangle in the center here. And that's going to allow you to flip your poly groups and delete hidden. And then we'll mash at point 1 again. Go back to geometry edge loop and hit Group loops to smooth everything out. And then 0 mesh one more time. And then we can go down to panel loops and turn the Polish town to 0. Mr. all set. And we can just take something like H polish and just bevel out these edges. And we can go a step further and even just take our Z modular. Actually the geometry, it's really uneven in this, so I'm just going to match this one more time. And 0 mesh long more time again. And we'll paint this poly group here, Q mesh and just pull it out. And if we go into solo mode here, now I can hold space, select poly group, Pali loop, and it will select the entire surrounding ring around that. And now I can change back to Q mesh again, polygraph island. And it's that same trick that we were using before. As we pull it up, it'll snap to the edge closest above it and create this nice bevel. So now it actually looks like a nice beveled armor piece there. And I think it's just works better because it's before that shape was just sort of sticking out and competing for all of the sort of covering those other parts up. So I think this works better. So now moving on with its go to the next piece here. So if this piece, this is a good example because the geometry is really messed up here. So everything is kind of forced over to this corner and the edge loops don't really go in the direction that I want them to. So to fix that, you can either turn the modeller all the way down to 0.1 to lowest sudden. Setting and hit 0 mesh. Or you can do the same armor making process that we did before, because as soon as we hit Z rematch, it's going to kill our inside poly groups. So now this is all one Paul, the group. And we don't always want that. So we can just click on the exterior poly group and then go to hide part, delete hidden. And then go hit Group loops under edge loop and 0 mesh one more time. And now we get this much better edge flow. And then when we're ready to create more of that, create that interior geometry and close everything up. We can go back to Edge Loop, a 100 geometry, go to panel loops and turn the polish all the way down to 0 and hit panel loops. And now we have that insight geometry back. And now this topology is much better, much cleaner. From here, I'm just going to grab the model error and zoom in and we don't need all these edge loops. So if I hold Alt or if I make sure that I have my edge action set to insert single edge loops. So now I can just hold Alt and delete each other edge loop in here. And I will really simplify the topology of this. Could even do that. And I'll keep that one because we wanted to do this. So I'm going to go paint on another poly group just like we did the last piece. Paint this poly group. And then we'll queue mesh, pull it out. And then we'll use this part here and this face here and just q match that up to create that snap to the next. Oh, it looks like it did on both sides. Perfect. All right. So that looks good like that. We're just going to use this same technique all throughout the different parts of the armor. And as you can see here, I did this with this part of the suit as well. Where before it just looked, the geometry just looked like this. So what I had to do was insert a single edge loop here to split this down the center. And in order to connect this piece, all I did was paint all of these polygons here to create a new polygon. And only the faces that are going to be touching the same edges has the edge above and then just q mesh up. And it creates this nice Bevel effect like that. So this creates a more gradual transition, rather than it just being a straight 90 degree cut inward toward the leg. And I'll do the same thing on top. Just these polygons that are touching. And I'll leave that last one alone. So then we'll just Q mesh that out. And it snaps to that edge right there. So I like this, this looks better than it did before because now it actually looks like it's a part of the leg or a part of the armor. And you can even do the same for this section here if you want to pull this up. So it looks like a more gradual transition and just experiment with it. It's, it's It's box modelling. It's just sort of figuring things out and seeing what looks good and what works. So I think that works this way. It looks like there's almost like a canister or like a weapon piece or something sort of wrapping around the leg. And I think that looks cool. So enzymes, it's all very low Pali, it's all very easy to control. The thing here is when you're using Q mesh, sometimes it does this, it gets added to this ugly topology on the inside. But I'm not going to worry about that too much right now because really we could just go in and delete all the interior geometry for all of this and then do something like panel loops and close it all up again. But I'm not gonna go through all that because that part is never going to be seen and I don't think it's necessary to clean it up at the moment. Right now I'm just using my Move brush to line all of these pieces up because everything is kinda pushed together now. Cool. So that's looking better. And we have our trim around the gauntlets around the upper arm. Let's see if we want to add this armor trim to these shoulder pads and see what it looks like just to see. So with your piece selected, hold Control and Shift, click on the outside polygon so that it's the only poly group Shelley, go up to stroke, curve function, frame mesh. And select your IMM brush like extrude profile to or curve tubes or any of those others, such a brush size and tap on the curve. And when you're done, just tap on the mesh somewhere. And you know, I think that actually looks really good. I kind of like that. So I'm going to keep it. I think that looks good. I might just end up doing this on more pieces than I originally thought because it actually looks pretty good like that and does not look bad. I might even do that on all of these pieces. Let's try it. So if we for some reason, mine, for some reason it's not letting me tap on the poll a group about doing the inside poly group. I don't know why this isn't working. There we go. I guess the issue with that is if you're not hovering directly over a polygon and you hold Control and Shift and tap. It doesn't understand that you're trying to touch just that poly group. So I think that was the issue it was having anyway, stroke for a mesh. I'm just gonna go through these parts very quickly, just doing the exact same thing over and over again with like what we just did. Just to see how it looks. Okay. I think this looks cool. I think we're gonna do this for all three of these. It's looks a lot better than I thought it would. For some reason I thought that this was not going to look has good as it does. But that's just that's just what happens sometimes. Sometimes you try something and you're pleasantly surprised. And it's not like anything you've done before and it just works sometimes. So that's great. I'll take it. And I'm just using my Move brush to get all these into place. So as you can see, just adding that little bit of detail, the trim around the armor like that just makes this character start to pop that much more. And part of it is that color difference, the light to dark. And I'm just leaving all of the trim on this armor as white. And I forgot to mention when you create the actual trim. So once you go to Stroke, hit frame mesh, when you tap on the curve, whatever color you have selected, that trim will become that color automatically. It will fill it with that color. So I just leave it at white because I think it looks better being a lighter color. But that's also a shortcut if you don't want to have to go and manually fill them all with a different color. Just when you draw it or when you tap on the curve, just have your color selected before you tap on that curve. All right, Let's just going around and doing some last little fixes so that everything is not that everything is not just overlapping into each other. Here we go. All right. Well, that's looking kind of cool. I like that.
37. Armor - Trim And Details - Part 2: For this piece on the chest, I didn't set this up correctly because my poly group by grouping is the same all throughout this and it's a closed mesh. So I can hit Auto Groups and it doesn't do anything. I can. But what I can do if I messed up my poly groups is I can go down to the Poly Groups menu. And I believe if we do groupBy normals, group by normals, the normals are the direction that the polygons are facing. So see if it did it. Now it did not. So we would actually have to go in and manually either paint the back of this and then delete that poly group or just do something else. Because right now it will not allow me to go to stroke frame mesh because this is entirely closed and there is no open edge for it to frame itself. So that's my frame mesh will not work on this. So I'll have to figure out a way to fix how I messed how I created one poly group for this entire object, I'll have to be able to create a poly group on the back of this object. Somehow. I'm sure we can figure it out. Even in Z modular. There's, Let's try this. There's Paul a group. And we can do front facing facing front Island. And let's see if that works. Ha ha, that worked. Great. Okay, Well that was a happy accident and a great experiment that worked. So if you ever have an object, It's a poly group that's the same on the front as it is on the back. Snap to front view. Grab your Z modular brush. Zoom in on a polygon face hold space. Select poly group for your action and for the target. Select facing front island. So essentially it's just telling ZBrush that whatever's pointing at the camera, when you tap on a polygon face, it is going to change everything facing the camera into one poly group. And then everything that is not facing the camera will remain the way that it was. Perfect. So thankfully, now we can just hold Control and Shift, tap on this front poly group and everything else will be hidden. And then we can go up to the stroke and do our frame mesh and our insert brush trick. And this should work just like all the other parts of locate that yes, it worked. I'm so happy. I'm so happy that that worked. I look at that and it just makes it look so much better with, with a framing. That's so cool. I'm so glad I was able to figure that out. Sorry that that took a minute. But we made it work. Now we just need to use our Move brush to get all these pieces in place around it. And I just realized that this shoulder is sitting inside of the rest of this here, so I need to fix that. And I wonder if I can just mask this off and rotate it forward. I guess I could do that. I just have to rather than rotating it forward, I could just move this whole part up so that it's not sticking into the armor there. What I need to do, That's right. I had this here because I wanted it in case I needed again, I'm going to hide this. And then we'll switch to this. So I need to mask this. Flipped my masks that all the other pieces are all masked because I made them all one sub tool. And now I can just move this piece freely. And we'll reset our gizmo here and use our gizmo. Push this into place. I don't wanna get too crazy with this. As long as it's in place. There we go. And remove brush and just this part around a little bit. Cool. Cool. That is looking much better. Much better. Now I could do this frame mash trick on these parts, but I don't think it's necessary. It may be, I'm not sure. Let's see. Surely opposite here. So our poly groups are, I think we'll put a frame around it, this poly group. So stroke, frame mesh. These are IMM brush radius of 15. Yeah, For some reason it's doubling my insert when I taught the curve, I don't know why it's doing that. There's a blue and a, there's a yellow and a green poly group here, which means if I hold Control and Shift and click on it, yeah, that means that there are two for each loop. I don't know why it's doing that. Let's us strange. And it's a strange glitch. I'm not sure why ZBrush is doing that. But I think that looks pretty cool. Yeah, we'll keep it. I think that looks good. So we'll keep that. Just use the Move brush to make this a little more even all the way around. Get into this meticulous detail here a little bit. Make sure that it all looks consistent. Cool. Now we're just going to go to the legs and do exactly the same thing with the Z model air. At the beveling effect. Paint this poly group cube mash ups, Q mesh poly group island. And they built move this point up here like that. Line all these points up a little better, and then just snap that. And then I'll do the same for the polygons below it. Snap that up to there. And we'll see if this works here. If I do this, yeah, actually it does work. So we'll just have to see how this looks. I may have to insert an edge loop here so that we can drag this side up to here and then paint this drag this side up and it will snap to there. Yeah. Yeah, So we'll have to insert an edge loop there as well there. And just to make it even I'll do one right there to paint those. Snap that up to there. Same thing to the other side. That side and that side, and then the bottom. Like that. So this just creates a gradual fall off rather than them just being at a 90 degree cut inward like that. I think it just looks nicer. And I'll do the same thing on this side. And on this side. But I don't think I'll do it for these I will that actually I like that. Never mind. I changed my mind. So we'll just paint these and pull them up and they'll snap. Cool. So very quickly able to just add a much more complex shape and make it look much more interesting. Now these knees are kind of because I use the slice brush, these are kind of messed up. So what I'll do is hold Control and Shift, tap on this purple poly group and add Control Shift click and drag to show the opposite and that I'll click on this with Control and Shift. Okay, So I'm missing the geometry right there. That's why. So I need to go back. So I need to hide this group and hide that group and then show the opposite. That's all I want, just that. And now if I hit petal loops, it's all closed up at perfect. There we go. Now I'm just gonna do the same thing. Maybe I'll scale this up a tiny bit. Move it right over this kneecap. And that pushed in a little more to there. So it's sitting right on top of our mesh. At now we can take Z modular, paint this centered Poly Group, pull it up, and then just paint the surrounding edge loop. Or we could, if we don't want to manually paint it, could select poly group, Polly loop edges, poly group for loop around it like that. And that cube mesh. And it should snap. Makes up for those corners. So we'll paint these corners a different color so that we're just using Q mesh on. And see modellers be in a pain right now. Alright, so we'll paint this, paint this, and paint paste. And there we go, That's what we want. Corners are left alone. Just the knees have that nice Bevel effect. And I can even go a step further and just pull this out one more time to just add a nice final squared look to them. Now the reason I went through all that trouble of creating this piece is because it's really easy to just take something like this, duplicate it, and use it for other parts for detailing your armor. So what we're going to do now that we have this knee made into its own unique piece. I'm going to hold Control Shift and hit D, duplicate it. Symmetry turned on. I can just move it up. And we're going to use this to create a ribbing effect on the armor in the front. And it's going to look like it's connecting these pieces. So I'm just going to scale this down a little bit. And the act of number of points is pretty low on this. So we're just going to end up duplicating this a couple of times. But even just creating something really simple like this is really easy. So say if you, if you want to create something like this from scratch, I'll just show you how rather than taking a piece that I created myself, I'll show you how to make something from scratch so we're going to delete this. So the easiest way to do this if we want to create a piece is to go to sub tool and go to append. And append in any shaped like a sphere or a cube or cylinder or anything like that. They'll take a sphere. Select the sphere, and we'll go down on the right side to initialize. Under initialize, set your X, Y, and Z resolution to two and hit q cube. And now you can't see it because it's hidden. But if you go into solo mode, this little polychaete here. So if we turn on mindframe, we can actually see it's just a cube that's two by two by two, because that's what we said here. And when we hit Q, Qb a made it into a cube, okay, the same thing by hitting Q sphere and it makes it into the closest thing to a sphere or grid, which is a poly plane with both sides. But we don't want both sides, we just want one. So Q Qb is what we want. Now, facing the front. So I want to face side view and I'm going to snap to side view. And if I hold Control Alt and Shift altogether and click and drag, I get this red box. Whatever is inside of this red box is going to be hidden. So because I'm on side view, I'm just going to drag up behind that front-facing set of polygons and hide all of that. So now if I go to front view, only thing showing are these polygons right here. So I just have four polygons and nothing else. No backward geometry. And then I'm gonna go and delete hidden. So this is all that I'm left with just four faces. And what we can do is we can mask just these outside polygons here. Oh, let's see, turn on symmetry. So symmetry turned on. We're going to mask just these outside polygons. And then I'm going to press WMA keyboard and scale up in this direction. And it's going to create this diamond shape. Now I can grab the modeller, unmask everything and I can insert an edge loop here. Insert an edge loop here, and again on the bottom. And now we can actually just model something really quickly. So if I wanted, I could paint these polygons here. Q mesh, drag them up, paint these Q mesh and drag them up. That's right. So it's not going to do, it's snapping because there aren't enough polygons. Let's before I do that, I'm going to insert one more edge loop here. So we'll paint these polygons and that Q mesh poly group island. Pull that up, paint these, and pull that up. There we go. It's okay, It's this nice bevel. Now, if I want to create some thickness, I can hover over a face, hold space and select Extrude. All polygons. And when I extrude, it will pull out and create thickness for the entire object. And because I did that bevel trick first, this is creating some problems. So I'm going to go back. And then we'll extrude this first to create some thickness. And then we'll go back and do our paint this poly group, use Q mesh poly group island, and then paint this q match polytope island and it will pull up like that. And then we can even do the same here if we want. That's going to bend polygons there. So I could, as you'll have to play with this a little bit. There we go. That's a little cooler. So I'm just getting creative with my shapes here. I'm just trying to, trying to mess around with a little bit of just to create some dimensionality and just kind of have fun with this. Because we can create these kind of shapes really quickly using Z modular. So, you know anybody, if we want the sides to come out here, we can do this and put an edge loop and paint. Just paint these polygons here and here and then pull that out. So very quickly you can just really go, go crazy with these shapes and just create something really unique very quickly. And then I can just use my, my Move Gizmo, to pull this into place here. And I knew I wanted to put something here in the center because I had this open space here on the chest, so I knew I wanted something here. So in fact, this might look better if it were smaller or taller. Something like this. Yeah. But you get the idea. And if I turn symmetry off and go to unmask center, I can hold Shift and use my gizmo to shift it a 180 degrees sit down so that it fits a little better there, something like that. So this is the basic idea, just creating the shapes of your own using Z modular. So you get unique shapes. Something like that. We can add, I can add a border to this and touch it up a little bit so it doesn't look so flat, but we'll get around to that later. For now. I just wanted to show you that that's a very easy way to just create a shape of your own like that for the ribs. All right. So because now we have this shape for the chest part there. I'm just going to use that for the chest. I will also use this for the ribs, but I'll hit Control Shift D to duplicate it. And we'll move it over to one side. Go to Z plugin, subtotal master, select Mirror on the x axis, hit Okay, so now it's on both sides. And now I want to zoom in and I want to delete some of these polygons because I don't need all of them because it's just a lot. Please. The same trick we did before here where we hold Control and Shift and Alt and use this red box to hide that part. And then same thing on this side. Control Shift and Alt Click drag, hide that part and that part is hidden. So now we can go to Geometry, modify Topology, Delete Hidden, and then Close Holes. And it will just fill that in. For now we're just stuffed with this diamond shape. And I did not have symmetry turned on, so that didn't work on both sides. So let's go back. Let's see. Now I have, yeah, now we have symmetry turned on. So Control Shift and Alt, click and drag to hide that. And then I part, delete hidden, Close Holes. There we go. And now I'll scale it up a little bit and maybe even grab the Move brush or not, the Move brush will mask that point. Flip our mask, scaled down. And then same thing with this. I just mask that point, flip the mask and it's scaled down. So it's a little smaller. And then if I really want to change the shape of this dramatically, I can mask about three-quarters of it like this, as long as it's an even mask and can scale it all down or scale it out. Either way. In fact, I think I'll scale it out this direction so that it's longer on one ended shorter on the other. And then I'll flip my mask. Flip my mask and scale this down even more on that side so that it's a very specific shape. So it's very short on one end and longer on the other. I don't think this will look nice. Then I can even scale it in a little bit so it's thinner, like this. Cool, that looks nice. Alright. And the very last we need to go to the gear here on our gizmos. If we press W, There's this little gear icon and then go to bend arc. Okay, this little warning there. So we can't do bend arc with symmetry turned on, which means we can just turn symmetry off. And I'll mask this half of my model. And then I will hide part and delete hidden because we're going to have to mirror it afterward anyway. For I do this, I want to move this into place on top of the ribs as close as I can get it into place, how it's going to be, it will scale it down. And actually I'm going to flip it around this way. So I think this looks better like this. Now I changed my mind. We'll do it like this. Sorry guys. Keep changing my mind. Scatter, keep messing around with these shapes. And when I see you one way and it works and it's gotta go with what works. Okay? So I'll change my camera angles so I can see it better. Click on this gear icon on my gizmo bend arc. And then we will bend it this way. And it'll bend up and down also. So depending on the angle of your camera, just sort of mess around with that to get it to bend and the shape you want. And then press W, move it out, see if it fits. So it looks like we bent it a little too much. So we'll go back. Go back to bend arc. So it doesn't take much, just a little tiny bit of a bend. And then press W and rotate it into place. And then we can even scale it up on that axis. So that's a little thicker like that. And maybe even scale it up just a little more. Once we get this into place, it'll be a lot easier for the other parts because we're just going to mirror it and then we're going to duplicate it and scale it down to use for the rest of the pieces going down. So we can get this right. The rest is easy. I'll just use my move brushed him of this and because that's that's not right. And I think it's okay if it's overlapping with that a little bit right there, that should be fine. And in fact, I'll just use my brush to that. Sort of push this in on that side too. Because I want this sitting inside of these objects like it's a part of them. There we go. Okay, so that looks fine. So now we can go up to Z plugin, subtotal master, mirror, mirror to set. Now we can hit Control Shift D plus W on my keyboard and reset our gizmo so that it's up and down. Hold Alt and click on this little arrow. And then you just push this down. Oops. If we unmasked up and turn symmetry on this down and move it forward a little bit, angled it into place, scale it down just a little bit. And then we'll do the exact same thing again, Control Shift D, move down, scale it down, and move those parts inward. Just a little bit. And we'll do it one more time. So we have four inset, scale it down just a tiny bit and move it just a tiny bit. And I want to rotate these so that the tip is intersecting and overlapping with this center part here. Like that. Just barely so that it looks like it's in front. Like that. Cool. And for these ones, I may just have to grab my Move brush and just just pull them out just to save time. Like that. Cool. So that is a quick way to put some ribbing on the chest part here. And it looks pretty cool. It looks and I think it's a nice added effect. It just adds a little more of a pattern here. And draws your eyes sort of downward here and just makes it a little more interesting. And now we're just going to do a very similar thing here. Just going to unmask this intro Shift D to duplicate this, move, this over. With symmetry turned on with this over this over here. And we're just going to do the same thing on the side of the ribs. And we're going to scale these way out. So they're sticking out more like that. There we go. Yeah. I think that'll be cool. I'll just snapped to the side and move this up a little bit and pull it out. Then control shift D, move it down. And I'll scale it down a little bit. And control shift D and scale it down there. And if we want to add to this effect even more, we can select our vest and select the polygons that are following the direction of this. In fact, it looks like the direction this should be angled more like this. So what I'm doing is just rotating this, these three pieces so that they follow the direction of the edge loops on the fast. And I'm lining up this tip with the edge of an edge loop here. In fact, it should be in the center of an edge loop like that, like that. So this tip of this is sitting between this line and this line here, right down the center. And you'll see why in just a sec. Why I'm doing this. One that up, line that up like this. There we go. And actually we could do is make this bottom one extra large. Grab our move brush and just pull it down like this and get really extreme with it. Just because it might look cool. Now we're just playing with the shape and just seeing what looks nice. It looks good. Similar to the part that's right here. I'm just getting just creating something that's that same kind of shape. Smooth it down a little bit, and just using my Move brush. And then I can always just 0 mesh and at point 1. If I want my topology to be different. Yeah, yeah, Well, why not? Why not? Yeah. Just experiment with that. And now the only reason that I'm hesitant about this is because of the negative space between here and this trim right here. But I think it will work. Looking at it. I don't think it looks bad. It's sort of completes the transition from this piece up to here. From wider to narrow urge the narrowest over here. Kind of pleats that that flow. Yeah. I think it looks fine. So I'm going to keep it. I may have to put something here on the edge to sort of complete this line right here though, we'll see. And notice how the tip of this to this and tip of this for all kind of in correlation with one another, are all lined up. They're all gradually come into that same taper here, here and here. And it creates sort of a shape. And then this outside also creates a shape in the center. The way this, all three of these pieces, That's what I'm looking at. Trying to create some shapes that flow together. Yeah. Okay. I think it works. I'm going to keep it. Yeah, we'll keep it. So what I was going to do before, Let's grab this vest. If we turn on poly frame here. I was going to grab the vest. And this line right here. And we can use z modeller to just drop that and draw that because these are lined up at the tips of this ribbing here. Just pulled this out. And then same thing in the front. Pull it up just a little bit. And then we can select our Move brush and just of this into place, just p. Let's be a little bit lazy with it. It's, it should be fine. Since then and it's actually connected and this will just pick it look like it's one piece. All right, there we go. And then of course, if we want to finish up, this can just pull this up and it will snap to that. Same right here. Pull it up in the queue mesh like we did before. And then it creates that gradual curve. And then just do a little bit of manual clean up. And now I'm just taking my Move brush manually moving these points so that they are taper in toward this rib part here, so that it looks like it's connected. A little bit more. There we go. So I'm just creating a rib effect from the front side and around the back. It's a really simple shape. And it just adds more depth to the whole thing. I think. And like that, we have some much more complex looking armor. And, you know, the sky's the limit. We can just get his complicated because as we want, I could do this all day. All right, We saved. We're good. Cool. So I like this little added effect of thing. It just gives the armor a little more depth and it doesn't take much, looks like this got messed up on one side. So we'll have to delete hidden and Z plugin mirror and hit Okay. There we go. And we got our symmetry back at looks good. It looks like this is about as far as I want to go with this, I don't think I want to do any more detail or it's just going to start to get kind of muddy. This. So all right. We've made it this far. We've detailed the armor and the hair, done the paint. So in the next video, we're just going to go into any final details and touch ups. I'll see you in the next one.
38. Armor - Cleanup - Reduce Polycount: So we're getting to a point of almost being ready to sculpt some detail on this armor and making this character really stand out as a finished, completed a piece of art. But before we do that, we have to do a little bit of clean up on this armor in order to make it ready for detail. So what I mean by that is if I go to one piece of armor here, you can see that my act of number of points is at 21 thousand. That's a lot of points because I have a lot of different pieces. And if we see the total number of points here I have, it's like five, almost 5.5 million, which is just way too high. And it's going to take a lot longer to render and lot longer to process. Also, clean up is nice because it allows for higher detail on a lower detail mesh later. And you'll see what I mean when we get it, get into that. So what we need to do is we have to Z rematch, especially a lot of this extra trim around the armor pieces. The reason that I started working so low Pali to begin with on all of his armor is the savy extra step of having to transfer the data when we start putting detail in later and you'll see what I mean when we get there. So anyway, what we need to do is go to each piece of armor here that we created this trim on. And for some of these, for some reason it gave me two sets. So what I need to do is hold Control Shift and click on that extra set mascot. And then show, I'll flip my mask and then go to Visibility, Hide parts so that that extra piece of trim is hidden. And then go to Modify Topology and delete hidden under the geometry menu. So that all I'm left with is just one set of trim and my original piece of armor. Well, it's sort of this point. I need to hold Control and Shift, click on just the arm or trim. And I'm going to use Z remeasure on it. So we go over to our geometry menu and go down to 0 measure and change Z remeasure to 0.1 all the way down to 0.1. So the reason that I'm hiding everything else and just showing this and then z remeshing is because it's going to clean up just the trim. And it's going to leave these other poly groups alone. If I were to use the remeasure without hiding anything, it would kind of try to smush all of it together and it wouldn't preserve any of the detail. But now after running Z remeasure on just that trim, now my act number of points is one hundred ten hundred eight hundred, which is five times less than what it was before we ran Z remeasure. And if I turn poly frame off, it's still retains its shape fairly well and it still looks pretty good. And even if I hit control D and sub-divide up for higher detail, it still looks pretty nice. The shape is still there, and all the detail is still pretty pretty decent. And if it were to get messed up, I could try doing a little bit of clean up or you can always take your brush and just sort of, you know, just do little fixes if it doesn't look right after you 0. But the whole point of this is that we need to go through each piece of armor because there's a lot of this trim. And the trim is important. But we need to make sure that it's lower resolution. And on some of these, like I said before, it gave me an extra set of trim. For some reason, looks like there's only one on this. So that's good. So we'll show everything. So I just want to go around hold Control and Shift, click on the trim and then 0 mesh at point 1. To reduce the resolution, the geometry. And in some spots you might get a little bit of this, like tearing and bending. And you can just try to either move 1 at a time or even just smooth and see kind of what happens. And if it's not working, you can chain hold shift and change the intensity of your smooth brush down to something like two or three. And just very gently. See if you can straighten this geometry out and then use the Move brush, just put it back into place. If I hold Control Shift and tap again, it'll show everything again. So this isn't too bad. And if I hit control D, when it goes up a subdivision level, it actually looks like it's smooths out. All right? So even if I were to leave it looking kind of wonky like this, when I hit control D, it's still does a decent job of just smoothing it out. So, you know, I think on the lowest subdivision level, I think I can actually leave it the way that it was, even though it doesn't look right you right now. I think it'll be okay. Because even if I wanted to unwrap this and Create UVs for it, it maybe not, maybe it, maybe it would create problems. Anyway. You get the idea. You may have to do a little bit of clean up where there are these really tight turns for the curve. But in fact, let's just see if it'll allow me to unwrap it, even if it looks like this. So if I were to go to Z plugin and go to UV master, I'm just doing a quick test, turning poly groups on and hitting unwrap. Yeah. And it looks like it's still unwrapped it, which is pretty amazing. So even doing something is messy looking is this. It'll still allow you to create UVs for it. And for those of you that don't know what UVs are, we'll get into that in the next videos and how to transfer data from one set to another. So some of this is pretty chunky. I think I will just clean this up a tiny bit just because I can because the geometry is it's so uneven that it's making me uncomfortable. All right. Great. So little bit of clean up. And now we're left with 2500 active points, which is significantly lower than what we had before. And it's okay if it looks a little blocky because it's low resolution and we're actually going to, eventually we're just going to hit Control D on a lot of these parts and creates sub-division levels. And just sculpt in our detail. But for right now, just for this video, we're just doing cleanup on our mesh. So rather than showing you, rather than showing myself doing this to every individual piece of armor, It's really just the same step for every single piece. I'm just going to go into a quick time lapse where I go through each piece and just reduce the geometry. And if I do anything differently, I'll be sure to cut in and tell you what I'm doing. So something that I noticed that happened here that I forgot to mention is making sure that you have symmetry. Active or inactive whenever you're using 0 measure. So in some cases like this, I used symmetry and for some reason just totally blew up this glove and threw it off of my axis over to this side. So you can see that it basically looks like these two gloves at thrown over here to the right. And this is a problem. Obviously, we don't want that. So so what I will do to fix this, pretty sure what I did was I had symmetry turned off when i 0 meshed. So when I was showing this part of the armor flipped, showed hit the other part of the trim and then flipped my view again so that just the parts of the trim are showing, just make sure that symmetry is turned on. And make sure that the other half of the gauntlet is showing as well. I think that was part of the problem too, is this side was hidden. So it didn't know what to do. So it's basing my Symmetry off of just this set of poly groups over here. So if I show the opposite on the other gauntlet, these poly groups need to be showing also. So I need to hide that, hide that. And then flipped my view again. So now the trim for this side and this side and decide on this side are showing. And I'm pretty sure what happened is I went over to my Poly Groups button over on the right, and I selected auto groups at 1 because I was trying to split these up into groups. And what that did is it made these all four separate poly groups from one another. So I was trying to select everything with symmetry turned on and it wasn't working correctly because I was only selecting these two poly groups. And then instead of having all four of these are showing and then hitting Z remeasure. So just be aware of that. And it looks like that worked just fine. So we'll go back and do a little time-lapse here. The very last we need to do some clean up on these shoes because these shoes have an active number of points of 400 thousand. Part of that is because I worked mainly with DynaMesh. And I probably should have gone over cleaning this up a little earlier in the video process, but this is where we are. So I will show you how. Do that. So first, I'm still having this issue with all of the trim around the edges here. There for some reason seem to be two sets of this trim for everything that I did and I don't really know why I did that. Maybe that's just something to do with either the tablet that I'm using and it's tapping multiple times or it thinks that it's tapping multiple times, maybe using a mouse would fix this. I'm not quite sure why ZBrush is giving me this issue. So I still have to go through here, manually hide and delete hidden on all of these extra sets of this trimming. And it's not for every single part. So in some cases I go through and discovered that there isn't an extra set. And already that's reduced my polygon count by almost 200 thousand just from getting rid of that extra TRIMP. So this is something to keep an eye out for. Make sure that when you're doing these insert trim pieces, that if there are any extra sets, it's just going to blow up your poly count super high. I think we got rid of all of the excess pieces. Just double-check on this for sure to be sure. Yep. So it looks like we got rid of all of that, which actually reduced our poly count by quite a lot, that we still have to do clean up on all these pieces. So a fast way to do this, because all of these pieces are one, is I can go to the trim, select the first piece of trim, and then invert my selection or my view, and then hide the other pieces of trim as well. And we'll do all of them at the same time like this. So I'm just hiding the trimming on the boots. And then Inverse selection here so that I can only see all of the trim like this. And then 0 mesh at 0.1. And it should just reduce the polygon of all of that trimming significantly. And it looks like in this case and almost looks like get rid of some of it for some reason. That's really bizarre. That's very strange. I don't know why it did that. Either that or the geometry is just so flat that I can't see it. That's really unusual. I wonder why it did that. So that being the case, I think the issue is that these are just too small and Z remeasure at 0.1 can't calculate correctly, so I need to turn Z remeasure up a little higher. So let's put it to something like two and then hit 0 mesh with just those parts showing. And we'll see if it fixes that. That's a little better. Yeah. Okay. So that was the issue. It was just that 0 measure couldn't go down that low with these pieces as small as they are. But they're still there and then now they are meshed. So if I were to then go back over to my poly groups and select Auto Groups, then I can isolate each one of these individually. Say if this one is just too small, then I can go over to my deformation menu. Go down toward the bottom here and use inflate and just inflate it as much as I need it like that. And then the poly count stays the same, but then the mesh is just a little bit thicker like that. And already we're down to a 145 thousand points just by reducing the trimming all the boots, which is significantly lower than it was before. And if you want the same dramatic sort of flaring forth all the trim all the way around. You can just hold Control and Shift and click on that one and then inflate it a little bit. Same with this. And fluid it a little bit. Looks like it was. That's interesting. I think this one is inverted. I think it's turned inside out. For some reason. Zbrush has just given me all kinds of kinds of problems today. So what I'll do is I'll just delete that mascot, show everything. Flip my mask. I part, delete hidden. And then we'll just go to this poly group here on the tip of the shoe, hold Control Shift, click on it. And then we'll go to stroke, frame mesh, turn polygraph off like that. And I'll just redraw it. I'll just grab curved tube because I'm pretty sure that's what I used before. So in the brush menu, curve tubes. And, and make our brush size pretty small, like 15. And we'll just try that again. And there's that double set again, which is so strange. I want I'm done. I'll just tap over here and it goes away. And hide the extra part, delete hidden. And now we'll select this trimming here. Select two for 0 measure hasZero mesh. And it will reduce the poly count. And it looks like this one is thick enough that it can go even lower. So turned on to something like 0.20 mesh. There we go. Much lower. Now by like 30000 polygons, much slower, much better. And then last we want to do it for this section here. Let's reduce it down and we'll see if it'll work at point 1. Whoops, I was doing the entire shoe and do that for this section here. Nice. Okay, so that worked really well. Now I have all these extra polygons on the shoe that I need to take care of. So what I can do if you really are not feeling up to just individually z remeshing each one of these, you could just hit 0 mesh on the entire boot. Because all of these are separate poly groups, which is going to tell Z remeasure that they're all separate islands from one another. But it's gonna make it pretty chunky. And then you could go to auto, auto groups under poly groups and do this. But then when you hit control D, I guess when you subdivide up, it doesn't look bad. It's not, it's not terrible, but it's not good. It's not it's not as clean as it was when we had it. So I'm gonna go back because I want to, I want to preserve this detail. I want this to be nice and crisp. I'm sorry. We need to hide all the trims so that all the trim is hidden. So we need our selection to be just the boots and nothing else showing. And then turn 0 measure to something like five or even a little, maybe a little higher like six or seven and hit 0 mesh. And what that's telling 0 measure is its target poly count is higher when it's reducing the geometry. And it looks like this looks okay. It looks a lot better than it would have before. But I lost the detail on these little medallion pieces here. So I'm going to go back. And since I have all my trim hidden, I should be able to hit Control and Shift and just click on each one of these and it'll highlight those as well. Because I want those hidden. I don't want a 0 match those. So now I just have this part of my boot hidden or showing target poly count is at 6.7 mesh. So we went from a 130 thousand points data 47 thousand. And so that's huge, that's almost a 100 thousand points less than what we had before. In fact, it is because we weren't showing the trim either, which would have also added more. So this is looking much better. But now and problems today. What is, what is ZBrush doing with this one little stray polygon right here. So you know what, instead of instead of going through all the motions, I'm just I'm going to just mask this, flipped my mask hide part. And then delete hidden. Make sure that everything is showing before you hit delete hidden or any of the tram is going to get deleted too, if it's hidden. And now that that's hidden, I can just hit Close Holes. And it should close that hole wherever that came from. It looks like that came from the side of the shoe somewhere over here. And it was just trying to bridge the gap between two poly groups or something like that. So I'm going to zoom around and just kinda make sure there's no more of that going on from all angles here. It looks like it got it. Yeah, ZBrush given me all kinds of problems today. And now very last, I'm going to go down to my Poly Groups menu again and just hit Auto Groups one more time. And that's going to auto group every single piece that I made. The reason Auto Groups works is because we extracted all these as separate sub tools at 1 and then merge them altogether. So because they were all separate, it recognizes it as different group data. So and it looks like we got some like multiple poly groups going on in here too, are multiple copies of this piece, the tongue, so I can just hold Control Shift, Click on it, mascot, old Control Shift, click, sorry, Control and Shift and click out here to show everything else. Invert my mask and hide that part, and then delete hidden. And it looks like there's even one more. So I'm going to do the same thing. I part delete it and yeah, So it looks like that tongue of that shoe was duplicated a couple of times or something like that. So I have to get rid of those. This is what cleanup is all about, just like an extra geometry and excess parts that don't need to be there. And reducing the poly count as much as possible while preserving as much detail as possible. Okay, So now we have gone over every part of our mesh and cleaned up the detail. The very last thing that I want to talk about in this video is we still have the body, which is about 400 thousand points. We still have the chest, The human chest, which is 75 thousand points. And then we still have the face. And the face is almost a million points because of all this high detail. And I, at 1, we, we, DynaMesh did something and so it's just really high poly count and there's no lower subdivision level on it. So that's going to be harder to transfer any of that detail or mess with that in our future process here. So there is a way to transfer to the poly paint data to a lower duplicated version of it. And I'm going to show you how to do that in the next video. For now. That is the process for all of our cleanup. We've gone through each individual part, reduce the poly count for all the trimming and any other parts that we can all just keeping the same shape for everything. And now our character is much, much lower in poly count. And we can move on to either transferring our detail and starting to detail on the armor and actually putting in some realistic looking sculpting and textures and stuff like that. So in the next video, I will show you how to clean up the textures and transfer them from the body over to a newer model. And I will see you in the next one.
39. Transfer High To Low - Uv's And Textures: All right, so, so far we have cleaned up our mesh. We have very low poly on a lot of these pieces of armor. We also still have high poly or a really dense amount of polygons on some of the parts of this character, like the chest and the face, especially the face is almost a million polygons. Now, for the process that we are going to use for a final render, that doesn't really matter so much. But there is something that I need to show you how to do because for transferring your character out to other programs like Blender or substance painter in the future, you can adopt the workflow that we've used in all of these videos to use characters like this for games or for animations and other things like that. So in order to do that, I want to show you this step how to take high poly object like this, like this torso and like the face that are up in the hundreds of thousands of polygons. And still be able to preserve the detail that we've put in there with the Pauli paint and with the sculpting and detailing. And put it on a much lower resolution object, essentially just creating a texture out of what we have and transferring it to a lower poly object. So I will show, I will show you how to do that. The first thing that we need to do is look at our sub tool list. And because I haven't taken the time and organized my sub tools, everything is sort of scattered. I'm going to do this a little bit different because I don't want to have to hide and unhide everything. So instead what I'm going to do is I'm going to go to sub tool and I'm going to go down to merge. And since all of the parts that I want on my model are showing right now, I'm going to hit Merge Visible. And what that will do is above myself to a list that creates a copy of all of the sub tools that were visible on my scene. And they're all merged into one sub tool. So now everything is one part. The next step is we need to go down to poly groups on the right side menu under tool. And we need to go to the top of the polygraph menu and hit Auto Groups. Auto groups is going to take everything that was a sub tool before an individual subtotal and it's going to make it into its own poly group. So this makes it super easy to split things apart, which is what we're gonna do next. Well, let's see. We have so let's do the chest first. So if I hold Control and Shift and I make sure that your select Rectangle Tool is selected with Control and Shift, hold Control and Shift click on the torso and I'm going to mask the whole thing. Control Shift click to show everything again, and then go to sub tool. Go down to your split menu and Split Mask points. So now the torso, the chest is just its own sub tool with nothing else attached and it still has the texture on there. So that's what we needed. Now I'm going to duplicate this sub tool and I'm going to hide everything except for my original 01:00 AM. I duplicated one. So I'm going to hide the body because we don't need that right now. So this is a high density object and I need to just make it lower density. So to do that, I'm going to go into geometry, go to Z remeasure and just leave Z remeasure at its default setting and hit Z ring mesh. And it'll take a sec because it's quite a few polygons. So Z remeasure is going to clean this up and make it into a much, much lower polygon object for me. So we went from 76 thousand points. And once Z remeasure is done, now that 0 measure is finished, we're at 5,900 points before we were at 76 thousand points, which is pretty pretty up there. That's a lot. So this is nice and it looks it doesn't look like our original, but that's okay. Because the next step is, now that this is low, low poly, almost 6000 points, that's low enough for now. What we have to do is create subdivision levels for it. And you can just do that by pressing Control D on your keyboard or going into geometry. And you can, you can switch between your subdivision levels here and you can divide, which is the same as pressing Control D on your keyboard. So every time you press Control D, it's going to quadruple the number of active points that you have and just make it more dense. And you can just, you can actually see that in real-time. When you press Control D. And you turn, fill on and off again, it's just going to get more dense now we're at 95 thousand points. So my active number of points before was 76 thousand. And I don't want to subdivide too much higher than that because this is enough to capture the detail of my of my other object, which is the original, the original piece here. So this one was 76 thousand. This new one is at 95000 once I hit Control the two times. And so that's plenty, that's plenty of polygons to capture all that data, the Pauli paint data that I want to transfer over. So the first thing I wanna do, now that I've press Control D twice, so I have my subdivision levels. I'm going to select this. And we are going to transfer the data from this over to our new object, from our, from our poly painted chest over to our new chess piece here. To do that, we go to sub tool. We're going to go down to project. And just hit project all at the top of the list there. In order to hit project all the reason that it's not turned on is because I accidentally hit this original sub tool. So the way project all works is you wanna make sure that you only have the sub tools showing or visible in your scene that you want to transfer data from and to. So as long as I have this sub tool selected, my new piece with no poly paint data on it. If that's my active sub tool that I have selected. And the one that I want to transfer data to it is above it and visible. All you have to do is it project all. And it will ask you, do you want to transfer the poly paint data from everything that's showing? Yes. Now ZBrush says it's projecting the mesh details though what it's doing is it's taking the actual details of the sculpt, as well as the details of the poly paint and transferring them over to our actual new object. So that's what Project all is four. And because it was a little higher polygon count than the original one, this was 76 thousand. This one is 95000. It took just a little bit longer. But you can see here now we have our new object that is a little higher polygon, but that's okay. The reason we're doing this is because now if we hit Shift D, We can go down in subdivision levels down to our lowest polygon density, which is 655,900 points. But this is so much lower density and you can export this out with the textures on it, or just export it out to something like Substance Painter later. And it's going to load so much faster because you only have 6 thousand polygons versus 76 thousand. So now that we have this new chest made with 95 thousand points at the highest subdivision. And if we shift D walk down to our low subdivision, It's add about 6 thousand points. We need to create UVs for this first. And to do that, ZBrush has an automatic function for UVs that works relatively well on low poly meshes. So hit Shift D until you're all the way up to your lowest subdivision level or go to geometry and just drag the slider all the way down to one. So there's your on your first subdivision level. Then we're going to go up to Z plugin. And I'll drag this menu over here to the right and docket. So under Z plugin, you want to go to UV master. Turn on symmetry. If you have a symmetrical object, turn on poly groups because it's just a good idea if there are multiple poly groups that will unwrap those poly groups as individual islands and then hit unwrap. Because this is a really low polygon density object. It's going to, it's not going to take very much time. So it turned silver again. It turned to the color of whatever material you have selected because the UVs exist, but nothing is mapped to the UVs yet. And so the question is, some of you might not actually know what UVs are. If you're a beginner in 3D and you aren't familiar with what UVs are. They're basically just seems along. Either you can decide where the seams go on your object or ZBrush actually doesn't allow you to draw the seams manually. It does it for you. But all that the seams are four is it unwraps the skin essentially of your object or the unwraps your object like a piece of paper and lays it out flat. And then you're able to take an image and put that in Photoshop or in any other program. Put an image on top of where the seams laid out flat are. And all all that is is it's just the UVs telling the picture where to go on your object. So if we, now that we have UVs, we already hit on rap. I'll show you an example of what I was just talking about. If we scroll down to the bottom, go to the Texture menu, texture map, I'm sorry, texture map menu. And hit new texture. Because we already have poly paint on this, we can go to the Create, Create New from poly paint and hit that button. And it's going to take the poly paint that's on our object. And the UVs are laid out flat like this. And it's telling ZBrush where to put the Pauli paint that we already put on there onto the object. So it's essentially just like wrapping paper around the outside of your object, deciding where to cut it so that it will lay out the nicest looking when you lay it out flat. And then you can just apply any image to these UVs that you want. So you could even take this UV map, it's just a picture and put it in something like Photoshop and put a different picture over it. And then just drag and drop that UV onto your object and it would apply. So if I put a picture of a Smiley face here instead of this mask, palette poly paint, it would put a Smiley face on this, on this body. So that's just a really simple way of thinking of how UVs work. It's just an image file. And the UV seams tell ZBrush or whatever program where to put the image that it's assigned to two. So the paint on here is really low density, it looks pretty chunky. And what we need to do is we need, we need our data from our highest subdivision level. So hit Control Z. And we'll go back because we actually don't want. We actually don't want to create a new texture when it's on the lowest subdivision level. So what we do is we hit D to go up to our highest subdivision level so that this is the densest that it can possibly be. And then when you hit new texture, knew from poly paint, it will create a high density texture because you're on your highest density subdivision level, your highest subdivision level. So that's a lot of information, especially for any of you that might not know what the UVs are or any of that. But it just comes with practice and time. Just understanding that UVs are just meant to place a texture on the object. That's all that therefore. So we have to have UVs in order to transfer picture data of any kind onto an object from program to program. So if you're in ZBrush and you want to be able to send this out to Blender or Maya or 3D S max. And you want the texture to stay on it. You're going to have to have UVs on it. And then you're gonna have to create a texture from the poly paint that you put on there in order to send it out and then have that texture applied in the other program. So that's long winded explanation. I know that was a lot, but hopefully that makes at least some sense. And I thought it was important to include because there is just so much to understand about all of these processes. And I know that in the future, if some of you wanted to get into creating game characters or anything like that, you can definitely use this workflow to export your poly paint from ZBrush to another program like THE 3ds Max or Maya or blender or something like that if you wanted to keep working on your characters there. So now we need to do this same process with the face. And the face is still part of this main body here. So what I'll do is it hold Control and Shift. Click on the face, mascot, show everything. And then we'll split mass points again. It's kinda funny without a face. So I want to keep all the detail on my face here so I'm going to hide everything else. I'm going to take my face, move it down to the very bottom of my list, duplicate it. And now show both of them. I'm going to take the bottom face here as my active object. And I'm going to just hit 0 mesh. And because this is almost a million points, it's going to take a sec for Z remeasure to do its job. And then we go down to project. Make sure that these are the only two showing that I have my lower polygon selected. Hit project. Sorry, first we hit control D couple of times. It's at 97 thousand. I'm going to hit Control D one more time, so I'm going to hit, so it's about 400 thousand, that's not bad. And it doesn't really matter. This is an arbitrary number because we're just doing it for the detail. We just want the polygon count high enough to capture the detail. So once we've hit Control D a few times, then we'll hit projectile. Do you want to transfer PolyBase? Yes. And it'll take just a minute for ZBrush to take all of the data from our higher resolution and transfer it over to our lower resolution. Just keep in mind that it is important to hit Control D on your new object to create a few subdivision levels because you need the polygon density high enough to capture the data from your original object. Okay, So that actually took a lot longer than I expected. I timed it and that took about 12 minutes to transfer your all the data from the high poly to this other lower poly version. So depending on the hardware that you're using your machine and help how powerful your computer is. And it can really affect how long this is actually going to take. So that actually took quite a long time. Hey, I just got up and when gotta got some coffee. So anyway, just be aware that the higher polygon density that you're transferring over to another object can really affect and slow down your computer. Anyway, now that we're to this point, we have our new objects. I'm going to hide our old one. And this one has subdivision levels now. So it's all the way down to 6000 at the lowest. And if I press D goes up to about 400000 at the highest. So first thing we need to do is make UVs. So I'm gonna hold shift at D until I met my lowest subdivision level, go up to Z plugin, UV Master. And I'll keep symmetry and poly groups turned on and hit unwrap. And that should only take a sec because this is only 6 thousand polygons. So there we go. Uv is generated on wrapped. Ok. Now I'm going to go up to my highest subdivision level so that we're on our densest and we can see all the detail. Go down to texture, new texture, create new from poly paint. And because we have UVs, ZBrush just uses the UVs to project the poly paint onto the face. So that's that. And that is how you transfer from high poly to a lower poly with sub-division levels. And it's really just for the purpose of creating UVs so that you can take this object of the low poly stage. Send it up something like Substance Painter, and then bake all of the maps from the high detail like this onto it using a normal map or something. But that's something for a whole different that's a whole different workflow. I just wanted to show you guys for any of you that are curious about that workflow. That's how you would do it from ZBrush. So now that we have the new objects, we have the new chest piece, we have a new face. And we would do the same thing with this body here. But rather than doing that all over again, I'll just show you how to get these objects back into your original list of sub tools that you have over here. So you have your scenes above your SAP tools here. And you can have as many of these up here, but as you want, any of these scenes, I like to call them scenes can be appended into any of the others that you have selected. So if I select my original, my original scene here with all 59 sub tools in it, I want to get the body and the head that I just created from that other scene into my scene with my 59 subtitles in it so that I can merge those together when it comes time to do that. So I will select my scene with my newer sub tools that I already created. I'm going to hide the ones that I don't need. And all I have to do is have the sub tool that I want showing. I have everything else hidden. So we're going to start with this new, this new torso that we created. And I want that to be showing an everything else in this seemed to be hidden. Now I can go back to my original scene, go to sub tool, go down to append. And up here at the top of the append list, you'll notice that all of these icons match all of the icons that are appear above my sub tools up here. So each one of these scenes when I go to append under sub tool, will show up as an appended null object when I go to a pet. So the easiest way to find what I'm looking for is I know that the new scene that I created had fives up tools in it. And we can see that right up here. This is that scene has five sub tools and that number five right there in the upper right-hand corner. So if I go back to my original scene, go to append. I'm looking for the one with five sub tools and that's the only subtotal showing. So when I hit append, that will be the only thing that's appended into my scene. And I can confirm that if I scroll to the very bottom of my slip tool list and there it is right there, just the torso. If I had multiple showing, they would also append in as as well. So I just wanted that torso to come in. Now I can go back to my scene, but just those five sub tools and I can show the new head that I created and hide everything else. And I'll just make sure this is the correct head. The highest count on this was 400000. And if I hit Shift D, Yep, It has its subdivision levels. So I'm just going to go up to the highest just because so that's the only thing showing everything else is it. And I go back to my original scene, go down to the very bottom of my subtotal list here so I can see it. Append, find this right here with five subtitles in it. And that looks like the face that I wanted. It shows the poly count right there in that box. So I just hit that and it will append it in. So now I have this new chest that I created with sub-division levels. And I have this new head that I created with sub-division levels. And the texture is on it. And it is a part of my original scene. So I can take these and put them anywhere in my hierarchy that I want. And I can replace the old chest under the old, the old head with it. And then I will actually have subdivision levels. So that is how you go through the process of getting it from one list to another. So that is going to do it for this video. And once we get around to actually detailing and creating higher subdivisions, four parts of the armor and doing a lot of detail. We're probably just going to do that exact same process that I showed you in this video, where we have our lower subdivision level that we create our UVs on. And then go to our highest subdivision level and go over to our texture map and generate a texture using create from poly paint in order to project that detail as a texture. And then we can use the high version or the low version when we decide to go into Photoshop or in even if you wanted to go into Blender and do your rendering there. So then I will see you in the next video where we will actually get into creating some higher subdivision levels for pieces of the armor and creating some real detail that's going to make this character really stand out as a complete, finished work. I'll see you there.
40. High Detail - Shoulders : All right, welcome back. And in this video, we need to start creating details for all of these pieces of armor that we have. So I started working so low poly on all of this to begin with because I wanted to save the extra steps of having to do what we did in the last video where we are transferring the high poly data to a newer object, subdivision levels. That's why when I'm creating armor like this, I tried to work as low poly as possible to begin with, because then I essentially already have my lowest subdivision level with a really low poly count. And then all I have to do is hit Control D. However many times I need to capture the data, the detail that we are going to sculpt into it. So if you don't already have low poly pieces of armor like this, like we've been doing with z modular and other tools. It's really important that you work with armor at a low, low subdivision level or the lowest polygon count that you can possibly get. All of these objects are super, super low polygon count. They're all around ten hundred, ten hundred act of points or less. Some of these are 3000, but that's because it's a larger piece. So it's very important to just keep this process and mine working, starting really, really low poly and then working your way up to a much higher polygon density so that you can carve into details for your objects. So you can switch between low poly if you need to create, excuse me, low subdivision levels. If you need to create your UVs and export it out to another program. And then you have your high detail sculpt for transferring over the normals or anything like that in something like Substance Painter. So let's get started. I am going to start from the top of the character and just work my way down. So what I've done is I've looked on Pinterest google images and I've looked up reference for armor and different types of armor, futuristic cyber armor, fantasy medieval armor, different time periods, different, you know, different origins of different places. Tried to just look up different styles of armor to not only inspired this character, but also to look at some of the details and to try and figure out what it is that I want to do. So I encourage you to do the same thing, go and find some reference or from images that you think looks cool or whatever. And that's going to inspire you if there's chipping or cracking or if there are borders and edges and trimming and cool places that you know. And different types of armor are always good inspiration. So don't just use one reference. Use a lot of different references to sort of fuel your creativity as you work. So we went through the first thing we need to do is hit Control D. See what it looks like when we hit control D. And it looks like it smooths that out a little bit, but everything is still in place. The border is still touching everywhere. Hit Control D again, we're at about 35 thousand points and it doesn't matter how high your polygon count goes. Just know that depending on the strength of your computer, it That's really the only thing to be mindful of. But you can go as high as you want. You could go up to a million points if you want for one piece of armor, but then that's going to start to bog down your machine. But you can also capture more detail. So it's up to you. For me right now. I think this is a fine active point number to stay a 142 thousand is still pretty high. So we're going to find our h polish brush and that's under B, H and H Polish. I like each polish because you can smooth with it really nicely and create very flat, crisp edges. And that's all I'm doing along the bottom inside parts here of this part of the armor. And you can also hold Alt, and it will build up in the same exact way. So you can hold Alt and drag a few, a few times, and then just drag across without holding Alt. And it creates a really nice, clean surface when you do this. It's really nice. Age polish is a great brush. I love it especially for armor. So now I'm just going to go around and turn down the intensity. Intensity was way too high. Turn on poly frame so I can actually see what's going on here a little better. And you can also switch your material because sometimes the materials that you have selected allows you to see more or less depending on how the light reflects off of your object. So play around with that as well. You could also use a mat cap. If a mat cap helps you see a little bit better. Some of them act caps are better for different lighting. One that works pretty well as the MCAT, white because it shows a lot of shadow. So that's a good one for sculpting. So we're just going around and dragging across the surface trying to get a nice crisp edge on top. And then holding Alt and filling in a little bit of the space to kind of build it up and then dragging across again to smooth it down with the Polish. Just very gradually. And now from this angle, if I look at my silhouette here, it looks like this is kinda got some weird angles to it. I'm going to grab my Move brush. And just ever so slightly, just kind of correct to the angle that this is moving at. I want this to be a little more round. It was kind of a strange angle before. Just very, very lightly. And we'll go back to our age polish brush and just clean that up. Cool. So it doesn't take much. Polish is great for just getting a nice crisp edge like that. And we'll try to continue that down here as well. And this is what sculpting is all about. Just taking your time and attention to detail and just trying to capture the shape that you want that you're going for as best you can. And it looks like we can use our Move brush to just get that in the right shape. Again. I'm going to use my Move brush. I'm going to have to go back and polish over that again because it's not it's not perfect. And every time that I pull out with this brush, it creates a little bit of a thickness on that edge which isn't bad. It's just I don't want that there. So you go back over the top of this edge again. Cool. So that's looking nice. Now it's starting to look nice and crisp, nice and sharp edges there. And then I want that edge to continue right along down to this part here. And again, just using Alt to build up a little bit, can't really see it there, but just to build up a tiny bit. And then just passing over it again with the regular brush to push it back down again. And if the trim gets in the way, hold Control and Shift and click on just the shoulder pad. And the trim will disappear so that you're not affecting the trim. Just be careful about that too. You don't want to you don't want your brush to affect the trimming that goes around the edge. Just want to affect the shoulder beds. And this little part here is just sticking out too far, so just pushed up back in with the Move brush. Alright, and then we'll just smooth it out a little bit and H polish it one more time. And then Control Shift and click to show everything again. So I show that the trimming around the edge and the trimming looks like it's fine, it doesn't need to be moved. So for the most part, I'm just going to leave the trimming a loan because I don't want to have to mess with that. And now, once we have a nice clean shape, we can take a brush like our Damien standard under D and the brush menu. And go up to stroke. Turn on lazy mouse if it's not already on under stroke. And then turn the lazy radius way, way up to like a 100 or however much comfortable with. And this will just help us draw a nice line. If we want to put in lines for detail. Actually, before I do that, what we should do is switch to this sub tool with all of our bolts that are sticking out everywhere. And we should just move these around a tiny bit. A really fast cheap for that is grabbing the Move Topological brush, underbrush one needs a BAM and it's right next to the Move brush, just move topological. And Move Topological only moves one sub tool, sorry, one poly Island at a time. So I can find the center of this and just pull it out really fast with the Move Topological. Just be aware that Move Topological is also like a Move brush. So if you were to use it over here, it's going to stretch whatever you're pulling on. Which is why I make my, my brush size so big. And then try to find the exact center of the object. And click on that to move my object. And I'm only pushing. I'm trying to push really linear left, right, up, down. Now I'm not trying to push like this or it's going to squash it, it's going to stretch it out this direction. Only want to turn my camera angle so that I get a clear shot right at the center of it and then move it in the direction that I want it to go without any stretching. And even then it's doing a little bit of stretching, but it's not noticeable enough that it's going to matter. So don't tell anyone. And these ones look like they're okay and the place that they are, move them maybe just a little bit. And of course, if any of these are like way out of place, you'll have to press W on your keyboard, go into solo mode, hold Alt, and tap on that specific one. And you know, maybe mascot and then flip your mask so that everything else is masked. And then just use your Gizmo to rotate it into place. If it's just not cooperating with the Move Topological brush. So that was a quick fix for that. So all of these others, I might do it on this too. Yeah, I might just do this too. Because it's sticking out. So a mascot flipped my mask. And now I can just move that part with my gizmo. That's pretty close to the surface, so just like that, that looks fine. Okay. That's not bad. Okay, That's much better. So now I'm going to switch back to my shoulder piece here. And we want to put in some detail. So what I mean by detail is similar to what we do with the, did with the cyber suit with these lines in here. So you can either do that by masking and doing the same effect or you could just use something like the Damian standard brush and turn on lazy mouse like I was showing you before and just drag out some lines for detail. I really, the amount of detail is up to you. And this is looking pretty, pretty bad actually, the resolution isn't high enough for this yet, so I'm going to hit Control D one more time. So that puts this at 500 thousand. And that's, that's a lot, that's a lot better. So I'm just going to put in some lines here to sort of maybe a little bit smaller. Make my brush size smaller. There we go. That looks nicer. Cleaner lines. And we'll just draw in a little bit of detail to sort of give the appearance that there are circuits or events or something connecting all of these pieces together. And, oops, change my camera angle here. Trying to keep my angles sort of consistent. Let's see, I need to do that again. So physicians to come up and go down and over. Same thing comes up town and over. Same thing comes up little, and then town over like that. So I think that looks cool because that gives the effect almost like these are separate pieces of metal that have been linked together. So it's a nice added touch, I think for this sort of armor, just the way that it looks, I like the way it looks. So you'll have to kind of play with it until you find a shape that you like. And that is part of the fun for some people and is also part of the, part of the painful process for some people because designing is not easy. And just, you know, some people have an eye for it and some people just don't like doing it. So it's entirely dependent on whether you like to do it or whether it's a harder or easier for you or whatever. But that's nice. I like that. And later on, like we were saying in the previous videos, for something like substance painter, where all you really need is this high detail sculpt with some lines in it. When you hit the back button, all it's gonna do is take the high poly detail like this and turn it into a normal map and apply it to your lower resolution model. And this detail will be captured quite nicely by a normal map. So I think that's, I don't even want to paint it and I just want to leave it the way it is because I think that'll look cool. But we're not going to be using the substance painter for this, for this tutorial, but just want to point out that that's that's why I'm putting these lines in its in case I ever wanted to go in and do something like that. Now, these shoulder pads, they're hidden. So I'm not really going to touch them because they don't need any detail. I guess we could hit Control D One more time to up the resolution, but even that is kind of unnecessary because maybe, maybe I will just leave it like that. Because the number of polygons showing, sometimes show up in your render if it's not high enough polygon density because we can't smooth out the shading, so we'll just leave it like that. So let's just work our way down here. Try to speed this up. So next we're on this part, hit Control D. Control D again, thirty eight thousand, a hundred and fifty two thousand. And see how that looks. If I draw lines in it, and it looks okay. That looks good enough for right now. So now I'm just going to try and create some lines that follow the contours of parts of the armor that I've already made, hoops and looks like I affected the trim there. So I'm gonna hit Control Shift and click on this so it hides the trim and try to get these lines. Drawn in. That will show everything again. Cool. And just a couple of lines like that is good enough. It doesn't have to be crazy, just something to give the illusion that these are multiple pieces of metal fitting together. And from a distance, you know, from back here, it looks like that it gives the illusion. And that's what we're going for because this is, this is, this is a sculpt. It's a piece of art and we're trying to show it off, but we're also trying to save time and not just spent a million years sculpting in a ton of detail. So for the illusion, that works fine, I like these lines. I think it's going to work just fine. So we've got all this now let's move down to this next part of the arm hair. And we'll hit Control D. Control D One more time, 75000. And this will just sculpt in quick line and a one to match it. Oops. And it looks like I'm hitting this trimming again. So we're going to Control Shift. Click on this main group just to show it and nothing else. Come down here with those lines again. And then hit control shift and see how that looks. I'll have to redo this. So this can be kind of a pan. You'll have to really take your time. It's because I'm nervous. Like that. There. That looks better. And then same thing for this part here, just to align down the center. And then this line will outline the tricep muscles. So I'll have it just sort of follow that same shape that the tricep muscle halves. Let's try that again because I'll do it. So this part is actually covered up. So I'll just do a line down the center and see how that looks. And there's a good chance that that's not even going to show and it doesn't enhance the armor at all. It doesn't make it look better. So rather than putting something there, I'm just not going to put anything there. Rather just not put anything. And something else that I'm seeing now, two is this line should line up with this one coming down here. Otherwise it just doesn't make sense. So we're going to try drawing our line again. Draw it down to about there. Yeah. So that lines up with that. So that it looks like everything is linked together there. And I think that just gives the illusion of something that's all one piece a little bit better. Maybe just down like this. And then another line that follows this curve here, something like that. So that from far away it looks like this piece here continues down into this. I just liked the idea of that a little more because then we're starting to see patterns and there isn't a break in the pattern because then it can confuse your eyes or you'll just notice it and say like, oh, that doesn't look like like it belongs there. So we don't want that.
41. High Detail - Gauntlets : So for the gauntlets and what I want to do is create some higher subdivisions. So we'll press Control D, Control D, Control D. So it's at a 178 thousand. That should be plenty for all the detail we want. And for this, I'm going to use a slightly different method. So hold Shift, press D until you're down to your lowest subdivision level. And if we go and grab our Z modeller brush under B, z, m. Now we can hold Alt and paint these poly groups on here. And I'm just going to paint this section on top. And I'm just going to create poly groups really quickly. So there'll be aware of is because now that I've created subdivision levels, like if I press T and go to my highest and I can hit Shift D and go down to my lowest. A lot of actions and z modeler are going to give you this error up here. It says it's comprised of multiple subdivision levels, so z modular does not work, action is canceled. So be aware that once you create subdivision levels, you can't use a lot of functions in z model. They're like you can't insert edge loops. You can't do a lot of specific functions, but you can still do a lot with poly groups like extruding and moving and doing all that. That's all that I need. I don't need to be able to insert edge loops because I like the construction of this. I like the way that it's set up anyway. So once I hold Alt and paint this poly group a different color here, I'll hold space over a polygon face, select mask, poly group all. And I'm going to tap on the Apollo Group, it's going to mass the whole thing. Then I can just press Control W and it will color. It has a different poly group. Now I'll make my way around this edge here and just paint these groups. Just paint these polygons around this edge here. Oops, that one. If you accidentally color some over here, just hold Alt and tap on them again and they'll go away. Just going to color that border. And since I already have mask polygraph all I'm just going to tap on that polar group and then hit Control W and it will make it a different color group. Now I'm just an old halt. Draw more poly groups here. Something like this. Hoof and z modeler keeps getting mad at me and telling me that I'm doing something wrong because I keep accidentally tapping on an edge. So you know, what I'll do is hover over an edge, hold space and then just set that to do nothing. So now when I tap on an edge by accident, nothing will happen. So this over to here. And we'll paint B's. This may seem time consuming, but it's going to make these gauntlets look really cool. Gauntlets are really important, and I want them to look really cool. So to me, it's worth the little extra time here. And this is sort of a hard surface modeling technique that we're going to use. So that looks good, that looks good like that. Okay. So I have this in the shape that I want tap on that poly group and it'll mascot it Control W makes another poly group. So once we get our poly groups into place, and we have them separated like this. So I have one here, one here, one here, one here. What I need to do is I need to press W on my keyboard, hold Control. Click on the one poly group that I want to remain unmasked, which is the red color group here, and it will mask everything else. So all we can, sorry, press W, hold control and click on Apollo Group and it will mask everything else. Now I need to go up to my highest subdivision level by pressing D as many times as I need. And from here, I'm going to use my gizmo hold Control and D flight this. Or you can also go to deformation, take the inflate and drag it to the left, but don't do it too much, just a tiny, tiny bit. So by deflating this just enough to where it sits. So, so that it's not intersecting with any of the other geometry. Now while everything is still mast, I'll drag the Polish by feature slider over to the right of few times. And it should create a nice crisp edge right here, which it looks like it did a little bit, but I don't think I I don't think I did this enough. So unmask everything here. W, hold Control. Click on the red poly group. And hold Control and drag. Drag, either left or right, whichever direction d flights it. And you can actually see right here how it's doing exactly what I want. If I deflate it, it's pulling the edge of the gold poly group down with it. That's exactly what I want. Like that. But I don't want to deflate it too much hurdle intersect with all of the other geometry inside. Looks like it's creating a nice little border. So deflated. And then while everything is still mast, hit Polish by feature a couple of times and it will really clean up the edge of that separation. Now if I unmask and turn off poly frame, you can actually see where it did this, this really nice crisp edge. And now it actually looks like there's a metal plate sitting on top of the gauntlet like that. So I'm going to do this for each, each one of these poly groups that I have set up here. So we're gonna do it for all w and then press W and then hold Control and click on this. Oops, unmask. Click hold control and click on this top poly group. And then we're gonna do the same thing we're going to because we're on our highest subdivision level, hold control. And I'm going to inflate this instead of deflating it because I want it to go up and outward, see how it's already creating that nice border. And then before I unmask all paused my feature, Polish by feature. And then I can even inflate it again and Polish by feature again. And it's creating this really nice plate. Look. Somewhat ion mass can turn off poly frame. Now it's actually starting to be this, this real definition here. So it looks like a separate piece of armor sitting on top. And now we'll do the same thing with this purple bonding group here. Unmask everything, press W, hold Control, click on that polygon. And I think for this one, we'll see what it looks like if we inflate or deflate and how different it looks. So that's deflated. And if I paused by feature couple of times, it looks like it's creating like a sunken in effect, which is pretty cool looking. I think that's a cool look. I like that look. So I'm going to keep that. So I deflated it with my gizmo and then did Polish by feature and then unmasked. And it creates this nice separation. And just because I'll try it also again with this, with this poly group here. Hold Control, press W, hold Control, tap on that poly group and everything else will be masked. And just based on, you know, how the direction that all of these are sticking out. I think I'm going to inflate this because it's going to pull it away from the other poly groups, which might look better than if I deflate. So inflate and then mask, I'm sorry, a Polish bit feature a few more times. And then unmask and see how it looks here. Cool. So that's, that's a quick hard surface technique, just using poly groups and inflating Polish by feature to just get some really cool detail, just using poly groups. And then if you want, you could even for the detail on this part here on our highest subdivision level, we could grab our clay brush, change our stroke here to drag rectangle and then select an Alpha. And you can even put in a custom Alpha or grab something that already exists inside of ZBrush and just drag it out and put it on. It looks like RGB is turned on, so I made it white and we don't want that. But, you know, some kind of detail or some kind of cool pattern or something like that. Or you can just hold control and user mask pen to actually draw something in yourself if you just want it to. Cool detail here. Maybe some cool symbols. Something like this. Just like we did for the cyber suit. You know, just draw in on a mask, some cool details or whatever you want. And then flip your mask, press W, hold Control, and D flayed it so that it's carving down into your object like that. And it'll just place it directly. Drop it. It will just make it look like it's a stamp on your object like that. And that's just messing around. I like using alphas because alphas are much more precise. And if the detail isn't high enough in a Control D again. So now this is getting way up there in detail, but it's just going to make the alpha stamp look a lot nicer, a lot cleaner. And if the alpha isn't showing up correctly, whole can I'm sorry? If the alphas and drawing on correctly, you can do it with your masking tool. So you can hold Control and change your mask to drag rectangle, and then select the alpha on your wall you're holding Control so that when you drag out your masking tool, it becomes that Alpha. And then hold space, drag it over your mesh and let go. And then it stamps the mask on there perfectly. And then you can invert it. Press W on your keyboard for your Gizmo. And then just like, you know, just hold Control, deflate. You get the idea. Just another really fast way to take something from an Alpha and just place it on as a, as a stamp for detail. So moving on, we're going to get into, first, take the Move Topological here and grab this piece on the hand and just pull it up a little bit so that it's showing again buried inside the hand there. And now we need to move on to the next part of the armor here.
42. High Detail - Torso : So continuing on with our armor here, which is going to move to this next piece. I don't think that the poly grouping method is going to work the best for this. But we'll see how this looks when we hit Control D, it smooths it out quite a bit. So rather than, rather than carving in more detail, I'll hit Control D a few times to get my subdivision levels higher. Hit Shift D to go back down and subdivision. And then we will look at our poly groups here. Let's try polish but features what happens? So it is smoothing it out a little bit more. Which isn't bad necessarily. And I think the shape is still tall enough. Because if this is too big, if I look at the functionality of this, the elbows are going to hit this. Like in reality, if this character is running around in this piece is really tall and it's sticking out like that. Well, you wouldn't be able to move your arms anywhere near your hips because of that. So that's not exactly a knot. It doesn't need to be a huge shape. Trying to think of it proportionally in terms of, you know, in a, in a game setting or in a reality setting, how this would function for that character. So I don't think this needs to be terribly big. But I do want to talk a little more detail. So prestige ego to my highest subdivision and are looking like this right now. So I'm going to press W, hold Control, tap on this poly group, hold control and deflate it. Actually we're going to inflate it. Just getting inflate. And then paltry feature a couple times or punch my groups either way. And then I can smooth this section here because it's inflated way too much. So it was before it was just sticking out way too far in this corner, was obviously traveling way too high up. So I'm just going to smooth that part so that it sits flush again with the edge of the poly groups that it's lined up toward. And I might even just smooth this edge a little bit, gradually moving back. So that is a gradual transition from this sharp edge to this smooth part in the front. And the bottom can just be totally smooth because I want this to line up with poly groups and I don't want to inflate it too much. And it will polish my future again. It sounds a really fast way polish my feature is great with poly groups. So really quick way to get some really crisp edges around your object using poly groups. I think this works. Next, I'll do it to this top poly group up here. And because of what we did with z modeller earlier, per kinda lucky because these pieces where we use Q mesh to pull these up. So as we use Q mesh, it created these polytopes for us. So that was kind of a nice time-saver. I didn't even realize we're doing it when we did it. But now that I'm at that stage and realizing that, yeah, it's a huge time-saver. So I'm glad that we did it the way that we did. Forgot that I still had an alpha on my mask tool. So I'm going to take that off and set the stroke back to free hand for my mask pen. So now we can hold Control and tap on this poly group with our gizmo active and then hold Control inflate it, inflated some more. So it creates this nice bubbly look, an edge. And poetry feature. Couple of times, just dragging that slider all the way to the right. And that creates this nice sharp edge right here. Cool. Yeah, that looks nice. And the thing is, I might just leave this masked. And like we did with the part on the bottom, just do a gradual smooth toward the front so that it's not such a harsh angle. And I can do is just grab my brush and just pull this up. Because if I look at my silhouette here, it's not perfectly round, so I want it to be nice, a nice, clean angle around here. Something like that. Just keeping an eye on the overall silhouette as well. Cool. And then polish my future. To really clean up that edge. And movie unmask. It looks nice, looks a lot cleaner. And it's a unique shape as well. All right. Moving on. Moving on. So now the vest, Let's unmask everything, hit Control D. Control D again, go into solo mode. D, Control D, Okay? So because this is smoothing out with the subdivision levels, I'm going to have to hold Control and Shift and click on the trimming mascot or control shift click again to show everything. And I need to use my Move brush to move this down so that it matches up with the trimming again. Just to fix that slight smoothing issue. There we go. Now it matches up with the edges again. Okay? And now we're going to do the same trick that we did before with the poly groups. So on the highest subdivision level, press W, hold Control, tap this poly group. Hold control in flight with your Gizmo. And it's affecting these backbones two it looks like, and that's fine. And then polish my feature a few times. And it will really tighten up that edge. Yeah, Nice. Now they actually look like plates sticking off of there. And same thing with this poly group at the base. W hold Control, tap on it, hold control. Inflate or deflate. I think deflate might look really cool. Actually. Think that might look really cool. Let's try that. Polish my feature few more times. And on mascot. See what it looks like. Yeah, I think that looks really cool. And only problem with this is it's kind of sticking into a little too far. So I can either grab my Move brush and try to just very, very gently move it out without messing anything up. That which looks cool, but also not quite the way I want it. Well, this might work. I'm just thinking out loud. Sorry if we're just talking my way through this and just trying to say something so that I'm not just completely silent while I do this. Cool. I think this looks all right. He's back. Poly groups are sticking out pretty far. Little too far. They might get snagged on something. So and so if that's the case, then I will press W, hold Control, click on the red polygon here. And we'll just deflate them. Now. Let's just try polish my feature when we have it selected and see what happens. Okay. And now I will press W hold control and click on the gold polygraph here. This is hard to navigate. Yeah, there we go. This is sticking out way too far. So actually, rather than going through the trouble of doing all that, I'm going to grab my mask, Lasso. Just select tops of these, flipped my mask and then hold Control and click on the mask maybe a two times, maybe three times, to soften the edge of my mask and then press W to use my gizmo hold Alt and tap where you want your Gizmo to go and then just move the camera angle how you want it. And just push it down and end with your Gizmo, like that. And then we can just hit pause by future again if we just want to speed that up. And it will smooth the transition between those public groups there. Alright, that looks better than it did before. I'm just going to leave it like that because I don't want to mess with that too much and I want this to be sticking out as far as it was before. And it's doing it over here too on the sides. That's okay. So I'll just clear my mask hold shift and change my mask intensity way, way down to something like ten or 11. And just smooth this out and grab my Move brush. And we'll go down to our lowest subdivision level here and just manually push these in. So on the lowest subdivision level, it's going to save you a lot of work and it'll make it look a lot cleaner because you're dealing with way less polygons. There we go. Now when we walk back up to our highest, There we go. Now it's saved us a lot of time and energy. Just by moving those points around a little bit. On our lowest subdivision level. This might be tedious, but it's just clean up. Since normal, this is all part of the part of the process. It's kinda get in there and do it. Now if we go all the way up to highest, again, it's like the edges of those poly groups is better. Now if I want to clean this up even more, I can just hear my mask hit W, hold control and click on the gold poly group. Actually, I want to do multiple poly groups. So hold Control and Shift, click on the red one, flipped my view or Control Shift click on the Goldman and now flipped my view again. So only gold and red are showing. And now push my feature Polish trade groups and even go down to my lowest subdivision published by feature is going to work way stronger. That's too strong. So I'll go up a couple subdivision levels. And two Polish by groups are published by feature. And I'm going to show everything again. So now we just need to get our mesh back into place. Make sure that none of these parts are intersecting, that we don't want intersecting. Cool. And we have this part here in between. It's like I have these extra polygons here. So I'm just going to hold Control Alt and Shift and just get rid of those. Let's hide them. And then I can delete hidden and Close Holes. Now it looks like it created extra polygons there because of the way this thing is shaped. So I'll hide those. Hide those, delete hidden Close Holes. There we go. And then smooth this out. I'm trying to repeat all of the buttons that I'm pressing because it's I know it's helpful for people to be able to see exactly what I'm doing when I'm doing it. I'm trying to tell you what I'm doing. But occasionally if I miss a thing or if I don't say that, I went over to the geometry menu or if I use a shortcut or something, it's, it's probably just because it's something that I do so automatically at sorry if I missed anything. So hit Control D, control the to get some more subdivision levels in here. And we'll just grab our daemons tendered and just draw in some cool lines that will connect all of this out this way down. And I'll try to connect this with this line here. So it looks like it's all one part or like it's connected somehow. That's the part, that's the thing with armor is you're trying to create pieces that look like they are supposed to fit together. Think that's what I love so much about armor is just the layers and how many pieces you have to layer on top of one another before everything, it looks like it fits. But that's part of the fun. And you know, I have so many lines going on on the armor here. I think I need a couple more on the back. I'm just going to draw those in, but the Damian standard, rather than doing our full masking method that we did before. Just because I want to save some time and I think it'll still get the point across. Plus this is in the back of the Mesh, not anybody's, nobody's really going to be looking back here. So I think we can just get away with cheating and doing this for just this section and nowhere else. Just this part. If you must go in and just, you know, you can just go in and use the paintbrush to color in those lines where they quickly, if you wanted to or just do the masking method, don't be lazy, like me, I'm being lazy guy. Just an extra line or two to make all of this kind of fit because this was too smooth. So I wanted to add in some more lines. Okay. It's coming along. Now. We will continue on, I think for the chest, I'm just going to leave these pieces alone because they're as detailed as I want them. I don't think they need anymore. I like how boxy they look. Same thing with this chest piece that I modeled here. I don't think it needs any more detail because it's nice and simple. It looks like it hooks into the chest right there. So. I'm just going to leave that alone. So kind of wondering what I should do with this, I'll hit Control D a few times. It's cool but not, not sure. Now we just got to find something that works. Just gotta find what works. Kind of like. And it's cutting into that. Or you can see I divide, but it's also just bad geometry. At the same time. Smaller line. Smaller lines. Yeah, something like that. I like that because then it's vertical lines are everything else is more horizontal. So that mixes pretty well. Yeah, that's good. I think that's good. I'll leave it like that for now. If we change our mind, we can always go back, but I like that pattern right now. Next, shorts. So for this shorts we have a lot of poly groups. Just good. Old control. Tap on this poly group here. Oh, it looks like our polygon cleared. So we need to go to Z modular, draw on some poly groups manually. Like we had it before. Somehow these polychaetes got clear it I must have merged poly groups or something like that. So they went away. So hold Alt, draw the poly groups on manually with your Z modular tool. Hover over a face here, hold space, select mask, poly group, all tap on the Pauline group, Control W, and it will make it a different Pauline group there. Now we'll do this for these all around the outside. And then we'll tap it, hit Control W to make it a polygon group. I think that's good. I don't think I need to color these outside edges, we'll see. So press W, hold Control, tap on, tap on one poly group. Before I do any of this, clear your mask and create subdivision levels. So hold control and Christy a few times until you get much higher active points. And now on our highest subdivision level, it's w. Well it's Control. Click on one Poly Group, C modellers interfering, it's all swished, Remove Brush. So W control and tap on that poly group. There we go. And I'll hold Control and inflate it way out. So I get that big separation and then go to deformation over here. And published by feature. Gets that nice crisp edge. And then we'll just do the same thing with this other polygraph here. W control, click on it and scale it in, deflate it. Be like. And that looks good and then polish my future. Cool and clear a mask. And then very last, we have our large section of a shorts. You need to use our Move brush to fix any parts that are smoothed out from the subdivision levels. Just barely. And because these are shorts, I actually want to go in and sculpt a little bit of cloth, wrinkles and detail. But we'll do that in just a sec first, I'm going to switch to this last part of the shorts here. And we will hit Control D few times and use our Move brush to fix where it's smoothed out because of subdivision levels. If it's sticking out anywhere, bring this in, smooth this down, change my smooth brush intensity again because it was way too low. To smooth this out. And then use Damien standard to just get this line down the center. So it actually looks like it's forming to the character's body. Okay, so now I'm going to go to my Stroke menu term at lazy radius off for Damien standard. Because now I want to do a little bit of cloth sculpting on this section of the shorts. So sculpting cloth is pretty straightforward. You switch between the standard and the Damian standard brush. And a simple way to think about wrinkles in clothing. First, it's a good idea to turn symmetry off. Otherwise it's just going to look completely mirrored and it's not going to look organic. But wherever if you hold Alt with Damien standard brush selected and draw, it creates this upward edge. Now you can either, without holding Alt, you can carve in at the base of that edge and smooth it out to create the inside part of the wrinkle. Or you can take your standard brush and hold Alt and carbon at the base of it to create a smoother. A smoother in client or transition. And when there's, when there are wrinkles and clothing, they travel in V's or in w's. So if there's a line this way, another line is probably going to come this way because the fabric is getting scrunched up and restore pulled down and scrunched. So this way to this way. And they always either connect at a point like this, where then in between you can just without holding Alt, just carve in right here and then spit that out a little bit so that there's actually a dent where the wrinkled connects and then it comes down and then it'll probably either connect here and travel back up this way again. Or it won't connect and it will just continue back further on the leg. You just have to kind of play with it and look at a lot of reference of what clothing looks like when it's wrinkled to sort of be able to achieve that natural look. So this is pretty terrible. I'm going to undo this and then also think about where the wrinkling is happening. Because wrinkles happened where clothing bunches up, which generally happens more toward the cracks and crevices. So like in your armpits or like the inside of the legs, places like that. Because the fabric is being pushed from there. And that's where it creates the wrinkles from. So let's even turn up our intensity a little bit more because this is pretty high subdivision. And I'll turn off poly frame so I can see better. So holding Alt with my damien standard and just making a big thick line like this. And it's, let's say it connects back here at the back, comes up like that, and then travels back one more time like this. And then I'm going to grab my standard brush. And then at the base, not at the top right along the edge here at the base I'll hold Alt cart in, hold Alt curve in at the bottoms. And then smooth that. And then just smooth the edges near where the wrinkles would connect with one another. So not in the center of the lines but at the ends of the lines. And it looks like I almost crashed ZBrush probably because my ice, my history for all my Poly tools is getting way too high because it's taking a couple of minutes just to save my progress right now. So once that is finished, I think what I'm going to do is go through my sub tools and delete some of the Undo History. Zeros just gave me an error message that said, too many sub tools are too many objects. And asked me if I wanted to close ZBrush or if I wanted to continuous. So I think what I need to do is look at my sub tool list and just go through the sub tools that I know I don't need any undo history for. I mean, actually, I really don't need the undo history for any of these. So I'm just going to use my arrow and just go to edit, delete, undo, and then just press down without even closing this menu. Now I can just hit undo, I mean, sorry, hit Delete and undo history. So now I'm just pressing down once on my keyboard and then selecting Delete, down, down, down, down, down, Delete. So this is a very fast way to just pick through all of your sub tools, press down to lead down, to leak down, delete, delete, and just get rid of all of your undo history. Because that's also going to bloat your file size. That's the difference between sometimes having, you know, oh, there we go, that 101,600. So a lot of these subtotals just have hundreds, if not thousands of Undo steps in them. And that's making the file size. That's the difference between having a 100 megabytes or having like a two gigabyte save file. And why it sometimes it would take so long to save my file. So I'm just hitting down and delete down, delete WE over and over until they reach the very bottom of muscle to list. And now there's probably these scenes up here that also have any undo history in them to like any of these sub tool is probably all have undo history. And he said the six phases, so there's Undo steps and some of those, but that's not bad. Mainly I just wanted to delete, undo history for this hole. Main list of SAP tools that I'm using right now. But now when I hit Control S and go to save my file, I can save it as a different version, slightly different name. And the savings should probably only take about five to ten seconds, whereas before ZBrush was taking like two to three minutes to save. All right, so I think this is a good place to stop for this video. And in the next video I'll continue sculpting some wrinkles here for the shorts and we'll get into that next.
43. High Detail - Shorts: In this video, I will continue doing these shorts here. So we're just using the Damian standard and the standard brush to just add our highest subdivision level. Just holding Alt with the daemon standard pressure, carving Indies. These lines that are raised up, starting from the inside of a leg, moving toward the front and just smoothing out the lines at the front and ends. Oops. And it looks like I caught a little bit of that poly group there. So I'm just trying to be careful not to smooth out any parts of my mesh that I don't want spooked out. And the first thing that I did was I went on to Google Images and I looked up wrinkled shorts and just I'm just looking at reference images of what wrinkles actually look like in clothing. And just trying to recreate that here. So using the Damian standard to draw raised lines and then grabbing my regular standard brush and holding Alt to, to draw in between those creases. So by holding Alt, It's carving into my mesh. So it makes it sink in Word a little more and this creates a nice little effect for the wrinkles. So holding Alt with thymine standard to do this. So from far away, it looks all right. It looks okay. And if your die, if you don't have to patients to do wrinkles manually like this. If you're using ZBrush 2121.6 or above, there are there are tools for wrinkles for cloth. If you go into your brush menu, they have cloth, nudge cloth move all of these that cloth pole. And these work okay. Like if I were to hold Control and Shift, click on this poly groups so that everything else is hidden. And then make my brush a little smaller and then grab and pull. You can see that it's creating wrinkles like this. And if I make my brush even bigger, creates big wrinkles. But it's, it's good, but it's not great. It's not perfect. And it often creates more problems than it solves. For clothing. I'm not saying I'm not saying don't use it. I just mean, unless you really know what wrinkles look like, it's easy to get it wrong using these brushes. Let's turn symmetry on. So I'm going to mask this section. Mask all of this that, but you can still draw a mask, soften the edge of the mask, and then just try to use the cloth move to sort of pull up some wrinkles like this just very gently. And all I'm doing is grabbing and pulling up in the same spot and then moving slightly lower and just moving up and up and up like that. And it does a pretty good job. It's not bad. But that's depending on the direction that you're pulling and how you're making those wrinkles look. They can look incorrect very quickly. And then suddenly you just have these lumpy, this just kinda lumpy looking sculpt, that's not correct. So it's a very powerful tool, but it's also very easy to go too far, I guess is what I mean. But you can still use it. I don't I don't I try not to rely on these brushes, but they are extremely powerful. I just used them very sparingly. So in a way, it's almost a good way to get started with your wrinkles like this. Just pull up a few times and create some base wrinkles. And then you can go in with your brushes. You know, do the same thing on the bottom. Just pulled down a little bit, down a little bit. Control Shift show everything again. So even that's too much. It's just difficult to get this, to get the balance correct. When when you're trying to create wrinkles around the bottom. And this is why, this is why I avoid these brushes because now I'm just sitting here with a brush trying to force these wrinkles when really I could just be looking at a reference image and just sculpting them in manually. Sometimes I feel like this is even less time consuming when I just do it manually. So we're just going to do a few really quick. Let me connect those smoothies, split these out here, use our standard brush and hold all to just carve in between the near. And the strength is a little too high to turn the strength down. Hold Alt, just carbon at the bottom of those wrinkles and just smooth them out very gently. And just a few strokes, we already have some wrinkles kind of in the right place. We'll switch back to Damien standard here and just continue these out. And right now I'm just looking at a reference image from Google, images of just some shorts, just trying to match what it is that I see. And that's often the best way to do it. Cuz there's no better reference than real life. Or pictures of real life. Cloth is just one of those things that you have to 200 over and over again until it just clicks. Just keep looking at reference. Keep on sculpting and get our standard brush in year two. And I'm just trying not to make the mesh look lumpy, that it's easy to make the peaks and the high parts of these wrinkles, some of them stand out much further than others. And if I do that, it's gonna make the whole mesh just look uneven. And that's I don't we don't want that. So I'm just using the standard brush and just going through and trying to car B's. And then maybe I'll grab my inflate brush and just reinforce this part here because I kind of smushed it in a little too far. And you can see what I mean to like it's already starting to look lumpy and it's looking wrong because right now I have symmetry turned on which break in my own rules now. So I'm going to smooth out one side in turn symmetry off. And then just do this side independent of the other one to smooth these out. And I'm just using Damien standard to try and get those wrinkles in. And if a realistic reference isn't doing it quite right, like if it's too hard to read the lines or you're just not quite sure what it looks like or can't get it to look right. Try looking at cartoon reference like it. And I'm a reference like Dragon ballsy. Dragon ballsy is a fantastic, really great reference for clothing and stuff because they are there so dramatic the way that they do their lines. Especially for socially like for go cuz outfit, It's, it's got a ton of wrinkles in it. And it's very dramatic like the pant legs bundled bunch up around the knees and around the ankles a lot. So those, those are really cool examples. If you want your character to look stylized rather than more realistic, look at references like that. Animate characters are always really great for really dramatic reference like that. Okay, so that's looking better, but it's just going to take some time to get it right. It's not going to look right route away. And right now I still have this section masked so that anything I do is not affecting this part. That's helping a lot. Now we need to create wrinkles in the back here. Alt, smooth all this out. Hold Alt and rupees. And if you didn't put any kind of clothing like this on your character, then you don't even have to worry about this. To me, I do have to worry about this. So I want this to look on this to look right. And it was my own fault putting cloth on my character because now I have to go in and sculpt cloth, but it's just the way the cookie crumbles. Anyway. Drawn some more dramatic wrinkles up here. Get our standard brush, hold all, and just carve in on the insides to make those stand out more. And I'm gonna grab my Move brush here, pull those in and smooth it out. Okay? And all we Control Shift and Tab to show everything. So it's just going to take some time and patients to get those to look right. For now. I'm just going to move on because this could take a really long time and I don't want to just spend hours sitting here sculpting cloth when I could be showing you the next step in what we do, what we're doing here. So smooth the saddle bit. All right? And then last I want to switch back to the sub tool here. And I didn't do this before, but I actually still want to frame this mesh like we did with the other parts of the armor because I think it would look better. So I'll hold Control and Shift, click on my red poly group or the outside poly group. Go to Stroke. Curve functions. Turn poly groups off. Certain polygons off, hit frame mesh. And now there's a nice curved mesh and IS curve framed around the mesh. And then we can just grab anything like curve tubes. Or I like the extrude profile brush because it's got all of these different shapes that you can use which are really cool. Change my brush size down to something like 15 or 20. And just tap on that curve. And you know, that's not going to work. It's not going to work because of my subdivision levels. So if I hold Shift, press D, go down to my lowest subdivision level. Well, it's still not me. I'll have to either delete my subdivision levels, which is fine. Go to Geometry, go to my lowest subdivision level and hit Delete higher. Now my highest subdivision level is gone. Now I can just tap on that. And it'll create that mesh border. And if I like the way it looks, I can just tap on the mesh anywhere else and it goes away. Now you've just done mascot goal. I, I like this. I think that ties everything together a little better and makes it look more like a piece of clothing that belongs with the rest of it? And on this part here, I'm going to create just a little bit of wrinkling similar to what we did on the rest of the armor. So there would be some wrinkles coming out this way and up this way. And in here. Just very slight. Just to make it look like there's fabric bunching up a little bit as smooth it out. And it doesn't take much. Just a line or two should do it. If I Control Shift click on this, this will be the only thing showing, so I don't have to worry about messing up the trimming. There we go. And we'll just get that going in toward the inside like that and smooth it out. Even just a couple of lines like that can make a pretty big difference and just give the illusion of some cloth there. I'm going to show everything it's showing you again. Yeah. Just a tiny little bit of detail to kind of help show that that is Fabric, not just a metal piece. And then same thing up here. I want to create a little bit of wrinkling. So I'm going to do some more dramatic lines. Just holding Alt at the Damian standard and then not holding Alt to carbon at the base. And that's pretty strong. I don't know if I need that. And a lot of this is hidden anyway, you're not going to see most of this. It's just for this part that's showing that I wanted to throw in a line or two. This like for now that is gonna do it for the shorts. And in the next video, we will move on to finishing up the rest of the armor down here, like the legs and the boots and all that. I'll see you in the next one.
44. High Detail - Legs: All right, In this video, we are going to continue the armor and I'm going to finish sort of detailing on the boots. So first let's turn on our poly frame and we'll do something similar to what we did in the previous videos. Luckily, we already have our poly groups set up here because of Q mesh that we used on this and then low subdivision. But I also want to add some extractions off of the body because these just kinda look like they're sitting on the legs. They don't actually look like they're held on by anything. So I'm going to fix that. First. I will select the body, go into solo mode here and just grab my mask lasso. And we want to have at least a couple of straps that are gonna go around the legs. Hold this on. So we're going to just mask off this section. And we'll just make this all the same part. And let's say it's three. And we wanted to look about the same. So I'm just going to use my holding Alt, just cleaning up the mask a little bit. Something like that so that the spacing between them all is relatively similar. And I want this one, bottom one to be a little thinner. There we go, something like that. So we'll have these three and under sub tool go to the very bottom could have extract. And we'll turn our thickness down to 0.005 because that's what we used before with all the other armor and had extract. And that's fine. Let's do that. So if we like that, we can hit Accept, clear the mask, tool shift, click on the outside poly group, delete hidden to delete everything else. And then we're just going to go to the geometry menu, edge loop, group loops, and then go down to 0, measure under Geometry, set it to the lowest possible setting like 0.1, and let it 0 mesh that stuff. Group loops were more time to smooth it. Z remeasure again at 0.1. And now we have this really basic geometry, super basic. But that's perfect. That's what we want. Now I'm just going to use the Move brush to kind of push these in so that they're not overlapping with the leg parts. And rather than getting too complicated with these, I'm just going to grab Z modular hold space over a polygon here and go mask Pali loop. Go here and just click on this polytope in this direction. Let's hover over an edge here and select, Insert single edge loop. Just insert an edge loop right here by clicking on this edge. And then we'll mask of this polytope here. And then same thing. Click on this edge, insert an edge loop, and then mask that polio loop. Now I'll hit Control W. All three of those are going to be the same. The group. And I'll hover over a face here, hold Space. Q mesh poly group island. Oops, no, poly group, all Q mesh polygraph ball. And just drag it out. Just a little bit. So now these straps have a little bit of dimensionality to them. So they're not just a flat, blank look in peace. And then we'll just use our Move brush to kinda pull these in here. And instead of having this extra geometry that wraps around the leg like that, I don't need it. It's just kind of in the way. So instead, first what I need to do is create some thickness for all of these pieces. So I'm going to hold, grab my monoline brush, hold space over a polygon face. Select Extrude all polygons. So if I do extrude all and I pull out just a tiny bit, it'll create some thickness and others, Some inside geometry as well. So now I don't have to worry about this being an open, open object. And now I'm just going to hold Control Shift and Alt. And I'm going to hide the right side of these like that. And if this selection is too small, like if I hit too many, I can do hit Control Shift X on my keyboard and it will expand my view by just one set of polygons. So that looks fine. I just don't want this extra geometry wrapping around the outside of the leg because it's intersecting with this and I don't want that. So now that I'm here, I can just go to delete hidden and then hit Close Holes. Close Holes. We'll just kind of sloppily close up this geometry here and I'll have to grab my move, crash this point and move it over or just smooth it down. Like that. And then we can just leave that part alone. So that's good. And now I just need to take the Move brush, push these in just a tiny bit, or just grab the leg and just pull the plate up so that it's over the top of strap like that. And then switch here and just kind of work both of these around until I get what I needed. What I, what I'm going for here. Go out, switched the smoothness. And there we go. There we go. Now it actually looks like these are connected to the legs. Executives actually something holding these on. Rather than them just being floating on the outside of the characters leg. Like that. Cool. So now that we have these legs in place here, we're going to go, I don't think we have any subdivision levels. Okay. So there are no subdivision levels for this paired ever poly groups setup, so we don't have to draw them in manually like we did before. So I'll just hit Control D few times till we get higher subdivision levels. And then same thing, W, press Control, click on one poly group and then hold Control and scale up. Unfortunately, I'll like that's going to save us a lot of time. Those are all the same poly group. So this is doing it all at the same time. That's a faster way to work. Alright, so deformation here, Polish by feature a few times. And we'll clear our mask and we'll press W, hold Control. Click on this poly group, deflated, Polish by feature. So we really get that dramatic edge in there now. And then clear our mask. W hold Control, click on the red poly group, hold control, inflate it. So now this is a really creating that dramatic effect. Very cool. And then polish my feature few more times. And if we clear a mask and turn off all the frame, just like that, we've got these cool, unique sorta look, just using poly groups. Just to get some really nice cool look in detail very quickly. All right. And that these two legs here, that's why color is set to Brown, was wondering whether it's flipped. So brown. Fur for these, I'll hit Control D at least one time to sort of smooth them out. So not as blocky. Maybe one more time. Yeah. So these actually look like they have some subdivision to them. Now if I go down at my lowest subdivision level, I'm going to, with everything unmasked, I'm just going to hit Control W so that everything is one poly group. And then with z modular, go in and hold Alt and paint on this poly group, myself for each strap. Same thing for the bottom one. Just holding Alt and tapping those polygons and dragging across them. Now hit Control W. And if you don't like the color that it first hover over polygon and hold space and select mask. Poly group all. Tap on that polygraph first and then hit Control W. And if you don't like the color that it gave, you, just say Control Z tilde W again, and it'll give you a different color. So that looks good. Now I need to paint. Let's hover over an edge and select, do nothing. So we're going to paint the surrounding edge. And you know, I should do this too, because that's just going to make it clean up even nicer. So I'm painting, complete all of the polygons surrounding this purple poly group that I just made. I'm gonna do that for each band here. Because then when I hit publish my features, when I do this again, it's really going to just tighten up the edge between all of those poly groups. So it's a little time consuming, but it's worth it. In the end. We'll get a really nice result out of this. You could do that to that exact this polygon here also. So then we're just going to keep painting around the outside. Fees. Pose those. Zoom my n and p, These, because that's connected to it. We might as well. It's just going to help tighten up our edges more. Okay? That and then we need the bottom one. Turn on local symmetry right now just because that will revolve around their knee. The last thing that I tap on here, let's make this a little faster for us. I guess I can't tap on those. Okay. These paint, these very quickly trying to create these poly groups. So we can undo those so that we can get some extra detail in here and just keep moving. Okay, so now hover over a polygon face hold space, select mask, polygraph, ball, Topamax, white poly group hit Control W. So we ask that one, That's a now unmask this polygraph and hit Control W. There we go. Now it's set up the way we want. So we have separate poly groups for this top part and the edges surrounding it. So I'll press W Here, hold Control, and then Gail up or inflate this. Actually, before we do that, we need to we need to unmask and we need to hit D to wear all the way up to our highest subdivision level. And this will allow us to select the poly groups we want. So now I can press W hold control and click on this green poly group. There we go. Because now it is more than just one row of polygons. So hold Control, click and drag to inflate it. Polish by feature. So it smooths it all out, makes it all cool. And then we will clear our mask, hold Control, click on the gold poly group or control and deflate it. Just a little bit. Polish by feature. And I, when we clear a mask and turn off poly frame, we've got this cool look. Nice. Okay, next we need to move on to the shoes. So in ZBrush we're not really able to do a whole lot of texturing. But what we can do is we can use noise and we can use other things to generate patterns on the surface of objects. So for the shoes, the first thing I want to do is create subdivision levels. So press Control D, and we'll do this one more time. So now the subdivision count or the act of number of points is about 700 thousand, so it's really, really high. Now, on the right side menu, I can go over to noise. It's under Sorry, surface, we go to the surface menu and noise is under surface that we want to turn noise on. So they're kinda far away so we can hit the recenter button here and we'll show our shoes. Now. We can turn the noise scale way up. Or it creates kind of a cool pattern. So this is, I'm almost going for sort of like a leather sort of look, but I don't want this on the entire shoot. So first, we're gonna go down here and hit Cancel. And instead of doing the entire shoe, we're only going to do parts of the shoe. So let's hold Control and Shift. Click on this part of the shoe mascot. Hold Control and Shift click on this mascot. And we'll also do this part Control Shift click Mascot. Alright, so these three parts are masked and now I'm going to hold control and tap to flip on my mask it to the other side. It's because the poly groups are split up that way. So let's select this poly group, unmask, it is on, unmasking. There we go. It's another same ones are unmasked both sides. Now if we go over to the surface noise, now we can drag the scale up and it will apply. This noise has a preview to our object. So it's pretty cool and like in the way that it That's looking, flicking can mess with that magnify. The strength. Strength is going to significantly increase or decrease what the noise actually it looks like. So this is starting to look more like dry wall unless like leather. So we just want a real subtle effect, maybe even less than that. Like that, just something to make it look like it has a little more texture to it. Him from further away like that. Maybe we can drag this up a little bit. I think that's I think that's enough and we don't need it much more than that. So now you can also mess with this noise curve if you want, and it will, it will mess with the way that the noise is applied is you can sort of see like it changes the depth and the cracks and stuff like that. But I don't want it to be that much. Even like that's fine. Yeah. So once you get this to the way that you want and you can mess with all of the different angles and stuff. There's a lot of settings to mess with, but I'm just going to do like this. Well, I do okay. And it is on here, but it's not applied to our mesh yet. So the thing to keep in mind is you need enough active number of points to receive the noise mesh data before you apply it. So like if I'm on my lowest subdivision level, like at 43 thousand points and I'm like, okay, that looks good and hit Apply to mesh. Nothing happens because it's just not dense enough to receive that level of detail. So if I hit Control Z and hit D on my keyboard to go up to my highest subdivision level. Now when I hit Apply to mesh, it's going to take a lot more of that detail that I add. And it even looks like it didn't take enough of it. But from far away, I guess you can't really see it. So let's hit Control Z to go back to noise. And we'll maybe we should mask by Noise. Control W or sorry, hit W hold control and inflate or deflate. Now that's not going to work. So instead I'll just hit Control Z again and it'll turn noise off and then I can hit noise again. That's it. Let's go to, if you want to edit the current noise that you have just right next to noise, There's the Edit button, just hit Edit. And then you can crank the strength up again or mess with it as much as you need. And to turn it up just a little more and hit Okay. And on my highest subdivision level, apply the mesh. And that's fine. That's fine. I think that looks better than it did and it's not too much. I just want a little bit so that it looks different on this part than it does on the boot. The soul of the boot. Sorry. All right, so now that we have some detail on the boots, they look a little bit different from the rest of the mesh, which is nice because then it breaks up some of the pattern in some of the texture that we have going on. And if you want, you can fill different parts of your model with color for this. I just kept this black and gray because I thought it looked really good with the metal texture that's here, which we're going to use eventually when we export this character out into Photoshop to do a final render. So in the next videos, we will begin prepping to send our stuff to Photoshop and figuring out how we're going to render it. And I will see you then.
46. Finishing The Pose: All right, everyone, in this video, I created a time-lapse for the rest of my posing process. I really didn't like the original pose that I came up with, the character. I just felt it was pretty dry. I wanted something a little more interesting. So rather than walking you through again, another video of the same process over and over because the steps are pretty simple for posing. It's just holding Control and Shift and clicking on each sub tool, masking and unmasking and posing each part, I decided to show a time-lapse of what I did. So I just decided to move the legs a little bit, bend one of the knees, kinda put the feet together and pose the character in sort of a sitting position so that it almost looked like she was floating in place a little bit. Again, just using the T-pose mesh and going through each sub tool and sort of checking my angles. And this time around I decided to actually look at some reference images, which I think was my big mistake the first time. First time through I was just kind of winging it. I can just kind of wanted to show you the steps of how to use the T-pose mesh tool. And my biggest mistake was just not actually looking at any real poses or real photos for reference. And after looking at a few like looking at people lounging, people laying and chairs and people in the water or floating, things like that. I thought that something like that would work really well for this character. Being a Cyberpunk character and a futuristic character. I thought that I could do something fantasy ish and have the character flying or floating. So I just started playing with different positions for the waste and the legs and moving the head back like you can see here, I move the head back. And even just as simple change like that, changes the entire composition of the character, makes it look completely different and adds a whole new mood to the scene. Going back to our original scene here, I did do a little bit of extra sculpting on the character as well. I added a few extra parts. I added a piece around the neck. I added a piece to the bottom of the chin just because when I tilt with the character's head back, there was kind of a lack of color and a lack of shape going on there. So I decided to sculpt a little bit more on there on the characters next, which you'll actually see in the next video when we go into finishing up the pose and all of that. So just using simple brushes and just going in and doing some 3D sculpting. It was pretty easy, even though I had already applied my texture after doing the UVs on this character, does sculpting brushes still work fine and the texture would just stay on top no matter what I did. So I just went in and did a little extra sculpting and the mesh looks fine afterward. So it's pretty easy to go in and do some touch ups, just messing around with some camera angles, trying to find what looks good, what doesn't work, and just finding my inspiration for this character. So after I went in and did my T-pose mash, I went through and applied it to all the rest of my mesh. I had to go through my original scene and clean up all my sub tools because as you saw in the previous video, this process is pretty messy and you get a lot of stretching and a lot of, a lot of messed up geometry, especially if you do things at a weird angle or twist anything, it can really mess up your message or sub tool. So that's also a part of the reason I decided to do a time-lapse for this video, just going back and doing some manual clean up on every sub tool individually. So essentially 3D sculpting all the pieces of the character just a little bit. And it took me a couple hours just to do it. That's why In the beginning I wasn't going to do this method, but the character needed it. And the final image would definitely need more interesting dynamic rather than just having a character is standing still. And I just kind of wanted to show you guys that process going through and really sculpting the sub tools like you can see here. Having to re-adjust all of the different parts of armor and fix the stretching on the different parts of the clothing and things like that. So this is a normal process, especially if you're sculpting for, I'll pose in ZBrush. Or if your character is posed in any sort of fashion. If you have to move the character, it's completely normal to have to go back, redo any of the trimming on the armor or anything if it gets stretched out or go back and read sculpt any of the pieces. Really the main thing to remember with this whole process is that it just takes time. It's just going to take a lot of time and energy to sit and really study, reference and study what kind of pose you want to do. And it's not easy. You just got to be patient with it. Take your time and really study some references and use photos to help you understand kind of how the human body moves and what it looks like in different poses and positions. And that will help you really understand your character a lot better. And by the end of it, hopefully you can come up with an interesting pose that you like. And it will help you create more dynamic images. And in the end, it will just make you a better artist if you can just understand that level of detail and pushing your character that much further. And in the next video we are going to get into doing some final details on our character, like finalizing the eyes and doing some extra sculpting on the face and the hair to try and make our character really stand out and look like a finished piece of art. I'll see you there.
47. Final Details - The Eyes: Okay, so the previous video we went over just finishing up our pose and cleaning up our character a little bit more. Something that I want to go over in this video is that I still have a few placeholders here and I need to detail the eyebrows, the eyes, and the eye lashes because those are just kinda plane compared to the level of detail that we've gone into on the rest of this character. And I just don't want those to fall flat for right now. I'm just going to paint the eyes differently because I want them to look better than they do. So these, I still want them to be blue. So what we'll do is we'll go into our brush menu and we'll find the paintbrush. And let's take our color picker here. And I'll grab this color of blue by pressing C on my keyboard. And I need to find a darker shade of blue first. And actually I'm going to slide my picker over to the left. So it's like a deeper blue, something a little bit darker. So I want my picker all the way over to the right so that it's fully saturated because to the left is desaturation, to the right is saturated. So I want this all the way to the right. And I want it a little bit darker, a little bit further down. So we're going to try something like this. It looks like I have lazy mouse turned on. Turn my lazy radius down to one here, so I'm back to normal. So I'm just going to make my brush size about the size of this colored area. And that'll make it easier to just click and then just drag once or twice really gently around in a small circle. And that'll fill the entire area like that. So I have symmetry turned on. Let's, now that we have a darker color in here, it's easy to just sort of paint in our eyes in layers. So we start with the darkest layer first, and then we switch to black, just pure black. And I'm going to turn my RGB intensity way down to something like to make my brush radius a little bigger. And we're just going to paint around the outside of this blue area, really lightly, really gently because we want to outline essentially the outside of the iris. So and one thing I'm not going to do is I'm not going to put very much black at the bottom of the eyeball on this part here. I just wanted on the sides here because that's going to give it a really cool stylized look. And I have my reference image open. I have a couple of either stylized characters eyes or anime character eyes are really good for reference for this sort of thing too. So I'm just looking at where the colors are darker, where the colors are lighter. Because a lot of that is going to give this some serious, some very real depth to it. So looking here, we can just drag this side, this outline site a little further down. And I'm being careful not to get too dark with this. I want it to be nice and gradual, very light. So I'm going to leave that alone. I'm going to be this whole bottom section here just undone and nothing else on it for now. And so now let's draw our pupil. So I'm still on pure black. And let's just find the center of the circle. And just very careful ages paint in a circle. Since we're on a low intensity, we may have to go for a sec because I want this to be pure black in the center. Or you can just turn your intensity up. And now I want to make my brush just a little tiny bit bigger and then just barely paint a little more around that. I'll undo that was too much. Just a little more like that. And that's going to create a nice fade from the extremely black center. And it's going to gradually fade out as it goes out into the blue area. That I will back out and make sure that our eyeballs actually look like they're straight. And that the pupil is nice and centered on both eyes. Okay. Looks good. And I'm noticing right now that something that I did by accident that actually works in our favor. I had a lighter blue here before I started drawing in this darker blue and my brush radius didn't cover all of the lighter blue. There's actually a little bit of it poking out on here and that's actually a good thing. It was sort of a sort of an accident, but it was a good accident. So because it's just going to highlight this part of the eye even more if you can just see that strip of lighter blue down here. And that's actually a sort of what we're gonna do next. We're going to add in some lighter blues. So if I press C on my keyboard to grab this blue color, I'm just going to drag my picker slightly over to the right here. And then I'm going to drag my eyes saturation all the way to the right and then drag up, so like up toward the top right. So we get a nice light sky blue and make my brush radius a little bit bigger. And we're just going to do a couple of passes outlining the bottom half here. Like this. Now I'm going to make my brush radius really, really small and just draw some scratchy lines sort of around this iris or around the pupil, sorry, lentils. And these lines, it's important to not make it a perfectly straight circle because this from far away, it's going to add an effect that kind of looks like refracted light. It's going to make it look like it's not perfect and that's kind of what we want. So we could even just do this and put in these little up-down motions in here like this, these little scratchy motions. Because this just gives more of that effect what the iris actually looks like. Because ordinarily the iris has, if you look at your eye, it has these lines that come out like this and I don't want to draw it like this, but this is just an example. So we're just trying to sort of create that illusion by drawing these lines. Didn't like that. I think I could do a better job than this. I'm gonna do this a little bit better. And really just outlining very, very lightly like that. I just think circular motions, like think of it like a bunch of concentric rings that are all the same size going up, you know what, gradually bigger, gradually bigger. And we're just going to draw in some lines going around in rings like this. Before I, in the earlier videos, I had showed you a way to pain eyes that was a different style. But I The more than I looked at the eyes that I had, I just did not like them. And then I did something so plain afterward that the eyes just really lacked a lot of detail. And I think that this is going to give it a more stylized look and less of a realistic look. And I think that will match our character a little better, at least that's what I want to go forward with my character. But you can paint your eyes anyway that you'd like. So now that we have some of these circular, lighter colors in here, I'm going to switch back to black, pure black, and progress radius, much bigger. And I'm just going to paint above on the upper half of this part of the iris. Much darker. I don't want it black, I just want it darker. So I'm painting black on it because in the eye socket, this part of the eye is covered anyway. So this is going to create more of that effect of a shadow from the eyebrow on the eye. This is just more of that illusion that's going to give it even more depth. So I'm only doing the top half of the iris. And just very lightly, I'm at 2% RGB intensity right now. So that looks, that looks dark enough. I don't need it much darker than that. I'm going to take my black now and I'm just going to outline this outer edge a little stronger, better than that. Just like that. And on the other side as well, just a darker, slightly darker liner on the outside. So there's a little more definition. And then every once in a while, just back away and look at your eyes farther away. Look at it from different angles and see what it is you like and what you don't like about it. So I'm noticing that I have a bit of a gray shadow leftover from the previous version that I did. So I'm just going to grab some white, make my brush a little bit bigger edges, paint that out. Because I know that the rest of the eyeball is completely white. I already filled it with white, so that's the color that is sitting on. I just want to paint away that gray at the bottom. Yeah, there we go. So I still have a line there, but it's not very dark and there's no more of that shadow of gray there. Cool. All right, so we're getting there, It's looking better. It's getting a little better. I mean, now that we have our darker upper half of the iris here, I'm going to add in more light colors, so we'll grab a lighter blue again, much lighter this time closer to white on the top right. And this time I'm going to make progress rate is really small. It's at 1.5. I'm going to draw in some really, I might even turn up my intensity a little bit more into something like four. We're going to draw in some very deliberate light lines like this. Going down and around and very, very gradual. You want these colors to blend. I'm going to do more blending then covering up. Because that's going to give it that illusion of real depth and reflection coming off of it like that. Let's zoom back in. And we'll just some very small lines with brush radius like at one or 1.5. And just cut some of these lines up into this darker area like this. And L and all I'm doing is thinking in circles. Like there are imagined that there are a bunch of circles around the. Pupil going outward. I'm just sort of tracing in a circular pattern for all the P's. So I don't want to go this way because that's not the direction of the light or of the way that the iris is shaped. I want to go with the shape of the iris and the circular pattern around this way. Much like in, you know, when you're drawing something, it's important to draw the lines in the direction of the contour or the direction that the flow of the surface is going. Because then it gives the illusion of depth. And that's all we're doing here. So now I want to grab, I'm going to press C on my keyboard to grab this little darker blue. And I want to just paint some of this back in right here so that this swoops down in and around like this. That might be too dark. Maybe. That's okay. We can always add more color. So there needs to be a little bit of a glare. So I'm going to select a really, really light blue, like almost white, just like a little step down so that it's just barely barely got any Saturation. And just paint right here. Just like that. And that wasn't much like if I undo and redo just like that. And it's not covering the whole iris, it's just this section right here. So my brush radius is just covering that bottom left corner of the pupil. That before, after, before, after. And that's also going to give that illusion of the light bouncing off of the eyes like that. So even when even when the lights that we have set up in our scene hit our eye, it's still gives that cool illusion. Like there's light bouncing up off the bottom of, towards the bottom of the eye. It's looking a little better. I still want to take some of this, press C on my keyboard and grab some of this lighter color paint, a little bit more of that up here. Just try to blend these colors together a little better. Perhaps some of this darker blue and put it on top of this lighter blue. Just a tiny bit. Okay, so that's looking better. And now I'm gonna take a little bit of black. Just barely. Fill in this bottom part here. Just barely. I can do that one more time. I didn't do that very steady. So I just want that very, very lightly filled in at the very bottom you to make this edge over here darker. And then just one single pass to fill that in just like that. So that it's very subtle. And that it looks like the edge is fading into the white part of the eye. What does the white part of the eye called? I can't even remember right now. That's okay. For those of you that know the white parts lists sclera. That's what that's the sclera is the white part of the eye. So I just want this barely showing at all. That's kinda chunky looking like that. Even if I did one more pass would be too dark because then it's too close to the surrounding lines. So yeah, that's that's fine. I could even turn the intensity down more and try one more pass. That. That's that's fine. That looks nice. If I just move my eyes a little bit to see what they look like facing more forward. Yeah. Yeah, That looks cool. Alright. Now I need to add on the highlights for the eye. So I'm going to grab pure white and a zoom way in. And we want to just put a little tiny spot of white. Turn the intensity up to something like five or four. And I just want to put a spot of white right here. And it's going to be like a little triangle shape. Like this. I'm just painting over this very carefully over and over. And just a tiny little spot like that. And if I angrily as up still there, yeah. Just that tiny little dot of white like that. This way from multiple angles. Even if the light isn't hitting the eyes, it's still gives that cool effect of reflection off the corner there. And I want to see what it looks like if I just paint a little bit of white in here. Make it even lighter right there. Just a little bit of white at 2% RGB intensity. So just barely. And how to travel that way a little bit. Just barely there is even that's too much. I don't have to be even lighter than that. All right. I think that is gonna do it for that part. I think that's good. So next, I just want to grab a little more blue. Fade that in here. Faded around the edges a little more. Oops, there we go. Faded into this black edge around the iris and then grab the color next to it up here. That darker blue. Fade that into the black a little tiny bit. Maybe even fade a little darker blue into here. And even a little bit of dark around this pupil. Now, we'll undo that. So I'm really just trying to blend these colors together as much as possible so it doesn't look hard, it just, it looks very soft and blended. So that's just gonna give our character, especially if you were to zoom in on a, on a close render. It's just going to people who look and say, Wow, those look like really good eyes. That they probably won't do that, but you know what I mean? All right, then I'll grab my white and make my brush radius a little bit bigger. And I'm just gonna do a little bit of clean up around the edges of the iris around here. And something I should have just said before starting doing this was just fill the eyeball with pure white. And it makes this a lot easier because you just have a pure white base on the entire eyeball. And you don't have to worry about any base color underneath. Cool. So this is looking cooler, much cooler, much better than before. And now we have a little bit of illusion here of this reflection. And we can even move our eyes and they look cool, even look forward. We're looking whichever direction you want them to look. So the next thing that I wanted to do, very last what we should do before I go on to anything else, just grab some pure black, like 2% RGB intensity. And just paint a shadow right across the top part of this I. And this shadow. The shadow should follow. It should just come out. I should just stick out a little bit. Below are the eyelid is, and then again on the bottom, just a little bit of shadow over here and a tiny bit of shadow in here. That's what we're going to do. So you could go in and out of solo mode like this and just look and just one pass to maybe a third pass like that. Yeah, that's all it needs. Just that tiny, tiny bit of shadow. So this is before and this is after. So it's just filling in this little space below the eyelid. And then same thing over here. I'm gonna do a tiny bit of shadow. That's too much. Even just one pass like that. Yeah. And have it sort of follow the curvature of the eye a little bit like that. When we're hand painting eyes like this, it's just nice to have some hand painted shadows too, because it's just going to create more depth for your character. Yeah. So all I ended up doing was just that right there. You can see just that subtle change. This part of the eye. And then I wanted a little bit just on this inner corner to just like that. Just the tiniest bit like that. It's a hand painted shadows can go a long way. And same thing with the nose, like we had talked about in a previous video. A 2%, just one pass on the bottom of the nodes can make a huge difference. Because it's going to draw your eyes upward toward the eyes and the rest of the face. Just these little unconscious things about the way that we perceive light and shadow and stuff like that. It can really help bring out your piece even more. Okay, cool. Now we have much cooler looking eyes. The next thing I wanna do is I want to fix these eyelashes. Because these are, there's simple and I think that this character has a more complex sort of look to it. So I don't want simple eyelashes because they just don't match the look of the character completely. Who knows? I might decide later that I'm like, Oh man, I wish I still had them. So just going to hide them for right now. I also had a bottom eyelash that was on there too, but I'm going to hide that as well. I already hit that before I turn the video on, I guess. So. To create a nice look on this, instead of doing what we did before, what I did at first was I grabbed the curb strap snap, which draws just like a flat linked chain belt sort of shape. And instead of doing that, I'm going to grab the curve tube. Because I recently discovered that this is a really cool way to do eyelashes. And I thought I would add this in and I thought this was really cool and I saw this. So if we try to draw on our face right now, it's going to say Warning composed of multiple subdivision levels. You can't do that. So hit Control Z. What we have to do is duplicate the head. So I'll duplicate it. And I'm just going to rename this duplicate so that I know that this is my duplicated just so that later I don't get confused because I know with so many sub tools and my last and I haven't really organized this. So I don't want to lose my place and get disorganized anyway. First thing I'm gonna do is going to go over to my color here and I'm going to fill it with white so that I don't doubly don't get confused. And so I can see a little better. So this is my duplicate head and it's my original head. So for the moment, you can actually see the white one on top because it is pure white. Now that we have this, we can go to Geometry. I'm taking my duplicate head, not my original. In fact, I'm going to hide my original. Now we go to geometry. And at the top of the geometry menu is our subdivision levels. So we can go all the way down or up because I want the geometry to match my original ham and leave it on the highest subdivision levels. So it looks like Level 4. And right below that I'm going to hit Delete lower. And it's going to delete all lowers that division level. So now with curve tubes, I can draw right on the surface of it is before subdivision levels. We're not going to let me do that. So now that I have this, fortunately, my posing mode, I kept symmetry. I kept my head right in the center of everything, so symmetry still works. So I'm gonna go into solo mode and I'm going to use lazy mouse, go to stroke, turn lazy radius up to a 100 or whatever how you want it. And now that I have lazy mouse turned on, I'm just going to draw a curve tubes along this upper eyelid dot there. Just make this nice tube on there. And then for some reason it's not sitting straight on there the way that I want it. Not really sure why it's doing that. Maybe it's just my camera angle or it could have to do with the thickness of this. Could just be that it's getting confused. And it's trying to stick to the vertices over here as well. So I could look at this from a different camera angle and maybe that would help. So much of what we do in ZBrush has to do with our camera and which direction it's facing. So that looks fine. And it's part of this head because I'm drawing it directly on this head. When you're done drawing, just tap on the object itself and the curve will disappear. And now we'll grab our move brush and just pull it forward. Yeah, so it just sounds a little bit inside of the head, which is fine. Because I can always just grab the Move, press and pull it out. It's really in there. There we go. There it is. I want to pull this tube and I want to shape this tube. Just like my eye lid here. I want it to line up with the eyelid. The nice thing about doing this too is hold shift and turn my smooth intensity down to two here. Little higher. Ten term is smooth intensity down. So I can smooth this out really gradually. But the nice thing about working with the tubes like this for eyelids are eyelashes, rather than using the curves traps, snap brush is that it's a little thicker so you can use it. Sort of shape your eyes a little more by covering up a little more of the space here between the I and the eyelid. So it's kind of cool because then you can get an even more control than you could with the other brush. We're just using the Move brush. And I turned my smooth intensity down to ten so that I have a really gradual smooth while I'm doing this. And what I'm gonna do now before I forget, because when you draw the curve at masks, everything else that you drew or everything else on the sub tool that you drew on. I'm gonna go to sub tool. And go down to split, and split and split mass points. So now the eye lashes are separate from this duplicate head that we have, has its own sub tool. Let's see. So we want not. So eyeballs are tricky, especially like the shape of the eye socket is very, very tricky because of the way the skin pulls from, wraps around the eye and comes to this inner corner of the eye here. So I'm trying to make this match that shape so that it comes down. In fact, that's too much because I don't want this I lashed to go all the way down there. So I'm going to just pull it back a little more, smooth it out more. And actually it can be a lot smaller too. I think it's too thick for this. Smaller it is the harder it will be to deal with. Of course, you have to be more precise when it's really smaller, it'll look like it's bumpy and has imperfections. Part of the point there is I just I don't want this to come to the inner corner of the eye. I want this to go to about right there. Just before it would connect down and over to the inner corner of the eye? Yeah. Something like that. So that it's not lining the entire eyelid. Cool, something like that. And to make this easier on myself, I should select some black and hit Fill object and it'll make it completely black. Then I can get a more of an idea of what it's supposed to look like. And for the moment I'm going to oh, when I split this up tool off, it retained the same name as my duplicate head, which was duplicate. So I need to rename this. I'm going to click on my eyebrows and rename them. Are eyelashes. Rename them eyelashes. That's an easy way to get mixed up. I forgot about that. So I'm going to hide my duplicate ahead and show my original head. Because the color and everything is going to give me a better sense of how this looks while I'm doing it. From the side that looks okay, this doesn't look bad. Let's try to match this skin there. Cool down like that. And now we need to. And that's interesting. It looks like my head on this side is a little uneven. On this eyelash or eyelid. It looks different. On this side. That's fine. Maybe we got pulled forward. So now we have this. And what we're going to do is grab our snake hook brush. So go to your brush menu S for snake hook. So down and out. Sort of motion. Down, out, up, down, out. And it looks a little chunky, but that's okay. It's, you know, if it's pure black and from far away, you won't be able to tell the geometry there. It's more about getting a silhouette of the eyelashes sticking out with this. So I'm just going to my first one. I want to start just above the bottom here. Grab pulled down and then pull out, down and out like that, just so that there's a tiny little bit of space at the bottom. These first ones that I do that are on the left-hand or the outer side of the outside of the eye. These to be much longer. So once you find a good brush size, you should only have to grab and pull one time. If your brush is too small, you off to pull multiple times and I can create it, make it look kinda inaccurate or, or weird. So once you find the right brush size, it should just be one stroke, down, over, down over like that. And it creates this sort of nice swoop to them. So these ones are going to be longer and as you get further in toward the inside of the eye, you want them to be a little shorter and a little more scarce as well. Not as many. This very linear. So something like this. So I have a grand total of 123456789, 10. So I have a grand total of 10 lashes. So now I can just grab my curve tube brush. And I'm going to switch to my basic material, this one here. And then switch to m at the top and hit Fill object. And it'll fill with basic material instead. Going to solo mode here on the outer corner. And I want it to sit just right here, right along this line. Up to about half way. Like that. All right. Try this again from a different camera angles. Really small brush radius, bottom eyelid. I'm just going to draw it on the front of the eyelid. That's just drawing it somewhere like way. Actually, no, that's not bad. If you hover over the curve, it shows the whole thing and that's not bad. So I ended up drawing it from the front view here, like this. And it stuck it inside the face a little bit, but that's okay. That's not too far back. So I'll hover over here, tap on the mesh and the curve will disappear. Then grab our move brush. And before I forget, sub tool, split, split mass points. So now it's its own sub tool. So if I go out of solo mode, hover up to sort of almost top few and make my brush radius really big here. And just pull it down. So this bottom eyelash, it's going to be much smaller than the upper one. Or just trying to match it up with this edge. Just trying to get this to follow that lower eyelid. All right, so now that we have this in place, let's grab our snake hook brush. Pick our radius small again, 5, 6 to a few coming out from the front. And I wonder what this would look like if it were a little thicker. So I'm gonna press W hold control and scale up. And it's going to inflate the whole thing. And actually I think it's too long. So I'm going to chop some of this off. I'm going to mask that flip my mass Hyde Park delete hidden Close Holes. And I'm going to have to mess around with this a little bit to get the placement just right, but that's the basic idea. So we did some nicer looking eyelashes, little more stylized. And I think this is a good place to stop for this video. And in the next video, we'll get onto detailing the face just a little bit more and just adding some more paint like to the lips and making our character stand out even more. So I will see you in the next video.
48. Final Details - The Face: Welcome back to another video. And in this video we need to create some better eyebrows for our character. And we need to touch up the mouth. Gets better paint going on in a little bit more detail. So let's start with the mouth. First. Just need to make sure that the shape is fine. It looks like it's coming out from the face a little bit. Lower lip looks like it's got an oval shape to it, so I'm just going to leave that alone. Upper lip could use a little bit of work. But it's not bad, not bad. Since I've turned my texture off so I can paint on my face. I can also switch to different material by turning on M, selecting a material like basic material and hit Fill object. So the first thing I wanna do is I want to flatten out, I want to take my H polish brush, your h and the brush menu and just flatten out this front-facing part of the upper lip a little more. Just a little bit, and then smooth out some of this in here, turn up my smoothness up to 100 percent. And I have to be really careful when I'm doing this, when I'm redoing the mouth. The mouth is a lot of work to sculpt anyway. And I don't want to destroy any of this, you know, hard time and energy that we put into getting this shape, just ride and making it. So I'm just being really gradual, super low intensity with all my brushes. Just to try and push the shapes in the direction that I want them without destroying any detail. And we'll use the Move brush here too. Character doesn't have, I want this expression on my character's face to be really somber. So like even on the eyebrows, something that I didn't mention in the previous video is I just took my clay brush and added a tiny bit of clay here for the inner corner of the eyebrows. And it just creates this more of this look of concern on the character is when you furrow your eyebrows, you know, when they're drawn together, you get this kind of effect. The browse, the skin doesn't actually touch from one side to the other. There's always like this separation in the middle, like this, comes up and out kind of like that. This sort of shape, like if they were angry or mad, your character could look like this. But the clay brush is perfect for this because it just adds one layer of clay without doing too much and you can smooth it back down. So we're trying to retain the shape of the skull underneath while adding just this little bit of clay that acts as the muscles of the face and how the skin is moving. And then taking Damien standard and just barely tracing the edge of that. Just a little tiny bit. And it doesn't take very much. I'm going to change the material to that won't show as much. It's just basic material is better for sculpting because it shows a little more detail with lightened shadow. The skin shader material is better for rendering because it shows a little bit less of that detail like this, because then it looks more like a skin tone. You can see even just that tiny bit of clay made a huge difference in my character's expression. Like I had said in a previous video, like my teacher used to always talk about one of my teachers. She would always say it only takes about an eighth of an inch of difference for any of the facial muscles to move, to change the entire demeanor of your character. And just by adding in that tiny bit of clay, now we already get this very almost angry sort of look. Whereas before I've had just control Z. It's more of like a serious face like this. But when we added that clay in, now we actually have like almost an angry sort of look like very determined in serious. And it really doesn't take that much. Just the subtlest changes can really change your expression and really changed the intent behind your character. So actually, I don't want her to look mad. I like just this very subtle change, so I'm going to keep it. I'm just going to keep it like that. Just barely showing. We'll add a little bit of clay in here. And I want the expression to be more focused and serious but not angry. Like she's focused on something and she's determined. Not like she's upset. So I need the mouth to match that. And that means that I either want the lips to be. I don't want the ellipse to be pouty. I just, I guess I want the expression to read. Almost like the lips are drawn a little tight, like in focus almost. So this is looking good for that because the mouth isn't fully relaxed. The outer corners and an author coming down a little bit. And if you were to look at your own face in the mirror and sort of squinch your face a little bit, like put a serious look on. And you can notice that the muscles on your chin tighten up a little bit and the muffle the muscles up here from the sides of your nose that pull your upper lip kind of tighten a little bit. I'm not gonna go too much into facial anatomy, but those are the main sets of muscles that you use when you get that focused serious look on your face. So there are two muscles called the levator on the sides of the nose that pull the upper lip up. Especially when you're angry like if you smear it, pulls one side of the ellipse up like this up here. And then there is the I forget what it's called on the chin, there is a main muscle that pushes up. So it actually pushes the lower lip up like this. It's like the frown. And then there are two muscles here that pulled down, that also pulled the sides of the mouth down. This is a very pretty extreme, but so in this case, the muscles that our character is using in their face would be elevators on the sides here that are kind of squishing the nose down and drawing the lips together a little bit. So in fact, I should grab the pinch brush and just very lightly try to pinch the lips together. And a little bit of that frown on the chin. But I already have that built-in here because it's already pushing the muscles on the lower outer corner of the bottom lip here, kind of up and out a little bit anyway. Which was really simple to achieve because before I think the face look more like caved in like this. And all I did was just grab it and pull it out a little bit. And that sort of achieves that effect for me. But really, it just comes down to looking at reference. Pick a, pick a face, pick a mood, go on Pinterest, lookup as much references you can based on that particular emotion. And try to copy it. This, I think this is matching. The characters. Look and feel a little better. I might want to pull the corners of the mouth down ever so slightly. Because the mouth is never perfectly straight. Yeah, I think that's looking better. Yeah. So now the expression is not mad, not angry, but focused and determined. Yeah, I think that looks good. And I can mess with this more on my own time, but just wanted to get those few important points across while I was talking about it. So let's paint the lips now that they're in the right shape. Smooth this out a little bit up here. So let's add some paints. I'm actually going to switch back to my skin shade materials and select skin Shea, go up, turn on m and hit Fill object. So now the phase is filled with the final material that I want to use. And I need to smooth out this line between the upper and lower lip a little bit because there's some bumpiness going on there that doesn't look very good. It's kinda unsmooth. That looks better. I'll grab my damien standard brash, like a really, really low intensity. So the upper lip is made of three parts. If you carve right here, There's the center, and there's the two wings. There's one on each side. So I'm just going to very lightly, very, very lightly. Outline that center part and then put a couple of lines going out toward the outside corner of the mouth. And I need to add a little more for crease between the lips here. So I'm going to turn up my tensity a little more, Something like that. So I don't want much here because we're also going to paint in some color and a little bit of fake shadow too. And that's going to really add to the effect at this line right down the center of the bottom lip. And just a few lines, very, very, very lightly. Just barely on the bottom lip. And look at it from far away. Even that's a little too much because it almost looks like it's really wrinkly, which I guess if you were to try your lips together, they would wrinkle like that, but it still looks like too much. So I'm just going to smooth it out a little bit. Because it really doesn't take much to overdo it. I just want a tiny bit. Yeah. Yeah, that looks good. So now we'll grab our paint and let's press to see over the lips to see what color we already have. And I'll grab that color over here. I wanted to be a little bit darker. So let's go left two D saturate it down to make it darker. And we'll turn our RGB intensity to two. And let's paint these lips type color and the bottom lip. And I have that as a base color. I'm gonna make sure I fill all the way over here to the corners of this part. I'm even going to put a little bit, make my brush rate is really big and just put a tiny bit. Just like one pass. Maybe two passes on the outside corner of the mouth. Like small like this. Yeah. So that that color is bleeding out here just a tiny bit. A little bit more. Yeah, that's what I want. So that it almost gives the illusion of a shadow there too. So I'll actually make that a UE and a little darker. Just drag my color down a little lower. So it's a darker red. And put that color in here. It's really easy to overdo that. Just going to just try to be really subtle there. That's, that's good enough. Just like barely sticking out to the side but mostly underneath that top part of the upper lip here. So it looks more like a shadow. And I'll take that same color and I'll just paint along the line of the mouth between the lips. Dark, dark, desaturated red. This got a little bit of on the upper lip, little bit on the lower lip. And then I'll just drag my color down even darker. So it's really dark. And just paint some of them like this. Oh, that's too dark. Too much. There we go. There was some lightness in here between the line and the lips. And that's too much. It's too dark, way too dark. I gotta go back. Go back. Really easy to overdo this. So let's see how well go. Take our original color and go a little bit darker. And then just between the lips, just throw that color right in there, right into the crack between the lips. And I'm keeping my brush radius a little bigger so that it also gets out onto the lips like that. So it's very gradual, darker red and how it's much lighter red up here towards the top. The outline, these lips don't look like they're quite the right shape. So I need to move my brush. Pull this upper corner of the lip out a little bit more. That's too wide. Mouths are so complicated. And now to make it really stand out, because I kind of lost my edge here. I'm going to grab my standard brush and just draw, starting at the very center, draw a line out and around down, and then trace back over it one more time. And that will outline my ellipse here and make them really stand out more. And then I will go and smooth out the back edge of it. So not something that whole thing. I'm just smoothing this half of the edge so that this raised part is still a very crisp edge. Just smoothing the back edge so that it doesn't look as much like a mustache. And you can even add back in again with a standard brush if you need to understand the brush bigger and make this here. So there's always this little this little divot beneath the nose that goes out and connects to the upper corners here of the top lip before it travels down. Pull that in a little more. Alright, close enough. Let's keep color in these Lipson. Grab our paint brush. I'm going to switch to black, change my RGB intensity to one all the way down to one. And just really gently try to paint in some black right in the corners and the crevice here where the lips meet. Just like just barely like that. And maybe a couple more passes. So it looks like this. It's an hour hand painting a little bit of shadow. Now because of the way my lips look, it looks like they're kind of open. Part of that's to do with the way that it's modeled and part of that stuff with the paint. So I'm actually just going to inflate this ever so slightly through really big brush radius. Because I want the ellipse to look like they're more closed or together. And now I'm getting some unevenness. So I need to inflate this front bottom facing edge of the upper lip here. Because it looks like and really flat before. Cool. So that's looking much better. Characters actually looking kinda mad, pull the mouth back up a tiny bit. Just don't want it to look like she's smiling. I'll want that weird smirk on her face. Still like it's serious. Yeah. Good enough. Now let's go back to our paintbrush. I'm just trying not to stay too focused on this all the time. It helps to kinda look back out and look at something else every once in awhile. Otherwise I can lose perspective really easily. So that's why I keep backing out and picking other things focus on. So just like the bottom of the nose, when we did a tiny, tiny bit of black pain, put our RGB and density to do. And just below the lower lip, just one pass. I was symmetry turned on. It makes it even darker because I just like doing it twice. But that's that's before and after. Just one quick pass and baited shadow there. And that's going to add a lot of depth. Smooth out that lip. And the same thing here with we don't know what angle we're going to render this from. So rather than painting anything on the bottom of the jaw, I'm not gonna do that because I might angle it differently. We'll see I think that was too dark. So I'm going to turn symmetry off and then do one pass. Yeah. Just like that. One tiny little dark spot. Cool. That's all it needs. And now that we have our black selected, I want to paint on some of the lines like I was talking about that separate the sections of the lip like this. But I want to do a better job in this. Just showing you what I'm talking about here. So I'm turning symmetry off. When a semi RGB intensity to one. And instead of grabbing black, I'll actually hover over this, press C to grab that color and then there's drag the color picker down to a darker bread and use that instead. And I could even some intensity 2. So this works better than using black because now it's like a shaded area on the lip. Asymmetry turned off. It will just look that much more believable. So rather than using black, I'm just using a color similar that's just slightly darker. I'm going to grab a lighter value and fill in some of the space on top of it. Smooth out these edges, smooth out the top. So it's not just a straight line. Needs to be a little lighter. Actually, I'll just press C to grab that color and blend this down a little bit. So just trying to blend these lines. And that's even too much already I can. It's just, it's so easy to overdo this paint should just go as light as possible and just try to blend everything together. Because I'm far away. It looks so different and it's easy to just put in too much color. I just have it look really dark like these lines from here. Even from this far away. It's not, it's not believable. So just takes a little time and patients and experimenting with the color to try and find the right value to put in there. This, there we go. I think that looks a little better. I went way too dark the first time. So now I'm just trying to cover up those darker lines with something slightly lighter that blends with this lighter colored better. That, and now I'll grab my lighter value for my lips. And I'm just going to paint down an end to this darker color with it. So we're creating the illusion of shadow and depth. So that looks much better. Now it actually looks like there's texture on there, even though it's just paint. It's not the best job in the world, but we're kinda hurrying through this because I'm trying not to take a million years to show you guys what I'm doing. I'm just trying to get the point across. Now I'm taking this skin color here, press C to grab it and just painting around the outside edge of the lips so that I'm painting away any bleed or anything that came up here from the other part of the color. Same thing here. Just clean up a little bit around the mouth. This cool. Looking better. Now let's do the bottom lip. So press C on the darkest color we can find over here. Drag it down just a tiny, tiny bit. So it's only a tiny bit darker. Then zoom way in here and draw some very light lines. And remember to follow the contour of the lipid self. So draw the lines in the direction that the surface of the lip is going. So don't draw your lines like this because it's not That's not how the lip is shaped. A lower lip is shaped. It's two parts. A line down the center here, and there's this side and this side. And it's these kinda of like cylindrical little pillow shaped little fatty pads on the bottom of your lip. So you want to almost like cylindrical. So think cylindrical when you're drawing these lines. And then we'll grab a lighter color and paint a lighter color up and into this to kind of blend it together. And even smaller. Same thing. Cool. Before these lips were just so light and they didn't have any detail. Just needed a little bit of something extra because they were really kinda lacking before. So we'll take the Damian standard and just carve in that center line for the lower lip like that. Just a little line. So you can see a little separation there. And I'll do the same thing for the upper lip. Like that. Just so there's some natural shadow to just one or two more spots like that. And that was that was even a little too much. Just a little bit. Just takes a tiny little bit. So we get some of that natural shadow to. All right, I think that's gonna do it for the lips for now. Next we should do some eyebrows because these eyebrows or while they're just really plain. So like this sort of look. The fact that the inner corners of the eyebrows are coming up. This is what I want. I want them to come up and in like this. Because it creates that sort of look of almost concern. But it's actually how your eyebrow muscles contract. They actually have this inner corner and outer corner of the muscle. So the inside one moves down and in and it causes the eyebrows to do sort of this up and inward motion when you have this almost like when the look of concern or the emotion of concern causes the eyebrows to do this. And the shape. That's kind of an extreme example, but I just wanted to show that it would actually be shaped more like this. Turn our thickness way down to points 0, 0, 1, hit extract. See if we can turn it on even less and extract. So the lower the thickness, the more accurate this mask is going to pace up. I'll just do that except we'll turn them white so we can see them better. Unmask this for turn-on poly frame, go into solo mode. There's a back facing poly groups. I'll hold Control and Shift. Click on the front page facing poly group. Zbrush will let me. There we go. And so the back facing polygraph is hidden and I'm going to delete hidden. So now there's no back facing polygons, it's just the front. And then we're gonna do the same thing that we did with our armor in previous videos. Go to Geometry, go to edge loop, group loops and group loops. I'll make this ready to 0 mesh. You can see, remember without it, I just like to do group loops first because it smooths out a little bit. Then Z remeasure, turn it down to 0.1, the lowest you can go and hit the Refresh. Cool. Now if I press W on my keyboard, I can snap the side view and move this forward a little bit. So that's on the front of the face. So Z remeasure kinda did a good job. It could be better. Let's go back to Edge Loop, group loops. 0 mesh at 0.11 more time. Okay, that's better. It's even lower and even smoother. So now I have a little more control over this. So if I got my Move brush, now if I try to smooth this, the outside edge is not going to move at all. It's just the polygons inside that will move. So I can smooth this down so that everything is the same as nice and flush. And then I want to go to Z modular zoom way in. Actually before I use the modeller zebras crashes when I use the modelers, sometimes I'm going to save, don't forget to save there. So I want a little thickness to them so that they can sit inside the face. And I'll press W snapped side view and then just push them right up against the face like that so that they're sitting right on the skin. Now let's take our Pinch brush, super, super low intensity and pinch this facing right, the eyebrows. So if you do it from over here, it's going to pull in the direction of your cameras. So look at it straight on. When you use bench. We could just fill it with a light gray and leave it alone because it's still there, then they just look like they're penciled on a little more. So if we grab our paintbrush and then a tiny bit of shadow down in here, paint a tiny bit of black hole on the bottom of the eyebrow. And then I'll put C on my keyboard here to grab this color and drag it down to be darker. If I want to paint any shadow in here. And I'll paint some of that color on the upper lid as well. Yeah, there we go. The last bit of detail that I really want to go into is changing this hair. But I think we will do that in the next video because the character has a lot of motion to it that looks like the character is flying and moving. And because of that, I want the hair to look like it's in motion right now. It's very static. It's sitting very still. So in the next video, we'll get into changing the hair to make it look like it's moving with the character. And I'll see you in the next one.
49. Final Details - The Hair: And welcome back. In this video, we are going to do the hair and add a little bit of motion to the hair because right now it just looks like it's pretty static on the character's head. And if our character is moving, I want the hair to look like it is also moving and being affected by the wind or, you know, the, the general motion of a character. So to do this, our hairs already kind of clumped together. And if we look at it in solo mode, it's sort of smush in parts, and it's very tight and packed in here. So we need to create a little bit of separation between all of the strands. There's a few ways to do that, but the way that I'm going to start by doing is go to our brush pallet. And we're going to find the cloth wind brush. So cloth wind under C. So if you are just pressing the brush, you can see that it's blowing the hair in that direction, in whichever direction you're pointing. So you can push things around and it works sort of like using a thick a blow dryer on your mesh. So if you hold Alt with this brush, if you turn the intensity way down to something like 15 or 20 and then hold Alt, it will actually do the opposite. So instead of pushing it away, now it's sort of like pulling it towards you and separating the strands a little bit. So this is sort of an extreme version right here. What I'm doing, just to show you what it does. But already, there's so much more separation between the strands when we use this brush. So this is a really great way to just quickly create some looseness to the hair because it's already it's just way too tight. Like this. This looks more like if the character we're standing still. So the very first thing I want to do before I get into that is be sure that I don't have any subdivision levels, which it looks like I do. So I'm gonna go to Geometry, go to my lowest subdivision level here, or hit Shift D. And I'm going to delete higher so that I only have my base subdivision level with 8000 points. And if you have higher than that, That's okay. I just like to work on low low subdivision because it's easier to work with, it runs faster. And you can always subdivide up later. Plus if we have no subdivision levels, it's a good thing too. Because if we want to go back and use an insert mesh brush like another hair brush or something else. We can do that if we don't have subdivision levels. So going to delete my subdivision levels first. So let's grab the cloth when brush, make our brush radius pretty big. Turn the intensity down to something like 20. And we'll go into first, I'm going to mask off the hair roots that are touching the skull because I don't want the bases to move. I just want the rest of the hair strands to move. And just really lightly just going to look like a medium-sized brush hold Alt and just tap a few times. In the areas where I want to create some separation from the hairs and just changing my camera angle from side to top to bottom to kind of get an idea of what it's doing. I'm going to switch from this brush, go your brush palette, and grab one of these groom brushes. The groom brushes are typically used for fiber mesh. But since we're not using fiber mesh, we'll use it in a little bit of a different way. It can still be used on a regular mesh. So I'm going to grab groom hair long and groom hair long as great because it really, really pulls the hair. It's like the Move brush, but with some other added properties to it. So you can see how it kind of stretches poles like this. And this is because I have my intensity turned way down. I think by default the regular intensity is way too high, like this. It's going to throw your mash out everywhere. But if you turn the intensity way down to like 15, you can very lightly just tap and grab a few times and pull the hair out. And it does a really good job of just creating this loose sort of pull, especially the middle of the hair strands. It does cause some stretching those. So be careful because you don't want to stretch your hairs out like this because then it's not going to look realistic or at least not look believable. So I'm just trying to create some, some bending, stretching. Just very lightly. Go into solo mode. And from the side here I'm just going to pull this out and away from the head a little bit so that it actually looks like it's coming out from the shoulder a little. And already this is looking much better than it was before. So I can, if these start to get too thick from using other brushes or, you know, because I think that a little bit of that groom wind or the cloth when brush might have inflated this just a tiny bit. You can always just smooth it down a little bit. And if your hair strands get way too thin, like if they're like this, they're paper-thin. You can always mask off that area. That's too thin. Flip your mask. Press W, find your Gizmo hold Control and then just scale up while holding Control and it will thicken or the same thing. Go to the deformation menu, go down to the bottom and grab the inflate slider and drag it up and it will inflate whatever is unmasked. Rather than going through and making you watch me do this, I'm just going to grab my Move Topological brush. I'm just gonna kinda fake it here. Just going to create some more bending in each of these hairs to make it look like they belong there. And like they have some motion to them. But what we need to do next is we need to create some flyaway strands or hairs that are just not with the rest of them, like not not part of the mass, the main part of the hair. I'm just going to grab my Move Topological brush and pull a couple of these out in a way, the rest of the hair and either duplicate them or just use the brush to create flyways that are just sticking out like this one in the center here. That looks good. So I'm going to hold Control click out here. Oops. First I need to show everything and clear my mask so I don't have anything else mast. And we'll hold Control Shift. Click on this to isolate it. Hold control and click outside of here to mask that off. And then control shift click to show everything again and then go to sub tool. Go down to the split menu and hit Split Mask points. And now this one hair is its own sub tool. The only reason I did this is now I can select it. I'm gonna mess up till menu or just hold, hold Alt and click on it and then hit Control Shift D to duplicate it. And now I have an extra hair that I can just move around or use as my fly away strand. Grab our move brush. And this is my duplicated hair. So I just want this, I'm going to hold space and turn dynamic sizing off because if your brush radius won't go any bigger than this and you bigger than what you can see on your screen, hold space. And up here to the top right is the little dynamic button. If you double tap that, it will turn it off, which means your brush size can now get as big as you want it. It can get as large as your entire object. So turning dynamic off can be nice. It just allows you to, because then you could quite literally just move the entire hair strand all at once or, you know, make your brush much bigger. So I'm just using my Move brush. And I'm not getting the push that I want out of this. So I'm going to go up to brush curve and turn on accute curve. The curve turned on. It's really helpful for hair because it grabs right from the point that I'm touching with my brush and pulls from that point. So I want a specific shape out of this hair. I can just sort of force it with accurate curve. And then you get the actual direction that you want to go. With the Move brush. Sometimes the Move brush doesn't pull right from the point that you're touching with your cursor by default. So this is nice. With ACUE curve you get. You can make it go exactly where you want it to go. Because it moves in the exact direction. And from the exact point that you clicked on is obviously way too big. So I'm just going to scale it down to this. From front view is going to rotate it so it's sticking up and out. And I'm just using camera angles and my gizmo to just rotate this around. Okay. Something like that. And then I'll turn anti curve off, underbrush, curve turning off and then just use the regular Move brush to just push the top of that down so that it looks similar, more uniform to the rest of the hair. But I'm still getting a nice flyaway strand and it's coming off to the side. And if I look at my silhouette here, yeah, and now we have this cool little extra hair sticking off in this direction. Pull this up, push that down. I'm just trying to get a deeper bend out of this strand so that it really looks like it's coming off the head like that. And then I'll just hit Control Shift D again to duplicate this hair. Go to my top view, rotate it back, grab my Move brush and just pull it up in a different direction. And maybe I'll go rotate it back even more. Move it so that it's in the right place. Like the root is actually touching the head again. And we'll just keep messing with this and fly away. Strands are important because it. It makes the hair look more like hair, because there's always going to be a couple of loose strands. Not all the hair is going to fly in the same direction. But I don't want it to be the same height as my other hair strand over here. So it's at the same height right here. If I'm just looking at the back of the head. So I want it to be either higher or lower. And I want to smooth it out a little bit and then maybe press W and inflate it. Control and scale up. I'm sorry, I scale up holding control to inflate move. And so it's just going to be a little more of this, just messing around with the hair strands and then hold Control Shift, press D to duplicate that same strand again. And we'll just rotate it around. Put it in place, grab our move brush, and just try to create a different shape with every single strand. And you don't want to do more than like four or five of these. Because even with just a few like that, you're starting to get this shape here. And now the top of this highest one is starting to create negative space between the two and the other one that exists now. So now I'm looking at my negative space to try and create a more, a more readable shape in here. And you know, I mean, what is a readable shape? It's just if it's the directionality of the outline of this entire shape to do with these flyways trends. So do I like the curve? I like the look of the top part. I liked the look of the bottom part. So now I need to fill in the space in-between here. So I'll hit Control Shift D to make another hair rotate to top view, will maybe move it here to the center. Go back into Draw mode. And I'll just pull it down like this. Maybe this one needs to be a little smaller so that it looks like from the front view there's a gradual curve in here going from this bottom piece to the center backup to that top part. That's just sort of out and thinking about it. I'm just trying to explain how and going about doing this so that, you know, that I'm not just doing this with no explanation. That's sort of my thought process, which is linking a negative space from the front view back of you because it's, our renders are probably going to be from front side and stuff like this. And even like a three-quarter view like this. So I need to change the shape of the tip because it's too similar to all the other ones. I'm just going to smooth it and then inflated. So the space between here and here is a little less than the space below. And see on the bottom, I'm just thinking out loud as I'm doing this. So let's do one more control shift, D rotated top here, move it over this way, maybe in front of the other, fly away there. So from this angle, it's way too similar to the original hair, so I'm just smooth it out. And then MSW control scale up to us to inflate it again. We're going to pull it forward. See what that looks like. And that's too far forward. There's too much space between these. So I want this to be like a pattern and wanted to be readable. Eyes pick up on patterns. And that's what I'm trying to do is create some sort of pattern that looks cool. Something like that. Almost there. It's going to move up the tip of hair root again and get it so that it's coming down and forward like that a little bit. So that even from the front here. And you can switch back and forth between these two. Just start messing with the shape. Start pushing and pulling each one of these hairs are around. Messing with the individual shapes. Let's try and create that negative space that you want. And there's no wrong answer. There's no right answer. It's just whatever you think looks good. It's kind of the beauty of art in general is if you create something that you think looks good, then maybe it is good. And that should be up to you, not up to other people. Okay. So just trying to break up how all of these hairs look individually like this. And I think we need at least one more. But rather than duplicating that same error again, I think I can get away with just grabbing the Move Topological brush, switching back to my main hair here, and just grabbing a few of these from this bottom side view. And it's kind of pulling them out to match this same sort of motion as the rest. And same thing if, if the Move Topological brushes not pulling the way that I want it to go up to brush, go to curve, and turn on ACU curve. And now I can get a much more accurate pull on the hairs. I'm just going to isolate this one, smooth it out, and then press Control and scale it up. There. For this is obviously very time consuming, doing this manually. And there are other ways to do hair, but for this character, the way that we did the hair strands, I just thought this was a good practice to go through just to understand a basic exercise in hair. There's a lot less strands to deal with, which is nice. You know, we're not creating realistic hair anyway, it's stylized so we can kinda just play with it and have fun with it. Really pushed this in so that it's not that long. So it was way too long before I move that hide those. Okay, so now we're starting to get a little more of a pattern here. And I like that there's some negative space. If you see between the head and the hair here, there's that spot of white right there. I like that because I think in a final render, like if I go up here to the top right and hit BPR, I already have some settings turned on. So it's going to give me a decent looking render really quick. But seeing that little bit of negative space between the face and the hair over here is going to really make the model stand out in our final render. Because just that gap between the shadow and the light. Show the separation there and then it will really accentuate the outline of the face. That thing that's really important. Yeah, so this is starting to look okay. I'm liking the way that this hair is looking. So now it's really just moving the strands around so that they're not overlapping with one another. Since we have individual strands that we can see. And I'm just going to use the Move Topological brush to do that. Under them out, push them around a little bit. And of course you can always go back and use the wind cloth brush again, cloth, wind, hold ALT, tap a little bit. Well that's way too big. And tap and it will just essentially it's like taking an air blower or like a hairdryer to your to your hair strands. Just kind of forcing them apart from each other. Create a little more separation between them. And your camera angle effects at differently to subtract from different camera angles, not just the same angle. Always. Try from the back, tracking the bottom, top right, whichever direction you are looking. And it will work a little differently from every angle. Just being really patient and trying not to destroy the hair. I think the hair got a little longer than I wanted it to. But that's I guess that's okay. I don't think it's going to be a bad thing. Some of these hairs are way too thin, so I need to mask off this here. Flipped my mask. Both control and scale up, conflates them. And the rest of that tidings. So that's fine if Coke and even just grabbing my inflate brush and going in here and manually inflating some that look like they got a little squished. And just grab the Move Topological to separate any of these strands that are overlapping one another or that are touching and not Yeah, that are interested intersecting. That's that's the word. And all want the hairs to intersect. Okay? So this is the King. All right, now, I think this is a good place to stop for this video. You're able to create some flyaway strands like this. Make our hair look a little more like. It's actually in motion with our character. Give it sort of like a floating, drifting sort of motion. And in the next video we'll get into doing a little bit of lighting and setting up for rendering so that we can export this character out to Photoshop. I'll see you in the next video.
50. Export To Photoshop - Lighting And Rendering: So our character is basically complete at this point. We have done all of the finishing details on the face. We've detailed the armor. Now we need to light and render this character. So right now we are still in our scene right now we have 86 sub tools because of all of these pieces of hair and armor and all of these individual pieces. The first thing I want to do is make sure that everything is the right resolution so that the hair, I know that in the previous video I deleted my subdivision levels. So the Harris still looking pretty blocky because it's very low active number of points. And I can hit Control D once or twice or however many times I want to create a little more smoothness because it's going to subdivide my mesh, make it look a little bit, a little bit better. Also, I have all these individual flyways trends that we created in the last video. And if I go over to my sub tool menu, I think what I will do is just merge down with each of these hairs so that they're all one sub tool and keep them next to my hair. And with that sub tool selected with just these extra strands of hair, I'll also hit Control D couple of times just to give this more subdivisions so that they are smoother and not as blocky looking. So when we go to our render, they actually look a little smoother. And actually, now that I've subdivided, I can see a couple of little spots where I need to do a little bit of fixing so that the hairs are not intersecting with women there, but you get the idea. So next, we need to merge visible so that all of these sub tools in our list become one sub tool. Because if you have anything in your subtable lists, when you try to send things to Photoshop it by going to Z plugin and selecting the Photoshop plug-in. If you have something like a Z sphere in your list, Photoshop will tell you, sorry, you can't do that. That's not an actual 3D maps or something like that. So in order to eliminate that, what we can do is with all of our visible parts that we want showing for our mesh. Just go over this up tool, go down to the marriage menu and hit Merge Visible. And then above ourselves to a list that creates a merged sub tool of everything altogether. So it's all one sub tool. And now we can actually see our active number of points for the whole thing, which is 4.5 million points, which is pretty high, but that's not too bad. And depending on the strength of your machine, obviously it's going to make it more or less difficult to render depending on the number of active points that you have. So this is our view window. This little bounding box is a little thin line around our object. And next to this side menu here you have Zoom. So you can zoom in and out on the canvas so you can actually see the borders of it. And you can actually then it will just kind of give you a general view of your mash. But it, it's not going to show you the bounding box if you had actual, so it's more accurate to zoom in and out until you see this little edge up here. And then you realize that the edges of your, of your shot or of your frame of your camera are right along these bounding box edges. We need to make this canvas bigger or a higher resolution. And to do that, we need to go to Document and go down to here where it says Half double and there's Pro, and you can see the width and the height of your Canvas. So right now this is the actual image size that I would be rendering out if I created a rendered image of this character from this, if I render this out, so it's pretty small. So you can either hit double or if you want, you can turn off PRO and type in custom dimensions or if you leave Pro on and to lead them linked. So if you were to go in here and type in 2000, it won't automatically link the height to accordingly like that. So if you type in a custom dimension, you would hit re-size or you go to document and just hit double and it'll say resizing is undoable. Do you want to resize it? Yes. The next thing you need to do because this puts you into Draw mode and turns edit mode off when you resize your canvas. Which means if you click and drag, all that's going to happen is you're drawing your character out. So hit Control N. To clear your Canvas, Control plus n, declare everything and then just click and drag a onetime to draw your character out and hit T on your keyboard to go back into edit mode or just go up here and turn it back on. And now, if we go to our document, you can see that our canvas size was doubled because I press double. So now it's about 3000 by about 1500, which is pretty big and I don't I don't want to go much bigger than that. Unless you were doing something that you wanna do. A 4k image, 4096 by 4096 or something. But for this it's not necessary. Having something that's 2k, almost three k is pretty big and it's going to capture a lot of the resolution really nicely. So I think that's fine. Next, we just need to find a camera angle that we think looks good. So this is where you can kind of have fun and play with different angles and different renders. One way to move your mesh and get different angles if you're not able to just get the angle that you want by moving it around, by clicking and dragging is hold Shift, and then tap and drag and let go of shift. And you will rotate on just one axis. So you can actually spin and line your object up in different ways like this. So hold Shift, tap to click and drag, then let go of Shift. And it will snap back to the angle that you were at. And you can just rotate on whichever axis I think this would be the X or the Z axis, the axis that is facing directly towards you, I think in ZBrush that's the z-axis. So that is a handy tip. Just hold Shift, click and drag, let go of shift. And you can move your character by rotating just at a straight angle like that. So try to find a, a good-looking pose that you think looks dynamic and looks cool. For this, we can have her staring up at something that we can't see. And the last thing I need to do is use this zoom over here. And we need to zoom way out because we doubled our canvas size. You can already see the, the border of the canvas right here. It's really faint because it's a dark color. But they can, the image size is much bigger somehow. She is much smaller in the frame. So if I have this here and I have it posed the way I want, I don't want to lose that pose. I can always just use the zoom function over here and zoom in. Use the move function to, to move her up into place. To just sort of pose my character in place rather than tapping on my canvas. Because if I tap it will move the character. Alright? And I think I will change the pose just a little bit. I'm going to have her looking more toward the camera so we can see more of this hair that we worked so hard on. And I just want to try and get a little bit of negative space in there and I can use my silhouette to see it. There's just a little dot of white right there. And like I had mentioned in a previous video, I want just that little bit of negative space between the face and the hair. Because when we put a background in, in Photoshop, it will really, really accentuate the outline of the face right there. And then this will all just look at, won't all blend together as one big shape. There will actually be a bit of definition there. Yeah, something like this. I want that nice little hole where the light can come through right there. And then I'll just zoom out a little bit. Maybe tilt the character this way a little bit. Go. So we zoomed out and made sure that our documents size is on the bounding box edge here so that we can zoom our character up so that it's had its full resolution. It'll capture that really nicely. Next thing that we need to do is we need to render and well first we need to light our territory. Up here at the top right, there's the BPR button. If you press BPR, you get a pretty basic render. Bpr stands for Best preview render, which is ZBrush, his way of saying it takes the light and shadow and just calculates whatever settings you have and gives you a really fast render. So this is what it looks like kinda by default, which is fine, but it's also pretty bad. The shadows are really harsh. And I guess depending on the kind of image you're going for, that can be good or bad. For this. I want the shadows to be softer. I want the lighting to look a little different. So this is not going to work. So what we need to do first is go to our light menu at the top. Grab the little wheel here, grab it. And if I can grab it, grab that little icon, click and drag it over to the left. Or just double-tap on this divider to open it and drag and drop it in here. So we have our light menu here and now go over to render. Do the same thing. We're going to grab that little wheel, drag and drop it over here. So now I have my light menu and my render menu. So in ZBrush by default you have one light turned on. You can control the intensity of that light by turning it up or down here. And the ambient light as well, which is just the softer light that affects the entire scene. So by default, they ambient lights set to something like four or five, which is fine. I think I'll leave it around ten, something like that. I have it set to 10 or 11. Turn the intensity up just a little bit. And wherever you click and drag this dot on this sphere is where the light is coming from. So lighting in ZBrush is a little different because you can't actually see the lights. But you can still get a pretty accurate picture. Because if you go into your render menu, which we have down here, or you can open it at the top over here. In your render menu. You have these different modes and I like to keep it set to preview mode is preview is what we're in now. So it's giving us just a decent fast update for the direction that the light is coming from and how it's going to look before we push BPR. But even now if we push BPR, it's going to look very different because my light settings are not really set up yet. But having having preview turned on still gives you an idea of where the light is hitting, the highlights and how bright it is before you hit BPR, just to save a little bit of time. So I don't like that. So I'm going to tap on my canvas and it'll, it'll undo that. So my first light here, I'm going to add another light in a sec. I'm going to move my other light up to here at the top right. Sort of like we had it before. I want some of this light to hit the eyes. So I'll just sort of there it is. I want it hitting those eyes because I want to see that reflection. I'll just move it around until I get what I think looks good. Alright, now my intensity is only at 0.8 for this light, so it doesn't take very much to get a nice light. Now, the other lights in here, you can just tap on one. And it will select that light, which means that's your act of light. And if you touch it one more time, it will actually turn on. And now it's actually on in my scene and it's adding to my lighting. And this I can drag up or down or anywhere I want, turn up the intensity and the intensity of 2.3. And that's pretty bright. But if I move it all the way to the top of the sphere so that it's almost curving around the back. Then it casts a little more light on the top of the head here where the shadow for the hair. And maybe I'll move it to the left level. And if I hit BPR, BPR button here, it'll show me sort of where those lights are going. Okay, so that's, that's a cool effect. I like that. Because then we're getting a little bit of shadow on the face here. But not too much. You can add as many lines as you want. You can add in a third light. But generally, I don't think it's necessary to have more than three lights. Unless, you know, using one light as a fill light to just give some softness to everything is a good idea. And then having one or two lights for either direction above the character or in front of the character to create some dramatic lighting. And it just depends on what look you're going for. But a good way to get practice for that is to look up three-point lighting setups for photography. Because a lot of photographers use a standard, what's called three-point light setup. So it's just because it's made of three lights, there's a key light, a fill light, and then a rim light. So we're actually going to create a rim light, but I'll show you how to do that in just a little bit once we get to that. So let's hit EPR one more time. See where we're at. Okay, so that's looking pretty dynamic, pretty dramatic. I like that. I like that there's a little bit of shadow covering one eye. It makes it look a little more intense, little more dramatic like that, but the shadows are still too harsh, so we need to fix that. So once we have our lights setup, it's important to go to light properties here. Make sure that you have shadow turned on because that's going to affect our settings that we're going to do next. So light properties turn shadow on. Now we're gonna go down to our render menu. So under Render, go to Render properties. And the first thing we wanna do is where it says shadows, right next to that is ambient occlusion. And we want to turn that on. Ambient occlusion is essentially the way that shadows react with the objects or the way that light reacts to the objects around each other. So if I have ambient occlusion turned off, The shadows are really hard and really harsh because they're just the shadows from the lights themselves. And the light is not being affected by any of the other objects in the scene. The light is just literally just traveling in a straight line and casting a hard shadow on the object below it. But with ambient occlusion turned on, it allows it to give a more realistic simulation. Whereas calculating for how the light would bounce off of the face between the hair and how it would soften those shadows in-between. And same with like the face to the shoulder or the ear or any surrounding objects. So ambient occlusion is essentially taking the information of the light and how it bounces off of all the different parts, and how it reacts to all the different parts together. So for hip EPR now it's going to take longer with ambient occlusion turned on, but it is definitely worth it because you get a much better result. And even now it's not going to look great. It's still, still really harsh. We still have this same effect. So to make this actually work, what we need to do is go down in this render menu, we can close render properties, go down to the BPR shadow, and we need to adjust the rays and the angle when we have Ambien inclusion turned on. So raise means quite literally the number of rays of light in your scene. So the higher the number of rays, the softer your shadows will look. But it's not going to affect anything with rays if I don't turn my angle up because the angle is actually going to activate the raise themselves. So a general rule that a few people have said works pretty well for rays and angles is the number of rays that you have. If you select double-dot amount for your angle, it works really well. So if I have around 60 raise. So let's say we have our 54, so we have 54 raised, so we doubled that there'll be a 108. So a 109, close enough, 54 double-dot is a 108. And that should give us a decent result. So now if I hit BPR because I have more rays in my scene, it's going to take a little longer to render. And depending on the strength of the hardware that you're using to, it will take longer or shorter. But now we have real Ambient Occlusion going on in here where this is what I was talking about, the softness of the light actually bouncing from the face onto the hair and back again. So it's calculating all of that information for us now and creating a much more realistic shadow. And a much better look. So now you can just play with the number of rays. I think around 120 for res is pretty good because that gives a very nice look. And then you can go up to 200 it BPR and it'll take a minute. Rendering is a whole process of its own. You know, a lot of artists talk about how rendering can take an entire day or a couple of days because it just takes time where your computer has to quite literally has to process everything that you're doing and it's not going to look right the first time. So you just have to play around the settings and find something that works for you that you like. This is the pretty good, not perfect, but pretty good. I like that. The shadows are really soft, but it's also now my lights are not bright enough now I'm losing some highlights on the face and other things. So what I can do is go back up to my lights, go to my main light here, my first one and just tap on it, rips it, turned it off. So make sure that's selected. So I'll take note I was at 0.89 for the intensities alternative just a little bit to to one. Oops, I'll just type in 1 there. And now I'll hit BPR. Also with BPR. It's handy if you, if you don't move your model at all, if it stays in the same position, it takes less time to calculate every time you hit BPR. Because then it's only adjusting the settings that you changed. Versus if you move the angle of your model, it would have to recalculate everything from that different angle. So if you're staying at the same angle and just not touching your model at all, only hitting BPR when you change something. It can actually speed up your process just a little bit. So this is looking cool but not good enough. I may have too many rays, so maybe I'll turn my rays down to around a 100, turn the angle down to make it a little less soft. And it BPR. So you're just going to have to play around with this. And you'll notice too that I'm seeing a little bit of like on here on the lines on the cyber suit for the character and seeing some of that chunky sculpting redness that's in the Hara can actually see some of the deformed part of the mesh there. So if the resolution of your meshes and high enough, you can always go back in and hit Control D create higher subdivision levels to smooth that out or go in and really sculpted or do it a different way so that it looks smoother for your final render. So the lighting is really just something you're going to have to play around with. And we're going to have to just find something that we're happy with. And once it looks the way we want it, then we can go out in the next step. Okay, So coming back now, this is looking good enough and I think I will keep my render the way that it is here. One last thing that I wanted to show you that I did use in the end is under the render menu. If you go to your vendor properties, there's at the very bottom, there's Global Ambient and there's global diffuse. So global diffuse is just going to diffuse all of your lights at the same time. So by default, these are all set to 0. And before everything was just too bright, too harsh on the face like this, too harsh on the shoulders. I didn't want any whites because I don't want any anything blown out with my lighting. So I turned the ambient up just a little bit. The Global Ambient, which is just an additional ambient light effect. And then I turned my global diffuse to negative 30, right around negative 36. I think that's sort of a set two. And now if I hit BPR, the global diffuse is going to soften all of my lights, including the Global Ambient. And now those highlights on the face are just softened because it's dispersing the light. It's almost like putting a soft box over one of your lights in real life. It's that same kind of effect. So it's diffusing the light so that it spreads and scatters more softly and more evenly across the surface. So I think that this looks pretty good. So just once you get to this point, once you have your lights and you have pressed BPR and you have your renders sitting here. The next thing we need to do is export it to Photoshop. And there's a couple ways that we can do that. So under the render menu, if you were to go to Render BPR render paths, you can see that you have all of these different render passes that ZBrush has generated. So when you hit BPR here, and the BPR button is also here under the BPR render paths menu, BPR button, when you push this button, is the brushes calculated all of these different render passes. So there's like the main or underpass, There's the shadows, the depth, the ambient occlusion. And then there's a final mask for the character which is like, you know, to cut it out from the background. So you can click on any of these. And ZBrush will bring up your menu and say, Oh, do you want to save this as a file, rather than saving it as a JPEG, you want to switch it over to PNG. Create a, create a folder to put them in Photoshop render pass folder, which I've already done. So you can do these all individually. But that's going to take a long time. And I don't like to do that because it just takes forever. And and we're also going to create individual rim lights, which I'll show you how to do. So rather than doing this for every single one, you can go up to Z plugin. Go down to ZBrush, to Photoshop. And by default, if ZBrush doesn't know where your Photoshop is, you'll have to click on the when you try to send it to Photoshop, it will ask you where your Photoshop file is located on your computer. So you'll just have to go into your go and manually just find your Photoshop and then ZBrush will be able to find it. So once we have this menu open and you've already clicked and told ZBrush where to find Photoshop on your computer. You want to have sure make sure that you have BPR turned on depth, mask, shadow, and lights. Because these are the only things that I want to send. And make sure that you're also on your merged subtotal over here that you've already pressed BPR before you do any of this. So we've set up everything, we've set up our lights and we press the BPR, the renders here on our screen, it's within our bounding box, the correct size, everything now Z plugin and make sure all of these are checked. And then we're gonna go to the bottom and hit Send to Photoshop. And it's going to send all of our stuff straight into Photoshop, which we'll actually get into in the next video. But for right now I'm going to press this button so that it will actually go through and it will calculate all of my render passes for my entire objects. You can see ZBrush sort of calculating everything that's going on here. And now it's taking every single render pass from our render past BPR or underpass menu, calculating the lights, the Chateau de masking, ambient occlusion and everything else. And it's going to send all of those as individual layers and the object itself over to Photoshop, where then we can just tinker with all of our settings individually. So this is going to take some time. You're probably just going to want to get up and go do something. You know, it gets a water, have a snack, take a break, stretch, walk around because this will probably take, depending on how fast your computer is going to run. It's going to take anywhere from a couple minutes to 10 minutes, 20 minutes. Who knows how long it'll take? So once that is done, I am going to show you how to create a rim light for our character, which we're going to export as a separate light set and drop into our Photoshop file. The reason I'm doing it that way is because it's faster to just calculate the light that you want for your main shot. And then create the rim light separately and import it into Photoshop so that we only have a couple of passes and it's just much quicker that way. So before we get into anything else with Photoshop, we actually need to go back to ZBrush. Because now what we're gonna do is generate a rim light for our character. And I'm going to show you how to do that now. So very important thing. Don't move your model from its position that it's in right now. Don't rotate it or anything, or it's not going to match up with the version that you sent over to Photoshop. So you want the character to stay completely still, so don't touch your Canvas at all. But what we need to do first is open up our light menu. We already have it over here on the left. And I'm just going to have one light active. So select any other lights that you have in tap them to turn them off. Select your main light here, and we're going to create a rim light. So make sure that under light properties, shadow is turned on. And that's the first option here under the lights menu. With your main light selected. If you click and drag this around, it'll move your light. But if you tap one time, it will move it behind your object and create a shadow effect from Hyde. So if I tap once, this is in front of my object, if I tap again, it moves it behind my object like this. So you may have to turn up your intensity to be able to see the actual effect. Now if you look at the sphere, you can see that the light is behind it because it's creating this rim light effect when I crank up the intensity. And you can see the effect of that on your model. Now when you hit BPR, it'll actually go in and try to calculate what this is supposed to look like. And it'll look a lot different than the way that it looks. Preview. So we'll just give it a sec. And you can already see it's creating this nice white line along this ear right here. Which is really nice. That's the look that we're going for. I want to zoom in on that, but if I zoom in, I'll lose my position here. So this rim light effect is really important for characters, especially because it creates sort of that epic outline and separates your character from the background. This is sort of like a light trick that a lot of people use in photography and other things as a rim light. So I want this to be brighter. So we're going to crank up the intensity. And you can even move it around a little bit if you want it to be affecting a little more of the top of the head and the hair and stuff like that. And we can create multiple of these and Export As many as we want. So just play around with this and kind of have fun with it. Until you get a nice, a nice white outline going along the parts of the character that you want. I'm just starting here in the center of the sphere to try and get the top of the head and that years and the shoulders with one rim light and then I'll probably save another one that will drop into Photoshop again. Yeah, so this is nice. This looks good because now it also covers a little bit of the back. So you can see some of the foot there, the outside of the arms like this, the ear, the head, right? So once you have your BPR ready and you want to export this rim light out and save it. All you have to do is go to the BPR render pass menu under Render and click on shaded. And when you click on shaded, it will ask you if you want to save this as a JPEG or a PNG. So take the file type, change it from JPEG to PNG. And I named my first rim light, rim light A1, and saved it. And I created a second rim light the exact same way, just by moving around my light and hitting BPR, messing with it. Just seeing how it looks. Moving around the light on this sphere here. And then when I'm ready, ready to render out just that rim light again, you can save as many rim lights as you want. But just go to the render menu, BPR render paths, and click on shaded. And you can save as many of these lights as you want, which is nice. So you can just experiment around with them and play with them in Photoshop. And I wouldn't recommend saving more than three rim lights because you don't want your entire subject to be outlined in white. You just want the highlights to show up to outline specific parts of your model around the edges but not around the entire model. So just around the edges of the arms and things like that, but not the entire model. So I'm just going to go with these two rim lights. And I think those will work just fine for this. So just make sure that your change JPEG, PNG at the bottom, named them, you're a rim light. I've made my a1 and a2 so that it can have as many as I want and hit Save. Then I will show you how to import those into Photoshop in the next video. So I think this is a good place to stop. And in the next video we'll get into Photoshop and how to start setting up your final render. And I'll see you then.
51. Photoshop Final Render: Oh, right, and welcome to the final video in our set where we are going to create our render for our character in Photoshop. So once we hit that send to Photoshop Button with Z plugin in ZBrush. It's sent all of this information from our rendered scene over here into Photoshop. And you can see that it's all inside of this folder here. And it also gave us this black background. And we can turn on and off. So I'm going to turn that off. If we open up this folder here, we have all of the masks, effects, geometry, lights, material, base layer. So these are all individual folders within our characters folder. So really the only one that I'm going to use are the lights here. And I'm going to show you how to import the rim lights that we created in ZBrush as well. So these are actually lights, default lights, the ZBrush sends over that you can turn on and off. So if you want to give your character a little bit of extra light from one angle, It's kind of handy because it just gives you this extra set of default lights for every side of your character that you can turn on. And often, it's kinda nice, just a little bit of extra tinkering to make your final image look a little more appealing. So you can mess around with those. First, we need to import our our rim lights. So I ended up making three rim lights inside of ZBrush. So I'm going to select all three of them and just click and drag them onto Photoshop. And the first one will pop up. And you don't want to resize them because they should already be there right size for your character. If you export it the same exact render paths from ZBrush. So just hit Enter and it'll go to the next one. Hit enter, and it'll go to the last one and hit Enter. So now these are all imported into Photoshop and you can see them here on your list on the right side. So I'm going to select all three of them. I'll hold shift, select all three. And I'm going to click and drag these to my lights folder in my character. And what that's gonna do is it'll cut out the background. Or at least it should for each of these lights. Now if the light itself is still black on your character like this, but you have to do is either select all three and go up here to the blending mode and select screen blending. And that will turn it into an Alpha essentially so that it's only lightened, dark black and white. So now with these turned on and off, we can actually just view the highlights from each light there. And it looks like this light that at this rim light a2 that I created is actually no good because it has some extreme highlights in parts right next to shadows that conflict with some of the other lights in the way that her rendered it. So this is something to kind of be aware of and that you might have to just play around with a little more inside of ZBrush, creating a rim light that actually looks correct on your render in Photoshop. So this one is actually not going to be usable by rim light a2. So I'm going to leave that turned off, but it looks like a A1 and A3 are actually okay. And I think they look pretty good. So I think I will keep those after all. So with rim light a 31 turned on. Yeah. We'll leave both of those turned on. So if my rim lights turned on, now I have my lights here and you can try turning on these other lights if you think that they look nice for your character, for the lighting. But I'm just going to leave my character like this because I don't think it needs a whole lot more light. And I don't want to flood my scene with too much lighting because we're also going to do a lot of adjusting in just a second. That's going to fix some of the lightened dark issues anyway. So the very first thing that we need to do, now that I have my lights set up the way that I want, I'm just going to collapse this folder for the character so that it's by itself. And now we need to find a background for this. So what I like to do for backgrounds and photos is I use royalty free site called Unsplash. And it is a totally free photography website and they have thousands of images and you can go on and download images for free. And I believe most of their images have royalty-free licensing. So you should be able to just use them in your projects with no issues, but you have to be sure to check on any of the images. So if you click on one here and to the left, There's this here where it says free to use. You can click on that and it will actually tell you the license. So commercial and non-commercial purposes, no permissions needed, although attribution is appreciated. So I mentioned the artist. I throw and throw in a mention of the photographer or whoever it was that took the photo. But it says that the photos can't be sold or or redistributed from this website and you can't compile the photos and solemn yourself. So that's the basic license agreement, but you're allowed to use them commercially and non commercially. So these are free images to use for artists and is a great website and a great resource. So I've already gone on to this website. I typed in Cyberpunk and I downloaded a few images. One of them was this triangle image here with this purple and cool background. So that is one image that I'll be using for my background. And the other was this pink and purple and blue doorway, which I thought was very cool looking and we're going to use that as well. And we also want to go back up to our search bar and type in. Bokeh. Bokeh is, if anybody watching this video doesn't know what bokeh is, it's basically just like reflect refracted light that's out of focus in the foreground. And it creates sort of a cool focal depth to your photos. And you can use this and we're going to use these to sort of layer on top of our final render, just add an extra dimension of depth, hand, kind of cool reflections in the foreground. So I just found a few of these like the yellow or the blue and yellows or anything that you think would match the colors of your background and your character. And just download a few of those and we'll use those in our project as well. So once we're back in Photoshop, we need to get our background images in here. So we'll go to our background images. So I have this purple one here selected, and I have my doorway one here selected. And you can see I've already downloaded quite a few of these images because smokes that is just full of really, really great photographs that you can use for free in your projects. And so they are an excellent resource for artists. So I think I'm only going to need one bokeh. I found this nice like silver and yellow sort of colored bokeh. So I have all three of my images selected. I'm just going to click and drag and drop them in Photoshop. So the first one comes up like this, and it's not aligned with the direction of my image. So if I hover my cursor out here, I can rotate it. And if I hold Shift, it will snap so that I can rotate it at a perfect 90 degree angle. Now, it's too small, but if I hold Alt before dragging this, it will, it will maintain its resolution. And it will scale it to fit my image. So I wanted just a little bit larger than my canvas size like that. And when it's ready, I can just hit enter and it will move on to the next imported photo like this. So this one is fitting the aspect ratio. Okay, so I'll just hold Alt, drag it up just a little bit bigger and hit Enter. And then our last one, I'm going to rotate that also. Click and drag outside of it here, hold Shift, and it will snap and hold Alt. Drag it up here so that it's just a little bit bigger than our image. And actually this dark spot I think is going to cause me problems later on. So I'm going to rotate it this way and hold Shift to snap it. Because I want this dark spot to be on the bottom left where it'll be a little less out of the way. Our little more out of the way. So this looks good. So I'll hit Enter. So now I have my background images and my bokeh in here. So I need to select all of them. So click on the first one, hold Shift, select the last, and then right-click and select a rasterized layers. Rasterizing is just going to give us a few more options when we want to go in and do some editing. So the bokeh layer, I will drag up to the very top. And my background layers, both of these, I'm going to drag it below my folder of my character in it, like this. And I have my black background is turned off, so the background layers are behind the character that's hide the bokeh. Yeah, so now we can see our character and our backgrounds are behind it like that. So next what we need to do is we need to create a little bit of an effect for these backgrounds because they're too sharp and it obviously doesn't match what the character. So it'll actually look a lot cooler if we just apply a simple filter to it. So for this first pink image here, I'll have it selected and I'll go up to Filter, go to Blair and select Motion Blur. And with motion blur, you can change the angle to whatever you want. And it kind of distorts the image. For this, I want the lines in the image to kind of fade away. So I'm going to crank the distance up a little higher and try to make it so that the motion will sort of tear away these, these hard lines that are going through the image itself. So even setting it to something closer to 90 degrees, which is a little too much. So maybe if something around 40, 50 degrees, something like that looks good. 60, so that it looks like the lines are going this direction almost horizontally, but not quite. And it's at a distance of five 96. So that looks, that looks good enough for now. So I'm going to hit Okay. And now for this, I'm going to grab the blend mode and change it from normal and set it to Screen Mode. So screen mode is going to make it blend with all of these other, all the other colors and my screen, rather than just laying right on top of the other image, is going to find the lights and darks and try to match a little better to everything below it. So now I need to grab my image below that, my purple background layer here. And it's a little bit off center. So I'm going to hold Control and hit T and drag it over this way because I want these bars to be surrounding my character. Sort of like that. And it's a little small. So I'll hold Alt and scale it up over on this side so that it's outside of my Canvas. Yeah. So something like this so that it's outlining my character. And it's really going to draw your eyes to the center of the image because all the vanishing point is right in the middle here with all the lines and all of these light bars are surrounded by character. So that looks good. So when I'm done, I'll hit enter. Now we need to do the same thing with this. We need to apply a filter. So I'll go to Filter blur. And on this one I'll actually select a Gaussian blur. So this looks good. Maybe it's a little too high. Something like a be a little higher, maybe like 20. Yeah. Something like this. So around 20. Looks good, so we'll hit Okay, so just a little bit of a Gaussian blur on that. Now, our character is much darker than our background for the color, for the shadows, for everything. And this is a problem. So I'm going to show you a really basic technique to match the luminosity and the color values of your character to some of the values of your background. So in order to do this, the first thing I have to do is select my character group here. And then I want to hold control and click on the mask. There's a group right here, but then there's this black and white mask. So when I hold Control and click on the mask itself, and what that does is it creates a selection around my character of just the character itself. Now I want to go down below my layers here. I want to click on this little button here, the little circle atom, add a layer button and we're going to add a curves layer. So add curves. And because we, because we held control and clicked on our mask here and created that selection, the curves layer was created in the shape of our character selection, which is exactly what we want. So next I need to click on the layer itself here, not the layer mask and click on the layer, make sure you're clicking on the layer. Hold Alt. And you see this little down arrow with a square. So when you're holding Alt, click one time, and what that does is it makes it so that this layer only affects whatever is below it. So now with the layer itself selected here, the curves layer up to the top and to the right using the button that says auto, hold Alt and click on that auto button and you get this little menu. So by default, enhanced brightness and darkness, brightness and contrast selected. So we actually want to select fine darks and lights. So with this selected, now what we can do is click on shadows and you get this little box here and you can manually adjust the shadows. And it will only affect your character because we created that clipping mask for the curve layer. And it's only affecting what's below it. And it's only affecting it in the shape of our character because we created that clipping mask. So now you can either take the eyedropper and click on the darkest spot of your background. And it will add a little color in there too. But that's obviously too bright. So sometimes you have to just go in and manually do it over here on the little color picker. So our shadows can have a little bit of color in them if you want, can have them like lots of purple or blue or whatever color you want. I'm going to have it be a more desaturated color to the left. And maybe I don't want it to be too light. Because what we're trying to do is to match the lightness and darkness from our character and the background and make them sort of similar so that they look better. And that the difference between the two isn't too harsh. So I think this looks good. Somewhere around here the value number was 36, 300, 43 right there. It's like in the lower left section. So pretty dark, pretty desaturated for shadows. And when I'm done I'll hit Okay. Now you can select the highlights. And for the highlights, I like to click on a part of my background because then adds a little bit of color. So I'll select this white over here, but it, you'll still get some of the pinks and other colors. And you can see if you click on any of those colors over here, it adds that color to the highlights of your, of your selection, which is our character. So somewhere over here, I think looks good. Because then I get whites and pinks. And that's coming in the highlights and I think that looks good. And you can see on the manual adjustment here That's right up near the top left, but it's not white, it's just a little bit of pink and white in there. So that's perfect. So we'll hit Okay, and I'm going to leave the mid-tones alone. I'm not going to change anything there for now. So we'll just hit Okay. And Photoshop asked, Do you want to save this as the default colors? So hit no, because you don't want it to install, to install that as your default from now on. So just hit no. So now that we have this all set up, the next thing we need to do is we need to see the image in black and white. Because we need to, we need to change the values of light and dark because we just did a little bit of color matching. Now we need to do lightened dark matching. So to do that, we need to go down to this layer button again. And we need to create a black and white layer. And it's going to desaturate everything. And to make us more accurate, we're going to change the blending mode of the black and white layer to color down here at the bottom. So now we can turn this on and off, and we can see the color on, the color off. And when it's black and white, our character is still a little bit darker than our background. And this layer is just so that we can see that. And I'll show you how we can fix that next. So the same way that we did this curves layer one, we need to select that layer and now create a new layer here and go to curves again. So we're creating another curves layer. Now for this layer, it should appear above our curves layer one, I'm actually going to drag it below so that it's below curves one. And for this one I'm going to change the blend mode to Luminosity. Select my layer mask of my curves, one layer above it, hold control and click on it and it will select my character. And now I will select my curves to which is the luminosity. Hold Alt, and then click. And it should only affect the brightness or luminosity of our character. So now, if I want our character to be a little lighter, I can drag it up a little bit higher and you can see that only the luminosity is changing for the character and not the background. And just play around with this until you think that the lightness sort of matches. You don't want it to be too bright like this. Because then it's going to blow out all of the highlights. And a good way to check is just turn the black and white layer off. And you can actually see the luminance value like this. So I just want a subtle change like that. I think that's pretty good. Black and white. So that's looking pretty good, much better than before. So that looks okay. Once you're done, hover your cursor over here, hold Control and press D. And it will deselect everything. So now we have our, our color difference and we have our light difference. So before and after for the light, before and after for the color matching. So it's already made a significant difference. And our character might look a little bit light right now, but we're going to fix that with this next step. Because we're actually going to add saturation. And that's going to fix our character and make it match much better to the background. So the next thing we need to do is go down again to our layers here. Add in a color balance layer. And the color balance layer, I'm going to move it just above the character. And same thing, I'm just going to hold control and click on either man asked for my character hold Control and click and it will select just the mask so that only the selection of the character has been selected. And then if I hover my cursor below the color balance layer and hold Alt. Click. It should apply that. And actually didn't work. Let me try this again and Control D. So let's try it with our curves layer here. Actually, I think the color balance layer needs to be above everything. Maybe that's the issue that I'm having. So I'll hold Control and click on this layer mask here for my curves one, and then go to color balance, hold Alt, and click below it. And now the color balance should only affect what's below it, which should only be this selection that I have active right now. So I got that selection by holding Control, clicking on curves one, and it gave me the selection of my character. And then went back to color balance, hold Alt, and click below it with that little down arrow, and then only affects whatever is below it. So now if I want to change color values, it only changes the color values of my character. So now on this color balance layer, what we can do is by default the tone section is set to midtones. So first I want to go to shadows. And you can actually just drag the slider left and right to change the blues and reds, agendas and greens, and yellow and blue. So the first thing I wanna do is see what looks better here. If I had blue, it kind of takes it away from the background. If I had read, it actually looks like it sort of merges the character a little better with the background. So I'm going to add just a little bit of red. And maybe some think the magenta is a little too harsh. So maybe a little bit of greens. Just a slight like nine, it looks fine. And then either yellow or blue. Blue is too harsh because it makes the skin look like It's an unnatural colors, so maybe a little bit of yellow. So let's set that to negative six and then maybe I'll see how this looks with the skin tone. Trying not to wash out the skin tone too much. And I can even drag the red down a little bit because it looks like it's too high. Okay. So that looks, that looks okay. And this is just for the shadows. So just play with this to sort of mess with the colors of your character. And now change shadows to highlights. I'm going to leave mid-tones alone again. So now we're just play around with the highlights. I think red in the highlights is too much. So maybe I'll add a little bit of blue. And then magenta or green. Green is pretty harsh. Magenta is nice and soft. So I had just a little bit of magenta and then yellows or blues. I like the way that the yellows look because then it adds to that skin tone a little bit more. And makes this character kind of kind of stand out without making it too harsh. So that looks good. So the next thing that we need to do, now that we have this, I'm going to hit Control D while I'm hovering over my canvas and it will deselect everything. Because the next thing that we're gonna do is messing around with our character folder here. So what I will do instead at this point is I will save my file and then I'm going to save as a different name. So we're going to save this as suburban girl render three. And this will just give us the ability to go back in case we mess something up. Because what I need to do now is select this group, right-click it and hit Merge Group. So what I just did is I merged everything in my group, including the lights and everything that I did in ZBrush, all into one flat image, which means I no longer have control over the lights or any of the other stuff that was in there. So if you're going to do it this way, just remember that you're giving up control over your lights and your other information that you brought over from ZBrush, including your rim lights and anything else. So but that's why I saved my file as as a new file in case I mess up, I can always go back to my previous a file. Now I should be able to hold Control. Click on the Layer Mask, and it will select just the selection of the character. To select. Go into modify and select feather. And it says 0.1 and that's all right, so hit. Okay. So we select the layer mask itself because that's what our selection was on. And now we have this feather slider and we can drag the slider higher or lower. And you can see if you drive it, drag it really high up. The feather radius is so big that it starts to fade the entire image which we don't want. So we don't really need that much. We could do something like around 20, that's still too much. So I'm trying to soften the edge of my character. If I hit control D, it'll de-select and I can actually see the edge. So that's too much. So I Control Z. Drag this down to something like six, Control D. And that's looking better, but it's not perfect. So Control Z again. And we'll drag the radius down even more. So three or four control D to de-select. So that looks good. So it's just softening the edge of the character just a little bit for us so that we don't have such a harsh line around the outside of our character. Because in photography, it's very effective to soften the edge of your character because it makes it blend in with the background a little better. So, alright, so this looks good. And you can also nest with the density of it here if you don't want it as dense or, or whatever you wanna do to it. So now that we have our feathers selected, we have all of this done. This should be the final step. We've soften the edge of the character we've added in our background. We've adjusted a little bit of light and dark in color and saturation. So the next thing that we need to do now is create a merged copy of this. So first I'm going to save my file, hit Control S to save or go to File and Save. And with our layer here, our character layer selected hit Control Shift Alt plus e. And it creates a merged copy of everything in our scene. And I can drag this up to the top of my scene up here, like this. And you can see that this is just a merged copy of all of the information in RC like this, which is nice. The thing that I forgot to do, of course, I forgot to add the bokeh. We're going to add in our Broca. So and I forgot to do that, but that's okay. We can do that really quick as well. Our Boca, I'm just going to place above this merged layer here, turn it on so that we can see it. And I'm just going to grab the bokeh and select a different blending mode. And if we select screen blending, that's a little nicer. I can go here to turn the opacity of it down so that it's only showing like so 46 percent, maybe even lower. 39 percent, that's fine. And very last but the bokeh selected, I want to go up to Filter blur. And we're just going to do, Let's do a radial blur. Radial blur with actually not going to show me a preview. So let's see 24. What radial blur looks like. Kind of destroyed all the detail there. So maybe a different filters, so Filter blur. And let's try Gaussian blur. And we'll turn this way down. Just trying to soften some of the edges of the bokeh. Just a little bit. And that looks good so that it's soft like this in front of our layer here. And last I think I'll just try to change the blend mode to something else to see what looks good. Because I want it. I want it to be present in the foreground. Something like that looks pretty good but not good enough. So you can see all these different blending modes are good to play around with. And just see what works and what doesn't and lighten. What was that one that we had? Hard light. Hard light looks pretty good. Let's try hard light and we'll turn our opacity down even more like this. So a lot of this is covering up my character and it's making my characters colors and light values a little bit weird. And I don't want that. So what we need to do is create a layer mask for this. And if this isn't rasterized, it won't let you paint on this. So make sure that you right-click it and select a rasterized layer, which we already did. So it's not, it's grayed out for us. Rasterize layer right here. And with this selected, go down here and create a layer mask. So now we have a layer mask. And with a layer mask selected, it's really easy in Photoshop to just paint away anything that you don't want by having black selected over here. By default, Photoshop has black and white and you can switch between them by pressing X on your keyboard. So if you paint on a layer mask with black, it makes the layer disappear wherever you paint black. And if in the opposite, if you press X and switch to white, wherever you paint white, layer will show up. So we're going to switch to black as our active color. I'm going to set my opacity to something like 80. And we'll just paint this away off the top of our character. So I'm just clicking and dragging with my black paint brush to paint away this bokeh layer so that it's not covering up my character's body. And I can leave it on the arms and hands because that'll help it and merge with the background a little more. Looks okay. And on the face, especially I want that all gone. I want to paint heavy black there. I'm just going to paint it away on the body a little bit. And just gradually on the body. Working my way down like this. And that's fine. Yeah. So this is looking pretty good. I'm thinking I think this is looking okay so far. Now because I did it in this order and I did not do the bokeh before I created my merged layer of everything here. What I can do now is select my image layer and press Control Shift Alt and E again. Oops, that's not what I meant to do. Control Shift Alt and E. And it will create another merged version with everything and messy. And you can see if I turn it on and off, It's exactly the same as having everything in my scene turned on because it merged all of my stuff together. So this is sort of a non-destructive way to just get a quick flatten image without actually having to flatten everything together. So with my, I'm going to rename this one as a final render. Final render one. And so now that we've applied all of our filters on all of our work, gotten to this point, the last thing that we need to do is with my final render image selected, I'm going to go up to Filter and go to Camera Raw Filter. Now Camera Raw Filter is essentially just editing the base information, the color information, lightened dark, and all of this. So like it's called Camera Raw because it's quite literally like if a photographer were to take photos with Camera Raw, they take them in Camera Raw because photoshop has the ability to edit all of the preset light and color information to a much higher degree than if you don't do Camera Raw. So we're actually just adjusting the temperature and all of that in the color. And it's actually editing the base color and light information of everything which is much more accurate and gives you a lot more flexibility with Camera Raw. So now we can just mess with our temperature. We can make it really warm, are really cool. I like a little bit of a warmer color. I think it looks nice because a lot of the colors in here are warm anyway. The tint, you can add more magenta or green tint. And because it's already very purple, I'm going to add a little more green to sort of balance it out. Just a little bit. And next we'll do exposure. Think we'll keep the exposure. I'll just leave the exposure alone for right now because I don't want it to be too blown out. So we'll just have to play with some of these. Crank up the contrast a little bit, that'll make it a little bit darker. And the highlights could even bring the highlights down if you wanted your character to match the background. More. Shadows can make the shadows darker, brighter. And actually it looks pretty decent when I bring the shadows up. So I'm going to do that. Whites, lighter, darker, so just mess with each of these sliders. Just drag them left and right. And just see what you think looks good for your image. Blacks, make the blacks darker or lighter. I like the look of them being a little bit lighter. Now, clarity is a really cool one because it really accentuates, likes the lights and darks. So you can actually make it a little hazier, little dreamy are looking if you drag the clarity to the left or you can make it a little clearer, sharper. And this affects the colors a little as well. So I kind of like the softness of it being a little bit to the left, but not too much. So that's kinda like a nice dreamy sort of effect. And then D Hayes is very similar where either no haze or lots of haze. And I don't even think I need that. If I go left, it makes it too bright. If I go right, it gets pretty dark, pretty fast. And I lose a lot of that clarity that I got from the previous letter. So I'm just going to be done alone. And then vibrance is colors. Sort of desaturation value. And a little bit more extreme. So you drag your way up and you get these extremely intense vibrant colors, or vice versa all the way down, you get black and white. So I'm going to do, I'm going to do vibrance down to minus 10, ish minus 12. And then drag our saturation up just to see what that looks like. Saturation effects it a little differently. So maybe I'll drag saturation down and drag vibrance up and see what happens. That's pretty cool, but how does it look originally a little more like this? And yeah, I like that desaturated with the vibrance up a little bit. Cool. Right? So I'm, I'm liking the way that this is looking. So I'm going to hit Okay, and then it will finalize that. So now we have our final render all done in Photoshop. We've applied everything, we've adjusted and corrective color and all of that. And this is it. This is the final render. And hopefully for you, you've gotten to this stage and you have something that you're happy with by this point. The very last thing that we can do here is just go to file and you can hit Export, Export As quick PNG or export as if you want to export it as a different file type and put it in a different program or do anything else with it. But that is it. That is the final step. And now you can take this image and posted up on social media or put it up on your website or wherever it is that you need it. And that is the method for exporting from ZBrush to Photoshop and creating a final render. Thank you guys so much for watching these videos. I really hope that you were able to get some good techniques to take away from this class. And please remember if you enjoyed this class and feel free to leave me a review, it would be extremely helpful, especially for smaller creators like myself. It really helps if individuals go on and at least just write out a really basic review saying, yeah, I liked it or no, I didn't like it. Here's something that you could do to improve this class. Please let me know your thoughts because it's very important that I hear from you guys about your experience with this class and your experience using the programs and what I can do in the future to make these classes better and easier for people to use. So thank you so much for watching. I really appreciate it and I hope that you keep on learning and keep on creating. Thanks so much and have a great day.
52. Congratulations!!: Thank you for taking my course. I hope that this course was helpful and that you continue to learn and grow and improve as an artist. If you found this course helpful, please consider leaving a review. It's always helpful to hear your feedback and to learn what I can do to help improve these courses in the future. Keep an eye on for my next course for more sculpting and ZBrush. And I'll see you next time.
 Michael Gatz, 3D Artist