Transcripts
1. Intro: Hey everyone, welcome to MySQL share course. My name is Mike and I'll be your teacher for this class. I'm here to teach you how to use ZBrush, but not just to use the program, I wanted to give you a solid foundation and understanding for the process is commonly used and the workflows involved. So you can have a better understanding of 3D and how to use the tools and methods and apply them to projects of your own. When I first started using ZBrush, It took me a long time to gather my own information. A lot of my learning came from watching Random tutorials without any real understanding of what I was doing. This took a lot of time and was honestly pretty frustrating because I didn't have a proper teacher. That's why I created this class. I've compiled my years of experience into just ten steps that will teach you how to use the brush effectively and efficiently. Each step is broken down to show you the main functions of the most important tools in the software. I put each section in a specific order to introduce you to the tools and the order that you'll be using them for real processes and creating projects have irrelevant. One of the main points of this course is not giving you too much information. I tried to break down the concepts in these videos as much as possible to condense as much as I can into a shortened class. In the beginning chapters, we'll go over the tools and basic UI and functionality so you can understand the way the program thinks and helped get you adapted to the unique interface of ZBrush. After the first few videos will get into our class project and we'll start applying the lessons we learned to our project as we go for our class project will be doing a character sculpt in the form of a bust, which only focuses on the character's head and shoulders without worrying about the rest of the body below the neck and shoulders. For this character scope, I think it's important that you choose the character that you want to do as artists, some of our best work comes from doing what we love. And I think some of our best work comes from doing things that inspire us, and we're all inspired by different things. So choose a character that speaks to you. And if you're not comfortable doing your own, you can always follow along with my example and the end chapters, we'll begin discussing how to apply processes to future projects. And we'll wrap things up by discussing several different workflows that 3D artists use. So you can start creating projects of your own. For this class, you will need a working computer that can run one of the more current versions of ZBrush. You'll also need to have either a current license for the software or you can sign up for a 30-day free trial on the pixel logic website for this course, a drawing tablet is recommended for better accuracy and stability, but it's not required to use the brush. Even a simple drawing tablet can make a big difference and improve your stability and accuracy while sculpting and creating fine details. If you don't have a drawing tablet, you can also use your mouse. After you learn the program, you can decide whether using a mouse or a drawing tablet is right for you. The methods and processes we go over in these videos will show you several creative workflows and processes for creating projects and 3D. There's a lot to learn. So let's get started.
2. Part 1 - User Interface & Menus: Hello everyone. Welcome to step one of learning ZBrush. First, we need to talk about the user interface and menus. So let's get started. By default, the light box is opened automatically when you open ZBrush. This is where you can store your recent projects as well as many other tools, brushes and demo projects. But for now, we're not going to use those. So we can just click where it says lightbox to close it. When you first try to draw on the canvas, you'll notice that zebra, she doesn't really know what to do. And that's because we're still in 2D mode and we need to switch to 3D mode. On the right side we have our tool pallet. Inside of that tool palette is our simple brush. If you click on the simple brush, you get all of these options. On the top, there are all of your 3D Options, and on the bottom you have 2.5 D options, which we're not going to use for this tutorial because we just want to work in 3D. So in the top, select a sphere. Then you can click anywhere on your canvas and draw one sphere. Zbrush allows you to continue drawing spheres, but this is going to create problems for you later. So if you drew more than one sphere, hold control and press N, declare your canvas, and then click and drag to draw a new sphere. In the top left next to draw mode, you have edit mode. Go ahead and click and turn that on. If you click on your match ZBrush gives you a warning that says this needs to be a 3D primitive before you can start sculpting on it. On the right under our Tool menu, we need to click make poly meshes 3d. Once you do this, your sphere becomes a 3D primitive and you can start sculpting on it right away. If you press X on your keyboard, you'll activate symmetry mode. Press Control Z to undo, hold Control Shift, and Prezi to redo. Above the canvas there's a slider bar. This is your undo history. You can actually navigate forward and backward on this timeline freely. So you can undo and redo as you please. On the left or right side, you have these dividers that you can double-click to open or close. Inside of these dividers, you can dock and store any of the menus inside of ZBrush. You can click on the name of the menu to minimize or maximize it. Next to the name of the menu, there's a little wheel icon. If you click on this and we'll make menu disappear. The nice thing is, if any of your menus ever get closed, you can always open the menu at the top and click and drag on the wheel icon and drag and drop it into the divider. You can do this on either side with any of the menus and ZBrush. On the top, you can click File Save As to save your project, saving as a GPR file is recommended because it saves not only your object, but you're undo history and any other materials and textures that you have in your scene. On the right under the Tools menu, you can also export, but exporting only exports your current selection. So you can only do one object at a time. This is how you'll export something as an OBJ file when you need to drop it into another program. As a quick side note, if you're exporting an OBJ file to Maya, you need to go down under your tool menu to export and turn off groups. Turning off groups allows Maya to read your object as a single piece. If you leave groups on, it's going to get confused and read everything as separate groups. It's kind of a random sidenote to start on. But for those of you that are already familiar with Maya, this is an essential thing to know about ZBrush. By default, ZBrush stores the tool menu on the right side. If you ever lose it or close it, you can always open it at the top and click the wheel icon and drag and drop it in the dock on the right. And the tool menu is where most of your functionality is stored and is where you're going to be spending most of your time in ZBrush. Let's talk about a few of the important sections under the tool menu. The first one is sub tool. The tool menu shows you your current selection. If you scroll down by clicking the space on the right of the menu, you can select duplicate to duplicate your current sub tool. You can also remove some tools from your scene permanently by clicking delete, but this is an undoable operation. So be careful when you're using delete. So what exactly are sub tools? Sub tools are individual objects within your scene. Zbrush only allows you to work on one sub tool at a time, but you can switch freely between any sub tool and you can have as many sub tools and you're seeing as you want, as we get further in, you'll begin to see how this process works. If you want to add a new sub tool to your scene at anytime, you can scroll down on the sub tool menu and click Append. There are a number of 3D primitives here and you can add any of them to your scene simply by clicking on them. Now if we look at ourself to a list, we can see that the 3D primitive has been added to our self tools. You can do this as many times as you'd like, and you can modify existing sub tools or you can use them as parts for your 3D model. An important thing to note is that ZBrush is highly customizable. You can customize any of your menus by clicking preferences and config. If you turn on enable customize, ZBrush will allow you to drag and drop and dock any button from any menu, almost anywhere on your interface. On the left side I have the brush menu docked. And if I hold Control and all, I can click and drag any of these brushes and dock them anywhere I want. You can also do this with buttons inside of menus. So if I go to the right to the geometry menu, I can find any of the useful functions that I use frequently. Hold control and alt, and click and drag them anywhere I want. And you can see here when I turn the button on, it turns on in the menu also. When you're finished customizing, go back to the preferences menu in turn, enabled customize off. If you want ZBrush to boot up next time with your custom interface, click Save UI and save it with whichever name you want. And then click Store config and it will store your user interface. Now ZBrush, we'll start up the same way every time with your customized buttons, anywhere you want to remove buttons, just hold control and all, and click and drag them anywhere into your canvas and they'll disappear. If you have a 3D model you want to bring into ZBrush. You can import it by pressing the Import button under the tool menu. The thing to keep in mind is that ZBrush is going to replace whichever subtour you have currently selected with the object that you're importing. So if I import this 3D object, it will replace the sphere that I have selected. To avoid this, you can scroll down in the sub tool menu and duplicate your current selection by clicking the eyeball icon next to any sub tool, you can hide your sub tools in case you want to remember which one is your backup or your duplicate. Now if I select my duplicate, an import, my object, it replaces the duplicate and not my original selection. Many of these tools will start to make more sense once we go through them in the next steps. That's the end of step one. If you have any problems, feel free to contact me and I'll help you figure it out. And until then, I'll see you in the next video.
3. Part 2 - Understanding 3D Space: Welcome to step two. In this step, we need to talk about understanding 3D space and using the 3D gizmo and ZBrush. And the top right, there's a little head icon that you can click and drag to change your view from top to bottom, left to right, et cetera. You can also click on the little axis icon to change your view based on the Axis. I wanna go over a quick fix for a problem that I had when I first started using ZBrush in the top left. If you turn edit mode off, it asks if you want to switch from 3D to 2D mode. So you do this because you want to go back to the simple brush and draw a new sphere for your project will now if you do this, edit mode is no longer available. That's because when you turn to edit mode off, ZBrush stored a preview image of your object, even though it isn't there anymore. You have to press Control N to clear your canvas before you can draw another sphere. Once you draw a new sphere, you can turn edit mode back on and go back to 3D mode. The last step, of course, when you draw a new sphere is to go to the tool menu on the right and press make poly meshes 3d. So it's important to note that if there's ever an Image Preview on your canvas, you can clear it by pressing control n. Under the tool menu on the right, we have this simple brush as well as many other 3D primitives that are already there. You can click on any one of these and you'll see that it's its own scene with its own sub two. We'll list the number in the top right of each scene shows the number of sub tools in that particular scene. This is useful for keeping track of which scene it is that you're working on. Next, we're going to talk about the 3D gizmo. The 3D Gizmo is used to manipulate and move objects around in 3D space. And the top-left next to edit mode, there's draw mode and there's moved mode. You can switch between draw and move by pressing Q or W on your keyboard. Next and move mode. There's also scale and rotate mode. But we don't really have to switch to scale and rotate because these can both be accessed on the 3D gizmo while you're in move mode. The 3D gizmo represents the three axes in 3D space, x, y, and z. You can move an object by clicking the arrow icon on the X, Y, or Z. You can scale your object by clicking the yellow square in the middle. And you can scale on the x, y, or z axis by clicking the little colored box next to the arrow on any axis. And you can rotate your object by clicking the coloured ring on the x, y, or z axis. Above the gizmo, you have several options. By clicking the Home button on your gizmo, it will bring your object back to the center of 3D space or the world origin. You can also unlock your gizmo and move it freely away from your object. If you move your gizmo to the side of your object and then lock it in place. The object will rotate based on the location of the gizmo. So that gives me act as a pivot wherever you put it in 3D space. Around your gizmo, there's also the white arrows and the white circle icon. If you click either one of these, it rotates or moves your object based on the perspective of your camera. This can be inaccurate, but it's also useful if you just need to move something quickly. If you want to bring your gizmo back to the center of your object, you can press the Go To unmasked mesh center button, and it looks like a map checkpoint icon right next to the home button. Now I can hit the home icon and send my object back to the origin of my 3D space. If you're 3D gizmos crooked, you can unlock it and press the arrow icon next to the home button, and it will reset the orientation based on the world axis. In other words, it makes it pointing straight up and down again. Just be sure to lock your gizmo after you're done resetting it. Now we need to talk about the basic navigation in 3D space. If you click and drag on the canvas anywhere outside your object, it will rotate your view around your object. If you hold Alt and click and drag, it will move your object left and right. This is called panning. To zoom, simply let go of all While you're panning. And ZBrush will allow you to zoom in and out. If you zoom too far in and you can't click anywhere outside your object, you can also click outside of the canvas in this same way to zoom in and out. If your object is to close, you can also press F on your keyboard to frame it back up in the center. The buttons for move, zoom, and rotate are also on the panel on the right, but I recommend getting used to the quick pan zoom and rotate using a stylus. It's a much faster workflow and once you get used to it, it becomes second nature. While you're working on your model, you need to be able to be at an exact side or front view while you're rotating around. If you hold Shift on your keyboard, it will snap to the closest view. You can continue dragging your mouse around to pivot your object on one axis. And you can also click and drag the head in the top right corner to snap to any particular view. The 3D Gizmo is full of all kinds of different performers and actions that can change the shape of your object. If you switch to your 3D gizmo by pushing W on your keyboard, click the little gear icon in the top left above the gizmo to access your reformers. Along the top of the menu, there are all of your basic 3D primitives and you can replace your current selection with that primitive by clicking on it. Below this are your reformers. I'll use the bend arc to former as an example. There are three arrows for each axis. If you click on the green arrow, it will deform your object on that axis. The other arrows for each axis are just used to adjust the intensity for each function to farmers can be extremely powerful and there are a lot to choose from. I recommend trying some of these out because you can use them to create some very unique shapes. Next to our moves, scale and rotate buttons. We have the button to turn our 3D gizmo on and off. If we turn the 3D gizmo off, it activates a different tool. This is the transpose tool, as you can see on the left. The transpose tool shows you the x, y, and z axis. There are also three rings which you'll use to control x, y, or z. If you click and drag on your mesh, it will draw the transpose tool out in that direction. And depending on whether you're in Move, scale or rotate mode, you can click on any of the three rings and it will affect your mesh differently based on the mode that you're in and the ring that you click on. The transpose tool is a little confusing at first, but it's basically just like your 3D gizmo with a few extra options for the x, y, and z axis. So I encourage you to play around with this tool and move scale and rotate mode just to see what it does and how it functions. And of course, if you don't feel like using the transpose tool, you can just turn your 3D gizmo back on and use the 3D gizmo instead of the transpose tool. Well, you've made it this far and now you understand 3D space and the 3D gizmo. And the next video we're gonna talk about sculpting and brushes. And I'll see you there.
4. Part 3 - Sculpting Basics & Brushes: Welcome to step three. In step three, we need to talk about some of the sculpting basics, as well as some of the brushes that you'll be using when you're doing organic shapes and sculpting. For this demonstration, we're going to use a demo project from the light box. So click on the lightbox and go to project, demo project, and select the rhino on the bottom. On the left you have your brush pallet. You can click here and select from a number of brushes, like the clay buildup brush. The clay and the clay buildup brush are both excellent for sculpting. If you hold Shift on your keyboard, your brush icon will change to the smooth icon and you can smooth out your mesh while you're using your smooth brush. If you continue clicking and dragging and release shift, you will activate a secondary smooth mode that is less destructive to your mesh. This is useful if you just want to even out the surface without crushing your mesh while you're smoothing. Above the canvas, you have your z intensity or brush intensity. To the right of that you have your draw size or brush size. And above that you have your focal shift, which controls the diameter of the inner ring of your brush. Focal shift can be very useful for creating either blockier patterns or smoother patterns depending on if the ring is larger or smaller. And the center above z intensity you have Ziad and z subtract. Ziad will make whatever brush here using add geometry. And z subtract will of course make whatever brush or using subtract geometry. Most brushes have Ziad activated by default. But if you want to use z subtract without having to click the button, simply hold Alt on your keyboard while you're sculpting and it will reverse subtract. The brush menu has over a 150 brushes to choose from. Rather than clicking every time to open your Brush menu, you can push B on your keyboard and then select whichever brush you'd like alphabetically by pressing that letter. When you do this, you'll see that every brush has a specific number or letter as a shortcut. So if I want to select the Move brush, for example, I compress beyond my keyboard, then then V to select the Move brush. The move brush is another extremely versatile brush. You can use it for large or small actions, and you can change the entire silhouette of your shape in just a few clicks. If you hold S on your keyboard, you can change the size of your brush with a quick shortcut. And you can also access this by holding the space bar, where you also have access to your z intensity and many other options like move, scale and rotate and even changing the brush that you have selected. The clay and clay buildup brush, or two of the most versatile brushes for adding geometry to your model. The clay brush adds geometry a little thinner and slower to your model. While the clay buildup brush adds geometry a little faster and a little blockier by changing your brush size and intensity. These are both excellent brushes for many different situations. Another very useful brush is the damn standard or Damian standard brush. The Damian standard brush can be used to create creases in your model. And based on your brush size, it can create some very powerful shifts in the way that your model looks. If you hold Alt on your keyboard, it will invert the brush and you can create upward decreases, which can be used as ridges or wrinkles and many other things. And of course, we already talked about our move brush. But the move brush can be used in many different ways. Based on the size of your brush. You can use it to create very specific shapes, big or small, by pushing and pulling your model, sometimes you can create unique shapes that you would otherwise have trouble creating with other brushes. If you hold control on your keyboard, your brush, we'll switch to the mask brush. While holding control, you can draw a mask anywhere on your model and it will protect that area from being sculpted on. You can also hold control and click and drag outside of your model to do a box selection for a mask. Note that when you're using the box masking everything inside the box will be masked even if your camera can't see it. So it will actually mask everything through your model to the other side. If you hold control and click one time outside of your model, it will invert whatever mask you have drawn. And to clear your selection, hold control and click and drag anywhere outside of your model to clear your mask. You can also erase your mask by holding Control and alt and drawing on your model. You can also do the same thing with a box select tool by using control and alt and clicking and dragging. The last thing to note is that the edge of your mask can be softened by holding Control and clicking on your model. And you can create a hardened to edge on your mask by holding Control and alt and clicking on your model. And you can click as many times as you'd like and it will continue to soften or hard in the edge. If you're sculpting on the edge of a hardened mask, it creates much sharper blocky or geometry. Whereas if you're sculpting on a softer or smoother edge, it creates a much smoother transition. By default, ZBrush has a standard masking tool selected called the mask pen. If you hold control and click on the icon, you can change your mask selection tool to a different 11 of the most useful is the mask lasso tool, which you can use to draw any shape you'd like. This is extremely useful for masking off a specific part of your mesh and only working on that part. In the same way that you can hold Control or shift on your keyboard to bring up the mask or the smooth brush. You can hold Control and shifts together to bring up a whole different set of functions. Zbrush defaults to the select Rectangle Tool, which is great for hiding and showing parts of your mesh. If you hold control and shift and click and drag outside of your model, you can use the box select tool to isolate one part of your model and hide everything else. If you do the exact same function one more time, it will invert your selection and show the opposite to unhide everything. Hold control and shift and click outside of your model. Hiding and showing can be used to isolate specific parts of your model that you can't zoom in close enough with your camera, without other parts of your model getting in the way. If you hold control and shift and click on the icon, you can select from a number of different options, like the trim rectangle tool. Now if you hold control and shift and click and drag, it will actually cut into your model and subtracts geometry. The trim Rectangle Tool is great for getting rid of parts that you don't want, but it's not a 100% accurate. So it's not always best in all situations. As you can see here, I've dragged out this geometry to a point where it's stretched out so bad that it's almost completely useless. If you click on the poly frame button on the right, it will actually show you the geometry of your mesh. If we zoom in on these side phases, you can see there so stretched out, you can't really do any additional sculpting or anything else to them. In the top right of our screen, we can see the act of number of points on our model. This tells us how many vertices we have throughout the entirety of our mesh. If you hold control and press D on your keyboard, it will subdivide your model. In other words, it will quadruple the number of active points on your model. This will disperse the geometry on your model a little better and give you more active points to work with. But at the same time, it can impact the performance depending on the strength of your computer. If you continue to press Control D, you can quickly get up to several million active points which can severely impact the performance of your computer. Generally, 3D artists keep their act of number of points as low as possible for as long as possible. This is also called your poly cout. If you have a higher poly count, you can see that your model looks a little lumpy when you start to do sculpting. That's because higher poly count is used for finer details. If you subdivide too early, your model is going to end up looking lumpy because you have too much geometry to work with. When you press Control D, It creates a subdivision level. You can move up and down your different subdivision levels by going to geometry and adjusting the slider bar at the top. Depending on which subdivision level you're on, you can also delete higher or delete lower to get rid of subdivision levels. You can also walk up and down your subdivision levels by pressing Shift D to go down, or by simply pressing D on your keyboard to go up. And you can see the act of number of points change when you push d or shift D. So why are subdivision levels important? Working with a lower poly count is going to allow you to manipulate your object much easier while working on a high poly count is going to be better for finer details later on, subdivision levels allow you to switch between high and low whenever you want. If you need to delete extra polygons, you can mask the area you want to delete and then invert the mask. Then under visibility you can hit Hide part. This makes any unmask part of your mesh invisible. You can go to Geometry, modify topology, and select delete hidden to delete the vertices permanently. This can only be done on the lowest subdivision level. So you can either hit shift D to go down to your lowest, or you can go to geometry and adjust the slider. If you're comfortable with your mesh at a certain subdivision level, you can either delete lower or delete higher to get rid of extra levels that you don't want. When you hit Delete lower the current level that you're on then becomes your lowest subdivision level. To fill the gap where you deleted those polygons, go back to the modified topology menu and hit close holes. Zbrush uses triangles to close the holes instead of squares, which is perfectly acceptable when you're early on in the sculpting phase. Zbrush has a lot of different combinations of things that are useful together, but they're all hidden inside of different menus. Rather than going back and forth between menus, you can go to Preferences and enabled customize. Then you can navigate through your menus, find your favorite button combinations, and drag and dock them on your interface. For example, using hide part, delete, hidden, and close holes. I use these three buttons pretty regularly, so I usually keep them docked somewhere on my interface. Then with three simple clicks, I can simply delete a part that I don't need and it saves me a ton of time. In recent years, ZBrush has added a feature called sculptures pro. If you're geometry gets too stretched out in a certain place, you can turn on sculptures Pro. The button for it is right next to your 3D gizmo. While sculptures Pro is active, whichever Brush you're using will change the polygon density of your mesh while you're sculpting. If we zoom in, you can see that it's added triangles and tesselate the mesh to allow for a higher polygon density. If I need to add more details to this section. Sculptures pro can also be used while smoothing. So you can smooth your mesh and add geometry at the same time. Then if you want, you can switch sculptures pro off and just use your brush to the way you normally would. Congratulations on completing step three. Now you know all the sculpting basics and ZBrush. And next we're gonna move on to Z spheres and getting started with a base for your mesh.
5. Part 4 - Zspheres & Importing Reference: Using Disease spheres can be an extremely fast and accurate way to create unique and complex shapes as a base for your mesh. In this step, I'll show you how to build a model using Z spheres. If you open up the light box, click on project and click and drag and go all the way over to the right, you'll see a project titled Z sphere dot GPR. Double-click on that to open the project. Now we have a single disease fear in our project. I recommend keeping symmetry mode active at all times when using these fears. When you're in Draw mode, you can see the two dots hovering across the axes. If you click and drag, it will draw a new sphere on the surface of which ever sphere you click on and you can continue drawing spheres on top of existing spheres. These spheres only operate in four different modes. There's draw mode, and then there's Move, scale and rotate mode. Press W to go into move mode. In move mode, you can grab any one sphere at a time and move it around. You can move one sphere at a time by changing your brush size to one. Or you can move multiple spheres by increasing the size of your brush. Use E on your keyboard to switch to scale mode and scale the size of one sphere. And it will affect the size of the spheres around it. And press R to go into rotate mode. You get used to switching between draw and move mode using Q and W on your keyboard. This will significantly speed up your workflow. Keeping symmetry active will also save you a lot of time in the long run. Here I've drawn a sphere and pulled it out to the side in the space connecting the two spheres, you can see a long triangle. If I click and drag the triangle, the entire limb will pivot at the base of the triangle. Any of the spheres that you've already drawn can be grabbed and moved to using move mode. And you can see the space connecting them, stretches and moves depending on where you place it. If you want to insert new spheres on a chain, you can press Q to go into Draw mode and click anywhere on that connecting chain to insert a new sphere. If the sphere is too large and you move it too close to another sphere, you'll see that the connecting piece becomes transparent. This means the geometry is broken. If this happens, try scaling of the sphere down in size or moving it away from the other spheres. It's important to know how to import reference into ZBrush. I went into Google and typed in royalty free reference images and search that site for some reference images for our project. When you're importing reference, make sure you save your files as a JPEG or PNG file. If you don't, ZBrush won't be able to recognize the file when you try to import it. So I just found one image from my side reference and one image for my front reference. Now we need to open up our draw menu and drag and drop it into the left side divider. If we scroll down, you want to find where it says front to back, up to down, left to right. If we click on front to back, we have two options. Click on map one, and this is where we'll import our front reference image. If your reference image doesn't show, click the floor button on the right. Underneath where we imported the image. We can adjust the Scale, Rotate, and even flip the horizontal and the image if we need to. Now we need to close the front-back menu and open up the left right menu. This is where we'll import our side reference image. It's important to only use one side image because if you use two, they'll overlap and it will limit your vision. Now I need to adjust the scale of both images so that the head is relatively similar in size. And be sure to look back and forth because the camera angle can be kind of deceptive at times. If we go back to our front-back menu, we can line up the head of the rhino perfectly with the center of our sphere. Then we want to snap to side view and make sure that our front-facing images at the same height level as the head in the side view image. Ordinarily, draw mode enables you to draw two spheres at a time because of symmetry. But if you line the dots up with one another, it will only draw one sphere in the exact center of the sphere. Will draw one sphere and drag it back. And I'll leave my initial sphere where it is, so that I can draw a few more and drag them out for the head and neck. If you click and drag and then hold shift, it will automatically draw a sphere that's the same size as the sphere behind it. Now I am just drawing and moving spheres into place to try and match the general silhouette of my side view image. I can generally do this with a low number of spheres, and I only want to add additional spheres, want to absolutely have to. On the right, you can turn perspective mode on or off when we're doing work like this, it's a good idea to toggle perspective mode off because then you get a perfect front and perfect side view of your image. You should always be moving around and looking at your sculpt from different angles. You're not going for detail in this phase. You're just trying to match the silhouette of your reference image. You can insert new spheres as you go and you can scale and move them around to try and match the general proportions of the reference. Just bear in mind that the more spheres you insert, the less control you have over the general shape. This is similar to working low poly versus working HI polly. Try to look for distinct angle changes and try to match those angle changes from as many views as possible. Rotate your camera around and make sure that your shapes makes sense from different angles. And also be looking at lots of reference all the time. I only have two images on my screen here, but I have a bunch of reference images open on my other monitor. Always be looking at reference. This is something that artists ask all the time, is, is it okay to look at reference? Absolutely. Artists should always be looking at reference while you're working. When you're not working, you should always be studying shapes and looking at things because our brains aren't great at retaining that kind of information. By inserting two spheres and using a simple scale and move, I can get the basic shape of the horns on the head. Again, you don't want to worry about detail. You just want to get a basic outline, shape or silhouette. If you don't want your reference images on anymore, you can toggle the floor button on or off. And at this phase I think this is ready to move on to be a sculptor mesh. So I'll scroll down on my tool menu and go to adaptive skin, and I'll turn on the preview button. Now with adaptive preview on, I can start sculpting on this mesh as if it were a 3D object. You can toggle preview mode on or off by pressing a key on your keyboard. And this allows you to go back and work on your Z sphere. If you want to go back and change anything, keep in mind that your Skulpt is not going to be permanent until you go to tool and make polymath 3D. So don't do too much sculpting or you're going to lose all your work. Once you hit them. Make Pauline mesh 3D button. You can go to any scene and append in your sculpt as a new sub tool. This is a great way to reduce the number of sub tools you're working with. If you just want to go into a new scene and append in your current sculpt. Now I'm just rotating around and looking at reference images using some basic brushes like the clay buildup, the move and the Damian standard brush to insert a little bit of detail and just get a general shape. I work very loosely and fast and try not to get too hooked on one spot for too long. I said it before and I'll say it again. Always be looking at reference. As you continue to work on your sculpts, you don't wanna go into fine detail just yet. Continue to get into basic shapes and block in all of the major parts of the face and body. Before you move on to any kind of detail, make sure you place the eye sockets, the ears, the mouth, the nose, all of the major parts of the face, and then move on to the body and do this same thing. This is called blocking out by inserting all of the major pieces that your mesh is comprised of. And then worrying about detail. Once you have everything in place, now you know how to use these fears. You can use it to create a base mesh for your class project, which we'll get into at the end of the next video. I'll see you there.
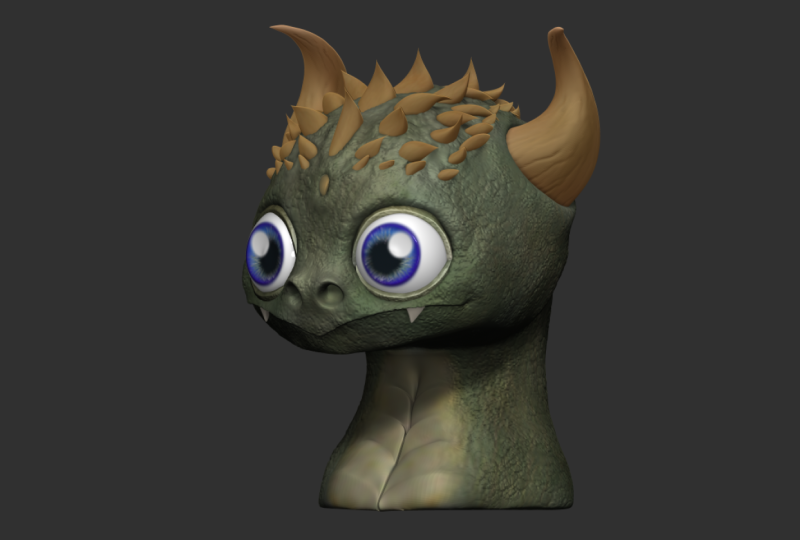
6. Part 5 - Subtools, Extracting & Dynamesh: Welcome to step five. In this step we're going to talk about using extracting and Dinah mesh to speed up your workflow. For this step, you can go to the lightbox and go to project, Demo Projects and select the earthquake bottle at the top. If we open up our subtotal list, you can see that this model is comprised of many different sub tools. There's a sub tool for the body, one for the iss, one for the teeth, and so on. You can click on any one of these to select that sub tool and take your brush and start drawing on it. But it will only affect one subtour. Let a time. If you hold Alt and left-click on any sub tool in your scene, it will select that sub tool. This is a fast way of switching back and forth between your sub tools while you're working on a project. Now I'm going to show you how to use extract. If you hold Control and go to your mask tool, select the mask lasso tool and we'll zoom in on our object here. Extract is going to take whatever we mask on our model and turn it into its own sub tool. So I am going to mask this part of the arm. Then in the sub tool menu, scroll down, open the extract menu and hit extract. As you can see, it took the mask I applied and made an object out of the shape of the mask. And this is only a preview. So if you rotate your camera or click anywhere, it will disappear. You can also change the thickness. So if you change this, it will make your extract a little thinner. Once we liked the thickness of your extraction, hit accept underneath the Extract button. And now if we look in r sub two a list, we can see that this extraction is its own sub tool. So extracting is extremely useful for creating accessories and clothing, because now this has its own sub tool and I can just start sculpting on it right away. Extracting has no limit, so you can just go and create a mask wherever you want. Hit extract and create a new sub tool off of any part of your model anytime, just remember to clear your mask before making a new extraction or the mass will still be there from the last time you used extract. This is a popular method for creating hair as well. You can simply mask the top of the head, change the thickness up a little higher, and hit extract. And now you have a piece that you can start sculpting on right away. Next, we need to talk about Dinah mesh. Data mesh is a function you can turn on and off and use while you're sculpting. When you activate it, it evens out the topology of your mesh and it makes it so your polygon count stays consistent while you're working. So on the right, if we turn on our poly frame button, we can actually see a wireframe of our mesh. In the top right are active number of points is about 8 thousand. If we open up our geometry menu, we can go down and find the dyna mesh menu. And there's a big button that says Dinah mesh. And below that we have a resolution slider. The resolution is going to affect our poly count. So the resolution of 128, if we turn down a mesh on, you can see that our active number of points is now at 43 thousand. So if I hit Control Z and I turned my resolution down with a resolution of a 56. It looks like our active poly count is still about 8 thousand. So dynamic effects, your resolution based on the size of your object in the scene. Now with Diana mesh turned on, I can take my move brush and stretch and pull my polygons all over the place until they're stretched out really wide. Now if I hold Control and I click and drag outside my object like I'm making a mask, dynamics will reactivate and red-eyed a mesh my object, and even out the topology of my entire mesh. As long as Diana meshes turned on, you can do this any time while you're working. One of the most useful things about data mesh is if you have any overlapping or touching geometry. When you redesign a mesh, it will merge that geometry together. So Donna mesh makes it really easy to combine pieces. Sometimes while you're working, your mesh can get thinned out too far and you can get these tiny holes in your match. If you're using dynamic, you can go into your brush pallet, go to the inflate brush. And if you gently inflate that area with the holes and reading a mesh, it will close all the holes. Another way to inflate your mesh is to go to Tool deformation, and use the in-flight slider. This is great with Diana mesh. If you need to inflate your entire mesh all at the same time, or you can mask off an area and just use the in-flight on that portion that's unmasked. Working with Diana mesh early on is extremely helpful. It keeps your polygon count under control and it allows you to achieve a nice silhouette while you're still blocking out your shapes early in the process, in the early phases, you should only be working fast and loose and not thinking about details until a much later stage. Now we need to talk about 0 measure, which is similar to dynamic but unique in its own way. Our number of active points is about 200 thousand. If we go to our geometry menu below the dynamo menu is the Z remeasure menu. You can change the target poly count with this slider. This will affect your poly count when you use the remeasure. If we activate z remeasure, you can see that most of our detail has been preserved, but the act of number of points is all the way down to 13 thousand. So z remeasure is for rebuilding your topology and preserving as much detail as you can see, you have a sphere and you wanna make more spheres rather than going to append to bring in five new spheres, you can hit control shift D to duplicate your current sub tool. And you can just use the move arrows to push them around wherever you want. And if you push w to open your 3D gizmo to the right, there's a little check mark icon. When you turn on this checkmark icon, every sub tool that's visible in your scene will move at the same time. So you can hide everything except for the spheres and just push all the spheres back at the same time. Just be sure to turn off the check mark icon when you're done. And then you can go back and turn on Diana mesh and build up all your forms. This brings us to the end of step five. And now we need to talk about our class project. For a class project we are going to be doing a sculptor, a character. The sculptor will only be a character's bust, which means just sculpting the character's head and shoulders without worrying about the body or anything below the neck and shoulders. Your sculpt can be in any style that you want, realistic or stylized. Keep in mind that a stylized character is a little easier starting out because the details don't have to be exact. And doing a realistic character is going to require much more accuracy and can be very frustrating, especially if you don't have experience doing realistic art prior to this class for the project, I want you to decide what you want to sculpt and ZBrush. As artists, it's important that we do what inspires us. We're all inspired by ideas from different things. Some of our best work comes from doing the things we love. And I think it's important to choose a character that speaks to you or inspires you in your own way. Just remember to pick something that's appropriate for your skill level. If you have no experience with ZBrush, maybe start with a character that stylized or cartoony and doesn't have a lot of details or accessories. For my sculpt, I decided to do a Dragon. For the purposes of this tutorial, I didn't end up doing an exact copy of any character because I didn't want to trigger any copyright warnings or get flagged for using somebody else's content. But I definitely used a lot of reference images from a lot of different characters to give myself guidance every step of the way. For this next part, I'm just going to walk you through what I did for your class project. You could also just follow along with my example if you'd like. I started with a simple sphere and using the Move brush, I held control shift and D duplicated my top part down to make a bottom jaw and just use the Move brush. Nothing fancy. Just switching back and forth between the top and the bottom, trying to get my silhouette. Now I go in with Diana mesh turned on and I'm using the Damian standard brush, just tracing out some basic shapes for the nose and the forehead by using the clay and clay buildup brush, I hollowed out the eyes and then I move back to the move brush and start pushing and pulling the shape around. At this point, I'm just playing with it, trying to get a nice silhouette and get the shapes and the features in place. No details, just experimenting. I'm also looking at lots of reference on my other monitor, I have tons of reference images from lots of my favorite cartoon characters and animals and dragons. As much inspiration as I can get, just so I can look at the features of the face and the eyes and the general shapes overall. Now I append in a sphere for the eyeball. Then I went to the Z plug-in menu, chose sub Tool master and selected mirror. If you hit OK, it will mirror your sphere to the other side of the x axis. This keeps it as one sub tool and both eyeballs are mirrored perfectly on either side. But we'll talk about this feature later in another step. Remember to keep your sculpt simple. I mostly use simple brushes when I'm starting off. I used the clay buildup damn standard move brush just to get everything in place. Now that I have my main shaped blocked out, I'm going back and smoothing things out with the H polish brush, which you can see in the bottom right. H polish is kind of like a flattened brush, but it just smooth things out a little bit and creates a nice flat, hard surface. Now by holding Alt with the H polish brush or you can also build up a nice stack and create sort of like a pillar out of your object. Did this to make the horns. I use the snake hook brush to grab and pull those out. Snake hook is similar to move, but it's a little harsher as a brush. And it creates some really interesting geometry while you use it, the silhouette of your characters, so important, that little box in the top left, the white box that has a black silhouette of your character. You can drag and expand it and you can look at a live preview of your silhouette. I use this all the time while I'm working. The silhouette creates the defining image for the character overall. So it's super important. So this is my initial sculpt. It's not finished, but I got all my main features in place and got a nice silhouette going for my character. As we continue, I'll show you how I apply the tools in each step to my model. In the next video, we'll talk about Pali groups. Hopefully you found this video helpful and I'll see you in the next one.
7. Part 6 - Polygroups, Splitting & Merging: Welcome to step six. In step six, we're going to go over the rest of the sub tool menu and then we'll move on to poly groups for this video, I'm just using the female demo head in the light box. You can open the light box and it should be there in the main folder. If you look at our subdue a list, we see that the female demo head is made up of two different sub tools on the toolbar next to the canvas, you can enable solo mode at the bottom. This allows you to see one sub tool at a time. Below your sub2 a list. There are two sets of arrows. The top set of arrows is used for changing your current sub tool selection by pushing up or down. You can scroll through your SAP tools. You can also use the up and down arrows on your keyboard to do this. In the sub tool menu, you can also duplicate your sub tools by holding Alt and left clicking on any sub tool, it will switch your selection to that sub tool. The second set of arrows below your sub two, a list is used for rearranging the order of your sub tools. You can click the up or down arrow and it will move your sub tool up or down the list one spot. If you hold shift and click up or down, it will send your selection to the top or the bottom of your subtitle list. And to the right of every sub tool, there's an eyeball icon that you can use to hide or show any SAP tool. You can hide or show all your objects in your scene by holding Shift and clicking on the eyeball. There are also the buttons for duplicate and for delete. Delete removes an object permanently from your project. Sometimes it's better to hide an object rather than deleted unless you're absolutely sure. Next to duplicate and Delete is append, where you can append in new primitive objects. In the last video, I inserted the eyeballs for my dragon sculpt, and I want to show you how I did that. First I append in a new sphere. Then I hit W on my keyboard, scale the sphere down in size, and place it into the eye socket. By snapping from front and side view, I just get the eyeball into place. Then I go up to Z, Plug in, sub Tool master, and select mirror. When you open the mirror menu, the X-axis is selected by default. In front view, this will mirror your object to the other side of the face. When I select ok, you can see now that the eyeball is on the other side, perfectly mirrored. Now if you want to move your eyeballs like rotate them and make them look in a certain direction. You can turn off symmetry and mask one of them and then hit W to go into your 3D gizmo and hit the go to unmasked mesh center button. This brings the 3D gizmo to the unmasked eyeball and centers it perfectly. Now that eyeball will stay perfectly centered and you can point in any direction you want. Now to switch to the other eyeball, hold control and click outside your mesh and it will invert your mask. And then use the unmasked mesh centered button to move your gizmo to the center of the other eyeball. The last thing I want to show you what this is, how to move your objects mirrored across the x axis with one another. You can unlock your gizmo with the unlock icon, or you can hold Alt on your keyboard. If you unlock your gizmo and press the Home button, it will bring your gizmo to the center of the x axis. Now if you move your objects, they move at the same time all as one piece because the gizmo is in the center of the x axis. To make your objects move mirrored from one another, all you have to do is turn on symmetry. And then go to unmask mesh center. And then your objects will mirror across the x-axis. This seems like a really simple thing, but at first it took me a long time to figure out how this worked. So I wanted to be sure and share that. Now we're moving on to Pauli groups. If I turn on the Pali frame button on the toolbar on the right, you can see my demo head is purple and that's because it is its own Pauli group. Now if I zoom in on my eyes and teeth, you can see a slight color difference here. Before I do anything else, I want to go to geometry and I want to delete any lower subdivision levels that I have, or I can simply go to my lowest subdivision level. Sometimes subdivision levels can create problems for some of the things we're about to do. So I'm just going to go ahead and delete the lower. Now if we turn on our poly frame button, we can see the colors of our Pauli groups here. It's not very obvious at first. And we can fix this by going down to poly groups and hitting auto groups. Now the colors are very obvious and you can see that each piece is its own color or its own Pauli group. Zbrush categorizes Pauli groups by color. So by hitting auto groups, it assigns a random color to every poly group. Now you can create a poly group by masking any part of your model and hitting Control W on your keyboard. This assigns a unique color to that poly group and creates a new one. If you want to reset your poly groups, you can just go back and hit auto groups again. Now if we hold control and shift, it brings up our select Rectangle Tool. If we click on a poly group with that, it will hide everything except for that poly group. If I hold control and shift and click outside of my object, it will show everything again. If I have one poly group isolated, I can hold control and shift and click and drag outside of my object and it will reverse my selection and show the opposite. And a little trick with poly groups is if you hold control and shift and click and drag to show the opposite, then you can hold Control and shift and click on Apollo Group and it will hide whatever you click on. Now if you hide appalling group and you start sculpting on it. You can see here when I show everything again, the geometry is all stretched out along the edge of the poly group, but it's still attached as a, this is something to bear in mind while you're working with poly groups. Next, we need to go over splitting in the subtable menu. If my sub tool has three different poly groups, if I go to Split and hit groups, split, it will take every poly group in that sub tool and split it into its own sub tool. In the split menu, if I hit split hidden, it will take whatever is hidden on my selection and turn it into its own sub tool. This also works with regular visibility, not just with poly groups, split to parts, just take separate islands of geometry and splits them into their own sub tools instead of poly groups. But now my favorite splitting tool is the split mast points, where you can simply mask off a part of your object and hit split mass points and it becomes its own sub tool. And the same can be done for split unmasked points. If you mask off an area and hit split unmasked, it will take the unmasked area and turn it into its own sub tool. Next in the subtour list is the merge menu. Before we talked about moving your sub tools up and down on your list. This is important when you're using merged down because whatever sub tool is on top will merge down to the sub tool below it. A fast workflow for merging objects together is holding Alt and clicking on the subsidy you want. Then hold shift and click the center top arrow button, and then hold Alt and click on another subtable you want to merge and then hold shift and send that one to the top as well. Then they're right next to each other, then you can just simply hit merged down and they're merged together. Now say I accidentally do a groups split on the face with Pali groups and it separates the geometry on the face. So now this is no longer attached. I can move both parts of my face up to the top of my list and then I can turn on the weld button and then hit merged down. And it will weld any points that are touching together as one. So now this is all one combined mesh. If the vertices are on top of one another or touching, there'll be welded together. Now next is merge visible. Merge visible is a pretty big step in the workflow process. When you hit merge visible, it takes every visible sub tool on your list and it merges it into one sub tool in a separate scene at the top of your Tool menu. So if I scroll up, I can see here that I have my original scene with three sub tools in it. And above that I have my emerged scene with all of myself tools merged into one. Nice thing is I have one sub tool now, but all my poly groups have been preserved. So I can still hold control and shift and click on any poly group to isolate that part and only work with one sub tool. If you're working with multiple policy groups, you can hit W on your keyboard to bring up your 3D gizmo and then hold control and click on Apollo Group and it will mask everything except for that group. If you want to select another poly group by holding Control and clicking on it, ZBrush might think you're just trying to soften your mask. So you have to clear your mask selection and then hold control and click on a new policy group. Using poly groups can speed up your workflow tremendously. Now let me show you how I applied poly groups to our class project. I had to continue my sculpt, so I ended up hollowing out the roof of the mouth and the bottom jaw. And then I append in a new sphere for the tongue and just use the Damian standard and the snake hook brush to get a nice shape out of it. You can also see I just used the 3D gizmo to move it around and position it correctly. Then I append in a cone for a tooth and I use the smooth brush and the move brush to get the right shape I want. And then the 3D gizmo, just to put it into place, I use the trick we did for the eyeballs and went to CSI plug-in mirror and mirrored across the X axis. And then I just hit control shift D to duplicate that sub tool and move it down, trimmed it up, and hit Control shifted D a few more times just to duplicate the teeth and save some time. Quick tip, if you select a color on your color picker and then you go to document and hit the back button. It will allow you to change the color of your background. So you can pick a pink color or blue. And by going to document and hitting back, it changes the color of the background. And sometimes this makes it easier to see if you're seen as too dark. And if you don't like the color you picked, by default, your color is set to a dark grey. So if you select a dark grey on your color picker and go to document and hit back. It will go back to the way it was when I merged each sub tool for the teeth together so that they're all one sub tool. But I kept the head and the jaw as one sub tool, just in two different poly groups. So the bottom jaw is its own poly group. I duplicated the teeth and I tried to move it up for the top teeth. But you can see here that it doesn't really work. If I want to flipped my teeth and use them for the top, I can go to the deformation menu. At the top of the deformation menu is the mirror button. To the right of the mirror button is the x, y and z buttons. And I turned on Y and hit mirror. And now my teeth are perfectly mirrored up. And I can just rotate them and move them down into place with the 3D gizmo. And there you have it. That's the end of step six. In the next step, we're going to talk about z modeler and Booleans. I'll see you there.
8. Part 7 - Zmodeler & Booleans: In step seven, we'll go over z modeller and Booleans. For this project. We're using the model rifle in the light box under project demo projects. And the model rifle is at the top. When we're working with z modeler, we need to keep our draw poly frame button on so we can see the geometry of our sub tools. If we zoom in here, you can switch between your sub tools and see the different geometry. I'll select the end muzzle of the gun and then find my Z modular tool. Z modeler is located in your brush pallet under z. Now z model or works in a couple of different ways. I'm going to zoom in close on our model so I can show you what I'm talking about. When I hover over a polygon face, you can see a little orange bar pop-up based on the direction of my cursor. That orange bar points in the direction that Z modular is going to go. It will either go up, down, left, or right. So depending on which direction I click, that's the direction z model or will go. Z modeler works with three different functions. Polygon actions, point actions, and edge actions. If I hover over a point and hold space, it will bring up my point actions. If I hover over an edge and I hold space, it will bring up my edge actions. And if I hover over a polygon face and hold space, it will bring up my polygon actions. So let's start with a polygon action. Hover your cursor over any polygon face and hold the space bar to bring up your polygon actions. On the top you have your actions. So I'll select extrude, and on the bottom you have your target for your action. So I'll select a single polygon as my target. Now that I have my polygon action selected, I can click and drag on any polygon and it will perform that action. Remember you can toggle symmetry on an off with x on your keyboard. That saves you a lot of time when you're working with z modeler. Extruding is a great way to create complex geometry very quickly, especially on a blocky model like this rifle. Now let's talk about point actions. By default, it's set to move. So if I click on any point and drag, it will move that point around. If I hover over a point and hold space, it will bring up my point actions. If I change my brush size, I can affect multiple points. So a larger brush radius will affect many points, and a small brush radius will affect less or even just 1. If I hover over an edge and hold space, it will bring up my edge actions. So for my actions, I'll select insert and for my target I'll select a single edge loop. Now if I click on any edge, it will insert an edge loop perpendicular to the edge that I clicked on. You can also click and drag to move the edge loop into position in whichever way you want. Say you want to delete some polygons. I can hover over a polygon and hold space for my action. I'll select, delete. For my target, I'll select a single polygon. Now whichever polygon face I click on, it will be deleted. You can delete as many faces as you want. But keep in mind that closing geometry is more difficult than creating geometry. So don't put too many holes in your mesh or you might put yourself in a position where you can't work any further on it. Say I deleted a single polygon and now I want to close the hole. I can bring up my edge Actions select Bridge. And then for Target, select edges, you'll have to click on one edge and then change your camera angle to click on a second edge that you want a bridge to. This works best if you click on an edge that's directly across from the one that you clicked on. First, you want to try to keep your geometry in square's not triangles. So z modeler thinks with three menu's top to bottom. First de-select your action, then you select the target. And some menus have modifiers for that target. Third menu at the bottom. You can also create poly groups with z modeler while you're working. For this example, I'm using polygon actions and I chose extrude Pauli group all. If you hold all, you can click or click and drag to create a poly group of a different color. Now if I have extrude poly group all selected, it will only affect that poly group that I just created by holding Alt and clicking and dragging, I can create a large poly group very quickly and use extrude poly group all to pull out the geometry. A quick tip for inserting edges. If you bring up your edge actions and select, insert multiple edge loops. If you click on an edge one time it will insert the edge loop at the exact center of that edge. You can insert multiple edge loops by clicking and dragging and pulling out as many as you'd like. In reality, we want to keep our geometry has low poly as possible. So I'm only doing this as an example. You wouldn't actually have to insert these edge loops unless you wanted to make changes to these faces or insert some extra geometry. Next we will move on to Booleans. Booleans essentially subtract one shape from another. So for this example, I'm going to go to sub tool, append and append in a new sphere. Now we'll just scale it down and use the 3D gizmo to make it so it's intersecting with the top plate of the rifle. And the top left next to the light box is the live boolean button. If you turn this on at first, it looks like nothing happens, but that's because we need to do a little setup first. First I'm going to rearrange my sub tools. So I'm going to click the top plate of the rifle and then I'm going to hold shift and click the send down arrow to send it to the bottom of my sub to a list. Now I'll select the sphere and I'll do the exact same thing and send it to the bottom. The sphere needs to be below the plate on the rifle, on my subtour list. Now for the rifle piece, you need to select the arrow icon and it should change and say start. And for the sphere, you need to select the icon, one icon to the right, and it will change it to a subtractive object. Now if I turn off my poly frame button and turn live boolean on, you can actually see a preview of what's happening on the sphere. And next to the icon for subtractive object, there is an additive object button and this will invert the selection, but that's not what we want. I just wanted to show you that it's there for example. So switch back to subtractive object. Makes sure that both of these tools are at the bottom of your sub tool list. Now we need to go to sub tool, opened the Boolean menu, and click make Boolean mesh. Now if I scroll up, I have a separate scene with my boolean object in it. On myself to a list, I have two sub tools. The top one is the entire rifle and the bottom one is my boolean object. So I need to click on my boolean object at least one time to activate it. Then go back to my original scene, go to sub tool append. And my boolean object can be appended into my scene as a new sub tool. I can just go and hide my original two parts in case I want to go back and fix anything later. And now my boolean object has a nice cut out of it and it's a sub tool in my scene. Turn my poly frame button back on. You can see here that booleans creates some pretty bad geometry. There are a few ways that you can deal with this. One way is to hit control D and subdivide to give your object more geometry before you create the Boolean, you can also run Dinah mesh on your Boolean object after you've created it. And this will make your geometry higher, but it will make it look nice. And last you can always try 0 measure, but that doesn't always work out the best as it will not keep its nice angular forms if you go to low poly, booleans can be used to create all kinds of very precise, very nice cuts and shapes, especially for mechanical parts. That brings us to the end of Step seven. And now I am going to use examples of booleans In our class project. For the class project sculpt, I used Booleans to create pupils and irises for the eyes. By the way, I'm able to go into solo mode very quickly. And that's because I went to preferences, edit and turned on click to solo mode. This allows you to click one time and enters solo mode like you would in the bottom right. But just with a simple click, I like this because it speeds up my workflow. Some people like to keep the solo buttons separate. So first I select my eyeballs, then I append in a new cylinder. And I scale the cylinder down to the size that I want and move it into place with the 3D gizmo. I want this to be the iris, and it shouldn't be too big because in the end I want this character to look cute and cuddly, not creepy and scary. Now I moved the eyeball to the bottom of the subtable list, and I move this cylinder to the bottom as well so that it's below the eyeball. Setup my start point on the eyeball and change the cylinder to a subtractive object and turn on live Boolean. Now I can move this cylinder around and see a live preview. Next I go to z plug-in sub Tool master, select mirror so that the cylinder is mirrored to the other side, so it does both eyes at the same time. I had to use the Move brush on the face a little bit and move parts out of the way so that it wasn't intersecting with the eyeballs. Then I just experiment with the cylinder is changing that size, moving them around, experimenting with the face shape a little more. And when I finally get the more I want, I go to subdue all opened the Boolean menu and hit make Boolean mesh. Then I can scroll up to my new scene where my boolean object is. Click on it and go back to my original scene and append in my boolean object. And then I'll hide my original iss. And I actually just repeat this process with my boolean object. I just scale the size of the cylinders down and try to get the pupil in place and repeat the whole process all over. Now It's just playing around with the face shape a little more and trying to finish up and polish up my sculpt. And in the next video we're gonna go over finishing our sculpt and I'll show you all the tools that I use to do it there. See you in the next one.
9. Interlude - Finish Sculpting: We're going to focus on something on the side really quick. We need to focus on finishing your sculpt. So whichever stage you're at in your scope, you should have already defined your major shapes and started going into at least some sort of detail. Your sculpt doesn't have to be perfect for this project. You just need to do the level of detail that you're comfortable with. Now my characters still looks pretty scary, and I didn't want them to look scary. I wanted them to look cute and cuddly. So I ended up messing around with the shape of the eyes, and the shape of the face and the jaw, and all of those pieces. And it was very difficult to get that correct. I ended up going back and looking at a lot of reference to understand what it was I was doing wrong here. It turns out that the teeth were too pointy. The eyes weren't the right size. The jaw was too big, the face was slanted back. I had all sorts of problems. And I started figuring this out when I started looking at reference images of cute characters. So I went back to some of my basic brushes the way that I did at the start. I went in with the brush and change the angle and the shape of the jaw, the top and the bottom. I changed the eyes a little bit. I changed the face shape a little bit. I went to and in which just the clay buildup and put in some volume in areas that needed it. And I tried to make his face look a little bit smaller and cuter, and generally not make him look scary. I ended up closing the mouth because it turns out characters with an open mouth look creepy. I didn't even ended up changing the shape of his nose so that it was a little cuter. By looking at reference, I was able to figure out what I was doing rock. It's super important to be looking at reference all the time, whether you're copying and exact character or if you're just using it as inspiration to create your own character, you always need to be looking at reference images because there's probably a dozen things that you don't know that you're doing wrong. The only way I could figure out how was to look at other people's good examples. The next thing that I had to take into consideration was the silhouette. And the top-left, there's that white box with a black shadow in it that's actually used for showing the silhouette of your character. You can grab and click and drag that box and make it bigger. And you can see a live silhouette of your characters you go, I use this constantly because silhouette defines so much about your character. Always be changing your camera angle and looking and turning and making sure that your silhouette looks good, or at least looks identifiable as its shape. If I look at it from the side, does it look like a dragon? If it doesn't look like a drag and what does it look like? These are the questions that you need to be asking yourself while you're working on your character. What do the eyes identify when they look at your shapes? How did they perceive your character? Another tool that's very helpful for this is negative space. The same way that you look at the silhouette of your object. Look at the negative space between points in your object. Look at this surrounding shapes that create negative space cutting into your character. These are all really important factors that affect the way that our eyes pickup and interpret what it is that we see and we don't even realize we do it most of the time. I tried a lot of different shapes and all in all, I just decided to make the head a smaller. When I made a wider it looked scary. When I made it big, it looked too intimidating or creepy. So I had to narrow down the face shape to make it look like a younger character that was cute and cuddly. I know I'm preaching about this a lot, but it's so important to look at reference. I had no idea what a young character even looked like. I had to go back and look at young dragon characters. I had to look at all kinds of Disney cartoons and Pixar and DreamWorks and different characters to get an idea of what a young, cute, cuddly character even looks like because my brain literally had no idea. And this is a normal part of the process. You should be going back and doing research. It's normal to go back and do a ton of research before you even start sculpting. Some people do more research than they do sculpting. And some of their sculpts turn up absolutely amazing because they already have in their head a perfect mental image of what they want to do. In the end, I made my character look a lot younger and a lot cuter than it did in the beginning. It took a lot of time, but it just took going back and looking at reference and doing my research and making sure that I understood what shapes go where and what I was doing wrong. That does it for all the sculpting on my project. But I want to see your work. Please share your work with me or with the class. You can either send it to me personally or you can post it in the class. And if you have any troubles, please feel free to reach out to me and I would be happy to help. In the next video, we'll get around to painting our model and putting some materials on it. So it looks really nice. I'll see you in the next one.
10. Part 8 - Polypaint, Materials & Layers: Welcome to step eight. Instead of eight will be discussing poly pain and materials using the demos soldier project in the light box under project demo projects, on the left you have your color picker. You can select any color by clicking on that color. And you'll notice that your model changes to whichever color you select. And that's because ZBrush hasn't assigned a color to any part of your model. So in order to give our sub tool color first, we have to select a single sub tool. And I selected the shirt by holding Alt and clicking on it. Now let's say I want to fill the shirt with red. First, I'm gonna open my left side divider. Then I'll go to my color menu and drag and drop it over to the left. Now I have several options here, but if I hit fill object, it will fill that sub tool with whichever color I currently have selected. Now if I change my color back to white, you can see that my shirt has stayed red and my preview color is white. So it shows that all my other sub tools still have not been assigned a color. So you can select any sub tool, select a color and click fill object, and it will fill that sub tool with that color. And your brush pallet, you have the paintbrush. You can select your paintbrush. And if you change your RGB intensity, it will change the strength of your brush while you're painting whatever color you have selected. So if I wanted to paint some green on here, I could just select green. Gotta my paint brush and start painting. Notice that my RGB intensity is at a 100, so it's coming out very strong. But I can change my RGB intensity lower and it will come out a lot smoother and be better for blending colors. Now above your RGB intensity, there is an RGB button. The RGB button is basically like the on-off button for your color. Next to the RGB is an M button, and that's for materials which we'll get into later. So make sure RGB is turned on. Or you can see here that ZBrush won't let you paint any colors. To quick select a colour. Just hover your cursor over any color on your screen and press C on your keyboard. Now you can select colors quickly. So if you want to switch back and forth between several colors, you already have, it's as easy as just pressing see on your keyboard. If my object is low resolution, my paint will appear as low resolution as well. So if I press Control D on my keyboard to sub-divide the paint on my model will appear higher resolution because there were more polygons. Now, this also matters when you're blending colors. So keep in mind which are poly count is if your paint is not quite looking the way that you want it to. Now let's talk about Mac caps and materials. On the left above your color picker, you have your material palette. When you open this menu, you have all of your Mat cap options on the top, and you have your material selections on the bottom. Map caps or designed to show your object in different lighting. So if you switch back and forth between different Mac apps, it will show the indentations and flaws in your model and it makes them easier to see. Another big difference between materials and Matt caps is that Mac apps don't always show the color that you paint on your model. Materials actually do show the color that you paint on your model just in a different sort of way. So if you experiment with different materials, they'll make your object and colors look different based on your lighting and other factors. Now let's say I want to fill an object with a material instead of a color. I'm going to select the basic material first. And we're going to use this fill object button like we did with our color. But first, we need to go up above RGB intensity, turn RGB off and make sure that M is turned on. And if you turn on m, it will automatically turn RGB off. Now if I hit fill object, it will fill that object with this material. And you can see that everything else changes to whatever I have selected because none of those sub tools have a material assigned to them. So the fill object button works the same for colors as it does for materials. You just have to make sure that for colors you have the RGB button turned on, and for materials you have the m button turned on. Now let's say you want to remove a material from an object. First, select the subtable you want to remove the material from. And then in your material palette you can choose flat color. Now we need to change our color to white. Make sure that the M button is on for material. And when we hit fill object, it removes the material from that object. This exact same method works with colors as well. So if I want to remove all the color from my shirt, I can select flat color, makes sure that RGB is turned on instead of M and hit fill object and it will remove all the color from the short. In the same way that you can paint with your paint brush, you can also paint materials onto your object. So if I select my paintbrush and my brush pallet, turn on the m button for material. Now I can paint with materials instead of paint. When you're painting with colors and materials, you should also experiment with brushstroke. Brushstroke is located directly below the paintbrush pellet. If I turn on spray, for example, it changes the pattern of my brush. Using different brush strokes is a great way to blend your colors together, which is absolutely essential when you're painting on any model. Using alphas can also change your brush stroke, but they have another function that I want to show you. If we go to our brush stroke and we change it to drag select, then we go to our alpha menu below, we can select a pattern like this star. And because we changed our brushstroke to drag select, now I can click and drag and my alpha will become a stamp on my model. I'll change my RGB intensity to 100. And you can see that my alpha can be inserted as many times as I want on my object. This is an excellent way to create patterns really quickly when you're painting. So by experimenting with different alphas, colors, and brush strokes, you can create some pretty unique patterns fairly easily. Another great way to do your painting and materials is using layers. The layers menu is located in the tool menu on the right. You can see that all my layers here are grayed out. That's because we don't have any layers yet. So if we go down and left, we can select create new layer. And a new layer appears to the right of my layer is little record button that says our ISI. And I can click to turn it on and off. When it's turned off, there's a little visibility eyeball icon that I can turn on and off. Next to that is the Record button, which I can just click to turn on and off again. If you want a layer to record what you're doing, make sure the record button is turned on. At the bottom, there's also a duplicate layer button, so you can duplicate layers or create new ones. To the right of that. There's also a Delete Layer button. So you can delete or remove as many layers as you'd like. There's also a button so that you can rename your layers, whichever you'd like. So you can name this one color or name another one for material. For every layer there's a slider bar. And when I move the slider bar, you see that nothing happens. But that's because I haven't done anything on this layer yet. If I slide the bar all the way to the right, I have to turn on my record button next to them, little eyeball icon. So if I click on that, it will turn record on. Now that record is active, I can make some changes to my sub tool, so I'll just go ahead and insert some new color. Now if I turn Record off, I can drag my slider bar back to the center to 0 and you can see that it fades away everything that I just did. And if I drag it back to the right. Realize everything that I did. I can slide my bar all the way to the right to a value of one, turn on record again and continue making changes to my model. This also works with sculpting, so I can choose the clay brush and start sculpting in my model. But you'll notice that color was applied to my model while I'm sculpting. That's because the RGB button is still turned on. So I need to go up and turn off RGB. Otherwise, it's going to apply color to my model while I'm sculpting. If you want to apply the effects of a layer to your object, you can go down on the list and select bake all. By baking all you can see that your layered disappears and now all of those changes are applied to your model. You don't want to apply the effects of a certain layer. You can always hide that layer and it will not make, or you can duplicate the layer and hide it in case of any mistakes. Another method for painting is using the spotlight. The spotlight is located in the texture menu at the top, I'm going to drag and drop the texture menu in my divider on the right. So the spotlight lets you take an imported image and paint it directly onto your model. So first we need to import an image by selecting import and I selected this polka dot pattern, then you want to click on the image that you just imported. And below that, all the way to the right, there is a plus minus button. We'll add it to the spotlight. You can turn the wheel menu on and off by pressing Z on your keyboard. And you can turn the entire spotlight on and off. By pressing Shift Z on your keyboard. You can click and drag outside of your wheel icon anywhere on your image and it will move your image around. Within the wheel icon, there are several options and you can access any of them by clicking and dragging to apply them to your image. If I lined my image up over my model, select my paintbrush and simply start painting on my model. It will transfer the image to my model. If I want to use sculpting tools instead of painting, I can go to the brush menu, go to samples and turn spotlight projection off. And this will allow me to sculpt on my object without applying paint. This is useful for importing references images directly onto your screen and being able to sculpt and work with your reference at the same time. It's so important as an artist to use reference while you're working. Using the spotlight to keep your reference image on screen is one of the best ways to have your reference image is present. You can even turn the opacity of your image down a little bit and lay your object underneath the reference image to make sure that you get some of the proportions and placement correct? Just remember not to rely completely on your reference image because sometimes your character might be at an angle or something that you can't quite recreate accurately by overlapping your image with your object. That brings us to the end of step eight. Now let's apply some of the principles that we learned in this video to our class project. Now that I've finally finished my character, it's time to start painting. So for this character, I selected a basic material and, uh, descended to fill the body with a dark grey color by just selecting a lower RGB intensity and filling the object with a dark grey. For the eyeballs, I selected the circle mask tool and tried to mask off everything except for the iris and the pupil so that I can start painting. I fill in the red color first, and then I use my circle mass to fill in the pupil. And I invert the mask so that the pupil is completely open and I fill it with black. Damage is selected some white and painted over those edges, cleaned up the edge of the eyeball a little bit. And moving on to the body, I just selected white and turn my RGB intensity way down and just paint it a little bit of white on the chest and neck. And now I start using some of the tricks I showed you earlier. I changed my brush alpha two sort of scattered pattern so that I can break up the look on the black material and give it a little more texture. So at this point I want to have sort of a skin looking texture on him. So I'm switching back and forth between light and dark color, just black or white with a low RGB intensity. So I can do some blending and make it look like he has sort of a scaly skin like pattern. So here's the trick that I showed you earlier with alphas. So because the body is a black color, I change my color to white and I changed my brush stroke to drag select. And its elected an alpha pattern that looked kind of like scales. At first I was dragging it out and nothing was really happening. So I had to add more black to the chest and neck so that the white color would come through more clearly. After getting a nice skin texture painted on him, I decided to add some color. So I looked for complimentary colors, like a dark purple and just began gently applying that to different parts of my model, like the end of the nose and some of the lighter areas on the face. Then I looked for complimentary colors, purple, some of the lighter parts of the face like underneath the eyes or on soft parts of the face. I added a little tiny bit of yellow as well. This is a perfect example of where layers are useful for poly pane, you can experiment with layers by just creating as many as you'd like. And every single different layer could be a different type of poly pain. So you can try different colors, different textures, and not actually apply them to your model until you're ready by hitting bake all. Once i was done with the paint or decided to move on and try some different materials on my object because I didn't really like the look of the basic material when you're making characters are great material to apply to your eyeballs is the toy plastic material. It has kind of a shiny plastic look and it looks really reflective, which is what eyeballs actually look like. So I applied toy plastic to the eyeballs and, uh, decided to apply the skin shade material to the rest of my model. This lightens things up and kind of brings up my paint and my color a little more. I generally like the way the skin shade material looks under lighting as well. Speaking of lighting, I want to tell you how to actually get a basic render and export an image of your object to the right of your viewport. At the top there's a BPR button. This means best preview render. If you click on that, you'll see that the shadows applied to your object because the lighting has kicked in and it gives you a pretty decent little Render. And the menus at the top, there's also the light menu. In the light menu, you can turn on as many lights as you would like by clicking the little light bulb icons. And you can click and drag on this sphere to the left and it will change the direction of your selected light. You can change the intensity of your lights. You can change the ambient of your lights, which is the general light overall. Play with these settings and try hitting the BPR button to get a decent render of your model. Once you get the lighting the way you want it, you can export whatever is in your view port as an image file by going to document and selecting export. And I'd like to change my image file to a PNG just because PNGs are a little higher quality, but they are larger in file size. On the right side menu, there's also a zoom button that you can click and drag to show the edges of your canvas. The edges of this canvas, or an accurate representation of what the edges of your image will look like when you export it. If you want to increase the size of your image and make it higher resolution, you can go back to document and down below, you can find where it says half or double. And you can actually click and drag the sliders to create a custom size. And once you do this, you have to hit Control N on your keyboard to clear the image and then click and drag and draw a new image. And then you have to go up to the top left and turn edit mode back on. But now if you zoom out, you can see the edges of your image again. And it has doubled the resolution of your image, increasing the size of your canvas like this can slow down the performance of your computer. So just be aware of that. If I want my viewport to return to normal, I can simply hit the actual button right below zoom. And it will hide the borders of my image and give me a full expanded viewport again, when you're exploiting an image of your models, sometimes it's nice to present from different angles. You can do this by pressing Shift S on your keyboard. This creates a snapshot of your image and freezes it in place. And then you can just move your model to a different location, rotated around, and hit Shift S again to get a different angle to clear your canvas and start over. Just hit Control N on the keyboard. And it will clear everything in your viewport. Say you get zoomed in way too far and you can't find your original image. You can just hit control in and then hit F on your keyboard to focus on your model. If you haven't already, you should finish sculpting and painting your model before moving on to the next step. And the next step we'll talk about creating movies for your model and exporting your textures to another program.
11. Part 9 - UV's & Textures: Welcome to step nine. Step nine will be using the Earthquake Model in the Lightbox under projects, demo projects. And the Earthquake Model is at the top. In this step, we're going to talk about UAVs and texturing on your model. So for people who aren't familiar, what exactly are you movies? If we zoom in on our object, we can see that they've already done a lot of textures and painting on this object. Really all that. This is just using alphas and nice sculpting to achieve details that look like fabric. But if we zoom in really close, you can see these are just some basic lines and some paint on the model. Basically u, v's are just a coordinate MAP that wraps around the outside of your object and tells the program where to put the color and where to put the textures. So this object does not have uv, so we need to create some. First, we need to go to the lowest subdivision level on our object. You can do that by hitting shift dy, or you can slide the slider in the geometry menu down to a one. When you're creating movies, it will only work on the lowest subdivision level. Now many to go to our Z plug-in menu. And because we're going to use this a lot, I'm going to drag and drop down menu in the divider on the right. Look into Z, Plug in menu and go down to UV master. We can turn on poly groups. This is one really efficient way of unwrapping your objects. So turn Pauli groups on and hit on rap and ZBrush will unwrap every Pauli Group as its own individual UV, chunk or Island. And you'll see what I'm talking about in a minute. So now that we've unwrapped our object, we're still on our lowest subdivision level, so we need to close UV Master and we need to go back to the geometry menu and go back up to our highest subdivision level. Now, in order to create a texture with our UAVs, we scroll down on the tool menu and find texture map. And then we can click on new texture. And if we click on Create, we can select New from Pali paint. And this will create a texture using our movies of our colors and our details on our object. So if I hover over this little thumbnail here of my texture, you can actually see the UV islands individually and the way that ZBrush unwrapped our object. So really all this is, is just a preview of an image file and the movies tell the image file where to go on your object. So for those that are not exactly familiar now, what our textures, textures, or just an image file when you're painting on your model than ZBrush, you're painting directly on the vertices. And then when you convert them to a texture, zebras simply turns the colors into an image file and exports them as a JPEG or a PNG. So you're literally just taking a picture and wrapping it around your object. That movies are what tell the picture where to go on your object. And the textures are just the colors and surface details converted into an image file. If you're creating the character for a video game, you have to create UAVs for every single sub tool. So you have to go through and unwrap every sub tool individually. We're just going to repeat our process that we did before. Go to our lowest subdivision level, turn Pauli groups on and UV unwrap each sub tool in our scene. Then we go back up to our highest subdivision level. Go down to your textures, create new texture, and then create from poly paint. And this is actually a better representation of what movies are supposed to look like because you can actually see the face and the arms and the body and they're all unwrapped as individual UV islands. And the reason that I selected unwrapped with poly groups is because ZBrush separates each poly Group as its own UV Island. So this simplifies the process quite a bit. When you need to export your model, you can go to the top of the tool menu and hit the Export button. Now it automatically defaults to an OBJ file and you can name your file and save it to your computer and it will export whatever your current selection is. Now I want to export my texture as an image file. To do this, I need to go to the texture map menu and I need to click on clone texture. Then if I go over to the left above my material tab is my texture tab. And if I click on that, my texture should be selected by default. If not, I can just click on it on the top to select it. Now at the bottom of this texture menu, you can hit export, changed the name of your file. And I like to change the format of my image to PNG because PNGs support transparency and alpha, whereas jpegs do not. I want to show you the method I was talking about earlier where you combine all your sub tools into one with urge visible, and combine the UAVs. First we'll dock are Z plug-in menu on the right. And if we go down the Z Plug in menu, we have transposed master. Now in transpose master, there's T-pose mesh. And if you click on this, what it does is it takes you to a separate preview of your object with everything at the lowest subdivision level. Now under z plug-in, if we go down to UV Master, turn on poly groups and click on wrap, it will unwrap every single sub tool in your scene. This method does take a lot longer. Zbrush needs time to process every single sub tool and unwrap it individually. So it can take a lot of time. Sometimes it freezes or has errors, and it's not the most reliable method, but when it does work, it works really well. Keep in mind though this doesn't always work if your geometry isn't very sound or if there's something wrong with the topology. If there are edges that are overlapping somewhere, it will fail and you will not be able to use this method. Now, assuming everything went well and that it unwrapped all of your objects successfully. You can close subtotal master and go back to transpose master and hit T-pose sub t to the right of T-pose mesh. It will ask if you want to transfer the movie's just hit yes. And ZBrush will go through and transfer those UAV's to every sub tool in your scene. If we scroll down on the tool menu, we can verify if our object has you movies by opening the UV map menu. And because more FUV and delete UV are active, that means that this object has UAVs. So that's a quick way to check. Now that all of our sub tools have movies, we want to go back to the sub tool menu, go down to merge, and we want to turn on a UV. And then you want to hit merge visible. When we scroll to the top, you can find your new scene with all your emerged sub tools. We can scroll down to UV and it's got UAVs. And we can click on texture, map, new texture, and create new from poly paint. So this doesn't always work, but ZBrush did a pretty good job because this is a nicely cleaned up model. And it put all of the UV islands for every piece of the character in one YUV space as one single image file. So we didn't have to have multiple image files for our character. We just need one. And the beautiful thing about this is now you can just go straight up to export under tool. And you can save your file. But now you can import this OBJ file of your Earthquake Model or your character straight into Blender. And if you go into a rendered view, the textures are already applied to your model. So this is a really nice way to export your model to Blender and get more realistic lighting and rendering. If you're familiar with that process. That brings us to the end of step nine. Now I'm going to show you how I applied these principles to our class project and show you how I unwrapped it, my dragon character. First, I had to go back on my character because I realized there was some really bad geometry on the eyeballs. And at some point I accidentally merged them together and I just couldn't have that when I was unwrapping it with UAVs. Fortunately, I still had my save file with my boolean object for my eyes when I created them. So I just went back and recreated the eyes and repainted them. Now the geometry on these eyeballs was pretty terrible. And if I tried to unwrap it like this, it would just be a disaster. So I instead went and I turned on Dinah mesh and I crank the resolution up pretty high because I wanted it to look nice. And you can see when I turned on Dinah mesh, it actually still preserved my poly paint, which is nice and my act of number of points is much higher. But in this instance, I'm okay with that because it's not going to affect the performance of my computer that much for this kind of unwrap. I also did this with the other sub tools in my scene because I wanted to ensure that my geometry was nice and even, and dynamics does a good job of evening out the topology on your mesh and it made by unwrap go a lot more smoothly. For this particular project, my poly groups who are not already set up. So what I had to do with split things off into their unsub tools and then merge visible and then go to poly groups and hit auto groups to separate everything into its own separate polygraph. So with all my subtotals merged together and my poly groups set up. I went up to Z, plug-in, went down to UV master, turned on poly groups and hit on rap. From this step forward, it's a little different, so I'll show you what I did. First, I verify that I have movies. Then I go to z plugin, go down to UV master, and at the bottom you can click on work on clone. Now this takes you to a separate scene which is kind of a preview of all of your pieces. And you can find it in your scenes above your sub2 list. And now if I go to UV map on the right, you can see that my clone has your movies. So if I go back to z plugin, I want to go down to the bottom and hit Copy UAVs. Then I want to navigate back to my original scene with my single sub tool that I had before. And if I go back to z plug-in again, I can go down to the bottom and hit paste movies. This is a necessary step because it doesn't always work if you unwrap your object and then go straight to creating your texture. So if you're ever having issues when you merge yourself tools together, creating movies, try this method. Now I can go to texture, created new texture, and create new from poly pain. And ZBrush created textures out of my poly paint. Now I can just hit Clone texture on the right and go over to the texture menu on the left and hit Export. And I'll change my file to a PNG and save my image file as the textures for my dragon. And then I can go up to the top of my Tool menu and hit export and export my dragon as an OBJ file. In blender, I can go to import wavefront OBJ, select my dragon object. And you can see here that it's imported. My dragon and my textures are good to go. I hope that this video wasn't too confusing. I know that movies are kind of a confusing concept, especially if you're new to 3D. It took me a long time to understand them and kind of understand what to do with them. That brings us to the end of step nine. And by this point, I hope that these videos have really helped and given you some kind of foundation to understand what it's like to create a project from beginning to end. In the next video, I'm going to go over some of the processes that 3D artists and professionals in the industry use for creating their own projects. And hopefully it will help you have an idea of what kind of projects you want to start creating.
12. Part 10 - Workflows & Starting Your Own Projects: Welcome to Step ten. And step ten, we're going to go over workflows and getting started on projects. If you wrote, the first question is, why is workflow important? As an artist or a creator of any kind? It's important for you to have a plan from beginning to end if you're creating a character or even parts for a machine or 3D printing, people spend hours and hours doing research and creating plans for whatever it is that they're trying to create. So this is important for you to try and understand what workflow works best for you. Method one is building your model using multiple sub tools. In this method, you append in as many sub tools as you need and shape them and form them into all the individual pieces of your object, you eventually work your way into a secondary phase where you start working and refining your shapes. And eventually you reach a point where you have to merge some parts together and start refining even further before adding color and gradually working our way up to a final image where everything is merged and composed as a single final piece. Another very popular method is sculpting. Everything is one piece. Now this is more advanced and probably more difficult for beginners because you have to have an understanding of a lot of different shapes and anatomy and how they all fit together. This method works well when you're using poly groups, because then you can isolate parts of your object and work on them individually. Similar to working with sub tools, but this way you're only working with a single object. Eventually you reach a point where you have to append in new subtitles for the eyes, hair and clothing and other accessories. But this method does save a lot of time in the long run. And you see a lot of industry professionals working this way, but that's because they are very advanced and they've been doing this for a very long time. Method three is sculpting for 3D printing. The nice thing about sculpting for 3D printing is you don't have to worry about the topology of your objects so much because in the end you're just going to do something called decimating your mesh, which will reduce the poly count but preserve all the fine details for 3D printing. This also means you don't have to worry about textures on your object because 3D printing doesn't involve textures, at least not yet. A lot of things that are made for 3D printing are made with high detail or with extreme accuracy, like machine parts and 3D printing as a way to sell your work if you wanted to print it out and hand painted, whichever path you choose. The main thing to remember is don't give up. Art is a very difficult process. It takes a lot of study and a lot of time. Eventually your skills will grow and you will improve as an artist, it just takes time and practice. Another thing to remember is to always be creating, always be creating something new, something out of your comfort zone. Always Be Creating things based on something that you love. It takes time to discover the thing that you absolutely love doing. If you keep creating projects, eventually you'll start discovering that you like things that you didn't even know that you liked. You may even reach a point where a certain processes or workflow that didn't even interest you is actually something that you really love to do. Just keep working and building, and eventually your projects will get better and better over time. I can't emphasize enough how important it is to practice. Anyone can become an artist. Anyone can learn to do it. It's just a skill. It takes time and it takes practice. Practicing can be very difficult. It's important that you're consistent with your practice. Practice one hour every day. That's much better than practicing for five hours, one day a week. The key is consistency. Develop a pattern. Our brains learn better if we create consistent patterns over time, you will develop better skills. And if you practice the right way by practicing consistently and practicing on things that you're not good at, you will get better. The next question you need to ask yourself is, what kind of artist do you want to be? There are so many different industries you can work in. Video games, movies, 3D printing. The important thing is to pick a path and stick with that path. If you spread yourself too thin, you're not going to be able to focus on one thing and get really good at it. First, you need to create a plan. If that means going back to school or if you have somebody that's already in the industry that you know, it's important to identify where you want to land in the industry of your choosing and pursue that path. And that will keep you focused as you go. Talking to other artists is extremely important. If you reach out to some of your favorite artists, some of them might actually get back to you and tell you about their process. Now this doesn't mean to ask them every single question in the book. It's a good idea to do your research, do your homework, and know what you're doing before you go in asking questions. But for complicated things, it's useful to understand somebody else's point of view when you're trying to create something. One of my last points is don't be afraid to get critiques. It's important that we identify our skill level no matter what project we're working on. Share your work with other people and ask them what they think honestly, openly and don't be afraid of getting feedback. It's just constructive feedback that you can use to get better with every project. One of the best ways to improve your work is to have somebody tell you exactly what it is that you're doing wrong. Think about where you are as an artist. Think about where you want to be in five years, ten years. Ask yourself what it takes to get there and do it. I hope that these videos have been helpful, not just showing you the program, but also giving you some constructive workflows and ideas for your own projects. It's important to remember that all processes take time and in time, you will get better if you stay focused and keep practicing. Do what inspires you, because that is what is most important.
13. Closing Thoughts: Thank you for watching my class. I hope that by this point, this class is not only showing you how to use the software, but also inspired you to start creating 3D projects of your own. Remember to keep practicing art is a process that takes a lot of time and a lot of study. And it's going to take time for your skills to improve. Remember to post your work to the class and share your work with other students. You can always ask me questions or send me a post in the class and I'll reply to you as soon as I can. It's important that you record your progress as you go so that you have a record of how you've been doing over time. The more projects you create, the better you'll get. Just remember to stay focused and practice. Keep an eye out for future tutorials in more advanced techniques in sculpting with ZBrush. And I'll see you next time.
 Michael Gatz, 3D Artist