Transcripts
1. Introduction: welcoming my Z brush course for beginners. My name is Matt. You and I will be your instructor through this course. In this course, I will guide you through the basics of Z brush. Then I will show you how you can make your first cartoons type character had inside Z brush . My friend dished. One is the other instructor of this course. He's a graphic designer and he gave us some cartoon head illustrations and you can choose that which one you want to make on this course? We will go through how to make the basic shapes off the head. Have to pay in the eyes how to colorize the warhead and how to add additional accessories to your character. By the end of this course, you will know all the techniques what you need to make any cartoon had you want inside Z brush beside the knowledge you will have. You will have access to our private Facebook group with the other students of this course. And here I will share really useful resources and content day today I am excited to start this journey with you. So see you in the first lecture
2. Drawing Tablet or Mouse?: okay in the section. I want to talk about the differences between working with a panto but and working with a mouse inside. See brush. In this course, it is not necessary to buy a panto black or to get one. Because ah, we want Teoh learns the brush. And I start video in ah, from the beginning. And I will teach you everything and show you everything. Case stroke like on the mouse. So if you need to hold down the left leak, I will say to hold down the left leg. I will use a pound of it. But I will say every case stroke for you as I am working with the mouse. So the main differences is the ram pressure level. As you can see, I can make different hard brushes. So if I push the pen harder to the top that I can make harder details. And if I don't pressure them, ban too much the tub that it is more softer detail. But what you can do during the course if you want to make softer details or harder details if you're working with the mouse and hold on the last week on the mouse you. We have one intensity. But what if I want to make a little soft or details with mouse here on the top, we have settings for every brash called Z intensity. With that, you can set the intensity off the brush. So, for example, I'm using the clay, Build a brush and I set Z intensity for lower amount. I can use it with more softer, and it is true for the smooth rush. If you hold down the shift and said the Z intensity for a lower amount, you can soft your detail more easily and more precisely, and you will not smooth everything out with two or three most movements. I want to make this course to to be useful for anybody and not for the ones who have spent a breath or the ones who can buy Panta, but right away. So it is open for everyone. If someone using a pent up that it is school. You don't need to, Ah, said the intensity in ah, lot off cases. But if you're using a mouse, you need to said this intensity. But I will teach you everything with saying the mouths K stocks. So I think that's it. We can start the course and see you in the first lecture
3. Zbrush Basic Tour: in this section, I will show you the basic things we need to know. In order to start the work I'm using the newest version of the Russia. That is the 2019.1 point two and I'm set my you white to the standard one. So I hope that this looks like yours when you open up the brush. Probably this window is open for you. This is the light books. Here. You can have your projects to use brushes, textures and anything. You can simply close it with the comic e or quicken the lightbox button on the top left corner. Here in the middle, we have our workspace. If you draw here with the left like you will have that really strange result. But we will don't need that. So if you draw something now, you can simply clear that with the control and all right, on the right side we have our tools, is the rush tools are equal to three d mashes. So if you click on the simple brush on the right side, you will get access to all three D machines and 2.5 D brushes. We will talk about all misreading marshes quickens three the sphere and you can drag their out. And you have this really strange result because he brushes right now in a 2.5 D mode. Okay, now we clear our workspace with the control arm and held over to the documents menu on the upper left side. Here you have these resolutions section, and here you can adjust the resolution off your workspace side. Note. It is a really useful featuring the rush. If you hover over your cursor on the button or any tool or function in the brush and holding control you we have additional information off that that is really useful. As you can see here, you can double your resolution and we will need that. Maybe you get this others but you Can he deal? Yes. And as you can see, you have a much bigger verse base you can work on right now. Now we would like to work with our actual SReed immortal. All we need to do is to only drag out one sweet air. And now he the T button or here on the top you have that added button. Now you will be in at it mount. And now you can actually working on your three D model. You can rotate it and anything. OK, now it's time to talk about some navigation tools. With the left click, you can rotate your model, but if you want to move it around or paling with it, you need to hold down the all key and with the right click, you can move it around. Okay, Zooming is a bit tricky, but I will try to explain that easy. All we need to do is to hold down the old cape was the right quick and now you can move around your mash. But if you really is on Lee the alky you will zooming with the right click. So tried it again. You hold down the alky who's the right click and now you can move really is the off key and you can zoom with the right click. Excellent. Now we are going on and find out how we can actually sculpting on the three This fear here on the left side you will have your brush palette. Here you can see all the brushes, but the brush has during the course. Are we using Onley. The standard brushes. What's the rush has originally? So you don't need to worry about that. I'm using some unique or custom Russia's during the course. Okay, Now I try to sculpt on this fear with the standard brush. Buzzy Brush says that I need to make that sphere to a polling mass. Reedy. Okay. To solve the problem, we need to go to the right upside. And he'd to make money must really bottom. As you can see, the tool name changed to boy must release fierce three D. Now we can sculpting on the three d model. We can undo our editing with the controls e on the top left side you have this undo slider . The slider is much longer and longer Depends on how much anything you made on There are three D model. I try to make some more anything and as you can see this slider, we'll be longer and longer. Now we would like to change the material off our object. Here on the Materia Pollitt, you will see you have some basic materials. But during the course, we will use that skin shade for But now we try that basic material. Now, if you choose the brush Blatt Clay, build a brush, for example. You can give these details to your three D model. Okay. Now, if you want to save my project, we can simply press down the control process. And Z brush will be saved. That project to the default project. Father, if you savor a project here, you will see that in the light books. Okay, The other thing, What we will need during the course is go after the left corner, the brush menu and you can see this little white arrow. You can click on that and Z brush real snaps that menu onto the left side of the brushwork space. Now here you can see the brushes, what to use frequently. And you don't need to open up the brush bullet every time. As you can see if you the standard birth, for example, it pulls out the German tree. If you hold on the alky, this will invert your brush. It is really useful in many case. Okay, now we will talk about another really useful thing. Go into the right side in the Joma three menu and you can find that button that calls D right with that, you will have much more resolution. The white cuts your polygons into four. And as you can see on the top, right side you we have more and more active points with that, if you sculpting on your three d model, you will have much harder and beautiful details. The other brush that we will use a lot called smooth brush. If you're sculpted on your three d model, you can smooth. They're out. If you want to use that brush, you need to hold down shift and you will see on the left corner. You have this moves brush active and yes, you can see that is really smooths out the details what you sculpted on your three d model . It is really useful in many case. Now, if you want to see your three D models wire frame, all you need to dio is to press down the shift bulls F buttons or on the right side. You have these Joe Polly frame button. With that, you will see the fire frame off your three D model and you can see that Howie changes as you scarfed on that Now I will show you how symmetry works in Z brush. If you press down the X key, you will see that you have now two points on your geometry and you can scarfed on that symmetrical. It is really useful if you have a character, for example, in a symmetrical position. You can sculpt the two different parts on that. If you go up to the transform I knew you can see. You can activate your symmetry with this button, and you can set your symmetry to the UAE exists or dizzy. Or you can use radial symmetry, which is really fun, and it has really beautiful results. The other really useful thing. What we really use a lot is masking. If you hold on the control, you can see the masked man active. With that you can masking out your three D model and the must place. We'll be unstoppable. If you want to clear your mask, you can just hold on the control and drag a small rectangle on your workspace. If you want to invite your mosque, you can simply hold on the control key and click on your workspace anywhere. If you go into the stroke. When you under the masked man, you can change the way you masking your surface. For example, there is a less 02 which is really useful in many case. Okay, during the course we have worked with a much simplified geometry. I will show you how you can simplify the geometry of that sphere. First thing, you need to go into the initialized money on the right side, and here you have many buttons. Q Q Q Sphere Cube. Really, or Q cylinder. Right now, we will need accuse for your bottom. And as you can see, this fear now has a much simply our version. If we do, why, that's fear. As you can see, it has much cleaner geometry, and we can handle it easier. All right, that is for the basics. Now we can get into the actual work and make our first cartoon had see you in the next lecture
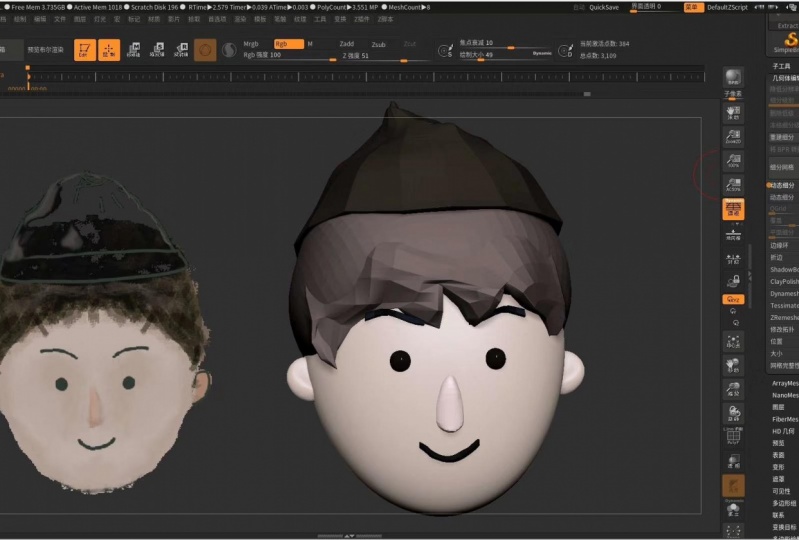
4. Paint Cartoony Style Eyes And Make Custom Brushes: in this section, I will show you how you can paint cartoon I to your character. The first thing you want to do is go to the right side to money, grab a sphere three D and drag it out on your campus. And there he didn t button to get into edit mode. Now we need a more cleaner geometry. So internationalized money, you maybe have a que mush button. But first we need to make a full Imus reedy off that sphere. And now we have that Q mash option, especially. We hate the Q sphere. Now, as you can see, we have a Q sphere with the most simplified geometry we should at some subdivision lovers to our sphere, especially, I suggest, to on eight level off subdivision. Now we would like to make our first custom rush to pain that I the first step is decide to stand there brush, go into the brush menu on the left corner and hit clone. As you can see, we have a second standard brush now, and we were turned from that copy into our first paintbrush. Now we need to make some modification on the brush here on the top. You need to turn off the Ziad, turn on the RGB and said the focus shift Tu minus 100. With these settings, we made the brush to Onley Modify the color of the mash and with the focus shift, we made the brush to have much harder edges. Okay, Now we would like to feel this object with white collar. All you need to do is to select the white color on the left side, going to the color menu and quicken feel object. Now the subject has the white color attached. If you turn off the little paintbrush I can under the SAFTA menu on our to and we changed the color. You can see the white color is not attached to our mash anymore. Now turn back the little brush. I can switch the active color to black and now we can paint with this black color. As you can see, you have a stroke, set things under our brush. We need to change the strokes that things to that freehand. And now, as you can see, if you paint on the object, you will have not really smooth result in order to change that We need to go up to the stroke when you and turn off Lazy mouse. Lazy Mouse is really powerful feature, and we will talk about that during the course. But right now we don't need that to our eye painting. If you try to paint your object again, you will see we have the result. What we want it now if he said the right breast sittings, how we need to do is to import a reference image or concept art to pick the exact eye color we need. Let's go after the texture menu. Click on the import button and open the image file you need when you open their up. You we have the image right here as mine. Click on the image to make it active. Then hit the other spotlight button and you will have the image as mine, and you cannot move it around with this rink. If you drag the spotlight, ring inside this little or in circle, you will drag on Lee the sport lettering. But if you dragged that outside this little circle, you will drag the image with it. We have a lot of tools around that ring, but now we said the opposite it till to the maximum to see our image, right? If you want to turn off this ring, just simply press dizzy button. And now we have a reference image inside their workspace, and we can work with that now. We would like to get the color what we have exactly on their France image. All we need to do is to hit the Z button again to activate the spotlight. I move it around a bit to not distract me. Move the cursor above the color. I want to pick and heat the sea button. As you can see, this color will be the new active color right now. Now, with the new color, we can paint on our object. In order to start that, we need to turn off the sports lettering with the sea bottom and said dross eyes until we get the right size for our characters. Iris. All right. When you got the right size of the iris, you need to go into the masking menu on the right side. Here you have a lot of masking functions, as you can see, but now we need the masked by color and inside that the masked by intensity As you can see , the new color is must. But there is a problem. We need to mask out the white part off our I. In order to solve the problem, you need to invert your mask in the masking menu. You have an inverse bottom or if you hold on the control and left click anywhere on your campus, you really emerged your mask. OK, we will stop the process for a bit. We want to save our brush and brush settings and we want to set a better as brush I come you need to do is going to the brush menu up on the left corner and he the select icon button why you hold down the all button and Z brush. We take a snapshot off your campus and your view port and set it up as a brush. I come now if you want to name our brush and save it, we go into the brush menu, save as give you the name, for example hard paint brush and save it. And now, as you can see, your brush has a name. Okay, so now we must buy intensity O gram involved the mosque and now we make a new brush. As we know, you need to go into the brass fittings and clone. Now we clone our heart paintbrush. But we will give it a new name and save us as, ah, separated brush. The only thing you need to modify on this brush is the focal shift. You need to set the focus shift 20 because we don't need to have on these brush hard edges . We want to just darkening the bottom part off the iris off our character. Okay, Now we need to pick the doctor part off the iris. We need to he dizzy button to activate the spotlight, move Your cars are above the darker part of the iris and hit the sea. As you can see, the active color is right now, the darker parts and we can pain that on our object. It is really hard. So the second thing we need to set on this brush is the RGB intensity. We will try that on 20. That is much better. But that is too hard for us. So let's try it. Five. And there we go. That will be the right instance. Ity for us. Okay, Now we don't need these softer brush anymore. But you want to say, with a separated brush, all we need to do is go to the brush menu as we learn. And with the select icon, Why holding down the old we can update the icon off that second brush. We will save that. We'd soft paintbrush name. All right. If you don't, we death. We can start to make the pupil. First of all, we need to change back to the hard brush. And now we can pain that to set the middle of the I. I usually used that move Teoh on the upper left side. And it it can shows me what is approximately What is the middle of that? I while nothing what we need to set up is the material. Now we have the skin shit for material. But here I bro's into this basic material. And I think that Ah, the named toy plastic material is the best for us. All right. You have down with your car tonight. Let's make a character around it.
5. Import our reference image: welcome in the first lecture. Now we will start to make our actual cartoon head. We got some reference images from each one, so we will choose one off them and imported to our workspace. How we need to do is to go after the texture menu, heat the texture off button and here on the left corner, we need to hit the import button and search for our image. If you find the image we want to use, we double click on that or just one click and heat the open button. If we imported a reference image, we need to left Click on that, and that will be our active texture. Now the nothing we need to do that we have this out to spotlight button. We need to plead that once, and we have our reference image on our workspace. As you can see, we have now the spotlight ring thing, which has a lot off cruise around this. Especially we will use the scale Teoh the opacity tool on and I think that's it. Now you can see that I can rotate the image and I can scale it. As you can see, this ring has a little circle on the middle. If you drag that here, we can drag the ring itself. But if we dragged that ring outside that little circle, we will drag actual reference image with that. Now, the nothing is to place a reference image, right? I suggest that to scale that down around this and put that on the left corner.
6. Setup for sculping: Okay, Now we want to import the germ A tree that we can work with. All we need to do is to go into the right side and select this fierce three D that feel be our base mush. If he selected this mortal, we can drag their out to our workspace. But from problem here are a sports like ring is turned on To turn that off, we need to hit Z if you turn it off Now we can drag out our sphere to our workspace and work with that here on the left side. You can change your material you want to use on your model, for example, this basic material or you can find any other material for our Cartoon Health Project. We will use a materia called Skin Shade for you can find that material in the standard material section. Okay, now we set up a lot of things. Now, if you want to move your reference image, you need to press down the Z again to activate the spotlight ring. And now you can move around your image or scale it. If you want to continue the work on your model, you need to turn off the spotlight ring with those icky. Okay, now we can start the actual work on our sphere. If I try to sculpt on that Z Brash alerts us to make this three d object to a problem. Ash three d to do that, go into the top right corner and he'd make Polhemus reedy. Now you can see the objects name changed. And now we can sculpt on our object You think? But we have one more thing that we need to know because we imported are texture a spotlight projection function automatically turn on to turn that off. Go to the brass fittings with the white arrow We can stitch death to the left side off the workspace And here samples money We find the sports I projection button. If you turn it off now we can sculpt our object. Okay, I promise. Now we can start the actual work one. Nothing we need to know is we can work more easily with the simplified geometry. So we go into the initialized menu on the right side and then here click on the Q sphere button. Now we have a more simplified geometry and we can make the base forms on the head
7. Dynamic Subdivision Feature of Zbrush: Okay, Everything set up. Now we help into the base forms. So now we have this simplified geometry. We going to the gym, a three tab on the right side. And we are one level of the white to the German tree to have a better control on that. So you can see it has now more resolution. And now we can work with that much better on the right side. Now we can really the lower level off the subdivision, and there we go. With that, we added up the subdivision permanently to our sphere. And now that is our basic shape. If you practice shift floozy, you can tag alone and off your reference image. Now, if you want to make the exact basic shape as we have on our reference image, we need to move. You move our reference image above our street, the model. And now we can form our three D model to the reference image to see our sweetie model behind the reference image on the spotlight bring, you can bring down the opposite a level. All right, so now you want to use the move, brush in the brush bullets you will find that. And with that, you can form your base geometry to the reference image. You want to turn on the symmetry with the axe key or in the transform I knew on the upper side there is another useful feature what I'm using during my process that named dynamic subdivision We death. You can give subdivision level to your geometry. But this didn't added to the geometry permanently. It is just a preview. That is good because you don't need to. A subdivision levels to your surface and you can go back and go go for higher subdivision We just one keystroke. That key stroke is the You will have these pop up probably with ask you to Would you like to go to activate dynamics active or you want to give subdivisions? We want that dynamic subject now. So we click on yes or on Always Yes, if you don't want this pope up anymore. If you want to go back to the lower subject, you need to get down shift. Please D. But why is it useful for us in this case if you make the base form off the head, you can do that with that Lower subdivision. But if you want to check out how it looks like if it would have a bigger subdivision level , you can check that with one keystroke without adding any permanent subdivision levels. So you can see I will check the geometry, the smooth one. And I really work on the smaller one. Okay, now, we made a lot of things, so I said, just you to save your project, Z brush has a quick say feature what you can reach in the preferences menu on the upper side. And it is ah, set to default. And it is made a quick save every 20 minutes. But we want to make our saving manually sometimes. So for that you need to hold on the control plus s and you can save your project anywhere you want. In the next section, I will show you how you can save the position off your germ. A tree behind the reference image
8. Save The Position Of The Mesh Behind The Reference: okay. If you place your mash to the reference image correctly, you can save this position and call that back any time. This can helps you if you move your mash out of the reference image, but you want to go back and check the correction and and you're matched the reference okay , when you place your own mash correctly to the reference image, all you need to do is to go after the movie menu timeline and click on the show. As you can see now, a timeline appears on your workspace, and now you need to click on the first part off this time. And as you can see, I did. You have now an orange circle. That means the placement is safe. Now, if you go back to the movie menu in the time and click on the show button again, this time disappear. Now, If you move your rash out off the reference image and use your arrow keys on your keyboard , the MASH will be replace itself behind the reference image correctly
9. Building The Base Of The Head: all right now, I would like to odd the bottom part off the head. Basically where the character will have the mouth found Basically the Joe part off the head I want to do, he's I will hide my a reference image with the ship Z turn down the subdivision with ah shifty And now in the brush the left you will have when I am am primitives brush This feel likes you to add additional geometry. An additional mesh to your three D model. If you have are over your three d model, you will see the dot to which is snaps to the vortexes. And now if I drag out sphere what I selected from this primitive brush this real appears on your street in mother's surface. If I really is the mas button, you will see the main three d model is must out Now I want to move my new mash into the other. All we need to do is to use the move toe on the upper part or using W. And now I move into the mush. All right. With the Q, you can go back to the dro now I will rotate this a little bit. And with scaling tools, I can scale the Joe part a little bit. All right, go back to the drama. And now with the move brush, I real move the joe a little bit into the head. Just it rotated with the move to you can easily switch to the move toe and the drove if you used. Ah, hot keys. I hate the d button to see the dynamic subdivision result. Andi, it looks like really clean now. Okay, I can turn on and turn off the wire frame with the shift F and I turned my reference image back on. And with the arrow keys, I snapped back my correct position. And now with the move toe, I can adjust the bottom part of the head to the reference image. I turned that off a little bit. As you can see, As I said, the base three d model is must out. If you want to insert this mosque, you need to hold on the control and click on the workspace anywhere. And you will insert your mosque if you want you for example, adjust the head and want to musk out the job part in this case, I will make this top part a little bit more like a head. And I quickly insert my musk to modify the bottom part. And now I want to check my basement. Sh Okay. Now we adjust our mash more to the reference image. We will use the move brush now in 90% off our time and tried to make ahead shape from a side view and from a front you I want to match my mash to the reference image. As you can see, where the two mash meets together we have the line. This line will indicates the places for the eyes and for the nose. Now I want to move this line a little bit more to the bottom. In the next lecture, I will show you how you can block out the ear for this character.
10. Blocking Out The Ears: Okay, so let's say you want to readjust your match to the reference image because you move it a little bit to the other side or or it didn't set it correctly to the reference image. All you need to do is to go back to the movie menu, open the time time again with the show button, and you have these orange little dots. You need to drag this and drag this out from the timeline we left like now you have a clean timeline. I removed my other dots here and with a simple left click. You can add your new orange dot to the timeline, and it will saves your new position to hide the timeline. Click on the show button again, and now we can continue the work. Nothing I want to show you is how to block out the years off the character. The first thing is to go back to the lower subdivision with the shifty, and we will use the I am, um, primitives brush again. Here we can use this fear what we used for the job. And around here we drag out the here part, for example, around this size, after that the base off the head must out and we can work on the years on Lee. Now I want to scale a bit on the X exists. The here I need to do is go to the right side of the workspace and turn on local symmetry. With this way, I can make this basic ear shaped for my character. We do move till I move that inside the head rotated a little bit. And now I need to adjust it to the reference image. I can use the move to found Aiken skillet, rotate it. And when I got the basic scale off the air, I can use the move brush to make additional adjustments. I need to rotate it back more to get more like your shape. The hot key of the move brush is if you hold on to be and he'd the M button, you will get all the brushes with it starts with the M after death. You have the letter beside every brush you can see. As you can see, you need to he hold down the V to sell out the move brush. So the husky of the move rush is B m we not as the car because that has a W at the end. So only the simple we at the end so be M V. You can use that hot K for any other brush. Just check out which letter is connected to the brush. So we that said I just the years with the move brush and I got nearly the shape What I have on my reference image I go up with subdivisions with the D to get the more smooth shape and now we have no shame. An additional thing we can do is to Bush in the inner part of the ear. With the move brush, I suggest to set down, drove size and you can push that back with the move brush. Now it is the time to save our project with the control s the next lecture. Always show you how we can do the eyes for this character.
11. Creating The Eyes: okay. In this section, I will show you how you can make the eyes for your character. The first thing is to modify ahead, shape a little bit. As you can see, we need to push back a little bit the places off the eyes and we that we can do the actual places for the eyes. All we need to do is to going to the easier button on the right side, below the sub toes and Judas Fierce Treaty. As you know, we need to use a lower geometry. So in initialized menu, we make this Reedus fear to a Q sphere. We are to this fear three level of subdivisions and we can t read the lower levels. Now we have a sphere and we can make the ice with that. We don't move toe. I adjust it to the reference image. I tried to match the I size from front you and now I move it into the place from side view , as you can see, because we did the had from two different part. We have these little eyelid shape around the ice or write the eyes in the place. Okay. With the move rash you can adjust the hat shape to the eyes by moved that forward a little bit if you hold on the all but, um, and used to move rashly that and move your cursor to the left or to the right. You can push in or push out your surface. Now I adjusting the head with these techniques, they pushed their out of the obey it, push it in to get this better had shape to the eyes, all right, and now, on the right side of the road space we have under the geometry modified apology, we have that mirror and world button. With this, you can mirror and copy second version off your sphere. In this case, the eyes and the estimate Reese turned on. We can adjust two sides together. You can easily select your mash with out click if you hold on a lot and click on the mash you want to select. I want to. So like the ice. I need to hold on the out and click on the mash, which is on selected Take your time and try to match to the reference image as much as you can. Excellent. In the next lecture, I will show you how we can make the eyelids around the eyes
12. Blocking Out The Eyelids: okay. In this section, I will show you how you can make the eyelids around the eyes. Firstly, I check out what I need to adjust on the base form off the head to the reference image We do move, brush. I can easily editing the base form off the head. As you can see, I push that on the old bait together. And now I closely have the result I wanted. Now we want to make the islands. To do that, we need to duplicate the ice, go to the septal menu on the right side and click on da placate Why the eyes are selected now we need to scale it up. This defecation off the ice with the scale to but not this type ofs election we need. First of all, we need to turn on the local symmetry what we have used for the eyes. But we need to turn on the symmetry to and now it is works scaling up a little bit. And now we need to clip that to do that, hold down the control shift and we have some new tools on the left corner. Said at the cliff carve too. And Now, if you hold down the control shift, you will have that curve which have these Graddy in effect, where this gradient Lina directed this part will be clipped. First, I need to duplicate this object do and now cleave down this part and on the other object cleaved down the bottom. Bart, With that, we will need to cleave sphere around the eye. And we have this I lied shape with a move to We can rotate it to get an exact I lied. We rotate upper eyelid a bit now. If we got this, we can do that with the bottom part two. All right. We rotated on the X axis on down the Z, and now we the move brush. We can make some additional changes on the island. Moving up a little bit from side view. I checked that, too, and I adjust the upper eyelid with the move rushed to here. We have a brush called in flat. We that you can make your cash a little bit bigger as ah is a balloon or something, so you can make some thickness today. Object. Now, if we check the reference image, we have the correct basic shapes. I know that doesn't have any eyelids, but I think if you make a three d version off that it is better if we do on eyelid for that . But that is your choice. Okay, now we do some more adjustments on the islands. We don't move toe. We pull down the eyelids to the middle, little bit and with a smaller drove size. Why holding down the shift with a smooth brush with touching and ah, dotting on the surface, not smoothing like a strong just tapping on the surface with the shift to make the Al leads a little bit sharper edges. We have a brush gold bench. If you served that from the Bash Rush ballot, you can make these sharper edges, and that's really do much better. With the move rash, we will adjusting lower part more, and I think that it don't forget to save your projects. Sometimes in the next lecture, I will show you how we can paint the characters. I That is really fun part. See you there
13. Painting The Eyes: Okay, so in this lecture, we will pain the ice. If you paint the ice, it will helps us to see how the character well looks like if you helps us to see the characters style, personality and and and helps us to see an overall luke off the almost final result. So the first thing is to send of the ice and give five level off subdivision. Now we turn back our spotlight and the reference image with the ship Z, and we turn back the opacity to the maximum. Now we would like to pick the eye color from the references, but first we need to make the I exactly white for that the color palette. We select the vita color, then go after the color menu and click on feel object. We that the I got the fight color. And now if we change the color that I we're not changing because the white color attached to that permanently until we didn't change that and feel that with another color. Now we want to pick the color from the I to do that. We he dizzy toe, activate the sport. Lettering hover over the color. What we want to select and heat the sea. As we can see, the color is speak. And now every other object. We have got this color but that is just a preview. So don't worry. We will change that later. Now we have these brushes What we did. Ah, previously in ah in another video where I showed to you how you can make custom rushes for I painting. So the first rush, what we use will be the heart paintbrush. With that, we can paint this hard edge painting on the eyes. We want to paint on Lee the RGB, but that is it. Is there a way to make the exact size to snap back the object behind the reference image and try to match the Irish size? Okay, that is around the size we need The nothing is to mask out the color what we painted on the I for that we will go down to the masking menu on the right side. Go to the must buy color and masked by intensity. Now our new color is must out. But you want to invert that mask so we can come the inverse button in the masking menu or hold on the control and click on the workspace. And now we will use the softer rush and painting this darker part off the I. To do that, we turn back the sports life ring again and we want to peak that darker part off the I. Okay, now then, nothing we want to do is the pupils. We will use the harp paintbrush again and we want a black color. We said the droves size around around 20. And with the heart brain brush, we try to match the pupil size as on the reference image. Okay, we can clear the musk and one thing we need to do is to are a shiny material to the eyes. But first I want to darkening that bottom part, bit more so with the soft paintbrush. I make it more darker, frightening pupil, bit smaller. And now, in the materials, we will need the toy plastic material. Okay, Now we want to feel this object with this material to to do that on the top. We need to select the material beside the RGB and in the color menu we click on the feel object again. As you can see the eyes got this material. And if you change back the material, everything will be changed back to the skin. Should material except the ice how we can change by the color to the base forms? Okay. Now, as you can see, the eyes are looks really cool. So on how we can see a bit more about our characters style.
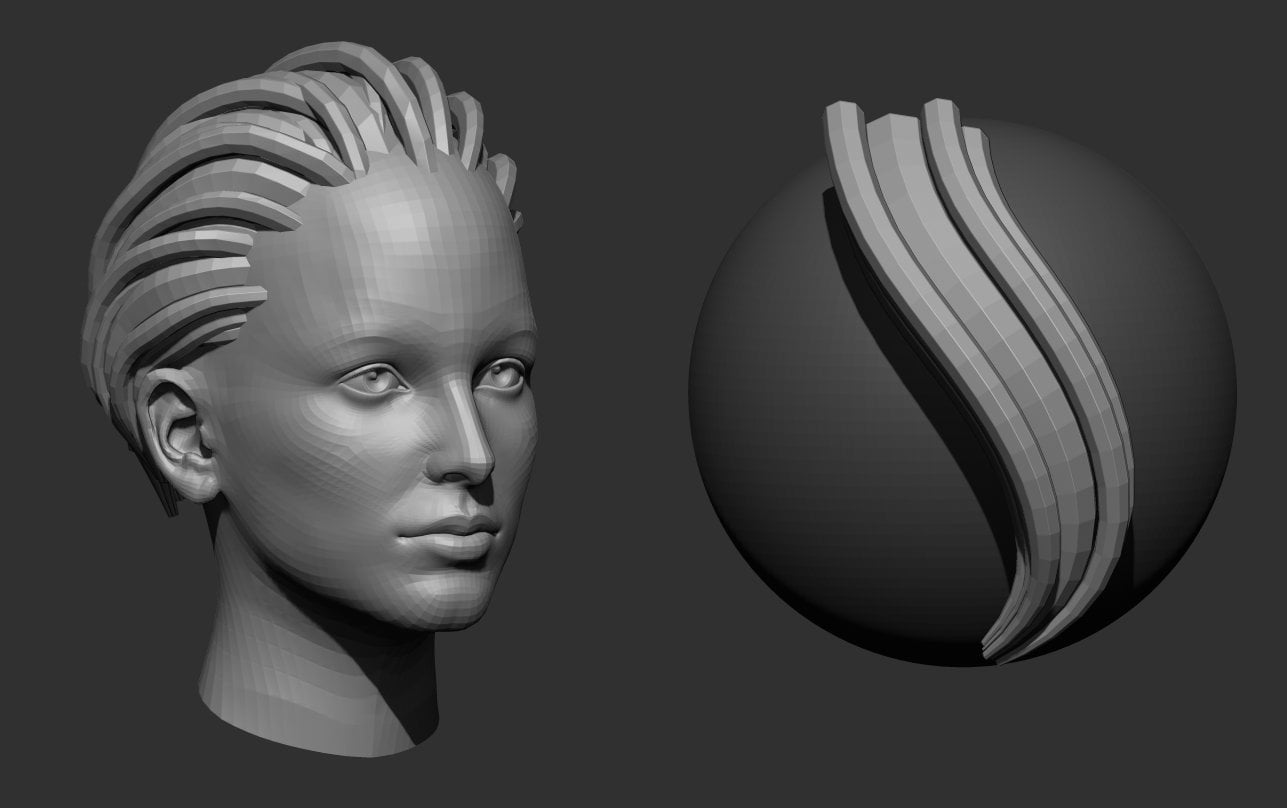
14. Building The Basic Shape Of Hair: Okay. In this section, we will do the hair for this character. The first thing we need to do. Uh, first I close the corpora. The first thing we need to do is to insert the Sphere three d, as we have done before, we will initialize this fear. So down in the initialized menu, we make this fear to accuse fear and will be a handle this easier With the move to lie, place it to the upper part of the head. Looks like a calf. Now I give it some subdivisions and snap it back behind the reference image. And now we do move, brush, turn on the symmetry, and I can Trey Pete to the hair. Okay, I pulled these out. Sometimes you can use the shift a smooth brush. But as I said before, don't use it really strong just stepping with this loose brush, as I do now. So with these techniques, we try to achieve the shape as we have on the reference image. Okay, Now we check the form off the hair from a side view, and this looks really bad, so we need to adjust it a little bit. So we the move brush through that to the back part off the head on both sides. You can turn off the symmetry now, and I think you will not need any more for the hair. Because, as you can see on the reference image, it is not symmetrical. So we building up the shape what we see on the reference image. In the next section, I will show you how you cannot more additional hair and make it more detailed.
15. Add Detail To The Hair: Okay, So now if you have done with the base forms off the head now we want to make the spicy details for do that, we will learn a new thing. First, I make some more adjustments with the move brush on the that being with the smooths brush on Lee to make it more smooth, sir. Okay. And now we will use the masked man here in the stroke when you you need to sell like the last so and now if you hit the control down, you can draw these shape into the base off the hair around this. All right, now it is must out and here on the right side. The subtitle menu we have extract you hit this bottom. You can see that we have additional thickness to the geometry and it will be a separated object. Now we want to delete the back part of the mosque. To do that, we need to select it with the lasso. And before we release the mouse button, we hold down the art that will be on in verse must selection which will delete the mosque. Now here in the extra money we try to set the correct thickness, and if we got it right, we can heat. Except now, As you can see, we have a new object. No, under the deformation menu. We want to use this Polish by features because we want to have smooth edges on this subject . But it's only working when when the edge off the object is not must out. So it is a good feature that extract masking out the edges for us. And now under the German between zero masher, we will use that, said the target polygon to 0.1 and Heat's eerie mush. Now we have a more clean or geometry, and if we hit the zero mesure again, eat Field calculates the geometry again. Now we have clean or edge groups on zero mashes really useful if you want to add nice details to your object. So in this case, because we are making a cartoon character, we want really foods details. Okay, now we do move brush. You can adjust the shape to the reference image. All right, With the smaller Doral sides, we can make the end off the hair. Okay, Now we want to make this spiky thing. So in the brush menu under the curve. We have these a coworker of a que kerf or I don't know how to pronounce it. We have this AC you curve function which will allow us to use the move rush Andi and have these spiky result. We had some subdivision to the hair to make it more appealing. And with that, we can make this spiky part with a small brush. I tapping it to have a smooth result. All right? And we are almost there now. We turn by the spotlight, drink with Z on, pick the color off the hair from the a reference image. Now the hair has this color and in the color palette we had the feel object to attach this collar to the object. We do that with both of the house. And as you can see, we have this result. Now we snap back behind the reference image and adjusted more. Take your time to to become comfortable with the brushes and adjust it until you don't like it. Okay? Now we want to deprecate this part of the hair what we made now and pool this to the back part made the move to we can rotate it. And now we want to go to the lower subject dealing that. And with the shift control, we will use the clip kerf to cut down the part we don't need anymore. Okay, Now smooths it in into the base and adjusted. We give back the white color to this part to see behind the reference image. Okay, we did it to spiky. Now I go back a little bit and try it again to get the shape, which is the best. Okay, okay. I give the hair color to this part, and now we can had the skin color to the head. If you want, we pick the color of the head and we add it to the eyelids and to the base off the head. And now we have our character nearly matching. Okay. Now, in the next sections, I will make some more adjustments to the hair shape and to the overall had shape. And I will speed it up a little bit on, make some comments, but take your time to make your characters shape The best matching with the reference image
16. Shaping The Hair: Okay. Now I speed up the process a little bit. Now I'm making some more adjustments on the head and the hair because I have some parts where I need to adjust my model to the reference image I'm using. Most of the time, a move brush Smoothes brash, and you will see that I'm using the inflated brush to inflate the hair some parts and add more voyeur to it. I'm checking my model really often from different sides, because if I am working too much on one side, only it can be looks really creepy from another side. So why you are adjusting your shape, pay attention to the other side's do. Okay. So the main focus is to try to match the reference image as much as you come. And the next thing that we were gonna do is the first accessory off our character. In this case, we real make the eyeglasses for this character.
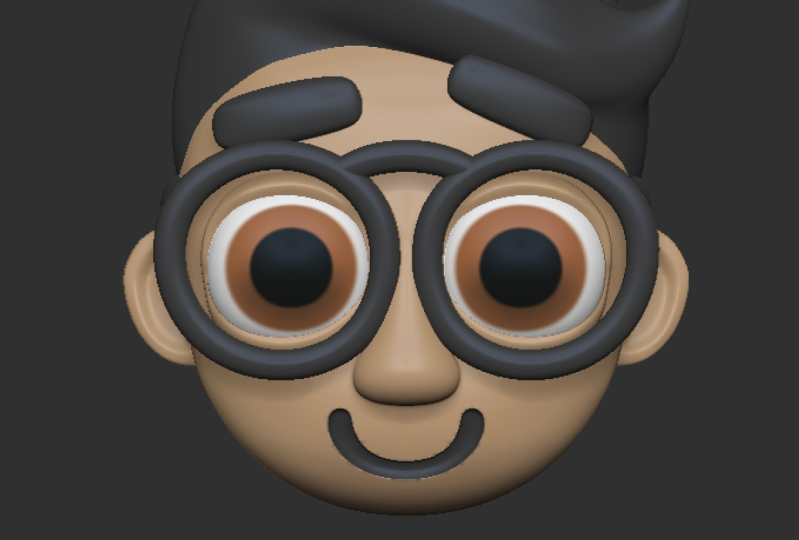
17. Blocking Out The Glasses: okay. In this section, I will show you how you can make the eyeglasses for this character. First of all, I suggest to save your project really often. The first thing you want to do is to insert a ring. Three d. Here's a color off it. Two black because we want black glasses. But we don't need to feel the object with this color yet. And now with the move toe, I want to rotate it 90 degree. If you want to snap the rotation, you need to hold down the shift y rotating and the two rotated with five degrees. Okay, I turned on the wire frame and we can see that we don't have a really clean topology. But in the initialized money, we don't have any option for ring. So we will use zero measure with the lowest target publicans. We use E reme assure a couple time until we don't like the result skillet down a little bit . And behind the reference image, we try to much with the reference. Okay, we love the deformation. When you we have an option to inflate, this will inflate our will object or with minus inflate. We can make our object more thinner. Oh, okay. We are nearly here. Okay. Now, to make it more punctual, we can use the move brush and adjust it with a bigger dross, eyes a little bit. And now, from a side view, I position it on the y axis and make it a little bit more thicker. - And now I check her out on a higher subdivision. We dynamics up, Dave hand position. It's okay. Now, I want to make the other part off the glasses. So I want to insert a cylinder and oh, it looks like a cube from side. Because it's all black. We can initialize it. So he accused feeling there on the y exists rotated 90 degree and then 90 degree here, scale it down. And may this side part off the glass. He didn t to get the dynamics of division and scale it on the sea to make it more flat. And we are nearly here. Move it into the circle bars. Now with the move brush with a big throw size, we can align the circle part to the sideboard. All right, now we want these to end off the cylinder to be more harder. So in the geometry tab and under decrees, we have a crease PG bottom, which all those us to make harder edges on the to end off the cylinder. Because as you can see, the 21 of the cylinder has another color, which means this two different part is in different poly groups. And crease makes extra jeez on, uh, on the two parts On this way, we have more sharper edges when we are using higher subdivisions. So freezing is really useful. If you want to make heart surface models must out the half part off the side part and move it up a little bit. I'll make it more thinner. There we go. And now we want to merge together the two parts. So in the south to polit if the parts are next to each other, we can heat the merge down button under the murder step. And now it is one object. Now we can see that it's too big, the CYP artist too weak to the reference image. So I scale it down a little bit. Okay, Now, if you want to editing the models, but you already merged them, you can must the out. You can mask out the part you don't want to editing or if you Onley merge them and didn't merge the actual geometry. We I will show you that later. But if you merge them together only you can select them separately. Weed the control shift if the select rectangle tool is active. No, If you turn on the symmetry and under geometry tab you heat the middle and world you will got another part on the other side. But we need to turn off the local symmetry on the right side. It is really important. So now we have the two side of the eyeglasses. Now we need to make the middle part off it. To do that, I insert another surrender, make it with the initialize more easier, rotated and scale it as we did it on the side part of the glass. Now, if you use another two inside the move toe, just move it into the position. I turned on the viral frame with shift off or with the button to see the actual model because three hard to see if it is black and on some subdivisions to it. I hate the crease PG on that, too, to have hard edges and the ends, and I add subdivision of us to my model Now in the Settings menu. We want to bend our object, but we need to delete lower subdivisions. So now if you sell out this settings bottom inside the move still, you will have this band arc modifier. And here, with the green arrow, you can bend your model and then this way we really gather shape what we have on the a reference image. Now we go back to the settings inside the move toe and click on the except now with symmetries on with the move toe weekend, push back the additional parts. Give some more subdivisions to the part. We were got a smooth result, and it is matching with our reference image.
18. Creating The Nose: all right. In this lecture, I will show you how we can make them knows for the Scudder. As you can see on the illustration, we don't really have a nose. But I think in three D it is really important to our character having knows. So we will make that. First, we will use a three d cylinder cell with the insert. We will insert the news treaty sitting there, change the color to this brown. And with initialized, we make a que cylinder. All right, We place it if you have her over your three. D mesh the base off the head. You can pick the color off that for the nose. And we noticed that the eyeglasses didn't get the black color permanently. So now we feel these object with the black color, and now we can change to the other. All right, replace the cylinder here. All right. Now scale it up on the y exists. And we out some subdivisions to that knows part, and we want to deform it as we did on the middle part, off the glass. But we need to deal with lower subsidies to make the formations, and we depend are modifier. We can banned the nose to get this shape click on accept And now we can rotate it and hide the top part into the head. All right. Scaling up a little bit. Moscow the top part on. And if you hold on the control and tep on the mast area, you can soft the mask a little bit and it will be not too hard. Okay, now with the move brush, I turned on the transparency on the right side to see what I'm doing with top part masking out the top part inverted. And now, with the move toe, I can move it into the head and it is now not visible. Now we want to adjust with a move. Brush the bottom part to make it an actual nose shape. Okay, of course, we want to do that with symmetries on. So I undo any deformation I did, and I start adjusting. We'd sima three is active now. It's symmetry. I can make the nose more wider and I playing with the shape on July don't like it. All right. Take your time to editing the shape with the move rush and with the smooth brush. You can make it a little bit softer, but don't use it too strongly. All right, I think knows is almost there. No, I give it Ah, subdivision to make it more smoother. And we'd that I can check out more the actual faith, Kelly, down a little bit. And don't forget to save the project really often. And I suggest you to save your project in different versions. So don't overwrite everything for one project version. Because if you want to go back sometimes, or you did. Ah, big mistake. What you can't undo. You can go back easily. All right, now we can say that the nose is done. So in the next section, I will show you how we can make eyebrows to our character.
19. Making The Eyebrows: all right. Now I will show you how we can make the eyebrows. The first thing you want to do is to insert a three the sphere and make it accuse fear inside the initialized menu. Scale it down, position it and at one level, off subdivision and the lead lower. Now we have this type of German tree to make the actual IA bro shape Select with the must. Still the half off this fear and call this out with the move toe. Now you can see that the right side is really good for us. But the left side is not that what we wanted, it is a bit smaller. Okay, we feel the color off the nose and we want to fix that too. Have exactly the same on each part. To do that, we will use a new rash called eczema. Another to use that we turn off the symmetry, however, over these edge and hold on the space to get the modifications, select the delete and under death, select the group complete. And now, if you click on the edge, this edge will be completely dilated. Now, we have exactly the same side on this eyebrow. Now I place it into into the hat. Rotated. Move! It's into the place. Santilli, Don't match to the reference image we will use now a technique What we have used on the nose That will be the bend our come on, the fire We want I bro to to lay down to the head more so with the band dark we move with in a little bit All right? And now, except the modification. I don't need to move brush. We can make some more adjustments. Skelley done a little bit on the Z axis to make it more thicker or a thinner Sorry at the one level of subdivision to it to make it more smoother. How were the move? Rash. We can make additional adjustments on it. Now. The task is to again try to make identical to the reference image with the move. Russ, you can make really smooth everything on this eyebrow. If I snap the mash behind the reference image, we can match to that with the move to No, we are nearly here. All right, Here. I want to push it, push it in a little bit, and now I want to misery to the other side. But we have multiple subdivision levels, so we need to deal with lower one. And now, if you mirror, we have really grange result. Because we need to relocate the gizmo here with this too. And turn off the local cemetery on the right side. Now it is work perfectly. All right. Now, if we have these on the other side, we can added that and make some a symmetrical changes musk out this part and now we feel hit the gizmo Relocation to the gizmo will be centred on the other side, but we need to turn off the symmetry now. Moscow, the one side center, the gizmo. And now we can rotate the other side on Lee. We can rotate it and again take your time until you don't like the result. And it's not really much with your reference. Oh, Kate. Now we want to move back the hair a little bit. So hold on the Alton. You can select the hair sub to and with the move rush, you can push it into the head a little bit. Andi, it's will be more smooth. Are now We saw like the eyebrows with the all key and save our project. We can now overwrite with the previous project we cause we didn't make Anne bigger, bigger anything. But if you want, you can save it to a different project wash in.
20. Adjust The Shape Of The Head: okay. In this section, I will show you how I make some more adjustments on the head to make it more correct shape . I solo out the head on the the places for the ice. I push that oil bit in our to make it more feeling I need to make the cheek a little bit harder. And now with the move toe I rotating the eyelids of it and adjusting them with the move rush. And with the move till two, I'm Bush. The upper part of the had a little bit more. So the main focus is now to adjusting. Your cartoon had what you're making to make it more like a reference image and beside a reference image, uh, try to shaping the head from side you to looks more like, uh, head. So you don't need to do exactly what I'm doing. If you don't make these type off garden character exactly, pull out eyebrows a bit. Okay. I chuck from every sign on the back of the head. I adjusting the hair a little bit with smooth brush, I adjusting the shape. Okay. The next section I will show you how you can make the characters. Mouth. We will make this type of mouth. What? Ah, you can see on my reference image. But if you have a different Carson has what you're making right now, you can follow these steps and and you may can use this technique. What? I'm showing you to your project.
21. Blocking Out The Mouth: in this section, we will make the mouth off the character. We will make it exactly mouth what we can see on the reference image. So we will follow this style, really use the almost the same technique as we used on the middle part of the glasses. So let's insert sphere and make accuse fear off that. Now if you position it, scale it down around the size we need and give it one subdivision level. The process is really similar to the eyebrows deleted, lower some things. Moscow The half part off that, and with the move to move that to the right side now we dizzy modeler to we deal it the edge on the middle. Now we got the symmetrical part. Relocate the gizmo with that. And now, if you click on the house icon inside the move toe the genome, a three will be center so we can move that again forward and try to position it. As you can see on the reference scaling debate on the Y axis. Give it subdivisions to have more smooth for results, and we will use the bench are modifier again, as you learned with the Green Arrow you can band your object and now click on Accept And we have these bandit part Now why added the banding a little bit, all right, And under deformation with the inflate, I can give it more thickness and it is almost looks similar to the reference Take your time to imagine the best snap back behind the reference image to match it more carefully. Okay, I re sent. Are that with the house? I come what you can see on the top off the move toe and from side view, I move it into the position. If you rotate your model and hold on the shift, you can snap to the side, you or front you or ah or any of you what you want. We heat meter and world to make sure that the two side is identical. And now this looks really nice. OK, but what if we want this mouth to be subtracted from the object here, you can see the life bowling bottle on the top, but first we need to make this object to work as a substructure in so in the south to menu , you click on this icon beside the object and now turn on the live Boolean. As you can see now we have this mouth subtracted from the object and it is not an additional geometry. Now you can feel this with Anna Calorie want and this obstruction. We're got this color. If you turn off the light bowling, we've got back our geometry. It is not a permanent obstruction. It is just a preview. So in the later section we will learn how we can make this obstruction permanent. In the next section we will working on the hair.
22. Merging The Hair Together: okay. In this section, we will merge the three part off the hair into one geometry. To do that, we make some more adjustments on the basic shape off the hair before we merge them together . So take your time to match the best you can to the reference. The first thing we need to do is to cut subdivision, love us to each part off the hair until we don't get a smooth result. Now we don't like it. For example, in this case, the Ford of of Subdivision is the best on that has the smoothest result. Okay, on the smaller parts, three level is enough to in the septal menu. I need to reorganize the objects of it to be below each other. Okay. As you can see, we have some errors on the hair. But with infant rush, we can adjusted easily with the move. Russia. I can push it in into the base of the hair. And now we corrected this part. Now it's time to save before we merge any objects together, I re common to save your project because, as you can see, easy breast says to us that merging is not under arable operation. Now we have the three object emerged, but the German tree is separated. Now we really used uh, dynamic feature of Z brush. Dana Bash basically merged together the objects and and they will have want apology. As you can see, with a basic resolution, we have ah, not really smooth result. And now you can smooths out the parts where the two geometry merging here. As you can see, we have a really Messi area where to geometry meat and we have a brush called them standers . This dumpster underbrush helps us to make these more detailed and more stronger lines into the mush and we that we can make deeper separation. All right, we smoothed out this part with swirls, brush and with the Daniel standard become stronger this geometry detail and now it'll smoothing out bigger parts What we didn't like. Now, as you can see with the dynamics, we have a massive topology. So we will zero mash it said the target poly count to 0.1. So to the lowest amount ended zero masher. Okay, now we have more simply are geometry, but had the color is disappeared because we have a wall, different geometries. So we need Teoh. Reattach this hair color from the reference to do that as we know, we need to turn on the spot like Ring. And we do see we can pick the color from the reference and in the color menu we can click on the field object. Okay, Now turn back the black color and feel the eyebrows with that color to because, as you can see, it is not attached to the eyebrows and to the mouth either. So feel object. And we said, like the mouth and feel object again. All right, with, uh, with this part off the hair, we have a little problem. So we need to adjust it. We can use the infant, brash the move brash, and and you can try out this move a lasting rush, which is a little bit harder move than the standard move rush. And that is good. In this case, we can turn on the AC you occur function to have more spiky details. Add one more subdivisions on it is now the time to playing with the shape until we don't like the result, smooth out the bottom inflate that on the bottom part. And now with this part, we want more spiky detail. Okay, now we did them standard. We want to have detail on this part. So now we will use this lazy mouse feature What I mentioned in the basics. We need to set this laser ideas for about 30. And now we can make this move ther lines. It is like if you put a rope on Iraq and and pull it in the sand on the beach, you will have more smoother lines. All right, now we have a little buffalo G error here, so we try to build off this part from different sides. Don't do it. Don't match to the reference. Now we snap it back behind and we the move brush. Fix it. OK, now it's time to playing with shapes again and try to match round off the shape on the curves. What you can see on the reference to have this cartoony style elements here, we can use the clay build up brush in some cases, if we want to build up some geometry to some parts now, save our project again. And in the next section we will merge the head base together
23. Merging The Head Parts Together: Okay, so now we were merging the head base together. As you can see, the head is now from three different parts or four if we separate the years. And now we want to make these objects into one. To do that, I suggest to da plicating head to have Ah, it's kind off back up off the head. It is always good if you have a backup off on object before we make bigger. Anything on that give subdivisions to the head until we don't have a really smooth result, as we did on the hair. And now we want to reorganize the subtitles here in the south to Manu because as we now we need to organize. The mash is below each other to merge them. I merge the two part off the glasses. Now I added a bit with the move toe on the eyelids and he underwrite with the solo button I can solo out and I can see if I give subdivisions to the eyelids. I can see the level off smoothing. I gave subdivisions to both off the eyelids and then merge them together. In theory, the arrow buttons I can organize under the headways. I do that with the nose too. And now we can merge them together, merging the nose, head and the head with eyelets. Now it is one object once up to and we can start the Dina machine. I will zoom into the model more to see the level of the merging and try it on this resolution. As you can see, it is not really good. And I think we can try with the biggest resolution. And there we go. This is the result we want. And now we need to smooth out the parts where the geometry merging with each other and we don't want to have any lines. For example, here, on the top of the nose, up off the eyelids not to really strong. You need to just smooth out a bit because we want to have lines around the eyelids. So with ah less stronger smooth you can with it out here in the light books and in the brushes on the in the smooth. Further, we have a smooth, stronger brush. If you double click on that, it will replace Are smooth brush to a smooth, stronger as you think that is a stronger, smooth brush and we can smooth out the lines We don't want more easily and with only two smoothing get for hours to get smooth result. So it is really useful in this case. Okay, Now I show you how you can make a detail for the years here in the mosque, pounding the strokes. We seller this freehand stroke and paint on the ear around this shape. And after that, I said the breast size to smaller and with holding down the all key I substrate act this kind of shape from the musk. I don't really like that results, so I try to do that again. Take your time. It is. It is okay, if you can see that for the first time. As you can see, I can do that either. Okay. If you like the result, we invert our mosque and setting the move to and or than the art and click on this part of the year. And as you can see the gizmo alliance to the surface. And now, with the rotation, we can make this detail to the ear. And if you clear the mask as you can see, it is looks really cool on this style. We will calculate the dynamics again with holding down the control and draw a rectangle on the cameras. And now we can smooths out the beats, this part. And I think that is a result what we wanted. In the next lecture, I will show you how we can make the bullying off the mouth permanent.
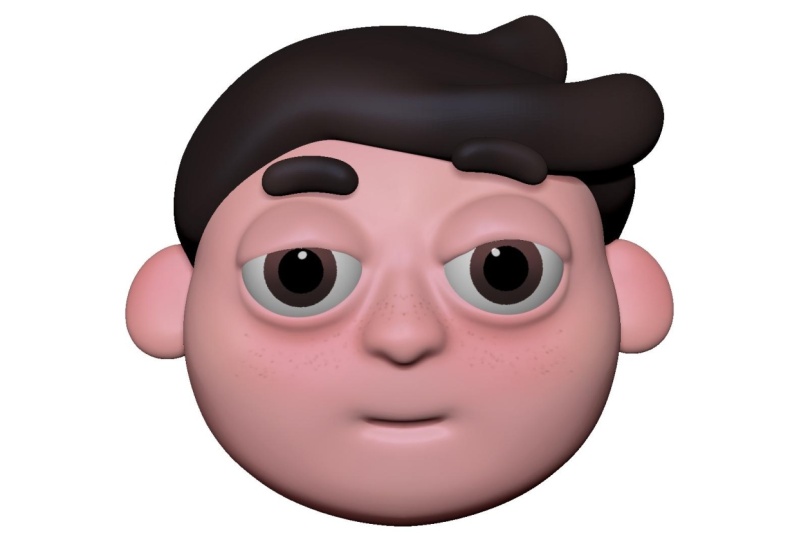
24. Make The Mouth Substraction Permanent: in this lecture, I will show you how we can make the mouth to sub struck did permanently as it did in a previous lecture we can preview are bowling and subsection, but we want to make it permanently. To do that we only need the mash is what we'll be in this operation. So in this case, the mouth and the hat trick to solo out these two. We need to hold down the shift and click on the I button in the south to Manu and now everything. I'm reasonable now turn on the I button to the mouth and to the head shape. Now on Lee, these two mashes are visible. Turn on the light blue lean and under the south to menu We have a bully menu and here click on the Meg Bully Mesh When the operation is done here on the top off the Tumen you we have a brand new mash but with the sub struck did geometry. And that is not just a preview, it is the actual geometry. Now, if you go back to our guys to head, we can turn off the mouth and the head shape and turn on the other shapes. And with the insert here on the top, we have the tools. What we did right now with the bowling, and here we go.
25. Congratulations, Your Cartoon Head Is Done!: congratulations. You have them with this course. And now you know how to build up a cartoon head of basic shapes inside zebrafish. You can use these techniques for any other cartoon had you make in the future. If you have any questions, feel free to ask here or in the private Facebook group, where I post really useful resources and content for you. So congrats once again and see you soon.
 Máté Vörös, 3D artist, Digital sculptor