Transcripts
1. Introduction: walk around Iran. My name is Matt. You. And during these lectures I were got you through how you can make your very own custom hairbrushes inside Z brush. During the lectures, I will show you how you can customize brush, how you can save it, how I can make a bad us Ah, brush icon. And, uh, after that we will see how we can make customhouse ties to are correct. In this case, I will show you how you can make more like a stylized hair side to your character. I can try to start this journey with you. So see you in the first lecture.
2. Set Up Project: welcome everyone in the first lecture off this course when you open up, see Rush probably. This is the first you can see. Now the first thing we want to do ease to go after document menu and click on the double to double the resolution off our campus. If you hit the comic E or go after the light box, you can open up these female head project and we will use that to beard the hair. On that. We will be all the hair off these cylinder. If you don't have the ceiling there in this panel, you can go back to the original state of dizzy brush. And ah, if you click on the simple brush, I come You can serve the cylinder easily, drag you out on the campus and heat the T button to go into edit mode. Now, on the right side, we have the initialized menu, and inside that we want to change two numbers. The first is the high D white and the other is V. D. Right. Both of them said to eight Now go up to the tool menu. Oops, So they go after the two among you and quick on the make believe Masri D we that now we can add it are Nash. And as you can see, it has now a blue color. That means the MASH now has Apollo Group. We will talk about that later and use that later. With the contract This we you can change the color off the Poly group.
3. Make The Brush Base: Okay, so now we have the first part off our hair. The nice thing we need to do is to build up different size and forms off hair streams off these cylinder. Um, go up to the move to and and we death. You can scale and, uh, and move to different directions locations. And if you hold down the control and move a cylinder to another location, this will duplicate and, uh, the other surrender. We'll be messed. So you can easily scale on other version off that cylinder, try to, ah, maintain the height of the cylinder, but we will fix that later. So I will make these, uh, little one and try to build the main cylinder around. All right. A little bit smaller on the why exists. You cannot play with that a little bit to have some were radiations killing town skill up to the why exist, too reached the height of the others. All right, so now I have seven. Also ate, uh, hair streams. Now, look, I clear the mask with the control and drag. And now, as you can see, these eight different brushes arena the same Paul group. So all of these are green. In the next section, I will show you how you can make these different batteries into different poly groups.
4. Set Polygroups: okay. In this lecture we will make these different hair. Strumpf mashes into different poly groups with different colors. As you can see, it is now one septal and we have these eight Hurst rooms in the one Poly Group. To separate them, you need to go to the right side, click on the poly groups menu and click on the outer groups button. As you can see now, zero brash gave to every separated hair stumps, a different poly group and a different color. Now, if you use the contract of shift and click on one of the hair strums, you can sell like these Onley or you can hide the others and edit them separately Easier. All right. Now, as you can see, the top of the cylinders is not really straight. So if you want to make it completely 100% straight, we need to use the masking till so hold on the control and select the top part off each cylinder. So we drug out a mask rectangle and now we selected the top part. Now it is must and we want to invert our mosque because you want to add it on Lee, the top off each cylinder cell with the control and left click click on the campus, and now we inverted our mosque, and the next thing we want to use is the move toe. If you click on the move toe, you want to click on this little icon left to the house I can on this gizmo and now on the y exists, you need to simply scale it down a few times and you can see that the cylinder heights are completely straight after a few scaling on the Y exists. Okay, I think we are good to go now. We can clear the mosque and do these with the bottom Section two. So use move till locate the gizmo to the center. And now skillet again on the y exists until we I don't have the right result. Okay, the nothing we want to do is to make the still part this bottom part and the middle part. Two different poly groups
5. Set Polygroups Vol. 2: in this lecture, we will make the top part the middle part in the bottom part. Two different poly groups off these cylinders. To do that, you need to use the masked man and select the upper part off that cylinders. And if they are must out, you need to simply just press down the control poster. W. Or you can go here to the right side in the polling group menu and click on the group must bottom with that, you via have the mask parts in one Palla group. Now, if you'll do the same with the bottom part, pay attention to that. If you just select the very bottom part of the Sooners, you will Onley have selected the planner part of the cylinders we want to select. Ah, so like these bottom part askew can see on my screen. And as we did on the top part, you just hold on control plews w or click on them group must bottom in the Poly Group section. Now. If you want to palla give the middle part of the cylinders with the constable shift, you can simply click on the top part. Click on that again and it'll disappears. Now you just need to click with the concert shift on the bottom part. And because these are in one poly group, these real, uh, disappear. And now, on Lee, the middle parts are risible, but as you can see, zebras displays that ceiling. There's, ah, a little bit strange because they don't have any thickness. So you need to go into the display properties and click on double to see every parts of the cinders. Now, only these cylinders visible. So now you can easily just press down the contra pose W or creek on the group visible button inside the polyp section. Now, as you can see, these cylinders have three different Palla group parts the top, the middle and the bottom, and in the next lecture, we will make hair brush off them.
6. Make The Brush: Okay, so now we want to make a new brush off these cylinders. And for that, all we need to do is to go after the brush palette menu. And now, on the bottom part, you have the button called create Insert mash zero sh Well, got, ah, question for you that you want to a pound this Ah, corn mash to the standard brush or you want to make a completely new brush off that current selected mash. Now we want to make a completely new brush. So we click on the new and as you can see now, you have a completely new brush off the cylinders. What we have made Now, if you want to use that, you can Onley drag that mash to any surface. But we want to use that as a curve and ah and Joe, we debt to get, uh, hair, feet
7. CurveMode: Okay, so now we will make some settings on that insult much brush and Ah, And after that, we they used that as a curve. So first thing you want to do is to go up to the brush menu, and with this little white arrow, you can talk it out to the left side, off the user interface and the inside that menu you have these modifier, spanner and the inside that we will need this great out section what we have. Ah, in the middle of that. And as you can see, we can't use that settings right now. That's because we are not in curved mode. So first, we need to go up to the stroke menu on the top, off the user interface and the inside that go into the curve menu and click on the curve mold. As you can see now, these functions on the left side are available here. We want to turn on the two parts, the WellPoint's and the stretch, and we can set the car resolution to around 17. And if you use that brush now on any surface, you will see that now you've got a more hair like results. As you said, the drove size, you will get the bigger diameter off that hair
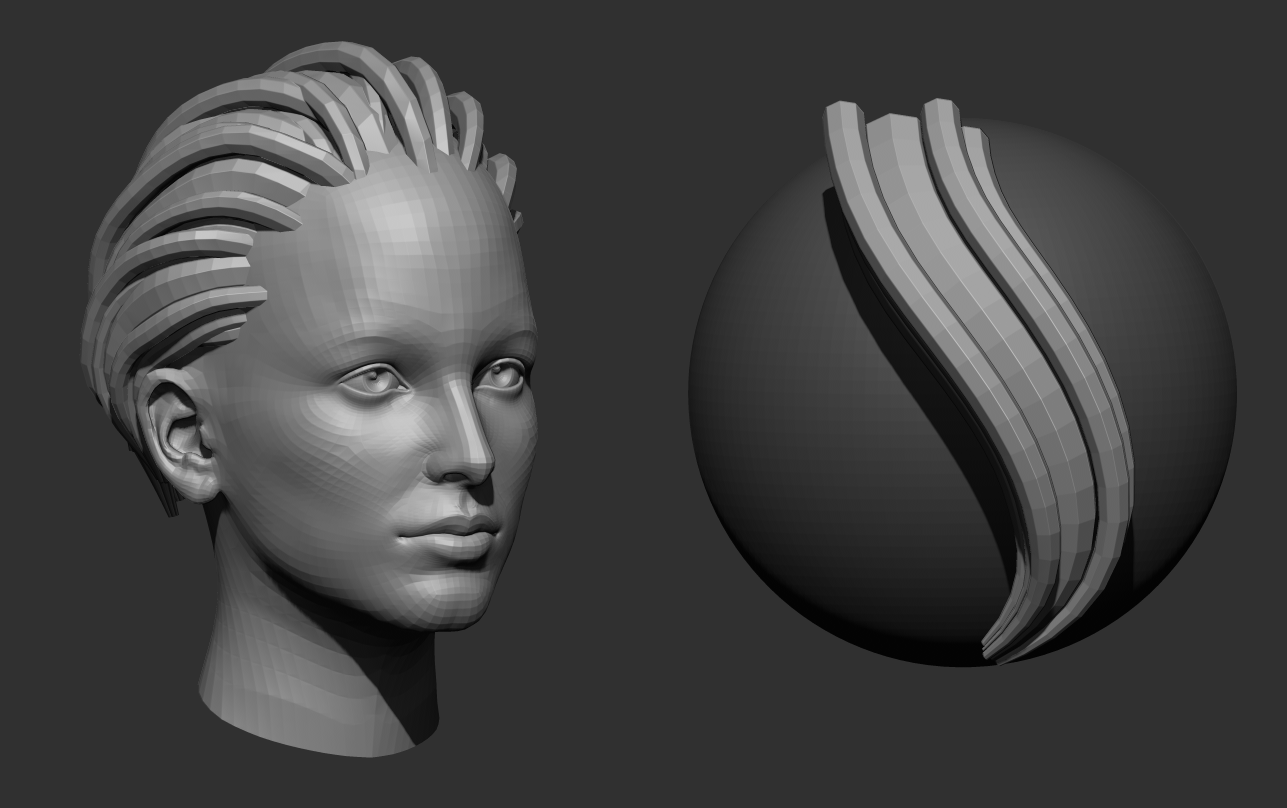
8. Try On A Head: Okay, So in this lecture, we will try our new hairbrush in a female head. Previously, I have loaded up female head what we get from Z brush and we will try that new brush on these had. And as you can see, if you try these rash on these demo head ah, you will see that it's not really lied into the surface. It's more far away off the surface as ah we want. So what you can do is to go into the brush menu and going to the deft menu. And here you can set the deft off the brush and ah, and the distance. I want to place your ah, desert mash on the surface. So if you said this point more to the middle, it real has more. Ah, deft into the surface. All right. And now, if you go into the stroke when you and ah inside the curve modifiers, you can said the follow off these brush, so reveal set, uh, the size fall off. So So you need to turn on the sides button. And now we can set these to have more thin our and off the hair brush. And now If you try to use the brush, you can see that now. The end off the brush has more thicker on and and it's more looks like a hair, all right, and as you can see now, because it is, ah, curve rush, it has two points, and you can move the brush after you have ah, drove that. I add one more point. Ah, into these curve modifier to have more volume on the middle off the hair. There you go. Does you can see we are near to the style what we want to achieve, but it's your choice what the type of hair style you want to make to your character.
9. Save The Brush: okay. In this structure, I will show you how we can save our brush and how to change the name of the brush. So, as you can see now, on the top left corner, we have a new brush. What we have made to save it, you need to go into the brush menu, click on the same as. And if you want that brush to be loaded every time when you open up Z brush, you need to save it inside. Ah, the sea program fights. Picks a logic Z brush Russian what you have and the inside that disease startup brush presets. And if you save your brush here, it's feel loads up every time when you open up Z brush. Let's say I named a rash to own hair brush course. All right. And if I save it, you can see that the name changed on the top left corner. I don't really like the image off that Ah brush. It's not like a hair, so I will show you how you can make your custom. I come for any brush. If you have ah, pre made icon, you can click on that select icon button and Ah, and select the picture or PS. Defy what you have. As you can see Now the brush has, ah, this demo image. But we want to make our own image. So we need a new sphere three D, and we want to make it a holy mass treaty. All right. And now we can use our rush on that sphere and ah, Joe, a nice hair part on that, or right. And if you like what you have ah, drawn on that. And you think that will be cool for ah, for a brush icon? You said the view what you want. I mask out the sphere and ah, And if you like the view, all you need to do is to press down the all key and why you holding down the all key. You need to click on the sacked ICOM bottom inside the brush menu and you can see now the brush icon is changed. I believe you need to save that again. So I override to the previous one. And there you go
10. Hair Buildup: all right. And now in this lecture, I will, uh, build up the hair off this. Ah, demo it. In this video, you can see how I use that brush, how I added that. And ah, what kind of settings I'm using. Why? I'm building up the hairstyle for character head. As you can see, I'm using the to end all these curve line and we debt. I have really huge council off my brush and I can Ah, just the shape and the style off the hair. What? I have drowned on the on the surface. Okay. If I want to make another hair streams, all we need to do is to less leak on anywhere on the surface. And ah, as you can see now I can adjust that hair stamp. We the we to move brush easily. Um, if you click or a used the outside groups in the polling group section, As you can see, each hair systems has ah different parts. And each of the parts are different poly groups. So you can adjust the hairstyle more precisely. All right. And you can mask out obviously more easier if you have ah different poly groups okay. And, ah, each time I, uh, I made the new house from obviously I need to make the auto group, uh, function again because, uh, originally, these brushes are these brushes will be in one play group. But if you want to modify the different part off this hair, Sam, you need to have ah, different polyps. And you can, ah, musk out different ways. - Okay ? After you have, Ah, a bigger amount off her sums. You can easily just ah co p a bigger amount. And you can, ah, make it different from the previous one with the move brush. And with that, you will have, ah, more volume on the hairstyle. All right. I think that's cool. Uh, female hair style.
11. Congratulations!: All right. Congratulations. You have done my course. And now you know how to make your own custom hair brush. And you can make really, really different and a lot off hairstyles for your character. I can't wait to see your works. And they wish you happy. Z brushing. See you next time.
 Máté Vörös, 3D artist, Digital sculptor