Transcripts
1. Class Introduction: Hi everyone, welcome to crafting your first
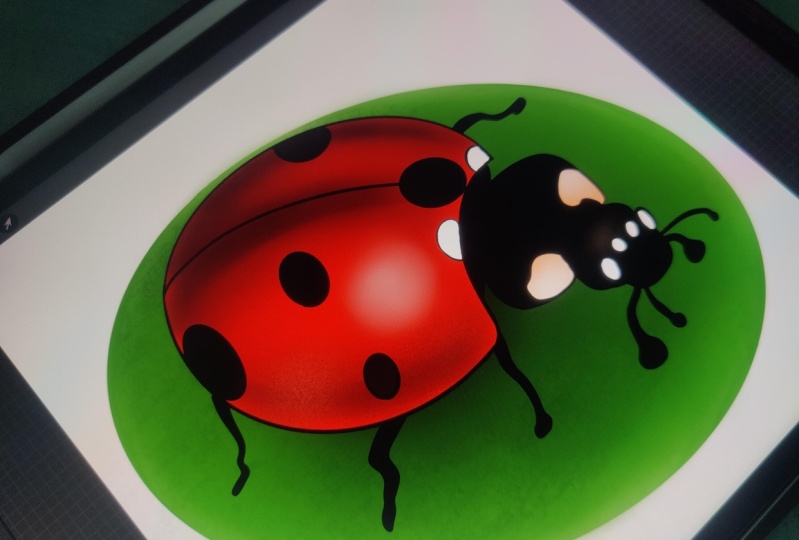
digital painting, a whimsical ladybug
illustration, a class for absolute procreate
new piece just like you. I'm also a fellow
creator who initially struggled to create my first digital
painting in procreate. My name is Utica. If
you're new to my classes, let me introduce myself to you. I'm an artist who specializes
in creating portraits. This was my first
digital painting in procreate in the year 2017. Since I didn't know how to use my ipad or the procreate app, I just kept it
aside and was doing traditional arts
for a long time. After three years,
that is in 2020, I started practicing digital
art and now look where I am, but of course, three years
was a really long time. If I had just found
the perfect tutorial, I'm sure it would have been
much easier. And time saving. I don't want that
to happen to you. You can simply
join this last for the next 30 minutes
and I'll show you how to use procreates basic tools to create your first
digital illustration. In this Las, I'll show you
how to use the procreate app, then add coloring and
shading to an outline. Then how to use
different brushes to create different
textures and effects. Finally, we'll add a background and some finishing touches. By the end of this class, you will have learned
how to create a whimsical ladybug
illustration appropriate. You will also have learned
some valuable tips and tricks that you can use to
create your own paintings. Not just that, you will also
get the brushes needed for the class and also the resources to create
your next painting. What are you waiting for? I will see you in the class then.
2. Class contents: In this class, you will learn
how to set up your canvas, making your first
mark rendering, adding textures and dots, and adding some finishing
touches to polish it up. This class is for
anyone who wants to learn how to create your very first
painting in procreate, I would recommend it for complete beginners
or if you're just looking up to brushing up your procreate skills for
crafting a quick illustration. This class is for you. In
addition to the class contents, you'll also get
outline sketches, links to all the brushes that
I'll be using in the class. On that note, this isn't
an affiliate or something, it's just my preferences. So I'm excited to get
started on this class. If you are too,
let's just dive in.
3. Understanding Procreate: Hi. Thank you for
joining the class before starting to paint
this beautiful lady bug. I'm going to show you
how to navigate through procreate so that you will get to know the procreate
interface better. The first one here is the brush C. This is the
foremost important thing. On the top right, you will have a lot of
procreate brushes. By default, procreate has
given a lot of precious, but of course I'm going to
give you a set of precious, or I'm going to show you the set of pressures that
I'm going to use. Some are licensed by
someone else and sold. I've bought a few paid
brushes to for those brushes, I'll be indicating the
names of the brushes. I will also show you some alternative brushes
for the same. You can use any
of those brushes, but of course, the
outcome will be the same. These are the brushes
in procreate. You can simply scrawl over and just select whichever
brush you need. Then the next icon
here is a smug tool. The smug tool works
similarly like a brush. That is, you can select any
brush for the smrchinglso. What it will do is colors that I created. I'm going to take a simple
quash brush for smudging. Then you can see I'm increasing and decreasing
the size of the brush, which is on the left side. I'm going to keep it to
30 and make opacity more. Now the Smh tools
simply smudges paint. This will help you
to shade it easily. But of course, I'm
not going to show you very complex
shadings in this class. This is a simple tutorial to
understand the basic tools. The next is the eraser. For the eraser as well, you
can use the brush shape and texture that it will erase according to the
texture of the brush. I hope you understand this. You can also find all
these examples and tutorials in the guide that
I'm giving along with you. This is the eraser, you
can erase it accordingly. Then here is the layers panel. The most important thing in
procreate is the layers. This is the layers panel. Here you can click on the plus
icon to create new layers. How many ever you
want to erase them? Just swipe left and
click on Delete. You can use your apple pencil, or you can use your finger to just swipe left and delete it. You can also
duplicate the layers by swiping left and
click on Duplicate. Now you can see there's two
copies of the same content. I'm going to dete this one now. Then to create groups, what you can do is select the layers that you
want to combine. What I can do is if I'm going
to color this lady bug, I can combine the layers of
the coloring in outline. In one group like that, what I'll be doing is create layers. Suppose if these are the
layers that I want to combine in one group,
just wipe, right. Go ahead and select
all those layers and click on the group
icon here on the top. You can get a new group. You can also rename layers, like even individual layers
and also individual groups. Click on the Group here, click on the Name New Group, and then you can click Rename. This will give you a pop
up here at the bottom. Click on that and
click on the keyboard. Simply rename the group. I'm just going to type in
example and leave it as such. Now you can see there's an arrow right next
to the example. Clicking on that will minimize the layers in that
group to see water, all the layers that are
present in the group simply click on it to
see all those layers. You can also take
one layer out of the group by just dragging
and dropping it out. These are the basics
that you need to know. Here at the bottom
of the layers panel, you can see that is
a background color. If you turn on the
background color, it will give you the color. You can also work without
selecting the color too. This is all about the layers. Next, I want to show you
about the color wheel. As the beginner,
I'm not going to rush you into knowing
all about these. Just know this is the
color wheel and you can navigate through any of
these colors you see you can get darkest to the lightest color in
the same tone is enough. Now here at the bottom
of the color wheel, there is a history which shows all the colors
that are used recently. This is pretty much
enough for a beginner. I'm not getting
deeper into this. If you want to know deeper about procreate and procreates, I have a lot of classes
in that for you. You can check out my classes
page next on the left. Coming to the left, I think I already told you
about the brushes. Again, I'll just
re brush on that. This is the brush size icon
where you can adjust it. This is the opacity icon, which means the darkness and the lightness of the
color that you need. Then actually this is the canvas that we
are going to work. You can simply pinch to zoom in, Pinch out to zoom out. If you pinch in
and just drop it, it will fit the
size of the canvas. You can use the settings. I will let you know what are all the important tools that you need to know on as settings. The first icon here is the add on in this first
tab, that is the ad. There is a lot of options, but the one thing that
I'm going to use in this class is insert a
photo or insert a file. We will be using that option to insert the outline that I'm
going to provide for you. To do that, go to Insert a photo and select the photo
that you want to insert. It will be added to the canvas. I'll go ahead and tell you that that is the one
thing that we need. Other things are
not needed for now. Next is the canvas here, you will be needing
the option reference. If you click on Reference,
this is the reference. Here is the reference option. If you click on it, you
will get the reference. I will show you in
the class how to import the photo for
this one and resize it. Then here is the share. This is how you will be
sharing your final artwork. Click on Share and you
can use PNG or Jpeg to share your images in case if you're going to share
it as a procreate file. That is, if you send it to
someone as a procreate file, they can get all the layers
that you have worked on and they can also get the time lapse recording of
this procreate. Be sure to whom you're
sharing that file. Generally, to print
or to save it, you can use PNG or J then the other things and
not read it for you enough. The next option that
is needed is video. In videos, always
make sure to turn on the time lapse recording so that once the artwork is done, it'll be very fun to watch
your drawing come to life. You can see the blue line on the top which is just crawling. And you can just move
it with your finger by swiping right and left
to see the full time lapse. Also, it will show
you the seconds and then I'm clicking on Done. That is your time
lapse recording. To export the time laps, you have to simply click on
Export Time Lapse Video. If you need it as a 32nd
for sharing it as a real, just use 30 seconds. If you need the full
***gth of the video, just click on Full ***gth. The next is preferences. You don't need much of these. Now that's fine. One more option that I forgot to inform you or show
you is that you can actually edit your
canvas size by using the option canvas
and crop and size. Now go to Settings on the top, and here you can adjust
your settings as well. This is pretty much
what you need, but there are some other things that I want to show you as well. Option that we're going
to use in the class is the Gaussian Create a
new layer or a new file. Now see I'm just coloring
it with a blue circle Now Gaussian blur is used to
just blur the contents. Click on Gaussian Blur
From Adjustments and just wipe right To blur it, I'm going to be using
this option in the class. You can just wipe right
and you can see there is a percentage that is represented of the
amount that is blurring. Just keep it, just don't
go too much blurring. Okay, this is one option
that you'll be needing. Another option that I'm going to use in the class
is the b***ding. More to go to b***ding more, just click on the layer
panel. Click on the layer. You can see the
option in the layers. If you click on that, we
will get a lot of options. These are called
the b***ding modes, which means the way the layer behaves with
the bottom layer. I'll show you with the example
of the lady bug itself. Now I have this layer. I'm going to here, I'm going to create a new
layer on top of it. I'm going to select
this red color. If I'm going to paint
this on top of it, but see it's a normal color. Now if you want to add some
special effects to it, click on N. Then go to Multiply. You can see there is a dark color of the
red that I've painted. I will toggle on and off. Show you If you click on the check box on the
right of the layer, it will turn on and off. Now you can see how the layer is reacting
with the bottom layer. That is, it b***ds it
with the bottom layer. I can also increase
the opacity of the layer by moving the
opacity panel here. I'm just keeping it
to this much amount, see how it reacts. It is b***ding it with the rest of the tones in
the bottom layer. Then there are just
two more options that I'm going to
explain to you. If you click on this layer, there are a list of options
on the list that you get. You have to click alpha log. If you click alpha log, what it does is it will lock
the contents of the layer. You can simply paint
only inside these parts. In this layer, only the
lady bug is present. It automatically only filled in these layers and the
colors are not going out. This is an option
that a beginner can use and save a lot
of time coloring. There's also one
more option now, with the help of alpha lock, you can only color within
this layer, right? But in case, what if you want to color on
top of this layer? I'm creating a new
layer and just coloring on top because I don't want to mess up the
original layer. What you can do is you can click Clipping Mask.
Click on this layer. Make sure that the layer
that the new layer that you created is above
the source layer. Now I'm clicking on this and you get option called
Clipping Mask. If you clip it, now see it is only coloring
in the Ladybug layer. These are options that we are
going to use in this class. I hope you found it easy
and useful to understand.
4. Making your first marks: Now that you've gotten here, let's get started
without delaying. I will show you how to import the outline and set
up your canvas. You will find the outline
and the resources. Just download it and you will
get the outline brushes, texture brushes, time
laps of the art. And so once the download
is done, save it to files. You can also save the
images to photos, open, procreate, and click
on the plus icon on the top. You will get a lot of sizes that is either saved or largely used. In your case, if you're using procreate for the first time, it might be blank, So choose the canvas icon with a plus
icon on the top right. Then it asks for few specifications
like the dimensions, canvas properties,
time laps, et cetera. Let me show you the dimensions that you need for this project. We can go for a square canvas, 1,500 pixels, and then set the DPI to 300 for
better quality. Then if you click on Create, you get your canvas.
This is enough for now. Then to insert the outline, select the settings
icon on the top left, then click Insert a Photo. Or if you save the
outline to files, click Insert A File, in my case it is in photos, then click on the outline. Then you get your outline. Then just to reposition it, click on the arrow arrow
tool on the top left. Then make sure the option
uniform is selected, which uniformly
moves to the center.
5. Let's color: If you have grabbed
your outline. Next, let's start
filling in the colors. Before that, I'm
creating new layers. To do that, click
on the layer panel, then click on the icon. I've created two layers. Then just swipe right on both
the layers individually. It means those
layers are selected. Then click on the group. It will create a group for those two layers in that group. You can also rename
the group I'm also renaming the Layer with the
outlines are sketching. Now I'm switching to the group. If you click on the arrow
next to the check box, it will show you the layers that are present in the group. Select any layer,
then to select color, click on the color
icon on the top right, which will open the color wheel. Choose the color that you want. Here, I'm choosing red. I think it looks a bit dull. Let me choose a brighter red. And let me show you an
easy way to paint it now. To do that, you have to be in a new layer below your outline. The outline layer has
to be in reference. To select that, click on the left edge of
the layer panel. You will get a list of options where you will find
the option reference, choose that, then get back to the new layer where
you want to fill the colors. And now select the brush icon. Then simply drag the color on the top right
icon and fill it in. Then select color for the dots to ease
the step even more. You can see while drop, you get the option
color next to it. There's an option called
continue filling. Select that, and
then you can simply click on the places where you
have to fill the color in. Also filling in the
legs and the head. Then I'm selecting a page tone
and filling for this part. With this technique, you
can fill the colors easily. But sometimes if you
zoom in and see, you will find white
caps to remove that. Select the colors again and
fill it in the same way. But after that, once you drop the colors just right without
taking your hand away. You can see in the, there is
an option called threshold. As you move towards right, the threshold value increases as well as the white
gaps keep filling it, but there is a limit to it. If the threshold
value increases much, it fills the entire screen. So keep it on a desired level. Then you see the legs
are filled entirely, since the gaps are
very fine to fill it. Zoom in the screen and fill the colors, Mm.
6. Rendering: Now let's shade it. For that, I'm going to
use a sampled brush. Of course, you can find
all the brushes in the resource library
or in the downloads, then increase the brush size a little with a
darker red selected. I'm also going to select the
layer that I'm currently on and turn on the
clipping mask option, which will clip it
to the bottom layer. Now if you color on
this current layer, it will not get out
of the base layer. You can see that by yourself. Just create a few strokes
in accordance with the shape of the buck
and then smudge it using the smug tool present
next to the brush icon. Just smudge it until the color b***ds
with the base color. I think I forgot to
mention that you can easily undo and redo using the options on the left panel below the brush
size and opacity. After smudging, I feel the shadows has to
be a bit more dark. You can do that by switching
the b***ding mode. I will say what it is. Just go to the layer
that you're drawing. Click on the alphabet
in the right. You get a list of menus below. Then select the
multiplier option, which will give you
a darker shade of that color in the present layer. And also it b***ds them with
a color in the layer below. Also, let me darken it a little more with another
layer of dark tones. If in case you're not
sure about the colors that just go to the
settings canvas, turn on the reference, which
gives you a dialogue box. With the preview of
the canvas itself, you can just move the dialog box wherever needed in the canvas. By just selecting on any of
the edge on the bottom panel, you will have the three options. Canvas image, and as click on Image and select
the reference image again. Now I'm picking the bright
red from the red color. To pick a color,
you have to choose a square icon in between the brush settings on the left or use your finger
to choose the color. But long pressing on the target. Once done, you can
notice the color on the color icon
changes instantly. But usually the
color picked from the reference appears to
be a bit desaturated. But usually the
color picked from the reference appears to
be a bit desaturated. So I prefer just moving on a little top for
getting a brighter tone wherever you need. The bright red just fill it in a new layer. And then I'm going to
change its b***ding. I'm also clipping this
layer to the bottom one, which directly clips it to the previously clipped
source base layer. We call the source
the base layer. I'm erasing some bit of extras after adding the
tones. Just mug it. Let me add some highlight. I think I'm going to increase the saturation for
the previous layer. Select the layer,
go to adjustments, click Saturation and Brightness. And then at the bottom panel, just light the
saturation a bit more. Let's smudge the high light color then. The dolls that we color
are on the bottom layer. I'm going to fill
the color for it in a new layer above all
the colored layers. And just below the
outline layer. Set the outline layer
to the reference and fill the colors
in the bottom layer. Just drag and drop the
colors and it's colored now.
7. Textures !: Let me show you the texture
brush that. I'm good. I'm good. Use the
one on the top. That is a sampled brush. The color and draw
fuse strokes as per the angle and
slowly mix the colors, both light and dark. Red Likewise, add the
texture with all the colors. And then I'm going to use
a skin texture brush just to add a little sprinkles
on top. But just a little, if you add more, you can just erase it back
here and there. Taping off with the A. Next, let me add colors
to the base oval. I will turn on that
layer and then select my color and just
drag and drop to fill it in. Also, you can see the
outline is still black. What you can do is
just it in with the outline layer and just drag and drop the color
on the outline. Then if you see gap
or black lines, you can simply slide over so the threshold
value increases, like we saw earlier. Now you see the color is filled. I'm going to change the color
to a bit more darker tone. Next, let me grab a bit more darker shade
and let me paint over it. Next, let me grab a
bit more darker shade and let me paint
over it on the top. I should have added
it in a new layer. Once done, I will duplicate it to make it even more opaque. And then I will blur
one layer using Gul. After smudging it, just smudge it on the edges,
smoothen it out. Also, I'm clipping both
these darker shades to the base layer. I'm making some adjustments
by b***ding it, also adding a darker
tone at the middle. Now, I will turn on the bug
layers too. It's done now. But lastly, I'm going to add
a background color for that. I'll go to the
bottom layer and add a gray tone which should
be in a separate layer. Now I'll use the retool and drag the edges
of the square and minimize it a little
like this, it's done.
8. Final thoughts: In this class, you will learn
how to set up your canvas, making your first
mark rendering, adding textures and dots, and adding some finishing
touches to polish it up. This class is for
anyone who wants to learn how to create your very first
painting in procreate, I would recommend it for complete beginners
or if you're just looking up to brushing up your procreate skills for
crafting a quick illustration. This class is for you. In
addition to the class contents, you'll also get
outline sketches, links to all the brushes that
I'll be using in the class. On that note, this isn't
an affiliate or something, it's just my preferences. So I'm excited to get
started on this class. If you are too,
let's just dive in.
 Ritika Sridhar, Artist, Illustrator