Transcripts
1. Introduction: Hi, my name is Melissa Renquist. I'm an artist, a
graphic designer, and a teacher on Skillshare. In this class, I'm going
to teach you how to use acrylic paint on wood to make some nice
holiday ornaments. This class is for anyone of
any skill level wanting to create holiday ornaments for their home or to
share with others. I'll share some tips
to help those who are newer to using acrylic
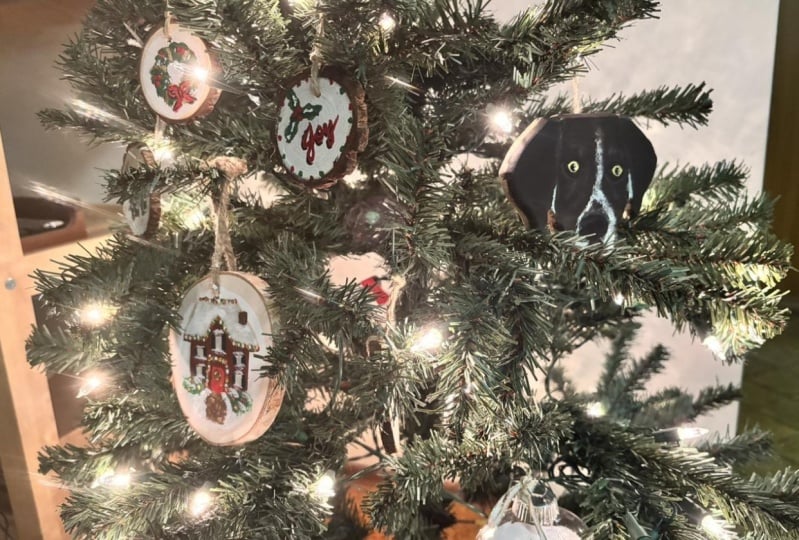
paint as a medium. I've chosen a dog
shaped ornament and some round wooden
ornaments for this class, but you can use other shapes
and designs you like. I have some templates posted in the resource section
for inspiration. By the end of the
class, you'll walk away with some holiday
ornaments to display in your own home or
to give to others to help decorate and
celebrate the holidays. And you'll be able
to use the same techniques to create
additional works of art on other surfaces
like canvas or plastic. I encourage you to check
out the class projects and resources section to see what other
students have made and to post your own finished
work there as well. If you're ready,
let's get started.
2. Materials: For this class, you'll
need wood ornaments. You can find these at
your local craft store or your local dollar store in
various shapes and sizes. Acrylic paint in
assorted colors. I'd recommend white,
black, yellow, red and blue to start and
you can either choose to mix your own colors or
some other colors I'd recommend having on hand
are green and brown. A paint palette.
I recommend using a large flat surface
palette if mixing your own colors,
assorted paint brushes. I like to use a small filbert, a small angle, a small flat, and a fine detail brush, a palette knife, a pencil, paper towel or cotton rigs, a cup of water, ribbon
or string, and scissors. Some optional items
for the project are plastic ornaments,
if you choose. White gesso to use as a primer. You don't need it
so much on wood, but I like to use it anyway, just the personal preference. And I'd recommend it for
painting on plastic. It adds tooth or texture to your surface to help the
layers of the painted here. Some sealer or top coat or a varnish medium,
if you choose. So metallic acrylic paint. Again, just depends on your design and the look
that you're going for and maybe a fine tipped permanent marker
to add some detail. If you're wanting to trace an image onto your wood ornament, instead of drawing freehand
or painting free hand, you'll need an image to transfer printed on copy paper
and some charcoal.
3. Base Layer: Step is optional depending
on your own preference, but I like to start
with a white base layer and then paint on
top with acrylic. I like the look of a design on a white area, but
it's not required. I'm using a small
angle brush here, but you could also use
a small flat brush or a small Filbert brush. I'll use the Filbert
brush later on as well. I tend to gravitate
towards a Filbert brush. It's pretty universal, easy to use no matter what type
of stroke you're doing. But here I'm using a
small angle brush. You can either use
white acrylic paint or white gesso to
add the base layer. Gesso is less opaque
than white paint, and it adds a bit of texture to the surface to help additional
layers of paint stick. The natural grain in the wood helps with adherence as well. By painting a base layer, it will help ensure the rest
of your layers go on smooth. I'm doing a couple
layers of the gesso just because I want the effect
to be a bit more opaque. As an example, I have this plastic ornament
that I'm going to paint on as well just to show you the difference between
wood and plastic. So just to ensure
that there's no oils from my fingers on
the plastic ornament, I'm going to give it
a quick wipe with some isopropyl alcohol
and a paper towel. A paper towel with soap
and water will also work. Just be sure to wipe it dry
before you start painting. You can also use gesso or white acrylic paint on the plastic ornament if you'd
like to have a base layer, or you can paint directly on the ornament
with your design. Acrylic paint is
essentially plastic and plastic likes to
adhere to plastic. I'm doing this layer again
with my small Filbert brush. I'll leave this wood ornament bare for a different effect. I'm going to paint a snowbank
and some trees on this one. For my first layer, I'll use some white acrylic paint
to start the snowbank. You can see it goes
on more opaque than the first layer of gesso I
did on the other ornaments. I'm going to add a layer of white paint on my
plastic ornament. I just want the
base layer to be a bit more opaque and
a bit smoother. The gesso didn't go
on super smooth, so I just want to start
with a nice opaque, smooth white layer on
the plastic ornament. A
4. Image Transfer: I'm going to be sketching
a simple outline of my design onto the
ornaments using pencil or a small brush and a light
layer of acrylic paint to help me judge spacing and to
get the basic shapes down. One good thing about acrylic
paint is you can layer it. If I sketch with a pencil
or with a layer of paint, when I layer over top,
these lines will disappear. A if you'd rather trace an image onto your wood ornament as a starting point, you can use this image
transfer technique. You'll need to
print your text or image onto a piece
of copy paper. When you print your
image, take into consideration how big
your final piece will be. You may need to scale your
image before printing to ensure it comes out
to the correct size to fit on your ornament. Once you have your image printed, make sure
to cut it out. Then you'll take a
piece of charcoal. The one I have is
medium softness, but it really doesn't
matter and you'll apply a generous layer on
the back of the image. If you have some
tape, you can use it to secure the image
to the ornament. Since the image and
ornament are small enough, I'm just going to hold the
paper in place for this one. Once you like where
the image is placed, trace the outline with a pencil. If you do have the image taped, you can gently lift
the paper to see where your outline is showing up and to make sure you
like the placement. If you need to
lighten the outline or if you want to start over, you can always erase or acrylic paint will also
cover the outline. You'll end up blaring over
top and you won't see the charcoal marks on the
final project anyway. I printed my snowman a bit
too big for this ornament, so I'm just going to use
the two top circles, the head and the torso and I'll just cut off the
bottom to make it fit. I'm pressing a bit
firmer with my pencil than I would if I was doing
this onto a sheet of paper. I want the charcoal to
show up on the wood, and since I have bare wood here, I need to use a
bit more pressure so I can see the outline. You'll need less
pressure if doing this onto a gesso base or
a painted surface, or if you use this technique for another project on
canvas or paper. You can save your image
with the charcoal on the back and reuse it
over and over again.
5. Painting - House: Paint a house on this ornament. I've just found a
reference image online of a house that I like, but a fun idea might be to take a photo of your own home and use that as a reference to paint an ornament of your home
decorated for the holidays. I'm making a reddish
brown mixing with a paletteknife until
smooth and combined. Even if not mixing colors, smoothing the paint
with a palette knife is a good idea to get rid
of any lumps or bumps, especially if you're using
an older tube of paint. Using a small fiilbert
or round brush, paint the outline of your house and then you can
start to fill it in. Outline the roof and
make marks where the front path will go and
then let the layer dry. If you make a mistake or
want to change something, let the paint dry
and you can layer over top. No one has to know. I'm using a small filbert to do another layer in a
slightly darker red brown. I'm mixing in a light
gray I've made by adding a very small amount of black to white with an unbleached
titanium color, or you could use white with a bit of yellow and
a tiny bit of black. Remember to mix using
a palette knife. I'll use this color to
fill in the roof and to block out where the
windows and door will be. A a I have some red brown leftover that I'll use with
my fine detail brush to clean up the
square shaped windows and I'll add a bit of
a window so below. Acrylic dries quickly,
limiting time to work with, but it allows you to
layer and cover up if you make any mistakes or
if you change your mind. I'm mixing black with brown to fill in the path with
a small Filbert brush, and I'll clean up the roof
line with a fine detail brush. I'll also add a chimney. Now I'll use a blue
green to add shutters on either side of the windows
with a fine detail brush, and I'll use red
to paint the door. I'd recommend using
the fine detail brush or the small Filbert
brush for this. If you get too much
water on your brush, you can always dab it off on a paper towel and then go
back in for the paint. You want it nice and thick, but the water just helps it move
a little bit more freely. You don't want too much
water on your brush though, or else your paint is going
to go on and look too watery. I'm going to do
some string lights around the roof
line and the door, so I'm just dabbing a little bit of red to start
that light string. Now I'm using the
small filbert with some green to add shrubs
in front of the house. I'm using a dabbing
motion to add paint, which gives it a textured appearance like a real
shrub would have. A I'm doing this in layers and I'll use some
darker green to go over top, just to give some texture
and depth to the shrubs. I'll use the detail
brush to dab on some green light bulbs
onto my light string. I'm also going to make a
wreath on the red door, using the detail brush by dabbing on green in
a circular form. I'm adding some yellow
to the string of lights. Instead of using the brush end, you can try using the handle
end of the brush to make some small dabs of color along the roof and around the door. I'll add some white to
the light string as well, and I'll add it to
the top roof line. I've added some red dabs
to the shrubs and some red and yellow on the wreath on
the door for decoration. Next, I'll add some
white to the ground and to the roof to make the
house look snow covered. A I'll add a little around the
window sills as well on top and on the
bottom of the windows. I'm going to finish with
some gold acrylic paint to dab on a door knob, and I want to add some
gold to the light strings. I think I'll dab it
over the yellow. I'm not loving the yellow. I'll add some gold to the path. I'm highlighting some stones, and I'm going to do a very
light gold outline on the sides of the
roof just to finish it off and add a
bit of dimension.
6. Painting - Dog: I'm using a reference
photo for my dog ornament. I'll be using black, white and brown paint and some
yellow for the eyes. I'm also using
unbleached titanium. It's an off white color. I've already blocked
off basic shapes using a light layer of paint. Now I'll use a dark brown
to layer overtop and further define the shapes I
want with a Filbert brush. Remember to mix your paint with a palette knife to
blend and smooth. I'm going to start
filling in some dark brown with
the Filbert brush. If you make a mistake and
want to change something, you can always layer over top. Make sure to let your first
layer dry completely, and then you can
layer right over it. A I'm going in very lightly with a little bit of the dark brown paint
on my filbert brush, just dabbing it over top of the white to give a little
bit of a speckled effect. I'm covering the edge with paint so that when you look at the ornament from the front, it wraps around the side. I'll go in for
another layer with the dark brown and I'm just going to touch up
around the edges. Now I'm going in with
a lighter brown with a small round brush to
just touch up on the nose, mouth, and the eyes, and just to define some shapes. I'm using a filbert with some white paint to
add some speckling by lightly coating the end of the dry brush and
lightly dabbing. I want to highlight
those ears again, so I'll just go over
with some white paint. And then while that
white paint is wet, I'm going over top
with a bit of brown. By going wet on wet, it helps to blend the two
layers together. Now I have some
unbleached titanium, that's the off
white color but I'm applying with my
small round brush just to mark out
where the eyes will be and then to define
the ears again. I'm dabbing my round brush on
the ridge between the eyes and around the muzzle
and the nose area with the unbleached titanium. I'm doing another layer with the dark brown just to further define and make sure that I have my wooden ornament
completely covered with brown in the areas
that I want darkest. Then I'm lightning up that brown with the unbleached titanium so that I can add
some highlights around the nose and the face. I'm making a pale yellow
by adding some yellow to that unbleached titanium and I'm applying to the eyes
with my filbert. I'll touch up around
the nose, mouth, and eyes with some
black and dark brown and my fine detail brush. When I do eyes, I like to dab some small white circles on
top of the black pupils. I'll do this using
the handle end of the detail brush for more
precision and control. To finish, I'm dabbing on a bit more white
between the eyes and around the mouth with
my fine detail brush. A
7. Painting - Small Round Ornaments: Smaller wood ornaments, I'm
going to do some trees, a wreath, a gingerbread, and some text with holly leaves. I'm starting the one where
I'll do a snowbank and trees. I'm adding some more white for the snowbank and then with
the handle end of my brush, I'm dabbing white to make
snowflakes in the background. Next, I'll use some green on a Filbert brush to dab
on and make a wreath. Dabbing gives the
wreath some texture. I'll also use the
detail brush to make some holly leaves
with the same green. I'll use the same green
and my detail brush to make three triangle
shapes for the trees. The ornaments I'm working
on are quite small. They're about 2 " in diameter, so I'll be using the
detail brush a lot. I'm mixing my own green
before going in with another layer to add
some texture and depth. I've made it green using
the yellow and blue paint. I I've made a darker version of the same green by adding
just a touch more blue paint. If you're mixing colors, remember to use
your palette knife. Even if you're not
mixing colors, it's a good idea to
massage your paint with a palette knife to smooth
out any chunks or lumps. I'm using a flat brush
to dab on some of the dark green to add texture
to my foliage and trees. You can see by using
the stabbing motion, at least some texture
on the ornament. I'm using the same
flat brush with white paint to dab on
some snow onto my trees. I've added the white
while the green is still wet and I'm doing just a little bit more green
over top of the white. Again, everything
is still wet so that I can blend the
colors together nicely. On the plastic ornament, I'm going to do another wreath. I'll take the same flat
brush with the green. I'll go light first and
then I'll do some dabs with dark overtop while
the paint is still wet so it can blend
nicely together. I'll start the gingerbread
cookie with the detail brush. I'm using some brown to add tree trunks to the detail brush. I'm using the handle end
of my Filbert brush to dab berries onto the wreath
and holly leaves with red. I'll use a pencil to write the word joy very lightly
before I go in with paint. Again, if I make a
mistake with paint, I can always layer over top. Make sure to let
the bottom layer completely dry before
layering over top. If you like, you
can use the image transfer technique to trace your word onto your ornament and charcoal if you haven't already. Or just rehad with a pencil or brush like I'm
doing in acrylic. It's so forgiving. I'm using the fine detail brush
to write the word joy. I'll add some colored dots with my detail brush
around the edge. I'll use the white to add some more snowflakes
on top of my trees. And I'll add some white details on the holly leaves and wreath. Using a detail brush or
a small round brush, you can add details
to the gingerbread. Dab using the handle end of the brush to make perfect
eyes and buttons. I'll use some metallic
gold acrylic paint on my wreath to make some
ribbon and a bow. I'm dabbing the gold
acrylic paint with the end of my Filbert
brush onto the wreath. I didn't like the original
gingerbread man that I did, so I painted over the
entire ornament with white, and then I went in with
the same brown and a Filbert brush to
make the cookie and then I've dabbed
around the edge, just some half circle shapes with the Filbert
brush in the brown. I let the cookie dry completely, and then I took my
fine detail brush and some white paint and went around the edge just to
clean up the lines. Now I'm doing the details for the icing with my detail
brush and the white paint. It's important to
let the layer below dry before you go over
top with any details. Otherwise, you're going to start mixing and blending your paint. It depends on the effect
that you're going for, but I would suggest to let the bottom layer dry before
adding any details over top. I'm using the fine
detail brush and some black paint
just to add a bit of outline around the bottom
left side of my letters. I'm adding some
ribbon and a bow to my wreath on the
plastic ornament with a small round brush, and I think I'm going
to make the bow on the other wreath red as well. If you want, you
can add the year or some additional details, but
I think I'm finished here. I'll show you how
to add a top coat in the next video
if you so choose. But these are fine and durable
just the way they are.
8. Finishing Touches: Finish off these
smaller ornaments, I'll take a fine tipped
permanent marker and add some details like outlining
the gingerbread cookie, and I'll add my initials. You could add more detail
with the marker outlining different shapes or signing
your name or initials, adding the dates or year or any other text that you don't
want to add with paint. If you choose, you
can add a top coat to seal your design.
It's not required. The acrylic paint will
hold up pretty well, especially as an ornament
that doesn't get handled, but you may want to add
a slight shine over the entire surface
just to finish it off. I'm using manpog
but you could use an acrylic medium or another
product as a clear top coat. You can get different
finishes like shimmer, glitter, and matte depending on the final look
you're going for. Make sure to shake the bottle well and then add
some to a pallet. I'm getting my brush damp with water just before
dipping into the medium, and then I'll apply
a generous layer. I'm using a medium
sized flat brush to apply the mod podg. You could also sprinkle
your own glitter over top before the top coat dries if you wanted to
add some sparkle. For this class, I'm
just going to show you basic application on my joy ornament and on the plastic
ornament with the wreath. You can do a few coats
of this if you like. Just make sure each coat dries first before applying the next. You'll notice mod page in particular goes on
a bit translucent, but dries completely clear. It's nice to be able to see where you've
applied it and that you have a generous coating on the entire ornament surface. Next, I'm going to
finish these off by tying on some strings
so I can hang them. There are different
ways to tie these, but I'm going to start with about an eight to
ten inch length of string and I'll fold in half. I'll tie a knot in the
end with the two ends by wrapping them around together and pulling the ends
through the loop. Then I'll feed the folded end through the hole
in the ornament. I'm tucking the loose ends which are now knotted
together through the loop I've made with the folded end and I'll
give it a pole. Now the string is securely
through the hole in the ornament and I have a loop to be able to hang the ornament. I already have a
metal loop on top of my plastic ornament
that I can put a hook through to
hang it on my tree. I'm going to tie
a bow on top with ribbon just as a finishing
touch on this one. I'm taking an eight to
nine inch piece of ribbon. Make sure the ends are even
and then tie in a bow. Adjust the length of the
loops to where you like, and then tie a second knot
by tying the loops in a knot together to keep
the entire bow secure. Just like that, I'm ready
to hang my ornaments.
9. Thank You: Thank you for taking this class. I hope you enjoy the
holiday ornaments you made and enjoyed working with
acrylic paint as a medium. Head over to the projects and resources section to see what other students have made and to post your own finished
work there as well. I look forward to seeing
what you come up with.
 Melissa Runkvist, Artist, Writer, Teacher