Transcripts
1. Introduction: Winter has a quiet
calming beauty, soft light, gentle snowfall, and the moments of
peaceful stillness. A snowman reflects
warmth and simplicity, making it a perfect subject for a relaxing watercolor
study. Hello, everyone. I'm Soma Karthik, a
passionate artist and a mom, and welcome to my class
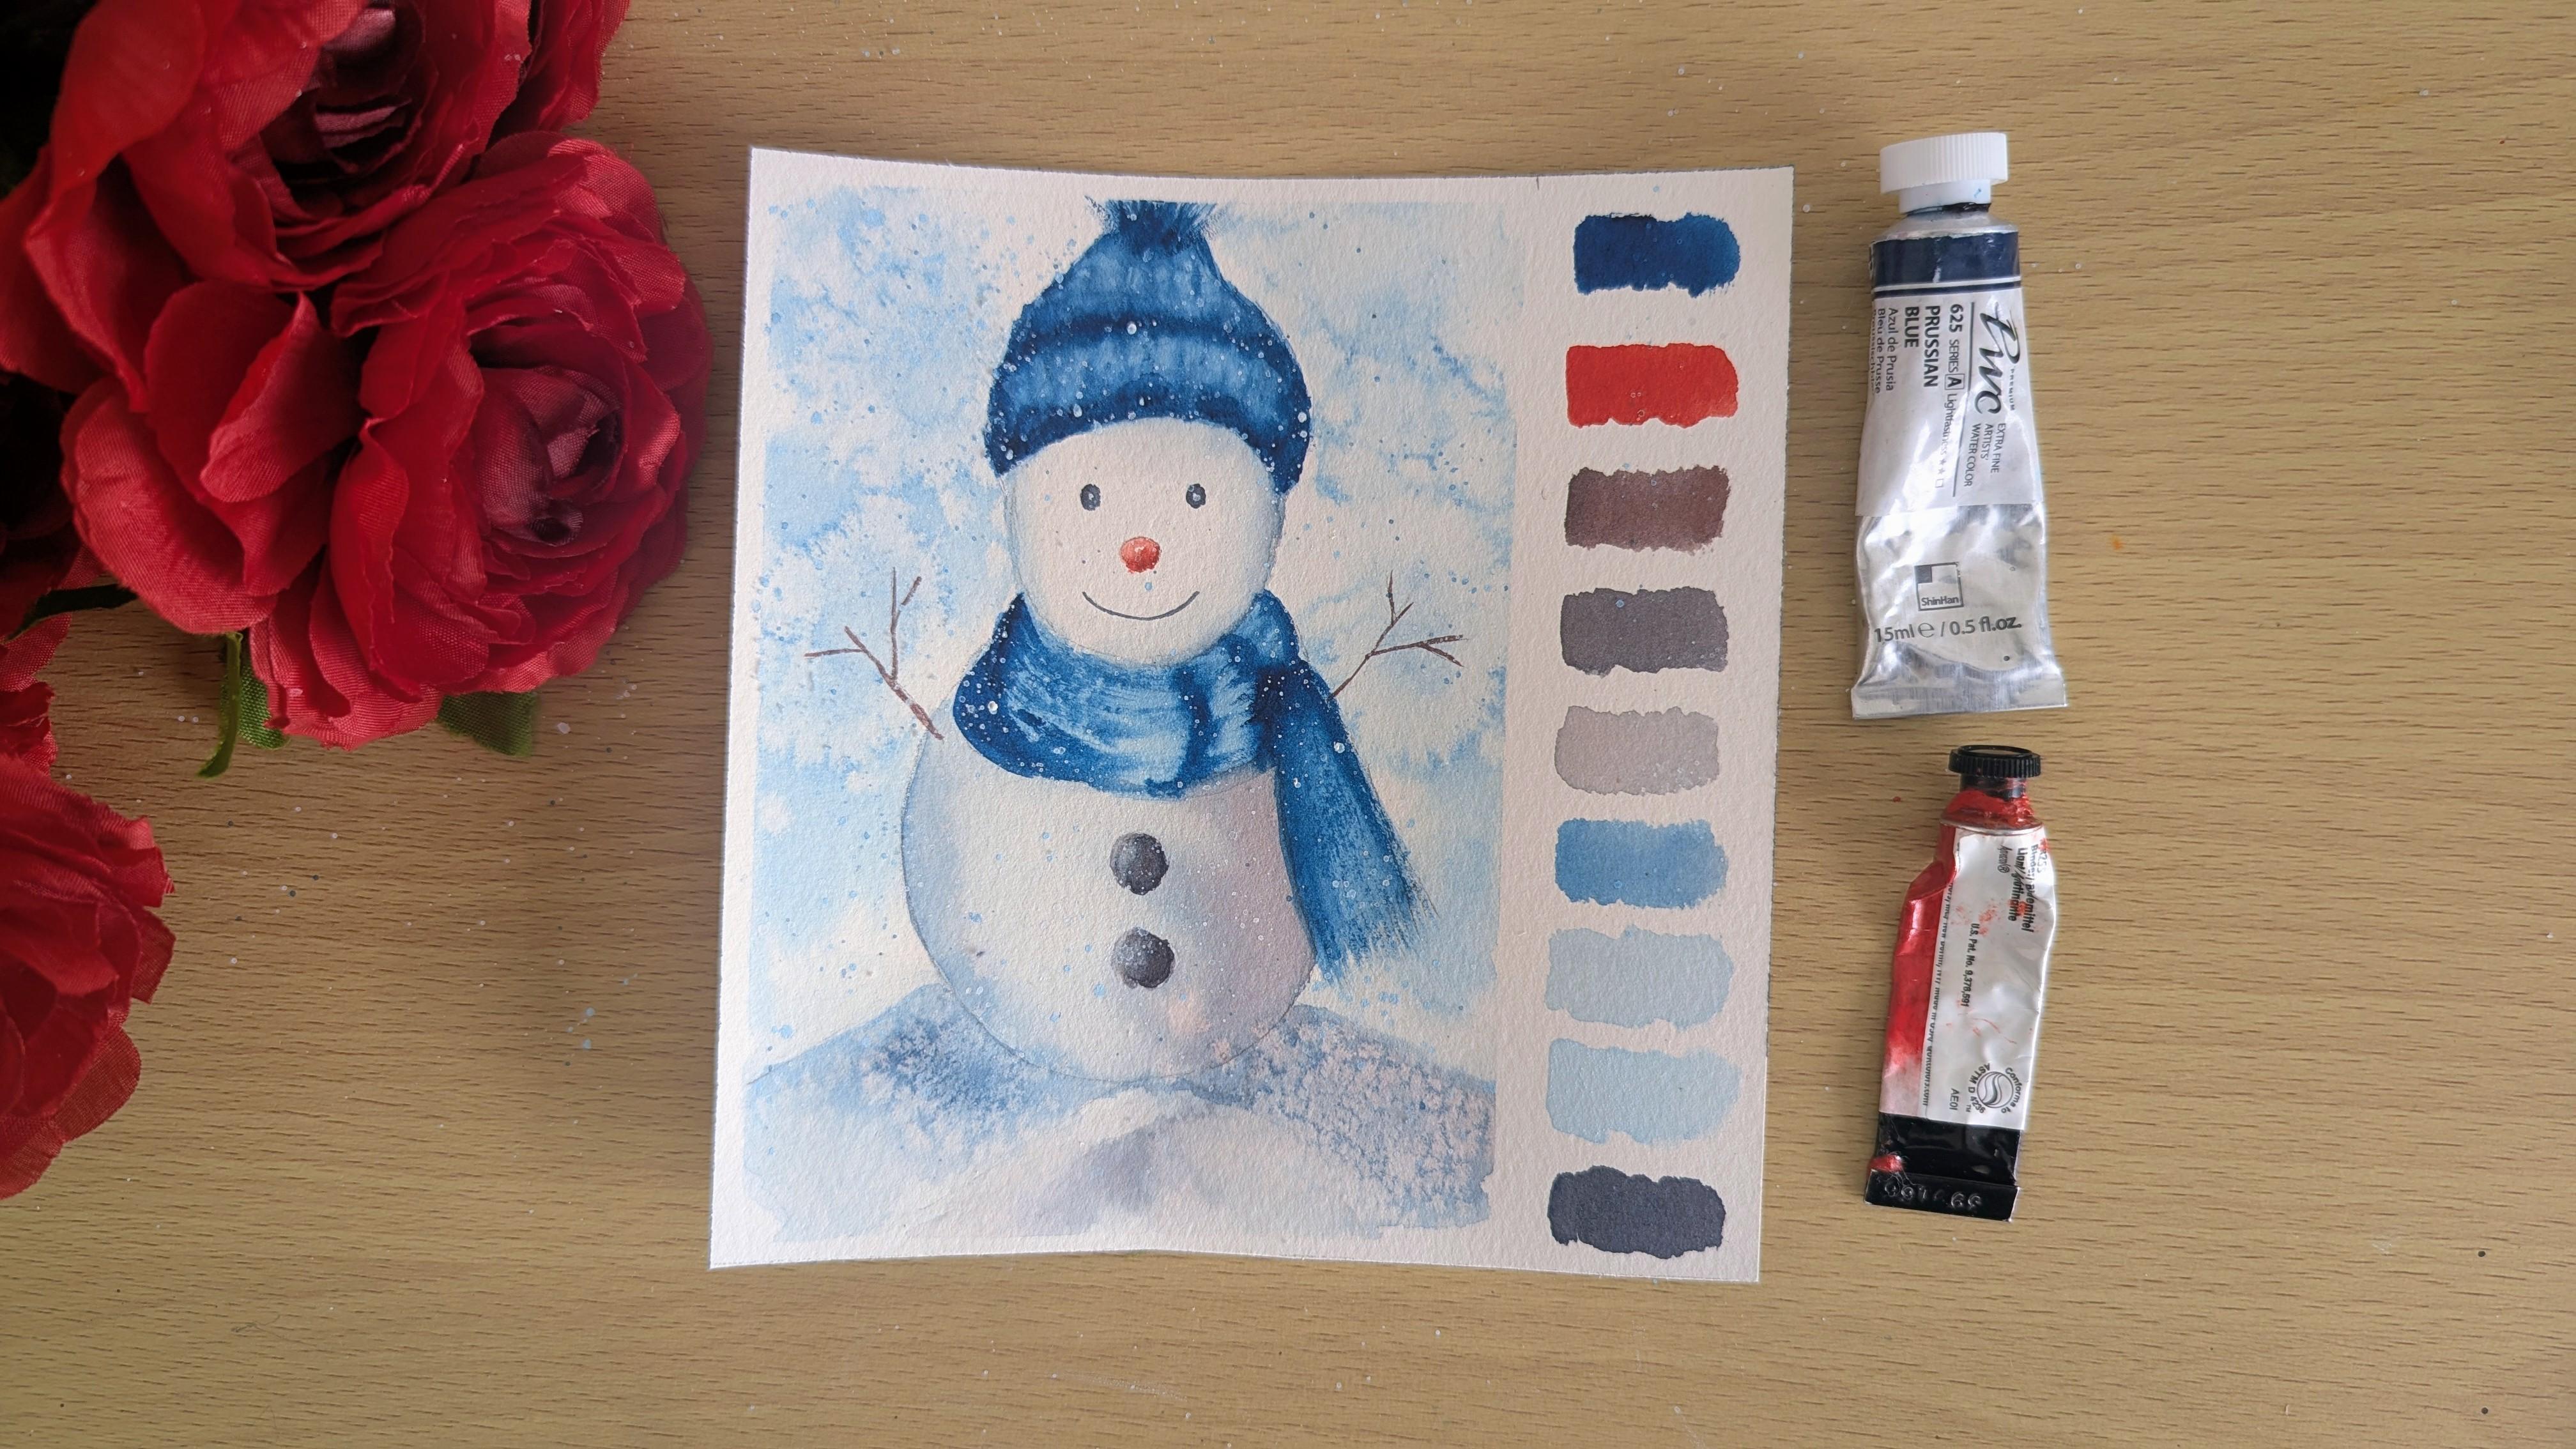
Winter come in watercolors, a snowman using two colors. In this class, you will create a serene winter snowman scene using just two
complimentary colors through limited palette, and simple techniques will
focus on soft plans, textures, and tonal values, making particular approachable and
enjoyable for all levels. I'll guide you step
by step to create a beautiful winter snowman
scene using four techniques, wet-on-wet, wet-on-dry, layering and dry
brushing technique, and create a beautiful piece. So this class is
perfect for beginners or anyone who wants a relaxing
winter painting section. So I'm excited to have you
share. Let's get chatted.
2. Class Supplies: I'll come back. In this section, let's quickly work
over the materials we'll be needing for
a class project. So first, I'll talk
about the paper. So I'm going to use arches, 100% cotton, 300 Jasm 140, B, and I'm going to use the size of a postcard
that is six by four. You can go with
any size you want. And next, I'll talk
about the brushes. So these are the four brushes we'll be using for
the crass project. So first, these two brushes
are from Zanat supplies. So I'll be using this flat brush for making
the initial washes. And wetting the background. And this one, this one is size
three by four flat brush. And this is also from
Zen Nut supplies, and this is size
eight round brush, and I'm going to use this round brush for
wetting the snowman hat and the scarf and also before adding the shadows and also for the background of
the snowman naturally. So I'll be using this brush. So next, I'll be
using this brush for this note painting, stone. And this brush, this
is from marine. It's size zero for adding the
final details like twigs, eyes, nose and mouth and
also splatting to snow. So next, you need
two jars of water. For washing off your brushes. And these are the two colors you'll be using for
entire painting, along with white watercolor
paints or white gouache. First color is Prussian Blue. You can use Teel blue
or Windsor blue. Any cool blue, and Pyl red
light is the second color. So it's a warm red. So you can use any warm bread, like cadmium bread, any red you have or scarlet,
pyrrol scarlet red. To these are the substitutes, and you need white gouache or white watercolor paints
to splatter as a snow, and you need kitchen salt, powdered salt top for the snow effect of the
snowman in the background. For the one like
this and also below the snowman in the
snow and you need a masking tape to keep
your edges clean. And I'm going to use this
wooden board to tape my paper. You can use any glass
board or even cardboard. Make sure you don't
wet it too much. And finally, you need a pencil and eraser to do
your snowman sketch. And you need a palette. I'm going to use this ceramic
palette to mix my paints. So These are the
supplies you'll need, so grab your supplies, and I'll see you in
the next section.
3. Complementary Colors: Hi, guys. Welcome back. So
before starting our painting, let's understand
complimentary colors. So complimentary
colors are colors that sit opposite each
other on the color wheel. So as you can see, here
Pyl red light is a warm, bright red, whereas Prussian
Blue is a cool, deep blue. So the nice thing about
complimentary colors is that they don't look good
when they sit side by side. And when we mix them together, it gives soft, beautiful, earthy tones like
browns and muted grays. These two gray colors are
best and good for adding shadows and also even
other fine details like twigs here and the snowman, even the stone here and eye nose and mouth
details like that. So complimentary colors help
make the painting simple, balanced, and pleasing
to your eyes. So you don't need to remember
any color theory rules, just enjoy how these two colors work together naturally
in a balanced way. So if you don't have these
two colors, I already said, you can use windsor blue
and even cadmium red light, or you can use ultramarine
and Bon Sienna too. So these two, when
mixed together, gives muted rich gray
that's perfect for shadows. And also, you can
use thalo blue. If you don't have Windsor
blue or Prussian Blue, you can use thalo
blue with Indian red. Or cadmium red,
that will work too. So these are the swatches. I tried while planning
for this class project. So I even tried other
complimentary colors. I don't mean complimentary, but these two colors, see if I mixed in and
cadmium red deep, I get bluish gray, not a gray. And when I mix arcois
blue and Alyson crimson, I get dark purple
and a dark magenta. So this one was better. So I went with this. So now you have a better idea of how
complimentary colors works. So let's move on
to the next lesson where we'll start to
sketch our snowman. See you next section.
4. Background Washes: Welcome back. In this section, we are going to paint the snowman background
using wet-on-wet technique. And I'm going to use
only diluted mixture of brush and blue
for the background. And as you can see, I have measured and taped my paper in the
size of a postcard. It's six by six, actually. But I have left a
space extra space here for doing these watches after we finish our painting. So this is a sketch. And also, I even have a thumbnail
for a snowman. You can download it from the project and
resource section. I have ged it there.
So let's start. So I'm going to use my three
by four inch wash brush. To wet the background
area evenly, make sure it's not a puddle. Apply even coat. And don't wet the
snowman body or hat. Only the background area. So now I'm going
to use my siege on brush and drop the Brushian
blue in the background. Let it spread naturally because we are using
wet-on-wet technique, wet paint on a wet surface. So I'm just dropping
the paints randomly. So while the layer is still wet, we are going to add some salt. You can either directly add like this or you can use your hand. Either way, it works. So
let this dry completely. That's it. In the next lesson, we'll start to paint the body of the snowman. See
you next section.
5. Snowman Body: O. Welcome back, guys. Now we are going to
paint the snowman body. As you can see, this
is my reference. So as the light comes
from this side, the shadows will be on
the right side, right. So here, it'll be darker and
here it will be lighter. And also, we are going to paint this foregone retails of the snowman using the
same diluted blue. And I had created this picture
by mixing Persian blue, 80% and Pyl red light
20% to get this gray, I'll show you this watch. So I'm using my eight round
brush. So this is the color. You should get. So we are going to use
wet-on-dry method. So I'm going to use my paint directly on a wet paint
on a dry surface. So first, I'm taking this gray mixture and starting to apply it
on the right side. And then we'll smoothen it out. And then I will wash my brush
and using my damp brush, I'm smoothening out the texture. See, you get such a
smooth and nice blend. So I need more paint, so I'm mixing both
colors red and blue. So you can drop some
wet-on-wet to get a smooth blend and blend it in. So make sure you
don't bet the button. And I can smooth all the other
sides, but not the button. Make sure it's nice and dry. And here I'm going to drop
the diluted version of blue. Just going over the line. And then I'm going to wash my
brush and smoothen it out. It's that simple glass. So we'll wait for a few minutes so that we can paint the
ground details of the snowman. So now I'm going
to wet this layer. You can use wet-on-wet
or wet-on-dry method. So I'm just adding
diluted blue and gray. So I'm mixing both
colors and then dropping it here
on the ground of the snowman and also
a lighter version of blue on this side, and more blue on the other side, more blue and gray, muted gray mixture
on the other side so that a snowman looks more
dimensional and soft. And also, I'm going
to soften the edges like this and on either side, too, because it gives
us a smooth plant. And here, I'm going to put the gray color
for the snow details. The same color we used here. And if you're water spreading, you can even lift with your flat brush and smoothen it out. I'm just lifting here.
This is lifting the paint. My layer is still wet. This is lifting technique. And while the lail is still wet, I'm going to again sprinkle some salt to get a
subtle snow texture. You can, uh, wait for
the layer to dry. And then in the next section, we'll start with the scarf, pom pom, and the hat for
the snowman. See you there.
6. Snowman Hat and Scarf: Hi, everyone. In this section, we are going to paint the
snowman hat and the scarf. Like this, we're going to use different tonal values
of Prussian blue, starting with the light, then building layers gradually
using medium tone, and then giving fine details
using the darker shade. So we're going to build
layers like this, and also we'll use a bit
of dry brushing here for a scarf texture to make it interesting and
also here a little bit. So let's start. So I'm
going to use two brushes. This is size five brush from Minson Newton
Foundation series and this is size eight
from Gena supplies. So these are the two
brushes I'm going to use. First, I'm going to start with a lighter tone for the scarf or the hat,
whichever you can start. So I'm going to start
with a lighter color, just going over my sketch. So your sketch is little
important when you add paints like this and your
sketch should be lighter, not darker so that it guides you throughout
your painting. So I'm just filling my lighter color potion blue or the hat and the
pompom on the top. And then using the same colour, I'm going to fill in my scarf. This is wet-on-dry wet
paint on a dry surface. So I'm taking excess paint
and then blending it in. So now I'm going to take my smaller brush size number
five in a medium tone. I'm going to take the excess water and
paint from your brush. If you have it, make sure it little bit darker than
the previous version, and then I'm going to add
the details of the hat. Wet-on-dry gives us
crisp and clean edges. So for snowman, you
are using wet-on-dry. And I'll do some
wet techniques too. You'll see now. So these
legs are still wet. It gives a smooth blend
for our snowman hat. So I'm just outlining
the snowman. Make sure you take
the excess paint and you have more pigment on your breast and
not more water. And then I'm going to use
the same consistency paint, a lighter version, like
this for the pom pom. Make sure you take
the excess and see. My brush is almost dry, not wet. And then I'm going to take a even more darker version to
make digest look prominent. And then I'll smoothen it out. So I'm doing softening edges
on both side, actually. If you're comfortable
with a smaller brush, you can go for it or you can do with your
bigger brush too. I'm doing with my smaller brush. And then I'm going to add
my darkest layer here. The bottom part of the snowman. See? Let the watercolor
do its magic. And then here I'm taking a
very thick consistency of mint and then shaping my hat. And then for the pompom, I'm going to just
dab off my paints, take a thicker constancy. It's like dry brush, and then Well my pompom. And also, while the
layer is still wet, you can add the textures like this one and make
your Santa Not Santa. I mean, sorry. Snowman
had little interesting. See, it gives a smooth blend. This one you can do while
the air is still wet. And then it gives a nice
texture for a snowman hat. You can blend the layers here, fit get dry and also
smoothen the edges. And also, I'm going to do
the same technique here. I think his calf is dry, so I'll make sure I
add a darker layer, a little bit darker layer
here and smooth my paint. And I'm going to apply my
darker consistency here, make sure you take the excess. And then I'm going to add some crease details here to give depth to a
snowman's scarf. And also, I'm following my
sketch here and painting it. So to give the crease
little more dimension, and then you can soften it. And you can just fill it
here, fill it in here. And also a small line to differentiate the
body and the snowman. So I'm taking even more
darker constituency here and just adding
it the details and also I'm going to use this lighter version here
and blend the damp brush, Bill mall, the damp brush. And also, you can take a darker paint and
make the grease, scarf titles even
more prominent. And also, make sure you smoothen the edges so that it
doesn't look different. And also with the darker paint, I'm going to use some dry brush. Make sure there is more
paint and less water. Just few dry brush to make a
snowman scarf interesting. And you can also
pullo the paints. Just pullo the paints. And also, and little
texture like this one, we are going to create
with a lighter color, actually, not with
the darker one. Make sure your paints in
a right consistency, see? More pink and less water. And then and also, I'm going to make it dark towards the right
side of the scar. And then and darker
towards the body. Here and then smoothen it out. And then add the details of
the scarf here like this. Just flicking at him like this. So let's wait till all
their leg gets dry and one more final th before we
finish it off or the pom pom. And one more final
touch because as watercolor rise a
little lighter, I want to give even more
dimension to a snowman, so I'm adding more layers
before finishing the hat. So that's it. Let's wait. In the next lesson, we'll start to paint
other details like eyes, nose stigs and the
buttons. See you there.
7. Snowman Details - Part 1: Hi, everyone. Welcome back. Now we are going to
paint other details of the Snowman, like snowman twigs. You say, Earthy
Brown and there's button details and the eye
details and the nose details. With a color and mixture, as you can see,
this is pyrol red. And this is a lighter
version of Pyrool red. And this one I got by
mixing this mixture, earthy brown, mixing
70% red and 25% blue. And this one is vice versa, Persian blue, 70% and 25% red. So I'm going to use this madne brush size zero
to paint the twigs first. So let's start. So you can
take the pictures away. I didn't take the
pictures still. So you can take the
pictures of the salt we created in the
background area first. So just I'm drawing the
tracks, tracing over my line. If you're comfortable,
you don't want to sketch the twigs the starting. You can directly sketch
it with your paint. So this brush has
a very fine point. This is size zero
from marine actually. You can use any fine line a
small brush to do the twigs. So I'm just drawing the
twigs of the snowman. Make sure your brush
has fine point to get a clean thin line
for your snowman. And now I'm going
for the buttons. So I'm just starting with
the darker color here. It's like, black, dark, gray. You got this by mixing
more blue and less red, 75% blue and 25% red. So as the shadows on this side, I'm making this side darker. And then I'm wetting
my brush and smoothening on the right side to get a soft blend,
smooth blend. If it's too watery, make sure you take
the excess paint from your excess water
from your brush, and then do the step so you
get a clean and smooth blend. And also, I want to
make a lighter version and because the shadows
on the right side, I want to make the buttons
even more dimensional. So I'm just smoothening it out. I think my darker layers
are a little bit light, so I'm going to make it
even more darker here. See? That's look perfect. So now
moving on to the faith, I'm going to use my size fib
brush and make and taking a watery consistency of russian blue for the shadows and the snowman on this side. And you can use both colors
lighter version of blue, and the gray muted gray
we created, both colors. And then paint it like
this on the right side, and then spot the net out. If you have a round brush, bigger brush with a fine
point, you can use that, too. I'm using my same smaller brush, like I said previously. And also one more final touch here with a gray on the right side and with a
blue too to make a snowman. Look dimensional. So make sure you smoothen it out your layers to
get the nice texture. So now I have mixed a darker consistency of paint that is
literally like black. It's the darkest
gray for painting the eyes and the
mouth of the snowman. So just I'm taking my round brush size zero and
then going over the eye. Make sure it's pretty dark so that the snowman
looks pleasing. The eyes are very important to bring a scene of
the snowman to life. And also, there is one
more step after this. After we add the nose details, I'm going to add little snow. And now for the mouth So let's wait for a few
minutes because it's wed, so we don't want to smudge
the nose, so let's wait.
8. Snowman Details - Part 2: So now I'm going to use
my same size number, zero brush to paint
the snowman nose. So I'm just going on
the right side first. Bottom part of the snowman. And then washing main brush
and smoothening it out. Leaving a white space, white
white for the highlight, white gap for the highlight
of the snowman nose. And also you can use
this darker version of brown red and then add some wet-on-wet touch to give the soft and smooth
blend to the snowman. Make sure you dab
the excess water from your brush and
then smoothen it out. And one more final touch
for the ground texture. So I'm going to add some
wet-on-wet technique, so I'm wetting my ground. And then taking that
dark blue we mixed your ear and then giving some
soft mixture, snow texture. We can use dry brush
technique too, but I'm using
wet-on-wet technique. And also, I'm going to use this white paint to splatter those snow
falling texture for a snowman to bring
the entire scene to life and also a lighter both white and lighter
version of Russian blue. Both I'm going to splatter. First, I'm loading my size
number zero brush with white. And then make sure you tap the excess paint from
your brush though that it doesn't bleed too much, and then you can tap
it with your hand. And you can use
your size fi brush. I used earlier too. But first, I'm going
to use this brush, and I'll show you
the other one too. So just flattering some paint, and I'm going to use
my size fib brush now to splatter because it's no falling texture
for the scene, see? Or you can use another brush to tap your paint from your brush. Both either way works. Like this, I mean, so I'm using this brush to tap my bigger
brush to tap like this. So either way it works,
whichever is compatib for you. And also, I'm going to take the lighter blue colour
and splatter it too. Lighter version
of Prussian Blue, not a darker version
or a medium tone, a lighter version to keep
Manso snowman interesting. And one more final
touch for the snow. I want more snow to
create that falling snow. I'm adding no stitches here. And also want to add one dot for the snowman
eye to make it pop out. That's the final touch. Then we can reveal the
snowman in the next section. So I one more final
touch before we wrap up. See? That's it. Let's wait for the layer
to dry completely, and I'll see in
the final section.
9. Conclusion: And with that, our winter snowman artwork
is complete, everyone. Congratulations. I
hope you enjoyed this. Calming and bigness
friendly class and learn how much you can create
with just your colors. As you can see, I watch the colors over here
for your friends. And please don't
forget to upload your projects in the projects and resource section
of the class. I would be so happy to see your beautiful snowman and we can all enjoy
your creativity. And if you enjoy this class, I would request you
to review a review. It would help more students and artists find this class
here on Skillshare. And thank you so much for
painting along with me. Stay cozy, keep creating, and I'll see you in my
next class. Take care.
 Sowmya Karthik, Artist and Educator