Transcripts
1. Introduction: If you're interested in seeing your products that
you make in stores, then creating a
wholesale catalog is a great first step
to make that happen. It's a great document that you can attach to E mails
that you send to stores when you make inquiries or you can print it off
and hand deliver it, if that's something you prefer. Catalog isn't just a place to advertise the items
that you're selling, It's also a place you
can put information about your brand and
your business and all of the terms and information
about ordering from you that would be important
to a wholesale client. This can really
help to streamline the whole wholesale
process and it also sets a professional tone for your new wholesale
client connections. In this class, we are
going to be learning the basics of what
you should include in your wholesale catalog. And then we will design
one together using Canva, which is a free and easy
design tool that you can use. This class is ideal for small
business owners who have a kind of DIY attitude and want to do these
things themselves. It's also great for designers
who may want to offer this product as a service
to small business owners. Or if you want to
create templates for catalogs that you
sell as digital products. My name is Rebecca. I will be your instructor
for this class. I am an artist and
a graphic designer. I have products that I've made in stores and I'm
actually going to be showing you one of
my old catalogs as an example in this class today. So if you're feeling
ready to get started, then let's head on to the
first lesson together.
2. Why make a catalogue?: If you're not already
sold on the idea, then the first thing you
might be wondering is, why do I actually need a catalog for my wholesale practice? So let's just go over
a couple of reasons why a catalog is actually
a really good idea. So number one is it's
really easy to convey what items are actually available for wholesale
from your business. In some cases, and actually
in my case as well, not everything in
my online store is something I'm
willing to wholesale. That could be for a
variety of reasons. It could be how
difficult it is to manufacture the item or
the cost of manufacturing, price it out of the
window of wholesaling. It could also be that
you have certain one of a kind items and you don't
want to wholesale those. And I will say that even
when you do the catalogs, sometimes you will have
stores that just look at your online store and ask for things that you don't offer. So you can just clarify that only the stuff in the
catalog is what's available. Second reason the catalog is a great idea is
because you can be very clear about your pricing
as well as quantity limits. So typically you're
going to be listing what this item retails at and
then what you wholesale at, as well as saying
whether there's a minimum or maximum purchase. So for example, with
greeting cards, which is a thing I sell
you sell them in packs of six rather than
one card at a time. So that's just an
industry convention that I would want to make
clear in my catalog. And don't worry, we're going
to go over all of this in more detail when we're actually doing the design and prep work. Another reason that a catalog
is a great idea is because the aesthetic and
design quality of that catalog can convey
a lot about your brand. And it's very helpful
at a glance for a store to decide if your brand and what you offer is a good fit aesthetically for what they
are selling in their store. This is something that
you should be looking into earlier on before you
send out your catalog. But it's also just
helpful for the store. So for example, if your brand is really cute and
pink and adorable, and you send it to a
store that sells like really black and white
minimalist aesthetic things, then they would be
able to clock pretty quickly that actually this isn't a good fit for our store, so it's just a helpful tool in terms of making
that decision. The catalog is also
great because it helps to centralize
the terms of purchase. We're going to go over
those in a lot more detail, but there's a lot of information that needs to be exchanged and figured out when
you're setting up a new case or account
with a client, having that all in one
place is really helpful. So they're not searching your
website for information or emailing back and forth all
the time to ask questions. And finally, creating a catalog is really great
because it is very easy to host on your website or e mail or deliver somewhere. I don't personally
put my catalogs on my website, but I
know some people do. They'll put it in like a link in the photo of the site as sort of a wholesale page or maybe even behind a log in or something
along those lines. So there's a lot of options, but it's very
versatile to have it designed as a PDF in any case. So with that being said,
we're going to hop over into a screen share and I'm going to show you one of my catalogs. This is from a previous season. Just to give you a sense of sort of what has worked for me, this is a catalog I've used
and gotten orders from. And also to sort
of outline the way that we're going to be designing
the one for this class.
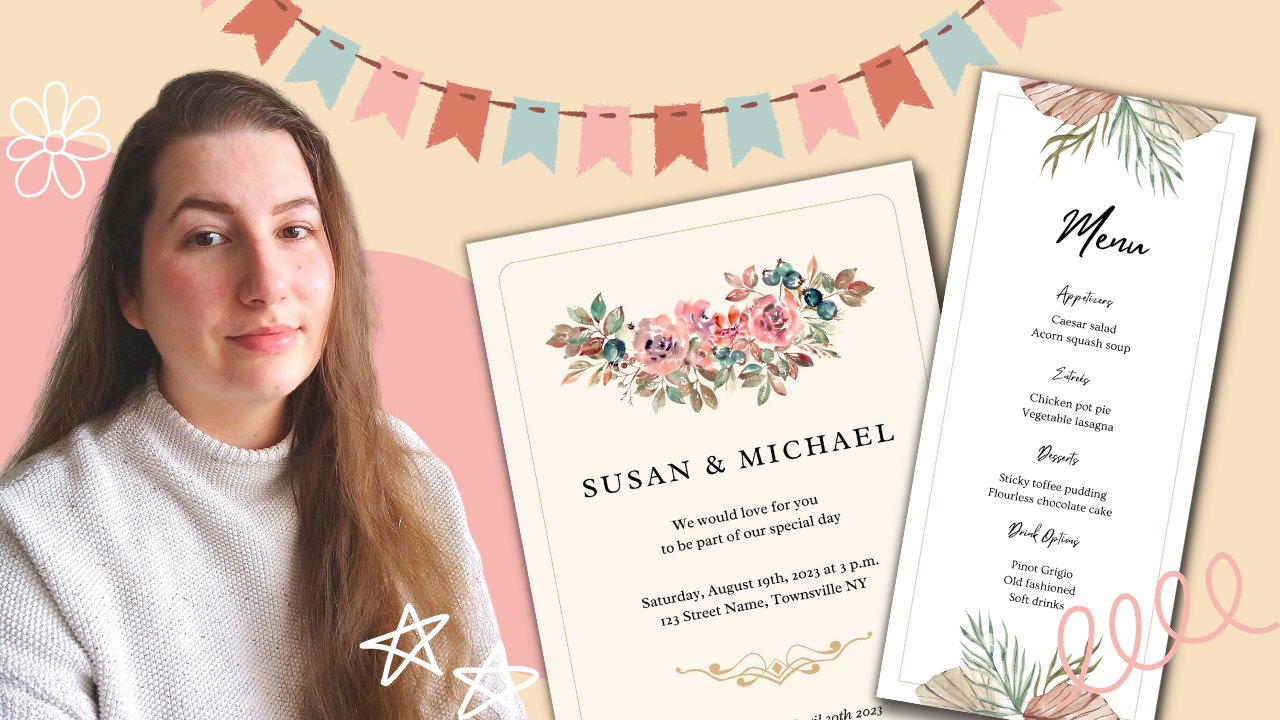
3. Example catalogue: What you're looking at here
on the screen is one of my older catalogs from my
greeting card business. So it is from October 2023. And we're just going
to flip through a couple different pages
and I'll just give you an idea of what works
and what has worked for me. And we're going to be using
this basic formula that you're going to see in this catalog for
this class as well, but with some filler content. First of all, we have,
this is my title page. So if I was going to
be printing this out, this would be the
cover as it is. It's just the first
page in the PDF. In the background is
one of my art pieces. It was one that was just
popular at the time and it really fit with the vibe of my brand. So
that's why I picked it. And then I just have my logo
and the basic information. And then I also included
updated October 2023 so that anyone referencing it would know what time period this
catalog was for. Generally, I will do like
two to three catalogs a year because I'm not designing
too many cards right now. But you could do,
I would say even up to four a year, if you
were doing quarterly. It's really up to
you. Of course, you can have just
one catalog roll with that too. That's
not a problem. I'll also not just some of
the design aspects here, I'm just using a
lot of boxes and my logo is wide, so
I've put it there. And I'm also using brand colors. So I have a color
guide for my brand, and that's what I've
pulled from here, and I've tried to
pull ones that match both my logo and the tones of
the illustration in behind. Moving to the next section,
this is two pages, it's just showing like two
at a time in this view. On the left, we
have my about page. We have two illustrations
at the top. These aren't actually cards, they're just different pieces. I had done digital
illustrations that again, are very popular at the time. I've included a tag line and then a one paragraph
description of my business. This is useful because people will not just read this in
reference to the catalog, but also if the store you're whole sailing to has
an online store, they will often prefer
to put in information about the brands
that they carry. So I've seen
different stores use this block of text in their copy as well, and
that's totally fine. That's something I'm
happy for them to do, since this is a PDF.
This is interactive. There are three links here. Take them to my Instagram, my website, and also
my Youtube channel. This isn't totally necessary, but just because I have them,
I wanted to include them. Also, at the bottom of the page, you'll see it says Lucky
Spurt Studio and page one. So I do have that at the bottom of all the pages except
for the title page, just to make sure that they're clear on what page they're on. But also if for some
reason this got printed out and the
pages got scattered, it says not only
which page it is but whose designs these are because it doesn't always say that in other
parts of the page. On the right hand side is
the first product page, because I do greeting cards, I have them just
separated by type, and I do have other
cards available. Now, this is just a
smaller collection compared to what
I have currently. I am using headers to divide
up the types of products. I'm also just using one font throughout this whole catalog. I'm just mixing it
up with all caps, with italics, with bold,
with different sizes. It just stays more visually cohesive by just using one font. And we'll talk more about
that a little bit later. In terms of each product itself, I just have them in a white box to contrast with the background. I wouldn't recommend doing
a colored background if you were intending
to print this out. I would do white
with maybe a box with just an outline
just to save on ink. But this is not intended to
be printed in most cases. Stores don't want
physical catalogs, they would just like
an e mail version. All of my cards have the photo
of the front of the card, then the name of it, just
sort of a casual title. And then it has the skew number that
I've created below it. Then I have the wholesale price. And the MSRP which
is manufactured, suggested retail price, so that I suggest they
sell them at six. I wholesale them for three each. These are just more of my cards. This is the holiday side
appreciation cards, so you can fit as many products
you want as on each page. But I try not to squish
them too much just because there's a lot of
detail under each one. And we have another
page of cards, and this one on the right is
the last page in my catalog. I've just covered up some
personal information at the bottom just with like
my phone number and stuff. I have three boxes here
with the key information. Now, my whole business
is pretty simple, so you may have something that's more complex and
that's totally fine. But basically the
three sections I have are ordering
and payment process, shipping and delivery options, and then processing time for ordering and
payment process. I say just tell me via E mail
which you'd like to order. I'll issue an invoice that's payable online via credit card or you can send an E transfer, which is in Canada that's
just sending a bank transfer. That's very easy to do here. Then payments are due within
15 days of product delivery. Sometimes stores, especially bigger ones or more
established ones will have their own ordering system
and payment system. This is generally, it's
good to set your own terms. We'll talk more about this a little bit later
when I discuss in another lesson about creating your own terms and the questions you
need to ask yourself. But this is just
what I have on mind currently shipping and delivery. I say that we are able
to deliver within 25 kilometers of
our headquarters in Bedford, Nova Scotia. That's just because I'm driving around a
lot all the time. I'm happy to drop anything
off in the nearby area. For all others we
ship in Canada Post and I'll calculate
shipping at ordering time. Finally it has processing time. I say please allow one to
two weeks for processing. That's usually good
enough for me. But you can take longer
or you can do it shorter. But definitely overestimate. That's it for my catalog.
Those are the pages. It has worked really
well. It's pretty clear, it's not too busy
and not too long. I can very easily use this
template in Canva that I've created over time and
just swap in new photos. I can easily create new products in it and
it works really well. That's the example that I have used that has
worked for me. And like I said, we're
going to use this piece as our model for the design work that we're going to
do together in Canva. But before we get into that, there are some things that we
should discuss about making your decisions about
policy and the information you want to put
inside your catalog. So let's go and talk
about that next.
4. Questions to develop policies: Now before we get into
the design process, there are some things that
you're going to want to consider and some
decisions you're going to want to make
that we can talk about in this lesson to help
you be better prepared. You may have figured out a
lot of this already or if you've done some wholesale before and already
made your decisions. But if not, I just
want to talk about some of the questions that
you should be thinking about. Question one, are your
items priced for wholesale? So generally, most
stores are buying items at 50% of retail costs. So if your item sells
to a customer for $20 the stores are going to want to buy it for $10 from you. If you are hand making items, this becomes very difficult. Like I said, there are items in my online store that I make by hand that simply that those
numbers don't work for me, I'm only willing to sell them
at that $20 retail price. So therefore, I don't
wholesale them. So you want to make sure
that you have looked at the numbers behind
the manufacturing of your items to ensure
that you're making a profit with the retail
price expectations. Your catalog is
probably also going to use the acronym MSRP, which stands for manufactured
suggested retail price. So this is the price that
you are telling the store, you should probably
sell this thing for $20 or whatever price. But they can set it for
whatever they want. They don't have
to abide by that. But generally, they're
going to be setting it at what you suggest. The second question is, are
you going to be setting minimums or maximums
In lots of cases, Small businesses will set a minimum dollar amount for the first purchase that a wholesale client
makes for them. So that could be $100
$150 it could be more. It depends on what
type of item you're selling and what the
prices are for them. Generally, this is
set in place just to make sure that this whole
process is worthwhile for you because
there's no guarantee that a store will
place a second order. And because of that, you don't want their first order to be $125 pack of something. That is way more effort for you to prepare than it is
for you to get paid for. That would only be
worthwhile if there was a guarantee of future orders,
but you don't get that. So therefore, you want
your first order to be a little bit more substantial just to show the commitment
and to make sure that you are getting
paid for your time. Especially the
time that it takes to source these new clients. Like that's typically time that we don't get compensated for. So you want to make sure your first order from
them is worth it. And it's not like you're
up charging them anything. It's just saying that
there's a minimum amount that they have to
order the first time. You can also put minimums
on certain items, especially if they
are low cost items. Like I said before,
with greeting cards, they are typically
sold in packs of six. So nobody's going to order one single greeting
card from either going to order multiples of six. There could be
industry standards for the kind of thing that
you sell in this case. And there may also be
cases where you want to set maximums as well, especially if you
were doing one of a kind art or something
that you can't produce. A lot of this is very much up to you and depends
on what you're selling. The next question is about your processing and shipping
times and expectations. So a couple of questions
on this front. How long after placing
an order should your customer or the store
expect to receive it? So your processing times. What kind of shipment
method do you use? Do you offer delivery
if it's local? Is there a specific shipping
carrier you always use? You want to indicate
that in the catalog as well and you'll want to indicate something about who
pays for the shipping. So is the shipping a flat rate that you just charge
for all your orders? Is it calculated at
the time of orders? So after they tell
you what they want, then you will send them
back an invoice with the shipping calculated based on the weight of
what they ordered. Or do you give free shipping? You don't have to give free
shipping, but some people do. It's just an
incentive. It really depends on the scale
of your business. And other times you'll see like free shipping for orders
over $500 or something, just an incentive for
those bigger orders. You'll also want to think
about if you are including refunds or returns and some
sort of policy about that. This could be the same policy that you have on
your online store. So this isn't in
every single catalog, so you could leave
it off there or just say referred to
website for policies, it can be catalog dependent
and also product dependence. So if you're selling
a food product, if you're supplying a baked good or chocolate
or something, you probably want to have
a no returns policy. But other products,
some retailers very much rely on
the return policy. So an example of industry
for that would be books. So if you are, if you're an author or self
published author or run a small printing press, a lot of bookstores like
there to be a return policy. Because they say, well, I'm
going to order ten books. If only two of them sell, I want to be able to
return the other eight. That expectation of returns in the wholesale world
is very unique to books. In my experience. You don't have to be able to
accept returns. You certainly can
say no. But you may be want to outline that. This is why I think
it is a good thing to include based on your industry. You also want to think about
how you want people to place your orders and you should include this in your catalog. So back in the day, it would include an order form
that would be sent in. But I find that most
stores don't really have the time or interest
in doing a paper form. So the three suggestions
that I have is, number one, just say, send me an e mail with what you want off the list. And that is an easy solution. You can include a link
to something like a Google form or some sort of online ordering form
that you've set up. And in other cases,
some stores will have an internal ordering
system like on their computers. And they will put you in there, so you will get an
automated e mail from them with the items that they
regularly order listed in it. So you can just sort
of indicate if you would prefer by e mail
or whatever you like. Another thing to think
about is if you are going to give your inventory
skew numbers. So this is just rather than having like happy
birthday greeting card, it could be like card 123, whatever kind of skew
system you want to make up. This is a good thing to do to label your products
by skew if you have a large collection because it just keeps there from
being a lot of confusion, especially if you have
variations of products. So like I said with
my greeting cards, I have tons of them. And if I was skimming a list
and I saw birthday card, birthday card and they
were different ones, I could get confused. Just using a number
system avoids people from making mistakes in like the cute names that
you give products. There isn't really a fixed way that you have to create a skew. Typically it's got numbers
and letters in it, but make a system
that works for you. For me, my skews are all a four letter representation
of what the item is. Car D for card, or P, R, I, N for print if
it's an art print, and then A and then a sequence of numbers to indicate
which one it is. That's just a very
simple system. You can make one
up for yourself, but I like to put
that in the catalog. So like we'll look at this
in the design section, but like picture the cute
name of the product, the skew number
that I've made up, and then the wholesale
cost and then the recommended cost
is how structure it. We'll look more at that later, but do consider if you want
to add skew numbers in. Finally, the last thing
that you should think about ahead of time is what
is your business story? How do you represent yourself? Because I think it is a
very important part of a catalog to include
some photos. It doesn't have to be of you, if you're not
comfortable with that, but of your business or of your work that's
representative of your brand. Maybe it's going to include
your logo and your colors. And then it would
be nice to have one to two paragraphs
explaining who your company is, what you do, why you do it, and sort of what your vision is. That piece of text
is going to be really helpful to help the
stores connect with you. A lot of the stores
that we connect with as small businesses are
also small businesses. So in that case, making
that human connection as to like it's not just
I sell greeting cards, but here's my whole vision and here's why I do it
and what inspires me. And it makes it kind of
a more rich connection. But this is also nice if you're trying to connect
with a larger store too. Because there is a human being who's going to be looking at it and they want to feel
connected to something. And that was a bigger
incentive to work with you. So those are my suggestions
of things that you work on. Before you dive into
the design process, you may want to take this
list that we created. Sit down with a paper and
pencil or on your computer, make some notes and come up
with your policies as well. And once you've got all
that information collected, then we can move on to
doing some design work. So in the next lesson,
we're going to look at the materials that you are going to need before we get started, and these are like
digital materials, so let's take a look at those.
5. Materials for project: The materials that we are
looking for for this class are the things that
you're going to need to actually do your design work. So we're going to
go over a list of them first and you
can track them down, put them in a folder
on your desktop or upload them to Canva if you
already know how to do that. And we will get started
on designing afterwards. So the first thing
you're going to need are product photos. It's really up to you how you want to style your
product photos. That's kind of a whole
other conversation, really. If you have an online store, you may already have
all these photos, so just pull them together in a folder if that's
convenient for you. You can do photos on
a white background. You can do them with
a styled background, something on a color
or with a setting. Or you can even do
them with a background clipped out like a
transparent PNG. It's really up to you how
you want to style this, so feel free to do it,
whatever makes sense to you. If you are looking for more
of a background removed look, there are pieces
of software that can do that and you can
actually do that, right? In Canva, they have a
background removed feature, but that is a Pro feature, so we can't do it
on a free account. You don't have to
have a Pro account to do anything else
in this project. We're just focusing
on free tools. But I have a Camper Pro account and I really use it all
the time for my business. So I would suggest that if you are looking for a
background removal tool, it's just one of many reasons that I think Camper
Pro is great, but they're not paying
me to say that. I just think it's really good. The second thing that
you're going to need for materials are brand photos. So these are photographs that aren't just pictures
of your products, but they could be
your products in use. It could be you at work, it could be your team. It could be aesthetic photos
that just fit your vision. We're going to be using
these for our about page, the page that describes
about your business. We could also use it
for the title page, the front cover of your catalog. And you can also use these for sort of decorative
elements throughout the catalog if you want to add some interesting
things to look at. So these don't have to be about your product,
but they can be. If you have like art prints, you could do mock ups, pictures of, you know, the mugs you sell, being used or full of
coffee, whatever. That's really up to you because I don't know what
your product is. But yes, brand photos are great to
have as many as you want. But I would say at
minimum front cover and maybe like two extras. I would say three at minimum. But more definitely, it
gives you more to work with. Next, you want to have
your brand kit ready. So what I mean by brand
kit is your logo, your colors and your
fonts primarily. So these are just pieces of information that
are going to be helpful because you want your catalog to look like your brand. So have your logo with transparent or whatever you want your file to be saved as. And then also pick your colors and ideally
know the hex code. If Brand kit is a
new concept to you, I actually have another
class on how to design a brand kit in Canva that you
can use for your business. So you may want to check that
out if the aesthetics of this part are a little
bit challenging or if you don't have this
prepared ahead of time. The other thing is
the fonts you want to know what kind
of fonts you use in your logo or your brand,
merchandising and packaging. If you want to go really
simple with all of this, I would say just pick one font that you use through
the whole catalog. Pick one color in addition to black and white,
and use your logo. If your logo has a color, use the color from your logo. But you can do a black and
white with one accent color. Very simple catalog.
Totally fine. If you don't have
any of this yet and you are in the position of, I'm just getting started
and I want to be ambitious, or I'm designing this
for someone else and I need placeholders or
I'm making a template. You don't have to
use real assets, you can just use things from the element library to
act as placeholders. In that you can find photographs of mugs or vases or something and pretend
that's your product. And you can mock
up a fake logo or something just if you are trying to develop a scale for this, but you're not ready to put a brand realistically into it. And that's what I'll be
doing in this classes. I'm just going to use
canvas library elements to mock up a catalog for
our teaching purposes. So once you've got all
of those materials ready and you've
already thought through all the questions from the last lesson
about your policies and things you
want to include in the text of the catalog. Then we're finally
ready to get designing. So I'm going to hop
over to my computer, I'm going to screen
share with you. And we're going to walk through this process step by step
to design your catalog.
6. Setting up in Canva: In this lesson, we're just
going to start setting up our document so it's
ready to go in Canva. If you haven't
used Canva before, this is not going to be a
super complicated project. But you might find that I go a little bit
fast if you're not familiar with some of the shortcut sort
of terms I'm using. So a little bit of familiarity
with Canva would be great. But I'm not to say that you can't just pick it
up along the way. And I'm doing all of this
with a free Canva account, You don't need to have
a paid one at all. Now I have Canva open here, so it's just Canva.com You can also use the
app if you prefer. But I find that desktop is
the easiest one to design in, so that is what I'm going
to recommend and be using. We're going to be
designing something that is basically like
a sheet of paper. We need something
that is that size. I'm going to go up to create a design in the
top right corner, and I'm going to choose
custom size right here. Now we can type in the
size that we want. I'm going to move to inches just so that it's
easy to understand. Then for width, we're going
to do 8.5 And height 11. 11 by 8.5 is just the size
of a sheet of printer paper. We'll create new design. And this is what
we're going to be working in as our canvas. Now in this lesson, I'm just
preparing the document. We're going to start doing
the individual pages after, But I'm just going to show you a couple of things
that I like to do. First of all, I know what
I'm going to be creating. I'm going to actually go to the grid view and I'm going to name and create a blank page for each of the
pages of my catalog. This is just going
to make it a little bit easier for us to remember to do all the pages and also just clarity as
I'm doing a tutorial. The first page is going to be our cover and I'll
name it cover. Then I will add a new page. And the second one is going
to be our About page, that's the information
about your brand. The third page is going
to be a product page. The fourth page will
be our terms page. Now these are all the basics that you need and this
is going to give you the design skills to expand your catalog into other things
as you want to add them. You could add
something like after the about page, a
table of contents. This could be useful if you are selling a wide variety of items. The more items you are selling, obviously, the more complex
your catalog will be. So you will need
additional product pages, maybe even more title pages to divide them up if
it's a really big catalog. But we're just doing something
really simple for now. So feel free to modify this
to suit whatever you need. And of course, I'm imagining most people will want more
than one product page. But we'll just design
one and you can duplicate it or make
additional ones as needed. And I will say there
certainly are cases where you can have a single
product catalog. For example, if
you are an author and you have a book
that you're selling, and it's just one book,
or a book in a companion, or a book in a coloring book to go with it,
something like that. You could still absolutely
do just a single page. Once we're set up, let's get ready to design our cover page.
7. Design: Cover page: So as I mentioned, if you
don't have assets ready for your business
or you don't have your photos yet, that's okay. I'm just going to pull
some examples out of the elements library in Canva and we'll just pretend
that this is a little brand. In fact, let's pretend that
this is a pottery brand. And we're selling handmade
pottery because I have a feeling there's
going to be a lot of stock photos of vases
that I can use. So you can absolutely go outside the mold of
what I'm going to do to make your cover more interesting and more aligned with
kind of what you're picturing. There
are no rules here. I would just say that, don't worry about making
it too creative. This is just a
cover. It's going to get looked at very briefly. And I would just focus on
either photos of your art or a single photo of a product
or something like that. As the feature here,
I'm going to look for a vase and we're going
to go under photos. Now if you haven't
used Canva before, you may notice that some
of these little icons have a crown on
them that say Pro. And that means that these
graphics can only be used if you are a Pro member, have a paid account, basically because I'm making an example, one that's not
super relevant and typically you'd just
be using your photos. But if you want to add any other little
decorative elements to your catalog and
you want to pull from the Canva library,
just keep that in mind. You can filter those
out just by going to these little sliders right here at the end of
the search bar. And click on Free only. And then that will take
out anything that is paid. I'm just going to find a
photo here that we can use to pretend is our hero
photo for our brand. I think I'm going to go
with this one because I like these two little phases. It's an interesting picture
in terms of design. As you saw in my
example catalog, I just do big picture and then
a box with the text in it. It's really simple design,
nothing too complicated, but it is a good way to get
the information across. I'm just going to fill this
whole thing with the picture. It's a little bit
of a long picture. I'll have to slide this up,
we'll just put it there. I'm going to hit R on my
keyboard for rectangle. I'm using shortcuts on my keyboard because it's
just a faster rate to work. But if you want to find any of the elements or the
shapes I'm using, you can just go to
the Elements tab. And the second one
down should be shapes. This will have all the
shapes that I'm referencing. You can just use keyboard
shortcuts like R for rectangle for
circle, and L for line. If you want to be
a little faster, I'm going to use a rectangle, I'm going to probably
make it white. I think that we're doing a
neutral branding look here. We'll make the box,
maybe that big. I'm just positioning it so that the main items in the
photo aren't cut off. But a little bit of
overlap is okay. This page is meant to be more
aesthetic than functional. Now, I don't have a
logo for this company, but I'm going to
just make a little fake one to pretend I do. I'll, I'll take this
little leafy picture, make it smaller, and just going
to add a circle under it. I'll make the circle white. If you have a circular logo, you can do something
like this where I'm putting the white circle over top of the white rectangle
to make this bump out that. Then I can put this logo on. I'm going to change it to
black so I can see it. And move it to the
front. There we go. I'll just position
that on the circle. We'll pretend that's our logo. We'll just leave it as it is. Now, we're just going
to add some text that says Wholesale Catalog. I'm imagining that the name of the brand would
be in the circle. So we can leave it
off, but you could fit it in the box somewhere. I'll also put the date or the time frame
for this catalog. I'll hit for text
on the keyboard. Then I'm going to select a font that in your case would
be your brand font. I like this a day
without sun text. I find it interesting looking, Maybe we'll use this, we'll
make it a lot bigger. Let's say Wholesale Catalog, which I recognize, I'm spelling, I believe the Canadian way
with the U E at the end. We'll pop it right
there in the center. Now like I recommended before, I think that it is great to have just one font
that you stick with through your whole
catalog because I think it makes it
really cohesive. It's just a simple design trick that lets everything look good
without overcomplicating. I just like to experiment
with font styles and choices. In this case, I can go all
caps and increase the letter spacing Just adds a variety that makes this plain font look a little bit more
like a display font, which means like a title font or something along those lines. You can also add
another text box. We will use the same font
and I'll put it below. We will say updated March 2024, just as an example. Make that a little bit
bigger but not too big. And put it right below. This is basically it
for our example cover. I would just say grab a photo, put it as the whole background. Add a box over top, position it around the
images in the photo. Add your logo or whatever
other branding you want and then your wholesale
catalog and a date, like I said, get as creative
as you want with this page. It doesn't have to be
complicated whatsoever. Follow this example
if you prefer, but you have some fun with it. This is your catalog and it's meant to reflect your brand. You know that much
better than I do. By all means, let yourself do something that
suits your brand. Now next we'll head into the about page. So I
will see you there.
8. Design: About page: Now we finished doing
our cover page. We are going to work
on our about page. As I've mentioned before,
the about page is an opportunity for you
to give the viewer, the reader, the store, an idea of the flavor
of your brand. So we're just going to be
including some images, or even just one
single image that is representative of who
you are and what you do. And also including the paragraph or two that is about
your business. And like I said, they may be using this
text for something. So make sure that it is
copywritten well and edited and that is something you're comfortable
sharing with the world. Now I'm going to be
designing this catalog with a white background just to
keep things really simple. But you saw mine. I use a yellow background because it's part
of my brand colors. But we're doing a neutrals and browns color for our fake brand. We're going to
continue that here. I like to think about
the page as being divided in half for
this section where the top half is going
to be image and the bottom half text or
flipped if you prefer. Then at the very bottom, we will do our navigational text. We can start with
that first because it's really easy to figure out. First, we're going to
do our brand name, Beautiful pottery ink,
something like that. I'm just going to add a little
dot and then do page one. And I will make that
in our brand font. Just make the box a
little bit bigger. This font is actually a size 12, which is a very large
readable size on paper. So I'm going to keep
it at that size even though it looks small
when we're designing, when I like to move the
page numbers and such, when you move things around, Canva will show
you this pink box that shows the safe
area for text. I like to put the page
numbers right below it, snug right in the middle. There you go. We can actually
let's just be efficient. I'm going to copy and paste this onto the other pages too. I just copied it on my keyboard. This is the product
page. I'll paste it. It goes to the same place as long as you're clicked
onto the page. And I'll do the same
for the terms page. Now in terms of images, the way that I have
mind styled is that I have two
pictures side by side. The reason that I did this
is because I'm typically doing my illustrations
in portrait style. So they're same
orientation as this paper. It's longer at the sides. It is not very easy to
crop my art to fill a large landscape,
rectangular space. I found it easier
to do two pictures side by side to fill that space. It's also the way
that, you know, we take photos on our phones are typically in this
portrait orientation. So you may find that
you actually have a lot more photos
or anything for your products or even
squares that you want to put two of rather
than just one big picture. That's certainly an option.
I'm just going to look for something that would be
more of like a brand photo. In this case, it doesn't
always have to be a photo of a product
because I'm doing a vase. One, I'm going to
try and look for a photo of someone
making pottery. Here we have lots of
photos of people making pottery that would
work perfectly well. I'm just going to look
for something that's in the color range of our
branding, which typically, if you're making this photo that is authentic to your brand, it should already be in the same style flavor of your
brand's aesthetic. All right, I like
this photo here. We could pretend
that this is me. She's making a vase that
looks like a person, maybe. Anyways, in terms
of positioning it, certainly one option
would be just to put it like that and have
box of text below. I think that looks quite
clean and professional. You can also do edge to edge, which is easier if
you are going to be delivering this
digitally printing. Some printers don't like
edge to edge printing, so you might get a white
space around it anyways. But again, I'm doing this
with the digital in mind, we'll do this full
size picture next. We're just going
to add a tag line and then our about text. So I'm just going to
make those up really quick and then I'll
show you what I did. All right, so here is the fake text that I
made up, design wise, what I've done is I
have a title here that is just in our regular font that we're using
for this project. And I've just done
it in all caps. I've also made it a
little bit bigger. It's a size 28.2 Just to the contrast with the other
aspects on the page below it. I have our literally just
made this up on the fly. It's not very insightful, but what I've done
stylistically, it is Cs centered in the page. You could do left justified
alignment two if you prefer. I've also made the text
a little bit bigger, so it's size 14 because I want it to be a little
bit more legible. And the font that I've chosen here is a bit of a petite one, so it's a little bit shorter. I've also increased
the line spacing. That's the feature right here
in spacing on the toolbar. I've cranked this up to two, so it's basically double spaced. I think that for busy
small text it's a little bit easier to read when they're not
cramped together. And it also fills
out the space better without having to
write a huge novel. This is our about page. You can emulate this
exactly with one big photo. By all means, you
can also be creative and add in other elements if
you think they are relevant. But I wouldn't say
that you need to put a huge amount of text here. That is kind of a pitfall that
I do see sometimes is that people will put sort of their whole life story
on here, which is nice. But again, remember that the purpose of it
generally is that the store may be
using this text to put on a little card next to your work or on their website, or on a social media
post to introduce you as a new supplier that
they are carrying. So we don't need to put too much there and overwhelm them. Now on my page, I do have social
media links below, so I'll show you how to do that, but this is very optional. This is not something
that you must have. I'm just going to move these up. A titch. I'm going to add, I'll just do one
just as an example. Let's look for Instagram. I'm going to go to Graphics and it gives us some logos here. I'm just going to grab something that's pretty much
the Instagram logo. It's close enough
to make it small. Just put it right here,
maybe a little smaller. I'm just centering it below. We can change the
color of this as well. I'm just going to pick black, just so it goes
with our branding. Now to make this
a clickable link, you can click on this and then
we're going to go to this. Three dots that show
up beside it for more link is one of the options. You can also use command
K if you're on a Mac. What this allows you to do
the link feature in Canvas. Cool. It can let you link to another Canva document
you've designed, which is this recent tab here. It can let you link to
other pages in the PDF. So it helps you navigate
it once you've exported it or you can link to a
completely external source. I'm just going to type
in HDP, Instagram, Loop, Ram.com I would put
my proper link, if I had one, it will
display as a link. That's good. And we'll
just hit Done. That's it. Now, when we click
on this element, we'll see that it is
linked to Instagram, clickable again, if you were to print this out.
Obviously it doesn't work. If you were thinking
to print it, you could just write beside it, maybe the URL and the icon will indicate
that it is for Instagram. But as long as you are using this online, it
will be clickable. Once you export it. We
will talk, like I said, about exporting and
the last lesson, now that our About page is done, we're going to move on
to doing a product page. I will see you in the
next lesson for that.
9. Design: Product page: In this lesson, we are going to design a product page with some example products
to show you how you can set up and style this
type of content. In most catalogs,
we're basically just going to be having product
with a picture below it. You can also add text
around it for context. If you need a description or any other information
that is relevant. In most cases you're going to just have product name price. So not super complicated, but feel free to customize this, as I've always said to
whatever it is you're selling, the first thing I'm
going to do is just find some example items to use
as our fake products. Now because I'm doing a
fake pottery company, I'm going to use
some of these vases because they have the background removed and they're really easy to make uniform for a catalog. They are pro elements. So I apologize if you're trying to do this exactly the same but you
don't need to by any means. Hopefully, that's not a
problem for any of you. Now, I think I'm
just going to do four products on this page. For our example,
let's just grab four. We're looking vases, okay? The first thing
we're going to do is get our items scaled. Now, in terms of product photos, you don't have to have them
with backgrounds removed. Lots of brands will do
like an actual photograph, but some will do it background. That's just a stylistic choice for your catalog
you get to make. Now, I've resized these all to be the same height relatively, so that our catalog
looks consistent. Now if you're doing a
colored background, you may want to put white
boxes around these to indicate what they are
or where the bounds are. Just to organize the information
a little bit better, visually, I'm going
to do four quadrants. I think we're just going to use text rather
than adding boxes. These are our four
fake products. I'm going to add
my first text box. Let's zoom in a
little bit just to get a closer look
at we're doing. Let's start up here.
I'm just going to center this with
the image above it. We're going to call
this black lack, let's call it black vase. I'm going to highlight
it and make it all caps. And let's make it
two sizes bigger. And we'll bold it just for the sake of visual
differentiation. Now below that, I'm going
to just duplicate this. Add another text box. You may have skew numbers for something like
a one of a kind vase. A skew number might
not be as relevant, but we're just going
to put one in here. And I will turn off the bold. We'll call it one, and then a couple
of random numbers. Perfect. Now we can put
the wholesale price, and we'll say that it
wholesales for $100 then MSRP, let's say $200 Just
for this section, I'm going to turn off the caps, that's basically
our information. Now I'm just going
to select this and put it in a group just to keep it all together. We'll out. I want to make sure this looks lined up with the black phase. I'm just going to duplicate the group and put the same
thing under the other ones. And then I'll just go in and
customize the information. Catalogs can be very overwhelming
if you feel like you have to design everything custom for every single item in it. I would say that the best
thing is to come up with a little formula with
how you design things. Use the tools like you see the pink dash lines showing up. This is canvas guides. Just use those to make sure everything is lined up properly, then you can go through and
customize that information. I won't bother because
this is just an example. This is just the very
basics of our product page. Now, you can certainly jazz
it up with more detail. I like the idea of having
some stripe along the top, so I'm just going
to add a rectangle. I'm just going to fit
it up in the top of the document just for like a little bit
of visual interest. Because it can be boring just
to have a plain white page, but it is more printer friendly. You choose what's more
important to you, if I want this to be a color that unites with
one of these colors, in this photo, I can go
in and select that color. The way to do that is I have
picked on this box here, I'm going to go to this color. Right here is the
background of the box. Go to add a new color, and then this little
dropper tool, and it's going to see
that on my screen, it is picking up whatever
color is below it. So I'm just going to scroll. Oh, it doesn't let you scroll
while you're selecting. Okay. I'm just going
to deselect then. I will still have that up, but I'm just going to scroll up so we can see the pictures. Now I will click on it and let's pick like this medium
brownish color. Now that top color
is like a top. This will just
visually help tie in the page with the
rest of the design. I'm just going to
go to Grid View. You can see that. I'll just click on Terms to get
that purple box away. In terms of like
visual continuity, you do want there to be something between
all the pages so that it looks like you have
a clear brand identity. As I mentioned, having that branding kit
with your colors, your stock photos or
your product photos and your fonts figured out is going to make
this a lot easier. I'm just winging it because
I'm making a fake brand here. But I do, and I actually do this in quite a lot
of design projects, is I will just add a
contrasting stripe to the top or the bottom
of the page, or both. And just pull in that color. And that will just help
a very simple page look like it's more intentional within a larger design project. Another option, just in
terms of selecting colors, let's say I was doing, still
working on this stripe, is when you go into color. Sometimes canvas will pull out colors from photos
you've inserted, so you can also find a
good color through here. If using that dropper tool is a little bit chaotic for you, you can see all of this is
basically my brand colors, which I would say is
a very nice palette. We've got some warm browns, we've got some blues,
greens and yellows. You could easily pull together a brand and kit
right out of this. As I said, you can also add in boxes to separate these items from each other if you
wanted to do that. I'm just going to
make one quickly. I'm tapping R on the
keyboard for the rectangle. I'm going to, first of all, for color, select no
color right here. I will go to border style
and do a solid line. I'm going to just do border
weight one because that's the thinnest you can choose a different color right here for the border
if you prefer, I'm just going to
leave it black. Then I can move this shape and just resize
it over the item. For this particular collection. I don't think that
this is necessary, but you're going to have to use your design sense
when doing this as to whether it would be better
to have your items boxed. If you have a lot
of small items, it might be easier
to do some shape to contain them or
categorize them. But yeah, that's
really up to you. I would say that this
page covers just a few of the canvas design
techniques that would be useful in creating a pretty wide variety of product pages. Feel free to experiment if you have a page and you wanted to put two products and instead of a second
product beside it, do a paragraph describing it. That can be useful if
you are doing one of a kind items or also if you know that the person
that you are or the store you're connecting with has
a big online presence. Something that is really helpful is a paragraph
there because they can put that on their listing as the description
for the product. Just as someone who has written a lot of product descriptions, it's a real gift to have
someone else do that for you because it's
a very annoying task. It could be helpful if you are trying to optimize this for an e commerce partner or someone again with a very
prominent online store, or maybe they would
request it as well. In most cases, this
is going to be like a perfectly adequate
kind of formatting. So that's it for
our product page. You probably will want to make multiples of these
or add in lots of different ones with
different orientations to keep the catalog interesting. But we're going to move
onto our terms page, which is the last page of
our mini catalog project.
10. Design: Terms page: In this lesson, we are going
to design our terms page. Just to recap really quick, we've done our cover, our bout page, and our product page. The terms page is
usually at the back, but you could also put it up in the front if you preferred. That's just a choice. But
I'd like to put it at the back just because it's the technical part
and the boring part. We save it, but
we do include it. Now I've done a pretty minimal style for this whole thing, so I'm not going to do
it terribly differently. But the way that I had it styled in my example that I showed you, was that I had three boxes for the purchasing and
order information, shipping information
and processing time. And then I had a box
at the bottom with sort of my logo and my
contact information. So I'm just going to
kind of emulate that by adding in some headers and
then the body text below it. As you've seen, I've
made these text boxes pretty simple actually. Let's see the size
I did this one, I'm just going to copy this
box to make things quicker. Get rid of that, I'm
going to paste it here. Let's add three headings, let's do ordering information. I think these are the key things that you would
definitely want to have. Then if there's other
things that are important, of course you
should add based on your business. All right. I'm going to just line these up in the center and I'll probably reposition them
again after again. I'm sorry I'm jumping around, but I think I'm
going to want to add the strike to the
top as well just to keep the visual
continuity. There we go. Now we're just going to put in, I'm just going to make some
filler content with the text. I'm probably going
to copy this box as well just to keep the
formatting to save time. And we just, I'll just make
something up real quick. Okay. So I have put in
some fake information. So we have ordering information. So I said to order, please
send an E mail with your desired items from the
catalog to e mail address. Upon receiving your
order, we will issue an invoice and begin
preparing your order. Payment is due within
15 days of delivery. Just some basic stuff you
can make this custom. Of course, shipping
and delivery, I said we ship our
products via UPS to ensure that they are
covered by insurance due to their fragile nature. The cost of shipping
will be added to your invoice based on the
delivery address you provide. Orders over $500 will
include free shipping. This is just an example of
what you can include here. If you do have a free shipping over a certain amount offer, you can put that here, but you don't have to offer
such a thing. Shipping is one of the worst parts of
running a small business. Then for processing time,
I said please allow up to three weeks of
processing time due to the handmade
nature of our items. You can put whatever reason you want and whatever time
frame works for you. Now, in order to organize these, I'm just going to
select everything and going to position. I'm just going to go down
and use the tidy up feature. And as you can see,
that's just going to rearrange everything so
the spacing is even. That's a great feature to
use in any of the pages, really if you have
a lot of stuff that you're trying to
line up perfectly, but you can use vertically
or horizontally. Sometimes it throws your graphic elements around a little bit, but it is a good tool
when it works properly. So I'm just going to move these down a little
bit so there is still some space at the bottom for my business information. I'm going to go
grab my fake logo. Well, copy that, I'll
put it down here. Then let's just put
a little bit of text below it with our
contact information. I'll zoom in just to show
you what I've done here. I just put the basic information of this fake brand and I will make that bold. There you go. So that could be the logo. We can make it a little smaller. Even make this a
little bit bigger. You can put the side by
side, whatever you prefer. I've just put the
name, the city. It could be in an e mail
and a phone number. That's just the basics of
what I could think of. You could also put
social media website or any other important
information down below. That's really it
for the terms page. Again, you could
put these pieces of information in separate
boxes if you prefer, rather than the big headings. You can do a colored
background and use some design tools to make
that higher contrast. But this is pretty
much a simple design, and that's it for
the design lessons. Here we have four pages made, which hopefully
you can see there is some visual continuity here that makes it look
like a consistent brand. It is sometimes a good
exercise to sit there and look at what you've made and think if I was a store and
I received this, would I think that
it's professional, cohesive, fits with my store. Comprehensive. I'm including everything I need
to include here. If so, then hopefully you've reached the
end of your project. I know I keep saying it, but
I will reinforce this again. Feel free to be creative
with this and you don't have to make it all
minimalist and blank like this. But if you are intimidated
by the project, this level of simplicity
is perfectly fine. You don't have to
be outstandingly creative with a catalog project. It's something that
certainly you can develop over time
to make it more unique or more
interesting or more fitting to whatever
vibe you're feeling. That time when I design something along
this from my brand, basically every time
I have an update, I will go in and swap out
all the photos so that it kind of is clear that it is
a different seasons catalog. But I'll leave all the
other elements the same and even the color stripes
and things like that. And then I will just
change up the products. Designing this once
is really helpful because you can use it over
and over again in the future. Also, I find doing it in Canva means that it's
very customizable. You can go in and
tweak things quickly. You don't have to rely on a designer to be going in
and making changes for you. Additionally, you
can access this through Canvas apps
on your phone. Sometimes on the go, you'll
realize like, oh no, I need to send this
person or I want to show this person in person my
catalog and I don't have it. But you could just log into
Canva and find it there. That's it for our
design lessons. In the next lesson,
I'm going to talk to you about how
to export this and just a couple tips on formats
and delivery methods.
11. Exporting and delivering: So we're all in designing and the next thing you're
going to want to likely do is export your work so
that you can distribute it. Now in almost all cases, you're going to
want this as a PDF. In order to do
that, we are going to go up to share right here. If you are working on an
ipad or something mobile, there will be a different kind of location for this button, but it's basically going
to have that Share icon. We're going to go
down to download. Here are our options. First of all, you can do a PNG, which is like a graphic. It's not saving
it as a document, but as it says here, the links won't work unless you use a PDF. Canva gives us two options, PDF standard and PDF print. They are pretty much
good for what they say. Standard is great if you're
going to be e mailing this. And that's generally what
I choose most of the time. Pdf print can have some
advantages for print quality, but in general, I don't find a huge difference
when I export. With these on canvas, we're
going to go with standard. Now there are some options here. Flatten PDF is an option. But what that is going to do is basically take all
those elements on each page and compress them into like a single item picture. What that will do is it will disable any links
that you've inserted. If you are using links, then you will want to
not check that off. Make sure that you've
got the pages you want selected download
and you're done. If you aren't worried
about links or in the case where your
PDF is really huge, that could happen if you
have a ton of products or a ton of elements in the design that basically
if you export it like this, you find that the file is
way too big to e mail, or it's just too big of a file. Then you can flatten
it and that may compress and reduce the
size of the document, but it will disable the links. So it's a little
bit of a trade off, depends on what is important
for you and delivering your, I keep mentioning
sending this virtually. So what I mean by
that generally is e mailing this as an
attachment to a store. But there may be cases where it's too big of a
file to e mail, but you can't or don't
want to compress it. Some other options are
you could upload it to a Google Drive or a Dropbox and get a link for
it that you can distribute. You could also put
it on your website and have it linkable there. Or you could use a catalog. Magazine service like Issue or Issue. It's
probably called issue. I haven't used it, but I
haven't uploaded to it, but I have viewed
people's catalogs on it. So that could be something to
look at if you are looking to upload your catalog to a service that
you could link to. But in general, I would
just put it on Google Docs and link it there if it
wasn't able to be e mailed. Or Google Drive, sorry, I
put it on Google Drive. Now if you are going
to print this, what I would
recommend is that you do edge to edge printing if you are doing
something like this where the pictures touch
the edge of the page. Or you have an
element like this one here that touches the edge. Now, not all home printers
can do edge to edge printing, so in this case, you may want to take it and get it
printed somewhere else. That can also just be more
economical on your ink usage. I would recommend going
somewhere like Staples copy and print center and just seeing if
they can print it. Maybe as a double sided
document as well, which could be and some of those printing places could also even offer
binding services. Maybe printed as a booklet. If you were interested in that, they would likely just want
you to send them the PDF of the document exported
as the way we discussed. Now do keep in mind that most of the stores that
you are approaching, if you are looking to
deliver a catalog in person, which is sort of
an old school way to do it, but it's not bad. But just keep in mind
that the person who does the buying decisions
is rarely going to be the one who's working at
the shop when you appear. So that means that you
are probably handing off your catalog to somebody and hoping that they pass it along. And, you know, it
doesn't always happen. Sometimes these things
get recycled or get lost. So you could go in, in person and ask for the
contact information of the person who does the buying or whoever does the ordering. And then you could e mail them. You can also find
that information usually in the footer or the about page of a
shops online store. And then you can send
them a pitch e mail that just says like
hi, like I sell this. I really like your store and
think it would be a good fit because and then I've attached my catalog or
here's a link to my catalog. If you have any
questions, let me know. I'm flexible. Let's
work together. Thanks for your time. That would be like a very
simple pitch e mail. And I would say, don't be too intimidated, because these
stores, most stores carry a huge variety of brands. And so they work with dozens, if not hundreds of
people like you, trying to send them a catalog. So it shouldn't be too
intimidating, I think. And if you have a catalog
designed like this, well that's a pretty
professional first impression if you are making this
as a template to sell. I mentioned the
introduction to this class. Some people will make
these and just sell them on Etsy like as a
digital product. If you are making that to sell, in order to sell this
as a digital product, we're going to go
to share and then we're going to go to
more at the bottom. This may also pop up here in the options, but
we'll click on more. And we're looking for
template link, not brand. Template, because that just
shares it within your brand or your own Canva account
and connected ones. We want template link,
when we click on this, it says anyone with this link can use this design
as a template. Signing is required. You won't know who makes a
copy of the design, so we would click this,
it would give you a URL. And that URL is something
that you could distribute in a PDF or something else when someone purchases
your digital product, if that's something
you're interested in. I have a lot of other classes on running a digital
product shop on Etsy, especially using
Canva templates. So I have lots of content that will explain
how to deliver that, if that is something
you're curious about and want more
information on. So that is it for exporting. In the next and final lesson, I'm just going to
talk to you about a class project and how you can use what we've learned today to create something that
you can share with us. Because I would love to see your work. So I'll
see you there.
12. Class project and wrap-up: As we finish up this class, it is time to discuss
our class project. I bet you can probably
figure out what it is. It's that I would
love to see you create a catalog, just
like we've discussed. If that is too big of a project, then I would definitely
say just make a mini one. You can use
placeholder elements. You don't have to go to all
the trouble of creating your full one just for this
class if you're not ready. But I would love to
see you practice those skills we talked about in terms of organizing and putting in placeholder
information. At the very basics, I
would love to see you create your title
page about page, and then a one or
two product pages and maybe a page at the
end for your terms. So it just four pages
as a PDF would be fantastic if you're not sure what kind of business to
use as a placeholder. If you're not really
ready to put your own in, I'd recommend just thinking of something you enjoy buying, coffee mugs or
books, stationery, anything you'd find in a public domain stock photo
catalog perhaps. And in terms of how to share it, I would recommend that
either you just share your cover of your book if you only want to
show just one page. Or you can take a screenshot of your Canva Workspace when it shows all of the
pages all laid out. When it's on grid view,
that would be great too, because then we can just get
an overview of your project, but however you're willing to share it, that's really great. I appreciate it because
I'd love to see your work. And of course, it's really
nice to be inspired by each other when we get to look
at everybody else's work. Now, if you have any questions about anything that we've
talked about today, just leave a comment
in the discussion and I will be happy
to answer it. If you liked this
course, I would really appreciate it if you
left me a review. I read every single one of them. I send the really cute ones to my mom so she
could read them too. It's a really valuable tool
for me to know what's good, what could be improved,
and also to help other students know if they
want to take this class. I also teach a lot
of other classes, primarily in the graphic design, digital product entrepreneurship,
creativity categories. Pretty broad, but there's a
lot to choose from in there. So if you liked
learning with me, I hope that you'll
check those out. I also have a Youtube channel where I chronicle
my art business. There's like, it's more of like a log tutorial art
kind of thing. So if that interests you, feel free to look at it. I will provide the link here on the screen and
that's everything. Thank you so much for sticking around and finishing this class. I really hope that it helped you achieve the goals that you
were setting out to achieve. I know that it was
really exciting for me when I
reached the point in my business where I
was ready to start reaching out for
wholesale clients. So I'm very excited for you as well and hope
that it goes well. Good luck with your
design project. I'm very excited to see it,
so don't forget to share. And also I look forward to chatting with you
in the discussion. If you have any other thoughts, have a great day.
I'll see you later.
 Rebecca Wilson, Artist