Transcripts
1. Trailer: Hi, in this class, we'll take a cozy
winter illustration and animate it using
procrete dreams, exploring everything from
simple looping motions to frame-by-frame touches and the
powerful performance mode. You learn how to plan an
animated illustration, how to give personality
to steel objects, and how to build a
smooth looping sequence that feels warm,
whimsical, and alive. I'm Julia, and I'll guide
you through importing a procreate artwork
into Procreate Dreams, prepping the file for
motion, organizing layers, importing custom
colors, watches, and brushes, and using the
old toolkit dreams offers. No prior animation
experience needed. This class is fully
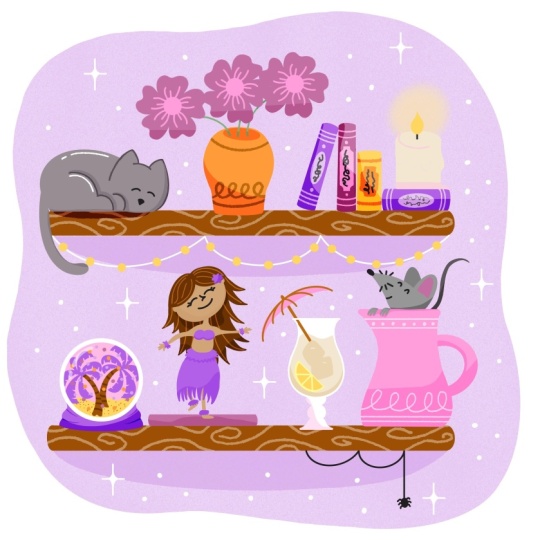
beginner friendly. This is also part of a fun
two class Winter collab with Illustrator
Claire Makes things. In fact, you can animate with me the illustration you created
in her Procreate class or simply download the ready made
artwork and colors watches included in the resources here and jump straight
into animating. Throughout the lessons,
we'll bridge illustration and animation in a
practical, approachable way, celebrating how smoothly Procreate and Procreate
Dreams work together and how small movements can transform a steel
drawing into a story. We also recorded a Q&A together where we
compare our work flows, share advice from both sides, illustrator and animator,
and talk brushes, color, prep, dos and don'ts, and reflect on what this
collaboration taught us. Let's dive in and make
your winter cabinet move.
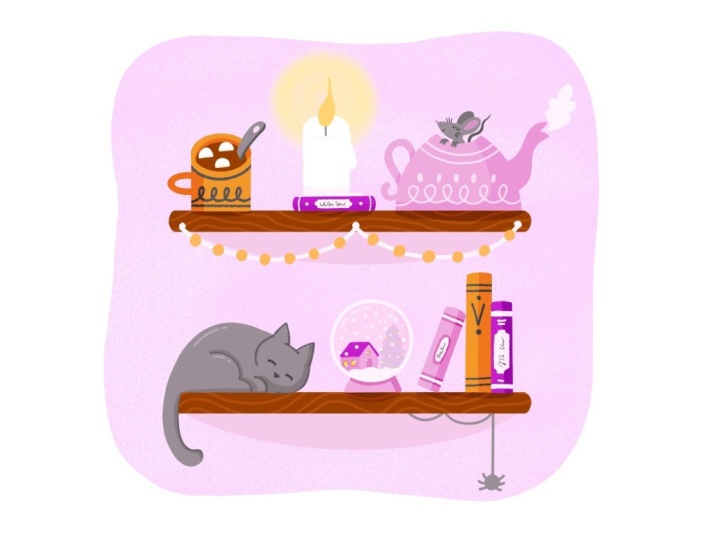
2. Exploring the Illustration File: Hi. In this video, we are exploring the
procret file made by Claire and figuring out
how structure it is, how she organized
the illustration, what's the structure
of the layers, and if we have everything
we need for the animation. So first things first, I'm having a look at the layers, how they are organized. I noticed she
renamed all of them, which is great and
she grouped them every element has its own group. For example, up here, I see the very first thing
is this sketch layer, which I don't really need. It's very nice to see it, but for the animation itself, I will not need it, so I can go ahead and delete it. In order to see which layer
or which group is what, you can quickly
turn it on and off and see what happens
on the canvas. Then we have a layer
called sparkles with all these nice sparkle effects, which are great
for the animation. I think we will use this
layer as a reference because you can see
all the sparkles are merged into one layer. In order to animate them, we will have to redraw them. Then we have a spider group. Inside the spider group, we have two layers. One is a spider hanging
and the other one is this other piece
of spider web. I'm going to rename those
layers just for extra clarity. In Procreate Dreams, when we will drag and drop
the whole project, every layer will become a track and every group
will also become a group. Um, I'm already thinking about
animation at this stage, so I'm imagining how I could
move this little spider, for example, and
I think it could go up and down like this. Of course, in order to do so we will have to animate
a mask as well. So I rename my
layers and I go on. Then we have a snow globe layer. In this case, it's very
nice that Claire gave us every element really separated as I asked, which is great. But in this specific case, I know I will only
move the snow. I can merge every
element under the snow. Because those parts of the
illustration are not going to be in action or moving. I have the house,
the background, the Christmas tree all
merge into one layer then the snow and then
on top the actual globe. Next layer is the cat.
Here it's very nice. We have an extra layer
of the open eyes, which we can use as a reference or really as part
of the animation. Then we have the lights, those little fairy lights
hanging from the shelf. We have the lights themselves
and then the string. I will keep them
separate, I think, because I imagine we could
animate a glow in between. I'm just going to leave
them as they are just renaming the layers for clarity. Then here we have
the mouse group. In this group, we have all
three elements of the mouse, the hands, the
head, and the tail. I'm going to rename
them for clarity again. But then this is actually a
good example because what I'm thinking for
the animation is to animate the mouse popping
out of the teapot. I think it's going
to be quite cute. As you can see, I can
select the layer and just imagine what I want the mouse
to hide behind the pot, but as you can
see, in this case, the mouse is on top of the pot. I'm going to dragon drop
the head underneath the pot layer or
the pot group so that I can actually
do this movement. As you can see, now the head
goes behind the teapot. Because I move the mouse and
also the tail underneath, there's probably no need for
the mouse group anymore. I can go ahead and delete the group and just
leave the hands on top because they have to be above the teapot and the mouse
face and tail underneath. About the teapot,
as you can see, we have an extra layer for the
shadow or for the texture. Those because I know
I will not move them, I can definitely merge those
layers so that I will have less chaotic tracks once I import everything
in procre dreams. The steam, of course, will be animated, so I
can leave it separated. Then we go to the candle. Same thing, I'm going
to merge anything that doesn't move in my plan. Of course, for the candle, I'm planning to move the flame
and maybe even the light, I will be able to scale it and maybe animate the
opacity as well. We have done a group
with all the books. They're all on separate layers, but because they're
part of the background and they're not going
to be animated, I'm going to flatten the group, so merge everything together. And the same, I will probably
do them for the background. In MA group, I have these
three marshmallows. They're already nicely
separated. That's great. Because they will animate
on their own separately. I will simply rename
every layers for clarity. And then the other elements
of the mug, the spoon, the chocolate or the actual mug are not going to be animated, so I can simply merge
them all together. For the marshmallow, the
animation I'm thinking and planning is to make them
float in the hot chocolate, so we will probably
mask them as well. So what's left now are some
elements in the background. They're probably
not going to move, so I could merge them together. But in this case,
I just group them, which is also a good
way to simplify the timeline when we import everything
Procreate Dreams and I rename some layers. I notice here on
this layer three, that I rename texture. Then we have this
nice texture and I think I might want
to animate this. I just keep everything
separated and group it in a group called background
that will stay down there. Actually, about textures, Claire used some
very nice brushes. And also provided the colors watches that you can find
in the palette section. We have this whimsical
winter colors watches. Those end brushes
are going to be very useful for our
animation process. Keep in mind that
we can drag and drop those any custom brush and any color palette or
colors watches you have into the Procreate
Dreams project and we will see how
to do that later. This is one of the
great features of Procreate and
Procreate Dreams. They can really
communicate easily, and that's what
we love about it. I think now we have everything ready for importing
Procreate Dreams. To recap this first
phase is to analyze the illustration
file with in mind the animations we want to and
checking if the layers are, first of all, separated the
way we need for them to move, but also renamed in a
way that it will not be confusing once we import
everything in Procreate Dreams. Now that everything is
ready for animation, let's move to the next lesson where we set up the
Procreate Dreams project.
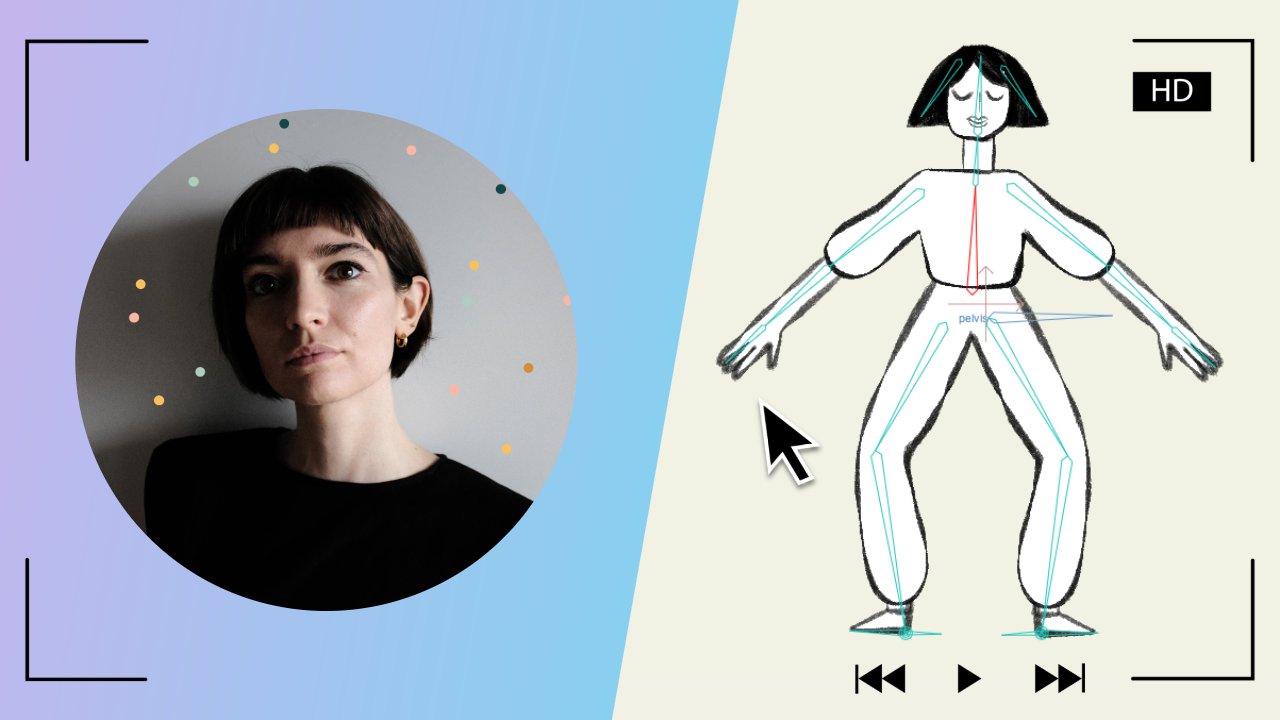
3. Importing into Procreate Dreams, Setting the Project: I'm opening Procreate
Dreams and because the illustration from
Claire was square, I'm going to choose the square
template and once I'm in, I will just quickly
check the settings. In properties, I will set
eight frames per second and the duration of the project is at the
moment 15 seconds, which is good to
start even though I think we will make
it shorter later. We can adapt these
settings anytime. Then I simply rename the
project and we are ready to go. Now it's time to import
the Procreate project. In order to do so, open
on the side Procreate like that and then drag and drop your illustration
in Procreate. As you can see, we need
to scale it a bit. I'm going to adjust the full illustration so that it fits our
animation Canvas. And you can see at the moment, it's all on one track, but we need layers. We need to see all
the different layers, we're simply going to
tap on the track and click Convert layers to tracks. In this way, opening the group, you will find all the
layers as we organize them. Everything is renamed
and organized and clear. At this point, I
noticed, for example, that I forgot to
rename the layer of the flame inside of the candle and I want to
show you that you can, of course, also rename
it at this point. Simply taping and
rename the layer. But I simply find it
easier to do this job and rename layers in
Procrit rather than in Procrit dreams because
as you can see, now the tracks are a bit more complicated to browse
and to go through, and it's a little harder to
figure out what is where. But of course, you can rename
them also at this point. So now let's see how to import the color palette
and the brushes. In order to do so, we will
have to open Procreate instead and open procreate
dreams on the side. The opposite of what we just
did to import the project. So open Procreate and then
with dreams on the side, drag and drop the watches
into the Procerrems project. The same goes for the brushes. You can choose any custom
brush that you have or created in Procreate and then drag and drop it inside
of Procreate Dreams. They will be saved in the
imported section at the bottom. Now that we have both the colors watches and the custom
brushes that we will need, we can start with the animation.
4. Planning the Animation: Before we jump into
the actual animation, I want to go quickly through the illustration and the
project and plan the animation, think about what we
would like to move, what kind of loop
we could create, how long the animation could be. And what kind of general vibe we want to create
with our animation. If I look at the
illustration, first of all, I notice that it's very cozy and we have several
different elements, and I'm planning to
do tiny little loops, tiny little animations that
keep the illustration alive, but not so big that
they would distract. What I mean is that I'm
planning to animate those six elements in a way that they are on the same level
and there is no one element that is the hero, let's
say, of the piece. I don't want, for example, the cat to do a crazy
jump or something that would clearly take the
attention of the viewer, but rather create a loop
where the full piece is constantly alive and
the viewer can notice different details
the more they watch. So as we mentioned a
little bit earlier, I'm going to go into
details and say what I'm planning or what I think it
could work in this case. I'm going to start just
from the top left. Of course, the chocolate
and the marshmallow, the most obvious animation
that comes to mind is to have the marshmallow
floating in the chocolate. Then we have the candle. I think it will be very nice to animate the flame
frame-by-frame, and then the glow
behind the candle would be also nice to have a
little maybe pulsating glow. Then we have the mouse.
I think it would be very cute to see the
mouse appear and disappear inside of the teapot and the teapot,
which is steaming. I will be nice to animate this little cloud coming out of the teapot
and disappearing. Then the cat, as we said, it's going to be a
simple animation, no character animation really. We could simply
animate the eyes. The tail will be very nice, but I fear it's a little
too complicated for such a quick class to
animate overlap of the tail, so we will just stick to the ice opening and close
and maybe moving a bit. Then of course, in
the snow globe, we will have the snow falling
in ice loop and lastly, the spider hanging from the spider web could
just go up and down. I think it could be very funny. So this is the
plan, and I'm also planning to start
with the easiest and ending with the hardest so that we can progress
with the difficulty level, and of course, you can also decide to jump from one
lesson to the other.
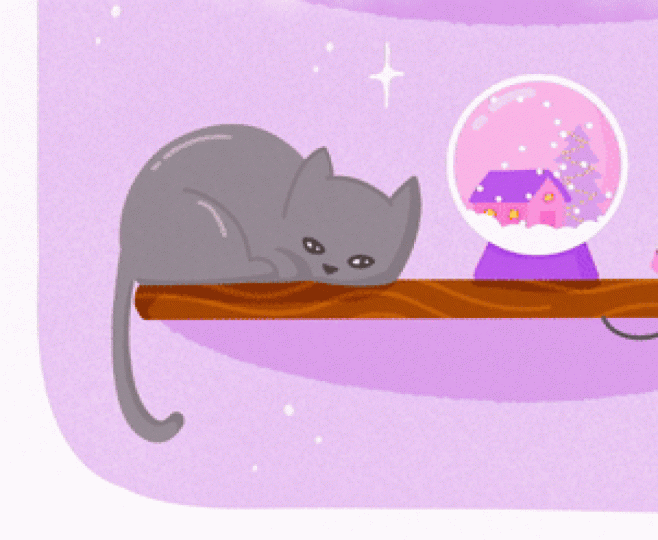
5. Spider Animation: So we are going to start now
with the spider animation, which I believe is the easiest. What I want to do is to see the spider going up and
down the spider web. In order to do so I'm
going to set a keyframe at 0 seconds and another one at 3 seconds without
moving anything. In this way, we will have the same keyframe at
zero and at three, and at 1 second, I'm going to create another
keyframe and this time move the layer with the spider
all the way as you can see, we already have the movement. There is an automatic easing, which is working very well
right now and it's already a loop because we already set the other keyframe
at 3 seconds. And I think it's
already super cute. But of course, now
there is the problem of the spider web going up and
not disappearing as we want. In order to do so, we
create another track on top of the spider and
we draw our mask. I use yellow here, but any color would
work because in fact, it will become transparent. Then I have to enlarge the frame for the whole
duration of the animation, dragging the mask all the way. And then once we're done, we're going to click on the
layer mask and layer mask. As you can see, it's
working perfectly. And our spider is already doing
what it's supposed to do. In case you have a problem with the mask and it's not
working properly, for example, also
a little bit of the other spider web is masked. The reason is because the mask
apply to the whole group. In fact, the spider is
grouped as we saw earlier. There are two
solutions for this. You can degroup the spider or put the mask
inside the group. The first element
is already done, so we can move to
the next lesson.
6. Snowglobe Animation: The next animation is the
one for the snow globe. What I want to do
is to let it snow. The very first thing I do
is to move the snow all the way up and set a key frame
there outside of the globe, and then I will go
around 5 seconds and I will set another
keyframe and this time, move the snow all the way
down out of the snow globe. Like so. In this way, as you can see, we already
have a little animation. We can play and
see how it looks. There is snow falling
and disappearing. It's fine, but I think it's a little too little
and I would like a little more snow to fall and I would like the loop to
be a little longer. Once I have this
first loop ready, I duplicate my snow layer
and I shifted a little bit. Here I'm trying 1 second. As you can see, let's
say layers of snow will overlap a bit and I will
shift it at 2 seconds. So they overlap a bit,
but not too much. I think I will need a third one, so I will duplicate the
same layer one more time. Here I have my third copy
of the snow animation, and this time, I will shift
it again another 2 seconds. To recap, we have three snow
layers one starting at zero, one starting at two, and
one starting at 4 seconds. I actually also duplicated the first layer twice
on the same track. You can see there is a double
animation so that the loops last 10 seconds and it
perfectly fits for my plan. Like this, we would
have the snow starting and then ending and the loop would
work like that. But as you can see, the snow is still outside of the snow globe. In order to fix that, we have to group all the snow animation. And use the mask trick again. Here on a new track, I'm drawing the mask, which is the exact same shape
of the snow globe itself. Once I create the
mask and enlarge the frame for the duration
of the animation, again, I will tap on the mask
and create a layer mask. This way, as you can see, our snow globe is
alive and the snow is gently falling and in a nice loop, disappearing
and reappearing.
7. Candle Animation: Now the next element
is the candle. In this case, as
we said earlier, I would like to animate the
flame and then the glow. We will animate the
flame frame-by-frame, meaning this time we will draw. I'm splitting the flame track because I don't
need a fixed frame. I just need one initial
drawing so that I can go on with my own
drawn flame shapes. I'm setting the onion skin so that I can see the
previous drawing. And I'm start drawing and
animating straight ahead, which means just following the flow and without keyframes
or without real plan. In fact, I think
flames are a bit wild and it's okay if we just redraw
them in different shapes, a little bigger,
a little smaller, more or less on the same spot. As you can see, I drew nine different flames
one after the other. And if we want to
check how it looks, we can quickly go through
with the cursor or we can simply zoom the timeline until the end of
the ninth drawing, which is in my case, a
little after 1 second and see how it looks like. I think it looks very nice. It could be a natural
looking flame, I think. I'm just going to group all
those frames and duplicate it so that I can cover the whole duration
of the animation. Here we have our flame alive moving and burning. I
think it looks fine. We're going to move to the glow. Here we have the layer of
the glow and as you can see, I'm planning to move it
like saw with a scale to let it pulsate a
bit like candles do. I'm also planning to animate
the opacity in the same way. Order to do so I'm going
to set a key frame in the very beginning
for the scale, but also for the opacity later. I'm going to use this
performance mode, which is a very cool mode
in Procreate Dreams, which allows us to do the
animation live, let's say, on screen, and the program will record it for us
and set keyframes. After setting my first
keyframe and clicking on play, I animated my scale. Of course, I want it to be a loop and I want it
to last 5 seconds. I go at 5 seconds and here
I have the last frame. I'm going to drag it
exactly at 5 seconds and change it to 00 like
the initial one, 0011 is the first one. I go back at 5 seconds, drag my final
keyframe in position. In this way, the
first keyframe is exactly like the last one
and this can be a loop. At this point of the project, I'm starting to
realize that probably the whole project is
going to be 10 seconds. I already have the
snow globe animation lasting 10 seconds
and in this case, I made a 5 seconds loop. I will be able later to adjust those animations in order for
them to be at seconds loop. For example, the candle, I will simply duplicate
because at the moment, it lasts 5 seconds. And spider, I will probably
duplicate and have the spider moving twice
in this 10 seconds loop. Lastly, for the glow, as I said, I want to animate
the opacity as well, the same way with the
performance mode. Of course, we set the first
key frame at opacity 100%, and then I drag the
canvas a little bit on the right so that
I can see the opacity. And just by moving the opacity slider while
in performance mode, the program is going to
animate the opacity, which is quite awesome. Again, as I did before, I'm going to go to the
last frame at 5 seconds, make sure that the last
keyframe is at 5 seconds and set the opacity
at 100% again. Here we go. Now that we animated those 5
seconds of the candle, we can group everything, the candle, the
flame, and the glow, after we group it, we
can duplicate it twice so that the animation
lasts 10 seconds. And it's lovely to see already the illustration come into
life, as you can see. We didn't finish yet. We barely animated Alf of the elements, but the illustration
looks already alive. This is a nice reminder how just one or two
elements moving in a steel illustration
already give the sense of vitality
and in this case, also a mood of magic
and whimsical. Let's move to the next element, which is going to be the cat.
8. Cat Animation: This is the lesson where
we bring the cat to life. And as we said earlier, we don't want the animation to be too much or too big to
be the hero of the piece, we want something subtle. And because we already have
those eyes, as you can see, we have one layer
with open eyes, turning the track on and off already gives
this blink effect, which is quite nice. So I'm thinking about a blink and maybe adding
the pupils moving. I think it could be very
interesting and fun also if the cut could look towards the
right where the spider is. And now I just drag
the open eyes track at 4 seconds so that we start with closed eyes and then
at around 4 seconds, the cat will open the eye. This works already
and it's fine. But if we want to make the
animation a little smoother, we will need to draw
an extra frame, which is in between the closed
eyes and the open eyes. I want a half closed
eyes right before. I'm picking the colors
from the illustration. So that we have
exactly the same. I'm trying to draw
in the same style of the illustration Alf closed eye. There we have the cat
gradually opening its eyes. Then as I said, I would
like to move the pupil. But in our open eyes tract, the pupil is not separated. I'm actually recreating the
open eyes in two tracks, one with the white open eyes and one with just the pupils. My pupils are on a
separate layers, which means I can move them. So here we created the pupils. They are now separated so
the cat can look in front. Then if we select we can put
a key frame for movement. As you can see, the pupils
now can move left and right, but they're going out the eye in order to make it
easier for us to animate, we're going to click
on the track and make it a clipping mask so that it will clip to the
bottom layer to the layer. In this way, we can easily animate the eyes
going right and left. The cat now is looking at
the spider if we want to. I will make the pupils
start in the center, and then a couple
of seconds later slide towards the right,
which is very nice. I'm going to set a
second keyframe. Then the cat will simply close the eyes for closing the eyes, I actually copy and paste the in between so that the action
of closing the eyes is also a bit less abrupt and so that in this way we end
with the eyes closed again and the cat animation
can be a loop as well because it happens
within the 10 seconds. So this is also done
before we move forward. Just let's have a
look at the piece, I look right now. And as I said earlier, you can at this point adjust the timing
already if you want. The idea is that we always
have something going on in the animation and no loop is stealing the
stage, let's say. So you can always group your animations,
move them around, and above all, to make
sure that we have the loops lasting 10 seconds. Anytime really in this process, you can have a look
at the whole project, how the little
animations are coming together and you can
readjust the timing, for example, shifting one
animation a bit or the other. In a way that we have the loops happening
at the same time, lasting 10 seconds and
having, let's say, a nice composition in the timeline so that they
don't happen, of course, all at the same
time, but they are nicely spaced in those
10 seconds time. Let's move to the marshmallow.
9. Marshmellow Animation: In this lesson, we are animating the marshmallows floating
in the hot chocolate. There are two ways
to approach this and I'll walk you through
both. Here's the goal. Each marshmallow should gently bob up and down in the liquid. But to make it look realistic, we also need to mask
the bottom part of it, so it disappears below
the chocolate surface. Method one is with
the performance mode. I start by adding a key frame in the beginning
and then I will use the performance mode to move the marshmallow
slowly up and down. For this one, I'm only
animating 2 seconds. Dreams was lagging a bit with such small objects
over ten full seconds. Making a short loop
and duplicating it, it's simply more efficient. Once the movement is recorded, I scrap through the key
frames and clean them up. First of all, as always, I adjust the last
keyframe so it matches the first and that's
what makes it a loop. Then I also tweaked one of the inner key frames
because as you can see the movement felt a
little too strong there. I Now that it looks good, I create a new truck
and I draw the mask. In this case, the mask sits
under the marshmallow, so you need to invert it. With the last marshmallow, I will show you
the opposite mask. Also, remember if the shape of the mask doesn't look right, you can go back
into the layer mask anytime and redraw it
or fix it, no stress. Once the two second
loop looks good, I simply group the marshmallow
and the mask together and duplicate the group until it
fills the full 10 seconds. In my case, five times. That's our first
marshmallow done. Now, for the second method, I'm going to show you
the manual key framing. I'm animating everything
manually this time, so I'm not going to use
the performance mode so you can see the difference. This time, I mask the marshmallow before
I start animating just to keep a clear sense of how deep I can go
beneath the chocolate. Then I set the first keyframe, jump ahead 1 second at the time and move it
gently up and down. I put five key frames
in total to build a five second loop in which the marshmallow dives twice
and comes back up twice. Then I duplicate that loop
once to reach my 10 seconds. With the mask applied, you can see the motion feels
natural and importantly, it doesn't match the
first marshmallow. You always want
slight variations so they don't bob
in perfect sync. That's also why we don't just
animate one marshmallow and duplicate it for the other two because we want them
to be different. For the last marshmallow, I repeat the manual key framing, but I want to show you a
different masking setup. This time the mask
is drawn on top of the marshmallow so it
doesn't need to be inverted. And that's it, all three
marshmallows are floating gently in the chocolate and
now I'm officially hungry. Now let's move on to
animating the steam.
10. Steam Animation: Here we are animating the steam
coming out of the teapot. I go to the steam truck
and I notice that Claire, while doing the illustration, she set the layer at 58%. In order to pick
the exact color, I am going to set
the opacity at 100% and pick the right color
and start animating. Want the steam to appear coming out of the teapod
and then disappear. You can notice here
how, of course, the illustration or the cloud of steam illustrated by
Claire is not going to be the very first frame
of our animation and not even the last one
is an in between pose. Here I digress a little bit, but I think it's
interesting to notice how the illustration as a pose that tells the old story and that
conveys the motion, but it's not necessarily a
key pose of the animation. What I'm doing here is to shift the illustration a bit
because I need to get there. I need to animate the steam coming out
of the teapot first. I'm going to pick
a brush that fits the style and I'm ready to go. So I go in hand drawn mode. I set my onion skin
so that I can see the previous following
drawing this time. And I start to animate
straight ahead, imagining how the steam is
coming out of the teapot. Here I am improvising
really this movement. Straight ahead means we're
not following any key pose. Of course, I know
where I want to go. The direction I
want to go is the one of Claire's illustration. But I'm animating quite
freely here as you can see, I just make this little cloud
coming out of the teapot and gradually growing and reaching the position
I want to be. The more I come closer
to the final drawing or at least to the
reference of the steam, the more I have frames close to each other because
I want the steam to come out a little faster
and then slow down and gently and
slowly disappears. Here I'm testing
quickly how it looks and I will have to adjust
the opacity of every frame. In this case, I'm
going frame-by-frame and bringing down
the opacity to 58, which was the opacity
of Claire's drawing. And another way could be
to do the whole animation, then group it and then set
the opacity on the group. Now that I reached the
illustration of the steam, I want the little steam cloud
to dissolve and disappear. So first of all, I'm animating
frame-by-frame again this cloud slowly dissolving
and breaking apart. But at the same time, I
think I will play with the opacity as well and make it disappear also with the opacity. So again, here I go
frame-by-frame and I'm going to draw again, many times. I'm going to draw the
cloud growing a little more because I wanted to gradually disappear
and dissolve, from now on, I'm going to be a little more loose
with my drawings. Also with my feeling, actually, I'm going to start filling my steam a little
less precisely, and this is going to give the impression of the
steam dissolving. Now the bubble or
the steam cloud is becoming more round and less precise and I'm just going
to quickly doodling side of it so that it becomes gradually less and less clean and
less and less precise. In this way, we will see the
steam appearing and then puff and then like a cloud of smoke as
it is disappearing. As you can see, the last
frames are really rough, and I think this will
work quite nicely. We can then play and
see how it looks like. Of course, at the
moment, the opacity is not set to every frame, but we still get an idea of how the animation is looking
and I think it looks nice. I just noticed a little
jump in the beginning while the cloud is coming out of the teapot and I'm going
to fix that in a minute. Now I'm setting
the opacity down. Actually, as you can see here, I'm setting it even
lower than 58, gradually more and
more lower 48, 45, now 38, so that the
last frames are also literally
disintegrating and becoming less and less visible. Until the very last one
which I set at 30%. I group the animation
because I need to mask it. At the moment, the steam is not coming out exactly
out of the tipot. I want to create a mask
again as we did earlier, and in this case, I reverse the mask so that the steam is coming out of the tepot and it's working fine. Then I notice a little jump in the steam coming
out of the tipot. The part that I animated
straight ahead. I'm just going to
fix one frame a bit, simply adding a bit of
a drawing connecting the steam with the
tipot a little bit more so that
it's not so abrupt. Finally, our steam is coming out of the
tipot and dissolving. This is again a nice
loop that we can duplicate a couple of
times across the timeline. Now we have, in fact, this animation, it lasts
less than 2 seconds. As you can see,
I'm going to group the whole thing like the mask and the actual
steam animation. Once I group it, I'm
going to duplicate this animation three
times and spread those animations across
the timeline so that the steam is coming
out of the teapot three times in those 10 seconds. As you can see, this
works quite nicely. It's another subtle animation that works very well
with the other ones. It's looking great,
in my opinion, so we can move to
the next element, which is going to be the mouse
coming out of the teapot.
11. Mouse Animation: In this lesson, we animate the mouse coming
out of the teapot. My initial idea was to animate this little guy popping out of the teapot and
then hiding back in. As I select the head, I move it around and imagine what movement I
would like to do. In animation, when we create any kind of
movement, action, really, there is such thing as an anticipation
and an overshoot. Both an anticipation
and an overshoot are a movement in the opposite
direction of the main action. Which helps to
emphasize the movement. In this case, what it
means exactly is before hiding the neck and the head of the mouse
underneath the teapot, I would like the mouse
to first stretch the head a little high
and then hide down. And the same will go
also when popping up, it will pop up but
jumping a little more before settling
into its position. And only now, actually, I think about it and I
realize I don't have this extra neck or this
extra space in the drawing. I'm quickly adding a little
bit of neck for the mouse. Unfortunately, you cannot see it very well right now because I'm drawing underneath
the teapot. But you can see it
in a second once I'm done and here it is.
This is what I did. I added a little bit
of neck so that I have this extra stretch space and I can animate the overshoot and
the anticipation as I wish. Before I animate the main
action for the mouse, I'm thinking I could
show you an extra trick. In fact, we could also make the eyes open and close and maybe create a little
blink for the mouse. I'm going to create
another truck and on top of the truck, I'm going to draw
the closed eyes, and of course, I
will need a bit of a gray background because the eyes are not separated
in the main drawing. I'm going to prolong this
frame a bit For now, we can just turn
it off and forget about it and we'll
get to it later. For now, I'm just going
to group it together with the head and we can go back
to our head animation. The key frames of the head animation are
going to be on the group. So as I said, we're going
to set the first keyframe at 2 seconds with the
original position. Then a couple of frames later, I'm going to set
a second keyframe and stretch the neck a bit. Then six frames later, I'm just going to hide the
mouse underneath the teapot. As you can see, there is this little jump
before it runs down, and this is a very
nice animation trick to prepare the viewer for the action and gives a bit of anticipation before the
main action happens. Now the mouse
disappeared behind, we need to bring it back up. I'm going to set another
keyframe at 6 seconds so that it stays still and hidden
for all this time. Then a couple of frames later, I'm going to set the overshoot. A couple of frames later, let's say five or
six frames later. Here is the overshoot
where the mouse is jumping and then I'm going to
give it four frames to settle and go back to
the original position. Here I set the last keyframe exactly as the first
one with 0011. At this point, I noticed that my overshoot was a bit shifted, so it's not working very well. It's not very natural. I will just go back
there in that position, the overshoot and move
the head a bit more towards the right so that the movement is a
bit more natural. It's nice that we
can go anytime at any point of the animation
and modify the key frames. Like this, I think it's
working very well. We have now the
loop of the mouse, first disappearing and then after a while, coming back up. And this is the
moment if we want to in which we can
add the blink. In fact, the eyes we made
are inside of the group, so we don't need to animate the movement up
and down anymore. We can simply turn
on and off the eyes. For example, now I turn them on and they're constantly open. But what I want to do is
to reduce the duration of this track so that
the mouse will open his eyes when coming out of the pot and then
closing them again. Here just before
coming out of the pot, I'm going to split the
track of the open eyes, Edit split, and I'm
going to delete anything that is before so that before 6 seconds,
its eyes are closed. Then I'm going to keep them
open for a second or two, split again and delete
the other part. As you can see now
the mouse is popping out with open eyes and
then simply closing them. Here, if we want, we can also drawn in between
for the eyes. But I think because it's
such a small detail and such a small animal, we don't really need to
make the blink smoother. I think it's just
a little action and I want to show you actually this trick of hiding inside
of the group of the head, something and actually
animating the group itself. We made it. We animated
six elements of this beautiful
illustration and created subtle loops that bring
to life this cozy scene. Uh, but I'm not done yet. I want to animate still the sparkles and the
fairy lights and give you some extra tips on how to make a steel Illustration
alive. So let's move on.
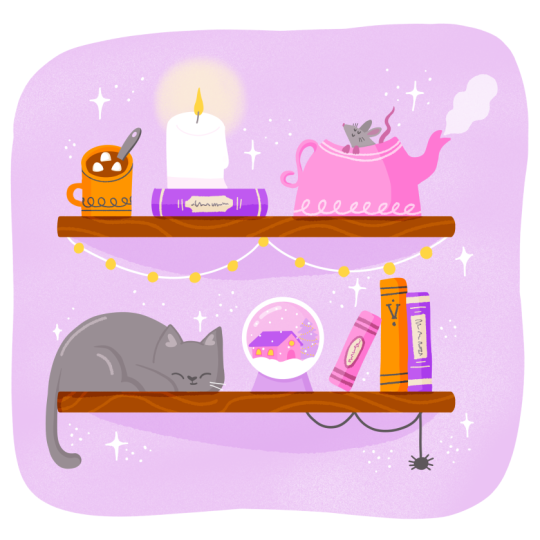
12. Sparkle and Fairy Lights Animation: Now that we animated all the main elements is time
to give some final touches. We have these beautiful
sparkles, illustrated by Claire, which are great in illustration as well to fill the composition. I like how it works
in animation as well. I'm going to animate
every single sparkle. Actually, I'm going to
animate one of them and then copy and paste
on a new track, I'm using here a different
color just to be able to see better and to draw
on top of the reference. In order to animate the sparkle, we already saw this
in a previous class, but I'm simply going to make it appear and gradually
grow bigger and bigger. It's another straight
ahead animation where I'm just letting the sparkle grow from a tiny dot
to a big sparkle. The more the sparkle grows, the more it breaks apart. At this point, you can see
how the arms, let's say, of the sparkle are
breaking and the center will pop back into a dot again and the arms will also break into little dots and gradually the
dots will disappear. Once we've done this, we
can check how it looks. Here it's 1 second animation. It can be longer,
can be shorter. You can do a couple of tests
and see how you like it. Then I select everything and group it because I want to reuse this sparkle animation across the illustration for
the other sparkles. Of course, if you want, you can create single sparkle
animations and different ones. Now I'm simply going to
create a big mask with a color to change the color of the sparkle
because as you saw, I used purple and this
is just a quick tip with a clipping mask to change instantly the color
of a whole animation. Once I've done this, I have one sparkle animation
and it's very nice. As we said, it's 1 second long. Of course, I want
to duplicate it and scatter it around
as you can see, Claire drew five sparkles. I'm going to duplicate
this truck four times and move the animation
around also in time. In fact, I don't want the sparkles to blink
all at the same time. I want these animations to fill the space of
the illustration, to create a nice composition
and to capture the eye of the viewer a bit
everywhere on the frame. Here I am scattering
them around. I'm following
Claire's reference to decide where to
position my sparkles, but I'm shifting them in
time so that, for example, one is happening at 1 second, another one is happening
at 2 seconds and so on. Again, because we have a ten second loop I
might duplicate or even triplicate every animation so that every sparkle
blinks three times. Also another thing I noticed is that together with the sparkles, the original
illustration also add those very nice white dots. I'm not going to animate them, but I want them to be
steel in the background. I'm simply deleting
the steel sparkles, the ones illustrated by
Claire from that layer so that we have those white
dots in the background. I think it looks very nice. As I mentioned, the next
step is to duplicate those animations
across the 10 seconds so that they open
a couple of times. As you can see here we have
our four sparkles tracks. For each track, I'm
going to duplicate the animation and move it
around so that they overlap, but not completely
so that they are spaced in the timeline but not bothering each
other, let's say. So here you can clearly see how I'm repositioning the sparkles, duplicating the animation first, and then reposition
the sparkle animations so that they are happening
across the 10 seconds. Each layer ended up having
three times the animation, and as you can see
from the final result, there is always a
sparkle going on somewhere on the canva
and I think this effect really brings everything
together and it's a cherry on top to make this illustrated
scene very magical and cozy. The next final touch is to add some glowing effect
on the fairy lights. This time, I'm not going
to animate the scale, but I simply want to draw a glow between the
fairy lights and the string and then
animating the opacity. I'm going in the lights group and between the string
and the lights track, I'm going to create
another track and with a white color and using
the brush we imported, I'm going to draw the glow
behind each little light. I first tried with yellow, but then figured
that with the white, we get a much more cozy
and natural result. So I'm drawing the glow under every single light
of the fairy lights. Once I've done this
all in one layer, I'm going to prolong the layer
across the all animation. Then as we did earlier
with the performance mode, I'm going to animate
the opacity so that the fairy lights are
pulsating and glowing. Once again, as before, make sure that your
final keyframe matches the first keyframe. So once we have done this, here is the final look and also the final illustration with all the elements
gently animated. The animated illustration
could be done. I think this is a nice result. But there is one more
little thing that I wanted to try for this
class and it is to animate a texture
over everything in order to give even more
vitality to the entire piece. It's a way to make the
illustration look alive even more. If you're curious about that, see you in the next lesson.
13. Final Touches: Technically the
animation works already, but I want to add
a final touch to make everything feel
a little more alive. Claire added a really
nice texture in the original
illustration as we saw earlier when we explored
her procreate file. I'm going to recreate that
using the imported brush. I'm creating a texture that's slightly larger
than the canvas. Then I'm going to scroll through blending modes until I find
something that feels right. I think multiply usually works well for this subtle
grain effect. Goal here isn't to
make a new animation, it's just to bring
a soft sense of movement to areas that
are completely steel, like the books or the
cat's body, for instance. It will add a gentle
buzz or boiling effect that makes the entire
piece feel cohesive. Once the texture layer is set, I stretch it across the whole duration and drop the opacity so
it stays subtle. Then I will animate it
with the performance mode, just simply moving it
quickly up and down left and right to create
that noise like movement. Then it's done. If you zoom in on a flat area like the cat, you can really see the effect. It's tiny, but it gives the whole scene a warmer,
more cinematic feel. All let's move to the export, then Q&A and the wrap up.
14. Export: Time to export our
final animation. Go to share video and
export an MP four file. From there, you can, if you
want convert it into a Jif, for example, using photoshops, save for web feature, but keep in mind that a ten
second loop can get heavy, so you might need to reduce
the resolution or the size. And that's it. You have now a looping animated illustration you can share here in the project section
or on social media. If Skillshare doesn't let
you upload a full animation, feel free to drop a link
to your Instagram post. I'd really love to
see what you created.
15. Q&A: Oh, hi. This is a Q&A with Claire about this
collaborative project we made, creating class two sister
classes, actually. Yeah. So yes, in this Q&A, we will go through some
questions that popped during our collaborative process about Procrit and Procrit dreams, how we went on creating this whimsical illustration
and animation together. We try to answer every question. We had in mind, but if you have any other
request or question, be sure to let us know and
we'll be happy to reply. Yeah, then let's jump into it. Okay. I would say
we can start off with sort of recap of this collaboration
and this project. And one good question could be for both of us what we learned from
this collaboration, What was, the highlight
or even the struggles. As I mentioned in my
Q&A, I think for me, the highlight was seeing someone else take my work and then
turn it into movement. Like, I cannot explain. I feel like it was so cool to see, and it actually motivated me to try animation more myself.
I love that process. Like it was so fun.
I really enjoyed, trying some of the
animation that you did, try it myself and seeing how easy it is
because I was like, I cannot do this, but I could. And it was so easy. And I really liked the first one I tried was the Spider
to animate that, and it was a really good
feeling to be able to do that. That was really cool. The
most satisfying moment for me was to see my
illustration in movement. Yeah. That was, like, magical, and I tried some of your animations like when you were actually doing
them in a moment. And I loved how easy it was. I was like, There's
no way I can do this. Like, Procre Dreams is
still a mystery to me. But I was able to do it
like under 2 minutes, like to animate the
Spider, for example. And that was an incredible
feeling to be able to do that. So huge highlight for me. Yeah, this already for me, this is yeah, it's a great
feedback, first of all. And then I think that's what I like about this kind
of collaborations. As an animator, it makes me
very happy to hear that, you loved it and I like to kind of interpret your illustration and try to bring it to life. Yeah, I like how we both brought something
to this project. And I find it interesting
that you said you wanted to animate to see,
you know, to try. And I actually also I
am very tempted to do my own illustration now following your class and
then bring it to life. So I like how this like Chris Cross pollination
really is working. And I hope this
would also inspire the students the same
way because it's really nice if you're
an animator to test the illustration
part or if you're an illustrator to jump
into the animation. Absolutely. Making
something from scratch, and then I mean, in general, with illustration, it's really fun to make something
out of nothing. But then to make it move
is a whole other level. And even if you think
you cannot do it, like, this is actually possible,
but it's also your skill. Like, I was never interested
in animation before. I took your classes, and that showed me that I can do really small interventions
and do it on a really small scale and still feel like it's a
huge accomplishment. I make something really fun. Animation doesn't
have to be like a full Disney movement and
overlaps and walk cycles. 'cause we don't have time
for all that anyway. So yeah, that is true, yeah. I want to add one takeaway from this collaboration
for me is h about communication because I think every time we
collaborate and as an animator, I notice that every time in a client commission
or anytime really, you have to collaborate
with someone. Mm hm. In a creative environment,
but not necessarily, it's really important to
have a clear communication, to be able to communicate, exchange, you know,
needs and information. And I found this
very, very useful. Yeah, as a reminder, but also yet to learn even more. Absolutely. And it's always
good to get feedback as well. Like, to work with someone else, because as I said, what
was a struggle for me. Sometimes it just happens color. Like, it just wasn't working. And just to have
you give me ideas, inspiration to make this, you know, work for both of us, that was huge. Like,
I got me out of it. And otherwise, maybe
I would have gotten out of it myself eventually. But sometimes it
just ends there. Sometimes when I get stuck
with an illustrator, I just leave and it's
like, Well, that's it. I can't figure this out.
This is a dead end. When you work with someone else, it's not necessarily, so. Yeah, I agree. I think
it's always enriching. I also find it collaborating
somehow humbling because it makes
you step back a bit and be open for the other um, the other person
input or skills even. In animation, I have this a lot when I work with a bigger team, and maybe I'm the
animation director, like the one who
wrote the story, but maybe it doesn't mean
that I'm good at every step, and I love to let
people in and say, Okay, you are a storyboard. It means you can make
storyboards better than me, and I trust you and I
want you to let you in the process and into my story
to bring something extra. Yeah. So I like this about collaborations
that really make you feel humble in the sense,
I cannot do everything. And I'm happy to accept help. Yeah, absolutely. So basically, this is a call for
other students to find a Skillshare buddy and try
and do it together, maybe. That would be very cool. Yeah, I would love to see that. Somebody needs to be the first, any questions in the
discussion post, please, because
we're here to help. So if you just need feedback,
we're around somewhere. So yeah, actually
it would be very cool if our discussion
section would become a place where students match and find
someone to work with. Well, make it happen.
Let's make it happen, yes. That'll be very cool. This is a good question for you because we kind
of discussed this, but what excites you about bringing illustrated
objects to life? Yeah, it's a really good one. As I said, maybe it's a bit of the animators point of view, because we said the animators
is very collaborative. I like as an animator
to jump into other people's worlds, really. So when you receive an
illustration or a concept, even from a client, you're trying to bring to
life their vision. And I like this part of
my job sometimes to try to understand what you had in mind with this
cozy illustration, for example, and see, like, how can I make it real? Mm hmm. And so,
first of all, yeah, I really love this part
of the process where I kind of try to step into
your shoes and imagine, how can we make this alive? Yeah. And then there is
maybe the nerdy part of it, which is how to actually
make it happen. So I have this object
or this layer. I want to get that result.
How can I get there? Yeah. So for example,
with the steam, there is I noticed that
your layer was in opacity, I think around 58%. And I thought, Oh, this is actually very nice. She used opacity. And the steam, as we know, is
quite transparent. And so in the movement, I need to create a loop. It needs to disappear. And so I thought, well, I could animate it frame
by frame as I did, but also use opacity as an animation tool to
make it disappear. And in the class, animated the steam
so that it does animate disappearing a little
bit, this kind of cloud. But at the same time, I animated
opacity as well to make it completely go away. I like this kind of finding the right trick that works with the style
of the illustrator. Yeah, yeah, yeah. I think
that's so cool to see every object is a different
type of animation, I guess. I mean, you cover
these in your class. They are different types of,
like, interventions, right? But I find that
so fascinating to see how you have
to think of like, Okay, we've got this object. What is the movement, and then the technical
aspect of that. It's so fascinating. And I think that's why
animations so interesting. Yeah. That's why
I love animation. I think it's as I call it nerdy, this nerdy side of finding a solution
because there are many. I think there is one way. There's just one way
to get a result. And so you have this creative
moment where you have to come up with a different way to animate a different object. And for example, with the
steam that was that way, and as you mentioned, it's true, Procreate dreams has
these different ways of animating something
could be frame by frame, or there is a performance mode, which is awesome and only in
Procreate that I know of. And exactly. So it's up
to you as an animator to decide what can I do? What tool can I use in
order to reach that result? Yeah. Yeah. I love that part. It's a perfect blend of artistic
and technical, I think. Yeah. I think so, too. And it's really creative because no one else would do
it exactly like you. There are also in animation, there are so many softwares, and every software you use is going to give you
a different result. So I like that part, too. You can be very unique
with your animation. Yeah. That's awesome. So how to keep the look and
style of the illustrator. This is connected to
what we just said, because as an animator, especially if it's not
your illustration, you want to mimic as much
as possible that style. And of course, if you don't
have to redraw anything, it's easier because
you just move the objects that are already
drawn in the layers. But in our case, we did
redraw a little bit. Again, it was not
a crazy animation, so I didn't have to redraw
the full character. For example, if I had to animate a cat jumping on the shelf, yeah, I would have redrawn the
full character many times. But in this case, for example, we had the flame, that is andron or
the steam, right? And as an animator or when you approach
the animation plan, I start thinking, first of all, brushes because of course, they are very important and necessary the moment
you want to emulate the look you have to retrace
or redraw something, and it needs to be
exactly the same. And in this case, it's perfect. Procreate allows
you to dragon drop any costume brush
that you have or made or use in appropriate and drag it in procreate dreams. And we did that in the class, and we also did the same
for the colors watches, which is super useful. Yeah. So if the illustrator or you yourself as
an illustrator, prepare for yourself that
like brushes and colors, makes it even easier
to simply drop them in the Procrit Dreams
project and use them. Well, I would say I didn't this is an extra
brainstorming moment, but I thought also in general, the mood, we have this cozy
scene, this cozy setting. So when running the
animation, I thought, for sure, we don't need anything catching too
much the attention. Also in terms of timeline, I knew it would have
been a big loop of a couple of seconds. In this case, it turned
out to be 10 seconds loop, and I want every
element to be balanced. So I cannot or at least
it was not in my plan. I cannot have one element
or one character, which is the hero of
the scene, right? I mean, it could be a choice. It could be that there are
little subtle movements, and then the cat does something
crazy, jumps or whatever. But in our case, I
really wanted to keep the style of
the illustration, which was on the same
level, every element. There is no hero in
the piece, right? And so I tried to mirror the illustration
mood in the sense that it was this big
composition and also the animation will be
a big composition. When you animate a piece, and maybe the illustration
is very graphic. Then the animation could also be less realistic, more
graphic as well. Oh, yeah, in the movement, yeah. Yeah. If the illustration
is very realistic, maybe then the animation has
to be realistic as well. So a bit more like
smooth and Yeah. But also, in terms of actions, imagine very
realistic character, like a human character, right? That has really,
like, proportions that are close to real. And then on the other hand, maybe a very cartoony character, like one of those
cartoon network very edgy, very exaggerated. The animation, then it's
more makes sense to be exaggerated or more graphic
or more snappy if the hero. Yeah, yeah. Would be a bit weird with a
bit of a dissonance, I think if the character
is very realistic and then animation is very cartoony
or the other way around. It reminds me of your
walk cycle class where if you're animating a little funny
cartoon character, for example, the movement
can be a bit squashed. It's very exaggerated
movement, which is very, like, quirky and it's cute. But, imagine with, like, a more realistic person, they cannot be bouncing
around like this. It has to be more yeah,
natural, I guess. Yeah. I think then it's up to you to the
south to decide how squishy and how stretchy your character or your
work wants or needs to be. Yeah. It's soft like a very thin line, but I think in this case, particularly for me
was interpreting the style and act accordingly. I think it works really
well because in the end, I mean, we wanted to go
for, like, a whimsical, cozy feel, and the little
animations show that even more. Like, they're very calming. They're soft, and
they're like, again, like, finding these
little objects. Like, you still have to keep looking at, like, what's moving. And, you know, it's like a bit of a yeah,
hidden object game. Yeah, I like that. When you
rewatch it and rewatch it, then you know it
is something more. Yeah, exactly. Yeah.
That's really cute. About the whimsical
and the mood, that perfect example are the sparkles that we already
mentioned in the other Q&A. Sparkles they were there
in the illustration, and they are the best
way to kind of give this bit Christmasy or,
like, mystical vibe. Yeah, so Mm hmm. Yeah. That's cute. I was no brainer. Yeah. I love that as well, because that was like we said in the other Q&A that
wasn't intention. Like, I just drew
those, you know, for cohesiveness, for the
general vibe of the design. And then to see that you animated those
as well was so fun. And now it makes so much sense. That's something that
I didn't even think of because I'm not an animator, so I illustrate as
an illustrator, and you think about
another layer. Sorry. You think about
another layer on top of that, like how things
work in movement. Yeah. Actually, because
you're talking about this, I'm going to connect
to the next question, which is the key
frames? Yeah, exactly. I find it very
interesting and I had a aha moment while
I was working on this project to verbalize
this and I'm going to try now realize we receive an illustration with certain poses the objects
and the elements, they are in a certain position and they have a certain pose. I find it interesting
that as an animator, those poses not very often are actually key
poses of the animation. And so, um, I find it
interesting to compare the illustration poses versus the animation poses that are actually part
of the movement. So in animation, as we know, there are such
things as key poses. There are the key
moment of an action. And when you have
an illustration, there are some poses, but they're not taught
for the movement. Those illustration poses,
they are single frames that contain already
the movement or the storytelling, kind of. So I'm going to
give some examples so that it makes it more clear. The steam, you gave me
the illustration with this very nicely drawn um cloud of steam coming
out of the teapot. And as I was about to
animate it, I wondered, Okay, will this be one
of the key frames? Will this be one of
the frames at all? Of course, I don't
have to start from that one because the
steam need to appear. So I start from an
empty frame and then slowly the steam will
come out of the teapot. So, for sure, it's not
the first key frame. And maybe it's not even a frame. And this made me realize how
Illustration and animation, as we said, are similar,
but they're also different. The illustrations images are designed to feel
alive but not to move the animators task
is to take it and think, how can I use this or how can I translate
it in actual frame? First of all, as I said, this cloud was
very nicely drawn, a nice almost symmetric
or very clean cloud. And in the animation, I
think I used it in the end, it's part of the animation. But in animation doesn't
necessarily have to be so clean because there is this
movement of the steam, and so the cloud can be
more squashed or more, um, yeah, the frames
single frame by frame. If you take one of them, doesn't have to be
necessarily beautiful. Yeah. I just work
in the sequence. And this I find it
very interesting. Another example, which
is maybe helpful is a job I did in the past where I
had to animate a juggler. And the illustrator
gives me the piece, like the final illustration
where there is this beautiful juggler juggling five
balls at the same time. And the illustration
was very graphic and the composition was very
nice and symmetric. And the five balls were
positioned in a very graphic way, like in a circle and
very equally distant. Beautiful for an illustration. But the moment I had to animate, I quickly realized this would
have never been a frame because an animator has to think about physics and
the actual movement. And it was not possible to make a realistic or
believable movement with five balls in the air
in this circle position. If you juggle, I had to watch a bunch of YouTube
videos of jugglers. There was no way to have five balls at the same
time in the air like that. I mean, you could,
but it would be supernatural to have these five balls moving
like this, right? Yeah. But that's not
how juggling works. This I think is a great example of the differences
between animation and illustration and
sometimes those bit of clashes of trying to convey what the
illustrator had in mind, but also make it possible. Yeah. So I thought about
it during this project, and I saw it could be a
very interesting point for the students
to keep in mind, especially, let's say, when we tackle this small loop
or this small project, you don't have to start with that exact drawing
or that exact frame. Maybe that is part
of the animation. Maybe it's in the middle,
maybe it's in the end. Yes, so to recap what I
wanted to say and what I learned with this project
is that as we know, illustration and
animation are different. They are similar, but
they are different, and especially they
have different goals. And the illustration is there to have an impact with the steel image and it's
not thinking about motion, usually the pose the
illustrator chose, actually, the pose the illustrator creates is usually a mid action pose. It's a sweet spot that
describes the motion, but not necessarily a frame. And the animation has to think about the
timing and the physics. And so when the animator has
to bring something to life, they are animating toward the intention of
the illustration, I would say, trying to bring the spirit of the
illustration to life. And to do that, they have
to kind of reverse engineer the physics to create a
believable movement. Yeah. Yeah. So basically, like one static image in
illustration is not the same as a key frame because I'm thinking
of a static image, and that is that
conveys the design. But for you, it is multiple frames that
then make the image, basically. Yeah. Like a puzzle. Mm hmm. Yeah. It's funny because it's like the
animators think in time, and the illustrators think
in the steel moment. Yeah. Which is, I think why
it can be difficult for an illustrator to understand
the animation process because you're
thinking about the static image of, like, Okay. And then that's my first one, and then I keep going with
other movements as frames. But yeah, you need to
think in a different way. But that's why
Procreate dreams is such a good solution because
it makes it a bit easier to understand because
you can move things directly instead of always having to work with key frames. And so I think that's why trying all these
different objects, trying all these different types of animations is a
really good exercise. Yeah, I agree. And it's true
that really procreate and procreate dreams kind of create a bridge between the two worlds. I find it fascinating. And I honestly didn't
even know that you could import colors, brushes, your whole files,
like, everything can go directly into dreams, like, but no problem.
So it's perfect. Yeah. I think this
is a key feature that no other software
has like that. So smooth. Yeah. One of the questions we
have noted down was, do I need to animate
every object or is it okay if just one moves
and connected to that, the second question, I think is, do I need to understand complex animation principles
to start animating? I think they can go together. And this makes me think also of the podcast episode we
recorded some time ago, which is on YouTube,
because there we also mentioned how it's totally fine, and in some cases, it's even better if the
animation is subtle. And there is no need
for crazy skills or crazy actions which
are complex to create. Yeah. In order to make an illustration
appealing and alive. As we mentioned then, and I'm going to repeat this
because I really believe it, the simplest thing that is so effective and has a great
impact is the blink. You could have a
complete steel image, but if you are a
character not moving, but if you blink the eyes, it suddenly comes to life. And it's really magical. As also humans and animals, we are the moment we see something blinking or
we see ice everywhere. And the moment we see a blink, this becomes instantly alive. Yeah. So this will be my first tip to just learn
how to animate a blink, which are tree
drawings, super simple, open eyes, like
Alf closed closed, and this gives great motion
already to the picture. Another thing I wanted to
mention here that we used in the class was to animate a
sort of noise or texture. And I liked earlier
in the other Q&A, you mentioned the noise to get
a weight of the flat look. I didn't know this when I animated because now we are
having the Q&A at the end. But it's funny
because then I also thought I thought I want to make the old piece
a little more alive. At the end of all animation, once we animated every
single element was working, and it's very beautiful. But then I thought I can give an extra step and an extra
idea for the students to try, which is to give a bit of motion or to give more alive
feeling to the whole piece. So we have some elements moving, but some others are flat
or completely still. And so what I did was to use the texture and on top of everything and give a
little bit of movie. Yeah. So that gives this boiling
effect or like this yeah, noise effect, we can call it. Yeah. And even though not every single pixel of the
illustration is animated, this gives to the final
video a live feeling. Otherwise, some parts
of the illustration or the animation would be still a proper illustration.
Which is fine. I think I mentioned it in
the class. It was a test. It's not necessary to have an animated
noise on top of it, but it gives an extra layer. And I think that could be also something people can
try if they want to bring their illustration to life and they have
maybe a simple blink. Maybe a noise on top
can help to enhance it. Yeah. I was also going to say, I think that all of these types of animation that you added, they can all apply to
different projects, right, because the subtle
the texture on top, now that I know that
I wrote it down, I'm like, I'm going to try
this and other stuff, too. And for example, the
blinking of the eye, if you ever want to do, like, a Halloween
illustration and have, like, a bunch of eyes in a jar or something, make them blink. I've done it a couple of
times, and it's so fun. Even when you have
no animation skills, that's the easiest
thing you can do. And, for example, these are
all things that can apply to other types of animation like the spider moving that
could be any kind of apply to any kind of movement up and down,
left and right. The steam could
be, will you have a class on making steam come
from a mug, for example, that could be any kind of
steam or clouds, I think, clouds in that way, the
movement of the mouse. I'm thinking of all
these kind of types of movement that you can apply to so many other things as well. Yeah, I love thanks
for mentioning this because I truly
love this approach and it's something I really
believe and I hope I can pass it on to my students
every time I make a class. I don't want to just show a skill or a trick that you can use for
that specific project, but hopefully opening
possibilities so that you can mix and match all of those things and use them in future projects, collide different skills
and put them together. So yeah, ideally, it's a toolbox of
different tricks that you can then learn and use whenever you want
or whenever you need. I agree. It opens so many
possibilities, right? I'm really now very excited to do my own whimsical
shelf, you know. Yeah. I've only done well, I've tried a couple
of your animations, but I want to do the
full thing again and, like, get a good feel for it. And then I think that would make me
feel so much more comfortable in P cray
dreams, as well. And I'm already
thinking of, like, different takes on this project. Like, you could do
another season. You could do, like,
a summer bookshelf. You could do an autumn
one and a Halloween one. Like the possibilities are
analysts just with this type of illustration and
movement, basically. Exactly. I was
thinking the same. I love this format because it allows you to do
it over and over, but completely different and
try new things and improve. I was also thinking, I really
actually want to do it. After we did this
collaboration, I thought, I want to do the same,
but with stamps. I saw that you also illustrated these amazing stamps on the
facade on a shop window. Yeah. Madrid. And
I was thinking, how cool it would be
to have a sort of illustrated like frames
of different Yeah. Stamps and animate them. Absolutely. Cool. Think we even talked about this when we were brainstorming this idea of in general, having not just one big piece, but an illustration that is made up of different
little objects. We decided on a
bookshelf with objects, but we were even thinking, What if it was frames or
what if it was stamps? And I think initially the
cat was going to be inside a frame like popping up or
something or like blinking, but like a frame of a cat. And I still really
want to do that. Something with stamps or
frames. Like that sounds so. Yeah, stamps or frame, as you said, would be
very nice, like a wall, different frames with different
shapes and in that case, I also like the
idea of the frame because it allows
you to bring into the shelf setting something that could be outside or
a different scale. For the students if they
feel trying it again or it doesn't have to be an object that sits on a shelf could also be a picture of a lion
and the lion is blinking. This opens so many
possibilities. Once you've tried all
those different animations that you've made everyone do, I think you can apply those to so many different types
of movements and topics. It works so well, so yeah. Yeah, I love this. It was
a great collaboration. Yeah, same. It was awesome. I want to do another one.
Now, I'm so excited about it. Yeah, me too. Let's start Brice
Dorming for the next one. Exactly. Yeah, overall,
I feel like it was a great test also for us
and a great collaboration. And on this note, I want to say one more time that really, I feel collaborating with other creatives, also
different fields. It's always a great experience and opens up so many doors. So I would just recommend not
just in this specific case, a Skillshare but in general to be open to collaborate
with other people. Yeah, I just just recommend it. Absolutely. I mean, just to be able to work with
someone else, get feedback, and work with someone else in a different field is a huge, a huge bonus, a
huge plus, so Mm. Yeah. Yeah. So yeah, with this Q&As, we tried to cover everything that came
really into our heads. But if there are any other
questions, of course, we're very happy to reply and to continue
this conversation. So just be sure to write it down in the comments or in
the discussion on Skillshare. And we'll be very
happy to go on. Yeah, we'll be here. Yes. And if people are looking for people
to collaborate with, right? Let's do that in the
discussion post. We mentioned that in my Q&A. Like if you're looking
to work with someone, do like illustration animation. Do appropriate file, like
an illustration together. Find your people. Yeah,
you can do it here. Yeah, let's make the discussion
section a good matching place where you can find
your body for collaboration. I like that. Mm hmm. Okay. Thank you, Claire. Thank you. It. Well done.
16. Wrap Up: Thank you so much for
taking this class. I had a lot of fun working on this collaborative
format with Claire, and I hope you enjoyed it, too. If you'd like to
see more classes like this, please let me know. Your feedback really,
really helps. I can't wait to see your work, so don't hesitate to
upload your progress or your final loop in
the project section. And if you have any
questions or on feedback, I'm always here to help. If you like this class, please consider leaving a
review here on Skillshare. This really helps
the class and me to create more classes like
this in the future. Finally, if you want
to stay connected, you can find me on Instagram, YouTube, or through my website. Until next time, atta
 Giulia Martinelli, Animation Director / Illustrator