Transcripts
1. Introduction: Hi. Today, I'm going to show you my go to basic rig in Moho. We're going to take a simple
anthropomorphic character, a sketch from my iPad, and bring it to life in
record time. I'm Julia. I'm a two D animator
with over a decade of experience in traditional
frame by frame animation. Lately, I've been
diving deep into rig characters in
Moho, and I'm hooked. Why? Because this software perfectly combines the speed of puppet animation with that
beautiful organic look and feel we love in andron work. Moho is incredible because
it combines the soul of andron animation with vectors and the speed of
puppet animation. No prior knowledge is
required for this class. We're going to build
it from the ground up. To help out, I've included
some great resources. A character template to retrace. If you're stuck for ideas, a Moho quick start PDF, accurated list of further
links to keep you inspired. See you in class.
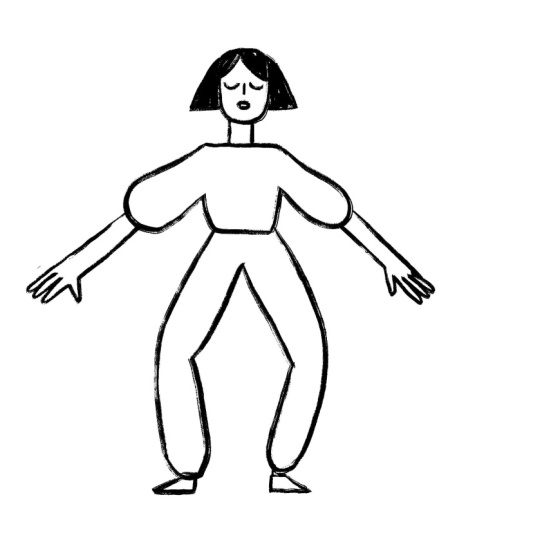
2. Designing the Character: I'm dropping into Moho the sketch that I just
made on Procreate. I try to make it as
symmetrical as possible, but that's just a sketch. In fact, we will have to
redraw it here in Moho. I'm going to scale it so that it fits nicely in my canvas. I didn't draw the ice on purpose in this character
because in this class, we are focusing on a simple
rig and we don't care, for example, about the blinking. By double clicking on the layer of the image
I just imported, I can set the
opacity, let's say, to 20% so that I have a
nice reference underneath. And here I created a new vector layer and I'm going to start drawing
on Frame Zero. This is very important. Frame Zero is our workshop
to build the character. So I will start by
retracing the head first. In Procrite, I used
an inky brush. I think it's called Inca
found in the inking section, and it's one of the
default brushes. I want to reproduce this
type of brush here in Moho, so you could create
your own custom brush. But for today, we
just use Guash, which is one of the brushes
already present in Moho. This is how it looks
like, and of course, you can click on
the brush settings and make it even better. In order to do that,
because it's a style, you would have to go in the
main style panel up there, select your gush style, and then adjust the settings. For example, I
want less spacing, but maybe more variation,
something like this. So when I'm ready to draw, I select down here my style, and it will be updated. And the good thing
about styles in Moho is that you can
adjust them anytime, even at the end
of the animation. We will see it in a while. So now I will start
redrawing my character. I will start by redrawing
the head first. In this case, as
we're keeping things simple and making
a very basic rig, I'm keeping the
face in one layer because I'm not planning to animate the eyes or the mouth. Here with this tool, you can
work on the thickness of the line a little more and
customize it even further. For instance, for
the ice details, it works for me better this way. Because they're
vectors, of course, then you can always move
them and adjust them. Maybe I'm not happy with the shape of the
head, for instance, so I can refine the line and reposition some points until
I'm satisfied with them. So let's say that
this is the head, I'm going to create a
separate vector layer for the hair because
I'm thinking I could put two bones in
there and animate a light movement of the
hair as a secondary action. By the way, you see when
I go in another layer, the program blurs out a bit the quality of the other
layer. But no worries. This is just a render issue. It's not compromising the
quality of your final piece. Here, I'm going to use my brush to make this kind of a texture. In this case, I do this because I want to have
this sketchy look. Of course, you can also use auto fill up here to have
a clean field shape. But this lady has a
doodly aesthetic. So by doing this, I'm clearly
creating a lot of points. It's a choice. It's
a style choice. And actually, that's what
I love so much about Moho. I can take something
very sketchy from my sketchbook and make it vector and animate it
very fast. So we move on. I'm going to do the neck next. I could keep it
together with the body, but I'm thinking to
probably leave it separately just
for extra motion. Yeah, you see here, I don't like the thickness at
the moment of this line, but I know that we
can fix it later. And after all, this is
a class about rigging, not drawing, so I don't want to spend too much
time on designing. But it's good to know and to
remember that you can change the design or the quality
of the line later. Okay, now I'm going to create the body and when I say body, I mean the chest mainly. So here we can test
the autofil actually. If I select a white fill
and tagle autofill up here, while I draw my inky line, M is going to
automatically put a fiel, which is not mandatory
for such a sketchy look, but it could be
useful in animation, especially if you have some
overlaps of some element. For example, if the arms
go on top of the body. Now I'm going to create a
new layer for the right arm, and I'm going to
do shoulder arm, forearm, and even hand together. And I will keep the autofill on for this part,
and here at the end, just leave it so
that there is no fell in the connection
between arm and chest. And maybe this is
a good occasion to show you a cool trick. For example, we have a
point at the armpit, and then I have a point
a bit inside here. Actually, I have
more than one point, so let's delete one. In the final look, I don't
want to see this section. And with this tool, I can
hide a section of a stroke. And then I'm going to continue
with the rest of the arm. And when I design, I'm not super precise because I can adjust points afterwards. And here's another
trick. I need to move this second shape behind. So using this tool, I can select the shape, then press Shift and arrow down to move it behind the
shape I drew previously. Now I can adjust a
beat those points, so I'm more happy
with them, maybe. And ideally, I would
also go layer by layer, and maybe we can
do it afterwards and reduce the number of points because
reducing the points makes the animation
a bit easier. We're going to do the same for the other side for the left arm. And to be more
precise, actually, you can duplicate the first
arm and flip it horizontally. In this way, the arms
are exactly the same. Here we go flip
horizontally super easy. I reposition this
wherever I want it. So as you can see, the sketch
underneath was not as good. I mean, I do like
imperfections of sketches, but especially for limbs, I think it's important if
they are the same length. Now we want to do the
same with the legs. I prefer the left leg here, so I'm going to first draw the left and then duplicate
it for the right one. Once again, I will just use one layer with the
entire leg together, including the foot, like so, even though probably I
would extend it a bit, like so and put a point here, and then hide this part. And then I'm going to go
down here and draw the foot, moving it behind the pens. And today, I want to
add the sock, as well, which will be like
a small rectangle, and I will select it
and send it back. But now it's a little
too much back, so I'm going to send
this one back now. Let's see if it makes any sense. I'm not 100% convinced, so I move something
around like this. That's the idea. Now
it looks okay to me. The ankle or the sock is
not really necessary. You can also skip it and have the foot directly coming
out of the pants. Now I'm going to
duplicate the layer, call it leg R, right, and then
flip horizontally. And then I'm going to
reposition it with this tool here so that
they are symmetrical. And as you can see, again, my sketch wasn't very
symmetrical, and to be honest, I'm not even sure that
the head is symmetrical, so I'm going to select everything head and neck and move it a bit
more in the center. So this is the
character And actually, before we move on to rigging, I wanted to show
you how we can add the white feel also, for
example, on the head. So let's dry that quickly. Now, this is the head, right. I'm going to select
those points and another trick to select all
the points of a stroke, you can select just one or a couple of them and
then hit the tab key. This will automatically select all the points of a stroke. Then I'm checking if
feel is on up here, and then I'm going to
select the color white and click Connect and
create. Here's a trick. And here, as you can see, it's again on top of everything, so I have to select it, shift, arrow down to move it
in position. There we go. For the hair, I don't
need to do anything, and for the neck, I do. And here it is. This
specific point, I just want to adjust the
thickness here. Okay. The only thing I'm
really not happy is the mouth because
it's very blurry. As I mentioned earlier, at any point, we
can edit the style. So we're using guash. If I go on wash in styles up
here and we open this panel, we can modify the brush. And as you can see,
automatically, it's going to modify
our character. For example, now I lower
the number for the spacing, and design is much more visible.
This could work for me. Then I can, of course, even modify the actual vectors. For example, here, I can
go back and say, really, this slip is way too bold and then go like this
and tone it down. Actually, I don't
dislike it like this. I can even reduce it and
delete in some points, and maybe I'm a little
happier like this. She's also happier. Walla,
that's better. Okay.
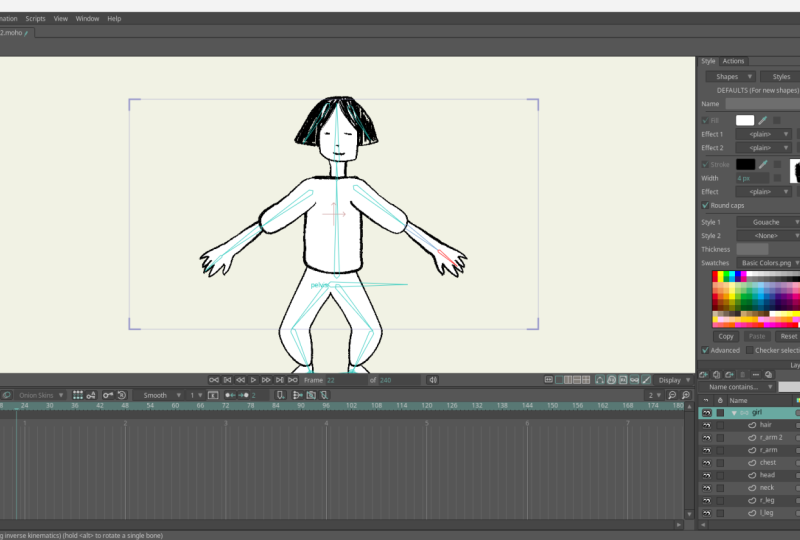
3. Rigging the Character: Now, we go to the actual point of this
class, which is rigging. We create a bone layer
on top of everything, and we call it girl. And then we drag all
the vector layers we designed into this folder. And finally, it's time to rig. This is the tool we
use to add bones. First thing I create
is the pelvis bone, which is the main bone. I can also rename
every bone up here. I call it pelvis, and if I click here, I can even show ups, show a label with the name. If you shy the bone, the bone
is going to be invisible. Everything we do now is on Frame Zero and on
the bone layer. This is very crucial. And now we go on creating the
next bone from the pelvis. I want a bone that goes up. And now the pelvis is
selected. You see, it's red. So it means that
whatever bone I create next is going to be
parented to the pelvis. So I create a bone
for the chest, and now the chest is red, so I go on with the neck
and then with the head. And from the head, I want to put two
bones for the hair. So one is here, and the next one should not be parented to
the other here, of course. But then in order to have
it parenting to the head, I press on option for Mac and At for Window and
click on my headphone. And we're going to do
the same for the arms. I'm going to select the chest. Of course, the arms are
parented to the chest. Same thing other side. And then I go back to the pelvis because the legs
are connected to the pelvis. And here I have a knee,
and for the shin, I'm going to go until the
ground and then at the foot. And the same goes
for the other side. Note that for Moho, it's quite important
that the legs bones are not super straight. In my case, the legs have
a very generous bend, but it could also just
be one degree angle, and that would be enough. And then once we've done this, I want to option click on the canvas so that there
are no bones selected, no bone is red, and I will add two little bones
attached to the feet. And remember option
or I'll click on the canvas before drawing
each one of those mini bones. Those will be our target bones. And now let's rename
a couple of bones, the shin R and shin L. And
then also the foot and foot R. This should be
enough for a basic rig. This tool here shows
the bone strength. You see that every
bone has a sort of aura of power and what it means is that each bone will affect the drawings
in those areas. So you can test the rig by going to any
frame in timeline, not zero and clicking on
the Manipulate bone tool. Then you can try
move things around. Note that we are on the bone
layer and not Frame Zero. So they do move already, but you can see that
when I move the arm, for example, the head
is affected, too. And that's because for now, they're just following those
strength bubbles, right? The character is moving already, but it's not great, right? There is a bit of distortion. But it's nice, for example,
that the feet are lifting. So this is already something. But if I move this,
nothing really happens. And if I move the pelvis, also nothing happens because I didn't set the target bones yet. I personally don't use
the bone strength much, so I select everything, go to the bone
strength and drag it down so that there
is no bone strength. Once I do this, nothing is happening because there
is no bone strength, and we didn't attach the
drawings to the bones yet. So don't be scared. That's
what we're going to do now. But it's good for
you to know that you could also use
the bone strength. So before we move into binding
the drawing to each bone, I want to set the target bones, which means telling Moho
where the ground is. I select Shin R. I go in
bone constraints up here, and for the target,
I choose target R. This is an important trick
that now I learn by heart. Same stuff other side, Shin L, target L. And finally, and I don't have to close
every time, but I do it, I go on foot and I tagle independent angle on
the other side as well. And by doing this,
just the bones are going to move
but bear with me. When I do this, you can see now that when I move the pelvis, the legs and the feet are on the ground and it's
working as I want to. But now let's connect the
drawings to the bones. I said before, I want to reduce the points as
much as possible. Again, for the purpose
of this class, I'm not going to
do it in detail, but I'm going to show you how binding means we're
going to connect each bone to a
portion of the body. We select the bone with
the select bone tool. And with this other
tool here, bind points, we select the points we want to connect to the bone and
then press bind points. By doing this, these points are going to be connected
to this bone. But to make it easier
or a bit more dynamic, you could just reduce points. So what I just did, for example, and adjust your
design if you want it differently so that it's
a bit less chaotic. I'm also going to do
this one and bind points and then next bone
and bind points. And then finally, for the foot, I'm going to bind
all the other ones. And of course, I don't
bind anything to the target bones so
other leg, same thing. I bind the points like so. And then when you
select the other bone, you can see the
points that have been already bound to
the previous bone. They have the same color. So you know more or
less where to bind. And if you bind again a point
that was already bound, it's going to automatically be unbound from
the previous one, which means every point can
be bound to only one bone. So now we move to the neck. Here you can see there
are a bunch of points. The neck could also
just have four points, and those four points could be bound to the chest
bone and the headbon. But here we have a little more, so I select only the central
ones and bind them with the neck bone and
select this part here. These points can be
connected to the body bone, and those points on top can
be connected to the headbone. And then I go to body, and for sure, all those
points belong to body. We do now the right arm so I select again my bone
and here upset Daisy. Let's try like this. I don't think there is a perfect
science for this. In some of the characters I've been working on in
the past months, I had a rule for myself
there was, at this point, at the junction of two bones, I would have two
points for each side, so that one would go with the previous bone and one will
go with the following one. But I'm not sure that that's the best idea
because sometimes I only have two points
at the junction and they work better
in the bending. So I would say it
depends so much on the character
design and brush. Do your experiments. In this case, we can
test this quickly. You can always fix those
issues with Smart Actions, even though I think ideally you try to solve these
problems earlier, as much as possible
in the rigging phase. And then with the Smart Actions, you can fix some extra stuff or yeah whatever you
couldn't fix earlier. So ideally we don't
postpone the problem. That's what I'm saying. So here, again, very straightforward
for the hair. Yeah, each side of the hair is connected with its
bone, like so. So now that we did it,
we're going to test it. We go somewhere in the timeline, for instance, at 6 seconds. It doesn't matter as long
as it's not frame zero, and I have to be on the bone layer and use
the manipulate bone to. We don't need the timeline, so we can see a bit better. Now I can test some movement. Of course, I cannot
move the hair too much, but because now the head is
filled with white color, I could actually complete
the hair behind it, and we're actually going
to do this in a second. You see, those testing phases are useful to spot problems. I mean, she could ask pigtails. So let's keep testing.
This is moving. Here there are issues
with the outline, and of course, we
have to fix it. This bends quite well. Actually, I'm quite
happy with this. And then the pelvis
works like so, and you see like
automatically it bends. But it creates some mistakes. But maybe we like
those mistakes. Actually, I don't
dislike this style, but we can fix this with
a smart action later. And here I can use the target
bone to move the foot. And here we have this
independent angle, which is very nice and useful, especially for walk cycles. And by the way, I have a
class on walk cycles, too. The ankle is actually
moving not too bad. So after this test, we can just delete those keyframes and go
back to Frame Zero. As we said, we can fix the hair. I'm just going to turn
off the head for now. And of course, now
I'm adding points. So I will have to reconnect and rebind those points
to the bones. Let's do it like this.
This is the hair. Alright. So what we have to do is to go on the hair layer, and here we decide how
to bind those points. So I would do it like
this. Let's look at this bone on the left. Now, the red dots are the
ones we already connected. We're going to select half
of them and pin points and then select the other bone and bind the other
half more or less. Now, let's test it. It works, so I think it's not that bad. Of course, the anchor
point is not ideal, but in this case, what I want is just a little bit
of subtle movement. So for the purpose
of this class, this is more than enough. Let's have another quick test. Op. That's how we
spot mistakes in a rig by testing it
out. Whoop whoop whoop. I'm keeping this
in the editing of the class on purpose
to show you that it's a back and forth process in
which we go in frame zero to build and then in the timeline to test
the movement and so on. What happened here is that
there are most likely some points that have
not been bound properly. So I have to re select everything
and bind my points one more time. Now we're good. Okay. So the main
rig has been done, which is the main
part of this class. But I also want to show you very quickly how we can polish some movements
using Smart Actions so that the rig works perfectly. It's not perfect now
because, for example, here we see the white patch, or here the line is breaking. This is not perfect,
but it's a great start. So let's learn what actions are. There is this panel
called Actions. If you don't see
it, you can open it by clicking on Window
and then Actions. When we create an action, we basically create a
sort of small animation. If you know animate
or the old flesh, it's a little bit
like symbols in the sense that it's
a separate timeline, a separate parenthesis in
which we put an animation. In this case, we use it to
fix some bone movement. Like, for example, now, I'm
going to test this arm. If I bend the arm like so,
it's not working, right? Or if I pull this arm up, this doesn't look great, either. So we want to solve
this problem. And in order to do this, we have to create a smart action. Firstly, I'm going
to rename some bones because each action is going
to be connected to a bone. I call it shoulder lm, and this will be shoulder
right, of course. Then I select the bone that I want to create
an action for. Note that I have to be in my bone layer and on Frame Zero. And in the action panel, I'm just going to click on this icon to create a
new action and hit Okay. And the action is going
to have the same name as the bone that we
already created. Don't ever change those names because it's going
to make a mess. When I do so, you
can see that we enter a different
timeline, which is blue. We are inside of the action. Then I go around 4
seconds and I move the shoulder bone up like probably the highest I
would move it in animation. And to do so, I use the
transform bone tool. And now I need to go in the vector layers
and fix this part. Right. So I'm telling Moho every time this bone
does this movement, the arm, so I go to
the arm vector layer, the arm should do this. And as you can see here, I drag this point down, and now I'm going to
drag this point up. And actually, I
will have to make this section transparent
on frame zero. Now you can see that
as the arm goes up, the outline is going
into position, but it's still not perfect. So I'm going to add another
key frame at 1 second, fix the vectors, and also actually reduce the thickness
of this line a bit. Let me check the movement
until 4 seconds, the arm pit is working. But let's fix what I meant
before for the shoulder, so I go back to
the main line with double click and I go
back to Frame Zero, and I go back to my
left arm vector layer. So first thing I see is that
it's not connected nicely. And then probably this could
be a thinner line too. And then this one here, I'm going to put
it a little more inside and make it
transparent so that when so that we have a bit of
a transparent section here. Now we go back to
the action shoulder, so you can see that this
section became transparent. This is what we moved
earlier and now it works. So I'm going to quickly zoom out and show you what we
just did with this action. With this action,
we're telling Moho every time the shoulder
bone moves up, adjust basically those
two connection points. And you can notice here the
shoulder is not perfect. I want to show you
that in an action, you can add keyframes in
multiple vector layers. For example, the chest,
let's move it a bit. Like at 4 seconds, I could adjust even
further and select this point in the shoulder and move it so that when
the arm goes up, also the chest is
a bit affected. So, yeah, you can decide
how your character will move and the body parts will
react, but this is the idea. So in order to finalize the rig, I would go on and create a smart action for each bone
that needs some polishing. I go back to the mainline. Remember when you are inside
of an action timeline, the timeline has a
different color, and then you have to go back to mainline to actually animate. So here, for example,
we are in the mainline. If I animate always
on the bone layer, of course, you can see that when I move this arm, it's fixed now. This is the action we just made. While this other arm, we didn't. So you would have to
create an action for every arm or for every
bone you want to fix. For example, let's see the leg. Let's try to fix the leg. I want the leg to bend better when it does this kind
of extreme movement. I want this to be fixed. And actually, this is
a perfect occasion to show you a very
important trick. I'm doing the other
side because there is the pelvis bone in the
way, and that's confusing. So you can see here this
movement breaks the rig of it. And this happens every
time I move this bone up, but also when I move this
other bone, the shin down. So it's a combination
of bone movement. And this I found very
tricky when I started because usually an action
is linked to one bone only. So here's a trick. It's a very weird one,
but bear with me. Let's first rename this
bone to thigh left. Now, with this bone selected, I create an action, and
here comes the fun part. We go again at 4 seconds, and now we move this leg up, and by moving just
the first bone, I already have an
issue to solve, which is here at the groin. Let's fix it right away, so we do it gradually. We go on the leg
and we're going to connect the outline
with the pelvis. So this is solved. Not the top though. So the top may be
like this. All right. So this is not a
problem anymore. Of course, the other leg will
have to be fixed as well. But we want to fix
the knee bending. I go back to bone layer. I'm going to select
the other bone, the shin, always using
the transform bone tool. I do the biggest bending that
I would do in animation. And just to see better, I turn off the arms. So now that I did this, you can see that the stroke
of the leg is messy. I go back on the
leg vector layer and I want to fix the points. Here, there are a bunch of
points, and this doesn't help. And of course, as
I said earlier, the smallest number of
points you have the better. But basically, I have to
unravel this mess and find a shape of the leg that would work for me
for this position, right, for this action. So she has baggy pants, and I think something
like this could work. Then we test it. It's not bad. I think
it works quite well. But now here's a trick. I cannot just go back to
mainline like this because I moved another bone inside of the thigh bone action, right? And I don't want to
tell M that every time that I move
this thigh bone, also the shin has to move. So what I have to do, and
this is the tricky part is to go back to the bone
layer inside of my action. Select the shin bone, which in this case
is already selected. But it's important to
know that once you select a bone and it's red here, the red line in the timeline and the keyframes correspond
to that bone. So I need to select
the shinbne and then go on its keyframe
and delete it. Crucial part here, delete it. This looks horrible now, but it doesn't matter because
we are inside the action. Now, we basically
tell Moro, Well, every time this tie bone
moves in that direction, the points are going
to move this way. And I'm going to show you in the main line that
nothing really broke. Now, if I move this leg
up, you see what happens. First of all, this
part is fixed. We already solved it, and then it's following much better. And of course, if I stretch it too much, then it's not nice. But then this is a problem
for this other bone. Like, I should create probably a smart action for the shin. Let's maybe do one more. I want to show you that you can create multiple actions
for the same bone. Why would you do it? You
would ask? Here's why. Let's say you finished your
rig and it's time to animate, or you're testing the character and all the poses that
this girl can strike. Let's start with a resting pose, and then you go 1 second and you find a nice dynamic pose. And this is funny because I have another class about
dynamic poses. Let's say this is our animation. Tara she's funny. Earlier, we created
a Smart action to fix the shoulder movements
when it goes up. But we didn't create the action for when the
shoulders goes down, like so, so we see here
when the arm goes down, and maybe this is the
maximum it will go. This part is broken, right? We already created an
action for the shoulder L, and you cannot fix this
in the same action. You would have to
create a new action. With the bone selected, you just create a new action, and it will be automatically
called number two. And then you just go in
the other direction, move the bone first
at 4 seconds. Um then again, I go on the
vector layer and sorry, I did the leg, but I
need the arm quickly, I'm just going to show
you that we can fix it. Now I'm doing it super
fast just to show you. I go back to main line and
yeah here is my frame, and as you can see, we fixed it. Great. So this is the point. Do your rig, fix your
broken usually limbs. Those are the ones that
need some Smart Actions, and then you're
ready for animation. Here, as we said, we did
a very, very basic rig. She has no eyes, no blink,
no mouth animation. Of course, you could
also animate a blink. Maybe I could do
a separate class about controllers
and how to animate the blink or a mouth
or even the head turn and maybe even on
the same character, so that we can go on with the same character and
improve the same rig. And also fun fact in
case you already have a small action or animation and you want to play
around with key frames, you can, of course, select them, right click and play
with the easing. At the very end,
last but not least, I want to share an
important trick for my favorite feature in
Moho, the boiling effect. One of the reasons I
love this software is that even though
it's a vector puppet, it simulates that brushy
traditional feel so well. To do it, simply open the brush setting of your
style and toggle line boil. Now look at the
randomness interval. You can choose zero if you
want it to boil every time the line moves or set it to three to mimic
that trees effect. Here you go. Enjoy that
beautiful sketchy look.
4. Wrapping Up: And that's it for today. We took a sketch from a
sketchbook or from the iPad, and we brought it into Moho. We redrew it with a brush that looks pretty much
like the one we used, and we rigged the character
in a way that it's working. So this character now
can do a bunch of poses and can move very nicely. I hope this was useful
and you can have fun with this and you can fall in love
with Moho as much as I did. I can't wait to see
your Rig characters. When you're ready, share your
rig in the project section. Here's how to do it. Option one, take a screenshot of the character with all
the bones visible. So we can see your skeleton. Option two, the plus point, screen record a quick
video of your character moving or you testing it
and save it as a Jif. Or if the video is too
long or too heavy, share it on social media, tag me and link it in
the project description. Either way, I'm so excited
to see what you build, and I hope you have a lot
of fun with your rig. That's all for today.
And please let me know if you want to see more Mohawk tutorials because I'm hyped, and I will be very
happy to do it. I love how easy and
intuitive this software is. Happy creating. I'm looking forward to see
your Rik and talk to you soon.
 Giulia Martinelli, Animation Director / Illustrator