Transcripts
1. Introduction: Hello friends. My name is Maria. I'm an artist, illustrator and surface pattern
designer based out of North Carolina in
the United States. Welcome to this
class and my studio. In this class today
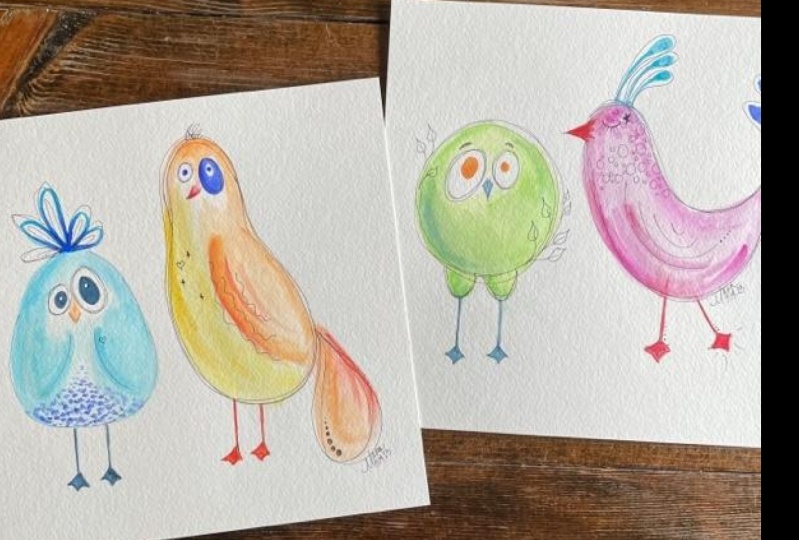
we're going to be making some cute whimsical watercolor. A little birds like these. Aren't they adorable? All you need is some basic
watercolor supplies, a pencil, a pen. I miss watercolor
paper, and that's it. Now. So you have to make
these little birds. So grab your supplies together. We'll get the painting.
2. Supplies: For our whimsical
watercolor birds, you'll need some
simple supplies. Some watercolor paper. Mine is just so cheap
watercolor paper. It's an eight by
eight size inches. That is a pencil and appropriate size
watercolor paintbrush. And I have my micron to 0.5 ten. Here's my palette, and I use fairly limited number of
colors from my palette, but any colors you
like for work. And then we will get
started in creating these cute whimsical
watercolor birds. Shown here is the watercolors that I'm using in this project.
3. Blue and Orange Birds 1 of 2: Alright, we're
gonna get started. I have a number six
paintbrush here, and that's a good size for my
paper that I'm working on. Baristas doesn't
matter as long as it matches your paper size. So I like to have
a pointed tip and that way I really don't
have to change sizes. My paper here is eight by 8 ". It's relatively small intestine inexpensive sheet of paper. Got my mechanical pencil, and I'm going to put into birds. So I'm going to make
them different sizes. This one I'm gonna make a
little bit of an egg shape, so he's a little bit
smaller at the top and a little bit rounder and
chunkier at the bottom. Well, it doesn't
have to be perfect. I like to just sketch
super, super light. I don't end up
generally erasing, but I will make a boo-boo
here in just a second. So you'll see that. Then I'll put these
little feet shape in. Now, you will be able to see these shapes come up
when we start to paint. Or if you check in the
resources section, I provided you with two papers. And those will give
you the shapes of the feet and the different
shapes, bodies and eyes. I just marked into little
curved shapes for a wing, I got a really big eyeball and then I'm gonna put
a smaller eyeball. And then first beak
is just a little v. That's all the detail I need
to get in on this bird. The next bird I'm
going to work on it. He's gonna be kind of
like a bowling pin shape, but he's kinda tilted. So it's almost as if he's
kinda leaning to the side, put in a nice small head, could look like a squash, that type of thing. Now just work on getting him in. I'm going to make a beak
that's gonna kinda come down. It's a V, but towards the side it looks
like he's looking at the other bird that left
eye balls pretty small. And then I'm going to
make a really big kind of eyeball and he only
has one wing showing. We'll get the little
bitty legs in for identity like little bitty
legs and the little feet. So make sure you check out. It's more like a duck foot
rather than a true bird foot, but they look so cute. And I'm deciding
on that wing here. Okay, I think we're good
enough now to start painting. I'm going to get a little bit of water, all my paintbrush. And I'm going to start
by putting water just on the area of my bird. Sometimes I like to start
off with just clean water. And then that way when
I dropped paint in, I can watch it move throughout the entire bird or
whatever I'm painting. To be honest with you, I'm making sure that I'm
really concentrating around those eyes and getting
color all the way around. Now here's my palette. It's just a 48 half pan. Again, it's one
of those supplies that is relatively
inexpensive for what you get. And I don't want it
to move everything ever see you can see it. So I'm starting with a
little bit of a bright blue, cerulean blue, I
guess it would be. And going in and being really
careful along those edges. Now the watercolor
paper will start to absorb that water you put on. So it starts to
dry out relatively quickly and it doesn't
take a lot of pain. So C is already dried out. I had to get some water, but it really doesn't
take a lot of paint. Watercolor tends to
dry a little bit lighter than it
looks when it's wet. Now, I'm going right
over that beak area. And it might be something
if you're going to use a lighter color, you might want to
leave that beak white. I'm just going to travel
along somewhere along those lines that the
wing I'd sketched in. Not being very
particular about it. And then I'll start to move
that color back and forth. Wiping off my paintbrush. And I'm gonna go grab
a little bit of a purple and make sure that I have diluted it down
enough and I'm going to start adding little dots
on his bottom side. Now, I don't really know. I don't really know. They haven't really planned
out what I was doing. So this is kind of on a whim. And you'll notice that these
dots start to spread out. And as they spread out more
and more they lighten up. I'm just gonna give them
a dotted underbelly. As I start to add
some of these dots and I realized that my
paper is drying out, so I'm going to wipe my
paint brush off and just get a little bit of water. I'm going to let
me draw that off. There's too much water. I'm just going to
drop a right in the center of some
of those to help that pigment just
spread throughout. And it kinda makes a
fuzzy edge like that. Instead of it being just a hard, just a pure dot. Wanted to give it little, just a little bit more
water to help it move. My blue birds done,
blue and purple. And we're gonna move on
to the teardrop shape. Bowling pin shape has a pigeon, a look to them. Same process. I've rinse my paintbrush off, a wiped it off and make
sure that I don't have any extra blue
hanging out there. Being careful to go
around the eyes. I like to work. There's details in and then just throw in as much
water is needed. Now the water doesn't need
to pull on the surface, it just needs to
wet the surface. The more water you put on
your watercolor paper, the more it will tend to warp. Working quick like this, and not taping it down. It's really just best to work as only as what as
you need it to be. So I'm using to kinda
two different yellows. I got a little bit deeper
color on the bottom as opposed the top working right
along those edges. And being lighter towards this center gives the
illusion of volume. So I'm just adding little
bits and little bits. Were wipe off our paint brush, rinse it off each time. I'm just getting a little
bit of pure water up there to help move some
of this paint around. Deciding what color to use. I think I'll use this
peachy color, orange. I didn't have a
pre-plan on this. So we're just kinda, kinda go for it. I like that in doing a whimsical design
because that way it leaves you free to make
decisions on the fly. And I'm filling in
very close and very careful around these
as taking my time. And I'll just spread this color, working it back towards
the inside of the body. Rinsing the paintbrush off, wiping off some of
that excess water. So what we're going to
move on down to the legs, I've got this Prussian
blue and purple color already on my palette. So I'm just gonna
get a little bit of water and activate it. Will start to put in some
little legs on here. And this is a great
thing about having a paintbrush with a point is just a nice light pressure and just the right
amount of paint. You can honestly paint this with that one paintbrush
starting with a fee. Was this nice little
triangular ish pointy toed. Just so stinking, cute. You'll see that on that, on the resources I've provided
for you, the exact shape. There we go, zooming
in just a little bit. That helps a lot. So I'm just going to
make a nice long line, two lines going down and
then just a little swoop, getting a little
bit of clean water. Just a little bit. And we'll put that in the center and then move that water to the edge to give the illusion of volume. So the paint had already, the pigment I've
already absorbed to the outside and lighter
in the end side. Join me in the next lesson. We'll, we'll finish
painting these two birds.
4. Blue and Orange Birds 2 of 2: Okay, We're on part
two of painting this blue and orange,
yellow, orange bird. Let's get going. So our bodies are all done with
these two birds. We're going to start working on adding some of
the other details, not the final details. So I'm going to use a same
Prussian blue, purple mix. Maybe grab a little
bit more purple. It worked well for the feet, so I think it's going to
work well for the eyes. And I'm putting in an
iris for this little guy. Just working my way around
the eye, being very careful. In this same on this, I got a bigger eye. We're just going to
really accentuate that decided, that
little highlight. I'm going to go
ahead and just map it in first and then work around it as almost
freedom, right? I'd miss that. And we don't want to miss
those cute little details. You can always come in
with a paint pen or a gel pen or white one
and add that over it. But I just went ahead
and left it out. So rinsed off my paintbrush
and wiped it off. And I'm trying to
decide what we're going to do with his
feathers on top. He needs to have a little
bit of height there. Again, mixing up a little bit of that bright blue that we did as body and a little
bit of a darker blue. And I'm making these
just off centered wonky real quick loops. This is in real time. It's not sped up, not really thinking
about it too much. I'm gonna get a
little bit more paint and start adding it in. Because that watercolor
paper is Thursday, I'm going to have
to go back over. It's not spreading around. Not like it was when
we worked on his body. So just going to deepen up
some of those colors just a little bit and basically
trace over it one more time. They start to really get fun in a little bit when we start
to do those details. So just going over those
edges again and again. I'm wiping off that paint brush. I think I want to get a little
bit of color variation. Tilting my paper here
to try to get some of that blue to move down
towards the ends. To get it to move a little
bit because I'm really liking the idea of putting them some purple really close to the head. So just dropping in a
little bit of that deep purple and hoping it
spreads into the blue. Again, tilting my paper. Not wanting to overwork
this and overthink it. And I think it
looks pretty good. Maybe take out a little bit
of color towards the edges. Guinness at back-and-forth
of visit enough. Is it too much? Is it dark enough? It's light enough. And I think we're yeah, maybe just add a
little bit more water and see if I can get it to move. And tilting the paper again, trying to force that
pigment to spread out. And we're done. We're gonna move on over to our orange bird. So I wanted to go ahead and we need to highlight that
weighing a little bit. I'm gonna get that
same color we use before, that peachy color. And maybe a little bit
of a deeper orange. We have a little bit
of a contrast there. Not too much. I'm going to run a
nice little line right down that edge to
the paper's dry, it's leaving real crisp edge. I'm just manipulating
that pigment, wiping off my paintbrush,
grabbing freshwater. And then I want
to feather it off so it looks like
it's fading off into the background and move that pigment around
just a little bit. I don't want it to
be too harsh lines. One a harsh line and
one faded offline. Just to give a little idea that the wing is still
attached to the body. It doesn't look like
something that was just kind of attached on later. Wipe off the paint
brush, rinse it off. That keeps my water clean. If I wipe off my paintbrush
before I rinse it. I know many artists
who keep one water cup for warm toned pay pigments and one for cool tones so
you don't mix and get muddy. But I use one in the same. We're going to do
those same feat, but I decided we're
gonna go with fred. We'll see if we can get this
same effect to happen with the feet where we're going to drop in just a
little bit of red. I didn't let it dry
off quick enough, so I'm going to dry
my paint brush off and absorbs some
of that pigment. And then I'll give
that same effect, the effect of volume there. So it'll be darker
on the outsides and lighter towards the n side. Using that small
amount of paint, we're going to go ahead and get one more little leg in here. One more foot. Wipe off the paintbrush, get a little bit of water, and see if we can get
that same process to work where it's lighter and it worked a
little bit better. So we'll just leave that and
we've got some beaks to do. I've got to be careful
because my bird is still wet and I'm
painting over it. And we're just going to use that read the same that
we used on his feet. It kinda gives us
the two characters, the two birds and opportunity
to share something. It a little bit of water
and I'm pulling that pigment up just a little bit. Not too far. Not a lot of back-and-forth
with the paintbrush. And that's it. We're just going to
leave that little beak. And so deciding on what
color to do his beak. Again, I think that purple
impression blue works. Maybe a little bit more purple. Dilute that down
just a little bit. I'm going to do something
different with this. I'm gonna give him a
big old purple eyeball. Might look like he
has a black guy, but it'll work out fine. It's gonna be fun.
We're all fine. Everything's going to be fun. I'm going to leave a
little white on the center and I just give them
like these big bags, these dark, dark circle around is he's going to
turn out so cute. And give them a
little dot for pupil. And that's it. Wipe out the paint brush, rinse it off a little bit. Getting mixed up a little
bit more of that color. I used all that purple, I had a little bit more and we'll just
work on this smaller. I I'm just gonna give him a single solitary pupil and I think that
works just fine. Gives them so much character. And debating. What to do, what to do. I've been painting with my
paintbrush on the other side, with my paper towels on the
other side of my palette. And I've been crossing
over my painting, which is kinda dangerous if
they're drops that to happen. We're going to start to work
on the tail and I think he's gonna get a teardrop tail. These birds are very big
on this piece of paper, but small in general. I waited on the tail because it didn't know exactly
what I wanted to do. Again, just painting
these on a whim, getting that deeper orange
color like this in the wing, mixing up a little
bit of that color. And I'm going to
a lot of fluid in that paintbrush because I'm gonna be working quick
and that's all dry. So as opposed to that, the Bluebird that I
put just Clearwater, this one's going
to have pigment is pigment and a lot of water
and that paintbrush. So I'm going to start up
a little bit and we're just going to draw in a
little teardrop shape. Again, I have to work
pretty quickly because that pigment will
start to settle. And I don't want a harsh
edges except for on the outside which gives
that outline look. And keeps everything
nice and crisp. Grab a little bit of that red. And I'm just going to start at the top and drag
some color down, drag some of that red down. And we'll just feather
that off a little bit. And I think that might be good. That gives the same kind
of illusion of volume. Let's put a little mark up on
his wing in that same red. So the wing and the tail
share the same colors. And just drawing
in a few streaks. I think he's starting to
look pretty darn good. Getting that read. Those two red colors
are mixed together before we're going to
make his little beak. Is that sideways V,
being really careful, wiping off my paintbrush,
rinsing it off, making sure it's nice and
clean because I want to manipulate and move
that pigment around. So I'll start by getting a little bit of water
just away from that red and then moving that
pigment up slightly. So it kind of fades off. Taking a little bit
of that water out. Don't want it to
take over too much. And I think I like
them the way they are. Yeah, I think we're
good with these, so let's let these guys
hanging out here and dry. And when we add details, it'll all start to come to life. Looking good job. Maybe in the next video we'll
be doing our trio of birds.
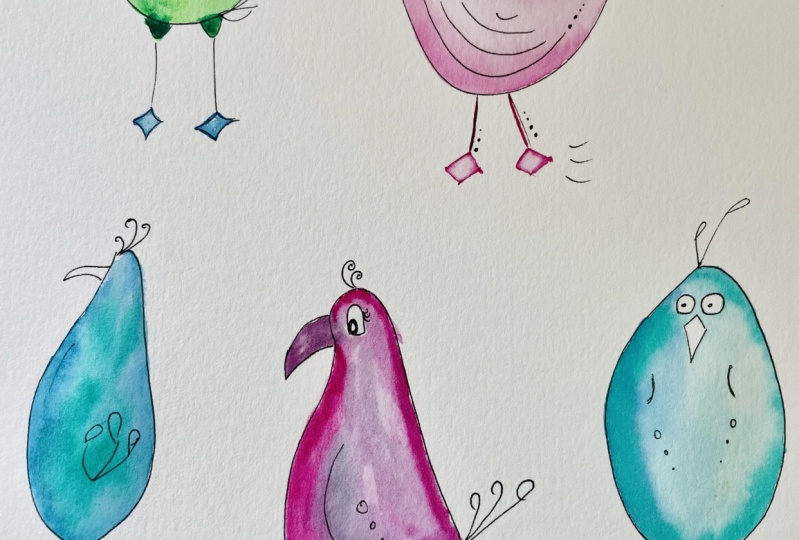
5. Bird Trio 1 of 2: We're back and we're
getting ready to start on our trio of birds. I think I'm gonna
do two larger on the outside and on
smaller on the inside. Again, I haven't planned
this out as I started, I just had my mind. I'm going to make these shapes and just using composition. I think let's go ahead and just start with a guy in the center. And so that way we
know how much room we have for the
birds and the side. I'm just starting
with the center kinda makes sense to me. So he's just a little
teardrop fellow. Nothing very special
about his shape. And then we'll work
on his little friend. Kind of like that same
pigeonhole kind of shape. The teardrop that's
rounded at the top, a little bit fatter
at the bottom. And this guy is going
to be a lot larger. He's gonna be a tall bird. And lightly we're just
going to, again as all, all these I'm bursts and have that same kind of
smaller head and bigger body like a
typical bird does. And just working on
that sloped back, the rounded head, maybe a little bit
skinnier and the neck. And let's give him a big belly that swoops down
and comes back up. I'll just refine some of
those little details. Adding a big upside-down
teardrop for a tail on this guy. And let's just fix his
head just a little bit. It was a little wonky, a little bit flat and his
belly was a little flat. So we've got him mapped out fairly quickly and will
start left to right. I'm right handed. So instead of me crossing
that paintbrush over and over again, forgot
those eyeballs. So let's get some teardrop
eyes on this guy. One's gonna be a little
bit bigger than the other. This teardrop one is going to have a bigger and a smaller
one more circular shape. And this are little
fellow will be closed. I were gonna give them a little beak and I think
he's gonna be singing. So let's make a
beak that's open. Again, in the resources section, you'll see some illustrations, some sketches that you
can follow along with. And I'm thinking maybe he'll have some feathers
up on the top. I'm not sure. Let's round that head out
just a little bit more. Good. Here's a little flat. He needed to go
good as hair done. So we'll work on this gum and left throwing a little while. Now a little bit ease along, bake little bitty beak. So we all have beaks,
we all have as and we'll work on
those legs later. Time to get painting. I have just clear water
and I'm going to fill in this bird being careful
around those eyes. That watercolor
paper is thirsty. So by the time I work around, it might have already started
to draw on the other side, we'll just have to see
how quickly we can work making sure every
bit of it has water. And tilting my head to the side, I can see if it's
shiny and that way I know that there's
enough water on the paper to allow me to get
this paint to move and flow. We're going to go with
a little bit of red. Going right along that edge
and look at it spread out. Isn't that gorgeous? It's kind of a pinky red
instead of a tomato red. And it continues to move and flow almost
as if it's alive. I'm gonna drop in a lot
of pigment right here. We'll look at that. That is just so much fun. And this will
continue to happen. Even for even after you
quit working on it. It'll continue to move. Making sure I've
got enough color, enough pigment in there. That might be all that
we're going to do with him. Might just get a
little bit more color. We'll give them a little
bit on that left side. Again, trying not
to overwork these. It's easy to do. I tilting my paintbrush
again to make sure that I can get that paint to manipulate
the way I want to. Wiping off my paintbrush. I'll just grab a little
bit of that pigment up. I didn't want that much
on there rinsing off, wiping off that back-and-forth, back-and-forth between
one and the other. I think he needs to have a little bit more
color and the crown of his head since I got that
red and move down so much. Just going to add a little
bit of purple up here at the top and see if it
will move around. Just like that red had done. And hopefully it'll kinda
just work its way down. Again. You have to wait and
see how it goes. That some of the fun with the watercolor will move on
over to our next little guy. Tiny teardrop shape. And I'll start with that
blue this time I'm gonna get a little bit of pigment
and a lot of water. And instead of working
with clean water, I'm going to fork ride in and have a little
bit of pigment. You have to work quick to keep those hard edges from appearing. So continuing to move
the water across, which draws the pigment
down and around, grabbing a touch more pigment. Careful around those as
careful around those. Grabbing that pigment
and just kinda moving it with my paint, getting a little bit more. That's a little bit
of a deeper color, giving them a little
bit more personality, a little bit more water to
move that color around. Grabbing some freshwater. Didn't rinse off my paintbrush, but just grabbed
that freshwater. And so that helps me get that pigment shifted
all around the shape. Wiping the paintbrush
off, rinsing it off. I think I'm gonna get a
little bit of bright green. And I will add a little
bit of that green just by dropping and dots
and letting it blend, letting it move
across the surface. Blue and green are side-by-side
on the color wheel, so they will work well and
moving around together. I didn't mix blend a little
bit of the paint together. And so that helped that blue
and green come together. And otherwise I'm just dropping
in one drop at a time. This little teardrop
is a lot more consistent than
the red pink bird. He's kinda faded down. But I liked the
way he looks here and we're going to
leave them at that. Rinsing my paintbrush off, making sure I got clean water. And the same process
we've done before. So each time we do this, we're working super quick. Lots of paint to
start or excuse me, lots of water to start off with just filling in the shape. And then we'll start
to getting to dropping in some paint here. In a moment. We start this process over
again on this little guy. We're going to fill him
in with that clean water, same as we've done before. I'm going to grab a
little bit of yellow. It's fairly bright yellow, not starting at the head. And I'm going to just manipulate that pigment and move
it around the bird, adding more color as I need, I'm getting a little
bit of a brighter yellow to run right
down his back. And then it'll be just like
the sunlight's hitting, it's a subtle change. Then taking that deeper color
and going across the belly, moving that pigment up towards the head and getting just
a little bit more pigment. Making his head nice and
saturated with color. Wiping the paintbrush
off, rinsing it off. I am going to grab a
little bit of orange. It's kind of a yellowy orange, finding a little
spot off the camera. So I can mix those
colors together. And it's just a
little bit deeper. And we'll go ahead
and add that big, huge proud tail feather. And that little
bit deeper color. I'm going to grab a
little bit of orange starting at the
base of the tail. And I'm just going
to draw marks up, just kinda moving that pigment, allowing it to flow
from the base, that tail all the
way out to the end. So it's darker where it hits his body and lighter at the end. Using that same color. I'm going to come in
and start on a beak. So he's got his
little open beak. I'll put the pigment
further away from where I know
there's wet paint. And I'll draw right back to it, almost touching until
the very last second. So getting it
super, super close. And then I'll let those
connect here in just a second. There we go. And that will allow
them to blend. The next video we'll be finishing off this
beautiful trio.
6. Bird Trio 2 of 2: We're going to jump right
back into those birds. So rinsed off my
paintbrush, wiped it off. I'm just checking to
see if that red bird is dry enough to start putting
in little curved shapes. For wings. Want to use a little
bit of a purple and a little bit
of a blue color. And just working with that
color just a little bit. I think I've got too much. I think it's too saturated, so we've got a
little bit of water. And order's going to put
it into little swishes of feathers in taking another
stroke down the edge. And we're going
to blend that in, wiping off the paintbrush, getting that water out. And so that'll allow
it to just kind of move and fade off into the edge. Coming right along the edge, we'll get a little
bit deeper color, almost as if it's an outline. But when we do that, when
the paint is still wet, it'll start to move back towards the rest of the body or
the rest of the wing. And let's just go ahead
and add some stripes. It seems to work well, wipe the paint brush off. I think that I'm
at top is bright. And so I think we need to go ahead and get those
feathers in and start using the color that's still wet up there and start
to move that around. You'll see here in a second, I'm just doing
little strokes up, giving him a little tuft of hair at the top,
which is adorable. There's still a lot
of pigment there. So I'm going to wipe off my paint brush and dry it off
a little bit and I'm going to absorb some of that
color with my paintbrush. Just lightening that
up ever so slightly. It was little bit too dark. And there I think he's gonna
be perfect just like that. Maybe get a little
clean water and soften those edges and allow that purple to move
around just a little bit. Marking from left to right. I had a little bit of paint on my arm from leaning
over my palette. I got them on the
base of my bird. But I'm just going
to ignore that. We're just going to let it go. There's no need to worry
about anything like that. Moving on to our
little teardrop, he'll kinda looks
like the Earth. That with that blue and green. The green speckled
in on the blue. Kinda like him working with mixing up a little bit of blue with a lighter
and darker together, putting in a wing. And then another wing. Kind of like we did
with our red one. Wiping the paintbrush
for rinsing it off, getting a little bit of
that excess water out. And then just
working that pigment back and absorbing
any extra pigment. I don't need any extra water. So we're back to mixing up a little bit of that
blue color again, I'm not really specific. We're going to give some legs, so just some nice
thin little legs. And I'm going to give him a
short little chicken feet. At least that's what
they're going to look like right now and give
him some kneecaps. Why not give them some
ovalis shapes on his legs? Keep that personality
and character. Cute. He's kinda got a
little chunky legs taking a little bit
of that pigment out, wiping off my paintbrush, drying it off so it will absorb some of that
water and pigment. It's time to move on. I'm using a little
bit of that purple that's still left on my palette. I'm going to give our
little earthbound teardrop water
baby a big purple. I gonna go ahead and mark
out the center of the eyes. So he's going to have a
little purple surround, really big white spot. And I'm going to leave a little
bitty highlight of white in that center of the smaller
wipe off my paintbrush. I'm going to drop
in just a couple of little drops of more
concentrated pigment. Look like that color was
a little bit too light. So just dropping in just a little bit more pigment will move on to our yellow bird. Have that purple in there. I think we'll go
ahead and start with our legs on this guy. Deciding on what I wanna do. I think we need to
have as little one little leg kick
out to the front. He's a happy little bird. So instead of standing
on both legs, he's going to stand on just one. Maybe he's Davidson. Maybe he's walking on the
white that paint brush off, rinse it off, and
get a little bit of clean water to the center. And that didn't work as
well as it has in the past. So wipe off the paintbrush, dry it off so it can
absorb a little bit of that pigment that's
in the center, given it that
illusion of volume. And that works really
good right there. Means looking good, wiping my paintbrush and
rinsing it off again. I'm going to get a little bit
of the orange color we had used before for the
accent on the tail. A little bit of that yellow and a little bit of that orange, making sure not getting
that blue in there, then I wanted to just put
a little bit of color. Yeah, that's not
the right color. So let's wipe that off
and let's try again, dry off that paintbrush. We're going to try
one more time. Let's just get a little bit of that orange, a
little bit deeper. It wasn't quite the right color. You don't know that sometimes
until you put it on. So we're just gonna go right underneath that
where we drew that i now that paint there was that water
that was left there. So it's going to blend a
little bit, which is perfect. I didn't plan on it, but that's a Okey-dokey. So wipe off that paintbrush. I'm just going to help it
blend a little bit further. Wipe it off and draw
the paintbrush. Time to move on and
making decision about what color legs are little
earth guys gonna get? We already have some purple. I'm keeping all bright colors. So we'll get some
of that purple. And start with our
little legs here. Again. Those skinny little
legs two lines down. We're gonna give him
some kneecaps to his his little legs are tiny, tiny, smaller little kneecaps. And those duck feet. We're going to
square those off and make them a little triangle. Let's get a little
bit of water on the paintbrush and
see if we can. So very small area. So we'll see if we can
give them a little bit of volume by letting, taking out some of
that paint from the inside and letting
it go to the edges. And it just didn't work. So let's bring down
those little points. Let's give him a
little point in there. So the triangle wasn't
quite the look I needed. A course, didn't know
that till I did it. And those little guys
are looking good. Time to move on and debating on colors as far
as what color we should put into the eyes
of our red bird. So I think he made it blue. Just some bright blue kind of teardrop shape is
a very small area. Again. These birds are
pretty compact in here. Filling that area
in and I want to, I have a little bit
too much pigment. Wipe off the paint brush, rinse it off and dry it off. And I'm just going to take out some pigment out of
the top of the eyes. So you'll have the bottom edge a little bit more
saturated in color. I'm taking my time here, getting it just the look I want. And I think that works good. Moving on to our
little earth guy, trying to decide
what color he needs for his little tuft of
feathers on the top. Because right now he didn't
look really bird-like. So I'm going to take
that bright green, maybe a little bit deeper green, wiping off my hand and make
sure I don't get paint. And there's going to be making some loops on the top for him. Super quick, super fun. And we'll grab a
little bit of blue. I think I took all three colors. Mine as well. Why not? I'll just put a little dot right there and there and
there and there. Let's see. Yeah, That should be good. Just figuring out where
the color needs to go. We're almost done with this guy. Yeah, I think we're done. Don't miss the next video. We've got two more
birds are a little bit different than the
other ones we've worked on. So hop on over to that
next video and we'll be creating a nature and very
vibrant pink and purple bird.
7. Nature & Pink Birds 1 of 2: Alright, welcome back to
our last set of birds. Were going to make two
birds in this one. So we're going to lift up this bar to his own,
those circular shaped. And so the egg shape, He's almost really
round and we're gonna give them U-shape that. So he's going to have
some chunky thousand, some really skinny legs. And that same foot I
have been creating. We're going to go ahead and
do the same thing there. I like to have two off sized
as they're pretty big. And since as beak. And I'll just go
ahead and draw on those irises real quick. So quick and simple. This bird, He's
going to be taller. Kind of a chicken
E shape I think. I'm seeing I'm thinking
of a really deep belly on him as so let's just
go ahead and try it. So we're going to
make the tail up to the head and then round
off that big fat belly. Just sketching him out, getting him a little
beak that sideways, it's gonna be a close beak. So I want to add top feathers. So skinny on the ends, big loops, little teardrop
loops on the end. And he needs some fun tails. So let's do the same
thing on the tail. Real quick sketches. And then put his little leg in. I think it will sketch
out a little bit of a U-shaped wing. He's going to also be a
little standing on 1 ft. He is definitely a fancy bird. He is our fancy as bird
right now as of yet. So the little ligand, the same triangle feet. I won't get to starting to
paint here in just a second. Getting clean water
on my paintbrush, making sure I don't have
any excess color there. We're going to start I
start left to right. Again, take making
sure I will check my wrist and my hand and make sure I don't have
any wet paint there. And just drawing it, I'm drawing the water
around the eyes. Leave it up to me to end up painting myself
with the watercolor. Just going around those
as being real careful. Getting water all
over the place, remembering that that
dry paper is thirsty. And let's go ahead and
get some water into those little chicken,
chicken thighs. Some big chunky U-shaped thighs. We're gonna go with
that green color we mixed up previously. That's not exactly
as bright as I want, so we're just going
to leave that there and then we're
gonna go ahead and add that bright,
bright lime green. He's gonna be a green bird. There are Greenberg's
in nature, right? Sure. Of course I'm not basing these birds off
any reality whatsoever. Being careful to work
around those eyes. Wiping off my
paintbrush is needed. Grabbing more paint as needed, grabbing more water as needed. Because I'm just
working super quick. There is no worries about doing anything
really right or wrong. I'm gonna get it a
little bit more of that green and work it around. Let's get some color
into those thighs. To having in just a little
bit here and there. And watching it
spread as I paint. Deciding how much
pigment I want to have. I noticed there are some dry
areas that have no water. I'm gonna get a little bit of
water and fill those areas. And you might be able
to see them real here. Just a little dry
there and right there. So I want that
pigment to be able to move into those areas. Again, a little bit more paint, a little bit more paint, and a little bit more
water and spread it around and wipe
off my paintbrush. And I think we're
gonna be good for now. Now, let's go ahead and add
a little bit of drop of water and see if we can
move that pigment around, creating little blooms
is what they're called. We've taken a lot of time
with this little green guy. Maybe add a little bit
more of the rest of that color that's
left on my palette, dropping in little drops and little drops and coming in really close to
that i with it. And I think it will be, Let's get a little bit more, a few more drops, and then we're done. In the next lesson,
we'll move on and paint his friend. Join me there.
8. Nature & Pink Birds 2 of 2: Alright, welcome back. I'm using an eyedropper and just adding a little bit more
water to my palette. I like to do that sometimes as opposed to using my paintbrush, seems to be quicker sometimes, especially when I don't know what color I'm gonna
be using next, I'm using a little
bit of water again, clean water and just running along the outline of my bird. The same process we
have done before. I'm going to grab just
a little bit of pink. And I want to go ahead and get as much light color all over
this bird real quickly, speeding up that video
just a little bit. And then we are going
to start getting in to just dropping
in some color. I'm seeing that we're going
to have a little bit of a darker belly on this bird. So making sure that
we've got enough pigment down on that belly side. And then manipulating that
pigment and moving it around. Working careful
along those edges. Moving that pigment down. And then moving it out
and up. Going back in. I like those little dots
that were happening. So let's add a couple more
and make him just very fancy. I'm going right on
the underside of that sketch of the
wing I created. Working in a lot more pigment. Spending a lot of
time on this bird. I should have probably
started off with pink and a lot of water. So let's grab or rinsing
off our paintbrush. I think that's good on him. Right? So rinsing off paintbrush, making decisions as to
where I'm gonna go next. I think we're going
to start working with the, the top feathers. I'm just going to fill in those little teardrop
shapes at the top. And then we'll work on getting the connecting color
here in a moment. Just going in and out, lining and filling
in those teardrops. Looking so cute and
my bird still wet. So I'm being careful, I'm drawing from those top down to the top of the
head and the bird is wet. So when I mix that other
pigment is going to blend. Look at that, look
how great that looks. Drawing a little bit
more of that pigment down to the head and letting
it all blend in together, not worrying about it. And so we're gonna
go with that tail. And I think we're
gonna go with purple, bluish, purple,
purple, bluish purple. What do we do? What do we do? The debate goes on. Yeah, We're going purple. Just some of that pure, deep purple filling in
those teardrop shapes. The pigments to strong there. So I've got a little bit of
water and I'm going to borrow some of that pigment
from the first one. And let's borrow a
little bit more pigment and move those around. Finalizing the shapes
as we do that. Because I just roughly
dropped in some paint. Realizing pretty
quick that pigment was a little bit dark. And drawing back down
towards the tail. Now the tail is not going to react the same way because it is almost drive,
not completely dry. So it's not going to
really absorb that other, that purple pigment
into the pink. I like the fact that these colors will be a
little bit different. I'm going to rinse
off my paintbrush, dry it off, and then we'll start working
on our Greenberg. So let's grab a little bit
of orange and we're going to drop in his irises
with just pure orange, fill that thing all the way in. We've got the bigger one
and the smaller one. And we're just
putting in pigment there and we'll let that dry. I think he's almost done. So we're going to have to work on a whole bunch of
different little things. This work on some legs. So getting that blue green
or blue purple color, that Prussian blue ish, we're gonna go ahead and
let's get him on his feet. And I'm going to draw
in the feet first. This guy that'll allow that pigment to dry
just a little bit, getting a little bit of
paint in the center. And that's too much. Those first few worked
out really good. Oh my goodness. Let's wipe off the paintbrush
and will dry it off. We're gonna go into those
little feet and let's zoom in. We're going to absorb some
of that paint dried off. Absorb some of that. There we go, That's
starting to look good. And C Now that gives us
the volume that we need. And we can work on maybe taking a little bit of clear water and
dropping in the center. And that will spread that paint to the pigment, to the edges. And we'll work on his legs. So I'm drawing from top
from bottom to top this time because it sounds
like a good thing to do. And a little bit of that
blue pigment is starting to hit into the thighs
and spreading up, which is really cute. Those eyeballs are super wet. And let's go ahead
and add in a beak. So he's kind of a diamond shape. And he has so much personality. I love it, I love him. You gotta love them. These are your babies. I'm checking to make
sure my pink guy is dry enough to work on and not too wet,
but dry enough. So we have him set up and debating on
whether what to do here. I think we'll just
go ahead and dive in to getting a beak. I'm rinsing off my paintbrush. And we're going to
grab a little bit of red and do a nice
bold red clothes. Be again, painting
right up to the edge. And then letting it touch. And that bird is still
wet up there so that red is going to bleed
back into the blue. And let's just take that
color and do those feet. Why not read feet? He's a fancy bird. Will draw his little legs down. Let's see if I can
get these feet right. This term, a little bit of water and manipulate
that around. Just a little bit Same here. And I think we're going
to have to absorb some of that pigment out. I'm just not batting
1,000 with *** feet. First ones turned out great. These maybe not so much. You can just watch me
work here for a second. Okay, So we've
finished the birds. Now, it's time to go ahead
at least painting bird. Now it's time to go ahead
and grab those pins, markers, anything that you want to use, colored
pencils even. And we'll dive into getting
into some of those details. See you in the next video.
9. Details--the Fun Stuff: All right, This is
our final video. We've grabbed are
all var supplies. We're going to start
working on maybe some outlining some details. I've got my micron 0.25 pin
that I'll be working with. You can use any pen
that you want to. You need to make sure that
your paint is super dry. If you're going to use a
pen that is water-soluble, otherwise that pen will
bleed into any water. So if your pin is
not water-soluble, you can paint as it or you can mark over it as it's still wet. This guy's pretty dry. I'm gonna circle is
as about three times. Not really wanting to keep
directly in those same lines. Outline the beak just a little
bit down at the bottom. I'm going to start by putting in a few marks here and
there around his body, especially on the areas where
it's a little bit lighter, kind of following those
same lines as the paint, making decisions as I go. So maybe outlining these wings. I think that's cute. And I've decided now to give
this guy a little butterfly. So just putting a little
body and a little antenna. A couple of wings
with a few tiny, tiny little dots and lines that are going
through those wings. Nothing too detailed, but
definitely cute and whimsical. And we'll work on
around the body, maybe down the legs. Maybe not necessarily outlining
every portion of him, just giving some areas
that are highlighted. I'm going up and I'm
just going to do some loops in and
around my watercolor. So it gives a little bit more
movement to the birds and especially not following
exactly along the line. Yeah, just throw one out
here kinda randomly. So there's no color there, but it worked well. I'm gonna go and outline a
little bit around that iris. And making decisions might go back and forth
between the birds. Going couple of circles around the left die outlining the beak. And then I'll run a few
lines around this guy, this orange is bird. And I've put a few little
tufts of feathers, and I've decided now, let's just go ahead and loop around him a couple of times. Why not making those
decisions just really quick. And knowing that I
really can't make a mistake on any of these marks, outlining or giving a little bit of something to the legs. And then I'm going
to just sit here and think what to do, what to do. Let's go back up to this. I and let's give him a
couple of little circles. Kinda gives him a droopy eye. Like he's tired. A few little toughs of feathers
up at the top Justin pen. And he is precious. And I want to put some circles. I'm going to put a series
of dots running up the inside of that tail feather. I'm going to speed up this
video here and you can just watch me work for a
little bit on this guy. Now I decided his senses
little friend had a butterfly, he needed a heart and some stars and some squiggly
little feathers. And don't overwork these. Maybe put a few marks, maybe come back in and look
at it after a few minutes. Now I've decided to come in here underneath those little
drops of purple and add little U-shapes to give a little bit more definition
to some of those areas. Again, taking a look at it from a distance and I think
we're good on this one. Moving on to the next, the trio of birds
having my micron, 0.25 Penn course, you can
use any pen that you want, any colored pencil, crayons, anything that you want. And then just taking
a few moments to look at my birds and
decide what I want to do. So it started with
a yellow bird. I'm just going to outline
his beak a little bit. No real rhyme or
reason as to why I chose to start with
a yellow bird. And I stop there and I'm just going to start
outlining the tail. It's one of those things. It was easier. I knew I wanted to do it. And so we'll just get that
tail in nice and big. And we'll work on the
rest of his body. Looping around
connecting points, maybe put a little dashes. And he's gotta get as
little wing outlined. So I'm going to put
a few little dashes to make it look like he's got multiple feathers and
all go up to his eye. He's got a closed eye. So we're just going to put in a couple of little eyelashes because what little fancy
bird doesn't need eyelashes. And at the top, I'm
going to add a few of these little curly cues, right? He is so fancy and
he's, he's singing. So let's go ahead and give him his voice and some music notes. You've gotta have your
sheet music there. And we've got to
really see that he's singing in a couple
of little swirls. Moving along to our little Earth looking bird we outlined did
little lines on the inside. I'm going to loop around him a couple of times,
outlining the wings. Going carefully
around those eyes and putting him a
little bitty pupil in. Oh my gosh. Just perfect. Little bitty pupil. He is great. Feel a little dashes zooming in. I'm going to put little
stars up his wing. Again, if you're not
just using a black pen, if you're using
any other colors, you could add those in there. And let's get him
some little eyebrows. He's got one, he looks
like he's gotten angry or they're going to confuse now
giving him as other eyebrow. Oh, yes, cute and confused. Just give them a little beak. I didn't add color to his beak like I did in
some of the other birds. But he's got enough
personality right there. And let's get our little
pinkish red bird. We're going to go
around him a few times, circle around his kneecaps. And let's draw in the feet
like we did with the others. Instead of gate keeping him
at his little chicken legs. We're going to go ahead
and draw in and around. There we go outlining the wings, giving him a little heart
right there on his chest. We're going to work on his eyes. Going around those eyes, adding irises, excuse me, pupils at the very top. He is definitely a
funky little bird, giving him a nice long beak. Let's add a couple
of little stripes. So he's got stripy little beak. Look at that. We're going to move
on to our next birds. Our final are Duvall
here, green and pink. And we'll go ahead and
go around the bird a few times just to give
him his fun and fancy. Going around those big
chicken legs a few times. Big thighs. And I've decided he's a little
nature, he's all green, so I'm going to put like little bitty leaves
kinda coming around him. Leaves and leaves and
leaves all the way around. Now that we've got
his leaves done, we're going to circle
around his eyes and go ahead and outline
his feet, his beak. I think he's gonna be done. Oh, let's see. Maybe give them too little
bitty eyebrows, right? We give one on arteriosum
eyebrows so he needed some two. Don't want them
to feel left out. Some of my tail feathers
are still a little bit wet. Again, I've worked on
this in all one big time. So deciding where
I'm going to put that wing and just putting
in a little bit of a wing, I'm going to start putting
in circles on this guy. Not really outlining those dots. But I just kinda felt
like he needed to have a little bit of
detail up in this head. Working my way around this bird. Adding little dots
and little dots, little circles, not really dots, little circles just around. I'll start my little outline. Outline the beak. He's got a closed eye. So again, need eyelashes, right? Cute little eyelashes. And he's gonna get a little star right on the outside of his eye. Now if you had a different pen, I'm putting dots
down on his legs. I need to add some switches
to give him movement. A few dots up and around. And then I'll spend
a little bit of time outlining those tail
feathers and top feathers. He needs a few little lines for wings because he's so
light right there. And I think he's done. So the next thing or the
last thing you need to do is sign your painting. You're painting is done. I hope you enjoyed it. So be sure to oh, yeah, those eyes are really wet. I might come back and
add a few details later, but we're going to
let them be now. We got one more video, so be sure to hop on
over and see that video. I've got a few things
in that video for you.
10. Wrap Up : Hi friends. I hope you had a
good time creating our whimsical watercolor
birds. I knew I did. I mean, come on, look, he's got a little leaves. How adorable is he? And it was all just on a whim. You can create anything if you just let go and just have fun. I hope you take this lesson and apply it to
many other things. Maybe you want to make a
whimsical sea creatures, right? You can always do that. So if you're gonna go and post this on social
media, please, please be sure to tag me Maria, vague Campania,
that's going to pop up here in a minute
along with my website. You can go visit me at www dot cotton and wood
designs over there. You can sign up
for my newsletter. I send out tips and tricks and just let you know
the general chaos, my artistic world through that
website and my newsletter. So that all will pop up
here in just a moment. Be sure to do that thing
you're supposed to do here and write a
review from my class. Alright, let me know
if there's anything else that you would like to
see whether it's watercolor, procreate surface pattern
design, illustrator, InDesign. I do a little bit
of Photoshop too. There are plenty of
classes on that. So let me know if there's anything else you'd like for me. Okay. Thank you so much for joining me in this
class. I had a great time. Have a great day.
 Maria Campagna, Artist, Illustrator, Yogi