Transcripts
1. Intro Skillshare: Hi, everyone. My name is Katya, and welcome to this class. In this class, I
will show you how to draw a wind cal character, and I chose something
as simple as fish because they still have all the attributes
of a character, and they have all the
incredible shapes and forms that we can imagine, and we can pull and stretch them into anything
that we want, okay? So I really hope that by
the end of this class, after we go through shapes,
linework and coloring, you will come up with your
own winder character that is going to be interesting,
full of personality, and you will really enjoy the class
altogether because it's meant to be fun and definitely
there to make you relax, open up your inspiration, and just go with the flow. Do not push yourself. Do not make yourself
drop perfect. Fighting perfectionism here. So, yeah, um, thank you so much for
taking the class if you do, and I hope to see you in the
first lesson. Thank you.
2. Part 1 Looking for shapes: Hey, guys. So today, we're going to be doing
some fish concept sketches and giving some color to them. So we're going to be creating
some fun characters, and I hope you will
enjoy this class. Okay. So I will share all the resources and the
canvas that I created. It's especially made for
watercolor and pencils, and I will show you how to
use it. So let's begin. So the first thing that
I want to do is I have prepared myself a pintrasbard of different shapes of fish, and that the shapes of fish, what I want to do
is I want to take different interesting
elements and put them all together in a
couple of fish that I like. So I'm going to take
some colors that I like to create sets first.
So let's start doing that. So as I start creating
the silhouettes, I'm looking at the fish,
and there are some fish. I'm going to take a brush that is I will share
this brush as well. So I'm going to
take a brush first. First, let's go. First, we're
going to go onto the layer. That is not the
watercolor layer, so that it doesn't disturb us. So, okay, so what I
want to do is I want to take a fish that I see here. And I have my brush quite large. This is the fish
that I see here. That's kind of a
square shaped fish. And what we're going to do, we're going to maybe
give her some lips. Then here at the bottom, she has these very thin kind of looking loppers I'm thinking
how to replicate those? Maybe replate them
shorter a bit. Like, so I'm already thinking what it's going to
look like on the other side. Oh actually, maybe we see only. Here thick, and then let me see. Then further on, then
we can separate this. I'm gonna move fish
a bit so that I have more space to look
at it to work on it. Alright. So here, what we're
doing are I'm going to see how her then
on top, it's made. It's like this triangle
that goes all the way here. And here, there's
smaller triangle. Goes all the way here, and then it also has this little part where
the tail starts. The tail is quite interesting. It has these little doesn't
have a straight shape. Okay, so this is my first Gbola. This is my first
fish silhouette. And now I can do is
I can go and correct the shapes where I think
that they could be better. I'm going to use the same brush to make that they
are more visible. Maybe these could be very, very thin, like so. And here you clean up the lin. Here we can add another of
those little pointy things. And with the eraser, what we can do is we can
come in here and refine it. So I'm going back
and forth between the eraser and the brush. Okay. So in this plate, like in this stage, we are
shaping our fish. Okay? So What I'm doing is I'm creating
these little indents and the flipper that
might be interesting. So we're creating an
interesting shape. I already can see the
eye here, to be honest. Okay, maybe this tail is huge. It counterbalances the
fish, maybe let's do it. Smaller. This is the beauty of brocade where you
can change things up. And this is awesome. So, okay, so maybe I'll make it smaller. And I'm going to fix the
shape here and give it some of those indents. Maybe too many.
Let's leave just do. Maybe one here and that's it. Like soap. I'm going to
make a smaller brush. And create a more
interesting shape. Okay, and now we're going
to create those indents also on the fins. Those, for example, the one Like soap. Maybe the lips. I don't
like those to be so huge. This is something
that I like more. Okay, so this is
one of our shapes. I want to make it just
a bit smaller queer. Let's see if I like
it more squished or, like, maybe it's gonna
be facing this way. Let's create some threes like
distinctive shapes of fish. And I have here, basically the aquarium
fish in front of me. And what I have is
guppies, as well. And then I have
some of those like flatter rounder fish
as know the name. I never know the name,
but I like the fish. So, yeah. So let's try another one. I like this technique that
I learned from Natal Art. You can find it on Instagram
and also from Woofy cat that they use different colors to create the symboettes
or to sketch, and it's really, you know, takes away that fear
of the white sheet. So let's go on and
create a different fish. Let's maybe make
it bluish. Okay. So I'm going to create
a new layer here. And let's create
that rounder fish. So first of all, I'm going to take a big
brush and I'm going to so I want her to be
almost squared here, maybe. I'm looking at the reference, I will add also the
reference, okay, to the resources, and
you can find them. Okay, then it has
this little tiny, tiny sale that goes
like a fan like so. And here we have maybe
a bit of the upper lip. Maybe the lower jaw could
be jetting out. That's so. And here we can
have some of those. So let's do the overall shape. I'm simplifying the shapes. And now I'm going to be
erasing the unnecessary parts. Okay. S. Okay, so I'm going
to go with the eraser. So with the eraser,
we want to kind of add more interest
to the silhouette. Okay? So there are
different fish that have different flippers,
different flipper bits. So they are very interesting. So like we did with
the previous one, we're going to try and add
also some whimsy into this. So here, what I want to
do is I want to recreate those cuts into the
Lo the upper one, like it is on the
reference photo. Still, I'm not creating
a realistic character. Is gonna be like a bossy
fish or something. Then here, the less pronounced. Like a bully fish. Okay. L sew. And then on the tail, we can add some of those
fix the shape of the tail, and we can add some of
those lines as well. Some of those cuts or I
have a different idea. What if it's a bullyfsh We were already thinking
about the buoy fish. What if he has a chump
out of his tail? Like, se Someone jumped
him from underneath, like when he was king, this is what happened
with my parents. The little ones, they go bite the big one on the tail
when she's not looking. So someone jumped
him on the tail. And here we have other
maybe some lines to create. Like, sew and the
flippers, also, maybe two. Okay. So, this is the Boy fish. I really like the bully fish. I'm quit to get to
know it better. Let's do a third fish. The third fish, I want something I'm looking always
at the same reference photo, and I want something
more traditional fish. But let's make it interesting. So as I have guppies, we can try to do
it with guppies. So, or we can use any other
reference if you want. So you're totally
free to do that. There's also a very
interesting fish. I think they call it the spear carrier or
something like that. So Ooh, my reference went away. Have the reference here in
front of me and went away. So they have this
interesting tail. So what if we take
a guppy and we take this fish that has the
steer on the little tail, and we kind of combine it. So here, I'm going to
take my little guppy. So they usually
tend to have the, the lips towards the upper side. And I'm looking at the
shape of the body. Law fish. This is going to be
like a female guppy. Correct the shape. Take away where I don't like
it already at this point. And she has this
little fan tail. Like, so a little fin over here. That actually separates from
the body. So let's keep it. That's an interesting element. I'm going to make the
brush smaller to make the the exact I don't know, maybe I want it smaller still. Like, so and then just
fill it in, like so. Okay, so you can always
go change things, and no one's going to
punish you for that. So I'm cleaning
up the silhoette. I want the tail to go inside the fin of the tail naturally. Okay. And here, what I want to do is I want to create that
little flipper, so she has these
little tiny flippers. One, there's gonna be two. And then there is
another one here. Like so. And what if
we add some of that, like the spear thing? What if she has this
long spear thing on her tail like so. Maybe she can have two. Maybe it's a fish, with a weird tail like so. So you'll think about it. And then with the eraser, I want to make it smaller, I want to add some of those
maybe some lines here. Maybe make this a bit
as we have the spear. You make these a bit rounder. I don't want them to be sharp, so I want to create
that contrast. Okay. So now we have
our three fish. Ooh. What did I do?
What did I do here? Let's remove the cream. Oh. Okay. So now we
have our three fish, and each one already has its
own personality, I think. So we can start
working on adding some details on top of our
layer with the silhouettes, because the sillottes
already read quite good. The only thing I'm
thinking maybe, no, I think I'm going
to leave them this way because I think adding little cheese mean
bullet fish kind of too. But we'll be doing
that in a while. And yeah, I will see
you in the next video.
3. Part 2 Characters and Personality: Okay, so now we're
going to go into the drawing of the parts of the fish that are within
the silhouett, okay? So what I'm going to do is I'm going to create a new layer, take, let's maybe
like a black brush, still using the
same brush, okay. And now we have to focus on
each fish in particular. So I don't want to draw the
shape of the fish itself. What I want to do is I want
to add details to my fish. Okay. So here, I can
already see that eye. I am sorry, but I
could not unsee the eyes since the very
first time that I did it. And I really like these big eyes that seer into, like, Oh that. So here, what I want to do is I want to separate the
body from the flippers. Here, we're going
to do a little lip. Here, we're going to
separate this part. Maybe the body goes like so. And then we can do Okay, so this is our fish. I'm thinking maybe it
can have a bigger eye. Like, I don't want to make
it perfectly perfect. I, I want to make it
more interesting. So we can have a
fish or like this. We can have a fish
shape like this. This is going to be
the flipper itself. Okay? Maybe we can
have something like repeating the
pattern the eye here. Like a bigger eye loop here
is like a smaller one. So this is gonna be one color, and then there's gonna
be the other color. And here, there's
gonna be the opposite. The tail will start. Okay. So this is one fish. Thinking about those lips, what can we do with the lips? Maybe's redo them. So this is completely
totally improvised. So, guys, have fun
with this one. Like Hm This one already gives it some attitude. Like, Hm. I mean, like a fish. Um, I want to see if we take the side ball and
we play with the size. Maybe it can be looking like
into different directions. Maybe they can be
looking at each other. This one's gonna be. Dude, like, we can also add this. No, I don't want it straight. And then the eye can go. Here, we can erase this part. It's gonna be like, Oh, no. Oh, my God, I don't want
to draw mean fish, no. Let's draw it, like Scared. Let's draw it scared. It's so a bully, it's like, oth don't know. But now, maybe we can
change the path a bit. It's scared. Now we
have a scared fish, not a happy one, fine. Okay. If we move this eyebrow, it's very easy to change. Now he's an angry fish. Like, by moving just the
elements of the eyebrow. And now he's like this Ah. God. Board fish. And the eyeball, if we move
it under the upper eyelid, it's gonna give us that
appearance of, sure, whatever. Maybe this fish is
like mega pretty, and she thinks a lot, like, or he let's give
her some eyelashes. I know it's a fish. So
remember, the eyelashes, we're going to put them where the upper eyelid
meets the lower one. So let's make it a bit thicker. And here, maybe she has these
kind of she's a girly girl. She has these kind of
heart shaped scales. See, like, it's so cool that it's getting a personality
of its own already. And here, maybe we can
add her some of those. Te markings. Like so. So we have a very, very, like High school girlfsh. Okay, let's do the
other one, okay? So I'm going to do
another layer again. This guy he has to
be the bully fish. So, I'm thinking about
placing both eyes here, giving him a big tooth. Like. Like so with this big tooth
with these tiny eyes. That's quite. We
can set them wide apart or we can set them
like quite close together. L's see. What we first do. The eyeballs. Like so. They're too big. What if we do one eye only?
Too far away. And we need to move this
tooth. It's too large. Maybe we can make multiple
tees. High school bully. We can refine the shape. Uh, maybe I can be
even a bit curved. Mean fish, Miner winerfsh. What if one of them was broken? So this is the ideas
that you come up with. What if we had the tooth here that was here
and it got broken. So this is this kind of Manfsh. No, like this, he's scared. Like this, he's scared. And maybe we lower the eyebrow a bit and make it more squared. Like, so the meaner winerfsh. And here we have the body shape. Here the flipper starts. Okay. Like so. Maybe we
can do one thing. Maybe we can make him squarer. So he is, like, like, very, you know, mean guy. Mean guy, we're
making him square. So here we have that part, and here we have
the bite. Like so. And over here then, we have to give him that art where the head ends and
the scales kind of start. And here, what if he has
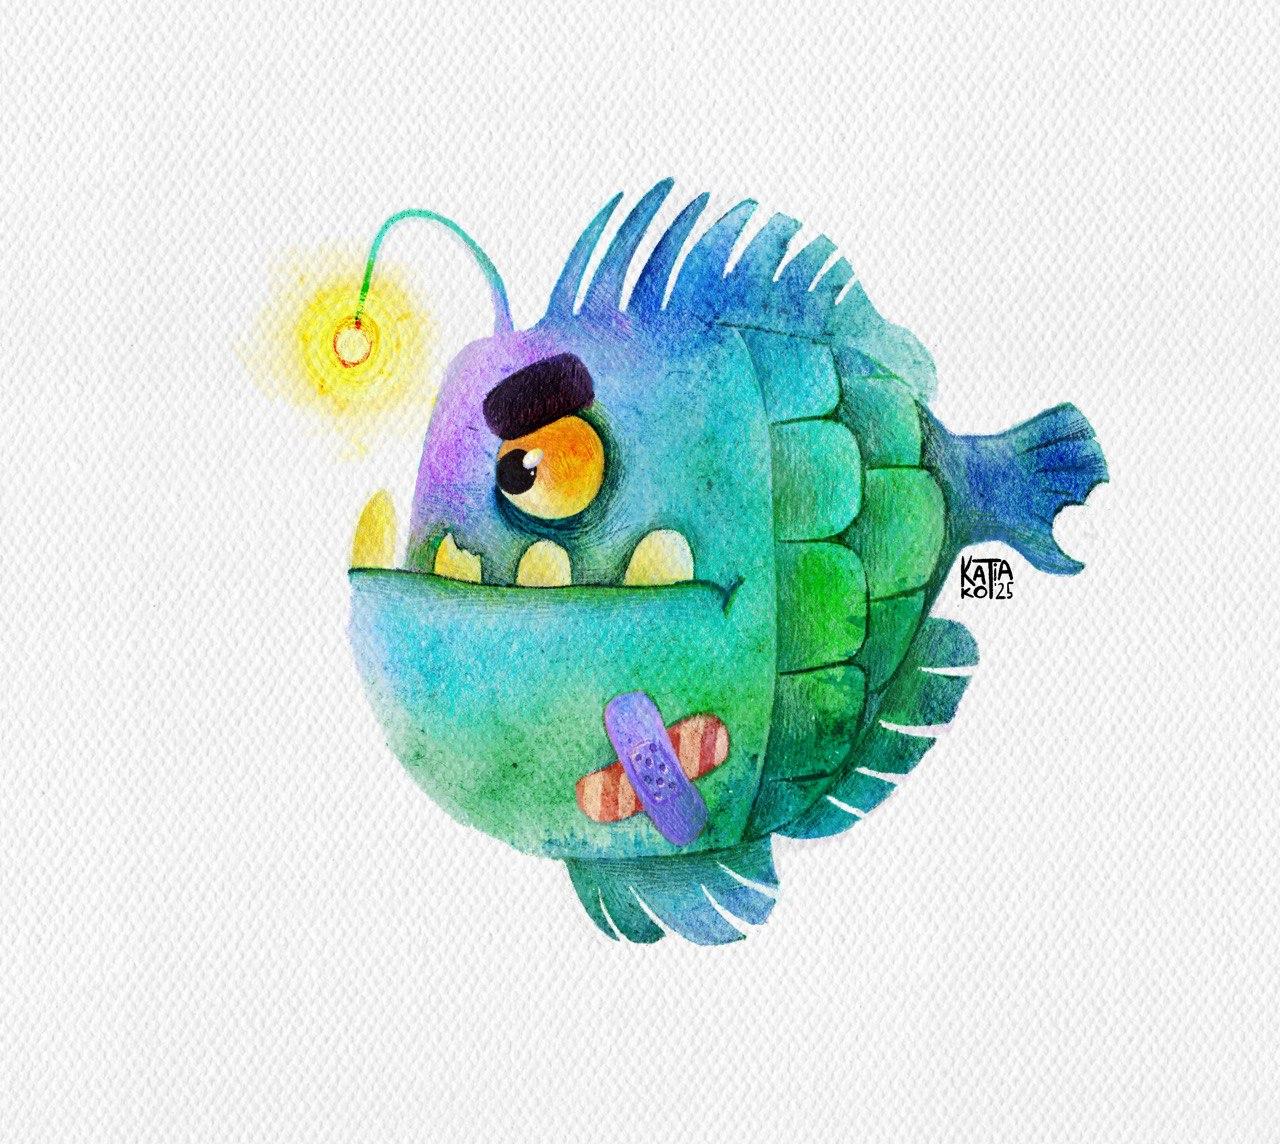
squares like scales? He doesn't have them round. He has them square. Like rounded square. Like so. Maybe here, he will have a band aid. For all the times
he was fighting. You will make it
bigger the band aid. Like, so and maybe
even has a black eye. What do you think, guys? I think this is coming
along quite interesting. So now we are left
with the third fish. That is our little yuppie fish. And now, what we're
going to do is we're going to think about her. I want to give her everyone
has quite large eyes. I want to give her
this big eye as well. Like so. It's like, What's happening?
What is happening. And here we will have
maybe just a normal fish. And the fish, what if this
was shaped like a brown I think this one has
to be a bit bigger. The like so. Okay. Okay, so we have the
three winners, I guess. So I'm going to now,
what I'm gonna do. This could be more interesting. I don't know, like, um, bigger eye doesn't have
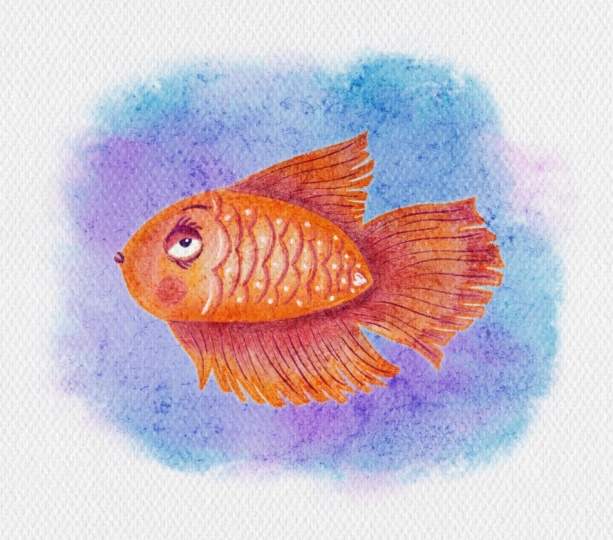
personality. I don't know. Maybe we could work
a bit more on it. But if it's a princess. Not that I like senso fish. Then we don't have that mouth. If it's a princess fish, then she should have these like. Like this. Maybe this
is her perky nose. Like this. She has a nose. Yes, fish have a nose. So like so, and maybe she has these beautiful scales that
will be in rainbow colors and the tao that also is, like, Okay. So here, I'm going
to outline now. What I'm going to do is
I'm going to outline the silhouettes of my fish. Actually, it went to give
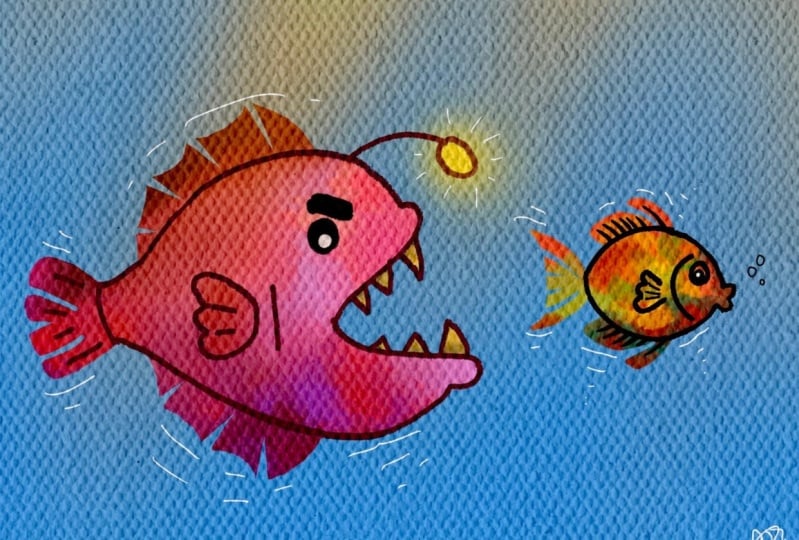
this guy this little lamb. Like, so I know it's a cliche, but I love the deepwater fish, and the sea angler is like, you can't beat the anglerfish. Okay, here we can do this. And this and this fish also is a very beautiful shuett. You have two girlfsh
and one boyfish. I really would love to see
what you come up with. So I'm just outlining that
silhouette so I know where it is so that we can
start adding colors. So take your time and
outline it carefully. But mostly we will be working over with water
colors and colour so. Okay, so now we take
away our layers with the color we
can have already, we can see already the three
fish that we have created, and now it's time to get
into the water house. The the the
4. Part 3 Adding Color: Okay, guys. So now what we're
going to do is we're going to try different color
variations for our fish. Okay? So I have
different to here. What I do is I'm going to select this fish
that I like the most, and I'm going to duplicate
the whole group three times. And see which fish
I like the most. So let's try to add different colors here under
the layer of imperfections. Okay, so I'm going
to close these. I don't need them
for now. And what I want to do is I want to try
out different colors, okay? So I'm going to go in
Adelson Fis' brushes, and I'm going to go
into each of my fish. So here I have
these layers, okay? So I'm going to turn
them off for now. Going to select only
one that is on. I'm gonna select it. Now that I have it selected, I can remove this area, like to hide the layer, okay? And what I'm going to do
is I'm going to choose a watercolor brush and start
adding colors to my fish. So this one, maybe I want
to make a more purple. Like so. Now, I want to do some of
that watercolor spread, maybe going into blues. Maybe the part here
can be blue. Like so. And maybe going a
bit into pink also. And here, the light, actually, I'm going to remove it with
my watercolor eraser brush, the same from Adelson
arises brushes. And I'm going to add yellow. Like, we have these colors. So yellow is on the
opposite spectrum, so that's going to
add some of that. Some of that kind
of highlight, okay? And I'm going to add
maybe some reds, but I want to do an
overlay layer, like so. So I want to add
some warmer pinks, and I want to add with this brush that is watercolor
dry jitter. Let's try. You can try different textures. So I'm adding a bit of this, a bit of cooler blues. And what I want to
do here is I want to create a color burn layer, and I want to make it deeper
purple here on the tips. On the tail. Here
and on the fence, as well. Like so. Then obviously, we're going to go in with the eraser brush. Again, I'm using Adelson
ferus as brushes, and I'm going to
go into this layer and I'm going to raase
the eye and the teeth. As well as these laster
things, like the band aids. Okay. And here as well. Okay. So here I'm going to erase them as
well on this layer. So the teeth, I want them to
be a bit kind of yellowish. So let's add another
layer in normal. And I'm going to go into this
yellowish kind of color, and I'm going to add
my base layer color. And I'm going to lower
the size of the brush. And what we're going
to do, we're going to create that color of the teeth. Kind of yellowish white. And the eye may be
also kind of orange. And here, the eyebrow, I would like to go deeper in the eyebrow to create that scary menacing
looking eyebrow. Okay. And for the
I think maybe we can go even darker
orange in the eye, maybe this is too much. Maybe if we take what spread, water spread, make it smaller. So here I'm just trying
out the brushes, okay? Like so, and here also
make that light brighter. And now, if I deselect
the whole thing, I'm going to add the
eye that is going to be with the normal base color. The eye here and I'm going to add in the color burn layer, I'm going to add
the wet with what, what, what, what what color. Wet spread, I'm going
to choose this area. To make it kind of
that he has a bruise. Like, so and also on
the overlay and on the maybe it too
dark, less o pasity. Okay. So this is one version, and now we need to also
add in the normal. We also need to add the
color of those band aids, and maybe we can go into
something kind of bluish. I was thinking maybe we can
make them completely cute. But, okay, so let's select
the band aids first. Or fighter fish. Okay. Let's try to fill it
in. Think this color fits. Okay. We take edge
loaded color here too. Add this bluer maybe
darker color. Okay. And maybe now if we go and
we hmm. Let's do one thing. Let's create a new layer. Let's select this
shape that we have. Was my shapes. This one, yes. I'm
going to select it. And I'm going to
fill it with white. Ooh. Let's go here so I
can merge the colors. Okay. And now these ones, I'm going to put them together, okay, so that I can change the color of different
parts, the way I want. So this is one fish. Here, what I want to do is
I want to take this fin, and I want to go into the color saturation and make it darker and push
it backwards. Okay. And now, what I want
to do is I want to add some random kind
of bleed effects. Were changed the hues lately. Maybe here. I go
to further it out. Just changing a bit. The hue? I think so. Okay. And also, I want to add
some of that yellow color. Um, I'm going to
add a tender neath. Actually, here on
top is also good. So, what am I doing? I'm going to take the
water spread brush. I'm going to add
that shining effect. Too big. Like so. Okay. And then here maybe
on his forehead, as we have the light here. Let's though didn't
want to copy. No. I wanted to feather it. And I want to add some warmer tones because he has this light that
is shining at him, so I want to add
the warmer tones, more saturated, like so. Okay. And then on the body, I think we're good
maybe on the textures. We don't need any more textures. Maybe here in the Band Aids, let's select a little area and also slightly varied the color. Maybe towards the greens, maybe get darker here, maybe just a bit
feathering it out, maybe more towards the blues, making it more
saturated, more lighter. Okay. So now I have this
kind of base for my fish. What I'm going to do now is I will actually, um, duplicate. I'm going to put
this in a group. I'm going to
duplicate this group, and I'm going to take it into the other fish that is
this one, for example. Like so. And what
did I lose here? Ah. 1 second. Of course. So not there. Sorry. So we duplicate the
thing and we move it. We don't move it into the area because we need the paper
texture. That's why. So I'm moving it here, and I
duplicate it another time. And we move it in here. Sometimes you get
lost in layers. So now we have three
different fish. And what I want to do
now is I'm going to select only the layer with the colors that
I have already, and I'm going to go
into brightness hue and saturation and see if I like
this fish more greenish. Maybe the green is
more interesting. So maybe this one
could be green. This one could be more
blues and greens. I really like this kind
of blues and greens. And then here, what I could do is I could change the color of those eyes and
those So actually, the color of eyes I like, what I'm going to do is I'm going to change the color
of the plasters. Like so, maybe. Yeah, I think I
like it like this. So, for me, my favorite
one already, I don't know. I'm kind of stuck
between the two. So out of these three, I need to choose now one that is going to be
my favorite one, the one that we will
actually be rendering, okay? I will see you in
the next video.
5. Part 4 Rendering: So we're going to
be rendering now, and I have my fish. I decided to go with green, blue, and a bit purple fish. And now, what I'm going to do is I'm going to change the
color of the line, okay? So I'm going to
go in alpha lock, and I'm going to choose
one of these colors, the green, for example, and I'm going to go into my brushes. You can use any brush and
just cover the line work. So that it's not so contrasting. Okay? We can increase
the opacity here. And what we can do,
we can play with it. We can see if it's
good in linear burn, for example, or
maybe in color burn. This is an interesting
version also because it gives us
more colors that we can choose and pick from to actually add some shadows and
things like that. Or we can go into the into the
overlay doesn't work here. So you can either
leave it on multiply, but I really like the color burn version because it gives me more different shades that I can work with because linear
burn is not so colorful, but this one is, and I'm
going to keep it here. Okay. So now, what we're
going to do is we're going to create a new layer above our
linework, okay, in normal. And here we're going to
select our scribbler brush. I will add that
brush in particular, but I can't add Adelson
Par's brushes, okay? So I will add the
scribbler brush, but the watercolor brushes, you can use any, to be honest. But those are my favorites. That's why I'm using them here. But the underpainting,
to keep it, like in the watercolory, that's the brushes
I would suggest. So now, let's go into our fish. And the first thing that
I want to do is I want to start correcting the eye
shape because the eyes are the so of any character. So what I'm doing is
I'm basically picking the colors from the from the
palette that I have here. And scribbling them in. And we're gonna also fix
the pupil now in a sack. So this is the way
I like doing it. Most importantly, is that
the pupil is this is not the main character
in any book. Usually, I make eyes that
have more depth to them. But now what I'm doing, I'm getting rid of those
colors that I don't want. Doesn't have to be perfect, but I do want his eye to look
a bit ONG and kind of air. So yeah, here, I'm gonna fix the shape
of the eye, like so. So we're covering the linework. And this is very meditative. This is like mega
meditative, to be honest. And here I have the
color that I can choose to actually
create that outline of the eye and blend it into the color that I
have the watercolor. Like so, and here maybe even darker here to
create that kind of oppression of the
ye coming out of a place where it's
placed like with socket. I'm just scribbling away. So, the further I go away
from the eyeball itself, the less pressure I apply. So some people prefer to do to make the eyeballs
perfectly round. It's up to you,
depending on your style. I prefer imperfect
eyeball eyeballs. So here I'm gonna make this idea of a bruise
under his eye. He has a bruise. Maybe
we'll add some purples into it later as well. Like so. Okay, here we have our eyebrow. And I really like
this purple to kind of Our fish has an eyebrow, yes. And we're gonna blend it all in. So I'm gonna make it like a
square eyebrow, rectangle. So here, it's your fantasy, how you want to go about it. But I think here,
it's quite okay. And I'm gonna use different colors to kind
of scribble in the shape, maybe add some shadow here. But the most important thing for me is to keep the
watercolor texture, the one that is on the
fish itself, okay? So here, I'm okay
with my eye for now. What I want to do, though,
is take my brightest color, and I want to add
that highlight. Like so. And then I want to
go onto the opposite side of the color circle and give a bit of the
opposite side of the opposite color like here, into the bluish, purplish kind of color into
that highlight. And then, go into the total white and add just a little bit and a little dot. Like so. So our fish is already
becoming more alive. So now what we do is we need
to fix our here, the edge. We're adding texture
at the same time. I'm not removing the line,
even though it's messy. I'm not removing it.
Because like this, I can see where my
fish actually is. So this is our fish's
fish like here. And we still keep that watercolor and a bit of that line work
showing through. So I'm perfectly fine with that. Makes it more interesting. Now, here, I'm going to
start adding that txture of the of the how do you call them? Oh, God, the deep fish, the angler fish, dear. And I'm blending it
together with the propo so it doesn't look like it's
growing out of nowhere. So it's my unicorn fish. Okay, so here for now,
I'm gonna leave it. I'm gonna fix for what I
want to do here in the line, I'm gonna choose the same
eraser that is the pencil. And here I already like the way the watercolor
has created that edge. So I'm not gonna touch it. I'm just removing the line
where I don't need it. Okay? So here, like so. And over here now, we're going to go back to
the layer with the color. Fix the linework here. Okay. And here, what I want to
do is I want to start with this color
that I find here on the line and blend it
into the color of each of these spikes on his forehead. And here we're going to
blend it into the purple. Like so. So we're gonna make
the other more colorful. We have the. We have
the background. Like the underpainting
already done. Like, so let's take a look. And here I want to blend in more picking the colors
and blending in more, picking the colors and
blending them and more. So now I'm gonna be mixing
the colors together. Creating that kind of gradient. And the farther I
go from the edge, the less pressure I do, so to make it the watercolor
texture visible as well. And here I like this bright
color also. So we can add it. And here I don't
like this dark area. I can fix it. Leave some leave
some of it there, but, like, to shine
through, but not much. So if you take a look
at the fish now, we can see that there are
different colors happening, and he has textures
also happening here. And I'm going in with
local colors and just scribbling away so that we can have everything quite cohesive. Like so. Okay.
Let's go into here. Again, I'm going through
the colors from the edge. Too strong, so I'm
pressing the hardest where the edges here. Okay. Here. All we can do is eliminate
this by adding white. So we're cleaning up the lines. Okay. So we're cleaning
up the shapes. So. As you can see slowly, little by little,
it's coming along. So here, let's go
on to the teeth. I'm going to create
the teeth now. So there's white and yellow. So I'm keeping to the
lines of the teeth, and I like this green
to use as a shadow. So we need to make
it slightly darker where the teeth have like, where the teeth
meet the upper side of the mouth to detach it a bit. So this color works. Good. I'm adding some
darker tones as well. This will make the
teeth come forward. And now, what we're going to
do is we're going to take a local color and blend it together with that
color that we created. Like so. And here, I can actually go into a darker
color because here, it's kind of coming
out from the mouth, and it's going to have a bit of darkness to it as
well this tooth. Okay. So this one we have done, you can see already how
the fish is coming along. So here, the same, we go with one color first. Pick another color, fix
the shape of the tooth. Like yellow, also. Like so. And then here we're
gonna add that contrast to make the teeth come forward. I've been blending it in. But the local color. Okay. And here, the mouth. The same way we're kind
of blending it in. And here, it's gonna have that lip and we can leave grain. Like so. It doesn't
have to be straight. Okay. And we can make
it like this green. I'm always using the
same size of the brush. Not changing 25 times. Just going with the same green. There's this crassi green over here that I'm
also going to add. Always going back and forth, and now I'm gonna be blending it in with the whoter color. Okay. There's some blue here. And as I am moving away from
the from the lift itself, I'm kind of loosing and
loosening the weight that I'm pressing with onto
the onto the iPad. Okay, there we go.
Now I'm going to. Now I'm going to select this darker color
and outline bullet. Again, like so. And here, I'm going to select the same color to
outline that broken too. If so, I'm gonna
take these colors also to add them into the mix. The ones that I find here. They all are present
in the fish. They are mixing quite
harmoniously together, and they're also analogue. So this is what helps to prevent the mud and the feeling of
muddiness in the drawing. And here, I'm going
back in the purple and a bit of darkness here so
that I can outline my tube. And now we're gonna create the
shape of the tooth itself. So, there's our tooth.
The broken one. Okay. So as you can see, already we're starting to push some elements
of the fish forward, even though that's
a simple fish. Now, we continue. We continue with our fish, and we're going to be adding the details
to this tooth here. And I'm going to
raise this line, and I'm going to use white
colour from the paper. Kind of create that
shape that I want. Hey. Okay. Here at the bottom,
I'm going to use the white the white color too. I'll use the white color to erase the area that
I don't need to fix the shape of our Actually, I like this shape. Now, we're gonna
erase the lines. Picking the same color. Maybe some of this
working into the other Here I'm gonna
remove this line. Here I'm gonna go white and
remove this to keep it clean. Maybe I'll add another
little cut in here. Like so. Here, I really like the texture. Now it created the watercolor
texture over here, and I'm going to add just a bit of a separation
here and cover the linework. You can also delete
the linework, but I like sometimes covering the linework because like this, I get to add more
textures with the pencil, and there's more
colors also that create by mixing and
matching, basically. This is like a very
calm meditative thing. Okay, so I'm going to take from here and I'm going
to go downwards onto the flierf
thingy of the fish. And I'm going to add
that kind of shadow ish effect. Like so. Here, what I want to do is I
want to create the blasters. So the band aids. So I'm gonna fix the
shape of those band aids. Using the same colors
that I have here. Like so. And here, I'm going to
go onto the line layer. What I'm going to do is I'm
going to erase the start. Make it pick up and erase it. Go back to the color layer. And here I have I'm going to go over these different
colors that I have created to make a
more interesting texture. Okay. And here with the black, I can draw those like
the black that got created from the colors
mixing together. So the greens and the reds. And this is going to be
kind of the band aid theme. And we're going to add
some highlights here. I want them to be green. I want them to be quite
light, but not green. So this is our fighter fish. Okay. Here, I really like
this band aid as well. And I like to add this reddish shadow
to show that it's underneath here
and fix the shape. Like so. And here the saying, I'm going to add
that shadow part. And I'm going to actually erase this part of the linework
and simply fix it already on the parts of the
on the part of the color. Okay. Now, what we're missing
here is that we need to create an illusion that there is like the fish's
skin is right under. The band aids are
kind of stuck to it, so we need to create
that occlusion shadow. So what I'm going to do, I'm going to choose
a darker color. We can do it on an overlay layer as well or on a multiply. But in this case, it's a very quick drawing, just like an idea sketch. We're just adding in some
places that darker color. To kind of indicate that the band aids are on
the skin of the fish. That's called an occlusion
shadow or the contact shadow. So like so, and if you look from afar,
now we can see that, um, the occlusion shadow actually sticks it to the
fish. I'm thinking one thing. What if we create
a new screen? Mm. Layer. What if we make this one? Kind of stripy. Maybe that screen
now, we will see. So, this one is gonna be stripy, maybe in a different color.
So I'm gonna select. I'm gonna select this part. I'm gonna change the color. Maybe it's gonna be more purple. Green or blue maybe. No. What if we changed the
color of the upper one? The more blue one. And then
on this layer of watercolor, the patch here is also
going to be purple. Like, so, you know, if we go back to
our render layer and fix it the way we need it. So like this, we have
more interesting. It's like eaching. We have more interesting
variation in color. Okay. Now, here, let's
move on to the scales, okay, here, I want to
raise these lines. Don't give me any
inflamation anymore. I have the mold that
I'm good enough. I like the watercolor
texture here. And what I want to
do is I want to take this darker color and create
kind of a shadow feel to it. And I'm going to go
into white and separate this fin from the other fin. Like so maybe make these
more interesting in the shapes. Like so. Okay, let's take a look. Now, I want to greed for
a shadow effect on these. White so. Okay. And here, what I want
to do is the opposite. I want to separate my fish from this shadow
layer that we created. Wrong color. Over here to
fix the shape of my fish. So now, you can see that
kind of these parts are Um they're fins, and the other part is
the body of the fish. Okay, so here, what
I want to do with these scales is I'm gonna
pick the color here. The one that I find and blend
it in into the scale color. So maybe some blues
from here as well. Like so, and I'm gonna go into a darker color in
between the scales. I'm outlining the scale like so. This is one scale, so we're gonna work
scale by scale now. Okay. We're gonna outline
this scale as well. I like this shape
that's, like, chunky, and at the same time, it's squeerish but rounded. So this guy maybe he's tough, but he pretends to be a bully, but he maybe isn't
a bully at all. And I'm gonna of bring this green color
in here for now. Like, so here we
have some blues. I really like this darker blue, so let's bring the
darker blue colors here. Let's take a look. Okay. So we outlined this one
as well. Like so. And here I want to
remove a bit of that line because it's
messing things up a bit here. Going back to the
color of the layer, adding some shadow here. So as this pencil, it's not completely opaque, like it has a lot
of holes in it and makes it, like, transparent. It creates a very beautiful
hand drawn texture. And here we're going to add the separation line between
the shadow and the light. Like so. And now, what I want to do is I
want to take this color, and I want to bring it out all the way into the next scale. So this way, we will
separate scales. And here we have another
scale to separate like so. And here again, we
take the dark color, and we bring it out
into this scale. Like so. We will go with
brighter colors and marine. The point here is to sep rates. The back ones back. The
ones that are behind? Sorry. From the ones
that are in front. Okay, so I'm gonna go on with some blue tones to go over it. So I'm not covering
it all completely, but what I'm doing here is I am adding more texture
and more colors. So this still will look dark. Now, you see, it's not as
dark as in the beginning. Still looks dark. Okay. So greens also. We're going in with a hand
painted texture here, hand trough texture into
the shadows. Like so. Okay. And here as well, let's add some greens. Let's add some lighter greens. So blues. And some of those lighter colors. Like so. So now you can see that
our scales are separate. Here, let's give them that mouth rumpiness Like so. So I'm working from one part of the fish
to the other one. I'm not very worried. Okay. Like so. Here we will have another
darker part on the tail. I'm going away from the shadow. I'm kind of blending
it into the area here. And then I'm going back in with the colors that I
pick from the tail. I'm blending them melen. Okay, if you think
that at some point, I will show you a trick now. If you think that at some point, your colors look dull. So maybe take a larger brush
and we take a pink brush, and we're adding the
same brush, okay? And we're adding some of
those areas that need a bit maybe of green,
maybe of purple. So this is a trick to
make your drawing, have more texture
and stand out more. And use the same brush just
in a giant size, okay? And here I'm going to
go into the teeth. Like so and into the eye, maybe make it a bit more orange. Okay. And here, maybe
a bit more like this. Okay. So now that I
have all these colors, I can create a new
layer in normal mode, and I can already fix
up the drawing by using these colors
in a smaller size. Like so. So this adds this adds the brightness and
colorfulness you're drawing, but at the same
time, keeps it very, very, um, what do you call it? It doesn't make it fall apart, so it's all consistent there. That's the word that
I was looking for. So I'm just picking the colors and lending them and removing
to go for the white here, removing the parts
that I don't need for ones that are bitten here, cleaning up the shape. We can also erase
it from the layer. Later, we can do
that because we have the layer with the select tool. Like so. Okay? Now, what we need to do is I'm actually
going to go and erase these colors here because we don't
need those lines. Like so. Maybe leave
it a bit here, and here as well we don't it. So let's take a look. I think our fish is starting
to look quite nice. And what I'm gonna
do now is I'm going to go to my watercolor
layer and I'm going to erase these
areas where I have them flattered a bit
just to fix the shape. Like so. Also here
in the line layer, I'm going to erase
these lines that I don't need anymore either. So now let's go back
read this one here. Let's go back into the
color layer and I'm going to start adding this shape. And here, what I want to do is I want to add
the yellow inside. And then I'm going to create
a new layer in screen I'm going to add this light layer. Okay. Maybe nothing screen
and add. So like this. And here I'm going to
take this orange color. Maybe something
orangi like this. Okay, so I think that
our fish is done. If we take a look at it,
I think it's very cool. I'm going to insert my signature my eye cloud. Let's find my signature. There we go. Let me get smaller. I'm going to place it somewhere here so that it's
visible, and that's it. Basically, what we have is
now we have the fish that is bully fish has
already some story to it and has different
interesting textures. So I hope you
enjoyed this class, and I will create the overall video so that you can watch from the
beginning until the end, and we will go through
the main steps.
 Katia Kot, Children's Illustrator