Transcripts
1. Introduction: We're going to have some
fun painting today. Hi, I'm Denise Love, and I'm an artist photographer
and creator of workshops that teach how to work in both traditional
and digital media. In this class, I invite you to join me in exploring the joy painting, whimsical mixed
media Christmas trees. We'll be incorporating
acrylic paint, water color, gold inks, and hand
embellished details to add sparkle and
dimension to our paintings. Whether you're an experienced
artist or a beginner, this workshop is designed
for everyone who wants to push their
creativity and have some fun. We'll start by warming
up and experimenting with color and mark
through easy exercises. You'll learn how to
create beautiful, unique, and one of a kind
Christmas trees for art. And cards to send
to your loved ones, complete with hand
embellished details. Next we'll scale up
and explore painting, larger pieces that can
be framed and hung. You'll receive guidance
and support every step as you bring your
unique vision to life. Using a variety of supplies
and hand embellished details to add sparkle and
dimension to your painting. I'm passionate about the arts and having fun while you create. Join me in this class
and let's get started. I can't wait to
see the beautiful, whimsical Christmas trees
that you'll create.
2. Class Project: Your project is to create some yummy whimsical trees and
come back and share those. I'd love to see what
you started with, what materials you
experimented with, the marks you made, and I can't wait
to see your yummy, whimsical trees come back
and share a project, and I'll see you in class.
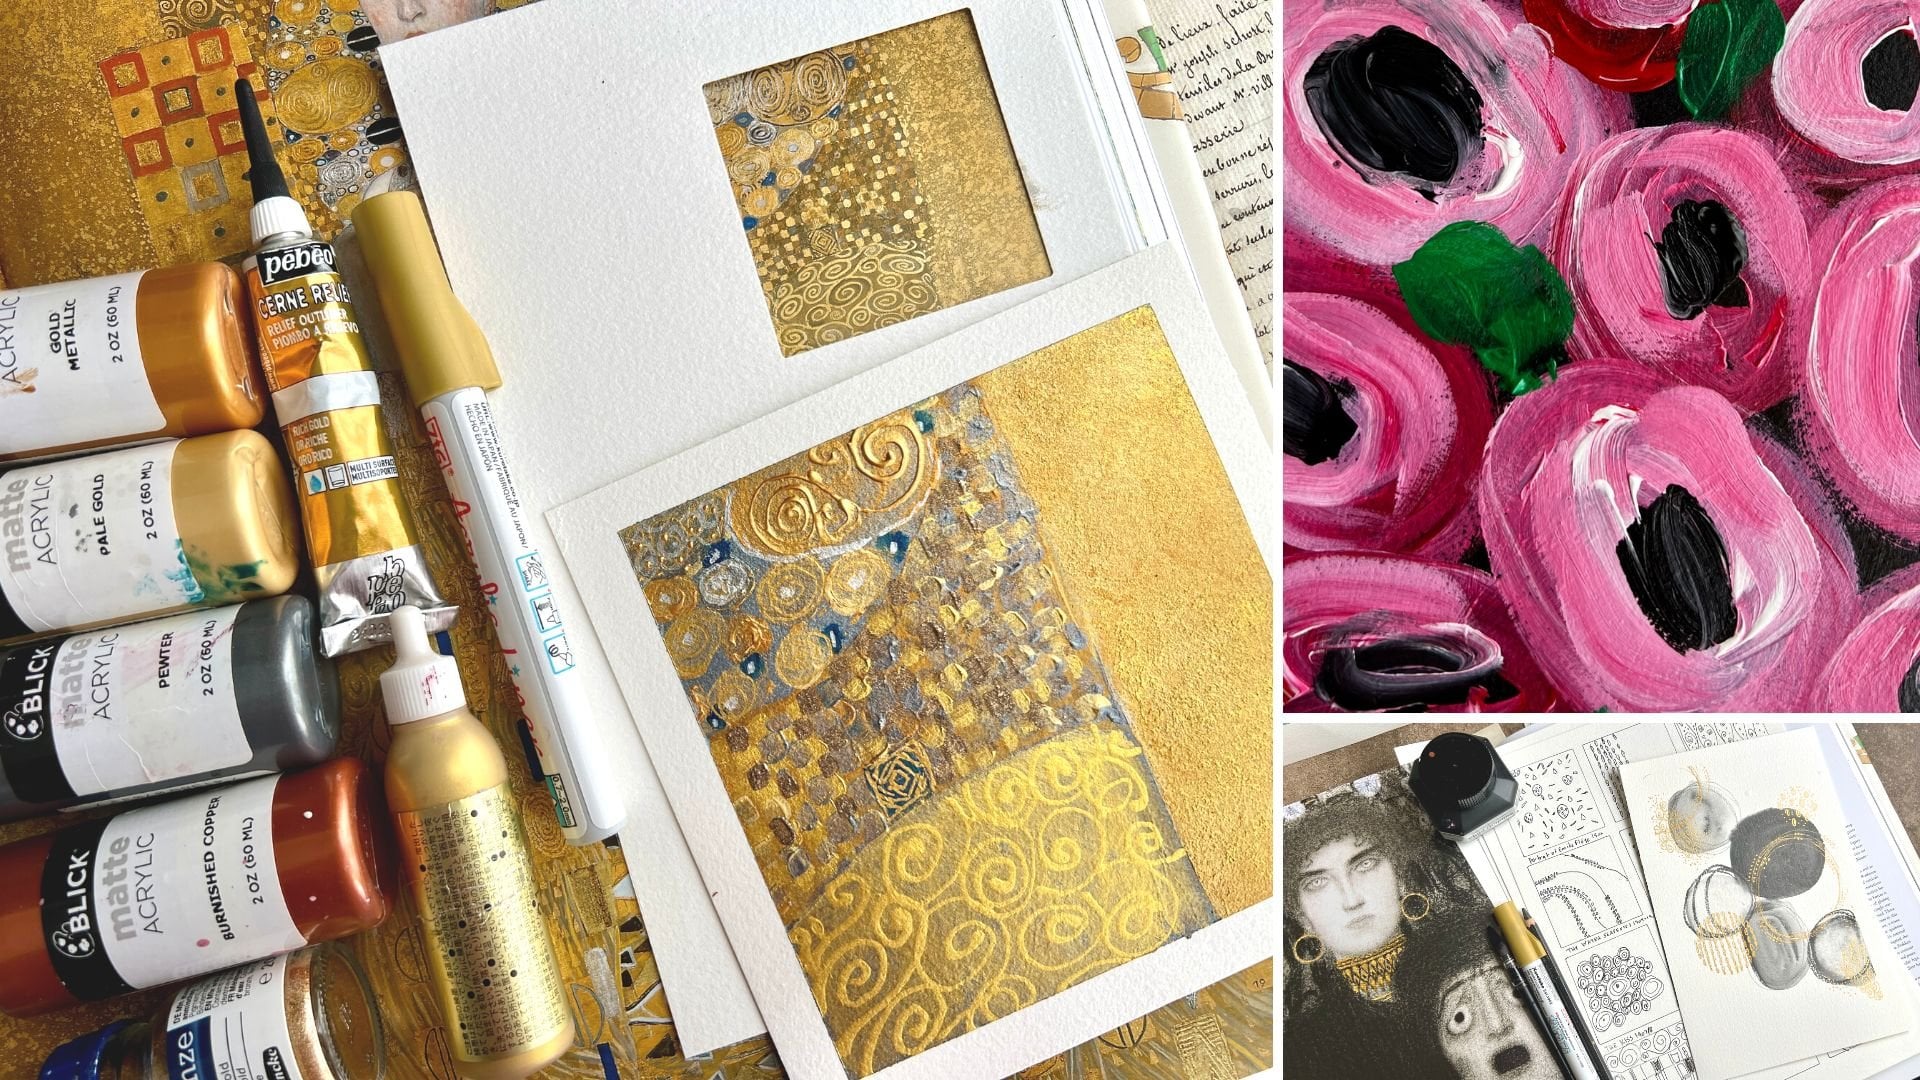
3. Supplies: Let's talk about
supplies that you could use for your
Christmas trees. This really is a page of anything that you happen to
have to make your trees. This is a true
mixed media class. You can use any paints
that you're interested in. We could use water color. We could use acrylic paints in any thickness that
you're thinking. I even have cheap folk
art acrylic paints because I liked the colors. Sometimes color is
what I'm looking for. And you can certainly
mix up all these colors. You have the nicer
acrylic paints and you're really wanting to dive into art quality trees,
which my grandparents, my grandmother did, beautiful crocheted and
Tadd Christmas pieces that were framed up and
came out every Christmas. That's not saying
that you can't do the same with these
beautiful painted trees. My recommendation to you, I even have acrylic
inks out here. My recommendation to you on the paints is what
is the purpose? Is this going to be
cards that you send and people may or may not keep and you're
hoping they keep, maybe they'll frame
them and you're not wanting to spend a
lot of money on paint. Then you can go with your
less expensive paints, pick out a selection
of colors that you really love and go at it. I'm going to be using
a variety of paints because some of these maybe I
just want to do for myself, some have the right colors. And maybe I don't
want to go through all the trouble
with mixing it when I already found
like the perfect, pretty colors just depends
on what the purpose is. If it's a really yummy design, and I'm like, okay,
I love this so much, I think I want to frame it. Then I'm going to move up to the artist quality
acrylic paints and paint some with that. I do have just everything under the sun that
I could pull out. You could do these
in watercolor. I've done some of
these in watercolor. They turn out
beautiful that way. Also, pull out your
favorite paints. This is truly the
project where you're going to be able to use
all kinds of fun stuff. I also have a Brayer
here because I pulled my jelly plate
out and I thought, oh, making a few backgrounds with my jelly plate
might be fun. I have those available
while I'm experimenting. Just trying to give you
all the different ideas. I have my punchinella,
which I love. This is the paper that they
punch sequence out of. It's like the leftover scrap. What I love about
it is it's metal. It's very sturdy. It's very thin. So it's perfect for not
creating a big thick. It's just easier to use because it's so thin,
but it's strong. I use this for everything. It's my favorite stencil thing, but with Christmas trees. How about ornaments
perfect for ornaments or any decoration with round a
hole that white want to use? If you have any
favorite stencils, this is the time to go
through your stash and think, oh, what kind of stencil
might I want to use in the background or
somewhere on my piece? You can just really let loose
and experiment with these. I have a catalyst wedge
because on some of these I want to smear the paint and have it flatten
out really cool. So I've got that I'm
going to be using. I also have my favorite
gold mica inks by a take. I've got the paste and the ink. The ink does tend to be the one that I use
the absolute most. Now if you are looking
for a beautiful, very vibrant metallic
gold ink to be using, this is my favorite, but the paste is very fun too to use with the paint stuff. I do have both of these
out that I'm maybe using. Any of your pins that
you like to use. Posca, acrylic pins and colors. I've got all kinds
of colors here. Actually a post cassette. So I could pull any of my
acrylic type markers out to be mark making in doing
ornaments and decoration. These are fun to have available. Also have a pencil, because sometimes I like
to sketch out maybe a shape to keep myself
conformed into a specific, say, triangle for the tree. I do have one of those and
some erasers sitting around. Got some palette knives. I've got a ruler just in
case I want to say make the. Backbone of the tree. I can keep it straight and decide how long I want to do
that and work off of that. I'll have a ruler handy and
a variety of paint brushes. And depending on what paints
that you end up using, might determine what paint
brushes that you want to use. I just have a variety handy. I also have my favorite dip pin where I'm going to be dipping
into the ink and mark making and doing
some things with any dip pin works
for stuff like this. You can get creative and play with some of
your mark making tools. I also have some
palette paper here. I thought, what
would be really fun after you've made a
few and your thought, Yes, I've got this,
these are amazing. I want to make some
Christmas cards. You can buy Christmas cards at the store, at the art store. I've got Strathmore. Both these are Strathmore. I've got some watercolor cards
that I got just recently. These are nice,
they're acid free, they're art quality so they
could be framed afterwards. You might consider
practicing and doing some different
designs and cheap paint. And then move up
to your nice paint and make some really
beautiful cards. I've got white and they
come in a few colors, but I tend to stick
to the white. And just to keep in mind that you don't even have
to buy the cards though, These cards are basically a half a sheet of
paper folded in half. And then they've got
envelopes in this package, so you don't have to go
looking for envelopes, but you don't have to
buy the pre made card. You could fold your
papers in half. Once you got some that
you really loved, then I'm going to be
painting personally on my Canson XL watercolor paper just because it's inexpensive. It's a nice size. I took a lot of the pages
out of this pad and just cut them in half that I had
a nice size to work on. Not too small. You
can of course, make these even half of that if you want to
make it smaller. I did find though, that I
liked working on this by nine. 6 " by 9 " would be
about the size of this. If you're in inches,
that's what we got. If you're working
in centimeters, this is about 15 by 23. Just to give you an idea on
the size that these are, it is just half of this pad. These are just cut in half. That's the paper I'm going to be working on through class. I just want to get excited and see how many different
designs that we create. I can't wait to see what designs you come up with
after being inspired by some of the
projects and some of the examples that I've shown
you. Let's get started.
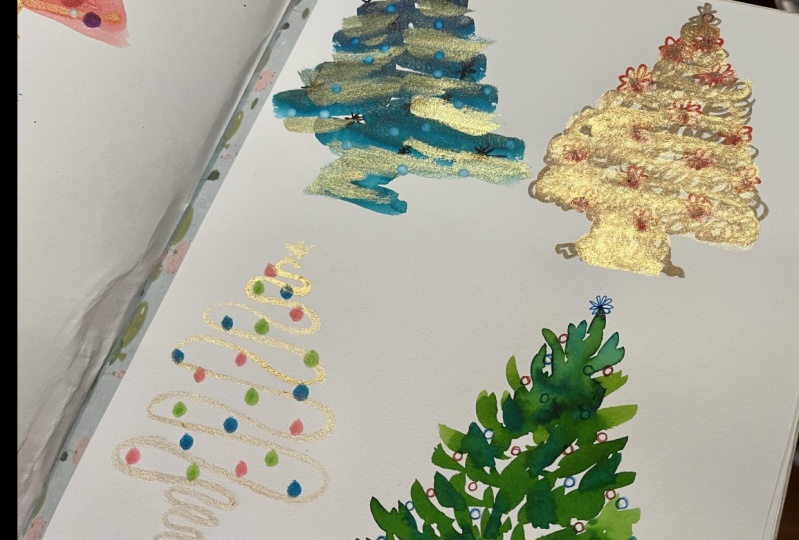
4. Warmup Shapes & Colors: I thought it might be
fun to start out by brainstorming some ideas
for some tree compositions. I'm just going to take, you can do this in
your sketchbook too. This is perfect
sketchbook practice. A little refer back to guide, something you can think
of when you're like, oh, what kind of
compositions can I do? Maybe just draw some
rectangles out. You could use a ruler if
you want to get more exact. I'm just looking to
brainstorm some ideas here. I've got the shape of a
piece of paper and I'm just thinking like what
tree might be cool? I think trees are
planted in the ground. Maybe I have a horizon
line on something. Then just as a plane
regular tree we have, trees are about the shape
of a triangle with a stump. That could be our
first composition. That's a good idea there. And then as we're going
on, we could think, well, I've got a triangle, I want some garland, maybe I want some ornaments. Now all of a sudden, I'm
starting to think a little bit more about the trees that
I might be able to create. Then I'm thinking, oh, I got a horizon. Maybe I want like a little
forest of Christmas trees. Maybe I have a little
threesome here on that. I could have some little
ornament decorations and some May, some
little garland. Now I'm starting to get into the mood here and
then I'm thinking, okay, now we've gone from that. What about if I've
got a horizon? Trees are the shape
of triangles. What if I start off with
some different triangles? Maybe wonky shapes.
A little tree trunk. No, I'm like really starting to get into this now and
think outside the box. And maybe I've got
some ornaments. Maybe I've got some
type of treetop. Now I've gone from a
very plain triangle to starting to think, okay, how can I make this
fun and wacky, super fun exercise from
here's the standard, what can we do to push that? I'd really love it if
you start off with a standard triangle
tree and come up with as many variations of
a triangle as you can to see how many different compositions you
could come up with. Then after we do that, if we keep on with
our triangle thing, I'm thinking a tree
is a big triangle. And the stump, this tree, instead of it being
painted as a triangle, maybe I've got it painted
with some tree branches, maybe that's got a
star at the top. Some ornaments and
decoration painted in. Now, we've even pushed that
even further then what I say, let's start thinking of
non traditional trees. What if we have just a tree
made of only ornaments? In my case, I'm thinking
circle ornaments. And I'm thinking in my mind, go up in a triangle Here
I've got the stump. Now I've got super
fun Christmas tree made of just circle
ornaments, that's fun. Maybe I want a tree made of
just pretty gold swirls. I might just give myself a line for about
how tall I want the tree. I've got a little bit
of a tree stump here. As I start painting gold swirls, I'm thinking that the swirls
are bigger at the bottom. Then as we go up,
maybe they conform in our triangle shape and they're
getting a little smaller. As we go up, we get to
the very top there. Maybe in those little swirls, I've got some ornaments, and maybe those ornaments have
some pretty drippy pieces. Thinking I could do
the swirls in gold, I could do the ornament pieces in some type of solid color. I could drip off with
some Posca pen dots. Now really starting
to get into how can we make these as
fancy as possible. Then as we keep going, maybe then we start thinking trees don't have
to be triangles. What if I did something
like a big ornament, maybe a little trunk
here at the bottom? Then maybe some pretty gold swirly things coming
up from that. We could say all of our Christmas things don't
just have to be trees we. Now start thinking of some
other pretty decorations that we could come up with. Maybe this ornament is
painted, some pretty color. Then maybe we've got some
pretty drips off the bottom. We'll just see what
could we create there. I want you to start
brainstorming ideas. I have an idea PDF guide
for you over under your resources of
different ideas and trees that
have been painted. I want you to take
a look at those and see what interest you, what looks fun, what do you
think that you could create? Also have another little ideas. I'm just looking at these.
Might draw it right here. Have a little horizon line, maybe I've got a stump, maybe some fun strip, some type of stripe pattern
as we get to the top. Then in those stripes we
could have ornaments and things and we could have a tree topper that
would be pretty fun. Like a stripe tree. Look how fun that was just sitting here. Going from very simple
to super elaborate, I want you to do some of these. Look at the example inspiration guide to really start those creative
juices flowing, then start compositioning out a few layouts for
yourself and think, okay, what do I want to
create on my paintings today? Or my cards or whatever it
is that you're creating? Then you can start
brainstorming color. You can start
brainstorming paint marks. Like if I have this
as my idea guide, let me move this
cardboard piece. That is my inspiration guide. Then I'm thinking, oh, you know, with the swirls, I
really like gold. I've got my gold ink,
I've got a dip pen. I might just start
practicing swirls. Swirl, Am I thinking of
just start thinking, oh, was that it or
was that not it? Did I want to come out, have the trunk start, maybe give myself a line. Maybe come out
further with more, less exact swirl.
A little messier. I'm feeling a little
messier because now I can, I can go up further still thinking in my tree
is a triangle shape. Then at the top, maybe I've
got some funky decoration. Then I'm thinking, oh, I could have some yummy
ornament in here. Let me draw some circles, then we could leave it all gold. I could have some fun
little dots around here. Really start thinking, oh
what extra decorations? Oh, look at that. What the
dots definitely like the dots. Then what if you're thinking, I don't know if I
wanted all, just gold. What if I wanted
some color in there? What if I had maybe this
little red acrylic ink which really comes out fast. But what if I had like a little
dip of red in that gold? That's super fun. Oh yeah, see that is super
fun right there. I want you to start
thinking in this way. I want you to start
brainstorming some shapes and ideas
and then start thinking, okay, what can I
use to paint these? And what colors do I want? I know I love the gold. This is my A take gold, Mica ink is the most fun, shiny, bright, pretty ink. And then also start
thinking about color, then how might you apply some
of these onto your paper? I'm obsessed with this
greenish blue color. I've got some little
folk art paint that I didn't have to mix up. I've got sage and green scape. I'm feeling like those
are a fun choice. You can use any kind of paint
basically, that you want. But you want to keep in
mind titanium white. You want to keep in mind
what are you using this for? Is this for a Christmas
card that you're going to send and people may
or may not keep, then you might use
cheaper paint. If this is going to be something that you're like, this
is a piece of art, people need to frame
this, then use the paint according to the use you think you're
going to be having. Out of these. If it's nicer art, use nicer paint art that may or may not be kept,
then use cheaper paint. I'm thinking, what
about a fan brush? What if I mix these colors
in the fan brush and then come out like this as I'm
going down just thinking, oh see now, that right
there, totally feeling that. Look at that, now you get
the wispess of a tree. All three little colors again. We can come back.
We see some depth. We see some dimension. Oh yeah, look how
pretty that tree is. If you want, you come back
with a brown brown trunk. I've got the raw umber here. In this case. I could come in with just a little
paint brush with some. Oh, yeah, Yeah,
yeah. Look at that. What if I wanted to put
that on the ground, but I wanted it to be a little
more straightened defined, maybe with my catalyst wedge. Look at that perfect
tree right there. Then I'm thinking, what about, how can we decorate this? Now I'm feeling like, oh, we could do some gold, some gold ornaments,
maybe some gold garland. You could do a little splatter of painting here if you wanted. Maybe I want like gold. Look at that right
there. Gold garland. Oh my goodness. Right, You need to do a
tree with gold garland. Maybe at the very top can do some little decorative
tree. Look at that. Maybe a little bit of
gold here at the bottom. Check it out. Oh my goodness. And then you can see
that bit of sparkle. Then start thinking, how
could you do some ornaments? Maybe I want an ornament or
two in here, maybe I don't. If you had some white ink, which I don't have out, we
could do the white ink. I do have silver in though. Let's do some silver in. We
could take a little brush and paint our little circles
if we wanted with white. Because of course I
have white over here, but I just did a drop
perfect, some fun little. And then what if that was
a touch of red in there? See, I like these little. What if, what if I did
this? What if I did that? Just start thinking crazy. And outside the box and that one wasn't so
round but that's okay. Could come back with
a little more silver. Make it. Oh yeah. There we go. Check out that fun tree. Check out that fun tree. I also have some pretty green. I could have done that in a
pretty green right there. I'm feeling like could be our
Christmas card right there. We can do totally that
right there on a card. I'm feeling like that's
what we're going to do. Maybe we'll change the
color up and have some fun. Because I've got some other
I've got this pretty green. Well, I got all kinds of paint. We could use regular
acrylic paint too. I like these Matt paints, which a lot of these folk
art paints are Matt. I like matt paint because then
you can see differences in the shine and the
matins and it adds like that extra layer of
dimension to it. Those are really fun to play
in. I want you to do this. I want you to practice
different compositions and say, okay, how crazy can I get? Let me get some ideas
from the idea guide. And get my juices
flowing and see, okay, how creative can I get? Then I want you to start testing out your paints and your inks, and your water colors, because that's
another thing too. I want to play a little
bit in watercolor. I've got my graphite
water colors right here, which I particularly like. You don't have to use graphite water colors
if you don't love them, use any of water
color that you love. But I do find that what
makes these projects the most fun is when you're using what you truly,
truly love already. If you've been on my channel
for any length of time, you know I love the graphite. These just make me so happy. That one right there
love that one. So I'm thinking we
could do some graphite. We could color a
whole background. We could just, we could
actually take our pencil. Let's do this. Let's
take our pencil.
5. Warmup Watercolor & Finish: We can sketch out tree like, what if we did like
little triangles? And I'm going to get really
scratchy here because I want that little bit of
scratchiness to show through. I don't want these to
get paint everywhere. I'm going to set
them to the side. Terrible about painting and
getting messy and then go, oops, and getting it
where I didn't intend. Okay, now we've got
a good messy tree Started here. Exactly
what I wanted. Now let's come back in. I'm using the kuretake set here. The five or six colors that
come with the kuretake. That's what I'm going
to do right here. I'm just going to start
laying some color in. Just seeing, do I like these, Do I like what it's doing? Let's see that's there. This is another greenish color. This ones a little bit prettier, Green actually though
it's the green blue one. These don't have to be perfect. Again, we're experimenting.
We're playing, maybe I want to get
extra water color at the bottom of one of these. Why not a little bit up here. I'm definitely feeling like my yummy gold is going
to be pretty on this. One of these is like
a red or brown 0. Let's just go ahead and pull that down there.
I need this to dry. So I'm going to dry
it with my gun. Even though I try
not to do that, just having to think of an
idea as I was doing that. We're going to let
that keep drying for a second right next to it. Let's do another
watercolor one because I'm thinking of the
little stripe idea. We could have a top little thing here and then stripe
out some stripes. Oh, yeah, Yeah. Oh, yeah. Oh, yeah, totally filling that
right there. Look at that. We can come one
wider if we wanted, if we wanted to get
even bigger. Oh, yes. Can come in with some
yummy paint marks and then just get some
differences there. And then I've got
that brown colors and just come on down and we'll
come out with the ground. Look at that. Super fun. Then we can start
decorating our trees. Because really when we
start to decorate things, that is when they
start to really shine. Let's maybe post, got
some Posca pen over here. We could start doing
maybe some Posca. Maybe I like some little dots. Those are fun. Oh my goodness. Okay. I really love
the gold the best. I also love like, hang on. What you can do, any kind of metallics in
here that you want, but I'm just playing here. What do I want to do? Think
about this for a second. I definitely want ornaments. Maybe the ornaments
can be in the gold, some kind of just
swirly something at the top would be fun. Maybe some garland. And on that garland, we could do tiny little dots. Oh, yeah, yeah,
yeah, yeah, yeah, totally Do the garland
with the tiny dots. Love. Let's go back to all of our
little mark making that we do and all our abstract
classes and think, okay, how can we apply some of our favorite
marks to our trees? I am feeling like a little tiny hop of red here
in the middle of my gold. I don't know, For some
reason I love that. Look at that. Super fun. You might be looking at that
thinking that's terrible. But you know what?
It's not up to you to like what
everybody else is doing. It's up to you to have fun and play and like what you're doing. This was really fun
with this green. I actually feel like. Posca pen dots on this. Ooh, that's pretty because
this could be like at the top, this could be the garland. If we did some pattern across the top of these
or the bottom of those, but the top on mine is what has such a fun little lolly going. Then we could look
at this and think, oh, I love the silver. Maybe I want some
silver something. I'm going to use my dip pen because it's in,
it should do fine. So looky here. Oh, look at that. We could pretend this
is silver tinsel. Silver tinsel. Look at that. That's fun. I want you to just start when you're
doing it on scrap paper. This is the time. It doesn't matter if the
idea works or doesn't work. What matters is your
brainstorming different ideas. And then you're
seeing which ones were good and you're like, okay, this did work, okay, I did not like. Before you get to the
most important paintings that you're going to be doing, you're going to want to
figure out what does work, what doesn't work, what do
I like, what do I not like? How can I now translate
all my favorite bits into my paintings that I'm
going to do going forward? Super fun. Of course, you can make a tree out of inks. What I took like this
silver for instance. One of our ideas was
a tree out of dots. What we did, a little dots all the way across here going
up like a little triangle. Look at that. Then you
can play with and adjust dot sizes as you're going
thinking, oh, I love this. What if I tried that? What if I did whatever it
is that you're thinking, Then you could come
in and have a stump. What am I looking for? I'm
looking for a paint brush. We could create a little stump out of here if we wanted to. We could come back and
have it on some ground. Maybe there's some snow. Maybe we can put in some different colors
in a few of the dots. Like that's the decorated part. Oh, look at that. Look at that. Yes, that is super fun. Another fun tree choice for us. I want you to start
brainstorming, thinking, spit balling ideas, getting out your different
paints that you already have. And I want you to go
buy specific stuff. I did not buy specific
stuff for this. I picked out things that I truly had and already
loved and thought, let's play with this stuff
and see what we get. Start spit balling ideas and coming up with
some compositions. And start testing your brushes and your paints
until you're like, okay, I feel like
I got something. I like, let's start making
some cards or some art. I want to start seeing you
do your little doodles and testing things out and come back and
show those to us. Can't wait to see what
you've come up with. Check out the idea
guide that I have for you and the resources
that will get your creative juices
flowing and give you some ideas that maybe you're just not going to
think of right away. I can't wait to see those. I'll see you back in class.
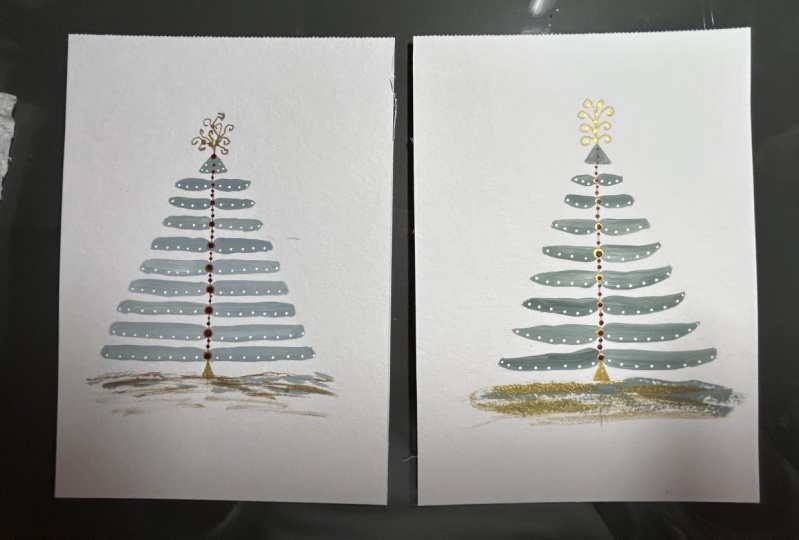
6. Christmas Cards: All right, I'm feeling
pretty good about some of the things
that we painted, about our samples that
we were creating, testing out paint and color. And I got so excited with using the fan brush to make
a tree that I thought, let's make some cards with that design because
I know I loved it. Then we can make cards with other designs to what
you could do too, if you don't have some of
these watercolor cards. I'm using the Strathmore
watercolor cards. It's a nice weight if
you don't have the card. This is basically
a flat piece of watercolor paper with
a fold in the middle. You can use regular watercolor
paper if you wanted. I like the cards
because they come with the envelopes already and I don't have to
worry about that. But if you're looking
at watercolor paper, this is a 79.34 size. About seven by ten ish, which is centimeter wise. Because I know we have
people who don't do inches. It is about 17.5 centimeters by 25.5
centimeters in that range. If you're going to do
your own watercolor ones, I recommend you
getting some envelopes and making the cards a size
that'll fit the envelope, then you don't have to worry about painting something
the wrong size. You can see here that
the envelope is slightly larger than the card is. It's about an eighth of an
inch all the way around, leave a little bit of space. The card actually goes in the envelope because it's thick. If you make your own,
if you just get some of these Strathmore watercolor
cards, those are fine too. I've gotten these
a couple times, but I think they're
the same cards. The packaging just
changes color, or maybe it's the color. This is actually an ivory, like a little bit creamier
color than this other box, which is more of a white. Cards do come in slightly
different colors, but they're about the same. Whichever you can find, if you get the ones that are already made up for
you nice and easy, I'm feeling like that tree that we painted with
the fan brush in our warm up exercise is a really fun way to start
and paint right on here. Now if you're scared to
paint right on here, then get some watercolor paper. Cut it maybe to a size
slightly smaller than the car. Paint out as many of these as you need until you're
like, this one's perfect. And then cut that out
and glue it to the card. You don't have to use the card itself if you're afraid
to ruin the card. I already had some paint
still here on my paper. Let's just dive right in. The paint is getting dry, so it's sat here for a bit. But I started out
with the fan brush, putting all three colors, and this was the folk
art, home decor, chalk sage, and the folk art matt green scape color
that I had used. And then titanium white is what was already
on my palette. And then raw umber
is that brown. I'm going to be using
that. Mica Atake gold ink. Let's just dive right in if you're scared of
where you're going to put this and you want
to be real exact and maybe you want to do some
hand lettering below it. You can lightly
pencil out where you think this is going
to be because then you can take an eraser
and lightly erase it. If you're thinking too much. I'm thinking right there. All
right, let's just do this. It was really pretty, just coming in from the
side and going down. Don't worry about mistakes. It doesn't have to be perfect. This is some fun stuff. It doesn't have to be exact. My sample is
probably going to be the best one I ever painted. I'm right there with you. But it's still fun to jump in and give it a
go, just have fun. I don't want you to let
this be over stressful. That's why I'm
thinking, if you're nervous to paint on your cards, paint on a watercolor
piece of paper. And let your mistake paper
in case you mess up. And then if you don't,
then you can just glue it right onto the top of
this and it'd be perfect. I definitely feel this
feeling pretty good. Yeah, for the fan brush. Okay, let's go ahead and give us a little bit
of a trunk. I'm just. My silver white round. Let's just get a little
bit of a trunk here. Doesn't have to be exact. Then I'm thinking, why not use
my wedge for a less exact. I want the paint in the middle. I don't want the edge to edge because I don't want
to go edge to edge. Oh yeah. Perfect. Perfect. Then if we wanted, we could come back in and put a little bit of the blue at
the bottom if we wanted to, imply that there's maybe a little bit of limbs
and stuff that dropped. Let's dry this really quick. Going like some gold. I'm not sure what
I did originally. I think I did the gold. Maybe some yummy garland
and some ornaments. Let's do pretty gland. And you can see as we're going do a tremendous amount of time. You certainly could take a tremendous amount of
time if you wanted, but if you're doing a bunch
of cards and you want to be, you're sending out for
your holiday season, Make it so hard that
you're like oil. I got one done. Look how pretty that
is. Oh my goodness. A little, tiny bit of sparkle. That is my favorite bit. Want to get some sparkle? I
want something at the top to just some type of
Maybe a little dolly. Yeah, look at that.
Maybe some pretty dots. If you practice on a couple of watercolor things before
you get to this point, totally makes the
whole process easier. Another thing I might want to do is a little bit of
gold at the bottom. Then you can see how
this would be perfect. Merry Christmas,
happy holidays, hope, peace, whatever you could hand letter that right to
the bottom of that. If you're into hand lettering, which I'm not going
to have handwriting that looks like I should have been a Dr. you can't read it. Then we let me go
get some white ink. All right. I found my white ink
in my little in set because I think this really is like the easiest way to make
a round ornament is like an ink drop, just like that. Rather than trying
to paint a circle, I think why do a few ornaments, maybe with a gold center or
maybe with a red center. Look at that. Oh, you know
what would be really pretty? A little, tiny bit
of a white spray. Let me open that. Right there. Got to be super careful. I'm the worst about
knocking into my paints, spewing everything in all the places I didn't
want them to go. But what if we got a little
bit of this white ink? Tiny bit, and you can see
it as you get real close. I'm trying to be
real careful and real tiny. Oh, there we go. That's what I wanted.
Pretty look at that. Let's see if it'll let us focus. Tiny bit of some
white drops in there. How pretty that is.
Okay. Loving that. Maybe a tiny of the red, maybe, because I
like red and green. Oh, I could have done
a tiny dip of a green. That's okay. Let's get
the holiday red in here. Just a tiny little dip in there. Oh, and then we could do
the gold on top of that. Just get crazy here. Who knows what color
will end up showing? Obviously not the gold. We're just picking up the red. If we're letting that
dry, we can let that dry. Maybe I want the bronze on top. I just want something on
top so it's not so vivid. Just a tiny, tiny via gives it like one
other bit of dimension. But of course, the more
we add on top of here, the bigger they're getting. But you want to be careful,
you don't want to smear that. That's a point where
you'll want to be like, okay, that's probably the
last thing I want to do. I don't want to smear those. I want to set them
to the side and let them dry and do their thing. Then you could
come back and draw on top of them with
some ink maybe, And add like little dots or decoration to make it look
like a decorative ornament. Look how gorgeous that is. Super easy only took a few minutes to
create that, that one. Super fun. Let's create another card while we're
in here with the cards. And set this where I'm not
going to completely ruin it. What if I want to
do a swirly tree? Let's do a swirly tree. We could do some
others. I really like the swirly stuff though. You could do a painted
background too. But a lot of these, I've
just decided that I like the white background or
like a light background. Thinking what we
start off with gold, we do a strip tree, can do it on white, but you could do
this, you paint this, and do this on like a
neutral background. And before I even do that, let's stop for a second. Let me get my ruler and my little pencil because I
want to know where to stop, just judging for
where I want to stop. Let's say right here. And then let's just come
right up the middle. If we say this is 2.5, would be right about the middle. About right there.
I want to come up. Oh yeah, There we go. Now I feel better, okay. Thinking little
gold at the bottom. Kind of thinking a little goal to kind of start our
tree trunk there.
7. Christmas Cards Finish: Gold right up the top there, some decorative
something at the top. You could do an angel,
you could do a star, you could do some twirls, whatever it is that you're
feeling at the moment. Let's just put a decoration up there. We could
do that last too. I didn't have to do
that right then. Then what if we go with
these yummy colors? Again, maybe I should
change up the colors. But I'm feeling these colors just go with what
you're feeling. You don't have to have
100 paint colors. You don't have to have 1 million different things
going on out here. You just want to have
enough to have some fun. Let's start off, don't mess up the other tree feeling I'm using our little
round brush here. What if I do a tiny triangle
top and then stripe it down with some different
colored little stripes? I'm feeling this,
this feeling good. I want you to definitely do the different ideas as they
come to you and you're like, oh yeah, I'm feeling this. Because that's when
you're going to have the most fun look at that. Oh my gosh. So pretty. Oh my goodness, This one, you're going to have the fun on these is when you're
like, oh, I'm inspired. And then go paint one right
when you're inspired, because later you're going
to like, what was that idea? You don't know how many
times I've done that, coming out like it's a triangle, like we're coming down, the
tree is getting bigger. I like mixing the three colors on my paint brush
so that I'm just doing like one swipe
out there and just letting that paint do its thing. Look at that. And I don't
have to have them perfect. I don't want them perfect shape. I like the shape when
it's less uniform, a little more organic. Feeling good about this one. Oh my goodness, this one definitely feels
like a pretty tree. Check it out, paint with me, people have some
fun, enjoy this. This is super fun. This might be the most fun I've had painting in a while with
the different things. Let's take a little
bit. I want the gold. Oh my gosh. I'm not
even going to tell you when I'm making this class because it's nowhere
near Christmas. And we have to just like hold
it for a very long time, but sometimes you just
got to paint when the inspiration hits
and just go with it and then put it out when
it's the right time of year. That is gorgeous. Okay, now let's let that
do its thing a little. Let's dry it real quick. It's wanting to not
sit flat because it's a card that drives me
a tiny bit bunkers. I got these little bull clips
here, I might bull clip it. Let's see if that'll
help hold it down because maybe I'll bull clip both sides and then
it's like the same. There we go, because
what I want to do is put some ornaments
up the center. Didn't see that one
coming, did you? I don't want it to be on
an angle that I'm like, oh, what's it doing? I think I'm going to dip it. I'm going to use a different
color on top of this. But I do want some of these
to just be this pretty gold. Then we can come back
in with something else here in a
second, like a red. For some reason
I'm in a red mood. You might be in a green
mood when you're doing these or a purple
mood. Look at that. Oh my goodness. Okay. I'm actually almost
feeling like I want to dip my pin into the red
rather than use the stop, because this stopper is a
little crazy unpredictable. And I might dip it down on, there we go, just to see, oh, look how pretty that is. The more of these
you do, the more exact you can get
into what you like. And these are so pretty. Oh my goodness. Oh my goodness. I'm just the pin on the
top side of the gold, so there's actually steel
gold there and then dipping as the stem part
of it a little bit there. And it is pretty, oh my goodness, Look at that. Maybe we can dip a little, maybe a few dots up
here at the top, just so that red didn't
come out of nowhere. That is super pretty. Oh my goodness, Might be
my favorite card ever now, check out the yummy
little details there. Pretty. Now what we could do, you don't have to stop
there if you don't want. What we could also do with say, our postcap, come back in
with some white dots on. Don't touch the center. Oh my goodness, I'm the worst for touching everywhere.
I'm not supposed to. Maybe white dots right along, just the edges would be a
final little decoration. Doesn't have to go edge to edge just a little
bit on each side. Like maybe that's
just a little drop of snow or something fun like that. Look at that. Oh my
goodness, Look at that. That is so pretty. All right. Second
card, two cards. Look how pretty our cards are. Let's take these
little book clips out. Here's the other
one that I've so far not managed to mess up. Yeah. Now we have some pretty little Christmas
cards that we've created. And we've left room
for hand lettering. If you want to hand letter, I can't wait to see
some of your cards. Look through our
inspiration guide. Look through the pieces
that you were drawing out and being inspired
by earlier in class. Pick some of your
favorites and create a couple cards that you can send to some very
special people. Then as we keep going in class, we'll paint some little bit
larger on watercolor paper. Some different designs that I know is going to inspire you. So I can't wait to see some of those. But how fun are these? I can't wait to see yours. So definitely come back
and share those with me and I'll see
you back in class.
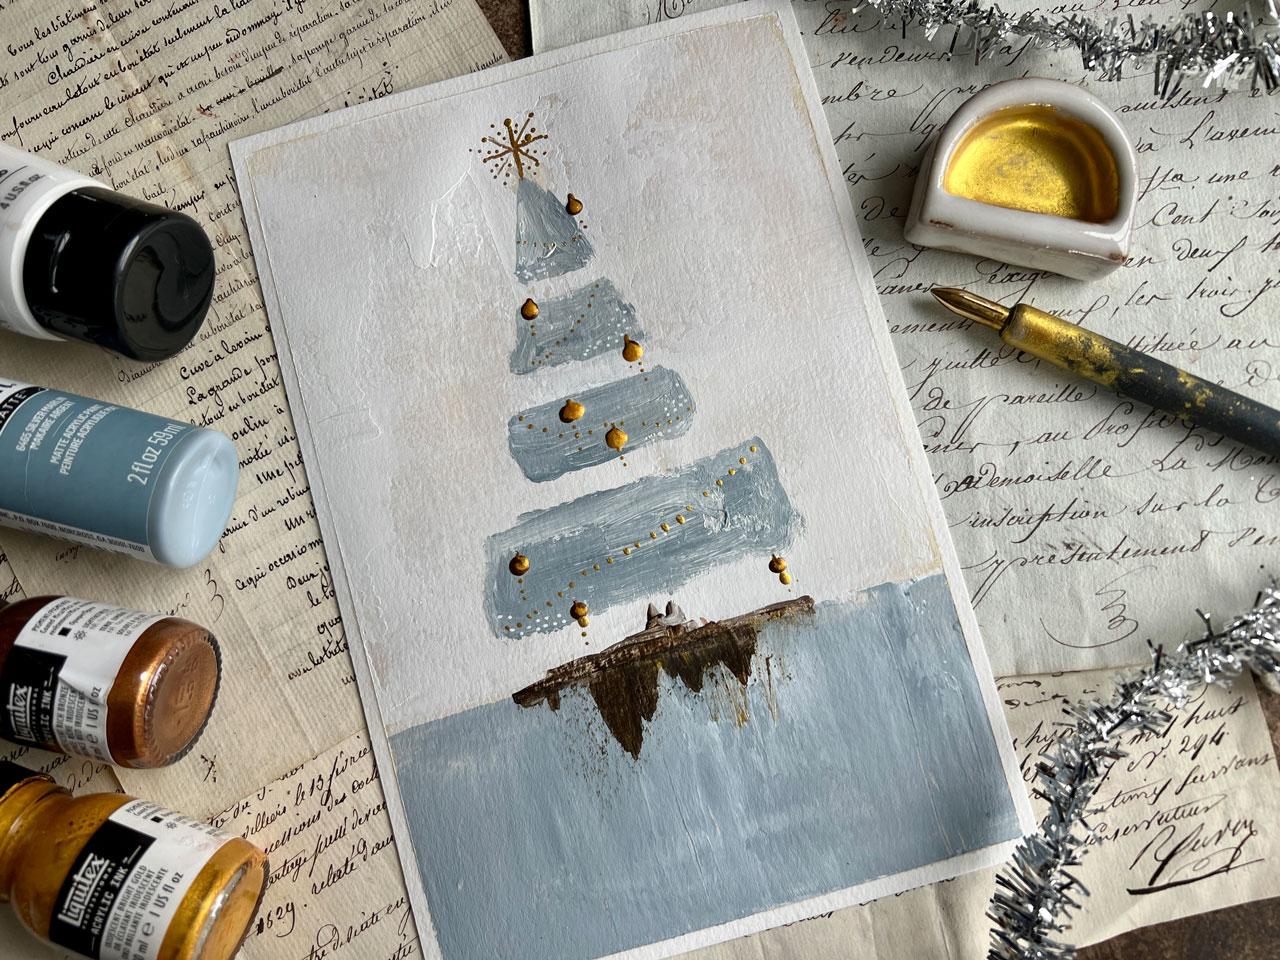
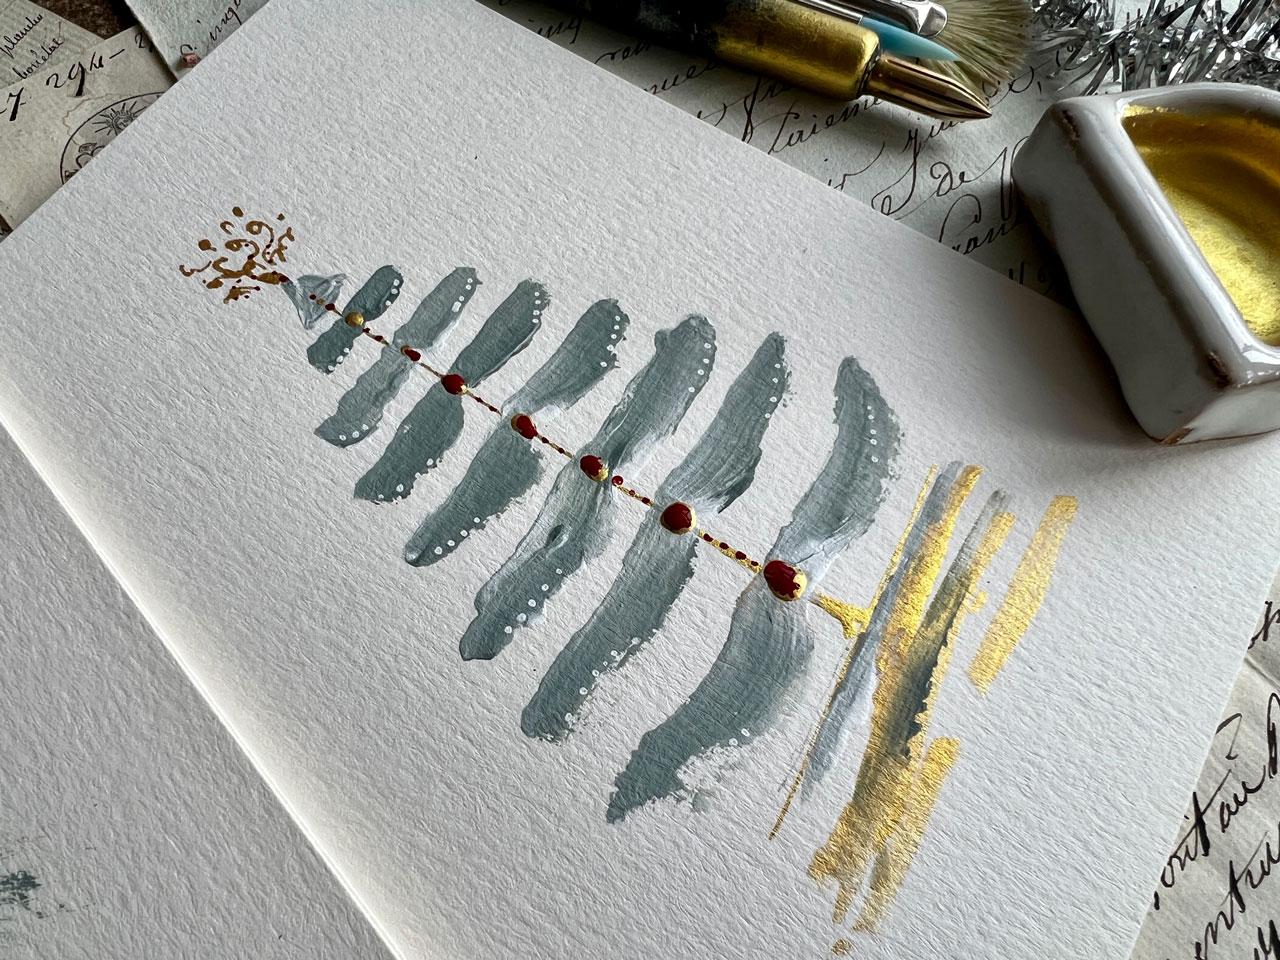
8. Stripe Tree: For this project, I thought
we could do a simple tree. Let's focus on a very
limited color palette. I want to focus on something
in this pretty bluish gray. I love elegant trees that maybe aren't the
traditional green. I'm going to just try to
go a little funkier on my color palette than what you might traditionally
see a Christmas trees, But that's just my own
personal preference. If you're thinking, oh, I
love green, go for the green. If you're thinking,
oh, I love red, I love orange, I love peach. Whatever color it is
that you happen to love, I want you to jump
into that color. I'm going to jump into one
of these bluish grays. I like this sea mist color. This is just cheap craft
paint that I'm playing in. If these are pieces
that I'm like, wow, I need to paint this in something I can
frame and hang that. I would definitely move up to a nicer acrylic paint,
like some of the Golden. You could do some
of the liquid text. You could do your really nice acrylic paints
in the tubes. You could do heavy body. You
can really do anything here. This is working on the cans
and Excel watercolor paper and I've emptied that pad of its paper because I've
cut it all in half. I think I'm going to use this board just as
something I can tape down. Because for some
reason I love to peel tape and like reveal the final piece rather than
it being painted edged edge. You can paint edged edge. Do it any way that you're
feeling comfortable to do. I just happen to, I just want to play here. I thought maybe a little
tiny edge would give us a look of what it
might look like framed. If you're painting
these to go on greeting cards and you're
wanting to maybe just glue this to the front of a card and instead of painting on the card itself
in case you're like, oh, I don't want to mess up, then tape off the part
that you're needing to paint the size of the card, and then you can cut
off any extra paper. We got this one down,
I'm thinking white. One of these misty,
bluish colors. I'm going to go ahead and put a few colors down on my
palette to be using here. Then we will just jump into painting and
seeing what we get. I'm going to have some
of this white down here. I really love this blue. Let's go for this blue. I also think I'm going to need something like in
the middle, neutral. This is the Titan buff. So you can see very
limited color palette. I'm also feeling perhaps a
little bit of a raw umber, maybe like at the trunk. Just thinking of a tree. Then I'm definitely going
to be thinking gold ink. I've got that right
over here. Let's paint. I've got some dirty
water over here. I should have changed out
my water but that's okay. You can paint these any way
that you're feeling inspired. I'm that I want to
horizon line in my mind. Let's just draw this out with a pencil and tell you
what I'm thinking here. And then you can use that
for your piece as you want. But let's say a horizon line about one third up might
be what I'm thinking. That might be too
high, actually, now that I've put that on there, maybe a little bit lower. We're painting on top of this. I'm not worried about
being able to see this. Okay. Then maybe I want the
tree to be some type of say, triangle. Is that what? Maybe I'm thinking that I'm
almost thinking maybe I want to paint stripes. Like I don't want
it to actually be like just a whole exact tree. Maybe I want it to be a
tree shaped set of stripes. Then perhaps at the top I want some type of little
star, maybe up here. This is, if you're
doing acrylic paint, you can do this and think what is that
composition that I'm, if you're doing it
watercolor paint, then you might do this on a separate sheet of paper
and then work off of that. But then I'm thinking, what
about ornaments thing? You can be whatever you're wanting to do
with the ornaments. I'm thinking a little bit
different, not traditional. Just getting some stuff in there and then I've got a
little tree trunk here, maybe I've got a little bit
of some darkness coming down. Maybe I drag the paint. I think that's what I'm feeling. Let's see what we get. Actually, let's paint
the whole thing. I hate to cover that
up now that I saw it. What you could do too, if you forget what you're doing, is we could take a picture. Then we could have that picture
sitting up to the side, so that we're thinking, okay, what did we do there Now
I can refer back to it. Okay, let's just do that. This is not the
color I want on top, but I am thinking that I want
this to show underneath. I think what I'm going
to do is paint this. The frustrating
thing about paint, you're going to have to get
a little patience here, is letting some layers dry before you get
to the next layer. We're going to go ahead
paint this on here. If you see a little pencil work showing through who cares? Because we're going
to add more paint. But let's start with this. We can take our heat
gun and speed that up. Nice thing about acrylic paint is it really dries super fast. Now I'm actually, we decided that our line
was about right here. I can still see it. I'm going to go over
this with white. I'm not being careful
at the moment, I'm wanting a abstract,
different background. Just think as you're
painting these, as you're doing some of the
same things that I'm doing. What do you like about the way you're painting it?
What do you not like? What would you change? How
would you do it different? Maybe come back in here now. Oh, I didn't mean to
quite wipe it all off but come back
in with your wedge. I was very heavy handed on that. Just start working
the background. Background doesn't
have to be perfect. You want to get it to the point that it's where you like it. The reason I did that
little creamy underneath, because I like that little bit showing up through our paint. And we can see the differences in that background
part that we create because we have that tiny bit of a darker color behind it. Look at this, I really
love this part right here, but I know I'm going
to cover it up, but look how pretty that is. I like that variation in that. I also have, which I might not have mentioned
in the supply video, I've just a standard supply that you ought to have
at your art table. Just a roll of shop
towels or paper towels. I like the shop towels
because they don't have a texture to them and they
soak up a lot of stuff. Okay, I've got that. Now I'm wanting to
do this bottom half, I just want to get
the background laid. If you're working something
and you think, oh, that's darker than I thought, then start mixing and playing. I wanted to be really close to the color I wanted
to begin with. Just so that I didn't spend all my time worrying
about color. But sometimes this is the perfect exercise to
practice your color mixing. Take this experience and
play in any way there that's going to work for you and help you
enjoy this process. Because these are fun. I want you to have
fun painting these. Okay. I'm going to put some
of that on my wedge and see that's what I
wanted right there. Okay. I'm a n I know it's exactly
what I wanted though. That really saw rag. Let's just Oh, that's
perfect right there. All right. Let's dry
that with the heat gun. Feeling good about this one? Okay, hang on. Let's
get the heat gun. Okay, I think we're dry
enough and I think I'm going to get this paint brush. This is my Princeton select
round blender number six. But I really like how
this tip is going to, let me get say,
that triangle part. It's going to help
me stay loose. If we refer back to our original drawing
that we did on here, I don't know if that's showing
up because it is dark, but I've got lots of little
stripes that I want to create. You don't have to do
nearly that many, but I want to do it in
this bluish whitish shade. I can almost see the tip
of my triangle right here. I'm just going to start
layering that in. I think these look really nice. When you've got color
variation in them, we can come back in
with some other tones. That's a lot of
paint on my brush. Can get some of
that off. Just play work it a little, have some fun. All right, we've got
one stripe in here now. I'm mentally trying to
continue the triangle here. You can block them like color,
block them a little bit. Come in here, real rough, maybe. The real rough is like the
finished. Look at that. Look at here. If we get a little bit
where we didn't intend to, this is what's nice about having extra little
paint brushes around. Because look at here. I can come right here and
I can wedge that back up, or I can even like lift some paint and just get that
back where I wanted it. Don't get stressed. We've got a little few
things here that we can do to fix a spot
if you're like, uh, oh, I didn't
do what I wanted. All right, continuing
the triangle here. I'm going real rough. I'm not trying to
make it something perfect and then I can
judge as I'm going, do I need to make that bigger? Do I need to come back in
and add more color to that? Because it's looking pretty
darn good. Just real rough. Ooh. Look at that.
Look at that, her. Okay. Let's come
back in here with a bigger one and finish
it off. Oh, yeah. Oh, yeah. Oh, Oh, oh, yeah. See, the rougher is
the better it looks. Check it out. At that point, I could stop and make this
like a little tree trunk. We could come in here even with, let me wipe this brush off. We could come in here with some, a little bit of white,
maybe in some umber. We could say, oh yeah, here's the base of the tree, I've got brown here. And then check it out.
What we could do, let's get some good
brown right here. Because what we could
do, check this out, we could take this and do a soft drag and just pull
some of that umber down. You don't have to
just idea spitball in here just to see what
are we going to get. That's fun. I like
that right there. I wish I'd come a little
further down with that. Maybe a little less fat. But let's just go with it, because now check it out. Let's start putting
some gold in here. Let's start putting
some ornaments. Let me get some
of this paint out of my cute little brush. Now, now that I
can really see it, we could have even pushed our horizon line down even further and head
it even further down. But once it's done,
what I can come back in here and cut this
to the shape I need. Because I don't mind cutting up art. I
love to cut up art. Just throw that paint
brush over there. Let's get out some gold stuff. I do like the acrylic
inks a little bit because what we could
do with the dropper, we could just come
and put a drop onto our piece and it be like
a nice perfect circle. That's one option that we
can do for some of these. Let me see if I
have a pretty gold, which I don't know
if you've taken some of my other classes, but if you have, I got
a lot of acrylic inks. But look at this Liquitex one iridescent bright gold looks really close to the mica. I like the gold. I could drop a little bit
of bronze in a little bit of gold and have it like a little two toned ornament.
That might be fun. Then that would give me
room to come back in with the mica in and make
tiny little details. Let's just do this, let's drop in some little
Christmas ornaments. You could be real strategic
about where you put them. You could be haphazard about it. You could decorate your
whole tree and just have it, all kinds of stuff going on. Just have some fun here. Look at that. Okay. With the inks, I tend
to knock them over. Be careful not knocking
your inks over now, what if bit of gold on there. Oh, I could have done
this little bit of gold with my mica in to. That will almost make it
look like a high light. What if we came
back with our pin? Gave it, let's do
that. Those are big. What if we take a regular pin
with a nice sharp edge and just give it a like you
see like an ornament, like the little head
of the ornament. We can just bring
that up a tiny bit, look at that, our acrylic
ink or we can use mica in. We could come back in and
add some more details. I like dots and details. You can use your post dots. Oh yeah, I'm filling white dots. I've got some white over here. Let's just see what, let's just see what we do. Let's see. All right, so I'm going
to use the regular dip pen and I'm going to make at the top here.
9. Stripe Tree Finish: Okay, so this dip pin, it is not one I normally use, does not have as much
ink in it as I want. Let's go ahead with
a different dip pin. This is my favorite one.
This is my Akamai dip pin. Just holds a lot more ink. Lets me do a little bit more. My regular pin, that's a new
pin that I've just gotten. My regular pin, or
the ruling pins, if you've seen me
use any of those, those are all good choices. Regular pin is a
good choice too, but I hid it from myself. I regularly hide
things from myself. I don't know if you do this too, but put it where I wouldn't lose it and I thought,
where did that go? I did that with my
jelly plates too. I was looking for the
jelly plates because I had an idea to make some of these backgrounds
with jelly plate. I got like ten jelly plates done a jelly plate class and I could not find the jelly
plates to save my life. And I'm like, Where
could I have hid the jelly plates Yeah, that took many hours and then
I had to go out to lunch, take a little break,
went to Michael's and Hobby Lobby who no longer carry the jelly plate and stock, then came back home, took every item I own
out of my art closet, and got to the very bottom, All of the jelly plates
I finally found, and they were in a box
labeled jelly plates. I even wrote the label on it. I'm like so proud that I
would have labeled that, but I thought that's ridiculous. What if we have a
little decoration that was not what I wanted. A little stream of dots coming
off of these, like that. There we go. Just why not? Look at that. I put a little garland in there. I could even do like a little gold down
here if I wanted to. I could do some
little gold things and I could drag it. Ooh. Oh yeah, that was nice. I like that. Okay. We could, we could
keep on going, but what we get that where
it doesn't get clogged up. What if we do postcapin? You could just come
in really pretty. Some dots, wherever you
feel would be cool. Look at that. Oh my goodness. Super pretty. Okay. Now when we peel the tape, we may think that I want to trim this down to
the right composition. I feel like I, this was too big. I almost wanted
it shorter there. Let's just, let's just
see what we got feeling. This one, we'll
have to peel tape. It just makes everything look finished when you get it peeled. Look how pretty that is. A see now, Mike, go ahead and just leave
that bottom there. But what if the bottom
weren't as big? Let's take a piece of paper here and just visually
look at that. What if I had trimmed the
bottom, say to there? Instead of it being
a whole third, I could've done it right there. That actually looks more appropriate for the
size I did in my tree. When you do these, consider
coming down a little further here on that horizon
line and let that sit at the bottom and
see what you can create. And, you know, on these
ornaments and stuff you can get as decorative
or as you want. I was keeping things a little more simple because I
just wanted to see like, what could I create
dipping in some inks, but after your inks are dry, you could come in with
some Posca pens and make some other marks
and things in there. But check out that fun thing. I'm loving that one. Alright, So I will see you back in class.
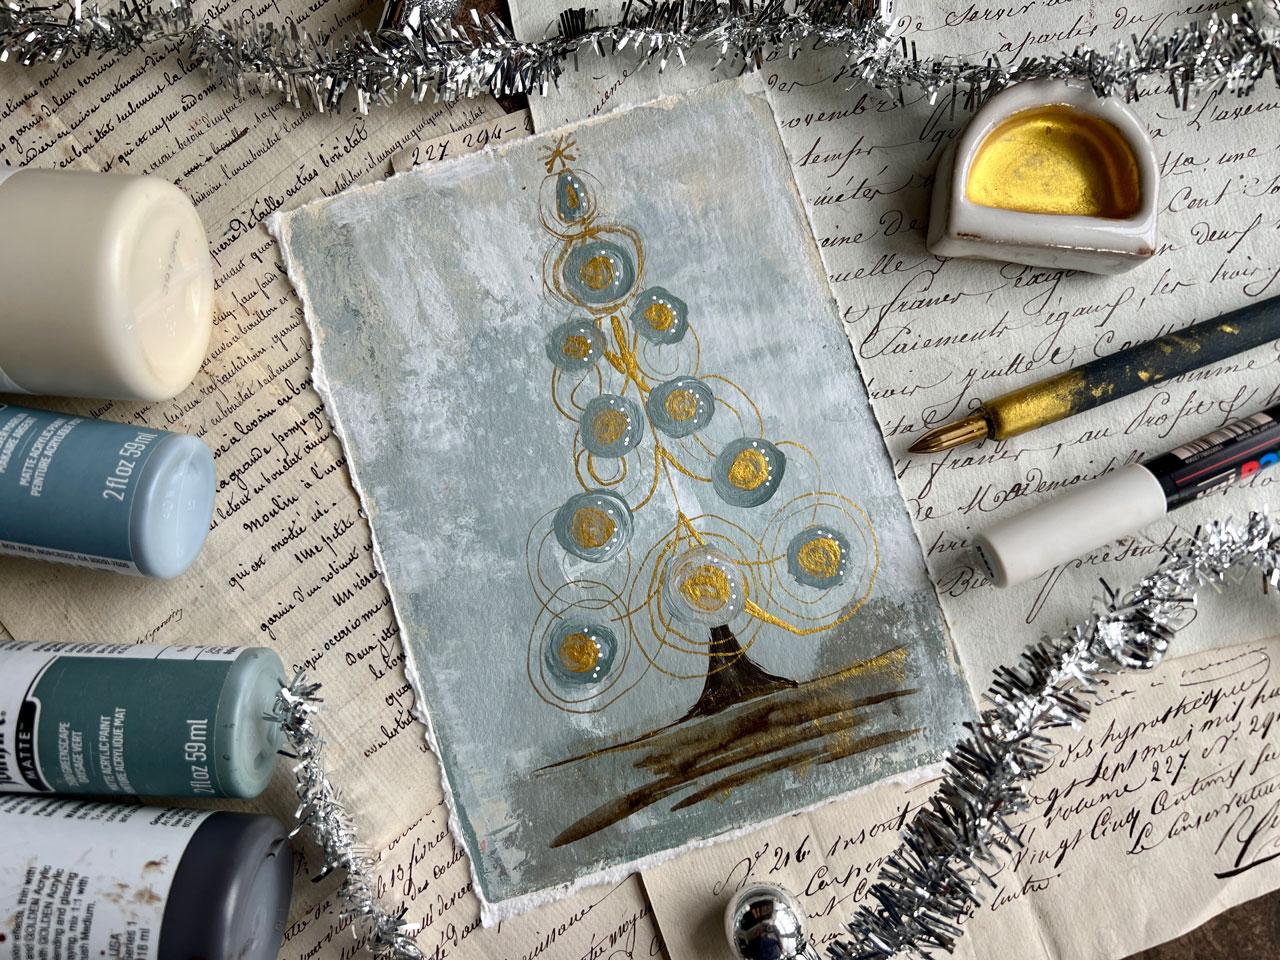
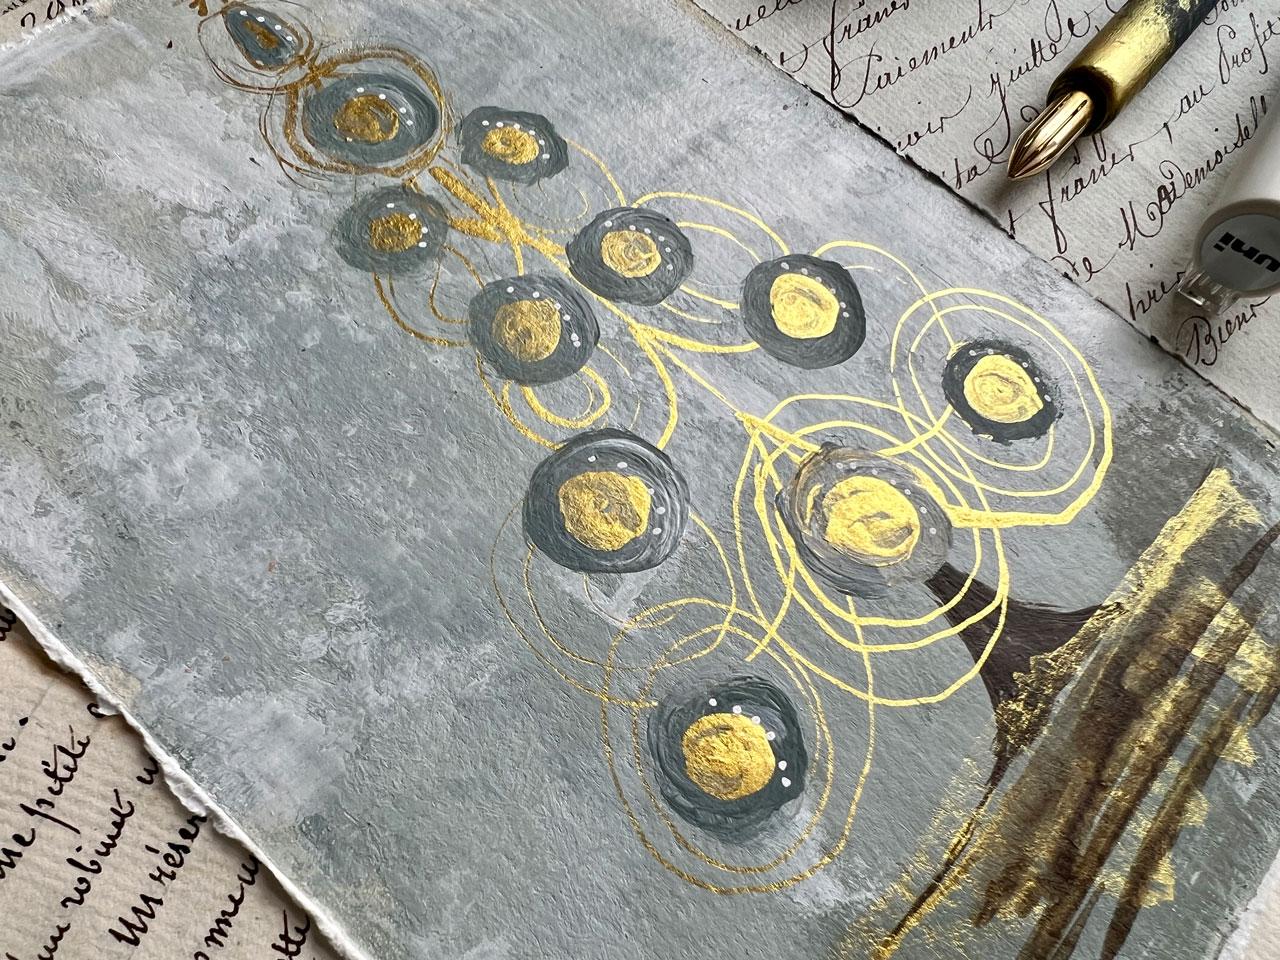
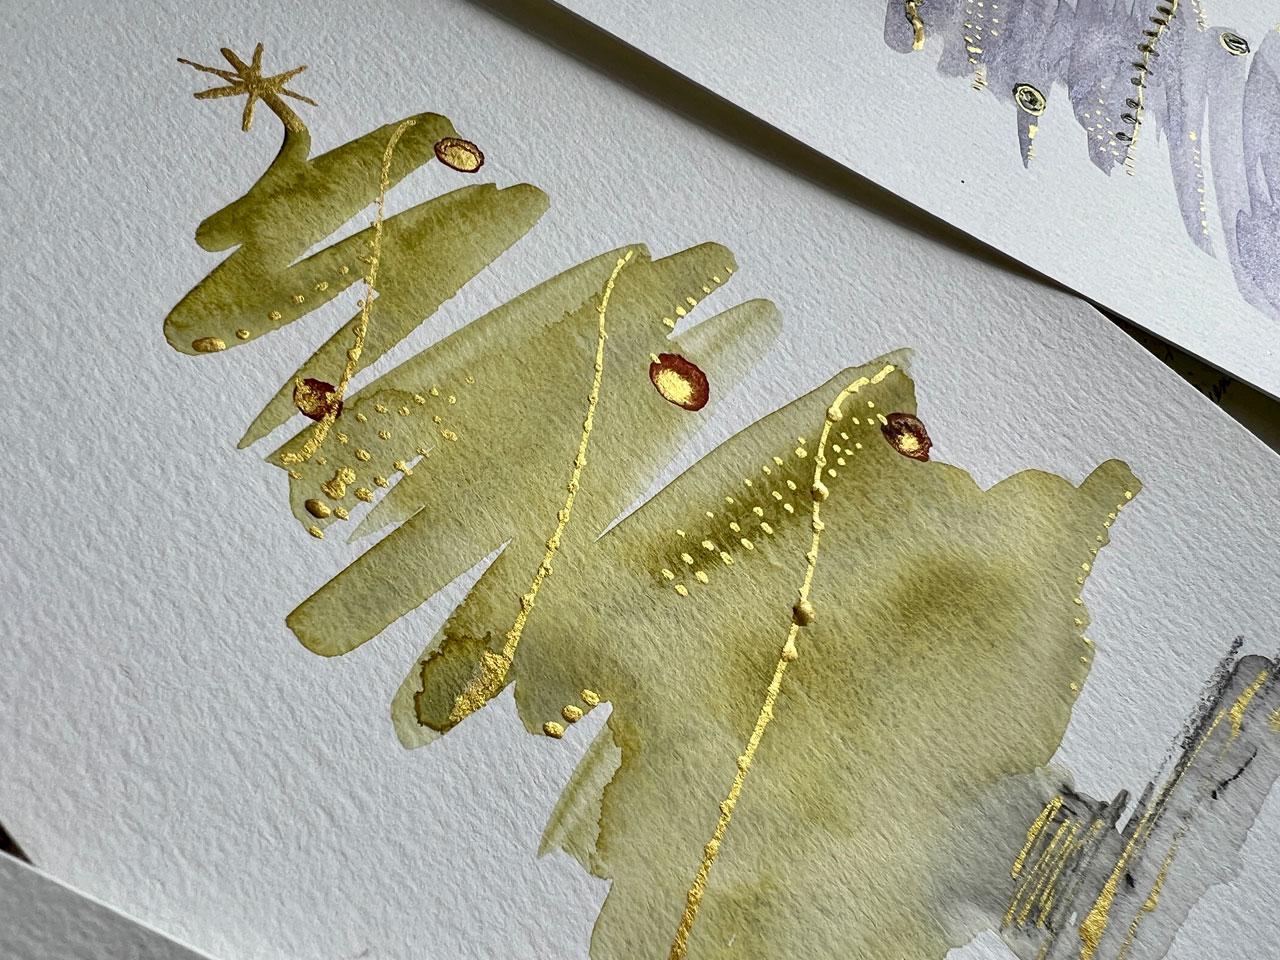
10. Gold Swirl Tree: In this piece, I
want to start with a jelly plate background and
just see what we can create. I'm feeling like some of
the similar colors that I had going this tight, not really the white, but I
am feeling the tighten buff, the blue, maybe some gold. And I want to do a
less traditional tree. Let's start off on
the jelly plate, creating a cool background, which I might come back in, smudge around with a brush
with some of the same colors. But I'm thinking tighten buff. I'm using the fluid acrylics. Let's start with that then. I'm feeling like maybe we
could go from light to dark. A little bit of a
maybe an ombre finish. But let's start with this. We'll do maybe a
couple of layers, maybe thin layers because I love the way the jelly
plate works for us. I'm not getting real
exact on the first layer. I could have actually
done that backwards, but what I was thinking was the other layers
I'll put down from this way so I can
keep it lined up, but in the end I
can trim it all. It doesn't matter if you've got paint from other
pieces that stuck on there. I don't worry about those. Usually it's just
not a big deal. Maybe a little bit of white. Let's do a little bit of white. This is the titanium
white by golden. These fluid acrylics
really do work so nicely on the jelly plate with
really yummy thin layers. And I'm not worried if
I get 100% coverage. I don't mind it giving
me some dappled looks. I do want to get it real
close in the same spot. So I can do that by
looking through and then flipping it over to
smooth the paper out. Oh, yeah. It's very
subtle, but it's there. Now I'm feeling like what if we start the top
with maybe some Titan? Then maybe we come back with, say, one of these blues. This one is green scape, folk art mat, Green scape. So we could do
something like that. Maybe at the bottom of
this little bit of green, just kind of creating
a little bit of an ombre in the same place. Not worried about the back side, but you could be more
careful than I am. If you're worried
about what the back is doing, look at that. See now, at this
point I could do. I'll stick that back
on my jelly plate to get any extra color off. This is my junk sheet
over here to the side. Just helps me clean it
off a little better. I've still got my pad of paper from the last
project that we did, and that paint is still wet. I'm going to keep
on using those. I used this blue instead
of this other blue. Oh yes, this other
one is silver, Marlin, darker blue there. But I like this greenish blue. I can mix with some white and make this a
little bit lighter. And then with my blender brush, my round Princeton
blender brush, I could come back in now and work this a little
more because I do want it to be more of a blended, little less choppy, total
personal preference there. You can make these any way that you're feeling
it at the moment. It's all about inspiration, the feel of the moment, which is what makes
these super fun. I think in my mind if the area behind where the tree would be is maybe
a little lighter. If I'm thinking about
a portrait backdrop, sometimes that spots
lighter and it gets a little darker
as it goes out. That's what I feel
a little bit like. We're creating a
portrait backdrop. Basically, we'll paint
all just being fast. A little bit choppy
in the strokes and a little more
abstract in the field. That's what I'm going for. I'm mostly staying in line here with the jelly plate background
that we started with. I'm not too keen to spread out, but I've got a little
paint on my backdrop here. But what I'm thinking is
on something like this, we could deckle the edges, so I could come right up to
the edge and tear those. That might be what
we end up doing. And then it won't matter if you came over the edge
and you're like, oh no, I ruined it
because you didn't. Just your plan. If you're thinking,
change the plan. Sometimes these
yummy things that we think are mistakes really are like the best little
turn in the piece of art. And you're like, oh,
that really was amazing. Then at the bottom here could
go a little darker even. I did cover up all the
jelly plate work mostly, but it got me started. Whatever it is that gets you started is the right
thing for you to do. If you just want to start off swishing paint
around, do that too. I'm also feeling
like what if we take our scraper and drag a
little and see what we get? Because that will
blend it in even more. Oh, that's fun. Could come
back with white up here. A little bit of brown on there. I don't think I want that brown. But let's see what we get. See, look at that. I like when I get this little
look right here, that's what usually
I'm trying to get. I might have too
much paint built up here on my scraper,
but that's okay. The goal is just to make
the background interesting. Oh, I love this. Doesn't
have to be perfect. Don't get hung up
on is it perfect? See, look at that. Now that's
blending really pretty. Just work it a little
bit and think, okay, I'm going to use
that right there. Ended up real pretty. Then
the thing I like about these silicone scrapers
is even if you get some paint stuck on here
from like a previous job, you can just pull these right
off with your fingernail. It just cleans right
off very easily. Okay. I feel like
we have a start. I'm almost thinking that I'm going to use my gold
because I think what I want to do is something totally outside of the box. A little swirly tree,
not traditional. It's not going to have
any branches and stuff. You could use a bigger dippin', my Akamai nib on my dip pin. You could use gold Posca
pen if you wanted to. You could use a paint brush
with some gold paint. Lots of choices there. Whatever you feel
comfortable with. You'll see me go back to what I feel comfortable with
over and over again. It's just what I feel
comfortable with thinking. Low horizon, as
low as we can go. What if that I've dipped that, let's back up a tiny, tiny hair. What if we took our
brown fluid paint, which is the raw umber? We start a little where I'm going to use just a angle brush
here, very gently. A horizon line, just
very thin look at that. Doesn't have to be
anything big and major. Then I want to start a tree trunk and then go
all the way up with a line. See you, look at that. And then I can fill that in
with the umber and some gold. Maybe I'll fill that in
with my blender brush. Maybe a brush with a
point is what I want. Yeah, brush with a point,
that's what I wanted. This is a silver white
number six round. But I want to get
it where it's at a spot that I can then go up. And it's not
completely centered. We're going to work with what
we did though. That's okay. Now I'm thinking straight. I want to go straight
up and just start. Some of the line doesn't
have to be perfect. I just wanted to give
myself a starting point. You notice I didn't go all
the way up because what if at the very top of the tree
we have like an ornament. Like, let's say something round. Maybe something outside of that, I'm just thinking out loud here. And then we could maybe have some stuff
drawn around there, possibly we could ended up here in some type of say, star decoration, something
with some detail. Just thinking as I'm going here, I could even see if I can
get a little tighter lines. With this other dip pen, the paint might not
be perfectly dry. That could be my
issue. My gold ink is not sticking where
I want it to stick. I think my paint's not dry. What we could do is hit that with the
heat gun real quick. I'm just going to get
creative here and start thinking ornament round circles, maybe some spirals
coming off of here. Oh yeah, I'm filling the spirals that was thick there on that
gold, but it is what it is. Just be a little careful
as hitting that ink that maybe tipping it off like on something else just
to see you don't end up with a blob feeling These little
I'm thinking triangle, I'm working my way up here. The drier the paint,
the better it works. So I wish I had dried
that real quick, but we're going to
just keep going. Oh, these are so pretty. That's what I'm thinking. Let me, before I
get rid of this, let me run some gold over here. I could pull the gold. Yeah, I like that And
just have it down there. Just thinking out loud here, could come back with this. Umber. Oh, see I like that little gold out
there. That's pretty. Then let's come back in
here and add some paint. Like add some ornaments in here somehow feeling like
some gold in the center. And paint a, let's do the paint. We could do something
like this and then it could have a gold
center when we're done. I like that. Let's
do that right here. And that'll help us get rid of that extra heavy blob
there that I had. You can do these in any color. I've just chose to keep it in this fun palette that
we're already working in. But it would be fun to
see if you did these in red and purple. Purple would be fun. I'm not
really even a purple person, but lavenders,
those would be fun. You can stick with in
the circle that you drew or you can do like me
and just do on top of it. And create again another
layer on these, which is fun, actually came out of my triangle
layer, but that's okay. Oh yeah, now I'm filling it. I'm filling it if you get your gold on
there and you think, whoa, too heavy covered up like I just did.
Totally worked. Let me get one. With my point on it here, I feel like I need a
point up here at the top. That blender brush is a
little scrappier brush. Oh yeah, See, there
we go, Look at these. Maybe think of where the
high lights might sit, maybe we have highlights
sitting over here on one side. Let's come back with some
gold on top of that. I can do that with a brush. I don't have to do
that with a pen. Can dip this right into my ink and do gold
right on top of it. Because I want to.
You don't have to. Just feeling the moment like
what does this moment feel like if you are having trouble getting
the gold to look solid on top of the paint, Take your heat gun and dry that paint, which I did not do. I'm just going to go with it. What if we came in with some little tiny dots and we
could do that with white. What? We could do
that with white. Let's do that with our Posca. We could do it with gold,
but I'm feeling posca pen and we might need to dry this paint some my
postcapinticksI'm. Going to dry this and
I'll be right back.
11. Gold Swirl Tree finish: All right. Now
we've got that dry. I think with my Posca pen. I'm going to come in
here with some detail. We could do some dots. Like I'm filling maybe some
dot work. There we go. Let's get that started
because I like dots. Totally your preferences to your extra decorations
and what you add. But when you come
back in and you just add a few extra details, just seems to finish
the piece off. Look at that. Look at that. I almost want,
what do you think? Would some gold
drips be too much? Feel like gold drips
would be too much. Oh my goodness. Look
how pretty that is. All right, maybe
we'll stop there. That's really pretty.
Okay, This project is all about a non
traditional tree. Maybe some swirls of color
with some ornaments thrown in. But not necessarily a tree
that was really there. I just want to see
what you can come up with because I got some
stuff on the side. I just want to show
you real quick how you could do
like a decked edge. I needed my Posca pen to dry, but basically I'm going
to take this ruler, make sure these are dry, to put my pretty dots
and then ruin it. But basically I'm
going to come to the edge of wherever
I want to tear. And I'm just going
to line that up with my jelly plate edge. Just pull that edge
up towards the ruler. I'm pulling it this way. Then we get really
uneven, yummy, torn edges to finish
it off, look at that. Love that right there. If you have a piece
that you're like, oh, I don't like that
piece right there. Take your thumb
and tear it down. Don't tear it up. Tear it down and that will
even that out for you. We could do all
four edges and end up with a really beautiful
finished piece of art that could then if you really loved it and
you wanted to frame it, you could float frame that where it's floating above
a piece of Matt. And you can see the
mat around the edges. That would be gorgeous
with a piece like this. You can see why you want
your paint to be dry since you're setting you
ruler right down on it. I have a rip ruler. A
rip ruler is real fun. You can Google rip ruler. It's got pretty
little edges to it. It's a little more uniform. It's more uniform, giving
you a less uniform look. But it is more uniform than what you get tearing
the paper like this. And that might be your thing, if not quite what you
were thinking. It's exactly what I'm thinking. If you ever see a piece
of art that says hand torn edges, that's
what they're doing. The hand tearing the
edges, just like that. And then we could just
like just come with your thumb and tear down on
any piece that you're like, oh, that one's sticking
out, just pull it down. Look at that. That's really pretty. Now we're ready to float
frame that and I want to see what you can
come up with with a beautiful non traditional
tree. All right. I'll see you back in class.
12. Three Trees: In this project, let's do what I'm going to
call a triple tree. To be three fun trees in here. I think I'm going to use the folk art because I like
the colors the sage vert, green, scape, and sage. I've got Titan buff,
titanium white. I've got some thicker
titanium white, and I've got some silver. I also have out my little mica
A Take mica ink and paste. I'm feeling like I want it mostly white silver with three trees with
some gold maybe. Then I've got some little inks here to maybe make
some ornaments. Because I like the way these
make nice round ornaments. When you just drop a
piece of paint on it. Got some other colors
over here if I need to, like I've got a silver, we
put some silver in there. A gold if I need it. We'll just see. I
like starting off playing because I want to do three trees that
are like triangles. I have taken a piece of
watercolor paper and drawn three triangles in
the watercolor paper. And just taken an exacto
knife and cut the triangles out so that I could play and paint with
my three triangles. And you can see it's
already got paint on it. This is something that
once you make it, you can keep using it for
more than one project. I did it for something
a little different, as we can see with the
paint colors around it. I like being able to use
this for multiple paintings. I'm going to use that. I've got my piece of watercolor paper
here that I can tape down. I want to tape it down
and be able to Relias, which is my Y favorite part, let's just do it
since we love it. If you end up finding in your art practice that there's
a moment that you're like, this is my favorite moment. Remember what that moment is? So that every time you paint, you can replicate
that moment for me. That moment it's
peeling off tape. I hardly ever paint edge to
edge on something because I know I love that little right white
lip and the revealing. When you're done and when
there's no tape to peel, there's like no reveal. I think I am going
to put some paint down and see what it
is that we can get. I've got my little Princeton
select round blender brush. I love this brush so much. This number six
that I've ordered myself a number 12
because it'll be bigger, I can do bigger stuff with it. And then just a flat
low corning brush, I don't know what it
says there, 34 inch. Just a flat brush. I'm going to put this on there. Maybe blend it in
with my little brush. Maybe do some smearing with my catalyst wedge and
get the background set. Then we'll dry the background
and put three trees. That's my plan, so you can
see where I'm going here. Let's go ahead and put some titanium buff down
on our palette paper. Here I've got white, but I might come
back on top of that with maybe some silver. I don't know. Let's start here. Let's just get started. Fill in the buff underneath
the white on top. Maybe we need a
little vote button, so you can be like, no, do it this way, let's
vote about it. The goal, I'm just starting
off the goal here is just to get the whole piece
of paper painted. I might need some more
of that because I might want to blend with
it in a minute. To with the acrylic paint, it dries so fast I don't
put so much on my palette that I got to worry about it going dry before
I can get to it. Okay, there we go. I'm thinking that maybe on top
with the wedge. How about that? Let's see, this is the thinner paint. I might should have done
this with the thicker paint, but I just want to see, am
I going to get what I want? Let's see if we
blend, what we get. It's all about experimenting
as you're going, making some decisions
on the fly. Just do I want this to
be like when I'm done, maybe you're looking at
the inspiration picks, then you're thinking,
oh, I think this is what's done
here or there. Because don't forget, I've got that inspiration PDF for you with a whole
bunch of painted, yummy trees from
that I did before. You can look at those
and just think, okay, this is watercolor. Here's how I think I could do this or something
similar. I don't want to. Usually when I'm looking at
inspiration things myself, I'm not looking to
copy it so much as get inspiration from it or maybe
look at technique on it. I did not have lots of techniques written in
the inspiration guide. Because I want you to
look at it and think, okay, how could I do
something like this? Really think through
your process. You're going to learn more about your art process and what
you like and how to do stuff if you actually work through the painting
mentally and physically. Instead of me saying, oh, I did X, Y, Z like
we're doing with this. Like I'm actually showing
you how I do these, but I didn't do that on
the inspiration ones because I want you
to work through some of that with your creativity and just see what can
you come up with. Okay, I'm going to go
for some thicker paint. Let me set this down. Let's
get the thicker paint. I really want this
to do some blending. See what we can get
on top of here. Oh, yeah, thick, er, paint,
That's the way to go. It's working through
struggles just like this, like okay, that didn't give
me quite the look I wanted. How can I get the look I want? And experimenting
and working through that struggle to you're
like this is it. I'm wondering if I want this to be a
grayish, silvery color. Let's pull out this silver, because I really
like this color. Is this going to give me
the look I want or not? Let's just see. It
would be really good. Maybe I do a little bit. Yes, that's exactly what I want. Do a little on a little
scrap paper and just see, is that the look you
were thinking of? Then attack your painting. It's nothing worse than putting something onto your
painting and thinking. But take the O's and make them into something that's going
to work in your piece, that I ruined it. See, I love this brush. I need the bigger one. And if I were not impatient
to be up here painting today, because I'm like, oh,
there's so much fun, I want to paint some more
then I would have waited a couple of days for that brush to come in, but that's okay. We'll have it at the next class. Or depending on when you're
watching this class, you might see those already. Just know this is when I
dreamed of having that brush. This is when I needed
it. All right. Look at that. It's getting
a really fun brash look here with the layers and
stuff we got going on there. Wondering if I do a little
bit of that on my wedge, to pull some of this
around the edges. Oh yeah. See I really like that. Ooh, look at that. I
like that right there. That's kind of what
I was hoping for. Oh yeah. Give it
a soft yumminess, a little grungy but not
grungy because it's silver. How can silver be grungy? Right. But we're getting that just work that background
until you're like, oh yeah, that's beautiful. Then we can dry this. I think I'm going to
take my heat gun, wipe off my wedge
here and dry this. You want it pretty dry?
Because we're going to be setting a template
on top of this. I'm thinking that maybe I
want to do the triangles and then have them overlap like a
big one, little little one. And then create
like a horizon line and maybe drip paint down. Maybe I'll take my coals
wedge and drag it. Let's see what if we
did the tree in silver. I'm thinking three colors, but maybe the big
tree in silver, maybe a color in one of the little ones and a
gold in the third one. On this silver one,
we could overlap. Let's where do we actually, I think I want that
to come lower down. Let's go ahead, let's go for about right there.
Let's just commit. All right. Going for that. I'm going to want
the silvery color. Let me get my paint brush. The paint brush in the water. But I don't know that I needed
to Big paint brush though. Maybe I'll grab a
smaller paint brush. Maybe we'll just use this angle brush that I've got over here. This is the Princeton
angle shader. But it's really fine
for what I want to do. And I'm just going to hold the stencil down and
paint the tree in. I'm not worried
about it going under the edges per se because
I could always come back with a little bit of paint in the background color
and blend that back in. I think we'll be all
right if I need to, which I probably will
because I'm a messy painter. We've got some of
that. I also want some of this paste out there.
So let's go ahead. This is the gold mica paste, which is my favorite gold. Let me get to the edge here. It's my favorite gold because
it's so vibrant and shiny. I think I have clogged the tip. There we go. Now we've
got some gold out there. I think I'm going to use my
little blender brush here. I mean, this brush
is so much fun that really having one or two of those around
would be convenient. Then let's just some of this
gold and just blend this in. I really want that silver
to be more blended too. I don't like the way it looks
like brush strokes there. Let's take this silver and
work it a little better. Just so it's got its
own little texture. It doesn't have to be
perfect, I just don't want those brush lines. Then maybe at the bottom. Let's just do gold here at
the bottom. I'll apologize. Now, I live in a little
town home community. I hear that the mowers, people that do our yard work
and mowing just showed up. If we hear any mowing
in this video, I hate to stop painting
until I'm done. I'll apologize if we hear
any mowing going on under my window because Murphy's Law has it on any day
that I want to film, the mowers come and hang
out around my house, right under my window,
and they mow things. Murphy's Law, I'm
telling you 100% of the time the mowers
are here. Okay. I'm feeling like,
what if we give it a little stem on my catalysts? Ooh, Look at that. Oh, see that? Totally. Maybe just
a little draft. Look at that. This is why I don't
want to stop even though the mowers
just showed up. Totally made the tree. Okay, so I got to dry that. All right. Let's put two more
trees in here. So I'm going to do this,
I'm going to overlap it. I'm feeling like maybe
this one could be gold. I did put my little brush in water so it didn't
dry out on me. So let me get that back out, Get this gold before
it gets all dried. And we're just going
to overlap this. We could do some other color, like I could come
back in maybe with a little bit of this titanium at the top and let that gold
overlap it like this. Maybe get that little
blender brush in here. Look at that. Oh
yeah, look at that. Okay, so it's running
into this one. I can't really see,
but that is okay. It still fantastic. We're
going to go for it. Do our little stem here. Oh yeah. Oh yeah. A little bit of gold. Oh, yeah. Okay. So let's do the third one. I'm going to put these
in the water real quick. Let's do a third one with
that was a lot of paint. I know I'm not going
to use all that, these yummy little sage colors. Let's see. Let's get
the one brush here. Let's dry this tree. All right. Third tree. I've got three sizes
that I did here. Those are just going to be your choice on how you do those. I went with three sizes. Trying to keep them basically
standing up straight. I feel like I want to mix them. Let's go ahead and do
some yummy mixing here. Get that on there.
Good. We don't want this tree to be
totally not matching. I think what I'll do
is take my blender, brush with some gold, tap some gold right over here. Just let that blend
right in with the tree, with the other trees. Oh, yeah, came over on the edge. That's okay. So now I can
just take one of our brushes. Let's take this angle brush. I hear the mowers getting closer to trying to out
paint the mowers here.
13. Three Trees Finish: I could go ahead and dry the paint so I'm not
moving blue paint around. That would probably
be better. Let's dry this paint, curly paint. Just dry so fast and we'll just kind of work this in the edge and make it an edge. I love it just kind working
this stuff in a little bit. I need a tiny bit
of that titanium then if you do that
and you're thinking, oh, it's obvious, then just come back and work
it a little more. And work it out so that
it doesn't feel like, oh, you came back at one spot. It looks like it was meant to be how it was
painted. There we go. Now let's, let's get
our little brush here. Let's give it a little edge here of gold and
come on down with a stem and take our catalyst. Go ahead and get some of that. We might also pull in a tiny
bit of this darker color. Ooh, ooh, look at that. And then pull down for
like a little drag here. Oh man, look at that. Oh yeah, that's some fun stuff. So when that dries, that
gold will just hit, the light will be so beautiful. Alright, now we
decorate the tree. So what else could we do
to decorate this tree? I was kind of
thinking, in my mind, it would be pretty with say, a pop of some red ish color. I got to move this paint out of my way before I
put my hand in it. I've got some Amsterdam carmine. And I'm just thinking,
do I want to do? That's what we're going
to do right there. That was a lot of ink though. Maybe a little tiny ooh,
see that's perfect. Maybe something up here,
like little berries. Oh, what else we could
do? That would be fun. I got to be careful here. Let's see, I think I want my mop brush and I'm going to dip
that in some water. Then I'm going to
dip in the tip, just lightly the
tip into some ink. I did it really light
and I did it on purpose because with splatter, tiny bit of splatter. With splatter, you
can really easily overdo the splatter then. Do we want some gold
dots and stuff? Feel like we could use
some gold dots like garland, got my ink. A dip pen might just dip
us some gold in here. Just where it feels good. You don't have to overdo it. You don't have to add
any of it, really. If you don't want or you can just totally over the top it. I just feel extra little
details make it so much fun. Look at that. Dots around the red thing, make it look like it's a topper. Oh yeah. Oh yeah. Oh, look how pretty that is. Yummy. Yummy. Okay.
So definitely keep going if you're feeling it. I'm feeling this right here, I'm thinking, let's hit this with the heat
gun for a second. Be real careful. Don't
smudge your circles. All right? Not completely dry. I'm going to be very
careful, but I want to peel the tape and I hope that I don't move my little
red dips there. But I want to see what
do we get when we pull the tape off.
Do we love it? Was there something that
we would change next time? I think next time I
wouldn't do red splatter. I might do gold splatter. That's a fun little tid
thing that I just decided. But I do like the splatter. Consider splattering
in something just to see you like it. Oh my goodness. Oh my goodness. Oh my goodness. Look at how pretty these are
when you peel the tape. Oh my goodness. Look at that. And then you see the
sparkle of all that gold. You can do gold acrylic paint, you can do gold inks. You don't have to do
the same gold I do. It's just fun to experiment with what you have in what you
know you already love. But check out little
triple trees. Triple trees, fun. Okay, I want to see you paint some of these and I'll
see you back in class.
14. Watercolor Trees: I thought it might be fun to do some watercolor trees since we have done so many
other fun mediums. I've got a few watercolors
here that I'm going to get out that I just thought would be fun to experiment with. I've got some Daniel
Smith colors. You can do this with
any watercolors. Olive green. I like
this Perlin Green. It's a real deep green. I think I'm going to do this in my swishy way that
I like to paint, But we can do this
is Garnet genuine. It's just a red. I thought it might be prettiest ornaments. This is sugar genuine. Sugar light genuine.
It's a purple. I think it's made of stones. It's got some nice little
granulation in there, It's not as fine as a pigment. I was thinking I got
a couple sheets here. I thought I would
just do a couple and then I could set them to
the side and let them dry. And then once these are dry, we can then come back
and do some mark making. I'm going to do this
on a white background, but if you want some
colored backgrounds, do your colors first. Like a nice buff Titan might be a good
color for a background. Just very things up. But I want the swish of
the white paper for these. Personally, I'm thinking that I'm going to use
that olive green. And I'm just going to judge, where do I want to start,
where do I want to stop? And then this could
be like a base. I'm just going to
start right there and make my triangle
come down as I go. Then you can see that that probably won't
take forever to dry. I'm pretty excited about that. Might come back in with some
more color, a little deeper. I'm still working with
just the one color, but we're just going to work that in so it's
not dark to light. I want it to be pretty even. I want the bottom to
be wider than the top. It's mostly a triangle. Then we can make a base. I was thinking perhaps
we could make a base out of just some soluble graphite
and we can just like this. I can then, oops, come back with a little water. Just wet that a little
bit and blend it in. That's a pretty
tree. Okay, let's do three non traditional colors. I want you to do another
color that was a green. I think this is also a green. It is traditional, but at the same time it's a
pretty deep color. And then the third one, let's do something weird out there. Outrageous. Okay. I'm going
to do the same thing. I'm just going to start up
there and just work it down. Look how pretty this green is. And then I've got a
base about right there. I'm actually going to
do something similar. You could do all three
of these different. You could do every single tree you make could be different. But I'm just some fun painting that I know I'm enjoying
and practice one technique. Tree number two. Let's
set this over here. Let's do number three. All right, let's do this purple. And it's going to react a little different because I
think it's stones, but we're going to do it anyway. All right, Again, starting
right up at the top. Let's get real light. Look how pretty light this is. Okay. I didn't do as good with my tree shape on this
one, but that's okay. When we're done, it'll
look like a tree. Put a little basin here and
give myself some ground. My green ones do look a
little more tree like. That's not the point. Point here is to step
outside the box. Okay, so third tree almost. What if came back with
some more wrong color? That was the green. We could
do two tones in here too, but what if I came back a
whole lot more paint and just really got some extra marks and movement going in there. That's fun. Let's pull
the first tree back out. I'll swap that tree over here. And I'm going to dry
this a little bit. I actually don't like drying the water color with a heat gun, usually because I want the water color to have
time to do its thing, but setting this one to the
side to let it do its thing, let all this yummy crackle
and stuff up here and there. I feel like I did leave it long enough to get something
super cool going. Then let's do some ornaments, and I'm a feeling like
I want some gold. So I've got my mic of gold here. I've got red. I'm thinking we could do red and gold maybe. Let's just see what is this
red even going to look like? It's like a red, red. I could do like some, some dots. See. Now that is pretty, I like using the acrylic inks like we did in the other videos because I can drop like
a perfectly round spot.
15. Final Thoughts: I hope you had as
much fun as I did creating these beautiful
pieces of art today. As we come to the
end of this class, I'd like to reflect on what we've learned and
achieved together. You've learned how
to use a variety of art supplies,
including watercolors, acrylic inks, and
hand embellishing details to create whimsical
and unique Christmas trees. I'm sure that by now you have a greater appreciation
for the versatility of mixed media and the
beauty that can be achieved by combining
different materials. Whether you're a seasoned
artist or just starting out, I hope you feel
more confident in the ability to create something
beautiful and special. As you move forward
with your art, I encourage you to
continue to experiment, try new things, and
push your creativity. Remember, there are no rules
when it comes to making art. The only thing that
matters is that you enjoy the process and you're
proud of what you created. Finally, I want to thank you for joining
me in this class, and I hope you continue to
explore your creative side, whether you're creating
holiday decorations, cards or paintings. I wish you all the best
in your art journey. Until next time, keep creating
and I'll see you soon.
 DENISE LOVE, Artist & Creative Educator