Transcripts
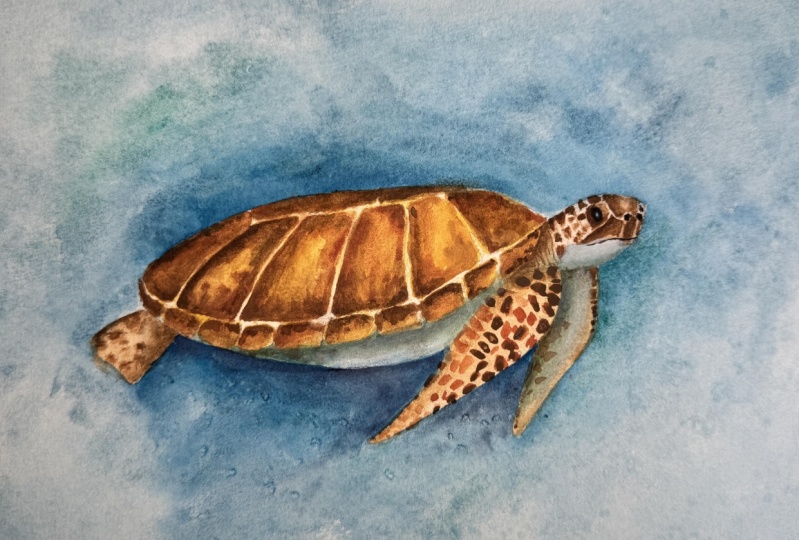
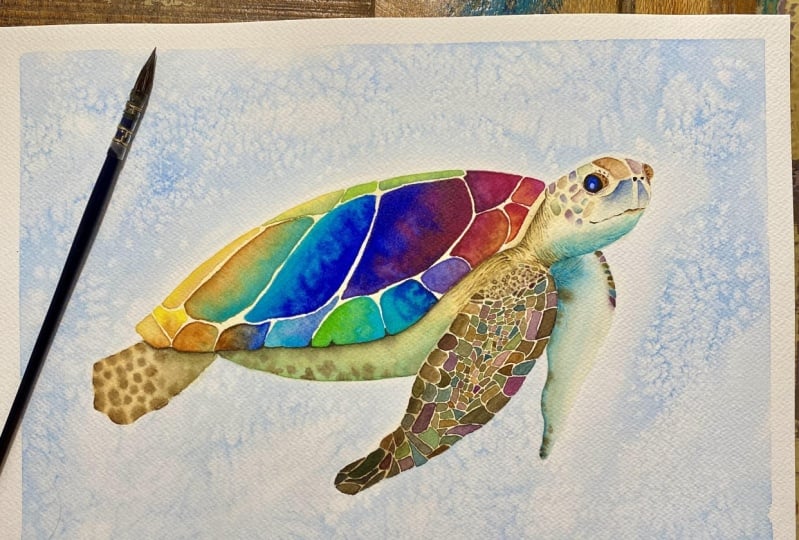
1. Introduction: What you will be learning: Hi, Welcome to this
watercolor sea turtle lesson. In today's class, you're
going to learn step-by-step how to paint this
beautiful sea turtle. Sea turtles of my
favorite animal. I absolutely loved them, so I did have lots of fun
painting unless you're going to learn step-by-step how
I painted this in layers. I'll talk you through
what colors and brands of watercolors
are used as well. I'll also show you step-by-step how I mixed certain colors. And I'll also show you how I painted this
textured background. If you're going to follow
along with me today, I've popped the reference in the projects area of this class. So you can go and print off that reference or you can
just follow it on an iPad. I would suggest using quite a large iPad so you
can see the screen clearly. Or you could always print it off and use it as a photograph
in front of you. If you've got any questions, send me a message and
I'll get back to you. Let's get straight into
lesson number one.
2. Colours: The colours and brands I used: I'll be using my
favorite yellow. So this is Hansa Yellow Deep, and this is a
Daniel Smith color. I absolutely love this. I'm going to be using some
paint, sienna as well. And I'll use the
sienna over the top of the hansa yellow to get
a lovely rich color. I'm also going to be using
dioxazine, violet left on. I'm going to mix this
together with the hansa yellow to make a
gorgeous dock around. When you mix those
two colors together, you end up with a lovely dark
brown, reddish brown color. This color here, which is
more like a burgundy color. I really like this color for the front flipper and
the head as well. That comes out like this, but we will use a more
pigmented version as well. So that will be darker
than this here. And then we use in some
cobalt turquoise as well. This is the color
that I recently found and I am obsessed with it. And this is the hansa
yellow on its own. And they'll also be used in this turquoise color by Winsor
and Newton Cotman as well.
3. Supplies: What you will need: You'll need some good-quality
watercolor paper. I'm going to be using
140 pounds cold pressed, and this is 100%
cotton Arches paper. Today, you'll need
watercolor paint. I'm going to be used
in tube paints today. But of course, if
you've got pans, then you can use those to you. You'll also need a palette
for mixing your paints onto. I use ceramic palettes, but you can use whatever
palettes you've got. A helmet, be using my
flower palette today. A pencil for
sketching the turtle, and I'm using hard
lead pencil and also some scrap paper for
testing your colors on. I'll be using salt today to add texture to the background
of the sea turtle. I am going to be using sea salt, but you can use regular
table salt if you want to. And of course you'll need
your favorite brushes. I'm going to be used in silver black velvet brush is today because they
are my favorite. So of course the size
12 and a size 10, you might see me
use an old brush, mixin, unsung very small, fine detailed brushes
only for small details.
4. The Background: First layer: I'm going to paint
the background now, so I've got some
turquoise in my palette. This turquoise is from
Winsor and Newton. I'm going to do all
this down now because I want the background
to be quite Dell, because I want the
bright parts of the turtle to stand out. I'm going to add a little bit of burnt umber into their somewhat
that is going to do is, but she's going to del dot color down and make it not so vibrant. And it's more of a greenish
tinge now it's really lovely, actually, the green collaborate still a lovely turquoise color. I'm going to be
working in sanctions. We're going to start off
on the left-hand side. And I am going to
cover the whole of my paper because I want to make sure that the paint
doesn't create any harsh edges. So I do want to
cover a large area. I want to add that water
further than water. I want the paint to
travel so carefully going around the
edge of the turtle. I'm just going to come at the back of the flapper
here with the water. And I'm ever so carefully going around the outside
with the water, following my pencil marks, and just taken over the
back of the turtle's shell. You could always go back over and apply another
layer of water if you want to work
on this for longer and you want to work
quite quickly with this, BUT wants to work while
the paper is still wet so that you're not
getting any harsh edges. You want to keep this nice and soft and lurking
in the background. But my size 10 nylon, that's only because I
want to keep my brush nice and clean the water. So I'm just going to
follow the edge of my turtle and you can bring the paint out
further as well. So following the edge of my turtle will bring that
painter little bit further. Here's what you can
do is you can rinse your brush and
then bring some of that paint further up so it's a little bit more
diluted at the top. Like I said, you have to work
quite quickly with this. Just rinse my brush
off now and I'm just going to bring
some of that paint up, just a bit more dilute sides. And then what you can
do is you can drop in clean drops of water to
create little blooms. Take a sea salt,
just a little pinch, and then sprinkle
it into areas of the paint and just leave
it there with the orange. Just allow that to
dry on the paper. I'm going to continue
to watch this. Now. I'm just going to
wet around the head. Careful because the top of
the turtles had does have a little bulbous area like a potluck sticks
out for his eye. So just bear in mind that there is little area of us
sticks out there. And it's taking my voice again, I'm going to add that to you. I've already put down
you could always kind of stippling on
if you wanted to. So leave a little area as white. And that might suggest bubbles. You could always add a little
bit more of the turquoise, make it more concentrated
right next to the states and areas
to Sunday would like his head salts again and
you can sprinkle that on. I'm going to continue to
paint this water down now. Say can I influence
of the flipper? So I'm going to continue to
paint this turquoise on now. Rinsing off my brush and it's just a dump brush
and I'm just going to paint down to a little
bit just to dilute in areas. I'm going to drop
some water droplets on to create some
blooms on paper. You can use your brushes
to bring that pink down before that starts drying, I'm going to the little bit of my sea salt small ready
CVC salt is taken effect. Carefully paint that
to coil up into these little areas along
the edge of the flippers. And just be very careful that you don't paint
over the flippers. I'm going to use a damp brush at the bottom of this
turquoise as well, too diluted to be
in blended out. That I've got some clean
water and I'm going to paint that around the
edge of the turtle. I want to paint that onto the edge of that to Crystal
I've already put down as well as keep those
edges nice and soft and blend those colors into one. I'm going to very
carefully paint around. The frills will vary and even
area on the flippers well, without water, be very careful. You could always just skip
this part and just paint the wall that paint up to the edge of the flipper
instead of painting the water, if you can't see very well, I'm going to paint that
water underneath the shell. And then I'm going to take all around the back of the flippers. And with this backflip
or I'm actually going to take the water plus BOC, BOC flipper because I want
some of the background to seek onto that backflip or just appreciate after
little bit faded back, painting my turquoise on again. I'll take my damp
brush and bring some of that color down by UT, little bit on the edges. You can see that I'm
leaving areas of white. But it's just
personal preference. You don't have to
do that. You could just do a nice even layer. I'm going to have
this buck area really diluted will more diluted
than the rest of it. So I've just dipped my paint
brush into my water jar. And I'm just going to
bring law around the back. I'm going to allow some of that paint to bleed
onto the backflip. And you can help it along
by using a damp brush. Some water droplets
if you want to, with some clean water. And I'm not going to add
any salts this bottom area because I want the
head to be the focus. So allow that salts
to dry completely. Now it does take a
little bit longer when you add salts your paper. So give this a couple of hours, leave it to dry completely
and then you can rub the salt off and we will
continue our turtle.
5. The Shell: First layer: I'm going to apply a
really diluted layer of the hansa yellow over
the turtle's shell. Now, this has got lots
of water mixed into it. Very, very light. I'm just going to
wet this area here of what's in the turtle shell. And then I'm going
to avoid the very back because I want to
keep that area white. So I'm just going to paint in little bits of the
yellow at the back. And then I'm going to
take this color over the whole of the
top of the shell. I'm going to leave
a little bit of white showing at
the top as well. We'll leave little areas of white showing just for
variation in color. I'm going to leave this front
part white here as well. Actually going to use
my brush and just take off some areas of white. So I'm just going to add
some concentrated yellow as well into areas of the shadow where I can see
the light shining through. And I'm going to apply that to the shell while it's still wet.
6. Shadows under the shell and the front left flipper: I'm going to mix up a
greenish gray now by using the turquoise
and raw sienna. And I do want to get
a greenish gray. So you can see that I've just added a little
bit more raw sienna. And I'll show you the
color of that in a minute. But this is the color
you're looking for. We are going to dilute this. But you can see it's kind of a very nice sort
of seaweed, green. So I'm going to add that
color wherever I can see, a darker gray shadows. So I'm going to apply some water to this
front flipper here. Also going to take it onto
the head and neck area. Diluted paint now and
I'm just going to dab it into areas where
I can see shadow. So you've got a shadow
on the neck area here. So very diluted version. So I'm just gonna debate and this sort of triangle
part underneath the chin and ever so slightly underneath his chin area here. And it comes up to his mouth
and continue into paint that shadow color onto this
front flipper as well. I'm going to keep that
shadow color towards the back edge of his flipper because I
want a nice shutting day. So we want to keep the front of his flipper nice and light. I'm going to paint
carefully around that top front flippers. Well, and I'm just going to have this paint quite diluted, so it's not too dark. It's got quite a lot of
water mixed into it. And these not lose of
water on my brush. I did dab my paintbrush onto a paper towel and
I've got some of the burnt sienna now I'm
dropping in a little bit of the bins Yanni into
the wet area as well. And I'm also going
to take some of that color around the
back of his flipper, just in a few little areas. Now I'm going to paint
some black green color at the back of the
flipper as well. So on his very back flipper, I'm going to just
paint around the shell and creates this little
hard edged shadow which is underneath the shell because that part of the shell really sticks out over the
top of the shelf body, the turtle's body, sorry. So it really protrudes out
and I want to create that 3D. So I'm going to paint
that green shadow underneath his shell. Zones you, his
tummy area as well. Who's going to take a
damp brush and I'm just going to blend the edge
to make it softer. I'm going to take that shadow underneath here and around the
back of this flipper here. Because if you look at
the reference photo, is quite a hard shadow here, just going to drop in
some yellow ocher. They're just blending it out
with the edge of my brush. I'm going to add
a darker shadow, just the bulk of this flippers. Well, because the area on
the reference is quite dark, I have allowed the
first layer to dry completely
before the shuttle. And if you just take a
damp brush and just blend those edges, making soft.
7. The background: Second layer: I'm going to add a second
layer to the background now. So I'm just, we use
in this color again, the turquoise mixed in with
a little bit of burnt umber. And I've had to mix
this color again, so it might be a
slightly darker shade, a bit more green. I'm just going to
test that color out onto a piece of scrap paper
just to check that I like it. And you can see there it's a
darker shade of that color I used originally and it's called slightly more of a
green tinge to it. So I rubbed off all
the salt and you've got that lovely
pattern underneath. I'm taking my size 12 brush now and I'm using
some clean water. I'm going to paint that
around the turtle. So it's best if you're
using Arches paper, which is my ultimate favorite, to work in little sections
like what I'm doing here. Because your paper might draw the quicker or
you might just not apply enough water because it does absorb into the
paper ie correctly. And then taken my size 10 brush, I'm going to take that
color again and I'm going to paint thought
near the turtle. So I'm taking it around. It doesn't matter if it bleeds
on slot buck flip a foot. I did want that
to happen anyway. You can take your paint over the salts pattern that
we've put down as well. As long as your paint is
gotten water mixed into it, then it's going to still
allow that pattern to show through because those colors, transparent lamin see-through. Anyway, so you're still gonna
see the layers underneath. So don't worry about we went in that lovely pattern
that you've put down. I've just rinse my brush off now settled is
nothing on my brush. And I'm just pulling up
some of that paints just to cozy up a little bit and also soften the
edges a little bit. You can add a bit
more darker paint the very edge of the turtle
to make it stand out more. You don't want it to
be a harsh lines. So try and sort of blend it out a little bit with the brush. I've got more water
on my brush now, so I'm just reapply in some water around
the turtle's head. So taken it very carefully
around the head. Be very careful you
don't have to go right to the age of
the hide of you. Don't feel confident
with the water. You could leave a small strip there and then use the paint
right close to the head so you can see battles
sometimes with what you do in when you've got
paint on your brush. I've got my turquoise
greenish paint again. And I'm just painting
up close to the turtle. So I'm going to take
it right close. Be very careful around the turtles at you do
want to try and keep this turtle's shell
nice and smells. And also the head. He had quite smooth as well. You can see brush off, so it's more diluted on the edges and just coax
up some of that paint. If you find that there
is too much water on your brush and your paint
is just spreading crazily. Just use a cloth or paper towel under stop the end of
your paintbrush on your cloth and that
will take off some of the excess moisture.
I do this a lot. I tend to, so swipe my brush on the edge of my palette to get off
most of the water. And among them still
w on a cloth as well. You don't want your paintbrush
to dry up VS. Lipa. You don't want his
sopping wet either. So I'm giving my brush a rinse. Well, see much water. And then I'm just going
to blend that paint out, then just coax it
out, pull it out. You could even put
some water droplets into the paint as well. Make a water droplets will
create, pick a spreads. So continuing to paint
around the turtle. I love arches paper. I always got really lovely, crisp results when
I use arches paper. There's another paper that
I use a lot of as well. And last is by Canson. It's a 100 percent cotton paper. I find the arches is a really
nice photo paper for me, but it works really
nicely as well. And also the concern is
a little bit cheaper. So that's why I use the symbol. I really, really like it. You can see that I'm applying in more pigment towards
the very edge of that turtle just to apply bit more depth and make it a bit darker close to the turtle. I've actually
gotten a little bit of Payne's gray here and I'm just going to drop
that into edge. And just around the edge of thought tears
or not just gonna make that quite dark in there. Continuing with the words and now I'm going to take
thoughts underneath the turtles to me and then
around to his buck foot. Same first, I didn't really know the actual scientific term for a turtle's back
foot is Philippa. Foot is no. Somebody please enlighten me. So I'm just taking this was around the bottom
of the turtles, Tammy. And then I'm going to paint
it around the buck flip. And again, I'm saying flip, I think is a flipper. This is just me guessing. You know, I'm not
a turtle expert. I love sea turtles though. And the first time I
answered sea turtle is actually at the CLF
center in Florida. And I was absolutely mesmerized. And I got to see them up close and personnel straight-on right in front of the
tank layer right by me. They say there for ages
and I was just captivated or level the patterns on next shell and then
go just little faces. They're just beautiful
to so beautiful I'm, I loved the way that they
swim in the water as well. I just think they look
like floating angels. Right? So I'm just applying
this turquoise now. And it needs to tell me if the turtle and will this back area to beat quite diluted. So I'm just going to make
it a bit more diluted, like dropping in
some water droplets and then taking my turquoise, I'm just going to drop
that onto the edge just to make it darker right
underneath that turtles to me, I've got some Payne's
gray now and I'm going to dump that into some areas close to the turtle just to
add more of a shadow and more depth industry
make that turtle stand out with the contrast
of the dark and then light. So by adding Payne's gray, you're going to get a
really lovely color is not going to dull the
colour down to match, is still going to get
a nice fresh luck. But it's gonna make
that look darker. So I'm just going to add
quite concentrated areas. Just go a damped brush year and I'm just bringing
that up just to dilute it a bit because I just wanted to blend
it out a little bit. Make it not look so
patchy and harsh. Can use this as an opportunity
to clean up any edges, look a little bit scruffy.
8. The Shell: Second layer: I'm going to concentrate
on the turtle shell now. So I'm going to wet
sections soldiers using one brush for the water and then I'm going to use another brush
for the paints. And then we use in
raw sienna on this. And I take my little size six
brush to apply the paint. And I'm just going to
drop this into areas. I'm going to leave
little areas white. This back part here
is very light, so I'm actually going
to keep it quite light. You can take more pigmented
paint and droplet in as well. By doing it like this, it
gives the mottled affect. Also got a little bit of yellow on my brush and I'm
just dropping that in as well. Then we move on to
the next section. So I'm just using
some clean water and I'm going to wet
the whole section, does not lose water
on my brush and it's not loads of water
going onto my paper. I am making sure that this is
a nice even layer of water. And I'm not going over my pencil marks or ydA
because I wanted to keep the gaps in between
a light shade or the lighter yellow that
I've already popped down. Again, I've got the raw sienna. I'm going to drop
this into areas. We're going to keep
the outer edges, license meals and
skip parts as well. You can skip bits on
the edge if you want to leave those whites. So there's a bit of a lost
edge or an painted edge, which I think looks really nice. It just adds to the effect. And I'm going to leave areas
of white showing as well. You can see the yellow
showing through it and then you can take more
pigmented paints. So this is paint that switch stronger on my brush and it's got less water mixed in red. And then Doppler in as well. So you've got a mixture
of the lights on, the darker pigment. I'm going to continue
to work in sections. So just using my
clean water and then taking my bent Sienna afterwards on Zang
going to drop that in. So just use your brush, use the tip of your
brush to get into the Kuhn is on the
cross those edges, make sure it doesn't go over
the edge of the pencil mark. Then taking your raw sienna
or burnt sienna, sorry. You can actually fix up areas. So if you want those
lines to be a little bit closer to one another, you can take this
opportunity to fix up those lines and bring them a
bit closer to one another. So we simply just painting
on the outside edge smooth. And now I can use my brush to flick some paint
up if I want to. I can dab it on, Let it Bleed up. I can leave some edges
free of paints as well. So it's just a white edge on 10 psyche my more
concentrated paints, I'm just going to
adapt that into areas, mainly the conus, some
of the edges as well. There is a bit DACA continuing with my clean water, just painting on a nice thin even layer of about one section. And then I can take my
bent Sienna and I can drop that into areas of
the turtle's shell. Like I said, you can use this
opportunity to get those, bring those lines back closer. You can see that I've
missed an area there and I actually quite like effect. So just smoothen out the edges and then allowing some of that
paint to bleed across. You can follow the shape of
that shell if he weren't too. You can see that I can leave
bits of white in-between. And you got lot like lined
pattern on the shell then taking my more concentrated then CNN and just drop it right
into a few areas. You can drop it in and
I'm bringing some of it up a little bit water to this. And actually I'm going to
allow that water to seep into the paper a little bit
because I applied to match. So with these small sections, you could work on two sections. Once it's the largest sections, I will recommend just doing
one section at a time, but because these
are quite small, then not go into a dry as fast, we can work on them quite correctly in the paint,
this one as well. So I've got my bins, sienna, and I'm just
going to drop that in. You can see that I'm
leaving little highlights. So leaving some white areas. Mainly at the top. We're actually going
to bring this one a little bit further in. So bringing those lines a little bit closer
to one another. And then I've got my more
concentrated burnt sienna. I'm just going to drop that into a few little sections are
not going to go wild though. And then you can
see that this one has slightly bled
into the other one. It's okay, we can fix that
later with a stiff brush. B-flat happens to you. Don't fear you could
always try and fix that one while it's still wet. Weight and solid steroid
and then fix it afterwards. So you can see that I'm just
tidying up the edges of these sections here
with my brash. Got some more concentrated CNO, my brush and I'm just
dropping that in. Just tidying up the edges a little bit because
sometimes when I drop the paint and I just accidentally
goes on the outside, I'm going to work on this part
of the turtle on an elif, this park paths white. I've allowed this top
shell here to dry completely and then just
wetting the bottom. So I'm just going to
wet the whole thing. And then what I'm gonna
do is I'm going to apply some yellow ocher to it fears because if you have a
look at the reference photo, it kind of sticks
worked out by here and then it blends backwards. I can really explain
it, but it blends out a little bit on this area here so it
doesn't stick out as much. So I do want to try
and get that effect. So I've got some yellow
ocher on my brush and I'm going to apply it
to certain areas. These areas here are
going to blend down. So the tops of these
little sections that are going to
be burnt sienna. And then this bottom part then is going to be more of a yellow, yellowish tinge of yellow color a little bit to
this area as well. And then we're going to
add a little bit here. And also here. And then right on the edge of this one is quite a
nice bright yellow. Might actually going to
dab a little bit of Hansa yellow and pledged to
really bring it out. And then on these
parts here I'm going to just dab in a little bit of light burnt umber to make it more of a
brownish tinge in areas. So I'm going to
allow that to dry.
9. The Back Flipper: For this backflip,
I want to keep it my son's mutism diluted. So we've got some
diluted yellow ocher. And I'm going to paint that
onto this backflip or well, I'm going to leave little
bits of white at Lubbock just to kind of blend
into the background. So I'm going to take
that around the back of that Shell and I'm
painting all lawyer. Doesn't matter if it goes
over the shadow area. Shadow areas first
we green anyway, so kinda helps that out
there a little bit. And then taking my brown
mixture that I made, I'm going to just
drop into areas. So like I said, I want this to be out
of focus little bit. So I'm not going to
have nice crisp edges. I am going to paint
in this shadow that's really quite
dark underneath here. So I've still got
this brown color. And I'm just going to add
areas of the shell detail. I'm not going to cover the
whole of absolute bear. I'm going to leave
quite a lot of it. Not yellow color. And that is because like I said, I don't want it to
be too detailed. I want to be out
of focus really. So because it's fuzzy, it's going to be
after focus anyway. And we're going to
keep the colors nice and enlightened, muted. So that's going to
push that in the Bach. It's going to push that
towards the buckle. And it's going to seem
like it's further away. It's not going to draw too much attention to that area there. So this is a little bit of water mixed into
it. Let's paint. I'm going to leave it at that.
10. The Front Right Flipper: First layer and adding shadows: I wanted to paint
this in sections, but what I wanted to do
is I want to just apply a very light wash
of the hansa yellow over this flipper
before I start. And that is so that we can see that yellow shown
in three areas. I'm not gonna go as detailed as it is in
the reference photo. I am going to do my own thing. So you'll see a bit of a difference between
the reference frame 2 and this finished piece
is not due to lazy. It has, I'm trying to
make my paintings a little bit less detailed
because I do love detail, but sometimes I can go
a little bit overboard. So what I'm trying to do is add last detail in certain areas. So that's other
areas really pop, going to add a little bit of the hansa yellow
over here as well, because you've got our
lovely texture on the skin. So I'm just going to bring
that ends nice, Michelle. I'm going to allow that
to dry completely. Now you can see that that's
created a bit of a watermark. I'm not too worried about that
because I'm going to paint over this area anyway
while that's drying, I thought I'd work on the
end of the chin area to the mouth area
here address up to his mouth with the water. I'm actually going to
paint over his mouth as well because I saw it while
I'm wetting this area. I can just go ahead and
add some nice colors. So I'm just going to paint his head or pains
carefully around his eye. So I'm just carefully
painting around his eye. And I will print this area here. I've got some
diluted yellow ocher on my brush and I'm
just going to drop that into some areas on
the turtles mouth, underneath his mouth, a little
bit around his eye area. So just on this top area here, which can paint our area. They also done here little
bit on his bio years. Well, this year low on
the back of his head, I'm actually going to use
the hansa yellow for that. So there's a little area
here along the back of his head and there's
also a bit yellow. Here. I'm going to use the quiz now, so I'm just going to
go to pigment and then I'm just going
to paint that here. I'm going to paint that
underneath his chin area while the paper is still wet
up to his mouth area. And just using a damp brush
now just to blend that color, I'm gonna drop a little bit more of the turquoise right underneath his chin
is quite brutal. The reference. And also what this
area here as well, because this is dries now. And then I'm going to also apply the turquoise to areas
of the turtles knack. So just at the bottom I can
dab with my brush to apply more pigment or more paint onto the paper so that it
comes out a bit darker. When I say DACA, I'm mean more vibrant so that you get more
of the color on the page. I'm also going to wet
this front flipper. This front flipper
which is further back. So it's further away
from us are going to use clean water on this. So I've got this
gorgeous darkish green. I got this by mixing bins, y'know, with the interior grace, I'm going to apply them
onto this buck flip, as you can see this quote, adopt shadow underneath here. So I'm going to
apply that there. I'm going to apply that dark colored towards the
back areas where the shadow is really quite dark. I've just dipped my
brush into my water now, so it's a bit less pigment, it is bit less dark ones. I'm just going to apply
that green color. Once you've up flipper there, right down to the bottom. I've also got some
turquoise here, and I'm just going
to paint it onto this area here. Just underneath. Then on the front here,
There's a reflection. And I'm also going to take that canal on the
bottom of this flipper here on the front edge
using a damp brush again, I'm just going to
blend that out. I've got some yellow ocher on my brush and I'm
going to dab that in as well because you can see
this hints of yellow layer. So I'm going to take some on
to the front of the flipper, but leaving little
gaps in between.
11. The Shell: Adding Detail and Texture: I'm going to add
a bit more detail now to the turtle's shell. So I'm going to wet each of these are I'm gonna do is I'm going to
watch two at a time. And then we're going to
apply very pigmented paints. So that means it's
not going to have that much water mixed into it. It's going to be a bit
darker than what's on the paper already. Know I'm going to
apply wet on wet. So I'm just going to add this
to some areas of the shell. Not too many, just a little
bit in certain areas. Just to add a texture
and a bit of depth. We don't want it to
be all one color, otherwise they all
look quite flat. I'm only going to pop
a little bit into this block one because I
want to keep it quite light. So I'm just using
the tip of my brush. I've got a tiny bit of that darker brown shades and I'm just going to use
it at the very bottom here, just in little areas. I'm not going to
go wild with this, so don't go overboard with
using this dark color. You do want to keep
the shell more light, more of a reddish tinge. A little bit more
at the top here. You can see that I'm
just dabbing it on. I'm going to add more
clean water to this. Pass here on keeping that
water inside that shell. And then taking the bins here. And I'm just going
to drop that into a few Av is just too dark at some of those areas
up an inch of it. And then that darker brown, then luck can go on the inside. Coolness can create
a few streaks with this just to create lots
of texture on the shell. You can use it on the bottom and just bring your
paintbrush app. We're not so b2 uniform
with this or not, what I mean is not too perfect. You can apply little patches
to certain areas and then sometimes use the tip of your brush to flick
some lines, F as well. I'm just going to
apply a little bit. It's this top area, bringing a few lines into here, but I'm not gonna go wild, gonna apply clean water
to this one as well. And I'm gonna do the
same with this shell. So I'm going to speed these
patches that for you. Okay. I've just wet the
top two patches with some clean water
and then I've got my concentrated burnt sienna. And I'm going to drop in some markings and
lines to create texture that I've got the
very dark brown again. And I'm running that along the
bottom edge of this shape. And then I'm bringing
my brush up. You can also dip your brush into your jar as well to
make it less pigmented, to vary the color a little bit, just make sure that you
tap your paint brush onto a clustering are playing too
much water to your paper. If these water on the paper
already and then lots of water in your brush as well. Then you're not gonna
get good results. You're going ends up creating blooms and watermarks
and all sorts. So just be wary of how much water you've
got in your brush. You can also use a damp brush to blend out some of the color. I've got burnt sienna on my
brush now and I'm painting it onto the wet area of this patch. I'm allowing that paint to bleed out within the white area. And then I'm going to paint in this little section as well. So you can see I'm using
the tip of my brush and just basically
adding texture, of course, a little bit of
the dark brown as well. And I'm dropping that into.
12. The Front Left Flipper: Adding shadows and detail: I'm going to wet this
area here because I want to apply some yellow ocher. So I'm just going to
wet just underneath the shell and up
to the neck area. And then I've got some yellow ocher on my brush and I'm going
to dump that in. It is quite concentrated. So there's a bit more
pigment mixed into it. So it's a bit dark. I did want to quite dark here. I'm just going to
paint it underneath this shell area here. Around is this a
funny shape around his like between his neck
and his flipper here. So I wanted to get
that in as well. Then I'm just going to
paint around his neck area. Mooc. Accidentally did thought for don't worry, I can just fix it. And then I'll take a damp
brush and I'll just, I'll just blend that out then show that the edges
stay nice and soft. I've also got some of
this brown color that I mixed using the dioxazine
purple and the Hansa. Yellow. Hansa yellow, yeah, there's lots of things then can remember what colors I used. Who's going to adopt
little bit in there. There's a tiny amount of here. And then I'm just going to dab
some little textured bits. Just on this shoulder area and some little
markings as well. I'm just going to use
the tip of my brush. I've just added some Payne's
gray to my green mixture now and I'm going to apply that to this little flipper here. There are areas of this class. I wanted to be quite dark, but I still wanted to
have a green tinge, so the green tint, sorry. So I do want to keep that G soft lighting
appliance and clean water. And then I've got my
dark color on my brush. And I'm just going to apply
it to some areas on the fin. There's some lovely markings
on this bottom fin here. You can see that
I'm not following the reference photo completely. I am kind of making my own
thing up a little bit, but that's the beauty of
painting your own pictures. You can do whatever you want to. And I love having the freedom to play around and swap
things up a little bit. Just make it your own. Squared, a dark shadow in here. So you can go on top with some more darker pigment
if you want to as well, really dark and an app. And we're actually
going to make this edge quite dark here.
Just on the bottom. So really abduct contrast there. I'm going to take
this brown color and mix known as the markings on the end of the
turtles flipper here. I've just dipped my
brush into my paint job because it was a it was coming
out a little bit too dark, so I just wanted to lighten
that up a little bit. So there's a little edge
at the top and then as you come down a little bit, you follow the edge. Dark color sits on the edge, right on the edge, and
obviously it kills over the flipper land. Just make sure that
you paint that write-ups the edge there. You can see that my color
really leaked here, so I'm just going
to take that out. I'm just going to take that
out while it's still damp. I'm just going to
go over this with some water because I want to
soften it out a little bit. So I'm just going to go
over very lightly with some clean water and you can see that it's bleeding
a little bit, but I'm just going
to blend that out.
13. The Bottom of the shell: I'm going to add some bins, CNN, so these areas now. So what I'm gonna do is
I'm going to add some cnf. Going to take my
brush and just blend the edges just to
soften those edges. And then before it dries, I'm just going to drop
a few little areas of thought dark paint. So first on goes the Ben Sienna. You can be a bit
haphazard with this. Use your brush to
blend the edges. It's really easy. Just use
a few different brushes. And then I've got
another brush and that's called the dark mixture on it. I'm just going to drop that in. Sienna. Sprint now
on the top edge. Get EA damp brush, lens the edges out a little bit. And then use your
other brush just to drop the darker mixture in. Many, drop it at the top. Just don't forget
which brush you use in like Friday sometimes. So again, painting law, rule, sorry, I keep saying
nearly same raw sienna. I mean Ben Sienna, painting the CNS, the top. Catch it on brush and
blend the edge out. And then use this other brush. Then just to add
a few dark areas. I'm going to continue
each section. So just painting on the Sienna. Taking a dump brush and
blend in the handout. Make sure you've
got a clean brush. So just rinse your brush
off now and again. And then dab some of
that darker painting. You can create some texture with the tip of your brush
if you want as well. You can see that I'm not making the edges straight or anything. I'm leaving them
quite jargon because I'm going to blend
the edge out anyway. And then taking my darker
color and just drop in law in the US to a few areas. I'm painting over that yellow
that I painted earlier. So don't worry about that. But yellow is certain to shine through because this water, this paint is transparent, is still gonna see
that lovely glow of the yellow combinatorial. Then Part a few drops
of the darker paint. Just a few don't
go wild with it. These two little shapes by here, so just be careful and adapt my dark mixture here. And let's take a
list of the hansa yellow and drop that in just to brighten it up and a bit
more of the dark mixture. And the last little section. Just be careful to leave
little gaps of white. You know, the little strips of white gives the turtle
is lovely pattern shell. Sake. The brown again, a darker brown and just
drop a few little reason.
14. Under the Shell: Adding Shadows: I'm going to paint the shadow
underneath the shell now. So I'm going to use that
green that I used earlier. So I've just got some
water on my brush here. I'm going to paint
that ends the shell. So on the tummy area. Well, I'm going to take you
to a little bit further than what I want that
color to travel to. And that's only
because I want to keep those edges nice and soft. So I'm going to apply
it a bit further up. And then I've just got
this green shadow shade that I've mixed ones. I'm gonna take that
right underneath that shell to create
a nice hard edge day. And you can convert into
these little nooks. The tip of your brush or painting it right
up to the edge there. It was creating a nice hard
edge over this part here, going to actually leave it. So I'm not going to paint
right epsilon edge. It's going to create a bit
of a softer transition. Then I'm continuing to paint
the green on the tummy area, but I'm gonna give
it a lovely shape. So you can see the
shape that I'm using and I'm going
to paint that up to the edge of the flip buyer and really define the
edge of the flipper. Make it nice and crisp with dark green color to really
make that flip a standout. And then I'll take a dump brush a lot blend flat edge to
make it lovely in soft.
15. The front Right Fipper: Second Layer: I'm going to paint this
front flipper now here. I'm just going to paint some yellow ocher at the
back of this flipper. And the reason for
that is I want to have this path so the
bottom, the back part, more in shadow and then the lines coming
through this area here, I want to be quite light so
that it stands out more. So you'll see what I mean
when it's all painted and we've painted in the
shadows and the patterns. So just paint the lower end. Take your brush and just
blend out the edge. To soften it. You can
paint over the whole of this if you want so you
don't get any watermarks. I've also got a watered
down version of that brown I made and
I'm just going to drop that in while the
paint is still wet. I'm going to take it
down Lubbock just to create a shadow,
make it more dark. I've really worked. It's down this brown
mixture of I've made now and I'm going to apply a little
bit of this to the face. So I've added lots of water
to this is very, very light. I'm going to apply a little
bit of this color above. The mouth area. Funds a little bit
ends nice as well. And then I'm going to just apply a little bit
in-between these gaps here and around these
shapes as well. I'm just going to cover the whole of these
because we're going to go back over these with
the BNC and there anyway. I'm just going to
cover just these, this little area here just
to give it some depth. Also a little bit by here. And then I'm going to take
a small amount underneath the eye area and also onto this area at the
top of the eye as well. I'm painting that brown to create more of a domed
shapes around the eye. And I'll take some of that color underneath the eye as well.
16. Sea turtle deepening the shadows under the shell: I'm going to paint on a shadow
underneath here because I just felt like the Savior
needed to be a bit darker. I'm going to just take
my brush and paint. Quite a dark shadow
underneath here. This is a little bit of
Payne's gray that I'm using to paint the
shadow Justin's Neith, the bottom edge of that shell, they're just at the back and then it's slightly
diluted now on, I'm going to take a
little bit further past the shell and just blend
it out with a damp brush. I'm dropping in some
green now as well. And I'm dropping
this onto wet paper. You can see that the
color is bleeding out nicely and creating
on my soft feel. So this is the green
that I used in a year to paint the shadows underneath
the turtle's shell. It's slightly more
paint mixed into it, a little bit less water, so it's a little bit darker. And then I've got the turquoise, this is the cobalt two. Plus I used earlier on. And I'm going to
paint a little bit underneath the belly area here. And then I'm going to take
my damp brush and blend the edges out because I'm
only using a damp brush now. I've still got a little
bit of thoughts. Paint on my brush, but it's hardly there. It also is become more
diluted so it's lighter now. And then I'm going to drop in some yellow ocher and
I'm dropping this onto the wet paper and
letting it bleed and bleed out into
the turquoise. I'm using some of the
dark greens you create, these little creases or Knox within the
turtle's shell as well. So I'm just using the
tip of my brush to paint in some dark little line. And then I've got some
very diluted burnt sienna. I want to put some of that color on the
head area as well. So I'm just going to carefully
wet just this area here. And being careful not to touch thumb parabola
I've already put down because
I don't want them bleed and into the head area. Then I've just got
that turquoise on my brush and I'm just
going to tap back on. And I'm pretty
much just going to let it do its own thing. But it's going to come
out quite concentrated. Funny, because I've
already laid down already.
17. The Front Flipper: Adding Detail, The Dark Markings: I'm going to paint in these small markings on
the front flipper now. So I've caught that dark brown
that we mixed the ilia and bandwidth used in the violet
mixed with Hansa yellow. And I'm going to paint these little irregular
shapes on the front flipper. So I'm starting at the
bottom of that flipper. And you can see those shapes and not particularly rectangle
or square or circle, the very irregular
and I'm not really making them very neat either. So I've got quite concentrated
paint on my brush, but it does have some
water mixed into it. So it is quite dark, but it's noise and
flowy as well. And I'm just going to continue
to paint those shapes. I'm leaving little lines of the yellow or the under
wash showing through and in-between those
little shapes so that we got those lovely markings
on the turtle shell. So I do want to leave
little lines or little areas of the wash to
create those lovely markings. Lots a turtle has. I'm painting those shapes right on the edge of
the flipper as well. I do use the shape of the
previous shape that I've done to determine the shape
of the next global shakedown. I'm going to put down as well. I kind of follow the shape of the last area that I've painted. I'm painting slightly
darker areas as well. So this really
changes the color, makes it look a bit
more interesting. So I've got darker
brown on my brush now. And this is the burden
that we mixed up, but it's got more
pigment mixed into it. I'm going to paint the edge
of that flipper as well. So I'm making sure that I'm
painting whites the edge. Because flip a coin twists
around the turns around, and that will make it look more like a
three-dimensional object. Then I'm also going to paint
the top of the flipper. So you can see that this
paint is made range tone, so it's not particularly
darkness to light either. So it's called some
water mixed into it. I'm going to take
darker brown and pop that into those shapes while
the paint is still wet. And then I've got some really dark brown and I'm
going to paint those shapes at the top of the flagpole in
dark brown color. You can see I'm making some
of those shapes a bit longer. So at the bottom of the flip, shapes are quite small. And then as the shapes
move up the flip back, that becoming a
little bit larger at the friends is a flip ions
a bit darker as well. Some of those shapes really
very irregular shaped. So this one looks more
like a triangle shape. I am going to paint
different shapes or different times of thought frown just to make it
look a little bit, my interest in ICANN
domain as well. I decided to add
a second layer of brown onsets and shapes
just to darken them. So just make sure that
these shapes are completely dry before you add
a second layer on, then I'm just filling in
some areas where I feel like maybe it's too
much of the show in. I'm going to just continue
with those shapes, painting in the brown irregular
shapes, a Honda flip. With this shape. I painted
on some of the brown color. And then I took a damp
brush and I blended up the bottom edge just
to fade the ads. And I found that this made for a very interesting
texture on the flip is, so you can do this on a loss
of the shapes if you feel like I actually really
loved the effect, I'm going to continue now with painted in nice shapes
and you can see how I'm following the
shape that I've already put down and kind of using that shape as a guide really to paint the next shape. Just make sure that you do. Leave those little
gaps in between. Because thought small,
we'll make new shapes. 3d standouts. Have a practice on some scrap paper with
changing within your paints. Some use varying
amounts of water, make your paint
darker or lighter. And then you get a
really good sense of the tones that you can
use within this flip. So if you wanted a darker brown, just add less water
to your paint. And then if you want
a nice light brown, you could add quite
a lot of water. Just make sure that you
don't have a dripping brush because you don't
want to add lots of pedals to your paper. Use a cloth or W
on a paper towel. Before you actually
saw painting. You can see that I've used quite a lot of that dark brown. And then at the top
of the flip back, I've got some diluted paint and I'm going to paint in these little shapes
right at the top. I've got some of the dark
brown now and I'm going to paint in some little shapes
at the top of the flat bar. This is going to give the
flip more of a rounded feel. And to really finish off
flat flippers shape. Because if you leave the shapes out from the top of the
flapper is not really going to make it look like that
flippers coming forward onto the turtles shoulder and creating some creases within
that shoulder as well. So I've got some slightly
diluted brown and I'm painting these thin lines to create little creases within
the top of the flagpole. I'm also just going to
staple my brush and create these little
dots and blobs. And then I talking in that
color up in some areas. So I've just costs
a bit more paint on my brush and I've waited for those lines to dry
and then I'm just going over with a second layer. I've got some burnt sienna
on my brush now and I'm just really not underneath
the turtles shells, make it stand out a little bit. And I've got the dark brown
again and I'm going to create some little shapes and blobs and some texture
within the neck area. So this is just
underneath the neck, just the top of the flip. And I'm going to use
some burnt sienna and yellow ocher as well to create some little
thin lines for creases within the neck area. So I'm using the tip of my
brush and then I've got some turquoise and I'm dropping law in its
quite concentrated. I just wanted this area to be really bright with
the turquoise. I'm wiggling my brush
back in full to make those lines very
an event as well, to give it more of
a crease effect.
18. The Head: Second Layer: Allow this to dry completely, and we'll come along and we
will put burnt Sienna on top and also our brown
that we mixed with the violets and the
Hunt's the yellow. I'm going to use my
dark brown that I got from mixing the dioxin, violets and the hunt's. The yellow is slightly
more purple in this, and it's a lovely purplish
brown color. Really like it? I will also be used
in burnt sienna and will use this nice
and concentrated. I'm going to start off
with the neck area, and the reason why
I'm starting off on the left is because
I'm right handed. So if I painted on
the right hand side, I could accidentally stick my hand in it as I'm
working across the page. I'm going to wet this area using my clean water
and I'm going to wet it about half way
just past his neck area, then take in some of the brown
that I've just mixed up. This is got quite a lot
of water mixed into it, so it's not very super diluted, but it's not really
pigmented either. And if you find that you've got too much
water in your brush, just stop your paintbrush on a cloth to take out
some of the moisture. I'm just going to
paint this onto his neck area here
and let it bleed out. So as I said, I lost my footage for the head. So we're going to pretend
like he has a body and we're going to
paint this brown area. I'm going to use pensioner
a bit more pigmented now. It's got more paint mixed
into it and less water, but it's still nice and runny. I'm going to use this on
the markings on the head, so I'm going to start off on the back markings and I'm going to just carefully
paint these markings. Then I'm going to
make sure that I leave small gaps in
between these markings. So I'm going to paint over. All these markings
with the burnt Sienna. And then what we'll do is we'll
come along and we'll read them and then we will
drop in the dark brown. And the reason why
I don't want to drop in the dark brown is because those two colors
are going to mix, and I want to make
sure that I keep the burnt Sienna suppressed. Do you want to have some of the burnt Sienna whose markings? Going to leave a small amount of yellow on the top of the head, so I'm just painting
in half a mark there. And half of Mark here, and what I'll do is
I'll rinse my brush off completely and then I'll just blend out with
the damp brush. So painting carefully
those marks. These marks are going to be
a lot darker than they are because I am going to come
along with the the dark brown. By giving it a
layer of, you know, it's going to make that color
nice and rich and nice and dark and the paint in
these front parts here. I'm going to paint carefully
around that mark in. And then because
I want the bottom of that mark to
be nice and soft, I'm just going to
take a dump brush and I'm going to blend that out. To bring that color down, but keep it nice and soft. And like I said, keep it nice and soft and a bit more diluted on
the end is a bit lighter. You can dilute it further and use a damp brush just to
really blend that out. I'm also going to
carefully paint in this mocking that goes
between the nostrils. And I'm going to use
the same technique, I'm going to use
my damp brush and just blend that edge out
when the bottom of it out, make sure you haven't
got too much water in your brush because you don't want any of that water to push up into the paint
and create a bloom. I'm going to paint the
top markings here. The top of the head
is quite light, so there are areas
where I'm going to miss and then I'm going
to paint around the eye. So I'm just painting
in the bottom of that eye around the area. And then the side
side of his eye. While those patches are
dry and I'm going to take some very diluted magenta, and this one is an accurate which magenta by Daniel Smith, but you can use any purple
purplish pink or you could mix in permanent rows with dark growing violence that
might make a nice magenta. If you do have a magenta color, then use that of mixed in
lots of water with this, so it's nice and diluted. I'm going to paint in
this mark in here. This Daniel Smith Magenta
is quite vibrant, so that's the reason why
I've mixed in lots of water. But if you want it, this bright, then mix in slightly less water. So I'm just going to
paint these markings here because to me, they look like they have a
magenta sort of tends to them. So I thought it would
be nice to add a bit of that color on
top of his head. We are going to add a bit
of brown to this as well, and I'll just take my damp
brush and blend that edge out. I will blend that edge out there as well just to keep
it nice and soft. I'm going to request
these shapes now, so I've just got some
clean water on my brush. I'm going to use two
brushes and that is one for a plain clean
water and then the other for playing the paint and carefully wet in a
few of these shapes. So because they're quite small, I'm going to wet about five at a time and then I'll take
the brown that we mixed up earlier and I'll
just drop it into the top of that
shape and allow it to blend within the water. So you're going to get a nice, concentrated mixture of that
brown at the top and then it's going to become more soft and faded as it goes
down the shape. So you're going to get a
lovely variation in color. You can keep those
colors nice and blended. If the cold doesn't come
down as far as you hopes, just use the edge of
your thumb brush to bring down some of
that color so you can really blend that color out, continuing to apply water now
to a few of these shapes. I'm going to add water
to these three shapes here wants to keep the top of
this shape nice and light. So I'm just going
to add the brown at the bottom with this one. I'm going to apply
the brown at the top here and let it run down. We're going to have this one
nice and dark at the top. Just blend it down if
it starts to spider out the edges with a damp brush. I've got the water again
and I am going to wet these two shapes
here and then just apply in the dark brown to
the top of these shapes. So the bottom of the
shape is going to remain the burnt sienna, and then the top of it is going to be that lovely brown mixture. So you're going to get a
nice variation in color, and it looks like
it's sort of two toned and then
it's going to look more interesting
and not so flat. I'll do the same with
these shapes here, just some clean water and then a little bit of
the brown mixture. You don't have to place the brown mixture in exactly the same places
as I'm putting it. You can do your own
thing if you want to, if you want to put
them in different areas of those patches. I'm going to let these shapes
on the top of the heads, so I've got some clean water. I'm making sure
that I don't apply that water in the middle because I don't want that that color to spread
into the middle area. Do you want to keep that nice
gap in the middle there? And then I've got
the dark brown, and I'm just going to paint that onto the left hand
side of that shape. So over the top of
that bulbous eye area? And then at the
bottom of that shape, they're just allowing it to
bleed across into the water. I'm going to do the
same this shape, but I'm just going to apply that color at the bottom
of that shape there. I've got some water on my
brush now and I'm applying it to this news area, so I'm going to take the water just to the top of his mouth. Let's keep those
edges nice and soft and then going to wet
this one here as well, and then nice and dark brown on the left hand
side of that shape. Use this as an opportunity to
really crisp up that edge. I'm only applying this color to the left hand
side of this shape, and then I've just got a damp
brush and I'm just going to blend out some of that color and help it across a little bit. I'm also going to bring some of that color down because I did want it to travel a little bit further down into
this area here. And then with this shape, I'm just going to
paint that brown on the outside of that shape. So it really defines
that shape there. And actually, it's
gone a bit dry. So what I'm going
to do is just take a damp brush and blend those edges out just
to keep them nice and soft because I haven't
painted in the background. I'm just going to show the
edge of this face here. So don't paint this and
I'm just doing this so I can show the the
edge of the face. Obviously, when you've
got your background, you're going to have
that lovely background defining the head there. I'm going to take this brown. I'm going to paint it onto
the eye area as well. So I'm just going
to paint it into a few areas of the
eye underneath. I'm going to paint
this onto dry paper. So taking it underneath the eye, keeping it nice and dark. The eye area is lovely and dark, so I'm going to paint that
all the way underneath his eye and around the
side of his eye as well. I've just rinsed off my brush, and I'm going to
blend this edge here, so it's a bit more light
at the top of that mark, and I've got a dump brush and I'm just going to
blend out some of that of the bottom
just so we don't get such a harsh edge.
19. The Head: The eye, mouth and finishing detail: I'm going to paint
in the eye area now. And what I'm gonna do is
I'm going to paint in the pupil with a light
layer of ultramarine blue. So this is called lots
of water mixed into it. It's nice and diluted it. I've taken most of the
water out of my brush and I've gotten lifes and
pigmented paint snack. So I've taken this from my chief paints and
Lynn gonna drop flat into the top of the pupil and just
let it bleed across. So the people will
be darker blue on the top and then lighter
blue on the bottom. I've got some Payne's
gray on my brush now under very small brush. So this is a size 0, it's a Princeton Neptune. My paint is nice
and concentrated, so it's very dark. I'm going to attempt to
paint in a little mouth. I'm gonna skip little areas because I don't want
it to look like a cartoon mouth which is just
being drawn in by a trial. So I'm going to try
and skip little areas. I'm going to make his miles
very irregular as well. We don't want to paint
a straight line here taking the same
paints I'm going to paint in his nostrils as well. So we want those nostrils
to be very dark. They are quite printed at the ends on them. I'm going to fill
in this area here. So we're going to
paint in the rest of his pupil with the
very dark gray. So this is got hardly
any water mixed into it. It's only got a
little bit of water, just a lot I can get it move in. We're going to make
sure that we avoid that blue area in the middle
because we want to keep bat. And I'm just going to paint
around the blue area. Being very careful. We don't want to make any
mistakes at this point because this is very dark is going to be very
hard to remove this. If we make a mistake, then
make that edge nice and crisp. So it looks like
that bulbous area, the yellow area is Bolden
over the top of that the pupil is going to use the dark brown that
we used earlier. And I've costs and mice
concentrated amount. I've got my little thin brush. And what I'm gonna do
is I'm going to paint some little creases in his neck. I'm only taken a few
little thin markings onto his neck area to
create some creases. And they want to make
this quite irregular. I'd want to make those
markings straight. Some of them I'm going
to use just the tip of my brush to create a
little thin strip. And we are just
going to continue to paint in these lovely creases. So I'm pressing down with the belly of my
brush a little bit and make the top of those
creases a little bit wider. And then I'll just
use my brush upon its points to make the
edges bit thinner. You can make some
very short as well. But basically we are
creating increases within the Mac to seek a few up
near his face as well. And one or two at the top for just at the top
and the markings. I'm also going to use
the dark brown or suffixes little area here. So I'm just bringing that
brown around the top here. And then I'm going to paint in some little dark markings on the top of his little eyelid. Are going to make sure of art. I paint some of them to the edge because that's going
to make his eyelids look like it's bulging around and it's not
just one flat thing. I'm also going to take
some of those markings on the edge of this
eyelid here as well. And then I'm going to get
locked dark mark in here. I've got a little bit
of burnt sienna here, and I'm just going to paint
it ends beneath his mouth. Then I've rinsed off my
brush and I've just got a damp brush and I'm going
to blend that edge out. I've got this brown again. I'm going to drop it into little areas on top
of his head as well. I'm going to use
the cobalt again. And this isn't Docker, it's just got less
water mixed into it. I'm I'm going to create
a few little areas on his face to
create query says. So I'm just using the tip
of my brush to create some wavy lines to add a few little creases
within his neck area. You can make some FECA and you can make some
thinner as well. So what I would
suggest is making them thicker towards
the base of his neck, so the bottom of his neck. And then bring in that crease
up to a bit of a point. So it looks more
like a crease shape. Also adds a bit more pigment at the very bottom
of his chin as well. From then blend that out
a little bit as well. I've got some dark brown again
and I'm going to drop it around this area here
just to darken it up. And also at the top of this brown area here
and underneath his eye. Last thing I'm
going to do is drop some more ultramarine very top of his pupil to
add a bit of a shadow. And that's the end of
the turtles hides.
 Lindsey Dawn Art, Watercolour Artist