Transcripts
1. INTRODUCTION: Hello, and welcome. Today, we're going to
paint this beautiful, delicate peony flower
in watercolor, and we'll focus on soft petals, subtle tonal shifts, and a
loose atmospheric background. We'll build this gorgeous
painting together step by step with expressive washers
and gentle layering. You'll learn how
to create depth, use internal values, and soften edges for
natural transitions. To keep the painting
fresh and elegant, we'll balance detail
with looseness. It's suitable for all levels, including beginners because I'm going to be guiding you
every step of the way. And I'll be sharing all
the techniques, tips, and tricks that I use in
my own professional work. I've included a copy
of the drawing in the project resources section so that you can download
it and trace it, and then not worry
about the drawing because this is a
painting class. I am a professional artist, author, and tutor,
and over the years, I've sold a lot of work
across the world and helped hundreds of people to
learn more about watercolor. You can see examples of
my work on my website. My style leans towards
impressionistic and contemporary rather
than photorealistic. I like to explore loose approaches that
bring out the color, light, and essence
of my subjects. I've tried to
replicate this across all the many other videos
that I have on Skillshare. I'd love to see your
own finished painting, which you can upload through the project and resources tab. I'll give you some
personal feedback on it, and you'll be able to
see the artwork of other students and
get their support. At the end of the class, you'll have your own
beautiful artwork to be very proud of. So let's swizzle our brushes and get on with the painting.
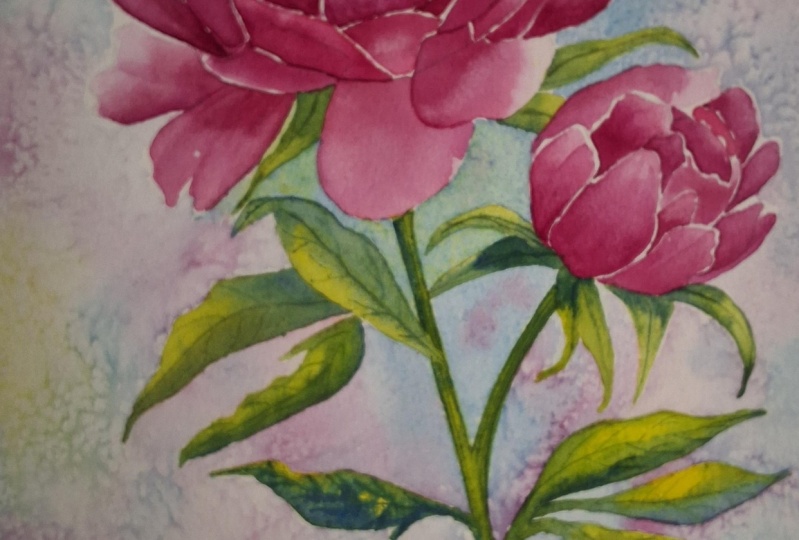
2. Materials & Drawing. Paint the Petals wet-on-wet and wet-on-dry techniques. Blend & soften edges.: I know you're going to love
creating this painting, and I'm sure it will put a really big smile
on your face, too. For this class, these are the colours and materials
that I'm using, but do feel free to use
any that you already have. For lots more, useful
information about brushes, paper, and other art materials. Take a look at the
document that I've added to the project
and resources section. You'll find that really helpful. And I've included a
copy of the drawing in the project resources section so that you can download
it and trace it, and then not worry
about the drawing because this is a
painting class. Now you can see that I've
kept the drawing very simple, minimal details so
that we get a nice, loose free flow painting. Now before we start
to paint the petals, I'd like to introduce
you to a couple of different techniques
that will really make a lot of difference
to your painting. And if you haven't
used them before, I would practice
these techniques on a little bit of spare
paper beforehand. The wet-on-dry technique is simply putting wet paint on top of dry paper or painting on top of paint
that's already dry. And this results in
a stronger color and a more defined edge
where the paint ends, and the paint will only go
where the brush takes it. So you have much more
control with this technique. The wet-on-wet technique
gives you less control. First of all, you
wet the paper with clean water and then apply wet paint on top
of the wet paper and let it spread into
the wet wash. Now, this results in a lovely
diffused effect with soft edges. And because the paint mixes into the wetness of the paper, the color is diluted
and the tone is paler. If several different colours
are used in this way, they will intermix and
blend with each other. So when you drop some
blue into a wet, yellow underwash, that will
result in a blended green. To blend and soften a hard edge, you need to use a clean
damp brush to pull the paint away from the hard
edge and blend it softly until the colour disappears into the white of the paper or the underlying wash.
You may need to clean and dry your brush and repeat the process
several times in order to get that
gradual gradation of color until it disappears
into nothingness. It may sound like quite
a simple technique, but in fact, it is quite a
difficult one to master. So do practice it
because it will make a massive difference
to all your paintings. Sometimes it can
be as much about lifting paint off
as putting it on. And there are several ways where you can lift some color to either correct a mistake or to lighten the
tone where needed. And some colours are more
staining than others. So whereas one color may lift
off well, another may not. One method is to use
a clean brush and clear water to paint the shape that you want
to lift out or lighten. Leave it be for a
couple of minutes and then dab away the water
with paper towel. Now, you might need
to repeat that a few times depending
whether you want to lighten the ton of shade or try to remove the
color completely. Alternatively, you can use
magic sponge or magic eraser, as it's sometimes called, which works miraculously
to remove unwanted color. Tear off a small piece of it and dip it into some clean water, squeeze it out,
and then rub away the unwanted paint and
blot with paper towel. As with the brush method, you may need to repeat
that several times depending on how much
color you want to remove. I'm going to show
you now how to use all three of these techniques in our Peonies painting
because the best way to learn any technique is to actually put
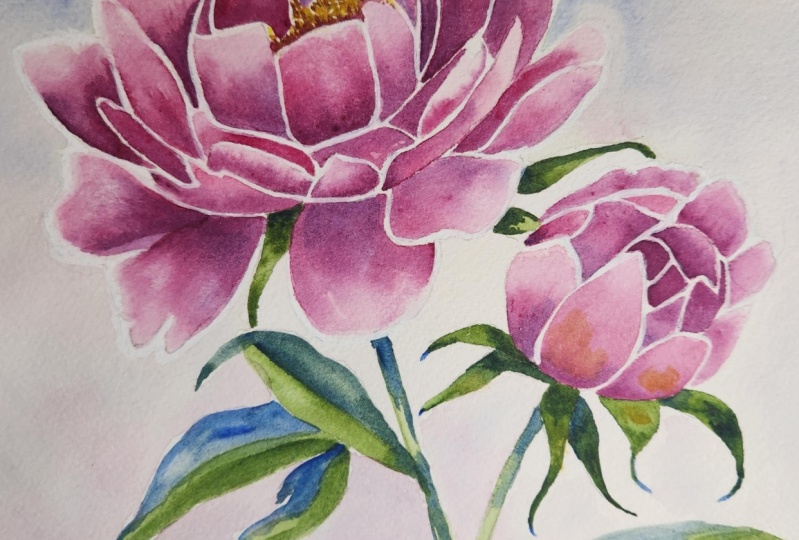
it into practice. I've got three colors
mixed in my palette. The first color is some
permanent rose with a little bit of opera
rose added to it. If you don't have
the opera rose, then just miss that out altogether and simply use
permanent rose on its own. As you can see, I'm painting that wet paint onto dry paper. It's quite a watery mix about the consistency of tea or milk. And then because I've
got a hard edge through applying the wet
paint onto dry paper, I'm using a clean
damp brush to just soften those hard edges
at the top of each petal. I noticed that I haven't applied the paint right to the
top edge of the petal. As the petals unfold from
the center of the flower, the color becomes paler as
they reach towards the light. And so I've left a sliver
of white paper just along the top edge of each petal where they are
catching the light. And then, while those two
petals are still wet, I've had a little touch of my second pink,
which is magenta, which is a darker pink, and I've touched that
in at the base of each petal and allowed it to
spread slightly upwards. And so what we've
got now within each petal is some tonal variation. We've got the darker pink
at the base of the petal, a medium tone in the middle, and spreading into a much lighter and almost
white tone at the top. Another point to note
is that I'm painting alternate petals and
missing out the ones in between so that I don't get the paint running
all over the place, and I will get some distinction between each of the petals. The idea is that by
the time I finish painting all the
alternate petals, they will then be dry, and I can go back and paint
the ones that I've missed. Now that you're getting
too many hard edges and difficulty softening them, we can switch to the
wet-on-wet method, and that's what I'm using now. So instead of putting
wet paint on dry paper, I first of all, pre wet that
paper with clean water. Actually, mine was a little bit tinted pink because I've
got pink on my brush. And then I've dropped the
permanent rose mixture into that underlying wet wash. Although you've
got less control, you do get a much gentler, softer spread with that
method, and of course, you can still add
that darker magenta pink at the base
where it's darker. And if the color does
spread too far, of course, you can still use
your clean damp brush to lift some of that color off, and you can even use a
little bit of paper towel, if necessary to blot it off. The third color that I've got is magenta with a little bit of
a lizarin crimson mixed in. So I've now got an
even darker pink. The petals that I've
painted are still damp, so I can add in this darker pink again at the base where it
needs to be much darker. If the paint has already
started to dry too much, and I'm not getting a nice
soft blend of this dark color, that's when I can use the blending and softening technique that we looked at earlier to just blend and soften that dark color into the
underlying mid tone. I'm thinking about where one petal will be slightly
behind another, so there will be some shadow, some darker tone
because of that, around some of the lower edges. Now, although I'm going on a lot about blending
and softening, if you look very
closely at a flower, you will see actually that
there are some hard edges, so you don't want
everything to be too soft. We do need a little bit of
definition here and there. So as I've built up the
tones in each petal, it's now much more
easy for you to see that we need a light tone
at the top of each petal, a medium tone in the middle, and a dark tone at the base. It's pretty much the
same process now for painting all of the petals
on our painting flowers. We're going to continue with the wet-on-dry and
wet-on-wet techniques and the blending and
softening techniques for those hard edges that
we want to remove. And we're going to keep using
our three tones of color, our light, medium
and dark tones, placing the darker tones at
the bottom of each petal, the medium tones in the middle, and the light tones at the top. And don't forget we want to try and leave a little sliver of white paper right at the tip of each petal where it's
catching the light, and that will also help to separate the petals out
across the whole flour. And then later on, I'm going
to show you how to lift off some color where
we want to lighten the tone or even recover
some strong highlights. If you want to remind yourself how any of
these techniques work, just pop back to
the beginning of this section and re read
through the information slides. So I'm now going to let you just watch or work through the
rest of this section, but I'll pop up a
few little reminders here and there to keep you on track. Mm. B oh
3. Sepals, Stem, Leaves & Seedheads
. Mix a variety of greens for natural foliage. : There are not many
greens that work well straight out of the tube, and that's why many
artists prefer to mix their own greens for more
natural foliage colors. I'm using sap green, but I've mixed it
with a little bit of handsome yellow medium for
a lighter spring green, and I've made another
mix of sap green with some cobalt blue and perhaps a little touch of ultramarine to
darken even further. I'm using my light green mix to, first of all, paint the sepals
around the flower heads. It's quite a thin watery mix, not dissimilar to
the consistency that we use for the petals, so about the consistency
of milk or tea. And I'm working my way now
around the small peony bud, which has got more sepals
that form the calix. Now, these are
quite small shapes, so I am using a
small pointed brush. And I'm painting in
the direction that the sepals grow outwards from
the center of the flower. And then, while all those
shapes are still wet, I'm mixing some
sap green, again, with my cobalt and a little bit of ultramarine to
get a darker green. And I'm just touching
that in at the base of the sepals where they
emerge from the flower, where they will be
darker and in shadow. I'm also adding a few
dark accents to some of the tips and also down the sides of some of
the sepuls again, where they are turning
away from the light, and so you've got
that little bit of shadow on the underside. I'm not trying to create a botanical painting
that is hyper realistic. My style is more loose
and impressionistic, but we do need to add
a variety of tones, even to these little shapes to give some semblance
of naturalness. And just as we did
with the petals, you can use a clean, damp, thirsty brush to just lift off any highlights where you think
you've put too much paint. And then I'm just going to
touch in a little bit of pure cobalt blue at the
bases of each sepal. I'm going to use some
blue in the background, and so I do need to
place that color in other parts of the painting in order to achieve
some harmony. So I'm thinking ahead
to where I'm going to be using some blue
and thinking about where I can just add a
few little touches to tie all the colors in together across the
whole composition. I'm just dropping in a few
little touches of pure yellow, either to the tips or
middle of the sepals, just to add a little bit
more color and variety. I'm also adding a little touch of yellow to this base petal here as if there's
a little bit of reflected light from
one of the sepals. Whilst I've got the
yellow paint on my brush, I'm dotting in a
few little seeds in the center of the flower. So just little dots and
dashes in the yellow, using just the yellow at the
moment in that little area. I've mixed some blue and
pink and yellow together in my palette to get a sort
of purply brown color. And I'm using the tip
of my brush to paint this dark color in and amongst the yellow seed heads that
I've just placed recently. And that's adding a little bit
of depth to the seed head. The contrast between the
dark and the light will also help to engage the viewer's eye into
this center of interest. For the leaves, I'm going to use a bit of
artistic license, and I'm going to switch
the colors up a bit. I want to introduce
a little bit more blue into the
overall appearance. For one half of the leaf, I've simply stroked on some
of my light green color, trying to use as few
brush strokes as possible so as not to
disturb the paper. For the other half of the leaf, I've mixed up some cobalt blue, added a little touch
of sap green to it, but it's predominantly
blue, as you can see here. And I'm allowing
those two colors to blend and mix on the paper, but not to the extent that
they take over one another. While the paint is still wet, I'm using the point of an unwound paper clip to
score in the leaf veins. When you score into
the paper this way, the paint runs back into those indentations
and appear darker. And if you add a little bit more darker paint as I am doing now, those indentations will
appear darker still. This is a really useful
little technique that avoids having to paint in all those
tiny little vein lines. It is worth having a look
at a real leaf and just studying the direction and
the placement of those veins. Don't want them to all
be equidistant apart and in horizontal fashion so that they look like
a line of soldiers. On the other hand, you
don't want to overdo it. Don't have an excess of veins. You just need a couple
on each side of the main vein running
along the center. That will suffice. I'm going to use the same process for all of the leaves
in the painting. Now, you can either do one at a time if you're a slow painter, or you can do a few at a time. So I'm going to add on
my light green colour, a few leaves at a time, and that will allow
them to dry a little bit more when I come back to them and put the blue
colour next to the green. If the two colors, the blue and the green
mingle together too much, I will just end up with one single color
over the whole leaf. And I do want some distinction between the blue side
and the green side. On the other hand, I don't
want them to dry so much that there is a very distinct
us and them separation. Placing two colors next to
each other so that they just blend slightly where they meet really does come
with practice and time. And it also depends
on the humidity, the warmth of the room
that you're painting in, how wet your paint is, how dry the paper is. So many factors can affect
that blending situation. I want the leaves to look as though they are growing
from the stalk, so I've now painted that in along with the leaves
at the same time, so it doesn't look like
they are just stuck on. I'm also thinking about where the leaves are in shadow and
where they are in light, and I'm using some of
my darker green color just on the undersides and also where the
leaves meet the stalk, where they're likely to be
in a little bit more shadow. I'm applying the same
concept to the stem. Now, that will be darker
just below the first petal, where it's in shadow
from the flower, and it'll also be a
little bit darker in shadow if there's an
overhanging leaf above it. A I'm getting so carried away with adding little bits of
color to my leaves that I'm forgetting that if these leaves drive
the paint dries, I won't be able to
score the lines, the vein lines in them
with the paper clip. So I need to do that
now very quickly, and then I'll paint over some of those areas on the
leaves that are a bit too yellow with some more green, and that will flood
back into those in lines and make
them stand out more. I'm going back to the leaves that I missed out because they were too close to leaves that had already got
wet paint on them. And just as before, I'm painting on my light green
colour to start with And then my mainly
bluey turquoisy color on the underneath of that leaf. It will be in shadow from where the leaf above it
is hanging over, so a little bit darker colour, adding a little bit of
pink magenta to the mix to give me a more purply
green for that shadow. I'm using the same
purple green mix to add a few more shadows
to the undersides of leaves and where they
are joining the stem. Now, you only want
little touches here and there. Less is more. You don't want to overpaint
all your lovely spring green, lovely cobalt turquoise colors. There will also be
some dark shadow where the peony bud
sits on the calix. So I'm adding a little bit of my purply green just
around the edges there, and then using a damp brush to blend and soften that
little bit of shadow in. I'm also going to
emphasize the shadow on the little sepals coming out of the main
flower head as well. There will be a little bit of shadow in the seed head area. So I've turned my paper upside down so I can reach
it more easily. And I'm just using
my magenta color to add some shadow going over the little edge there
next to the petal. I don't want to be
too much in shadow. It's not I don't want to lose my little yellow seed heads
and little purply brown ones. Then just as I did
with the petals, I'm using my magic
sponge to just lift a few little bits of paint for the highlights
on the leaves, getting that leaf
shine appearance. Again, you don't
want to overdo this. Don't lift up all
the lovely paint that you've just
put on and think about where the
light is catching the leaf and giving
it that leaf shine. I've just realized
that I've forgotten to paint in this little
leaf here at the bottom. So I'm very quickly
going to pop it in. And then we'll be ready to move on to the next section. Oh
4. Petal Shadows
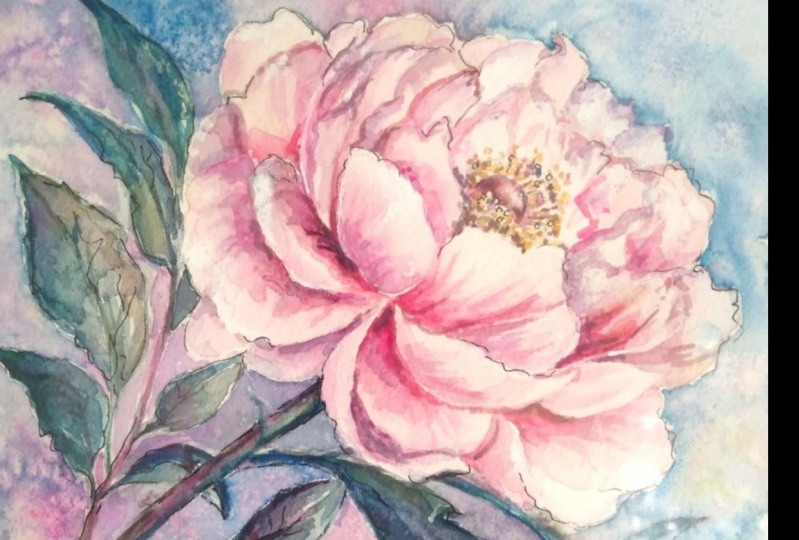
. Add subtle shadows using a dedicated shadow colour to enhance depth and realism.. : I've got some shadow
on the petals already from using that third
darker tone of pink. But I feel that it does need a little bit more of a blue cast. Adding a little bit
more of the cobalt blue to the petals that are
in shadow will also help to tie the flower
head into the leaves and also the background when
we come onto that later. I'm using a very wary
mix of cobalt blue, and just brushing that on
deep into those shadow areas, and using my damp clean brush to blend and soften
any hard edges. Remember that shadows
are darker nearer to the source and lighter as
they move further away. I don't want to turn my glorious pink
and magenta bloom into a blue or a purple one. So I am going to be quite selective about where I
place this blue co bolt. I've got a bit of paper towel
in my left hands so I can very quickly blot off any
paint that I've overapplied. Or if it simply
doesn't look right. I'm also placing it mostly
on this left hand side, and I'll put a few little
touches on the right, where it's very deep in shadow. And using the same
cobalt blue to add a few shadows to the little
pony bud over on the right. Mainly, again,
positioning that paint that blue color on
the left hand side, or where it is very
deep in shadow. I'm fairly happy now with the amount of
shadow that I've got on. I don't want to overdo it, so time to stop fiddling, sit on my hands, and then
move on to the next section.
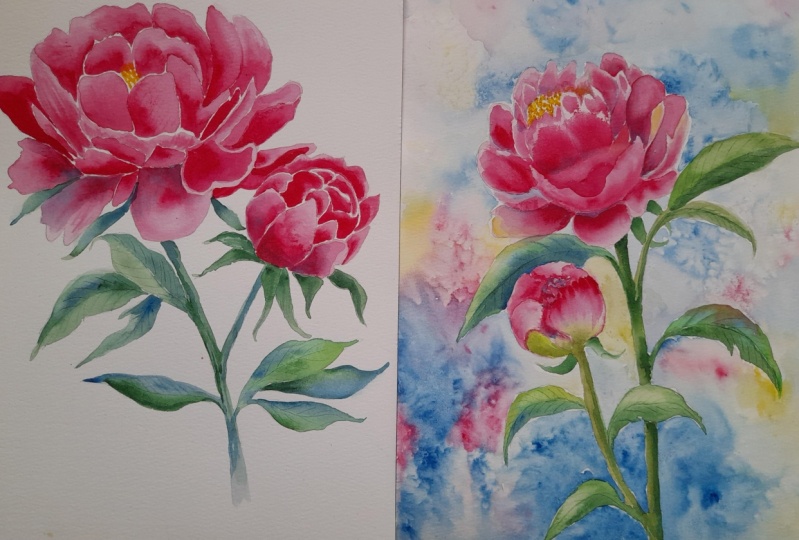
5. Create a soft, abstract background by overlapping washes across a large area. : There are lots of
flower paintings that don't have a
background at all. If you're happy with
your painting as it is, that's absolutely fine,
and you could miss out putting a background
on it completely. Another option would be
to take a photograph of it as it is before you
do the background, and then you have got
something to go back to if things go
disastrously wrong. If we're not careful, we could paint on a very busy and
cluttered background, which would then detract from the flower being our main
focus and overshadow it. But I do think a flower
painting without a background tends to
look more like a study. So I'm going to show you
how to paint a really soft, ethal, and relatively
easy background. Hard edges occur when paint
on wet paper meets dry paper. And this is particularly
unsightly when painting a background washing
sections and the hard line appears slap bang in the middle
of the painting. To avoid that, we first pre wet the paper further away from the section that
you're going to paint, and this gives the paint
enough room to move and disperse softly
into the paper. Then you can paint the
area that you've pre wet, but not right up
to the edge of it. The paint needs some wet
space to travel and die. When this is, you can pre
wet the paper again in the next area to be painted
overlapping the first, and you can then overlap
a second wash of paint so that the overlapped
area isn't obvious. I've used a lot of water to pre wet this top section
of the paper. It's very much
wetter than when I wet the paper for the petals and the leaves because
I want the paint to really flow and disperse
in this wet wash. I wet carefully around the petal shapes of
the flower head. I turned my paper
upside down so that I could more easily
reach this area, and I've gone in between the little sepals as well
with the clean water. Notice also that I didn't
pre wet those little slivers of dry white paper that we left on those
top petals earlier. When I'm applying the blue paint around the top area
of the flower. It's forming a barrier
and I'm still keeping those little white slivers of dry white paper on the
tops of the petals. I've dabbed my blue paint over my wet paper and let it die very softly into
that wet underwh. But I haven't painted as far down as I actually
wet the paper. I've left some of that
wet paper unpainted. By not putting color right
to the edge of that wetness, that will allow me to overlap the color in the next stage
without getting a hard edge. And by very lightly dib dabbing the blue color
into the wet under wasah. I've got quite a lot
of variation in toe, so it's not a flat
blue sky behind it. We've got that nice
soft variation in tone. Because the paper and the
blue paint is still very, very wet, I'm able to drop
in a little bit more color. I've added a few
touches of yellow, and I'm adding now a few
more touches of pink. Remember this paint
does need to be very watery for it all to
blend and diffuse nicely. Water color does tend to dry 20 to 30% lighter than
when you first put it on, so it will actually dry even lighter than it
looks at the moment. I've turned my paper the right
way around now so that I can check the appearance of what I've done and see
if I'm happy with it. I'm trying to work rather
quickly because I want to use the salt technique to introduce some texture
into the background. A plain salt is very useful for creating the
appearance of snow flakes, foliage, or rock texture. Just sprinkle some grains of household salt into
the drying paint, just as the sheen is
going off the wet paper. Leave it to dry,
then gently brush away any excess salt
with your finger. You'll find that the
salt has absorbed the paint and left behind some lovely little
sparkles of light. I pre wet the paper on
this left lower edge, slightly overlapping
the first wash that I put on earlier. Whilst the paper is still
very wet, working quickly. I'm dabbing in my blue cobalt
color just as I did before. Letting that color disperse
and spread randomly into the underlying wet wash. And remembering to leave
those little slivers of white dry paper
around the petal edges. Then I can drop a
little bit more color, the pink and the yellow
into the blue wash, just as I did earlier to add a little bit more variety of color in this background area. I'm using a little bit more of the pink and yellow than
I did in the sky area, because I want it to look
as though there might be some blurred distant
blooms in the background. I'm using the tip of my brush. I've got quite a small brush here just to go into
those very small areas. You don't want to have
some stark white areas in the middle of your
background because they will just stand out
and detract from it. Although I'm mainly focusing
on this bottom left area, I'm still keeping an eye on the top sky area that
I painted previously. It is still very wet, so I can still add
some paint to it. If it was dry, I
wouldn't do that. I would get start getting hard
edges, but it is very wet, so I just want to
emphasize a bit of blue sky along that top area. So I'm just trickling
in a little bit more cobalt blue and nudging that so that it disperses into the
underlying wet wash. I can use my paper towel to
blot it out a little bit, and I can also give
the paper a bit of a shake if needed to help
to disperse the color. I do want the color to
be a little bit darker or denser in this lower
part of the painting. So I am adding more color
here than I did in the sky. A word of caution is
that when you mix pink and yellow and blue
together in your palette, you will get a sort of
a muddy brown color. So do be careful when
you are overlapping these colors that isn't what
ends up being the result. I think I'm in danger of putting too much color on actually in this little
left hand section. It's starting to
look overworked, which is not a bad thing
because I can show you another little technique
for rectifying that. Simply take a small piece of paper towel and
screw it up into a long thin shape and then rag roll it across the area
that you want to lighten. Then you can see that the
creases in the paper towel leave little traces of light patterns criss
crossing over each other. Which has helped to knock back some of that heaviness
I was starting to get. The leaves that I painted
earlier are quite dry now, so I can go right up
to the edge of them. Unfortunately, we've got
a stem very well placed there acting as a barrier between the left
and the right side. So I don't need to worry about overlapping a large wash here. All I need to do now is to use the rag rolling technique
to add some traces of light shapes in there and get some salt on before
it dries completely. I'm going to use exactly the same
process techniques to complete this lower right
hand side of the painting. I'm painting the
smaller shapes first. They're easier to control. And then I'm going to pre wet my paper at the
right hand side, overlapping that first
wash just as I did on the left hand side so that I won't get an ugly
join in the middle. Parts of the paper are now
starting to dry quite well, and you can see here the effect of the salt
crystals already. And that will continue to work until the paper
is completely. So it's time now
to let it do that, let it do its own
thing whilst it's dry and call the
painting complete. S. I do hope you've enjoyed this painting and that you've learned some
tips and techniques along the way that you can incorporate into
your own paintings. And why not pop it into
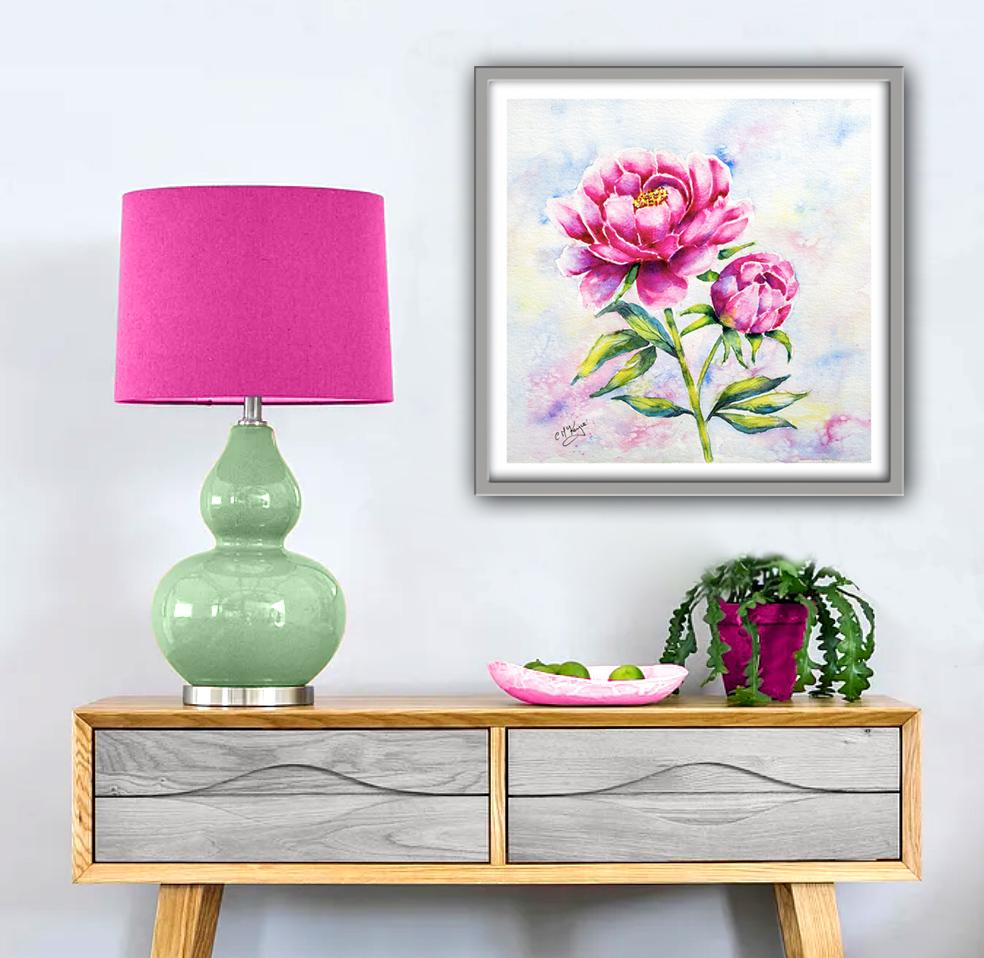
a mount and a frame? And you'll be amazed how good
it looks when you do that. Really love to see your
own finished painting, which you can upload to
the your project section. And if you could just take a moment to leave
me a short review, that also would be really great. I've got lots of lovely
subjects loaded with more tips and techniques to help you with your own
exciting art journey. In the meantime, thank
you for joining me, and I look forward to seeing you next time. Happy painting.
6. FINAL THOUGHTS: Well done on completing the
class and also the painting, if you've been painting
alongside of me. We've covered quite a few
different techniques. We've simplified the drawing
from the reference photo. We use the wet on wet technique, putting wet paint on wet paper. We use the wet on dry technique, putting wet paint on dry paper. And we use light medium
and dark tones of color to convey a
rounded three D effect. And we looked at how to soften hard edges using the blending
and softening technique. Now, don't forget to upload your own painting through the
project and resources tab. After all your hard work, I'd really love to see it, and I'll be sure to give
you some personal feedback. And if you've
enjoyed this video, do have a look at my other
classes on Skillshare, which are packed
with more tips and techniques to help you
on your own art journey. If you click the follow button, you'll be able to follow me, and then you'll be the first
to know when you upload a new video or any
exciting updates. And if you could
just take a moment to leave me a short review, that also would be really great. In the meantime, thank
you for joining me, and I look forward to seeing you next time Happy painting.
 Carrie McKenzie, creating painted visions